


User Manual - AirStation Draft-N WZR-AGL300NH
 Wireless Router & AP
www.buffalotech.com |
35010707 ver.02 v1.1 |
|

Table of Contents
Introduction . . . . . . . . . . . . . . . . . . . . . . . . . . . . . . . . . . . . . . . . . . 3
Initial Setup . . . . . . . . . . . . . . . . . . . . . . . . . . . . . . . . . . . . . . . . . . 4
Configuration Tool Login . . . . . . . . . . . . . . . . . . . . . . . . . . . . . . 8
Connecting Wireless Clients . . . . . . . . . . . . . . . . . . . . . . . . . . 10
Using the Configuration Tool . . . . . . . . . . . . . . . . . . . . . . . . . . . 11
AOSS . . . . . . . . . . . . . . . . . . . . . . . . . . . . . . . . . . . . . . . . . . . . . . 15
Router/Access Point Mode Switch . . . . . . . . . . . . . . . . . . . . . . . . . . . . . 17
EncryptionandSecurity .............................................. 18
ConnectingtoanExistingNetwork...............................23
Specifications . . . . . . . . . . . . . . . . . . . . . . . . . . . . . . . . . . . . . . . . . . . . . . 24
Troubleshooting . . . . . . . . . . . . . . . . . . . . . . . . . . . . . . . 27
Glossary . . . . . . . . . . . . . . . . . . . . . . . . . . . . . . . . . . . . . . . . . . . . . . . . . 30
FCC/CE Information . . . . . . . . . . . . . . . . . . . . . . . . . . . . . . . . . . . . . . . . . . . . . . 37
Warranty . . . . . . . . . . . . . . . . . . . . . . . . . . . . . . . . . . . . . . . . . . . . 47
ContactInformation(USA)............................................ 48
ContactInformation(Europe)........................................... 49
GPLInformation(USA)............................................50
GPLInformation(Europe)............................................ 51
2

Introduction
Work and play - further and faster! Your AirStation Nfiniti combines Ethernet networking with extended wireless range and speed. It offers excellent compatibility with most wireless clients, giving superb performance with Wireless-N, Wireless-A, Wireless G, and legacy Wireless-B clients. For best overall performance, use with Buffalo Technology Nfinity wireless clients.
System Requirements:
•A high-speed (Broadband) Internet connection or existing local area connection.
•A computer with a network connection (wired or wireless) and a good web browser. The screenshots in this manual were taken with Firefox, but Netscape and Internet Explorer are also supported in versions 4.5 or later.
Package Contents:
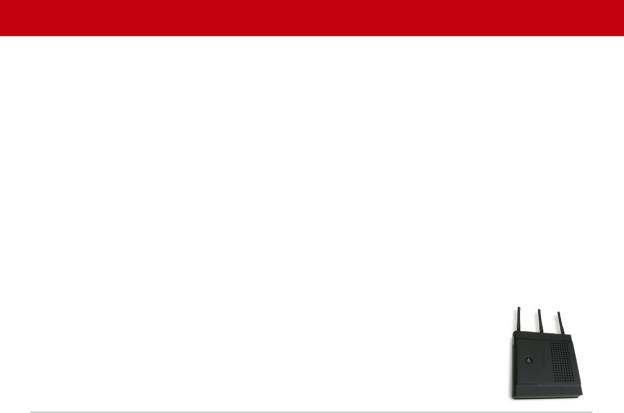
•WZR-AGL300NH AirStation with built-in antennas
•AC adapter
•CAT5 LAN cable
•Utility CD with Manual
•Quick Setup Guides
•Warranty Statement
3
Initial Setup
Begin by finding a good place to set up your router/access point. Some things to consider:
•You’ll need to be able to plug your internet connection into it, so it should go within reach of the LAN cable from your DSL or Cable modem. You’ll also want a power outlet nearby.
•Keep the access point as central in your work area as possible. Signal strength and speed fall off with distance.
•Higher is often better. For instance, set it up on the top shelf of a bookcase rather than the bottom one, if possible.
Do you need a password or other information to log in to your internet connection? Many DSL connections require information like global IP address, subnet mask, default gateway address, DNS server address, or PPPoE parameters in order to connect. Cable modems usually don’t require extra information. If you have a DSL internet connection, make sure that you have any necessary information handy before you continue. Your Internet Service Provider can give you this information if you don’t know it.
4
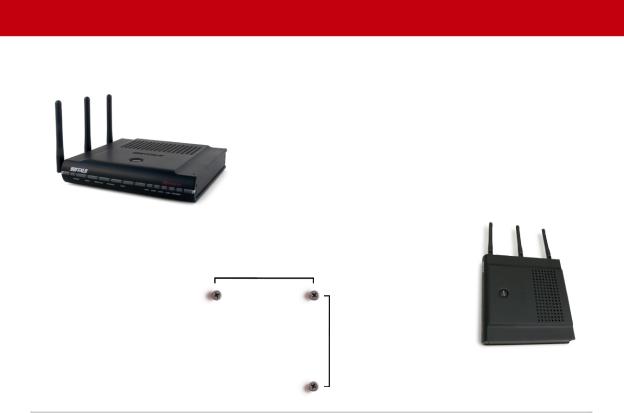
Placing Your AirStation
Your AirStation may be placed horizontally or mounted vertically on a wall. The antennas will usually work best if oriented vertically.
For wall mounting, screw three screws into the wall as shown below.
9 cm (~3.5 inches)
8.5 cm (~3.3 inches)
(Drawing not to scale.)
5

Connecting your AirStation
Power to outlet or power strip
Cable or DSL Modem |
PC |
6

Initial Setup
To initially configure your router, you’ll use a wired connection to your computer. Once you’ve connected to the internet through the router, you may switch to a wireless connection if desired.
The computer used to configure the AirStation should be set to obtain an IP address automatically using a DHCP server (this is the default). The WZR-AGL300NH has a default LAN IP address of 192.168.11.1 and Subnet Mask of 255.255.255.0.
1.Power down the Cable or DSL modem and the computer which will be used to configure the AirStation router.
2.Plug the Cable or DSL modem’s Ethernet cable into the AirStation’s WAN port. Initially, you may need to unplug this cable from your computer, hub or other router.
3.Plug the provided Ethernet cable into a LAN port on the AirStation and plug the other end into your computer’s Ethernet adapter (NIC).
4.Important: turn everything on in the correct order!! Power on your cable or DSL modem and wait one full minute, then power on the AirStation router and wait one full minute, and finally power on the computer which will be used to configure the
AirStation.
7
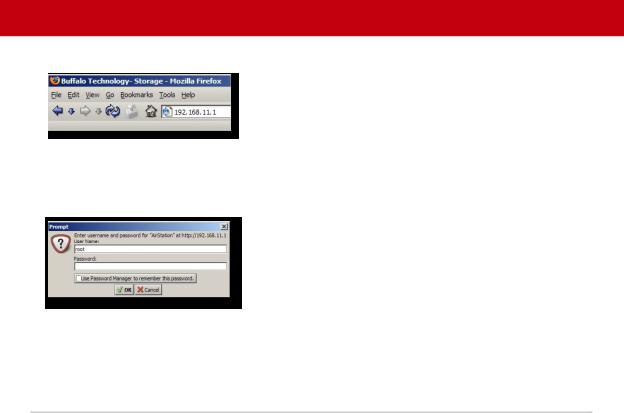
Log in to the Configuration Tool
Launch a web browser on the computer that you’re using to configure the AirStation.
Enter 192.168.11.1 into the URL field. Naturally, if you change your AirStation’s IP address, you’ll have to enter the new address instead.
A window will open, prompting you to enter a User ID and Password.
Enter root as the User name and leave the password field blank.
Your AirStation’s SmartRouter technology will determine the type of internet connection you
8
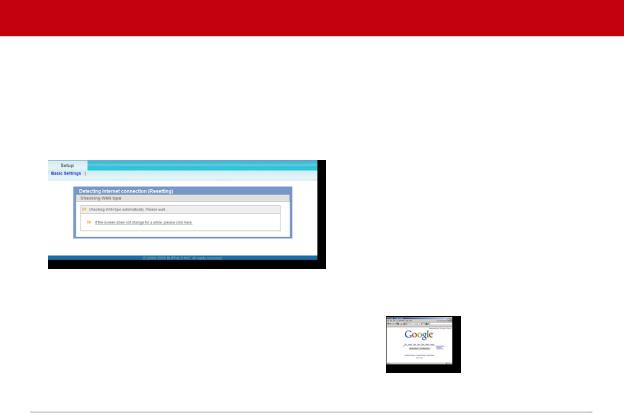
Detecting Your Broadband Connection
have automatically, and ask you for any needed information. If your ISP assigns IPs automatically (most cable providers do), their DHCP server will give your router an IP address. If additional login information is required to connect to the internet, the wizard will ask for it. Enter any required login information if asked. Contact your DSL provider for any missing login information.
Congratulations! You are now connected to the internet. Open a familiar web page to make sure everything is working correctly.
9
Connecting Wireless Clients to the Access Point
To connect wireless devices to the AirStation, you may either enter the SSID and encryption key manually, or you can use AOSS.
For more information on AOSS, see pages 14 and 15.
Consult your wireless clients’ manuals for instructions on configuring them manually. You can get SSID and encryption information from the AirStation’s
initial setup screen, as shown above. By default, encryption is not enabled
(“open”).
If you prefer to use encryption and/or a different SSID, you may change these default settings under the Wireless Config Tab.
10
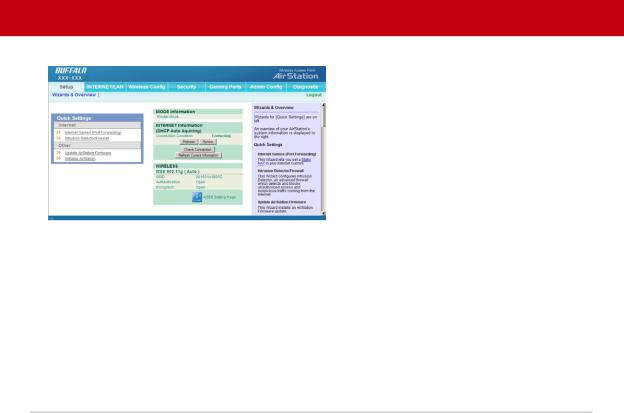
Basic Setup Page
You can get back to the Setup page from anywhere in the configuration screens by clicking on the Setup tab in the top left corner. From here, you can rerun the Internet Connection Wizard, change your wireless SSID and channel, and choose your encryption type under Basic Settings. The Wireless section shows your SSID and encryption settings.
You can also configure port mapping for your internet games, configure your Firewall, update your AirStation’s firmware, and reset your AirStation to factory settings. As you explore the configuration tool, you’ll see that context sensitive help is available on the right side of each page.
11

Navigating the Menus
The menus in the Configuration Tool let you change your AirStation’s settings. To navigate settings, choose a category at the top of the page and then a submenu below. Settings will appear on the left, help files on the right. This example shows the Internet/LAN category with the DHCP submenu item selected.
Category |
Submenus |
|
Tabs |
||
|
Individual 
Settings
 Help and
Instructions
The following pages show examples of some screens from the configuration utility.
12
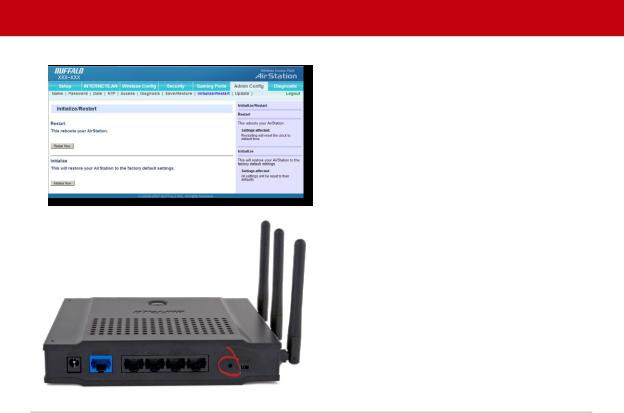
Initialize/Reboot
The Initialize/Restart page can be reached by choosing the Admin Config catagory tab and then clicking on the
Initialize/Restart submenu.
Click Restart Now from this page to restart your AirStation. Click Initialize Now to restore your AirStation to factory defaults and restart it.
You may also initialize your AirStation by holding down the Reset button for 3 seconds.
13
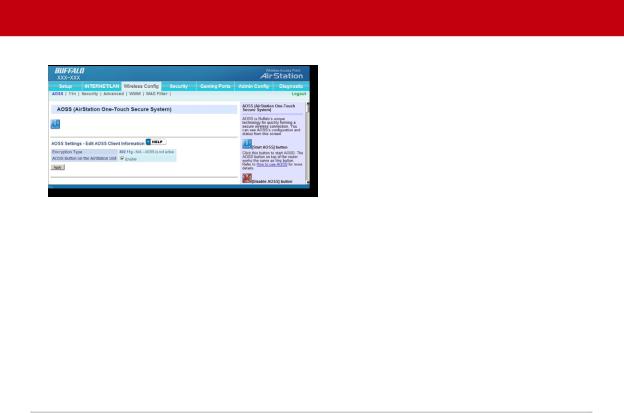
AOSS
You can get to this page by selecting the Wireless Config category and choosing the AOSS submenu.
The blue AOSS button at the top left of the page has the same function as the physical AOSS button on the top of the router: it initiates the AOSS process.
If all your clients support AOSS, it’s very
simple to set them up. Press the AOSS button on the router, or the one on this page, and then push the AOSS button on the client
device.
Each client device will have to be set up seperately. Wait for each AOSS process to finish before starting the next one.
You can also activate AOSS by pushing the button on the top of your AirStation (see page 15). Consult your client device’s documentation for the location of its AOSS button.
If you’ve used AOSS to configure some wireless clients, and now want to add other wireless clients that don’t support AOSS to your network, this screen will give you the information you need to connect them manually.
14
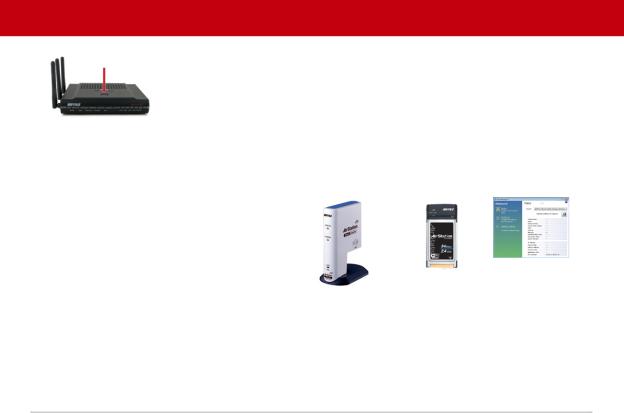
AOSS
AOSS (AirStation One-Touch Secure System) is a simple system for configuring your wireless network securely. If your router and your client device are installed and both support AOSS, then making a secure wireless connection between them is very easy.
Push the AOSS button on the top of your router and hold it in for a few seconds. The AOSS light will begin to flash amber. You now have two minutes to push the AOSS button on your client device and finish the connection.
If you have a standalone client device, it will probably have a little red button labled “AOSS” on it. Push the button! About 15 seconds later, you’ll have a secure network connection.
If your client device is a PC card, CardBus, or PCI adaptor, the AOSS button will probably be in its Client Manager Software. Check your client device’s user manual for instructions on where to push or click the AOSS button.
|
|
|
standalone |
PC card |
Client Manager |
client device |
|
Software |
|
|
|
After you’ve pressed both buttons, it will take about 15 seconds for the connection to complete. When it’s finished, the AOSS light witll glow a solid amber. You now have a secure network connection!
15

AOSS Notes
Some things to keep in mind with AOSS:
•Only one AOSS wireless client adapter can be configured with the AOSS router at a time. The buttons will need to be re-pressed to connect each additional AOSS wireless client adapter.
•It is not necessary to AOSS client devices that have already been configured via AOSS, unless significant changes have been made to the wireless network.
•Do not attempt to configure two separate AOSS networks at the same time, as it may cause undesired configurations.
•If an undesired client has connected via AOSS, it can be disconnected from within the WZR-AGL300NH’s advanced configuration menus.
16
 Loading...