

Page 1

53-1003160-01
®
11 July 2014
Brocade Network Advisor
REST API Guide
Supporting Network Advisor 12.3.0
Page 2

Copyright © 2014 Brocade Communications Systems, Inc. All Rights Reserved.
Brocade, the B-wing symbol, Brocade Assurance, ADX, AnyIO, DCX, Fabric OS, FastIron, HyperEdge, ICX, MLX, MyBrocade, NetIron,
OpenScript, VCS, VDX, and Vyatta are registered trademarks, and The Effortless Network and the On-Demand Data Center are
trademarks of Brocade Communications Systems, Inc., in the United States and in other countries. Other brands and product
names mentioned may be trademarks of others.
Notice: This document is for informational purposes only and does not set forth any warranty, expressed or implied, concerning
any equipment, equipment feature, or service offered or to be offered by Brocade. Brocade reserves the right to make changes to
this document at any time, without notice, and assumes no responsibility for its use. This informational document describes
features that may not be currently available. Contact a Brocade sales office for information on feature and product availability.
Export of technical data contained in this document may require an export license from the United States government.
The authors and Brocade Communications Systems, Inc. assume no liability or responsibility to any person or entity with respect
to the accuracy of this document or any loss, cost, liability, or damages arising from the information contained herein or the
computer programs that accompany it.
The product described by this document may contain open source software covered by the GNU General Public License or other
open source license agreements. To find out which open source software is included in Brocade products, view the licensing
terms applicable to the open source software, and obtain a copy of the programming source code, please visit
http://www.brocade.com/support/oscd.
Brocade Communications Systems, Incorporated
Corporate and Latin American Headquarters
Brocade Communications Systems, Inc.
130 Holger Way
San Jose, CA 95134
Tel: 1-408-333-8000
Fax: 1-408-333-8101
E-mail: info@brocade.com
European Headquarters
Brocade Communications Switzerland Sàrl
Centre Swissair
Tour B - 4ème étage
29, Route de l'Aéroport
Case Postale 105
CH-1215 Genève 15
Switzerland
Tel: +41 22 799 5640
Fax: +41 22 799 5641
E-mail: emea-info@brocade.com
Asia-Pacific Headquarters
Brocade Communications Systems China HK, Ltd.
No. 1 Guanghua Road
Chao Yang District
Units 2718 and 2818
Beijing 100020, China
Tel: +8610 6588 8888
Fax: +8610 6588 9999
E-mail: china-info@brocade.com
Asia-Pacific Headquarters
Brocade Communications Systems Co., Ltd. (Shenzhen WFOE)
Citic Plaza
No. 233 Tian He Road North
Unit 1308 – 13th Floor
Guangzhou, China
Tel: +8620 3891 2000
Fax: +8620 3891 2111
E-mail: china-info@brocade.com
Document History
Title Publication number Summary of changes Date
Brocade Network Advisor REST API
Guide
53-1003160-01 New document July 2014
Page 3

Contents
About This Document
How this document is organized . . . . . . . . . . . . . . . . . . . . . . . . . . . . . ix
Document conventions. . . . . . . . . . . . . . . . . . . . . . . . . . . . . . . . . . . . . x
Text formatting . . . . . . . . . . . . . . . . . . . . . . . . . . . . . . . . . . . . . . . . x
Command syntax conventions . . . . . . . . . . . . . . . . . . . . . . . . . . . x
Notes, cautions, and warnings . . . . . . . . . . . . . . . . . . . . . . . . . . . xi
Key terms . . . . . . . . . . . . . . . . . . . . . . . . . . . . . . . . . . . . . . . . . . . .xi
Notice to the reader . . . . . . . . . . . . . . . . . . . . . . . . . . . . . . . . . . . . . . xii
Additional information. . . . . . . . . . . . . . . . . . . . . . . . . . . . . . . . . . . . . xii
Brocade resources. . . . . . . . . . . . . . . . . . . . . . . . . . . . . . . . . . . . xii
Other industry resources. . . . . . . . . . . . . . . . . . . . . . . . . . . . . . . xii
Getting technical help. . . . . . . . . . . . . . . . . . . . . . . . . . . . . . . . . . . . . xiii
Document feedback . . . . . . . . . . . . . . . . . . . . . . . . . . . . . . . . . . . . . . xiii
Chapter 1 Overview of the Network Advisor REST API
Introduction . . . . . . . . . . . . . . . . . . . . . . . . . . . . . . . . . . . . . . . . . . . . . . 1
Network Advisor URIs . . . . . . . . . . . . . . . . . . . . . . . . . . . . . . . . . . . . . . 2
Protocol support . . . . . . . . . . . . . . . . . . . . . . . . . . . . . . . . . . . . . . . . . . 2
Default HTTPS port (443) . . . . . . . . . . . . . . . . . . . . . . . . . . . . . . . 2
Non-Default HTTPS port . . . . . . . . . . . . . . . . . . . . . . . . . . . . . . . . 2
Edition support . . . . . . . . . . . . . . . . . . . . . . . . . . . . . . . . . . . . . . . . . . . 3
Chapter 2 Getting Started
Introduction . . . . . . . . . . . . . . . . . . . . . . . . . . . . . . . . . . . . . . . . . . . . . . 5
Before you begin . . . . . . . . . . . . . . . . . . . . . . . . . . . . . . . . . . . . . . . . . . 5
Logging in. . . . . . . . . . . . . . . . . . . . . . . . . . . . . . . . . . . . . . . . . . . . . . . . 6
Retrieving resource groups. . . . . . . . . . . . . . . . . . . . . . . . . . . . . . . . . . 7
Retrieving FC fabrics . . . . . . . . . . . . . . . . . . . . . . . . . . . . . . . . . . . . . . . 8
Retrieving a specific FC fabric . . . . . . . . . . . . . . . . . . . . . . . . . . . . . . . 9
Retrieving switches in the context of a fabric . . . . . . . . . . . . . . . . . . . 9
Retrieving switches and ports . . . . . . . . . . . . . . . . . . . . . . . . . . . . . . 11
Creating a sample Python client . . . . . . . . . . . . . . . . . . . . . . . . . . . .12
Chapter 3 Using the Brocade Network Advisor REST API
Introduction . . . . . . . . . . . . . . . . . . . . . . . . . . . . . . . . . . . . . . . . . . . . .21
Brocade Network Advisor REST API Guide iii
53-1003160-01
Page 4

Logging in and out. . . . . . . . . . . . . . . . . . . . . . . . . . . . . . . . . . . . . . . .21
Logging in . . . . . . . . . . . . . . . . . . . . . . . . . . . . . . . . . . . . . . . . . . .21
Logging out. . . . . . . . . . . . . . . . . . . . . . . . . . . . . . . . . . . . . . . . . .24
Specifying content type. . . . . . . . . . . . . . . . . . . . . . . . . . . . . . . . . . . . 25
Accept HTTP request header. . . . . . . . . . . . . . . . . . . . . . . . . . . .26
Content-type HTTP request header. . . . . . . . . . . . . . . . . . . . . . . 26
Versioning (backward compatibility) . . . . . . . . . . . . . . . . . . . . . . . . .26
Using the Topology API . . . . . . . . . . . . . . . . . . . . . . . . . . . . . . . . . . . . 27
Using the SAN Fabric Discovery API . . . . . . . . . . . . . . . . . . . . . . . . . . 27
Notes about the SAN Fabric Discovery API URIs . . . . . . . . . . . .27
Limitations for the SAN Fabric Discovery API . . . . . . . . . . . . . . .28
Using the Traffic Flow API . . . . . . . . . . . . . . . . . . . . . . . . . . . . . . . . . .28
Using the Summary Data API . . . . . . . . . . . . . . . . . . . . . . . . . . . . . . . 28
Using the Events API . . . . . . . . . . . . . . . . . . . . . . . . . . . . . . . . . . . . . .29
Using the Zoning API . . . . . . . . . . . . . . . . . . . . . . . . . . . . . . . . . . . . . .29
Zoning URIs . . . . . . . . . . . . . . . . . . . . . . . . . . . . . . . . . . . . . . . . .29
Zoning operations . . . . . . . . . . . . . . . . . . . . . . . . . . . . . . . . . . . . 29
Using the Historical Performance Data API. . . . . . . . . . . . . . . . . . . . 30
Fibre Channel Routing . . . . . . . . . . . . . . . . . . . . . . . . . . . . . . . . . . . . 30
Handling errors . . . . . . . . . . . . . . . . . . . . . . . . . . . . . . . . . . . . . . . . . .30
URI error return behavior. . . . . . . . . . . . . . . . . . . . . . . . . . . . . . .36
Chapter 4 Use Cases
Introduction . . . . . . . . . . . . . . . . . . . . . . . . . . . . . . . . . . . . . . . . . . . . .37
Zoning . . . . . . . . . . . . . . . . . . . . . . . . . . . . . . . . . . . . . . . . . . . . . . . . . 37
Sample request payload . . . . . . . . . . . . . . . . . . . . . . . . . . . . . . .38
Sample Java code for performing the attach operation . . . . . .38
Sample JSON responses . . . . . . . . . . . . . . . . . . . . . . . . . . . . . . .39
Getting Traffic Flow Performance Data . . . . . . . . . . . . . . . . . . . . . . .40
Sample Java code for retrieving flow information . . . . . . . . . . .40
Sample JSON response . . . . . . . . . . . . . . . . . . . . . . . . . . . . . . . . 41
Retrieving performance data for the Transmit Frame Rate measure
42
Getting the Top N CRC errors port summary. . . . . . . . . . . . . . . . . . .44
SAN fabric discovery . . . . . . . . . . . . . . . . . . . . . . . . . . . . . . . . . . . . . .44
Discovering an FC fabric . . . . . . . . . . . . . . . . . . . . . . . . . . . . . . .44
Deleting an FC fabric . . . . . . . . . . . . . . . . . . . . . . . . . . . . . . . . . . 47
Binding the schema . . . . . . . . . . . . . . . . . . . . . . . . . . . . . . . . . . . . . .48
iv Brocade Network Advisor REST API Guide
53-1003160-01
Page 5

Chapter 5 API Reference
Topology. . . . . . . . . . . . . . . . . . . . . . . . . . . . . . . . . . . . . . . . . . . . . . . . 51
ResourceGroups. . . . . . . . . . . . . . . . . . . . . . . . . . . . . . . . . . . . . .52
Fabrics . . . . . . . . . . . . . . . . . . . . . . . . . . . . . . . . . . . . . . . . . . . . .53
FC Switch . . . . . . . . . . . . . . . . . . . . . . . . . . . . . . . . . . . . . . . . . . .54
PhysicalSwitch . . . . . . . . . . . . . . . . . . . . . . . . . . . . . . . . . . . . . . .56
AccessGateway. . . . . . . . . . . . . . . . . . . . . . . . . . . . . . . . . . . . . . .58
FCPorts . . . . . . . . . . . . . . . . . . . . . . . . . . . . . . . . . . . . . . . . . . . . .59
GigePorts . . . . . . . . . . . . . . . . . . . . . . . . . . . . . . . . . . . . . . . . . . .62
Connected-switch ports. . . . . . . . . . . . . . . . . . . . . . . . . . . . . . . .64
End-device ports . . . . . . . . . . . . . . . . . . . . . . . . . . . . . . . . . . . . .66
Trunks . . . . . . . . . . . . . . . . . . . . . . . . . . . . . . . . . . . . . . . . . . . . . .68
ISL Connections . . . . . . . . . . . . . . . . . . . . . . . . . . . . . . . . . . . . . .69
IFL connections . . . . . . . . . . . . . . . . . . . . . . . . . . . . . . . . . . . . . .70
EndDeviceConnection . . . . . . . . . . . . . . . . . . . . . . . . . . . . . . . . .72
Access Gateway connection . . . . . . . . . . . . . . . . . . . . . . . . . . . .73
End devices . . . . . . . . . . . . . . . . . . . . . . . . . . . . . . . . . . . . . . . . . 74
SAN fabric discovery . . . . . . . . . . . . . . . . . . . . . . . . . . . . . . . . . . . . . . 76
Fabric discovery . . . . . . . . . . . . . . . . . . . . . . . . . . . . . . . . . . . . . .77
Fabric deletion . . . . . . . . . . . . . . . . . . . . . . . . . . . . . . . . . . . . . . .78
Switch credentials update. . . . . . . . . . . . . . . . . . . . . . . . . . . . . . 79
Summary data . . . . . . . . . . . . . . . . . . . . . . . . . . . . . . . . . . . . . . . . . . .80
Status summary. . . . . . . . . . . . . . . . . . . . . . . . . . . . . . . . . . . . . .81
Asset classification summary . . . . . . . . . . . . . . . . . . . . . . . . . . .82
Network object count summary . . . . . . . . . . . . . . . . . . . . . . . . . 85
Events summary . . . . . . . . . . . . . . . . . . . . . . . . . . . . . . . . . . . . . 86
Bottleneck violations summary. . . . . . . . . . . . . . . . . . . . . . . . . . 87
Out-of-range violations summary . . . . . . . . . . . . . . . . . . . . . . . .88
Port health violations summary . . . . . . . . . . . . . . . . . . . . . . . . .89
VM violations summary . . . . . . . . . . . . . . . . . . . . . . . . . . . . . . . . 90
Port summaries . . . . . . . . . . . . . . . . . . . . . . . . . . . . . . . . . . . . . . 91
Product summaries . . . . . . . . . . . . . . . . . . . . . . . . . . . . . . . . . .104
Traffic flow summaries . . . . . . . . . . . . . . . . . . . . . . . . . . . . . . .109
Events . . . . . . . . . . . . . . . . . . . . . . . . . . . . . . . . . . . . . . . . . . . . . . . .114
Event retrieval . . . . . . . . . . . . . . . . . . . . . . . . . . . . . . . . . . . . . .115
Event count. . . . . . . . . . . . . . . . . . . . . . . . . . . . . . . . . . . . . . . . . 117
Event acknowledgement . . . . . . . . . . . . . . . . . . . . . . . . . . . . . .118
Zoning . . . . . . . . . . . . . . . . . . . . . . . . . . . . . . . . . . . . . . . . . . . . . . . .119
Zone DBs . . . . . . . . . . . . . . . . . . . . . . . . . . . . . . . . . . . . . . . . . .120
Zones . . . . . . . . . . . . . . . . . . . . . . . . . . . . . . . . . . . . . . . . . . . . .121
Zone aliases . . . . . . . . . . . . . . . . . . . . . . . . . . . . . . . . . . . . . . . .123
Zone sets . . . . . . . . . . . . . . . . . . . . . . . . . . . . . . . . . . . . . . . . . .124
Zone transactions . . . . . . . . . . . . . . . . . . . . . . . . . . . . . . . . . . .125
Zone transaction management. . . . . . . . . . . . . . . . . . . . . . . . .126
Zoning object creation. . . . . . . . . . . . . . . . . . . . . . . . . . . . . . . .127
Zoning object deletion . . . . . . . . . . . . . . . . . . . . . . . . . . . . . . . .128
Zoning object updating . . . . . . . . . . . . . . . . . . . . . . . . . . . . . . .129
Zone set activation . . . . . . . . . . . . . . . . . . . . . . . . . . . . . . . . . .131
Initiator target zoning. . . . . . . . . . . . . . . . . . . . . . . . . . . . . . . . .132
Brocade Network Advisor REST API Guide v
53-1003160-01
Page 6

Historical performance data. . . . . . . . . . . . . . . . . . . . . . . . . . . . . . .134
Authentication and session management. . . . . . . . . . . . . . . . . . . .144
Login . . . . . . . . . . . . . . . . . . . . . . . . . . . . . . . . . . . . . . . . . . . . . .145
Logout. . . . . . . . . . . . . . . . . . . . . . . . . . . . . . . . . . . . . . . . . . . . .146
Appendix A Request and Response Schemas
Topology. . . . . . . . . . . . . . . . . . . . . . . . . . . . . . . . . . . . . . . . . . . . . . .147
ResourceGroupsResponse . . . . . . . . . . . . . . . . . . . . . . . . . . . .147
FcFabricsResponse . . . . . . . . . . . . . . . . . . . . . . . . . . . . . . . . . .148
FcSwitchesResponse. . . . . . . . . . . . . . . . . . . . . . . . . . . . . . . . .148
PhysicalSwitchesResponse. . . . . . . . . . . . . . . . . . . . . . . . . . . .149
AccessGatewaysResponse . . . . . . . . . . . . . . . . . . . . . . . . . . . .150
FcPortsResponse . . . . . . . . . . . . . . . . . . . . . . . . . . . . . . . . . . . .150
EndDevicePortsResponse . . . . . . . . . . . . . . . . . . . . . . . . . . . . .152
TrunksResponse. . . . . . . . . . . . . . . . . . . . . . . . . . . . . . . . . . . . .153
IslsResponse . . . . . . . . . . . . . . . . . . . . . . . . . . . . . . . . . . . . . . .153
IflsResponse. . . . . . . . . . . . . . . . . . . . . . . . . . . . . . . . . . . . . . . .154
EndDeviceConnectionsResponse. . . . . . . . . . . . . . . . . . . . . . .154
AgConnectionsResponse. . . . . . . . . . . . . . . . . . . . . . . . . . . . . .155
EndDevicesResponse . . . . . . . . . . . . . . . . . . . . . . . . . . . . . . . .155
SAN fabric discovery . . . . . . . . . . . . . . . . . . . . . . . . . . . . . . . . . . . . .156
DiscoverFabricRequest . . . . . . . . . . . . . . . . . . . . . . . . . . . . . . .156
DiscoverFabricResponse . . . . . . . . . . . . . . . . . . . . . . . . . . . . . .157
UpdateCredentialsRequest . . . . . . . . . . . . . . . . . . . . . . . . . . . .157
FlowDefinitionsResponse . . . . . . . . . . . . . . . . . . . . . . . . . . . . .158
FlowsResponse . . . . . . . . . . . . . . . . . . . . . . . . . . . . . . . . . . . . .159
Summary data . . . . . . . . . . . . . . . . . . . . . . . . . . . . . . . . . . . . . . . . . .159
SummaryResponse . . . . . . . . . . . . . . . . . . . . . . . . . . . . . . . . . .159
StatusSummary . . . . . . . . . . . . . . . . . . . . . . . . . . . . . . . . . . . . .160
AssetClassificationSummary. . . . . . . . . . . . . . . . . . . . . . . . . . .161
NetworkObjectCountSummary . . . . . . . . . . . . . . . . . . . . . . . . .162
EventsSummary . . . . . . . . . . . . . . . . . . . . . . . . . . . . . . . . . . . . .162
BottleneckViolationsSummary . . . . . . . . . . . . . . . . . . . . . . . . .163
OutOfRangeViolationsSummary . . . . . . . . . . . . . . . . . . . . . . . .164
PortHealthViolationsSummary . . . . . . . . . . . . . . . . . . . . . . . . .164
VmViolationsSummary . . . . . . . . . . . . . . . . . . . . . . . . . . . . . . .165
SummariesResponse. . . . . . . . . . . . . . . . . . . . . . . . . . . . . . . . .166
PortsMonitorSummaryData . . . . . . . . . . . . . . . . . . . . . . . . . . .166
MonitorDistributionData . . . . . . . . . . . . . . . . . . . . . . . . . . . . . .167
ProductsMonitorSummaryData . . . . . . . . . . . . . . . . . . . . . . . .167
FlowMonitorSummaryData . . . . . . . . . . . . . . . . . . . . . . . . . . . .168
Events . . . . . . . . . . . . . . . . . . . . . . . . . . . . . . . . . . . . . . . . . . . . . . . .168
EventsResponse. . . . . . . . . . . . . . . . . . . . . . . . . . . . . . . . . . . . .168
CountResponse . . . . . . . . . . . . . . . . . . . . . . . . . . . . . . . . . . . . . 171
vi Brocade Network Advisor REST API Guide
53-1003160-01
Page 7

Zoning . . . . . . . . . . . . . . . . . . . . . . . . . . . . . . . . . . . . . . . . . . . . . . . . 171
ZoneDbsResponse. . . . . . . . . . . . . . . . . . . . . . . . . . . . . . . . . . . 171
ZonesResponse . . . . . . . . . . . . . . . . . . . . . . . . . . . . . . . . . . . . .172
ZoneAliasesResponse . . . . . . . . . . . . . . . . . . . . . . . . . . . . . . . .172
ZoneSetsResponse . . . . . . . . . . . . . . . . . . . . . . . . . . . . . . . . . .172
ZoneTransactionResponse . . . . . . . . . . . . . . . . . . . . . . . . . . . .172
ControlZoneTransactionRequest. . . . . . . . . . . . . . . . . . . . . . . .173
CreateZoningObjectRequest . . . . . . . . . . . . . . . . . . . . . . . . . . .173
DeleteZoningObjectRequest . . . . . . . . . . . . . . . . . . . . . . . . . . .173
UpdateZoningObjectRequest . . . . . . . . . . . . . . . . . . . . . . . . . .173
InitiatorTargetsRequest . . . . . . . . . . . . . . . . . . . . . . . . . . . . . . . 174
Historical performance data. . . . . . . . . . . . . . . . . . . . . . . . . . . . . . . 174
PerformanceDataResponse . . . . . . . . . . . . . . . . . . . . . . . . . . . 174
Authentication and session management. . . . . . . . . . . . . . . . . . . .175
LoginResponse. . . . . . . . . . . . . . . . . . . . . . . . . . . . . . . . . . . . . .175
Brocade Network Advisor REST API Guide vii
53-1003160-01
Page 8

viii Brocade Network Advisor REST API Guide
53-1003160-01
Page 9

About This Document
In this chapter
•How this document is organized . . . . . . . . . . . . . . . . . . . . . . . . . . . . . . . . . . . ix
•Document conventions . . . . . . . . . . . . . . . . . . . . . . . . . . . . . . . . . . . . . . . . . . . x
•Notice to the reader . . . . . . . . . . . . . . . . . . . . . . . . . . . . . . . . . . . . . . . . . . . . xii
•Additional information. . . . . . . . . . . . . . . . . . . . . . . . . . . . . . . . . . . . . . . . . . . xii
•Getting technical help . . . . . . . . . . . . . . . . . . . . . . . . . . . . . . . . . . . . . . . . . . . xiii
•Document feedback . . . . . . . . . . . . . . . . . . . . . . . . . . . . . . . . . . . . . . . . . . . . xiii
How this document is organized
This document is organized to help you find the information that you want as quickly and easily as
possible.
The document contains the following components:
• Chapter 1, “Overview of the Network Advisor REST API,” provides a high-level overview of the
API.
• Chapter 2, “Getting Started,” provides steps for getting started using the API in a tutorial
format.
• Chapter 3, “Using the Brocade Network Advisor REST API,” explains how to use the API.
• Chapter 5, “API Reference,” describes the calls supported by the API.
• Appendix A, “Request and Response Schemas,” lists the request and response schemas used
by the API calls.
Brocade Network Advisor REST API Guide ix
53-1003160-01
Page 10

Document conventions
NOTE
This section describes text formatting conventions and important notice formats used in this
document.
Text formatting
The narrative-text formatting conventions that are used are as follows:
bold text Identifies command names
italic text Provides emphasis
code text Identifies CLI output
For readability, command names in the narrative portions of this guide are presented in mixed
lettercase: for example, switchShow. In actual examples, command lettercase is all lowercase.
Identifies the names of user-manipulated GUI elements
Identifies keywords and operands
Identifies text to enter at the GUI or CLI
Identifies variables
Identifies paths and Internet addresses
Identifies document titles
Identifies command syntax examples
Command syntax conventions
Command syntax in this manual follows these conventions:
Convention Description
[ ] Keywords or arguments that appear within square brackets are optional. For example:
command [active | standby | disabled] = One (and only one) of this set of keywords may be
used.
command [active] [standby] [disabled] = Three independent options, and one or more may
be used on the same command line.
{ x | y | z } A choice of required keywords appears in braces separated by vertical bars. You must
select one. For example:
command {active | standby | disabled} = One (and only one) of this set of keywords must
be used.
screen font Examples of information displayed on the screen.
< > Nonprinting characters, for example, passwords, appear in angle brackets.
[ ] Default responses to system prompts appear in square brackets.
italic text Identifies variables.
bold text Identifies literal command options and keywords.
In standalone mode, interfaces are identified using slot/port notation. In Brocade VCS Fabric
technology® mode, interfaces are identified using switch/slot/port notation.
x Brocade Network Advisor REST API Guide
53-1003160-01
Page 11
Nesting square brackets and curly braces
NOTE
ATTENTION
CAUTION
DANGER
When reading a command entry, optional keywords are surrounded by square brackets and
mandatory keywords are surrounded by curly braces. Refer to “Command syntax conventions” on
page x for complete details.
In some cases, these brackets can be nested. In the following example, rbridge-id is optional as
denoted by the square brackets, but if you use it, then you must follow it with either a specific
rbridge-id or the word “all.”
command [rbridge-id {rbridge-id | all}]
However, square brackets can appear within curly braces, showing that while a keyword is
mandatory, supporting operands may be optional, as shown in the following example:
command {security [active] [standby] [disabled]}
command {security [active | standby | disabled]
}
Notes, cautions, and warnings
The following notices and statements are used in this manual. They are listed below in order of
increasing severity of potential hazards.
A note provides a tip, guidance, or advice, emphasizes important information, or provides a
reference to related information.
An Attention statement indicates potential damage to hardware or data.
A Caution statement alerts you to situations that can be potentially hazardous to you or cause
damage to hardware, firmware, software, or data.
A Danger statement indicates conditions or situations that can be potentially lethal or extremely
hazardous to you. Safety labels are also attached directly to products to warn of these conditions
or situations.
Key terms
For definitions specific to Brocade and Fibre Channel, see the technical glossaries on MyBrocade.
Refer to “Brocade resources” on page xii for instructions on accessing MyBrocade.
For definitions of SAN-specific terms, visit the Storage Networking Industry Association online
dictionary at:
http://www.snia.org/education/dictionary
Brocade Network Advisor REST API Guide xi
53-1003160-01
Page 12

Notice to the reader
This document may contain references to the trademarks of the following corporations. These
trademarks are the properties of their respective companies and corporations.
These references are made for informational purposes only.
Corporation Referenced Trademarks and Products
Microsoft Corporation Windows, Windows NT, Internet Explorer
Oracle Corporation Oracle, Java
Netscape Communications Corporation Netscape
Red Hat, Inc. Red Hat, Red Hat Network, Maximum RPM, Linux Undercover
Additional information
This section lists additional Brocade and industry-specific documentation that you might find
helpful.
Brocade resources
To get up-to-the-minute information, go to http://my.brocade.com to register at no cost for a user ID
and password.
White papers, online demonstrations, and data sheets are available through the Brocade website
at:
http://www.brocade.com/products-solutions/products/index.page
For additional Brocade documentation, visit the Brocade website:
http://www.brocade.com
Release notes are available on the MyBrocade website.
Other industry resources
For additional resource information, visit the Technical Committee T11 website. This website
provides interface standards for high-performance and mass storage applications for Fibre
Channel, storage management, and other applications:
http://www.t11.org
For information about the Fibre Channel industry, visit the Fibre Channel Industry Association
website:
http://www.fibrechannel.org
xii Brocade Network Advisor REST API Guide
53-1003160-01
Page 13

Getting technical help
Contact your switch support supplier for hardware, firmware, and software support, including
product repairs and part ordering. To expedite your call, have the following information available:
1. General Information
• Switch model
• Switch operating system version
• Software name and software version, if applicable
• Error numbers and messages received
• Detailed description of the problem, including the switch or fabric behavior immediately
following the problem, and specific questions
• Description of any troubleshooting steps already performed and the results
• Serial console and Telnet session logs
• syslog message logs
2. Switch Serial Number
The switch serial number and corresponding bar code are provided on the serial number label,
as illustrated below:
The serial number label is located on the switch ID pull-out tab located on the bottom of the
port side of the switch.
3. World Wide Name (WWN)
Use the show license id command to display the WWN of the chassis.
If you cannot use the show license id command because the switch is inoperable, you can get
the WWN from the same place as the serial number, except for the Brocade DCX. For the
Brocade DCX, access the numbers on the WWN cards by removing the Brocade logo plate at
the top of the nonport side of the chassis.
Document feedback
Quality is our first concern at Brocade and we have made every effort to ensure the accuracy and
completeness of this document. However, if you find an error or an omission, or you think that a
topic needs further development, we want to hear from you. Forward your feedback to:
documentation@brocade.com
Provide the title and version number of the document and as much detail as possible about your
comment, including the topic heading and page number and your suggestions for improvement.
Brocade Network Advisor REST API Guide xiii
53-1003160-01
Page 14

xiv Brocade Network Advisor REST API Guide
53-1003160-01
Page 15
Chapter
NOTE
Overview of the Network Advisor REST API
In this chapter
•Introduction . . . . . . . . . . . . . . . . . . . . . . . . . . . . . . . . . . . . . . . . . . . . . . . . . . . . 1
•Network Advisor URIs . . . . . . . . . . . . . . . . . . . . . . . . . . . . . . . . . . . . . . . . . . . . 2
•Protocol support . . . . . . . . . . . . . . . . . . . . . . . . . . . . . . . . . . . . . . . . . . . . . . . . 2
•Edition support . . . . . . . . . . . . . . . . . . . . . . . . . . . . . . . . . . . . . . . . . . . . . . . . . 3
•
Introduction
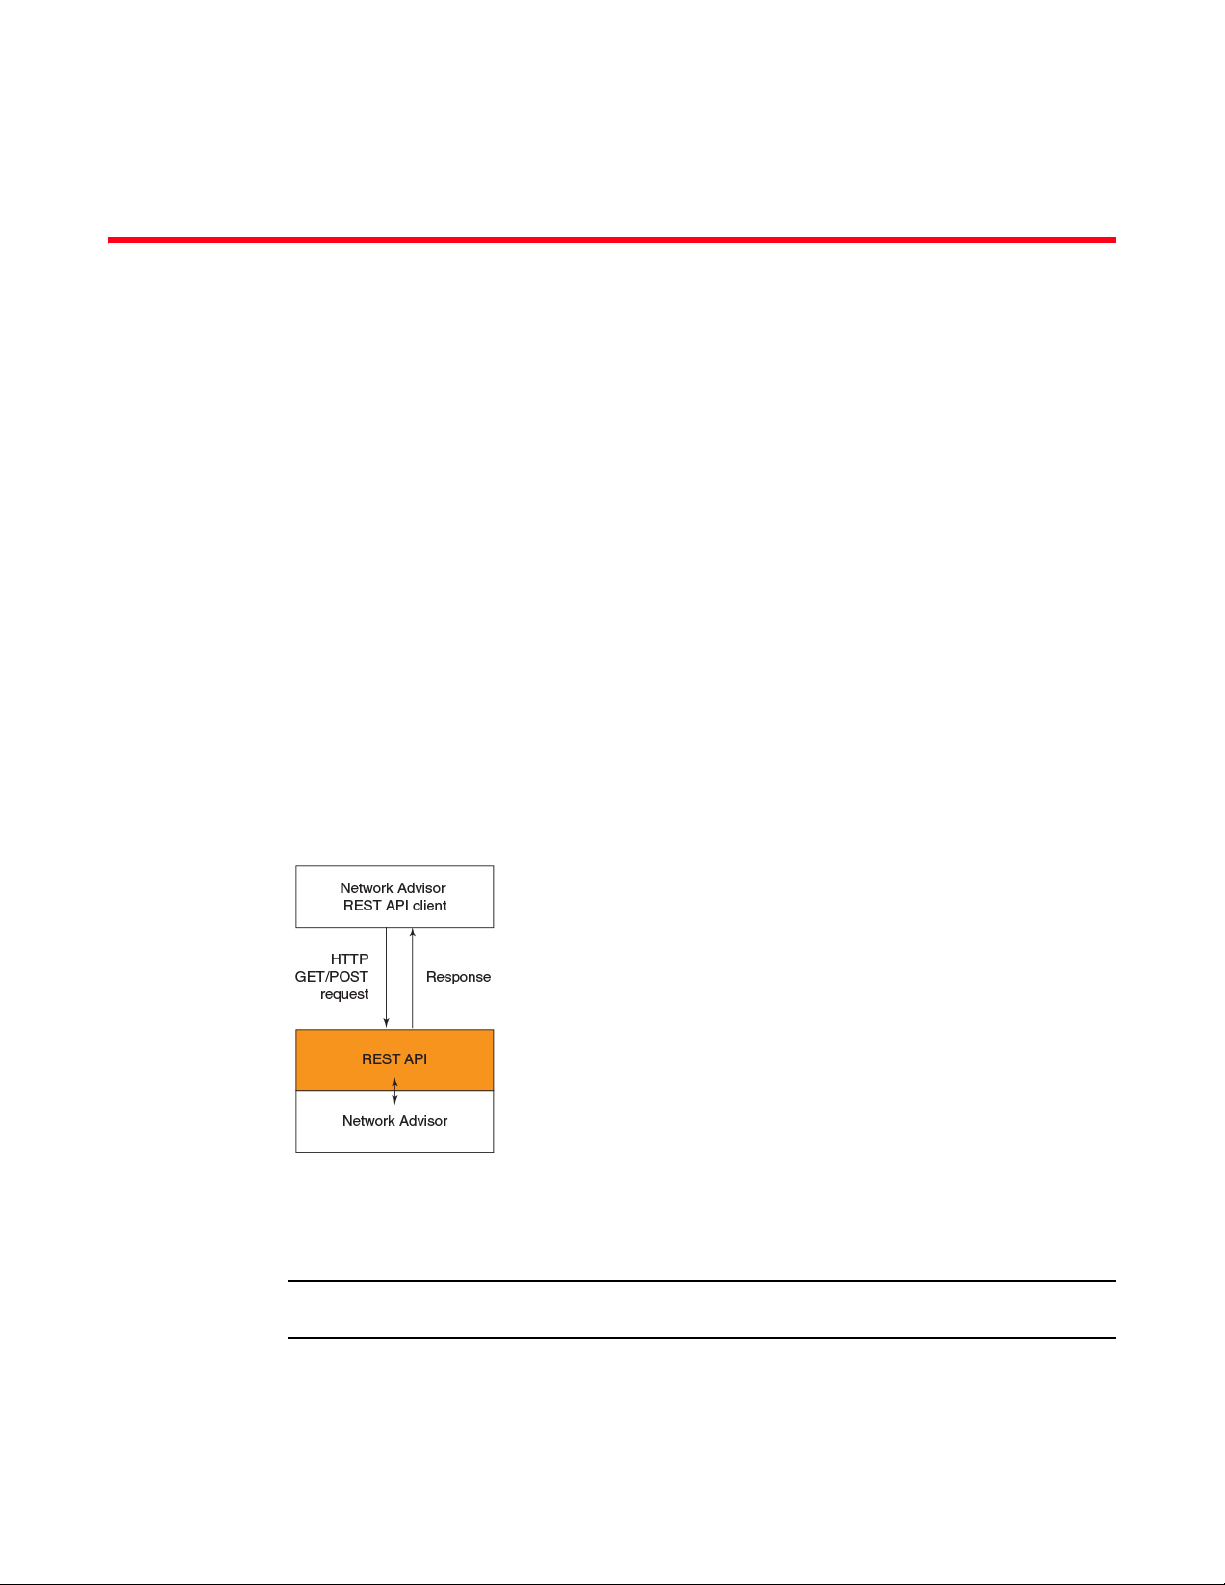
The Network Advisor REST API provides you with a Web services interface for configuring and
monitoring Brocade switches. Brocade Network Advisor 12.3.0 has been updated to provide a
REST API for storage area network (SAN) provisioning. The REST APIs are organized into various
services such as Topology, Authentication, and Zoning.
1
You can use the Network Advisor REST API to build your own Network Advisor clients. You can also
use third-party REST API clients to interact with Network Advisor.
FIGURE 1 Architectural overview
The Network Advisor REST API provides GET and POST uniform resource identifiers (URIs) that you
can use to retrieve information and perform certain management and configuration tasks.
This release of the Network Advisor REST API supports only SAN fabrics.
Brocade Network Advisor REST API Guide 1
53-1003160-01
Page 16

Network Advisor URIs
NOTE
1
Network Advisor URIs
Network Advisor URIs consists of two parts:
• Base URI: The base URI is specific to the Network Advisor server. All URIs accessing the same
server use the same base URI.
• Request URI: The request URI is the URI that you use to perform a GET or POST request. This
part of the URI is the same across all Network Advisor servers.
The following are examples of Network Advisor URIs (the text in bold is the base URI part and the
rest is the request part).
• POST URI examples:
• http://10.24.48.103/rest/fcfabrics/10:00:00:05:1E:90:52:07/createzoningobject
• http://10.24.48.103/rest/fcfabrics/10:00:00:05:1E:90:52:07/deletezoningobject
• http://10.24.48.103/rest/fcfabrics/10:00:00:05:1E:90:52:07/updatezoningobject
• http://10.24.48.103/rest/fcfabrics/10:00:00:05:1E:90:52:07/activatezoneset
• GET URI examples:
• http://10.24.48.103/rest/resourcegroups
• http://10.24.48.103/rest/fcfabrics
URIs are case-sensitive.
Protocol support
The Network Advisor REST API supports HTTP and HTTPS, unlike Network Advisor which only
supports HTTPS.
All REST HTTP requests are redirected to the HTTPS port. By default, the HTTPS port number is
443. However, this port can be changed during the installation of Network Advisor or after
installation through the server management console.
Default HTTPS port (443)
If the HTTPS port is 443 (default), you can use the HTTP and HTTPS protocols as show in the
following two example URIs. In the HTTP case, the request is redirected to HTTPS.
http://<server_IP>/rest/resourcegroups
https://<server_IP>/rest/resourcegroups
Non-Default HTTPS port
If the HTTPS port is changed to a non-default value, the REST URI must specify HTTPS as the
protocol and must also specify the port number to send the requests to, as shown in the following
example. If not, Network Advisor refuses connection requests.
https://<server_IP>:<non-default_port_number>/rest/resourcegroups
2 Brocade Network Advisor REST API Guide
53-1003160-01
Page 17

Edition support
The following table lists the REST API support for the Network Advisor editions.l
TABLE 1 Edition support
Network Advisor edition REST API availability
Enterprise YES
Professional Plus YES
Professional NO
Headless YES
Edition support
1
Brocade Network Advisor REST API Guide 3
53-1003160-01
Page 18

Edition support
1
4 Brocade Network Advisor REST API Guide
53-1003160-01
Page 19

Chapter
Getting Started
In this chapter
•Introduction . . . . . . . . . . . . . . . . . . . . . . . . . . . . . . . . . . . . . . . . . . . . . . . . . . . . 5
•Before you begin . . . . . . . . . . . . . . . . . . . . . . . . . . . . . . . . . . . . . . . . . . . . . . . . 5
•Logging in . . . . . . . . . . . . . . . . . . . . . . . . . . . . . . . . . . . . . . . . . . . . . . . . . . . . . . 6
•Retrieving resource groups . . . . . . . . . . . . . . . . . . . . . . . . . . . . . . . . . . . . . . . . 7
•Retrieving FC fabrics . . . . . . . . . . . . . . . . . . . . . . . . . . . . . . . . . . . . . . . . . . . . . 8
•Retrieving a specific FC fabric . . . . . . . . . . . . . . . . . . . . . . . . . . . . . . . . . . . . . 9
•Retrieving switches in the context of a fabric . . . . . . . . . . . . . . . . . . . . . . . . . 9
•Retrieving switches and ports . . . . . . . . . . . . . . . . . . . . . . . . . . . . . . . . . . . . 11
•Creating a sample Python client. . . . . . . . . . . . . . . . . . . . . . . . . . . . . . . . . . . 12
Introduction
2
This chapter describes how to log in to Network Advisor using its REST API and perform a few basic
information retrieval operations. In addition, this chapter shows you how to build a sample client
application using the Python programming language.
Before you begin
This chapter assumes that you are familiar with the concept of REST APIs.
Before you can use the Network Advisor REST API:
• Make sure that Network Advisor 12.3.0 or later is installed on your network.
• Obtain a username and password for accessing Network Advisor through the REST API.
• Make sure that you have a tool for interacting with REST APIs.
The Advanced Rest Console application is used in this chapter, but you can use any other REST
API tool.
Brocade Network Advisor REST API Guide 5
53-1003160-01
Page 20

Logging in
2
Logging in
To log in to Network Advisor, complete the following steps.
1. Enter the following URI in the URL field of your REST client tool.
http://<ip_address>/rest/login
2. Define the following HTTP request headers.
TABLE 1 Request headers
Header name Value
WSUsername The user name supplied by your Network Advisor administrator.
WSPassword The password supplied by your Network Advisor administrator.
Accept The content type of the returned data.
Specify the following content type to receive the response data in the JSON format:
application/vnd.brocade.networkadvisor+json;version=v1
If you prefer the XML format, enter the following value:
application/vnd.brocade.networkadvisor+xml;version=v1
3. Set the HTTP request method to POST.
4. Send the request.
The following is an example of login request headers sent to Network Advisor:
Request headers
Accept: application/vnd.brocade.networkadvisor+json;version=v1
WSUsername: Administrator
Origin: chrome-extension://hgmloofddffdnphfgcellkdfbfbjeloo
User-Agent: Mozilla/5.0 (Windows NT 6.1; WOW64) AppleWebKit/537.36 (KHTML,
like Gecko) Chrome/32.0.1700.102 Safari/537.36
WSPassword: password
Content-Type: application/x-www-form-urlencoded
Accept-Encoding: gzip,deflate,sdch
Accept-Language: en-US,en;q=0.8
If the request is successful, Network Advisor creates a new client session and returns, in the
response headers, the token
WStoken, which identifies the session.
The following is an example of the output of a successful request:
Status
200 OK Show explanation Loading time: 5592
Response headers
Via: 1.1 Secure Proxy
Connection: Keep-Alive
Proxy-Connection: Keep-Alive
Transfer-Encoding: chunked
Date: Mon, 03 Feb 2014 06:01:39 GMT
Content-Type: application/vnd.brocade.networkadvisor+json;version="v1"
Server: Apache-Coyote/1.1
WStoken: ghe/4Q//I0EJcxD6UPdO9/fvI94=
Raw
JSON
6 Brocade Network Advisor REST API Guide
53-1003160-01
Page 21

Retrieving resource groups
NOTE
NOTE
The JSON content of the response should look like the following:
{
serverName: "DCM-x3650-103"
serverIp: "10.24.48.103"
}
This response returns the name of the Network Advisor and its IP address.
Different tools may display the JSON or XML responses differently.
5. Record the value of the WStoken response header.
In this example, the value of the WStoken field is ghe/4Q//I0EJcxD6UPdO9/fvI94=. You need
this token for all subsequent Network Advisor REST API requests.
A client session has a default idle timeout of 10 minutes after which the token is no longer
valid. If you try to use an invalid token, an error message is returned:
errorCode=4009, errorMsg=Invalid token in header.
2
Retrieving resource groups
To retrieve resource groups defined in Network Advisor, complete the following steps.
1. Enter the following URI in the URL field:
http://<ip_address>/rest/resourcegroups
2. Define the following HTTP request headers.
TABLE 2 Request headers
Header name Value
WStoken The session token header returned after a successful login.
Accept application/vnd.brocade.networkadvisor+json;version=v1
3. Set the HTTP request method to GET.
4. Send the request.
The following is an example of resource groups returned by Network Advisor:
{
resourceGroups: [16]
0: {
key: "10:00:00:05:33:A6:B6:17"
name: "10:00:00:05:33:A6:B6:17"
type: "FC_FABRIC"
}
1: {
key: "10:00:00:05:1E:DB:1E:1E"
name: "10:00:00:05:1E:DB:1E:1E"
type: "FC_FABRIC"
...
}
Brocade Network Advisor REST API Guide 7
53-1003160-01
Page 22

Retrieving FC fabrics
2
Retrieving FC fabrics
You can use the REST API to retrieve FC fabrics in the context of a resource group. The resource
group “All” encompasses all fabrics.
To retrieve all fabrics, complete the following steps.
1. Enter the following URI in the URL field:
http://<ip_address>/rest/resourcegroups/All/fcfabrics
2. Define the following HTTP request headers.
TABLE 3 Request headers
Header name Value
WStoken The session token header returned after a successful login.
Accept application/vnd.brocade.networkadvisor+json;version=v1
3. Set the HTTP request method to GET.
4. Send the request.
The following is an example of fabrics returned by Network Advisor:
{
fcFabrics: [3]
0: {
}
1: {
}
...
}
key: "10:00:00:05:1E:A7:1F:EB"
seedSwitchWwn: "10:00:00:05:1E:A7:1F:EB"
name: "10:00:00:05:1E:A7:1F:EB"
secure: false
adEnvironment: false
contact: null
location: null
description: null
principalSwitchWwn: "10:00:00:05:1E:A7:1F:EB"
fabricName: ""
virtualFabricId: -1
seedSwitchIpAddress: "10.24.33.195"
key: "10:00:00:05:1E:DB:1E:1E"
seedSwitchWwn: "10:00:00:05:1E:DB:1E:1E"
name: "10:00:00:05:1E:DB:1E:1E"
secure: false
adEnvironment: false
contact: null
location: null
description: null
principalSwitchWwn: "10:00:00:05:1E:DB:1E:1E"
fabricName: ""
virtualFabricId: -1
seedSwitchIpAddress: "10.24.33.193"
8 Brocade Network Advisor REST API Guide
53-1003160-01
Page 23

Retrieving a specific FC fabric
In the previous section, you retrieved a list of all FC fabrics. Every fabric in the list has a unique
identifier specified by the
fabric.
To retrieve information about the fabric with the 10:00:00:05:1E:A7:1F:EB key, complete the
following steps.
1. Enter the following URI in the URL field:
http://<ip_address>/rest/resourcegroups/All/fcfabrics/10:00:00:05:1E:A7:1F:EB
2. Define the following HTTP request headers.
TABLE 4 Request headers
Header name Value
WStoken The session token header returned after a successful login.
Accept application/vnd.brocade.networkadvisor+json;version=v1
3. Set the HTTP request method to GET.
key parameter. You can use it to retrieve information about a specific
Retrieving a specific FC fabric
2
4. Send the request.
The following is an example of the response returned by Network Advisor:
{
fcFabrics: [1]
0: {
key: "10:00:00:05:1E:A7:1F:EB"
seedSwitchWwn: "10:00:00:05:1E:A7:1F:EB"
name: "10:00:00:05:1E:A7:1F:EB"
secure: false
adEnvironment: false
contact: null
location: null
description: null
principalSwitchWwn: "10:00:00:05:1E:A7:1F:EB"
fabricName: ""
virtualFabricId: -1
seedSwitchIpAddress: "10.24.33.195"
}
}
Retrieving switches in the context of a fabric
To retrieve the switches under a fabric, send a GET request with the following URI:
http://<ip_address>/rest/resourcegroups/All/fcfabrics/fcfkey/fcswitches
For example, to retrieve the switches in the context of the fabric with key 10:00:00:05:1E:A7:1F:EB,
use the following URI:
http://<ip_address>/rest/resourcegroups/All/fcfabrics/10:00:00:05:1E:A7:1F:EB/fcs
witches
Brocade Network Advisor REST API Guide 9
53-1003160-01
Page 24

Retrieving switches in the context of a fabric
2
Use the same request headers as the ones used in the previous section (“Retrieving a specific FC
fabric”). The following is a sample response:
{
fcSwitches: [2]
0: {
key: "50:00:51:ED:B1:E5:EF:03"
name: "fcr_xd_1_20"
wwn: "50:00:51:ED:B1:E5:EF:03"
virtualFabricId: -1
domainId: 1
baseSwitch: false
role: "SUBORDINATE"
fcsRole: "None"
adCapable: false
operationalStatus: "UNKNOWN"
state: "UNKNOWN"
statusReason: null
cryptoCapable: false
fcrCapable: false
fcipCapable: false
lfEnabled: false
defaultLogicalSwitch: false
fmsMode: false
dynamicLoadSharingCapable: false
portBasedRoutingPresent: false
inOrderDeliveryCapable: false
persistentDidEnabled: false
fcipCircuitCapable: false
maxFcipTunnels: -1
maxFcipCircuits: -1
fcipLicensed: false
autoSnmpEnabled: true
}
1: {
key: "10:00:00:27:F8:A7:A1:25"
name: "REST_5100_33_194"
wwn: "10:00:00:27:F8:A7:A1:25"
virtualFabricId: -1
domainId: 28
baseSwitch: false
role: "SUBORDINATE"
fcsRole: "None"
adCapable: true
operationalStatus: "UNKNOWN"
state: "ONLINE"
statusReason: "Switch Status is HEALTHY."
cryptoCapable: false
fcrCapable: false
fcipCapable: false
lfEnabled: false
defaultLogicalSwitch: true
fmsMode: false
...
maxFcipTunnels: 0
maxFcipCircuits: 0
fcipLicensed: false
autoSnmpEnabled: true
}
}
10 Brocade Network Advisor REST API Guide
53-1003160-01
Page 25

Retrieving switches and ports
Retrieving switches and ports in the context of a resource group is similar to retrieving fabrics (refer
to“Retrieving FC fabrics”). The only difference is the URI that you use.
To retrieve all switches, use the following URI:
http://<ip_address>/rest/resourcegroups/All/fcswitches
The following is a sample response:
{
fcSwitches: [11]
0: {
key: "10:00:00:14:C9:E5:56:AB"
name: "REST_6520_33_189"
wwn: "10:00:00:14:C9:E5:56:AB"
virtualFabricId: -1
domainId: 2
baseSwitch: false
role: "SUBORDINATE"
fcsRole: "None"
adCapable: true
operationalStatus: "MARGINAL"
state: "ONLINE"
statusReason: "Switch Status is MARGINAL. Contributors: * Power Supply: 1 bad.
(MARGINAL). * Fan: 1 bad (MARGINAL)."
cryptoCapable: false
fcrCapable: false
fcipCapable: false
lfEnabled: false
defaultLogicalSwitch: true
fmsMode: false
dynamicLoadSharingCapable: true
portBasedRoutingPresent: false
inOrderDeliveryCapable: false
persistentDidEnabled: false
fcipCircuitCapable: false
maxFcipTunnels: 0
maxFcipCircuits: 0
fcipLicensed: false
autoSnmpEnabled: true
}
...
Retrieving switches and ports
2
To retrieve all ports, use the following URI:
http://<ip_address>/rest/resourcegroups/All/fcports
The following is a sample response:
{
fcPorts: [325]
0: {
key: "20:22:00:27:F8:A7:A1:25"
wwn: "20:22:00:27:F8:A7:A1:25"
name: "port34"
slotNumber: 0
portNumber: 34
userPortNumber: 34
portId: "1c2200"
Brocade Network Advisor REST API Guide 11
53-1003160-01
Page 26

Creating a sample Python client
2
...
portIndex: 34
areaId: 34
type: "U_PORT"
status: "DISABLED"
statusMessage: ""
lockedPortType: "U_PORT"
speed: "8"
speedsSupported: "1,2,4,8"
maxPortSpeed: 8
desiredCredits: 0
bufferAllocated: 0
estimatedDistance: 0
actualDistance: 0
longDistanceSetting: 0
remoteNodeWwn: ""
remotePortWwn: ""
licensed: false
swapped: false
trunked: false
trunkMaster: false
persistentlyDisabled: false
ficonSupported: true
blocked: false
prohibitPortNumbers: null
prohibitPortCount: 0
npivCapable: true
npivEnabled: true
fcFastWriteEnabled: false
islRrdyEnabled: false
rateLimitCapable: false
rateLimited: false
qosCapable: false
qosEnabled: false
fcrFabricId: 0
state: "OFFLINE"
occupied: false
masterPortNumber: -1
}
Creating a sample Python client
This section shows you how to create a sample Network Advisor REST API Python client. Python
version 3.3.3 for Windows (MSC v.1600 64 bit (AMD64)) is used for creating the client.
This sample client logs in to Network Advisor and uses the returned session token to retrieve a list
of all FC fabrics.
To create a sample client using the Python programming language, complete the following steps.
1. Create a new file using you favorite Python editor.
2. Add the following code to the file and replace the example IP address 10.24.41.138 with the IP
address of your Network Advisor server.
import http.client
import json
# Create HTTPConnection object and connect to the server.
12 Brocade Network Advisor REST API Guide
53-1003160-01
Page 27

Creating a sample Python client
connection = http.client.HTTPConnection("10.24.41.138")
###########################
# Log in to Network Advisor
###########################
# Send login requrest
connection.request('POST', 'http://10.24.41.138/rest/login',
headers={"WSUsername":"Administrator",
"WSPassword":"password",
"Accept":"application/vnd.brocade.networkadvisor+json;version=v1"})
print()
print("Sending login request to Network Advisor...")
# Get the response
response = connection.getresponse()
# Display the response status
print()
print ("Status= ", response.status)
# If successful (status = 200), display the returned Network Advisor session
token
if response.status == 200:
WStoken = response.getheader('WStoken')
print()
print("Login successful!")
print("WStoken: ", WStoken)
else:
print()
print (response.status, response.reason)
2
connection.close()
###########################
# Retrieve fabrics
###########################
# Send GET requrest
connection.connect()
connection.request('GET',
'http://10.24.41.138/rest/resourcegroups/All/fcfabrics',
headers={"WStoken":WStoken,
"Accept":"application/vnd.brocade.networkadvisor+json;version=v1"})
print()
print("--------------------------------------------------------------------")
print("Getting list of all fabrics...")
# Get the response
response = connection.getresponse()
# Display the response status
print()
print ("Status= ", response.status)
# If successful (status = 200), display the returned list in JSON format
Brocade Network Advisor REST API Guide 13
53-1003160-01
Page 28

Creating a sample Python client
2
if response.status == 200:
print()
print("List of fabrics:")
json_response_bytes = response.read()
json_response_string = str(json_response_bytes, encoding='utf8')
list_of_fabrics_dict=json.loads(json_response_string)
print(json.dumps(list_of_fabrics_dict, indent=4))
print("Number of FC fabrics: ", len(list_of_fabrics_dict["fcFabrics"]))
else:
print()
print (response.status, response.reason)
connection.close()
##############################
# Retrieve details of a fabric
##############################
# Get the key of the first fabric in the list
fabric_key = list_of_fabrics_dict["fcFabrics"][0]["key"]
# Send GET requrest
connection.connect()
connection.request('GET',
'http://10.24.41.138/rest/resourcegroups/All/fcfabrics/'+fabric_key,
headers={"WStoken":WStoken,
"Accept":"application/vnd.brocade.networkadvisor+json;version=v1"})
print()
print("--------------------------------------------------------------------")
print("Get fabric '+fabric_key+'details...")
# Get the response
response = connection.getresponse()
# Display the response status
print()
print ("Status= ", response.status)
# If successful (status = 200), display the returned list in JSON format
if response.status == 200:
print()
print("Fabric details:")
json_response_bytes = response.read()
json_response_string = str(json_response_bytes, encoding='utf8')
fabric_details_dict=json.loads(json_response_string)
print(json.dumps(fabric_details_dict, indent=4))
else:
print()
print (response.status, response.reason)
connection.close()
######################################################
# Retrieve list of switches in the context of a fabric
######################################################
# Send GET requrest
14 Brocade Network Advisor REST API Guide
53-1003160-01
Page 29

Creating a sample Python client
connection.connect()
connection.request('GET',
'http://10.24.41.138/rest/resourcegroups/All/fcfabrics/'+fabric_key+'/fcswitc
hes',
headers={"WStoken":WStoken,
"Accept":"application/vnd.brocade.networkadvisor+json;version=v1"})
print()
print("--------------------------------------------------------------------")
print("Get the list of switches under fabric "+fabric_key+" ...")
# Get the response
response = connection.getresponse()
# Display the response status
print()
print ("Status= ", response.status)
# If successful (status = 200), display the returned list in JSON format
if response.status == 200:
print()
print("List of switches:")
json_response_bytes = response.read()
json_response_string = str(json_response_bytes, encoding='utf8')
list_of_fabric_switches_dict=json.loads(json_response_string)
print(json.dumps(list_of_fabric_switches_dict, indent=4))
else:
print()
print (response.status, response.reason)
2
connection.close()
3. Save the file as my_na_client.py.
4. Run the program by entering the following command at the command prompt:
C:\Python33>python my_na_client.py
If successful, you should see output similar to the following:
Sending login request to Network Advisor...
Status= 200
Login successful!
WStoken: RPTZz0z5ayVkvqIuy7quIEbjap8=
----------------------------------------------------------------------------Getting list of all fabrics...
Status= 200
List of fabrics:
{
"fcFabrics": [
{
"seedSwitchWwn": "10:00:00:05:33:A6:B6:17",
"name": "10:00:00:05:33:A6:B6:17",
"secure": false,
Brocade Network Advisor REST API Guide 15
53-1003160-01
Page 30

Creating a sample Python client
2
"principalSwitchWwn": "10:00:00:05:33:A6:B6:17",
"fabricName": "****8G FABRIC FOR REST******",
"seedSwitchIpAddress": "10.24.33.191",
"virtualFabricId": -1,
"contact": null,
"key": "10:00:00:05:33:A6:B6:17",
"adEnvironment": false,
"description": null,
"location": null
},
{
"seedSwitchWwn": "10:00:00:05:1E:A7:1F:EB",
"name": "10:00:00:05:1E:A7:1F:EB",
"secure": false,
"principalSwitchWwn": "10:00:00:05:1E:A7:1F:EB",
"fabricName": "",
"seedSwitchIpAddress": "10.24.33.195",
"virtualFabricId": -1,
"contact": null,
"key": "10:00:00:05:1E:A7:1F:EB",
"adEnvironment": false,
"description": null,
"location": null
},
{
"seedSwitchWwn": "10:00:00:05:1E:DB:1E:1E",
"name": "10:00:00:05:1E:DB:1E:1E",
"secure": false,
"principalSwitchWwn": "10:00:00:05:1E:DB:1E:1E",
"fabricName": "",
"seedSwitchIpAddress": "10.24.33.193",
"virtualFabricId": -1,
"contact": null,
"key": "10:00:00:05:1E:DB:1E:1E",
"adEnvironment": false,
"description": null,
"location": null
}
]
}
Number of FC fabrics: 3
----------------------------------------------------------------------------Get fabric '+fabric_key+'details...
Status= 200
Fabric details:
{
"fcFabrics": [
{
"seedSwitchWwn": "10:00:00:05:33:A6:B6:17",
"name": "10:00:00:05:33:A6:B6:17",
"secure": false,
"principalSwitchWwn": "10:00:00:05:33:A6:B6:17",
"fabricName": "****8G FABRIC FOR REST******",
"seedSwitchIpAddress": "10.24.33.191",
"virtualFabricId": -1,
"contact": null,
"key": "10:00:00:05:33:A6:B6:17",
16 Brocade Network Advisor REST API Guide
53-1003160-01
Page 31

Creating a sample Python client
"adEnvironment": false,
"description": null,
"location": null
}
]
}
----------------------------------------------------------------------------Get the list of switches under fabric 10:00:00:05:33:A6:B6:17...
Status= 200
List of switches:
{
"fcSwitches": [
{
"statusReason": null,
"fcipLicensed": false,
"autoSnmpEnabled": true,
"state": "UNKNOWN",
"persistentDidEnabled": false,
"lfEnabled": false,
"fcipCapable": false,
"fcsRole": "None",
"maxFcipTunnels": -1,
"maxFcipCircuits": -1,
"wwn": "50:00:51:ED:B1:E5:EF:04",
"type": 41,
"fcrCapable": false,
"portBasedRoutingPresent": false,
"cryptoCapable": false,
"fmsMode": false,
"name": "fcr_xd_1_30",
"defaultLogicalSwitch": false,
"fcipCircuitCapable": false,
"baseSwitch": false,
"virtualFabricId": -1,
"adCapable": false,
"key": "50:00:51:ED:B1:E5:EF:04",
"operationalStatus": "UNKNOWN",
"role": "SUBORDINATE",
"domainId": 1,
"inOrderDeliveryCapable": false,
"dynamicLoadSharingCapable": false
},
{
"statusReason": null,
"fcipLicensed": false,
"autoSnmpEnabled": true,
"state": "UNKNOWN",
"persistentDidEnabled": false,
"lfEnabled": false,
"fcipCapable": false,
"fcsRole": "None",
"maxFcipTunnels": -1,
"maxFcipCircuits": -1,
"wwn": "50:00:51:ED:B1:E1:EE:14",
"type": 40,
"fcrCapable": false,
"portBasedRoutingPresent": false,
2
Brocade Network Advisor REST API Guide 17
53-1003160-01
Page 32

Creating a sample Python client
2
"cryptoCapable": false,
"fmsMode": false,
"name": "fcr_fd_160",
"defaultLogicalSwitch": false,
"fcipCircuitCapable": false,
"baseSwitch": false,
"virtualFabricId": -1,
"adCapable": false,
"key": "50:00:51:ED:B1:E1:EE:14",
"operationalStatus": "UNKNOWN",
"role": "SUBORDINATE",
"domainId": 160,
"inOrderDeliveryCapable": false,
"dynamicLoadSharingCapable": false
},
{
"statusReason": null,
"fcipLicensed": false,
"autoSnmpEnabled": true,
"state": "UNKNOWN",
"persistentDidEnabled": false,
"lfEnabled": false,
"fcipCapable": false,
"fcsRole": "None",
"maxFcipTunnels": -1,
"maxFcipCircuits": -1,
"wwn": "50:00:51:ED:B1:E5:EF:06",
"type": 41,
"fcrCapable": false,
"portBasedRoutingPresent": false,
"cryptoCapable": false,
"fmsMode": false,
"name": "fcr_xd_1_30",
"defaultLogicalSwitch": false,
"fcipCircuitCapable": false,
"baseSwitch": false,
"virtualFabricId": -1,
"adCapable": false,
"key": "50:00:51:ED:B1:E5:EF:06",
"operationalStatus": "UNKNOWN",
"role": "SUBORDINATE",
"domainId": 1,
"inOrderDeliveryCapable": false,
"dynamicLoadSharingCapable": false
},
{
"statusReason": "Switch Status is MARGINAL. Contributors:\n* Power
Supply: 1 bad. (MARGINAL).\n* Fan: 1 bad (MARGINAL).",
"fcipLicensed": false,
"autoSnmpEnabled": true,
"state": "ONLINE",
"persistentDidEnabled": false,
"lfEnabled": false,
"fcipCapable": false,
"fcsRole": "None",
"maxFcipTunnels": 0,
"maxFcipCircuits": 0,
"wwn": "10:00:00:14:C9:E5:56:AB",
"type": 133,
"fcrCapable": false,
18 Brocade Network Advisor REST API Guide
53-1003160-01
Page 33

Creating a sample Python client
"portBasedRoutingPresent": false,
"cryptoCapable": false,
"fmsMode": false,
"name": "REST_6520_33_189",
"defaultLogicalSwitch": true,
"fcipCircuitCapable": false,
"baseSwitch": false,
"virtualFabricId": -1,
"adCapable": true,
"key": "10:00:00:14:C9:E5:56:AB",
"operationalStatus": "MARGINAL",
"role": "SUBORDINATE",
"domainId": 2,
"inOrderDeliveryCapable": false,
"dynamicLoadSharingCapable": true
},
{
"statusReason": "Switch Status is HEALTHY.",
"fcipLicensed": false,
"autoSnmpEnabled": true,
"state": "ONLINE",
"persistentDidEnabled": false,
"lfEnabled": false,
"fcipCapable": false,
"fcsRole": "None",
"maxFcipTunnels": 0,
"maxFcipCircuits": 0,
"wwn": "10:00:00:05:33:A6:B6:17",
"type": 118,
"fcrCapable": false,
"portBasedRoutingPresent": false,
"cryptoCapable": false,
"fmsMode": false,
"name": "REST_6505_33_191",
"defaultLogicalSwitch": true,
"fcipCircuitCapable": false,
"baseSwitch": false,
"virtualFabricId": -1,
"adCapable": true,
"key": "10:00:00:05:33:A6:B6:17",
"operationalStatus": "UNKNOWN",
"role": "PRINCIPAL",
"domainId": 191,
"inOrderDeliveryCapable": false,
"dynamicLoadSharingCapable": true
}
]
}
2
Brocade Network Advisor REST API Guide 19
53-1003160-01
Page 34

Creating a sample Python client
2
20 Brocade Network Advisor REST API Guide
53-1003160-01
Page 35

Chapter
Using the Brocade Network Advisor REST API
In this chapter
•Introduction . . . . . . . . . . . . . . . . . . . . . . . . . . . . . . . . . . . . . . . . . . . . . . . . . . . 21
•Logging in and out . . . . . . . . . . . . . . . . . . . . . . . . . . . . . . . . . . . . . . . . . . . . . . 21
•Specifying content type. . . . . . . . . . . . . . . . . . . . . . . . . . . . . . . . . . . . . . . . . . 25
•Versioning (backward compatibility). . . . . . . . . . . . . . . . . . . . . . . . . . . . . . . . 26
•Using the Topology API . . . . . . . . . . . . . . . . . . . . . . . . . . . . . . . . . . . . . . . . . . 27
•Using the SAN Fabric Discovery API . . . . . . . . . . . . . . . . . . . . . . . . . . . . . . . . 27
•Using the Traffic Flow API . . . . . . . . . . . . . . . . . . . . . . . . . . . . . . . . . . . . . . . . 28
•Using the Summary Data API . . . . . . . . . . . . . . . . . . . . . . . . . . . . . . . . . . . . . 28
•Using the Events API . . . . . . . . . . . . . . . . . . . . . . . . . . . . . . . . . . . . . . . . . . . . 29
•Using the Zoning API . . . . . . . . . . . . . . . . . . . . . . . . . . . . . . . . . . . . . . . . . . . . 29
•Using the Historical Performance Data API . . . . . . . . . . . . . . . . . . . . . . . . . . 30
•Fibre Channel Routing. . . . . . . . . . . . . . . . . . . . . . . . . . . . . . . . . . . . . . . . . . . 30
•Handling errors . . . . . . . . . . . . . . . . . . . . . . . . . . . . . . . . . . . . . . . . . . . . . . . . 30
3
Introduction
This chapter describes how to use the Brocade Network Advisor REST API.
Logging in and out
The Network Advisor REST API provides URIs for logging in and out.
Logging in
Use the /login POST URI to log in. This URI returns the BNA Server credentials in a LoginResponse.
<BASE_URI>/login
Login request headers
A valid user name and password are required for login and this is sent through the HTTP request
headers. You must add the headers while forming the HTTP POST request.
Brocade Network Advisor REST API Guide 21
53-1003160-01
Page 36

Logging in and out
3
The following are the header names and values. The password must be passed in as clear text.
TABLE 5 Login request headers
Request header name Request header value
Accept The content type
WSusername The valid Network Advisor user name
WSpassword The password
Login response header
Upon successful authentication, a new client session is created and a token is returned through
the HTTP response header. The token identifies the client’s Network Advisor session and must be
used for all subsequent web service requests. The token expires after 10 minutes of no activity.
TABLE 6 Login response header
Response header name Request header value
WStoken The token
For information about the login response schema, refer to “LoginResponse.”
Sample login request (Java)
The following is sample Java code for establishing a REST API session with Network Advisor. For a
Python example, see “Creating a sample Python client.”
HttpURLConnection con = null;
try {
/**
* Create the HTTP connection object with the URI, method and headers
*/
URL obj = new URL("http://10.24.48.103/rest/login");
con = (HttpURLConnection) obj.openConnection();
con.setRequestMethod("POST");
con.addRequestProperty("WSusername", "Administrator");
con.addRequestProperty("WSpassword", "password");
con.addRequestProperty("Accept",
"application/vnd.brocade.networkadvisor+json;version=v1");
System.out.println("CALLING POST http://10.24.48.103/rest/login");
/**
* Make the HTTP call
*/
int responseCode = con.getResponseCode();
System.out.println("Response code is " + responseCode);
if (HttpURLConnection.HTTP_OK != responseCode) {
PRINT_ERROR(con);
assert false : "REST FAILED for login, responseCode = " + responseCode;
}
String token = con.getHeaderField("WStoken");
if (null != token) {
System.out.println("GOT TOKEN FROM RS RESPONSE = " + token);
PRINT_RESPONSE(con);
22 Brocade Network Advisor REST API Guide
53-1003160-01
Page 37

}
} catch (IOException ie) {
System.out.println(ie.toString());
} finally {
if (null != con) {
con.disconnect();
}
}
Sample JSON response
The following is a sample JSON response to a login request.
CALLING POST http://10.24.41.138/rest/login
Response code is 200
GOT TOKEN FROM RS RESPONSE = Yh8veQHgxR6v6KgNR9Eioeg7168=
{"serverName":"W2K8R2-41-138","serverIp":"10.24.41.138"}
Sample XML response
The following is a sample XML response to a login request.
CALLING POST http://10.24.48.103/rest/login
Response code is 200
GOT TOKEN FROM RS RESPONSE = kPkOm7PX4WempcfP7B8iZrb5RDY=
Logging in and out
3
<?xml version="1.0" encoding="UTF-8" standalone="yes"?><ns2:LoginResponse
xmlns:ns2="http://www.brocade.com/networkadvisor/webservices/v1/authservice/respo
nse"><serverName>DCM-x3650-103</serverName><serverIp>10.24.48.103</serverIp></ns2
:LoginResponse>
Sample error response
The following is a sample error response to a login request.
CALLING POST http://10.24.48.103/rest/login
Response code is 500
<html><head><title>JBoss Web/7.2.0.Final - JBWEB000064: Error
report</title><style><!--H1
{font-family:Tahoma,Arial,sans-serif;color:white;background-color:#525D76;font-si
ze:22px;} H2
{font-family:Tahoma,Arial,sans-serif;color:white;background-color:#525D76;font-si
ze:16px;} H3
{font-family:Tahoma,Arial,sans-serif;color:white;background-color:#525D76;font-si
ze:14px;} BODY
{font-family:Tahoma,Arial,sans-serif;color:black;background-color:white;} B
{font-family:Tahoma,Arial,sans-serif;color:white;background-color:#525D76;} P
{font-family:Tahoma,Arial,sans-serif;background:white;color:black;font-size:12px;
}A {color : black;}A.name {color : black;}HR {color : #525D76;}--></style>
</head><body><h1>JBWEB000065: HTTP Status 500 - RSException [errorCode=4005,
errorMsg=Invalid username or password]</h1><HR size="1"
noshade="noshade"><p><b>JBWEB000309: type</b> JBWEB000066: Exception
report</p><p><b>JBWEB000068: message</b> <u>RSException [errorCode=4005,
errorMsg=Invalid username or password]</u></p><p><b>JBWEB000069: description</b>
<u>JBWEB000145: The server encountered an internal error that prevented it from
fulfilling this request.</u></p><p><b>JBWEB000070: exception</b>
<pre>org.jboss.resteasy.spi.UnhandledException: RSException [errorCode=4005,
errorMsg=Invalid username or password]
Brocade Network Advisor REST API Guide 23
53-1003160-01
Page 38

Logging in and out
3
org.jboss.resteasy.core.SynchronousDispatcher.handleException(SynchronousDispatch
er.java:264)
org.jboss.resteasy.core.SynchronousDispatcher.handleInvokerException(SynchronousD
ispatcher.java:209)
org.jboss.resteasy.core.SynchronousDispatcher.getResponse(SynchronousDispatcher.j
ava:557)
org.jboss.resteasy.core.SynchronousDispatcher.invoke(SynchronousDispatcher.java:5
24)
org.jboss.resteasy.core.SynchronousDispatcher.invoke(SynchronousDispatcher.java:1
26)
org.jboss.resteasy.plugins.server.servlet.ServletContainerDispatcher.service(Serv
letContainerDispatcher.java:208)
org.jboss.resteasy.plugins.server.servlet.HttpServletDispatcher.service(HttpServl
etDispatcher.java:55)
org.jboss.resteasy.plugins.server.servlet.HttpServletDispatcher.service(HttpServl
etDispatcher.java:50)
javax.servlet.http.HttpServlet.service(HttpServlet.java:847)</pre></p><p><b>JBWEB
000071: root cause</b> <pre>RSException [errorCode=4005, errorMsg=Invalid
username or password]
com.brocade.dcm.webservices.server.util.WebServiceCommonUtil.throwException(WebSe
rviceCommonUtil.java:98)
com.brocade.dcm.webservices.server.sessionmgmt.WebSessionManager.validateUsername
Password(WebSessionManager.java:485)
com.brocade.dcm.webservices.server.sessionmgmt.WebSessionManager.createSession(We
bSessionManager.java:169)
com.brocade.dcm.webservices.server.security.LoginRequestInterceptor.preProcess(Lo
ginRequestInterceptor.java:105)
com.brocade.dcm.webservices.server.security.LoginRequestInterceptor$Proxy$_$$_Wel
dClientProxy.preProcess(LoginRequestInterceptor$Proxy$_$$_WeldClientProxy.java)
org.jboss.resteasy.core.ResourceMethod.invokeOnTarget(ResourceMethod.java:247)
org.jboss.resteasy.core.ResourceMethod.invoke(ResourceMethod.java:222)
org.jboss.resteasy.core.ResourceMethod.invoke(ResourceMethod.java:211)
org.jboss.resteasy.core.SynchronousDispatcher.getResponse(SynchronousDispatcher.j
ava:542)
org.jboss.resteasy.core.SynchronousDispatcher.invoke(SynchronousDispatcher.java:5
24)
org.jboss.resteasy.core.SynchronousDispatcher.invoke(SynchronousDispatcher.java:1
26)
org.jboss.resteasy.plugins.server.servlet.ServletContainerDispatcher.service(Serv
letContainerDispatcher.java:208)
org.jboss.resteasy.plugins.server.servlet.HttpServletDispatcher.service(HttpServl
etDispatcher.java:55)
org.jboss.resteasy.plugins.server.servlet.HttpServletDispatcher.service(HttpServl
etDispatcher.java:50)
javax.servlet.http.HttpServlet.service(HttpServlet.java:847)</pre></p><p><b>JBWEB
000072: note</b> <u>JBWEB000073: The full stack trace of the root cause is
available in the JBoss Web/7.2.0.Final logs.</u></p><HR size="1"
noshade="noshade"><h3>JBoss Web/7.2.0.Final</h3></body></html>
Logging out
Use the /logout POST URI to log out. Successful completion of the request results in the deletion of
the client session. The logout request does not require any request payload except for the session
token, which must be passed in an HTTP header parameter. Because there is no return value to
this request, an HTTP status code of 204 (No Content) is returned upon success.
<BASE_URI>/logout
24 Brocade Network Advisor REST API Guide
53-1003160-01
Page 39

Specifying content type
3
Logout request headers
A valid token is required for logout and this is sent through the HTTP request header. You must add
the header while forming the HTTP POST request.
TABLE 7 Logout request headers
Request header name Request header value
WStoken The token obtained from login
Sample logout request (Python)
The following is an example of an HTTP POST request for logout sent using Python.
HttpClient hc = new HttpClient();
method = new PostMethod("http://10.24.48.103/rest/logout");
method.addRequestHeader("WStoken", token);
Sample logout request (Java)
The following is sample Java code for terminating a REST API session with Network Advisor.
HttpURLConnection con = null;
try {
/**
* Create the HTTP connection object with the URI, method and headers
*/
URL obj = new URL("http://10.24.48.103/rest/logout");
con = (HttpURLConnection) obj.openConnection();
con.setRequestMethod("POST");
con.addRequestProperty("WStoken", "wppCy/NGdC4o5gGFJjXRMv7blhc=");
System.out.println("CALLING POST http://10.24.48.103/rest/logout");
/**
* Make the HTTP call
*/
int responseCode = con.getResponseCode();
System.out.println("Response code is " + responseCode);
if (HttpURLConnection.HTTP_NO_CONTENT != responseCode) {
PRINT_ERROR(con);
assert false : "REST FAILED for logout, responseCode = " + responseCode;
}
} catch (IOException ie) {
System.out.println(ie.toString());
} finally {
if (null != con) {
con.disconnect();
}
}
Specifying content type
All Brocade Network Advisor REST API requests that return data support both XML and JSON
formats. Depending on the content type you request, the proper data format is returned.
Brocade Network Advisor REST API Guide 25
53-1003160-01
Page 40

Versioning (backward compatibility)
3
Accept HTTP request header
In the case of GET requests, your client must specify the format of the data of the responses. You
do this by providing the HTTP header information. The content type for the response data is
specified through the HTTP request header named “Accept”.
The value for the content type has the following format:
MEDIA type/MIME subtype;Version Identifier
For example:
application/vnd.brocade.networkadvisor+xml;version=v1
application/vnd.brocade.networkadvisor+json;version=v1
In this release, the version is v1. For information about the version identifier, refer to “Versioning
(backward compatibility).”
When forming an HTTP GET request, you must specify the request header. The following header
values are supported:
TABLE 8 GET request header values (Accept header)
Request header name Request header value Response data format
Accept application/vnd.brocade.networkadvisor+xml;version=v1 XML
Accept application/vnd.brocade.networkadvisor+json;version=v1 JSON
If you do not provide a request header when calling URIs, the response data is returned in XML
format.
Content-type HTTP request header
In the case of POST requests, in addition to specifying the response data format, as described in
“Accept HTTP request header,” you must also specify the format of the data you are sending
through the input request payload. You do this by providing the HTTP Content-type header.
TABLE 9 POST request header values (Content-type header)
Request header name Request header value Request data format
Content-type application/vnd.brocade.networkadvisor+xml;version=v1 XML
Content-type application/vnd.brocade.networkadvisor+json;version=v1 JSON
Versioning (backward compatibility)
The Network Advisor REST API provides backward compatibility. However, not all API changes allow
for backward compatibility.
26 Brocade Network Advisor REST API Guide
53-1003160-01
Page 41

Using the Topology API
The Topology API provides GET URIs for retrieving information about the network resource shown in
the following figure.
Using the Topology API
3
FIGURE 1 Topology API URI hierarchy
Using the SAN Fabric Discovery API
The SAN Fabric Discovery API provides POST URIs for discovering, updating, and deleting SAN
fabrics.
Notes about the SAN Fabric Discovery API URIs
• All SAN Fabric Discovery API URIs are POST requests.
• You can discover all types of SAN fabrics supported by the Brocade Network Advisor.
• You can update the switch credentials and the SNMP configuration used to discover the fabric
after the fabric is discovered.
• You can delete a fabric based on the fabric key.
• In the event that discovery of one of the virtual fabrics fails, the response payload contains the
Fabric Identifier (FID) of the fabric that failed to get discovered.
• All the contexts are discovered by default in the VF setup. You cannot select the contexts to be
discovered, but you can delete the unwanted contexts through the “deletefabric” URI.
• The value for snmpRetries should be from 1 through 5. The default is 3.
• The value for snmpTimeout should be from 3 through 999. The default is 5.
• In the event that SNMP registration fails, the discovery of the fabric still succeeds. However,
you can retrieve the events to check for any specific SNMP registration failure messages.
Brocade Network Advisor REST API Guide 27
53-1003160-01
Page 42

Using the Traffic Flow API
3
• In the case of SNMP V3, if the privacy protocol is specified, the authorization protocol is
required; it cannot be null.
• The default user name is “admin”.
• The default password is “password”.
Limitations for the SAN Fabric Discovery API
• There is no support for monitoring or unmonitoring a discovered fabric.
• There is no provision to change the seed switch.
• There is no support for discovering M model switches.
Using the Traffic Flow API
The Traffic Flow API provides URIs for retrieving traffic flow information. Basically, in the context of a
specific FC Switch, you can get the flow definitions and the flows.
The flow definition and flow supports the minimum required properties needed to correlate with
the traffic flow summary data.
Using the Summary Data API
In support of Fabric Vision, Network Advisor calculates and publishes various kinds of summary
data. You can retrieve these summaries through the REST API. They can be obtained in the context
of a resource group, fabric, switch, or port.
The Summary Data API supports the URIs shown in the following figure.
FIGURE 2 Summary Data API URI hierarchy
28 Brocade Network Advisor REST API Guide
53-1003160-01
Page 43

Using the Events API
The Events API provides URIs that you can use to retrieve Network Advisor events. The URIs provide
query parameters that allow you to filter the results.
For example, to retrieve the first 100 special trap events, you could use the following URI:
<BASE_URI>/resourcegroups/All/events?startindex=0&count=100&specialEvent=true&ori
gin=trap
In this example, you instruct the server to send 100 events that are categorized as specialEvents
and that originated as TARP events.
Using the Zoning API
The Zoning API provides GET and POST URIs for zone administration.
Zoning URIs
The HTTP request header “Accept” must be specified to indicate the content type of the response
payload. For more information, refer to “Specifying content type.”
Using the Events API
3
The HTTP request header “WSToken” must be specified with the token received from login. For
more information, refer to “Logging in and out.”
Zoning operations
When performing POST zoning operations for creating, deleting, and updating zoning objects, note
the following:
• All POST zoning operations are valid only within the context of a zoning transaction.
• The appropriate request instance must be formed and sent through the POST request.
• All operations within the context of a zoning transaction are local to Network Advisor. Only on
the commit of a zoning transaction, the data is pushed as a big blob to the switch.
• Multiple zoning objects can be created, deleted, or updated in one call.
• Unlike on the switch, Network Advisor does support the creation of empty zoning objects.
Before data can be committed to the switch, the zoning objects must contain data.
• Operations such as CreateZoningObject map to multiple operations within Network Advisor.
Failure of such an operation could internally be partial success. As a best practice, check the
contents of the zoning database before proceeding or abort the transaction and proceed with a
new transaction.
• Because in the case of a commit, there could be multiple reasons for failure, the REST API
returns the exact same error messages returned by the switch in response to commit failures.
• For LSAN zoning, zone names must start with LSAN_. And the members must be identified by
WWNs only.
• Empty LSAN zones cannot be created.
• LSAN zoning is supported only in the context of a backbone fabric.
Brocade Network Advisor REST API Guide 29
53-1003160-01
Page 44

Using the Historical Performance Data API
3
Using the Historical Performance Data API
You can use the URIs provided by the Historical Performance Data API to retrieve historical
performance data for ports, switches, and flows based on a measure.
Fibre Channel Routing
This section describes important aspects of Fibre Channel Routing (FCR) setup.
All the URIs related to fabrics, switches, ports, end devices, connections, and connected ports are
applicable.
The Backbone and Edge fabrics are returned in the fabric URIs (refer to “Fabrics”).
The FC switches including the Front and Xlate phantom switches are returned in the switch URIs
(refer to “FC Switch”). The type parameter in FcSwitch contains the values 40 and 41 for the Front
and Xlate phantoms, respectively.
The FC ports, including the ports on the phantom switches, are returned in the port URIs (refer to
“FCPorts”). Front phantom switches are created in the Edge fabric for every EX-port connection to
the Backbone. Xlate phantom switches are created in the Edge fabric for every other Edge fabric
from which an end device is imported.
Within each Edge fabric, the Front phantom is connected to an Xlate phantom and a real switch
(one connected to the BB via the EX-port) in the fabric. The Front phantom port, which connects to
the real switch in the Edge fabric, has a WWN that is the same as the EX-port in the Backbone
fabric. So, in order to make the Front phantom port key unique, it is prefixed with FF.
Similarly the Xlate phantom port keys are prefixed with XF. These connections are E-port to E-port
ISLs and are returned in the connection URIs (refer to “ISL Connections”). The connected switch
ports to the Front phantom port can also be retrieved by the connected switch port URIs (refer to
“FCPorts”).
The imported devices in an Edge fabric are returned in the end device URIs (refer to “End devices”).
These imported devices are connected to the Xlate phantom via end device connections (refer to
“ISL Connections”).
The connected end device ports to the Xlate phantom port can also be retrieved by the end device
port URIs (refer to “FCPorts”).
The physical connection between a switch in the Backbone and a switch in the Edge is an
Inter-Fabric link and this is returned via the IFL URIs (refer to “ISL Connections”). These IFLS are
visible only when all the Backbone and Edge fabrics are discovered. The complete FCR topology
can only be returned when all Backbone and Edge fabrics are discovered.
Handling errors
The exception for all REST errors is RSException. This exception contains an integer error code and
a string error message. The exception is a string of the following format:
RSException [errorCode=<int>, errorMsg=<string>]
REST operations are HTTP requests, so the execution of an operation returns an HTTP status code.
30 Brocade Network Advisor REST API Guide
53-1003160-01
Page 45

Handling errors
3
For successful operations the status code is usually 200 (OK) or 204 (No Content). In the case of
an error, depending on the reason for failure, any of the HTTP status codes may be returned.
However, in the case of an API error, the HTTP status code is 500 (Internal Server Error). More
details on the server error can be obtained from the RSException embedded in the HTTP response.
Tab le 10 describes the RSException error codes.
TABLE 10 Error codes
Error code Error message
1000 Interval server error
1001 Invalid filter type
1002 Invalid filter operation
1003 Invalid filter value
1004 Filter value is null or empty
1005 Invalid key property format
1006 Key property is null or empty
1007 Key property number format exception
1008 Mismatch in number of elements in filter properties
1009 Input request object is null
1010 Invalid request object
1011 Filter value number format exception
1012 Exception while getting information from database
1013 Key parameter is null or empty
1014 Adapter error while marshalling bound type to value type
1015 Adapter error while unmarshalling value type to bound type
2000 Fabric not found
2001 Switch not found
2002 Resource group not found
2003 Port not found
2004 Blade not found
2005 End device not found
2006 Connection not found
2007 Node not found
2008 End device connection not found
2009 Host not found
2010 HBA not found
2011 Access Gateway not found
2012 Flow Definition not found
2013 Flow not found
3001 Invalid zone name prefix
3002 Initiator is null or empty
Brocade Network Advisor REST API Guide 31
53-1003160-01
Page 46

Handling errors
3
TABLE 10 Error codes (Continued)
Error code Error message
3003 Target is null or empty
3004 Initiator is an invalid wwn
3005 Target is an invalid wwn
3006 Only inactive zoneset can be activated
3007 Only active zoneset can be deactivated
3008 Invalid lsan zone name
3009 Zoning object name is null or empty
3010 Update action is invalid
3011 EdgeFabricWwns is null or empty
3012 Cannot create empty lsan zone
3013 Operation supported on backbone fabric only.
10003 Common DCFM error
16001 Zone does not exist
16002 Zoneset does not exist
16003 Zonealias does not exist
16004 Member does not exist
16101 Unknown error
16102 Unknown interop mode
16103 Transaction does not exist
16104 Not the owner of the transaction
16105 Password encryption error
16106 Session authentication error
16107 Hostname error
16108 Transaction already exists
16109 Transaction commit error
16110 Empty zoning objects
16111 Save zone database to switch failed
16112 Save imported zone database failed
16113 Zoning object already exists
16114 Parent does not exist
16115 Not supported in zone transaction
16116 Null zone database
16117 Not supported
16118 Transaction start failed
16119 Transaction abort failed
16120 Activate failed
32 Brocade Network Advisor REST API Guide
53-1003160-01
Page 47

TABLE 10 Error codes (Continued)
Error code Error message
16121 Deactivate failed
16122 Clear zone database failed
16123 Unable to retrieve zone database
16124 Online member does not exist
16125 Invalid backbone fabric
16126 Activation failed
16301 Database error
20301 Dao exception while getting managed BB fabrics
20101 Unknown exception while getting managed BB fabrics
4001 Token in header is null or empty
4002 User name in header is null or empty
4003 Password in header is null or empty
4004 Failed to get token
4005 Invalid user name or password
4006 Failed to parse soap header
4007 Failed to create session
4008 Failed to add token outbound
4009 Invalid token in header
4010 Unknown host exception
4011 Client limit exceeded
5000 Action not supported
5001 Event not found
6000 Switch IP address is null or empty
6001 Snmp version is invalid. Valid values are v3 or v1.
6002 Snmp timeout is invalid. Valid values are 3 to 999.
6003 Snmp retries is invalid. Valid values are 1 to 5.
6004 Operation supported only under resource group All.
6005 Authentication protocol is invalid.
6006 Privacy protocol is invalid.
6007 Privacy password is null or empty.
6008 Authentication password is null or empty.
6009 Failed to delegate request.
6010 Invalid queue for this operation.
6011 Error in queue creation.
6012 Error in encrypting switch password.
6013 Operation not supported on this switch.
Handling errors
3
Brocade Network Advisor REST API Guide 33
53-1003160-01
Page 48

Handling errors
3
TABLE 10 Error codes (Continued)
Error code Error message
6014 Switch user name is null or empty.
6015 Switch password is null or empty.
6016 Set switch credentials failed.
6017 Set switch snmp credentials failed.
6018 Unsupported edition.
6019 All virtual fabrics already discovered.
6020 Discovery failed.
6021 DNS error.
6022 Fabric unstable.
6023 Discovery redundant.
6024 Seed switch not in fabric.
6025 Duplicate fabric name.
6026 Unsupported switch mode.
6027 IO error.
6028 Malformed URL.
6029 Internal error.
6030 Seed switch authentication failed.
6031 Password decryption failed
6032 Seed switch HTTP not ok.
6033 Seed switch HTTPS not ok.
6034 Seed switch not fcs primary.
6035 Unsupported firmware version.
6036 Seed switch host name verification failed.
6037 AD detected.
6038 Fabric name exists.
6039 Unsupported vendor.
6040 Undiscovered mmodel switch.
6041 Seed switch SSL certificate validation failed.
6042 Invalid firmware.
6043 Fabric count limit reached.
6044 Eos fabric count limit reached.
6045 Syslog registration warning
6046 No chassis access
6047 Insufficient privilege.
6048 Virtual fabric list not visible.
6049 Invalid snmp version.
34 Brocade Network Advisor REST API Guide
53-1003160-01
Page 49

TABLE 10 Error codes (Continued)
Error code Error message
6050 Session limit reached.
6051 Account locked.
6052 Account disabled.
6053 Connection timeout.
6054 FCoE not supported.
6055 Switch unmanageable.
6056 Seed switch not supported.
6057 Snmp survey failed.
6058 Mixed fabric.
6059 M model not supported.
6060 Invalid product type.
6061 Switch initializing.
6062 Invalid network address.
6063 No available trap registrations.
6064 Product deleted.
6065 Protocol error.
6066 Protocol mismatch.
6067 Switch timeout.
6068 Too many sessions.
6069 Trap registration failed.
6070 Trap registration lost.
6071 Link never connected.
6072 Connection lost.
6073 Link disabled.
6074 Switch unmanageable, unknown firmware.
6075 Request failed.
6076 Not capable.
6077 User does not have proper AOR to discover fabrics.
6078 Privacy protocol setting requires Authorization protocol setting.
7000 Cannot create user defined network scope.
8000 Ports exceeded limit.
8001 Switches exceeded limit.
8002 Flows exceeded limit.
8003 End date is null or empty. Please provide enddate for startdate.
8004 Start date is null or empty. Please provide startdate for enddate.
8005 Duration exceeds limit for given granularity.
Handling errors
3
Brocade Network Advisor REST API Guide 35
53-1003160-01
Page 50

Handling errors
NOTE
3
TABLE 10 Error codes (Continued)
Error code Error message
8006 Range from start date to end date exceeds limit for given granularity.
8007 Start date is beyond end date.
99010 Opaque key value not found
URI error return behavior
This section explains the error a user can expect when a URI fails. Parsing of the URI follows a
pattern and returns an error in the following order.
1. The server checks the URI, including the path parameters, for correctness. If the URI is not
valid (for example, a word in the URI is misspelled), the resource cannot be found and you get
back an HTTP status code of 404 (Not Found).
2. If the URI is correct, the server checks the query parameter values for correctness. If the query
parameters are invalid, the REST operation fails with HTTP status code of 500 (Internal Server
Error) and an RSException. The value of the error code depends on the exact error.
3. If the previous two steps succeed, which means that the URI is syntactically correct, the server
parses the URI from left to right. If any resource corresponding to the path parameters is not
present, then the appropriate “Does Not Exist” or “Not Found” error is reported. For example:
<BASE-URI>/resourcegroups/{rgkey}/fcswitches/{fcskey}
In the example URI, if the resource group specified by rgkey does not exist, you receive the
appropriate error code. If rgkey is valid, then the server checks whether fcskey exists. If not, the
appropriate error code is generated.
4. The server returns “Not Found” errors if you are looking for a specific object that cannot be
found.
5. In the case of a collection like fcswitches, the response is either a populated or empty list. The
return of an empty list indicates that there are no instances within the requested collection.
6. If you are using a filter like “/fcswitches?property1=<value>,” and if there is no switch in the
fabric with that property, an empty response is returned.
Filtering is not the same as using a key. Filters let you sift out a smaller list from a larger one.
The smaller list could be an empty list.
The following is an example of an exception generated due to a REST operation failure:
REST FAILED WITH HTTPSTATUS = 500
RSException [errorCode=2001, errorMsg=Switch not found]
36 Brocade Network Advisor REST API Guide
53-1003160-01
Page 51

Chapter
NOTE
Use Cases
In this chapter
Introduction
This chapter discusses common use cases for the Network Advisor REST API.
4
•Introduction . . . . . . . . . . . . . . . . . . . . . . . . . . . . . . . . . . . . . . . . . . . . . . . . . . . 37
•Zoning. . . . . . . . . . . . . . . . . . . . . . . . . . . . . . . . . . . . . . . . . . . . . . . . . . . . . . . . 37
•Getting Traffic Flow Performance Data . . . . . . . . . . . . . . . . . . . . . . . . . . . . . 40
•Getting the Top N CRC errors port summary . . . . . . . . . . . . . . . . . . . . . . . . . 44
•SAN fabric discovery . . . . . . . . . . . . . . . . . . . . . . . . . . . . . . . . . . . . . . . . . . . . 44
•Binding the schema. . . . . . . . . . . . . . . . . . . . . . . . . . . . . . . . . . . . . . . . . . . . . 48
Zoning
Zoning is the means by which administrators partition their SAN into logical groups of devices that
can access each other.
When zoning a SAN, it is best to implement 1-to-1 zoning, where each zone contains a single
initiator and a single target. Single-initiator zoning has the advantage of eliminating host-to-host
visibility, which results in less RSCN traffic.
You can use the REST API to carry out single-initiator to single- or multiple-target zoning using the
attach/detach URIs.
To attach a single initiator with one or more targets, perform the following steps.
1. Establish a REST session with Network Advisor (refer to “Logging in”).
The network consisting of the initiator and targets is assumed to be discovered in Network
Advisor. If not, you can use the Network Advisor client or the Network Advisor REST API to
discover the fabrics of interest (refer to “SAN fabric discovery”).
2. Create the InitiatorTargetsRequest.xml file with the payload information consisting of the
initiator and target WWNs and other properties defined in the REST schema of the
InitiatorTargetsRequest request object (refer to the “InitiatorTargetsRequest”).
The InitiatorTargetsRequest REST schema is published in the directory
<INSTALL-DIR>/conf/rest-schema, where <INSTALL-DIR> is the Network Advisor installation
directory.
Brocade Network Advisor REST API Guide 37
53-1003160-01
Page 52

4
Zoning
3. Perform the attach operation by calling the following POST URI.
<BASE_URI>/resourcegroups/All/fcfabrics/fcfkey/attach
4. To detach the initiator from the same targets, the payload is the same, but the POST URI is
different.
<BASE_URI>/resourcegroups/All/fcfabrics/fcfkey/detach
Sample request payload
The following is an example request payload.
<tns:InitiatorTargetsRequest
xmlns:tns="http://www.brocade.com/networkadvisor/webservices/v1/zoneservice/r
equest">
<lsanZoning>false</lsanZoning>
<initiator>10:00:00:05:1E:53:0B:93</initiator>
<targets>20:01:00:11:0D:C6:01:01</targets>
<targets>20:06:00:11:0D:C6:01:01</targets>
<activate>true</activate>
</tns:InitiatorTargetsRequest>
Sample Java code for performing the attach operation
The following is the sample Java code for performing the attach operation. This sample code
assumes that some tool has been used to generate the required code for the requests (refer to
“Binding the schema”).
HttpURLConnection con = null;
try {
URL obj = new
URL("http://10.24.48.103/rest/resourcegroups/All/fcfabrics/10:00:00:27:F8:42:
B4:0D/attach");
con = (HttpURLConnection) obj.openConnection();
con.setRequestMethod("POST");
con.addRequestProperty("WStoken", "wppCy/NGdC4o5gGFJjXRMv7blhc=");
con.addRequestProperty("Accept",
"application/vnd.brocade.networkadvisor+json;version=v1");
con.addRequestProperty("Content-type",
"application/vnd.brocade.networkadvisor+xml;version=v1");
JAXBContext jaxbContext =
JAXBContext.newInstance(InitiatorTargetsRequest.class);
Unmarshaller u = jaxbContext.createUnmarshaller();
Object element = u.unmarshal(new File("./InitiatorTargetsRequest.xml"));
Marshaller m = jaxbContext.createMarshaller();
m.setProperty(Marshaller.JAXB_FORMATTED_OUTPUT, true);
m.marshal(element, con.getOutputStream());
System.out.println("CALLING POST
http://10.24.48.103/rest/resourcegroups/All/fcfabrics/10:00:00:27:F8:42:B4:0D
/attach");
int responseCode = con.getResponseCode();
System.out.println("REQUEST HTTPSTATUS = " + responseCode);
if (responseCode != HttpURLConnection.HTTP_OK
&& responseCode != HttpURLConnection.HTTP_NO_CONTENT
&& responseCode != HttpURLConnection.HTTP_PARTIAL
&& responseCode != HttpURLConnection.HTTP_ACCEPTED) {
38 Brocade Network Advisor REST API Guide
53-1003160-01
Page 53

Zoning
PRINT_ERROR(con);
assert false : "Fabric Discovery FAILED, responseCode = " +
responseCode;
}
PRINT_RESPONSE(con);
} catch (IOException ie) {
System.out.println(ie.toString());
} finally {
if (null != con) {
con.disconnect();
}
}
Sample JSON responses
The following are sample JSON responses showing zone databases before and after the attach
operation.
CALLING POST http://10.24.48.103/rest/login
REQUEST HTTPSTATUS = 200
GOT TOKEN FROM RS RESPONSE = 5ryMd4/SBrWX9kDqH1AhLfPdFz4=
{"serverName":"DCM-x3650-103","serverIp":"10.24.48.103"}
4
CALLING GET http://10.24.48.103/rest/resourcegroups/All/fcfabrics
REQUEST HTTPSTATUS = 200
{"fcFabrics":[{"key":"10:00:00:27:F8:42:B4:0D","seedSwitchWwn":"10:00:00:27:F
8:42:B4:0D","name":"10:00:00:27:F8:42:B4:0D","secure":false,"adEnvironment":f
alse,"contact":null,"location":null,"description":null,"principalSwitchWwn":"
10:00:00:27:F8:42:B4:0D","fabricName":"","virtualFabricId":128,"seedSwitchIpA
ddress":"10.24.48.191"}]}
CALLING GET
http://10.24.48.103/rest/resourcegroups/All/fcfabrics/10:00:00:27:F8:42:B4:0D
/zonedbs
REQUEST HTTPSTATUS = 200
{"zonedbs":[{"key":"10:00:00:27:F8:42:B4:0D-false","active":false,"checksum":
4043007525,"zones":[],"zonealiases":[],"zonesets":[]},{"key":"10:00:00:27:F8:
42:B4:0D-true","active":true,"checksum":1895126470,"zones":[],"zonealiases":n
ull,"zonesets":[]}]}
CALLING POST
http://10.24.48.103/rest/resourcegroups/All/fcfabrics/10:00:00:27:F8:42:B4:0D
/attach
MARSHALLED request
REQUEST HTTPSTATUS = 204
CALLING GET
http://10.24.48.103/rest/resourcegroups/All/fcfabrics/10:00:00:27:F8:42:B4:0D
/zonedbs
REQUEST HTTPSTATUS = 200
{"zonedbs":[{"key":"10:00:00:27:F8:42:B4:0D-false","active":false,"checksum":
3900215559,"zones":[{"key":"NARestZone_100000051E530B93-false","name":"NARest
Zone_100000051E530B93","type":"STANDARD","active":false,"aliasNames":[],"memb
erNames":["10:00:00:05:1E:53:0B:93","20:01:00:11:0D:C6:01:01","20:06:00:11:0D
:C6:01:01"]}],"zonealiases":[],"zonesets":[{"key":"NARestZoneSet-false","name
":"NARestZoneSet","active":false,"zoneNames":["NARestZone_100000051E530B93"]}
]},{"key":"10:00:00:27:F8:42:B4:0D-true","active":true,"checksum":1349809297,
"zones":[{"key":"NARestZone_100000051E530B93-true","name":"NARestZone_1000000
Brocade Network Advisor REST API Guide 39
53-1003160-01
Page 54

Getting Traffic Flow Performance Data
NOTE
4
51E530B93","type":"STANDARD","active":true,"aliasNames":null,"memberNames":["
10:00:00:05:1E:53:0B:93","20:01:00:11:0D:C6:01:01","20:06:00:11:0D:C6:01:01"]
}],"zonealiases":null,"zonesets":[{"key":"NARestZoneSet-true","name":"NARestZ
oneSet","active":true,"zoneNames":["NARestZone_100000051E530B93"]}]}]}
CALLING POST http://10.24.48.103/rest/logout
REQUEST HTTPSTATUS = 204
The text in bold shows that a zone with the requested initiator and targets has been created
and activated.
Getting Traffic Flow Performance Data
Network Advisor collects and persists performance data for the various SCSI and
Frame measures related to traffic flows. You can use the Network Advisor REST
API to retrieve this historical performance data.
To collect performance data for traffic flows, perform the following steps.
1. Establish a REST API session with Network Advisor (refer to “Logging in”).
The network consisting of the initiator and targets is assumed to be discovered in Network
Advisor. If not, you can use the Network Advisor client or the Network Advisor REST API to
discover the fabrics of interest (refer to “SAN fabric discovery”).
2. Set up the monitor flows between the initiator and target ports using the Network Advisor client
flow dialogs.
For more information about setting up monitor flows, refer to the Network Advisor
documentation.
After you create the flow definitions for the initiator and target, Network Advisor starts
collecting the performance data for the flows.
3. Use the following GET URI and pseudo code for retrieving flow information.
The following is the URI.
<BASE_URI>/resourcegroups/{rgkey}/fcswitches/{fcskey}/flows
Sample Java code for retrieving flow information
The following is sample Java code for retrieving flow information.
HttpURLConnection con = null;
try {
/**
* Create the HTTP connection object with the URI, method and headers
*/
URL obj = new
URL("http://10.24.48.103/rest/resourcegroups/All/fcswitches/10:00:00:05:33:13:78:
7E/flows");
con = (HttpURLConnection) obj.openConnection();
con.setRequestMethod("GET");
con.addRequestProperty("WStoken", "wppCy/NGdC4o5gGFJjXRMv7blhc=");
40 Brocade Network Advisor REST API Guide
53-1003160-01
Page 55

Getting Traffic Flow Performance Data
System.out.println("CALLING GET
http://10.24.48.103/rest/resourcegroups/All/fcswitches/10:00:00:05:1E:40:40:00/fl
ows");
/**
* Make the HTTP call
*/
int responseCode = con.getResponseCode();
System.out.println("Response code is " + responseCode);
if (HttpURLConnection.HTTP_SUCCESS != responseCode) {
PRINT_ERROR(con);
assert false : "REST FAILED, responseCode = " + responseCode;
}
} catch (IOException ie) {
System.out.println(ie.toString());
} finally {
if (null != con) {
con.disconnect();
}
}
4
Sample JSON response
The following is the JSON response.
/**
* Getting the list of flows on a specific switch
*/
CALLING GET
http://10.24.48.103/rest/resourcegroups/All/fcswitches/10:00:00:05:33:13:78:7E/fl
ows
REQUEST HTTPSTATUS = 200
{"flows":[{"key":"fldbid-7","flowDefinitionName":"web_server_flow","featureType":
"MONITOR","srcDevicePorts":["031900"],"destDevicePorts":["011a00"],"srcSwitchPort
":"0/25","destSwitchPort":"","bidirectional":false,"sfid":"","dfid":"","lunIds":[
],"frameSize":0,"framePattern":"","subFlowMd5hash":"","mirrorPort":""},{"key":"fl
dbid-11","flowDefinitionName":"traffic_flow","featureType":"MONITOR","srcDevicePo
rts":["aa01e2"],"destDevicePorts":["031900"],"srcSwitchPort":"","destSwitchPort":
"0/25","bidirectional":false,"sfid":"","dfid":"","lunIds":[],"frameSize":0,"frame
Pattern":"","subFlowMd5hash":"","mirrorPort":""},{"key":"fldbid-8","flowDefinitio
nName":"traffic_flow","featureType":"MONITOR","srcDevicePorts":["aa01e4"],"destDe
vicePorts":["031900"],"srcSwitchPort":"","destSwitchPort":"0/25","bidirectional":
false,"sfid":"","dfid":"","lunIds":[],"frameSize":0,"framePattern":"","subFlowMd5
hash":"","mirrorPort":""},{"key":"fldbid-9","flowDefinitionName":"traffic_flow","
featureType":"MONITOR","srcDevicePorts":["aa01e8"],"destDevicePorts":["031900"],"
srcSwitchPort":"","destSwitchPort":"0/25","bidirectional":false,"sfid":"","dfid":
"","lunIds":[],"frameSize":0,"framePattern":"","subFlowMd5hash":"","mirrorPort":"
"},{"key":"fldbid-12","flowDefinitionName":"traffic_flow","featureType":"MONITOR"
,"srcDevicePorts":["011a00"],"destDevicePorts":["031900"],"srcSwitchPort":"","des
tSwitchPort":"0/25","bidirectional":false,"sfid":"","dfid":"","lunIds":[],"frameS
ize":0,"framePattern":"","subFlowMd5hash":"","mirrorPort":""},{"key":"fldbid-13",
"flowDefinitionName":"traffic_flow","featureType":"MONITOR","srcDevicePorts":["01
1b00"],"destDevicePorts":["031900"],"srcSwitchPort":"","destSwitchPort":"0/25","b
idirectional":false,"sfid":"","dfid":"","lunIds":[],"frameSize":0,"framePattern":
"","subFlowMd5hash":"","mirrorPort":""},{"key":"fldbid-15","flowDefinitionName":"
traffic_flow","featureType":"MONITOR","srcDevicePorts":["fffcaa"],"destDevicePort
s":["031900"],"srcSwitchPort":"","destSwitchPort":"0/25","bidirectional":false,"s
fid":"","dfid":"","lunIds":[],"frameSize":0,"framePattern":"","subFlowMd5hash":""
Brocade Network Advisor REST API Guide 41
53-1003160-01
Page 56

Getting Traffic Flow Performance Data
4
,"mirrorPort":""},{"key":"fldbid-10","flowDefinitionName":"traffic_flow","feature
Type":"MONITOR","srcDevicePorts":["aa01ef"],"destDevicePorts":["031900"],"srcSwit
chPort":"","destSwitchPort":"0/25","bidirectional":false,"sfid":"","dfid":"","lun
Ids":[],"frameSize":0,"framePattern":"","subFlowMd5hash":"","mirrorPort":""},{"ke
y":"fldbid-16","flowDefinitionName":"traffic_flow","featureType":"MONITOR","srcDe
vicePorts":["032b01"],"destDevicePorts":["031900"],"srcSwitchPort":"","destSwitch
Port":"0/25","bidirectional":false,"sfid":"","dfid":"","lunIds":[],"frameSize":0,
"framePattern":"","subFlowMd5hash":"","mirrorPort":""},{"key":"fldbid-17","flowDe
finitionName":"traffic_flow","featureType":"MONITOR","srcDevicePorts":["010500"],
"destDevicePorts":["031900"],"srcSwitchPort":"","destSwitchPort":"0/25","bidirect
ional":false,"sfid":"","dfid":"","lunIds":[],"frameSize":0,"framePattern":"","sub
FlowMd5hash":"","mirrorPort":""},{"key":"fldbid-14","flowDefinitionName":"traffic
_flow","featureType":"MONITOR","srcDevicePorts":["*"],"destDevicePorts":["031900"
],"srcSwitchPort":"","destSwitchPort":"0/25","bidirectional":false,"sfid":"","dfi
d":"","lunIds":[],"frameSize":0,"framePattern":"","subFlowMd5hash":"","mirrorPort
":""}]}
Retrieving performance data for the Transmit Frame Rate measure
Depending on the desired measure, you can choose the appropriate URI to get the historical
performance data for the traffic flows within the scope of the switch. If Transmit Frame Rate is the
measure of interest, the following GET URI returns the performance data for this measure.
<BASE_URI>/resourcegroups/{rgkey}/fcswitches/{fcskey}/timeseriestxframerate?granularity=<val
ue>&startdate=<value>&enddate=<value>
Sample Java code
The following is sample java code for retrieving performance data for the Transmit Frame Rate
measure.
HttpURLConnection con = null;
try {
/**
* Create the HTTP connection object with the URI, method and headers
*/
URL obj = new
URL("http://10.24.48.103/rest/resourcegroups/All/fcswitches/10:00:00:05:33:13:78:
7E/timeseriestxframerate?startdate=1402012800000&enddate=1402023600000&granularit
y=GRANULARITY_30MIN");
con = (HttpURLConnection) obj.openConnection();
con.setRequestMethod("GET");
con.addRequestProperty("WStoken", "wppCy/NGdC4o5gGFJjXRMv7blhc=");
System.out.println("CALLING GET
http://10.24.48.103/rest/resourcegroups/All/fcswitches/10:00:00:05:33:13:78:7E/ti
meseriestxframerate?startdate=1402012800000&enddate=1402023600000&granularity=GRA
NULARITY_30MIN");
/**
* Make the HTTP call
*/
int responseCode = con.getResponseCode();
System.out.println("Response code is " + responseCode);
if (HttpURLConnection.HTTP_SUCCESS != responseCode) {
PRINT_ERROR(con);
assert false : "REST FAILED, responseCode = " + responseCode;
}
42 Brocade Network Advisor REST API Guide
53-1003160-01
Page 57

Getting Traffic Flow Performance Data
} catch (IOException ie) {
System.out.println(ie.toString());
} finally {
if (null != con) {
con.disconnect();
}
}
4
Sample JSON response
The following is the JSON response for retrieving performance data for the Transmit Frame Rate
measure.
CALLING GET
http://10.24.48.103/rest/resourcegroups/All/fcswitches/10:00:00:05:33:13:78:7E/ti
meseriestxframerate?startdate=1402012800000&enddate=1402023600000&granularity=GRA
NULARITY_30MIN
REQUEST HTTPSTATUS = 200
{"performanceDatas":[{"targetKey":"fldbid-16","targetType":"FLOW","timeSeriesData
s":[]},{"targetKey":"fldbid-13","targetType":"FLOW","timeSeriesDatas":[{"timeInSe
conds":1402023599,"value":0.0,"lo":0.0,"hi":0.0,"sum":0.0},{"timeInSeconds":14020
21799,"value":0.0,"lo":0.0,"hi":0.0,"sum":0.0},{"timeInSeconds":1402019999,"value
":0.0,"lo":0.0,"hi":0.0,"sum":0.0},{"timeInSeconds":1402018199,"value":0.0,"lo":0
.0,"hi":0.0,"sum":0.0},{"timeInSeconds":1402016399,"value":0.0,"lo":0.0,"hi":0.0,
"sum":0.0},{"timeInSeconds":1402014599,"value":0.0,"lo":0.0,"hi":0.0,"sum":0.0}]}
,{"targetKey":"fldbid-10","targetType":"FLOW","timeSeriesDatas":[{"timeInSeconds"
:1402023599,"value":0.0030000000000000005,"lo":0.0,"hi":0.005,"sum":0.0},{"timeIn
Seconds":1402021799,"value":0.005833333333333334,"lo":0.004,"hi":0.009,"sum":0.0}
,{"timeInSeconds":1402019999,"value":0.006000000000000001,"lo":0.0,"hi":0.014,"su
m":0.0},{"timeInSeconds":1402018199,"value":0.006666666666666665,"lo":0.0,"hi":0.
013,"sum":0.0},{"timeInSeconds":1402016399,"value":0.007666666666666666,"lo":0.0,
"hi":0.011,"sum":0.0},{"timeInSeconds":1402014599,"value":0.006333333333333333,"l
o":0.0,"hi":0.013,"sum":0.0}]},{"targetKey":"fldbid-9","targetType":"FLOW","timeS
eriesDatas":[{"timeInSeconds":1402023599,"value":0.004833333333333333,"lo":0.0,"h
i":0.009,"sum":0.0},{"timeInSeconds":1402021799,"value":0.006166666666666667,"lo"
:0.004,"hi":0.009,"sum":0.0},{"timeInSeconds":1402019999,"value":0.00433333333333
3334,"lo":0.0,"hi":0.011,"sum":0.0},{"timeInSeconds":1402018199,"value":0.0066666
66666666665,"lo":0.0,"hi":0.013,"sum":0.0},{"timeInSeconds":1402016399,"value":0.
007833333333333333,"lo":0.0,"hi":0.014,"sum":0.0},{"timeInSeconds":1402014599,"va
lue":0.004166666666666667,"lo":0.0,"hi":0.012,"sum":0.0}]},{"targetKey":"fldbid-1
1","targetType":"FLOW","timeSeriesDatas":[{"timeInSeconds":1402023599,"value":0.0
05,"lo":0.0,"hi":0.011,"sum":0.0},{"timeInSeconds":1402021799,"value":0.004833333
333333334,"lo":0.0,"hi":0.009,"sum":0.0},{"timeInSeconds":1402019999,"value":0.00
6666666666666668,"lo":0.0,"hi":0.013,"sum":0.0},{"timeInSeconds":1402018199,"valu
e":0.007166666666666666,"lo":0.0,"hi":0.014,"sum":0.0},{"timeInSeconds":140201639
9,"value":0.005833333333333334,"lo":0.0,"hi":0.012,"sum":0.0},{"timeInSeconds":14
02014599,"value":0.004166666666666667,"lo":0.0,"hi":0.01,"sum":0.0}]},{"targetKey
":"fldbid-15","targetType":"FLOW","timeSeriesDatas":[]},{"targetKey":"fldbid-14",
"targetType":"FLOW","timeSeriesDatas":[{"timeInSeconds":1402023599,"value":0.0188
3333333333333,"lo":0.009,"hi":0.028,"sum":0.0},{"timeInSeconds":1402021799,"value
":0.023499999999999997,"lo":0.017,"hi":0.036,"sum":0.0},{"timeInSeconds":14020199
99,"value":0.022166666666666668,"lo":0.008,"hi":0.034,"sum":0.0},{"timeInSeconds"
:1402018199,"value":0.02933333333333334,"lo":0.01,"hi":0.048,"sum":0.0},{"timeInS
econds":1402016399,"value":0.02916666666666667,"lo":0.01,"hi":0.045,"sum":0.0},{"
timeInSeconds":1402014599,"value":0.021500000000000002,"lo":0.004,"hi":0.043,"sum
":0.0}]},{"targetKey":"fldbid-17","targetType":"FLOW","timeSeriesDatas":[]},{"tar
getKey":"fldbid-8","targetType":"FLOW","timeSeriesDatas":[{"timeInSeconds":140202
3599,"value":0.005833333333333334,"lo":0.004,"hi":0.009,"sum":0.0},{"timeInSecond
s":1402021799,"value":0.006666666666666667,"lo":0.004,"hi":0.01,"sum":0.0},{"time
Brocade Network Advisor REST API Guide 43
53-1003160-01
Page 58

Getting the Top N CRC errors port summary
4
InSeconds":1402019999,"value":0.005,"lo":0.0,"hi":0.012,"sum":0.0},{"timeInSecond
s":1402018199,"value":0.008499999999999999,"lo":0.004,"hi":0.013,"sum":0.0},{"tim
eInSeconds":1402016399,"value":0.007666666666666666,"lo":0.0,"hi":0.014,"sum":0.0
},{"timeInSeconds":1402014599,"value":0.006833333333333333,"lo":0.0,"hi":0.013,"s
um":0.0}]},{"targetKey":"fldbid-12","targetType":"FLOW","timeSeriesDatas":[{"time
InSeconds":1402023599,"value":0.0,"lo":0.0,"hi":0.0,"sum":0.0},{"timeInSeconds":1
402021799,"value":0.0,"lo":0.0,"hi":0.0,"sum":0.0},{"timeInSeconds":1402019999,"v
alue":0.0,"lo":0.0,"hi":0.0,"sum":0.0},{"timeInSeconds":1402018199,"value":0.0,"l
o":0.0,"hi":0.0,"sum":0.0},{"timeInSeconds":1402016399,"value":0.0,"lo":0.0,"hi":
0.0,"sum":0.0},{"timeInSeconds":1402014599,"value":0.0,"lo":0.0,"hi":0.0,"sum":0.
0}]}],"granularity":"GRANULARITY_30MIN","duration":null,"startDate":1402012800000
,"endDate":1402023600000}
In this response, you can see the value for Transmit Frame Rate within the provided start and end
times. Each entry has the target key specified and this can be used in combination with the flow
data you received from the previous flows response to plot the data.
Getting the Top N CRC errors port summary
Physical layer errors cause signal degradation on the transmitter or receiver end and results in loss
of transmitted data. The most common physical layer error reported is the CRC error which
indicates frame corruption. CRC errors along with “encode out” errors usually point to a cabling or
SFP-related problem.
The Network Advisor REST API supports the retrieval of summary information for various
performance measures such as CRC errors, C3 discards, and BB credit zero.
For example, if you are interested in getting the top 10 ports reporting CRC errors, perform the
following steps.
1. Establish a REST API session with Network Advisor (refer to “Logging in”).
The network consisting of the fabrics is assumed to be discovered in Network Advisor. If not,
you can use the Network Advisor client or the Network Advisor REST API to discover the fabrics
of interest (refer to “SAN fabric discovery”).
2. Use the following GET URI for retrieving the top 10 ports reporting CRC errors.
<BASE_URI>/resourcegroups/{rgkey}/crcerrors?timeline=<value>×cope=<value>&l
imit=<value>&portscope=<value>&descending=<value>
SAN fabric discovery
Discovering an FC fabric
The Network Advisor REST API provides support for SAN Fabric discovery through the following
POST URI:
<Base_URI>/resourcegroups/All/discoverfabric
When calling this URI, you must pass the following:
• Session token
This token is returned in an HTTP header (WSToken) after a successful login request.
44 Brocade Network Advisor REST API Guide
53-1003160-01
Page 59

SAN fabric discovery
NOTE
4
• XML file (DiscoverFabricRequest.xml) containing the payload DiscoverFabricRequest object.
The payload object specifies the parameters that are needed for FC fabric discovery
(for example, user name, password, and the seed switch IP address. For more information
about the parameters defined by the DiscoverFabricRequest object, refer to
DiscoverFabricRequest.
The REST XML schema for DiscoverFabricRequest is published in the directory
<INSTALL-DIR>/conf/rest-schema, where <INSTALL-DIR> is the installation directory of Network
Advisor. The schema for DiscoverFabricRequest provides more details on the default values for
some of the properties.
Sample DiscoverFabricRequest.xml file contents
The following is an example of XML payload for SAN fabric discovery.
<tns:DiscoverFabricRequest
xmlns:tns="http://www.brocade.com/networkadvisor/webservices/v1/discoveryservice/
request">
<switchIpAddress>10.24.45.92</switchIpAddress>
<userName>admin</userName>
<password>password</password>
<fabricName>ApsFabric</fabricName>
</tns:DiscoverFabricRequest>
Sample SAN fabric discovery code (Java)
The following is an example of Java code for SAN fabric discovery. This sample code assumes that
some tool has been used to generate the required code for the requests (refer to “Binding the
schema”)
HttpURLConnection con = null;
try {
/**
* Create the HTTP connection object with the URI, method, and headers
*/
URL obj = new
URL("http://10.24.48.103/rest/resourcegroups/All/discoverfabric");
con = (HttpURLConnection) obj.openConnection();
con.setRequestMethod("POST");
con.addRequestProperty("WStoken", "wppCy/NGdC4o5gGFJjXRMv7blhc=");
con.addRequestProperty("Accept",
"application/vnd.brocade.networkadvisor+json;version=v1");
con.addRequestProperty("Content-type",
"application/vnd.brocade.networkadvisor+xml;version=v1");
/**
* Unmarshal the XML data into the Java content object
*/
JAXBContext jaxbContext = JAXBContext.newInstance(DiscoverFabricRequest.class);
Unmarshaller u = jaxbContext.createUnmarshaller();
Object element = u.unmarshal(new File("./DiscoverFabricRequest.xml"));
/**
* Marshal the java object into the connection o/p stream
*/
Brocade Network Advisor REST API Guide 45
53-1003160-01
Page 60

SAN fabric discovery
4
Marshaller m = jaxbContext.createMarshaller();
m.setProperty(Marshaller.JAXB_FORMATTED_OUTPUT, true);
m.marshal(element, con.getOutputStream());
System.out.println("CALLING POST
http://10.24.48.103/rest/resourcegroups/All/discoverfabric");
/**
* Make the HTTP call
*/
int responseCode = con.getResponseCode();
System.out.println("Response code is " + responseCode);
if (responseCode != HttpURLConnection.HTTP_OK
&& responseCode != HttpURLConnection.HTTP_NO_CONTENT
&& responseCode != HttpURLConnection.HTTP_PARTIAL
&& responseCode != HttpURLConnection.HTTP_ACCEPTED) {
PRINT_ERROR(con);
assert false : "Fabric Discovery FAILED, responseCode = " + responseCode;
}
if (responseCode == HttpURLConnection.HTTP_PARTIAL) {
String location = con.getHeaderField("Location");
if (null != location) {
System.out.println("URI FOR NEXT PAGE = " + location);
}
}
PRINT_RESPONSE(con);
} catch (IOException ie) {
System.out.println(ie.toString());
} finally {
if (null != con) {
con.disconnect();
}
}
Sample SAN fabric discovery JSON response
The following is an example of a SAN fabric discovery JSON response.
/**
* Establishing REST Session
*/
CALLING POST http://10.24.41.138/rest/login
Response code is 200
GOT TOKEN FROM RS RESPONSE = Yh8veQHgxR6v6KgNR9Eioeg7168=
{"serverName":"W2K8R2-41-138","serverIp":"10.24.41.138"}
/**
* Getting FC fabrics list BEFORE discoverfabric operation, it is empty
*/
CALLING GET http://10.24.41.138/rest/resourcegroups/All/fcfabrics
REQUEST HTTPSTATUS = 200
{"fcFabrics":[]}
/**
* Executing discoverfabric, all virtual fabrics if any have been discovered
*/
CALLING POST http://10.24.48.103/rest/resourcegroups/All/discoverfabric
46 Brocade Network Advisor REST API Guide
53-1003160-01
Page 61

SAN fabric discovery
REQUEST HTTPSTATUS = 200
{"virtualFabricIds":[]}
/**
* Getting FC fabrics list AFTER discoverfabric operation, fabrics exist
*/
CALLING GET http://10.24.48.103/rest/resourcegroups/All/fcfabrics
REQUEST HTTPSTATUS = 200
{"fcFabrics":[{"key":"10:00:00:05:1E:40:40:02","seedSwitchWwn":"10:00:00:05:1E:40
:40:02","name":"ApsFabric-10:00:00:05:1e:40:40:01","secure":false,"adEnvironment"
:false,"contact":null,"location":null,"description":null,"principalSwitchWwn":"10
:00:00:05:1E:40:40:02","fabricName":"","virtualFabricId":2,"seedSwitchIpAddress":
"10.24.45.92"},{"key":"10:00:00:05:1E:40:40:01","seedSwitchWwn":"10:00:00:05:1E:4
0:40:01","name":"ApsFabric","secure":false,"adEnvironment":false,"contact":null,"
location":null,"description":null,"principalSwitchWwn":"10:00:00:05:1E:40:40:01",
"fabricName":"","virtualFabricId":1,"seedSwitchIpAddress":"10.24.45.92"},{"key":"
10:00:00:05:1E:40:40:00","seedSwitchWwn":"10:00:00:05:1E:40:40:00","name":"ApsFab
ric-10:00:00:05:1e:40:40:01-10:00:00:05:1e:40:40:02","secure":false,"adEnvironmen
t":false,"contact":null,"location":null,"description":null,"principalSwitchWwn":"
10:00:00:05:1E:40:40:00","fabricName":"","virtualFabricId":128,"seedSwitchIpAddre
ss":"10.24.45.92"}]}
4
Sample error response for wrong password
The following is an example of a SAN fabric discovery incorrect password error message.
CALLING POST http://10.24.48.103/rest/resourcegroups/All/discoverfabric
REQUEST HTTPSTATUS = 500
RSException errorCode=6030, errorMsg=Seed switch authentication failed.
Deleting an FC fabric
You can use the following POST URI to delete an existing fabric in Network Advisor.
<BASE_URI>/resourcegroups/All/fcfabrics/fcfkey/deletefabric
This POST operation does not require any request payload except for the session token which is
passed back in an HTTP header parameter after a successful login.
This POST operation is performed on the fabric specified by fcfkey.
Sample Java code for deleting an FC fabric
The following is the sample Java code for deleting an FC fabric.
HttpURLConnection con = null;
try {
/**
* Create the HTTP connection object with the URI, method and headers
*/
URL obj = new
URL("http://10.24.48.103/rest/resourcegroups/All/fcfabrics/10:00:00:05:1E:40:40:0
0/deletefabric");
con = (HttpURLConnection) obj.openConnection();
con.setRequestMethod("POST");
con.addRequestProperty("WStoken", "wppCy/NGdC4o5gGFJjXRMv7blhc=");
Brocade Network Advisor REST API Guide 47
53-1003160-01
Page 62

Binding the schema
4
System.out.println("CALLING POST
http://10.24.48.103/rest/resourcegroups/All/fcfabrics/10:00:00:05:1E:40:40:00/del
etefabric");
/**
* Make the HTTP call
*/
int responseCode = con.getResponseCode();
System.out.println("Response code is " + responseCode);
if (HttpURLConnection.HTTP_NO_CONTENT != responseCode) {
PRINT_ERROR(con);
assert false : "Delete Fabric FAILED, responseCode = " + responseCode;
}
} catch (IOException ie) {
System.out.println(ie.toString());
} finally {
if (null != con) {
con.disconnect();
}
}
Binding the schema
Most of the POST operations supported by the Network Advisor REST API require input data. This
data is passed in the form of an XML payload.
To access the XML payload using Java, this example uses the Java Architecture for XML (JAXB)
binding. JAXB simplifies access to an XML document from a Java program by presenting the XML
document to the program in a Java format. As part of the JAXB framework, JAXB provides APIs for
unmarshaling and marshalling XML data.
To bind the schema, perform the following steps.
1. Unmarshal the XML data into a Java object, as shown in the following Java code example.
JAXBContext jaxbContext =
JAXBContext.newInstance(InitiatorTargetsRequest.class);
Unmarshaller u = jaxbContext.createUnmarshaller();
Object element = u.unmarshal(new File("./InitiatorTargetsRequest.xml"));
In this example, you can see that in order to unmarshal the XML data into Java objects, you
first need the Java class that represents the XML data, meaning binding the XML schema to
the Java class. That means that you need to generate the set of Java classes that represent the
REST XML schema.
2. Marshal the jaxbContext object into the HttpURLConnection output stream, as shown in the
following Java code example.
Marshaller m = jaxbContext.createMarshaller();
m.setProperty(Marshaller.JAXB_FORMATTED_OUTPUT, true);
m.marshal(element, con.getOutputStream());
The REST schema is published in the directory <INSTALL-DIR>/conf/rest-schema, where
<INSTALL-DIR> is the Network Advisor installation directory.
In this example, the standard JDK’s xjc application which is the XML-to-Java compiler was used to
generate the needed Java classes from the REST XML schema (xjc is included as part of JDK since
Java SE 6). Shown below is the ant target to use xjc to generate the java artifacts.
48 Brocade Network Advisor REST API Guide
53-1003160-01
Page 63

Binding the schema
<target name="generate-artifacts" depends="init">
<property name="java.home" value="env.JAVA_HOME"/>
<property name="xjc.destination" value="<where you want the java classes>"/>
<property name="xjc.source" value="<INSTALL-DIR>/conf/rest-schema"/>
<exec dir="${java.home}\bin" executable="xjc">
<arg line="-d ${xjc.destination} ${xjc.source}"/>
</exec>
</target>
4
Brocade Network Advisor REST API Guide 49
53-1003160-01
Page 64

Binding the schema
4
50 Brocade Network Advisor REST API Guide
53-1003160-01
Page 65

Chapter
API Reference
In this chapter
Topology
• “ResourceGroups”
• “Fabrics”
• “FC Switch”
• “PhysicalSwitch”
• “Ac cessGateway”
• “FCPorts”
• “GigePorts”
• “Connected-switch ports”
• “End-device ports”
• “Trunks”
• “ISL Connections”
• “IFL connections”
• “EndDeviceConnection”
• “Access Gateway connection”
• “End devices”
5
•Topology . . . . . . . . . . . . . . . . . . . . . . . . . . . . . . . . . . . . . . . . . . . . . . . . . . . . . . 51
•SAN fabric discovery . . . . . . . . . . . . . . . . . . . . . . . . . . . . . . . . . . . . . . . . . . . . 76
•Summary data . . . . . . . . . . . . . . . . . . . . . . . . . . . . . . . . . . . . . . . . . . . . . . . . . 80
•Events. . . . . . . . . . . . . . . . . . . . . . . . . . . . . . . . . . . . . . . . . . . . . . . . . . . . . . . 114
•Zoning. . . . . . . . . . . . . . . . . . . . . . . . . . . . . . . . . . . . . . . . . . . . . . . . . . . . . . . 119
•Historical performance data . . . . . . . . . . . . . . . . . . . . . . . . . . . . . . . . . . . . . 134
•Authentication and session management. . . . . . . . . . . . . . . . . . . . . . . . . . 144
Brocade Network Advisor REST API Guide 51
53-1003160-01
Page 66

5
Topology
ResourceGroups
Network Advisor supports “network scopes.” A network scope is a grouping of resources, a sort of
a convenience mechanism to enable you to retrieve data for any grouping of your choice. In the
Network Advisor REST API, a “resource group” is the equivalent of a “network scope.”
Resource groups can be predefined system groups or they can be user-defined groups. They are
keyed by unique names. Each resource group, whether system-defined or user-defined, is of a
particular type as defined by the enumeration
enables you to differentiate user-defined groups from other groups.
The system-defined resource group named “All” encompasses all resources. The resource group is
the starting point for all of the supported URIs in the Network Advisor REST API.
GET URIs
URI Description
<BASE_URI>/resourcegroups Returns all the resource groups in the system.
<BASE_URI>/resourcegroups/rgkey Returns the specified resource group.
NetworkScopeType. The resource group type
Path parameters
Name Description
rgkey Resource group identifier.
Response parameters
Property Description
key The unique identifier for the resource group. The key is the unique resource group
name with spaces encoded.
name The unique name of the resource group.
type The type of resource group.
Notes
The response schema is ResourceGroupsResponse.
52 Brocade Network Advisor REST API Guide
53-1003160-01
Page 67

Topology
Fabrics
Retrieves information about FC fabrics.
GET URIs
URI Description
<BASE_URI>/resourcegroups/rgkey/fcfabrics Retrieves FC fabrics for the given resource group.
<BASE_URI>/resourcegroups/rgkey/fcfabrics/fcfkey Retrieves the details of the specified FC fabric.
Path parameters
Name Description
rgkey Resource group identifier.
fcfkey FC fabric identifier.
Response parameters
5
Property Description
key Unique identifier for the fabric. The key is the principal switch WWN.
seedSwitchWwn WWN of the switch used as the seed switch to discover the fabric.
name The name of the fabric as configured in Network Advisor.
secure Whether the fabric is running secure Fabric OS.
adEnvironment The admin domain environment of the fabric.
contact User-assigned fabric contact.
location User-assigned fabric location.
description User-assigned fabric description.
principalSwitchWwn WWN of the principal fabric switch.
fabricName Fabric name persisted on switches running Fabric OS 7.0 and later.
virtualFabricId Virtual fabric ID. A positive value indicates VF is enabled; otherwise -1.
seedSwitchIpAddress IP address of the seed switch. Could be either an IPv4 or IPv6 address.
Notes
• The resource group “All” encompasses all fabrics while the resource group FC_FABRIC
retrieves a subset of the fabrics.
• Even though a user-defined resource group can be a group of fabrics, products, or ports, FC
fabrics can be retrieved in the context of an FC fabric or user-defined resource group of only
fabrics. As there is no containment hierarchy within products or ports for FC fabrics, for a
PRODUCT_GROUP, PORT_GROUP, or USER_DEFINED resource group of products or ports, the
list is empty.
• The fabric is keyed by its unique principal switch WWN.
Brocade Network Advisor REST API Guide 53
53-1003160-01
Page 68

5
Topology
FC Switch
Retrieves information about FC switches.
GET URIs
URI Description
<BASE_URI>/resourcegroups/rgkey/fcswitches Retrieves the FC switches of the given resource
group.
<BASE_URI>/resourcegroups/rgkey/fcswitches/fcskey Retrieves information about the specified FC switch.
<BASE_URI>/resourcegroups/rgkey/fcfabrics/fcfkey/fcs
witches
<BASE_URI>/resourcegroups/rgkey/fcfabrics/fcfkey/fcs
witches/fcskey
Path parameters
Name Description
Retrieves the FC switches of the given FC fabric.
Retrieves information about the specified FC switch.
rgkey Resource group identifier.
fcfkey FC fabric identifier.
fcskey FC switch identifier.
Response parameters
Property Description
key The unique identifier for the switch, which is the switch WWN.
type The switch type, the sw_bd_type of the switch.
name The switch name.
wwn The switch WWN.
virtualFabricId The virtual fabric ID. A positive value indicates VF is enabled; otherwise -1.
domainId The domain ID of the switch.
baseSwitch Indicates whether it is a base switch.
role The role of the switch. Refer to RoleType.
fcsRole The FCS role of the switch. This is applicable only when FCS policy is on.
adCapable Indicates the switch’s capability for Admin domain.
operationalStatus The operational status of the switch. Refer to OperStatusType.
state The state of the switch. Refer to StateType.
statusReason The status reason, the contributors to the status.
lfEnabled Indicates if logical fabric is enabled on the switch.
defaultLogicalSwitch Indicates if the switch is the default logical switch.
fmsMode Indicates the FMS mode in FICON environment.
54 Brocade Network Advisor REST API Guide
53-1003160-01
Page 69

Topology
Property Description
dynamicLoadSharingCapable Indicates the switch’s capability for dynamic load sharing.
portBasedRoutingPresent Indicates the switch’s capability for port-based routing.
inOrderDeliveryCapable Indicates whether in order delivery is enabled.
persistentDidEnabled Indicates whether persistent domain ID is enabled.
autoSnmpEnabled Indicates if automatic SNMP configuration is enabled.
5
Notes
• The resource group “All” encompasses all switches while a ResourceGroup of type
PRODUCT_GROUP scopes a subset of the switches. Even though a USER_DEFINED resource
group can be a group of fabrics, products or ports, FC switches can be retrieved at the context
of a USER_DEFINED resource group of fabrics or products only. As there is no containment
hierarchy within ports for FC switches, for a USER_DEFINED resource group of ports, the list is
empty.
• In the cases where the URI contains the FC fabric, FC fabrics can be retrieved at the context of
FC_FABRIC or USER_DEFINED resource groups of fabrics only. As there is no containment
hierarchy within products or ports for FC fabrics, for a PRODUCT_GROUP, PORT_GROUP or
USER_DEFINED resource group of products of ports, the URIs with FC fabric key will return an
empty list of FC switches.
• The FC switch is keyed by its unique switch WWN. The result is FcSwitchesResponse
containing a list of FcSwitch.
Brocade Network Advisor REST API Guide 55
53-1003160-01
Page 70

5
Topology
PhysicalSwitch
Retrieves information about physical switches. This includes properties such as IP address, switch
serial number, model, and so on.
GET URIs
URI Description
<BASE_URI>/resourcegroups/rgkey/fcswitches/fcskey/p
hysicalswitches
<BASE_URI>/resourcegroups/rgkey/fcfabrics/fcfkey/fcs
witches/fcskey/physicalswitches
Retrieves the PhysicalSwitch for a given FC switch.
Retrieves the physical switch of the given FC switch.
Path parameters
Name Description
rgkey Resource group identifier.
fcfkey FC fabric identifier.
fcskey FC switch identifier.
Response parameters
Property Description
key The unique identifier for the switch, which is the WWN.
wwn The WWN of the switch.
ipAddress The IP address of the switch. Could be either IPv4 or IPv6 address.
userId The Telnet user name used to log in to switch.
firmwareVersion The firmware version of the switch.
vendor The vendor information of the switch
supplierSerialNumber The supplier serial number of the switch.
partNumber The part number of the switch.
modelNumber The model of the switch, such as Brocade 6505 and Brocade 6520.
manufacturer The manufacturer for the switch.
switchSerialNumber The factory serial number of the switch.
vendorVersion The vendor version of the switch.
vendorPartNumber The vendor part number of the switch.
snmpInformsEnabled Indicates if the SNMP informs is enabled.
contact The contact details of the switch. Syscontact from the RFC 1213 MIB.
location The location details for the switch. Syslocation from RFC 1213 MIB.
description The description of the switch. Sysdescr from RFC 1213 MIB.
56 Brocade Network Advisor REST API Guide
53-1003160-01
Page 71

Topology
5
Notes
• The physical switch is keyed by the physical switch WWN.
• This resource contains the properties that depict the physical nature of a logical FC switch.
• The response schema is PhysicalSwitchesResponse.
• There is no physical switch for Front and Xlate phantom switches.
Brocade Network Advisor REST API Guide 57
53-1003160-01
Page 72

5
Topology
AccessGateway
Retrieves Access Gateway information.
GET URIs
URI Description
<BASE_URI>/resourcegroups/ALL/accessgateways Returns a list of Access Gateways.
<BASE_URI>/resourcegroups/ALL/accessgateways/agkeyReturns the details of the given gateway.
Path parameters
Name Description
agkey Access gateway identifier.
Response parameters
Property Description
key The unique identifier for the access gateway, which is the WWN.
name The AG name.
wwn The AG WWN.
operationalStatus The operational status of the AG. Refer to OperStatusType.
state The state of the AG. Refer to StateType.
statusReason The status reason, the contributors to the status.
firmwareVersion The firmware version of the AG.
Notes
• When a switch is in Access Gateway mode, it does not possess a domain ID and is not part of
any fabric. It acts as a gateway for multiple devices to log in to a specific switch, which is part
of a fabric, via a single F_Port. The N_Port on the Access Gateway connects to the FC switch’s
F_Port and end devices are connected to the Access Gateway’s F_Port. These ports can be
retrieved in the context of that Access Gateway. For information about port URIs related to
Access Gateway, refer to “FCPorts.”
• The end devices and their ports can also be retrieved in the context of an Access Gateway. For
information, refer to “Connected-switch ports” and “End devices”.
• The connection between an FC switch and the Access Gateway is represented as an
AgConnection object. For more information about the AgConnection-related URIs, refer to
“Access Gateway connection”.
• Access Gateways can be retrieved only in the context of the resource group “All.” They cannot
be retrieved with respect to any other resource group such as fabric, product, or port.
• An Access Gateway is keyed by its unique WWN.
• The response schema is AccessGatewaysResponse.
58 Brocade Network Advisor REST API Guide
53-1003160-01
Page 73

Topology
FCPorts
Retrieves information about FC ports.
GET URIs
URI Description
<BASE_URI>/resourcegroups/rgkey/fcports Returns a list of FC ports for the given resource
group.
<BASE_URI>/resourcegroups/rgkey/fcports/fcpkey Returns details of the given port.
<BASE_URI>/resourcegroups/rgkey/fcswitches/fcskey/f
cports
<BASE_URI>/resourcegroups/rgkey/fcswitches/fcskey/f
cports/fcpkey
<BASE_URI>/resourcegroups/rgkey/fcfabrics/fcfkey/fcs
witches/fcskey/fcports
<BASE_URI>/resourcegroups/rgkey/fcfabrics/fcfkey/fcs
witches/fcskey/fcports/fcpkey
<BASE_URI>/resourcegroups/rgkey/accessgateways/ag
key/fcports
<BASE_URI>/resourcegroups/rgkey/accessgateways/ag
key/fcports/fcpkey
Returns a list of FC ports for the given FC switch.
Returns details of the given port.
Returns a list of FC ports for the given FC switch
under the given FC fabric.
Returns details of the given port.
Returns a list of FC ports for the given access
gateway.
Returns details of the given port of the given access
gateway.
5
Path parameters
Name Description
rgkey Resource group identifier.
fcfkey FC fabric identifier.
fcskey FC switch identifier.
fcpkey FC port identifier.
agkey Access gateway identifier.
Response parameters
Property Description
key The unique identifier for the port, which is the WWN.
NOTE: The key of the Front phantom port is FF-wwn.
The key of Xlate phantom port is XF-wwn.
wwn The WWN of the port.
name The user-assigned port name.
slotNumber The slot number. The default value is 0.
portNumber The logical port number within the slot. In case of directors, this port number is unique
within the slot.
userPortNumber The user port number. This is a unique port number within a chassis.
Brocade Network Advisor REST API Guide 59
53-1003160-01
Page 74

5
Topology
Property Description
portId The port ID.
portIndex The port index, number used in identifying port in zoning.
areaId The area number of the port.
type The port type. The specific mode currently enabled for the port.
status The status of the port. Refer to PortStatusType.
statusMessage Any additional port level status similar to what is seen in CLI, like Segmented, Speed
Mismatch, Trunk master, and so on.
lockedPortType Indicates the locked port type. Ports can be locked down so that they can come up
only in that mode.
speed The port speed currently configured on the switch.
speedsSupported The supported port speed as a list of comma-separated values.
maxPortSpeed The maximum supported speed on the switch.
desiredCredits The number of BB credits desired by the port.
bufferAllocated The number of BB credits allocated to the port.
estimatedDistance The estimated distance of the link.
actualDistance The actual distance of the link.
longDistanceSetting Indicates if long distance setting is enabled.
remoteNodeWwn WWN of the node at the remote end of this switch port.
remotePortWwn WWN of the port at the remote end of this switch port.
licensed Indicates if the port is licensed.
swapped Indicates if the port is swapped.
trunked Indicates if the port is trunked.
trunkMaster Indicates if the port is trunk master. Applicable only if the port is trunked.
persistentlyDisabled Indicates if the port is persistently disabled.
ficonSupported Indicates if the port is FICON supported.
blocked Indicates if the port is blocked.
prohibitPortNumbers Indicates the ports prohibited with the current port as configured in the “Allow”
prohibit metric (PDCM).
prohibitPortCount The count of prohibited ports.
npivCapable Indicates if port is NPIV-capable.
npivEnabled Indicates if is NPIV-capable is enabled.
fcFastWriteEnabled Indicates if FC Fast Write is enabled.
islRrdyEnabled Indicates if ISL receiver ready is enabled.
rateLimitCapable Indicates if the port is capable of rate limiting.
rateLimited Indicates if the port has rate limiting enabled.
qosCapable Indicates if the port is QOS-capable.
qosEnabled Indicates if the port is QOS-enabled.
fcrFabricId The FCR fabric ID. Applicable if the port is configured as an EX_Port.
60 Brocade Network Advisor REST API Guide
53-1003160-01
Page 75

Topology
NOTE
Property Description
state The state of the port. The state type is in the schema.
occupied Indicates if the port is occupied.
masterPortNumber The trunk’s master port number for the trunk member ports. For trunk master port, it
will be its own port number. For non-trunk ports, it will have the default value -1.
5
Notes
• This release supports only FC and GigE ports.
• The ports can be retrieved in the context of a resource group, a switch, or an access gateway.
The resource group “All” encompasses all ports while a resource group of type PORT_GROUP
or USER_DEFINED scopes a subset of the ports.
In the cases where the URI contains an FC fabric, the FC fabrics can be retrieved in the context
of the FC_FABRIC or USER_DEFINED resource group of fabrics only.
• As there is no containment hierarchy within products or ports for FC fabrics, for a
PRODUCT_GROUP, PORT_GROUP or USER_DEFINED resource group, the URIs with an FC
fabric key return an empty list of FC ports.
On a similar note, in the cases where the URI contains the FC switch, FC switches can be
retrieved at the context of FC_FABRIC, PRODUCT_GROUP or USER_DEFINED resource group of
fabrics or products only. As there is no containment hierarchy within ports for FC switches, for
a PORT_GROUP or USER_DEFINED resource group or ports, the URIs with FC switch key return
an empty list of FC ports.
The FC port is keyed by its unique port WWN. The result is FcPortsResponse containing a list
of FcPorts. The responses are paginated.
Brocade Network Advisor REST API Guide 61
53-1003160-01
Page 76

5
Topology
GigePorts
Retrieves information about GigE ports.
GET URIs
URI Description
<BASE_URI>/resourcegroups/rgkey/gigeports Returns a list of GigE ports for the given resource
group.
<BASE_URI>/resourcegroups/rgkey/gigeports/gpkey Returns details of the given GigE port.
<BASE_URI>/resourcegroups/rgkey/fcswitches/fcskey/g
igeports
<BASE_URI>/resourcegroups/rgkey/fcswitches/fcskey/g
igeports/gpkey
<BASE_URI>/resourcegroups/rgkey/fcfabrics/fcfkey/fcs
witches/fcskey/gigeports
<BASE_URI>/resourcegroups/rgkey/fcfabrics/fcfkey/fcs
witches/fcskey/gigeports/gpkey
Returns a list of GigE ports for the given FC switch.
Returns details of the given GigE port.
Returns a list of GigE ports for the given FC switch
under the given FC fabric.
Returns details of the given GigE port.
Path parameters
Name Description
rgkey Resource group identifier.
fcfkey FC fabric identifier.
fcskey FC switch identifier.
gpkey GigE port identifier.
Response parameters
Property Description
key The unique identifier for the port, which is the MAC address.
portNumber The GigE port number, 0 for ge0 and 1 for ge1.
slotNumber The slot number on which the GigE port is present.
enabled Indicates if the port is enabled.
speed The port speed.
maxSpeed The maximum port speed.
macAddress The MAC address of the port.
portName The GigE port name.
operationalStatus The status of the port.
ledState The LED state.
speedLedState The speed LED state.
portType The port type.
62 Brocade Network Advisor REST API Guide
53-1003160-01
Page 77

Topology
Property Description
persistentlyDisabled Indicates whether the port is persistently disabled.
remoteMacAddress The MAC address of the port attached to the 10 GigE port.
userPortNumber The user port number. This is a unique port number within a chassis.
portIndex The port index, number used in identifying port in zoning.
5
Brocade Network Advisor REST API Guide 63
53-1003160-01
Page 78

5
Topology
Connected-switch ports
Retrieves information about connected-switch ports.
GET URIs
URI Description
<BASE_URI>/resourcegroups/rgkey/fcports/fcpkey/con
nectedswitchports
<BASE_URI>/resourcegroups/rgkey/fcswitches/fcskey/f
cports/fcpkey/connectedswitchports
<BASE_URI>/resourcegroups/rgkey/accessgateways/ag
key/fcports/fcpkey/connectedswitchports
<BASE_URI>/resourcegroups/rgkey/fcfabrics/fcfkey/fcs
witches/fcskey/fcports/fcpkey/connectedswitchports
Path parameters
Name Description
rgkey Resource group identifier.
fcpkey FC fabric port identifier.
fcfkey FC fabric identifier.
fcskey FC switch identifier.
Response parameters
Property Description
Returns the details of the connected-switch ports
connected to the port specified by fcpkey.
Returns a list of connected-switch ports for the given
FC port of the given FC switch.
Returns a list of connected-switch ports for the given
port of the given access gateway.
Returns the details of the connected-switch ports
connected to the port specified by fcpkey for a
specific switch in a specific fabric.
key The unique identifier for the port, which is the WWN.
domainId The domain ID of the switch to which this device port is connected.
wwn The device port WWN.
deviceNodeWwn The WWN of the node of this device port.
switchPortWwn The switch port WWN to which this device port is physically connected.
number The port number of this device port.
portId The port ID.
type The port type.
symbolicName The port symbolic name.
fc4Type The port fc4type.
cos The port class of service.
hardwareAddress The hardware address.
npvPhysical Indicates if this is a physical device port or a logical NPIV port.
64 Brocade Network Advisor REST API Guide
53-1003160-01
Page 79

Topology
5
Notes
• Connected-switch ports are connected ports (switch port to switch port and access gateway
port to switch port).
• The port is keyed by its unique WWN.
• The connected-switch ports response schema is FcPortsResponse.
Brocade Network Advisor REST API Guide 65
53-1003160-01
Page 80

5
Topology
End-device ports
Retrieves information about end-device ports.
GET URIs
URI Description
<BASE_URI>/resourcegroups/rgkey/fcports/fcpkey/end
deviceports
<BASE_URI>/resourcegroups/rgkey/fcswitches/fcskey/f
cports/fcpkey/enddeviceports
<BASE_URI>/resourcegroups/rgkey/accessgateways/ag
key/fcports/fcpkey/enddeviceports
<BASE_URI>/resourcegroups/rgkey/fcfabrics/fcfkey/fcs
witches/fcskey/fcports/fcpkey/enddeviceports
Returns the details of the end-device ports connected
to the port specified by fcpkey.
Returns a list of end-device ports for the given FC port
of the given FC switch.
Returns a list of end-device ports for the given FC port
of the given access gateway.
Returns a list of end-device ports for the given FC port
of the given FC switch in the specified fabric.
Path parameters
Name Description
rgkey Resource group identifier.
fcpkey FC fabric port identifier.
fcfkey FC fabric identifier.
fcskey FC switch identifier.
Response parameters
Property Description
key The unique identifier for the port, which is the WWN.
domainId The domain ID of the switch to which this device port is connected.
wwn The device port WWN.
deviceNodeWwn The WWN of the node of this device port.
switchPortWwn The switch port WWN to which this device port is physically connected.
number The port number of this device port.
portId The port ID.
type The port type.
symbolicName The port symbolic name.
fc4Type The port fc4type.
cos The port class of service.
hardwareAddress The hardware address.
npvPhysical Indicates if this is a physical device port or a logical NPIV port.
66 Brocade Network Advisor REST API Guide
53-1003160-01
Page 81

Topology
5
Notes
• End-device ports are the ports with end devices connected to them like initiators, targets, or
N_Ports from an access gateway (switch port to node port and access gateway port to node
port).
• The end-device ports response schema is EndDevicePortsReponse.
• The port is keyed by its unique WWN.
Brocade Network Advisor REST API Guide 67
53-1003160-01
Page 82

5
Topology
Trunks
Retrieves information about ISL trunks.
GET URIs
URI Description
<BASE_URI>/resourcegroups/rgkey/fcswitches/fcskey/tr
unks
<BASE_URI>/resourcegroups/rgkey/fcfabrics/fcfkey/fcs
witches/fcskey/trunks
Returns a list of ISL trunks for the given FC switch.
Returns a list of ISL trunks for the given FC switch of
the given FC fabric.
Path parameters
Name Description
rgkey Resource group identifier.
fcfkey FC fabric identifier.
fcskey FC switch identifier.
Response parameters
Property Description
key The unique identifier for the trunk, which is the master port WWN.
switchWwn The WWN of the switch having this trunk.
masterPortWwn The WWN of the master port.
memberPortWwns The member port WWNs.
Notes
• The trunk is keyed by its master port WWN.
• The response schema is TrunksResponse.
68 Brocade Network Advisor REST API Guide
53-1003160-01
Page 83

Topology
5
ISL Connections
Retrieves information about inter-switch links (ISL) connections. These are connections between
switches within a fabric.
GET URIs
URI Description
<BASE_URI>/resourcegroups/rgkey/fcfabrics/fcfkey/isls Returns list of ISL connections for the given FC fabric.
Path parameters
Name Description
rgkey Resource group identifier.
fcfkey FC fabric identifier.
Response parameters
Property Description
key The unique identifier for the ISL, which is formed as
sourceSwitchWwn;sourcePortWwn;destSwitchWwn;destPortWwn.
fabricWwn The WWN of the fabric to which this ISL belongs.
sourceSwitchWwn The source switch WWN.
sourcePortWwn The source switch port WWN.
destSwitchWwn The destination switch WWN.
destSwitchPortWwn The destination switch port WWN.
cost The cost of the ISL link.
trunked Indicates whether ISL link is part of a trunk.
Notes
• The response schema is IslResponse.
Brocade Network Advisor REST API Guide 69
53-1003160-01
Page 84

5
Topology
IFL connections
Returns information about inter-fabric links (IFL) connections (connections between fabrics in an
FCR setup).
GET URIs
URI Description
<BASE_URI>/resourcegroups/All/ifls Returns list of IFL connections for all resource groups.
<BASE_URI>/resourcegroups/rgkey/fcfabrics/fcfkey/ifls Returns list of IFL connections for the given backbone
FC fabric.
Path parameters
Name Description
rgkey Resource group identifier.
fcfkey FC fabric identifier.
Response parameters
Property Description
key The unique identifier for the IFL, which is formed as backboneSwitchWwn;
backboneSwitchPortWwn;edgeSwitchWwn;edgeSwitchPortWwn.
edgeFabricName The name of the edge fabric.
edgeSwitchName The name of the edge switch.
edgeSwitchIPAddress The IP address of the edge switch.
edgeSwitchWwn The edge switch WWN.
edgeSwitchPortWwn The edge switch port WWN.
backboneFabricName The name of the backbone fabric.
backboneSwitchName The name of the backbone switch.
backboneSwitchIPAddress The IP address of the backbone switch.
backboneSwitchWwn The backbone switch WWN.
backboneSwitchPortWwn The backbone switch port WWN.
trunkingEnabled Indicates whether IFL link is part of a trunk.
speed The speed of the IFL link.
speedConfigured The configured speed of the IFL link.
longDistanceMode The long distance mode setting.
desiredDistance The desired distance setting.
linkCost The cost of the IFL link.
70 Brocade Network Advisor REST API Guide
53-1003160-01
Page 85

Notes
• The response schema is IflResponse.
Topology
5
Brocade Network Advisor REST API Guide 71
53-1003160-01
Page 86

5
Topology
EndDeviceConnection
Retrieves information about end-device connections (from switch to end device including those
from access gateway to end device).
GET URIs
URI Description
<BASE_URI>/resourcegroups/rgkey/fcfabrics/fcfkey/en
ddeviceconnections
<BASE_URI>/resourcegroups/rgkey/accessgateways/ag
key/enddeviceconnections
Returns a list of connections of end-device directly
connected to the given fabric.
Returns a list of connections of end-device directly
connected to the given access gateway.
Path parameters
Name Description
rgkey Resource group identifier.
fcfkey FC fabric identifier.
agkey Access gateway identifier.
Response parameters
Property Description
key The unique identifier, which is formed as
switchWwn/agWwn;switchPortWwn/agPortWwn;deviceWwn;devicePortWwn.
fabricWwn The WWN of the fabric to which this connection belongs.
deviceWwn The WWN of the device at the end of this connection.
devicePortWwn The WWN of the device port at the end of this connection.
switchWwn The WWN of the switch at the end of this connection.
switchPortWwn The WWN of the switch port at the end of this connection.
agWwn The WWN of the AG at the end of this connection.
agPortWwn The WWN of the AG port at the end of this connection.
logical Indicates if this a logical connection.
Notes
• The response schema is EndDeviceConnectionResponse.
72 Brocade Network Advisor REST API Guide
53-1003160-01
Page 87

Topology
Access Gateway connection
Retrieves information about access gateway connections (connections between an access
gateway and an FC switch).
GET URIs
URI Description
<BASE_URI>/resourcegroups/All/agconnections Retrieves a list of the access gateway connections for
all of the resource groups.
<BASE_URI>/resourcegroups/All/accessgateways/agkey
/agconnections
Path parameters
Name Description
agkey Access gateway identifier.
Retrieves a list of the access gateway connections for
the given access gateway.
5
Response parameters
Property Description
key The unique identifier, which is formed as
sourceSwitchWwn;sourcePortWwn;destinationSwitchWwn;destinationPortWwn.
sourceSwitchWwn The source switch WWN.
sourcePortWwn The source switch port WWN.
sourceUserPortNumber The source switch port user port number.
sourcePortType The source switch port type.
destinationSwitchWwn The destination switch WWN.
destinationPortWwn The destination switch port WWN.
destinationUserPortNumber The destination switch port user port number.
destinationPortType The destination switch port type.
Notes
• The response schema is AgConnectionsResponse.
Brocade Network Advisor REST API Guide 73
53-1003160-01
Page 88

5
Topology
End devices
Retrieves information about end devices. These are initiators and targets discovered during fabric
discovery.
GET URIs
URI Description
<BASE_URI>/resourcegroups/rgkey/fcfabrics/fcfkey/en
ddevices
<BASE_URI>/resourcegroups/rgkey/accessgateways/ag
key/enddevices
Returns a list of end devices for the given FC fabric.
Returns a list of end devices for the given access
gateway.
Path parameters
Name Description
rgkey Resource group identifier.
fcfkey FC fabric identifier.
agkey Access gateway identifier.
Response parameters
Property Description
key The unique identifier, which is the WWN.
wwn The WWN of the device.
type The possible values are Initiator, Target, Initiator+Target, Unknown (Initiator or Target).
deviceType The type of device. Refer to DeviceType.
symbolicName The symbolic name.
fdmiHostName The FDMI host name.
vendor The vendor of this device.
capability The capability.
proxyDevice Indicates if this is a proxy device. If one of the device ports of this device has a
translated domain, that device port is set as the proxy and this device is treated as
virtual.
name The name of the device as defined by the user.
ipAddress The IP address of the device as defined by the user.
contact The contact detail of the device as defined by the user.
location The physical location of the device as defined by the user.
description The description of the device as defined by user.
fabricWwn The WWN of the fabric to which this device belongs.
fdmiSerialNumber The serial number available via FDMI.
fdmiFirmwareVersion The firmware version available via FDMI.
74 Brocade Network Advisor REST API Guide
53-1003160-01
Page 89

Property Description
fdmiDriverVersion The driver version available via FDMI, ex: 2.1.0.2.
fdmiManufacturer The manufacturer available via FDMI, ex: Brocade.
fdmiModel The model available via FDMI, ex: Brocade-825.
fdmiHardwareVersion The hardware version available via FDMI, ex: Rev-C.
fdmiModelDescription The model description available via FDMI, ex: Brocade-825.
fdmiNodeName The node name available via FDMI, ex: 20:00:00:05:1e:7c:64:94.
Notes
• The response schema is EndDevicesResponse.
• End devices are keyed by their unique WWN.
Topology
5
Brocade Network Advisor REST API Guide 75
53-1003160-01
Page 90

SAN fabric discovery
5
SAN fabric discovery
This section lists the SAN fabric discovery URIs. These URIs are provided in the context of the
system-defined resource group “All.”
• “Fabric discovery”
• “Fabric deletion”
• “Switch credentials update”
76 Brocade Network Advisor REST API Guide
53-1003160-01
Page 91

SAN fabric discovery
Fabric discovery
Discovers fabrics.
POST URIs
URI Description
<BASE_URI>/resourcegroups/All/discoverfabric Initiates fabric discovery.
Returns a list of the fabric VFIDs that failed discovery,
if any. The XML payload associated with this request
is the Discoverfabricrequest schema.
Request parameters
Property Description
switchIpAddress The IP address of the seed switch used for discovering the fabric.
userName The user name required for discovering the fabric.
password The password required for discovering the fabric.
fabricName The user-defined name of the fabric to be assigned.
snmpVersion The SNMP version to be used in discovering the fabric.
snmpTimeout The SNMP timeout to be used in discovering the fabric.
snmpRetries The number of SNMP retries to be used in discovering the fabric.
snmpReadCommunityString The SNMP read community string to be used in discovering the fabric
(SNMP V1 only).
snmpWriteCommunityString The SNMP write community string to be used in discovering the fabric (SNMP
V1 only).
snmpUserName The SNMP user name for discovering the fabric (SNMP V3 only).
snmpContextName The SNMP context name for discovering the fabric (SNMP V3 only).
snmpAuthorizationProtocol The SNMP authorization protocol for discovering the fabric. Refer to
AuthorizationProtocolType (SNMP V3 only).
snmpAuthorizationPassword The SNMP authorization password for discovering the fabric (SNMP V3 only).
snmpPrivacyProtocol The SNMP privacy protocol for discovering the fabric. Refer to
PrivacyProtocolType (SNMP V3 only).
snmpPrivacyPassword The SNMP privacy protocol for discovering the fabric (SNMP V3 only).
5
Notes
• The FC fabric that is discovered contains the IP address and WWN of the seed switch that was
used for discovery in the DiscoverFabricRequest XML payload.
• The request schema is DiscoverFabricRequest.
• The response schema is DiscoverFabricResponse.
Brocade Network Advisor REST API Guide 77
53-1003160-01
Page 92

SAN fabric discovery
5
Fabric deletion
Remove fabrics from Network Advisor.
POST URIs
URI Description
<BASE_URI>/resourcegroups/All/fcfabrics/fcfkey/delete
fabric
Removes fabrics of the specified FC fabrics.
Path parameters
Name Description
fcfkey Identifier of the fabric to be deleted.
Notes
• There is no request or response payload for this operation.
78 Brocade Network Advisor REST API Guide
53-1003160-01
Page 93

SAN fabric discovery
5
Switch credentials update
Updates switch credentials and SNMP configurations after fabric discovery using a request XML
payload (an UpdateCredentialsRequest object).
POST URIs
URI Description
<BASE_URI>/resourcegroups/All/fcswitches/fcskey/
updatecredentials
Updates switch credentials and SNMP configurations
for the specified FC switch.
Path parameters
Name Description
fcfkey FC fabric identifier.
Request parameters
Property Description
userName The user name to be updated.
password The password to be updated.
fabricName The user-defined name of the fabric to be updated.
snmpVersion The SNMP version to be updated.
snmpTimeout The SNMP timeout to be updated.
snmpRetries The number of SNMP retries to be updated.
snmpReadCommunityString The SNMP read community string to be updated.
snmpWriteCommunityString The SNMP write community string to be updated.
snmpUserName The SNMP user name to be updated.
snmpContextName The SNMP context name for discovering the fabric.
snmpAuthorizationProtocol The SNMP authorization protocol to be updated.
snmpAuthorizationPassword The SNMP authorization password to be updated.
snmpPrivacyProtocol The SNMP privacy protocol to be updated.
snmpPrivacyPassword The SNMP privacy protocol password to be updated.
Notes
• The request schema is UpdateCredentialsRequest, which is an XML payload sent with the
POST request.
Brocade Network Advisor REST API Guide 79
53-1003160-01
Page 94

Summary data
5
Summary data
You can use the URIs in this section to retrieve summary data. They can be obtained in the context
of a resource group, fabric, switch, or port.
Depending on the scope of the context, the relevant summary data is returned. There are various
query parameters such as timeline, timescope, limit, and so on, that can be used to further filter
the summary data as shown in the following table.
TABLE 1 Query parameters for Summary URIs
Name Type Default value
Timeline (Date expressed as a long
milliseconds value) (limit of 30 days past
current time)
timescope TimeScope THIRTY_MINUTES
portscope MonitorPortType ALL
Limit (max value is 10) Integer 10
descending Boolean true
The URIs return a SummaryResponse containing the requested summary.
long Current time (which is set as -1)
TABLE 2 Response parameters for Summary URIs
Property Description
summary The requested summary.
summaryName The name of the summary returned.
timeLine The requested timeline for the summary.
timeScope The requested timescope for the summary. Refer to TimeScope.
limit The requested limit for the summary.
portScope The requested port scope for the summary. Refer to MonitorPortType.
descending The requested order for the summary.
• “Status summary”
• “Asset classification summary”
• “Network object count summary”
• “Events summary”
• “Bottleneck violations summary”
• “Out-of-range violations summary”
• “Port health violations summary”
• “VM violations summary”
• “Port summaries”
• “Product summaries”
• “Traffic flow summaries”
80 Brocade Network Advisor REST API Guide
53-1003160-01
Page 95

Summary data
5
Status summary
Retrieves status summary data for all the discovered products.
The returned summary is StatusSummary. This contains a list of entries, one for each status. Each
entry shows the number of products for that particular status.
GET URIs
URI Description
<BASE_URI>/resourcegroups/rgkey/statussummary Retrieves status summary data for the specified
resource group.
<BASE_URI>/resourcegroups/rgkey/fcfabrics/fcfkey/sta
tussummary
Path parameters
Name Description
rgkey Resource group identifier.
fcfkey FC fabric identifier.
Retrieves status summary data for the specified FC
fabric.
Example
The following is an example of returned summary data in the JSON format, showing the following
information:
• 10 products in healthy status.
• 2 products are down.
• 11 products in marginal status.
{"summary":
{"statusCounts":
{"HEALTHY":10,
"DOWN":2,
"MARGINAL":11}},
"summaryName":"StatusSummary",
"timeLine":null,
"timeScope":null,
"limit":null,
"portScope":null,
"descending":null}
Brocade Network Advisor REST API Guide 81
53-1003160-01
Page 96

5
Summary data
Asset classification summary
Retrieves asset classification summary data. The returned summary is
AssetClassificationSummary. This contains a list of entries, one for each ClassificationCategory.
Each entry shows the AssetClassification for that particular ClassificationCategory.
GET URIs
URI Description
<BASE_URI>/resourcegroups/rgkey/assetclassifications
ummary
<BASE_URI>/resourcegroups/rgkey/fcfabrics/fcfkey/ass
etclassificationsummary
Retrieves asset classification summary data for the
specified resource group.
Retrieves asset classification summary data for the
specified FC fabric.
Path parameters
Name Description
rgkey Resource group identifier.
fcfkey FC fabric identifier.
Example
The following is an example of returned summary data in the JSON format, showing the following
information:
• One of the classification categories is LOCATION.
• There is one Marginal Brocade 5300 switch under the classification category “MODEL.”
• There is one healthy product with the software “_main_bld06” under the classification
category “FIRMWARE_VERSION.”
{"summary":
{"classificationCounts":
{"LOCATION":
{"counts":
{"End User Premise.":
{"category":"End User Premise.",
"count":{"statusCounts":{"HEALTHY":10,"DOWN":2,"MARGINAL":11}}}},
"category":"LOCATION"},
"MODEL":
{"counts":
{"Brocade 300":
{"category":"Brocade 300",
"count":{"statusCounts":{"HEALTHY":1}}},
"Brocade 5300":
{"category":"Brocade 5300",
"count":{"statusCounts":{"MARGINAL":1}}},
"Brocade 8000":
{"category":"Brocade 8000",
"count":{"statusCounts":{"DOWN":1}}},
"Brocade DCX-4S":
{"category":"Brocade DCX-4S",
"count":{"statusCounts":{"DOWN":1}}},
"Brocade 6505":
82 Brocade Network Advisor REST API Guide
53-1003160-01
Page 97

Summary data
{"category":"Brocade 6505",
"count":{"statusCounts":{"HEALTHY":2}}},
"Brocade 5100":
{"category":"Brocade 5100",
"count":{"statusCounts":{"MARGINAL":7,"HEALTHY":5}}},
"Brocade DCX 8510-4":
{"category":"Brocade DCX 8510-4",
"count":{"statusCounts":{"HEALTHY":2}}},
"Brocade 6520":
{"category":"Brocade 6520",
"count":{"statusCounts":{"MARGINAL":1}}},
"Brocade 7600":
{"category":"Brocade 7600",
"count":{"statusCounts":{"MARGINAL":1}}},
"Brocade 6510":
{"category":"Brocade 6510",
"count":{"statusCounts":{"MARGINAL":1}}}},
"category":"MODEL"},
"FIRMWARE_VERSION":
{"counts":
{"v6.2.2e":
{"category":"v6.2.2e",
"count":{"statusCounts":{"MARGINAL":1}}},
"v6.2.0a":
{"category":"v6.2.0a",
"count":{"statusCounts":{"MARGINAL":1}}},
"v7.3.0_main_bld21":
{"category":"v7.3.0_main_bld21",
"count":{"statusCounts":{"HEALTHY":4,"DOWN":1,"MARGINAL":5}}},
"v7.3.0_main_bld07":
{"category":"v7.3.0_main_bld07",
"count":{"statusCounts":{"MARGINAL":1}}},
"v7.3.0_main_bld18":
{"category":"v7.3.0_main_bld18",
"count":{"statusCounts":{"MARGINAL":1,"HEALTHY":1}}},
"v7.3.0_main_bld06":
{"category":"v7.3.0_main_bld06",
"count":{"statusCounts":{"HEALTHY":1}}},
"v7.2.1":
{"category":"v7.2.1",
"count":{"statusCounts":{"MARGINAL":1,"HEALTHY":2}}},
"v7.2.0":
{"category":"v7.2.0",
"count":{"statusCounts":{"HEALTHY":1}}},
"v6.0.0":
{"category":"v6.0.0",
"count":{"statusCounts":{"MARGINAL":1}}},
"v7.1.1a_rc1_bld04":
{"category":"v7.1.1a_rc1_bld04",
"count":{"statusCounts":{"DOWN":1}}},
"v7.3.0_main_bld11":
{"category":"v7.3.0_main_bld11",
"count":{"statusCounts":{"HEALTHY":1}}}},
"category":"FIRMWARE_VERSION"},
"CONTACT":
{"counts":
{"Field Support.":
{"category":"Field Support.",
"count":{"statusCounts":{"HEALTHY":10,"DOWN":2,"MARGINAL":11}}}},
"category":"CONTACT"}}},
5
Brocade Network Advisor REST API Guide 83
53-1003160-01
Page 98

5
Summary data
"summaryName":"AssetClassificationSummary",
"timeLine":null,
"timeScope":null,
"limit":null,
"portScope":null,
"descending":null}
84 Brocade Network Advisor REST API Guide
53-1003160-01
Page 99

Network object count summary
Retrieves network object count summary data. The returned summary is
NetworkObjectCountSummary.
GET URIs
URI Description
Summary data
5
<BASE_URI>/resourcegroups/rgkey/networkobjectcount
summary
<BASE_URI>/resourcegroups/rgkey/fcfabrics/fcfkey/net
workobjectcountsummary
Retrieves network object count summary data for the
specified resource group.
Retrieves network object count summary data for the
specified FC fabric.
Path parameters
Name Description
rgkey Resource group identifier.
fcfkey FC fabric identifier.
Example
The following is an example of returned summary data in the JSON format:
{"summary":
{"fabricCount":4,
"switchCount":23,
"hostCount":0,
"ipDeviceCount":1,
"ethernetFabricCount":0},
"summaryName":"NetworkObjectCountSummary",
"timeLine":null,
"timeScope":null,
"limit":null,
"portScope":null,
"descending":null}
This example shows that there are four fabrics and 23 switches in the network.
Brocade Network Advisor REST API Guide 85
53-1003160-01
Page 100

5
Summary data
Events summary
Specifies the count of events of a particular type for a particular severity. The returned summary is
EventsSummary.
GET URIs
URI Description
<BASE_URI>/resourcegroups/rgkey/eventssummary?tim
escope=<value>
<BASE_URI>/resourcegroups/rgkey/fcfabrics/fcfkey/eve
ntssummary?timescope=<value>
<BASE_URI>/resourcegroups/rgkey/fcswitches/fcskey/e
ventssummary?timescope=<value>
<BASE_URI>/resourcegroups/rgkey/fcfabrics/fcfkey/fcs
witches/fcskey/eventssummary?timescope=<value>
Retrieves event count summary data for the specified
resource group.
Retrieves event count summary data for the specified
FC fabric.
Retrieves event count summary data for the specified
FC switch.
Retrieves event count summary data for the specified
FC switch of the specified FC fabric.
Path parameters
Name Description
rgkey Resource group identifier.
fcfkey FC fabric identifier.
fcskey FC switch identifier.
Example
The following is an example of returned summary data in the JSON format:
{"summary":
"eventsSeverityCounter":
{"emergencyCount":{"trapCount":0,"inmEventCount":0,"securityCount":0,"syslogCount":0},
"alertCount":{"trapCount":0,"inmEventCount":0,"securityCount":0,"syslogCount":0},
"criticalCount":{"trapCount":0,"inmEventCount":0,"securityCount":0,"syslogCount":0},
"errorCount":{"trapCount":0,"inmEventCount":96,"securityCount":0,"syslogCount":0},
"warningCount":{"trapCount":0,"inmEventCount":1,"securityCount":0,"syslogCount":0},
"noticeCount":{"trapCount":0,"inmEventCount":0,"securityCount":0,"syslogCount":0},
"infoCount":{"trapCount":0,"inmEventCount":4,"securityCount":0,"syslogCount":16},
"debugCount":{"trapCount":0,"inmEventCount":0,"securityCount":0,"syslogCount":0}}},
"summaryName":"EventsSummary",
"timeLine":null,
"timeScope":"ThirtyMinutes",
"limit":null,
"portScope":null,
"descending":null}
This example indicates that there is one INM event at the WARNING level and 16 syslog events at
the INFO level.
86 Brocade Network Advisor REST API Guide
53-1003160-01
 Loading...