

Page 1

®
53-1003220-01
11 July 2014
Brocade Network Advisor
Port Commissioning Quick Start Guide
Supporting Network Advisor 12.3.0
Page 2

Copyright © 2014 Brocade Communications Systems, Inc. All Rights Reserved.
Brocade, Brocade Assurance, the B-wing symbol, DCX, Fabric OS, MLX, SAN Health, VCS, and VDX are registered trademarks, and AnyIO, Brocade
One, CloudPlex, Effortless Networking, ICX, NET Health, OpenScript, and The Effortless Network are trademarks of Brocade Communications
Systems, Inc., in the United States and/or in other countries. Other brands, products, or service names mentioned may be trademarks of their
respective owners.
Notice: This document is for informational purposes only and does not set forth any warranty, expressed or implied, concerning any equipment,
equipment feature, or service offered or to be offered by Brocade. Brocade reserves the right to make changes to this document at any time,
without notice, and assumes no responsibility for its use. This informational document describes features that may not be currently available.
Contact a Brocade sales office for information on feature and product availability. Export of technical data contained in this document may
require an export license from the United States government.
The authors and Brocade Communications Systems, Inc. shall have no liability or responsibility to any person or entity with respect to any loss,
cost, liability, or damages arising from the information contained in this book or the computer programs that accompany it.
The product described by this document may contain “open source” software covered by the GNU General Public License or other open source
license agreements. To find out which open source software is included in Brocade products, view the licensing terms applicable to the open
source software, and obtain a copy of the programming source code, please visit
http://www.brocade.com/support/oscd.
Brocade Communications Systems, Incorporated
Corporate and Latin American Headquarters
Brocade Communications Systems, Inc.
130 Holger Way
San Jose, CA 95134
Tel: 1-408-333-8000
Fax: 1-408-333-8101
E-mail: info@brocade.com
European Headquarters
Brocade Communications Switzerland Sàrl
Centre Swissair
Tour B - 4ème étage
29, Route de l'Aéroport
Case Postale 105
CH-1215 Genève 15
Switzerland
Tel: +41 22 799 5640
Fax: +41 22 799 5641
E-mail: emea-info@brocade.com
Asia-Pacific Headquarters
Brocade Communications Systems China HK, Ltd.
No. 1 Guanghua Road
Chao Yang District
Units 2718 and 2818
Beijing 100020, China
Tel: +8610 6588 8888
Fax: +8610 6588 9999
E-mail: china-info@brocade.com
Asia-Pacific Headquarters
Brocade Communications Systems Co., Ltd. (Shenzhen WFOE)
Citic Plaza
No. 233 Tian He Road North
Unit 1308 – 13th Floor
Guangzhou, China
Tel: +8620 3891 2000
Fax: +8620 3891 2111
E-mail: china-info@brocade.com
Document History
Title Publication number Summary of changes Date
Brocade Network Advisor Port Commissioning Quick Start Guide 53-1003278-01 New document. May 2104
Brocade Network Advisor Port Commissioning Quick Start Guide 53-1003220-01 New document. July 2014
2 of 21 Brocade Network Advisor Port Commissioning Quick Start Guide
Publication Number: 53-1003220-01
Page 3

In this document
NOTE
•Port commissioning overview . . . . . . . . . . . . . . . . . . . . . . . . . . . . . . . . . . . . . 3
•Configuring port commissioning . . . . . . . . . . . . . . . . . . . . . . . . . . . . . . . . . . . 5
•CIMOM servers . . . . . . . . . . . . . . . . . . . . . . . . . . . . . . . . . . . . . . . . . . . . . . . . . 5
•F-Port commissioning. . . . . . . . . . . . . . . . . . . . . . . . . . . . . . . . . . . . . . . . . . . 11
•E-Port commissioning . . . . . . . . . . . . . . . . . . . . . . . . . . . . . . . . . . . . . . . . . . 13
•Port commissioning by switch . . . . . . . . . . . . . . . . . . . . . . . . . . . . . . . . . . . . 14
•Port commissioning by blade . . . . . . . . . . . . . . . . . . . . . . . . . . . . . . . . . . . . 15
•Port commissioning deployment results . . . . . . . . . . . . . . . . . . . . . . . . . . . 17
•Viewing a port commissioning deployment report. . . . . . . . . . . . . . . . . . . . 18
•CIMCLI trouble shooting. . . . . . . . . . . . . . . . . . . . . . . . . . . . . . . . . . . . . . . . . 20
Port commissioning overview
Port commissioning is only supported on FICON devices running Fabric OS 7.1 or later.
Port commissioning provides an automated mechanism to remove an E-Port or F-Port from use (decommission) and
to put it back in use (recommission). This feature identifies the target port and communicates the intention to
decommission or recommission the port to those systems within the fabric affected by the action. Each affected
system can agree or disagree with the action, and these responses are automatically collected before a port is
decommissioned or recommissioned.
Note the following restrictions of port commissioning:
• The local switch and the remote switch on the other end of the E-Port or F-Port must both be running Fabric OS
7.1. 0 or l a t e r.
• Port commissioning is not supported on links configured for encryption or compression.
• Port commissioning is not supported on ports with DWDM (dense wavelength-division multiplexing), CWDM
(corse wavelength-division multiplexing), or TDM (time-division multiplexing).
• E-Port commissioning requires that the lossless feature is enabled on both the local switch and the remote
switch.
• Fabric tracking must be enabled to maintain the decommissioned port details (such as port type, device port
wwn, and so on). Do not accept changes in the Management application client.
For more information about fabric tracking, refer to Brocade Network Advisor User Manual“Enabling fabric
tracking” on page 289.
Brocade Network Advisor Port Commissioning Quick Start Guide 3 of 21
Publication Number: 53-1003220-01
Page 4

z/OS requirements
NOTE
NOTE
You must meet the following requirements to configure port decommissioning and recommissioning through the
Management application.
• Make sure the z/OS is running 1.12 or later to support z/OS CIM and port decommission.
• Make sure there is a working CIMOM server on each LPAR (logical partition) that participates in port
decommission.
For more information, refer to the sections: Quick guide: CIM server setup and verification, CIM server security
setup, and Setting up the CIM server for storage management in the Common Information Model User’s Guide,
version 1 release 13 (part number: SC33-7998-08).
• Make sure you have SMP/E (System Modification Program/Extended), RACF (Resource Access Control Facility),
and UNIX systems services skills.
• Make sure you have the following IBM APARs (Authorized Program Analysis Reports) for z/OS CIM (CIMOM) and
port decommission on z/OS version 1, release 13.
- OA38145 — z/OS CIM APAR in support of port decommissioning
- OA38303 and HA42524 — IOS port decommissioning APARs
OA38303 requires OA40538 and OA40037.
- OA40538 — Switch CUP diagnostics APAR
- OA40037 — ESCON director code in support of switch CUP diagnostics APAR
- OA40876 — IOS switch SPOF enhancements APAR
Contact the IBM Support Center for the latest APAR updates.
• Make sure you have a Common Event Adapter (CEA) running in full function mode on each LPAR that has a
CIMOM server that participates in port decommission.
For more information, refer to Customizing for CEA in the z/OS Planning for Installation, version 1 release 13
(part number: GA22-7504-28).
• Make sure that the CIMOM server runs as a started task (CFZCIM) on each z/OS LPAR. The CIMOM server must
be running for F_Port decommission to function properly.
• Make sure you have access to the CLI (cimcli command) for troubleshooting.
For more information, refer to “CIMCLI trouble shooting” on page 20.
4 of 21 Brocade Network Advisor Port Commissioning Quick Start Guide
Publication Number: 53-1003220-01
Page 5

Configuring port commissioning
The following procedure provides an overview of the steps you must complete to configure port commissioning.
1. Make sure you meet the z/OS (mainframe operating system) requirements.
For more information, refer to “z/OS requirements” on page 4.
2. Register each CIMOM servers within the fabric affected by the action.
For step-by-step instructions, refer to “Registering a CIMOM server” on page 5.
3. Decommission an F-Port.
For step-by-step instructions, refer to “Decommissioning an F-Port” on page 11.
4. Review the decommission deployment report.
For step-by-step instructions, refer to “Viewing a port commissioning deployment report” on page 18.
5. Recommission the F-Port.
For step-by-step instructions, refer to “Recommissioning an F-Port” on page 12.
6. Review the recommission deployment report.
For step-by-step instructions, refer to “Viewing a port commissioning deployment report” on page 18.
You can also configure port commissioning for E-Ports (“E-Port commissioning” on page 13), all ports on a blade
(“Port commissioning by blade” on page 15), or all ports on a switch (“Port commissioning by switch” on
page 14).
CIMOM servers
Before you can decommission or recommission an F-Port, you must register the CIMOM servers within the fabric
affected by the action.
Registering a CIMOM server
Make sure you obtain the CIMOM server system and credentials from the CIMOM server administrator and the
authorized user ID from the RACF administrator.
1. Select Configure > Port Commissioning > Setup.
The Port Commissioning Setup dialog box displays (Figure 1).
Brocade Network Advisor Port Commissioning Quick Start Guide 5 of 21
Publication Number: 53-1003220-01
Page 6
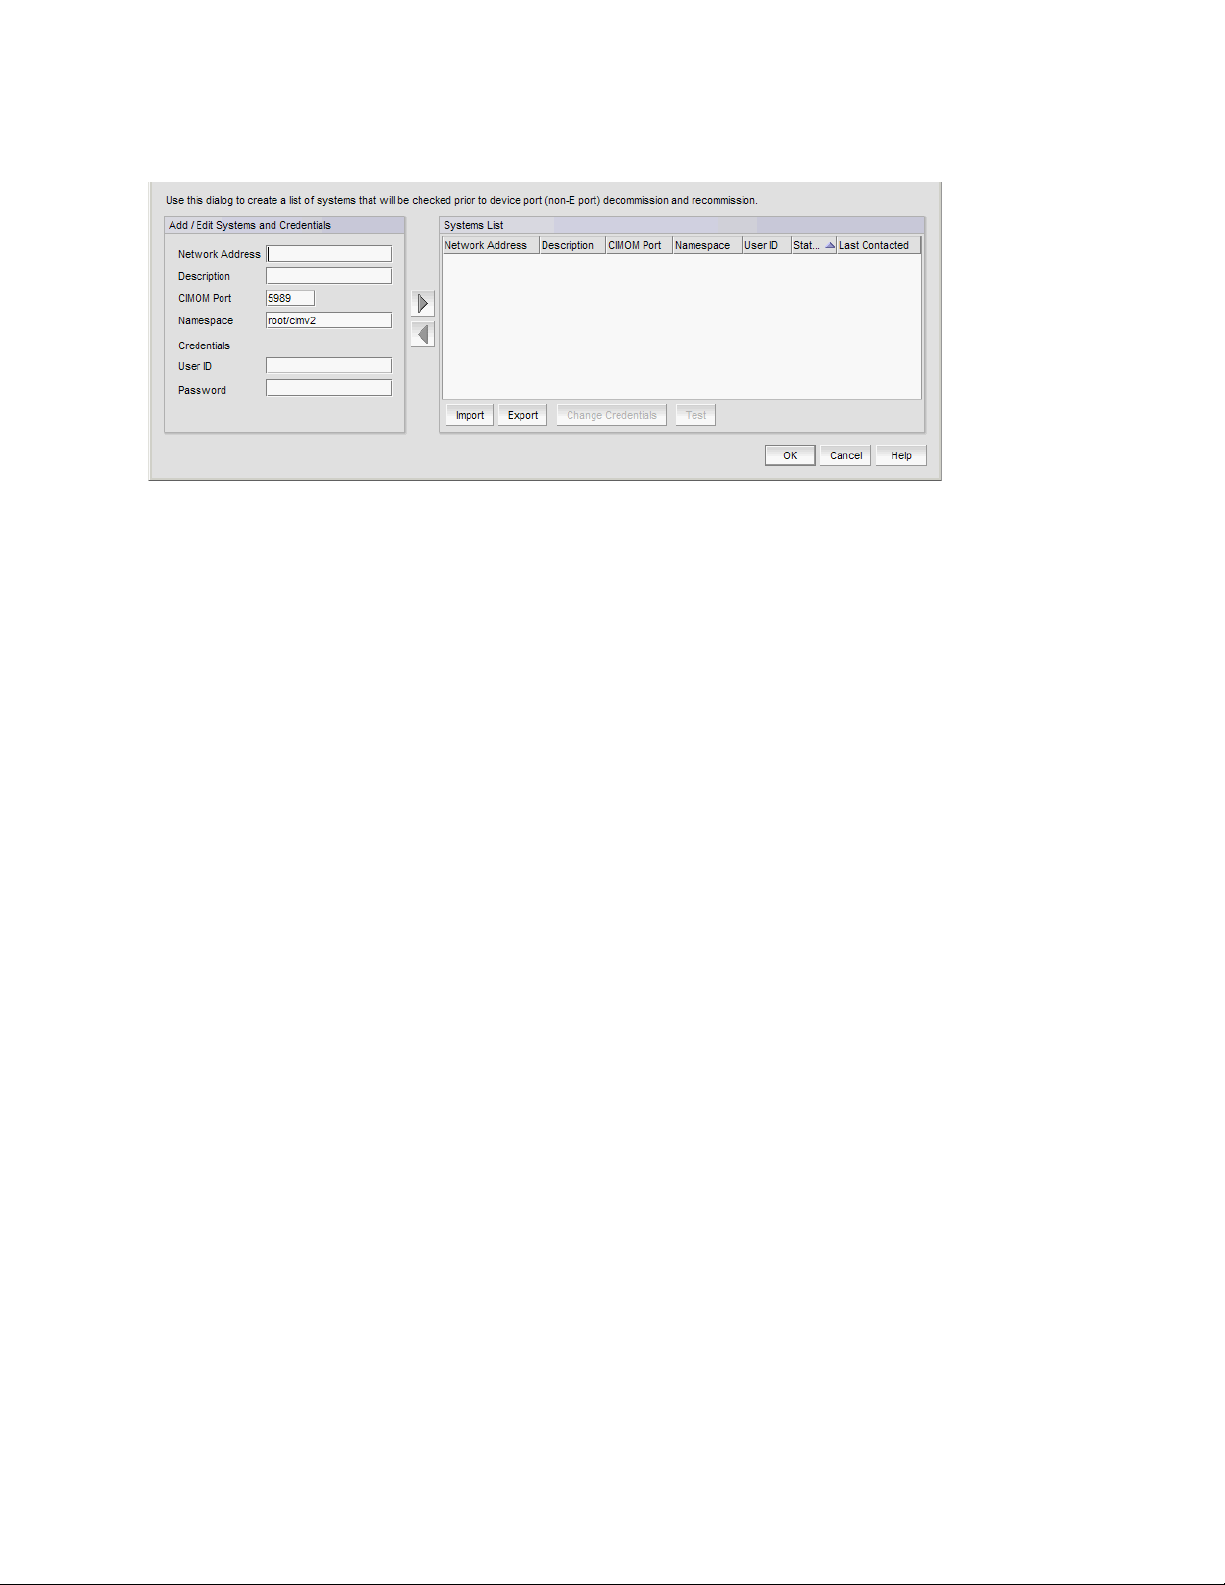
FIGURE 1 Port Commissioning Setup dialog box
2. Enter the IP address (IPv4 or IPv6 format) or host name of the CIMOM server in the Network Address field.
3. (Optional) Enter a description of the CIMOM server in the Description field.
The description cannot be over 1024 characters.
4. Enter the CIMOM port number for the CIMOM server in the CIMOM Port field.
The default port number is 5989.
5. Enter the namespace of the CIM_FCPort in the Namespace field.
The default namespace is root/cimv2.
6. (Optional) Enter a user identifier for the CIMOM server in the Credentials User ID field.
The credentials user identifier cannot be over 128 characters.
7. (Optional) Enter a password in the Password field.
The password cannot be over 512 characters.
8. Click the right arrow button to add the new CIMOM server and credentials to the Systems List.
The application validates the mandatory fields.
9. Select the new CIMOM server in the System List and click Tes t to check connectivity.
When testing is complete, the updated status displays in the Status column of the Systems List for the selected
CIMOM server.
10. Click OK or Apply to save your work and save the CIMOM server details in the database.
6 of 21 Brocade Network Advisor Port Commissioning Quick Start Guide
Publication Number: 53-1003220-01
Page 7

Viewing existing CIMOM servers
NOTE
Port commissioning is only supported on FICON devices running Fabric OS 7.1 or later.
Before you can decommission or recommission an F-Port, you must register the CIMOM servers within the fabric
affected by the action. For more information, refer to “Registering a CIMOM server” on page 5.
1. Select Configure > Port Commissioning > Setup.
The Port Commissioning Setup dialog box displays (Figure 1).
The Port Commissioning Setup dialog box has two main areas. The Add/Edit Systems and Credentials area
enables you to register CIMOM servers (system and credentials) one at a time and contains the following fields
and components:
• Network Address — Enter the IP address (IPv4 or Ipv6 format) or host name of the CIMOM server in the field.
• Description — (Optional) Enter a description of the CIMOM server in the field. The description cannot be over
1024 characters.
• CIMOM Port — Enter the CIMOM port number for the CIMOM server in the field. The default port number is
5989.
• Namespace — Enter the namespace of the CIM_FCPort in the field. The default namespace is root/cimv2.
• Credentials - User ID (Optional) — Enter a user identifier for the CIMOM server in the field. The credentials
user identifier cannot be over 128 characters.
• Credentials - Password (Optional) — Enter a password in the field. The password cannot be over 512
characters.
• Left arrow button — Select a CIMOM server in the Systems List and click to move the defined CIMOM server
credentials to the Add/Edit Systems and Credentials area for editing or deletion.
• Right arrow button — Click to move the defined CIMOM server credentials form the Add/Edit Systems and
Credentials area to the Systems List.
The Systems List details the defined CIMOM server and contains the following data:
• Network Address — The IP address (IPv4 or Ipv6 format) or host name of the system.
• Description — User-defined description of the system.
• CIMOM Port — The CIMOM port number of the system.
• Namespace — The namespace of the CIM_FCPort.
• User ID — The user identifier for the system.
• Status — The system connectivity status. Updates when you test the reachability of the CIMOM server and
when you contact the CIMOM server to respond to the F-Port decommission or recommission request. Valid
status options include:
OK — CIMOM server contact successful with current credentials.
Not Contacted Yet — CIMOM servers configured, connectivity not tested yet.
Credentials Updated — Credentials changed, connectivity not tested yet.
Credentials Failed — CIMOM server contact failed with current credentials.
Not Reachable — CIMOM server not reachable.
Wrong Namespace — CIMOM server namespace is incorrect.
• Last Contacted — The last time you contacted the system. Updates when you test the reachability of the
CIMOM server and when you contact the CIMOM server to respond to the F-Port decommission or
recommission request.
Brocade Network Advisor Port Commissioning Quick Start Guide 7 of 21
Publication Number: 53-1003220-01
Page 8

2. To register a CIMOM server, refer to “Registering a CIMOM server” on page 5.
3. To edit a CIMOM server, refer to “Editing CIMOM server credentials” on page 8.
4. To import CIMOM servers, refer to “Importing CIMOM servers and credentials” on page 9.
5. To export CIMOM servers, refer to “Exporting CIMOM servers and credentials” on page 9.
6. To edit CIMOM server credentials for one or more CIMOM servers, refer to “Changing CIMOM server credentials”
on page 10.
7. To validate CIMOM server credentials, refer to “Testing CIMOM server credentials” on page 10.
8. To delete CIMOM servers, refer to “Deleting CIMOM server credentials” on page 11.
9. Click OK to close Port Commissioning Setup dialog box.
Editing CIMOM server credentials
1. Select Configure > Port Commissioning > Setup.
The Port Commissioning Setup dialog box displays (Figure 1).
2. Select a CIMOM server from the System List and click the left arrow button to edit the CIMOM server credentials.
3. (Optional) Edit the description of the CIMOM server in the Description field.
The description cannot be over 1024 characters.
4. Enter the CIMOM port number for the CIMOM server in the CIMOM Port field.
The default port number is 5989.
5. Enter the namespace of the CIM_FCPort in the Namespace field.
The default namespace is root/cimv2.
6. (Optional) Enter a user identifier for the CIMOM server in the Credentials User ID field.
The credentials user identifier cannot be over 128 characters.
7. (Optional) Enter a password in the Password field.
The password cannot be over 512 characters.
8. Click the right arrow button to update the CIMOM server credentials in the Systems List.
9. Click OK or Apply to save your work and save the CIMOM server details in the database.
8 of 21 Brocade Network Advisor Port Commissioning Quick Start Guide
Publication Number: 53-1003220-01
Page 9

Importing CIMOM servers and credentials
NOTE
You can import one or more CIMOM servers (system and credentials) using a CSV formatted file. You can import a
maximum of 2,000 CIMOM servers.
1. Select Configure > Port Commissioning > Setup.
The Port Commissioning Setup dialog box displays (Figure 1).
2. Click Import to import CIMOM server information from a file.
The CSV file must use the following format:
Network Address, User ID,CIMOM Port, Namespace, Description, Password
Example
10.24.48.100,user,2015,root/cimv2,IBM Host,password
Network Address is mandatory. If you do not provide values for the User ID,CIMOM Port, Namespace,
Description, and Password; the Management application provides default values.
3. Browse to the location of the file (.csv format) and click Open.
The imported CIMOM servers display in the Systems List.
4. Click OK or Apply to save your work and save the CIMOM server details in the database.
Exporting CIMOM servers and credentials
1. Select Configure > Port Commissioning > Setup.
The Port Commissioning Setup dialog box displays (Figure 1).
2. Click Export to export CIMOM server information to a file.
The Export Files dialog box displays.
3. Browse to the location where you want to export the file (.csv format) and click Save.
The CSV file uses the following format:
Network Address, User ID,CIMOM Port, Namespace, Description,
Example
10.24.48.100,user,2015,root/cimv2,IBM Host,
Export does not include the password. You can edit the exported file to add the password to the credentials.
4. Click OK to close the Port Commissioning Setup dialog box.
Brocade Network Advisor Port Commissioning Quick Start Guide 9 of 21
Publication Number: 53-1003220-01
Page 10

Changing CIMOM server credentials
You can edit the CIMOM server credentials for one or more CIMOM servers at the same time.
1. Select Configure > Port Commissioning > Setup.
The Port Commissioning Setup dialog box displays (Figure 1).
2. Select one or more CIMOM servers from the System List table and click Change Credentials.
The Edit Credentials dialog box displays. If you selected one CIMOM server, the credentials for the selected
server display in the dialog box. If you selected more than one CIMOM server, the credential fields are empty.
3. (Optional) Enter a user identifier for the CIMOM server in the User ID field.
The user identifier cannot be over 128 characters.
4. (Optional) Enter a password in the Password field.
The password cannot be over 512 characters.
5. Click OK to close the Edit Credentials dialog box.
The Port Commissioning Setup dialog box and the status of the selected CIMOM server rows displays
“Credentials Updated”.
To validate the credentials, refer to “Testing CIMOM server credentials” on page 10.
6. Click OK to close the Port Commissioning Setup dialog box.
Testing CIMOM server credentials
You should validate the CIMOM server credentials before you decommission or recommission ports. During the
decommission or recommission of an F-Port, the Management application validates the CIMOM server credentials.
1. Select a device and select Configure > Port Commissioning > Setup.
The Port Commissioning Setup dialog box displays (Figure 1).
2. Select one or more CIMOM servers from the System List table and click Tes t.
The status of the selected CIMOM server rows display “Testing” in the System List table. When testing is
complete, the CIMOM server connectivity status displays. Valid status options include:
• OK — CIMOM server contact successful with current credentials.
• Not Contacted Yet — CIMOM servers configured, connectivity not tested yet.
• Credentials Updated — Credentials changed, connectivity not tested yet.
• Credentials Failed — CIMOM server contact failed with current credentials.
• Not Reachable — CIMOM server not reachable.
• Wrong Namespace — CIMOM server namespace is incorrect.
3. Click OK to close the Port Commissioning Setup dialog box.
When the test is complete, an application event displays in the Master Log detailing success or failure.
10 of 21 Brocade Network Advisor Port Commissioning Quick Start Guide
Publication Number: 53-1003220-01
Page 11

Deleting CIMOM server credentials
NOTE
NOTE
NOTE
1. Select Configure > Port Commissioning > Setup.
The Port Commissioning Setup dialog box displays (Figure 1).
2. Select one or more CIMOM server from the System List table and click the left arrow button.
The details for the last selected CIMOM server row displays in the Add/Edit System and Credentials area.
3. Confirm that this is the CIMOM server you want to delete and click OK or Apply to delete the CIMOM server from
the Port Commissioning Setup dialog box.
When the deletion is complete, an application event displays in the Master Log detailing success or failure.
F-Port commissioning
Although you can use any of the following methods to access the F-Port commissioning commands, individual
procedures only include one method.
• From the main menu, select the F-Port in the Product List or Topology, then select Configure > Port
Commissioning > Decommission/Recommission > Port.
• From the Product List, right-click the F-Port and select Decommission/Recommission > Port.
• From the Topology, right-click the F-Port and select Decommission/Recommission > Port.
• From a Dashboard widget, right-click the F-Port and select Decommission/Recommission > Port.
Decommissioning an F-Port
You must configure at least one CIMOM server (refer to “Registering a CIMOM server” on page 5) before you can
decommission an F-Port.
Fabric tracking must be enabled (refer to Brocade Network Advisor User Manual“Enabling fabric tracking” on
page 289) to maintain the decommissioned port details (such as port type, device port WWN, and so on). Do not
accept changes in the Management application client.
1. Select the F-Port in the Product List, then select Configure > Port Commissioning > Decommission > Port.
The Port Commission Confirmation dialog box displays.
2. Choose one of the following options:
• Apply Default Settings (default) — Select to have the Management application contact all registered CIMOM
servers within the fabric affected by the action and obtain the status from each CIMOM server. If all CIMOM
servers are reachable, the Management application sends a CAL Request to decommission the port. If even
one CIMOM server is not okay, decommissioning fails.
If any CIMOM server is not reachable or the credentials fail, F-Port decommission does not occur.
Brocade Network Advisor Port Commissioning Quick Start Guide 11 of 21
Publication Number: 53-1003220-01
Page 12

• Force — Select to force decommission on the N-Port connected to the F-Port. The Management application
NOTE
NOTE
NOTE
contacts all registered CIMOM servers within the fabric affected by the action, but forces the N-Port
decommission regardless of the CIMOM server response.
You cannot force decommission on an F-Port.
3. Click View Deployment Status to view the port commissioning results immediately (refer to “Port commissioning
deployment results” on page 17).
You can also view the deployment status in the deployment report at a later time (refer to “Viewing a port
commissioning deployment report” on page 18).
4. Click OK on the Port Commission Confirmation dialog box.
While decommissioning is in progress, a down arrow icon displays next to the port icon in the Product List. The
port decommissioning status (Port Decommission in Progress or Decommissioned F Port) displays in the
Additional Port Info field of the Product List. When decommission is complete, a deployment status message
displays.
When the decommission is complete, an application event displays in the Master Log detailing success or
failure.
Recommissioning an F-Port
You must configure at least one CIMOM server (refer to “Registering a CIMOM server” on page 5) before you can
recommission an F-Port.
Select the F-Port in the Product List, then select Configure > Port Commissioning > Recommission > Port.
F-Port recommission occurs whether or not any CIMOM server is not reachable.
While recommissioning is in progress, an up arrow icon displays next to the port icon in the Product List. The port
recommissioning status (Port Recommission in Progress or Recommissioned F Port) displays in the Additional Port
Info field of the Product List. You can view the port commissioning results in the deployment reports (refer to
“Viewing a port commissioning deployment report” on page 18).
When the recommission is complete, an application event displays in the Master Log detailing success or failure.
12 of 21 Brocade Network Advisor Port Commissioning Quick Start Guide
Publication Number: 53-1003220-01
Page 13

E-Port commissioning
NOTE
NOTE
NOTE
Although you can use any of the following methods to access the E-Port commissioning commands, individual
procedures only include one method.
• From the main menu, select the E-Port in the Product List or Topology, then select Configure > Port
Commissioning > Decommission/Recommission > Port.
• From the Product List, right-click the E-Port and select Decommission/Recommission > Port.
• From the Topology, right-click the E-Port and select Decommission/Recommission > Port.
• From a Dashboard widget, right-click the E-Port and select Decommission/Recommission > Port.
Decommissioning an E-Port
You must enable Lossless DLS on both the source and destination switches before you decommission an E-Port.
Fabric tracking must be enabled (refer to Brocade Network Advisor User Manual“Enabling fabric tracking” on
page 289) to maintain the decommissioned port details (such as port type, device port WWN, and so on). Do not
accept changes in the Management application client.
Select the E-Port in the Product List, then select Configure > Port Commissioning > Decommission > Port.
While decommissioning is in progress, a down arrow icon displays next to the port icon in the Product List. The port
decommissioning status (Port Decommission in Progress or Decommissioned E Port) displays in the Additional Port
Info field of the Product List. You can view the port commissioning results in the deployment reports (refer to
“Viewing a port commissioning deployment report” on page 18).
When the decommission is complete, an application event displays in the Master Log detailing success or failure.
Recommissioning an E-Port
You do not need to enable Lossless DLS before you recommission an E-Port.
Select the E-Port in the Product List, then select Configure > Port Commissioning > Recommission > Port.
While recommissioning is in progress, an up arrow icon displays next to the port icon in the Product List. The port
recommissioning status (Port Recommission in Progress or Recommissioned E Port) displays in the Additional Port
Info field of the Product List. You can view the port commissioning results in the deployment reports (refer to
“Generating a deployment report” on page 1709).
When the recommission is complete, an application event displays in the Master Log detailing success or failure.
Brocade Network Advisor Port Commissioning Quick Start Guide 13 of 21
Publication Number: 53-1003220-01
Page 14

Port commissioning by switch
NOTE
NOTE
NOTE
NOTE
Although you can use any of the following methods to access the port commissioning commands for a switch,
individual procedures only include one method.
• From the main menu, select the switch in the Product List or Topology, then select Configure > Port
Commissioning > Decommission/Recommission > All F-Ports on the Switch.
• From the Product List, right-click the switch and select Decommission/Recommission > All F-Ports on the
Switch.
• From the Topology, right-click the switch and select Decommission/Recommission > All F-Ports on the Switch.
• From a Dashboard widget, right-click the switch and select Decommission/Recommission > All F-Ports on the
Switch.
Decommissioning all ports on a switch
Fabric tracking must be enabled (refer to Brocade Network Advisor User Manual“Enabling fabric tracking” on
page 289) to maintain the decommissioned port details (such as port type, device port WWN, and so on). Do not
accept changes in the Management application client.
1. Select the switch or logical switch for which you want to decommission all ports in the Product List, then select
Configure > Port Commissioning > Decommission > All F-Ports on the Switch.
You can only decommission ports from the logical switch, not the physical chassis.
The Port Commission Confirmation dialog box displays.
2. Choose one of the following options:
• Apply Default Settings (default) — Select to have the Management application contact all registered CIMOM
servers within the fabric affected by the action and obtain the status from each CIMOM server. If all CIMOM
servers are reachable, the Management application sends a CAL Request to decommission the port. If even
one CIMOM server is not reachable, decommissioning fails.
• Force — Select to force decommission on the N-Port connected to the F-Port. The Management application
contacts all registered CIMOM servers within the fabric affected by the action, but forces the N-Port
decommission regardless of the CIMOM server response.
You cannot force decommission on an F-Port.
If any CIMOM server is not reachable or the credentials fail, port decommission does not occur.
3. Click OK on the Port Commission Confirmation dialog box.
While decommissioning is in progress, a down arrow icon displays next to the port icon in the Product List. You
can view the port commissioning results in the deployment reports (refer to “Viewing a port commissioning
deployment report” on page 18).
When the decommission is complete, an application event displays in the Master Log detailing success or
failure.
14 of 21 Brocade Network Advisor Port Commissioning Quick Start Guide
Publication Number: 53-1003220-01
Page 15

Recommissioning all ports on a switch
NOTE
NOTE
NOTE
NOTE
Select the switch or logical switch for which you want to recommission all ports in the Product List, then select
Configure > Port Commissioning > Recommission > All F-Ports on the Switch.
You can only recommission ports from the logical switch, not the physical chassis.
While recommissioning is in progress, an up arrow icon displays next to the port icon in the Product List. You can
view the port commissioning results in the deployment reports (refer to “Viewing a port commissioning deployment
report” on page 18).
When the recommission is complete, an application event displays in the Master Log detailing success or failure.
Port commissioning by blade
Although you can use any of the following methods to access the port commissioning commands for a blade,
individual procedures only include one method.
• From the main menu, select the blade in the Product List or Topology, then select Configure > Port
Commissioning > Decommission/Recommission > All Ports on the Blade.
• From the Product List, right-click the blade and select Decommission/Recommission > All Ports on the Blade.
• From the Topology, right-click the blade and select Decommission/Recommission > All Ports on the Blade.
• From a Dashboard widget, right-click the blade and select Decommission/Recommission > All Ports on the
Blade.
Decommissioning all ports on a blade
(Virtual Fabrics only) All ports on the blade must be managed by the Management application.
Fabric tracking must be enabled (refer to Brocade Network Advisor User Manual“Enabling fabric tracking” on
page 289) to maintain the decommissioned port details (such as port type, device port WWN, and so on). Do not
accept changes in the Management application client.
You can only recommission ports from the logical switch, not the physical chassis.
1. Select a port on the blade for which you want to decommission all ports in the Product List, then select
Configure > Port Commissioning > Decommission > All Ports on the Blade.
The Port Commission Confirmation dialog box displays.
2. Choose one of the following options:
• Apply Default Settings (default) — Select to have the Management application contact all registered CIMOM
servers within the fabric affected by the action and obtain the status from each CIMOM server. If all CIMOM
servers are reachable, the Management application sends a CAL Request to decommission the port. If even
one CIMOM server is not reachable, decommissioning fails.
Brocade Network Advisor Port Commissioning Quick Start Guide 15 of 21
Publication Number: 53-1003220-01
Page 16

• Force — Select to force decommission on the N-Port connected to the F-Port. The Management application
NOTE
NOTE
NOTE
NOTE
contacts all registered CIMOM servers within the fabric affected by the action, but forces the N-Port
decommission regardless of the CIMOM server response.
You cannot force decommission on an F-Port.
If any CIMOM server is not reachable or the credentials fail, port decommission does not occur.
3. Click OK on the Port Commission Confirmation dialog box.
While decommissioning is in progress, a down arrow icon displays next to the port icon in the Product List. You
can view the port commissioning results in the deployment reports (refer to “Viewing a port commissioning
deployment report” on page 18).
When the decommission is complete, an application event displays in the Master Log detailing success or
failure.
Recommissioning all ports on a blade
All ports on the blade must be managed by the Management application.
You can only recommission ports from the logical switch, not the physical chassis.
Select a port on the blade for which you want to recommission all ports in the Product List, then select Configure >
Port Commissioning > Recommission > All Ports on the Switch/Blade.
While recommissioning is in progress, an up arrow icon displays next to the port icon in the Product List. You can
view the port commissioning results in the deployment reports (refer to “Viewing a port commissioning deployment
report” on page 18).
When the recommission is complete, an application event displays in the Master Log detailing success or failure.
16 of 21 Brocade Network Advisor Port Commissioning Quick Start Guide
Publication Number: 53-1003220-01
Page 17

Port commissioning deployment results
FIGURE 2 Port commissioning deployment results
The Deployment Results contains the following data:
• Date and Time — The date and time of the deployment.
• Export — Select to export the results to CSV or HTML (refer to “Exporting and saving a report to a file” on
page 19).
• Email — Select to e-mail the results (refer to “E-mailing a report” on page 19).
• Configuration Name — Name of the deployment.
For example, Decommission/Recommission - switch_name, Decommission/Recommission - switch_name -
blade, or Decommission/Recommission - switch_name - Ports.
• Product — The product name.
• Status — The status of the deployment. For example, Success or Failed.
• Reason — The port level status of the decommission or recommission. Also, provides the following data for each
CIMOM server associated with the port:
- IP Address — The IP address of the CIMOM server.
- Reason — The deployment request and whether it was successful or not.
- Status — The status of the deployment. For example, Allowed or Failed.
• A list of any CIM errors that occurred during the port commissioning.
Here are a couple of examples of the possible CIM errors:
CIM_ERR_FAILED: A general error occurred that is not covered by a more specific error code.
CIM_ERR_ACCESS_DENIED: Access to a CIM resource was not available to the client.
CIM_ERR_INVALID_NAMESPACE: The target namespace does not exist.
Brocade Network Advisor Port Commissioning Quick Start Guide 17 of 21
Publication Number: 53-1003220-01
Page 18

Viewing a port commissioning deployment report
To access a port commissioning deployment report, complete the following steps.
1. Select Configure > Task Scheduler.
The Task Scheduler dialog box displays.
2. Click the Log tab.
A list of deployment configurations that are executed and the status of each displays.
3. Select the port commissioning deployment report you want to view and click Report.
4. Review the contents of the port commissioning deployment report.
The Configuration Deployment Report table contains the following parameters:
• Date and Time — The date and time of the deployment.
• Export — Select to export the results to CSV or HTML (refer to “Exporting and saving a report to a file” on
page 19).
• Email — Select to e-mail the results (refer to “E-mailing a report” on page 19).
• Configuration Name — Name of the deployment.
For example, Decommission/Recommission - switch_name, Decommission/Recommission - switch_name -
blade, or Decommission/Recommission - switch_name - Ports.
• Description — A description of the deployment.
• Module — The module name. For example, Port Commission.
• Sub Module — The sub module name.
• Deployment Time — Time when the deployment occurred. Click to launch the detailed deployment results.
• Status — Status of the deployment.
• Creator — Name of the user that performed the deployment.
The Deployment Results table contains the following data:
• Configuration Name — Name of the deployment.
For example, Decommission/Recommission - switch_name, Decommission/Recommission - switch_name -
blade, or Decommission/Recommission - switch_name - Ports.
• Product — The product name.
• Status — The status of the deployment. For example, Success or Failed.
• Reason — The port level status of the decommission or recommission. Also, provides the following data for
each CIMOM server associated with the port:
IP Address — The IP address of the CIMOM server.
Reason — The deployment request and whether it was successful or not.
Status — The status of the deployment. For example, Allowed or Failed.
5. Click the close button (X) to close the deployment report.
18 of 21 Brocade Network Advisor Port Commissioning Quick Start Guide
Publication Number: 53-1003220-01
Page 19

Exporting and saving a report to a file
NOTE
You can save a report to a CSV (comma separated values) or HTML file. Each report has an Export list at the top right
corner of the page.
1. Select one of the following from the Export list:
• Select Export as HTML.
• Select Export as CSV.
2. Browse to the location where you want to save the file and click Save.
E-mailing a report
You can e-mail a report in a CSV (comma separated values) or HTML file. Each report has an Email list at the top
right corner of the page. To export reports to an e-mail recipient, you must configure e-mail event notification.
1. Select one of the following from the Email list:
• Select Email as HTML.
• Select Email as CSV.
The Repor t via E-mail dialog box displays.
2. Click the ellipsis button next to the E-mail Recipients field.
The Users dialog box displays.
3. Select the preconfigured e-mail user account from the list and click OK.
4. Enter additional e-mail addresses in the Other Recipients field.
5. Enter text in the Subject field to change the subject of the e-mail.
6. Enter text in the Body field to send a message with the report.
7. C l ic k Send to send the report.
Mozilla Firefox Browser does not support the window close script. Click the browser close button (X) to cancel.
8. Browse to the location where you want to save the file and click Save.
Brocade Network Advisor Port Commissioning Quick Start Guide 19 of 21
Publication Number: 53-1003220-01
Page 20

CIMCLI trouble shooting
NOTE
NOTE
Use the following sections to obtain data to support trouble shooting.
Obtaining FCPort and PCCUPort data
To obtain CIMOM supporting documentation for troubles hooting, complete the following steps.
1. Log onto the TSO.
You need a very large TSO user region size for the cimcli command.
2. From the ISPF Primary Option Menu, select option 6.
3. Enter the TSO OMVS to open the z/OS USS shell.
4. Enter
5. Enter
cimcli execquery “select * from IBMzOS_FCPort” to obtain the obtain the FICON channel FCPort
control unit’s known to CIMOM on a LPAR.
cimcli execquery “select * from IBMzOS_FCCUPort” to obtain the obtain the FICON channel
DASD/Tape (FCCUPort) control unit’s known to CIMOM on a LPAR.
IEE169I VARY REJECTED message
If you receive the “IEE169I VARY REJECTED, PATH(dddd,xx) OFFLINE DUE TO sss” message on the z/OS, use the
“force” option to vary the path online as the IBM message text indicates.
Enabling the CIMOM Trace file
To enable the CIMOM Trace file for trouble shooting, complete the following steps.
1. Open the CIMOM trace file (cimserver.env) in a text editor (such as Notepad).
The CIMOM trace file is located in the /etc/wbem/ directory.
You must have superuser ‘SU’ access to change the cimserver.env file.
2. Enable the trace file by changing the file as follows:
#OSBASE_TRACE=0
#OSBASE_TRACE_FILE=/tmp/wbemosbase.trc
to
OSBASE_TRACE=4
OSBASE_TRACE_FILE=/tmp/wbemosbase.trc
20 of 21 Brocade Network Advisor Port Commissioning Quick Start Guide
Publication Number: 53-1003220-01
Page 21

Capturing Server and Client support save data
NOTE
To capture both server and client support save files, complete the following steps.
1. Select Monitor > Technical Support > SupportSave.
The SupportSave dialog box displays.
2. Select the Server SupportSave check box to run supportsave on the server.
3. Enter a file name for the server support save file in the File Name field.
The default file name is DCM-SS-Time_Stamp.
4. Select the Include Database check box to include the database in the support save and choose one of the
following options.
• Select the Partial (Excludes historical performance data and events) option to exclude historical
performance data and events from the database capture.
• Select the Full option to capture the entire database.
Clear the Include Database check box to exclude the database in the support save.
5. Select the Client SupportSave check box to run supportsave on the client.
6. Enter a file name for the client support save file in the File Name field.
The default file name is DCM-Client-SS-Time_Stamp.
7. C l ic k OK on the SupportSave dialog box.
8. Click OK on the message.
A progress message displays with a list of the steps to be performed:
• Capturing client support save
• Capturing logs and server data
• Capturing partial/full database
• Capturing data from the products
You cannot close the progress message and you cannot perform any other actions until the SupportSave is
complete.
The application generates separate master logs to show the status of the Server and Client Support save
collection.
You cannot change the destination directory for Server and Client support save. Here are the default directories:
• Server Support save location: Install_Home/support
• Client Support save locations:
(Local client) User_Home/Management_Application_Name/localhost/support
(Remote client) User_Home/Management_Application_Name/Server IP/support
Server support save initiated from the remote client is only available from a client installed on the server.
However, you can copy the server support save from the View Repository dialog box (using the Save button) to
the remote client location.
Brocade Network Advisor Port Commissioning Quick Start Guide 21 of 21
Publication Number: 53-1003220-01
 Loading...