Bosch SHX43R56UC, SHE43RL6UC, SHX55RL5UC, SHE43RL2UC, SHX55R55UC Short Instructions
...
Getting started with your new dishwasher.
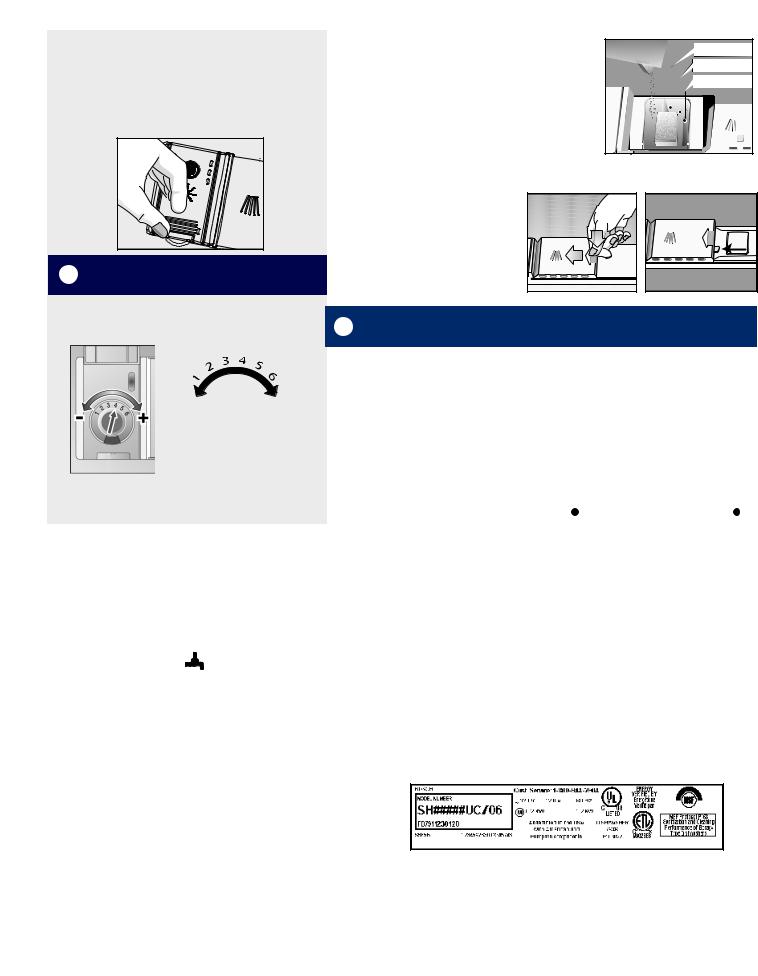
1 Adding Rinse Aid |
3 Adding Detergent |
|
|
——Rinse aid is necessary to improve drying results.
——Add rinse aid when the Rinse Aid LED or symbol on the control panel illuminates.
——Lift the tab to open the rinse aid reservoir and add liquid rinse aid by pouring over the arrow.
——Wipe up any excess rinse aid that may puddle.
Recommended |
drying |
2 Adjust Amount of Rinse Aid Dispensed
——Turn the arrow inside the rinse aid dispenser to adjust the amount of rinse aid dispensed.
——Use fresh powdered detergent or detergent tabs |
3Tbsp. maximum |
|
for best results. |
|
|
|
2Tbsp. (25ml) |
|
——1 tablespoon will clean most loads |
|
|
|
1Tbsp. (15ml) |
|
——3 tablespoon max, do not overfill |
|
|
|
|
|
——When using detergent tabs, lay them flat to avoid |
|
|
contact with the cover. |
|
|
To close the cover: |
To close the cover |
To open the cover |
——Place finger on arrow and slide |
||
cover fully left. |
|
|
——Push rear end of cover down |
|
|
firmly until it clicks. |
2 |
|
To open the cover: |
|
|
| <![if ! IE]> <![endif]>1 |
|
|
——Push the blue button inward |
|
|
|
|
|
(not down) and cover will slide |
|
|
open. |
|
|
4To Start the Dishwasher
|
|
|
|
——Open the door and press the On/Off button to turn dishwasher on. |
||||||
|
|
|
|
——Select a cycle and desired option if applicable. |
||||||
|
|
To decrease |
To decrease |
——Close the door to begin the cycle. |
|
|
|
|
|
|
|
|
Cancelling a cycle / Reset the dishwasher |
||||||||
|
|
streaks on glass |
spots on glass |
|||||||
|
|
If you need to cancel a cycle or the dishwasher control panel seems to not respond, |
||||||||
|
|
|
|
|||||||
|
|
|
|
cancel or reset by following these steps. |
|
|
|
|
|
|
|
|
|
|
——Open the door slightly and press and |
——Open the door and press the On/Off |
|||||
|
|
|
|
hold the two Cancel/Reset buttons |
button. If you choose to start a new |
|||||
|
|
|
|
for 3 seconds. |
cycle, turn the unit on again and select |
|||||
|
|
|
|
——Close the door and wait about 1 min- |
a cycle. |
|||||
|
|
|
|
ute while the dishwasher drains. |
|
|
Cancel/Reset |
|
|
|
|
|
|
|
|
|
|
||||
|
|
|
|
|
|
|
|
|
|
|
For up to 45% dryer dishes: |
Cycle Descriptions |
|
|
|
|
|
|
|||
1 - Always use Rinse Aid
2 - Use Auto Cycle
3 - Press Sanitize button
The sanitize feature is available only in the Heavy, Auto, Normal and Half Load cycles. Press the “Sanitize” button to activate the sanitation features during the Auto, Normal and Half Load cycles.
The sanitize LED or symbol |
will light when sanitation require- |
ments are met. |
|
Frequently Asked Questions
Dishwasher beeping after cycle end: The default settings alert the consumer that the cycle has finished. To adjust the volume or deactivate, refer to “Operating the Dishwasher” in the Use and Care Manual.
Dishes are not drying properly: Refer to section above.
Odor: Debris at the bottom of the dishwasher or in the door seal can cause odor. Clean both according to instructions in the Use and Care Manual.
Dishwasher still on after cycle ends: Default factory settings have the dishwasher stay powered on after a cycle ends. Customer must manually turn the dishwasher off. Dishwasher must be powered on again in order to start a new cycle.
Heavy: Uses higher water temperature and pressure to remove baked-on foods
Auto: Reads the size and soil of each load, adjusting water and heat to the ideal balance for optimum cleaning results
Normal: Cleans normal loads with loosely attached, normal soiling Express*: Cleans lightly soiled loads with reduced wash time
Half Load*: Can reduce energy and water consumption when washing small loads that fill approximately half of the dishwasher’s capacity
* Available wash cycles vary by model
To Contact Customer Service
Call the toll free Customer Service number, 1-800-944-2904. Before calling, locate the model number and serial number on the label on the inside of the dishwasher door.
ALWAYS READ YOUR USE AND CARE MANUAL FOR DETAILED INSTRUCTIONS AND IMPORTANT SAFETY NOTICES.
9000633150 Rev A 3/11
 Loading...