Bosch MUM9GX5S21 Instruction manual [zh]

Register your new Bosch now:

WWW.BOSCH-HOME.COM/WELCOME

MUM9...

OptiMUM

en Instruction manual

ms Arahan pengendalian zf

zh

ar مادختساا تاداشرإ

en 

English 

3


ms 

Bahasa Melayu 

23


zf 


43


zh 


59


ar 

ةيبرعلا  

94

Intended use

en

Intended use

This appliance is intended for domestic use only. Use the appliance 

only for processing normal amounts of food and for normal amounts 

of time for domestic use. Do not exceed permitted maximum  quantities. X “Recipes” see page 15

The appliance is suitable for mixing, kneading and beating food. 

The appliance must not be used for processing other substances 

or objects. Additional applications are possible if the accessories 

approved by the manufacturer are used. Only use the appliance 

with approved genuine parts and accessories. Never use the 

accessory parts for other appliances. 

Only use the appliance indoors at room temperature and up to 

2000 m above sea level.

Important safety information

Read and follow the instruction manual carefully and keep for later 

reference! Enclose these instructions when you give this appliance 

to someone else. If the instructions for correct use of the appliance 

are not observed, the manufacturer’s liability for any resulting 

damage will be excluded.

This appliance can be used by persons with reduced physical, 

sensory or mental capabilities or lack of experience and/or 

knowledge if they have been given supervision or instruction 

concerning use of the appliance in a safe way and if they 

understand the hazards involved. Keep children away from the 

appliance and connecting cable and do not allow them to use the 

appliance. Do not let children play with the appliance. Cleaning and 

user maintenance must not be performed by children.

W Risk of electric shock and fire!

■  The appliance may only be connected to a power supply with  alternating current via a correctly installed socket with earthing.  Ensure that the protective conductor system of the domestic  supply has been correctly installed.

■  Connect and operate the appliance only in accordance with the  specifications on the rating plate. Do not use the appliance if the  power cord and/or appliance are damaged. Only our customer  service may repair the appliance, e.g. by replacing a damaged  power cord, in order to avoid hazards.

■  Never connect the appliance to timer switches or remotecontrollable sockets. Never leave the appliance unattended while  it is switched on! 

3

en Important safety information 

■  Do not place the appliance on or near hot surfaces, e.g. hobs.  The power cord must not come into contact with hot parts or be  pulled across sharp edges. 

■  Never immerse the base unit in water or place it in the  dishwasher. Do not steam-clean the appliance. Do not use the  appliance with damp hands. 

■  After each use, whenever the appliance is unsupervised, prior to  assembly, prior to disassembly, prior to cleaning and in the event  of an error, the appliance must always be disconnected from the  mains.

W Risk of injury!

■  Before replacing accessories or additional parts which move  during operation, the appliance must be switched off and  disconnected from the power supply. 

■  Whenever the swivel arm is lowered, do not reach into the  housing to avoid your fingers or hands getting caught. Do not  adjust the swivel arm while the appliance is switched on.

■  Only use tools when the bowl is inserted, the cover is fitted and  the protective drive covers are in place! When using accessories,  fit the bowl, cover and drive covers according to the instructions!

■  While operating the appliance, never reach into the bowl or filling  shaft with your hands. Do not insert any objects (e.g. wooden  spoon) into the bowl or filling shaft. Keep hands, hair, clothing  and other utensils away from rotating parts. After switching off,  the drive continues for a short time. Wait until the drive has come  to a standstill. 

■  Never use tools and accessories or 2 accessories at the same  time. When using the accessories, follow the individual operating  instructions enclosed. 

■  When using accessories, observe the colour coding marked on 

the drives and accessories.

W Risk of suffocation!

Do not allow children to play with packaging material.

W Caution!

■  We recommend that the appliance is never switched on for longer  than is necessary to process the ingredients. Do not operate  at no-load.

■  Your work surface should be easily accessible, resistant to  moisture, firm, flat, dry and large enough to prevent any harm  from splashing and to let you work unhindered.

4 

Important safety information

en

W Important!

It is essential to clean the appliance thoroughly after each use or  after it has not been used for an extended period. X “Cleaning and

maintenance” see page 15

Congratulations on the purchase of

Contents


your new Bosch appliance. You can find


Intended use .............................................

24

further information about our products


Important safety information .....................

24

on our website.


Overview...................................................

27

www.bosch-home.com

Before using the appliance  


Our appliances continuously undergo 

for the first time .........................................

27

further development. For this reason 

Parts and operating controls.....................

27

individual functions may differ from these 

Preparation ...............................................

30

instructions. In this case check whether 

Settings.....................................................

30

a newer version of these instructions is 

Using without additional functions ............

31

available on our website.

Using the time and timer function .............

32

When using this instruction manual: 

Using SensorControl Plus ........................

33

You can fold out the cover pages of these 

Using the scales .......................................

34

instructions. There you will find illustrations 

Using accessories ....................................

36

marked with letters and numbering. 

Cleaning and maintenance .......................

36

Reference will be made to these illustrations 

Recipes.....................................................

36

throughout the manual (e.g. X Image

Re-adjustment of tools..............................

38

sequence B).

Safety systems .........................................

38


Disposal ....................................................

39


Guarantee.................................................

39


Troubleshooting ........................................

39


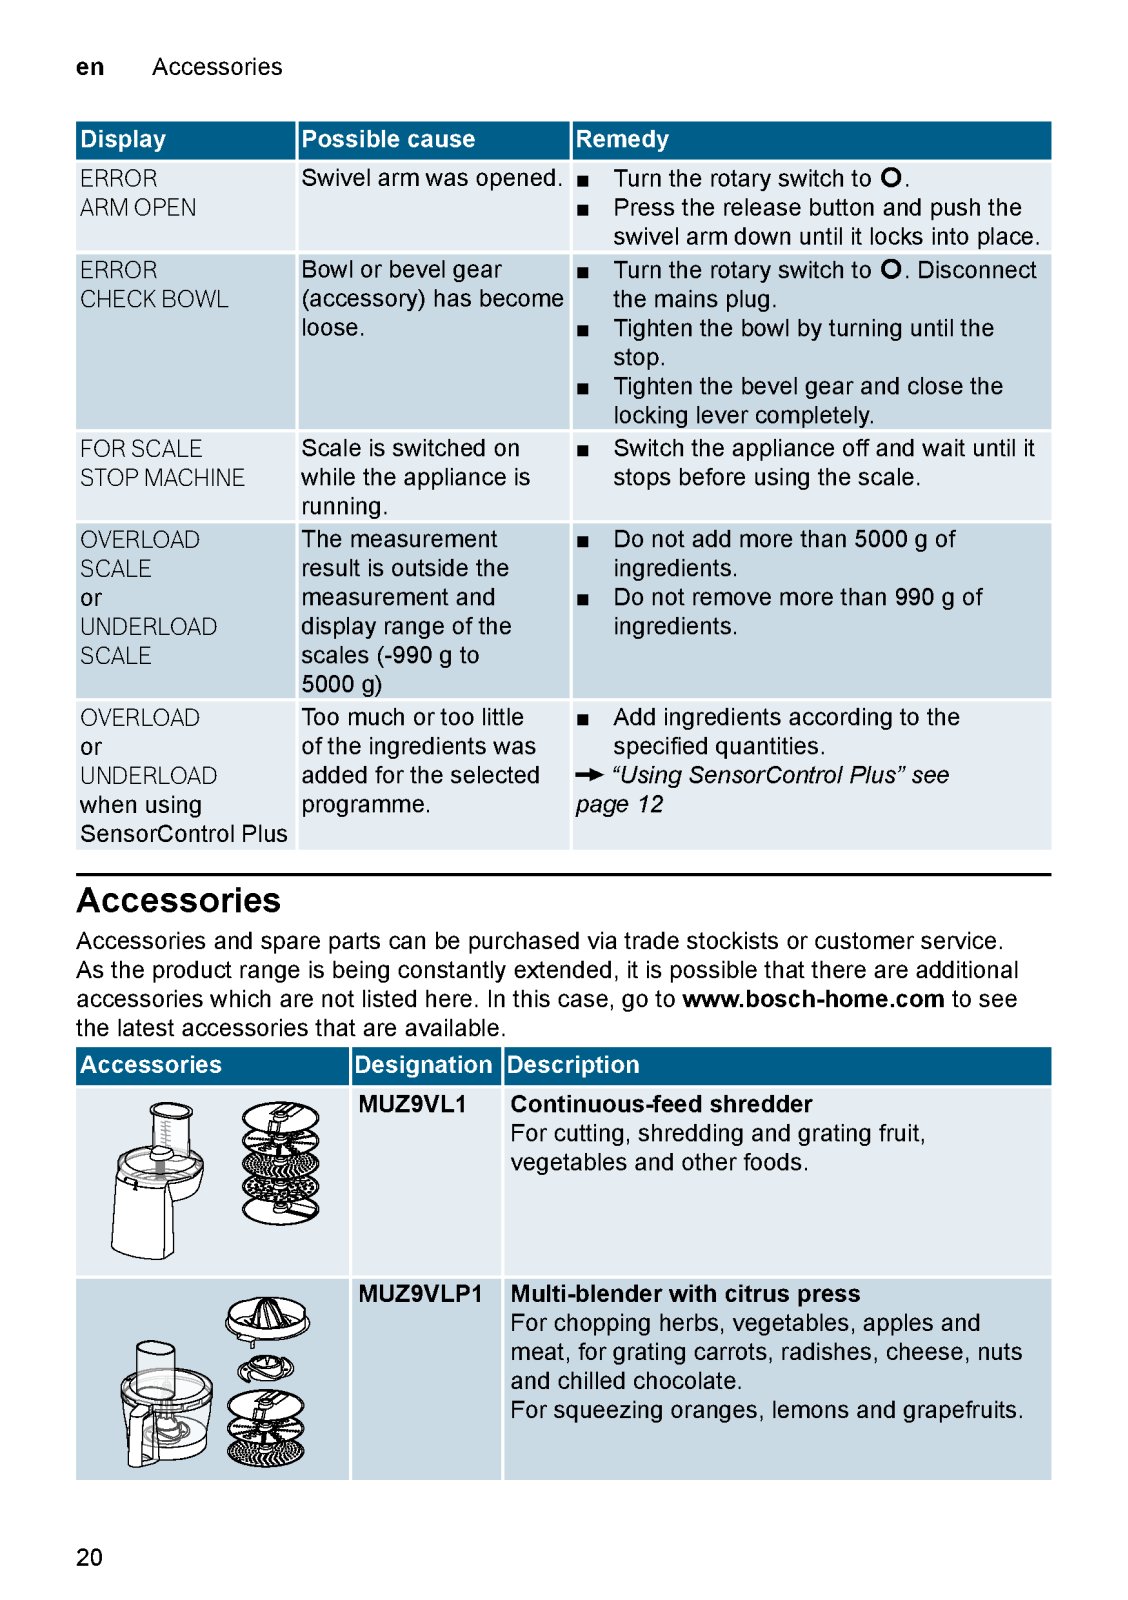
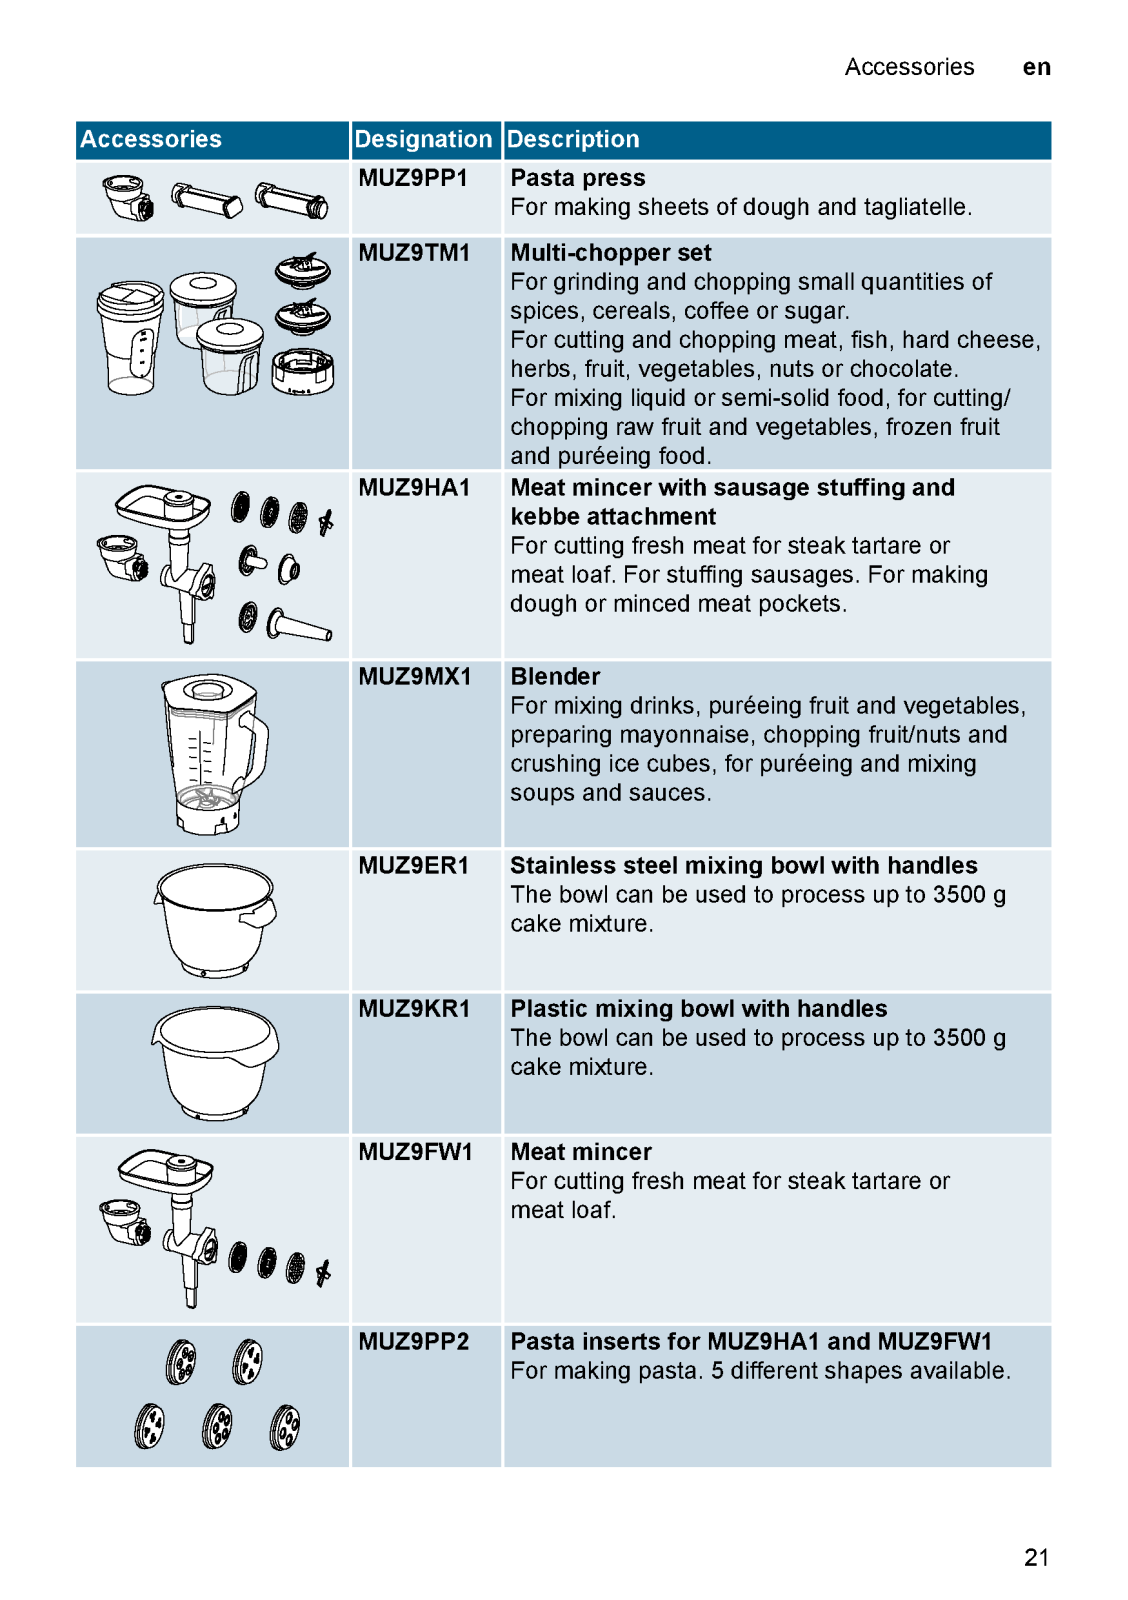
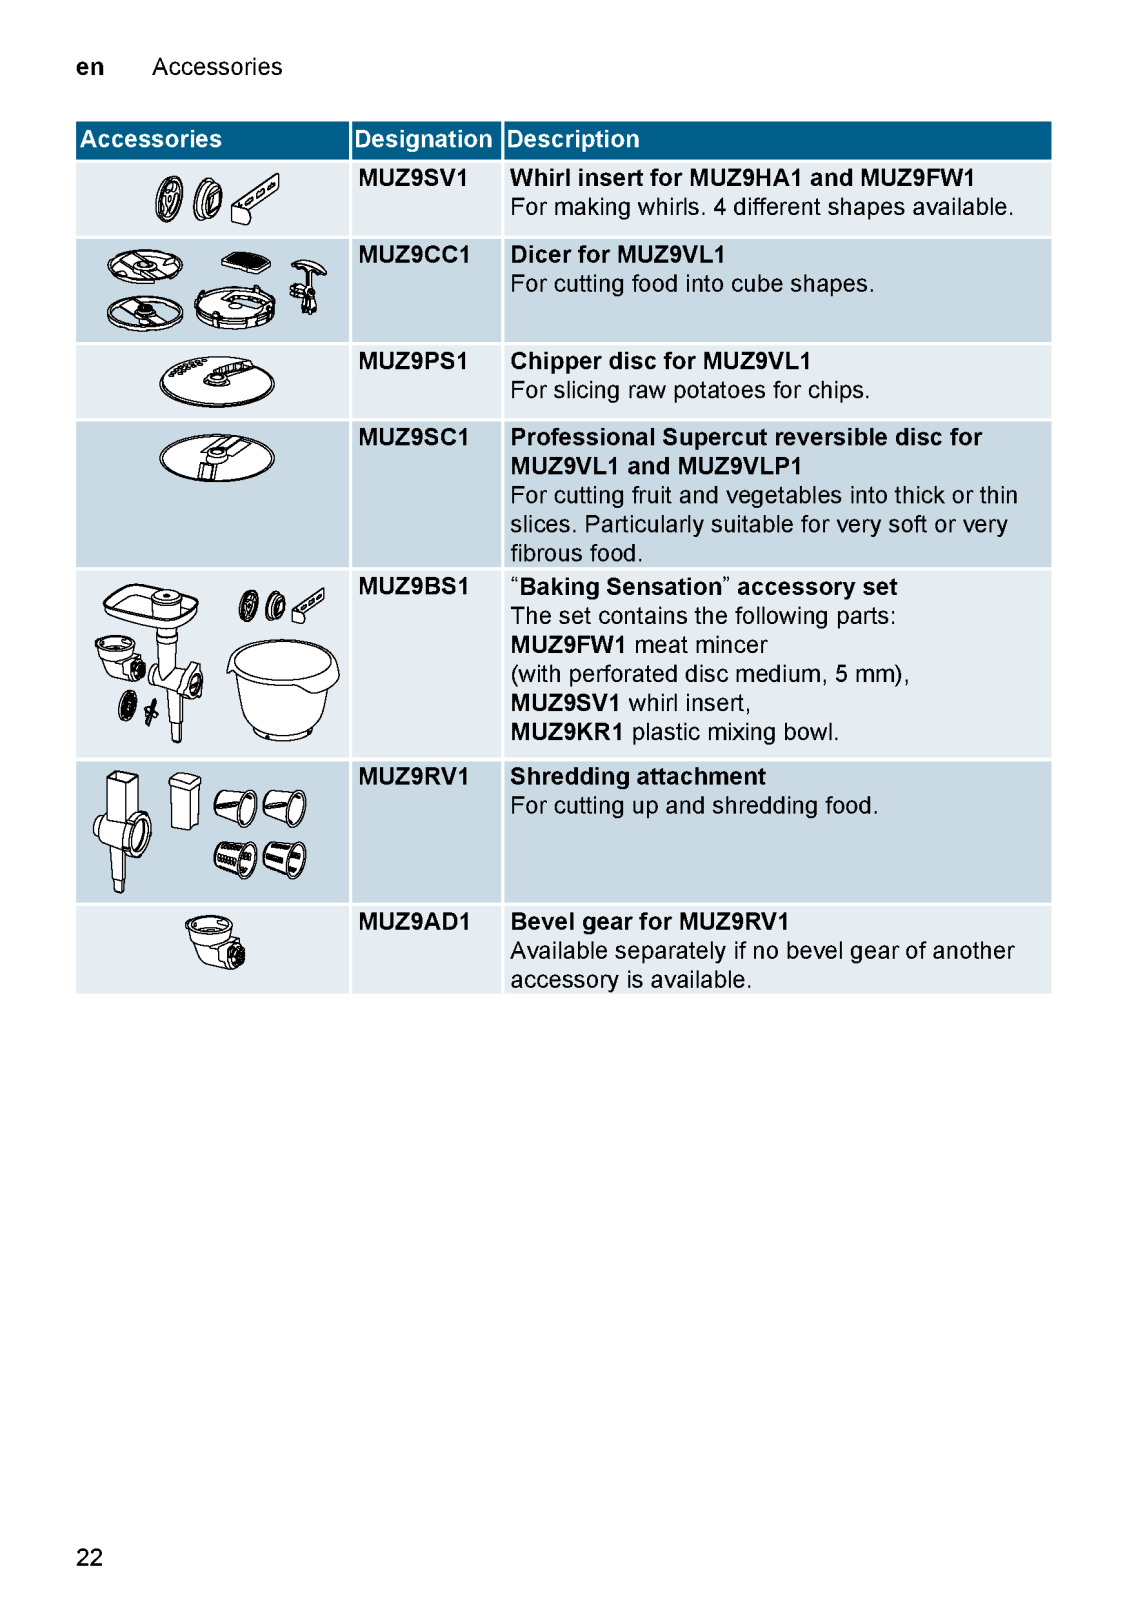
Accessories ..............................................

41

5

en Overview 

Overview

Please fold out the illustrated pages.

X Fig. A

Base unit

1Rotary switch

a Illuminated ring (operation indicator) b Setting dial

2Release button

3Swivel arm

4Main drive (black)

a Opening for inserting tools

5Front drive (yellow)

a Protective drive cover

6Rear drive (red)

a Protective drive cover

7Cable storage compartment or cable reel*

8Recesses for bowl

Control panel

9Function buttons

a Function selection buttons* b Setting buttons

10Display

Bowl

11Stainless steel mixing bowl

12Cover

a Filling shaft

Tools

13Professional flexible beating whisk a Protective cap with eject buttons

14Professional stirring whisk

a Protective cap with eject buttons

15Kneading hook

a Protective cap with eject buttons

* Depending on the model

Note: Your kitchen machine comes with  additional accessories depending on the  model. 

Before using the appliance for the first time

Before the new appliance can be used, 

it must be fully unpacked, cleaned and 

checked. 

Caution! 

Never operate a damaged appliance! ■  Remove the base unit and all 

accessories from the packaging and 

dispose of all packing materials.

■  Check that all the parts are present and  examine them for obvious damage. 

X Fig. A

■  Thoroughly clean and dry all parts  before using for the first time. 

X “Cleaning and maintenance” see page 15

Parts and operating controls

Colour coding

The drives have different colours (black,  yellow and red). This colour coding system  can also be found on the accessories. Only  use accessories for the drive with the same  colour.

Drives

X Fig. A

The appliance has 3 different drives.

Main drive, black (4)

For using tools or for using 

accessories with a bevel gear.

Front drive, yellow (5)

For using accessories with a yellow 

connector.

Rear drive, red (6)

For using accessories with a red 

connector.

Protective drive covers (5a and 6a)

For covering unused drives. Further information: X “Accessories” see page 20

6 

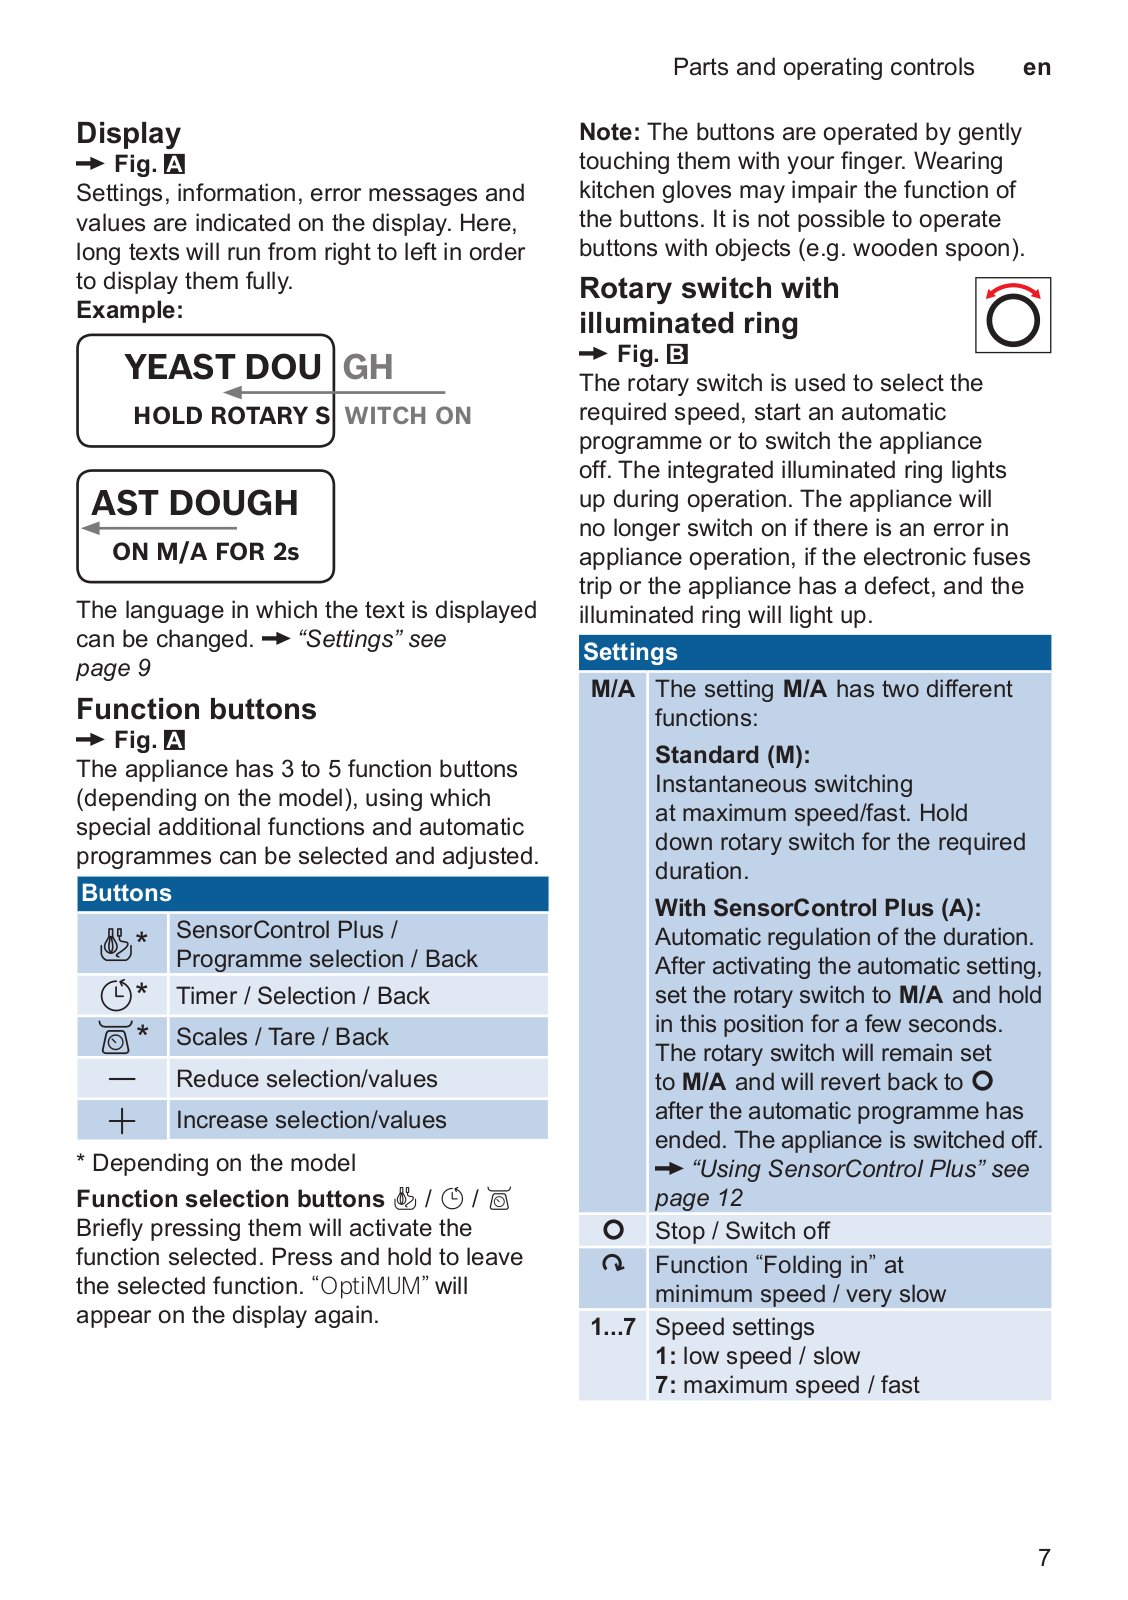
Display

X Fig. A

Settings, information, error messages and 

values are indicated on the display. Here, 

long texts will run from right to left in order 

to display them fully. 

Example:

YEAST DOU GH

HOLD ROTARY S WITCH ON

AST DOUGH

ON M/A FOR 2s

The language in which the text is displayed  can be changed. X “Settings” see

page 9

Function buttons

X Fig. A

The appliance has 3 to 5 function buttons 

(depending on the model), using which 

special additional functions and automatic 

programmes can be selected and adjusted. 

Buttons

D* SensorControl Plus /  Programme selection / Back

A* Timer / Selection / Back

C* Scales / Tare / Back

- Reduce selection/values

+ Increase selection/values

* Depending on the model

Function selection buttons D / A / C

Briefly pressing them will activate the 

function selected. Press and hold to leave  the selected function. “OptiMUM” will  appear on the display again.

Parts and operating controls en

Note: The buttons are operated by gently  touching them with your finger. Wearing  kitchen gloves may impair the function of  the buttons. It is not possible to operate  buttons with objects (e.g. wooden spoon).

Rotary switch with illuminated ring

X Fig. B

The rotary switch is used to select the 

required speed, start an automatic 

programme or to switch the appliance 

off. The integrated illuminated ring lights 

up during operation. The appliance will 

no longer switch on if there is an error in 

appliance operation, if the electronic fuses 

trip or the appliance has a defect, and the 

illuminated ring will light up.

Settings

üThe setting ü has two different  functions:

Standard (M):   Instantaneous switching  at maximum speed/fast. Hold  down rotary switch for the required  duration.

With SensorControl Plus (A):   Automatic regulation of the duration.  After activating the automatic setting,  set the rotary switch to ü and hold  in this position for a few seconds.  The rotary switch will remain set  to ü and will revert back to y  after the automatic programme has  ended. The appliance is switched off.

X “Using SensorControl Plus” see page 12

yStop / Switch off

zFunction Folding in at  minimum speed / very slow

1...7 Speed settings 1: low speed / slow 7: maximum speed / fast

7

en Parts and operating controls 

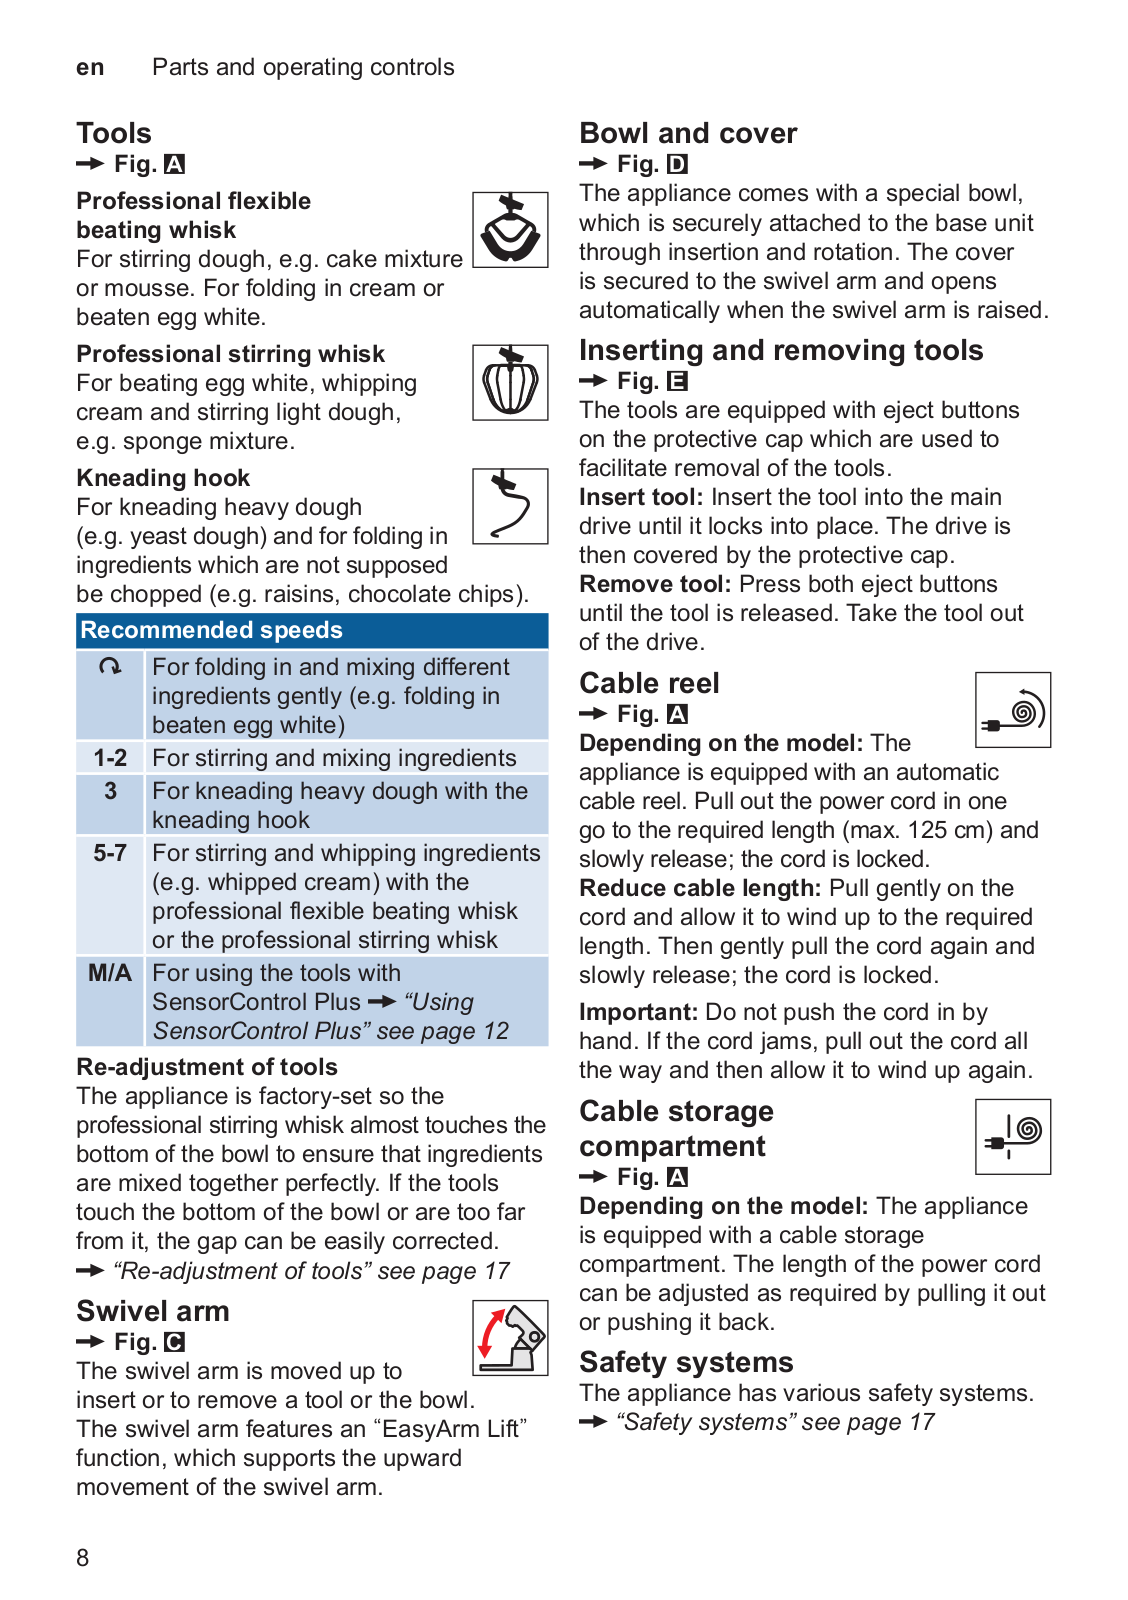
Tools

X Fig. A

Professional flexible

beating whisk

For stirring dough, e.g. cake mixture 

or mousse. For folding in cream or 

beaten egg white.

Professional stirring whisk

For beating egg white, whipping 

cream and stirring light dough, 

e.g. sponge mixture.

Kneading hook

For kneading heavy dough 

(e.g. yeast dough) and for folding in 

ingredients which are not supposed  be chopped (e.g. raisins, chocolate chips).

Recommended speeds

zFor folding in and mixing different 

ingredients gently (e.g. folding in 

beaten egg white)

1-2 For stirring and mixing ingredients

3For kneading heavy dough with the 

kneading hook

5-7 For stirring and whipping ingredients  (e.g. whipped cream) with the  professional flexible beating whisk  or the professional stirring whisk

üFor using the tools with  SensorControl Plus X “Using SensorControl Plus” see page 12

Re-adjustment of tools

The appliance is factory-set so the  professional stirring whisk almost touches the  bottom of the bowl to ensure that ingredients  are mixed together perfectly. If the tools  touch the bottom of the bowl or are too far  from it, the gap can be easily corrected. 

X “Re-adjustment of tools” see page 17

Swivel arm

X Fig. C

The swivel arm is moved up to 

insert or to remove a tool or the bowl.  The swivel arm features an EasyArm Lift  function, which supports the upward  movement of the swivel arm.

8 

Bowl and cover

X Fig. D

The appliance comes with a special bowl, 

which is securely attached to the base unit 

through insertion and rotation. The cover 

is secured to the swivel arm and opens 

automatically when the swivel arm is raised.

Inserting and removing tools

X Fig. E

The tools are equipped with eject buttons 

on the protective cap which are used to 

facilitate removal of the tools.

Insert tool: Insert the tool into the main  drive until it locks into place. The drive is  then covered by the protective cap.

Remove tool: Press both eject buttons  until the tool is released. Take the tool out  of the drive.

Cable reel

X Fig. A

Depending on the model: The  appliance is equipped with an automatic  cable reel. Pull out the power cord in one  go to the required length (max. 125 cm) and  slowly release; the cord is locked. 

Reduce cable length: Pull gently on the  cord and allow it to wind up to the required  length. Then gently pull the cord again and  slowly release; the cord is locked.

Important: Do not push the cord in by  hand. If the cord jams, pull out the cord all  the way and then allow it to wind up again.

Cable storage

compartment

X Fig. A

Depending on the model: The appliance  is equipped with a cable storage  compartment. The length of the power cord  can be adjusted as required by pulling it out  or pushing it back.

Safety systems

The appliance has various safety systems. 

X “Safety systems” see page 17

Preparation

■  Place the base unit on a smooth, clean  and stable surface.

■  Pull the power cord out to the required  length.

■  Press the release button and raise  the swivel arm to the stop.

■  Place the cover with the filling shaft at  the front on the main drive.

■  Insert the bowl. When doing so, use the  recesses on the base unit.

■  Turn the bowl anticlockwise until it locks  into place.

The base unit is prepared for further use.

Important: Do not slide the appliance about  on the work surface as this may impair  the functioning of the scales. To move the  appliance, lift it.

Settings

■  Press the release button and push the  swivel arm down until it locks into place.

■  Plug the mains plug into the mains.  The appliance is switched on.

■  “OptiMUM” appears on the display.

Note: If the appliance is not used or  operated within a certain period, the display  will slowly fade and switch to standby  mode. “OptiMUM” will appear once again  when any button is touched.

■  Press and hold buttons A and + at the  same time until the configuration menu  is opened. 

■  Release buttons A and + again.

Selecting setting

■  The following settings appear in  sequence each time button A is briefly  pressed:

LANGUAGE

Language in which the display texts are 

displayed.

SOUND

Volume of the acoustic signals – setting 

in 6 levels from off to loud. 

BRIGHTNESS

Brightness of the display – setting in 

6 levels from dark to bright.

Preparation en

UNITS (for models with scales)  Unit of display for the scales – grams (g)  or pounds (lb).

Changing and saving settings

■  The current setting is changed using the  button + or -.

■  Press and hold buttons A and +  simultaneously until “SETUP SAVED”  briefly appears on the display. 

■  Release buttons A and + again. 

The changed settings are saved.

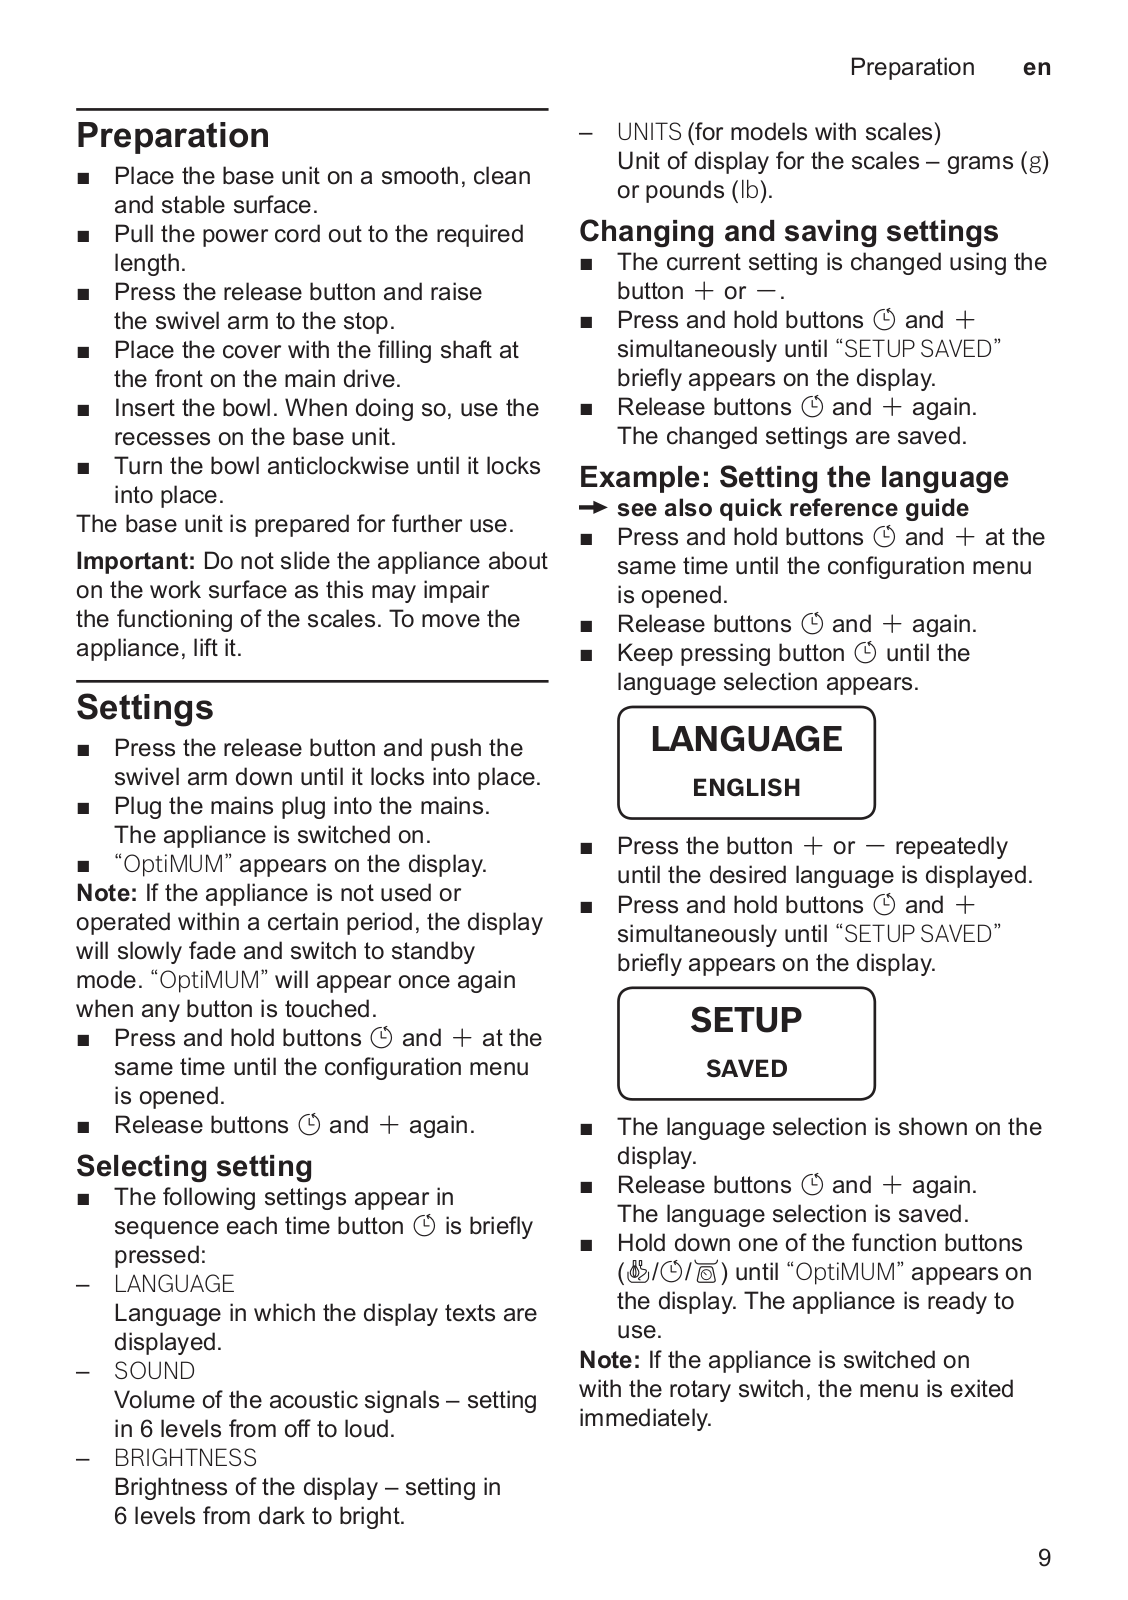
Example: Setting the language

X see also quick reference guide

■  Press and hold buttons A and + at the  same time until the configuration menu  is opened. 

■  Release buttons A and + again. ■  Keep pressing button A until the  language selection appears. 

LANGUAGE

ENGLISH

■  Press the button + or - repeatedly  until the desired language is displayed.

■  Press and hold buttons A and +  simultaneously until “SETUP SAVED”  briefly appears on the display.  

SETUP

SAVED

■  The language selection is shown on the  display.

■  Release buttons A and + again.  The language selection is saved.

■  Hold down one of the function buttons  (D/A/C) until “OptiMUM” appears on  the display. The appliance is ready to  use.

Note: If the appliance is switched on  with the rotary switch, the menu is exited  immediately.

9

en Using without additional functions 

Using without additional functions

W Risk of injury!

  Do not insert the mains plug until  all preparations for working with the  appliance are complete.

  While operating the appliance, never  reach into the bowl or filling shaft. 

  Do not operate the appliance without  the cover in place.

  Always wait for the drive to come to a  standstill before moving the swivel arm  or changing tools. 

  For safety reasons, always fit the  protective drive covers on the front and  rear drive.

Important:

  Prepare the base unit as described  under Preparation. 

  The appliance cannot be switched on  unless the bowl has been inserted  correctly.

Note: The function “TIME” starts  automatically with every use, counts the  ongoing processing duration and indicates  this on the display.

X Image sequence F

1.Depending on the processing task, 

select the professional flexible beating 

whisk, professional stirring whisk  or kneading hook X “Tools” see page 8. Insert the tool into the main 

drive until it locks into place. The drive is 

then covered by the protective cap.

2.Put the ingredients to be processed in 

the bowl.

3.Press the release button and push the 

swivel arm down until it locks into place.

W Risk of injury!

Carefully lower the swivel arm! Make 

sure you do not get your hands or fingers 

caught.

Operating the appliance

4.Plug the mains plug into the mains.  “OptiMUM” appears on the display.

5.Set the rotary switch to the required  setting (X “Recommended speeds”

see page 8). “TIME” appears on  the display and the elapsed processing  duration is displayed in minutes and  seconds.

Note: If the duration is 60 minutes or more,  hours are also displayed: “1:01:30”.

6.Process the ingredients until you 

achieve the required result.

7.Turn the rotary switch to y. Wait  until the drive comes to a standstill.  Disconnect the mains plug.

8.Press the release button and raise 

the swivel arm to the stop.

9.Turn the bowl clockwise until it can be 

raised. Remove the bowl.

10.Press both eject buttons until the tool is 

released. Take the tool out of the drive.

11.Take the cover off the drive. 

12.Clean all parts immediately after use. 

X “Cleaning and maintenance” see page 15

Note: Please also use our application  examples to familiarise yourself with  your new appliance and its functions. 

X “Recipes” see page 15

Adding more ingredients

More ingredients can also be added during 

processing.

X Fig. G

■  While the appliance is running, carefully  add more ingredients through the filling  shaft in the cover.

W Risk of injury!

While operating the appliance, never reach 

into the bowl or filling shaft with your hands. 

Do not insert any objects (e.g. wooden 

spoon) into the bowl or filling shaft.

X Image sequence H

1.To add larger quantities or ingredients,  turn the rotary switch to y. Wait until  the drive comes to a standstill.

10 

Using the time and timer function

en

2.Press the release button and raise 

the swivel arm to the stop. 

3.Add the ingredients directly to the bowl. 

Press the release button and push the 

swivel arm down until it locks into place.  “OptiMUM” appears on the display. 

Continue processing your ingredients.

Using the time and timer function

The appliance features a time and timer 

function. The following functions are 

available:

“TIME” function

Display of the elapsed processing duration  (standard setting). The “TIME” function  starts automatically once the processing of  food has been started.

Notes:

  Press button A briefly during processing  to switch on the “TIMER” function.

  Hold button A down during processing  to reset the display to “00:00”.

“TIMER” function

Setting of a required duration. Once the 

duration has elapsed, an acoustic signal 

will sound and processing will stop. 

The function may also be used without 

processing food (e.g. for boiling or resting  times of food). 

X Image sequence I

1.Prepare the appliance. Add ingredients.

2.Plug the mains plug into the mains.  “OptiMUM” appears on the display.

3.Press button A. “00:00” appears on the  display.

4.Set the required processing duration using  button + or -. The values will change  faster if the respective button is pressed  and held down. The set processing  duration will remain saved for approx. 5  minutes.

5.Set the rotary switch to the required setting. 

6.The remaining duration will be shown 

on the display and the countdown will 

continue. 

7.Once the remaining duration has 

elapsed, an acoustic signal will sound 

and the appliance will stop processing  automatically. “FINISH TIMER” appears on  the display. 

Note: Setting the acoustic signal 

X “Settings” see page 9

8.“TURN ROTARY SWITCH TO 0” appears on  the display.

9.Turn the rotary switch to y.  “OptiMUM” appears on the display.

10.Disconnect the mains plug. 

11.Processing with the “TIMER” function is  ended.

12.Clean all parts immediately after use. 

X “Cleaning and maintenance” see page 15

Notes:

  The duration is indicated on the display  in minutes and seconds. Example:  1 minute and 30 seconds: “01:30”. If the  duration is 60 minutes or more, hours  are also displayed: “1:01:30”.

  Press button + or - at any time to adjust  the displayed remaining duration.

  Press button A briefly twice to stop the  timer (the appliance will continue to run) or  to start it again.

  Turn the rotary switch to E to interrupt  processing. The remaining duration  remains saved and the countdown will  continue after the appliance is switched on  again.

  Hold down button A to switch the timer off.  “00:00” appears on the display. The “TIME”  function has been activated again.

Using the timer without processing food:

■  Press button A. “00:00” appears on the  display.

■  Set the required processing duration using  button + or -.

■  Press button A briefly twice to start the  timer.

■  The remaining duration will be shown  on the display and the countdown will  continue. 

11

en

Using SensorControl Plus 


■ 

Once the duration has elapsed, an acoustic 

* For appliances with integrated scales, 


signal sounds. “FINISHTIMER” appears on 

the options “>300ml” and “>700ml”are 


the display.


not displayed for “CREAM”. “0g” flashes on 

Notes:


the display. If a quantity of cream between 

Press button A briefly twice to stop the 

300 ml and 1500 ml has been added, 


timer or to start it again.

the display shows the quantity and the 

If food starts to be processed while 

appliance automatically uses the correct 


using the timer, the appliance will 

settings. If less or more cream is added, the 


continue to run until the remaining 

displayed weight will flash.


duration has elapsed and then stop 

Notes:


processing automatically.

Before using the automatic 


SensorControl Plus for the first time, the 


Using SensorControl Plus


kitchen machine must have been running 

Depending on the model, the appliance 


for at least two minutes to ensure that the 


sensors function correctly.

may be equipped with SensorControl Plus 


Do not add ingredients until the program 

automatic programmes. Sensors monitor 


has been selected and the scales 

the processing of the ingredients and switch 


indicate “0g” or “0.00lb” (depending on 

the appliance off once the pre-programmed 


setting) or “ADD INGREDIENTS” appears 

consistency has been reached. 


on the display.

The following automatic programmes are 


If the appliance is switched on with 

available with SensorControl Plus:


the rotary switch, the menu is exited 

CREAM


immediately.


Automatic preparation of whipped cream


When processing has been started with 

EGG WHITE


SensorControl Plus, do not add any 


Automatic preparation of (beaten) 


more ingredients.


egg white


SensorControl Plus is only programmed 

YEAST DOUGH


for the described tools and food 


Automatic preparation of yeast dough.


(in the specified quantities). Other 


Selecting programme


combinations are not possible.

■ 

Press button D. “CREAM” appears on 

The age, the temperature and the 


the display.


contents of the ingredients affect the 

■ 

Press button D or buttons +/-. 


time required and the result.


The following programmes appear in 

SensorControl Plus cannot produce 


sequence:


optimum results unless the eggs are 

Programme Tool/Ingredients


fresh or the cream has been cooled 

CREAM

Professional stirring whisk


(approx. 6 °C). 

Cream which was previously frozen 

>300ml *

300-700 ml cream 


cannot be whipped.

CREAM

Professional stirring whisk


Cream which contains additives or 

>700ml *

700-1500 ml cream 


lactose-free cream can not produce 

EGG WHITE

Professional stirring whisk


ideal results.


White of 2-12 eggs

Do not add sugar, flavours or other 

YEAST

Kneading hook


additives for cream or beaten egg white 

DOUGH

Ingredients and quantities 


until SensorControl Plus is complete.


according to the recipe 

The buttons are locked once 


X “Recipes” see page 15


SensorControl Plus has started.

12 


Using the scales

en

  Turn the rotary switch to y to cancel 

10. “SENSOR CONTROL PLUS” appears 


SensorControl Plus. A slight resistance 

on the display. SensorControl Plus 


must be overcome for this.

monitors the processing.


If the result is not how you wish it to be, 

11. Once the pre-programmed consistency 


turn the rotary switch to setting 7 (for 

has been achieved, an acoustic signal 


cream and beaten egg white) or setting 

will sound and processing will stop. 


3 (for yeast dough) and continue to 

“FINISH” appears on the display.  


process the ingredients until the desired 

Note: Setting the acoustic signal 


consistency is achieved. 

X “Settings” see page 9


Do not start SensorControl Plus a 

12. The rotary switch automatically switches 


second time with ingredients which have 

to y. “OptiMUM” appears on the 


already been processed.

display.


Example: Making beaten egg

13. Disconnect the mains plug. 


14. Processing with the “EGG WHITE”


white with SensorControl Plus


function is ended.


X Image sequence J

15. Clean all parts immediately after use. 


1.

Prepare the base unit and insert the 

X “Cleaning and maintenance” see


professional stirring whisk.

page 15


2.Press the release button and push the  swivel arm down until it locks into place. Using the scales

3.Plug the mains plug into the mains.  Depending on the model in question, the  “OptiMUM” appears on the display. appliance may be equipped with scales. 

4. Separate the eggs (2-12 eggs).

The following applications are possible:

5. Press button D. “CREAM” appears on 

Weighing the added ingredients 


the display. 


(either each ingredient individually or all 


Note: Models without a scale display 


ingredients together).


“CREAM>300ml”. Press button D 


  Pre-setting a desired weight and 


again. “CREAM>700ml” appears on the 


counting down until sufficient ingredients 


display.


have been added (with audible 

6.

Press button D. “EGG WHITE” appears 


information signals).


on the display.


Important:

Note: If appliances feature integrated 

The scales display the weight in 5 g 

scales, these are now calibrated. Individual 


steps (0.01 lb). If less than 5 grams 

dashes appear in succession on the display 


(0.01 lb) are added, the scales will not 

during calibration: “–––––” (tare). “0g” or 


provide correct measurement results.

“0.00lb” appears on the display (depending 


The appliance has 4 weight sensors 

on the setting). 


in the feet. The scales only supply 

7.

Add the egg white to the bowl. “HOLD


the correct results if all of the feet are 


ROTARY SWITCH ON M/A FOR 2s”


standing on a solid and level surface. 


appears on the display. 


Do not put any cloths or other items 

8.

Turn the rotary switch to ü and hold 


underneath. 


in this position for 2 seconds.


The worktop must not be subject to any 

9.

After 2 seconds the rotary switch is 


vibrations while the scales are being 


automatically fixed in this position and 


used (e.g. by other activities or other 


remains on ü after being released.


appliances).

Important: If the rotary switch does not 


remain on ü, it was not held for long 


enough in this position.


13

en Using the scales 

  Do not slide the appliance about on  the work surface as this may impair the  functioning of the scales. To move the  appliance, lift it.

  After switching on or resetting the  scales, they are calibrated for a brief  moment (tare). During this process, do  not touch the appliance or place any  items on top of it (e.g. wooden spoon,  tea towel etc.). 

  Ensure that measuring jugs or  packaging are not lying on top of the  appliance (e.g. on the edge of the  filling shaft).

Weighing ingredients

X Image sequence K

1.Prepare the base unit.

2.Plug the mains plug into the mains.  “OptiMUM” appears on the display.

3.Press button C and don’t touch the  appliance again.   Individual dashes appear one after each  other on the display during calibration:  “–––––” (tare). 

4.“0g” or “0.00lb” appears on the display  (depending on the setting). The scales  are ready.

5.Add ingredients. The scales display the 

weight.

6.Start processing or put out other 

ingredients ready for use.

7.Press button C and do not touch  the appliance again. “0g” or “0.00lb”  appears on the display (depending on  the setting). The scales are ready.

8.Add all desired ingredients and weigh 

them in this manner.

Process the weighed ingredients. X “Using without additional functions” see page 10

Note: If button C is pressed while  processing food, “FOR SCALE

STOPMACHINE”appears on the display. 

Pre-setting the weight

X Image sequence L

1.Press button C and don’t touch the  appliance again.   Individual dashes appear one after each  other on the display during calibration:  “–––––” (tare). 

2.“0g” or “0lb” appears on the display  (depending on the setting). The scales  are ready.

3.100g or 0.20lb appears on the  display (depending on the setting).

4.Set the required weight (50-3000 g /  0.10-6.00 lb) using the + or - button.

5.Add ingredients. The quantity still 

missing is shown on the display, e.g. 

“65g”. 

6.From “40g”, a recurring acoustic signal  sounds. The lower the remaining  quantity, the faster the acoustic signal  sounds. 

Note: Setting the acoustic signal 

X “Settings” see page 9

7.At “0g” (meaning that the pre-set  quantity has been added), the acoustic  signal stops. 

8.If the pre-set quantity has been  exceeded, the acoustic signal will sound  continuously. 

Note: Setting the acoustic signal 

X “Settings” see page 9

The additional weight is indicated 

with a minus symbol. If the quantity is  exceeded by 25 g, “–25g” is displayed.

■  Either remove the excess quantity  added or hold down one of the function  buttons (D/A/C) until “OptiMUM”  appears on the display.

14 

Using accessories

en

Using accessories

Your kitchen machine offers a number 

of accessories that significantly extend 

its functions. Depending on the model, 

certain accessories are already included 

in the scope of supply. If an accessory 

is not included, it can be purchased 

via trade stockists or customer service. 

X “Accessories” see page 20

Preparation for accessories

The base unit requires different preparation 

depending on the accessory.

■  Place the base unit on a smooth, clean  and stable surface.

■  Pull the power cord out to the required  length.

■  Prepare the base unit as shown  depending on the accessory. 

X Fig. M

1.Preparation for tools.

2.Preparation for accessories on black 

drive with bevel gear and accessory 

used in place of the bowl.

3.Preparation for accessory on red drive,  for example blender or multi-chopper.

4.Preparation for accessory on yellow 

drive without outlet opening for food,  e.g. multi-blender or citrus press.

5.Preparation for accessory on yellow 

drive with outlet opening for food, e.g.  continuous-feed shredder.

Important:

■  Observe yellow, red or black marking on 

drive and accessory. X “Colour coding”

see page 6

■  Always secure unused drives with 

protective drive covers.

■  See the separate instructions for the 

individual accessory for all further steps.

Cleaning and maintenance

The appliance and the tools used must 

be thoroughly cleaned after each use. 

X Fig. N

W Risk of electric shock!

  Unplug the appliance before cleaning it.

  Never immerse the base unit in liquids  and do not clean in the dishwasher.

  Do not steam-clean the appliance.

Caution!

  Do not use any cleaning agents  containing alcohol or spirits.

  Do not use any sharp, pointed or metal  objects.

  Do not use abrasive cloths or cleaning  agents.

  Do not wedge plastic parts in the  dishwasher as they could become  permanently deformed!

Cleaning the base unit

■  Remove the protective drive covers.

■  Wipe the base unit and drive covers with  a soft, damp cloth and dry off.

Cleaning the bowl and tools

■  You can clean the bowl, cover and  tools with a detergent solution and a  soft cloth or sponge, or put them in the  dishwasher.

■  Allow all parts to dry.

Recipes

Whipped cream

  200-1500 g

■  Whip the cream with 

the professional stirring whisk for 1½ 

to 4 minutes at setting 7, depending 

on the quantity and properties 

of the cream.

Note: For models with SensorControl Plus, 

use the automatic programme. X “Using

SensorControl Plus” see page 12

15

en

Recipes 

Egg whites

  2-12 egg whites

■ 

Beat the egg whites with 


the professional stirring whisk for 4 to 6 


minutes at setting 7.

Note: For models with SensorControl Plus, 

use the automatic programme. X “Using

SensorControl Plus” see page 12

Sponge mixture

Basic recipe

3 eggs

  3-4 tbsp hot water

150 g sugar

1 sachet vanilla sugar

150 g flour

50 g cornflour

Baking powder if required

■ 

Beat the ingredients (except the flour 


and cornflour) with the professional 


stirring whisk for approx. 4-6 minutes 


at setting 7 until frothy.

■  Turn the rotary switch to setting 1 and 


spoon in the sifted flour and cornflour 


within approx. ½ to 1 minute and mix.

Maximum quantity: 2 x basic recipe

Cake mixture

Basic recipe

  3-4 eggs

  200-250 g sugar

  1 pinch salt

  1 sachet vanilla sugar or peel from 

½ lemon

  200-250 g butter or margarine 

(room temperature)

  500 g flour

  1 sachet baking powder

  150 ml milk

■  Mix all ingredients with the professional  flexible beating whisk for approx.  ½ minute at setting 2, and then for  approx. 2-3 minutes at setting 7.

Maximum quantity: 2½ x basic recipe

Shortcrust pastry

Basic recipe

  125 g butter (room temperature)

  100-125 g sugar

  1 egg

  1 pinch salt

  A little lemon peel or vanilla sugar

  250 g flour

  Baking powder if required

■  Mix all ingredients with the professional  flexible beating whisk for about  ½ minute at setting 2, then for about  2-3 minutes at setting 6.

From 500 g flour:

■  Knead ingredients with  the kneading hook for  about ½ minute at setting 1, then  for about 3-4 minutes at setting 3.

Maximum quantity: 4 x basic recipe

Yeast dough

Basic recipe

  500 g flour

  1 egg

  80 g fat (room temperature)

  80 g sugar

  200-250 ml lukewarm milk

  25 g fresh yeast or 1 sachet dried yeast

  Peel from ½ lemon

  1 pinch salt

■  Mix all ingredients with the kneading  hook for approx. ½ minute at setting 1,  then for approx. 3-6 minutes at setting 3.

Maximum quantity: 3 x basic recipe Note: For models with SensorControl Plus,  use the automatic programme. X “Using

SensorControl Plus” see page 12

Pasta dough

Basic recipe

  500 g flour

  250 g eggs (approx. 5)

  2-3 tbsp (20–30 g) cold water  as required

■  Mix all ingredients for about 3 to  5 minutes at setting 3 until a dough  forms.

Maximum quantity: 1.5 x basic recipe

16 

Re-adjustment of tools

en

Bread dough

Basic recipe

  1000 g flour

  3 sachets dried yeast

  2 tsp salt

  660 ml warm water

■  Mix all ingredients with the kneading  hook for approx. ½ minute at setting 1,  then for approx. 4-5 minutes at setting 3.

Maximum quantity: 1,5 x basic recipe

Re-adjustment of tools

W Risk of injury!

Pull out the mains plug before re-adjusting.

Caution!

Only re-adjust tools in small steps. It must  be possible to completely lower the swivel  arm, and when doing so, the tools should  not catch on the bottom or on the edge of  the bowl. The optimum distance between  the tools and the bowl is 3 mm.

X Image sequence O

■  Insert the professional stirring whisk and  check the current setting.

■  Press the release button and raise  the swivel arm to the stop.

■  Hold the tool with one hand. Release  the lock nut in a clockwise direction  using a spanner wrench (10 mm).

■  Adjust the distance to the bowl by  turning the tool (1 whole turn corresponds to a height adjustment of 1 mm). 

Turn anticlockwise:

Distance to bowl is reduced. 

Turn clockwise:

Distance to bowl is increased.

■  Press the release button and push the  swivel arm down until it locks into place.

■  Check the tool distance. The optimum  distance between the tools and the bowl  is 3 mm. Adjust if necessary.

■  Once the distance is perfectly adjusted,  press the release button and move the  swivel arm back.

■  Hold the tool with one hand. Turn the  lock nut in an anticlockwise direction  using a spanner wrench (10 mm).

Safety systems

Start lock-out

The appliance can only be switched on if 

the bowl has been inserted and turned until 

it locked into place, or if an accessory has 

been secured to the main drive with the 

bevel gear, and if the swivel arm is locked 

into the lower position.

Automatic power-on safety lock

If the power is interrupted, the appliance 

remains switched on, but the motor does 

not start again when power is restored. 

To switch back on, first turn the rotary  switch to y, and then switch on again.

Overload protection

The overload protection will switch the 

motor off automatically during operation. 

One possible cause may be processing 

too much food at once.

Swivel arm protection device

The swivel arm will not unlock and move if 

an accessory is fitted to the rear drive.

17

en Disposal 

Disposal

Guarantee

Dispose of packaging in an environ-

The guarantee conditions for this appliance 

J mentally-friendly manner. This 

are as defi ned by our representative in the 

appliance is labelled in accordance 

country in which it is sold. Details regarding 

with European Directive 2012/19/EU 

these conditions can be obtained from 

concerning used electrical and 

the dealer from whom the appliance was 

electronic appliances (waste electrical 

purchased. The bill of sale or receipt must 

and electronic equipment – WEEE). 

be produced when making any claim under 

The guideline determines the frame-

the terms of this guarantee.

work for the return and recycling 


of used appliances as applicable 

Changes reserved.

throughout the EU. Please ask your 


specialist retailer about current 


disposal facilities.


Troubleshooting

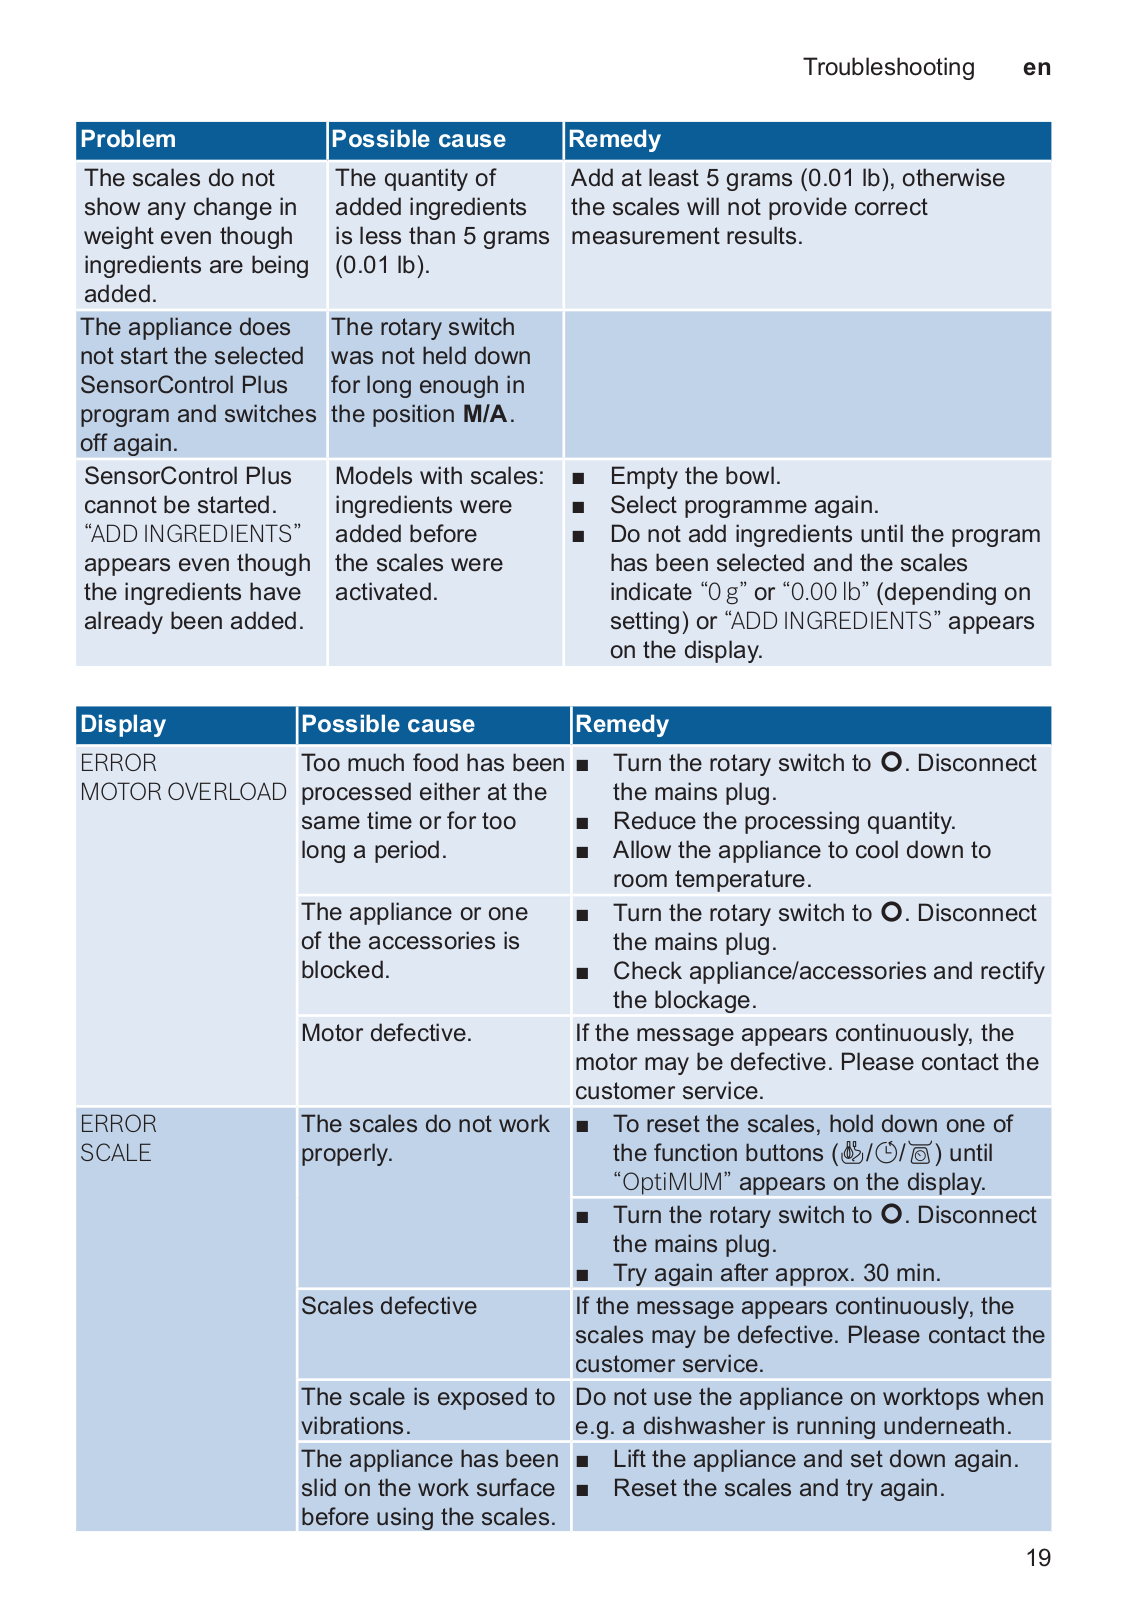
In the following tables, you will find solutions for problems or faults which you can easily  rectify yourself. If a fault cannot be eliminated, please contact customer service.

Problem

Possible cause

Remedy

Nothing shown on 

Appliance has no 

■ 

Check the power supply.

display. Illuminated 

power supply.

■ 

Plug the mains plug into the mains.

ring is off. 


Appliance cannot be 


switched on.


Appliance does not 

A safety system was  X “Safety systems” see page 17

start.

activated.


The illuminated ring 


lights up.


Appliance switches off  Too much food has 

■ 

Turn the rotary switch to y. Disconnect 

during use.

been processed 


the mains plug.


either at the same 

■ 

Reduce the processing quantity.


time or for too long a  ■ 

Allow the appliance to cool down to room 


period.


temperature.


Swivel arm was 

■ 

Turn the rotary switch to y. 


opened.

■ 

Press the release button and push the 


Bowl or bevel gear 


swivel arm down until it locks into place.


■ 

Turn the rotary switch to y. Disconnect 


(accessory) has 


the mains plug.


become loose.

■ 

Tighten the bowl by turning until the stop.


■ 

Tighten the bevel gear and close the 


locking lever completely.

The swivel arm cannot An accessory is fitted ■ 

Remove accessory. 

be opened.

to the red rear drive.

■ 

Press the release button and open 


the swivel arm.

18 


Troubleshooting

en

Problem

Possible cause

Remedy


The scales do not  The quantity of  Add at least 5 grams (0.01 lb), otherwise  show any change in  added ingredients  the scales will not provide correct  weight even though  is less than 5 grams  measurement results. ingredients are being  (0.01 lb).

added.

The appliance does  The rotary switch  not start the selected  was not held down  SensorControl Plus  for long enough in  program and switches  the position ü. off again.

SensorControl Plus 


Models with scales: 

■ 

Empty the bowl.

cannot be started. 


ingredients were 

■ 

Select programme again.

“ADD INGREDIENTS”

added before 

■ 

Do not add ingredients until the program 

appears even though 

the scales were 


has been selected and the scales 

the ingredients have 

activated.


indicate “0g” or “0.00lb” (depending on 

already been added.


setting) or “ADD INGREDIENTS” appears 


on the display.

Display

Possible cause

Remedy

ERROR

Too much food has been ■ 

Turn the rotary switch to y. Disconnect 

MOTOR OVERLOAD processed either at the 


the mains plug.


same time or for too 

■ 

Reduce the processing quantity.


long a period.

■ 

Allow the appliance to cool down to 


The appliance or one 


room temperature.


■ 

Turn the rotary switch to y. Disconnect 


of the accessories is 


the mains plug.


blocked.

■ 

Check appliance/accessories and rectify 


the blockage.


Motor defective.

If the message appears continuously, the 


motor may be defective. Please contact the 


The scales do not work 

customer service.

ERROR

■ 

To reset the scales, hold down one of 

SCALE

properly.


the function buttons (D/A/C) until 


“OptiMUM” appears on the display.


■ 

Turn the rotary switch to y. Disconnect 


the mains plug.


■ 

Try again after approx. 30 min.


Scales defective

If the message appears continuously, the 


scales may be defective. Please contact the 


customer service.


The scale is exposed to 

Do not use the appliance on worktops when 


vibrations.

e.g. a dishwasher is running underneath.


The appliance has been 

■ 

Lift the appliance and set down again.


slid on the work surface 

■ 

Reset the scales and try again.


before using the scales.


19

Bosch MUM9GX5S21 Instruction manual

Pengendalian mengikut peraturan

ms

Pengendalian mengikut peraturan

Perkakas ini hanya sesuai untuk pengunaan di dalam rumah 

atau persekitaran sepertinya. Penggunaan perkakas untuk 

memproses kuantiti makanan yang biasa untuk kegunaan domestik.  Jangan melebih kuantiti tinggi yang dibenarkan. X “Resipi” lihat

halaman 35

Alat ini sesuai untuk mengadun, menguli dan menumbuk makanan. 

Perkakas ini tidak boleh digunakan untuk memproses objek atau 

bahan yang lain. Aplikasi tambahan boleh digunakan, apabila 

menggunakan aksesori lain yang diluluskan oleh pengilang. 

Gunakan alat hanya dengan bahagian dan aksesori tulen yang 

diluluskan. Jangan gunakan pemasangan ini untuk peranti lain. 

Gunakan perkakas ini hanya di dalam bangunan pada suhu bilik 

dan ketinggian sehingga 2000 m di atas paras laut.

Arahan keselamatan penting.

Baca arahan pengendalian dengan teliti, patuhinya dan simpan! 

Jika perkakas diberikan kepada pihak yang lain, sertakan bersama 

manual ini. Ketidakpatuhan terhadap arahan bagi penggunaan 

perkakas dengan betul akan mengecualikan pengeluar dari liabiliti 

kerosakan yang berlaku.

Perkakas ini boleh digunakan oleh orang dengan kekurangan 

keupayaan fizikal, deria atau metal, atau kekurangan pengalaman 

dan/atau pengetahuan dibawah selian atau telah dilatih mengikut 

keselamatan pengendalian peralatan ini dan memahami kesan  bahayanya. Kanak-kanak hendaklah dijauhkan daripada perkakas  dan kabel penyambungan serta tidak dibenarkan mengendalikan  perkakas ini. Kanak-kanak tidak dibenarkan bermain dengan  perkakas ini. Kanak-kanak tidak dibenarkan untuk mencuci atau  menyelenggara perkakas ini.

W Bahaya kejutan elektrik dan kebakaran!

■  Perkakas hanya dibenarkan disambung pada soket yang telah  dipasang menurut arahan dengan pembumian pada bekalan  kuasa. Sila pastikan sistem litar pelindung bagi pemasangan  dalaman dipasang menurut arahan.

■  Sambung dan kendalikan perkakas hanya mengikut spesifikasi  pada plat identifikasi. Hanya guna sekiranya tiada tanda  kerosakkan pada perkakas dan kord kuasa. Pembaikan pada  perkasas, seperti penukaran kord kuasa yang rosak, hanya boleh  dilakukan oleh servis pelanggan kami bagi mengelakkan bahaya.

■  Jangan sambungkan perkakas pada pemasa atau soket yang  dikawal dengan alat kawalan jauh. Sentiasa awasi perkakas  semasa menggunakannya! 

23

ms Arahan keselamatan penting 

■  Jangan letak perkakas di atas atau berdekatan dengan  permukaan panas, seperti plat panas. Jangan biarkan kord kuasa  bersentuhan dengan bahagian panas atau menariknya di atas  bahagian sisi yang tajam. 

■  Jangan sesekali merendam unit asas ke dalam air atau mesin 

basuh pinggan mangkuk. Jangan gunakan pembersih wap. 

Jangan kendalikan perkakas dengan tangan yang basah. 

■  Peralatan ini mestilah sentiasa dipisahkan dari punca kuasa  selepas setiap penggunaan,ketika tanpa penyeliaan, sebelum  pemasangan, penanggalan atau pembersihan dan kerosakan.

W Risiko kecederaan!

■  Sebelum menukar alat ganti atau tambah, yang bergerak semasa  pengendalian, perkakas mestilah dimatikan dan dipisahkan dari  punca kuasa. 

■  Apabila merendahkan lengan putaran tidak mengakses perumah,  untuk mengelakkan tersepit jari atau tangan. Jangan melaraskan  lengan pemutar ayun semasa perkakas sedang hidup.

■  Kendalikan alat hanya dengan mangkuk yang dimasukkan,  penutup yang dipasang dan penutup pelindung pemacu yang  dipasang. Apabila menggunakan mangkuk aksesori, tudung dan  pelindung pemacu, pasang mengikut arahan!

■  Jangan sesekali mencapai ke dalam mangkuk atau aci pengisi  dengan tangan semasa operasi. Tiada objek (contohnya sudu  kayu) boleh dimasukkan dalam mangkuk atau dalam aci pengisi.  Jauhkan tangan, rambut, pakaian dan perkakas lain daripada  bahagian berputar Selepas dimatikan, pemacu berjalan untuk  seketika. Tunggu sehingga pemacu telah berhenti sepenuhnya. 

■  Jangan sesekali gunakan alat dan aksesori atau 2 aksesori  serentak Perhatikan penggunaan aksesori selain arahan yang  disertakan untuk setiap aksesori. 

■  Perhatikan tanda warna aksesori dan pemacu apabila 

menggunakan aksesori.

W Risiko lemas!

Jangan biarkan kanak-kanak bermain dengan bahan pembungkusan.

W Perhatian!

■  Adalah dicadangkan supaya jangan sesekali tinggalkan  alat dihidupkan terlalu lama daripada yang diperlukan untuk  pemprosesan makanan. Jangan kendalikan dalam jalanan lahu.

■  Kawasan kerja mestilah mudah diakses, bebas kelembapan,  tetap, tahap, kering dan cukup besar untuk mengelakkan  keroskaan daripada percikan dan boleh beroperasi tanpa  gangguan.

24 

Arahan keselamatan penting

ms

W Penting!

Perkakas mestilah dibasuh dengan teliti selepas setiap penggunaan 

atau selepas tidak menggunakannya untuk jangka waktu yang  panjang. X “Pembersihan dan penjagaan” lihat halaman 35

Tahniah atas pembelian perkakas Bosch

Kandungan


baru anda. Anda boleh mendapatkan


Pengendalian mengikut peraturan............

23

maklumat lanjut tentang produk kami di


Arahan keselamatan penting. ...................

23

halaman web kami.


Sepintas lalu .............................................

26

www.bosch-home.com

Sebelum penggunaan kali pertama ..........

26

Perkakas kami akan sentiasa terus 

Bahagian dan elemn operasi ....................

26

dibangunkan. Oleh itu, ada kemungkinan 

Persediaan ...............................................

29

bahawa fungsi tertentu berbeza daripada 

Tetapan .....................................................

29

panduan ini. Sila periksa dalam kes ini, jika 

Penggunaan tanpa fungsi tambahan........

30

ada versi panduan yang baru di laman web 

Penggunaan fungsi masa dan pemasa ....

31

kami.

Pengunaan SensorControl Plus ...............

32

Untuk pengunaan panduan ini: Muka surat 

Penggunaan penimbang ..........................

33

hadapan panduan ini boleh dilipat keluar. 

Penggunaan aksesori ...............................

35

Huruf dan nombor yang selalu dirujuk 

Pembersihan dan penjagaan....................

35

dalam panduan ini dalam bentuk lukisan 

Resipi........................................................

35

terletak di sana (contohnya X Rajah

Laraskan alat ............................................

37

kerajang B).

Sistem keselamatan .................................

37


Pelupusan.................................................

37


Syarat-syarat waranti................................

38


Penyelesaian masalah .............................

38


Aksesori ....................................................

41

25

ms Sepintas lalu 

Sepintas lalu

Sila lipat keluar halaman ilustrasi.

X Rajah A

Unit asas

1Suis putaran

a Paparan pengendalian  (Gelang berlampu)

b Skala boleh laras

2Butang pelepas

3Lengan putaran

4Utama - pemacu (hitam)

a Bukaan untuk kemasukan alat

5Pemacu hadapan (kuning) a Pelindung pemacu

6Pemacu belakang (merah) a Pelindung pemacu

7Penyimpanan plag kuasa atau gelendong plag kuasa*

8Bukaan untuk mangkuk

Panel kawalan

9Butang fungsi

a Butang pilih fungsi* b Butang pelaras

10Paparan

Mangkuk

11Mangkuk kacau keluli tahan karat

12Tudung

a Aci pengisi

Alat

13Pemukul Profi-Flexi

a Penutup pelindung dengan butang  pelepas

14Profi - Pemukul

a Penutup pelindung dengan butang  pelepas

15Cangkuk penguli

a Penutup pelindung dengan butang  pelepas

* bergantung kepada model

Perhatian: Bergantung pada model  pemproses makanan anda adalah  dibekalkan dengan aksesori. 

Sebelum penggunaan kali pertama

Sebelum perkakas baru boleh digunakan, 

perkakas ini mestilah dikeluarkan 

sepenuhnya, dibersihkan dan diperiksa. 

Perhatian!

Jangan kendalikan peralatan yang rosak! ■  Keluarkan unit asas dan semua 

aksesori daripada pembungkusan dan 

buang bahan bungkusan yang ada.

■  Periksa kesempurnaan dan kerosakan  yang boleh dilihat pada semua  bahagian. X Rajah A

■  Sebelum penggunaan pertama, basuh  semua bahagian dengan teliti dan  keringkan. X “Pembersihan dan

penjagaan” lihat halaman 35

Bahagian dan elemn operasi

Kod warna

Pemacu mempunyai - warna berbeza (hitam,  kuning dan merah). Kod warna juga boleh  ditemui dalam lampiran. Gunakan aksesori  hanya daripada pemacu yang berwarna  sama.

Pemacu

X Rajah A

Alat ini mempunyai 3 pemacu yang 

berbeza.

Utama - pemacu, hitam (4)

Untuk langkah selanjutnya, lihat 

arahan bagi setiap aksesori  berasingan

Pemacu hadapan, kuning (5)

Untuk kegunaan aksesori dengan 

penyambung kuning.

Pemacu belakang, merah (6)

Untuk kegunaan aksesori dengan 

penyambung kuning.

Pelindung pemacu (5a dan 6a)

Untuk melindungi pemacu yang tidak 

digunakan.

Maklumat Lanjut: X “Aksesori” lihat halaman 41

26 

  Bahagian dan elemn operasi ms

Paparan

Suis putaran dengan


X Rajah A

gelang berlampu


Seting, maklumat dan indikasi masalah 

X Rajah B


ditunjukkan pada paparan. Teks yang 

Dengan suis putaran, kelajuan yang diingini 

panjang bergerak dari kanan ke kiri, untuk 

boleh dipilih, program automatik dimulakan 

menunjukkannya sepenuhnya. 

atau perkakas ditutupkan. Gelang berlampu 

Contoh:


menyala juga semasa penggunaan. Apabila 


YEAST DOU GH

terdapat ralat dalam operasi peranti, 


mencetuskan fius elektrik atau kerosakan 


pada peranti, peranti tidak boleh dihidupkan 


HOLD ROTARY S WITCH ON


dan gelang berlampu akan bernyala.


Tetapan


AST DOUGH

ü Tetapan ü mempunyai dua 


fungsi yang berbeza:


ON M/A FOR 2s


Standard (M):  

Bahasa yang ditunjukkan pada teks boleh 

Tork litar pada kelajuan penuh / 

laju. Tahan suis untuk tempoh yang 

ditukar. X “Tetapan” lihat halaman 29

dimahukan.


Butang fungsi

Dengan SensorControl Plus

X Rajah A

(A): Penyesuaian automatik 

Perkakas ini mempunyai 3 ke 5 butang 

untuk tempoh. Selepas automatik 

fungsi (bergantung kepada model), mana 

diaktifkan, letakkan suis ke ü 

fungsi tambahan khas dan program 

dan tekan beberapa saat dalam 

automatik boleh dipilih dan digunakan. 

keadaan ini. Suis masih berada 


di ü dan lompat kembali ke y 

Butang


selepas automatik tamat. Mesin 


D*

program / KembaliSensorControl Plus / Pilihan 


telah dimatikan.


A*

Timer / Pilihan / Kembali

X “Pengunaan


SensorControl Plus” lihat

C*

Timbang / berat kosong / Kembali

halaman 32


- Pilihan / kurangkan nilai

y Hentikan / Matikan

zFungsi “melipat masuk” pada 

+Pilihan / tinggikan nilai kelajuan paling rendah / sangat 

* bergantung kepada model


perlahan.

1...7

Tahap kelajuan

Butang pilih fungsi D / A / C


1: kelajuan rendah / perlahan

Jika butang ditekan sekejap, fungsi yang 


7: kelajuan tinggi / laju

dipilih akan diaktifkan. Jika butang ditekan 


lama, fungsi yang dipilih akan tamat dan 


“OptiMUM” ditunjukkan di paparan.


Perhatian: Butang ini boleh dikendalikan 


dengan sentuhan ringan jari. Jika sarung 


tangan dapur dipakai, ia boleh menjejaskan 


fungsi butang. Pengandalian dengan objek 


(Contohnyasudu kayu) tidak dibenarkan.


27

ms Bahagian dan elemn operasi 

Alat

X Rajah A

Pemukul Profi-Flexi

Untuk mengacau doh, contohnya 

adunan kek atau mousse. Untuk 

lipat putih telur yang dipukul atau 

krim.

Profi – Pemukul

Untuk memukul putih telur, krim dan 

doh ringan, contohnya kek span.

Cangkuk penguli

Untuk menguli doh berat dengan 

cangkuk doh (contohnya doh yis) 

dan untuk lipat campuran yang tidak  harus dikisar (contohnya kismis, cip coklat).

Had kelajuan – cadangan

zUntuk menurunkan dan  pengadunan lembut bahan-bahan  (contohnya lipat putih telur yang  dipukul)

1-2 Untuk mengacau dan mengisar 

bahan

3Untuk menguli doh berat dengan 

cangkuk doh

5-7 Untuk mengacau dan memukul  bahan (contohnya krim putar)  dengan pemukul Profi Flexi atau  pemukul Profi

üUntuk guna alat dengan  SensorControl Plus X “Pengunaan SensorControl Plus”lihathalaman 32

Laraskan alat

Alat ini adalah set kilang sehinggakan  Profil -Whip hampir menyentuh bahagian  bawah mangkuk supaya bahan akan  diadun bersama secara optimum. Jika alat  menyentuh bahagian bawah mangkuk  atau terlalu jauh, jaraknya boleh dibetulkan  dengan mudah. X “Laraskan alat” lihat

halaman 37

Lengan putaran

X Rajah C

Lengan putaran dipaksikan ke atas 

untuk menggunakan atau mengeluarkan 

alat atau mangkuk. Lengan putaran 

dilengkapkan dengan fungsi “EasyArm Lift” 

yang menyokong pergerakan lengan 

putaran ke atas.

Mangkuk dan penutup

X Rajah D

Alat ini disediakan bersama pinggan khas, 

yang bersambung dengan kemas kepada 

unit asas. Tudung dipasang pada lengan 

dan terbuka secara automatik apabila 

menaikkan lengan.

Masukkan dan keluarkan alat.

X Rajah E

Peralatan dilengkapi dengan butang 

pelepas pada penutup pelindung yang 

digunakan untuk menanggalkan peralatan 

tersebut dengan mudah.

Pasang peralatan: Masukkan peralatan  tersebut hingga dipasang pada pemacu  utama. Penutup melindungi pemacu.

Tanggalkan peralatan: Tekan keduadua butang pelepas hingga peralatan  ditanggalkan. Keluarkan alat dari pemacu.

Gelendong plag kuasa

X Rajah A

Bergantung kepada model:

Perkakas dilengkapkan dengan gelendong 

plag kuasa automatik. Tarik kabel kuasa 

sekali sehingga mencapai panjang yang 

dikehendaki (maks. 125 cm) dan lepaskan 

dengan perlahan; kabel akan dikunci. 

Mengurangkan panjang kabel: Tarik  sedikit kabel dan biarkan ia bergulung  sehingga ke panjang yang dikehendaki.  Kemudian tarik semula kabel sedikit dan  lepaskan dengan perlahan. kabel akan  dikunci.

Penting: Jangan tolak masuk kabel dengan  tangan. Jika kabel tersekat, tarik keluar  kabel sepenuhnya dan biarkan ia bergulung  masuk semula.

28 

Persediaan ms

Penyimpanan plag kuasa

X Rajah A

Bergantung kepada model,  perkakas ini dilengkapkan dengan ruang  kabel kuasa. Panjang kord kuasa boleh  dilaraskan sewajarnya dengan menarik  atau menolak kembali kabel.

Sistem keselamatan

Alat ini mempunyai sistem keselamatan  yang berbeza. X “Sistem keselamatan”

lihat halaman 37

Persediaan

■  Letakkan unit ke atas permukaan yang  licin, bersih dan teguh.

■  Tarik kabel kuasa mengikut panjang  yang dimahukan.

■  Tekan butang lepaskan dan tekan  lengan putaran ke atas kepada tanda.

■  Tudung tersekat dengan tiub masukan  ke bahagian hadapan pemacu utama.

■  Tetapkan mangkuk. Sila ambila  perhatian pada alur pada unit asas.

■  Putarkan mangkuk sehingga ia bergerak  lawan arah jam.

Perkakas asas disediakan untuk 

pengunaan yang lain.

Penting: Perkakas ini tidak boleh ditolak ke  kawasan kerja, kerana fungsi penimbang  mungkin boleh terjejas. Angkat perkakas  untuk memindahkannya.

Pilih tetapan

■  Setiap kali butang A ditekan, tetapan  yang berikut akan terpapar.

LANGUAGE (BAHASA)

Bahasa yang ditunjukkan pada teks 

paparan.

SOUND (TON)

Pembesar suara untuk isyarat ton – 

Tetapan dalam 6 tingkat daripada 

sehingga ke kuat. 

BRIGHTNESS (KECERAHAN)

Kecerahan paparan – Tetapan dalam 

6 tingkat daripada gelap ke cerah.

UNITS (UNIT)

(untuk model dengan penyimbang) 

Paparan unit untuk penyimbang –   gram (g) atau paun (lb).

Tukar dan simpan tetapan

■  Tetapan semasa boleh ditukar dengan  butang + atau -.

■  Tekan butang A dan + serentak  sehingga “SAVED” (DISIMPAN)  ditunjukkan pada paparan. 

■  Lepaskan semula butang A dan +.  Tetapan yang ditukar telah disimpan.

Contoh: Tetapan bahasa

X rujuk juga kepada panduan ringkas

■  Tekan butang A dan + serentak  sehingga halaman tatarajah dibuka. 

■  Lepaskan semula butang A dan +. ■  Tekan butang A berulang kali hingga 

pilihan bahasa muncul. 

Tetapan

■  Tekan butang lepaskan dan tekan  lengan ke bawah sehingga ia berdetak.

■  Pasangkan plag. Mesin dipasangkan. ■  “OptiMUM” ditunjukkan pada paparan.

Perhatian: Jika perkakas tidak digunakan  di dalam jangka masa yang tertentu,  paparan akan tutup dan ke mod tunggu  sedia. “OptiMUM” akan ditunjukkan jika  butang tertentu disentuh.

■  Tekan butang A dan + serentak  sehingga halaman tatarajah dibuka. 

■  Lepaskan semula butang A dan +.

LANGUAGE

ENGLISH

■  Tekan butang + atau -, sehingga  bahasa yang diingini ditunjukkan.

■  Tekan butang A dan + serentak  sehingga “SETUP SAVED” (PASANG DISIMPAN) ditunjukkan pada paparan.  

SETUP

SAVED

■  Pilihan bahasa ditunjukkan pada paparan.

29

ms Penggunaan tanpa fungsi tambahan 

■  Lepaskan semula butang A dan +.  Pilihan bahasa disimpan.

■  Tekan dan tahan butang fungsi  (D/A/C) hingga paparan “OptiMUM”  muncul. Peranti sedia untuk beroperasi.

Tip: Jika peranti dihidupkan dengan suis  putar,menu terpadam dengan segera.

Penggunaan tanpa fungsi tambahan

W Risiko kecederaan!

  Jangan memasukkan palam sesalur  sehingga semua persiapan untuk  bekerja dengan perkakas telah lengkap.

  Jangan sesekali mencapai ke dalam  mangkuk atau tiub masukan semasa  operasi. 

  Bekerja dengan tudung dipasang  sahaja.

  Sebelum menggerakkan lengan atau  menukar alat, adalah perlu untuk  menunggu pemacu berhenti. 

  Sentiasa pasang pelindung pemacu  pada bahagian hadapan dan belakang  pemacu atas sebab keselamatan.

Penting:

  Sediakan perkakas asas seperti  penjelasan di “Persediaan” 

  Alat ini tidak boleh dihidupkan jika  mangkuk tidak diletakkan dengan betul.

Perhatian: Fungsi “TIME” (MASA) mula  secara automatik untuk setiap penggunaan,  dan juga mengira tempoh penggunaan dan  ia ditunjukkan pada paparan.

X Rajah F

1.Bergantung kepada tugas penyediaan, 

pilih pemukul Profi Flexi, pemukul Profi  atau cangkuk penguli X “Alat” lihat halaman 28. 

Masukkan peralatan tersebut hingga 

dipasang pada pemacu utama. Penutup 

melindungi pemacu.

2.Letakkan bahan-bahan yang hendak  diproses ke dalam mangkuk.

W Risiko kecederaan!

Rendahkan lengan putaran secara berhatihati! Pastikan jari atau tangan anda tidak  tersepit.

Gunakan alat

4.Pasangkan plag. “OptiMUM” ditunjukkan  pada paparan.

5.Tetapkan suis putaran ke tahap yang 

dikehendaki (X “Had kelajuan –

cadangan” lihat halaman 28). 

“TIME” (MASA) muncul dalam paparan  dan masa pemprosesan akan  dipaparkan dalam minit dan saat.

Tip: Bermula dari tempoh 60 minit, jam  tambahan akan dipaparkan: “1:01:30”.

6.Proses bahan selama mana hasil yang 

dimahukan terhasil.

7.Letakkan suis putaran pada y. Tunggu  pemacu berhenti. Cabutkan plag.

8.Tekan butang lepaskan dan tekan 

lengan ke atas kepada tanda.

9.Putarkan mangkuk lawan arah jam, 

sehingga ia boleh diangkat. Tanggalkan 

mangkuk.

10.Tekan kedua-dua butang pelepas  hingga peralatan ditanggalkan.  Keluarkan alat dari pemacu.

11.Keluarkan pelindung daripada pemacu. 

12.Cuci semua bahagian segera selepas  digunakan. X “Pembersihan dan penjagaan” lihat halaman 35

Tip: Gunakan sampel aplikasi kami,  untuk mengetahui peranti baru anda dan  fungsinya dengan lebih baik. X “Resipi”

lihat halaman 35

Menambah lebih banyak bahan

Bahan lain boleh diisi semula semasa 

pemprosesan.

X Rajah G

■  Jika alat sedang berjalan, isikan dengan  lebih bahan dengan berhati-hati melalui  bukaan dalam tudung.

W Risiko kecederaan!

Jangan sesekali mencapai ke dalam 

3.Tekan butang lepaskan dan tekan  mangkuk atau aci pengisi dengan tangan  lengan ke bawah sehingga ia berdetak. semasa operasi. Tiada objek (contohnya 

sudu kayu) boleh dimasukkan dalam 

mangkuk atau dalam aci pengisi.

30 

Loading...
+ 78 hidden pages