

Page 1
D7050DH
Installation Instructions
EN
Multiplex Photoelectric
Duct Smoke Detector
Page 2
D7050DH | Installation Instructions | 1.0 Description
Notices
Figure 1: D7050DH
These instructions cover the installation of the
D7050DH Multiplex Photoelectric Duct Smoke
Detector on a D7024 or a DS9400M 24 VDC Fire
Alarm Control Panel (FACP) with a D7039 or DS9431
Multiplex Expansion Module installed. The D7024 and
DS9400M requires ROM version 2.0 or greater.
Install, test, and maintain the D7050DH according to
these instructions, NFPA 72, local codes, and authority
having jurisdiction (AHJ).
Follow the procedures in these instructions
to avoid personal injury and damage to the
equipment. Failure to follow these
instructions can result in the D7050DH not
operating properly. Bosch is not
responsible for improperly installed, tested,
or maintained devices.
The D7050DH complies with Part 15 of the Federal
Communications Commission (FCC) Rules and with
the RSS-210 of Industry and Science Canada.
D7050DH operation is subject to the following two
conditions:
1. It does not cause harmful interference.
2. It must accept any interference it receives,
including interference that might cause undesirable
operation.
1.0 Description
The D7050DH (Figure 1) is Underwriters Laboratories,
Inc. (UL) Listed and requires a D343 Duct Detector
Housing. Use this detector with the D7024 or a
DS9400M that includes a D7039 or DS9431 Multiplex
Expansion Module.
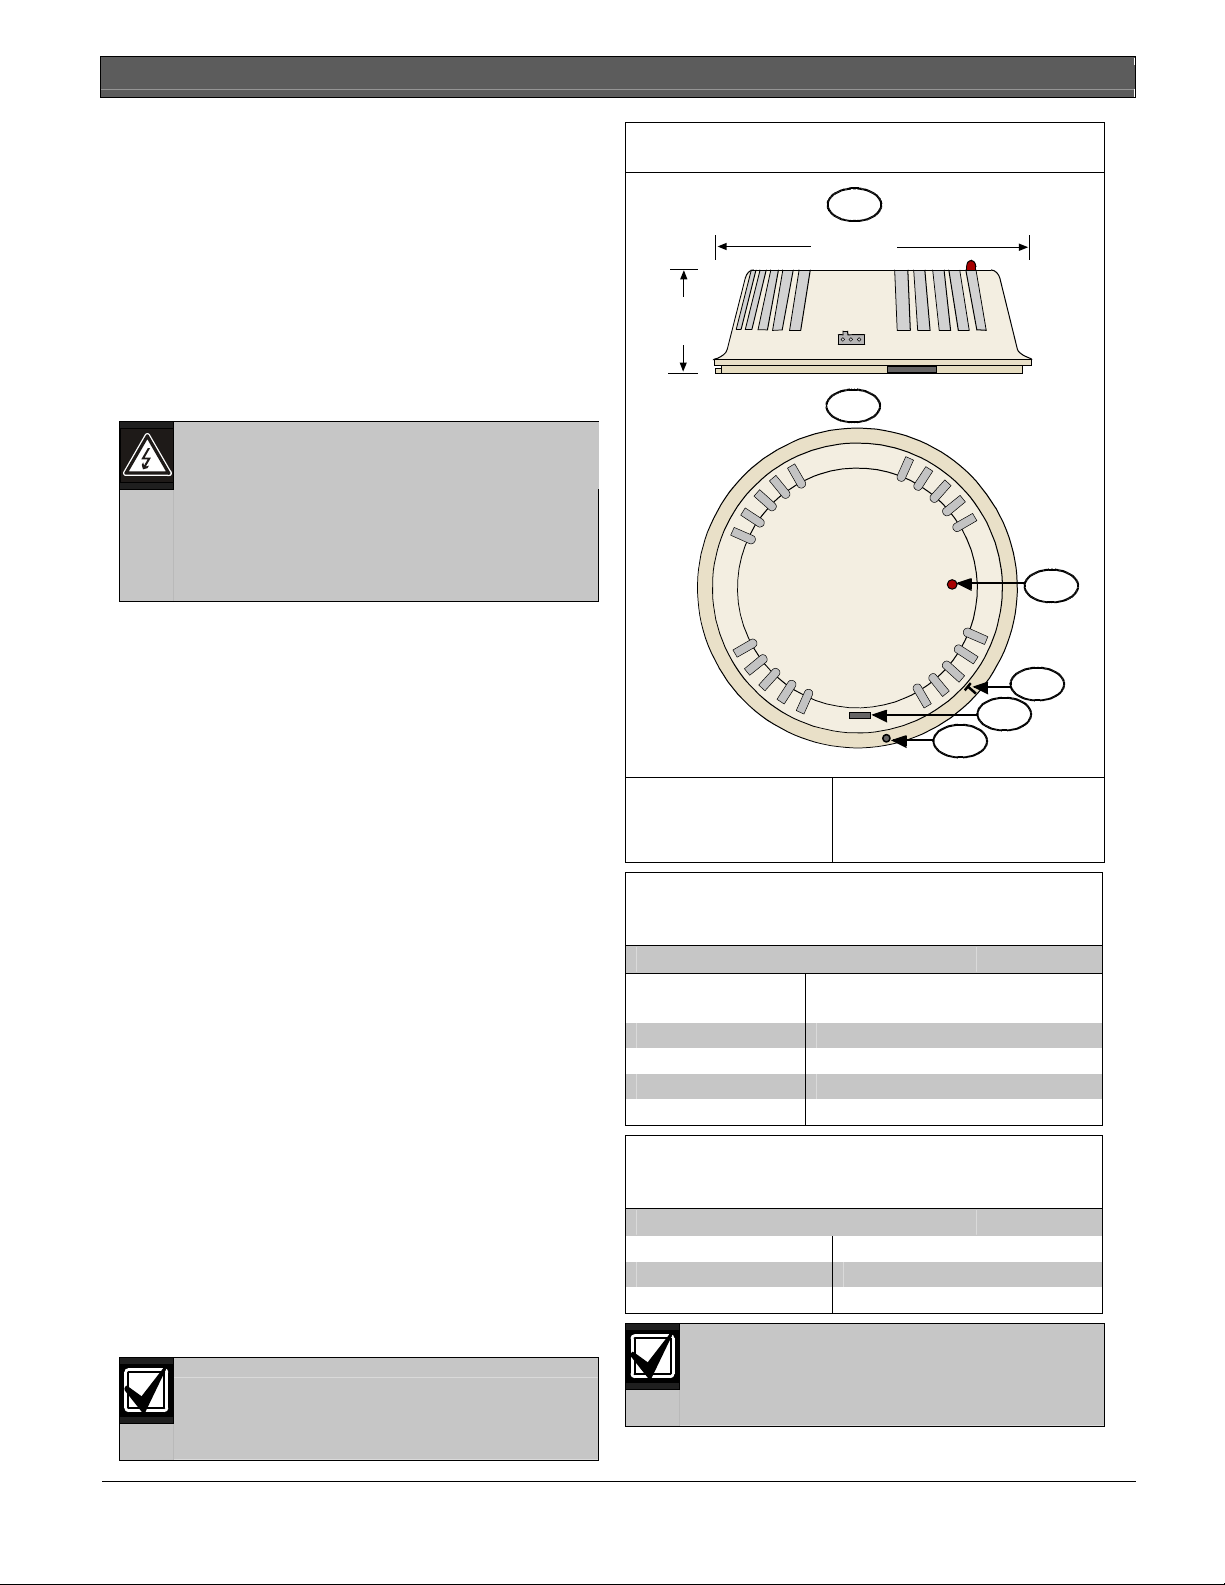
An LED indicator on the head flashes every 3 to 8 sec
to ensure the D7050DH has power and the smoke
sampling circuitry functions. This LED flashes at least
once each second during an alarm confirming
individual detector alarms. The D7050DH
automatically resets after the alarm condition clears.
2.0 Installation
For installation details, refer to the D7024 FACP
Operation and Installation Guide (P/N: 31499), the
D9400M Reference Guide (P/N: 44578), the D7039
Installation Guide (P/N: 38685), or the DS9431
Installation Instructions (P/N: 41381).
1
4 in.
(10.2 cm)
1.5 in.
(3.8 cm)
2
5
6
1 - Side view
2 - Top view
3 - Alarm/Test LED
Table 1: Maximum Wire Length Allowed for
each Multiplex Bus
Wire Gauge
18 AWG (1.02 mm) 3800 ft (1170 m)
16 AWG (1.29 mm) 5950 ft (1810 m)
14 AWG (1.63 mm) 5950 ft (1810 m)
12 AWG (2.05 mm) 5950 ft (1810 m)
Table 2: Maximum Number of Detectors
Allowed for each Multiplex Bus
With Remote Test 40
With Remote LED 50
Without Annunciator 70
4 - Magnetic test locator
5 - Calibration voltage pins
6 - Tamper screw hole
Maximum 50 Ω for each
Bus Loop
3
4
Do not use shielded cable.
Do not exceed the maximum line resistance
of 50Ω.
2 Bosch Security Systems, Inc. | 9/06 | 49325E
Page 3
.
3.0 Wiring the D343
You can wire the D343 in series as shown in Figure 2.
Figure 2: Wiring the D343 Duct Housing
1
(-)
(+)
BBR
Y
O
LRE
E
R
KND
L
N
Tampe r
Disable
14 13 12 11 10 9
B
G
L
R
U
N
1
Reset
Disable
2
3
4
5
6
7
8
2
BBR
Y
O
LRE
E
R
KND
L
N
Tamper
Disable
14 13 12 11 10 9
B
G
L
R
U
N
Reset
Disable
1 - Input output module for the D7039 or DS9431
2 - Multiplex bus connections
4.0 Setting the Address
Set the D7050DH address before
connecting to the control panel and
applying power. The address number is the
same as the input point or zone number.
D7050DH | Installation Instructions | 3.0 Wiring the D343
The A address range works on the D7039
Multiplex Expansion Module with the
D7024 FACP. The B address range works
on the DS9431 Multiplex Expansion
Module with the DS9400M FACP.
Figure 3 shows the A address range set at 095, allowing
1
the D7039 to work with the D7024 FACP.
2
3
4
5
6
7
8
5.0 Mounting
1. Remove the tamper screw located in the recess
on the top of the dust cover.
2. Remove the dust cover.
3. Mount and wire the duct housing according to the
D343 Installation Instructions (P/N: 48199).
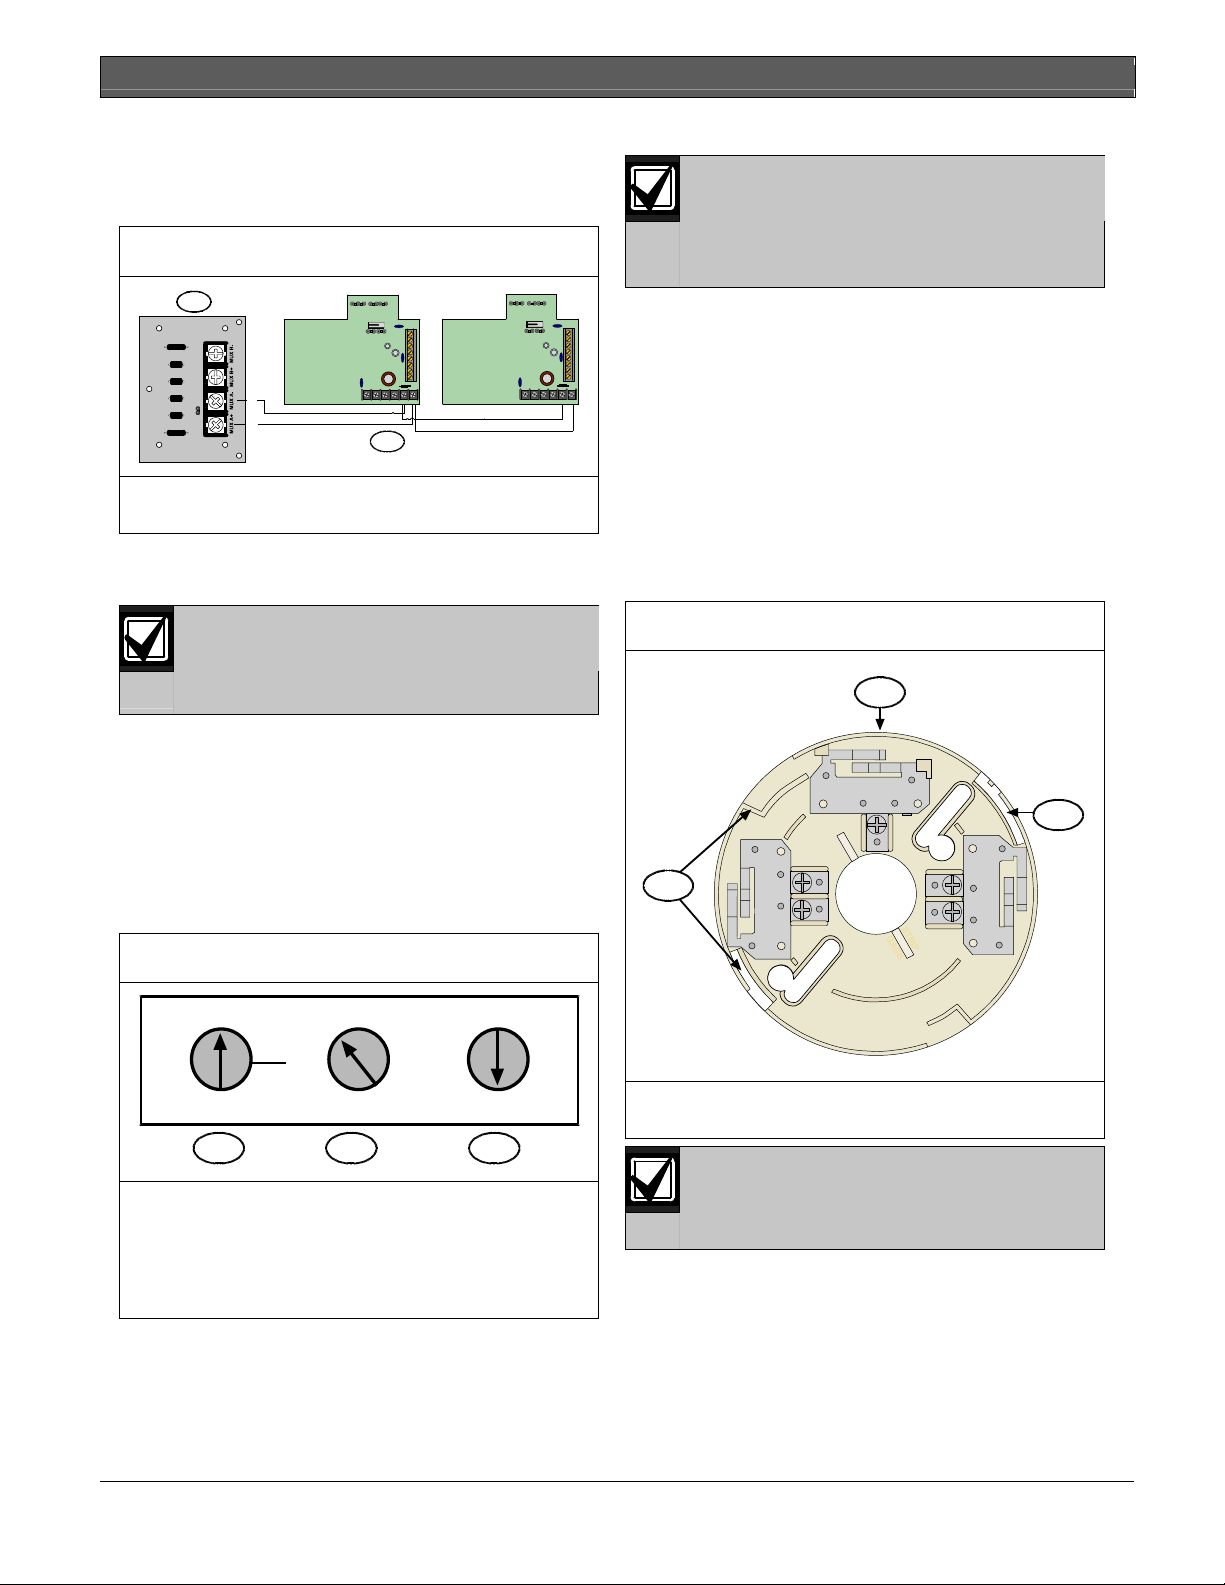
4. Mount the D7050DH to the base by turning it
clockwise until it clicks into place (Figure 4).
Figure 4: Mounting the D7050DH on the Base
1
Set the D7050DH’s address using a flat-blade
screwdriver to position the rotary switches
(Figure 3) located on the back. Note that the switches
click when turned.
The valid address range is from 009 to 255. Refer to
the D7024 Operation and Installation Guide (P/N: 31499)
or the DS9400M Reference Guide (P/N: 44578) for
additional address limitations.
Figure 3: Setting the D7050DH Address
A
0
1
2
0
1
B
2
0
1
9
8
7
6
2
3
4
5
0
1
9
8
7
6
2
3
4
5
1 2 3
1 - Hundreds 2 - Tens 3 - Ones
A = D7024 FACP, B = DS9400 FACP
For example:
0 hundreds, 9 tens, 5 ones = Address 95 on
the D7024 FACP
R2
+1
3-
2
1 - Base contacts (three sets)
2 - Set detector contact here and rotate clockwise
The detector is keyed. Do not force the
detector onto the base.
2
Bosch Security Systems, Inc. | 9/06 | 49325E 3
Page 4

D7050DH | Installation Instructions | 6.0 Programming
6.0 Programming
For multiplex programming, refer to the D7024 FACP
Operation and Installation Guide (P/N: 31499) or the
DS9400M Reference Guide (P/N: 44578).
7.0 Testing
Test detection devices immediately after installation.
Test the D7050DH according to NFPA Chapter 7-1.6.2
(1999) or more often as required by local code.
7.1 Operational Testing
Notify all concerned parties before and
after completing maintenance on or testing
1. Apply power to the system and check for alarms.
2. If a D7050DH is in alarm, shut down the system.
3. Remove the D7050DH and recheck for proper
4. When the system is free of alarms, check each
5. Test each D7050DH to ensure it causes a control
6. Alarm the D7050DH by doing one of the
7. When a D7050DH alarms, the red LED indicator
the
fire alarm system.
wiring. If the problems persist, replace the affected
D7050DH or exchange it with a known good
detector. This determines if the problem is caused
by the D7050DH.
D7050DH to ensure the red LED indicator on the
head flashes. This confirms the detector is
operating properly.
panel alarm.
following:
a. Place a magnet horizontally against the recess
in the duct cover, centering it over the “T”
marked on the head to activate an internal
reed switch.
b. Remove the duct cover and use a UL Listed
aerosol smoke detector tester such as the
Home Safeguard Industries’ 25S to simulate
an alarm. Follow the instructions included in
the aerosol smoke detector tester.
on the head flashes at least once per second. Clear
the alarm by initiating a system reset before
proceeding to the next detector.
7.2 Sensitivity Testing
Calibration is important in determining a
detector’s continued operation. Depending
Test the D7050DH’s sensitivity to meet NFPA 72
requirements by conducting a Magnet Test (refer to
Section 7.3 Magnet Test). You can also test sensitivity by
measuring the calibration voltage pins with D1005 Test
Cable, D344-RL, or D344-RT (refer to Section 7.4
Voltage Measurement Test). Calibration can be quickly
determined by visually inspecting the D7050DH’s LED
(refer to Section 7.2.2 Visual Check). These tests confirm
whether or not the detector is within its factory marked
calibration range.
7.2.1 Sensitivity Test
The control panel constantly monitors the D7050DH.
If the detector exceeds the limits of the sensitivity
thresholds, the control panel reports the detector in
question and generates a fault condition.
7.2.2 Visual Check
The D7050DH includes the Chamber Check
Automatic Trouble Indication that allows it to
automatically show if its calibration is out of the
factory-listed range. You can meet the NFPA guidelines
for sensitivity testing by visually inspecting the
D7050DH and checking the Alarm LED flash rate.
If the calibration is out of range during power up or
longer than 24 h, the Alarm LED double flashes. This
LED single flashes when the detector is operating
normally.
on local regulations, calibration testing
might be required more than once a year.
According to NFPA72, perform a
Calibration Test at installation and every
other year thereafter. Perform a Functional
Test monthly.
Visually check all detectors before
disconnecting the multiplex bus.
Disconnecting the bus erases the
calibration indication. If the detector was
disconnected or the control panel lost
power within the
last 24 h, perform a Magnet Test or Voltage
Measurement Test to confirm sensitivity.
4 Bosch Security Systems, Inc. | 9/06 | 49325E
Page 5

.
7.3 Magnet Test
To perform the Magnet Test, the control
panel must be in the Fire Walk Test Mode.
1. Hold a magnet horizontally against the recess in
2. Observe the LED. If the D7050DH is within the
3. If the D7050DH is not operating, it does not signal
If the control panel is not in this mode, it
sends fire reports to the central station.
Refer to your control panel’s reference
guide for Fire Walk Test information.
the D343 cover for approximately 10 sec.
factory marked calibration range, it goes into alarm
and the Alarm LED flashes at least once per
second.
a. If the D7050DH is too sensitive, the Alarm
LED flashes six times rapidly (once every 0.5
sec) and the detector goes into alarm.
b. If the D7050DH is not sensitive enough, the
Alarm LED flashes four times slowly (once
every 2 sec) and the detector goes into alarm.
an alarm. Return the detector for repair.
D7050DH | Installation Instructions | 8.0 Maintenance
8.0 Maintenance
Notify all concerned parties before and
after completing maintenance on or testing
Clean the detector and base at least once each year
using a vacuum or clean dry compressed air. Pay
particular attention to the screens. You might need to
clean more often in dusty areas or areas of heavy insect
concentration.
1. Remove the D343’s cover.
2. Remove the D7050DH from the base and clean
3. Remove the D7050DH’s cover using a thin,
Figure 5: Removing the 7050DH Cover
the
fire alarm system.
the base with a clean cloth and common window
cleaner.
flat-blade screwdriver to pry the chamber from the
cover. Insert the screwdriver into the cover slots
and pry off the cover (Figure 5).
7.4 Voltage Measurement Test
1. Plug a D1005 Test Cable (optional) into the
calibration voltage pin.
2. Connect a digital voltmeter to the D1005.
3. Connect the voltmeter’s negative terminal to the
black wire on the D1005 and connect the positive
terminal to the red wire. The white wire is not
used.
4. If a D344-RL or D344-RT is installed, use the
voltage monitor jacks as described below:
a. The voltage measured by the voltmeter is half
the sensitivity (in %/ft obscuration) of the
D7050DH.
b. Multiply the voltage by 2. The result must be
within the factory-marked calibration range
printed on the label located on the bottom of
the D7050DH.
c. If the D7050DH is outside the factory-marked
calibration range, remove it and clean it. Or
replace it as described in Section 7.1 Operational
Testing.
d. After cleaning, recheck the calibration voltage
measurement. If the D7050DH is still outside
of the factory-marked calibration range, return
it for recalibration to:
National Repair Center
130 Perinton Parkway
Fairport, New York 14450
1
2
2
3
4
2
1 - Flat blade screwdriver tip inserted into a cover
slot
2 - Cover slots (3)
3 - Chamber
4 - Cover
4. Remove the cover of the detector chamber. Gently
pull the chamber cover up and away from the
chamber (Figure 6)
Figure 6: Removing the D7050 Chamber Cover
Bosch Security Systems, Inc. | 9/06 | 49325E 5
Page 6

D7050DH | Installation Instructions | 9.0 Specifications
5. With the chamber cover removed, clean te inside
of the cover with a vacuum or clean dry
compressed air.
Do not clean the D7050DH components
with water or any liquid cleaner.
6. Replace the chamber cover and ensure the hole for
the LED is properly aligned over the LED. Place
the cover parallel to the chamber and gently snap
the locking tabs into place.
7. Replace the D7050DH’s cover, lining up the holes
for the LED.
8. Return the D7050DH to its base and replace the
D343’s cover.
After cleaning, test the D7050DH for
proper calibration. Refer to Section 7.0
Testing beginning on page 4.
Do not paint the D7050DH. Paint or other
foreign matter covering the screens can
stop or delay smoke from entering the
detector.
9.0 Specifications
Table 3: column width table
Standby
Current
Alarm
Current
Minimum
Operating
Voltage
Power-Up
Time
Installation
Temperature
Relative
Humidity
Required
Accessories
Options
Refer to the D343 Installation
Instructions (P/N: 48199), the DS9400M
Reference Guide (P/N: 44578), and the
DS6431 Installation Instructions
(P/N: 41381)
Refer to the D343 Installation
Instructions (P/N: 48199), the DS9400M
Reference Guide (P/N: 44578), and the
DS6431 Installation Instructions
(P/N: 41381)
8 VDC peak
22 sec (maximum)
+32°F to +100°F (0°C to +38°C)
0% to 93% (non-condensing)
D343 Duct Housing and Sample Tube
D344-RT Remote Test
D344-RL Remote LED
SMK-TM Test Magnet
6 Bosch Security Systems, Inc. | 9/06 | 49325E
Page 7

D7050DH | Installation Instructions |
.
Notes
Bosch Security Systems, Inc. | 9/06 | 49325E 7
Page 8

Bosch Security Systems, Inc.
130 Perinton Parkway
Fairport, NY 14450-9199
Customer Service: (800) 289-0096
Technical Support: (888) 886-6189
© 2006 Bosch Security Systems, Inc.
49325E
 Loading...