

Page 1
Bosch Cellular Services
en Reference Guide
Page 2

Page 3
Bosch Cellular Services Table of Contents | en 3
Table of contents
1
1.1 About documentation 4
2
3
3.1 Pre-activated products 6
3.2 Not-activated products 6
3.3 APN for module programming overview 6
4
4.1 Service plans 7
4.2 Estimate data usage 8
5
5.1 Create a VPN client on the RPS workstation 9
5.1.1 Windows 7 VPN client creation 9
5.1.2 Windows 8 VPN client creation 11
5.2 Set up RPS to use the VPN client 13
5.2.1 VPN connection-RPS setup 13
5.2.2 Web services-RPS setup 14
5.3 Control panel IP addresses 15
5.3.1 Query the control paneI for IP address and plan information 16
5.4 Cellular callback setup 17
5.5 Connect to the control panel 18
6
6.1 Certificate preparation 21
6.2 Build Remote Certificate wizard use 22
6.2.1 User Selection page 23
6.2.2 Connection Type page 23
6.2.3 Active Date Range page 23
6.2.4 Summary page 23
6.3 Remote Security Control preparation 23
6.4 Remote Security Control use 24
Introduction 4
Requirements 5
Product ordering information 6
Choose a Bosch Cellular Service Plan 7
RPS using cellular 9
Remote Security Control using cellular 21
Bosch Security Systems, Inc. Reference Guide 2015.03 | 04 | F01U273558
Page 4
4 en | Introduction Bosch Cellular Services
1
Introduction
This document includes basic instructions for using cellular communicators by Bosch for
Remote Programming Software (RPS) and Remote Security Control (RSC).
Use the steps below (in order) and the checkboxes as you complete the steps. Each step
includes references for more detailed information.
Get started
Review cellular operability requirements
– Requirements, page 5
Order cellular products
– Product ordering information, page 6
Choose a Bosch Cellar Service Plan for your customer needs
– Choose a Bosch Cellular Service Plan, page 7
Use the cellular connection for RPS
Create a Virtual Private Network (VPN) client on the RPS workstation for use with RPS
– Create a VPN client on the RPS workstation, page 9
Set up RPS to use the VPN
– Set up RPS to use the VPN client, page 13
1.1
Determine the control panel IP address to make the RPS connection
– Control panel IP addresses, page 15
Connect to the control panel and send/receive data
– Connect to the control panel, page 18
Use the cellular connection for RSC
Remote Security Certificate Builder installation, setup, and certificate creation
– Certificate preparation, page 21
– Build Remote Certificate wizard use, page 22
Remote Security Control installation, setup, and use
– Remote Security Control preparation, page 23
– Remote Security Control use, page 24
About documentation
Copyright
This document is the intellectual property of Bosch Security Systems, Inc. and is protected by
copyright. All rights reserved.
Trademarks
All hardware and software product names used in this document are likely to be registered
trademarks and must be treated accordingly.
2015.03 | 04 | F01U273558 Reference Guide Bosch Security Systems, Inc.
Page 5
Bosch Cellular Services Requirements | en 5
2
Requirements
The following are required for you to complete the steps in this guide:
A cellular-compatible control panel
A registered Wyless account and login credentials
Internet access on the RPS computer
RPS v5.18 or higher
Wyless login credentials
Wyless provides Bosch Cellular services with the security and performance of Bosch dealers in
mind. Wyless grants your designated service administrator credentials for:
– Porthos, the online management portal
– A Virtual Private Network (VPN) connection
– Web Services API
This information is sent in a welcome email to the account administrator.
Bosch Security Systems, Inc. Reference Guide 2015.03 | 04 | F01U273558
Page 6
6 en | Product ordering information Bosch Cellular Services
3
3.1
Product ordering information
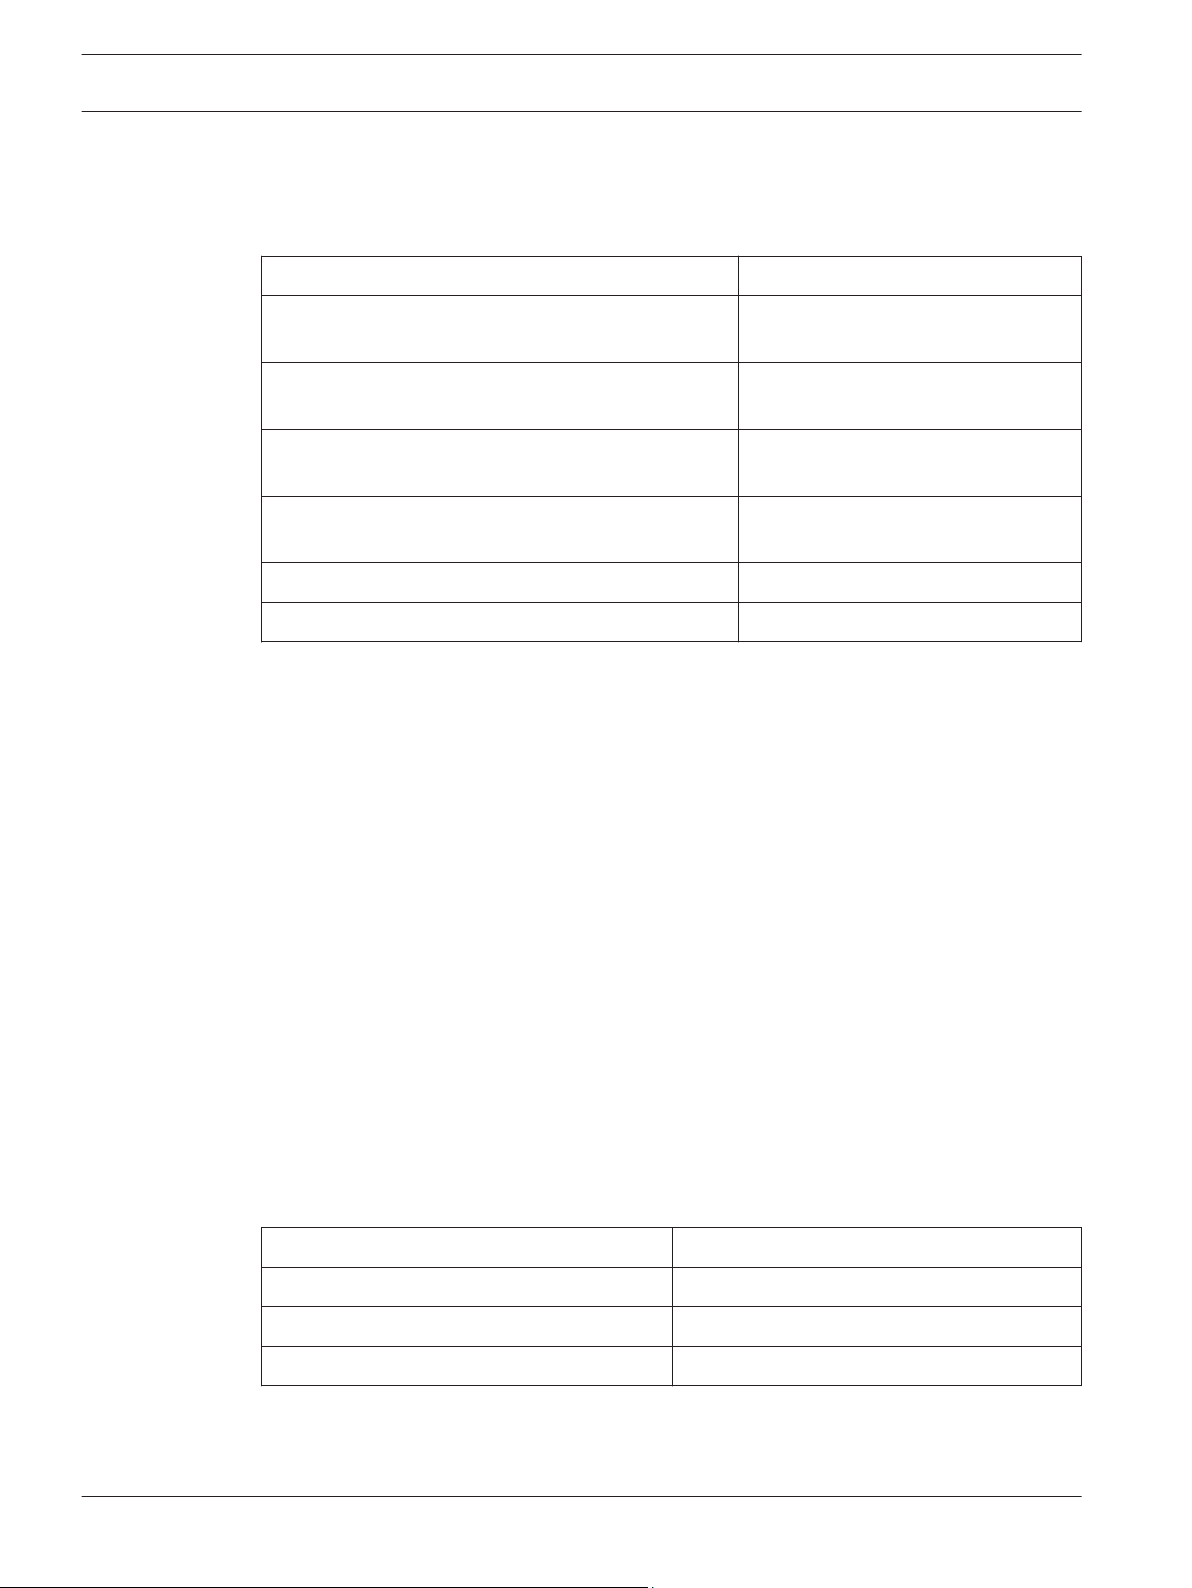
Once you register for service, order modules, SIM cards, and cellular kits from Bosch.
Order the following products from Bosch:
Model and description Notes
B440 Conettix Plug-in Cellular Communicator (using
3G)
B441 Conettix Plug-in Cellular Communicator (using
CDMA)
B442 Conettix Plug-in Cellular Communicator (using
GPRS for Latin America)
B443 Conettix Plug-in Cellular Communicator (using
HSPA+ for Canada)
ITS-SIM-ROG Rogers SIM card Not activated
ITS-SIM-TMO T-Mobile SIM Not activated
Pre-activated products
Pre-activated plug-in communicators arrive ready to communicate on the default service plan
you chose for your agreement. Wyless sends you an email with each product IP address and
phone number. You can also view the IP address and phone number online in your portal
account or in Remote Programming Software (RPS).
Billing for pre-activated Verizon plug-in communicators begins at 150 days from shipping date
or upon the first data connection, whichever comes first. SIM-based devices begin billing at 60
days or upon the first data connection, whichever comes first.
Pre-activated on Verizon
Pre-activated on Verizon
SIM card required
SIM card required
3.2
3.3
Not-activated products
SIM cards not yet activated are available if you want to purchase SIM cards to hold in your
stock without accumulating data charges. You must activate each SIM card prior to use.
Activation adds the SIM card to your billing account, and assigns its data plan, phone number,
and static IP address.
Activation requests made using the online ticket option or using email take up to 24 hours.
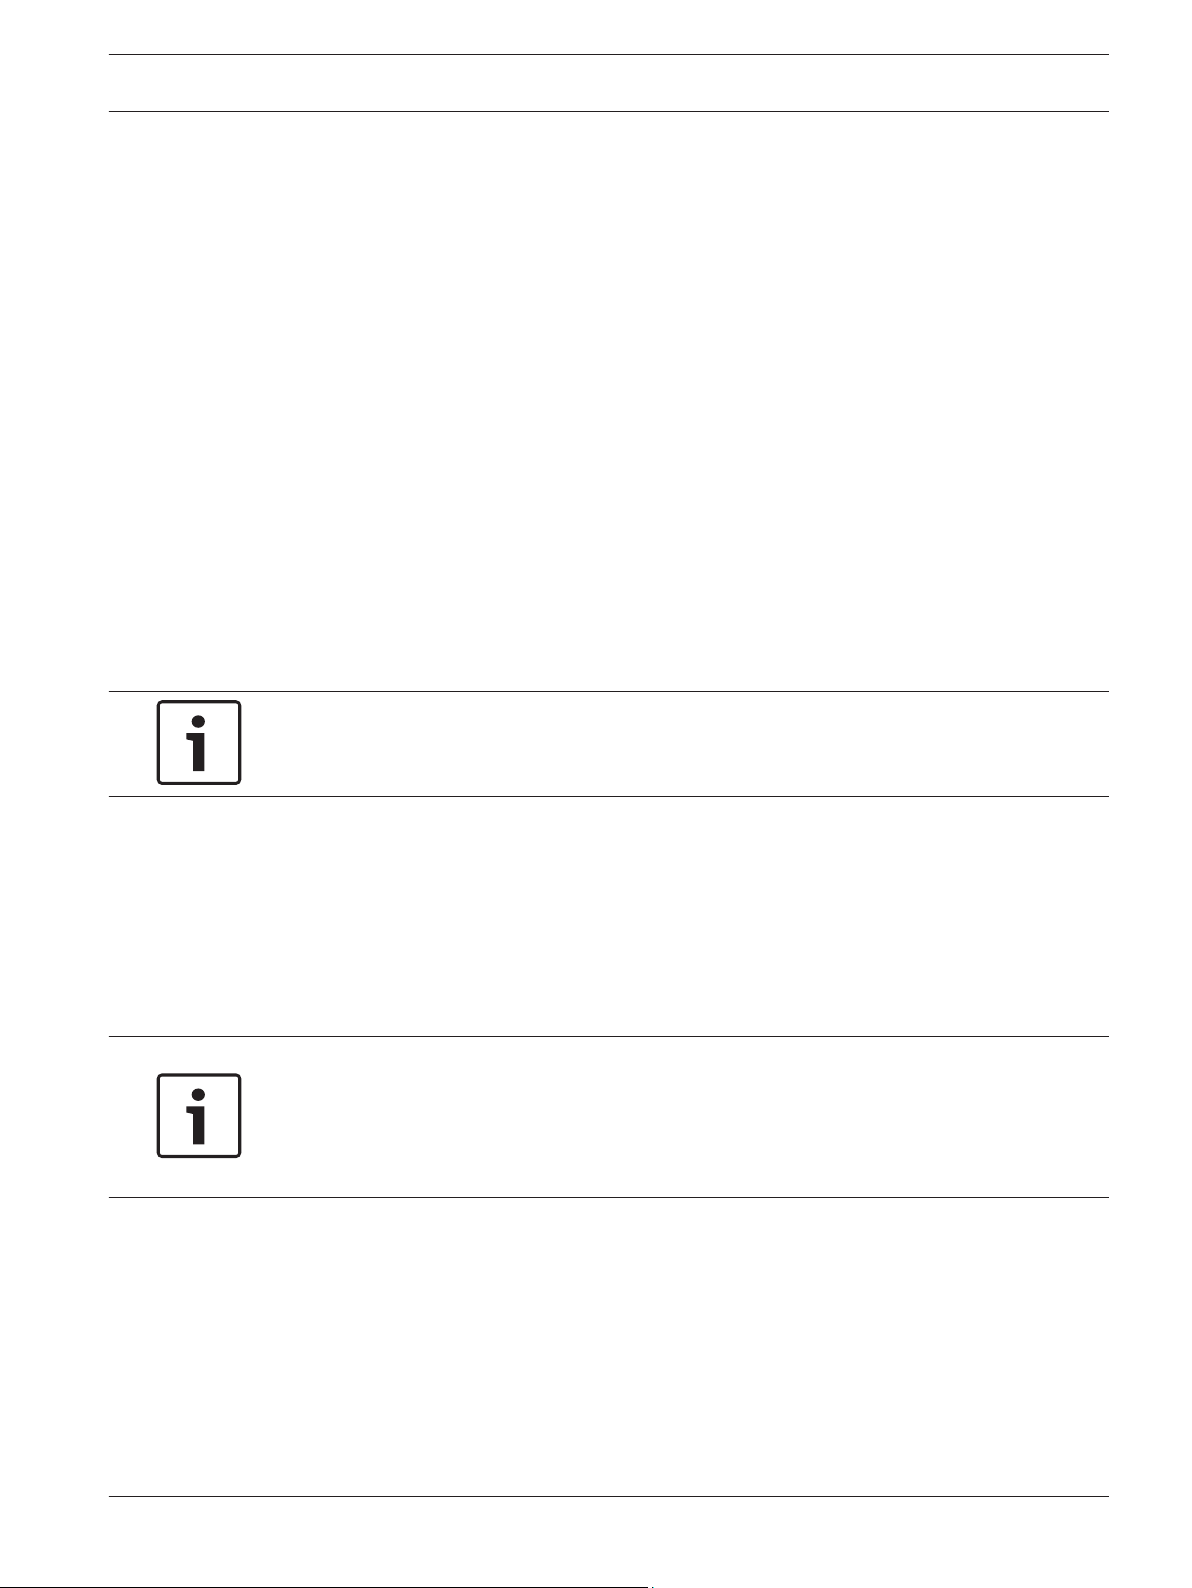
APN for module programming overview
For GSM-based communicators such as the B442 and B443, you must program the proper
network credentials and the Access Point name (APN) into RPS (refer to Web services-RPS
setup, page 14). The type of SIM card you have determines the APN to use:
SIM card type APN
T-Mobile gne
Rogers wyless.apn (RPS default)
AT&T wyless.com.attz
2015.03 | 04 | F01U273558 Reference Guide Bosch Security Systems, Inc.
Page 7

Bosch Cellular Services Choose a Bosch Cellular Service Plan | en 7
4
4.1
Choose a Bosch Cellular Service Plan
The right Bosch Cellular Service Plan depends on how you program the communicator within
the control panel programming in RPS. Review the plan details found in your Wireless Master
Services Agreement.
Notice!
Recommended programming settings
For recommended control panel and central station receiver settings for the most common
applications, refer to RPS Help (v5.18 or higher) for your control panel, or go to http://
www.conettix.com/Cellular.asp and click the Recommended System Settings link.
Service plans
Bosch offers service plans that align with the common applications for cellular connectivity on
Bosch control panels. The largest component of data usage is typically destination supervision
(poll rate). Session-based applications such as RPS and Remote Security Control (RSC) can
also use significant data volume.
To reduce the risk of overages, Bosch offers a shared data structure for all plans. For example,
if Connection A uses 120 kB on a 100 kB plan and connection B uses 10 kB on a 100 kB plan,
your account has 70 kB remaining between the two connections before an overage occurs.
Find full plan information in your Bosch Cellular agreement. Data is shared across connections
at the plan level – 100 kB, 1 mB, or 5 mB.
Backup Shared plan
The Backup Shared plan accommodates control panel check-ins daily and up to every 4 hours,
plus alarms and very light RPS use. The plan is ideal for:
– Primary residential alarm communication with light RPS capability
– Backup commercial alarm communication with daily supervision and light RPS
Standard Share plan
The Standard Shared plan accommodates control panel check-ins every 4 hours up to hourly,
plus alarms, Opening and Closing reports, RPS and light RSC application use. The plan is ideal
for:
– Primary supervised alarm communication with Open/Close reporting
– Normal RPS sync activity and light RSC application use
Commercial Share plan
The Commercial Shared plan allows high supervision for primary or sole path communication
in UL commercial burglary or fire applications, along with RPS or RSC application use. The
plan is ideal for:
– Multi-destination cellular alarm reporting with supervision
– Heavy RPS usage or firmware upgrading over cellular
– Heavy or multi-user RSC application use
As well as one of the following:
– 200 second supervision for UL1610 Commercial Burglary alarm with Open/Close
reporting
– 5 minute supervision (required for UL864 Fire) with Open/Close and RPS or RSC use
– 1 to 4 hour supervision with Open/Close and frequent RPS or RSC application use
Contact ID over Voice plan (ITS-DX4020-G SIMs only)
The Contact ID over Voice plan allows 40 minutes of voice calling for a daily test and alarm
reporting for Contact ID control panels that don’t support Conettix IP.
Bosch Security Systems, Inc. Reference Guide 2015.03 | 04 | F01U273558
Page 8

8 en | Choose a Bosch Cellular Service Plan Bosch Cellular Services
Text Messaging
Some control panels support personal notification using text messaging. Texting is available
on all carriers on a pay-per-use basis. Verizon Standard Shared and Commercial Shared plans
include 100 free messages and reduced usage rates.
4.2
Estimate data usage
This section provides information to estimate data usage so you can choose from the available
service plans.
Supervision (poll) rate
The poll rate is the rate of cellular check-in messages. The rate is the largest contributor to
monthly data usage.
– Check-in (poll) or event (alarm): 100 bytes
Remote programming
RPS data usage varies based on session length and the number of changes. Specific factors to
consider:
– Normal Sync (users, passcodes): 5 to 10 kB
– Full download for GV3 and prior: 50 kB
– Full download for B9512G/B8512G, D9412GV4/D7412GV4/D7212GV4, and B Series: 150
kB
– Firmware updates on D9412GV4/D7412GV4/D7212GV4: 700 kB
– Firmware updates on B9512G/B8512G and B Series: 1.4 mB
– RPS Diagnostics: Determined by session duration
Text messaging
Texting is enabled as pay-for-use in all service plans. Some plans include personal notification
text bundles which offer better rates. Remember that notifying multiple destinations uses
multiple messages.
Remote Security Control app
Remote Security Control data usage depends on the frequency, activity, and time of
connection. The more users and time spent online with the control panel, the more data is
used.
2015.03 | 04 | F01U273558 Reference Guide Bosch Security Systems, Inc.
Page 9
Bosch Cellular Services RPS using cellular | en 9
5
5.1
RPS using cellular
This section includes instructions for setting up RPS and the RPS workstation to connect to
the control panel using the plug-in cellular modules.
For instructions for a VPN connection (preferred), refer to:
– Create a VPN client on the RPS workstation, page 9
– Set up RPS to use the VPN client, page 13
– Control panel IP addresses, page 15
– Connect to the control panel, page 18
For instructions for using Cellular Callback, refer to:
– Control panel IP addresses, page 15
– Cellular callback setup, page 17
– Connect to the control panel, page 18
Create a VPN client on the RPS workstation
To use a cellular connection to connect to the control panel using RPS, you first need to
create a VPN client on the RPS workstation.
This section has instructions for Windows 7 and Windows 8:
– Windows 7 VPN client creation, page 9
– Windows 8 VPN client creation, page 11
Notice!
The VPN client creation process might require administrator rights.
5.1.1
VPN tips
– When connected to the VPN, the Network Connections window and the icon on the
system tray indicate Connected.
– You can create a desktop shortcut to connect with fewer steps. To do so, in the Network
Connections panel, right-click the VPN option and select Create Shortcut and then in the
Shortcut dialog box, click Yes.
– Remember to disconnect from the VPN when finished to avoid data consumption and to
allow a VPN connection from another workstation.
Notice!
For Newer control panel benefits
For newer control panels (B9512G/B8512G, B5512/B4512/B3512, and D9412GV4/D7412GV4
v2.xx), you can disconnect the VPN automatically when disconnecting RPS from the control
panel.
Windows 7 VPN client creation
Creating a VPN client on an RPS workstation with Windows 7:
1. Open the Windows Control panel and select Network and Sharing Center (or Network
and Internet and then Network and Sharing Center. The Network and Sharing panel
opens.
Bosch Security Systems, Inc. Reference Guide 2015.03 | 04 | F01U273558
Page 10

en | RPS using cellular Bosch Cellular Services
10
2. In the left pane, click Network and Sharing Center. The Network and Sharing Center
window opens.
3. In the center of the window under Change your network settings, click Set up a new
connection or network. The Set Up a Connection or Network window opens.
4. Click Connect to a workplace and click Next. The Connect to a Workplace window opens.
5. Click Use my Internet connection (VPN). The window changes to allow you to enter
information.
6. Do the following:
Internet address field. Enter vpn.wyless.net.
Destination name field. Enter a name that you will remember such as Bosch Wireless VPN
Connection.
Use a smart card checkbox. Deselect the checkbox.
Allow other people to use this connection checkbox. Select the checkbox.
Don’t connect now; just set it up so I can connect later checkbox. Select the checkbox.
7. Click Next. The window changes to allow you to enter a username and password.
2015.03 | 04 | F01U273558 Reference Guide Bosch Security Systems, Inc.
Page 11

Bosch Cellular Services RPS using cellular | en 11
8. In the User name and Password fields enter the User name and Password (supplied by
Wyless after the registration process), and select the Remember the password checkbox
to save the password for the next log in. Click Create.
9. When the window shows The Connection is ready to use, click Close to return to the
Network and Sharing Center. Do not click Connect now.
10. Click Change adapter settings to open the Network Connections window.
11. Right-click the Bosch Wireless VPN Connection option and select Properties. The Bosch
Wireless VPN Connection Properties dialog box opens. Click the Networking tab.
12. Select Internet Protocol 6 (TCP/IPv6) and click Properties.
13. In the resulting dialog box, click Advanced. The Advanced TCP/IP Settings dialog box
opens.
14. Deselect the Use default gateway on remote network checkbox and click OK. Click OK
again to return to the Bosch Wireless VPN Connection Properties dialog box.
15. Select Internet Protocol 4 (TCP/IPv4) and repeat the previous steps to remove the
gateway option. Click OK repeatedly to return to the Network Connections panel.
Connect to the VPN
For the following control panels, you must manually connect to the VPN (newer control panels
connect automatically through RPS):
– D9412GV4/D7412GV4/D7212GV4 v1.xx
– D9412GV3/D7412GV3/D7212GV3
– D9412GV2/D7412GV2/D7212GV2
– FPD-7024
Connecting to the VPN:
1. From the Network Connections panel, double-click the Bosch Wireless VPN Connection
option.
2. In the resulting Connection dialog box, click Connect.
5.1.2
Bosch Security Systems, Inc. Reference Guide 2015.03 | 04 | F01U273558
Windows 8 VPN client creation
Creating a VPN client on an RPS workstation with Windows 8:
1. Press [Windows]+[C] to open the Charm bar, and then click the Search icon to open the
Search dialog box.
Page 12

en | RPS using cellular Bosch Cellular Services
12
2. Select the Settings option to search Settings.
3. In the Settings search field, type VPN and press [ENTER].
4. In the results, click Set up a virtual private network (VPN) connection. The Create a VPN
connection window opens.
5. Do the following:
Internet address field. Enter vpn.wyless.net.
Destination name field. Enter a name that you will remember such as Bosch Wireless VPN
Connection.
Use a smart card checkbox. Deselect the checkbox.
Remember my credentials checkbox. Select the checkbox.
Allow other people to use this connection checkbox. Select the checkbox.
6. Click Create.
2015.03 | 04 | F01U273558 Reference Guide Bosch Security Systems, Inc.
Page 13

Bosch Cellular Services RPS using cellular | en 13
7. Press [Windows]+[C] to open the Charm bar, and then click the Settings icon to open the
Settings dialog box.
8. Click the Connection Manager icon to open the Connection Manager.
9. Right-click the Bosch Wireless VPN Connection option and select Properties. The Bosch
Wireless VPN Connection Properties dialog box opens. Click the Networking tab.
10. Select Internet Protocol 6 (TCP/IPv6) and click Properties.
11. In the resulting dialog box, click Advanced. The Advanced TCP/IP Settings dialog box
opens.
12. Deselect the Use default gateway on remote network checkbox and click OK. Click OK
again to return to the Bosch Wireless VPN Connection Properties dialog box.
13. Select Internet Protocol 4 (TCP/IPv4) and repeat the previous steps to remove the
gateway option. Click OK repeatedly to return to the Network Connections panel.
14. Select the Security Tab, select the Allow these Protocols option button, then select the
Microsoft CHAP Version 2 (MS-CHAP v2) checkbox. Click OK.
Connect to the VPN
For the following control panels, you must manually connect to the VPN (newer control panels
connect automatically through RPS):
– D9412GV4/D7412GV4/D7212GV4 v1.xx
– D9412GV3/D7412GV3/D7212GV3
– D9412GV2/D7412GV2/D7212GV2
– FPD-7024
Connecting to the VPN:
1. Press [Windows]+[C] to open the Charm bar, and then click the Settings icon to open the
Settings dialog box.
2. Click the Connection Manager icon to open the Connection Manager.
3. Highlight the Bosch Wireless VPN Connection option and click Connect.
4. Enter the VPN credentials and click OK.
5.2
5.2.1
Set up RPS to use the VPN client
RPS supports web services for IP address lookup for Bosch Cellular modules. RPS also allows
you to start and stop the VPN from the Connect dialog box.
Once you complete the steps to configure web services credentials and your VPN client, you
can connect to the VPN from within RPS, eliminating extra connections steps.
VPN connection-RPS setup
Set up the VPN connection within RPS using the VPN tab within the System Configuration
window. The instructions in this section specifically indicate the location for RPS 6.0 and
higher.
Setting up a VPN connection in RPS:
1. From the RPS Menu bar, select Config > System. The System Configuration window
opens.
2. Click on the Panel Specific tab, and then select VPN. The window shows any previously
configured VPN connections.
Bosch Security Systems, Inc. Reference Guide 2015.03 | 04 | F01U273558
Page 14

14 en | RPS using cellular Bosch Cellular Services
3. Click Add. The VPN Connection dialog box appears.
5.2.2
4. Enter a name for this connection in the VPN Connection text box.
5. Enter the VPN Name exactly as it is spelled in your Windows Network Connections list.
6. Enter your VPN User Name and Password. This VPN information was sent to your service
administrator in the welcome email, and is also available in the online portal.
7. Click Test to test the connection.
8. When finished click Add to add the connection and close the VPN Connection dialog box.
You can click OK to close the System Configuration window, or leave it open to set up web
services, as described in Web services-RPS setup, page 14.
Web services-RPS setup
Set up the web services within RPS using the Cellular tab within the System Configuration
window. The instructions in this section specifically indicate the location for RPS 6.0 and
higher.
This is a one-time setup.
Setting up web services in RPS:
1. From the RPS Menu bar, select Config > System. The System Configuration window
opens.
2. Click on the Panel Specific tab, and then select Cellular. The window shows the web
services information.
2015.03 | 04 | F01U273558 Reference Guide Bosch Security Systems, Inc.
Page 15

Bosch Cellular Services RPS using cellular | en 15
5.3
3. In the Credentials for Wireless Provider area of the window, enter your Wyless API user
name, password and company’s Partner ID. This API information was sent to your service
administrator in the welcome email, and is also available in the online portal.
4. In the Credentials for Web Proxy area of the window select the Use Proxy check box, if
required, and enter the proxy information.
5. Click Test to verify the connection to the Wyless web services.
6. Click OK to save the changes and close the window, or configure the cellular callback IP
address (refer to Cellular callback setup, page 17).
Control panel IP addresses
Each activated device has a unique static IP address assigned when using the Bosch Cellular
service as your provider. To connect to a control panel with RPS, you need the control panel
IP address.
You can obtain the IP address for control panels using Bosch Cellular Services using the online
portal.
For the following newer control panels, you can also use RPS (refer to Query the control paneI
for IP address and plan information, page 16):
– B9512G/B8512G
– B5512/B4512/B3512
– D9412GV4/D7412GV4 v2.xx
For the following control panels using another cellular service, you must obtain the IP address
or hostname from the provider:
– D9412GV4/D7412GV4/D7212GV4 v1.xx
– D9412GV3/D7412GV3/D7212GV3
– D9412GV2/D7412GV2/D7212GV2
– FPD-7024
Finding the control panel IP address using the online portal:
1. Go to https://www.myporthos.com.
Bosch Security Systems, Inc. Reference Guide 2015.03 | 04 | F01U273558
Page 16

16 en | RPS using cellular Bosch Cellular Services
2. Log in to your Bosch Cellular Services account.
3. Click the Connections tab.
4. Click Connection List. A list of all devices registered to your company show.
5. Click Search.
6. Enter the MEID (ESN) or SIM and click Filter.
Notice!
Shortcut
Enter only the last 4 or 5 digits of the number.
5.3.1
7. Scroll through the filtered list and find the desired device. The IP address shows in the IP
column.
8. If desired, save the device list to Excel by clicking Export as Excel.
Query the control paneI for IP address and plan information
For the following control panels, you can use the cellular module information and an internet
connection to obtain the IP address from within RPS:
– B9512G/B8512G
– B5512/B4512/B3512
– D9412GV4/D7412GV4 v2.xx
Viewing control panel IP address and data plan information:
1. In RPS, locate the desired control panel in the Panel List.
2. Right-click the control panel in and choose View. The Panel Data - View dialog box opens.
3. Click the Cellular tab, and then in the bottom left corner click Edit.
4. In the MEID (ESN) or SIM textbox, enter the ESN or SIM number from the cellular module
packaging or the label on the cellular module. Click Query.
2015.03 | 04 | F01U273558 Reference Guide Bosch Security Systems, Inc.
Page 17

Bosch Cellular Services RPS using cellular | en 17
RPS uses web services and the internet connection to query the module. It takes up to one
minute to respond and fill in the other Cellular Connectivity fields and the Data Plan section.
Write down the IP address, and make any desired changes, and then click OK to close the
dialog box.
View and change plan information
After RPS returns the query, you can change your price plan within RPS. You can make a
change once per plan month, and only to a larger capacity plan. To do so, highlight the plan in
the Data Plan section of the tab and click Set Plan.
5.4
Bosch Security Systems, Inc. Reference Guide 2015.03 | 04 | F01U273558
Cellular callback setup
You can set up RPS to use cellular callback instead of a VPN, if you want to connect to a
control panel over cellular but cannot establish a VPN connection. With cellular callback, you
initiate a message to the control panel that prompts the control panel to call the RPS
workstation, instead of the RPS workstation initiating the connection over VPN.
Setting up cellular callback:
1. Complete the steps for web services setup. Refer to Web services-RPS setup, page 14.
2. In the Callback IP Address (Public) area of the System Configuration window, enter the
public IP address of the network on which the RPS workstation resides, and the RPS
workstation communication port number. Each workstation has a unique port.
Page 18

18 en | RPS using cellular Bosch Cellular Services
5.5
3. Click OK repeatedly to save the changes and close the window.
4. Set up the router to which the RPS workstation connects to allow for cellular callback.
Refer to Router setup for callback example, page 18.
5. Query the control panel for cellular data. Refer to Query the control paneI for IP address
and plan information, page 16.
Router setup for callback example
To use cellular callback for the connection between RPS and the control panel, you must
enable callback on the router used by RPS. The following is an example of the steps for a
Linksys Wireless-G Broadband Router with SpeedBooster. The actual steps vary by
manufacturer and model.
Browse to the port forwarding page of the router, and enter the application name for the new
port forward rule. Enter in the port number you used in RPS, then select UDP for the protocol.
Enter the Private IP address and select the Enable checkbox. Click Save Settings to save the
rule.
Connect to the control panel
Once you complete the one-time setup using the previous steps, connect to RPS using the
Panel Communication dialog box.
RPS connects to newer control panels using the Cellular option or the Cellular Callback
option, and connects to legacy control panels using the Network option.
Connecting RPS to one of the following control panels:
2015.03 | 04 | F01U273558 Reference Guide Bosch Security Systems, Inc.
Page 19

Bosch Cellular Services
RPS using cellular | en 19
– B9512G/B8512G
– B5512/B4512/B3512
– D9412GV4/D7412GV4 v2.xx
1. Open the control panel to which you want to connect.
2. On the toolbar, click Connect. The Panel Communication dialog box opens.
3. From the Connect Via drop-down list, select Cellular. The control panel IP address or host
name automatically populate.
4. Click Connect. RPS connects to the control panel.
5. Send and receive updates as desired.
6. Disconnect the VPN when finished.
Connecting RPS to one of the following control panels:
– D9412GV4/D7412GV4/D7212GV4 v1.xx
– D9412GV3/D7412GV3/D7212GV3
– D9412GV2/D7412GV2/D7212GV2
– FPD-7024
1. Connect to the VPN.
2. Open the control panel to which you want to connect.
3. On the toolbar, click Connect. The Panel Communication dialog box opens.
4. From the Connect Via drop-down list, select Cellular. The control panel IP address or host
name automatically populate.
5. Click Connect. RPS connects to the control panel.
Bosch Security Systems, Inc. Reference Guide 2015.03 | 04 | F01U273558
Page 20

en | RPS using cellular Bosch Cellular Services
20
6. Send and receive updates as desired.
7. Disconnect the connection when finished.
Connecting RPS to a control panel using Cellular Callback:
1. Open the control panel to which you want to connect.
2. On the toolbar, click Connect. The Panel Communication dialog box opens.
3. From the Connect Via drop-down list, select Cellular Callback (or Cellular # Callback). The
Callback IP and Callback Port automatically populate.
4. Click Connect. RPS sends a notification to the control panel.
5. When available, click Answer to answer the call from the control panel.
6. Send and receive updates as desired.
7. Disconnect the connection when finished.
2015.03 | 04 | F01U273558 Reference Guide Bosch Security Systems, Inc.
Page 21

Bosch Cellular Services Remote Security Control using cellular | en 21
6
6.1
Remote Security Control using cellular
You can use the cellular connection for Remote Security Control on the following control
panels:
– B9512G/B8512G
– B5512/B4512/B3512
– D9412GV4/D7412GV4 v2.xx
Certificate preparation
This section includes basic instructions for creating a certificate. If you have not created a
certificate before, for detailed instructions refer to the Help available within Remote Security
Certificate Builder. To access Help, press F1, click the Help button when available, or select
Help from the menu bar.
Remote Security Certificate Builder installation
You need to perform these steps once on each computer on which you use Remote Security
Certificate Builder.
Downloading the installation files:
1. Go to the Bosch website (us.boschsecurity.com).
2. Click on the Products tab and select Intrusion Alarm Systems.
3. On the right side of the page, under Online Tools, click the Remote Security Certificate
Builder link.
4. After reviewing the required prerequisites, click Install.
5. Save the install file to your computer hard drive.
Installing Remote Security Certificate Builder:
1. After completing the download, double-click the setup.exe file.
2. When the Application Install dialog box appears, click Install.
3. The Installing Remote Security Certificate Builder dialog box indicates the installation
progress.
4. When the installation finishes, Remote Security Certificate Builder launches.
Configure the connection with the RPS database
Prior to logging in to a remote programming database through Remote Security Certificate
Builder, you must configure the database settings. The settings, which include the database
location, name, and authentication information (depending on the remote programming
software used), allow Remote Security Certificate Builder to connect with the database.
1. Select Start > (All) Programs > Bosch > Remote Security Certificate Builder. The Remote
Security Certificate Builder application window launches.
2. Click the Database Settings button. The Database Settings dialog box opens.
Figure 6.1: Database Collections dialog box
Bosch Security Systems, Inc. Reference Guide 2015.03 | 04 | F01U273558
Page 22

22 en | Remote Security Control using cellular Bosch Cellular Services
3. Click the Manage button for the database you wish to use. The corresponding Settings
dialog box appears.
Figure 6.2: RPS Database Settings dialog box
4. Enter the appropriate information in the text boxes, or browse to and select the correct
database.
5. Click OK.
The dialog box closes and returns to the Remote Security Certificate Builder application
window. You can now log in to access the desired database.
6.2
Notice!
For RPS, if you do not know the database location (server name), the database name, or
authentication method, you can view the database settings within RPS by selecting Config >
System, and then viewing the information on the Database Settings tab of the Work Station
Specific tab (or in File Locations tab for RPS version lower than 6.00).
Once logged in, you can create your first certificate using the Remote Certificate wizard. You
create a certificate for each end user.
Notice!
You can add Dealer information to the certificate by entering information in the Dealer Info
dialog box prior to creating the certificate. Refer to the Remote Security Certificate Builder
for details.
Build Remote Certificate wizard use
Launch the Build Remote Certificate wizard to create a certificate. In the Compatible Panel
Accounts area, locate the account for which you wish to make a certificate. Then, double-click
on the account, or highlight the account and then click the Build Certificate button or select
File > Build Certificate. The Build Remote Certificate wizard opens.
The Steps pane lists all the steps in the wizard, and highlights the current step. The field on
the right side of the wizard allows you to configure the certificate. Use the Next and Previous
buttons, when enabled, to move through the wizard.
2015.03 | 04 | F01U273558 Reference Guide Bosch Security Systems, Inc.
Page 23

Bosch Cellular Services Remote Security Control using cellular | en 23
Notice!
For B9512G/B8512G, GV4, and B Series control panels, the Build Remote Certificate wizard
requires specific programming parameters set in the Panel Data section of RPS. From RPS –
Panel List, select the control panel account and click View. Click Edit to modify these
parameters. These parameters are:
- For GV4 1.xx control panels, an IP address and a Datalock code.
- For GV4 2.xx control panels, an IP address.
- For B9512G/B8512G and B Series control panels, a cellular IP address (for a cellular
certificate) or an Ethernet IP address (for an Ethernet certificate).
6.2.1
6.2.2
6.2.3
6.2.4
User Selection page
In the first step of the wizard, select the user for whom you wish to create a certificate, and
then click Next. You can identify users by User # or Name.
Connection Type page
In the second step of the wizard, select the connection method for the control panel to use to
connect to the network, and then click Next.
The Connection Type page enables only the methods available for your control panel;
unavailable connection types are disabled.
Active Date Range page
In the Active Date Range step of the wizard, set the dates you want the user’s certificate to
remain active, and click Next.
Summary page
In the final step of the wizard, use the Summary page to view a summary of your selections in
the previous pages, and to confirm that the wizard successfully created the certificate with
those selections. You can click the Previous button to make changes and recreate the
certificate.
Preparing to send the certificate to the user:
1. Create an email.
Click Create Email to generate a prewritten email using your default email client and your
client email account. This feature requires an email client installed and configured on the
Remote Security Certificate Builder computer. The email includes the user name, account
number, and instructions for copying the certificate to the Remote Security Control
device and to install it.
For web-based email (for example, Gmail), create an email and add any text you want.
2. Attach the certificate to the email.
Tip. You can open Windows Explorer to the directory to which the wizard saved the
certificate, with a single click by clicking Open File Location.
Notice!
Certificates created for B9512G/B8512G and B Series control panels with cellular configured
include “_Cell” in the file name for identification (for example, B5512_Site1_Cell).
6.3
Bosch Security Systems, Inc. Reference Guide 2015.03 | 04 | F01U273558
When you finish creating the certificate for the desired account, click Finish.
Remote Security Control preparation
Downloading Remote Security Control for Apple:
Page 24

24 en | Remote Security Control using cellular Bosch Cellular Services
– Using Apple iTunes, download the app from the iTunes store by searching for Remote
Security Control, and then sync to your Apple iOS device.
- or – Using the App Store on your Apple iOS device, locate and install the Remote Security
Control.
Downloading Remote Security Control for Android:
– Using the Play Store on your Android device, locate and install BoschRemote Security
Control.
Prior to using Remote Security Control you must open the user’s certificate on the user’s
compatible device. To open the certificate, the device must have an email client configured.
Notice!
You can open an unlimited number of certificates on an a device, allowing for multiple users
on each device.
6.4
Opening the certificate for the user on the user’s device:
1. Open the received email on the device. (Use Gmail on Android devices.)
2. Open the certificate file.
3. Select Open in RS Control. Remote Security Control automatically opens to the
Certificates section.
4. Select the certificate you wish to use and tap Connect.
5. Tap the empty numeric box to launch the keypad.
6. Enter the user passcode for the user you selected when building the certificate.
7. Tap Done.
8. Tap Connect to Panel.
9. Remote Security Control connects to the control panel, and the current status shows on
the Security tab.
Notice!
For GV4 control panels, Remote Security Control and RPS cannot connect to the control
panel at the same time.
Remote Security Control use
Remote Security Control uses the (hamburger) icon to open menus. Remote Security
Control also uses push notification badges for events and alarms. Badges appear in the upperright corner of the app window and include a number to indicate the number of events or
alarms available to view. For the specific steps described here, this section refers to these
events (lightning bolt) badge as the Events icon, and the alarms (bell) badge as the Alarms
icon.
– To turn on (arm) or turn off (disarm) the system, from the Security screen, tap the lock
icon. When you turn on the system, choose between Part On and All On.
– To view system faults, from the Security screen, tap See Details (when available).
– To work with the doors connected to the control panel, tap
Doors screen shows the status of each door. Tap on a listed door to change its status.
Depending on the door’s current status, tap Secure, Unlock, or Cycle, if desired.
and then tap Doors. The
2015.03 | 04 | F01U273558 Reference Guide Bosch Security Systems, Inc.
Page 25

Bosch Cellular Services Remote Security Control using cellular | en 25
– To work with the outputs connected to the control panel, tap and then tap Outputs.
The Outputs screen shows the status of each output. A solid blue circle indicates the
output is On, and an empty circle indicates the output if Off. Use the All, On, and Off
buttons to change the outputs shown. Tap on a listed output to change its status.
– To view area status and turn on (arm) or turn off (disarm) specific areas in a multiple area
system, tap
and then tap Security and then tap Advanced.
– To view control panel events, tap and then tap Events.
– To view events, tap and then tap Events or tap the Events icon.
– To view active alarms, tap
and then tap Events or tap the Alarms icon.
– To view IP cameras, tap and then tap Cameras.
– To view dealer information, tap and then tap Dealer.
When finished, ta tap
and then tap p Disconnect to disconnect from the control panel.
Bosch Security Systems, Inc. Reference Guide 2015.03 | 04 | F01U273558
Page 26

Page 27

Page 28

Bosch Security Systems, Inc.
130 Perinton Parkway
Fairport, NY 14450
USA
www.boschsecurity.com
© Bosch Security Systems, Inc., 2015
Bosch Sicherheitssysteme GmbH
Robert-Bosch-Ring 5
85630 Grasbrunn
Germany
 Loading...