


 Loading...
Hardware Selection and Configuration Guide |
|
DaVinci |
|
Resolve 15 |
|
PUBLIC BETA |
|
The world’s most popular and advanced on set, offline and online editing, |
|
color correction, audio post production and visual effects system. |
1 |
DaVinci Resolve 15 — Certified Configuration Guide |
Contents
Introduction |
3 |
Getting Started |
4 |
Guidelines for selecting your OS and system hardware |
4 |
Media storage selection and file systems |
9 |
Hardware Selection and Setup |
10 |
DaVinci Resolve for Mac |
11 |
DaVinci Resolve for Windows |
16 |
DaVinci Resolve for Linux |
22 |
Shopping Guide |
32 |
Mac systems |
32 |
Windows systems |
35 |
Linux systems |
38 |
Media storage |
40 |
GPU selection |
42 |
Expanders |
44 |
Accessories |
45 |
Third Party Audio Consoles |
45 |
Third Party Color Grading Panels |
46 |
Windows and Linux Systems: PCIe Slot Configurations |
47 |
ASUS PCIe configuration |
47 |
GIGABYTE PCIe configuration |
47 |
HP PCIe configuration |
48 |
DELL PCIe configuration |
49 |
Supermicro PCIe configuration |
50 |
PCIe expanders: Slot configurations |
51 |
Panel Information |
52 |
Regulatory Notices and Safety Information |
54 |
Warranty |
55 |
DaVinci Resolve 15 — Certified Configuration Guide |
2 |

Introduction
Building a professional all in one solution for offline
and online editing, color correction, audio post production and visual effects
DaVinci Resolve has evolved over a decade from a high-end color correction system used almost exclusively for the most demanding film and TV products to become the worlds most popular and advanced professional all in one solution for offline and online editing, color correction, audio post production and now visual effects.
It’s a scalable and resolution independent finishing tool for Mac, Windows and Linux which natively supports an extensive list of image, audio and video format and codecs so you can mix various sources on the timeline at the same time. But most importantly, each stage of your post production has a page focused on that task and tailored for that user. Switching roles is a simple as a mouse click to another page and when in collaboration groups you can pass the same project to your colleagues without the fear that shots wont conform.
When deciding what hardware and configuration to use for your DaVinci Resolve system you can build one for almost every possible use. You can also configure DaVinci Resolve hardware for a subset of its various users.
On-set users have quite different needs to those focused only on offline editing who are looking for maximum flexibility with compressed files. The colorist is likely to request uncompressed full resolution clips, even camera RAW files and so Tera-bytes of high speed online storage. An audio engineer might not need a powerful GPU as they often use flatten HD reference video files but they will need access to many thousands of small audio elements. The VFX artist will want significantly more system and GPU memory than most other users.
Introduction DaVinci Resolve 15 — Certified Configuration Guide |
3 |

The key thing to keep in mind when selecting your config is unlike traditional editing, grading, audio post or finishing systems, image processing in DaVinci Resolve is graphics processor (GPU) based and so some of the features require a higher end GPU that you might be accustomed to. High performance GPUs or multiple GPUs will offer the best experience.
Whether you are just starting your editing, grading, audio post or VFX career, or if you just want to have some fun with video, this guide contains important information which will help you upgrade, buy or build and configure your system.
Getting Started
Guidelines for selecting your OS and system hardware
The system you select to upgrade, buy or build may be based on what computer you already have and can update, or a specific operational or technical requirement. It’s also worth considering that even on a modest budget using the right combination of hardware can make a significant performance difference.
The OS selection may also be as simple as what you have or prefer, or it’s guided by the system cost, however it’s really important to consider that each OS has its advantages over the others and sometimes the requirement to support a particular codec will define your selection.
Depending on your expected source formats and codecs and the selected timeline resolution, the hardware configuration defines the speed that you can edit, playback and grade and also the time to play complex VFX compositions and render your finished timeline.
As there are many potential bottle necks within an image processing pipeline depending on the clip codec, CPU speed and number of cores, system RAM, the number of GPUs, their core count and GPU RAM, even the motherboard slot speed, disk speed, etc. and each of these can affect the playback, editing, grading and display of your timeline. So in selecting your hardware configuration please consider these practical and often physical limitations and scale your system based on your budget as well as your expected performance requirement.
There are hardware configurations detailed below starting from a single dedicated GPU for image processing up to a eight GPU system suitable for demanding 8K projects. While performance varies greatly, most modern Intel, AMD and NVIDIA GPUs that support Metal, OpenCL 1.2 or CUDA 3.0 compute capability will operate with DaVinci Resolve.
Getting Started DaVinci Resolve 15 — Certified Configuration Guide |
4 |

DaVinci Resolve and DaVinci Resolve Studio for the most part have the same hardware performance needs so even if you plan on using the free version for home, the hardware configuration is important.
Please review the following information to help you select your system requirements.
Camera RAW and Codec considerations
With the increasing use of digital cameras, projects now often include camera clips at HD, UHD, 4K-DCI or higher resolutions. While some cameras provide UHD or 4K or higher capture resolutions they usually store the images as compressed data as this takes less storage space and bandwidth to record.
However for editing, VFX and grading, the compressed data needs to be decompressed to the full RGB per pixel bit depth that can use four times or more processing power of a HD image for the same real time grading performance. The decompression process, like compression, uses the CPU so the heavily compressed codecs need more powerful and a greater number of CPU cores. H.264 and H.265 are heavily compressed formats and while not ideal for editing are often used by lower cost cameras. If you use these types of compressed codecs you will need a more powerful CPU or be prepared to use proxies or Resolves optimised media feature.
Once the files are decompressed DaVinci Resolve uses the GPU for image processing so the number of GPU cores and the size of GPU RAM becomes a very important factor when dealing with UHD and 4K-DCI sources and timelines. For VFX each layer of images uses GPU memory and so any GPU with a small amount of memory will have a performance hit as you add layers up to the level where the GPU just has insufficient memory and performance.
For uncompressed images, in industry standards like DPX or EXR particularly with 16 bit files, the CPU has an easier time as these are effecient codecs, However they place greater demands on the disk array, RAID controller, storage connection and even the file system itself.
Audio facilites who plan to use flattened HD video files wont need as powerful GPU or disk I/O as audio files by their nature are smaller than video. But remember, if you are importing a DaVinci Resolve project file or sharing projects on a central database, you may be opening projects with complex video timelines, a variety of image formats and codecs and potentially with demanding VFX elements so even the most basic audio system should be prepared for these demands.
Getting Started DaVinci Resolve 15 — Certified Configuration Guide |
5 |

User interface monitors
DaVinci Resolve offers support for a wide variety of UI resolutions in single and also dual monitor configurations. The application is optimized for the Apple Retina 5K screen (5120x2880) with a resultant resolution of 2560x1440 and scales in a number of ways to even operate on laptops screens with 1440x900 resolution with abridged name and icons at the controls.
For Windows and Linux systems we recommend monitors with 2560x1440 down to 1920x1200 resolution for the best layout. There are also a number of superwide screen monitors that are suitable with 3440x1440 resolution to offer more timeline, node editor and gallery still
screen space.
Client, edit and grading monitors
Whether you are editing and grading for the latest Hollywood blockbuster, a TV series, web video or your own hobby shots, using a non calibrated monitor or one which drifts in black, white and color values means your shots could look different each day or week and certainly make consistent deliverables a challenge even for the most experienced colorist.
We don’t currently recommend any specific client, edit or grading monitors so no matter which you decide on, it’s very important to have it calibrated, either by an expert or yourself using a high quality probe. You can use one of the calibration programs that connect with Resolve or a standalone application to generate a 3D LUT and use it in the monitor LUT field within DaVinci Resolve, or within the monitor itself if that capability exists.
Client, edit and grading monitor connections
To deliver consistent quality video deliverables, all editors and colorists working on TV or film projects will need to use a proper color calibrated monitor connected to an SDl or HDMI video l/O card. This device will occupy a PCle slot in the computer, or a Thunderbolt port depending on the system you have and the video card you select.
DaVinci Resolve supports the Blackmagic Design range of DeckLink and UltraStudio capture and playback devices for SDI video and embedded audio ingest and playback. This I/O device is also used for connecting your client, editing and calibrated grading monitor. Users can loop a single feed from the VTR to the grading monitor or connect the second SDI output directly to the monitor.
You can also connect the HDMI output from the I/O device to feed a second monitor.
This same card or another can be used for SDI ingest into DaVinci Resolve from a deck or live camera.
Getting Started DaVinci Resolve 15 — Certified Configuration Guide |
6 |

You can also use the UltraStudio Mini Recorder and Mini Monitor with DaVinci Resolve however there is no ingest or tape transport controls available with these devices.
To use the Blackmagic Design video I/O devices with DaVinci Resolve, you will need to install the Desktop Video drivers. These are provided along with your I/O device. The latest version of the drivers are available from the support page at www.blackmagicdesign.com
Audio output and speaker connections
DaVinci Resolve supports the standard system audio output for most computers, a dedicated USB or Thunderbolt audio I/O device and the range of Blackmagic Design DeckLink and UltraStudio capture and playback devices. To use the Blackmagic Design video I/O devices with DaVinci Resolve, you will need to install the Desktop Video drivers. These are provided along with your I/O device. The latest version of the drivers are available from the support page at www.blackmagicdesign.com
The audio interface will dictate the number of speakers and the configuration that you can connect to DaVinci Resolve. As an example the USB device shown above offers a simple headphone connection and line level outputs that you can connect to stereo power speakers. The same interface can be used for recording audio to Fairlight tracks. Capturing audio with this style of interface at the same time as ingesting SDI is not currently supported. For that operation you will need the embedded SDI audio interface of a Blackmagic Design video
I/O device.
For 5.1 and 7.1 outputs consider a USB or Thunderbolt device that has sufficient discreet analog audio connections like the device shown below. This same interface can also be used for MIDI and multiple microphone or line inputs. There are dozens of options available and each are simple connected via the computer audio I/O selection.
For audio studios that need sub milli-second latency and speaker sets greater than 7.1 you can use the Fairlight Audio Accelerator and the Fairlight Audio I/O. These are currently only supported on Windows 10 and require BMD support for configuration. Please contact your local BMD office for assistance.
Getting Started DaVinci Resolve 15 — Certified Configuration Guide |
7 |

DaVinci Resolve grading control panels
Of course you can use DaVinci Resolve with your mouse and keyboard or with a pen and tablet however ideally for grading you should use all the benefits that come with the DaVinci Resolve control panel. Whether it’s the Micro or Mini control panel, or the Advanced control panel with the custom backlit keys featuring RGB color and intensity to suit your mood and taste, these panels will dramatically improve your creative throughput and will definitely impress
your clients.
As an example, with a single key on the panel you can switch your trackballs to grading shadows, mid tones and highlights using log controls with high and low range, contrast and master pivot. There are individual controls on the panel for contrast, lift, gain, color temperature, tint, highlight and lowlight recovery, saturation, color boost and mid tone detail.
In fact each knob allows super fine parameter adjustment and with a simple push, you can reset each parameter back to the default.
Colorists for years have reported more than double and often triple efficiency grading when they use the DaVinci panels. You can use this extra speed for creating more looks, getting through your job quicker when you need to, or just impressing your client by being able to deliver the vision they’re looking for without any fuss.
Audio console support
As with grading, your mouse and keyboard or a pen and tablet can be used for editing and mixing audio. However for greater control over multiple parameters at the same time, not to mention routing to other hardware audio processes, a dedicated audio console is a worthy investment.
The Fairlight consoles will soon be available and in the meantime you can use a MIDI connected third party console. Details can be found later in this guide.
Getting Started DaVinci Resolve 15 — Certified Configuration Guide |
8 |

Media storage selection and file systems
Mac
DaVinci Resolve for Mac supports a number of internal and external storage systems however almost any storage, designed for Mac and high bandwidth media, will be suitable for use with the Mac file system.
A current model iMac Pro, iMac, Mac Pro and MacBook Pro can be connected directly to a Thunderbolt disk array. Thunderbolt disk arrays provide fast, high capacity disk storage and are easily expandable as your media storage needs grow.
Facilities with SAN based shared storage can work concurrently with projects that are being graded in other Mac, Windows or Linux suites. The most common connection method for the SAN storage is via a Thunderbolt to Fibre channel adapter to connect to a SAN.
The Preferences option under the DaVinci Resolve menu is where you can add or remove internal and external disk storage for use with Resolve. The first volume in the list will be used to store gallery stills and cache files so this should be a drive that is always on your system.
Windows
Windows users can format their drives to the standard NTFS or any Windows supported format such as ExFAT. An external disk array and a RAlD or HBA card can also be used for additional disk performance.
Like Mac and Linux, facilities with Windows systems can use SAN based shared storage via single or dual 16Gbit or 32Gbit Fibre Channel connections to a FC card in the Resolve workstation.
The Preferences option under the DaVinci Resolve menu is where you can add or remove internal and external disk storage for use with Resolve. The first volume in the list will be used to store gallery stills and cache files so this should be a drive that is always connected and accessible to your system.
Linux
DaVinci Resolve for Linux supports a number of file systems and in QA we use the Quantum StorNext file system. For more than a decade this has proven to be a robust and reliable file system for direct attached storage (DAS) and storage area network (SAN) systems.
StorNext can provide real-time 8K bandwidth on a continuous basis without dropping or delaying frames as sometimes seen with other file systems. The StorNext license should be purchased from Quantum for a DAS system or ensure your facility has the license if connected to a SAN.
There are also a number of other vendors of file systems suitable for Linux . As there are too many variations for us to test we recommend you consult with your file system vendor for details of what each system can offer you.
Once you have the file system installed, SAN based shared storage can be connected via single or dual 16Gbit or 32Gbit Fibre Channel via a FC card in the Resolve workstation.
Getting Started DaVinci Resolve 15 — Certified Configuration Guide |
9 |

Hardware Selection and Setup
Time to select your OS and build your system
The following pages can be used to help select a hardware configuration for a Mac, Windows or Linux DaVinci Resolve system. System interconnection diagrams will also help you plug and play the different components of your selected system.
As there are too many perfectly acceptable configurations for Blackmagic Design to test them all so we recommend visiting the DaVinci Resolve section of the Blackmagic Design Forum to review the feedback other users offer on different configurations and their success for different user applications.
At the end of the guide is a shopping list for each OS where you will see system requirements and recommendations, often with alternatives, and optional extras. GPU models alone change quarterly so this guide should be used as that, a guide to what has been tested and something for you to review before making your hardware selection. These are not exhaustive lists but offer a guideline to help your selection.
We recommend you use this checklist to make sure you have all the items you need to buy and build your system.
Blackmagic Design items
DaVinci Resolve Studio online activation key or dongleCapture and playback card
DaVinci Resolve Control Panel
System requirements
Modern computer platform with at least a Quad core CPU and a powerful GPUUI monitor if you don’t select a laptop or iMac
Internal storage for the application and project database
Permanantly connected storage for stills, render cache and audio waveformsKeyboard and mouse
Optional extras
Client, edit or grading monitor
External media storage and connection
UI and image processing GPUs for Windows and Linux
PCIe Expander and external GPUs for Windows and Linux. Thunderbolt expander for Mac
DaVinci USB KeyboardUSB tablet and pen
USB extenderUI extender
Database server computer for shared and collaborative workflows
Hardware Selection and Setup DaVinci Resolve 15 — Certified Configuration Guide |
10 |
DaVinci Resolve for Mac
Overview and system selection
The Mac offers the broadest format and codec support and systems are available from low power laptops to the iMacPro. To select the best system configuration for your needs it’s important to understand how you will use the system.
There are no special configurations for the majority of Mac systems so you can select from the options listed, select your Blackmagic Design supplied components and then follow the DaVinci Resolve installation instructions.
All users should consider the media storage and other accessory options later in this guide and if you have a system using NVIDIA CUDA GPUs should read the third party driver info below before you start Resolve.
iMac Pro
The 27” Retina 5K iMac Pro with 32GB GPU RAM provides a flexible and versatile desktop workhorse for real time editing, audio mixing and grading material. You should consider the 64GB or even 128GB memory options if you plan extensive Fusion use. The Vega 56 is certainly no slouch and is considerable more powerful than previous iMac GPUs, however we recommend upgrading to the Vega 64 GPU if you can and particularly for UHD and higher resolutions and Fusion use.
The 27” Retina 5K iMac with 4GB GPU RAM will reach the GPU capabilities sooner with UHD timelines and when using optical flow speed changes, temporal processing and noise reduction, even at lower resolutions and with fewer editing tracks or color grading nodes. Performance of many of the older model iMacs with 2GB of GPU memory is limited even with HD images.
Connection of disk storage systems and the single or dual UI monitoring is via the Thunderbolt 3 ports. These Thunderbolt ports are also used to connect the Blackmagic Design capture and playback card. There are no special setup requirements for the 2017 iMac Pro.
Hardware Selection and Setup DaVinci Resolve 15 — Certified Configuration Guide |
11 |

iMac Pro configuration
Thunderbolt
USB
HD-SDI
Electrical Power
DAVINCI RESOLVE MINI PANEL
iMAC PRO
ULTRASTUDIO 4K
GRADING MONITOR
MEDIA STORAGE
Mac Pro
The Mac Pro includes dual AMD GPUs and both of these are used for image processing, even for the free version of DaVinci Resolve. After extensive testing we recommend the D700 GPU model. The D500 GPU model offers limited performance in comparison to the D700 and will exhaust the GPU ram with clips or timelines greater than HD, or when temporal processes, NR and optical flow speed changes are requested.
The 12-core CPU model is ideal for when source clips are UHD or higher resolutions or include heavy clip compression, such as clips from the RED and Sony camera range. We suggest a minimum of 8 CPU cores and 16GB system ram.
Connection of disk storage systems and the single or dual UI monitoring is via the Thunderbolt 2 ports. These Thunderbolt ports are also used to connect the Blackmagic Design capture and playback card. There are no special setup requirements for the 2013 Mac Pro.
Mac Pro configuration
Thunderbolt
USB
HD-SDI
Electrical Power
DAVINCI RESOLVE MINI PANEL
MAC PRO
ULTRASTUDIO 4K EXTREME 3
GRADING MONITOR
MEDIA STORAGE
Hardware Selection and Setup DaVinci Resolve 15 — Certified Configuration Guide |
12 |

MacBook Pro
As all laptop systems are designed for portability and low power, for use with DaVinci Resolve we recommend selecting the fastest CPU, 16GB of system memory and the GPU with the most memory that is currently available.
For example the Retina 15” MacBook Pro can be configured with a Radeon Pro 560 GPU option with 4GB of memory.
UHD timelines are practical with some performance limitations especially when using optical flow speed changes, temporal processing and noise reduction.
The 15” MacBook Pro with 2GB of GPU memory will reach these GPU limits at lower resolutions and with fewer editing tracks or color grading nodes.
MacBook Pro configuration
Thunderbolt
USB
HD-SDI
Electrical Power
DAVINCI RESOLVE MINI PANEL
MACBOOK PRO
ULTRASTUDIO 4K
GRADING MONITOR
MEDIA STORAGE
MacBook
The mid 2017 MacBook in the highest performance configuration, with just 8GB of system RAM and an Intel HD Graphics GPU, has been tested for use with HD ProRes files. For offline editing while you’re traveling or just reviewing your BMD camera files from the days shoot its performance while limited is operational with HD timelines.
Mac Mini
While the Mac Mini is not ideal for use as a Resolve workstation, due to its low performance GPU, the current series are suitable for use as a central database server for full license Resolve users that wish to share projects with a few other systems within their facility. Details of the Mac Mini setup and installation of the Remote Database Server are available in the
DaVinci Resolve User Guide
Hardware Selection and Setup DaVinci Resolve 15 — Certified Configuration Guide |
13 |

NVIDIA and CUDA drivers for Mac
Mac systems using AMD GPUs have the GPU drivers included in the Mac OS. If you are using DaVinci Resolve from the Apple App Store this also uses the drivers within Mac OS even if you have NVIDIA GPUs.
Systems using NVIDIA GPUs and also not using DaVinci Resolve from the Apple App Store will need to have the correct NVIDIA and CUDA driver to operate the GPUs. While Resolve will check the CUDA version on your system you may have to update it after any OS updates.
There are two parts to successful operation of your NVIDIA CUDA based GPUs.
NVIDIA drivers
If you use Mac OS X 10.8.4 or newer then Apple supplies within the OS NVIDIA drivers for the Apple certified GPUs. If you plan to use a GPU that’s not certified for Mac the OS driver will not work. In these cases, while not officially certified you can download and try the NVIDIA web driver for non-Mac GPUs. Generally all older Mac certified cards will work with the latest driver.
CUDA drivers
If your Mac has NVIDIA GPU’s and does not have CUDA installed the DaVinci Resolve installer will load the latest CUDA drivers suitable for Resolve. If however your system already has a newer CUDA driver that Resolve needs, the DaVinci Resolve installer will not update this driver as this may cause problems with other applications you have that use CUDA.
If the message, “WARNING: No CUDA Acceleration Hardware Detected“ appears when you launch Resolve and your Mac contains the recommended NVIDIA GPUs and NVIDIA drivers for those GPUs, you will need to quit Resolve and update to the correct CUDA drivers.
After quitting Resolve, go to the Apple menu and choose System Preferences. Then click on the CUDA icon to reveal the CUDA Preferences and note the installed CUDA driver version.
If the installed drivers are older than the certified version listed on the Resolve installer readme, avoid clicking on the “Install CUDA Update” button and instead visit www.nvidia.com/object/ mac-driver-archive.html to download the certified CUDA driver version.
Once the certified CUDA drivers are installed, you will be able to successfully launch DaVinci Resolve.
Installing DaVinci Resolve for Mac
Installing or updating Resolve is essentially the same process. Be sure to log in to your Mac as the user that will be operating Resolve. You will need an Administrator password to install the software on your system and we recommend that DaVinci Resolve be installed into the standard Applications folder on your startup hard disk.
Mac App store version
For DaVinci Resolve purchased from the Mac App Store, just press “Install” in the App store page for Resolve and the App Store takes care of everything. You can also receive alerts when updates are available.
Blackmagic Design website version
Using the installer that was downloaded from the Blackmagic Design website, double click the ‘Resolve Icon’ and follow the on-screen prompts to install the software.
The installation process takes just a couple of minutes. After the software has been installed you may wish to add the application icon to your dock to make DaVinci Resolve easy to launch.
Hardware Selection and Setup DaVinci Resolve 15 — Certified Configuration Guide |
14 |

For DaVinci Resolve Studio you will need to activate your license online or use a USB dongle which contains the Resolve for Mac license and must be connected to your computer before launching the Resolve software.
Driver installation
Systems with a Blackmagic Design capture and playback card for your client, edit or grading monitor you will need to install the latest Desktop Video drivers that are available from the support page at www.blackmagicdesign.com
If you use Apple Final Cut Pro, Avid Media Composer or Adobe Premiere Pro on the same Mac as Resolve, and you wish to use these applications with a DeckLink or UltraStudio, install the latest Desktop Video drivers after installing your alternative editing applications. Blackmagic Desktop Video drivers install associated easy setup options and presets for a number of other editing applications.
Important steps for first use
There are three important hardware items to configure when you first start the Resolve application.
1Open the Preferences window from the DaVinci Resolve application menu.
The first tab shows the System Overview where you select the application language and you can verify that Resolve has found your GPUs.
You can also select to use the Display GPU for image compute if you have
DaVinci Resolve Studio. Finally for some systems you can select the GPU processing mode here.
2Go to the second tab, Media Storage. The first location in the storage list will become the primary location for images, all proxies, cached files and gallery stills. This location will usually not be your system disk but a specifically installed permanent disk for media. Often it’s an internal or external RAID disk array and it needs plenty of storage capacity.
If you don’t have a permanently connected media array on your system we recommend that you identify a folder on your system disk to use as your primary drive and folder and then add and remove other drives as needed but don’t change the primary drive until you have considered how to back up and restore your stills.
Click on the “+” (add) button to add a volume, folder or mount point to the list of disk storage for your media. Click on the “-” (remove) button to remove a volume, folder or mount point from the list of disk storage.
3In the Video I/O and GPU tab select which capture and playback device you will use for capture and playback. Depending on your workflow, this device may also be connected to a VTR or camera. If you are using Resolve Live, select the video input capture device.
You can also select to use the computer system audio output in preference to the capture and playback card and the speaker configuration for your suite.
4In the Control Panels tab choose which color grading control panel hardware you have connected to your system. DaVinci Resolve supports the current DaVinci Resolve control panels but can also be used with third party panels from Avid, JLCooper and Tangent Devices. Details on connection follow later in this guide.
Hardware Selection and Setup DaVinci Resolve 15 — Certified Configuration Guide |
15 |

NOTE The Avid Artist Color does not work with the DaVinci Resolve
App Store version due to Apple sandbox restrictions.
The Advanced tab is generally not required by most facilities as it’s for specific system configurations. You should leave this blank unless directed otherwise.
5After changing any of these preferences select save and restart the DaVinci Resolve application.
DaVinci Resolve for Windows
Overview and system selection
The Microsoft Windows offers the broadest hardware support and systems are available from low power laptops to the generic motherboard build your own systems for independent users up to the workstation class for facilities that need faster processing. Each has multiple options to consider.
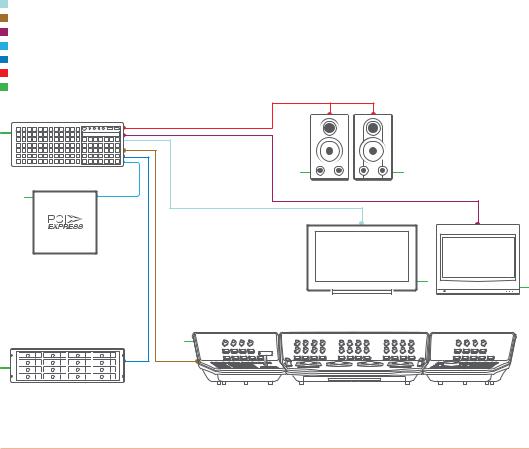
Standard configuration
DVI
USB
HD-SDI
Audio
Electrical Power
ULTRASTUDIO SDI
SPEAKERS
RESOLVE COMPUTER
GUI MONITOR |
GRADING MONITOR |
RESOLVE CONTROL SURFACE |
|
However in every case there are special performance and hardware configurations for the Microsoft Windows systems so please refer to the hardware and OS setup information below. Please also refer to the GPU driver information and follow the DaVinci Resolve installation instructions and the three important hardware setup steps to get you started.
Hardware Selection and Setup DaVinci Resolve 15 — Certified Configuration Guide |
16 |
DaVinci Resolve supports Windows 10 Creators Edition.
All desktop and workstation systems support the use of a PCIe expander to add extra
PCIe slots and power. However additional PCIe cards in the computer, such as capture, storage or even an expander HBA, should only be added to the slots shown in the tables below to avoid causing a slow down in the performance of the Ul and image processing GPU cards.
For all systems using an expander, we generally recommend that you install a single Ul GPU in your computer and have all image processing GPUs in the expander. While this guide refers to configs with up to three GPUs, there are now third party systems available with more image processing GPUs and for users interested in those configs please contact the vendor directly.
You will also find below a list of suppliers who can offer turnkey systems.
Please note that you cannot mix GPUs from the major suppliers, AMD and NVIDIA, in the one system. We recommend using the same model GPU if multiples are used. A number of GPU options are listed below, as are options for media storage, file system and accessories.
Advanced configuration
DVI
USB
HD-SDI
PCI-E Extender
Storage Connection
Audio
Electrical Power
RESOLVE COMPUTER
SPEAKERS
PCIe EXPANSION |
|
|
|
GUI MONITOR |
GRADING MONITOR |
MEDIA STORAGE |
RESOLVE CONTROL SURFACE |
|
Generic PCs
If you have a tight budget you can consider one of the many generic pro motherboards now available.
The ASUS motherboard and chassis listed is an example of a generic system that you can build yourself. It will be suitable for most independent users even at 4K when a powerful GPU is installed. The biggest limitation of these systems is the single CPU so files that need decompressing will use most of the CPUs capabilities.
Hardware Selection and Setup DaVinci Resolve 15 — Certified Configuration Guide |
17 |
Loading...