


 Loading...
Reference Manual
DaVinci
Resolve
March 2017  12.5
12.5

Welcome
Welcome to DaVinci Resolve 12.5 for Mac, Linux and Windows!
DaVinci is the world’s most trusted name in color and has been used to grade more Hollywood films, TV shows, and commercials than anything else. Now, with DaVinci Resolve 12.5,
you get a complete set of professional editing and advanced color correction tools combined in one application so you can edit and grade from start to finish, all in a single tool!
DaVinci Resolve 12.5 has the features professional editors and colorists need, and is built on completely modern technology with advanced color and image processing that goes far
beyond what any other system can do. With this release, we hope to inspire creativity by letting you work in a comfortable, familiar way while also giving you an entirely new creative toolset that will help you cut and finish projects at higher quality than ever before!
We hope you enjoy reading this manual. With its customizable interface and keyboard shortcuts, DaVinci Resolve 12.5 is easy to learn, especially if you’re switching from another editor, and has all of the tools you need to create breathtaking, high end work!
The DaVinci Resolve Engineering Team
Grant Petty
CEO Blackmagic Design
Contents
1 Introduction to Resolve |
|
20 |
Getting Started |
|
23 |
Switching Among Pages |
|
27 |
The Media Page |
|
27 |
The Edit Page |
|
31 |
Edit and Color Page Effects and Fusion Connect |
|
35 |
The Color Page |
|
36 |
The Deliver Page |
|
40 |
User Interface Conventions in Resolve |
|
43 |
2 Logging In and The Project Manager |
|
51 |
Single-User versus Multi User Installations |
|
53 |
Logging In and Creating New Users |
|
53 |
Using the Project Manager |
|
56 |
User Pop-Up Menu |
|
58 |
Saving Projects |
|
62 |
Dynamic Project Switching |
|
63 |
Archiving and Restoring Projects |
|
64 |
3 Project Settings and Preferences |
|
66 |
Opening and Editing Project Settings |
|
69 |
Presets |
|
70 |
Master Project Settings |
|
71 |
Image Scaling |
|
76 |
Editing |
|
78 |
Color |
|
79 |
Camera Raw |
|
82 |
Color Management |
|
82 |
Contents 3
Versions |
|
88 |
Audio |
|
89 |
General Options |
|
90 |
Capture and Playback |
|
92 |
Control Panel |
|
94 |
Auto Save |
|
95 |
Keyboard Mapping |
|
96 |
Metadata |
|
96 |
DaVinci Resolve Preferences |
|
97 |
4 Camera Raw Settings |
|
101 |
Camera Raw Decoding Explained |
|
103 |
Using ARRI ALEXA files |
|
105 |
Using RED files |
|
107 |
Using Sony Raw Files |
|
112 |
Using CinemaDNG files |
|
114 |
Using Phantom Cine Files |
|
117 |
5 Improving Performance, Proxies, and the Render Cache |
|
119 |
Understanding the GPU Status Display |
|
121 |
Prioritizing Audio or Video Playback in the Edit Page |
|
121 |
Using Proxies to Improve Performance |
|
122 |
Reducing Decode Quality to Improve Raw Performance |
|
122 |
Using Optimized Media to Improve Overall Performance |
|
123 |
Using the Smart Cache to Improve Effects Performance |
|
126 |
Other Project Settings for Improving Performance |
|
131 |
Contents 4
6 |
Data Levels, Color Management, ACES, and HDR |
|
132 |
|
Data Levels Settings and Conversions |
|
134 |
|
DaVinci Resolve Color Management |
|
137 |
|
Color Management Using ACES |
|
142 |
|
High Dynamic Range (HDR) Grading in Resolve |
|
145 |
7 |
Using the Media Page |
|
161 |
|
Understanding the Media Page User Interface |
|
163 |
|
Viewer |
|
167 |
|
Media Pool |
|
168 |
|
Metadata Editor |
|
171 |
|
Audio Panel |
|
172 |
|
Dual Monitor Layout |
|
173 |
|
Customizing the Media Page |
|
174 |
8 |
Adding and Organizing Media |
|
175 |
|
Copying Media Using the Clone Tool |
|
177 |
|
Adding Media to the Media Pool |
|
178 |
|
Adding Media in the Edit Page |
|
182 |
|
Removing Media From the Media Pool |
|
182 |
|
Adding and Removing External Mattes |
|
182 |
|
Adding Offline Reference Movies |
|
184 |
|
Extracting Audio |
|
185 |
|
Organizing the Media Pool |
|
185 |
|
Creating and Using Smart Bins |
|
190 |
|
Finding Clips and Timelines in the Media Pool |
|
193 |
Contents 5
9 |
Working With Media |
|
194 |
|
Renaming Clips Using Display Names |
|
196 |
|
Editing Clip Metadata |
|
198 |
|
Importing and Exporting Media Pool Metadata |
|
201 |
|
Syncing Audio |
|
203 |
|
Changing Clip Attributes |
|
206 |
|
Relinking Media Simply |
|
212 |
|
Locating Media Files in the Media Storage Browser and Finder |
|
213 |
|
Update Timecode from Audio – LTC |
|
213 |
|
Changing Clip Thumbnails in the Media Pool |
|
214 |
|
Creating Subclips |
|
214 |
|
Organizing Stereo 3D Media |
|
214 |
|
Camera Raw Decoding |
|
215 |
10 |
Using Scene Detection |
|
216 |
|
Using Scene Detection |
|
218 |
|
The Scene Detect Window Interface |
|
218 |
|
An Example Scene Detect Workflow |
|
223 |
11 |
Ingesting From Tape |
|
225 |
|
Tape Ingest |
|
227 |
|
The Tape Capture Interface |
|
227 |
|
Setting Up to Capture From Tape |
|
228 |
|
The Three Methods of Capture |
|
230 |
|
Batch Capture Via EDL |
|
232 |
Contents 6
12 Capturing From the Cintel Film Scanner |
|
234 |
Controlling the Cintel Film Scanner |
|
236 |
The Cintel Scanner Interface |
|
237 |
Cintel Media Page Settings |
|
239 |
Film Scanning Workflows |
|
243 |
Grading and Sizing Scanned Media |
|
251 |
13 Using the Edit Page |
|
253 |
The Edit Page User Interface |
|
255 |
The Interface Toolbar |
|
255 |
The Media Pool |
|
256 |
More About Timelines |
|
257 |
Effects Library Browsing |
|
260 |
Edit Index |
|
262 |
Source and Timeline Viewers |
|
265 |
Metadata Editor |
|
270 |
Inspector |
|
271 |
Timeline |
|
271 |
Toolbar |
|
275 |
Navigating the Edit Page Using the Keyboard |
|
276 |
Dual Monitor Layout |
|
277 |
Customizing the Edit page |
|
278 |
Undo and Redo in the Edit Page |
|
278 |
14 Editing Fundamentals |
|
279 |
Creating and Duplicating Timelines |
|
282 |
Selecting Clips in the Media Pool to Edit |
|
284 |
Transport Controls and Timeline Navigation |
|
286 |
Setting In and Out Points |
|
290 |
Contents 7
Working With the Timeline |
292 |
Assembling Clips in the Timeline |
295 |
Source/Record Editing |
297 |
Three-Point Editing |
301 |
Different Types of Edits |
309 |
Subclips |
319 |
15 Working in the Timeline |
|
320 |
Match Frame Operations |
|
322 |
Selecting Clips in the Timeline |
|
324 |
Deleting Clips From the Timeline |
|
329 |
Selecting Edits in the Timeline |
|
331 |
Linking and Syncing Audio and Video |
|
333 |
Locking Tracks |
|
336 |
Moving, Resizing, and Rolling Clips in Selection Mode |
|
337 |
Shuffle or Swap Edits and Inserts |
|
341 |
Splitting and Joining Clips |
|
343 |
Copying and Pasting Clips in the Timeline |
|
344 |
Duplicating Clips and Transitions in the Timeline |
|
346 |
Flagging and Marking Clips for Reference |
|
346 |
Color Coding Clips in the Timeline |
|
352 |
Enabling and Disabling Clips and Tracks |
|
353 |
Finding Clips, Timelines, Media, Markers, and Gaps |
|
354 |
16 Multicam Editing, Take Selectors, |
|
|
Compound Clips, and Nested Timelines |
|
355 |
Multicam Editing |
|
357 |
Take Selectors |
|
365 |
Compound Clips |
|
367 |
Nested Timelines |
|
369 |
Contents 8
17 |
Trimming |
|
372 |
|
Using Trim Mode and the Trim Tool |
|
374 |
|
Summarizing Trim Operations |
|
374 |
|
Trim Tool Operations With the Keyboard |
|
379 |
|
Trimming Without the Heads Up Display |
|
382 |
|
Trimming Using Timecode Entry |
|
382 |
|
Trimming Clips in the Source Viewer |
|
383 |
|
Ripple Editing Rules |
|
384 |
|
Commands to Start Trimming Quickly |
|
386 |
|
Trimming Multiple Edits or Clips at Once |
|
387 |
|
Keyboard Trimming During Looped Playback |
|
392 |
|
Dynamic Trimming |
|
393 |
|
Trim Start and Trim End |
|
395 |
|
Extend Edits |
|
397 |
18 |
Using Transitions |
|
399 |
|
Working With Transitions |
|
401 |
|
Adding and Editing Transitions |
|
401 |
|
Adding Transitions When There’s Not Enough Handles |
|
402 |
|
Transition Properties in the Inspector |
|
403 |
|
Using Transition Curves |
|
404 |
|
DaVinci Resolve Transitions |
|
405 |
|
OpenFX Transitions |
|
409 |
|
Organizing Transitions |
|
409 |
|
Changing the Standard Transition |
|
410 |
Contents 9
19 |
Edit Page Effects |
|
411 |
|
Using the Inspector |
|
414 |
|
Adding Titles |
|
416 |
|
Using Generators |
|
421 |
|
Using Stills |
|
421 |
|
Composite Modes and Transparency Effects |
|
422 |
|
Keying, External Mattes, and Window Compositing |
|
428 |
|
Transform, Cropping, and Lens Correction |
|
428 |
|
Speed Effects and Retiming |
|
432 |
|
Keyframing Effects in the Edit Page |
|
441 |
|
Paste Attributes |
|
450 |
|
Fusion Connect |
|
451 |
20 |
Working With Audio |
|
458 |
|
Compatible Audio Formats |
|
460 |
|
Assigning Audio Channels in the Media Pool |
|
460 |
|
Editing Audio Into the Timeline |
|
463 |
|
Editing Audio In the Timeline Using In and Out Points |
|
468 |
|
Setting Clip Levels and Pan |
|
470 |
|
Keyframing Audio |
|
472 |
|
Audio Fade Handles |
|
475 |
|
Audio Crossfades |
|
475 |
|
Audio Meters |
|
476 |
|
The Audio Mixer |
|
477 |
|
Automation Recording |
|
479 |
|
Using Audio Filters |
|
482 |
|
Pro Tools Export |
|
484 |
Contents 10
21 |
Media Management |
|
485 |
|
What is Media Management in Resolve? |
|
487 |
|
File Formats Compatible With Media Management |
|
487 |
|
Using Media Management |
|
488 |
|
Options in the Media Management Window |
|
491 |
|
File Naming When Consolidating During Media Management |
|
493 |
22 |
Importing Projects and Relinking Media |
|
494 |
|
Preparing to Move Your Project to Resolve |
|
497 |
|
How DaVinci Resolve Conforms Clips |
|
504 |
|
Creating Digital Dailies For Round Trip Workflows |
|
511 |
|
Conforming XML and AAF Files |
|
517 |
|
Conforming AAF Files |
|
521 |
|
Conforming EDL Files |
|
530 |
|
Verifying Imported Projects With Offline Reference Clips |
|
535 |
|
Manually Conforming and Relinking Media |
|
538 |
23 Introduction to Color Grading |
|
548 |
|
|
The Goals of Color Correction |
|
550 |
|
Maximizing the Look of Your Media |
|
550 |
|
Emphasizing What’s Important |
|
553 |
|
Audience Expectations |
|
554 |
|
Balancing Scenes |
|
555 |
|
Adding Style |
|
557 |
|
Quality Control |
|
560 |
|
Never Stop Experimenting |
|
561 |
Contents 11
24 Using the Color Page |
|
562 |
The Color Page Interface |
|
565 |
Customizing the Color Page |
|
571 |
Using the Viewer |
|
571 |
Monitor Calibration |
|
579 |
Viewing Broadcast Safe Exceptions |
|
581 |
Comparing Clips in the Viewer |
|
581 |
Using Video Scopes |
|
586 |
Navigating Using the Color Page Timeline |
|
590 |
Sorting and Filtering Clips in the Timeline |
|
593 |
Using the Lightbox |
|
600 |
The Info Palette and Clip Information |
|
602 |
Undo and Redo |
|
604 |
25 Color Page Basics |
|
605 |
Color Controls Covered in This Chapter |
|
607 |
Camera Raw |
|
607 |
Color Match Palette |
|
611 |
Color Wheels Palette |
|
616 |
RGB Mixer Palette |
|
631 |
Automated Grading Commands |
|
634 |
Using CDL Grades and ARRI Looks |
|
638 |
26 Curves |
|
639 |
Introduction to Using Curves |
|
641 |
Custom Curves |
|
643 |
Soft Clip |
|
650 |
The HSL Curves |
|
654 |
Contents 12
27 Secondary Grading Controls |
|
662 |
Secondary Qualifiers |
|
665 |
Basic Qualification Using the 3D Keyer |
|
669 |
Basic Qualification Using the HSL Keyer |
|
672 |
HSL Qualifier Presets |
|
675 |
Using Highlight to See What You’re Isolating |
|
676 |
Qualifier Parameters |
|
677 |
Matte Finesse Controls |
|
682 |
The Many Ways to Invert a Key |
|
685 |
Combining Qualifiers and Windows |
|
685 |
Manipulating Keys Using Additional Nodes |
|
686 |
Power Windows |
|
687 |
The Window Palette Interface |
|
689 |
Drawing a PowerCurve |
|
694 |
Combining Power Windows With the Mask Control |
|
697 |
Copying and Pasting Windows |
|
699 |
Saving Window Presets |
|
699 |
Using Windows and Qualifiers Together |
|
700 |
Manipulating Windows Using a Control Panel |
|
701 |
Motion Tracking Windows |
|
702 |
Tracker Palette Controls in More Detail |
|
705 |
Cloud Tracker Workflows |
|
710 |
Point Tracker Workflows |
|
716 |
Rotoscoping Window Shapes After Tracking |
|
721 |
28 The Gallery and Grade Management |
|
727 |
Using the Gallery |
|
730 |
The Gallery Window |
|
737 |
Importing and Exporting Stills |
|
738 |
Contents 13
Using and Organizing Memories |
739 |
Using Versions to Manage Grades |
740 |
Copying Grades |
751 |
Copying Individual Nodes and Settings |
757 |
Rippling Adjustments Among Multiple Clips |
757 |
Appending A Node to Multiple Clips |
759 |
Scroll Copy Grades Using the DaVinci Control Panel |
759 |
Rippling Changes Using the DaVinci Control Panel |
760 |
Using Groups |
763 |
Exporting Grades and LUTs |
769 |
29 Color Page Effects |
|
771 |
Motion Effects Palette |
|
773 |
OpenFX |
|
780 |
The Blur Palette |
|
791 |
Transforms and the Sizing Palette |
|
795 |
Image Stabilization in the Tracker Palette |
|
805 |
Data Burn |
|
813 |
Dust Removal |
|
817 |
Black Sun Highlight Correction |
|
819 |
30 Working in the Node Editor |
|
820 |
Node Editor Basics |
|
823 |
Grading Order of Operations |
|
834 |
Copying Nodes and Node Settings |
|
835 |
Serial, Parallel, and Layer Node Tree Structures |
|
836 |
Applying a LUT Within a Node |
|
843 |
Using Compound Nodes |
|
844 |
RED HDRx Input Support |
|
845 |
Contents 14
Clip vs. Timeline Grading |
849 |
Manipulating and Combining Keys |
850 |
Using External Mattes |
856 |
Using the Key Mixer |
863 |
Using the Key Palette |
867 |
Isolating, Splitting, and Converting Color Channels |
871 |
Putting Nodes into HDR Mode |
875 |
Compositing Using the Alpha Output |
875 |
31 Keyframing in the Color Page |
|
883 |
Introduction to Keyframing |
|
885 |
The Keyframe Editor Interface |
|
886 |
All/Color/Sizing |
|
887 |
Keyframing Methods |
|
888 |
Using Specific Keyframing Tracks |
|
891 |
Automatic Keyframing |
|
893 |
Modifying Keyframes |
|
893 |
Copying Keyframes |
|
896 |
Keyframes and Saved Stills |
|
897 |
Adding EDL Marks |
|
897 |
32 Copying Grades Between Timelines Using ColorTrace |
|
898 |
Copying Grades Using ColorTrace |
|
900 |
Using ColorTrace in Automatic Mode |
|
902 |
Using ColorTrace in Manual Mode |
|
905 |
Importing CDL Data Using ColorTrace |
|
907 |
Contents 15
33 Using the Deliver Page |
|
909 |
The Deliver Page |
|
911 |
The Interface Toolbar |
|
911 |
Rendering Files vs. Outputting to Tape |
|
912 |
The Render Settings |
|
912 |
The Deliver Page Timeline |
|
913 |
The Viewer |
|
914 |
The Render Queue |
|
915 |
34 Delivery Effects Processing |
|
916 |
Delivery Effects Processing |
|
918 |
35 Rendering Media |
|
922 |
Using Presets for Fast Rendering |
|
924 |
Choosing a Location To Render |
|
926 |
Single Clip vs. Individual Clips |
|
926 |
All Other Render Settings for Output |
|
927 |
Additional Outputs |
|
934 |
How to Avoid Overwriting Clips When Rendering Output Media |
|
935 |
Defining a Range of Clips and Versions to Render |
|
935 |
Using the Render Queue |
|
937 |
Rendering Jobs from Multiple Projects at Once |
|
939 |
Remote Rendering |
|
940 |
36 Delivering Using EasyDCP |
|
942 |
Licensing EasyDCP |
|
944 |
EasyDCP Color Management |
|
945 |
EasyDCP Output in the Deliver Page |
|
945 |
KDM Generation and Management |
|
947 |
Publishing Your Encrypted Digital Cinema Package |
|
947 |
Contents 16
37 Delivering to Tape |
|
948 |
The Tape Output Interface |
|
950 |
Setting Up for Tape Output |
|
952 |
Edit to Tape Queue Option Menu Settings |
|
954 |
Tape Output Procedures |
|
955 |
38 Exporting Timelines to Other Applications |
|
957 |
Exporting to AAF/XML |
|
959 |
More About Exporting to AAF |
|
960 |
Exporting an EDL |
|
960 |
Exporting a Missing Clips EDL |
|
961 |
Exporting Timeline Markers to EDL |
|
961 |
Exporting to CDL |
|
961 |
Exporting the Edit Index as a CSV or TXT File |
|
962 |
Exporting to ALE |
|
963 |
Exporting to ALE with CDL |
|
965 |
Exporting Timeline Markers to EDL |
|
966 |
Exporting and Importing Media Pool Metadata |
|
966 |
39 Resolve Live |
|
968 |
More About Resolve Live |
|
970 |
Configuring Your System for Resolve Live |
|
970 |
Grading Live |
|
971 |
Using Resolve Live Grades Later |
|
973 |
Using LUTs in Resolve Live Workflows |
|
974 |
Contents 17
40 Stereoscopic Workflows |
|
975 |
Stereoscopic Workflows |
|
977 |
Hardware Requirements for Working in Stereo 3D |
|
977 |
Supported Stereo 3D Media |
|
978 |
Creating Stereo 3D Clips |
|
979 |
Converting Clips Between Stereo and Mono |
|
981 |
Attaching Mattes to Stereo 3D Clips |
|
982 |
Organizing and Grading Stereo 3D Dailies |
|
982 |
Conforming Projects to Stereo 3D Media |
|
984 |
Adjusting Clips Using the Stereo 3D Palette |
|
985 |
Outputting Stereo 3D Media in the Deliver Page |
|
995 |
41 Managing Databases and Database Servers |
|
996 |
Using Databases |
|
998 |
Switching to a PostgreSQL Database |
|
998 |
Switching to a Disk Database |
|
1000 |
Working With the Database Manager |
|
1001 |
Configuring and Using a Remote Database Server |
|
1003 |
Setting Up a DaVinci Resolve Project Server |
|
1004 |
Connecting to Projects on a Server |
|
1005 |
Troubleshooting Tips When Setting up a Project Server |
|
1006 |
42 Collaborative Workflow |
|
1009 |
Setting Up to Collaborate |
|
1011 |
Opening Projects to Collaborate Upon |
|
1011 |
Using Collaborative Workflow |
|
1012 |
Contents 18
43 |
Remote Grading |
|
1015 |
|
Introduction to Remote Grading |
|
1017 |
|
Requirements for Remote Grading |
|
1017 |
|
Setting Up for Remote Grading |
|
1018 |
|
Remote Grading Restrictions |
|
1018 |
44 |
Using Variables and Keywords |
|
1019 |
|
Using Metadata Variables |
|
1021 |
|
Using Keywords |
|
1024 |
45 |
Creating DCTL LUTs |
|
1025 |
|
About DCTL |
|
1027 |
|
DCTL Syntax |
|
1027 |
|
A Simple DCTL LUT Example |
|
1029 |
|
A Matrix DCTL LUT Example |
|
1029 |
|
A More Complex DCTL LUT Example |
|
1030 |
46 |
TCP Protocol for Resolve Transport Control |
|
1031 |
|
About the TCP Protocol Version 1.2 |
|
1033 |
|
TCP Protocol Stream |
|
1034 |
47 Control Panel |
|
1035 |
|
|
DaVinci Resolve Control Panels |
|
1037 |
|
DaVinci Resolve Micro Control Panel |
|
1038 |
|
DaVinci Resolve Mini Control Panel |
|
1042 |
|
DaVinci Resolve Advanced Control Panel |
|
1045 |
|
Copying Grades Using the Advanced Control Panel |
|
1056 |
|
Rippling Changes Using the Advanced Control Panel |
|
1058 |
Contents 19

Introduction to Resolve
1
Introduction to Resolve
DaVinci Resolve integrates editing, color correction, and finishing within a single, easy to learn application. The editing and grading tools found in Resolve should be immediately familiar to experienced artists who’ve used other postproduction applications, but they’re also very approachable to folks who are new to postproduction.
Additionally, dedicated tools available for on-set workflows integrate tasks such as media duplication, shot and metadata organization, and on-location look management into a complete tool set that lets you smoothly segue from the camera-original media being acquired in the field to the organization and use of that media in a wide variety of postproduction workflows that use DaVinci Resolve at their heart.
The tight integration in Resolve between on-set media, metadata, and “look” organization, editing, and grading means that you can freely move from one task to the next without skipping a beat. This makes it easy to back up and organize your media, and then immediately dive into editing a program, switching over to color-correct clips in the middle of your editing spree, before going right back to editing, without needing to export projects or launch other applications. And you can go further, using the collaborative features of DaVinci Resolve to enable multiple artists, for example an editor, a colorist, and assistants, to work together on the same timeline simultaneously, for the ultimate integrated workflow.
Of course, no postproduction professional works in a vacuum, and DaVinci Resolve makes it easy to work with other facilities by importing projects and exporting project exchange formats and rendered or managed media among applications such as Apple’s Final Cut Pro X, Adobe’s Premiere Pro, Avid’s Media Composer, Autodesk’s Smoke, and many other applications via robust support of XML, AAF, and EDL import and export workflows.
This chapter introduces the DaVinci Resolve user interface (UI), explaining where to find each group of features, and how the highly focused and tightly integrated Media, Edit, Color, and Deliver pages of functionality work together to let you pursue nearly any postproduction workflow you can imagine. After this brief tour, the rest of Part 1 of this manual provides much more in-depth information about every aspect of functionality found in DaVinci Resolve.
This chapter covers the following topics:
Getting Started |
23 |
Logging In |
23 |
The Project Manager |
24 |
Preferences |
24 |
Project Settings |
26 |
Switching Among Pages |
27 |
The Media Page |
27 |
The Media Storage Browser |
28 |
Viewer |
28 |
Media Pool |
29 |
Metadata Editor |
29 |
Audio Panel |
30 |
Chapter 1 – Contents |
21 |
The Edit Page |
30 |
The Media Pool |
31 |
Effects Library Browsing |
32 |
Edit Index |
32 |
Source/Offline and Timeline Viewers |
33 |
Inspector |
34 |
Toolbar |
34 |
Timeline |
34 |
Edit and Color Page Effects and Fusion Connect |
35 |
The Color Page |
36 |
Viewer |
36 |
Gallery |
37 |
Node Editor |
38 |
Timeline |
38 |
Left Palettes |
39 |
Center Palettes |
39 |
Keyframe Editor |
40 |
The Deliver Page |
40 |
The Render Settings List |
41 |
The Deliver Page Timeline |
42 |
The Viewer |
42 |
The Render Queue |
43 |
User Interface Conventions in Resolve |
43 |
Customizing Each Page Using the Interface Toolbar |
43 |
Adjusting the Workspace |
44 |
Dual Monitor Layouts |
47 |
Contextual Menus |
48 |
Buttons and Pop-up Menus |
48 |
Adjusting Parameters |
49 |
The Three Buttons of a Mouse or Other Input Device |
49 |
Chapter 1 – Contents |
22 |
Getting Started
When you install DaVinci Resolve and then open it for the first time, there are a few things you’re going to want to do before you begin working on your first project.
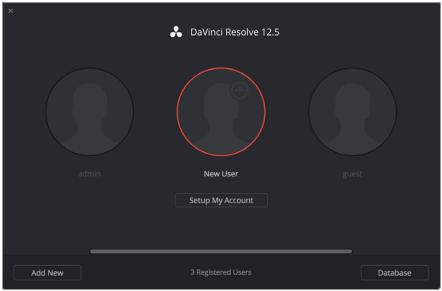
Logging In
If you’ve installed DaVinci Resolve in its multi-user environment, the first window you’ll see is the login screen. If you installed DaVinci Resolve’s default single-user environment, opening Resolve immediately takes you to the Project Manager, discussed in the next section.
DaVinci Resolve was originally designed as a multi-user application for professional grading suites where an elaborately appointed room at a high-end facility was being shared among a stable of colorists. Resolve is still very much used in that capacity, and the login screen provides the interface that’s used to create and manage multiple users on a single workstation.
Another way of looking at the multi-user capabilities of Resolve is organizational in nature. Each login has individual settings, preferences, projects, and PowerGrades. This means that you can create users, not for specific individuals, but for specific types of projects that you want to share common project settings and PowerGrades.
To open a user, simply double-click that user’s icon, or follow the on-screen instructions to create a new user and then double-click it to open.
The login screen that appears when you first open Resolve
Whether you simply use the default admin login to do your work (which is fine), or you create your own individual login, there are several controls for creating and customizing user logins, all of which are covered in Chapter 2, “Logging in and the Project Manager.”
Chapter 1 – Introduction to Resolve |
23 |
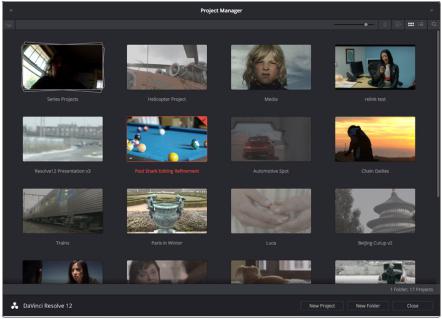
The Project Manager
If you’ve installed DaVinci Resolve as a single-user environment, the Project Manager is the first window you’ll see when you open Resolve
The Project Manager is a centralized interface for managing all projects belonging to the user who’s currently logged in, whose name appears at the upper right-hand corner in a project title bar. This is the second window you’ll see when opening DaVinci Resolve. The Project Manager is also the place where you import and export projects to and from Resolve, whether you’re moving projects around from user to user, or moving projects from one Resolve workstation
to another.
To open any project, double-click it. To create a new project, double-click the Untitled Project icon.
The Project Manager shows all projects belonging to the current user
More information about the Project Manager appears in Chapter 2, “Logging in and the Project Manager.”
Preferences
The Preferences Window lets you set up the overall environment of your DaVinci workstation, choosing which language to display the interface with, what hard drive volume to use as the scratch disk, what I/O interfaces to use for playing audio and viewing video output, and which, if any, control panel to use while grading. If you have a system that doesn’t change very often, then you may only rarely use the Preferences window. On the other hand, if you’re working with a mobile system with changing video interfaces, control panels, and scratch volumes, then you may use this window more frequently.
Whenever you change any settings in the Preferences, you must quit and restart Resolve for those preferences to take effect.
Chapter 1 – Introduction to Resolve |
24 |

The DaVinci Resolve Preferences let you set up your environment
A quick overview of the Preferences appears below, but for more information, see Chapter 3, “Project Settings and Preferences.”
System Overview
Provides an overview, for reference, of all hardware and computer characteristics that are relevant to DaVinci Resolve running smoothly, including listing of installed GPUs. A Language pop-up at top lets you specify which language the DaVinci Resolve user interface displays. Resolve currently supports English, Spanish, Chinese, and Japanese.
Media Storage Volumes
This is a list within which you define the scratch disk used by your system. The first volume in this list is where Gallery stills and cache files are stored, so you want to make sure that you choose the fastest storage volume that’s connected.
Video I/O and GPU
The preferences in this panel let you choose video interfaces and GPU processing hardware on your workstation. If you have multiple Blackmagic Design I/O interfaces connected to your computer, you can choose one to use for monitoring video output, and one to use for Resolve Live, a feature that lets you grade camera output during a shoot as part of an on-set workflow.
Control Panels
Lets you choose and configure (if necessary) a control panel that’s connected for use during grading in Resolve.
Chapter 1 – Introduction to Resolve |
25 |
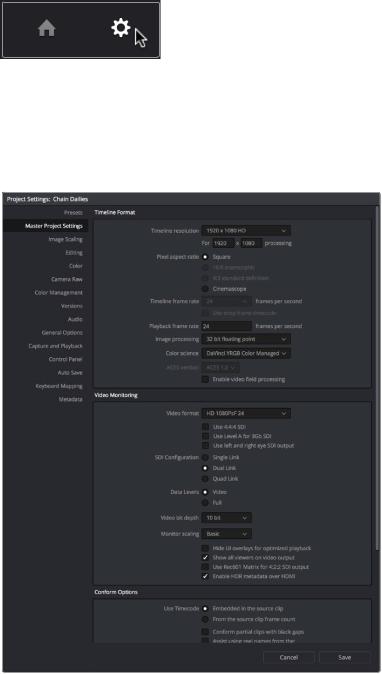
Project Settings
Once you’ve created a project, all project-specific settings are found in the Project Settings window. To open the Project Settings window, just click the gear button at the bottom right on any page.
Project Manager and
Project Settings buttons
The Project Settings open in the middle of the screen, divided into a series of panels which can be selected from a sidebar to the left. Each panel contains a collection of related settings that affects some category of Resolve functionality. To open a panel of settings, simply click its name in the sidebar at the left.
The Project Settings show all project-specific settings and attributes
The Master Project Settings define the principal attributes of a project, such as the timeline resolution, timeline frame rate, color science, and bit depth. Image Scaling settings define how clips that don’t match the timeline resolution are scaled to fit. There are other panels for Editing settings, Color settings, Lookup Tables (LUTs), et cetera.
For more information about Project Settings, see Chapter 3, “Project Settings and Preferences.”
Chapter 1 – Introduction to Resolve |
26 |
Switching Among Pages
DaVinci Resolve is divided into four main pages of functionality, which can be accessed using four buttons at the very bottom of the DaVinci Resolve interface. These buttons are organized in order of workflow, and they’re always available, letting you quickly switch between importing media, editing, grading, and outputting your project in a structured manner.
You can also switch pages using the following keyboard shortcuts.
Page |
Keyboard Shortcut |
Media |
Shift-2 |
Edit |
Shift-4 |
Color |
Shift-6 |
Deliver |
Shift-8 |
|
|
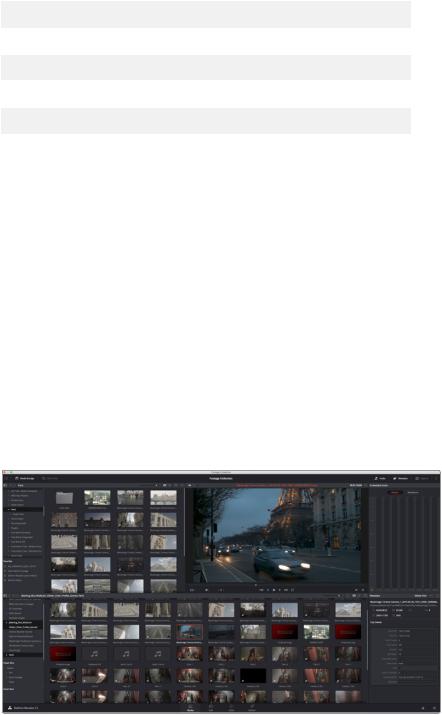
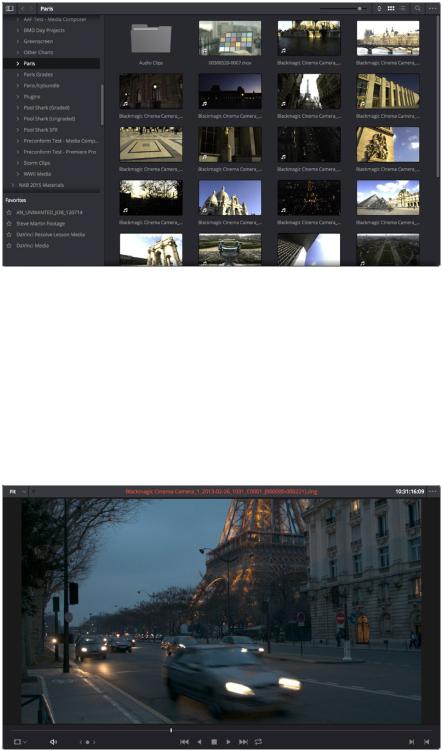
The Media Page
The Media page is the primary interface for media management and clip organization in DaVinci Resolve. It’s central to the way DaVinci Resolve works that the source media used by a project is organized separately from the project data that you import and manage in the Edit page.
In this way, you can manage and update the clips used by timelines in the current project with ease, switching between offline and online media, reorganizing clips, and troubleshooting any problems that occur.
The Media page also contains much of the core functionality that will be used for on-set workflows, and in the ingest, organizational, and sound-synching steps of digital dailies workflows. This chapter covers most of the functionality found in the Media page, including functions in detail that are referenced throughout this manual.
The Media page is divided into six different areas, designed to make it easy to find, select, and work with media in your project. Much of the functionality and most of the commands are found within the contextual menus that appear when you right-click clips in the Media Storage, File Browser, or Media Pool.
Media page
For more information on using the Media page, see Chapter 7, “Using the Media Page.”
Chapter 1 – Introduction to Resolve |
27 |
The Media Storage Browser
The Media Storage browser shows a list of all volumes that are currently available to your Resolve workstation. It’s used to locate media that you want to import manually into your project.
Media Storage with scrubbable Clip view
Viewer
Clips that you select in any area of the Media page show their contents in the Viewer. A jog bar appears at the bottom, letting you drag the playhead directly with the pointer, while a jog control between the mode pop-up and transport controls lets you move through a long clip more slowly. The full width of the jog bar represents the full duration of the clip in the Viewer. The current position of the playhead is shown in the timecode field at the upper right-hand corner of the Viewer. Simple transport controls appear underneath the jog bar, letting you Jump to First Frame, Play/Stop, and Jump to Last Frame.
Media page viewer
You can also put the Viewer into Cinema Viewer mode by choosing Workspace > Viewer Mode > Cinema Viewer (Command-F), so that it fills the entire screen. This command toggles Cinema Viewer mode on and off.
Chapter 1 – Introduction to Resolve |
28 |
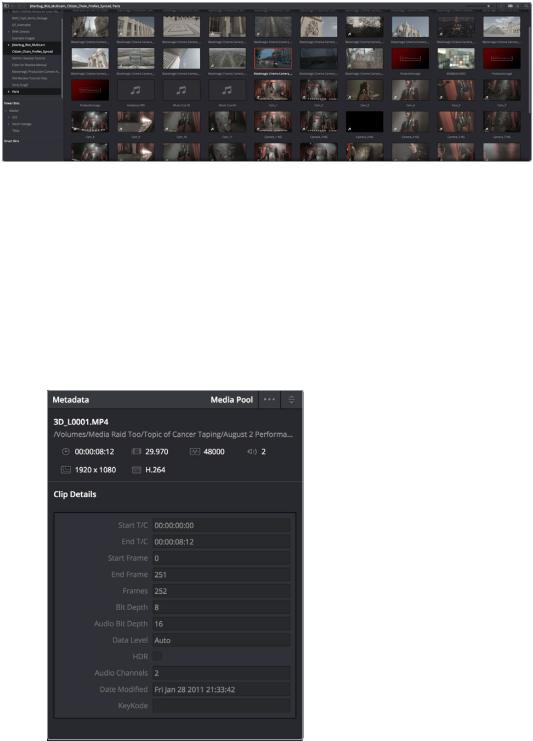
Media Pool
The Media Pool contains all of the media that you import into the current project. It also contains any media that’s automatically imported along with Timelines that have been imported into Resolve. Ordinarily, all media imported into a project goes into the Master folder, however the Media Pool can be organized into as many user-definable folders as you like, depending on your needs. Media can be freely moved from one folder to another from within the Media Pool.
Media Pool with the Folder View closed
Metadata Editor
When you select a clip in any area of the Media page, its metadata is displayed within the Metadata Editor. If you select multiple clips, only the last clip’s information appears. The Metadata Editor’s header contains uneditable information about the selected clip, including the file name, directory, duration, frame rate, resolution, and codec. A series of editable fields within the Metadata Editor lets you review and edit the different metadata items that are available.
A pop-up menu at the upper-right of the Metadata Editor lets you choose from many different sets of metadata fields and checkboxes, each grouped for a specific task or workflow.
Chapter 1 – Introduction to Resolve |
29 |
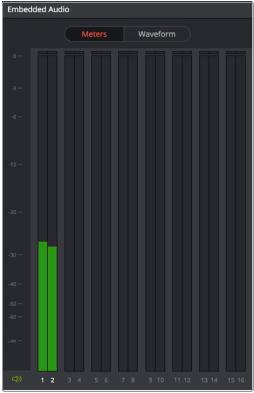
Clip Metadata Editor Panel and Audio Meters exposed Panel
Audio Panel
The Audio Panel can be put into one of two modes via a pair of buttons above the audio meters. In the default Meters mode, Audio Meters are displayed that show the levels of audio in clips you’re playing. In Waveform mode, you can load audio clips side by side with video clips opened in the Viewer in order to sync them together manually. The Audio Panel can also
be hidden.
The Edit Page
The Edit page exposes a source-record style NLE that incorporates many specialized features for both creative editing and finishing. The Edit page is divided into three main regions: the browsers found at the left, the Viewers at the top, and the Timeline at the bottom, all of which work together to let you import, edit, and trim timelines with a flexible variety of tools
and methods.
For more information on the Edit page, see Chapter 14, “Editing Fundamentals.”
Chapter 1 – Introduction to Resolve |
30 |
Loading...