


 Loading...
Installation and Operation Manual
HyperDeck Disk Recorders
Mac OS X™
Windows™
August 2014

Welcome
We hope you share our dream for the television industry to become a truly creative industry by allowing anyone to have access to the highest quality video.
Our range of HyperDeck disk recorders have made it easier and more affordable than ever to record and play back full 10 Bit uncompressed video and now
Ultra HD 4K! HyperDeck records directly to removable 2.5” Solid State Disks (SSDs) that are getting bigger, faster and more affordable every day. It’s incredible that you can now record and play the most amazing quality video onto something so small thousands of times without any degradation in quality!
SSDs can also be mounted on any computer for immediate editing and fast transfer of your media. With no moving parts, SSDs are unbelievably robust and can handle harsh conditions that would destroy conventional hard drives and videotapes!
You can bypass unwanted camera compression and record directly from HDMI or SDI cameras straight to SSD and even connect to any HDMI or SDI monitor for instant playback! With HyperDeck Studio Pro, you can connect analog sources and also record and play back Ultra HD 4K with 6G-SDI!
If you need longer recording times for each SSD, then HyperDeck also records and plays back Apple ProRes and Avid DNxHD files. These 10 Bit quality codecs retain fantastic picture quality and increase the recording length of SSDs by more than 5 times!
This instruction manual contains all the information you need to start using your HyperDeck disk recorder. For uncompressed recording you need to use an SSD that supports the required data speed and we are continually adding details on our website of new SSDs that we have tested.
Please check the support page at www.blackmagicdesign.com for the latest version of this manual and updates to the HyperDeck software. Keeping your software up to date will always ensure you get all the latest features. When downloading software, please register with your information so we can keep you updated when new software is released. We are constantly working on new features and improvements, so we would love to hear from you!
Grant Petty
CEO Blackmagic Design

Contents
HyperDeck Disk Recorders
5 Getting Started
Introducing HyperDeck |
5 |
Plugging in Video Sources |
6 |
Connecting Video Outputs |
7 |
Recording Video |
8 |
Playing Video |
9 |
10 Using HyperDeck
About SSDs |
10 |
Choosing a Fast SSD |
10 |
Preparing SSDs for HyperDeck |
11 |
HyperDeck Utility |
12 |
How to Update Your HyperDeck Software on Mac OS X |
12 |
How to Update Your HyperDeck Software on Windows |
12 |
Selecting Your Video Format in HyperDeck Utility |
13 |
About Ultra HD 4K |
14 |
Setting Up Ultra HD 4K Recording |
14 |
Setting Up Ultra HD 4K Playback |
14 |
Accessing Your Clips |
15 |
Mac OS X |
15 |
Windows |
15 |
Status Indicators |
16 |
Using the Display Menu on HyperDeck Studio Models |
17 |
Selecting Timecode Source |
17 |
SDI Start/Stop Recording |
18 |
Timecode Run Recording |
19 |
Shuttling with HyperDeck Shuttle |
20 |
Jog and Shuttle with HyperDeck Studio Models |
20 |
Ref Input |
20 |
RS-422 Control |
21 |
What is RS-422 Control? |
21 |
Using an External RS-422 Controller |
21 |
Daisy-chaining for Crash Recording |
22 |
Supported RS-422 Commands |
23 |
RS-422 Developer Information |
27 |
Installing the HyperDeck Shuttle Mounting Plate |
28 |
Contents
HyperDeck Disk Recorders
29 Using Your Favorite Editing Software
Capturing video via Thunderbolt |
29 |
Capturing from SSD |
29 |
Simultaneous Capture and Recording |
29 |
Avid Media Composer 7 |
30 |
Setting up |
30 |
Capturing live via Thunderbolt |
31 |
Apple Final Cut Pro 7 |
32 |
Capturing live via Thunderbolt |
32 |
Adobe Premiere Pro CC |
33 |
Capturing live via Thunderbolt |
34 |
Adobe Photoshop CC |
34 |
How to grab video frames |
34 |
35
43
54
57
72
73
74
Using Blackmagic Media Express
Using Blackmagic UltraScope
Using Blackmagic Disk Speed Test
Developer Information
Blackmagic HyperDeck Ethernet Protocol |
57 |
Protocol Commands |
57 |
Protocol Details |
59 |
Help
Warnings
Warranty
5 Getting Started
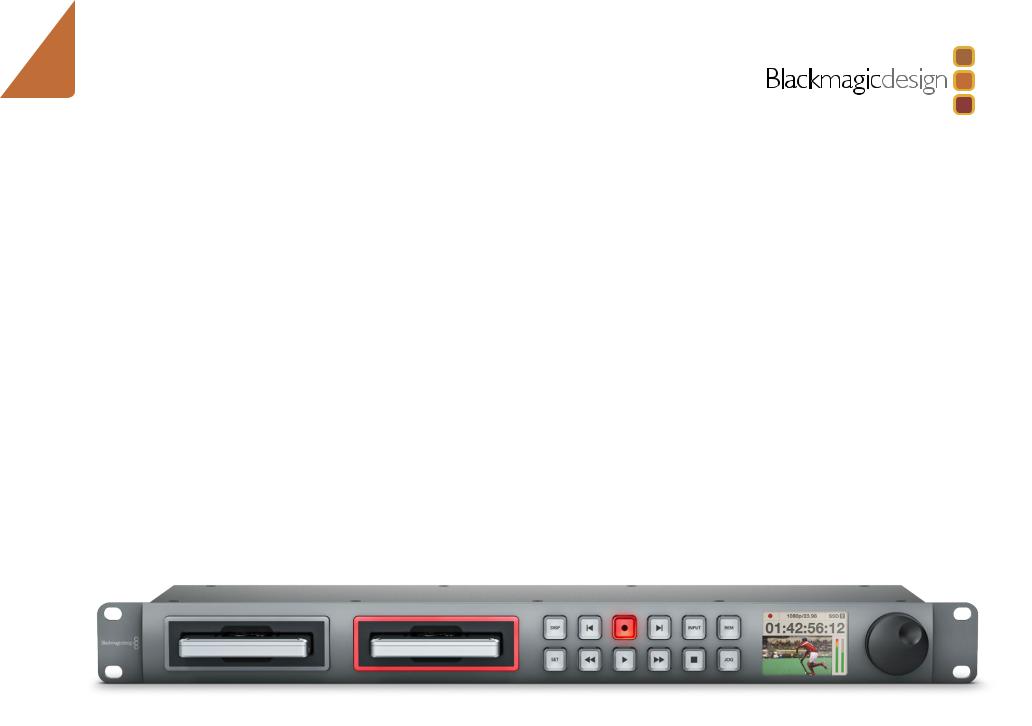
HyperDeck Shuttle
HyperDeck Studio
HyperDeck Studio Pro
Getting Started
Introducing HyperDeck
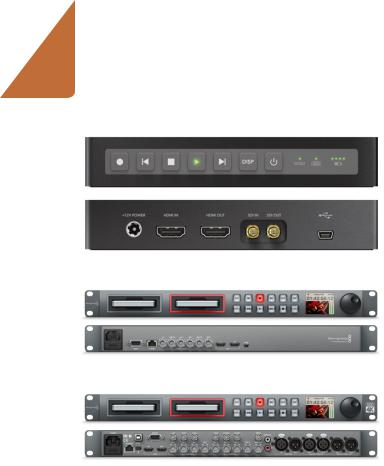
There are three models of HyperDeck disk recorders, which all have internal 3 Gb/s SATA ports for use with standard 2.5" SSDs.
HyperDeck Shuttle
HyperDeck Shuttle is compact, affordable and battery powered, so it’s perfect as a field recorder. HyperDeck Shuttle bypasses your camera’s compression and records from SDI and HDMI directly into the highest quality uncompressed video. If compressed video better suits your workflow, or if you need to fit more video on a SSD, the latest model records and plays back Apple ProRes and Avid DNxHD formats.
The HyperDeck Shuttle Mounting Plate can be purchased if you want to secure your HyperDeck Shuttle to a camera rig with your choice of rail mounts, cold shoe mounts, articulated arms and more. You can also use the plate to power your HyperDeck Shuttle from an external battery by attaching a V-Mount or Anton Bauer style battery plate.
HyperDeck Studio
HyperDeck Studio is a rack mount broadcast deck style recorder that features dual SSD slots so it can automatically continue recording onto another SSD when one is full. Only 1 RU high and less than 4 inches deep, HyperDeck Studio is perfect for when space is tight, such as in broadcast vans and fly away rack cases.
HyperDeck Studio features uncompressed quality recording and playback, RS-422 deck control, genlock, jog and shuttle controls and an integrated LCD. It can record and play back in Apple ProRes and Avid DNxHD formats if compressed video better suits your workflow or if you need to fit more video on a SSD. Both the HyperDeck Studio and the HyperDeck Studio Pro support the following ProRes codecs:
Prores 422 (HQ)
ProRes 422
ProRes 422 LT
ProRes 422 (Proxy)
HyperDeck Studio Pro
HyperDeck Studio Pro does everything that HyperDeck Studio does, with the addition of analog video and audio in and out, timecode in and out, ThunderboltTM connectivity and Ultra HD 4K ProRes capture and playback via 6G-SDI and HDMI 4K!
6 Getting Started
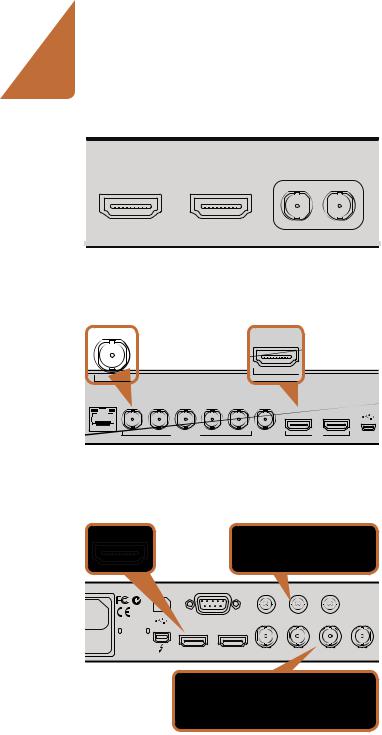
HyperDeck Shuttle HDMI and SDI inputs.
IN
|
|
|
|
IN |
|
|
|
|
|
|
H |
LOOP OUT |
OUT 1 |
OUT 2 |
MON OUT |
REF IN |
|
|
|
|
|
IN |
OUT |
ETHERNET |
SD/HD/3GHD-SDI |
|
|
|
HDMI |
HyperDeck Studio SDI and HDMI inputs
|
IN |
Y IN |
B-Y IN |
|
R-Y IN |
|
|
|
|
|
|
WER |
REMOTE |
Y IN |
-Y IN |
R-Y IN |
|
|
|
IN A |
IN B |
IN C |
IN D |
|
IN |
OUT |
|
|
|
|
HDMI |
|
|
-SDI IN |
|
|
IN A |
IN B |
IN C |
|
IN D |
Plugging in Video Sources
HyperDeck Shuttle
Step 1. Power on the unit. If HyperDeck Shuttle does not power on, you may need to charge the battery. Simply plug in the power adapter and turn HyperDeck Shuttle on. The battery will continue to charge as long as the power adapter is connected. You can also power it from an external camera battery as the connector supports an input range of 12V to 18V.
Step 2. Connect your SDI source to the DIN 1.0/2.3 miniature connector. You may need a BNC to DIN 1.0/2.3 adapter cable for this. If your source is HDMI, connect a Type A HDMI cable to the HDMI input. If you connect both SDI and HDMI, HyperDeck Shuttle will default to recording from whichever input was connected first. We recommend having only SDI or HDMI connected to each input as HyperDeck Shuttle will switch inputs if one is disconnected and then reconnected.
HyperDeck Studio
Step 1. Power on the unit by connecting an IEC power cord with a C13 connector. HyperDeck Studio's built in international AC power supply supports 110-240V, 50/60 Hz.
Step 2. Connect SDI video sources, such as cameras, routers, switcher outputs or decks to the SDI inputs. If your source is from HDMI, connect a Type A HDMI cable to the HDMI input.
Step 3. Press the INPUT button once while the stop button is illuminated to preview the video source on the LCD. If you don’t see the video you want, press INPUT again to switch inputs.
HyperDeck Studio Pro
Step 1. Power on the unit by connecting an IEC power cord with a C13 connector. HyperDeck Studio Pro's built in international AC power supply supports 110-240V, 50/60 Hz.
Step 2. Connect SDI, HDMI or component sources to their respective inputs. If you are recording Ultra HD 4K over SDI, the SDI inputs will automatically detect whether you are connecting via single link 6G-SDI to Input A, dual link 3G-SDI or quad link HD-SDI.
Step 3. If connecting analog audio sources, you can use the XLR inputs for professional balanced analog audio or the stereo RCA connectors for unbalanced analog audio from consumer equipment. Connect analog timecode to the XLR timecode input.
Step 4. Press the INPUT button once while the stop button is illuminated to preview the video source on the LCD. If you don’t see the video you want, press INPUT again to switch inputs.
HyperDeck Studio Pro HDMI, analog component and SDI inputs.
7 Getting Started
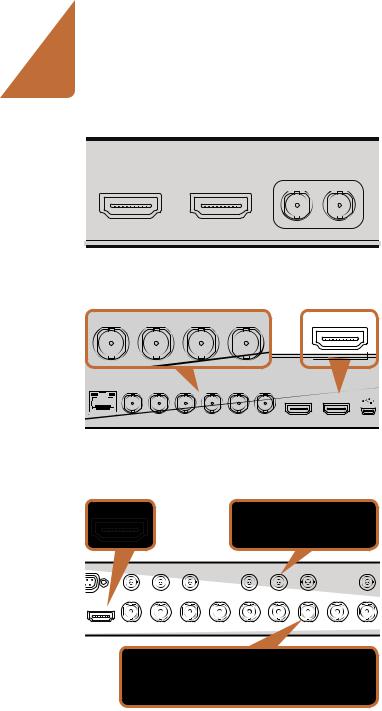
HyperDeck Shuttle HDMI and SDI outputs.
LOOP OUT |
OUT 1 |
OUT 2 |
MON OUT |
|
OUT |
|
|
|
|
|
MI |
IN |
LOOP OUT |
OUT 2 |
MON OUT |
REF IN |
|
|
|
|
|
IN |
OUT |
ETHERNET |
|
SD/HD/3GHD-SDI |
|
|
HDMI |
HyperDeck Studio SDI and HDMI outputs. SDI outputs include a Loop Out and a Monitor output.
|
OUT |
|
|
Y OUT |
|
B-Y OUT |
R-Y OUT |
TE |
B-Y IN |
R-Y IN |
|
Y OUT |
B-Y |
|
REF IN |
|
IN B |
IN C |
IN D |
OUT A |
OUT B |
OUT C |
OUT D MON OUT |
|
OUT |
|
|
|
|
|
|
MI |
SD/HD/3G/6G-SDI IN |
|
|
|
OUT |
|
|
|
OUT A |
OUT B |
|
OUT C |
|
OUT D |
MON OUT |
Connecting Video Outputs
HyperDeck features outputs for monitoring or connecting to additional recording units. All outputs are active, so you can record and monitor simultaneously.
HyperDeck Shuttle
Connect either an SDI or HDMI cable to their respective outputs. You may need a DIN 1.0/2.3 to BNC adapter cable for outputting SDI. Both outputs are active, so you can view your recording on both an SDI monitor and an HDMI monitor simultaneously.
HyperDeck Studio
Connect an SDI cable to the Loop Out port if you want to connect to another HyperDeck for redundant recording or to the Monitor output if you want to connect an SDI monitor. You can also connect additional SDI equipment to the SDI outputs such as additional recorders or monitors.
HyperDeck Studio Pro
Connect SDI, HDMI or component analog cables to their respective outputs. If you want to output Ultra HD 4K over 6G-SDI, use Output A. HDMI also supports Ultra HD 4K. For SD/HD-SDI monitoring, connect to the Monitor output. You can also send analog timecode via the XLR timecode output.
Congratulations! You are now ready to start recording!
HyperDeck Studio Pro HDMI, analog component and SDI outputs plus Monitor Out.
8 Getting Started
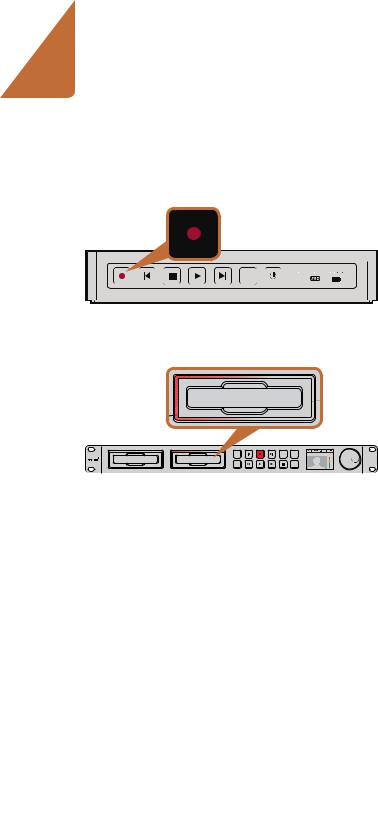
The record button lights up red when HyperDeck Shuttle is recording video.
SSD 2
REM 01:42:56:12
SET |
JOG |
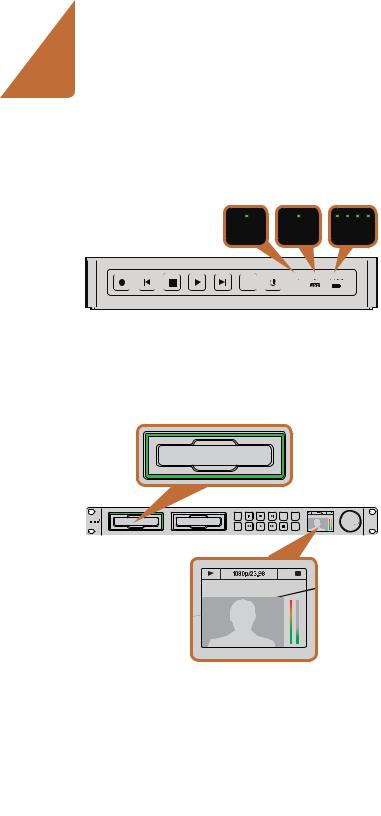
SSD slots on HyperDeck Studio models have rotating LEDs to show the unit is recording video.
Recording Video
HyperDeck ships ready to record immediately without having to configure any settings. All you need is a recommended SSD formatted in the HFS+ or exFAT format. If HyperDeck records from a video source that contains closed caption data, the QuickTime or MXF movie will be recorded as well as a separate .MCC file containing the closed caption data.
Recording Video with HyperDeck Shuttle
Step 1. Insert your formatted SSD. As HyperDeck Shuttle reads the disk, the SSD light will illuminate. When the light goes off, HyperDeck Shuttle is ready to record.
Step 2. HyperDeck Shuttle automatically detects whether SDI or HDMI is connected. The Video status LED lights up when a valid video signal is detected.
Step 3. Press the Record button and the SSD light will flash to indicate SSD activity. If the Stop button starts flashing while recording, there are only 3 minutes of recording time left on the SSD. Make sure you have another empty SSD ready so you don’t miss the next take.
Step 4. Press the Stop button to finish recording.
Recording Video with HyperDeck Studio Models
Step 1. Insert your formatted SSD into either SSD slot. The slot light will illuminate green as HyperDeck reads the disk. When the slot light goes off, HyperDeck Studio is ready to record.
Step 2. Press the INPUT button once while the stop button is illuminated to preview the video source on the LCD before recording. If you don’t see the video you want, press INPUT again to switch inputs.
Step 3. Press the record button to start recording to the SSD instantly. A looping red light on the SSD slot indicates the SSD is recording. During recording, you can press and hold the record button to switch recording from one SSD to the other instantly.
Step 4. Press the Stop button to finish your recording.
If the record button flashes, this means the disk is not fast enough and recording cannot keep up. We recommend you change to a compressed recording format such as ProRes or DNxHD, or use a faster recommended SSD for uncompressed or Ultra HD 4K recording.
9 Getting Started
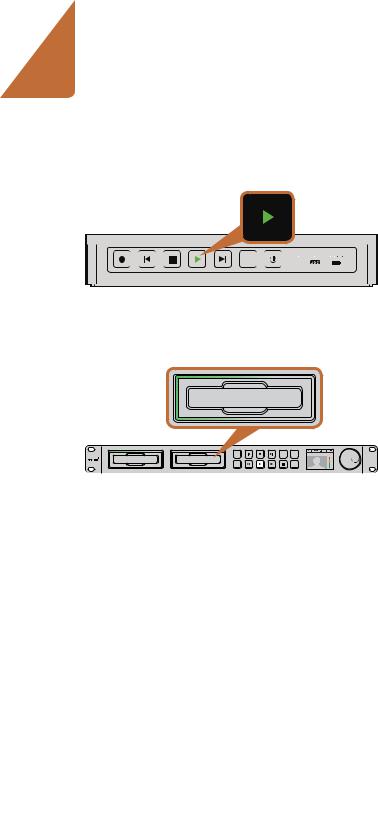
The play button lights up green when HyperDeck Shuttle is in playback mode.
SSD 2
REM 01:42:56:12
SET |
JOG |
SSD slots on HyperDeck Studio models have rotating LEDs to show the unit is in playback mode.
Playing Video
The controls of HyperDeck work just like a CD player, so playing back clips is simple and instantaneous. If you play back a video clip that has an associated .MCC file, the closed caption data will be played out with the video via the SDI output of your HyperDeck.
Playing Video with HyperDeck Shuttle
Step 1. Press the Stop button once to stop recording.
Step 2. Press Stop again to switch HyperDeck Shuttle to playback mode.
Step 3. Press Play and you'll see your video on any displays connected to the SDI and HDMI outputs. When a clip is playing, pressing Play again will loop it continuously.
Step 4. To skip to the next clip, press the next clip button on the shuttle controls. Press previous clip once to go to the start of the current clip or press twice to skip back to the start of the previous clip.
Playing Video with HyperDeck Studio models
Step 1. Press the Stop button once to stop recording.
Step 2. Press the play button once for instant playback and you'll see your video on any displays connected to the SDI and HDMI outputs. When a clip is playing, pressing Play again will loop it continuously.
Step 3. To skip to the next clip, press the next clip button on the shuttle controls.
Step 4. Press previous clip once to go to the start of the current clip or press twice to skip back to the start of the previous clip.
If the play button flashes, this means the disk is not fast enough and playback cannot keep up. We recommend you change to a compressed recording format such as ProRes or DNxHD, or use a faster recommended SSD for uncompressed or Ultra HD 4K recording.
Congratulations! Your HyperDeck is now up and running. Please continue to the next sections of this manual for more information on what you can do with your HyperDeck.
10 Using HyperDeck
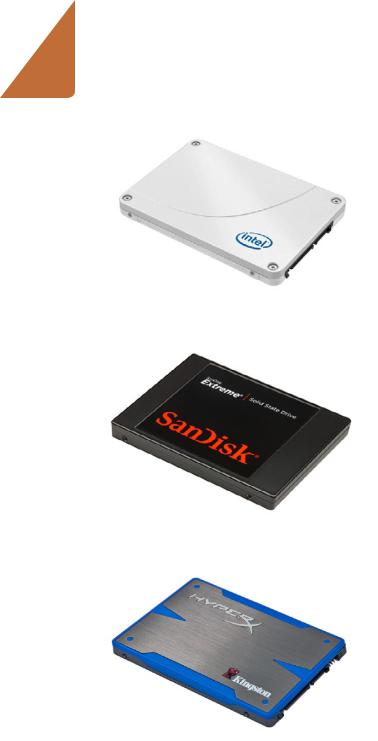
Intel 335 Series 240GB SSD
Sandisk Extreme 480GB SSD
Using HyperDeck
About SSDs
Choosing a Fast SSD
When working with high data rate video it's important to carefully check the SSD you would like to use. This is because some SSDs can have up to 50% lower write speed than the manufacturer’s claimed speed, so even though the disk specifications claim an SSD is fast enough to handle video, in reality the disk is not fast enough for real time video recording. Hidden data compression mostly affects recording and often these disks can still be used for real time playback.
In our testing, we have found larger newer models of SSD and larger capacity SSDs are generally faster. SSDs recommended for use with HyperDeck for uncompressed 10 Bit HD and ProRes Ultra HD 4K video recording include:
Crucial 512GB M4 (firmware 009 only)
Digistor – 128GB SSD Professional Video ExtremeDigistor – 240GB SSD Professional Video SeriesDigistor – 480GB SSD Professional Video SeriesIntel 335 Series 240GB SSD
Intel 520 Series 240GB SSD
Intel 520 Series 480GB SSD
Kingston 120GB SSDNow V+200
Kingston 240GB SSDNow V+200Kingston HyperX 240GB
OCZ 240GB Deneva 2 (firmware 2.22)OCZ 240GB Vertex 3
OCZ 480GB Vertex 3
OWC Mercury Extreme Pro 6G SSD
PNY 240GB Prevail SSD (firmware 5.0.2)Sandisk Extreme 480GB
Please check the tech notes on the Blackmagic Design website for the latest information.
If you find an SSD that isn’t fast enough for uncompressed HD video or Ultra HD 4K, try a faster SSD or use HyperDeck Utility to switch to a compressed recording format such as ProRes or DNxHD. These recording formats have a much lower data rate and are easier for the SSD to handle.
Kingston HyperX 240GB SSD
11 Using HyperDeck
Use Disk Utility on Mac OS X to erase your SSD in the
Mac OS Extended (Journaled) or exFAT format.
Use the Format dialog box feature in Windows to format your SSD in the exFAT format.
Preparing SSDs for HyperDeck
SSDs used by HyperDeck must be formatted as either HFS+ or exFAT. These disk formats allow long clips to be recorded in single files.
HFS+ is also known as Mac OS Extended. It is the recommended format for HyperDeck as it supports "journaling". In the event of a hardware or software malfunction, data on a journaled SSD is more quickly recovered and less likely to be corrupted in the first place. HFS+ is natively supported by Mac OS X.
ExFAT is supported natively by Mac OS X and Windows without needing to purchase any additional software. However exFAT does not support journaling which means data is more prone to corruption, and less likely to be recovered in the event of a hardware or software malfunction.
Preparing SSDs on a Mac OS X computer
The Disk Utility application included with Mac OS X can format a drive in the HFS+ or exFAT formats. Make sure you back up anything important from your SSD as you will lose everything on it when it is formatted.
Step 1. Connect the SSD to your computer with an external dock or cable adapter and dismiss any message offering to use your SSD for Time Machine backups.
Step 2. Go to Applications/Utilities and launch Disk Utility.
Step 3. Click on the disk icon of your SSD and then click the Erase tab.
Step 4. Set the Format to Mac OS Extended (Journaled) or exFAT.
Step 5. Type a Name for the new volume and then click Erase. Your SSD will quickly be formatted and made ready for use with HyperDeck.
Preparing SSDs on a Windows computer
The Format dialog box can format a drive in the exFAT format on a Windows PC. Make sure you back up anything important from your SSD as you will lose everything on it when it is formatted.
Step 1. Connect the SSD to your computer.
Step 2. Open the Start Menu or Start Screen and choose Computer. Right-click on your SSD.
Step 3. From the contextual menu, choose Format.
Step 4. Set the file system to exFAT and the allocation unit size to 128 kilobytes.
Step 5. Type a volume label, select Quick Format and click Start.
Step 6. Your SSD will quickly be formatted and made ready for use with HyperDeck.
12 Using HyperDeck
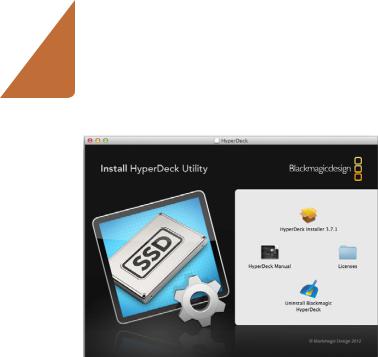
HyperDeck Utility
Blackmagic HyperDeck Utility is used to change settings and update the internal software in your HyperDeck. In addition to installing HyperDeck Utility, uncompressed 10 bit codecs are installed for Mac and Windows. The HyperDeck Installer software also installs Blackmagic System Preferences, which allow your favorite video editing software to perform live capture from HyperDeck Studio Pro via Thunderbolt.
Blackmagic system preferences provide a central location so you don't need to configure the same software settings in each video application that you use.
On Mac OS X, open the System Preferences and click the Blackmagic Design icon. When using HyperDeck Studio Pro, settings are grayed out and the main use of the Blackmagic system preferences is to tell you which version of Desktop Video software is installed for video capture via a Thunderbolt port.
When other Blackmagic video capture hardware is connected to your computer, additional settings may be available.
How to Update Your HyperDeck Software on Mac OS X
Step 1. Download and unzip the HyperDeck Utility software.
Step 2. Open the resulting disk image and launch the HyperDeck Installer. Follow the onscreen instructions.
Step 3. After installing the latest Blackmagic HyperDeck Utility, connect a USB cable from HyperDeck to your computer.
Step 4. Launch Blackmagic HyperDeck Utility and follow any onscreen prompt to update the internal software in your HyperDeck. If no prompt appears, the internal software is up to date and there is nothing further you need to do.
How to Update Your HyperDeck Software on Windows
Step 1. Download and unzip the HyperDeck Utility software.
Step 2. You should see a HyperDeck Utility folder containing this manual and the HyperDeck Utility installer. Double-click the installer and follow the onscreen prompts to complete the installation.
Step 3. After installing the latest Blackmagic HyperDeck Utility, connect a USB cable from HyperDeck to your computer.
Step 4. Launch Blackmagic HyperDeck Utility and follow any onscreen prompt to update the internal software in your HyperDeck. If no prompt appears, the internal software is up to date and there is nothing further you need to do.

13 Using HyperDeck
Selecting your recording and playback format. HyperDeck Studio Pro includes additional ProRes codecs.
HyperDeck Shuttle USB port
LOOP OUT |
OUT 1 |
OUT 2 |
MON OUT |
REF IN |
|
|
|
|
|
IN |
OUT |
|
SD/HD/3GHD-SDI |
|
|
|
HDMI |
HyperDeck Studio USB port
HDMI |
SD/HD/3G/6G-SDI IN |
Selecting Your Video Format in HyperDeck Utility
All current HyperDeck models let you select from a choice of uncompressed and compressed video formats. The original HyperDeck Shuttle exclusively records uncompressed video.
HyperDeck can record 10 bit uncompressed QuickTime files on a fast SSD, or to a compressed format if you have a slower SSD or want to fit longer high definition recordings on a single SSD. This means if you have used the HyperDeck Utility software to change the recording format, it is possible to have uncompressed QuickTime files as well as compressed files on the same disk.
Working with uncompressed video is exciting as there is simply no better quality. However, if compressed video better suits your workflow, or if you need to fit more video on a SSD, you can choose a high quality professional compressed video format which is also perfect for editing.
HyperDeck Studio Pro records Ultra HD 4K video using Apple ProRes codecs, which are high quality compressed codecs designed for post production.
To choose a video format:
Step 1. Connect HyperDeck to your computer via USB.
Step 2. Launch HyperDeck Utility. Your HyperDeck model will be named in the title bar of the utility.
Step 3. Set the recording format from the dropdown menu and save the setting.
All subsequent clips will be recorded in the chosen format.
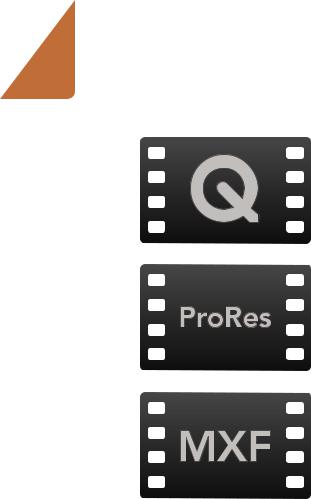
Setting the recording format also sets the playback format. For example, if you want to play back an uncompressed 10 Bit QuickTime file, set the recording format to Uncompressed 10 Bit QuickTime. Setting Avid DNxHD as the recording format lets you play DNxHD QuickTime and MXF clips, and by selecting Apple ProRes you can play clips using any of the ProRes codecs.
ProRes codecs include:
ProRes 422 (HQ) - For the highest quality compression at the maximum ProRes data rate.
ProRes 422 - For extremely high quality compression using a low ProRes data rate.
ProRes 422 LT - For high quality compression at a lower ProRes data rate.
ProRes 422 (Proxy) - For high quality offline compression at the lowest ProRes data rate.
ProRes clips will play back using the compression quality they were recorded in.
HyperDeck Studio Pro USB port
14 Using HyperDeck
SD (720x480)
HD (1920x1080)
Ultra HD 4K (3840x2160)
Ultra HD 4K is 4 times the resolution of HD.
Video In |
4K SDI Out |
4K SDI Out
 Single 6G-SDI
Dual 3G-SDI
Quad HD-SDI
Video In |
4K SDI Out |
4K SDI Out
 Single 6G-
Dual 3G-SDI
Quad HD-SDI
Choose between single link 6G-SDI, dual link 3G-SDI or quad link HD-SDI for Ultra HD 4K playback.
About Ultra HD 4K
With four times as many pixels as full HD 1080p, Ultra HD 4K is the new standard for high resolution video. This means you get 3840 x 2160 pixel resolution, allowing you the greatest creative control for pixel perfect compositing, VFX work, color grading as well as the ability to project onto large displays for digital signage and cinema projections.
HyperDeck Studio Pro features 6G-SDI technology, which is easily fast enough to handle Ultra HD 4K playback to the latest 4K monitors. Previously you would have required 4 separate cables to get Ultra HD resolution over SDI, but now with the amazing data rate 6G-SDI offers, you can get Ultra HD 4K video over a single cable!
Setting Up Ultra HD 4K Recording
HyperDeck Studio Pro records Ultra HD 4K straight to the Apple ProRes codec. ProRes is the most user friendly codec because it is QuickTime based, so your Ultra HD 4K footage can be imported to any QuickTime compatible software. See the previous page for a description of each available ProRes codec.
Step 1. Connect your Ultra HD 4K source to SDI or HDMI inputs. The SDI inputs will automatically detect if you are connecting via single link 6G-SDI, dual link 3G-SDI or quad link HD-SDI.
Step 2. Press the DISP button on the front of HyperDeck Studio Pro. Use the jog/shuttle wheel to select Record. Press the SET button and use the jog/shuttle wheel to select Codec. Press the SET button and use the jog/shuttle wheel to select ProRes HQ. Press the SET button.
Step 2. Press the INPUT button once while the stop button is illuminated to preview the video source on the LCD before recording.
Step 3. Press the record button to start recording your Ultra HD 4K source.
Setting Up Ultra HD 4K Playback
You can set the output through which HyperDeck Studio Pro will playback Ultra HD 4K with the Display menu on the LCD:
Step 1. Press the DISP button on the front of HyperDeck Studio Pro.
Step 2. Press the SET button to enter the Video menu.
Step 3. Use the jog/shuttle wheel to select 4K SDI Out. Press SET to enter the menu and scroll between Single 6G-SDI, Dual 3G-SDI or Quad HD-SDI. Press SET to confirm your selection.
Step 4. Press the DISP button to exit back to your video feed.
15 Using HyperDeck
Accessing Your Clips
To access your clips, simply connect the SSD to your computer using an SSD dock. You can either drag the files from the SSD directly to a local hard drive, or you can work directly from the SSD. You can also connect the SSD to your computer with a 2.5" eSATA to USB cable adapter, however this won't be fast enough to handle working directly from the SSD and is really only recommended as a portable solution for getting your video files off the SSD and onto a laptop.
Mac OS X
QuickTime is built into Mac OS X. Apple ProRes and uncompressed QuickTime movies recorded by
HyperDeck can be opened in almost any video software on Mac OS X.
DNxHD MXF files recorded by HyperDeck can be opened with Avid Media Composer and DaVinci
Resolve for Mac.
MCC closed caption data files recorded by HyperDeck can be opened with MacCaption software for
Mac OS X from http://www.cpcweb.com.
Windows
Apple ProRes and uncompressed QuickTime movies recorded by HyperDeck require QuickTime to be installed on your PC. Almost any video software on Windows that supports QuickTime can open movies recorded by HyperDeck. QuickTime for Windows can be downloaded free from http://www.apple.com/quicktime/download/.
DNxHD MXF files recorded by HyperDeck can be opened with Avid Media Composer and DaVinci
Resolve for Windows.
MCC closed caption data files recorded by HyperDeck can be opened with CaptionMaker software for Windows from http://www.cpcweb.com.
16 Using HyperDeck
Status indicators on HyperDeck Shuttle tell you whether your SSD is formatted correctly, whether a video signal is detected and how much battery power is left.
|
|
|
SSD 2 |
DISP |
INPUT |
REM |
01:42:56:12 |
SET |
|
|
|
SSD 2
01:42:56:12
The SSD slots on HyperDeck Studio models indicate if an SSD is formatted correctly and whether the unit is in recording or playback mode. The LCD on HyperDeck Studio models shows your video as well as status information.
Status Indicators
When recording or playing video with HyperDeck, any information you need to know is displayed on the unit itself. HyperDeck Shuttle's backlit buttons and LEDs provide vital information such as when your disk is nearly full and the remaining battery life, whereas HyperDeck Studio models display information on a LCD.
HyperDeck Shuttle
SSD Indicator
When you first switch on HyperDeck Shuttle, or any time you insert an SSD, the SSD indicator will light up while checking the SSD and then switch off. If the SSD has not been formatted correctly, or fails to work, the SSD indicator will illuminate solid red until the SSD is removed. Check if the SSD is formatted correctly and also check that it works with a computer.
Video Indicator
The VIDEO indicator lights up when a video signal is detected by HyperDeck Shuttle.
Battery Indicator
The four green battery indicators display the internal battery charge level. When all the LEDs go off, there’s approximately 4 minutes of battery power left. So you should plug in your external power source or switch to another charged HyperDeck Shuttle.
HyperDeck Studio Models
SSD Slot
When you first power on HyperDeck, or any time you insert an SSD, the SSD slot will light up while checking the SSD and then switch off. If the SSD has not been formatted correctly, or fails to work, the SSD slot will illuminate solid red until the SSD is removed. Check if the SSD is formatted correctly and also check that it works with a computer.
LCD
HyperDeck Studio models feature an LCD that not only shows your video but also displays status information such as video format and frame rate, record, playback and jog modes, the active SSD slot as well as timecode and audio levels.
17 Using HyperDeck
Codec Codec
Record |
Uncomp 10-bit |
|
Trigger |
ProRes HQ |
|
|
|
|
|
ProRes |
|
|
ProRes LT |
|
|
ProRes Proxy |
|
Codec Codec
Record |
Uncomp 10 |
|
Trigger |
ProRes HQ |
|
|
ProRes |
|
|
ProRes LT |
|
|
ProRes Proxy |
|
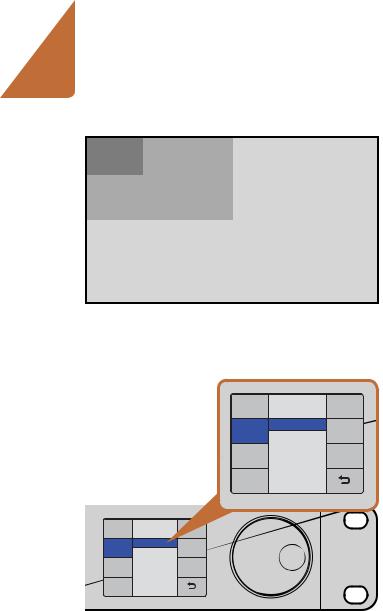
You can use the DISP menu on HyperDeck Studio models to select between recording in uncompressed, ProRes or DNxHD. HyperDeck Studio Pro includes four ProRes codecs.
Using the Display Menu on HyperDeck Studio Models
On HyperDeck Studio models you can use the Display menu to change your video and audio inputs and outputs as well as any settings changes you would make in the HyperDeck Utility such as trigger recording, timecode source and your chosen recording codec.
Step 1. Press the DISP button to bring up the main menu.
Step 2. Use the jog/shuttle wheel on the front of HyperDeck to highlight different options.
Step 3. Press the SET button to confirm a selection.
Step 4. To return to a previous menu, scroll to the return arrow and press SET.
Step 5. Press the DISP button to exit.
Selecting Timecode Source
When recording from HD-SDI video sources that provide embedded SMPTE RP 188 metadata, you can record the embedded timecode from the video source instead of using timecode generated by your HyperDeck.
To set this on HyperDeck Studio models using the Display menu:
Step 1. Press the DISP button to bring up the main menu.
Step 2. Scroll to the Timecode menu and press SET.
Step 3. Press SET to enter the Timecode Source menu and select Input.
Step 4. Press SET to confirm your selection.
It might be necessary to turn on the RP 188 setting in your camera before HyperDeck will be able to record the timecode.
18 Using HyperDeck
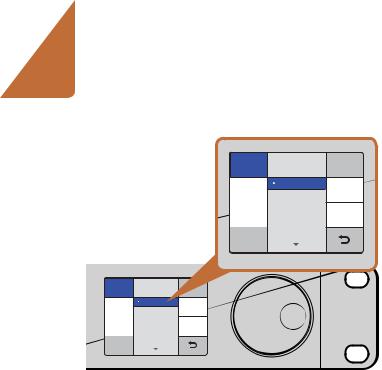
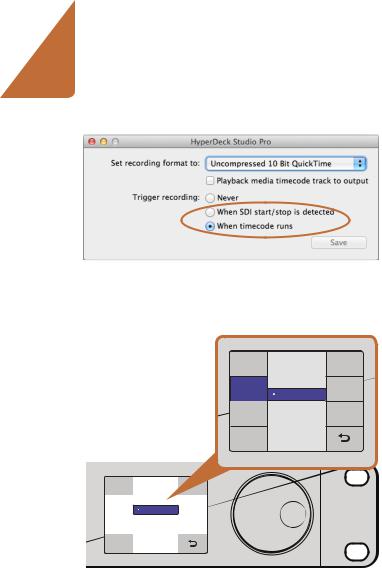
Use the HyperDeck Utility to enable Start/Stop Recording.
Codec |
Record Trigger |
Record |
None |
Trigger |
SDI Start/Stop |
|
|
|
Timecode Run |
Codec |
Record Trigger |
|
|
None |
|
Record |
|
|
Trigger |
SDI Start/Stop |
|
|
Timecode Run |
|
|
|
|
|
|
|
You can use the DISP menu on HyperDeck Studio models to select the different options for trigger recording.
SDI Start/Stop Recording
HyperDeck supports start/stop recording, which means when you press the record button on an HD-SDI camera, HyperDeck will start recording without also having to press the record button on your HyperDeck disk recorder.
To set up start/stop recording for supported cameras:
Step 1. You will need a camera that can trigger the record function of HyperDeck via HD-SDI. Cameras which support trigger recording via HD-SDI may include menu options such as "Trigger REC", "HD-SDI Remote I/F" or "SDI Remote Start/Stop Trigger".
Step 2. In HyperDeck Utility, set Trigger recording to "When SDI start/stop is detected".
Step 3. If using HyperDeck Studio models, press the REM button after setting SDI start/stop recording in HyperDeck Utility. The REM button must be illuminated on the unit to allow trigger recording.
To set this on HyperDeck Studio models using the Display menu:
Step 1. Press the DISP button to bring up the main menu.
Step 2. Scroll to the Record menu and press SET.
Step 3. Scroll to the Record Trigger menu and press SET.
Step 4. Select SDI Start/Stop and press SET to confirm your selection. Press DISP to exit.
Step 5. Press the REM button. The REM button must be illuminated on the unit to allow trigger recording.
19 Using HyperDeck
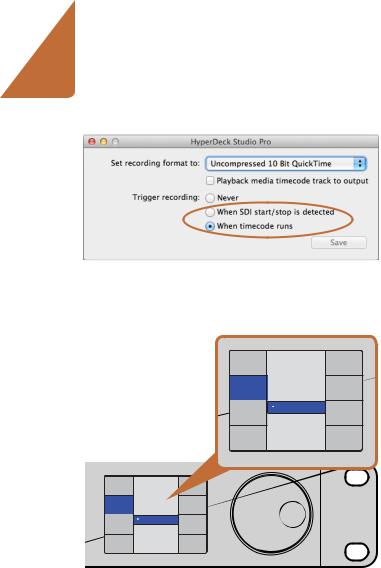
Use the HyperDeck Utility to enable Timecode Run recording.
Codec |
Record Trigger |
Record |
None |
Trigger |
SDI Start/Stop |
|
|
|
Timecode Run |
Codec |
Record |
Record |
None |
Trigger |
SDI Start/Stop |
|
|
|
Timecode Run |
Use the DISP menu on HyperDeck Studio models to set Timecode Run recording.
Timecode Run Recording
HyperDeck also supports timecode run recording, which is similar to start/stop recording, but is only used if your HD-SDI camera does not support trigger recording via HD-SDI.
To set up timecode run recording:
Step 1. Go into your camera's timecode settings and change them from "free run timecode" to "record run timecode".
Step 2. In HyperDeck Utility, set Trigger recording to "When SDI timecode runs".
Step 3. If using HyperDeck Studio, press the REM button after setting Timecode Run Recording in HyperDeck Utility. The REM button must be illuminated on the unit to allow trigger recording.
To set this on HyperDeck Studio models using the Display menu:
Step 1. Press the DISP button to bring up the main menu.
Step 2. Scroll to the Record menu and press SET.
Step 3. Scroll to the Record Trigger menu and press SET.
Step 4. Select Timecode Run and press SET to confirm your selection. Press DISP to exit.
Step 5. Press the REM button. The REM button must be illuminated on the unit to allow trigger recording.
Now whenever your HyperDeck detects the timecode running via HD-SDI it will start recording. Recording will stop whenever the timecode stops.
Be careful if your HyperDeck is connected to the SDI output of a video router, as any change to the video source might cause HyperDeck to start recording unexpectedly due to a change in timecode being detected via HD-SDI.

20 Using HyperDeck
|
SSD 2 |
DISP |
01:42:56:12 |
SET |
JOG |
The fast forward button on the front of HyperDeck Studio models lights up when fast forwarding through clips.
REF IN
IN |
LOOP OUT |
OUT 1 |
OUT 2 |
MON OUT |
REF IN |
|
|
|
|
|
|
IN |
OUT |
ETHERNET |
|
SD/HD/3GHD-SDI |
|
|
|
HDMI |
Reference input on HyperDeck Studio.
Shuttling with HyperDeck Shuttle
During playback, press and hold the Previous Clip or Next Clip button to rewind or fast forward at 2x speed. Press the Previous Clip or Next Clip button again and the speed will increase to 4x and then 8x. Once you’ve found the section you want to review, press Play and playback will resume at normal speed.
Jog and Shuttle with HyperDeck Studio Models
During playback, press the reverse or fast forward button to play through the clip at 2x speed. Press the reverse or fast forward button again and the speed will increase to 4x and then 8x. Once you’ve found the section you want to review, press play to resume normal playback.
You can also use the Jog/Shuttle Wheel to shuttle to a particular section at variable speeds. The more you turn it forwards or backwards, the faster your HyperDeck Studio will play through your video. Once you’ve found the section you want to review, press play to resume normal playback.
If you want to slowly jog through your video frame by frame, press the JOG button once to enable jog operation. Turning the jog/shuttle wheel in the desired direction will then jog through your video. Pressing the JOG button again will return the wheel to shuttle operation.
Ref Input
HyperDeck Studio and HyperDeck Studio Pro feature a Reference input, which accepts blackburst and tri-level sync signals from a sync generator. Connect a reference source to this input if you want to synchronize HyperDeck with other video equipment, such as a production switcher.
21 Using HyperDeck
5 4 3 2 1
|
9 |
8 |
7 |
6 |
|
|
|
|
|
|
|
|
|
|
|
Receive |
Receive |
|
Transmit |
|
Transmit |
Ground |
|
(–) |
(+) |
|
|
(–) |
|
(+) |
Pins |
|
|
|
|
|
|
|
|
2 |
7 |
|
|
8 |
|
3 |
1, 4, 6, 9 |
|
|
|
|
|
|
|
|
RS-422 remote pin connections.
REMOTE
|
IN |
LOOP OUT |
OUT 1 |
O |
REMOTE |
ETHERNET |
|
SD/HD/3GHD-SDI |
|
Remote port on HyperDeck Studio
HDMI
 SD/HD/3G/6G-SDI IN
RS-422 Control
What is RS-422 Control?
The RS-422 standard is commonly supported by NLE hardware and software and allows video players and recorders to be remotely controlled by an external RS-422 controller or capture device. You can remotely control HyperDeck Studio models using your favorite NLE software and video capture hardware to remotely capture, batch capture and play back video with your HyperDeck Studio. All you need to do is connect an RS-422 cable from your capture device to HyperDeck Studio and press the REM button to enable remote deck control.
Using an External RS-422 Controller
Both HyperDeck Studio models feature an industry standard Sony™ compatible RS-422 deck control port, which has the correct pin connections for a direct connection to any remote controller with RS-422.
You can use pre-manufactured 9 pin cables as long as each end of the cable is wired “pin for pin” where the same pin numbers on each end of the cable are connected together. If you would like to make custom cables, please refer to the accompanying wiring diagram.
You can remotely control your HyperDeck Studio from an RS-422 controller instead of locally pushing buttons.
Step 1. Connect a video signal to an SDI or HDMI video input of your HyperDeck Studio.
Step 2. Connect an RS-422 cable from your external controller to your HyperDeck Studio.
Step 3. Press the REM button to enable remote deck control.
You can now remotely start and stop recording and playback of your HyperDeck Studio as well as performing other common jog and shuttle functions. The full list of supported RS-422 commands is in the following section named "Supported RS-422 Commands".
Remote port on HyperDeck Studio Pro

22 Using HyperDeck
REM
|
|
|
SSD 2 |
DISP |
INPUT |
REM |
01:42:56:12 |
SET |
|
JOG |
|
Press the REM button on HyperDeck Studio models to enable RS-422 deck control.
Codec |
Record Trigger |
Record |
None |
Trigger |
SDI Start/Stop |
|
|
|
Timecode Run |
Codec |
Record |
Record |
None |
Trigger |
SDI Start/Stop |
|
|
|
Timecode Run |
For crash recording, set trigger recording to "When SDI timecode runs" in the DISP menu.
Daisy-chaining for Crash Recording
You can simultaneously record the same SDI video signal to multiple HyperDeck Studios. Press the REM button on each HyperDeck Studio to enable remote deck control. Each HyperDeck Studio can be set to record in a compressed or uncompressed video format using HyperDeck Utility.
Step 1. Connect a video signal to the SDI video input of the first HyperDeck Studio in the chain.
Step 2. If you are working entirely in high definition, connect a single channel RS-422 controller to the first HyperDeck Studio in the chain. RP188 timecode will be sent over SDI to every other HyperDeck in the chain. If working with standard definition video, you will need a multiple channel RS-422 controller connected to each HyperDeck Studio in your chain via RS-422.
Step 3. Connect an SDI cable from the SDI Loop output on the first HyperDeck Studio to the second HyperDeck Studio's SDI input. Repeat this for however many HyperDeck Studios you want to daisy-chain together.
Step 4. On the first HyperDeck Studio, press the DISP button. Scroll down to Record and press SET. In the record menu, scroll to Record Trigger and press SET. Scroll to Timecode Run and press SET.
Step 5. Press the DISP button to exit the record menu. All connected HyperDeck Studios will record the same video signal simultaneously.
You can now use your external RS-422 controller to set multiple HyperDeck Studios to remotely crash record the same video signal.

23 Using HyperDeck
Supported RS-422 Commands
|
|
Command |
Reply |
No Remote |
Notes |
|
|
|
|
|
|
|
|
0 - System Control |
|
|
|
|
|
|
|
|
|
|
|
|
|
|
|
|
NTSC: 0xF0E0 |
|
|
|
0x00 |
0x11 |
DeviceTypeRequest |
PAL: 0xF1E0 |
Enabled |
|
|
|
|
|
24P: 0xF2E0 |
|
|
|
1 - Slave Response |
|
|
|
|
|
|
|
|
|
|
|
|
|
0x20 |
0x00 |
Stop |
Acknowledge |
Disabled |
|
|
0x20 |
0x01 |
Play |
Acknowledge |
Disabled |
|
|
0x20 |
0x02 |
Record |
Acknowledge |
Disabled |
|
|
0x20 |
0x10 |
FastFwd |
Acknowledge |
Disabled |
|
|
0x21 |
0x11 |
JogFwd1 |
Acknowledge |
Disabled |
|
|
0x22 |
0x11 |
JogFwd2 |
Acknowledge |
Disabled |
Treated as N=1; |
|
Same as JogFwd1 |
||||||
|
|
|
|
|
||
0x21 |
0x12 |
VarFwd1 |
Acknowledge |
Disabled |
Uses ShuttleFwd1 |
|
0x22 |
0x12 |
VarFwd2 |
Acknowledge |
Disabled |
Treated as N=1; |
|
Same as VarFwd1 |
||||||
|
|
|
|
|
||
0x21 |
0x13 |
ShuttleFwd1 |
Acknowledge |
Disabled |
|
|
0x22 |
0x13 |
ShuttleFwd2 |
Acknowledge |
Disabled |
Treated as N=1; |
|
Same as ShuttleFwd1 |
||||||
|
|
|
|
|
||
0x20 |
0x20 |
Rewind |
Acknowledge |
Disabled |
|
|
0x21 |
0x21 |
JogRev1 |
Acknowledge |
Disabled |
|
|
0x22 |
0x21 |
JogRev2 |
Acknowledge |
Disabled |
Treated as N=1; |
|
Same as JogRev1 |
||||||
|
|
|
|
|
||
0x21 |
0x22 |
VarRev1 |
Acknowledge |
Disabled |
Uses ShuttleRev1 |
|
0x22 |
0x22 |
VarRev2 |
Acknowledge |
Disabled |
Treated as N=1; |
|
Same as VarRev1 |
||||||
|
|
|
|
|
||
0x21 |
0x23 |
ShuttleRev1 |
Acknowledge |
Disabled |
|
|
0x22 |
0x23 |
ShuttleRev2 |
Acknowledge |
Disabled |
Treated as N=1; |
|
Same as ShuttleRev1 |
||||||
|
|
|
|
|
||
0x20 |
0x30 |
Preroll |
Acknowledge |
Disabled |
|
|
0x24 |
0x31 |
CueData |
Acknowledge |
Disabled |
|
|
0x20 |
0x34 |
SyncPlay |
Acknowledge |
Disabled |
|
|
|
|
|
|
|
|
Loading...