

Page 1
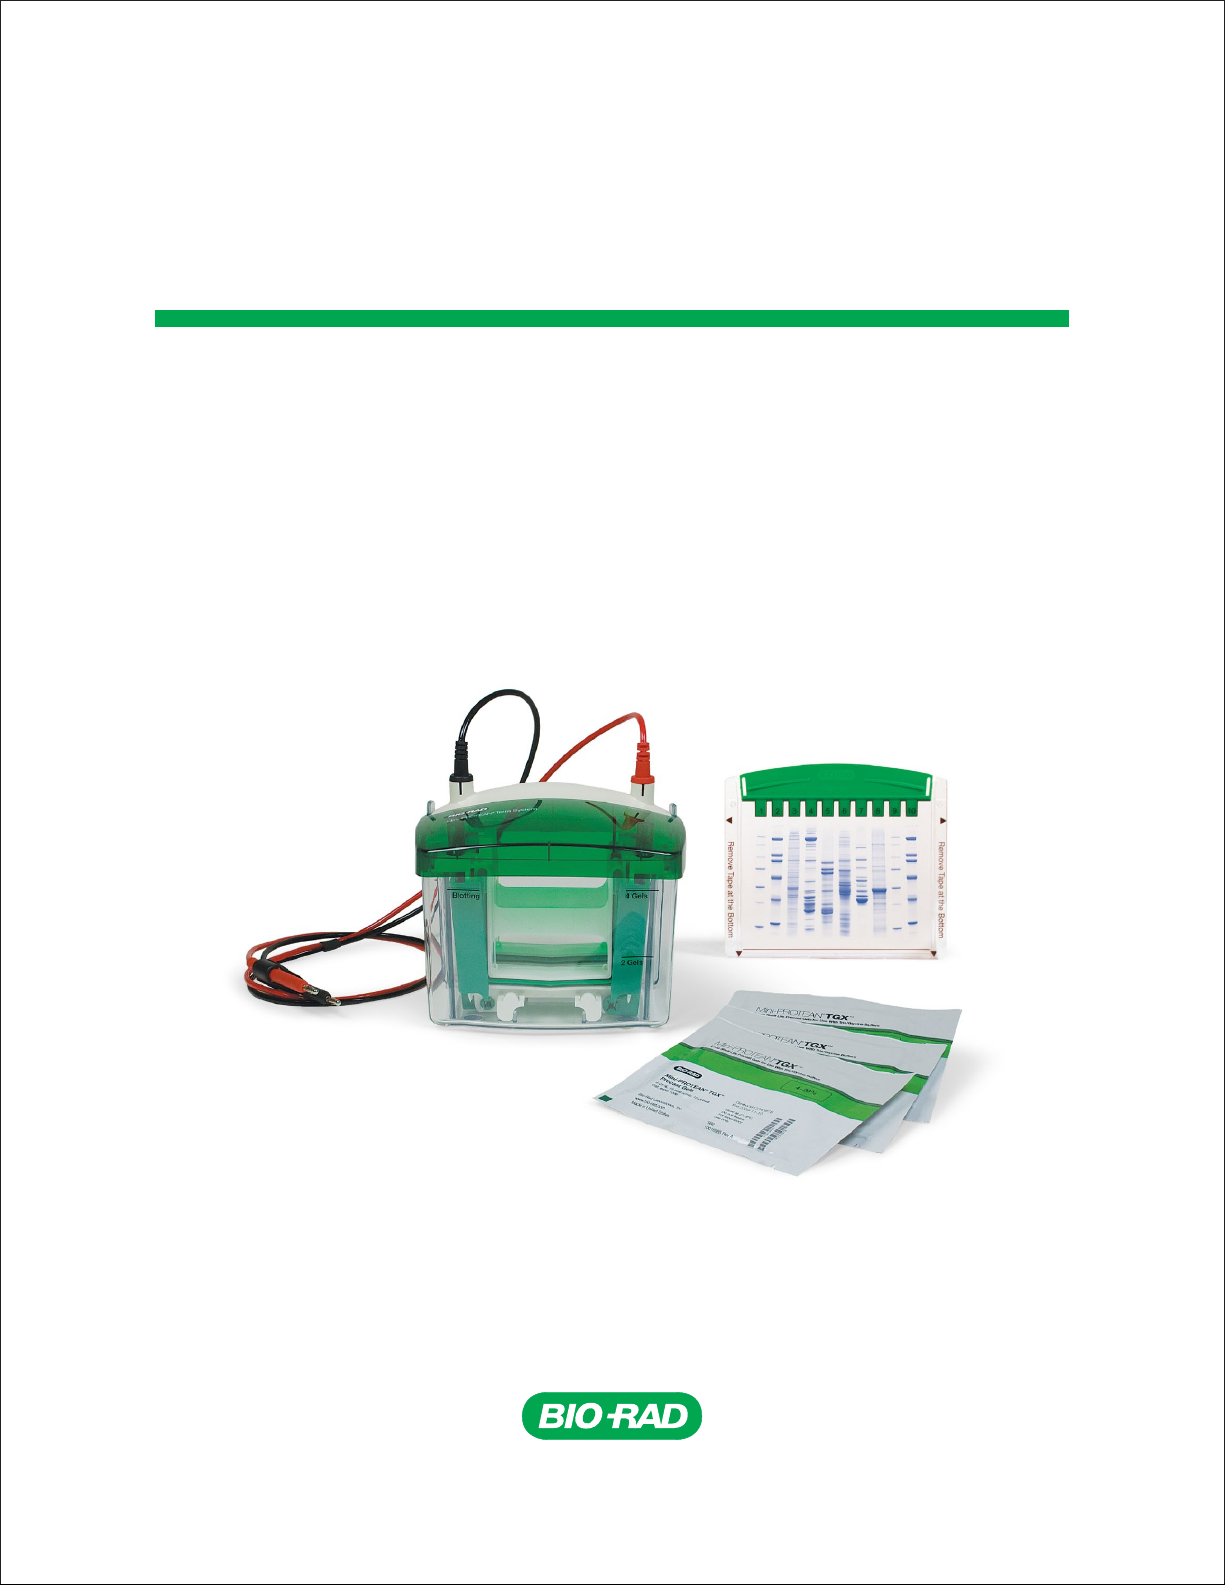
Mini-PROTEAN® Precast Gels
Instruction Manual and Application Guide
Page 2

Bio-Rad Technical Support
For help and technical advice, please contact the Bio-Rad Technical Support department. In the United States, the Technical
Support department is open Monday–Friday, 5:00 am–5:00 pm, Pacific Time.
Phone: 1-800-424-6723
Fax: 1-510-741-5802
Email: LSG_TechServ_US@bio-rad.com (for U.S. and international customers)
Online technical support and worldwide contact information are available at www.consult.bio-rad.com.
Legal Notices
No part of this publication may be reproduced or transmitted in any form or by any means, electronic or mechanical, including
photocopy, recording, or any information storage or retrieval system, without permission in writing from Bio-Rad Laboratories.
Bio-Rad reserves the right to modify its products and services at any time. This user guide is subject to change without notice.
Although prepared to ensure accuracy, Bio-Rad assumes no liability for errors, or for any damages resulting from the application
or use of this information.
Coomassie is a trademark of BASF Aktiengesellschaft. Ficoll is a trademark of GE Healthcare Group companies. StrepTactin
is a trademark of Institut für Bionalytik GmbH. StrepTactin is covered by German patent application P 19641876.3. Bio-Rad
Laboratories, Inc. is licensed by Institut für Bioanalytik GmbH to sell these products for research use only. SYBR is a trademark
of Invitrogen Corporation. SYPRO is a trademark of Molecular Probes, Inc. Bio-Rad is licensed to sell SYPRO products for
research use only, under U.S. Patent 5,616,502. Tween is a trademark of ICI Americas, Inc.
Copyright © 2011 by Bio-Rad Laboratories. All rights reserved.
Page 3

Contents
Chapter 1: Mini-PROTEAN® Precast Gels ............................................. 1
1.1 Introduction ................................................................... 1
1.2 Gel Formulations ............................................................... 2
1.3 Comb Configurations ........................................................... 2
1.4 Specifications ................................................................. 2
1.5 Storage Conditions ............................................................ 3
1.6 Important Notes ............................................................... 3
Chapter 2: Setup and Basic Operation ............................................... 4
2.1 Workflow Overview ............................................................. 4
2.2 Required Materials ............................................................. 5
2.3 Setting Up and Running Mini-PROTEAN Gels in the Mini-PROTEAN® Tetra Cell............... 5
2.4 Removing the Gel .............................................................. 7
Chapter 3: SDS-PAGE............................................................. 8
3.1 Introduction ................................................................... 8
3.2 Mini-PROTEAN® TGX™ and Mini-PROTEAN® TGX Stain-Free™ Gels ....................... 8
3.3 SDS-PAGE Buffers ............................................................ 10
3.4 Sample Preparation............................................................ 10
3.5 Running Conditions ............................................................ 10
Chapter 4: Native PAGE .......................................................... 12
4.1 Introduction .................................................................. 12
4.2 Mini-PROTEAN TGX and Mini-PROTEAN TGX Stain-Free Gels........................... 12
4.3 Native PAGE Buffers .......................................................... 13
4.4 Sample Preparation............................................................ 13
4.5 Running Conditions ............................................................ 13
Chapter 5: Stain-Free System ..................................................... 14
5.1 Introduction .................................................................. 14
5.2 Stain-Free Workflow ........................................................... 15
5.3 Electrophoresis with Mini-PROTEAN TGX Stain-Free Gels .............................. 15
5.4 Stain-Free Detection ........................................................... 15
Page 4

Chapter 6: Peptide Analysis ....................................................... 16
6.1 Introduction .................................................................. 16
6.2 Mini-PROTEAN Tris-Tricine Gels ................................................. 16
6.2.1 Gel Composition .......................................................... 16
6.2.2 Gel Selection Guide........................................................ 16
6.3 Peptide Analysis Buffers ........................................................ 17
6.4 Sample Preparation............................................................ 17
6.5 Running Conditions ............................................................ 17
Chapter 7: Nondenaturing Nucleic Acid PAGE ........................................ 18
7.1 Introduction .................................................................. 18
7.2 Mini-PROTEAN TBE Gels ....................................................... 18
7.2.1 Gel Composition .......................................................... 18
7.2.2 Gel Selection Guide........................................................ 18
7.3 Nondenaturing Nucleic Acid PAGE Buffers .......................................... 19
7.4 Sample Preparation............................................................ 19
7.5 Running Conditions ............................................................ 19
Chapter 8: Denaturing Nucleic Acid PAGE ........................................... 20
8.1 Introduction .................................................................. 20
8.2 Mini-PROTEAN TBE-Urea Gels ................................................... 20
8.2.1 Gel Composition .......................................................... 20
8.2.2 Gel Selection Guide........................................................ 20
8.3 Denaturing Nucleic Acid PAGE Buffers ............................................. 21
8.4 Sample Preparation............................................................ 21
8.5 Running Conditions ............................................................ 21
Chapter 9: 2-D Electrophoresis .................................................... 22
9.1 Introduction .................................................................. 22
9.2 Equilibration.................................................................. 22
9.3 Agarose Overlay .............................................................. 22
9.4 Second-Dimension Electrophoresis................................................ 22
Page 5

Chapter 10: Detection............................................................ 23
10.1 SDS-PAGE and Native PAGE Detection ........................................... 23
10.2 Peptide Gel Staining .......................................................... 24
10.3 TBE Gel Staining ............................................................ 24
10.4 TBE-Urea Gel Staining ....................................................... 24
Chapter 11: Blotting ............................................................. 25
11.1 Introduction ................................................................. 25
11.2 Transfer ................................................................... 25
11.2.1 Transfer Buffers .......................................................... 25
11.2.2 Wet Transfer Using the Mini Trans-Blot® Module................................. 25
11.2.3 Transfer Using the Trans-Blot® Turbo™ System.................................. 26
11.2.4 Semi-Dry Transfer Using the Trans-Blot® SD Cell ................................ 27
11.3 Total Protein Blot Stains ....................................................... 28
11.4 Immunodetection ............................................................ 28
Chapter 12: Troubleshooting ...................................................... 29
Appendix A: Quick Start Guides.................................................... 31
SDS-PAGE (Mini-PROTEAN TGX Gels) ............................................. 32
Native PAGE (Mini-PROTEAN TGX Gels) ............................................ 33
Peptide Analysis (Mini-PROTEAN Tris-Tricine Gels) .................................... 34
Nondenaturing Nucleic Acid PAGE (Mini-PROTEAN TBE Gels)............................ 35
Denaturing Nucleic Acid PAGE (Mini-PROTEAN TBE-Urea Gels) .......................... 36
Appendix B: Buffers ............................................................. 37
Appendix C: Related Literature .................................................... 40
Appendix D: Ordering Information .................................................. 41
Page 6

Page 7
®
Mini-PROTEAN
1
Precast Gels
1.1 Introduction
Mini-PROTEAN precast gels are 7.2 cm x 8.6 cm gels designed for performing polyacrylamide gel
electrophoresis (PAGE) with the Mini-PROTEAN family of vertical electrophoresis cells, which includes
the Mini-PROTEAN® Tetra and Mini-PROTEAN® 3 Dodeca™ cells and the discontinued Mini-PROTEAN II
and Mini-PROTEAN 3 cells. The Mini Trans-Blot®, Trans-Blot® Turb o™, and Trans-Blot® SD blotting cells
and precut membrane sandwiches are also available for blotting applications with these gels.
Features of Mini-PROTEAN precast gels include:
n
Outlined and numbered well that simplify sample loading and identification
n
Capacity for up to 15 samples per gel
n
Bottom-open cassette design for easy gel handling and blotting setup
n
Easy-to-open cassette for faster downstream processing
n
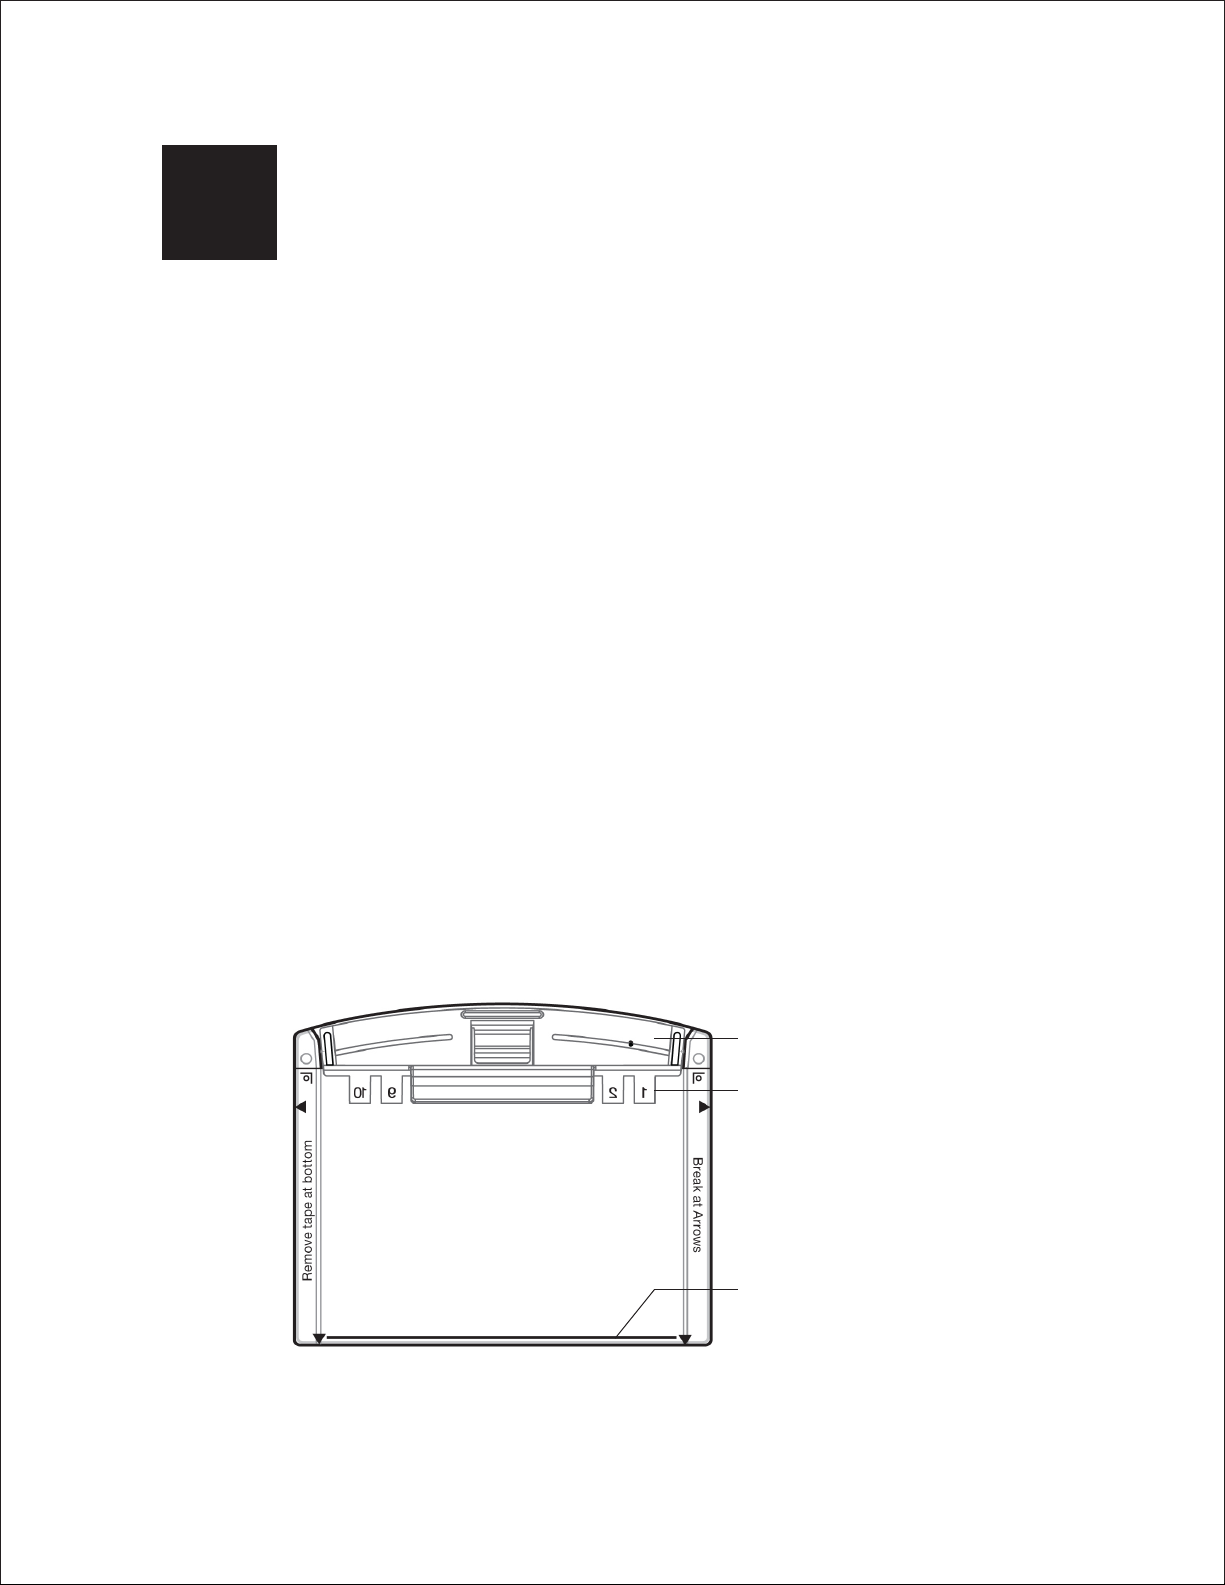
Reference line at the bottom of the cassette indicates where the run should stop
(for optimum resolution across the separation range)
n
Excellent staining quality and transfer efficiency
n
No gel foot to remove prior to blotting
n
Mini-PROTEAN® TGX Stain-Free™ formulations, which enable rapid 5 min gel imaging
without staining and destaining
Comb (available in a range of options)
Numbered well outlines
Reference line for monitoring
progress of the run
Technical Support: 1-800-4BIORAD • 1-800-424-6723 • www.bio-rad.com 1
Page 8

Mini-PROTEAN Precast Gels
1.2 Gel Formulations
Mini-PROTEAN precast gels are composed of polyacrylamide with a bisacrylamide crosslinker, and they
are available in a range of formulations (Table 1.1) and in a selection of single percentages and gradients.
Table 1.1. Mini-PROTEAN precast gel formulations.
Application Gel Formulation Sample Buffer Running Buffer
SDS-PAGE Mini-PROTEAN TGX™ Laemmli Tris/glycine/SDS
Mini-PROTEAN TGX Stain-Free
Native PAGE Mini-PROTEAN TGX Native Tris/glycine
Mini-PROTEAN TGX Stain-Free
Peptide analysis Mini-PROTEAN Tris-Tricine Tricine Tris/Tricine/SDS
dsDNA separation Mini-PROTEAN TBE Nucleic acid Tris/boric acid/EDTA (TBE)
ssDNA and RNA Mini-PROTEAN TBE-urea TBE-urea TBE
separation
1.3 Comb Configurations
Comb Type Well Volume
10-well 50 μl
10-well 30 μl
12-well 20 μl
15-we ll 15 μl
8 + 1 well* 30 μl
IPG/prep 7 cm ReadyStrip™ IPG strip (450 μl)
1.4 Specifications
Gel material Polyacrylamide
Gel dimensions 7.2 x 8.6 cm
Gel thickness 1.0 mm
Resolving gel height 6.2 cm (5.6 cm for 50 μl well)
Cassette dimensions 8.5 x 10 cm
Cassette material Styrene copolymer
Comb material Polycarbonate
Running buffer 750 ml for 1–2 gels, 1,000 ml for 3–4 gels (Mini-PROTEAN Tetra cell)
325 ml for 1–2 gels (Mini-PROTEAN II or Mini-PROTEAN 3 cell)
*
Multichannel pipet compatible.
2 Technical Support: 1-800-4BIORAD • 1-800-424-6723 • www.bio-rad.com
Page 9

Instruction Manual and Application Guide
1.5 Storage Conditions
Table 1.2. Storage conditions for Mini-PROTEAN precast gels. Store gels flat. Shelf life is from date of manufacture;
expiration dates are printed on the packaging.
Storage
Temperature Gel Formulation Shelf Life
2–8°C Mini-PROTEAN TGX 12 months
Mini-PROTEAN TGX Stain-Free 12 months
Mini-PROTEAN Tris-Tricine 12 weeks
Mini-PROTEAN TBE 12 weeks
Mini-PROTEAN TBE-urea 8 weeks
1.6 Important Notes
Use each Mini-PROTEAN precast gel as soon as possible after removing it from the storage pouch.
Improper storage of Mini-PROTEAN precast gels can produce artifacts. Store gels flat and at 2–8°C.
Avoid freezing or prolonged storage above 8°C. If your gels have been stored improperly, discard them.
Do not run more than one gel type in the same apparatus at the same time. Different gel percentages
and formulations have different conductivities and different run times.
With the Mini-PROTEAN Tetra cell:
n
When running 1–2 gels:
Use the electrode assembly (with banana plugs), not the companion running module
(without banana plugs)
Do not place the companion running module in the tank. Doing so generates
excessive heat and degrades the quality of the electrophoretic separation
n
When running 3–4 gels, use both the electrode assembly and companion running module
n
When using voltages >200 V, fill the outer buffer chamber to the 4 gel (800 ml) mark
Technical Support: 1-800-4BIORAD • 1-800-424-6723 • www.bio-rad.com 3
Page 10
Setup and Basic
2
Operation
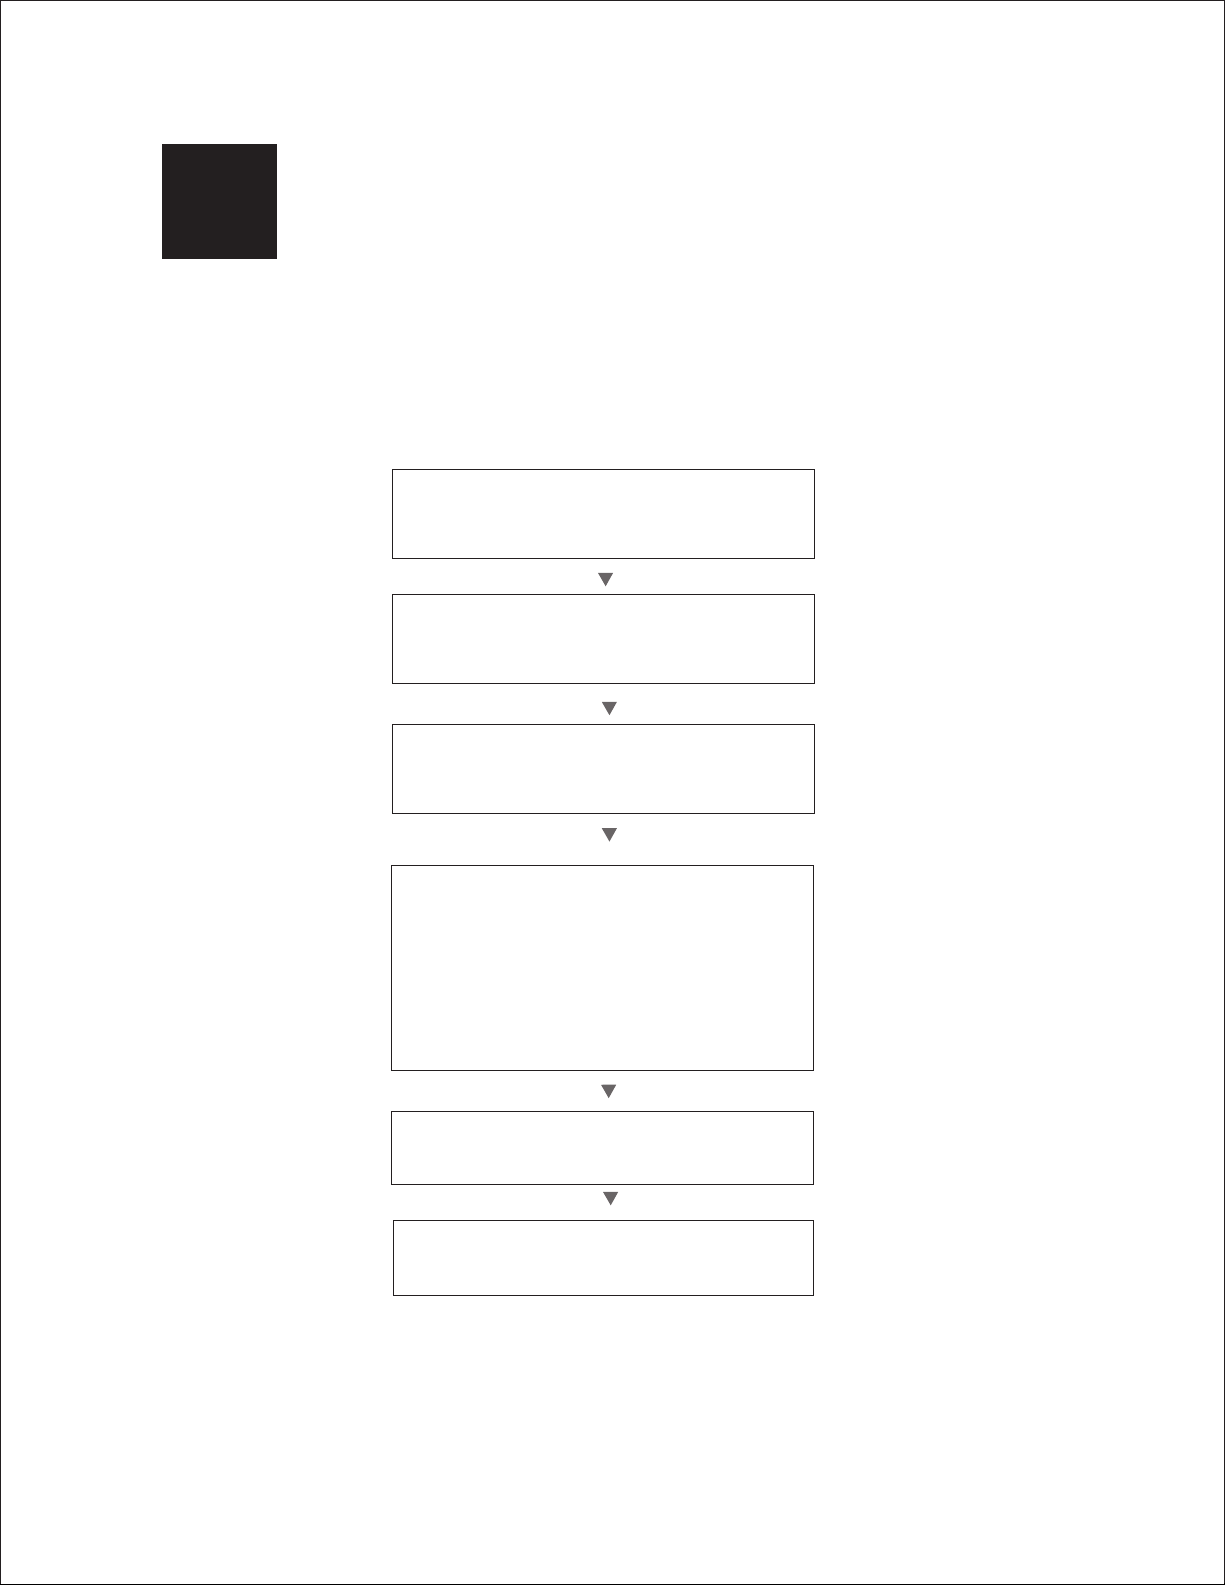
2.1 Workflow Overview
Prepare sample and running buffers
Assemble Electrophoresis Cell
Prepare and Load Samples
Prepare Buffers
Prepare Gels and
Dilute in sample buffer
Perform Electrophoresis
SDS-PAGE (Chapter 3)
Native PAGE (Chapter 4)
Peptide Analysis (Chapter 6)
Nondenaturing Nucleic Acid PAGE (Chapter 7)
Denaturing Nucleic Acid PAGE (Chapter 8)
2-D Electrophoresis (Chapter 9)
Analyze the Separation
Blot the Gels (Optional)
(Chapter 10)
(Chapter 11)
4 Technical Support: 1-800-4BIORAD • 1-800-424-6723 • www.bio-rad.com
Page 11
Instruction Manual and Application Guide
2.2 Required Materials
n
Mini-PROTEAN® precast gels
n
Mini-PROTEAN® Tetra cell (or Mini-PROTEAN® 3 Dodeca™, Mini-PROTEAN II or
Mini-PROTEAN 3 cell)
n
PowerPac™ Basic or PowerPac HC power supply (or equivalent); PowerPac HV or
PowerPac Universal required for high-voltage applications (>300 V)
n
Sample buffer
n
Running buffer (750 ml for 1–2 gels; 1,000 ml for 3–4 gels or when running at
voltages >200 V)
n
Opening lever (catalog #456-0000)
2.3 Setting Up and Running Mini-PROTEAN Gels in the
Mini-PROTEAN Tetra Cell
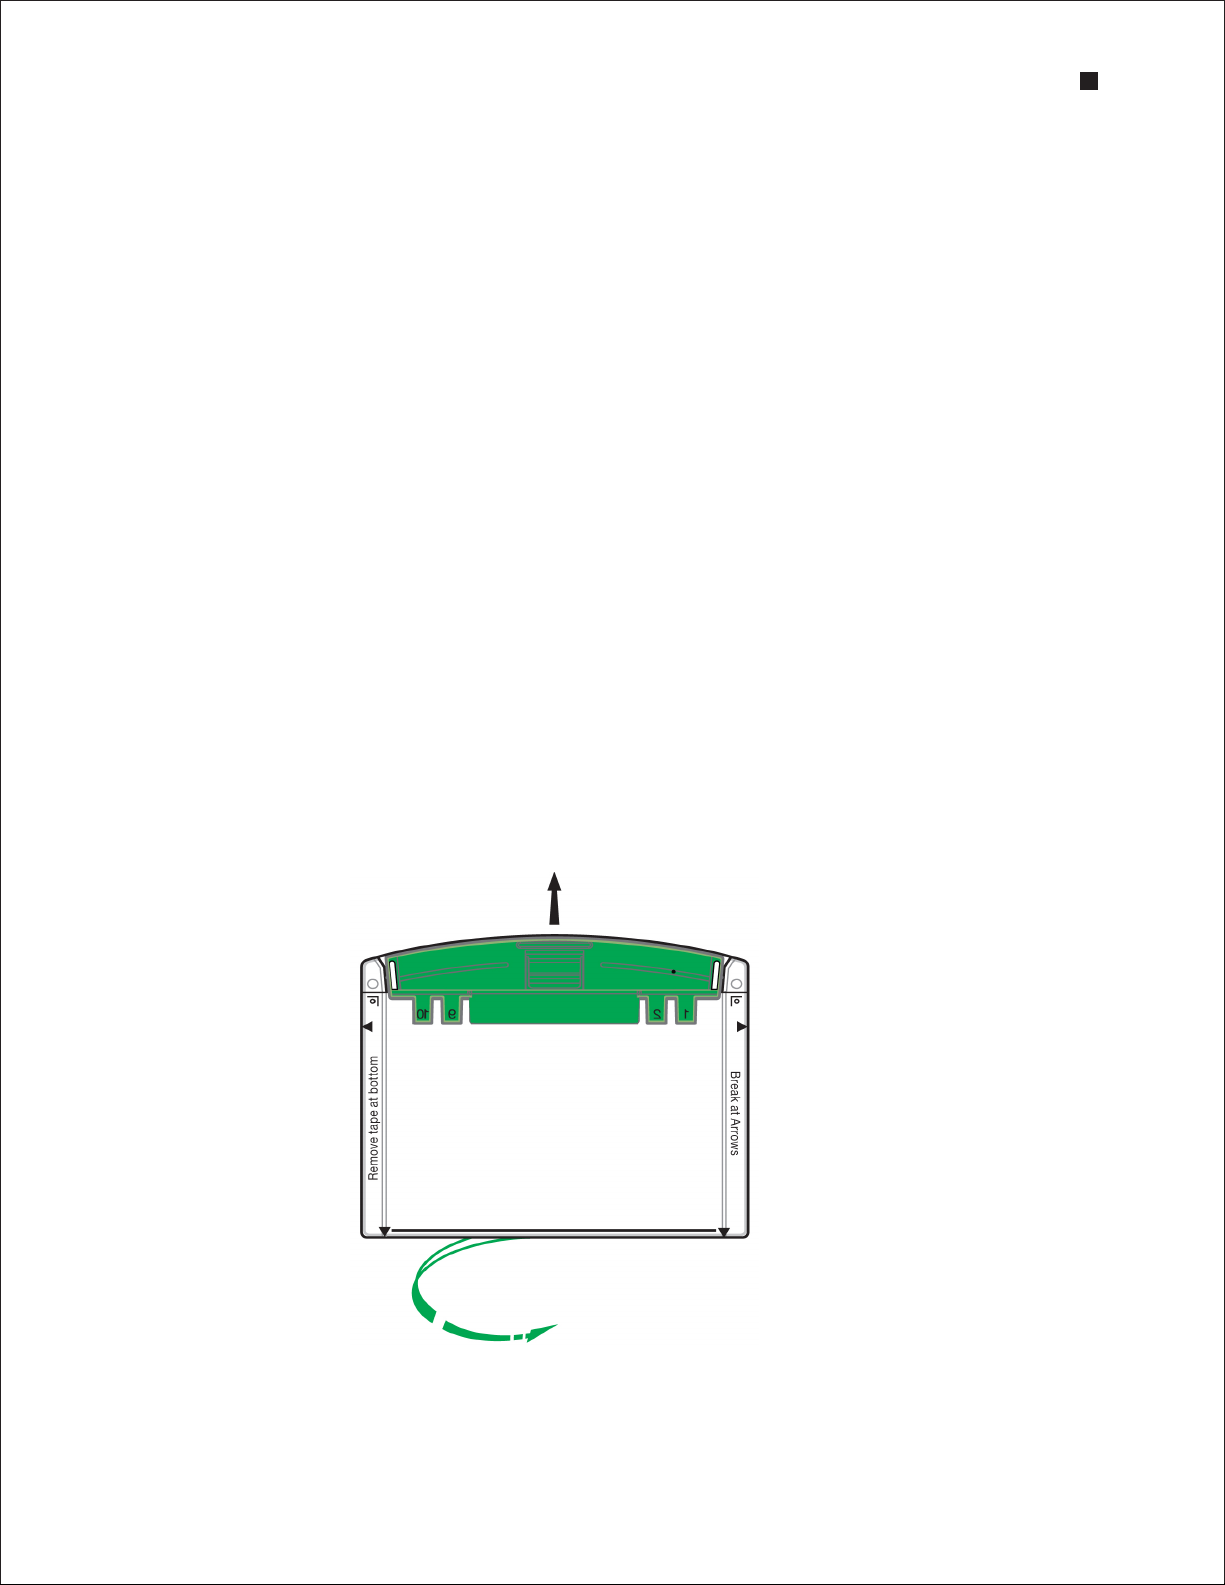
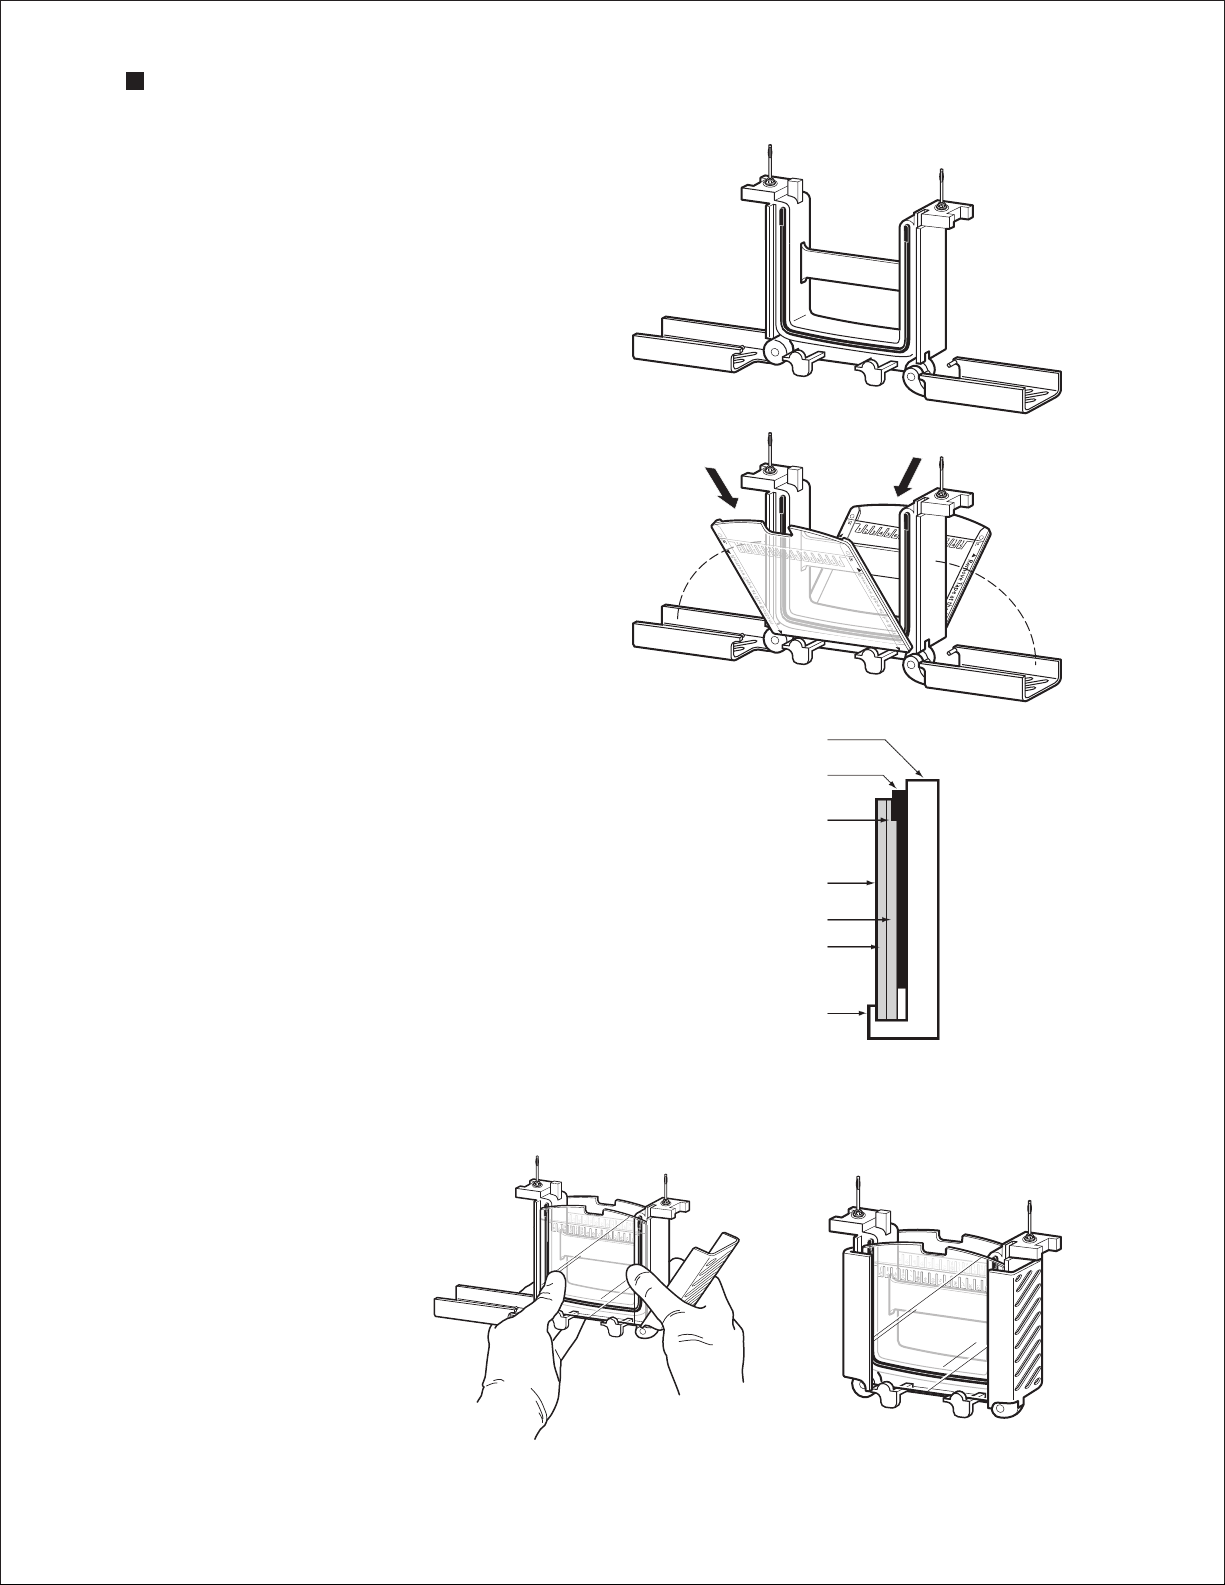
1. Remove the gels from the storage pouch and prepare them for assembly:
a. Remove the comb: Position thumb on the indentation (middle of comb) and remove the comb
by pulling upward in one smooth motion.
b. Remove the tape: Pull gently to remove the green tape from the bottom of the cassette.
If necessary, use the opening key or comb to help remove the tape at the corners.
c. Rinse the wells: Use a syringe, wash bottle, or disposable transfer pipet to rinse the wells with
Remove the comb
Remove the tape
Technical Support: 1-800-4BIORAD • 1-800-424-6723 • www.bio-rad.com 5
Page 12
Mini-PROTEAN Precast Gels
running buffer. Straighten the sides of the
wells, if necessary.
2. Set the electrode assembly to the open
position on a clean, flat surface (A).
3. Place the gel cassettes into the electrode
assembly. Two cassettes are required to create
a functioning assembly; when using 1 or 3
gels, use the buffer dam (included with the cell)
to complete the assembly.
a. Place the first cassette with the short plate
facing inward and so the gel rests at a 30°
angle away from the center of the electrode
assembly. Make sure the electrode assembly
remains balanced and does not tip over.
b. Place the second gel or buffer dam on the
other side of the electrode assembly, again
by resting the gel on the supports. The gels
rest at 30° angles, one on either side of the
electrode assembly, tilting away from the
center of the frame (B).
4. Gently push both gels toward each other,
making sure that they rest firmly and squarely
against the green gasket that is built into the
electrode assembly. Align the short plates to
ensure the edge sits just below the notch at
the top of the green gasket (C).
5. While gently squeezing the gel cassettes
(or cassette and buffer dam) against the green
gaskets (maintaining constant pressure and
with both gels in place), slide the green arms
of the clamping frame one at a time over the
gels, locking them into place (D,E).
Clamping frame
Gasket
Notch
Gel cassette
Short plate
Long plate
Gel support
A
B
C
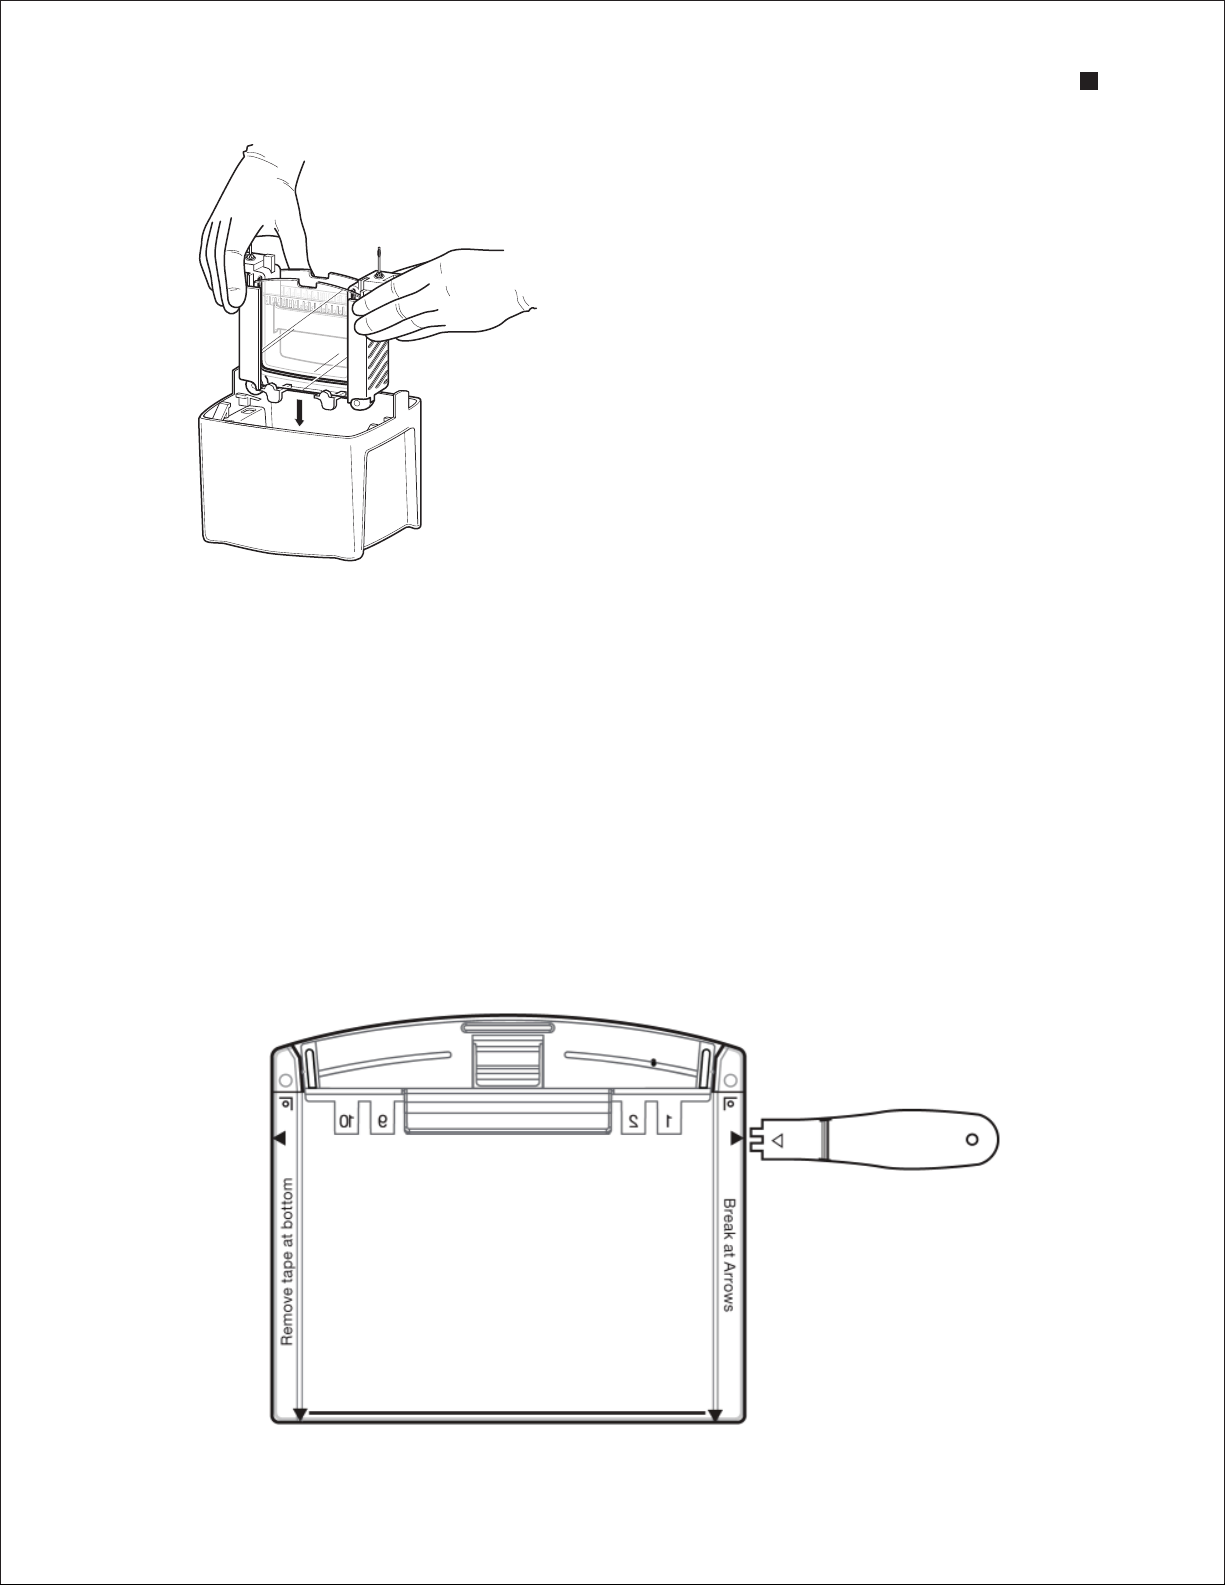
6. The wing clamps of the electrode assembly lift
each gel cassette up against the notch in the
green gasket, forming a seal. Check again that
D
6 Technical Support: 1-800-4BIORAD • 1-800-424-6723 • www.bio-rad.com
E
Page 13
Instruction Manual and Application Guide
F
the short plates sit just below the notch at the top of
the green gasket (C).
If running more than 2 gels, repeat steps 2–6 with the
companion running module.
7. Place the electrophoresis module into the tank (F) and
fill the buffer chambers with 1x running buffer:
n
200 ml in the inner buffer chamber
n
550 ml (1–2 gels) or 800 ml (3–4 gels, or
>200 V) in the outer buffer chamber
8. Wash the sample wells with running buffer (if this was
not done earlier).
9. Load samples and run the gels using the running
conditions appropriate to your application. Stop the run when the dye front reaches the reference
line imprinted on the bottoms of the cassettes.
2.4 Removing the Gel
1. After electrophoresis is complete, turn off the power supply and disconnect the electrical leads.
2. Remove the lid from the tank and remove the gels from the cell. Pour off and discard the running
buf fer.
3. To open the cassette, align the arrow on the opening lever with the arrows marked on the cassette
and insert the lever between the cassette plates at indicated locations. Apply downward pressure to
break each seal. Do not twist the lever.
4. Pull the two plates apart from the top of the cassette, and gently remove the gel.
Technical Support: 1-800-4BIORAD • 1-800-424-6723 • www.bio-rad.com 7
Page 14

3
SDS-PAGE
3.1 Introduction
Mini-PROTEAN® TGX™ (Tris-Glycine eXtended shelf life) gels provide a versatile system for separating
proteins by either molecular weight (SDS-PAGE) or mass-to-charge ratio (native PAGE). (See Chapter
4 for native PAGE applications and protocols.) This versatility is possible because the gels are made
without SDS; this allows the sample buffer and running buffer to determine the separation mechanism.
SDS-PAGE relies on a discontinuous buffer system. Two ions differing in electrophoretic mobility
(glycinate and chloride) form a moving boundary when voltage is applied. Proteins have an
intermediate mobility that causes them to concentrate, or stack, into a narrow zone at the beginning
of electrophoresis. As that zone moves through the gel, the sieving effect of the polyacrylamide gel
matrix causes proteins of different molecular weighs to move at different rates. This stacking effect is
responsible for the high resolving power of SDS-PAGE: the sample is loaded in a relatively broad zone,
and the moving boundary concentrates the proteins into sharp bands prior to separation.
Protein samples for SDS-PAGE are prepared using SDS and a thiol reducing agent, usually
β-mercaptoethanol or dithiothreitol (DTT). SDS forms complexes with proteins, giving them a rodlike
shape and similar mass-to-charge ratio. The reducing agent disrupts disulfide bonds between and
within proteins, allowing complete denaturation and dissociation. Heat treatment in the presence of
SDS and reducing agent effectively eliminates the effects of native charge and higher order structure on
electrophoretic mobility, so the migration distance depends primarily on molecular weight.
Molecular weight is estimated by plotting the logarithm of protein molecular weight vs. the relative
mobility (Rf) of the protein (Rf = distance migrated by the protein/distance migrated by the dye front)
or by using the point-to-point semilog interpolation method in Quantity One® or Image Lab™ software.
Refer to bulletins 3133, 3144, and 10014472 for more information.
3.2 Mini-PROTEAN TGX and
Mini-PROTEAN® TGX Stain-Free™ Gels
Mini-PROTEAN TGX gels are Laemmli-like gels that have a proprietary modification that extends shelf
life to 12 months and enhances separation characteristics relative to conventional gel types. They are
run using standard Laemmli sample buffer and Tris/glycine/SDS running buffer, and they generate
protein migration patterns that are similar to those observed with standard Laemmli Tris-HCl gels.
Two types of TGX formulations are available:
n
Mini-PROTEAN TGX — Laemmli-like, extended shelf life gels
n
Mini-PROTEAN TGX Stain-Free — Laemmli-like, extended shelf life gels with trihalo
compounds that allow rapid fluorescent detection of proteins with the stain-free system,
eliminating staining and destaining steps for faster results (see Chapter 5 for more details)
8 Technical Support: 1-800-4BIORAD • 1-800-424-6723 • www.bio-rad.com
Page 15
Mini-PROTEAN® TGX™ Precast Gels
Instruction Manual and Application Guide
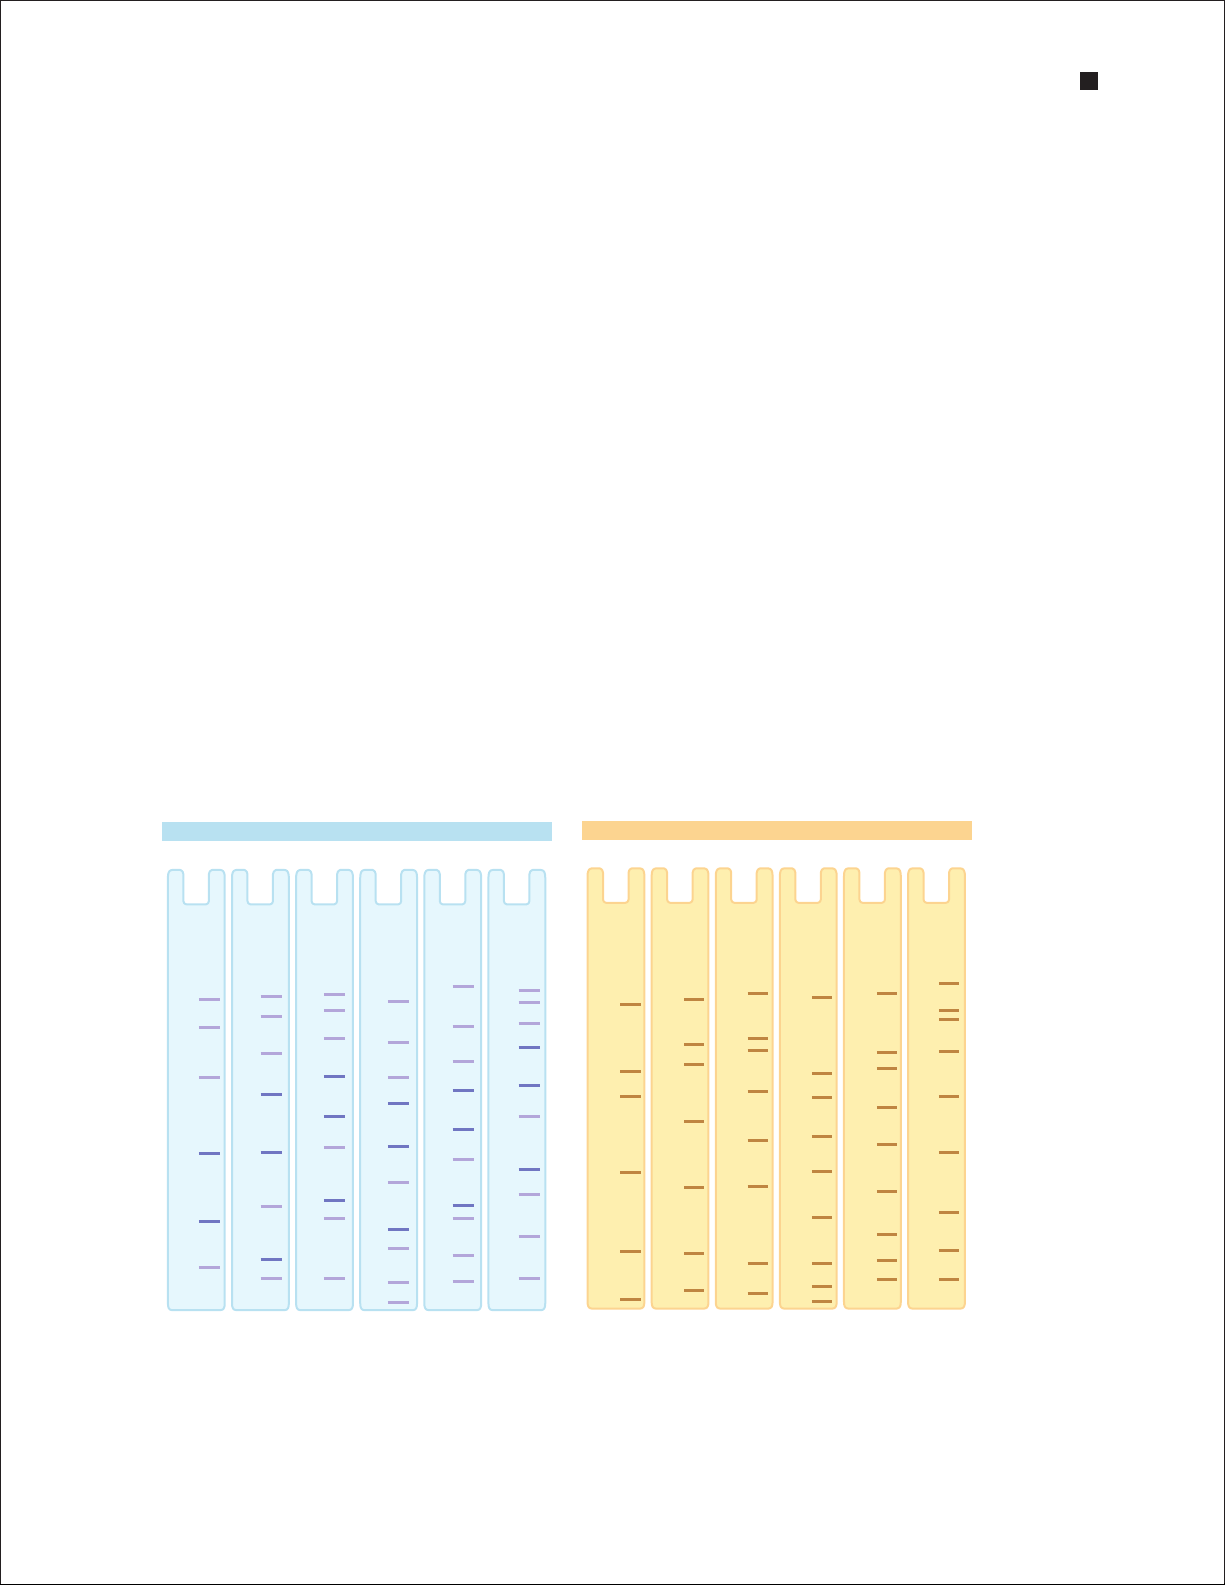
Both gel types gels are available in polyacrylamide single percentages and gradients. Use the protein
migration charts and tables to select the gel type that optimizes resolution of your sample:
n
Use single-percentage gels to separate bands of similar molecular weight. Optimum separation
occurs in the lower half of the gel, so use a percentage in which the protein migrates to the
lower half of the gel
n
Use gradient gels to separate samples containing a broad range of molecular weights. Gradient
gels allow resolution of both high- and low-molecular weight bands on the same gel. Larger
pore sizes at the top of the gel permit resolution of larger molecules, smaller pore sizes toward
the bottom of the gel restrict excessive separation of small molecules
Gel Composition
Crosslinker 2.6% C
Stacking gel 4% T, 2.6% C
Shelf life ~12 months at 2–8°C; expiration date is printed on package
Gel Percentage Optimum Separation Gel Percentage Optimum Separation
Range Range
7.5% 40–200 kD 4–15% 20–250 kD
10% 30–150 kD 4–20% 10–200 kD
12% 20–120 kD Any kD™ 10 –100 kD
Broad Range Unstained
200
116
97.4
21.5
200
116
97.4
66
45
31
21.5
14.4
™
Any kD
4–20%4–15%12%10%7.5%
200
116
66
97.4
45
31
21.5
14.4
6.5
200
116
97.4
66
45
31
21.5
14.4
6.5
200
116
97.4
66
66
45
31
45
31
21.5
14.4
6.5
250
150
100
Precision Plus Protein™ Unstained
™
Any kD
4–20%4–15%12%10%7.5%
250
150
100
75
50
37
250
150
100
75
50
37
25
20
250
150
100
75
50
37
25
20
15
250
150
100
75
50
37
25
20
15
10
75
50
37
25
20
15
10
250
150
100
200
75
50
37
25
20
15
10
116
97.4
66
45
31
Migration charts for protein standards on Mini-PROTEAN TGX and Mini-PROTEAN TGX Stain-Free gels.
Technical Support: 1-800-4BIORAD • 1-800-424-6723 • www.bio-rad.com 9
Page 16

Mini-PROTEAN Precast Gels
3.3 SDS-PAGE Buffers
See Appendix B for buffer formulations. Do not adjust pH.
Running buffer (1x) 25 mM Tris, 192 mM glycine, 0.1% SDS
Dilute 100 ml 10x stock (catalog #161-0732) with 900 ml deionized water (diH2O).
Sample buffer (2x) 62.5 mM Tris-HCl, pH 6.8, 2% SDS, 25% (v/v) glycerol, 0.01% bromophenol
blue, 5% β-mercaptoethanol or 100 mM DTT (added fresh)
Use Laemmli sample buffer (catalog #161-0737) and add β-mercaptoethanol or
DTT before use.
Sample buffer (4x) 250 mM Tris-HCl, pH 6.8, 4% LDS, 40% (w/v) glycerol, 0.02% bromophenol
blue, 15% beta-mercaptoethanol or 200 mM DTT (added fresh)
Use 4x Laemmli sample buffer (catalog #161-0747) and add β-mercaptoethanol
or DTT before use.
3.4 Sample Preparation
1. Determine the appropriate concentration of sample to load (depends on the load volume and the
detection method used; see Chapter 10 for approximate stain sensitivities).
2. Dilute the sample with sample buffer with added reducing agent.
2x: dilute 1 part sample with 1 part sample buffer.
4x: dilute 3 parts sample with 1 part sample buffer.
For nonreducing conditions, omit the reducing agent.
3. Heat the diluted sample at 90–95°C for 5 min or at 70°C for 10 min.
3.5 Running Conditions
Run conditions and times are approximate. Run times represent the time required for the dye front
to reach the line at the bottom of the cassette. Conditions may vary depending on water and buffer
conductivity, which vary from one lab setting to the next. Multiply current by the number of gels run.
Table 3.1. Standard running conditions for SDS-PAGE in the Mini-PROTE AN Tetra cell.
Gel Optimum Range Run Conditions Run Time
7.5% 40–200 kD
10% 30–150 kD 300 V constant:
12% 20–120 kD Starting current (per gel): 55 –75 mA 15–20 min
4–15% 20–250 kD Final current (per gel): 45–70 mA (Fill outer buffer volume
4–20% 10–200 kD to the 4-gel mark)
Any kD 10–100 kD
10 Technical Support: 1-800-4BIORAD • 1-800-424-6723 • www.bio-rad.com
Page 17

Instruction Manual and Application Guide
Table 3.2. Alternative running conditions for SDS-PAGE in the Mini-PROTEAN Tetra cell.
100 V 200 V
Run time 85–95 min 30– 40 min
Expected current (per gel)
Initial 15 –20 mA 25–50 mA
Final 5–10 mA 20–31 mA
Expected temperature 25°C 25–35°C
Outer buf fer volume
1–2 Gels 2-gel mark 2-gel mark
3–4 Gels 4-gel mark 4-gel mark
Table 3.3. PowerPac power supply recommendations.
# Gels 100 V 200 V 300 V
1–2 Basic/HC/HV/Universal Basic/HC/HV/Universal Basic/HV/Universal
3–4 Basic/HC/HV/Universal Basic/HC/HV/Universal HV/Universal
4–8 HC/HV/Universal HC/HV/Universal Universal
9–10 HC/Universal HC/Universal Universal
11–12 HC/Universal HC/Universal Universal
Technical Support: 1-800-4BIORAD • 1-800-424-6723 • www.bio-rad.com 11
Page 18

4
Native PAGE
4.1 Introduction
In native PAGE, proteins are prepared in nonreducing, nondenaturing sample buffer, which maintains
native structure and mass-to-charge ratios. Separation is also performed in the absence of SDS and
reducing agents. Though native PAGE uses the same moving boundary described for SDS-PAGE
(see Section 3.1), protein mobility depends on a number of factors other than molecular weight,
including the shape and charge of the protein. Protein-protein interactions may be retained during native
PAGE, so some proteins may separate as multisubunit complexes. Consequently, native PAGE is not
suitable for molecular weight determination.
The nonreducing and nondenaturing environment of native PAGE allows protein separation with
retention of biological activity. Because native structure is retained, native PAGE can enable separation
of proteins with the same molecular weight.
4.2 Mini-PROTEAN® TGX™ and
Mini-PROTEAN® TGX Stain-Free™ Gels
Mini-PROTEAN TGX gels are Laemmli-like gels that have a proprietary modification that extends their
shelf life to 12 months and enhances separation characteristics relative to conventional gel types. They
are run using standard native sample buffer and Tris/glycine running buffer, and they generate protein
migration patterns that are similar to those observed with standard Laemmli Tris-HCl gels.
Two types of TGX formulations are available:
n
Mini-PROTEAN TGX — Laemmli-like, extended shelf life gels
n
Mini-PROTEAN TGX Stain-Free — Laemmli-like, extended shelf life gels with trihalo
compounds that allow rapid fluorescent detection of proteins with the stain-free system,
eliminating staining and destaining steps for faster results (see Chapter 5 for more details)
These gels are available in a selection of polyacrylamide single percentages and gradients, and because
they contain no SDS, they can be used for either SDS- or native PAGE applications.
Gel Composition
Crosslinker 2.6% C
Stacking gel 4% T, 2.6% C
Shelf life ~12 months at 2–8°C; expiration date is printed on the packaging
12 Technical Support: 1-800-4BIORAD • 1-800-424-6723 • www.bio-rad.com
Page 19

Instruction Manual and Application Guide
4.3 Native PAGE Buffers
See Appendix B for buffer formulations. Do not adjust pH.
Running buffer (1x) 25 mM Tris, 192 mM glycine
Dilute 100 ml 10x stock (catalog #161-0734) with 900 ml diH2O.
Sample buffer 62.5 mM Tris-HCl, pH 6.8, 40% (w/v) glycerol, 0.01% (w/v) bromophenol blue
(catalog # 161-0738)
4.4 Sample Preparation
In the absence of SDS, the net charge of a polypeptide is determined by its amino acid composition
and the pH of the gel during electrophoresis, which is a function of the sample buffer, gel buffer, and
running buffer. Only polypeptides with a net negative charge migrate into gels under native conditions.
Most polypeptides have an acidic or slightly basic pI (~3–8). These proteins can be separated using the
following standard protocol:
1. Determine the desired protein concentration and load volume of your sample based on the
detection method used (see Chapter 10 for approximate stain sensitivities).
2. Dilute the sample with an equal volume of native sample buffer (do not heat the samples).
For example, combine: 5 μl sample
5 μl native sample buffer (catalog #161-0738)
10 μl total volume
Strongly basic proteins (pl >8.5) have a net positive charge and will not enter a Mini-PROTEAN TGX gel
under native conditions using Tris/glycine buffer. To allow polypeptides with a net positive charge
to migrate into a native gel, change the polarity of the electrodes by reversing the color-coded jacks
when connecting to the power supply.
4.5 Running Conditions
Running conditions for native PAGE are similar to the standard running conditions used for SDS-PAGE
(Section 3.4). If elevated temperature is a concern, run native PAGE at lower voltage; at lower voltages,
runs require more time to complete.
Table 4.1. Standard running conditions for native PAGE with one (1) gel in the Mini-PROTEAN Tetra cell. Run
conditions and times are approximate and assume a constant voltage of 200 V. When running more than one gel, current will
differ but temperature and run time should be close to those listed.
Current (mA) at 200 V
Gel Initial Final Temperature Run Time
1 Gel (buffer to 2-gel mark)
7.5% 35–37 17–20 28–30°C 38 –40 min
10%
12%
4–15% 50–55 25–28 30–33°C 30–34 min
4–20%
Any kD
Technical Support: 1-800-4BIORAD • 1-800-424-6723 • www.bio-rad.com 13
Page 20

5
Stain-Free System
5.1 Introduction
Bio-Rad’s stain-free system eliminates the time-consuming staining and destaining steps required
by other protein detection methods. Mini-PROTEAN® TGX Stain-Free™ gels include unique trihalo
compounds that allow rapid fluorescent detection of proteins with stain free-enabled imaging systems
— without staining.
The trihalo compounds in the gels react with tryptophan residues in a UV-induced reaction to produce
fluorescence, which can be easily detected (by stain free-enabled imagers) within gels or on lowfluorescence PVDF membranes. Activation of the trihalo compounds in the gels adds 58 Da moieties
to available tryptophan residues and is required for protein visualization. Proteins that do not contain
tryptophan residues cannot be detected using this system. The sensitivity of the stain-free system is
comparable to staining with Coomassie Brilliant Blue for proteins with a tryptophan content >1.5%;
sensitivity superior to Coomassie staining is possible for proteins with a tryptophan content >3%.
Imaging systems that can be used with the stain-free system include the Gel Doc™ EZ and ChemiDoc™ MP
systems (with Image Lab™ software).
Molecular weights of proteins can be estimated by a regression method using Image Lab software. The
software generates a standard curve using the molecular weight and relative mobility (Rf) of standard
proteins (Rf = distance migrated by the protein/distance migrated by the dye front). The standard curve
is then used to estimate the molecular weights of sample proteins.
Benefits of the stain-free system include:
n
Elimination of staining and destaining steps for faster results
n
Automated gel imaging and analysis
n
No background variability within a gel or between gels (as is often seen with standard
Coomassie staining)
n
Reduced organic waste by not requiring acetic acid and methanol for staining or destaining
n
Visualization of transferred (blotted) proteins on low fluorescence PVDF membranes
14 Technical Support: 1-800-4BIORAD • 1-800-424-6723 • www.bio-rad.com
Page 21

Instruction Manual and Application Guide
5.2 Stain-Free Workflow
Perform Electrophoresis
SDS-PAGE (Chapter 3)
Native PAGE (Chapter 4)
2-D Electrophoresis (Chapter 9)
Activate/Image Gels
(Chapter 5)
Stain the Gels for Total Protein
(Chapter 10)
Blot the Gels
(Chapter 11)
Analyze the Separation
5.3 Electrophoresis with Mini-PROTEAN TGX Stain-Free Gels
Mini-PROTEAN TGX Stain-Free gels are made and packaged without SDS, so they can be used for
both SDS and native PAGE applications. To perform electrophoresis with these gels, prepare the
sample and running buffers, set up the Mini-PROTEAN Tetra cell, and perform the run as directed in
Chapters 2–4.
Use unstained standards with Mini-PROTEAN TGX Stain-Free gels, as some prestained
standards are not compatible with stain-free technology. To monitor electrophoresis, use
10 µl of a 1:1 mixture of Precision Plus Protein™ unstained (catalog #161-0363) and
Precision Plus Protein All Blue protein standards (catalog #161-0373).
5.4 Stain-Free Detection
Image Mini-PROTEAN TGX Stain-Free gels and blots in a compatible imager. The imager activates the
reaction between the proteins and trihalo compounds in the gel to enable visualization.
n
Immediately place the gel in the tray of the imager; no fixation or rinsing steps are required.
Prolonged rinsing may diminish image quality and lead to gel deformation
n
If desired, stain the gel with any TGX-compatible stains after imaging. Certain stains, if used
prior to imaging, eliminate detection capability
Refer to the Gel Doc EZ Stain-Free Sample Tray Instruction Manual (bulletin 10019634) or the ChemiDoc MP
System with Image Lab Software Instruction Manual (bulletin 10022469) for detailed instructions.
Technical Support: 1-800-4BIORAD • 1-800-424-6723 • www.bio-rad.com 15
Page 22

6
Peptide Analysis
6.1 Introduction
Mini-PROTEAN® Tris-Tricine peptide analysis gels are optimized for separating peptides and proteins
with molecular weight <10,000. Peptide-SDS complexes move more slowly through these gels, allowing
the faster SDS micelles, which normally interfere with peptide separations, to completely separate from
peptides. This enables resolution of distinct peptide bands.
6.2 Mini-PROTEAN Tris-Tricine Gels
6.2.1 Gel Composition
Gel buffer 1.0 M Tris-HCl, pH 8.45
Crosslinker 2.6% C
Stacking gel 4% T, 2.6% C
Storage buffer 1.0 M Tris-HCl, pH 8.45, NaN
Shelf life 12 weeks at 2–8°C; expiration date is printed on the packaging
6.2.2 Gel Selection Guide
Gel Percentage Optimum Separation Range
16.5% 1.5–30 kD
10–20% 1–40 kD
3
Migration charts for protein standards on
Mini-PROTEAN Tris-Tricine gels.
16 Technical Support: 1-800-4BIORAD • 1-800-424-6723 • www.bio-rad.com
Page 23

Instruction Manual and Application Guide
6.3 Peptide Analysis Buffers
See Appendix B for buffer formulations. Do not adjust pH unless instructed to do so.
Running buffer (1x) 100 mM Tris, 100 mM Tricine, 0.1% SDS
Dilute 100 ml 10x stock (catalog #161-0744) with 900 ml diH2O
Sample buffer 200 mM Tris-HCl, pH 6.8, 2% SDS, 40% glycerol, 0.04% Coomassie
(catalog #161-0739) Brilliant Blue G-250, 2% β-mercaptoethanol or 100 mM DTT (added fresh)
6.4 Sample Preparation
1. Determine the appropriate concentration of sample to load (depends on the load volume and the
detection method used; see Chapter 10 for approximate stain sensitivities).
2. Dilute the sample with at least an equivalent volume of sample buffer (catalog #161-0739) and
reducing agent (β-mercaptoethanol, for example). Heat the diluted sample at 90–95°C for 5 min,
or at 70°C for 10 min.
For example, combine: 5 μl sample
4.75 μl Tricine sample buffer (catalog #161-0739)
0.25 μl β-mercaptoethanol (catalog #161-0710)
10 μl total volume
6.5 Running Conditions
Table 6.1. Running conditions for one (1) Mini-PROTEAN Tricine gel in the Mini-PROTEAN Tetra cell. Run conditions
and times are approximate and assume a constant voltage of 100 V. When running more than one gel, current will differ.
16.5% Gels 10–20% Gels
Power conditions 100 V constant 100 V constant
Expected current (per gel)
Initial 65 mA 65 mA
Final 35 mA 35 mA
Run time 100 min 100 min
Technical Support: 1-800-4BIORAD • 1-800-424-6723 • www.bio-rad.com 17
Page 24

Nondenaturing Nucleic
7
Acid PAGE
7.1 Introduction
Mini-PROTEAN® TBE gels are used to separate small double-stranded DNA (dsDNA) fragments,
particularly PCR products. DNA molecules have nearly uniform mass-to-charge ratios, allowing
nondenaturing nucleic acid PAGE to separate dsDNA by mass using a continuous TBE buffer system.
7.2 Mini-PROTEAN TBE Gels
7.2.1 Gel Composition
Gel buffer 89 mM Tris, 89 mM boric acid, 2 mM EDTA, pH 8.3
Crosslinker 3.3% C
Stacking gel 4% T, 3.3% C
Storage buffer 89 mM Tris, 89 mM boric acid, 2 mM EDTA, NaN
Shelf life 12 weeks at 2–8°C; expiration date is printed on the packaging
7.2.2 Gel Selection Guide
Gel Percentage Optimum Separation Range
5% 200–2,000 bp
10% 50–1,500 bp
15% 20–1,000 bp
4–20% 10–2,000 bp
Migration charts for DNA
standards on Mini-PROTEAN
TBE gels.
3
18 Technical Support: 1-800-4BIORAD • 1-800-424-6723 • www.bio-rad.com
Page 25

Instruction Manual and Application Guide
7.3 Nondenaturing Nucleic Acid PAGE Buffers
See Appendix B for buffer formulations. Do not adjust pH unless directed to do so.
Running buffer (1x) 89 mM Tris, 89 mM boric acid, 2 mM EDTA
Dilute 100 ml 10x stock (catalog #161-0733) with 900 ml diH2O
Sample buffer (5x) 50 mM Tris-HCl, pH 8.0, 5 mM EDTA, 25% (w/v) glycerol, 0.2% bromophenol
(catalog #161-0767) blue, 0.2% xylene cyanole FF
7.4 Sample Preparation
Determine the DNA concentration of your sample based on the detection method used. (See Chapter 10
for approximate stain sensitivities.) Dilute 4 parts sample with 1 part sample buffer.
7.5 Running Conditions
Table 7.1. Running conditions for nondenaturing nucleic acid PAGE with one (1) Mini-PROTEAN TBE gel in the
Mini-PROTEAN Tetra cell. Run conditions and times are approximate and assume a constant voltage of 100 V. When running
more than one gel, current will differ.
5% Gels 10% Gels 15% Gels 4–20% Gels
Power conditions 100 V constant 100 V constant 100 V constant 100 V constant
Expected current (per gel)
Initial 15 mA 15 mA 15 mA 15 mA
Final 10 mA 10 mA 10 mA 10 mA
Run time 45–60 min 60 –75 min 75–90 min 90–105 min
Technical Support: 1-800-4BIORAD • 1-800-424-6723 • www.bio-rad.com 19
Page 26

Denaturing Nucleic
8
Acid PAGE
8.1 Introduction
Mini-PROTEAN® TBE-urea gels are used for separation of small RNA and single-stranded DNA (ssDNA)
fragments. Applications include oligonucleotide analysis, RNase protection assays, and northern
blotting.
8.2 Mini-PROTEAN TBE-Urea Gels
8.2.1 Gel Composition
Gel buffer 89 mM Tris, 89 mM boric acid, 2 mM EDTA, 7 M urea, pH 8.3
Crosslinker 3.3% C
Stacking gel 4% T, 3.3% C
Storage buffer 89 mM Tris, 89 mM boric acid, 2 mM EDTA, pH 8.3, NaN
Shelf life 8 weeks at 2–8°C; expiration date is printed on the packaging
8.2.2 Gel Selection Guide
Gel Percentage Optimum Separation Range
10% 25–300 nt
15% 10–50 nt
3
Migration charts for DNA
standards on Mini-PROTEAN
TBE-urea gels.
20 Technical Support: 1-800-4BIORAD • 1-800-424-6723 • www.bio-rad.com
Page 27

Instruction Manual and Application Guide
8.3 Denaturing Nucleic Acid PAGE Buffers
See Appendix B for buffer formulations. Do not adjust pH unless directed to do so.
Running buffer (1x) 89 mM Tris, 89 mM boric acid, 2 mM EDTA
Dilute 100 ml 10x stock (catalog #161-0733) with 900 ml diH2O
Sample buffer (5x) 89 mM Tris, 89 mM boric acid, 2 mM EDTA, pH 8.0, 12% Ficoll,
(catalog #161-0768) 0.01% bromophenol blue, 0.02% xylene cyanole FF, 7 M urea
8.4 Sample Preparation
Determine the desired ssDNA or RNA concentration for your sample based on the detection method
used. Dilute 4 parts sample with 1 part sample buffer.
8.5 Running Conditions
Table 8.1. Running conditions for denaturing nucleic acid PAGE with one (1) Mini-PROTEAN TBE-urea gel in the
Mini-PROTEAN Tetra cell. Run conditions and times are approximate and assume a constant voltage of 200 V. When running
more than one gel, current will differ.
10% Gels 15% Gels
Power conditions 200 V constant 200 V constant
Expected current (per gel)
Initial 15 mA 15 mA
Final 10 mA 10 mA
Run time 45–60 min 60 –75 min
Technical Support: 1-800-4BIORAD • 1-800-424-6723 • www.bio-rad.com 21
Page 28

9
2-D Electrophoresis
9.1 Introduction
Mini-PROTEAN® precast gels are available for second-dimension PAGE in 2-D electrophoresis
workflows. The IPG-well gels accommodate 7 cm IPG strips. Mini-PROTEAN® TGX Any kD™ gels are
particularly well suited to 2-D electrophoresis applications.
The transition from first-to second-dimension gel electrophoresis involves:
n
Equilibration of the resolved IPG strips in an SDS-containing, reducing buffer
n
Placing the IPG strip on top of the second-dimension gel (agarose overlay)
9.2 Equilibration
Equilibration ensures that proteins in the IPG strips are coated with SDS and that cysteines are reduced
and alkylated. Use the equilibration protocols (bulletin 411009) and buffers in the ReadyPrep™ 2-D
starter kit (catalog #163-2105), or other protocols and buffers used for Tris-HCl gels.
9.3 Agarose Overlay
Place the equilibrated IPG strip into the IPG well of the gel and overlay it with molten agarose to ensure
good contact between the strip and gel.
1. Prepare 0.5% low-melt agarose (catalog #161-3111), 0.003% bromophenol blue (catalog #161-0404)
in 1x Tris/glycine/SDS running buffer (or use ReadyPrep overlay agarose, catalog #163-2111).
2. Following equilibration, place the IPG strip, gel side up, on the back plate of the gel, above the IPG
well. The “+” and pH range on the IPG strip should be on the left.
3. Using forceps, push the strip into the IPG well, taking care to not trap air bubbles under the strip.
Push on the backing of the strip, not on the gel.
4. Using a disposable pipet, apply overlay agarose into the IPG well. Fill the well to the top of the inner
plate. Dispense rapidly, as overlay agarose solidifies quickly. To avoid bubbles, tilt the cassette
slightly to allow bubbles to escape. Push gently on the plastic backings of the strip to free any
trapped bubbles.
9.4 Second-Dimension Electrophoresis
Place the cassettes in to the Mini-PROTEAN® Tetra cell and start the run using the run conditions for
SDS-PAGE. Use the migration of the bromophenol blue in the overlay agarose to monitor the progress
of the run.
22 Technical Support: 1-800-4BIORAD • 1-800-424-6723 • www.bio-rad.com
Page 29

10
Detection
10.1 SDS-PAGE and Native PAGE Detection
Following electrophoresis, stain the gel with a total protein stain to visualize the proteins (Table 10.1).
Table 10.1. Total protein gel stains for use with Mini-PROTEAN gels.
Stain
Mini-PROTEAN TGX Gels
Coomassie
R-250
™
Bio-Safe
Coomassie
Zinc stain
1
Sensitivity
(Lower
Limit)
36 –47 ng ~0.5 Laboratory
8–28 ng ~0.5 Nonhazardous 43 070 51
6–12 ng ~0.2 High contrast, fast,
Optimum
Protein Load
(µg/Band)
Advantages
standard
reversible
Disadvantages
Requires
methanol
destaining
Negative SDSPAGE stain, must
be photographed
Imaging
Photography
with white light
or transmission
densitometry
Manual
Consult
literature
4006082
Silver
Stain Plus™ kit
Silver stain 0.6–1. 2 n g ~0.01 Stains complex
™
Dodeca
silver stain kit
™
Oriole
fluorescent
1
gel stain
SYPRO
Ruby protein
gel stain
Flamingo
fluorescent gel
stain
Stain-free
imaging
1
Do not use zinc stain or Oriole fluorescent gel stain to stain native gels.
™
0.6–1.2 n g ~0.01 Sensitive, robust,
mass spectrometry
compatible
proteins (glyco- or
lipoproteins)
0. 5–1.2 n g ~ 0.1 Convenient
staining for a large
number of gels
~2 ng ~0.1 High sensitivity,
broad dynamic
range, simple
one-step protocol
1–10 ng ~ 0.1 Broad dynamic
range
0.25– 0.5 ng ~0.02 Broad dynamic
range, mass
spectrometry
compatible
2–28 ng ~0.5 Rapid (<5 min),
compatible with
blotting and mass
spectrometry,
simple protocol
with no additional
reagents
Does not stain
glycoproteins
well
Not mass
spectrometry
compatible
Requires laseror LED-based
imaging
instrument for
maximum
sensitivity
Requires
tryptophan
residues in
proteins for
detection
Fluorescence
visualization
with UV transillumination
Fluorescence
visualization
with UV,
LED, or laser
scanning
Fluorescence
using stain- free
compatible
imaging system
LIT4 42
LIT34
4110 15 0
10017295
400 6173
10003321
10014472
Technical Support: 1-800-4BIORAD • 1-800-424-6723 • www.bio-rad.com 23
Page 30

Mini-PROTEAN Precast Gels
10.2 Peptide Gel Staining
Peptides and small proteins are prone to diffusion and loss during staining. The following protocol
includes a fixing step prior to staining to prevent sample loss and is suitable for detection of bands as
low as 10–20 ng.
Fixative solution 40% methanol, 10% acetic acid
Stain solution 0.025% (w/v) Coomassie Blue G-250, 10% acetic acid
Destain solution 10% acetic acid
Place gels in fixative solution and equilibrate for 30 min. Stain gels with stain solution for 1 hr. Stain
should be used only once; reuse may result in loss of sensitivity. Destain gels three times for 15 min or
until the desired background is achieved. Some peptides may not be completely fixed and may diffuse
out of the gels if fixing and staining times are greatly exceeded.
10.3 TBE Gel Staining
Use Table 10.2 as a guide to selecting an appropriate staining method.
Table 10.2. TBE gel detection methods.
Method
Ethidium bromide 50 ng Classic fluorescent DNA stain Carcinogenic
Silver stain 1–2 ng More sensitive than ethidium bromide Requires multiple steps
SYBR® Green 0.02–2 ng High sensitivity Multiple steps, –20°C storage
SYBR® Safe 0.5 ng Non-hazardous Multiple steps
Sensitivity
(Lower Limit)
Advantages
Disadvantages
10.4 TBE-Urea Gel Staining
Use Table 10.3 as a guide to selecting an appropriate staining method.
Table 10.3. TBE-urea gel detection methods.
Method
Ethidium bromide 10 ng Classic fluorescent DNA stain Carcinogenic
SYBR® Green 0.02–2 ng High sensitivity Requires multiple steps, −20°C
Silver stain 1–2 ng More sensitive than ethidium bromide Requires multiple steps
Sensitivity
(Lower Limit)
Advantages
Disadvantages
storage
24 Technical Support: 1-800-4BIORAD • 1-800-424-6723 • www.bio-rad.com
Page 31

11
Blotting
11.1 Introduction
Western blotting is an electrophoretic technique used to move proteins from a gel onto a solid support,
such as a nitrocellulose or PVDF membrane. The membrane can be used for immunological or
biochemical analyses or demonstration of protein-protein or protein-ligand interactions.
Below are guidelines for western blotting of Mini-PROTEAN® precast gels onto nitrocellulose or PVDF
membranes using either wet or semi-dry transfer techniques. After transfer, assess transfer efficiency
using a total protein blot stain (see Section 11.3); with Mini-PROTEAN® TGX Stain-Free™ gels, transfer
efficiency to low fluorescence PVDF membranes may also be assessed using the Gel Doc™ EZ or
ChemiDoc™ MP imager (see Chapter 5; activate the gel before blotting).
See Appendix B for buffer formulations. Do not adjust pH unless directed to do so.
11.2 Transfer
11.2.1 Transfer Buffers
Towbin buffer (1x) 25 mM Tris, 192 mM glycine, 20% (v/v) methanol (pH 8.3)
Dilute 100 ml 10x stock (catalog #161-0734) with 400 ml diH2O.
Add 200 ml methanol, then adjust volume to 1 L with diH2O.
Add SDS to 0.1% to promote transfer of high molecular weight proteins.
11.2.2 Wet Transfer Using the Mini Trans-Blot® Module
1. Equilibrate the gels in transfer buffer for 10–20 min prior to blot assembly.
2. Assemble the Mini Trans-Blot cassette. Place the gel closest to the black plate and the membrane
closest to the red plate of the cassette. Use a roller to remove air trapped between the layers of the
blot assembly.
Wet PVDF membranes in methanol before soaking in transfer buffer.
3. Place the assembled cassette into the transfer module and tank. The red cassette plate should face
the red side of the transfer module. Repeat steps 2 and 3 for a second blot, if needed.
4. Add the cooling unit and stirbar, and fill the tank with transfer buffer. Place the tank on a stir plate,
and begin stirring to maintain even buffer temperature and ion concentration during the transfer.
5. Connect the Mini Trans-Blot cell to a suitable power supply and begin transfer.
For many proteins, excellent transfer efficiency is obtained in 30 min at a constant voltage of 100 V. For
best results, optimize conditions for proteins of interest. Large proteins (>150 kD) may take 60 min, while
smaller proteins (<30 kD) may transfer in 20 min. Refer to the Mini Trans-Blot Instruction Manual (bulletin
1703910) or the Protein Blotting Guide (bulletin 2895) for additional information.
Technical Support: 1-800-4BIORAD • 1-800-424-6723 • www.bio-rad.com 25
Page 32

Mini-PROTEAN Precast Gels
Foam pad
Filter paper
Membrane
Gel
Filter paper
Foam pad
Assembly of the Mini-Trans-Blot cassette.
11.2.3 Transfer Using the Trans-Blot® Turbo™ System
1. Open the transfer pack and assemble the components on the cassette in the order shown. For best
results, use the roller to remove any air trapped between the layers. If using a single mini or midi
sandwich, place the sandwich in the middle of the cassette bottom. With two mini gels, place the
sandwiches on a midi stack with the foot of each gel facing the center of the stack.
2. Place the lid on the cassette and lock the lid in place by turning the knob clockwise, using the
symbols on the lid as a guide. Slide the cassette into the appropriate bay of the Trans-Blot Turbo cell.
Each cassette and bay can hold up to two mini gels or one midi gel (Table 11.1).
3. Start the transfer. With the cassette in the cell, press TURBO and select the gel type. Press A:RUN
or B:RUN to begin the transfer. Press LIST to select a Bio-Rad optimized protocol (Table 11.2) or a
user-defined protocol. Press NEW to create and run a new protocol.
4. When transfer completes, RUN COMPLETE appears. Pull the cassette straight out of the slot and
unlock the lid. Disassemble the blotting sandwich.
Refer to the Trans-Blot Turbo Instruction Manual (bulletin 10020688) for complete instructions.
Cassette top
(–) electrode (cathode)
Top ion reservoir stack
Gel
Membrane
Bottom ion reservoir
stack
Assembly of the gel blot sandwich with the Trans-Blot Turbo system.
26 Technical Support: 1-800-4BIORAD • 1-800-424-6723 • www.bio-rad.com
Cassette bottom
(+) electrode (anode)
Page 33

Instruction Manual and Application Guide
Table 11.1. Placement of cassettes in the Trans-Blot Turbo cell.
Acceptable Unacceptable
Option 1 Option 2 Option 1 Option 2
Upper bay (A) 1 mini gel 2 mini gels -or- 1 midi gel 1 mini gel 2 mini gels -or- 1 midi gel
-a nd/or- -a nd /or- -and- -and-
Lower bay (B) 1 mini gel 2 mini gels -or- 1 midi gel 2 mini gels -or- 1 midi gel 1 mini gel
Table 11.2. Trans-Blot Turbo transfer protocols.
Protocol Name MW, kD Time, Min 1 Mini Gel 2 Mini Gels or 1 Midi Gel
STA ND AR D SD Any 30 Up to 1.0 A, 25 V constant Up to 1.0 A, 25 V constant
1.5 MM GEL Any 10 2.5 A constant, up to 25 V 1.3 A constant, up to 25 V
HIGH MW >15 0 10 2.5 A constant, up to 25 V 1.3 A constant, up to 25 V
LOW MW <30 5 2.5 A constant, up to 25 V 1.3 A constant, up to 25 V
MIXED MW 5–15 0 7 2.5 A constant, up to 25 V 1.3 A constant, up to 25 V
1 Mini TGX 5–150 3 2.5 A constant, up to 25 V N/A
11.2.4 Semi-Dry Transfer Using the Trans-Blot® SD Cell
1. Equilibrate the gels in transfer buffer for 10–20 min.
2. Assemble the blot for transfer using the Trans-Blot SD semi-dry transfer system.
3. Connect the Trans-Blot SD cell to a PowerPac™ Basic power supply and begin transfer at 25 V.
Optimum transfer efficiency is generally obtained in 30 min; smaller proteins (<30 kD) may transfer more
quickly, while proteins >150 kD may show increased transfer efficiencies at up to 60 min. Run times
longer than 60 min are NOT recommended for semi-dry transfers. Refer to the Trans-Blot SD Instruction
Manual (bulletin 1703940) or the Protein Blotting Guide (bulletin 2895) for additional information.
(–)
Filter paper
Gel
Membrane
Filter paper
(+)
Assembly of the Trans-Blot SD semi-dry cell.
Technical Support: 1-800-4BIORAD • 1-800-424-6723 • www.bio-rad.com 27
Page 34

Mini-PROTEAN Precast Gels
11.3 Total Protein Blot Stains
Total protein staining of a membrane provides an image of the complete protein pattern, which is
required for the full characterization of specific antigens detected in complex protein mixtures. Gels
shrink during staining, so comparison of an immunologically probed membrane to a stained gel is
not practical. Instead, the exact location of a specifc antigen is determined by comparing two blotted
membranes: one that has been probed with an antibody and the other stained for total protein.
Table 11.3. Total protein blot stains.
Method
SYPRO Ruby
protein blot stain
Sensitivity
2–8 ng ~0.2 Compatible with
Protein
Load
(μg/Band)
Advantages
mass spectrometry,
Edman-based
sequencing,
and standard
immunological
procedures
Disadvantages
Multistep protocol
requires UV, LED,
or laser imaging for
maximum sensitivity
Imaging
Fluorescence
visualization
with UV, LED
epi-illumination or
laser scanning
Colloidal gold stain 1 ng ~0.1 High sensitivity;
single-step protocol
Anionic dyes
(amido black,
Coomassie R-250,
Ponceau S, Fast
Green FCF)
100–1,000 ng ~5.0 Inexpensive, rapid Low sensitivity
Incompatible with nylon
membranes
Photography with
epi-illumination
or reflectance
densitometry
To visualize total protein on blots using the stain-free system, see Section 5.4.
11.4 Immunodetection
After transfer, blots are ready for downstream processing. Though all protein and antibody combinations
are different and may require optimization, a general protocol for immunodetection of a large number of
protein and antibody combinations is listed below. See Appendix B for buffer formulations.
1. Immediately after transfer, place the membrane into Tris-buffered saline with Tween 20 (TTBS)
containing blocking agent (for example, 3% BSA, 5% nonfat dry milk, 1% casein, or 1% gelatin) and
incubate either for 1 hr at room temperature or overnight at 4°C.
2. Dilute the primary antibody in blocking solution (dilution is specified by the manufacturer). Incubate
at room temperature with agitation for 1 hr.
3. Wash the blot with TTBS as directed (for example, five times, 5 min each at room temperature with
agitation).
4. Dilute the secondary antibody into TTBS as specified by the manufacturer. Incubate the blot in the
secondary solution at room temperature with agitation for 1 hr.
5. Wash the blot with TTBS five times, 5 min each at room temperature with agitation.
6. Follow the directions for the detection kit used to develop the blot. For the Immun-Star™ WesternC™
chemiluminescence kit (catalog #170-5070), mix 3 ml luminol/enhancer with 3 ml peroxide solution
to make a 1x working solution for a 7 x 8.5 cm membrane. Incubate the membrane in the solution
for 3–5 min. Prior to imaging, drain the excess substrate and place the membrane in a protective
sleeve (such as plastic wrap) to prevent drying.
28 Technical Support: 1-800-4BIORAD • 1-800-424-6723 • www.bio-rad.com
Page 35

12
Table 12.1. Troubleshooting electrophoresis and detection with Mini-PROTEAN® gels. For more troubleshooting tips,
refer to the relevant instrument instruction manuals or contact Technical Support.
Current is zero or less than
expected, and samples do not
migrate into gel
Troubleshooting
Problem Cause Solution
Tape at bottom of cassette not removed Remove tape
Insufficient buffer in inner buffer
chamber
Fill buffer chamber with running buffer
Insufficient buffer in outer buffer
chamber
Incorrect cassette orientation Ensure shorter plate is facing gasket
Electrical disconnection Check electrodes and connections
Gels run faster than expected Running buffer too concentrated or
incorrect
Gel temperature too high Do not exceed recommended running
Gels run more slowly than expected Companion running module left in tank
when running only 1–2 gels
Buffer leaking from inner chamber Incomplete gasket seal Wet gasket with running buffer before use
Improper assembly of the gel into the
electrode/companion module
Bands “smile” across gel: band
pattern curves upward at both
sides of gel
Excessive heating of gel Check buffer composition
Insufficient buffer Fill inner and outer chambers to ensure
Fill inner and outer chambers to ensure
wells of the gels are completely covered
Check buffer composition
conditions
Remove companion running module
Top edge of short plate should fit under
notch at top of gasket
Top of short plate should touch green
gasket
Do not exceed recommended running
conditions
wells of gels are completely covered
Bands “smile” or “frown” within gel
lanes
Protein load too high Load less protein
Sample or buffer preparation issues Minimize salts, detergents, and solvents
in sample preparation and sample loading
buffers
Incorrect running conditions Set correct voltage
Technical Support: 1-800-4BIORAD • 1-800-424-6723 • www.bio-rad.com 29
Page 36

Mini-PROTEAN Precast Gels
Problem Cause Solution
Bands are skewed or distorted;
lateral band spreading
Artifactual bands at
60 –70 kD
Poor resolution or fuzzy bands Sample volume is too high If possible, load a more concentrated
Too much salt in samples Remove salt from samples (dialysis,
precipitation, or other method)
Insufficient or wrong sample buffer Check buffer composition and dilution
Sample precipitation Selectively remove predominant proteins
Dilute sample in sample buffer
Insoluble materials (for example, cell
membranes) in samples
Skin keratin contamination Clean all dishware; wear gloves while
Diffuse sample loading zone Load sample with a syringe or gel loading
Centrifuge samples to remove particulates
prior to sample loading
handling and loading gels
Filter all solutions (0.2–0.45 µm filter)
sample in a lower sample buffer volume
pipet tip
Sample diffusion during staining with
Coomassie
Incompatible sample components Minimize salts, detergents, and solvents in
Expired gel Use gels before expiration date on cassette
Fix gel with 40% methanol, 10% acetic acid
for 80 min prior to staining
sample preparation and loading buffers
Mini-PROTEAN® TGX Stain-Free™ Gels
Low sensitivity for proteins Low tryptophan content in proteins After activation and imaging, stain gel with
Bio-Safe™ Coomassie or similar to detect
missing bands
Uneven sensitivity or fuzzy bands Gel was soaked in water or buffer prior
to activation and imaging
Bands are too light or missing from
blot (membrane)
Standards are not visible Incorrect standards were used Use unstained standards; some prestained
Dye front at bottom of gels
interferes with detection of proteins
Proteins transferred through membrane Use membrane with smaller pore size
Sample constituents present in gel
interfering with imaging
If possible, activate and image gel
immediately after electrophoresis
Decrease transfer time
Decrease voltage
standards are not detected by the imager.
To monitor electrophoresis, use a 1:1
mixture of unstained and prestained
standards
Dilute sample in gel running buffer prior to
loading
Activate and image gel, rinse in fixation
solution for 30 min, and repeat imaging
Signal intensity on blot is lower than
expected
Sample bands are faint relative to
prestained standards
Trihalo compounds bound to
tryptophan residues inhibit binding of
some antibodies
Brightness of prestained standards can
limit exposure times for sample bands
Blot gel without stain-free activation. If
signal intensity is restored, use another
(preferably polyclonal) antibody, if available
In Image Lab™ software, select Faint
Bands to optimize exposure time or
manually define longer exposure
Adjust transform to optimize contrast for
fainter bands
30 Technical Support: 1-800-4BIORAD • 1-800-424-6723 • www.bio-rad.com
Page 37

A
This section contains abbreviated protocls (quick start guides) for the following electrophoretic
techniques. Directions are for use of Mini-PROTEAN® precast gels and the Mini-PROTEAN® Tetra ce ll.
Quick Start Guides
n
SDS-PAGE using Mini-PROTEAN® TGX™ or Mini-PROTEAN® TGX Stain-Free™ precast gels
n
Native PAGE using Mini-PROTEAN TGX or Mini-PROTEAN TGX Stain-Free precast gels
n
Peptide analysis using Mini-PROTEAN Tris-Tricine gels
n
Nondenaturing PAGE of nucleic acids using Mini-PROTEAN TBE gels
n
Denaturing PAGE of nucleic acids using Mini-PROTEAN TBE-urea gels
Technical Support: 1-800-4BIORAD • 1-800-424-6723 • www.bio-rad.com 31
Page 38

Mini-PROTEAN Precast Gels
SDS-PAGE (Mini-PROTEAN TGX Gels)
Prepare Buffers
Running buffer (1x) Dilute 100 ml 10x stock (catalog #161-0732) with 900 ml diH2O.
Sample buffer Use Laemmli sample buffers: catalog #161-0737 or catalog #161-0747 (4x).
Prepare Gels and
Assemble Electrophoresis Cell
Remove the comb and tape from the gels, rinse wells, and assemble the electrophoresis cell.
Fill the inner and outer buffer chambers with running buffer.
Prepare and Load Samples
Component Reducing Nonreducing
Sample 5 μl 5 μl
Laemmli sample buffer, 2x
4.75 μl 5 μl
(catalog #161-0737)
β-Mercaptoethanol 0.25 μl —
Total volume 10 μl 10 μl
Heat samples at 90–100°C for 5 min (or at 70°C for 10 min).
Load the appropriate amount of sample on the gel.
Perform Electrophoresis
Connect the electrophoresis cell to the power supply and perform electrophoresis according to
the conditions in the table.
Table A.1. Running conditions for SDS-PAGE in the Mini-PROTEAN Tetra cell. Standard conditions are constant 300 V.
100 V 200 V 300 V
Run time 85–95 min 30–40 min 15–20 min
Expected current (per gel)
Initial 15–20 mA 25–50 mA 55–75 mA
Final 5–10 mA 20–31 mA 45–70 mA
Expected temperature 25°C 25–35°C 30–45°C
Outer buf fer volume
1–2 Gels 2-gel mark 2-gel mark 4-gel mark
3–4 Gels 4-gel mark 4-gel mark 4-gel mark
1
Requires the PowerPac™ HV or PowerPac Universal power supply.
1
32 Technical Support: 1-800-4BIORAD • 1-800-424-6723 • www.bio-rad.com
Page 39

Instruction Manual and Application Guide
Native PAGE (Mini-PROTEAN TGX Gels)
Prepare Buffers
Running buffer (1x) Dilute 100 ml 10x stock (catalog #161-0734) with 900 ml diH2O.
Sample buffer Use native sample buffer (catalog #161-0738)
Prepare Gels and
Assemble Electrophoresis Cell
Remove the comb and tape from the gels, rinse wells, and assemble the electrophoresis cell.
Fill the inner and outer buffer chambers with running buffer.
Prepare and Load Samples
Component Volume
Sample 5 μl
Native sample buffer
5 μl
(catalog #161-0738)
Total volume 10 μl
Load the appropriate amount of sample on the gel.
Perform Electrophoresis
Connect the electrophoresis cell to the power supply and perform electrophoresis according to
the conditions in the table.
Table A.2. Standard running conditions for native PAGE with one (1) Mini-PROTEAN TGX gel in the Mini-PROTEAN
Tetra cell. Run conditions and times are approximate and assume a constant voltage of 200 V. When running more than one
gel, current will differ but temperature and run time should be close to those listed.
Current (mA) at 200 V
Gel Initial Final Temperature Run Time
1 Gel (buffer to 2-gel mark)
7.5% 35–37 17–20 28–30°C 38 –40 min
10%
12%
4–15% 50–55 25–28 30–33°C 30–34 min
4–20%
Any kD™
Technical Support: 1-800-4BIORAD • 1-800-424-6723 • www.bio-rad.com 33
Page 40

Mini-PROTEAN Precast Gels
Peptide Analysis (Mini-PROTEAN Tris-Tricine Gels)
Prepare Buffers
Running buffer (1x) Dilute 100 ml 10x stock (catalog #161-0744) with 900 ml diH2O.
Sample buffer (2x) 200 mM Tris-HCl, pH 6.8, 2% SDS, 40% glycerol, 0.04% Coomassie
(catalog #161-0739) Brilliant Blue G-250, 2% ß-mercaptoethanol or 350 mM DTT (added fresh)
Prepare Gels and
Assemble Electrophoresis Cell
Remove the comb and tape from the gels and assemble the electrophoresis cell.
Fill the inner and outer buffer chambers with running buffer.
Prepare and Load Samples
Component Reducing Nonreducing
Sample 5 μl 5 μl
Sample buffer
4.75 μl 5 μl
(catalog #161-0739)
β-Mercaptoethanol 0.25 μl —
Total volume 10 μl 10 μl
Heat samples at 90–100°C for 5 min or at 70°C for 10 min.
Load the appropriate amount of sample on the gel.
Perform Electrophoresis
Connect the electrophoresis cell to the power supply and perform electrophoresis according to
the conditions in the table.
Table A.3. Running conditions for one (1) Mini-PROTEAN Tricine gel in the Mini-PROTEAN Tetra cell. Run conditions
and times are approximate and assume a constant voltage of 100 V. When running more than one gel, current will differ.
16.5% Gels 10–20% Gels
Power conditions 100 V constant 100 V constant
Expected current (per gel)
Initial 65 mA 65 mA
Final 35 mA 35 mA
Run time 100 min 100 min
34 Technical Support: 1-800-4BIORAD • 1-800-424-6723 • www.bio-rad.com
Page 41

Instruction Manual and Application Guide
Nondenaturing Nucleic Acid PAGE (Mini-PROTEAN TBE Gels)
Prepare Buffers
Running buffer (1x) Dilute 100 ml 10x stock (catalog #161-0733) with 900 ml diH2O.
Sample buffer (5x) 50 mM Tris-HCl, pH 8.0, 5mM EDTA, 25% glycerol, 0.2% bromophenol
(catalog #161-0767) blue, 0.2% xylene cyanole FF
Prepare Gels and
Assemble Electrophoresis Cell
Remove the comb and tape from the gels and assemble the electrophoresis cell.
Fill the inner and outer buffer chambers with running buffer.
Prepare and Load Samples
Component Amount
Sample 8 μl
Sample buffer
2 μl
(catalog #161-0767)
Total volume 10 μl
Load the appropriate amount of sample on the gel.
Perform Electrophoresis
Connect the electrophoresis cell to the power supply and perform electrophoresis according to
the conditions in the table.
Table A.4. Running conditions for nondenaturing nucleic acid PAGE with one (1) Mini-PROTEAN TBE gel in the
Mini-PROTEAN Tetra cell. Run conditions and times are approximate and assume a constant voltage of 100 V. When running
more than one gel, current will differ.
5% Gels 10% Gels 15% Gels 4–20% Gels
Power conditions 100 V constant 100 V constant 100 V constant 100 V constant
Expected current (per gel)
Initial 15 mA 15 mA 15 mA 15 mA
Final 10 mA 10 mA 10 mA 10 mA
Run time 45 –60 min 60–75 min 75–90 min 90–105 min
Technical Support: 1-800-4BIORAD • 1-800-424-6723 • www.bio-rad.com 35
Page 42

Mini-PROTEAN Precast Gels
Denaturing Nucleic Acid PAGE (Mini-PROTEAN TBE-Urea Gels)
Prepare Buffers
Running buffer (1x) Dilute 100 ml 10x stock (catalog #161-0733) with 900 ml diH2O.
Sample buffer (5x) 89 mM Tris, 89 mM boric acid, 2 mM EDTA, pH 8.0, 12% Ficoll,
(catalog #161-0768) 0.01% bromophenol blue, 0.02% xylene cyanole FF, 7 M urea
Prepare Gels and
Assemble Electrophoresis Cell
Remove the comb and tape from the gels and assemble the electrophoresis cell.
Fill the inner and outer buffer chambers with running buffer.
Prepare and Load Samples
Component Amount
Sample 8 μl
Sample buffer
2 μl
(catalog #161-0768)
Total volume 10 μl
Load the appropriate amount of sample on the gel.
Perform Electrophoresis
Connect the electrophoresis cell to the power supply and perform electrophoresis according to
the conditions in the table.
Table A.5. Running conditions for denaturing nucleic acid PAGE with one (1) Mini-PROTEAN TBE-urea gel in the
Mini-PROTEAN Tetra cell. Run conditions and times are approximate and assume a constant voltage of 200 V. When running
more than one gel, current will differ.
10% Gels 15% Gels
Power conditions 200 V constant 200 V constant
Expected current (per gel)
Initial 15 mA 15 mA
Final 10 mA 10 mA
Run time 45–60 min 60–75 min
36 Technical Support: 1-800-4BIORAD • 1-800-424-6723 • www.bio-rad.com
Page 43

B
Buffers
Running Buffers
10x SDS-PAGE (1 L) 250 mM Tris, 1.92 M glycine, 1% SDS, pH 8.3
(catalog #161-0732)
Tris base 30.3 g
Glycine 144.1 g
SDS 10 g
diH2O to 1 L
Do not adjust the pH (~pH 8.3)
10x Native PAGE (1 L) 250 mM Tris, 1.92 M glycine, pH 8.3
(catalog #161-0734)
Tris base 30.3 g
Glycine 144.1 g
diH2O to 1 L
Do not adjust the pH (~pH 8.3)
10x Tris-Tricine (1 L) 1 M Tris, 1 M Tricine, 1% SDS, pH 8.3
(catalog #161-0744)
Tris base 121.1 g
Tricine 179.2 g
SDS 10 g
diH2O to 1 L
Do not adjust the pH (~pH 8.3)
10x TBE (1 L) 890 mM Tris, 890 mM boric acid, 20 mM EDTA
(catalog #161-0741)
Tris base 107.8 g
Boric acid 55.0 g
EDTA 5.8 g
diH2O to 1 L
Do not adjust the pH (~pH 8.3)
Technical Support: 1-800-4BIORAD • 1-800-424-6723 • www.bio-rad.com 37
Page 44

Mini-PROTEAN Precast Gels
Sample Buffers
2x SDS-PAGE (Laemmli, 30 ml) 62.5 mM Tris-HCl, pH 6.8, 2% SDS, 25% glycerol, 0.01%
(catalog #161-0737) bromophenol blue, 5% β-mercaptoethanol (added fresh)
0.5 M Tris-HCl, pH 6.8 3.75 ml
50% Glycerol 15.0 ml
1.0% Bromophenol blue 0.3 ml
10% SDS 6.0 ml
diH2O to 30 ml
Add β-mercaptoethanol (50 µl to 950 µl sample buffer)
before use.
2x Native PAGE (30 ml) 62.5 mM Tris-HCl, pH 6.8, 40% glycerol, 0.01%
(catalog #161-0738) bromophenol blue
0.5 M Tris-HCl, pH 6.8 3.75 ml
50% Glycerol 24 ml
1.0% Bromophenol blue 0.3 ml
diH2O to 30 ml
2x Tricine (30 ml) 200 mM Tris-HCl, pH 6.8, 2% SDS, 40% glycerol, 0.04%
(catalog #161-0739) Coomassie Brilliant Blue G-250, 2% β-mercaptoethanol
(added fresh)
1.0 M Tris-HCl, pH 6.8 6.0 ml
100% Glycerol 12.0 ml
10% SDS 6.0 ml
Coomassie Blue G-250 12.0 mg
diH2O to 30 ml
Add β-mercaptoethanol (20 µl to 980 µl sample buffer)
before use.
5x Nucleic acid (10 ml) 50 mM Tris-HCl, pH 8.0, 5 mM EDTA, 25% glycerol, 0.2%
(catalog #161-0767) bromophenol blue, 0.2% xylene cyanole FF
Tris base 78.8 mg
50% Glycerol 5 ml
EDTA 14.6 mg
1.0% Bromophenol blue 2.0 ml
Xylene cyanole FF 20.0 mg
diH2O to 10 ml
38 Technical Support: 1-800-4BIORAD • 1-800-424-6723 • www.bio-rad.com
Page 45

Instruction Manual and Application Guide
TBE-urea (30 ml) 89 mM Tris, 89 mM boric acid, 2 mM EDTA, pH 8.0, 12%
(catalog #161-0768) Ficoll, 0.01% bromophenol blue, 0.02% xylene cyanole,
Store at 4°C 7 M urea
Tris base 0.32 g
Boric acid 0.165 g
EDTA 17.5 mg
Ficoll 3.6 g
Bromophenol blue 3 mg
Xylene cyanole FF 6 mg
Urea 12.6 g
diH2O to 30 ml
Buffer Components
0.5 M Tris-HCl, pH 6.8 (1 L) Tris base 60.6 g
(catalog #161-0799) diH2O ~900 ml
Store at 4°C Adjust to pH 6.8 with HCl
diH2O to 1 L
10% SDS (250 ml) SDS 25.0 g
(catalog #161-0416) di H2O to 250 ml
1.0% Bromophenol blue (10 ml) Bromophenol blue 100 mg
(10 g powder, catalog #161-0404) diH2O to 10 ml
Blotting Buffers
Towbin buffer (1 L) 25 mM Tris, 192 mM glycine, 20% methanol
Dissolve: Tris base 3.03 g
Glycine 14.4 g
diH2O 500 ml
Then add: Methanol 200 ml
diH2O to 1 L
Alternatively, use: 10x Tris/glycine (catalog #161-0734) 100 ml
Add 200 ml methanol and diH2O to 1 L as above
Tris-buffered saline with 20 mM Tris, 500 mM NaCl, 0.05% Tween 20
Tween (TTBS, 1 L)
Tris base 2.4 g
NaCl 29.2 g
10% Tween 20 5.0 ml
diH2O to 1 L
Alternatively, use: 10x TBS (catalog #170-6435) 100 ml
10% Tween 20 (catalog #166-2404) 5 ml
diH2O 895 ml
Technical Support: 1-800-4BIORAD • 1-800-424-6723 • www.bio-rad.com 39
Page 46

C
Bulletin # Title
10007296 Mini-PROTEAN® Tetra Cell Instruction Manual
4006191 Mini-PROTEAN® 3 Dodeca™ Cell Instruction Manual
1703930 Mini Trans-Blot® Instruction Manual
10020688 Trans-Blot® Turb o™ Blotting System Instruction Manual
4006066 Trans-Blot® SD Semi-Dry Transfer Cell Quick Reference Guide
1703940 Trans-Blot SD Semi-Dry Transfer Cell Instruction Manual
10014472 Ge l D oc™ EZ System Installation Guide
10019634 Stain-Free™ Sample Tray Instruction Manual
10022469 ChemiDoc™ MP System with Image Lab Software Instruction Manual
5871 Mini-PROTEAN® TGX™ Precast Gels Product Information Sheet
5535 Mini-PROTEAN Tetra Cell Brochure
Related Literature
2895 Protein Blotting Guide
3133 Molecular Weight Determination by SDS-PAGE
3144 Using Precision Plus Protein™ Standards to Determine Molecular Weight
6088 Bio-Rad V3 Western Workflow™ Brochure
1939 Blotting Membrane Brochure
6116 Immun-Blot® LF PVDF Membranes Product Information Sheet
2032 Western Blotting Detection Reagent Brochure
2317 Ready-to-Run Buffers and Solutions Brochure
2414 The Little Book of Standards
40 Technical Support: 1-800-4BIORAD • 1-800-424-6723 • www.bio-rad.com
Page 47

D
Mini-PROTEAN® TGX™ Precast Gels
10 Gels per Box
7. 5% 456 -10 29 45 6-1023 4 56-1024 456 -1025 4 56-1026 4 56-1021
10% 456-1039 456-1033 456 -103 4 45 6 -10 35 456 -103 6 4 56-1031
12% 456-1049 456 -10 4 3 4 56-1044 456-1045 456-1046 4 56-1041
4–15% 4 56-1089 4 5 6-10 83 456 -108 4 45 6 -10 85 456 -108 6 4 56-1081
4–20% 456 -109 9 4 56-1093 456-1094 4 56-1095 4 56-1096 4 56-1091
8-16% 4 5 6 -1109 4 56-110 3 4 5 6 -1104 4 5 6 -1105 4 5 6 -1106 4 5 6 -1101
Any kD
Mini-PROTEAN® TGX Stain-Free™ Precast Gels
10 Gels per Box
7. 5% 456-8029 456-8023 456-8024 456-8025 456-8026 456-8021
10% 456-8039 456-8033 456-8034 456-8035 456-8036 456-8031
12%
4–15%
4-20%
8-16%
Any kD 45 6-8129 456 -8123 45 6-8124 456-8125 456 -8126 546-8121
™
Ordering Information
8+1 Wel l 10-Well 12-Well 15-Well IPG/Prep
7 cm IPG strip
(30 µl/well) (30 µl/well) (50 µl/well) (20 µl/well) (15 µl/well) (450 µl/well)
456-9039 456-9033 456-9034 456-9035 456-9036 456-9031
8+1 Wel l 10-Well 12-Well 15-Well IPG/Prep
7 cm IPG strip
(30 µl/well) (30 µl/well) (50 µl/well) (20 µl/well) (15 µl/well) (450 µl/well)
456-8049
456-8089
456-8099
456- 8109
456-8043
456-8083
456-8093
456- 8103
456-8044
456-8084
456-8094
456- 8104
456-8045
456-8085
456-8095
456- 8105
456-8046
456-8086
456-8096
456- 8106
456 -80 41
456-8081
456-8091
456- 8101
Note: Mini-PROTEAN TGX and TGX Stain-Free gels are available in 10-packs (catalog numbers listed)
or 2-packs (add an "S" to the end of the catalog number listed).
Technical Support: 1-800-4BIORAD • 1-800-424-6723 • www.bio-rad.com 41
Page 48

Mini-PROTEAN Precast Gels
Mini-PROTEAN Tris-Tricine Precast Gels
2 Gels per Box
10-Well 15-Well
(30 µl/well) (50 µl/well) (15 µl/well)
16.5% 456-3063 456-3064 456-3066
10–20% 4 5 6 -3113 4 5 6 - 3114 4 5 6 - 3116
Mini-PROTEAN TBE Precast Gels
2 Gels per Box 2 Gels per Box
10-Well 15-Well 10-Well 15 -Well
(30 µl/well) (50 µl/well) (15 µl/well) (30 µl/well) (50 µl/well (15 µl/well)
5% 456-5013 456-5014 456-5016 15% 456-5053 456-5054 456-5056
10% 456-5033 456-5034 456-5036 4–20% 456-5093 456-5094 456-5096
Catalog # Description
Protein Standards
161-0363 Precision Plus Protein™ Unstained Standards (10–250 kD), 1 ml, 100 applications
Mini-PROTEAN TBE-Urea Precast Gels
2 Gels per Box
10-Well 15-Well
(30 µl/well) (15 µl/well)
10% 456-6033 456-6036
15% 456-6053 456-6056
161-0373 Precision Plus Protein All Blue Standards (10–250 kD), 500 μl, 50 applications
161-0374 Precision Plus Protein Dual Color Standards (10–250 kD), 500 μl, 50 applications
161-0375 Precision Plus Protein™ Kaleidoscope™ Standards (10–250 kD), 500 μl, 50 applications
161-0376 Precision Plus Protein™ WesternC™ Standards (10–250 kD), 250 μl, 50 applications
161-0377 Precision Plus Protein Dual Xtra Standards (2–250 kD), 500 μl, 50 applications
161-0385 Precision Plus Protein WesternC Pack (10–250 kD), 50 applications
161-0317 SDS-PAGE Standards, broad range, 200 μl
Equipment
165-8004 Mini-PROTEAN® Tetra Cell for Ready Gel™ Precast Plates (4-gel system)
165-8005 Mini-PROTEAN Tetra Cell for Ready Gel Precast plates (2-gel system)
165-4100 Mini-PROTEAN® 3 Dodeca™ Cell
170-3930 Mini Trans-Blot® Electrophoretic Transfer Cell
170-3940 Trans-Blot® SD Semi-Dry Electrophoretic Transfer Cell
170 -4155 Tran s-B lot® Turb o™ Transfer Starter System
164-5050 PowerPac™ Basic Power Supply
164-5052 PowerPac HC High Current Power Supply
170-8270 Gel Doc™ EZ Imaging System
170-8274 Stain-Free™ Sample Tray
170-8280 ChemiDoc™ MP Imaging System with Image Lab™ Software
42 Technical Support: 1-800-4BIORAD • 1-800-424-6723 • www.bio-rad.com
Page 49

Instruction Manual and Application Guide
Catalog # Description
Premixed Running Buffers
161-0732 10x Tris/Glycine/SDS, 1 L
161-0772 10x Tris/Glycine/SDS, 5 L
161-0734 10x Tris/Glycine, 1 L
161-0744 10x Tris/Tricine/SDS, 1 L
161-0733 10x Tris/Boric Acid/EDTA, 1 L
161-0770 10x Tris/Boric Acid/EDTA, 5 L
Premixed Sample Buffers
161-0737 Laemmli Sample Buffer, 30 ml*
161-0747 4x Laemmli Sample Buffer, 10 ml*
161-0738 Native Sample Buffer, 30 ml
161-0739 Tricine Sample Buffer, 30 ml
161-0767 Nucleic Acid Sample Buffer, 5x, 10 ml
161-0768 TBE-Urea Sample Buffer, 30 ml
Component Reagents
161-0719 Tris, 1 kg
161-0718 Glycine, 1 kg
161-0301 SDS, 100 g
161-0416 SDS Solution, 10% (w/v), 250 ml
166-2404 10% Tween 20, 5 ml
170-6404 Blotting-Grade Blocker, 300 g
161-0710 2-mercaptoethanol, 25 ml
161-0611 Dithiothreitol, 5 g
161-0404 Bromophenol Blue, 10 g
Blotting Membranes
162-0212 0.2 μm Nitrocellulose/Filter Paper Sandwich, 7 x 8.5 cm, 20 pack
162-0213 0.2 μm Nitrocellulose/Filter Paper Sandwich, 7 x 8.5 cm, 50 pack
162-0214 0.45 μm Nitrocellulose/Filter Paper Sandwich, 7 x 8.5 cm, 20 pack
162-0215 0.45 μm Nitrocellulose/Filter Paper Sandwich, 7 x 8.5 cm, 50 pack
162-0216 Sequi-Blot™ PVDF/Filter Paper Sandwich, 7 x 8.5 cm, 20 pack
162-0217 Sequi-Blot PVDF/Filter Paper Sandwich, 7 x 8.5 cm, 50 pack
170-4156 Trans-Blot Turbo Midi PVDF Transfer Packs
170-4158 Trans-Blot Turbo Midi Nitrocellulose Transfer Packs
162-0260 Immun-Blot® Low Fluorescence PVDF/Filter Paper Sets, 10 pack
162-0261 Immun-Blot Low Fluorescence PVDF/Filter Paper Sets, 20 pack
162-0264 Immun-Blot Low Fluorescence PVDF Membrane
*
May require addition of 2-mercaptoethanol or DTT
Technical Support: 1-800-4BIORAD • 1-800-424-6723 • www.bio-rad.com 43
Page 50

Mini-PROTEAN Precast Gels
Catalog # Description
Total Protein Gel and Blot Stains
161-0786 Bio-Safe™ Coomassie Stain, 1 L
161-0400 Coomassie Brilliant Blue R-250, 10 g
161-0436 Coomassie Brilliant Blue R-250 Stain Solution, 1 L
161-0438 Coomassie Brilliant Blue R-250 Destain Solution, 1 L
161-0443 Silver Stain Kit
161-0449 Silver Stain Plus™ Kit
170-6527 Colloidal Gold Total Protein Stain, 500 ml
161-0440 Zinc Stain and Destain Kit
170-3127 SYPRO Ruby Protein Blot Stain, 200 ml
161-0491 Flamingo™ Fluorescent Gel Stain (10x), 100 ml
161-0496 Oriole™ Fluorescent Protein Gel Stain (1x), 1 L
Immunoblot Detection Reagents
170-5070 Immun-Star™ WesternC™ Chemiluminescent Kit, 100 ml
170-6431 HRP Conjugate Substrate Kit, 4CN
170-6535 HRP Color Development Reagent, DAB, 5 g
170-8238 Amplified Opti-4CN™ Substrate Kit
170-8235 Opti-4CN Substrate Kit
170-6432 AP Conjugate Substrate Kit
170-5012 Immun-Star™ AP Substrate Pack
For additional product sizes, please refer to the Bio-Rad catalog or website.
44 Technical Support: 1-800-4BIORAD • 1-800-424-6723 • www.bio-rad.com
Page 51

Instruction Manual and Application Guide
Technical Support: 1-800-4BIORAD • 1-800-424-6723 • www.bio-rad.com 45
Page 52

Life Science
Group
Sig 12111658100 Rev F US/EG
Bio-Rad
Laboratories, Inc.
Web site ww w.bio-rad.com USA 800 424 6723 Australia 61 2 9914 2800 Austria 01 877 89 01 Belgium 09 385 55 11 Brazi l 55 11 5044 5699
Canada 905 364 3435 China 86 21 6169 8500 Cz ech Republic 420 241 430 532 Denmar k 44 52 10 00 Finland 09 804 22 00
France 01 47 95 69 65 Germany 089 31 884 0 Greece 30 210 9532 220 Hon g Kong 852 2789 3300 Hungar y 36 1 459 6100 India 91 124 4029300
Israel 03 963 6050 Italy 39 02 2 16091 Japan 03 6361 7000 Korea 82 2 3473 4460 Mex ico 52 555 488 7670 The Netherlands 0318 540666
New Zealand 64 9 415 2280 Nor way 23 38 41 30 Poland 48 22 331 99 99 Portugal 351 21 472 7700 Russia 7 495 721 14 04
Singapore 65 6415 3188 South Africa 27 861 246 723 Spain 34 91 590 5200 Sweden 08 555 1270 0 Switzerland 061 7 17 95 55
Taiwan 886 2 2578 7189 Thailand 800 88 22 88 United Kingdom 020 8328 200 0
 Loading...