

Page 1

MULTIPLEX SUSPENSION ARRAYS
Bio-Plex Data Pro™ Software
Getting Started
Page 2

BIO-RAD TECHNICAL SUPPORT DEPARTMENT
The Bio-Rad Technical Support Department in the U.S. is open Monday through Friday, 5:00 a.m. to 5:00
p.m., Pacific Standard Time. Worldwide technical support is available on the Web at www.consult.bio-
rad.com.
Phone: 1-800-424-6723, option 2
Fax: 1-510-741-5802
Email: LSG.TechServ.US@Bio-Rad.com (U.S.)
LSG.TechServ.Intl@Bio-Rad.com (International)
Web: www.consult.bio-rad.com
NOTICE
No part of this publication may be reproduced or transmitted in any form or by any means, electronic or
mechanical, including photocopy, recording, or any information storage or retrieval system, without
permission in writing from Bio-Rad.
Bio-Rad reserves the right to modify its products and services at any time. This user guide is subject to
change without notice. Although prepared to ensure accuracy, Bio-Rad assumes no liability for errors or
omissions, or for any damage resulting from the application or use of this information.
The following are trademarks of Bio-Rad Laboratories: Bio-Rad, Bio-Plex, Bio-Plex Manager, and
Bio-Plex Data Pro. Luminex, xMAP, and xPONENT are trademarks of Luminex Corporation. Windows and
Excel are trademarks of Microsoft Corporation. Pentium is a trademark of Intel Corporation.
No rights or licenses under any of Luminex Corporation’s patents are granted by or shall be implied from
the sale or acquisition of this Bio-Plex system containing Luminex technology (the “System”) to you, the
end-user. By using this System, you agree that (i) the System is sold only for use with fluorescently
labeled microsphere beads authorized by Luminex (“Beads”), and (ii) you obtain rights under Luminex’s
patents to use this System by registering this System with Bio-Rad in accordance with the instructions
accompanying this System and purchasing a kit containing Beads.
Bio-Rad Laboratories, Inc. 2000 Alfred Nobel Drive, Hercules, CA 94547
Copyright © 2001–2011 by Bio-Rad Laboratories. All rights reserved.
2
Page 3

Table of Contents
Welcome . . . . . . . . . . . . . . . . . . . . . . . . . . . . . . . . . . . . . . . . . . . . . . . . . . . . . 4
1 Installing Bio-Plex Data Pro™ 1.0 Software . . . . . . . . . . . . . . . . . . . . . . . . . . 5
2 Changing Your Screen Resolution . . . . . . . . . . . . . . . . . . . . . . . . . . . . . . . . . 6
3 Bio-Plex Data Pro™ Software Licensing. . . . . . . . . . . . . . . . . . . . . . . . . . . . . 8
4 An Overview of Bio-Plex Data Pro™ Software . . . . . . . . . . . . . . . . . . . . . . . 12
5 Analyzing Your Data . . . . . . . . . . . . . . . . . . . . . . . . . . . . . . . . . . . . . . . . . . . 21
6 Deactivating Bio-Plex Data Pro™ Software Licenses. . . . . . . . . . . . . . . . . . 25
7 Installing Bio-Plex Manager™ 6.1 Software . . . . . . . . . . . . . . . . . . . . . . . . . 27
8 Installing the NetHASP Network License Manager . . . . . . . . . . . . . . . . . . . . 29
9 Uninstalling Bio-Rad Products . . . . . . . . . . . . . . . . . . . . . . . . . . . . . . . . . . . 33
3
Page 4

Bio-Plex Data Pro Software Getting Started Guide
Welcome
Thank you for purchasing Bio-Rad Bio-Plex® software.
Bio-Plex Data Pro™ software meets your multiplex data analysis needs. Bio-Plex Data Pro software is a
data management and data visualization tool designed to allow you to quickly draw conclusions about
your biological study. It allows researchers to get answers to the complex questions that are at the heart
of their research. You can easily manage data from many instrument runs, quickly making comparisons
between experimental groups and drawing conclusions.
Bio-Plex Data Pro software is used together with Bio-Plex Manager™ software to provide a seamless
and integrated solution.
The major functions of Bio-Plex Manager software are:
• Evaluation of raw instrument data
• Optimization of standard curves and usable assay range
• Identification of outliers
• Identification and resolution of problems with instrument runs
Packaging Checklist
The software product you purchased will be in one of the following two configurations.
BIO-PLEX DATA PRO (1 CD)
If there is one CD in the folder, then the folder should include the following:
• Bio-Plex Data Pro Software Getting Started Guide (this document)
• Bio-Plex Data Pro Software Installation CD. The activation code is located on the folder
pocket. You will need this activation code to activate the Bio-Plex Data Pro license.
BIO-PLEX MANAGER (2 CDS)
If there are two CDs in the folder, then the folder should include the following:
• Bio-Plex Data Pro Software Getting Started Guide (this document).
• Bio-Plex Data Pro Software Installation CD. The activation code is located on the folder
pocket. You will need this activation code to activate the Bio-Plex Data Pro license.
• Bio-Plex Manager Software Installation CD.
• Release Notes — Bio-Plex Manager Software, Version 6.1
• A white envelope containing the Bio-Plex Manager USB Network Security HASP key. This
HASP key is used to manage the Bio-Plex Manager user licenses. You will need this HASP key
in section 8, Installing the NetHASP Network License Manager, on page 29.
4
Page 5

1 Installing Bio-Plex Data Pro™ 1.0 Software
Install Bio-Plex Data Pro™ software as described in the following sections.
Bio-Plex Data Pro System Requirements
The following are the minimum and recommended system requirements for Bio-Rad Data Pro.
Component Minimum Recommended
Operating system Windows XP Service Pack 3 Windows 7 (32-bit or 64-bit)
Processor Core 2, 2.6 GHz or higher Core 4, 3.1 GHz or higher
Hard disk space 160 GB 500 GB
System memory 2 GB 8 GB
Videographic memory
Screen resolution 1280 x 1024 1920 x 1080
Screen colors 24-bit True Color 24-bit True Color
Other software Internet Explorer 8.0
a. Bio-Rad recommends that you keep your video drivers up to date.
Installing the Bio-Plex Data Pro Software
To install the software, insert the Bio-Plex Data Pro CD into the CD-ROM drive on your computer and
follow the prompts. The installation should start automatically. If it does not, open a Windows Explorer
window and click the CD drive icon. Then double-click setup.exe to install the software.
a
Not applicable 1 GB
Microsoft Excel 2007
Internet Explorer 8.0
Microsoft Excel 2007
Note: You have the option of choosing a Typical or Custom installation. The only difference
between the installation types is that Custom allows you to specify where the software is
installed. The Typical option installs the product in Program Files/Bio-Rad/Bio-Rad Data Pro.
When the installation is completed, the Bio-Plex Data Pro icon appears on your desktop.
Luminex Output CSV Files
Customers using xPONENT software (all versions) to run their Luminex system must convert their files
before these files can be imported into Bio-Plex Data Pro. You must use Bio-Plex Manager 6.1 to convert
the Luminex Output CSV files. Conversion of data files of other third-party software is not supported.
5
Page 6
Bio-Plex Data Pro Software Getting Started Guide
2 Changing Your Screen Resolution
Your computer screen resolution must be set to the minimum settings to correctly display the Bio-Plex
Manager™ and Bio-Plex Data Pro™ interfaces. The status bar and some dialog boxes will not display
properly at lower resolutions. If your display is currently set to a lower resolution, then follow the
procedure for your operating system.
See Bio-Plex Manager System Requirements on page 27 and Bio-Plex Data Pro System Requirements
on page 5 for the screen resolution settings.
WINDOWS XP
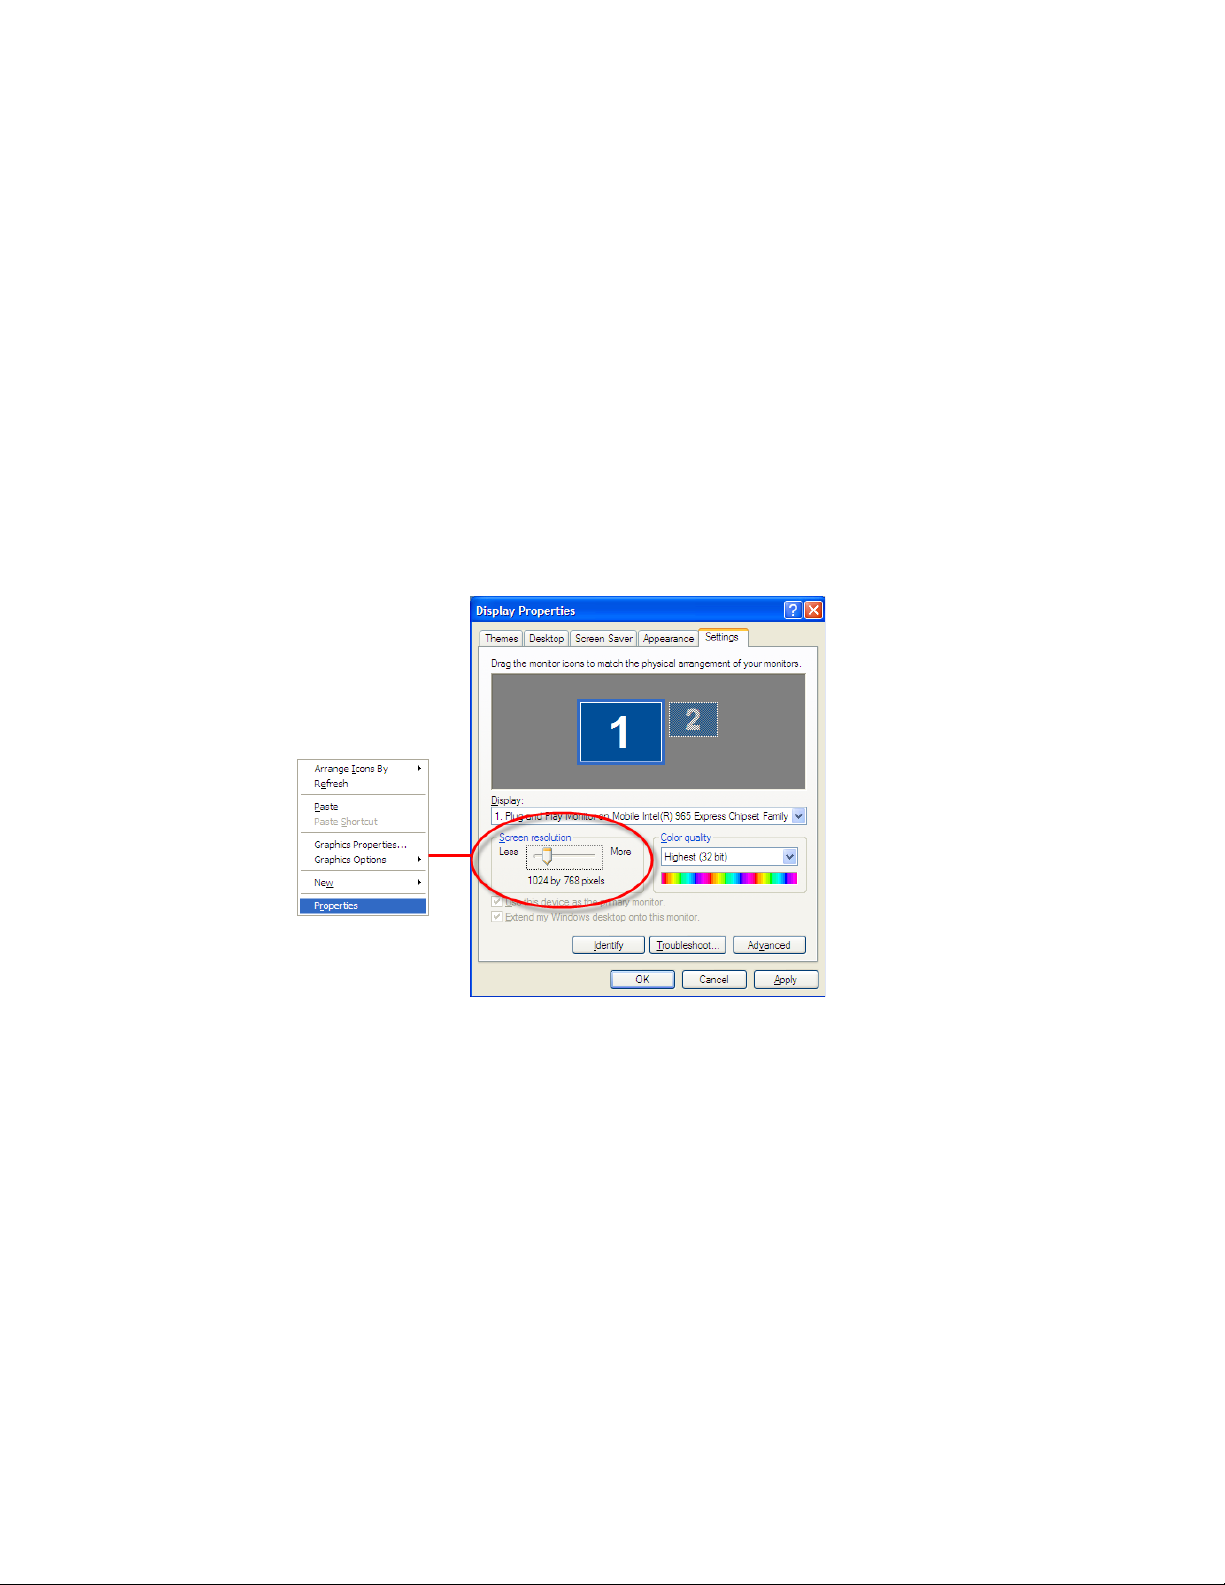
To change the screen resolution on Windows XP:
1. Go to the Windows Start menu, select Settings, and select Control Panel.
2. Open the Display control panel.
3. In the Display Properties dialog, select the Settings tab.
4. Drag the Screen Area slider to the right (toward More) until you have selected the desired setting.
Click OK to accept the settings.
Figure 1. Screen Resolution Dialog Box (Windows XP)
WINDOWS 7
To change the screen resolution on Windows 7:
1. Right-click in your desktop, then click Personalize.
2. Click Display.
3. Click Adjust Resolution.
6
Page 7
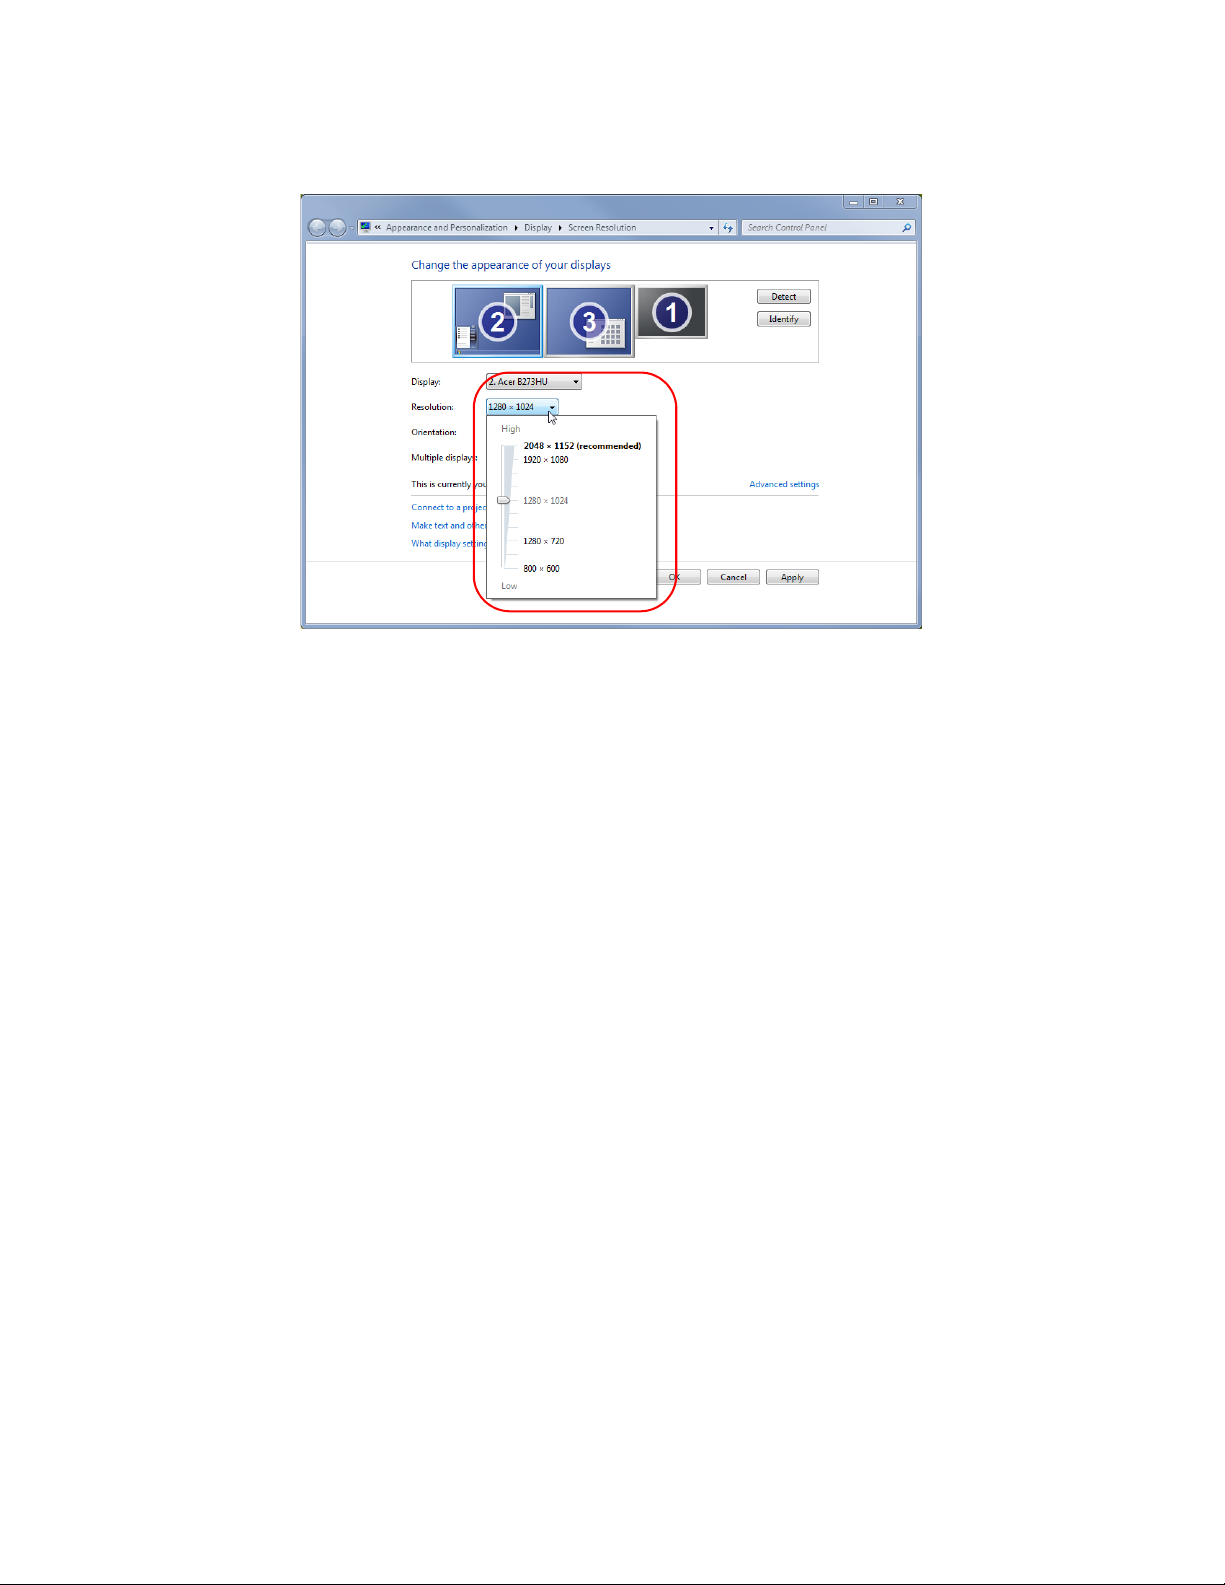
4. Click the Resolution drop-down list and move the slider until it displays the desired setting.
Figure 2. Screen Resolution Dialog Box (Windows 7)
5. Click OK.
7
Page 8
Bio-Plex Data Pro Software Getting Started Guide
3 Bio-Plex Data Pro™ Software Licensing
This section describes the terms of the Bio-Plex Data Pro™ evaluation period, the Bio-Plex Data Pro
license, and how to activate your license online or offline.
Evaluation Period
There is a 30-day evaluation period with Bio-Plex Data Pro. During the evaluation period, you have full
access to all Bio-Plex Data Pro Plus product features. You may continue to use the product once the
evaluation period ends on any projects already created. If the evaluation period ends and you have not
activated your license, you will not be able to create new projects nor will you be able to import additional
data into existing projects. All other features will continue to be available, and you can continue to use
the sample projects.
Bio-Plex Data Pro Software License
Each Bio-Plex Data Pro license is a five-user (5) license; you can have up to five computers with active
licenses at any time. You can move a license from one computer to another by deactivating it on the first
and activating it on the second computer.
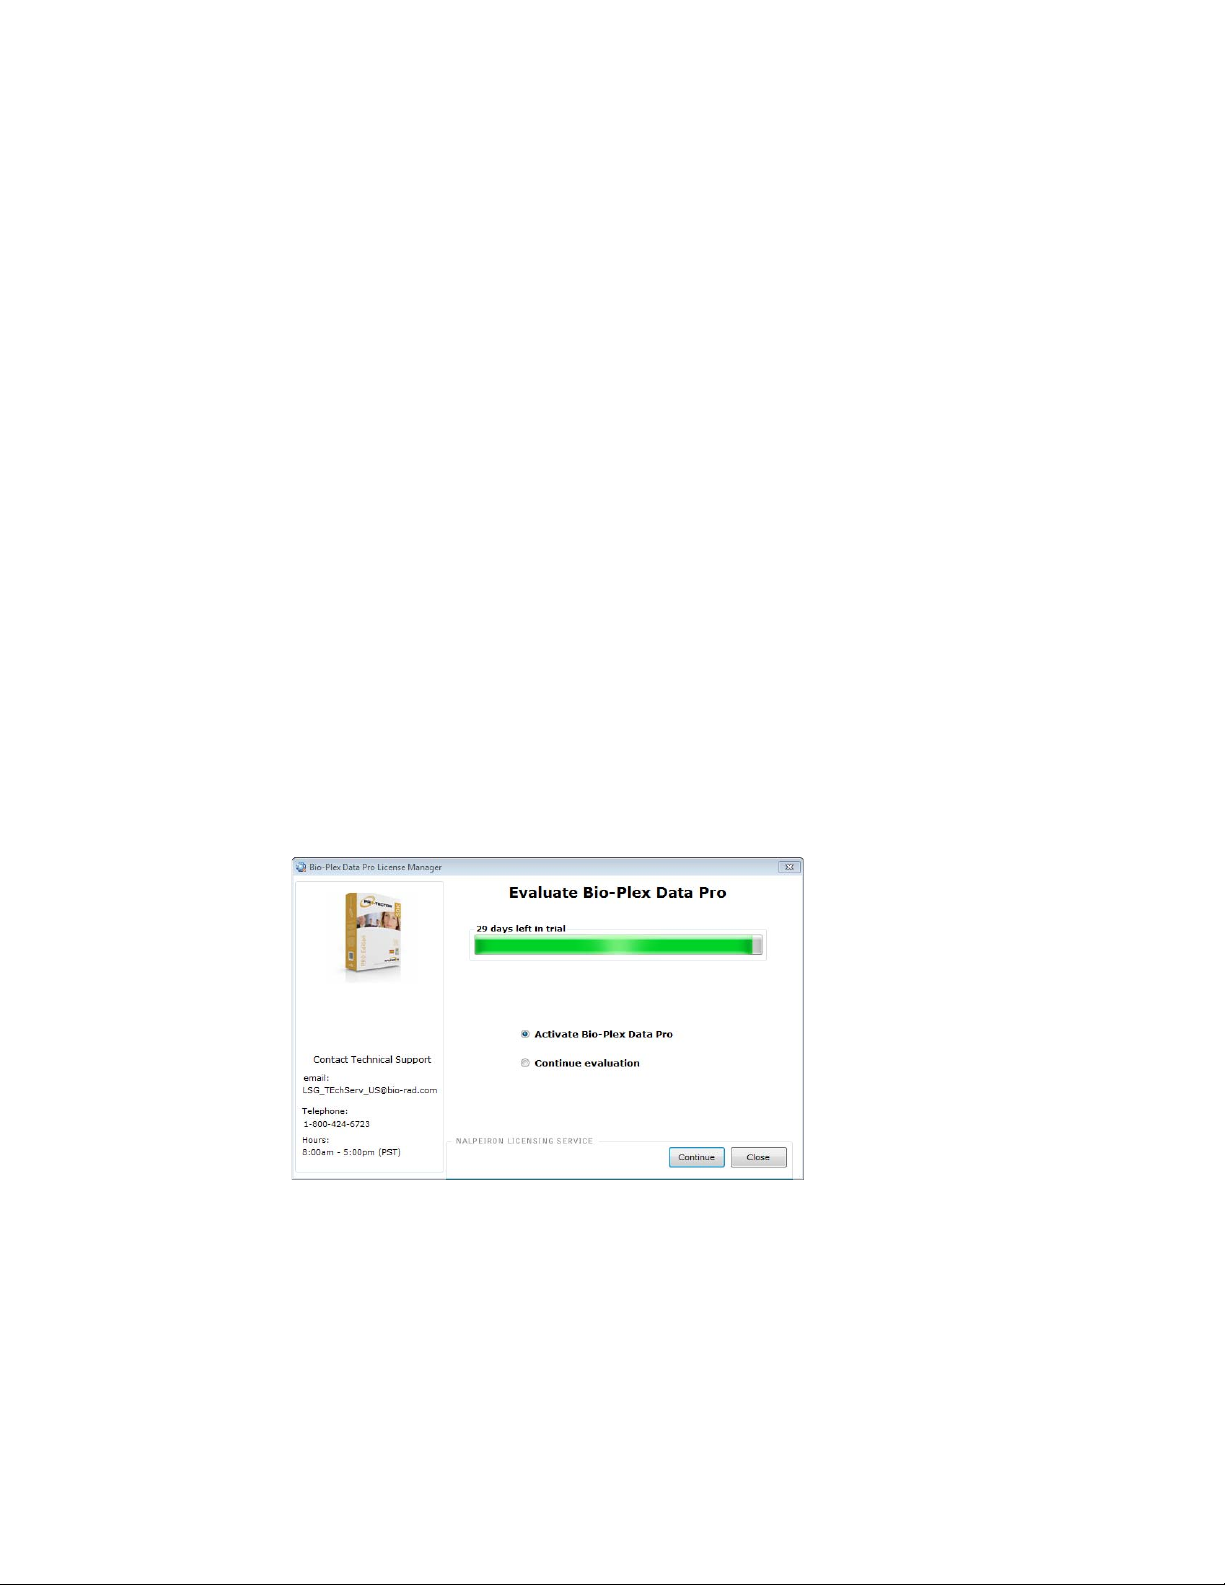
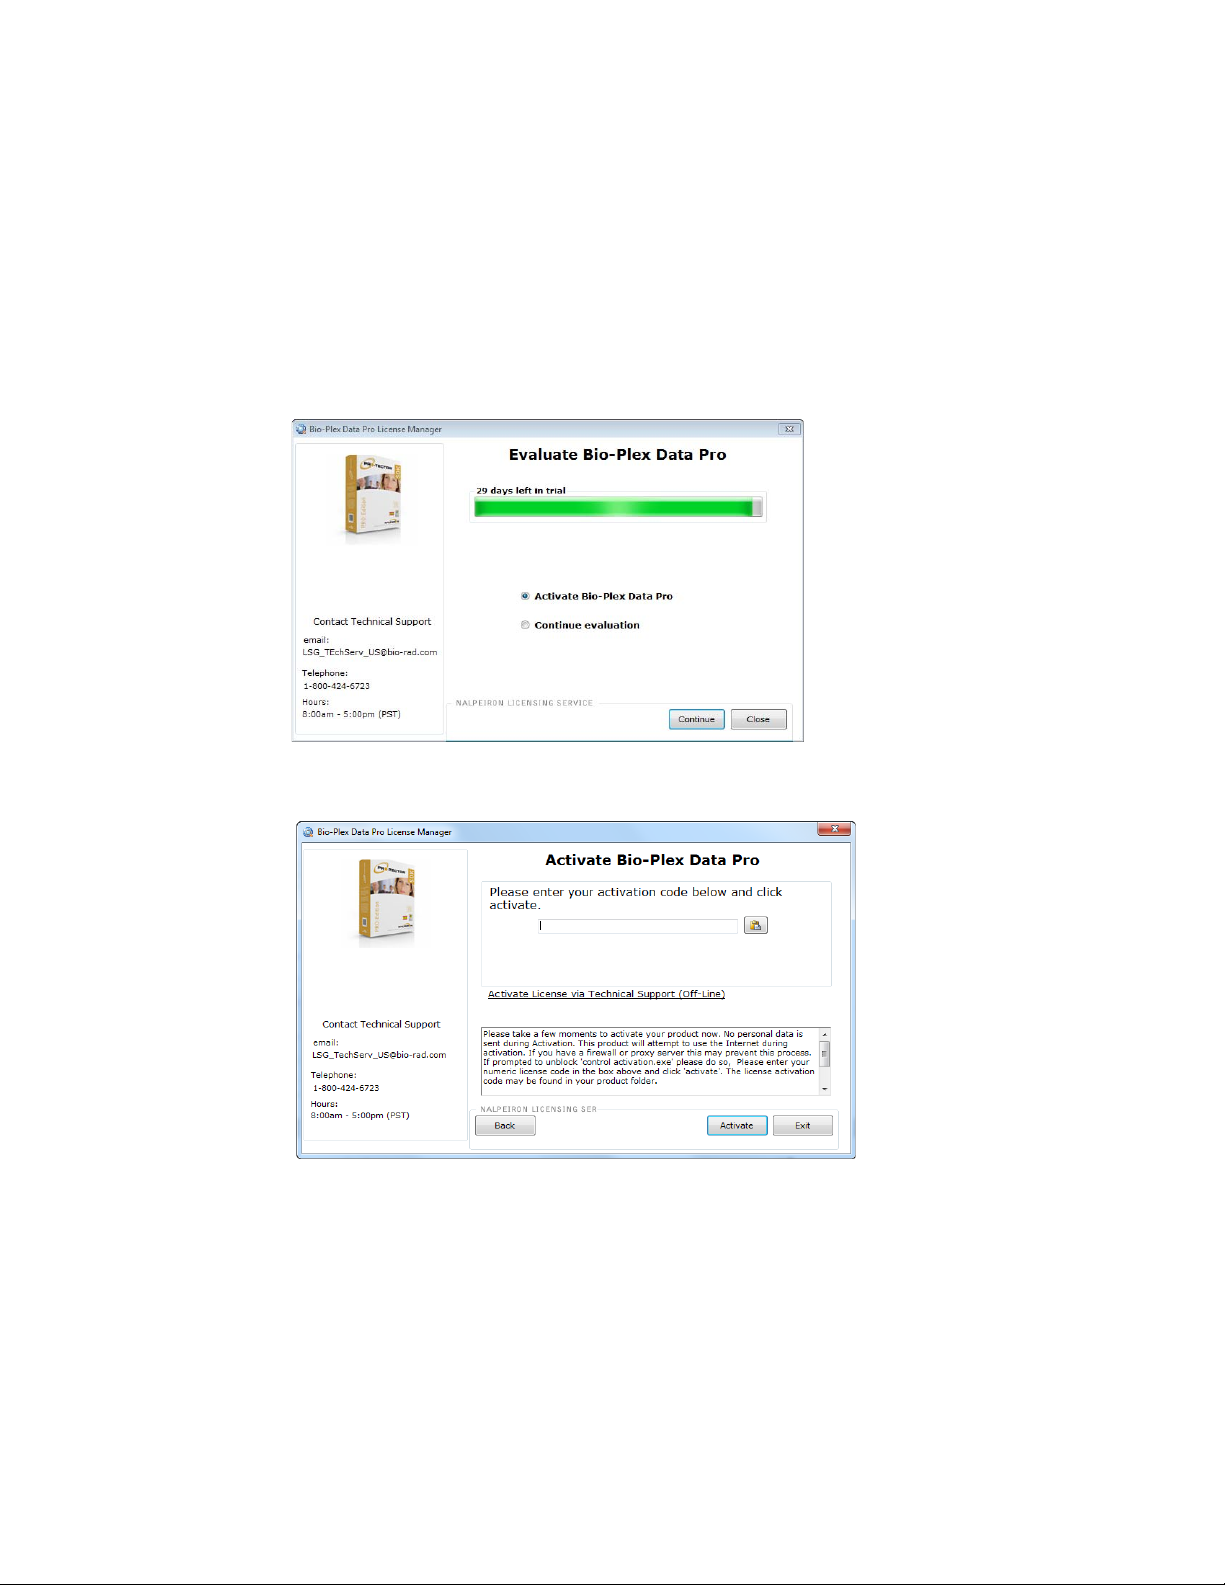
Activating Your License Online
You can activate your license at any time during the evaluation period.
Note: You must have Internet access in order to activate your license online.
To activate your license online:
1. Start Bio-Plex Data Pro.
2. In the Evaluate Bio-Plex Data Pro window, click Activate Bio-Plex Data Pro, then click Continue.
3. In the Activate Bio-Plex Data Pro window, enter the 18-digit activation code and click Activate.
8
Page 9
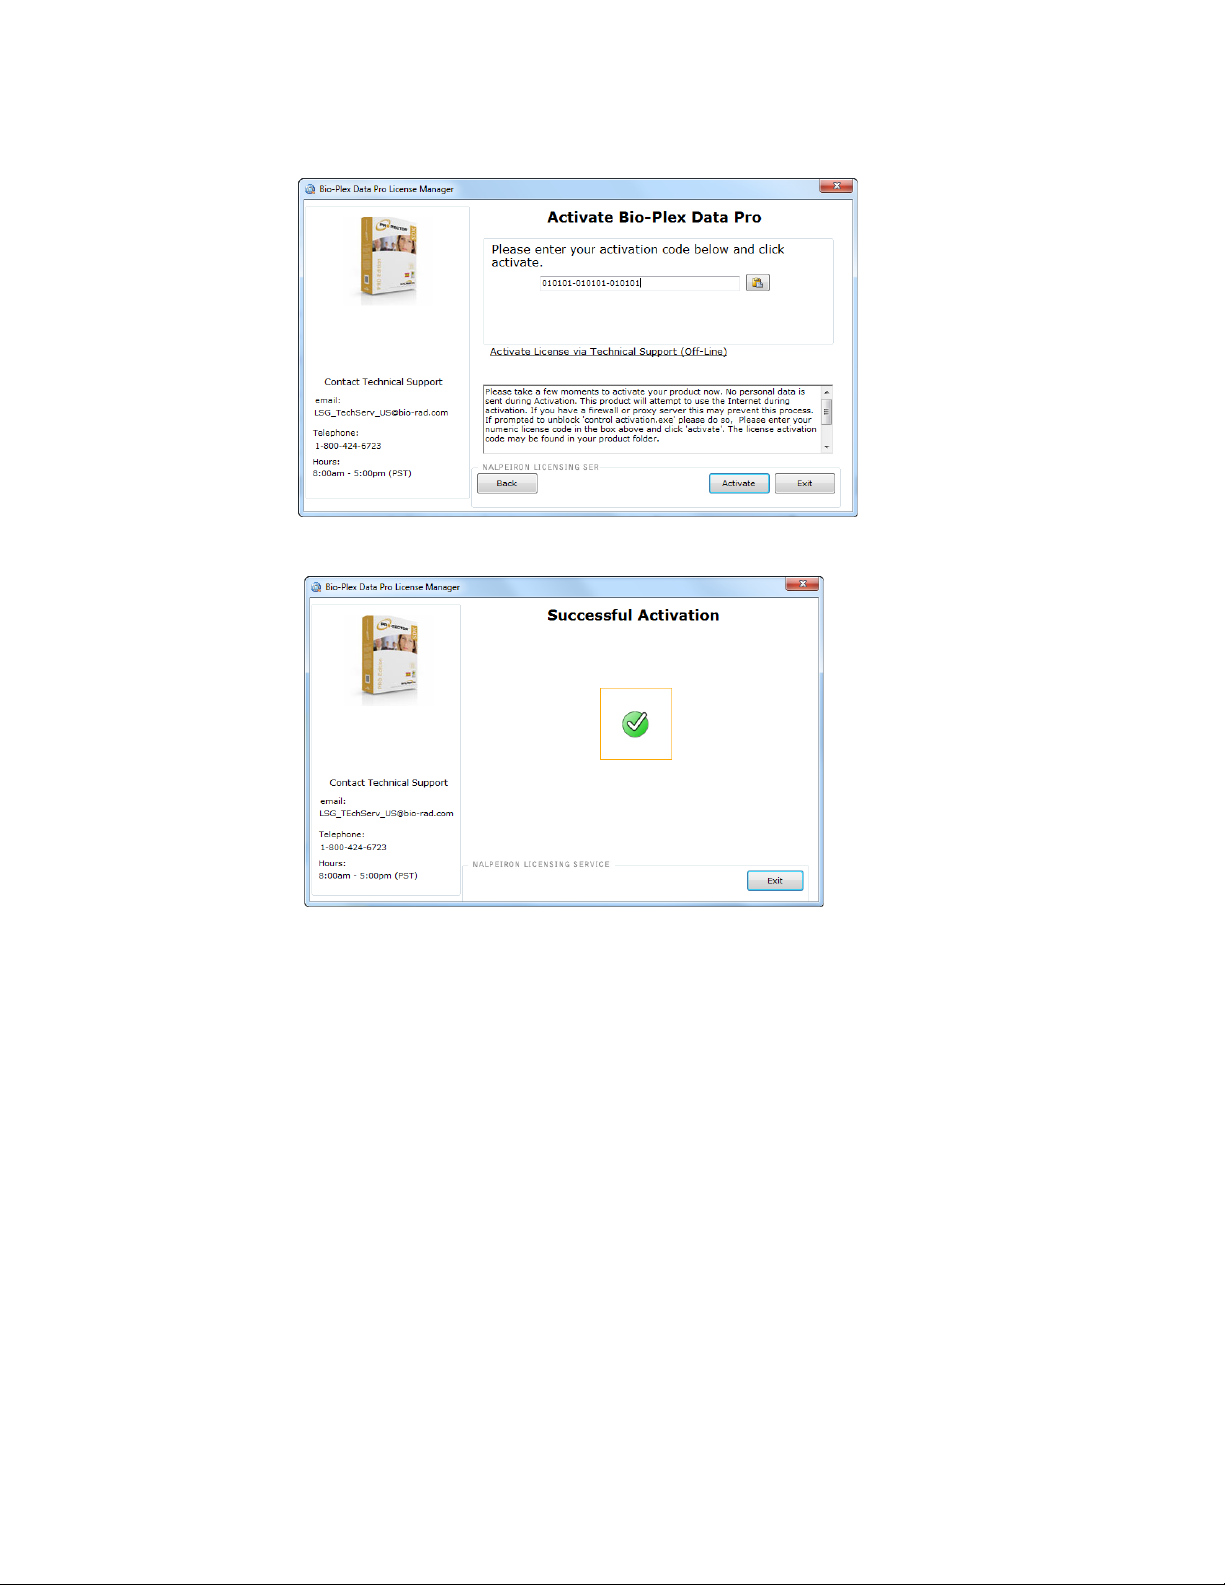
The 18-digit activation code can be found in the Bio-Plex Data Pro software product folder pocket.
Once the license is activated, the following window is displayed.
4. Click Exit.
Note: You can activate your license while the application is being run in evaluation mode.
Start Bio-Plex Data Pro in evaluation mode. To activate your license, select Manage License
from the Help menu and follow the prompts.
9
Page 10
Bio-Plex Data Pro Software Getting Started Guide
Activating Your License Offline
If you do not have Internet access or you want to activate your license offline, contact Bio-Rad Support
at 1-800-424-6723 or LSG.TechServ.US@Bio-Rad.com (email) to request an activation certificate.
Once you receive the activation certificate, follow the procedure to activate your Bio-Plex Data Pro
license.
To active your license offline:
1. Start Bio-Plex Data Pro.
2. In the Evaluate Bio-Plex Data Pro window, click Activate Bio-Plex Data Pro and click Continue.
3. In the Activate Bio-Plex Data Pro window, click the Activate License via Technical Support link.
10
Page 11
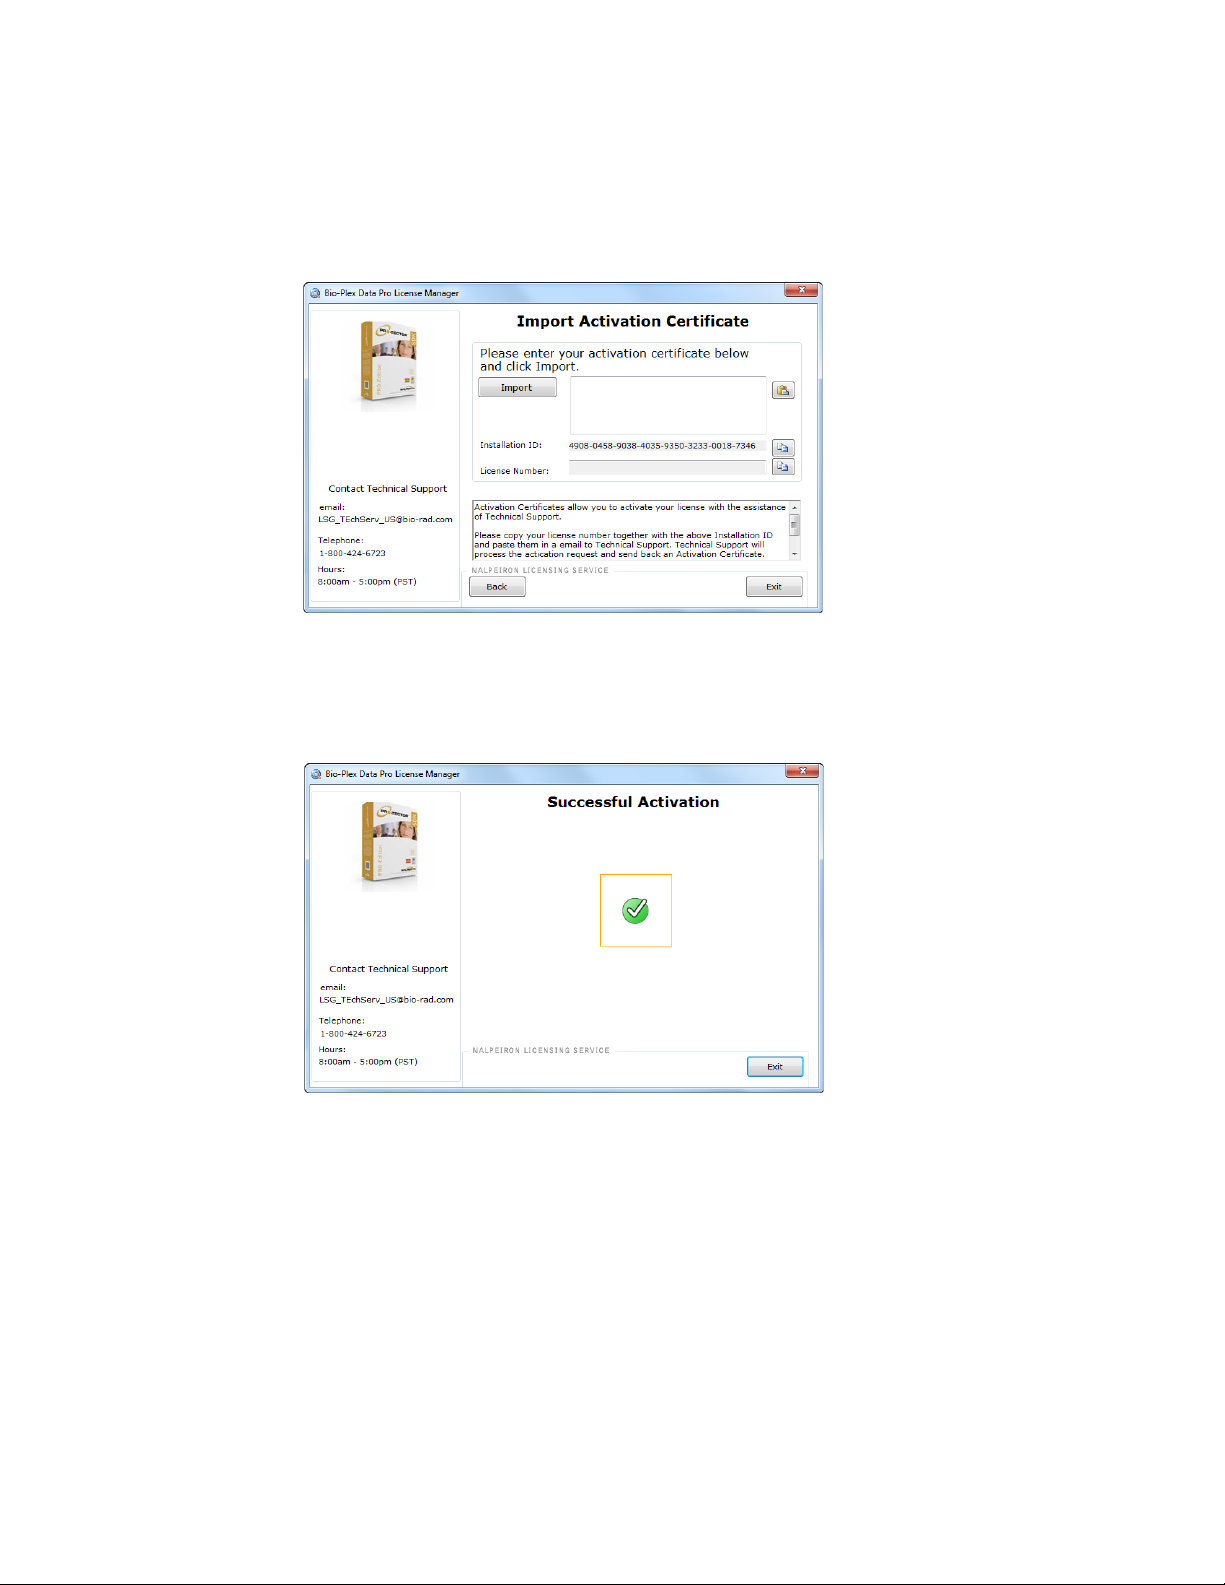
4. Create a text file and copy and paste the Installation ID number from the Import Activation
Certificate window into the file. Include the 18-digit activation code, which is found in the Bio-Plex
Data Pro software product folder in the text file. Attach the text file in an email to Technical Support
with the subject line: Request to Activate Bio-Plex Data Pro License.
Technical Support will process your email request and reply with a certificate and instructions for
completing the activation process.
5. When you receive the certificate, return to the Import Activation Certificate window. Copy and
paste the certificate information you receive from Technical Support into the text box.
6. Click Import.
The following window is displayed.
7. Click Exit.
11
Page 12

Bio-Plex Data Pro Software Getting Started Guide
4 An Overview of Bio-Plex Data Pro™ Software
This section introduces you to Bio-Plex Data Pro™. It takes you through and gives you an overview of the
product.
1. Start Bio-Plex Data Pro.
The Home view appears. In this view, you can create a new project or open an existing project. The
navigation bar in the left pane displays the project workflow, starting at the top with Manage Data
Sets and ending with Perform Analysis/Create Charts.
Figure 3. Home View
2. Click Sample Project 1 to open the example project shipped with Bio-Plex Data Pro.
The Manage Data Sets view displays the data sets in your project.
Figure 4. Manage Data Sets View
12
Page 13

3. Select one of the data sets and right-click to open the context menu.
• You can choose Edit Data Set to open the Edit Dataset dialog box, where you can edit the
description of your data set.
• You can choose Delete Data Set to remove a data set from your project.
Figure 5. Data Sets Context Menu
4. Click Perform Analysis/Create Charts in the navigation bar.
In this view, you visualize your results and view the results of common calculations.
Figure 6. Perform Analysis/Create Charts View
Note: In order to view results that are meaningful, you must label your samples with
information from your experiment. This is done in the Edit Samples/Add Columns view.
13
Page 14

Bio-Plex Data Pro Software Getting Started Guide
DATA OUTPUTS
There are six types of data outputs. Click on the buttons in the toolbar to display your data in the
desired output.
Scatter Plot — shows the results by biological replicates using the parameter you choose
to draw your comparisons. The scatter plot allows you to view one analyte at a time.
Figure 7. Scatter Plot
Box and Whisker Plot — shows the results by biological replicates using the parameter you
choose to draw your comparisons. It displays pertinent statistical information for one analyte at a
time.
Figure 8. Box and Whisker Plot
14
Page 15

Bar Graph — shows the results by biological replicates using the parameter you choose to
draw your comparisons. You can select as many analytes as you like from the Analyte Table for
comparison.
Figure 9. Bar Graph
Summary Table — displays common calculations for your biological replicates.
Figure 10. Summary Table
15
Page 16

Bio-Plex Data Pro Software Getting Started Guide
Export to Statistics Software — displays the sample information used to generate the
other outputs in a format that is convenient for import into statistical software packages.
Figure 11. Export to Statistics Software
Sample List — represents the data in the Results Table section. This can be used to
reproduce the scatter plots in Microsoft Excel.
16
Figure 12. Sample List
Page 17

5. Notice the “Compare by” and Control drop-down lists.
Compare by
and
Control
drop-down
lists
Compare by — changes how samples are grouped on the x-axis of the graphs and grouped for
analysis in the summary table.
Control — chooses the biological replicate group for your experiment. This group is plotted on the
left side of the graphs and results in the P-value for the pair-wise statistical tests being presented
in the relevant views.
Figure 13. Compare by and Control drop-down lists
17
Page 18

Bio-Plex Data Pro Software Getting Started Guide
6. Click Edit Samples/Add Columns in the navigation bar.
In this view, you see a list of every sample in your project. Each sample is created from samples
identified in Bio-Plex Manager™ software. In this view, you add specific information from your
experiment.
Figure 14. Edit Samples/Add Columns View
18
Page 19

7. Click View Results/View Heat Map in the navigation bar.
In this view, you can do the following and view your results:
• Filter your results by removing samples that meet specific criteria.
• Sort your data and export tables.
• Create heat maps of your results or custom tables.
Figure 15. View Results/View Heat Map View
Sample Projects
Bio-Plex Data Pro comes with two sample projects. Use these sample projects to familiarize yourself with
Bio-Plex Data Pro. The following is a description of these sample projects.
SAMPLE PROJECT 1
The samples in Sample Project 1 are of individuals who have been diagnosed with various cancers and
whose blood was processed as serum and plasma. The gender of the individuals is known. This project
includes several custom columns:
• Condition — the values are Normal or one of several cancers.
• Matrix — the values are Serum or Plasma.
• Gender — the values are Male or Female.
In the Perform Analysis/Create Charts view, “Compare by” is set to Condition. The Plasma samples are
excluded from analysis by default. You can click “Filter by” and select Matrix to see the list of samples.
The Sample Info section of Bio-Plex Manager is used to track all of the information that is pertinent to
your experiment (in this example, Condition, Matrix, and Gender). When you begin working with your own
projects, you will need to add the data you want to use to perform your analysis.
19
Page 20

Bio-Plex Data Pro Software Getting Started Guide
SAMPLE PROJECT 2
The samples in Sample Project 2 were labeled as Normal, Breast Cancer, Lung Cancer, Colon Cancer,
Ovarian Cancer, and Prostate Cancer. In the Perform Analysis/Create Charts view, “Compare by” is set to
Description. Labeling samples with informative descriptions in Bio-Plex Manager can eliminate the need
to label samples in Bio-Plex Data Pro if the experiment is relatively simple. In this example, we were
interested only in whether the samples came from patients diagnosed with a specific type of cancer or
were free of any cancer.
20
Page 21

5 Analyzing Your Data
This section describes how to take data from Bio-Plex Manager™ and analyze it using Bio-Plex Data
Pro™.
Analyze Your Data in Bio-Plex Manager Software
Before you use Bio-Plex Data Pro, first analyze the results of your run in Bio-Plex Manager. Bio-Rad
recommends you do the following:
1. Run the Curve Fit Optimizer for all curves.
This algorithm optimizes most curves to create as broad a dynamic range as possible.
2. Review the messages in your optimization report.
3. Visually inspect your curves and ensure that your data is acceptable for your purposes.
Importing Your Data into Bio-Plex Data Pro Software
There are two methods for transferring your data into Bio-Plex Data Pro:
• If you are viewing your results in Bio-Plex Manager 6.1, you can use the Export Results to BioPlex Data Pro function. The data are seamlessly exported from Bio-Plex Manager and
imported to Bio-Plex Data Pro. You can create a new project and import the data into it, or you
can import the data into an existing project.
• Create a new project and import data files in Bio-Plex Data Pro.
Selecting Your Samples
The results files that are imported into Bio-Plex Data Pro contain different sample types. Typically,
Standard and Blank samples are unnecessary and, sometimes, confusing. By default, these sample
types are automatically excluded. Click Select Sample Type for Analysis to see how these sample types
are filtered out. You can always include them by selecting them for inclusion.
Labelling Your Samples
Before you can analyze your data, you must first label your samples with data from your experiments that
are pertinent to your analysis. Sometimes the information entered in the description is sufficient to carry
out the desired analysis, but usually you need to annotate your data.
1. Open your project, then click Edit Samples/Add Columns in the navigation pane.
2. Click Add Column in the toolbar to add a column to the table for each of the
parameters you want to track for analysis.
These parameters can be experimental group (for example, Dosage, Concentration, or Time Point)
or demographic (for example, Gender, Species, Strain) information.
3. Add sample data to the column by copying and pasting from a Microsoft Excel spreadsheet.
You can arrange the order of the columns by clicking the header and dragging the column to a new
location in the table.
21
Page 22

Bio-Plex Data Pro Software Getting Started Guide
Filtering Your Data
You can control the samples that are included in your analysis by filtering your data.
Filters can be cleared at any time by clicking the Clear All Analysis Filters button.
Viewing Your Data in the Results Table
1. Navigate to the View Results/View Heat Map view.
2. In the Results table, click the triangle in the column header to open the drop-down list.
The drop-down list displays a list of the different sample types for that column.
22
3. Select and clear the check boxes to include or exclude the desired samples.
Note: When a filter is applied, the filtering is carried throughout the entire project.
You can also view your data as a heat map, a graphical representation of data that enables you to quickly
identify the intensity readings and to find patterns in the data. For more information on heat maps, see
the Bio-Plex Data Pro User Guide.
Page 23

The Perform Analysis/Create Charts View
Select a column in the
“Compare by” drop-down
list
Then select and clear
check boxes to
include and exclude
samples.
Select a column in the
“Compare by” drop-down
list
When you select a parameter in the “Compare by” drop-down list, a list of sample types is displayed. You
can include or exclude the sample types from the Filter list.
Figure 16. Filtering Samples in the Perform Analysis/Create Charts View
Analyzing Your Data in Bio-Plex Data Pro Software
1. Click Perform Analysis/Create Charts.
2. From the “Compare by” drop-down list, choose the parameter you want to see on the x-axis on the
charts in the Analyte Charts and Tables pane.
23
Page 24

Bio-Plex Data Pro Software Getting Started Guide
Select a group in the
Control drop-down list
3. If you have a control in your experiment, select this group from the Control drop-down list.
4. Review the results using the different display options.
TIP: When you use the bar graph, you may select as many analytes for comparison as you
like.
Analyzing Your Data Using Other Tools
There will be instances when you want to perform an analysis that is not supported by Bio-Plex Data Pro,
or when you want to verify the results using other software tools. There are two primary ways to do this:
• Statistical software packages — the Export to Statistics Package table is automatically
generated in the Perform Analysis/Create Charts view. You can copy your table, plot, or graph
to the clipboard and paste the data into the statistical software application. The Export to
Statistics Package table is updated when you change the “Compare by” and Control choices.
• Microsoft Excel — you can perform additional calculations by copying the Group Statistics
table in the Perform Analysis/Create Charts view to Excel. You can also produce custom
tables in the Results table (View Results/View Heat Map view) by using the filter and sort
functions in the column headers.
For More Information about Bio-Plex Data Pro
You can get more information about Bio-Plex Data Pro from the following sources:
• Bio-Plex Data Pro User Guide which is available on your Bio-Plex Data Pro Software
Installation CD as a PDF file. This guide is also available from the Help menu in the application.
Click Help, then click View Online Help.
• Bio-Plex Data Pro updates, training resources, tutorials are available on the Bio-Rad
Laboratories web site. From any view in the application, click Help, then click Go To
Resources and Updates to download available resources.
24
Page 25

6 Deactivating Bio-Plex Data Pro™ Software Licenses
Once the license is deactivated, you may continue to use Bio-Plex Data Pro™ on any existing projects.
However, you will not be able to create new projects or import additional data into existing projects.
You can deactivate your license online or offline.
To deactivate Bio-Plex Data Pro licenses online:
1. From the Help menu, click Manage License.
2. Click Yes and click Continue.
A message confirms that the license has been successfully removed.
3. Click OK.
To deactivate Bio-Plex Data Pro licenses offline:
1. From the Help menu, click Manage License.
2. In the De-Activate Bio-Plex Data Pro window, click the De-Activate License via Technical Support
link.
3. In the Export De-Activation Certificate window, click Export.
The text box is populated with a long string of numbers. This is your de-activation certificate.
25
Page 26

Bio-Plex Data Pro Software Getting Started Guide
4. Copy the contents of the text box into a text file. Attach the file to an email to Technical Support
with the subject line: Request to Deactivate Bio-Plex Data Pro License.
Note: The number of available licenses will not be updated until Technical Support
processes the deactivation request. Technical Support will send a confirmation once the
license is deactivated.
26
Page 27

7 Installing Bio-Plex Manager™ 6.1 Software
If you purchased Bio-Plex Manager 6.1™, follow the instructions in this section for installing the software.
Install, or reinstall, Bio-Plex Manager 6.1 software as described in the following sections. If you need to
upgrade your software from a previous version, see the Bio-Plex Manager 6.1 Software Upgrade and
Configuration Guide to determine the part number of your upgrade kit.
Bio-Plex Manager System Requirements
Following are the minimum and recommended system requirements for Bio-Plex Manager 6.1.
Component Minimum Recommended
Operating system Windows XP (XP Professional required
for running Security Edition) or
Windows 7 (32-bit)
Processor Pentium 4 or equivalent, 2.8 GHz Core 2, 2.6 GHz or higher
Hard disk space 80 GB 160 GB
System memory 1 GB 2 GB
Screen resolution 1024 × 768 (Windows XP)
Screen colors 256 colors 24-bit True Color
Ports for connecting
instrument (required for
Instrument Control
license only)
Port for connecting
the HASP key
Other software Internet Explorer 6.0 or later
NOTE: For Windows 7, the workstation version of Bio-Plex Manager 6.1 can be run only on Windows
7 (32-bit); it is not compatible with Windows 7 (64-bit).
1280 × 1024 (Windows 7)
1 RS232 serial port and
1 USB port
1 USB port 1 USB 2.0 port
Microsoft Excel 2003 or later
Windows XP Professional
1280 × 1024
1 RS232 serial port and 1 USB 2.0
port
Internet Explorer 8.0
Microsoft Excel 2007
Installing Bio-Plex Manager Software
To install the software, insert the Bio-Plex Manager Software CD into the CD-ROM drive on your
computer.
NOTES
• Before installing Bio-Plex Manager 6.1, we recommend that you first uninstall any existing
version of Bio-Plex Manager on your computer.
• We recommend that you turn off any antivirus protection software before installation. Such
software, if active, can greatly slow the progress of the installation. If you are unable to turn off
your antivirus protection software, allow 15 minutes for complete installation. Do not cancel
the installation during this period.
The Bio-Plex Manager Installation Program opens, displaying a navigation screen for performing the
installation.
Before you can use Bio-Plex Manager, your system administrator must install the Bio-Plex Manager
License Manager software. For more information, see Installing the NetHASP Network License Manager
page 29.
on
MICROSOFT.NET
Microsoft.NET is automatically installed on your computer when you install Bio-Plex Manager. It is
required to support the logistic curve-fitting features of Bio-Plex Manager.
27
Page 28

Bio-Plex Data Pro Software Getting Started Guide
BIOPLEXDATA.MDB FILE
During installation, you will be prompted to save the application database file (bioplexdata.mdb) to a
location on your hard drive or a file server. This database file contains logs of calibration, validation, and
instrument operations activity for your instrument.
You can save the bioplexdata.mdb file to any folder on your computer. The default location is the Bio-Plex
Manager application folder. If your computer is connected to multiple instruments, each instrument must
have a separate bioplexdata.mdb file saved in a different folder.
For more information about the calibration, validation, and instrument operations logs in Bio-Plex
Manager 6.1 Security Edition, see the Controlling the System chapter in the Bio-Plex Manager Software
6.1 User Guide.
NOTE: The bioplexdata.mdb file is not compatible with versions of Bio-Plex Manager earlier than 4.0. If
you have an earlier version of the software, installing version 4.0 or later will copy the data from your
existing database file (bioplex.mdb) into the new database. A copy of your old database will remain in the
application folder.
LUMINEX LXR DIRECTORY AND FILES
A directory called Luminex is automatically created in the Program Files folder on your computer during
installation. Inside this folder is a folder called LXR that contains various applications for monitoring and
communicating with the array reader and platform. A Windows service called LXService is also installed
and started. This service enables automatic communication with the instrument when you open Bio-Plex
Manager.
HARDWARE PROTECTION KEY (HASP KEY)
A hardware protection key, also known as a HASP key, is required to run Bio-Plex Manager. The HASP
key determines the license (Instrument Control, Desktop, or Network) and the edition (Standard or
Security) of your Bio-Plex Manager. A complete list of HASP key part numbers and the software versions
they enable is in the Bio-Plex Manager 6.1 Software Upgrade and Configuration Guide.
Instrument Control or Desktop HASP keys must be attached to a USB port on the computer running the
software. Network HASP keys must be attached to a USB port on the network file server computer.
The HASP key has a driver that is automatically installed when you install Bio-Plex Manager.
Upgrading Bio-Plex Manager
You can upgrade from versions 4.0, 5.0, and 6.0 of Bio-Plex Manager to Bio-Plex Manager 6.1. Before
you install Bio-Plex Manager 6.1, you must first uninstall your existing version of Bio-Plex Manager. See
Uninstalling Bio-Rad Products on
page 33 for more information on uninstalling your software.
28
Page 29

8 Installing the NetHASP Network License Manager
If you ordered Bio-Plex Manager™ 6.1, the product folder will include the Bio-Plex Manager Software CD
and an envelope containing the hardware protection key, also known as a HASP key.
You may install Bio-Plex Manager on as many computers as you like. The HASP key supports five (5)
users at any one time.
Work with your information technology group or the person who manages your network to install the
HASP key and related software. Refer to the following sections for detailed instructions.
OVERVIEW OF THE NETHASP NETWORK LICENSE MANAGER INSTALLATION
The basic steps to install the HASP key are:
1. Update the HASP drivers on the network license server that will be managing your Bio-Plex
Manager software licenses.
2. Install the NetHASP License Manager software on the network license server.
3. If necessary, update the HASP configuration file on each of your client machines.
Note: For more information, see the Bio-Plex Manager 6.1 Upgrade and Configuration
Guide. This guide can be found on the Bio-Plex Manager software CD or on the Bio-Rad
website.
Installing the NetHASP License Manager on the Network
License Server
Install the network HASP key and License Manager software on a server that is always on and to which
all PCs running Bio-Plex Manager have access.
Note: You must have Administrator privileges to install the HASP drivers and the NetHASP
Network License Manager software on the network license server.
INSTALL YOUR HASP DRIVERS
Follow the procedure to install the HASP drivers on your network license server.
To install your HASP drivers:
1. Insert the Bio-Plex Manager Software CD in the CD-ROM drive of your network license server.
2. Double-click Hasp Utilities\HASPDRIVERS\HASPUserSetup.
3. In the Welcome window, click Next.
4. Accept the license agreement and click Next.
5. Click Next to begin the installation.
6. When the drivers have been successfully installed, click Finish.
INSTALL THE NETHASP LICENSE MANAGER ON THE NETWORK LICENSE SERVER
Locate the HASP key in the envelope included in your Bio-Plex Data Pro product folder. You will be
instructed to insert the HASP key during this procedure.
To install the NetHASP License Manager:
1. Insert the Bio-Plex Manager Software CD in your CD-ROM drive if you haven’t already done so.
2. Double-click Hasp Utilities\HASPSERVERS folder\lmsetup.
29
Page 30

Bio-Plex Data Pro Software Getting Started Guide
3. In the Welcome window, click Next.
4. Accept the license agreement and click Install.
5. In the Installation Type window, Service is selected. Accept this default and click Next.
6. In Choose Destination Location, accept the default location, or click Browse and choose a different
location where the HASP License Manager will be installed. Click Next.
7. In Select Program Manager Group, accept the default or choose another program group. Click
Next.
8. Click OK to start the installation.
When the HASP License Manager is installed, the following dialog box is displayed.
9. While the dialog box remains on your screen, insert the HASP key in the USB port.
When the light on the HASP key goes on, the installation is completed and the HASP key has been
recognized.
30
10. Return to the dialog box on your screen. In response to the question “Do you want to start it now?”
click Yes.
11. Click Finish.
Page 31

Configuring Clients to run Bio-Plex Manager Software
Note: System administrators may want to edit the NETHASP.ini file once and have their end
users copy the file to the correct location on their client machines.
Start Bio-Plex Manager using the desktop shortcut. Often no additional configuration is required and you
will be able to start the application successfully. If you get a message saying that the HASP cannot be
found, then follow the procedure to configure the client.
GET THE NETWORK LICENSE SERVER ADDRESS
You will need the address of the network license server in order to configure the clients that are running
Bio-Plex Manager.
To get the network license server address:
1. On the server where the Net HASP License Manager is installed, click the Start menu, then click All
Programs > Accessories > Command Prompt.
2. In the Command Prompt window, type ipconfig/all.
3. Scroll down the window to locate the IP address, and make a note of the address.
You will need this address to configure the clients.
CONFIGURE THE CLIENT
If you are able to successfully start Bio-Plex Manager, no additional configuration is required. If you get a
message saying that the HASP driver is missing, perform the procedure below.
You will need the address of the network license server.
To configure the client:
1. Open the NETHASP.ini file in the C:\Program Files\Bio-Rad\Bio-Plex Manager 6.1 directory in
WordPad or NotePad.
2. Find the text NH_USE_BROADCAST = ENABLED in the file.
3. Change ENABLED to DISABLED.
NH_USE_BROADCAST = DISABLED
4. Enter the IP address of the network license server where the NetHASP License Manager is
installed. You may use a numeric address, a DNS alias, or a network station ID. For example:
31
Page 32

Bio-Plex Data Pro Software Getting Started Guide
NH_SERVER_ADDR = DD-dell551.genes.bio-rad.com
Note: The default port setting for the License Manager is 475. If the server on which the
License Manager is installed is firewall enabled, then port 475 must be reserved for the
License Manager. Contact Bio-Rad Technical Support if this conflicts with your existing
network configuration.
32
Page 33

9 Uninstalling Bio-Rad Products
Follow the procedure for your operating system to uninstall Bio-Plex Manager™ or Bio-Plex Data Pro™
from your computer.
WARNING! Uninstalling does not remove an active license from the active license count.
Therefore, if you have an active Bio-Plex Data Pro license on a computer and you want to
uninstall Bio-Plex Data Pro, first deactivate the license. Once the software is uninstalled, you
will not be able to access the license. If you need to use a license that was not deactivated,
contact Bio-Rad Technical Support for assistance.
To uninstall Bio-Rad products on Windows XP:
1. Click the Start menu, then click Add or Remove Programs from the list.
2. Click the name of the software program you want to uninstall.
3. Click Remove.
To uninstall Bio-Rad products on Windows 7:
1. Click the Start menu, then click Control Panel.
2. In the Programs section, click “Uninstall a program.”
3. In the “Uninstall or change a program” window, find the name of the Bio-Rad software application
you want to uninstall.
4. Select the application, then click Uninstall.
33
Page 34

Bio-Plex Data Pro Software Getting Started Guide
34
Page 35

Page 36

Bio-Rad
Laboratories, Inc.
Life Science
Group
Web site ww w.bio-rad.com USA 80 0 424 6723 Australia 61 2 9914 2800 Austria 01 877 89 01 Belgium 09 3 85 55 11 Brazil 55 31 3689 6 600
Canada 905 364 3435 China 86 21 6169 8 500 Czech Re public 420 241 430 532 Denmark 44 52 10 00 Finland 09 80 4 22 00
France 01 47 95 69 65 Germany 089 31 884 0 Greece 30 210 777 4396 H ong Kong 852 2789 33 00 Hungary 36 1 459 6100 India 91 124 4029300
Israel 03 963 60 50 Italy 39 02 2160 91 Japan 03 6361 7000 Korea 82 2 3473 4460 Malaysia 60 3 2117 5260 Mexico 52 555 4 88 7670
The Netherlands 0318 540666 New Zealand 64 9 415 2280 Norway 23 38 41 30 Poland 48 22 331 99 99 Portugal 351 21 472 7700
Russia 7 495 721 14 04 Singapore 65 6415 3170 South Africa 27 861 246 723 Spain 34 91 590 5200 Sw eden 08 555 12700
Switzerland 061 717 95 55 Taiwan 886 2 2578 7189 Thailand 66 2 6518311 United Kingdom 020 8328 20 00
11-1304 0911 Sig 021110022598 Rev B US/EG
 Loading...