

Bernina Artista 165 Owner's Manual

IMPORTANT SAFETY INSTRUCTIONS
030787.52.04_0401_a165_EN
Safety Instructions
1
When using an electrical appliance, basic safety
precautions should always be followed, including the
following.
Read all instructions before using this sewing machine.
When the machine is not in use, it should be disconnected
from the electricity supply by removing the plug from the
power outlet.
DANGER
To r educe the risk of electric shock:
1. An appliance should never be left unattended when
plugged in.
2. Always unplug this appliance from the electric outlet
immediately after using and before cleaning.
WARNING
To r educe the risk of burns, fire, electric shock or injury to
persons:
1. Do not allow to be used as a toy. Close attention is
necessary when this appliance is used by or near
children.
2. Use appliance only for its intended use as described in
this manual. Use only attachments recommended by
the manufacturer as contained in this manual.
3. Never operate this appliance if:
· it has a damaged cord or plug,
· it is not working properly,
· it has been dropped or damaged
· it has fallen into water
Return the appliance to the nearest authorized dealer
or service center for examination, repair, electrical or
mechanical adjustment.
10. Always unplug the sewing machine from the
electrical outlet when removing covers, lubricating
or when making any other user servicing adjustments
mentioned in this instruction manual.
11. Never drop or insert any object into any opening.
12. Do not use outdoors.
13. Do not operate where aerosol (spray) products are
being used or where oxygen is being administered.
14. To disconnect, turn all controls to the off (“0”)
position then remove the plug from the outlet.
15. Do not unplug by pulling on the cord but grasp the
plug before pulling.
16. No responsibility will be taken for any possible
damage as the result of misuse of the machine.
17. This machine is provided with double insulation.
Use only identical replacement parts. See instructions
for Servicing of Double-Insulated machines.
SERVICING DOUBLEINSULATED PRODUCTS
In a double-insulated product, two systems of insulation
are provided instead of grounding. No means of
grounding is provided on a double-insulated product nor
should a means for grounding be added to the product.
Servicing a double-insulated product requires extreme
care and knowledge of the system and should only be
done by qualified service personnel. Replacement parts
for a double-insulated product must be identical to those
parts in the product. A double insulated product is
marked with the words “DOUBLE INSULATION” or
“DOUBLE INSULATED”.
The symbol may also be marked on the product.
4. Never operate the appliance with any air openings
blocked. Keep ventilation openings of the sewing
machine and foot controller free from accumulation
of lint, dust and loose cloth.
5. Keep fingers away from all moving parts. Special care
is required around the sewing needle.
6. Always use an original or recommended BERNINA
stitch plate. The wrong plate can cause the needle to
break.
7. Do not use bent needles.
8. Do not pull or push fabric while stitching. It may
deflect the needle causing it to break.
9. Turn power switch to “0” when making any
adjustments in the needle area, such as threading
or changing the needle, threading the bobbin or
changing the presser foot.
SAVE THESE
INSTRUCTIONS!
This sewing machine is intended for household use only.
2
030787.52.04_0401_a165_EN
“Welcome
Choosing a BERNINA Sewing & Embroidery System is a decision which will have
a positive impact on your sewing for years to come.
Customer satisfaction has been the driving force of our family company for over
100 years and I intend to continue that tradition of delivering superb Swiss quality,
future-orientated sewing technology and unrivaled customer service.
The new BERNINA family of creative sewing machines gives you the unique
opportunity to select what you need to satisfy your sewing needs and
requirements.
to the
BERNINA
family!”
H.P. Ueltschi
BERNINA Sewing
Machine Company
As the name suggests, the “artista” range of computer sewing is pure artistry.
These machines provide unlimited scope for total sewing pleasure. They inspire
creativity and allow you to translate your ideas into practical sewing of the finest
quality.
In addition, a wide range of sewing accessories, together with sewing publications
full of practical and creative ideas, add to the joy of sewing the BERNINA way.
It gives me great pleasure to welcome you into the BERNINA family.
www.bernina.com
Fritz Gegauf Ltd. · BERNINA Sewing Machines · CH-8266 Steckborn/Switzerland

1
030787.52.04_0401_a165_EN
Safety Instructions
2
Foreword
4–5
Details of the machine
Contents
3
6–12
13–14
15
16–17
18–21
22–28
29
29–37
37–38
38–43
44
45
46
47–48
49
Setting up the machine
Stitch Summary
Presser feet
Practical stitches/buttonholes
General instructions
Functions
Messages
Buttonholes
Alphabets/numbers
Memory
Quilt stitches
Balance
Help
TC (Tutorial / Creative Consultant)
Smart function
50–61
62
62–65
65–67
68
69
70
71–72
Setup program
eco (ecology) function
Optional accessories
Needles, Thread, Fabric feed
Cleaning and maintenance
Troubleshooting
Glossary of terms
Index
Details 4
030787.52.04_0401_a165_EN
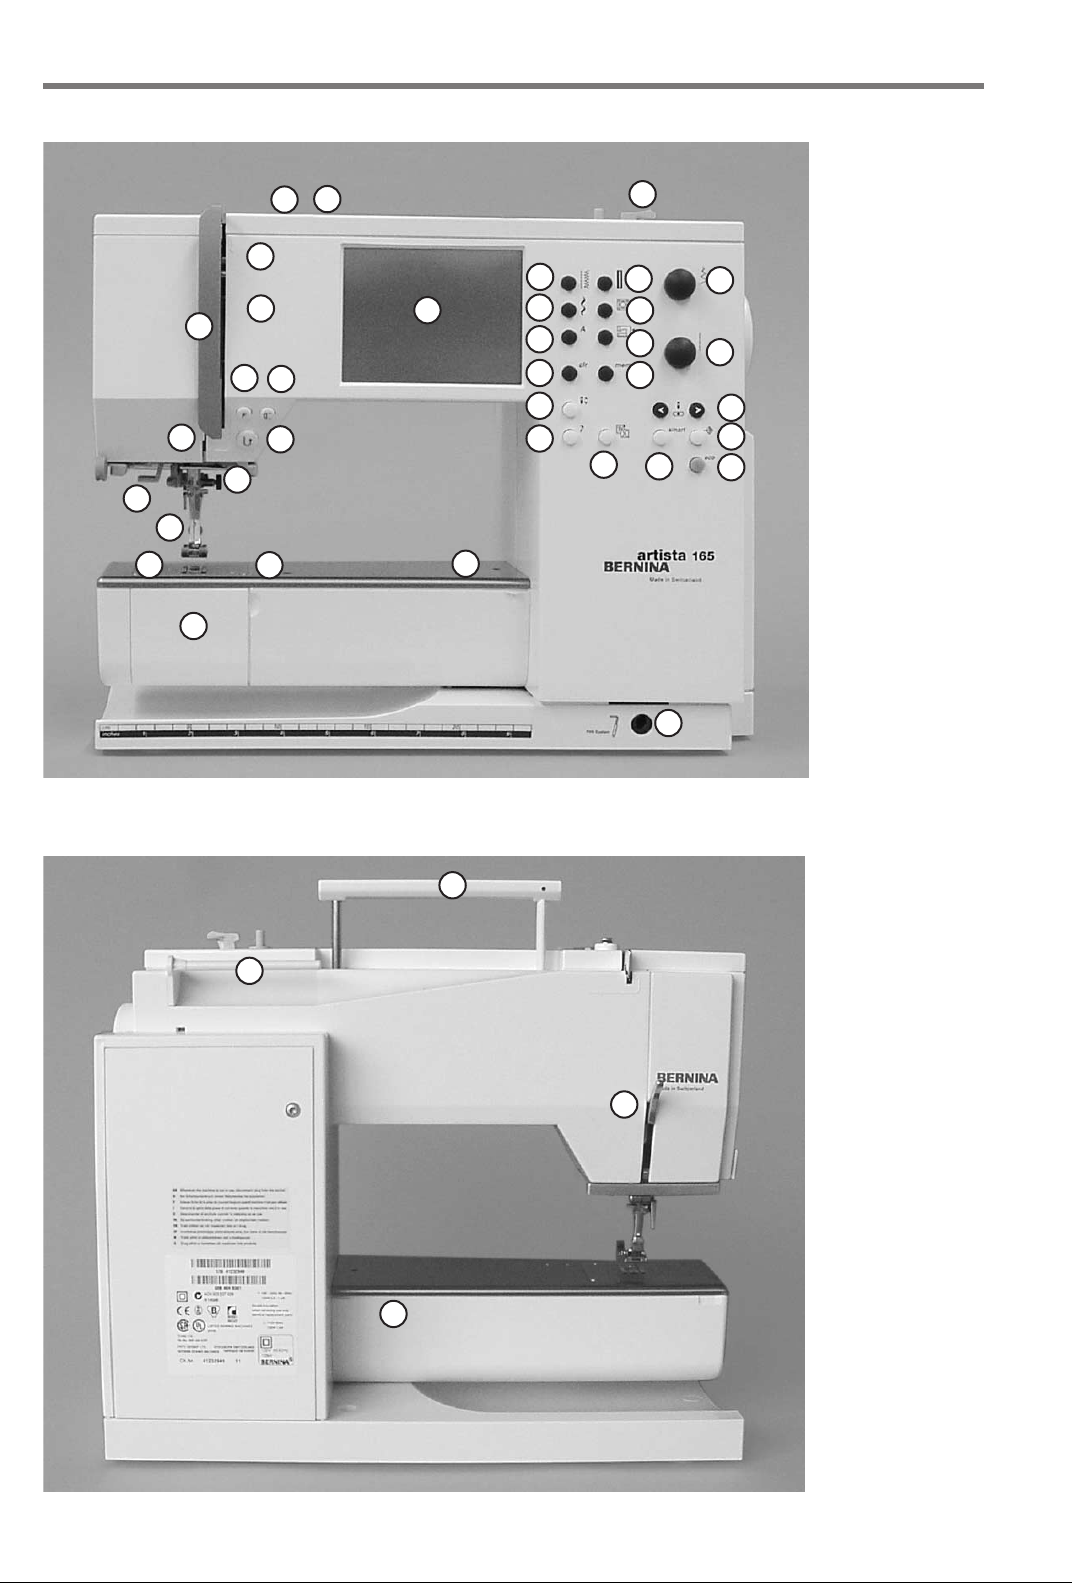
Details of the machine
28
19
17
23
22
25
32
29
30
31
33
34
35
49
12
11
18
10
9
14
15
7
8
5
2
1
13
6
3
16
4
20
21
24
26
27
Front view
37
38
36
39
Back view
36
030787.52.04_0401_a165_EN
40
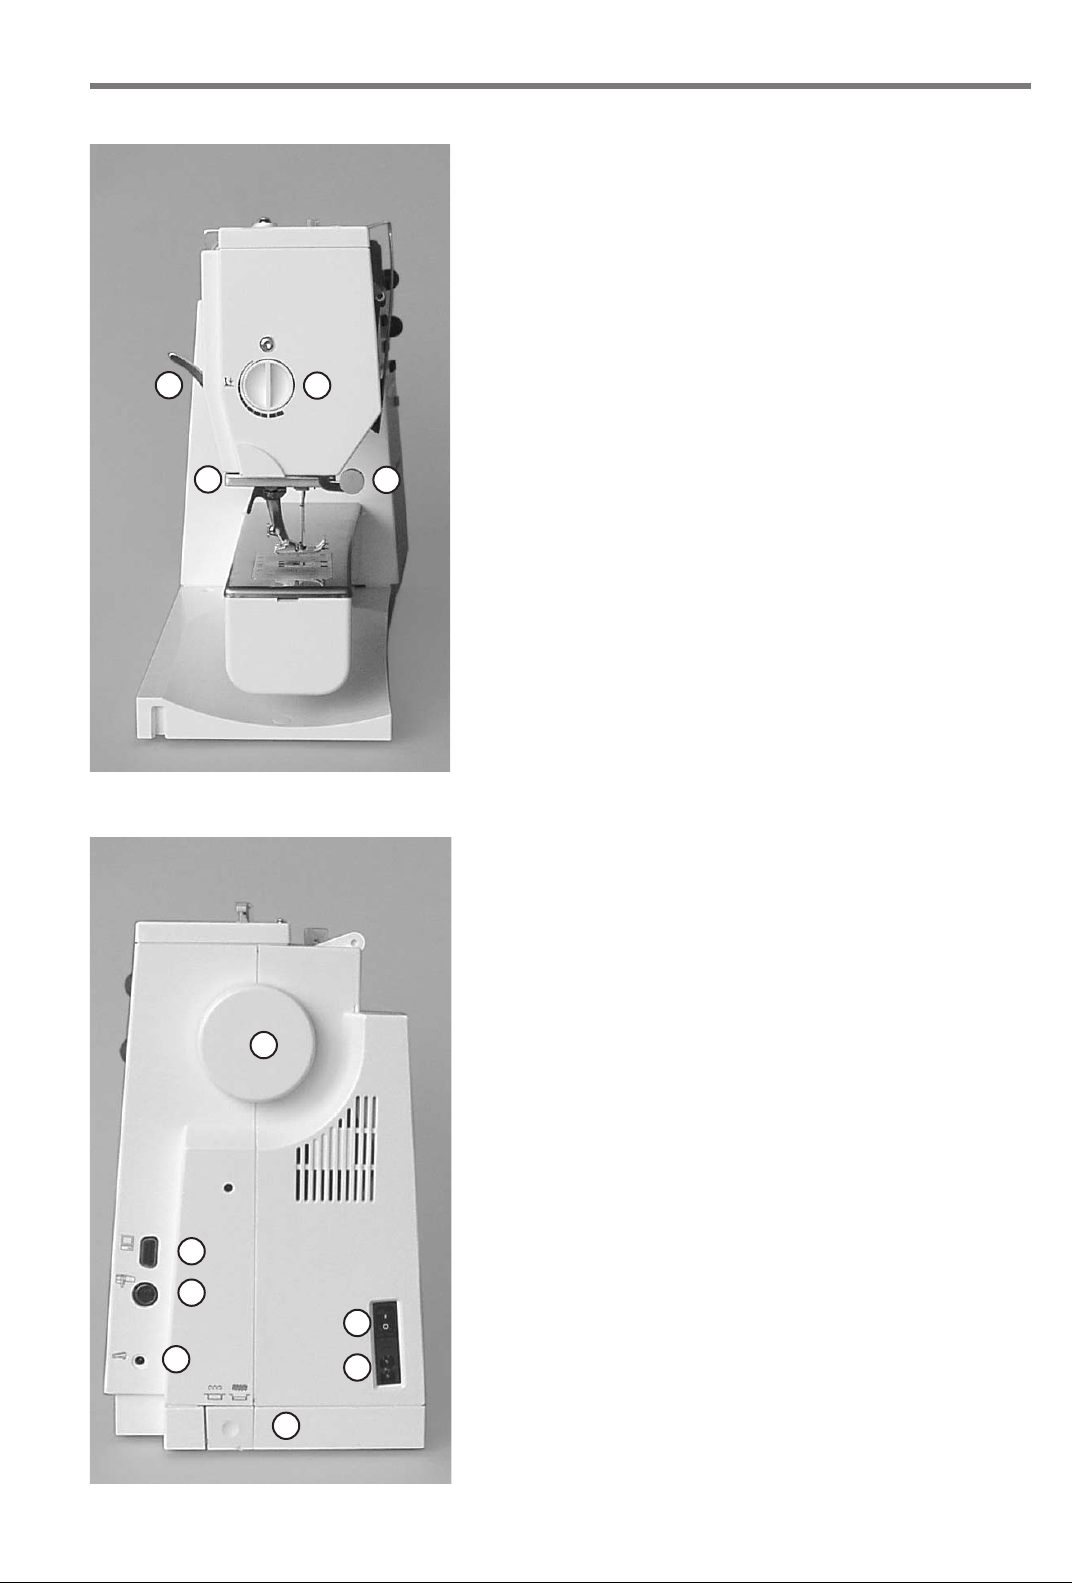
View from the left side
42
41
50
Details
1
Bobbin cover
2
Stitch plate
3
Attachment base for optional accessories
4
Darning ring connection
5
Presser foot
6
Needle clamp
7
Thread guide
8
Needle threader
9
Thread take-up cover
10
Thread path
11
Thread take-up
12
Bobbin pre-tension
13
Quick reverse button
14
F (Favorite Function) button
15
Pattern end
16
Screen
17
Bobbin winder with on/off switch and
thread cutter
18
Practical stitch button
19
Buttonhole button
20
Decorative stitch button
21
Alphabet button
22
External embroidery button
23
Quilt stitch button
24
clr (Clear) button
25
mem (Memory) button
26
Needle stop up/down
27
“?”( Help) button
28
TC (Tutorial/Creative Consultant) button
29
Stitch width knob
30
Stitch length knob
31
Needle position
32
smart button
33
setup button
34
eco (Ecology) button
35
FHS connection (optional accessory)
36
Presser foot lifter (manual)
37
Carrying handle
38
Spool pins
39
Sewing table socket
40
Thread cutter
41
Presser foot pressure dial
42
Handwheel
43
Power switch on/off
44
Power plug socket
45
Drop feed-dog
46
Foot control socket
47
Embroidery module connection
(optional accessory)
48
PC serial port
49
Tension adjustment
50
Magnifying glass holder
5
48
47
46
View from the right side
43
44
45
Setting up the machine6
030787.52.04_0401_a165_EN
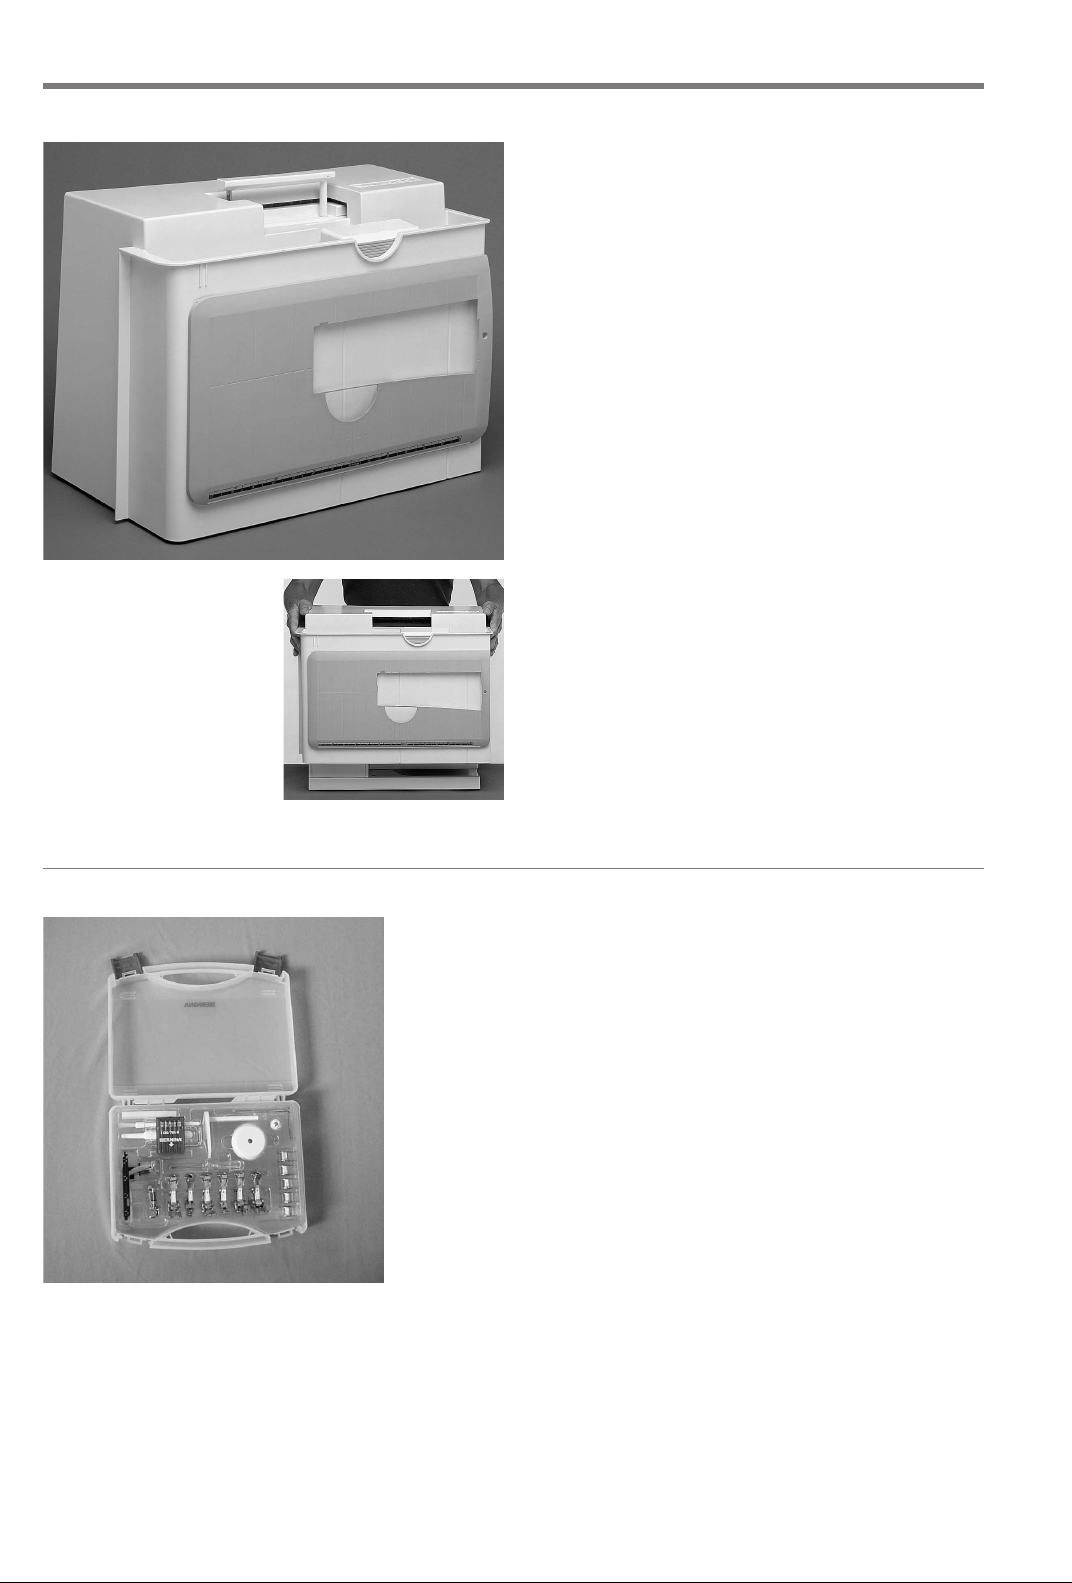
Carrying case
Carrying case
· protects from dust and dirt
· compartment for accessories
Accessories
· foot control
· instruction manual
· power cable
· warranty card
· FHS presser foot lifter (Free Hand System)
· ruler for sewing table
· sewing table (attached)
· To remove the sewing table, lift slightly and remove.
To r emove the case
· grasp both sides
· pull up vertically
Accessory box
Standard accessories *
·4 bobbins
· selection of 130/705H needles
· seam ripper
· small screwdriver
·brush
· seam guide
·reverse pattern foot No.1
· overlock foot No.2
· buttonhole foot No.3
· automatic buttonhole foot No.3A
· zipper foot No.4
· blind stitch foot No.5
· embroidery foot No.6
· jeans foot No.8
· height compensating tool
· vertical spool holder pin
· three spool discs
· foam pad
· Compensation plate for sewing buttonholes
*can vary from country to country
Important:
(USA/Canada only!)
Use only foot controller type LV1
with sewing machine models 165.
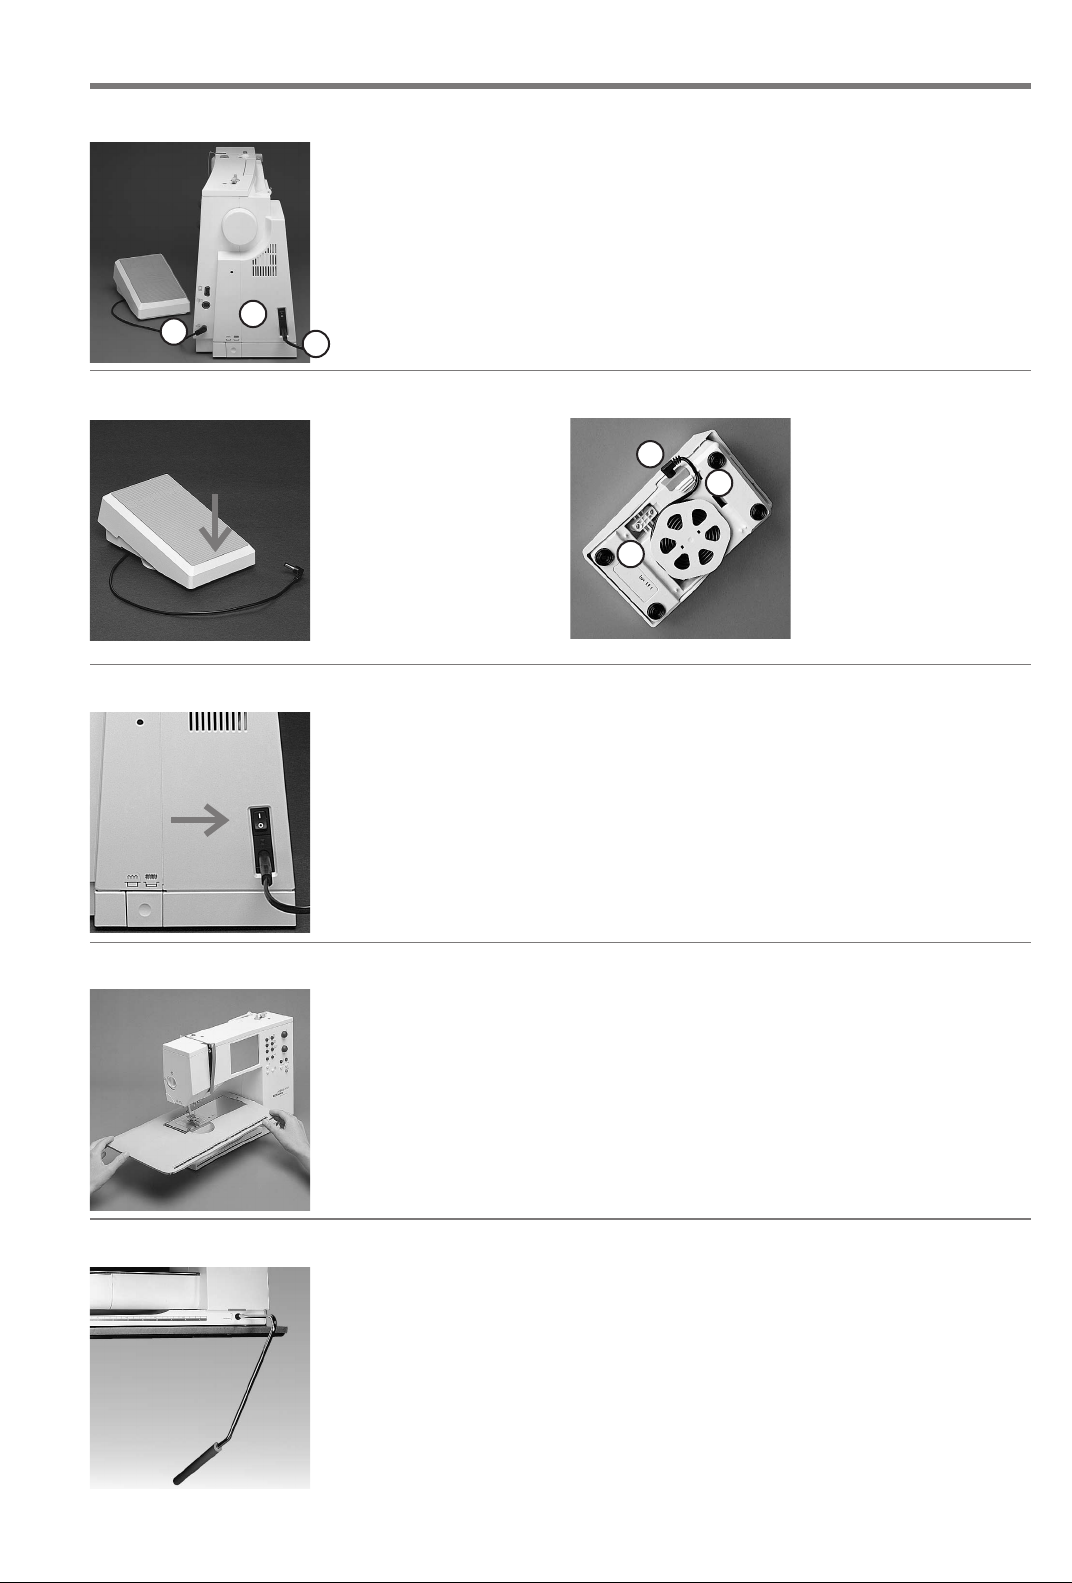
Power cable
030787.52.04_0401_a165_EN
C
Foot control
Setting up the machine
The power cable is stored in the case
· plug A into machine
· plug B into electrical outlet
Foot control cable
· plug C into machine
A
B
Sewing speed
· control the sewing speed
by depressing the foot
control with your toe
· raise or lower the needle
by tapping on the foot
control with your heel
Use only foot controller
type LV1 for sewing
machine model 165
(USA/Canada only)
C
Important! (USA/Canada only)
This sewing machine has a polarized plug
(one blade wider than the other). To
reduce the risk of electric shock, this plug
is intended to fit only one way into a
polarized outlet. If the plug does not fit
fully in the outlet, reverse the plug. If it
still does not fit, contact a qualified
electrician to install the proper outlet. Do
not modify the plug in any way.
Cable tidy
A
B
· wind the cable round the
spool
· insert the plug into A
When sewing
· unwind the cable to the
desired length and slip
into B or C
7
Power switch
The power switch is on the
handwheel side of the machine
1 the machine is switched on
0 the machine is switched off
The sewing light is switched on
and off within the Setup
program.
Sewing table
Larger sewing surface
· the sewing table
increases the sewing
surface
·free arm for larger
tubular items such as
pant legs and waistbands
To attach
· push over the free arm
and press firmly so that it
engages on the fixing lug
(needle and presser foot
fully raised)
To r emove
· pull to the left
· remove
FHS (Free Hand System) presser foot lifter
Raising and lowering the
presser foot.
· the presser foot lifter
raises and lowers the
presser foot
· push to the right with
your knee
· the presser foot is raised
and the feed-dogs are
lowered simultaneously
· the feed-dogs come up
automatically as soon as
the first stitch is sewn
Attaching the presser
foot lifter
· the presser foot lifter is
stored in the case.
· insert the presser foot
lifter into the opening in
the base plate
· you should be able to
operate the lifter in your
normal sitting position.
Refer to the safety
instructions!
Seam guide
· insert into the groove
(underside of table) from
the right
· it can be freely adjusted
over the whole width of
the table
Scale
· number “0” corresponds
to the centre needle
position
Note:
Your dealer can adjust the
position if necessary.
Setting up the machine8
030787.52.04_0401_a165_EN
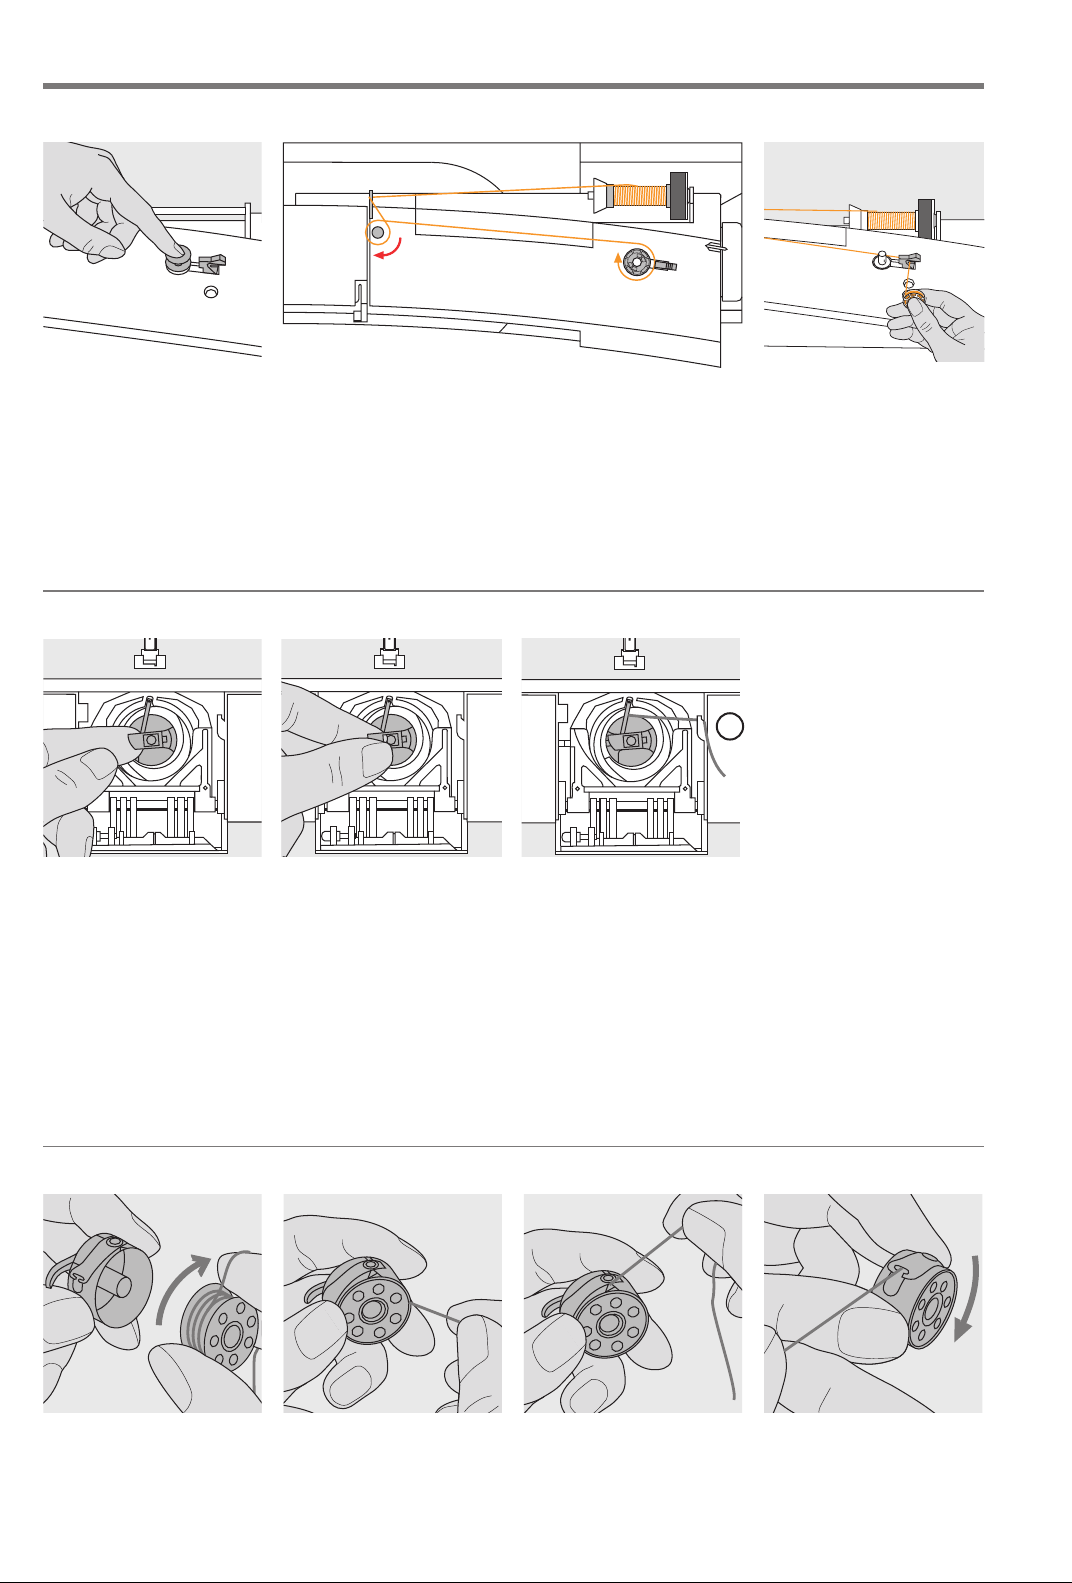
Winding the bobbin
Winding the bobbin
· turn power switch on
· place empty bobbin on
spindle
Bobbin case
To r emove
· raise the needle
· turn power switch to 0
· open the accessory box
cover
· open the bobbin cover
· grasp the latch of the
bobbin case
·remove case
Threading the bobbin
· following the direction of the arrow take thread through
the rear guide and round the pre-tension stud
· wrap the thread around the inner bobbin two or
three times and cut off any excess thread on the thread
cutter
·press the engaging lever against the bobbin
·press the foot control
the motor stops automatically when the bobbin is full
·remove the bobbin
A
To insert
· hold the bobbin case
latch
· the opening on the case
should be at the top
· insert so that it engages
· close the bobbin cover
· close the accessory box
cover
Bobbin thread cutter
· insert the bobbin case
· take thread over cutter A
· cut thread
Note:
For normal sewing, the
bobbin thread does not have
to be brought up as the loose
end is just the right length to
start sewing.
Thread cutter
· cut the thread on the
thread cutter
Refer to the safety
instructions!
Inserting the bobbin
Insert the bobbin so that
the thread runs clockwise.
Pull the thread counterclockwise into the slot.
Pull the thread to the left
under the spring until it
lies in the T-shaped slit at
the end of the spring.
The bobbin must turn
clockwise when the thread
is pulled.
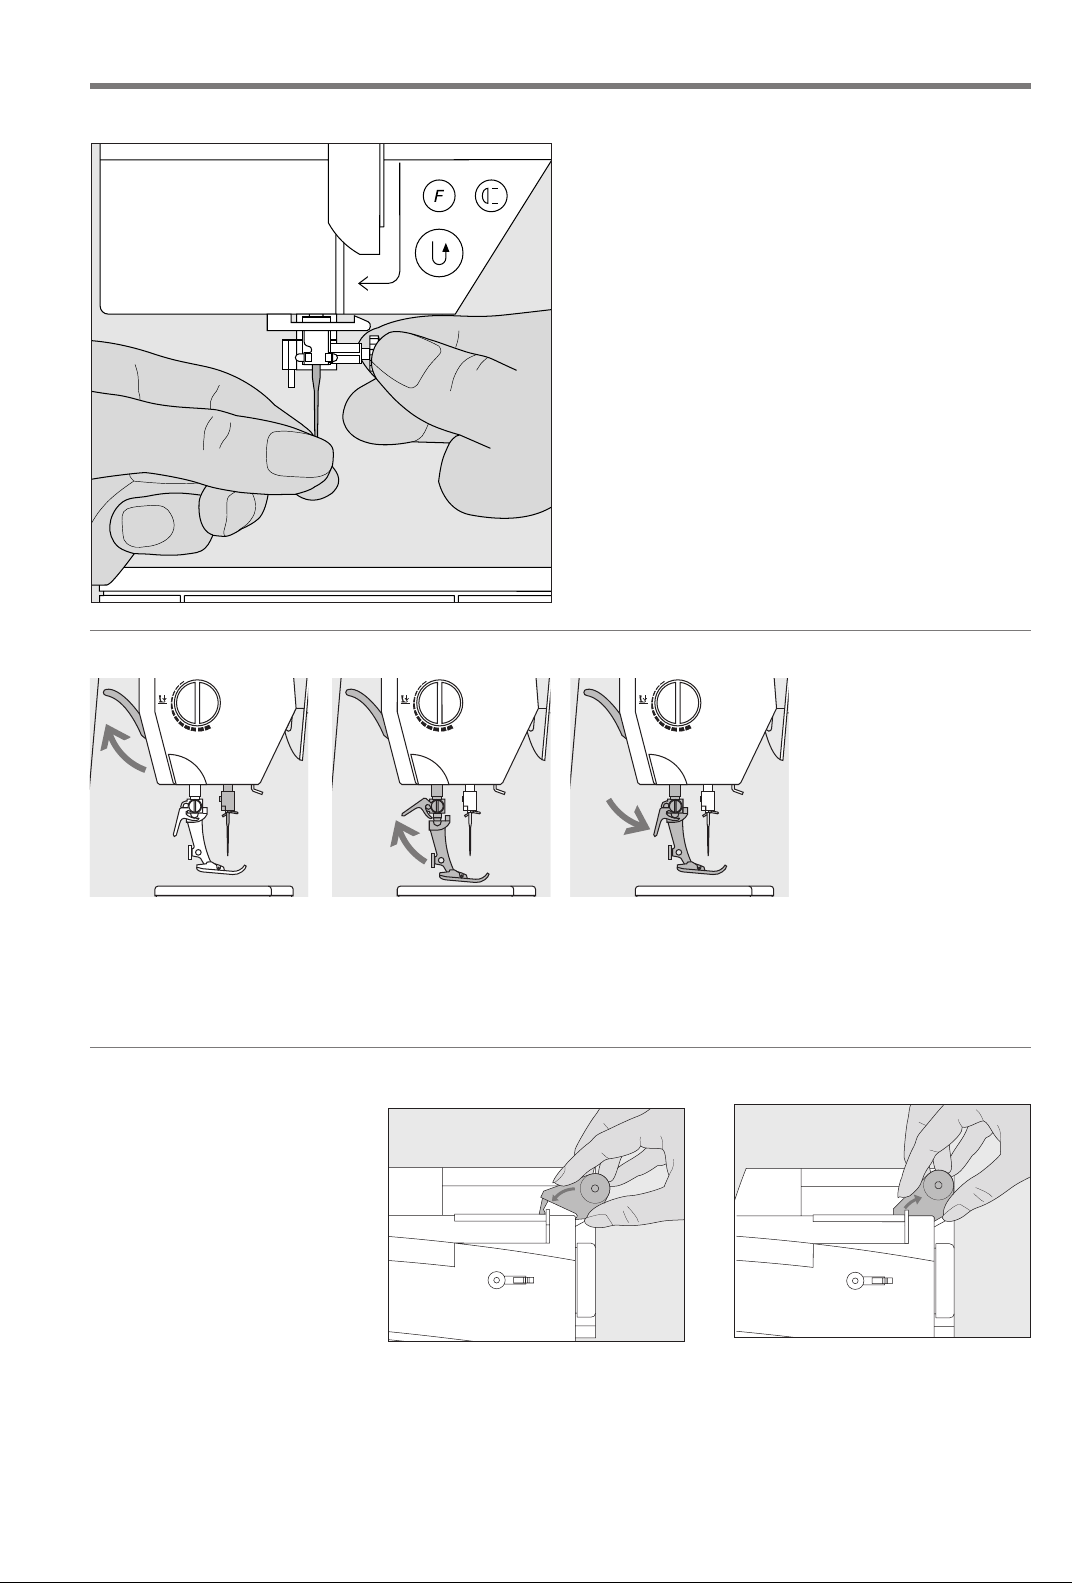
Changing the needle
030787.52.04_0401_a165_EN
Setting up the machine
Removing the needle
· raise the needle
· turn power switch to 0
· lower the presser foot
· loosen the needle clamp with the torx screwdriver
· pull the needle down to remove
Inserting the needle
· flat side of needle to the back
· insert the needle as far as it will go
· tighten the needle clamp
Refer to the safety instructions!
9
Changing the presser foot
Changing the presser foot
· raise the needle and
presser foot
· turn power switch to “0”
Raising the lever
· raise the clamping lever
·remove the presser foot
Supplementary spool pin (vertical)
Vertical spool pin
· the supplementary spool pin
(vertical) is stored in the accessory
box
· insert the pin from right to left in
the opening
· to remove, pull to the right at the
base of the spool pin
· essential sewing aid when using
more than one thread, i.e. double
needle, etc.
· threads wound onto spools
in a stacked manner work
best when feeding from a
vertical spool pin
· using a vertical spool pin
with metallic threads will
help avoid fraying and
splitting of the thread
Attaching the presser foot
· guide the foot upwards
over the cone
·press the clamping lever
down
Refer to the safety
instructions!
Setting up the machine10
030787.52.04_0401_a165_EN
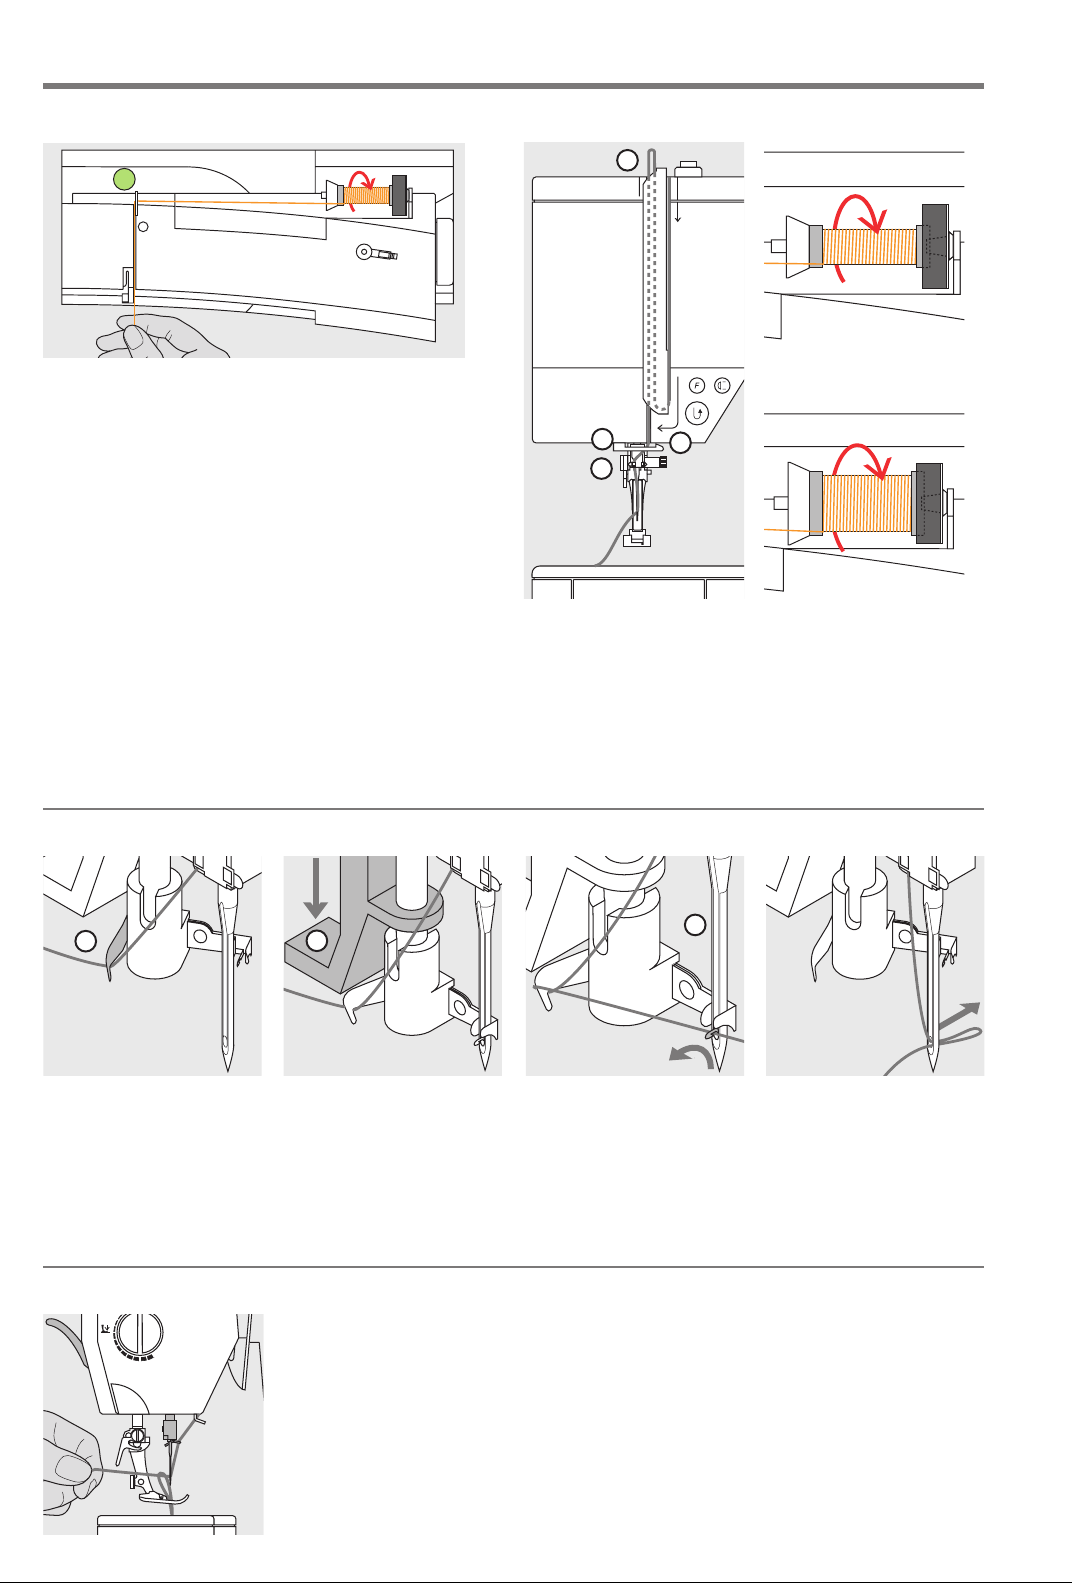
Threading the upper thread
A
Attaching the thread spool
· raise the needle and presser foot
· turn the power switch to «0» (off)
· attach the foam pad
· place spool on pin (spool turns clockwise)
· attach the appropriate spool disc - diameter of spool
disc is disc size. There must be no clearance between
the disc and the spool
· take thread through rear guide A
· then into slit of upper thread tension
Down
· pull thread down to the right of the take-up cover to B
Up
· take thread up to the left of the cover to C in the
direction of the arrow
C
D
E
B
Down
· take thread down and through guides D and E
Needle threader
A
Thread in hook
· lower the presser foot
· lay the thread behind
hook A and hold lightly
B
Lever down
·press lever B down
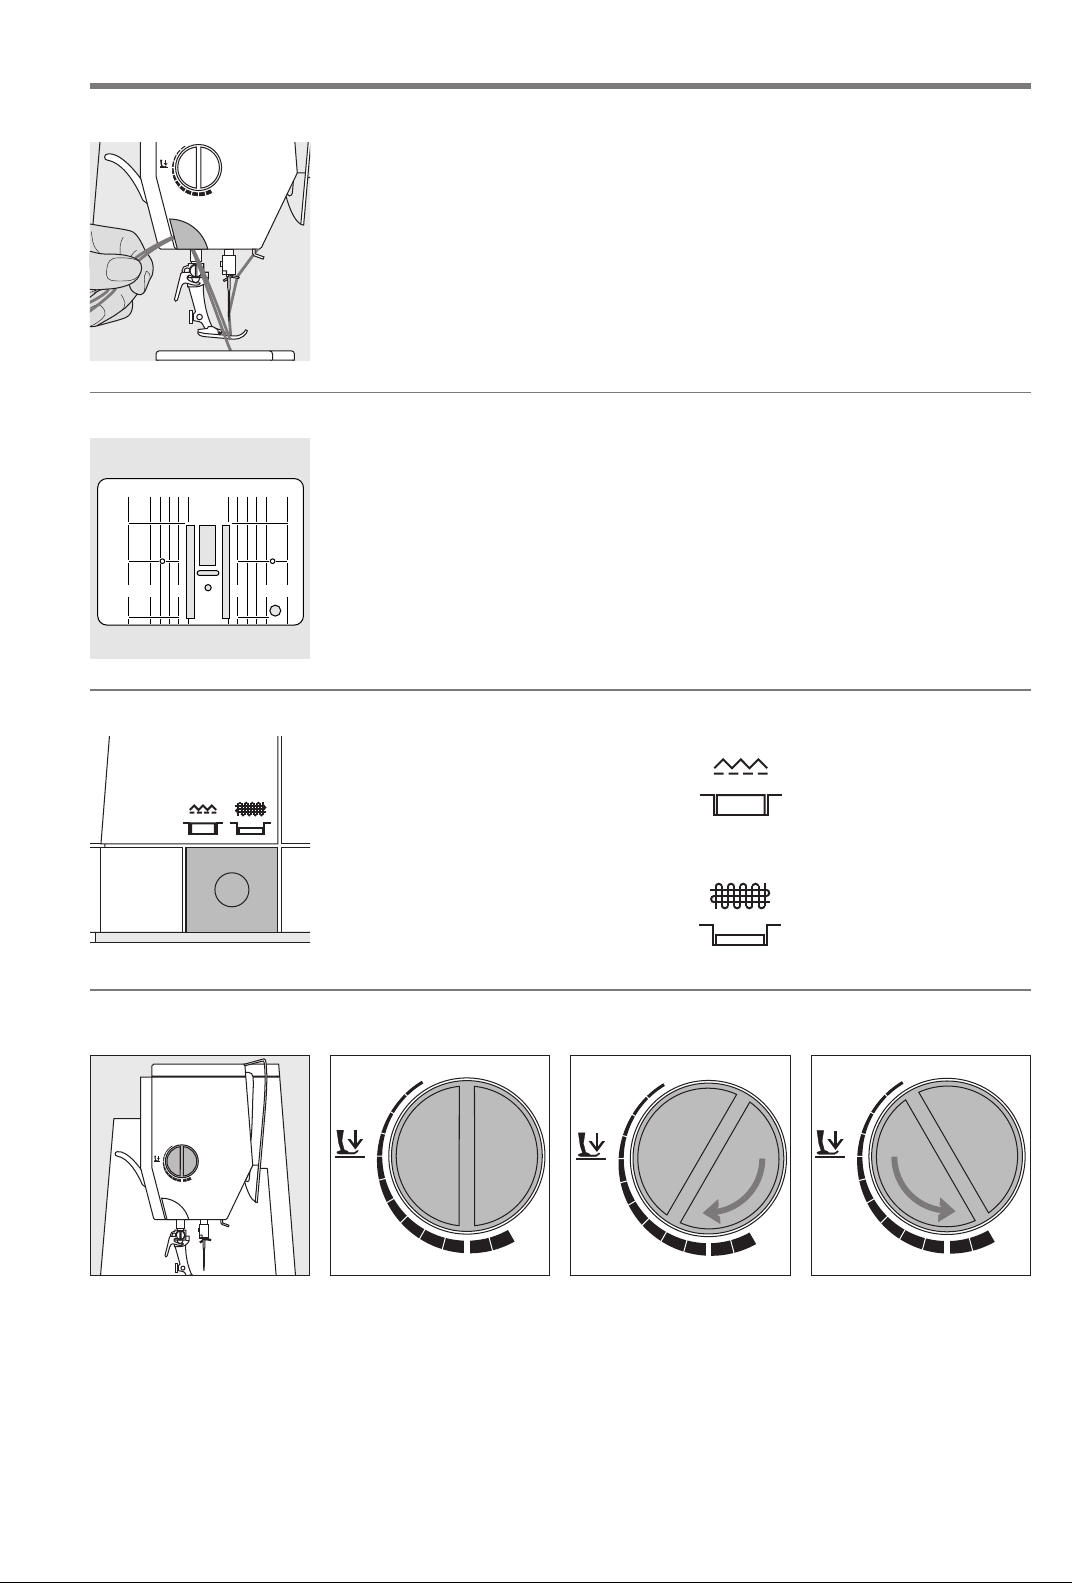
Bringing up the lower thread
Bringing up the lower thread
· if bobbin thread is cut on the cutter
(page 8), there is no need to bring it up
· hold the upper thread
· sew one stitch
· pull the upper thread to bring the lower
thread up through the stitch plate hole
· take both threads through the slit on the
presser foot to the back
· pull threads over the cutter
C
Thread in front of needle
· take the thread in front
of the needle C
· pass the thread from the
bottom to the top of the
needle until it catches in
the hook
Refer to the safety
instructions!
Let go of lever and thread
· let go of lever B and
thread
· pull the thread loop
through the needle eye
Note:
The bobbin thread must be
brought up through the
stitch plate for certain
types of work. The length
of thread is sufficient for
most normal work if the
lower thread cutter has
been used.
Thread cutter
030787.52.04_0401_a165_EN
Stitch Plate
5
1
/81/4
25 20 10 252010
5/81
/4
Thread cutter on head frame
· lower the presser foot and pull both
threads from front to back over the cutter
·the threads release as soon as the first
stitch is sewn
Stitch plate markings
· the stitch plate is marked with vertical
1
lines in mm and inches
· mm measurements are at the front
· inch measurements are at the back
· the measurements correspond to the
distance from the needle to the line
· needle insertion point is position 0
(center needle position)
· the mm/inch measurements are marked
to the right and left
Setting up the machine
· the lines help to guide the fabric for
perfectly spaced stitching
· the horizontal markings are helpful for
sewing buttonholes, etc.
11
Feed-dog
Button under the handwheel
Button flush with base plate = sewing
position
· for all machine-fed sewing
Button depressed = feed-dog is lowered
· for free-hand sewing (darning, freehand embroidery, free-hand quilting)
· for embroidery with the Embroidery
Module
Presser foot pressure
Dial on head frame
· the presser foot pressure
dial is on the left of the
head frame
Standard pressure
· for all normal sewing
Reduced pressure
· for jerseys and loose
knits, quilting
·prevents fabric stretching
· adjust pressure so that
the fabric still feeds
correctly
Increased pressure
· for sheer, slippery
lightweight fabrics,
quilting
· improves fabric feed and
prevents puckering

12 Setting up the machine
3
5
030787.52.04_0401_a165_EN
Thread tension
The tension is factory set for best possible sewing results
using a 100 weight, 3 ply polyester thread
types and weights can affect the stitch, causing a need
for a tension adjustment to get the best results.
(
100/3). Other
Different threads, including embroidery and decorative
threads, may require tension adjustments. The tensions
should be adjusted to suit the thread, fabric and stitch.
Basic setting
A
· the basic setting is indicated when
the red line on the tension
adjustment wheel is in line with the
marking A
· the tension does not need adjusting
for normal sewing work
· for special sewing, the tension can
be adjusted to suit the fabric
To r educe the tension
· Adjust to between
3 and 1
To increase the tension
· Adjust to between
5 and 10
Example:
Tension Needle
Metallic thread approximately 3 90
Monofilament approximately 2–4 80
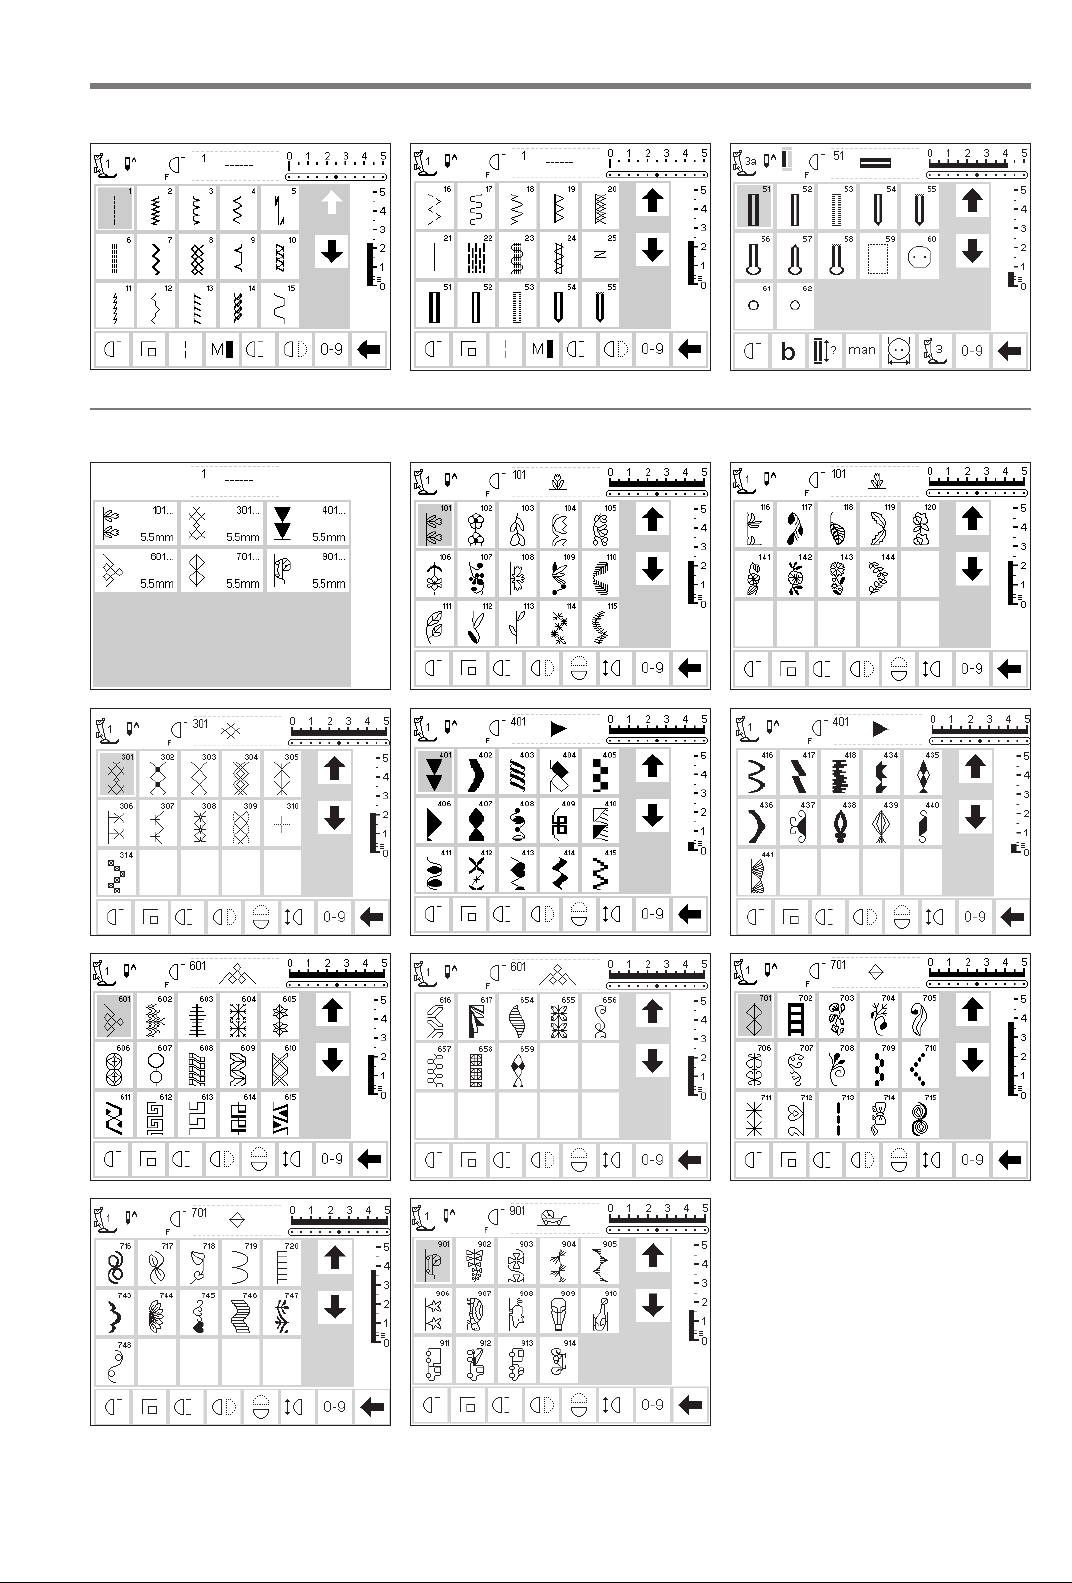
13Stitch Summary
030787.52.04_0401_a165_EN
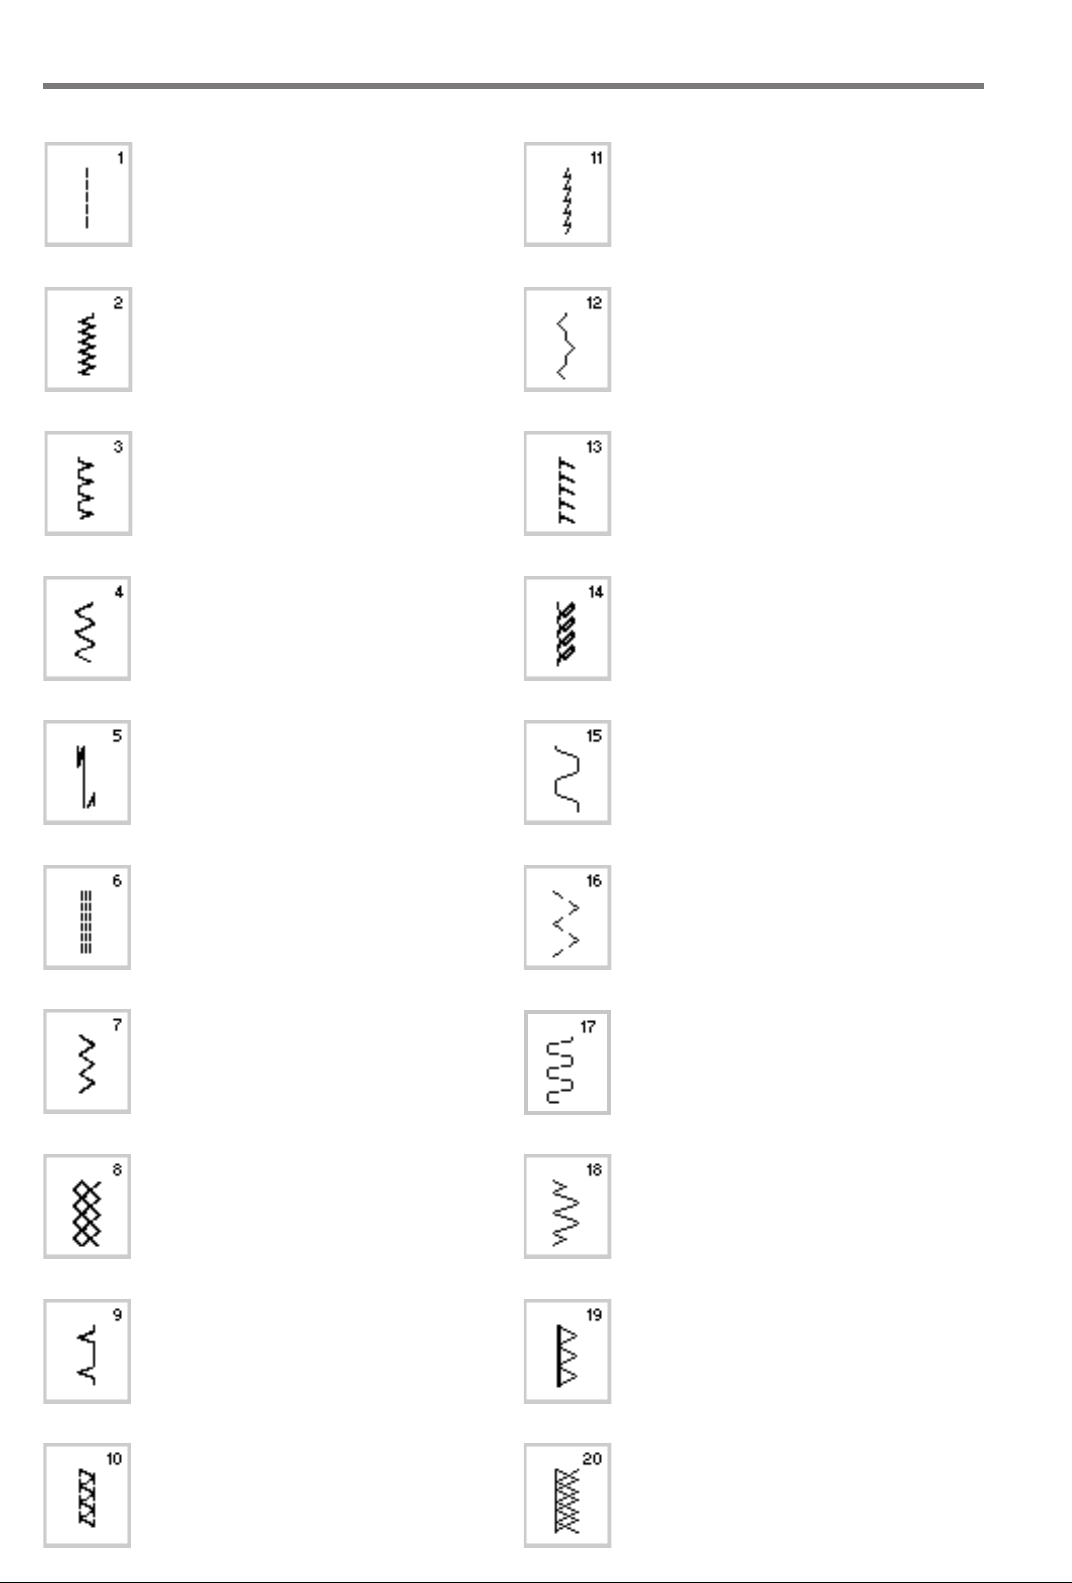
Practical stitches
Decorative stitches
Buttonholes
14 Stitch Summary
030787.52.04_0401_a165_EN
Quilt stitches
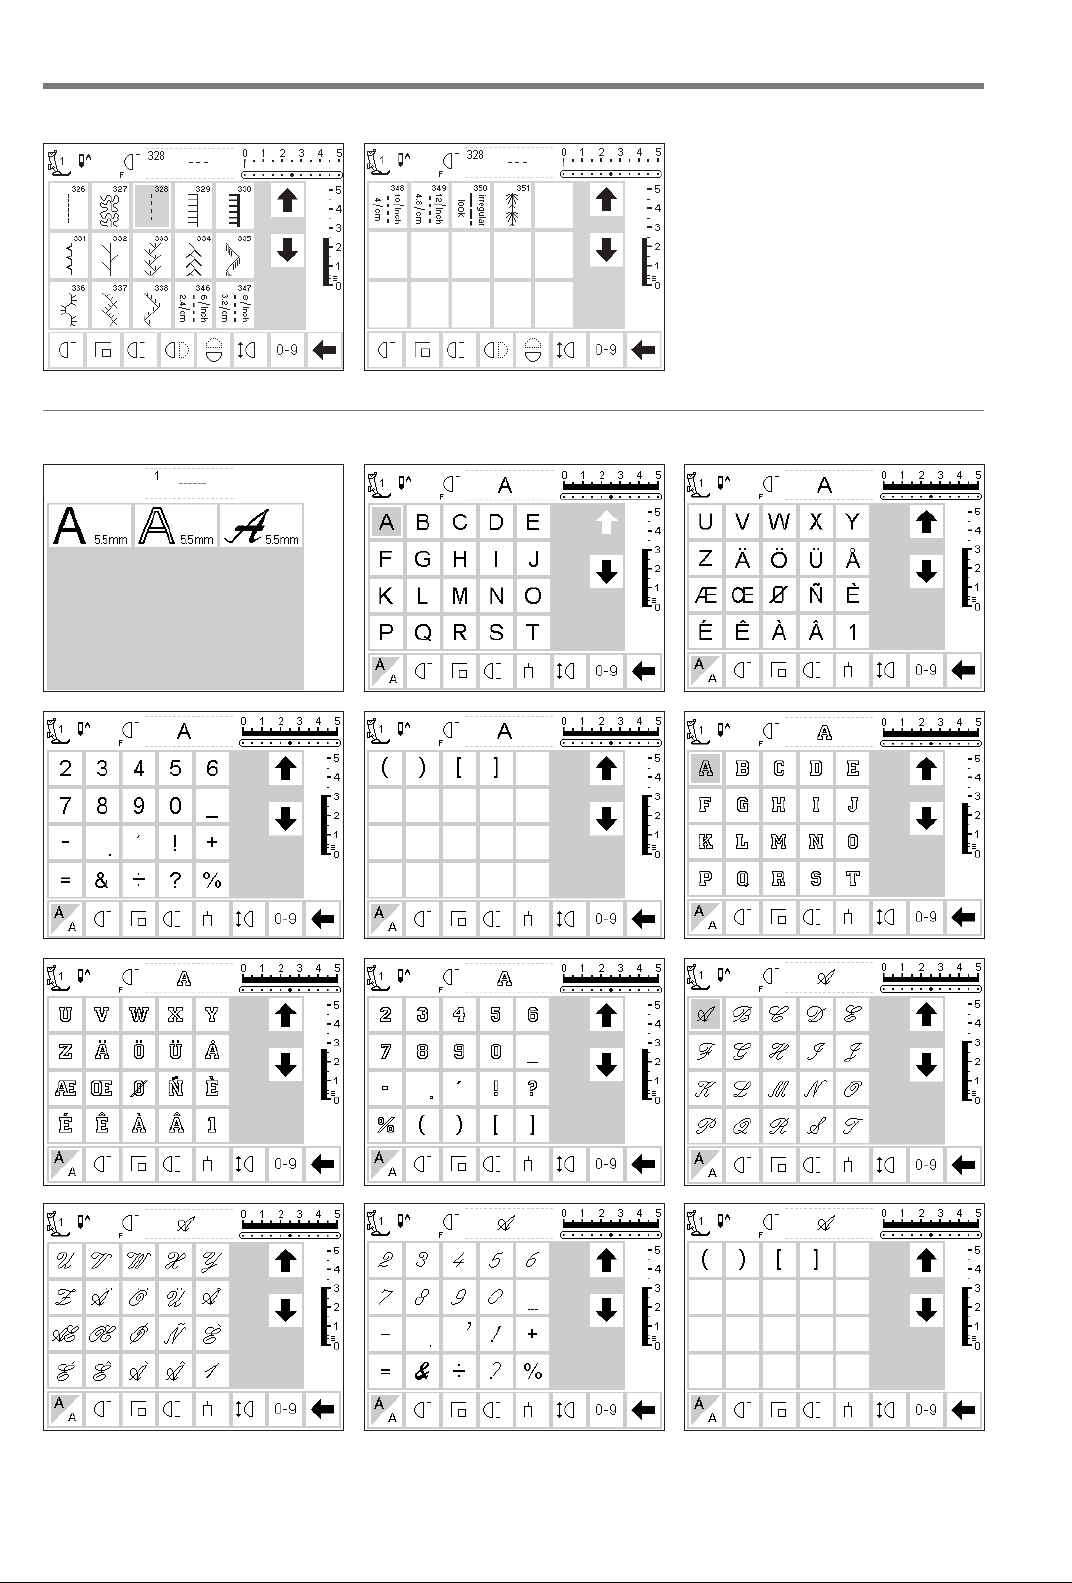
Alphabets
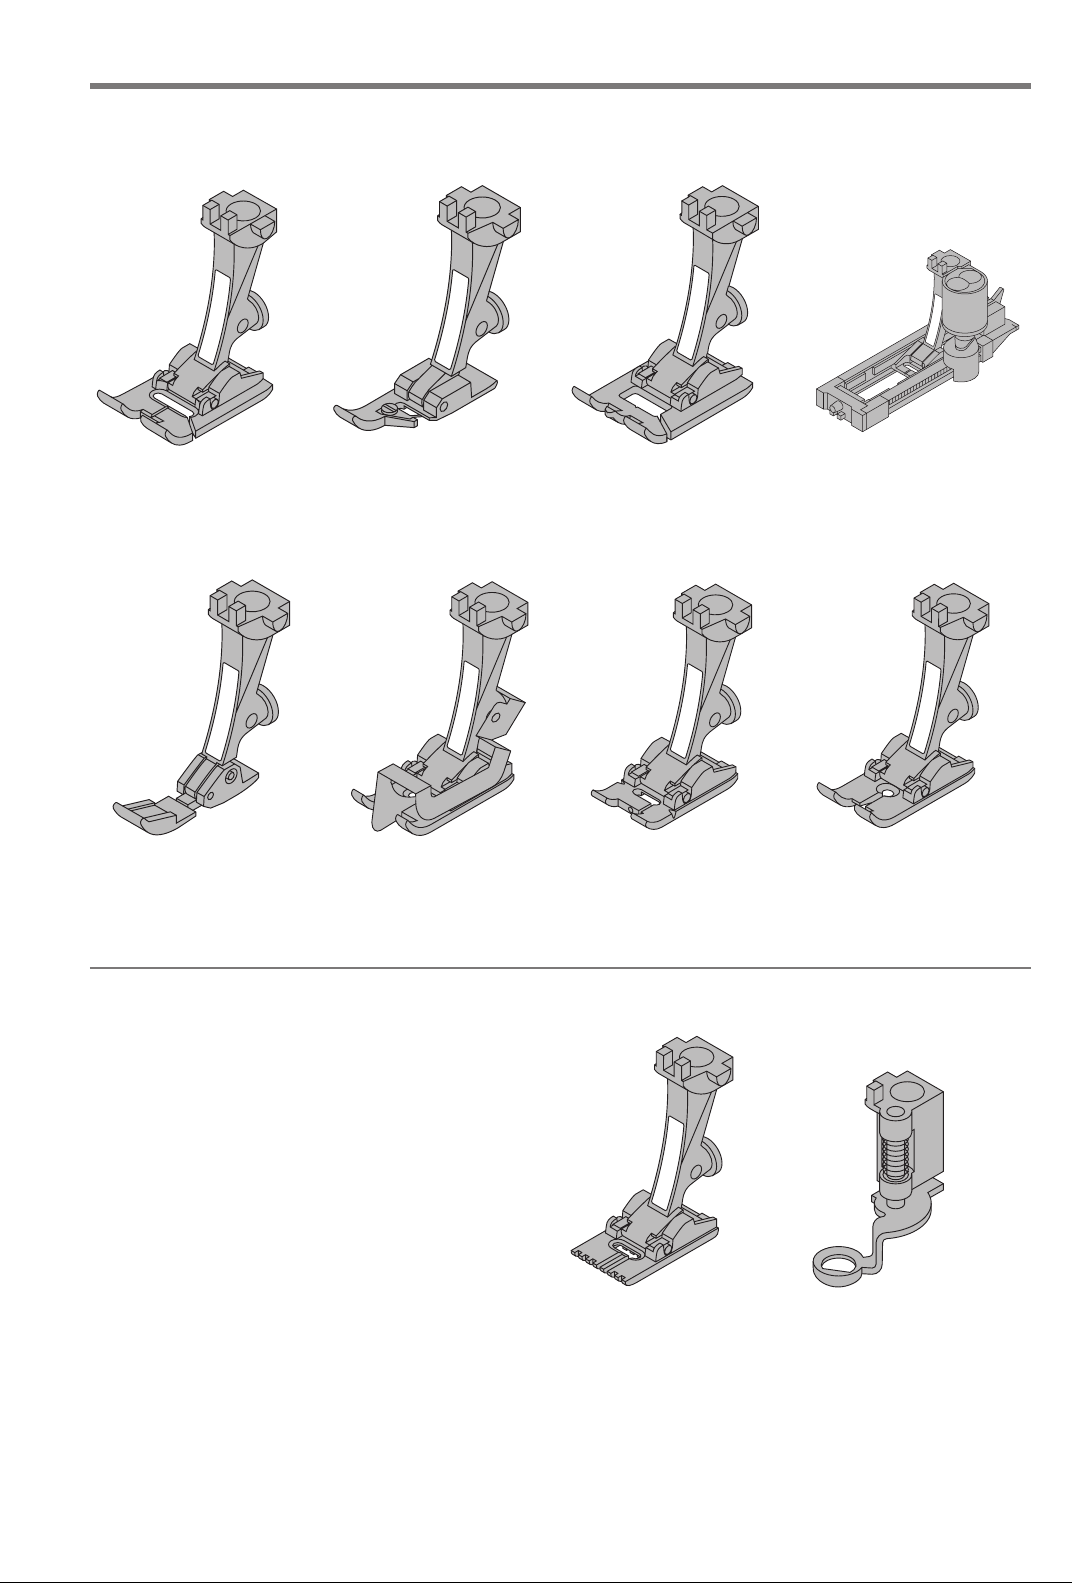
Presser feet
6
8
030787.52.04_0401_a165_EN
Presser feet
15
1
1
Reverse pattern foot with
code
Practical and decorative
stitches
4
4
Zipper foot
Sewing in zippers
2
2
Overlock foot
Overlock seams, hems,
oversewing edges,
narrow satin stitch
5
5
Blind stitch foot
Blind hems
Edge stitching
3
3
Buttonhole foot
Buttonholes
6
Embroidery foot
Embroidery, applique,
satin stitch seams, monograms
3A
3A
Automatic Buttonhole foot
Buttonholes in flat materials, Darning program
8
Jeans foot
Straight stitching in thick,
firm fabrics and over
seams
BERNINA Special Presser Feet
The standard selection of presser feet covers most normal sewing requirements but we recommend the use of
BERNINA specialty feet for specific sewing tasks such as
quilting, heirloom sewing, home decorating, tailoring,
etc.
They are available from your BERNINA dealer.
Samples of Specialty Presser Feet
32
32
Pintuck foot with 7 grooves
Used with a 2 mm double
needle to stitch pintucks on
medium weight fabrics such
as fine wool and cotton
9
9
Darning foot
Use with the feed dogs in
a lowered position for
darning, monograms, and
freehand embroidery
Practical stitches 16
030787.52.04_0401_a165_EN
Practical stitches
1 Straight stitch
All non-stretch fabrics. All straight
stitch work.
11 Super stretch
Open seam in all super-stretch fabrics
such as Lycra,
2 Zig-zag
Most fabric types. All simple zig-zag
applications such as oversewing fine
fabrics, attaching elastic, lace and
appliqué.
3Vari-overlock
Primarily for fine jerseys, stretch
overlock seams and hems.
4 Running stitch
Most types of fabric. Mending,
patching, reinforcing seams.
5 Securing stitch
All types of fabric. Secures the
beginning and end of seams sewn
with straight stitch.
6Triple straight stitch
Reinforced seams in tough, heavy
fabrics.
12 Gathering stitch
Most types of fabric. Gathering with
shirring elastic. Butted seams (edge to
edge).
13 Stretch overlock
Medium weight knits, toweling and
firm wovens. Overlock seams, flat
joining seams.
14 Jersey stitch
Natural, blended or synthetic fabrics
and delicate knits. Visible seams and
hems. Mending jersey/interlock.
15 Universal stitch
Firm fabrics such as felt and leather.
Flat joining seams, visible seams,
sewing on elastic, decorative seams.
16 Sewn-out zig-zag
Oversewing woven fabrics, reinforcing
edges, attaching elastic, decorative
seaming.
7Triple zig-zag
Reinforced seams in firm fabrics, visible
hems and seams, decorative stitching,
couching.
8 Honeycomb stitch
Most types of interlock and smooth
fabrics. Visible seams and hems.
9 Blind stitch
Most types of fabric. Blind hems, shell
edging on soft jerseys and fine fabrics,
decorative seams.
10 Double overlock
All types of knit. Sews and finishes
edges in one operation.
17 Lycra stitch
All two-way stretch fabrics, flat joining
seams and hems, reinforced seaming
on underwear.
18 Stretch stitch
All stretch fabrics, open seam in
sportswear.
19 Reinforced overlock
Medium to heavy weight knits and
toweling, overlock seams, flat joining
seams.
20 Knit overlock
All knits, machine or hand sewn.
Overlock = sew and neaten in one.
Practical stitches/Buttonholes
030787.52.04_0401_a165_EN
17
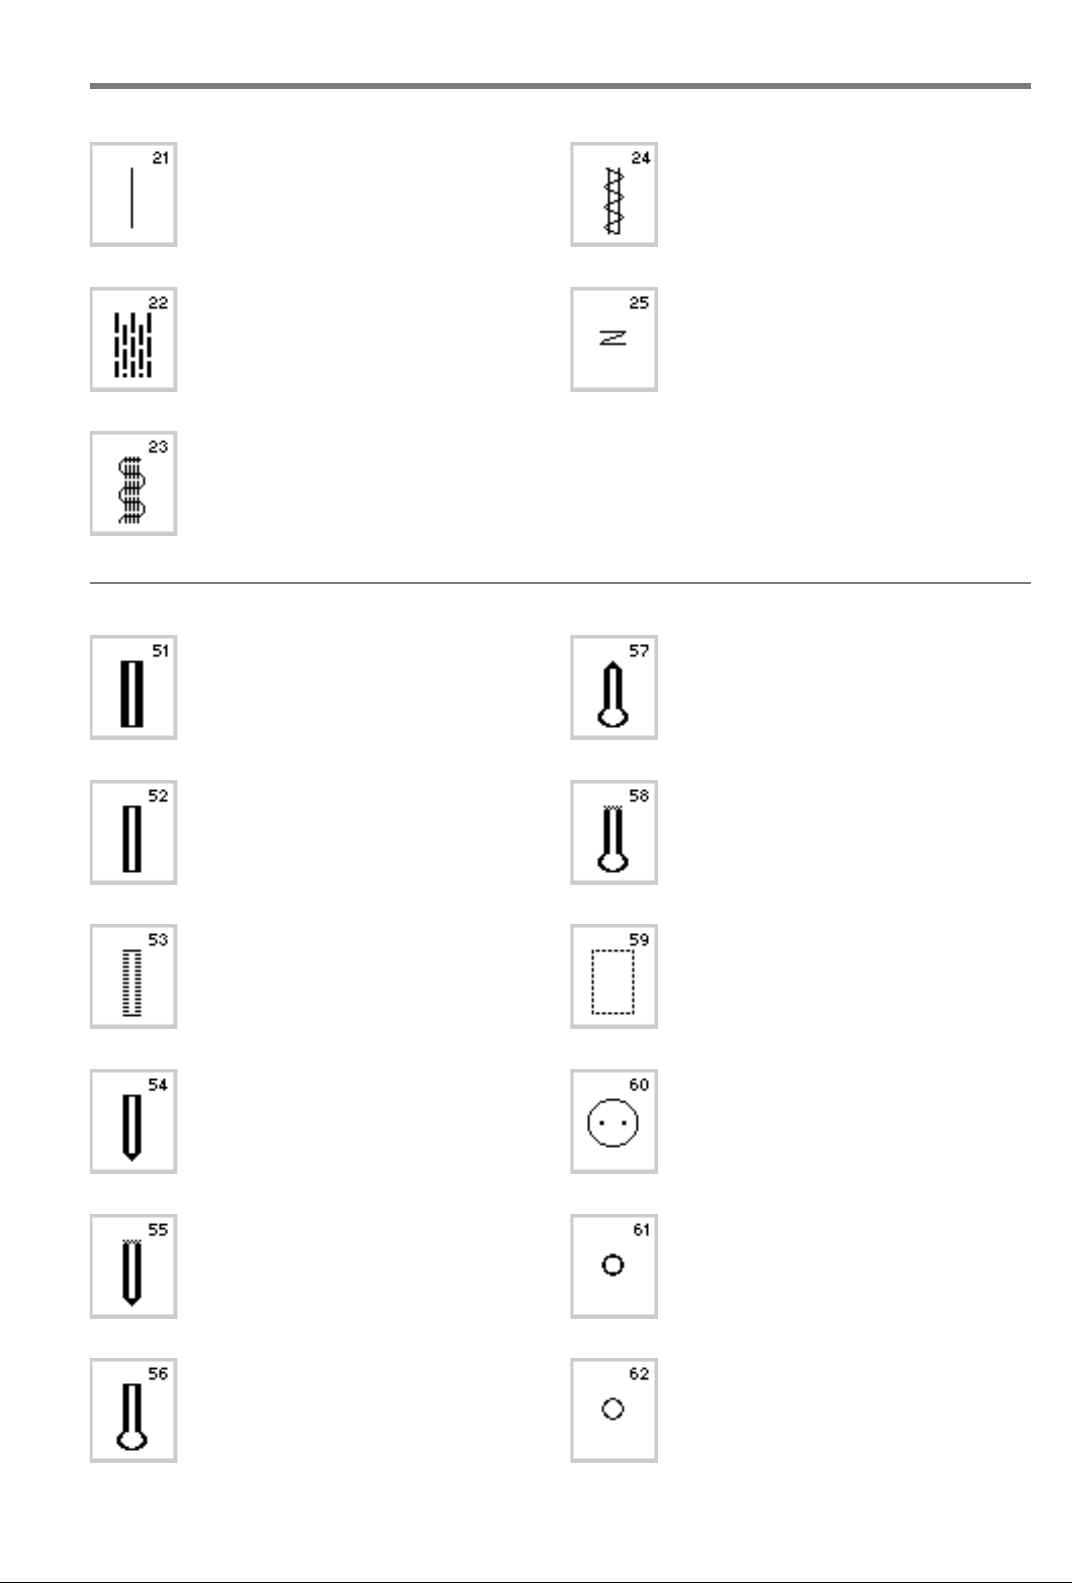
21 Basting
Basting seams, hems, etc.
22 Simple darning program
Automatic darning in fine and
medium weight fabrics.
23 Reinforced darning program
Automatic darning in heavy
weight fabrics.
Buttonholes
51 Standard buttonhole
Fine to medium weight fabrics.
Blouses, shirts, trousers, bedlinen, etc.
24 Bar tack program
Reinforcing pocket edges, belt loops
etc.
25 Bar tack program
Reinforcing pocket edges, belt loops
etc.
For more information on using various
practical stitches, refer to the artista 165
Sewing Manual, pages 2–20.
57 Keyhole buttonhole with pointed
bartack
For non-stretch firm fabrics.
Jackets, coats, leisure wear.
52 Standard buttonhole narrow (heirloom)
Fine to medium weight fabrics.
Blouses, shirts, dresses, trousers, children’s and baby clothes, doll clothes and
heirloom.
53 Stretch buttonhole
All stretch fabrics made from cotton,
wool silk and synthetic fibers.
54 Round buttonhole with normal bartack
For medium to heavy weight fabrics
of all types. Clothing, jackets, coats,
rainwear.
55 Round buttonhole with horizontal
bartack
For medium to heavy weight fabrics
£of all types. Clothes, jackets, coats,
rainwear.
56 Keyhole buttonhole with normal
bartack
Heavy weight, non-stretch fabrics.
Jackets, coats, trousers, leisure wear,
etc.
58 Keyhole buttonhole with horizontal
bartack
For firm, non-stretch fabrics.
Jackets, coats, leisure wear.
59 Straight stitch buttonhole
For reinforcing satin stitched
buttonholes, making bound
buttonholes, and stitching
buttonholes leather or imitation
suede.
60 Button sewing on program
For buttons with 2 and 4 holes.
61 Narrow zig-zag eyelet
Opening for cords and narrow
ribbons/bands, decorative work.
62 Straight stitch eyelet
Opening for cords and narrow ribbons.
For more information on stitching various
types of buttonholes, refer to the artista
165 Sewing Manual, pages 21–30.
18 General instructions
030787.52.04_0401_a165_EN
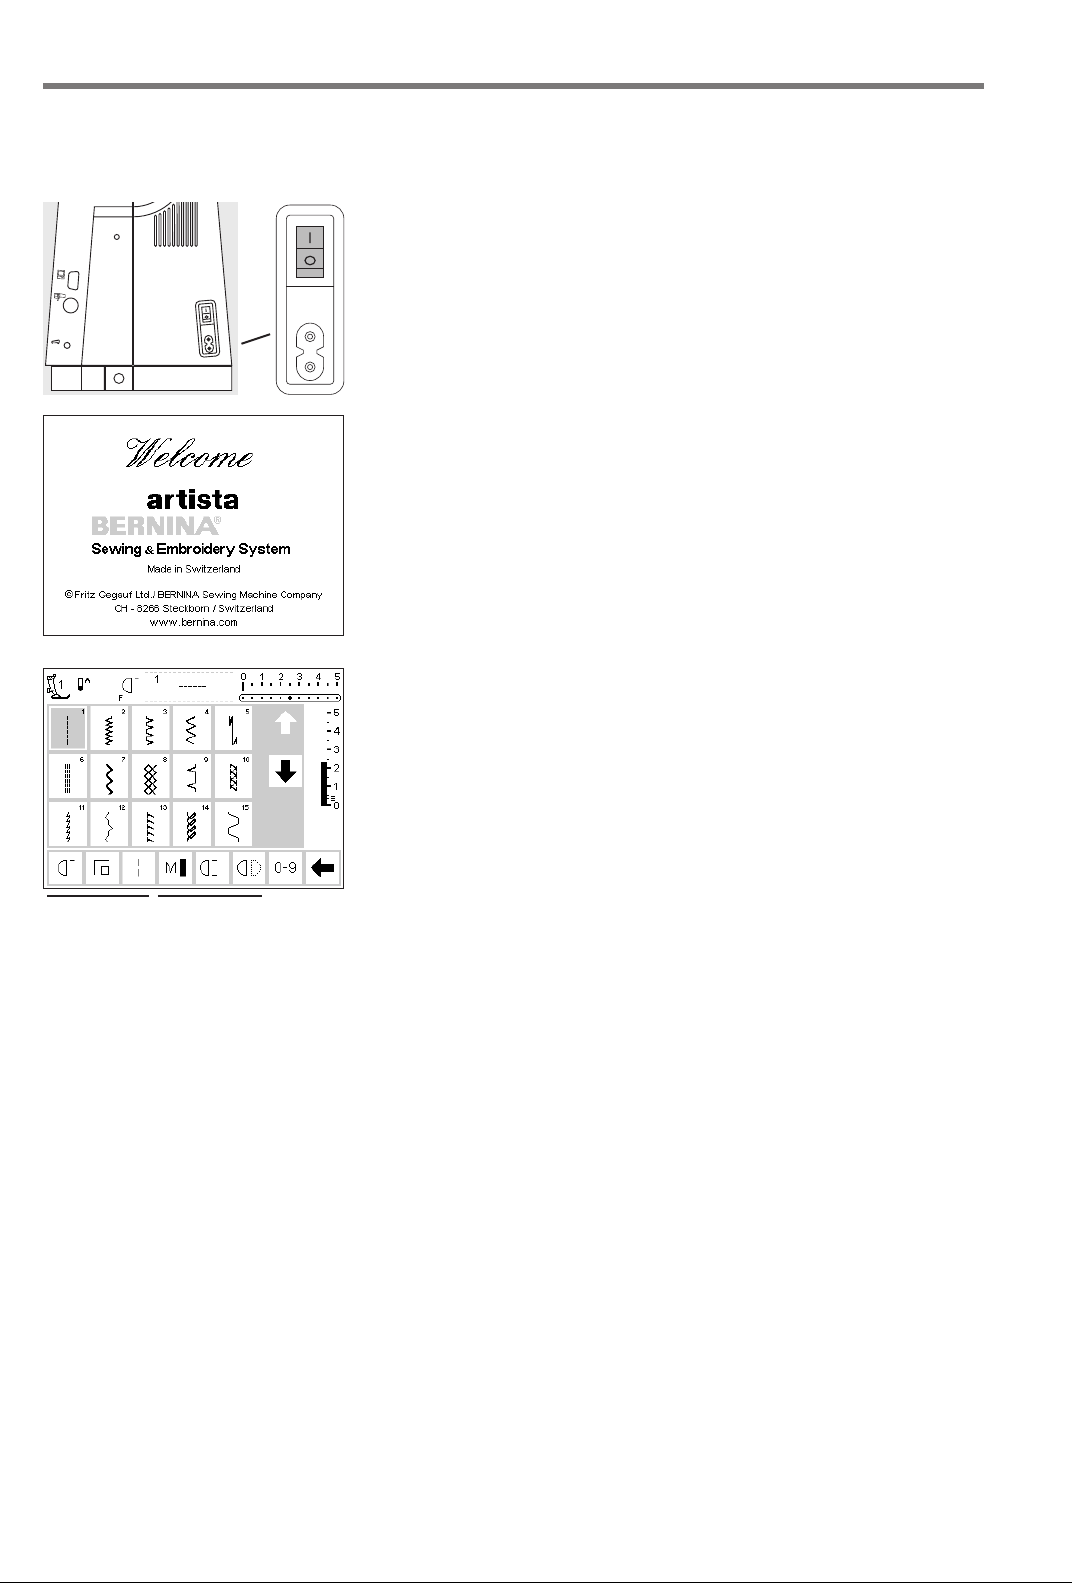
Screen
The artista is operated with a combination of external buttons and
knobs and a touch screen.
Switch machine on
· power switch to “1”
Welcome screen
· welcome
· appears for approximately 3 seconds
165
· can be omitted in the Setup program
B
A
CD
E
Practical stitch screen
F
· the practical stitch screen appears
immediately after the welcome
G
· screen shows:
H
A – presser foot indicator
B – needle stop position
C – assigned “F” button function
D – selected stitch and number
F – needle position (11 possibilities)
G – up/down scroll arrows
H – stitch length
(basic setting always visible)
I – scroll arrows for functions
J – stitch selection with numbers
(selected stitch is highlighted)
K– functions
E – stitch width (basic setting
always visible)
JK
I
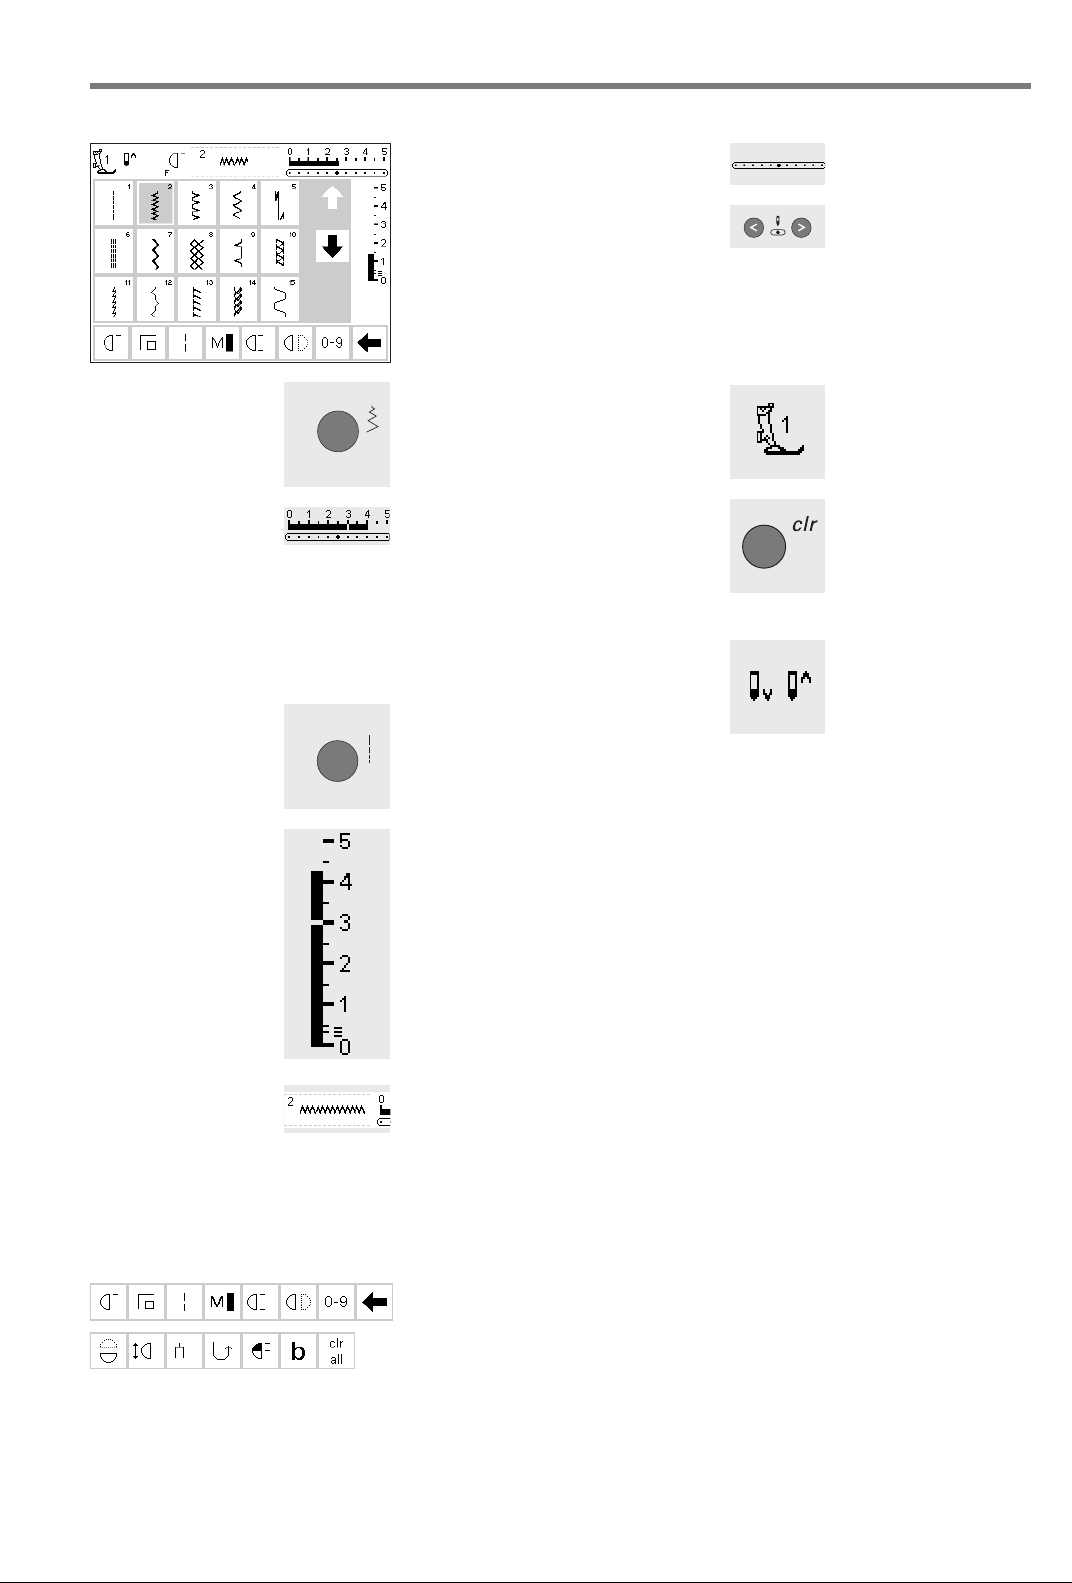
On screen stitch selection/stitch display/functions
030787.52.04_0401_a165_EN
Select a stitch
· touch the stitch of your choice
· the stitch is highlighted
· every stitch is displayed with its
number
19General instructions
Altering the needle
position
·press the right or
left needle position
button
· each press moves
the needle one
point to the right or
left
Altering the stitch width
·turn the upper knob
· altered width is shown on the
stitch width bar (basic setting
visible)
· stitch is displayed with altered
setting
· the stitch width can be altered
from 0–5.5 mm
· stitch width bar automatically
shows 0–5
Altering the stitch length
·turn the lower knob
· altered length is shown on the
stitch length bar
· the basic setting will be visible
(shown at 3mm)
· stitch length can be altered from
0 mm to 5.5 mm on most stitches
Presser foot indicator
· the recommended
presser foot is
displayed by number
Return to basic settings
·press the external
clr button
· the stitch will revert
to its basic settings
Needle stop
adjustment
·press the needle
stop button
·arrow points down
· the machine always
stops with the
needle down
·press needle stop
button again –
needle stop reverts
to up (arrow points
up)
Display of selected stitch
(to the left of stitch width bar)
· the stitch number is always visible
in the center of the upper portion
of the screen
· stitch number is displayed to the
top left of the stitch graphic in the
center of the upper portion of the
screen
Selecting functions
· touch the function of your choice
· the selected function is highlighted
(a number of different functions
can be selected simultaneously)
· touch the function toolbar arrow to
scroll more functions
· activate another function if desired
· touch the toolbar arrow to scroll
again
· the toolbar can be customized in
Setup
· for more information functions, see
pages 22–28
20 General instructions
030787.52.04_0401_a165_EN
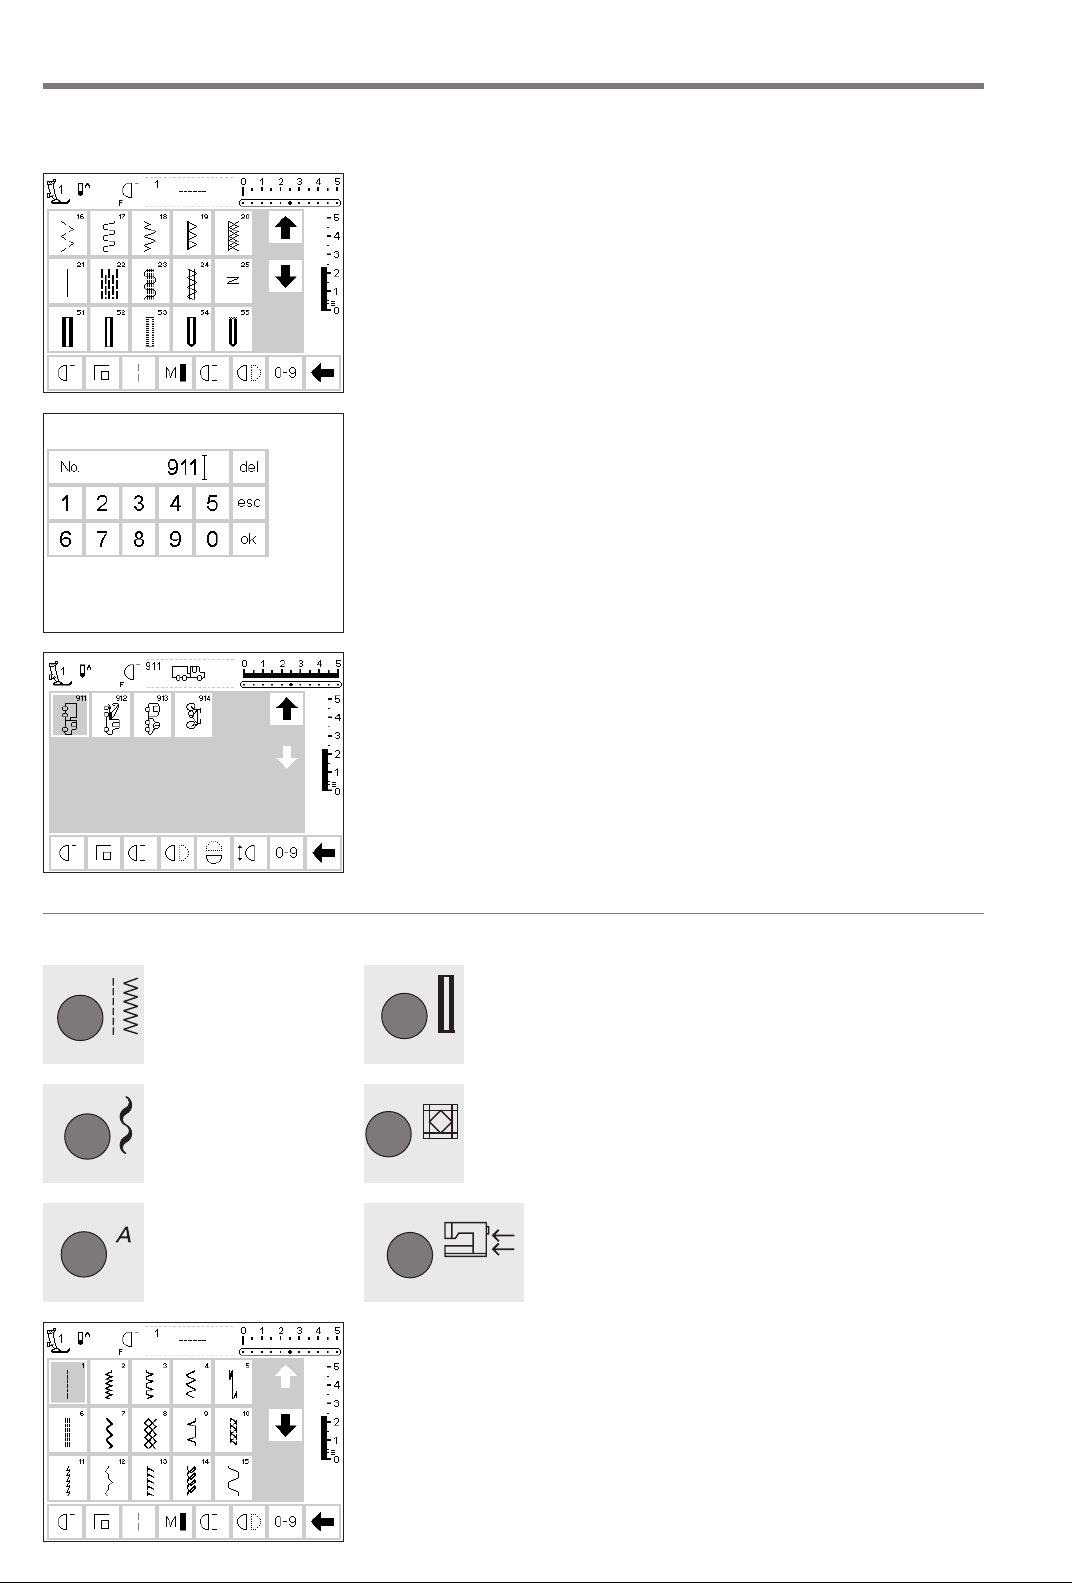
Stitch selection
Stitches can be selected using one of the two methods listed below.
Direct selection by scrolling up/down
· touch the arrow (down)
· scroll the screen to view all stitches
· the top row disappears
· the next two rows move up
·a new row appears at the bottom
· touch the arrow (up)
· the first row of stitches appears
again
· the scroll function (up/down) is
used to find and view all the
machine’s stitches
· use when a visual search for a
particular stitch is needed when the
desired stitch is located, touch it to
select
Simple menu selection
Practical
stitches
Decorative
stitches
Select a stitch by number
· touch the function “0–9”
· the screen changes to stitch
numbers
· touch numbers to select the stitch
of your choice
· the number of the selected stitch
appears in the top row
Confirm and go to next screen
· touch OK to confirm
· touch esc
· the screen displays the selected
stitch
· the selected stitch is active
(highlighted)
Back to previous screen
· touch esc
· the previous screen appears
Buttonholes
Quilt stitches
Correct
· to correct mistakes or deselect,
touch del top right
· the cursor moves to the left and
deletes the number
· select new number
· the stitch selected by number will
be ignored
Note:
The screen does not react if an
unavailable stitch number is
entered.
External menu buttons
·press a button
· the program is selected
· the first stitch/stitch program or
stitch summary appears on the
screen
Alphabets
Embroidery
Practical stitch button
· the practical stitch menu appears
· straight stitch top left is active
· 15 practical stitches appear on the
screen
· use arrows to scroll for viewing
additional stitches
Buttonhole button
030787.52.04_0401_a165_EN
· the buttonhole menu appears,
including the eyelet and button
sew-on programs
Decorative stitch button
· the decorative stitch menu appears
· pattern types can be selected
· 5.5 mm decorative stitches
· touch to select the desired stitch
group
· the selected stitch group appears
Alphabet button
· the alphabet menu appears
· touch to select the alphabet of your
choice
21General instructions
Quilt stitch button
· the menu appears
· touch symbol to activate quilt
stitches
External connections
· the following accessories can be
connected to the machine
· embroidery module
· embroidery cards
· menu appears
· touch to select
Setup
·press the external Setup button
· menu appears
· use Setup to customize your
machine’s settings
· stitches and functions can be
combined to form a customized
(Personal program) menu
· customized menu (Personal
program) can be saved
· saved customized menu (Personal
program) can be opened at any
time
· customized settings can be
cancelled at any time
22 Functions
030787.52.04_0401_a165_EN
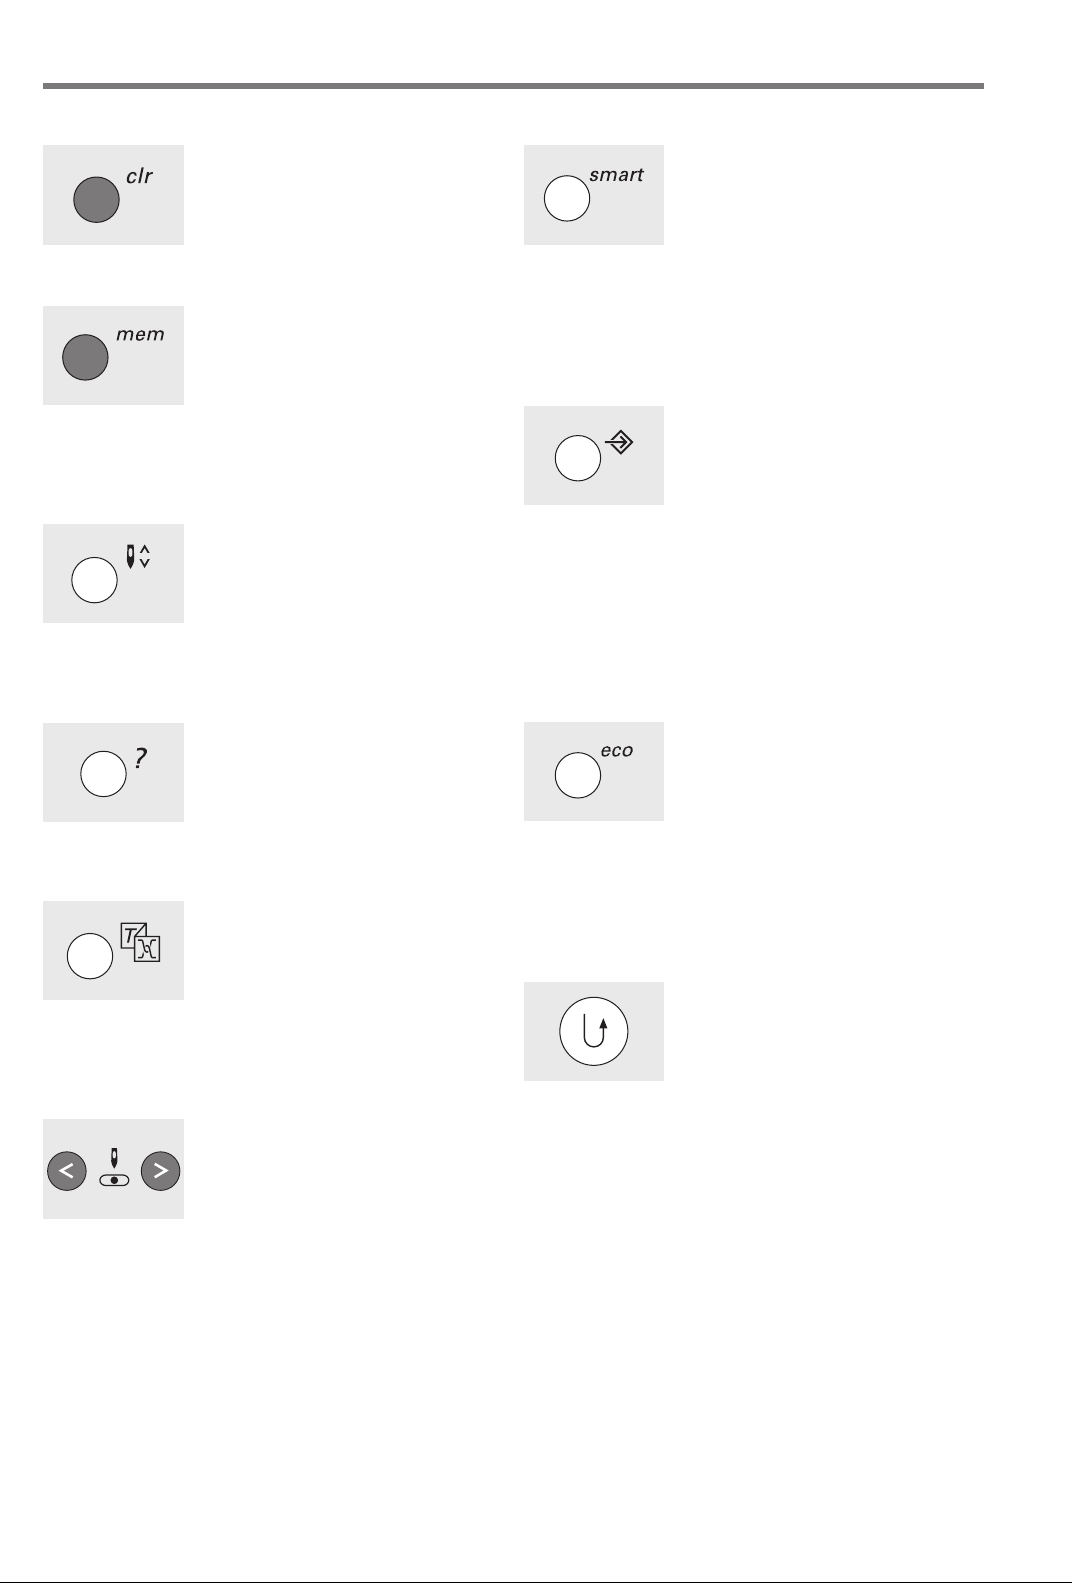
External function buttons
clr (Clear) button
·press the clr button
· stitch length, width and needle
position will be returned to basic
settings
· most functions will be deleted (see
individual functions)
mem (Memory)
·press the mem button
· memory is open and appears on
the screen
· the memory bar replaces the third
row of stitches on the screen
· see chapter on Memory
·press mem button to close
· for more information on using the
memory, see pages 38–43
Needle stop adjustment
· the default setting of the needle is
in the “up” position
·press the needle stop button
· the on-screen arrow points down
· the machine will always stop with
needle down
·press the needle stop button again
to revert to needle stop up
Smart button
·press the Smart button
· the stitch is saved with all
adjustments to width, length, and
needle position
· select a new stitch, e.g. buttonholes
·press the Smart button to return to
the previous screen with saved
settings
· use the Smart button to toggle
between stitches as you work
Setup
·press Setup
· menu appears
· use Setup to customize your
machine’s settings
· stitches and functions can be
combined to form a customized
menu (Personal program)
· customized menu (Personal
program) can be saved
· saved customized menu (Personal
program) can be opened at any
time
· customized settings can be
cancelled at any time
“?” (Help)
·press the Help button
· touch a stitch or function
· explanation for the selected stitch
or function appears
TC (Tutorial/Sewing Consultant)
·press the button
· menu appears
· Tutorial (instructions in brief)
· Creative Consultant (advice on
fabric/needle/techniques)
· touch to select the desired menu
· the information selected is activated and the appropriate screen
will appear
Needle position
·press the left or right needle
position button
· the needle moves to the right or
left
· total of 11 needle positions: 5 left,
5 right, center
eco (ecology) button
·press the eco button
· energy use by the machine is cut
by 50%
· particularly useful for long
interruptions in work
· all settings remain active; foot
control is inactive
· screen saver is activated
·press the eco button again to
restore the sewing machine to
normal function
Quick reverse button (above needle)
·press the quick reverse button
· secure the seam beginning and end
– sews in reverse as long as button
is depressed
· used to program buttonhole length
· used to program darning length
· used to switch to straight stitch
securing program (Stitch no. 5)
· used to start/stop stitching with
the embroidery module (special
accessory)
23Functions
030787.52.04_0401_a165_EN
Single Pattern (above needle)
·press the pattern end button
· machine stops at the end of the
next stitch pattern sewn
On-screen functions
Fields are highlighted when functions are activated.
Activated functions can be cancelled individually by
pressing a second time.
All selected functions can be cancelled simultaneously by
pressing the external clr button.
Exceptions:
Needle stop and Double needle limitation.
These functions must always be cancelled individually.
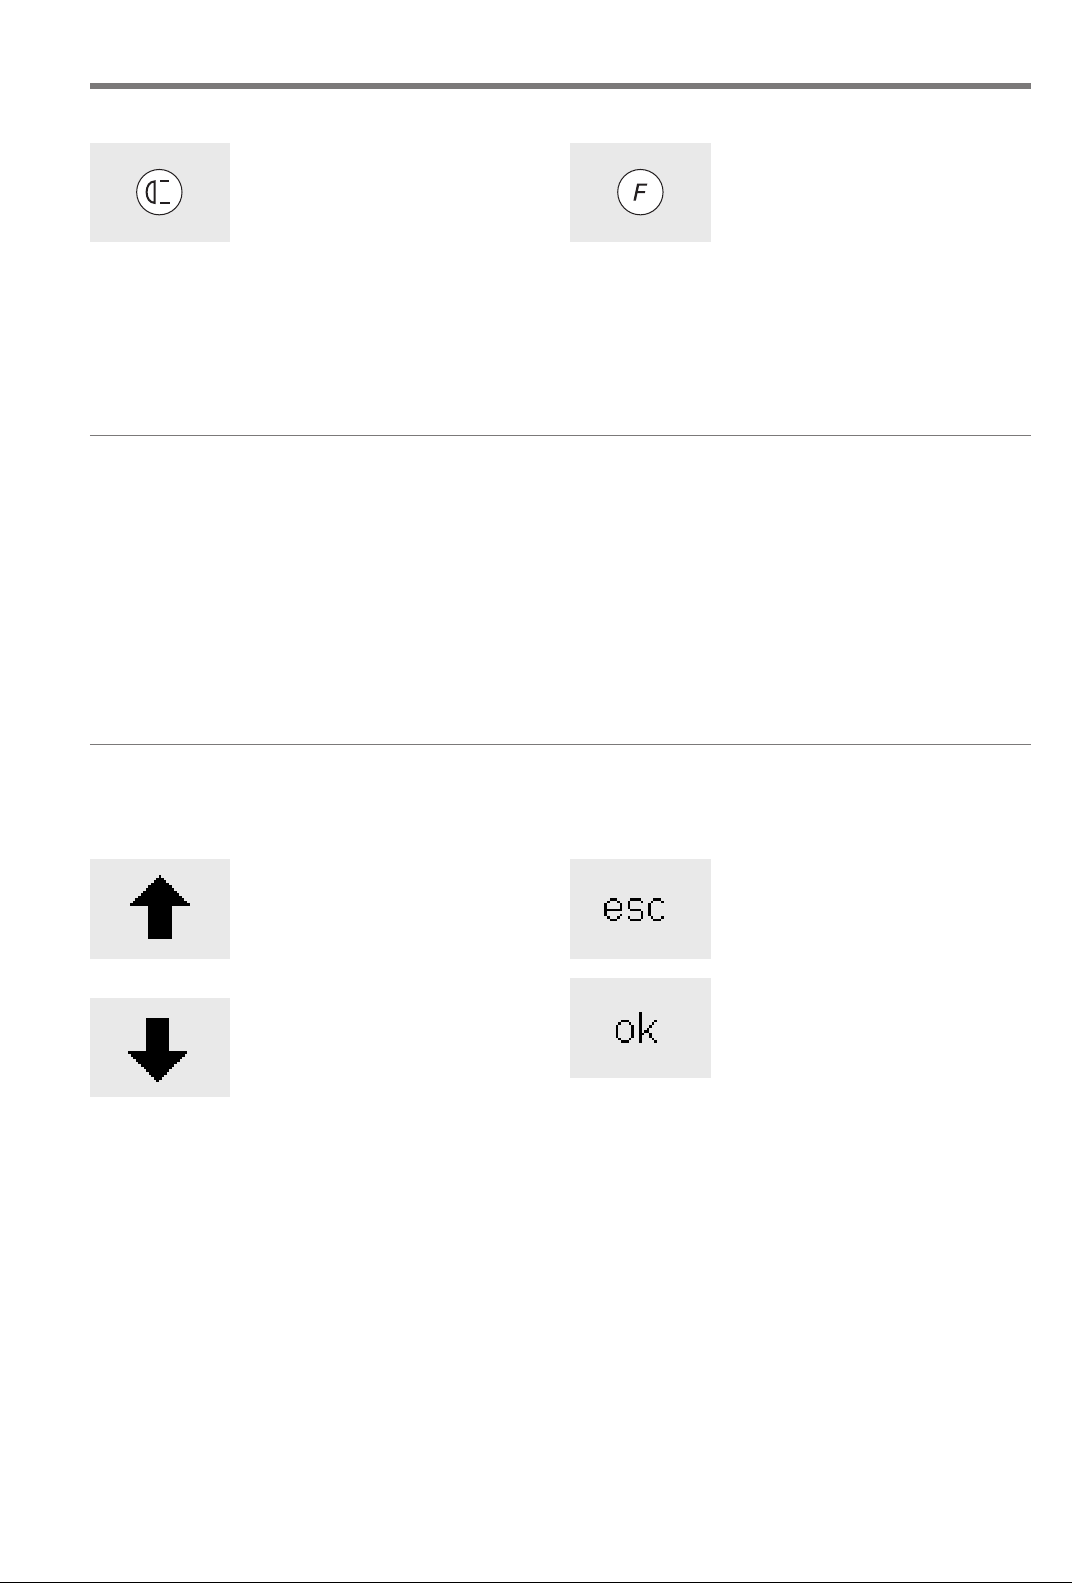
F (Favorite function) button
(above needle)
· this button can be individually
programmed in Setup with a
function of your choice
· selected function can be cancelled
and reprogrammed at any time
with another function
· personal program can be
programmed into “F” button
· for more information on the
Favorite function button, see
page 54
General functions
The following functions are found on various screens and
programs of the artista sewing machine. They are consistently
Scroll up
· touch one or more times
· screen scrolls up to show more
options
· touch the symbol continuously to
scroll quickly
Scroll down
· touch one or more times
· screen scrolls down to show more
options
· touch the symbol continuously to
scroll quickly
used in the same manner for specific tasks when accessing and
moving between different programs.
Closing special applications
· touch esc
· the special application closes
·returns to previous screen
OK
· touch to confirm and activate
adjustment/selection, e.g. thread
tension change
·programmed adjustment/selection
is ready to sew
24 Functions
030787.52.04_0401_a165_EN
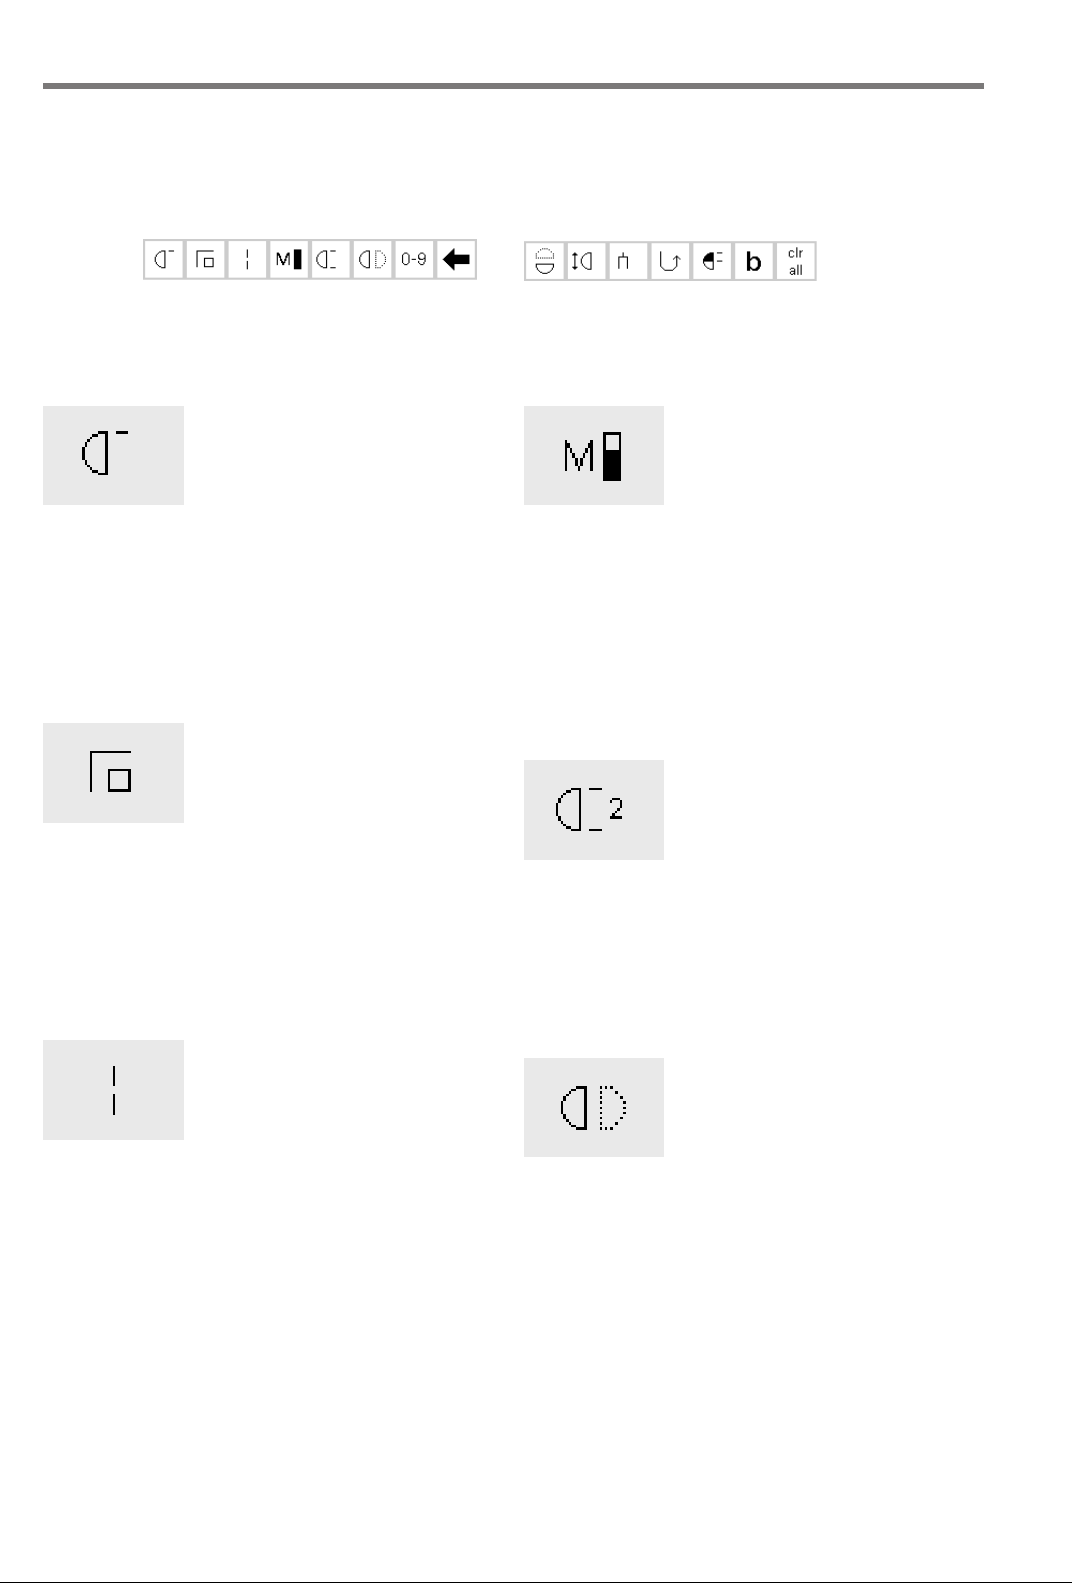
Function toolbar
The following functions are available on the artista
sewing machines. Any function which can be used in the
selected program will appear on the screen in the bottom
row. If there are more than eight (or four memory
functions), the remaining ones will be hidden and can be
accessed by using the arrow in the lower right corner to
scroll. When a hidden function is active, the arrow will
flash.
Complete function toolbar as it
appears in the practical stitch program.
Note: The scroll arrow and the 0–9 (stitch selection by
number) will remain on the screen for easy access and will
Pattern begin
· touch symbol
· the needle moves to the beginning
of a stitch or stitch combination
· field is highlighted but reverts to
normal after 2 seconds or after
beginning to sew
· if selecting Pattern begin for a
memory combination, the cursor
will appear to the right of the first
stitch on-screen
Applications:
· embroidery, buttonholes, working
in memory
Securing
· touch symbol
· individual stitches will be secured at
the beginning and end with
4 stitches
· securing in memory: stitch and
letter combinations will be secured
at the beginning and end
Applications:
· sewing individual decorative
stitches
· sewing individual letters
· sewing stitch combinations and
words
Long stitch
· touch symbol
· machine sews every second stitch
(max. stitch length 10 mm)
· can be activated for all practical
and decorative stitches except
buttonholes
· functions and stitches can be
combined
· can be saved in memory
· does not operate with the
embroidery module (special
accessory)
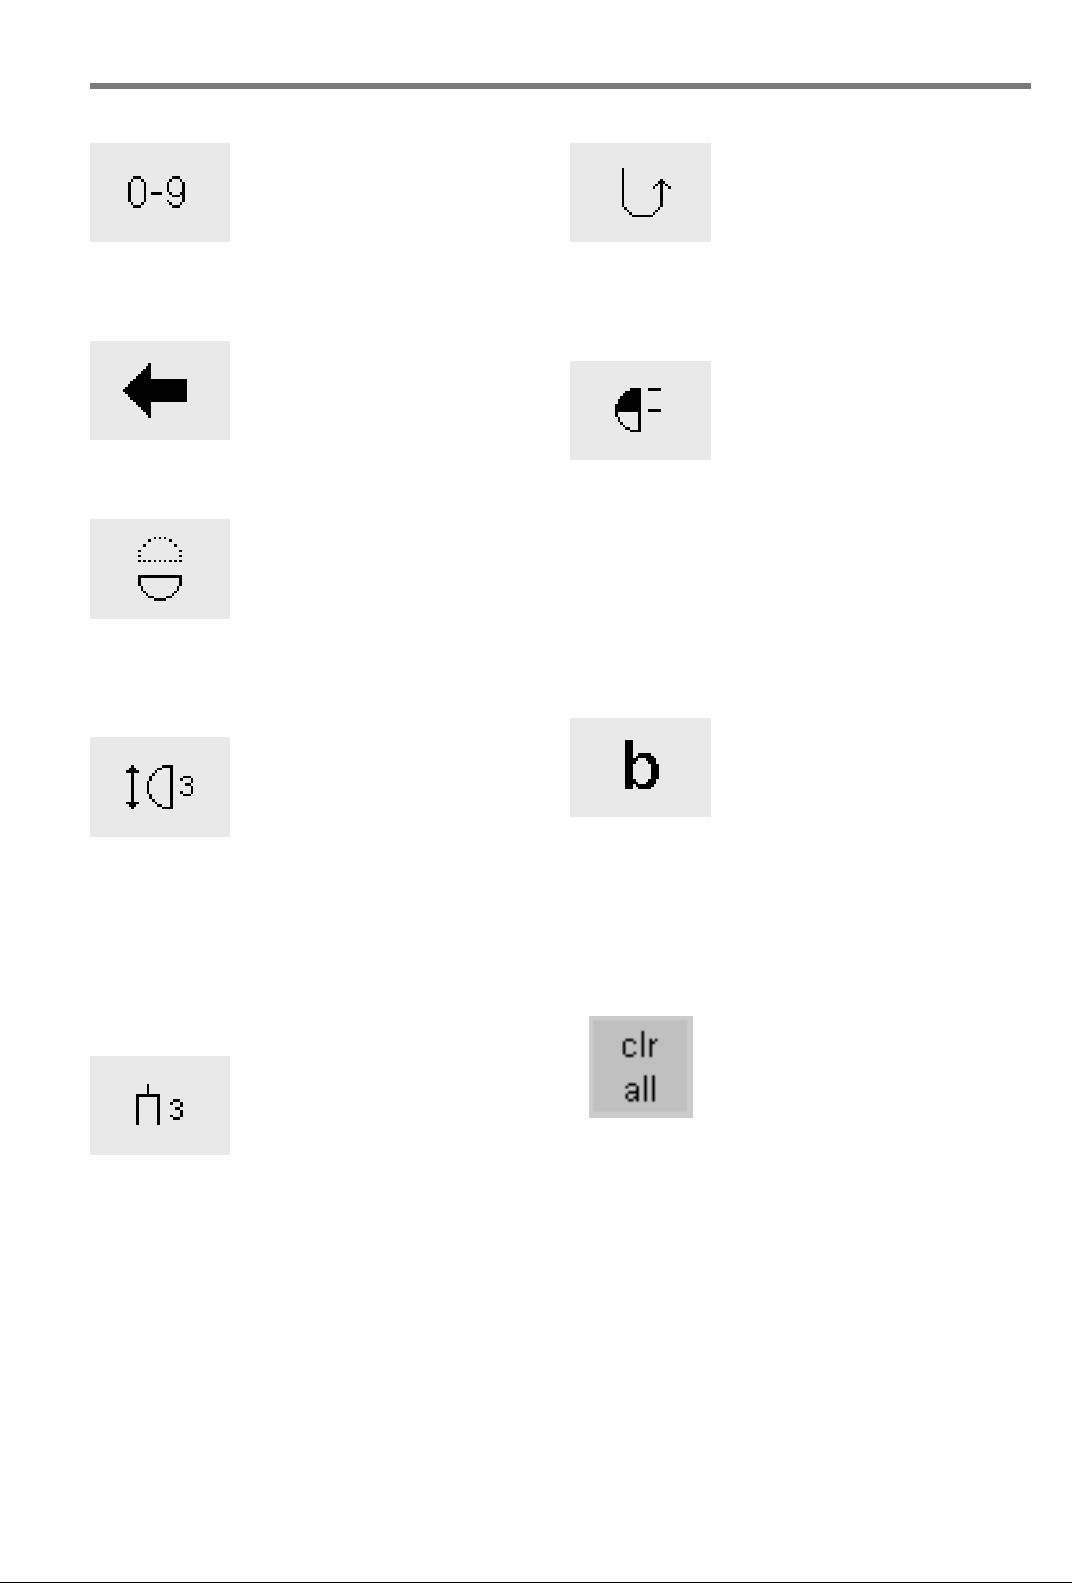
Hidden functions that can be
accessed by scrolling with the arrow.
never be hidden. A total of eight functions (or four regular
and four memory functions) will shown on-screen.
Motor speed
1
⁄4, 1⁄2, 3⁄4, 4⁄
4
· touch symbol one or more times to
select speed
· selected speed is displayed
·reduces or increases the motor
speed
· will sew the selected maximum
speed with the foot control fully
depressed
Applications:
· adjust speed for decorative sewing
machine work such as freehand
embroidery or freehand quilting
and when more control is desired
for the sewing task
· when children are sewing
Pattern end 1–9
· touch symbol one or more times to
select number required
·1 = machine stops at the end of an
individual stitch or stitch combination
· 2–9 = machine stops at the end of a
stitch or stitch combination after
the number of repeats selected
Applications:
· sewing individual motifs
· combine with practical stitches and
decorative sewing
Horizontal mirror image
· touch symbol
· machine sews selected the stitch in
horizontal mirror image (left/right –
determined by the sewing direction)
· can be saved in memory
Applications:
· decorative stitching
· pattern combinations in memory
Applications:
· combine with straight stitch to
baste
· combine with triple straight stitch
for topstitching
25Functions
030787.52.04_0401_a165_EN
Stitch selection by number
· touch number symbol
· select stitch by touching the
appropriate number combination
Applications:
· quick selection of individual stitch
· quick selection for stitch
combination in memory
Scroll
· touch one or more times to view
more functions
Applications:
· view all available functions
· combine functions with stitches for
individual motifs or in memory
Vertical mirror image
· touch symbol
· machine sews selected stitch in
vertical mirror image (up/down –
determined by the sewing direction)
· can be saved in memory
Applications:
· decorative stitching
· pattern combinations in memory
Pattern extension 2–5x
· touch one or more times
· the numbers 2–5 appear
depending on the type of stitch
selected
· the length of selected stitch will
be increased by 2–5 times
· lengthened stitches can be
programmed in memory
Applications:
· lengthen existing patterns
without affecting the stitch
density
· combine stitches
Double needle limitation
· touch one or more times to select
number from 2 to 5
· the numbers represent the distance
between the needles in mm
· the stitch width will be limited
automatically
· this prevents the needles from hitting the presser foot or stitch plate,
avoiding needle breakage
· can be saved in memory
Applications:
· sewing pintucks
· hemming knits
· decorative stitching
Note: There is one additional function, Hemstitch Needle
Limitation, available for placement on the function
toolbar (see Functions in Setup, page 26). This can be
placed on the toolbar using the Setup program
(see page 54).
Continuous reverse sewing
· touch symbol
· sews the selected stitch in reverse
Application:
· darning with straight or running
stitch
· decorative stitching on sleeves or
trouser legs
· quilting
Half pattern
· touch symbol
· machine automatically stops at the
halfway point of the stitch pattern
· when stitching is resumed, the
pattern is completed and the first
half of the next pattern is stitched
before the machine automatically
stops again
· use Single pattern to stop at the
end of the second half of the stitch
pattern
Application:
· turning corners
· altering decorative stitches for a
new look
Balance
· touch symbol to open balance
screen
· correct forwards and reverse stitches
Applications:
· adapting practical and decorative
stitches to various types of
fabrics
· altering decorative stitches for a
new look
· adapting buttonholes to different
fabrics
Clear All
· clears all settings that were
changed except those that were
changed using the Setup program
·returns to default settings
· Settings affected:
Continuous Reverse
Long Stitch
Pattern End
Securing Function
Horizontal Mirror Image
Vertical Mirror Image
Pattern Extend
Balance
Stitch Length
Stitch Width
Needle Position
Half Pattern
Double Needle Limitation
Hemstitch Needle Limitation
Needle Stop Position
Motor Speed
Alphabet Size
Stored Buttonholes
26 Functions
030787.52.04_0401_a165_EN
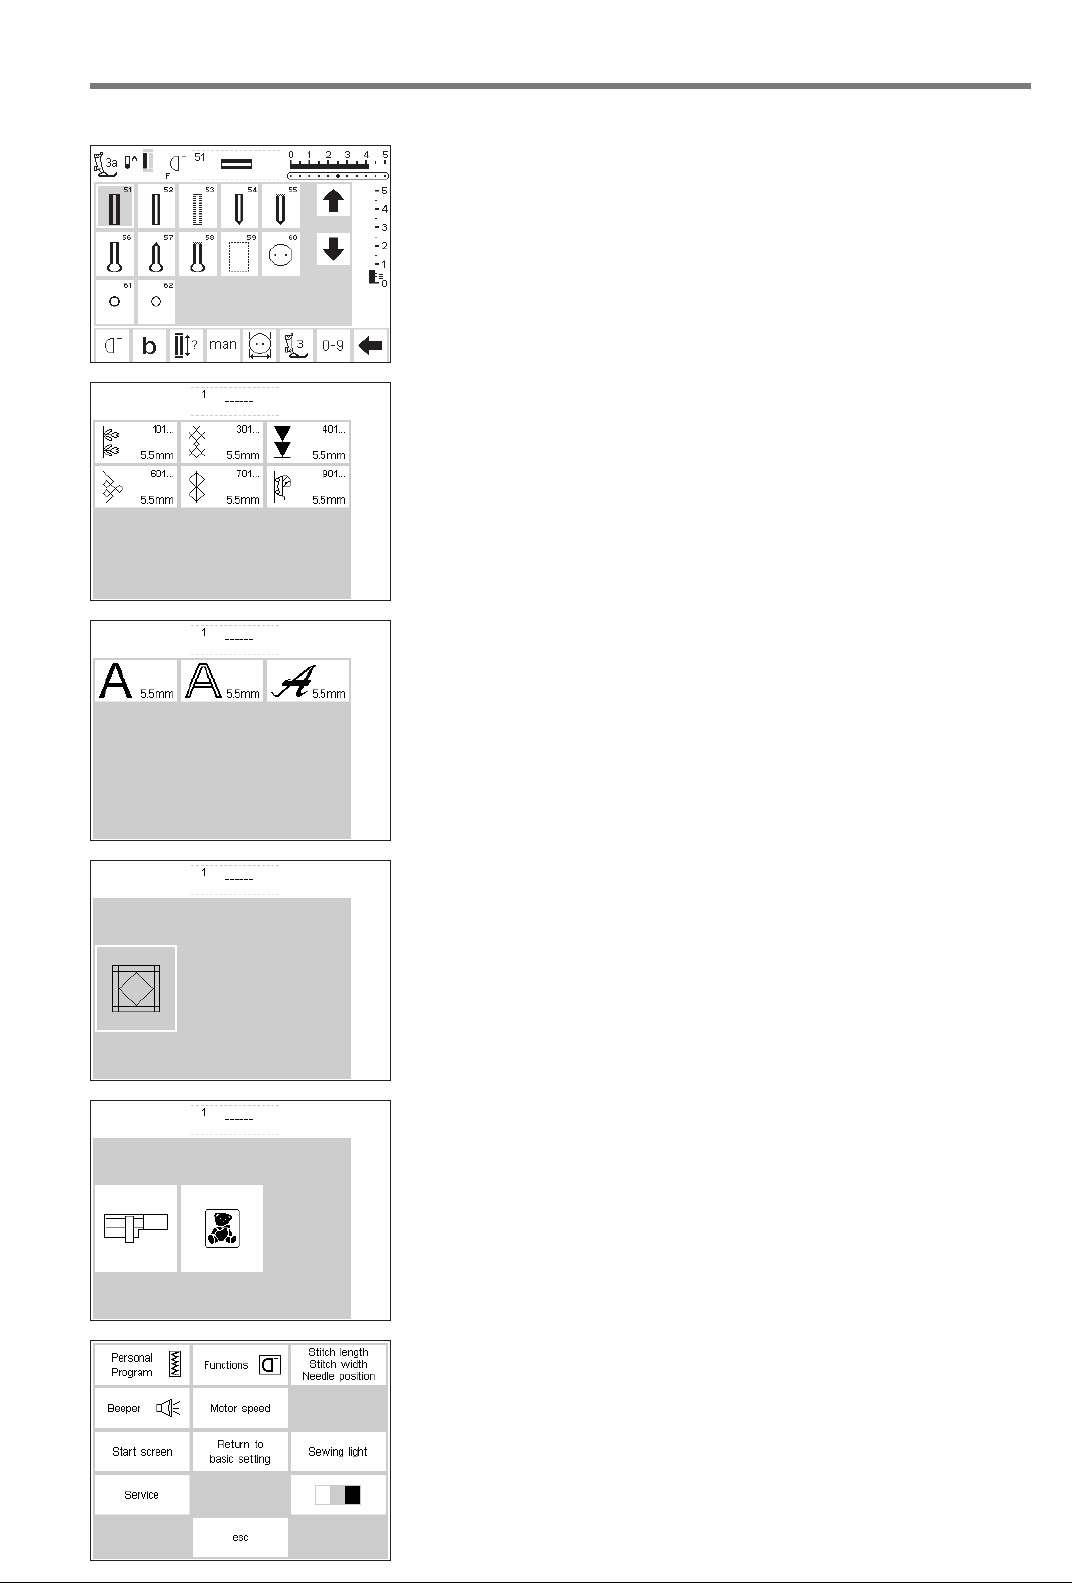
Functions in Setup
The functions below are found in the Setup program of the
artista sewing machine. They are accessed by pressing the
external Setup button on the front of the machine and then
touching Functions on the screen. These functions are used
when setting the features and functions of the machine to your
personal requirements.
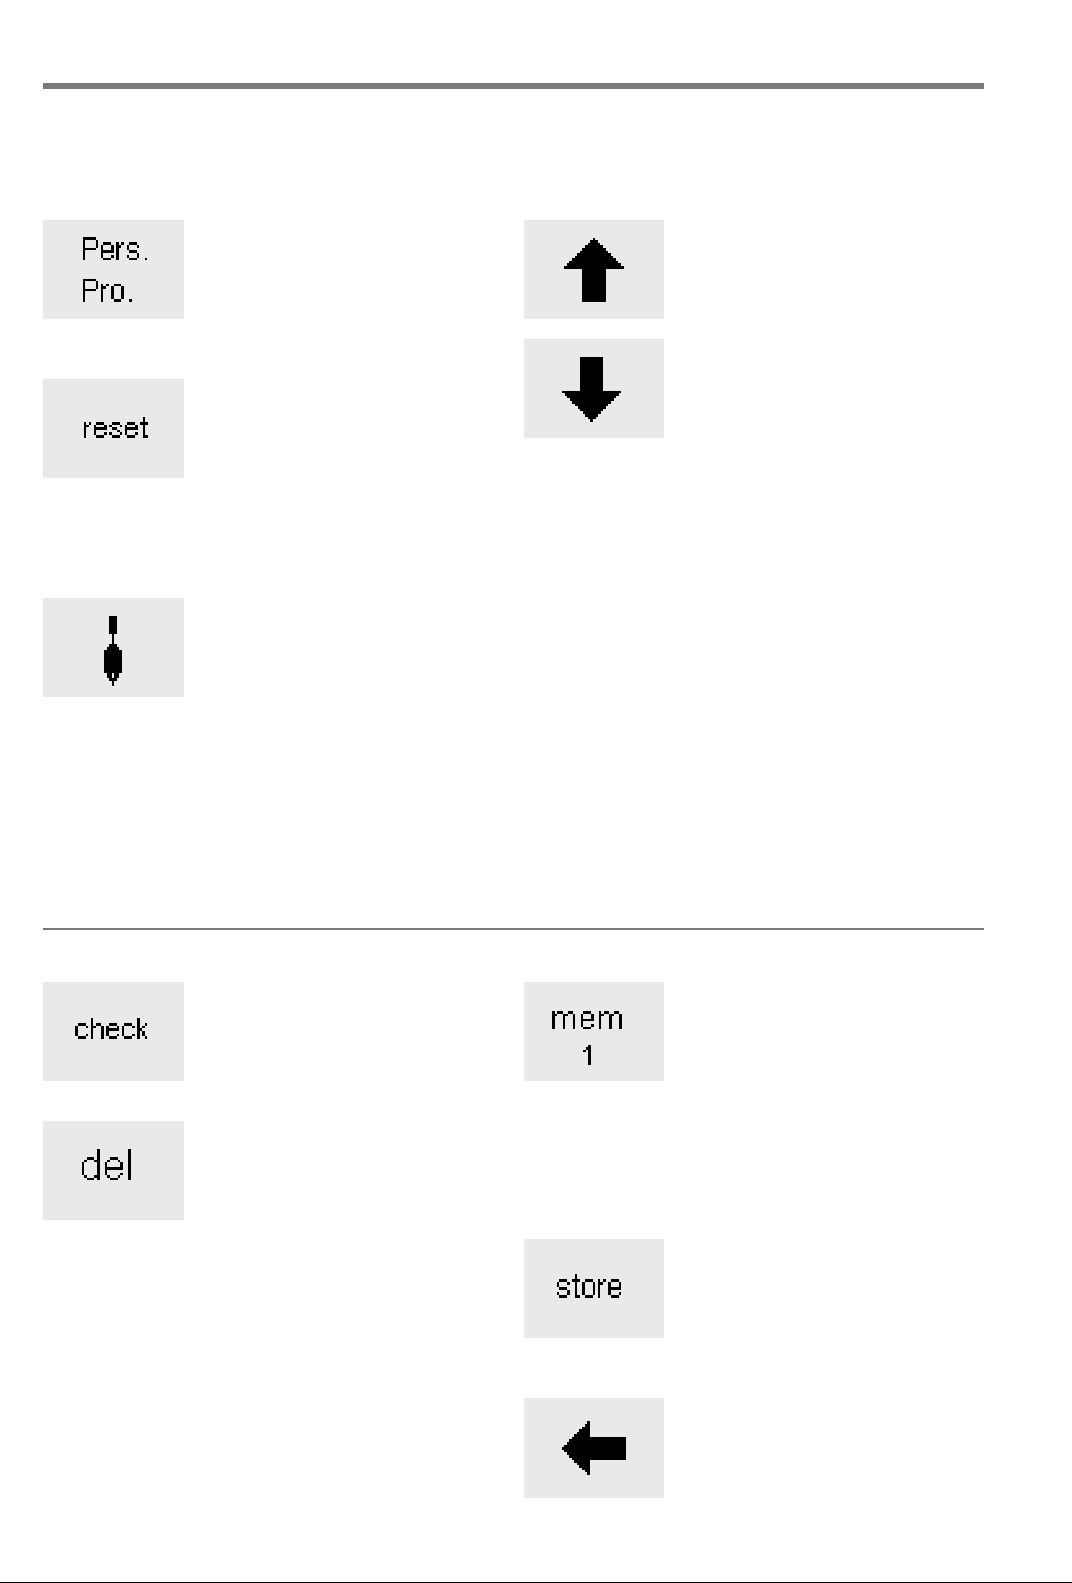
Personal program
· touch symbol
· personal screen appears
Applications:
· quick method to open personal
program
Reset
· touch symbol
· personal settings are reverted to
basic settings
The function below is available in the Setup program of
the artista sewing machine. It is a sewing function used
from the sewing screens; however, it will not show up on
Hemstitch (wing) needle limitation
· will not show up on the toolbar
unless it is inserted by the user
· can be installed in the Setup
program
· the stitch width is limited
automatically
· needle position limited to center
·prevents the needle hitting the
presser foot or stitch plate – no
needle breakage
Delete functions
· touch symbol
· delete functions
Insert functions
· touch symbol
· insert functions
the toolbar at the lower edge of the screen unless
specifically placed there. For more information, see
pages 53–55.
Application:
· hemstitching
· decorative stitching·
Functions in Memory
Check
· touch symbol
· memory contents are displayed
Application:
· check and correct memory contents
Delete
· touch symbol
· delete individual stitches or letters
to the left of the cursor
· delete stitch combinations
Application:
· corrections in memory
· delete complete memories
Select memory
· the opened memory is displayed
with its number
· touch to display the contents of the
memory bank
· touch esc to close memory bank
·press the external mem button to
close memory
Applications:
· working in memory
· saving stitch combinations
Store
· touch symbol
· saves individual stitches, stitch
combinations and letters in memory
Applications:
· saving programs
Scroll left
· touch symbol one or several times
· memory contents are scrolled
backwards
27Functions
030787.52.04_0401_a165_EN
Scroll right
· touch symbol one or several times
· memory contents are scrolled
forwards
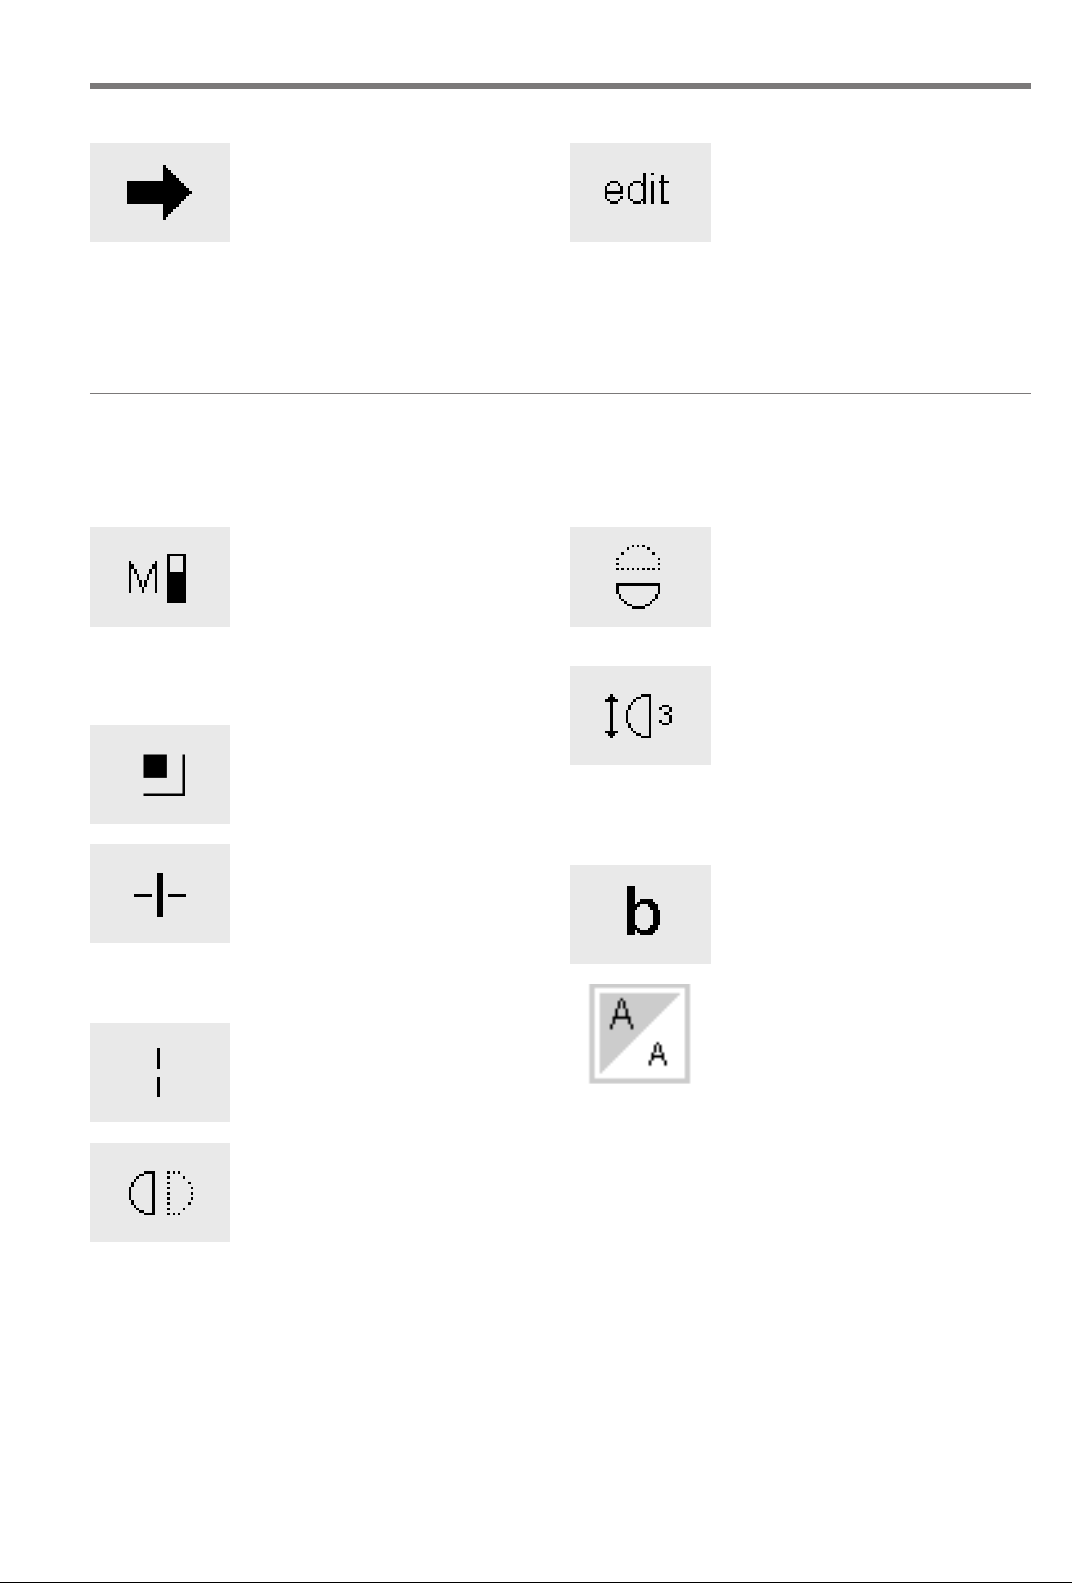
Functions in Editing
The following functions become available in the center
of the screen when the edit function is selected. All
functions on the toolbar (except del) will become inactive
Motor speed
· touch symbol one or more times to
select speed
· selected speed is displayed
· full speed is 880 stitches per minute
(unless the basic setting has been
changed in the Setup program)
·reduces or increases the sewing
Securing function
· touch symbol
· the end of the last stitch in the
Memory sub-division
· touch symbol
· the memory has up to 255 sections
· each bank can be subdivided as
· total memory (all banks together)
Long stitch
· touch symbol
· machine sews every second stitch
1
speed
/4at a time (1/4, 2/4, 3/4, 4/4)
memory will be secured with
4 tiny stitches
or banks
desired
holds 1023 stitches
(max. stitch length 10 mm)
Edit memory contents
· touch symbol
· correct, edit stitches, letters or
numbers to the left of the cursor
· insert functions, mirror image
· touch symbol again to close edit
screen
Applications:
· correcting, changing memory
contents
when the edit function is selected and will reactivate
when the edit function is closed.
Vertical mirror image
· touch symbol
· machine sews selected stitch in
vertical mirror image
· alteration of selected stitch is
shown on-screen
Pattern Extend 2–5x
· touch one or more times
· the numbers 2–5 appear depending
on the type of stitch selected
· the length of selected stitch will be
increased by 2–5 times
· the stitch density is not affected
· lengthened stitches can be
programmed in memory
Balance
· touch symbol to open balance
screen
· correct forwards and reverse
stitches
Letter size
· touch one or more times
· one half of field is highlighted
· the gray section visually indicates
the letter size: large (5,5 mm) or
small (4 mm)
Horizontal mirror image
· touch symbol
· machine sews selected stitch in
horizontal mirror image
· alteration of selected stitch is
shown on-screen
28 Functions
030787.52.04_0401_a165_EN
Buttonhole program functions
The functions below appear on the function toolbar at
the lower edge of the screen when any buttonhole
(stitches 51–62) is selected.
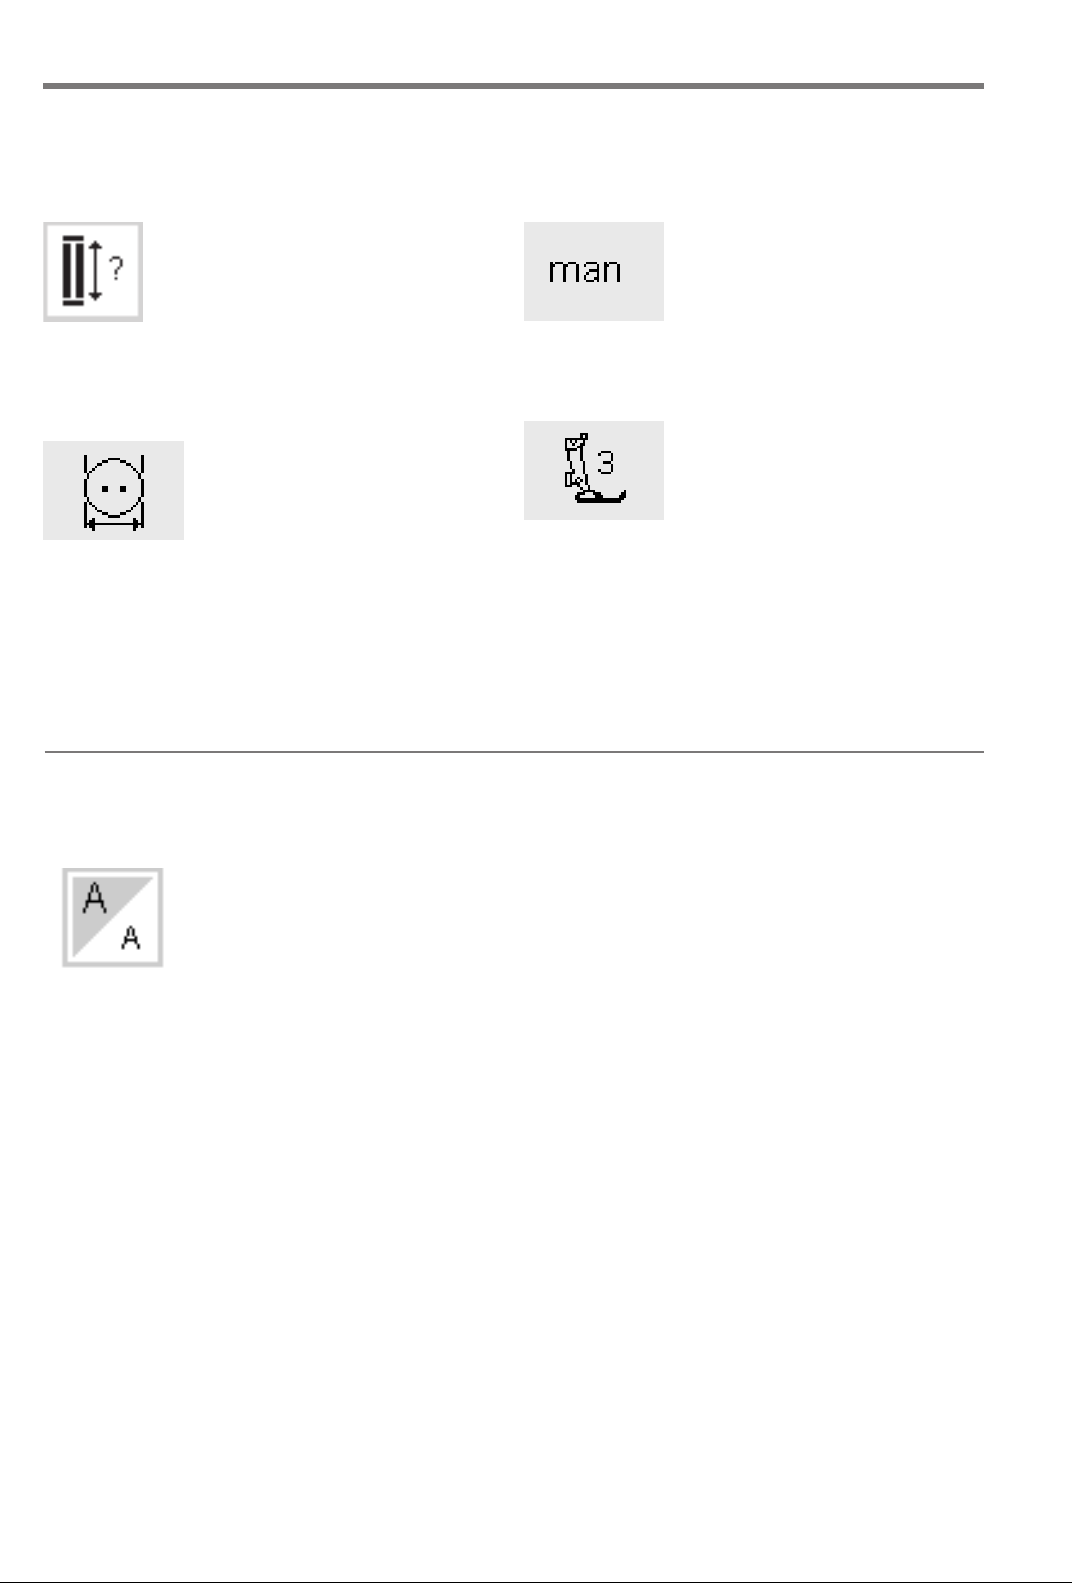
Buttonhole length – direct length
entry
· touch symbol to open number
screen
· Buttonhole length =
buttonhole opening in mm
Application:
· use this method if you know the
size of your button
Buttonhole length – on screen
measurement
· touch symbol to open measuring
screen
· hold button to bottom lower left
corner of screen and use the stitch
width knob to measure it
· buttonhole length will be
programmed with 2mm added
automatically
Application:
· simple method to determine
buttonhole size
Alphabet program functions
The following functions will appear in the lower left
corner of the screen when a letter of an alphabet is
Manual buttonhole
· touch symbol
· follow procedure (4–6 steps,
depending on buttonhole type)
Application:
· for individual manually sewn
buttonholes
· to repair existing buttonholes
Stitch counter buttonhole
· select buttonhole
· touch symbol
· stitch counter buttonhole will be
activated
selected. It will reduce the number of normal functions
shown on the toolbar by one, causing it to be hidden.
Letter size
· appears in toolbar when any letter
or character of one of three
styles of alphabets is selected
· touch one or more times
· one half of field is highlighted
· the gray section visually indicates
the letter size: large or small
Applications:
· size selection
· works in memory (letters do not
have to be reprogrammed but can
be resized using the edit function)
Messages
030787.52.04_0401_a165_EN
The following messages may appear on the screen of
the artista sewing machine during certain operations.
They are reminders, warnings, or confirmations about
the function or stitch being selected. Below is a list
MESSAGE RESPONSE
of the messages pertaining to the sewing machine (see
embroidery manual for messages that pertain to the
embroidery module) and the appropriate responses.
29Messages/Buttonholes
Please check the upper thread. Check to see if the needle thread has run out or has
The bobbin winder is on. Check to see if bobbin winder is on. If the bobbin winder
Do you really want to delete the Confirms the delete command before any stitches or
contents of this memory? functions are erased from memory. Touch OK to continue
Personal Program memory is full. To save a stitch, an already saved stitch must be deleted.
Memory is full. To save a stitch, an already saved stitch must be deleted.
broken. Rethread the needle thread if needed. Machine
will not sew until this is corrected.
is on, the foot pedal is inactive and the machine will not
sew. Disengage the winder if needed. Machine will not
sew until this is corrected.
Note: This message will appear when winding a bobbin;
touch esc to clear it from the screen.
with the deletion process; touch esc to abort the process.
Buttonholes
Buttonholes are practical closures
which can also be used for a
decorative effect. The artista165
provides a very versatile selection.
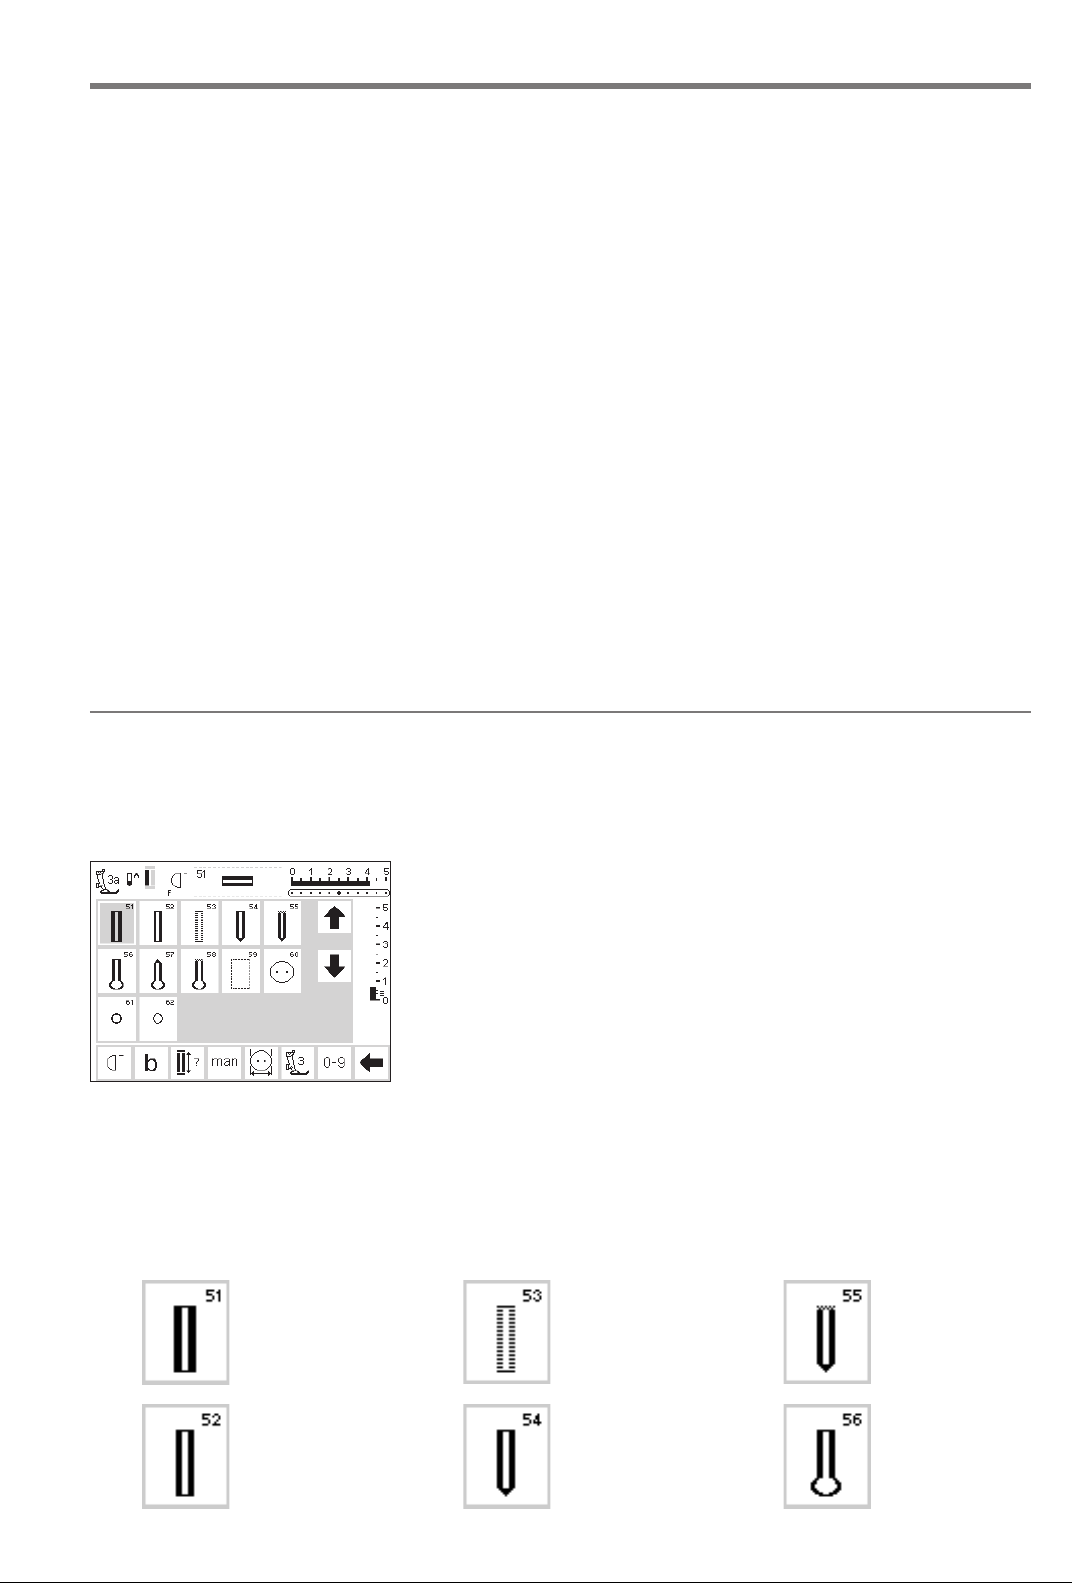
Buttonholes/Button sewing on program/eyelets
·press the external Buttonhole
button (to the right of screen)
· screen shows an overview of all
buttonhole and eyelet types
· 51 standard
· 52 narrow (heirloom)
· 53 stretch
· 54 round with normal bartack
· 55 round with horizontal bartack
· 56 keyhole with normal bartack
· 57 keyhole with pointed bartack
· 58 keyhole with horizontal bartack
· 59 straight stitch buttonhole
All buttonholes can be sewn and
programmed in a variety of ways.
· 60 button sew-on program
· 61 zig-zag eyelet
· 62 straight stitch eyelet
Select buttonhole/button sew-on
program/eyelet
· touch symbol
· selected buttonhole, eyelet or
button sew-on program is activated
· If one of the buttonholes (51–62) is
activated, all functions are reset to
the default settings
The following buttonholes and related stitches are found on the
buttonhole screen.
For additional information on uses for each type, see page 17.
51 Standard buttonhole
52 Narrow
buttonhole
(heirloom)
53 Stretch
buttonhole
54 Round
buttonhole normal bartack
55 Round
buttonhole horizontal
bartack
56 Keyhole
buttonhole –
normal bartack
30
030787.52.04_0401_a165_EN
Buttonholes
57 Keyhole
buttonhole –
pointed bartack
58 Keyhole
buttonhole –
horizontal
bartack
59 Straight Stitch
buttonhole
60 Button Sewon program
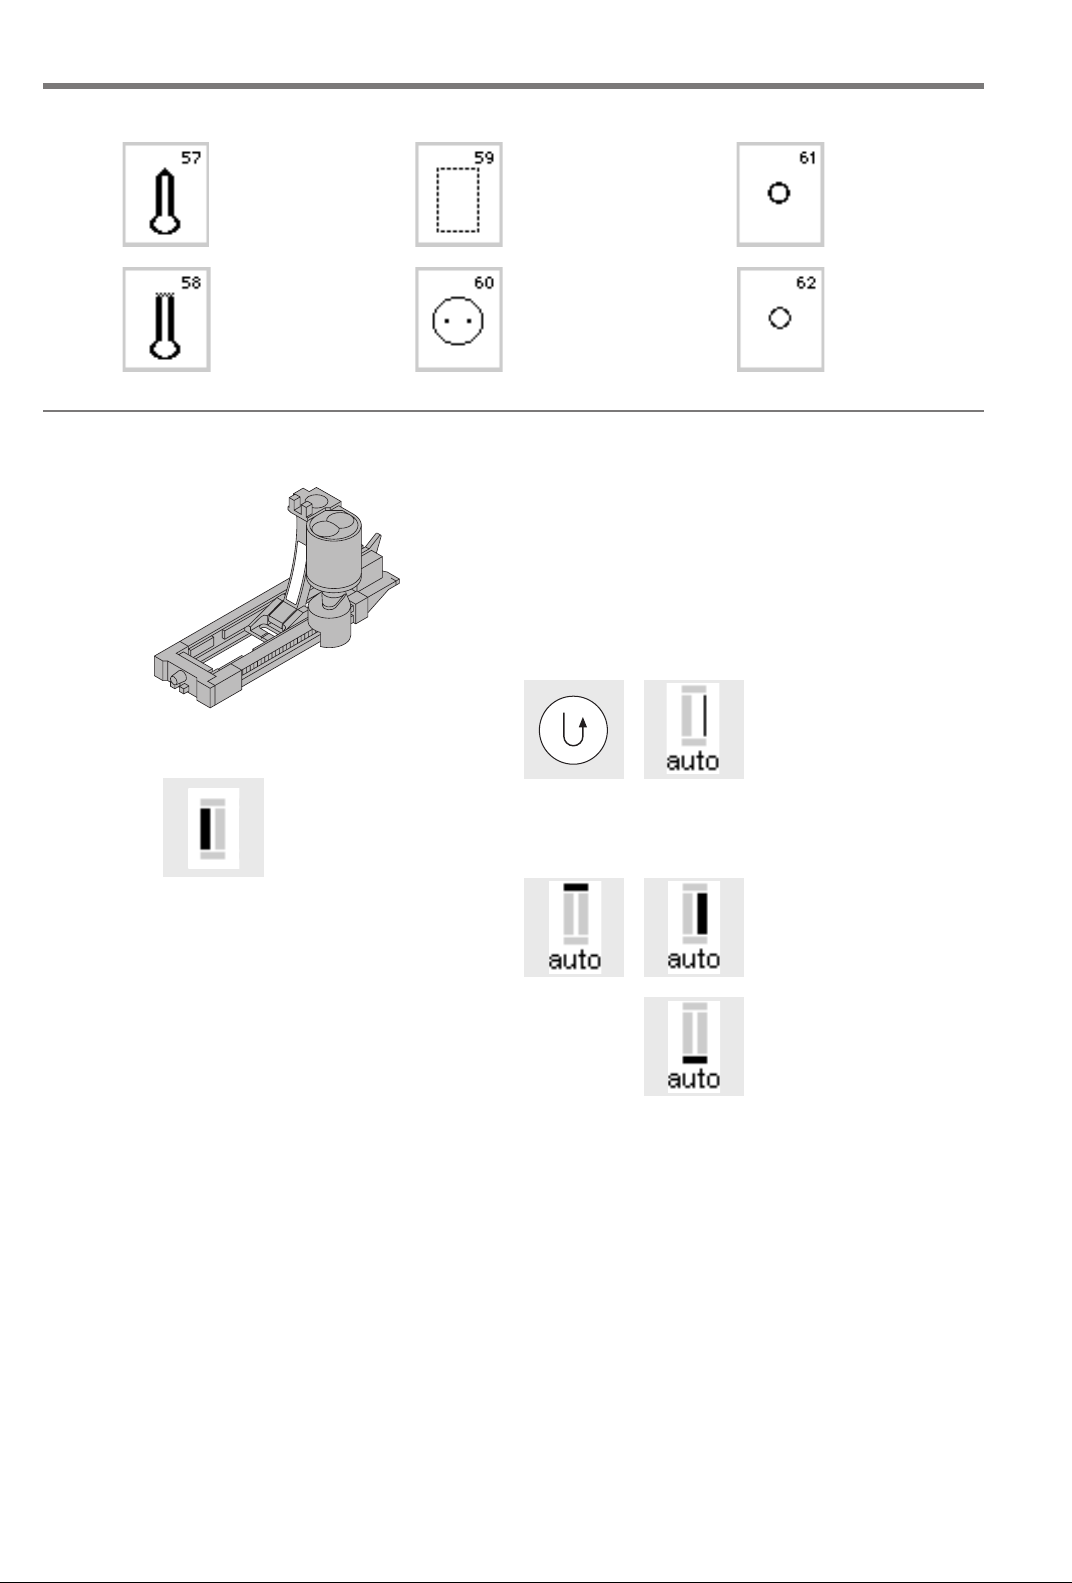
Automatic buttonholes (standard and stretch)
Both beads are sewn in the same direction.
Buttonhole length = buttonhole opening in mm
Note: the automatic buttonhole foot 3A must lie flat on
the fabric, i.e. not on a seam allowance, otherwise the
3A
For buttonhole example,
refer to the artista 165
Sewing Manual, page 25.
Sewing the first bead
· the sewn section will be
displayed on the screen
(to the right of the
presser foot indicator)
· sew the first bead
forwards, stop the
machine at the desired
length
length will not be measured accurately.
Automatic buttonhole
· the lens on the buttonhole foot 3A will register the
length that you determine automatically
· for making buttonholes from 4–29 mm length
61 Eyelet –
narrow zigzag
62 Eyelet –
straight stitch
Programming the
buttonhole
·press and release the
quick reverse button
· auto appears in
buttonhole symbol =
length is programmed
· machine sews straight
stitch backwards
Auto buttonhole
· machine sews first
bartack automatically
· machine sews second
bead forwards
Buttonhole Leveler (optional accessory)
When sewing a buttonhole using Automatic Buttonhole Foot
No. 3A on an uneven area (such as over a seam allowance),
use the Buttonhole Leveler. This accessory will create a smooth
surface for the foot and help make a perfect buttonhole.
· machine sews second
bartack automatically
· machine sews securing
stitches automatically
· machine stops and
returns automatically to
the beginning of the
buttonhole
· all subsequent
buttonholes will be sewn
automatically to the
same length (without
pressing the quick
reverse button)
 Loading...