

Page 1
BERNINA 830
Page 2

Dear BERNINA 830 customer,
032299.53.04_1204_B830_EN
Congratulations! With the purchase of the BERNINA
830, you have acquired the ultimate sewing and
embroidery system available in today’s market. By
purchasing this system, you have established that you
are a creative person who is looking for the opportunity
to explore and expand the unlimited world of creativity.
The use of modern, future-oriented technologies in the
computerized sewing and embroidery field coupled with
the tradition of BERNINA quality and reliability offer you
the best of the future and the best of the past. With the
BERNINA 830 system you will be able to sew faster,
smarter, longer, and more creatively- and with more
enjoyment. We have put all the dreams that our
customers have shared with us into this product.
BERNINA wants you to fully enjoy the enormous
possibilities that the BERNINA 830 sewing system
offers you. To do so, you must learn all the wonderful
features of the product. Therefore, don’t hesitate to
frequent your local BERNINA dealer and tap into the
knowledge of the BERNINA educators.
I wish you much happiness and great satisfaction while
enjoying your creative pastime.
H.P. Ueltschi
President
BERNINA International AG
CH-8266 Steckborn
www.bernina.com
Page 3

IMPORTANT SAFETY INSTRUCTIONS
032299.53.04_1204_B830_EN
When using an electrical appliance, basic safety precautions should always be followed, including the following:
Read all instructions before using this sewing-/embroidery
computer.
When the sewing-/embroidery computer is not in use,
it should be disconnected from the electricity supply
by removing the plug from the outlet.
DANGER!
To reduce the risk of electrical shock:
1 An appliance should never be left unattended
when plugged in.
2 Always unplug this sewing-/embroidery computer
from the electrical outlet immediately after using
and before cleaning.
3 LED Radiation – Do not view directly with optical
instruments. Class 1M LED product.
Safety Instructions
WARNING!
To reduce the risk of burns, fire, electric shock or injury to
persons:
1 Use this sewing-/embroidery computer only for its
intended use as outlined in this manual. Use only
attachments, accessories and parts recommended
by the manufacturer.
2 Do not use the sewing-/embroidery computer as a
toy. Caution is advised when the sewing-/embroidery
computer is used by children, or near children. The
sewing-/embroidery computer is not intended for use
by persons (including children) with reduced
physical, sensory or mental capabilities or lack of
experience and knowledge, unless they have been
given supervision or instruction concerning use of
the sewing -/embroidery computer by a person
responsible for their safety. To ensure children do
not play with the sewing-/embroidery computer they
must be supervised.
3 Never operate this sewing-/embroidery computer if:
► the cord or plug are damaged
► it is not working properly
► it has been dropped or damaged
► it has fallen into water
Return the sewing-/embroidery computer to your
local authorized BERNINA dealer for examination or
repair.
4 Never operate the sewing-/embroidery computer
with any air openings blocked. Keep ventilation
openings of the sewing-/embroidery computer and
foot controller free from the accumulation of lint, dust
and loose cloth.
5 Keep fingers away from all moving parts. Special
care is required around the sewing needle.
6 Never drop or insert any objects into any openings
on the sewing-/embroidery computer.
7 Do not use the sewing-/embroidery computer
outdoors.
8 Do not operate the sewing-/embroidery computer
where aerosol products (sprays) or oxygen are being
used or where oxygen is being administered.
9 Do not pull or push fabric while stitching - this may
cause the needle to break.
10 Do not use bent needles.
11 Always use a proper BERNINA stitch plate. The
wrong plate can cause needle breakage.
12 To disconnect, turn all controls to the OFF («0»)
position, then remove the plug from the outlet. To
unplug, pull the plug not the cord.
13 Turn all controls OFF (to the «0» position) when
making any adjustments in the needle area - such as
changing or threading the needle, presser foot etc.
14 Always unplug the sewing-/embroidery computer
from the electrical outlet when removing covers,
lubricating, or when making other user servicing
adjustments mentioned in this instruction manual.
15 This sewing-/embroidery computer is provided with
double insulation (except USA and Canada). Use
only identical replacement parts. See instructions for
servicing of double-insulated products.
SERVICING DOUBLE
INSULATED PRODUCTS
In a double-insulated product two systems of insulation are
provided instead of grounding. No grounding means is
provided on a doubleinsulated product, nor should a
means for grounding be added to the product. Servicing a
doubleinsulated product requires extreme care and
knowledge of the system and should be done only by qualified service personnel. Replacement parts for a doubleinsulated product must be identical to those parts in the
product. A double-insulated product is marked with the
words «DOUBLE INSULATION» or «DOUBLE INSULATED».
The symbol
may also be marked on the product.
DISCLAIMER
No liability will be assumed for any possible damage which
arises from misuse of this sewing-/embroidery computer.
This sewing-/embroidery computer is intended for
household use only.
SAVE THESE
INSTRUCTIONS!
2
Page 4
Sewing
032299.53.04_1204_B830_EN
Accessory & Preparation
Functions & Settings
Main Stitch Categories
BERNINA World
Maintenance/Troubleshooting
Stitch & Motif Overview
Index
Page 5
Very important!
032299.53.04_1204_B830_EN
Risk of damage!
Helpful tips!
Text
Gayle Hillert, Herbert Stolz, Joanna Wild
Sewing & Embroidering Projects
Colette Cogley, Jeanne Delpit, Susan Fears, Claudia Giesser,
Gayle Hillert, Nina McVeigh, Pia Welsch, Joanna Wild
Screen Design & Drawings
sculpt.ch, CH-Steckborn
Photographs
Sterling Rice Group, USA
Patrice Heilmann, CH-Winterthur
Manual Design & Concept
Erika Vollenweider-Czibulya
Typesetting, Layout, DTP
Susanne Ribi, Erika Vollenweider-Czibulya
Copyright
2008 BERNINA International AG, CH-Steckborn
All rights reserved
For technical and product improvement reasons, the sewing computer‘s features, parts and accessory are subject to unannounced
changes and alterations at any time. The accessory included can differ from country to country.
Page 6

Accessory & Preparation
032299.53.04_1204_B830_EN
Accessory 6
Your Delivery 6
Sewing computer cover 6
Accessory 6
In plastic bag 6
Presser Feet 7
BERNINA Specialty presser feet 7
Accessory Box 8
Free Standing 8
Lay-out 9
Sewing Computer 10
Details 10
Preparation 12
Battery 12
Power Switch/Power Cable 12
Free-Hand-System (FHS)
Presser Foot Lifter 12
Changing the Presser Foot 22
Stitch plates 23
Feed-Dog and Fabric Feed 23
Sewing with the Height Compensation Tool 24
Sewing Corners 24
Thread Tension 25
Upper Thread Tension 25
Lower Thread Tension 25
Altering the Tension 25
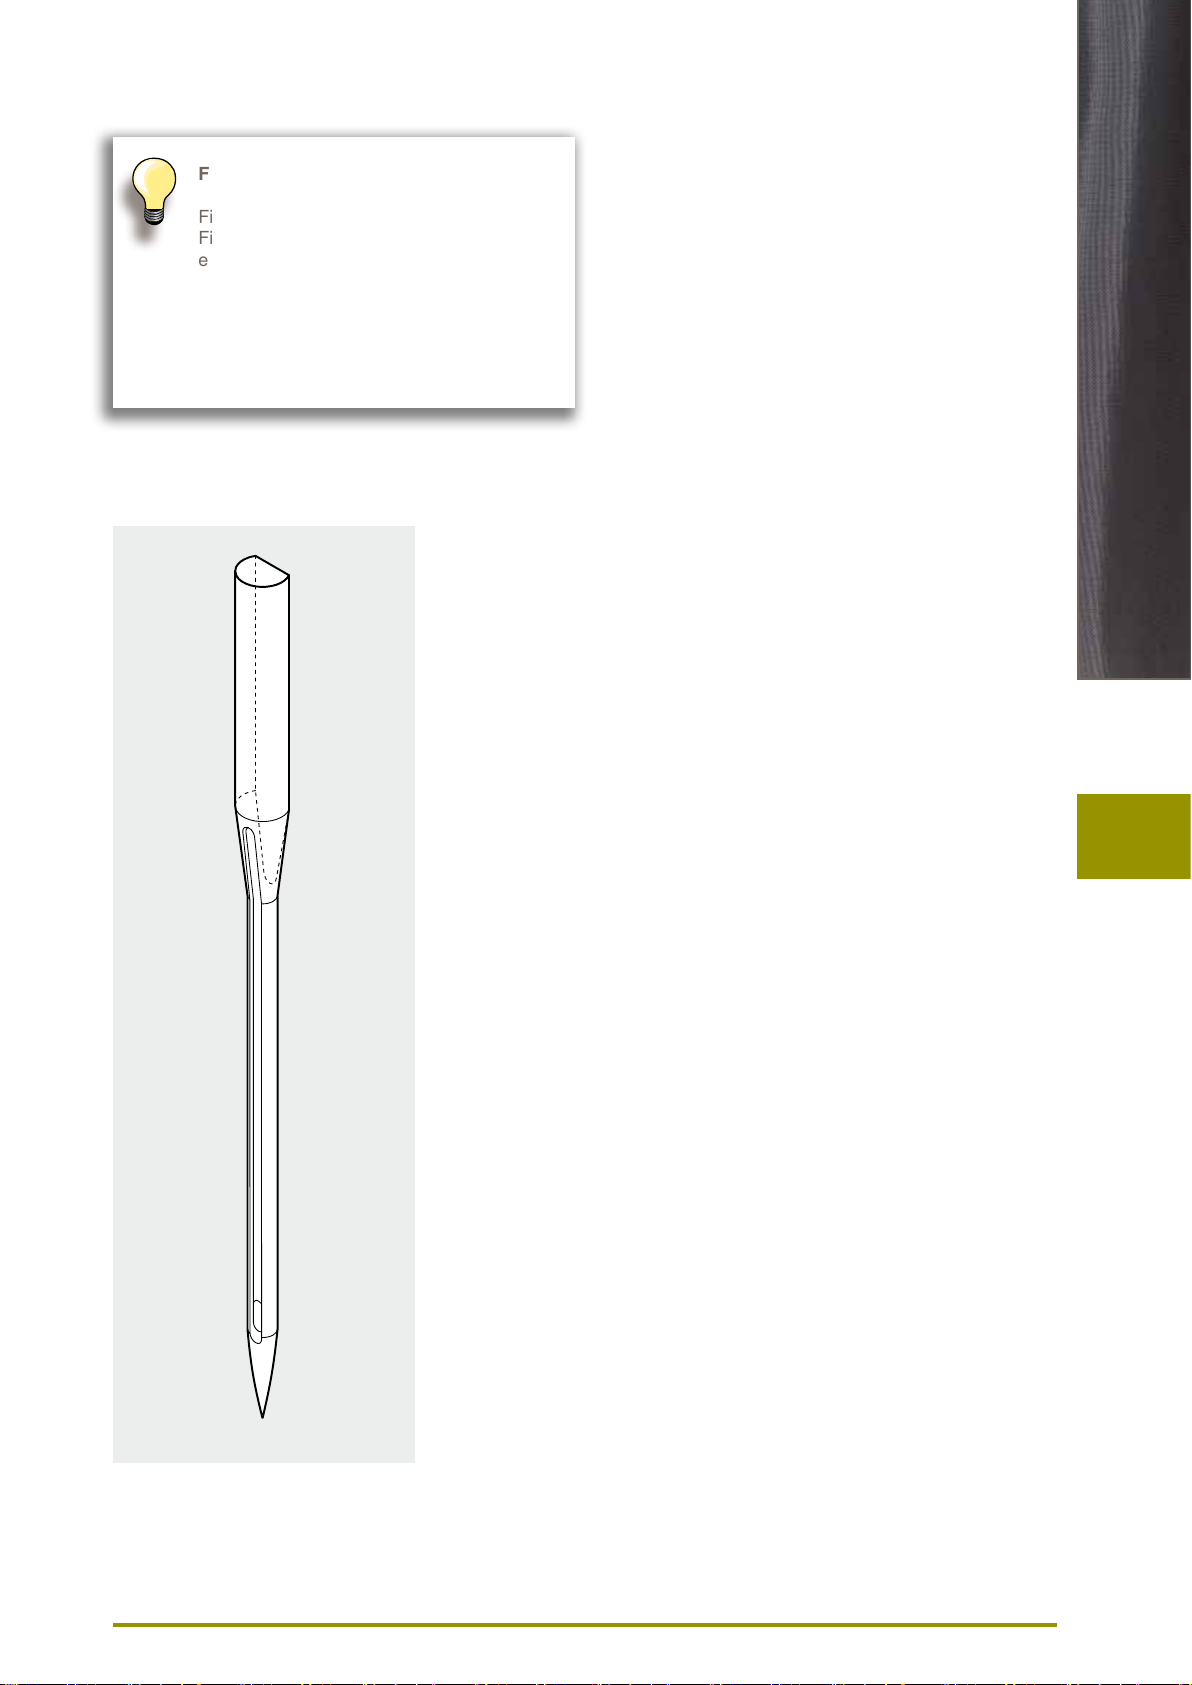
Needles 26
Important facts about
Thread and Needles 26
Thread 26
Needle, Thread and Fabric 26
Needle/Thread 26
Guidelines 27
Overview 28
Foot Control 13
LED Sewing Light 13
Pivotable Triple Spool Holder 14
Bobbin 14
Winding the Bobbin 15
Interrupting the winding process 15
Removing/Inserting the Bobbin 16
Threading Lower Thread 16
Slide-on Table 17
Thread Cutter 17
Threading the Upper Thread 18
Double/Triple Needle 19
Thread-Guide-and-Lubricating Unit 20
As a thread-guide eyelet (Fig. 1) 20
As a thread lubricator (Fig. 2) 20
Assembly 20
Radial Thread Guide 21
Various Options of Application 21
Changing the Needle 22
Page 7

Your Delivery
032299.53.04_1204_B830_EN
Accessory
Sewing computer cover
► protects from dust and dirt
Accessory
► foot control
► power cable
► warranty card
► FHS presser foot lifter (Free Hand System)
► slide-on table
► seam guide for slide-on table
► Instructional DVD
► sewing computer cover
► accessory box
► thread lubricater
7
6
6
9
10
8
5
2
11
13
14
34
1
16
17
12
15
19
18
20
In plastic bag
1 4 bobbins
2 adjustable guides
3 wire threader for threading cording for bobbin play
4 tweezers
5 2 nets
6 cording attachment
7 magnifying glass adapter
8 small screwdriver, gray
9 touch pen
10 seam ripper
11 lint brush
12 multifunction tool
13 manual threader
14 spool disc small
15 holder for king-size spools, cone holder
16 height compensating tool
17 needle pack 130/705H
18 lubricator
19 monitoring mirror
20 hook cleaning tool
Page 8

Presser Feet
032299.53.04_1204_B830_EN
1C Reverse pattern foot 1D Reverse pattern foot 2A Overlock foot
3C Buttonhole foot 4D Zipper foot 5 Blindstitch foot
3A Automatic buttonhole
foot with slide
Accessory
18 Button sew-on foot
20C Open embroidery foot 40C Sideways motion foot 42 BSR foot
BERNINA Specialty presser feet
8 Jeans foot 50 Walking foot
It is recommended that BERNINA specialty
presser feet be used for specific sewing tasks
such as quilting, heirloom sewing, home
decorating, tailoring etc.
All the presser feet are shown in the
enclosed accessory catalog.
They are available at your BERNINA dealer.
7
Page 9

Accessory Box
032299.53.04_1204_B830_EN
Free Standing
► on the back of the box, pull both
extensions out until they click into
place
Accessory
8
Page 10
Lay-out
032299.53.04_1204_B830_EN
Accessory
The box is equipped as standard with
one small A and one large B drawer
as well as a compartment for bobbin
holders C and presser feet D.
► to remove a bobbin, press the
compartment holder E lightly
D
C
G
E
F
A
B
► buttonhole foot with slide no. 3A
can be stored in the left compartment F
► store the needle range supplied in
the special compartment G
9
Page 11
Details
032299.53.04_1204_B830_EN
8
Sewing Computer
10
13
7
6
2
1
5
4
3
20
9
11
12
19
21
15
17
14
16
18
23
24
25
32
31
26
27
28
33
30
22
29
17
16
34
35
36
38 39
37
10
Page 12

33
032299.53.04_1204_B830_EN
41
40
1 Bobbin cover
2 Stitch plate
3 Attachment base for special accessories
4 Presser foot
5 Needle clamp
6 Thread guide
7 Screen
8 Carrying handle
9 System Settings
‣ Setup button
‣ Tutorial button
‣ Creative Consultant button
‣ Help button
‣ Eco button
‣ Sewing-/Embroidery mode button
‣ «clr» clear button
10 Stitch width knob
11 Stitch length knob
12 Needle position buttons
13 Bobbin winder
14 Thread cutter for bobbin winder
15 Threading slit
16 Triple spool pin
17 Telescope
18 Bobbin pre-tension
19 Slide-on table socket
20 Darning hoop connection
21 FHS (Free Hand System) connection
22 Slide speed control
23 Automatic needle threader
24 Needle stop up/down button
25 Presser foot up/down button
26 Securing button
27 Pattern end button
28 Automatic thread cutter
29 Start/stop button
30 Quick reverse button
31 Special-accessories port
32 BSR connection
33 BERNINA Dual Feed
34 Handwheel
35 USB connection
36 PC connection
37 Foot control socket
38 Power switch on/off («I», «0»)
39 Power plug socket
40 Connection for Magnifying glass
(optional accessory)
41 Thread cutter on head frame
42 Embroidery module connection
Sewing Computer
42
11
Page 13
Battery
032299.53.04_1204_B830_EN
Power Switch/Power Cable
Please remove the protective sticker of the battery
before taking the sewing computer in use.
A Power Switch
The sewing computer is switched on («I») and off («0»)
with the power switch.
Preparation
E
D
A B
C
(USA/Canada only):
The sewing computer has a polarized
plug (one blade wider than the other). To
reduce the risk of electrical shock, this
plug is intended to fit in a polarized outlet
only one way. If the plug does not fit fully
in the outlet, reverse the plug. If it still
does not fit, contact a qualified electrician
to install the proper outlet. Do not modify
the plug in any way!
Free-Hand-System (FHS) Presser Foot Lifter
I the sewing computer is switched on
0 the sewing computer is switched off
B Power connection
C Foot control connection
D PC connection
E USB stick connection
If the sewing computer is kept in a cold room,
place it in a warm room for 1 hour before use.
12
The FHS is used to raise and lower the Presser Foot.
Attaching the Free Hand System
► insert into the opening; you should be able to operate
the FHS with your knee in your normal sitting position
Raising and Lowering the Presser Foot
► with knee push FHS to the right
► the presser foot is raised and the feed-dog is lowered
simultaneously. Tension is released
► the feed-dog is raised as soon as the first stitch is sewn
Your dealer can adjust the FHS if necessary.
Page 14
Foot Control
032299.53.04_1204_B830_EN
A
Sewing Speed
► sewing speed is controlled by pressure on the foot
control
Raise or Lower the Needle
► entire foot rests comfortably on Foot Pedal
► tap the Foot Control with your heel to raise or lower the
needle
Cable tidy
B
► wind the cable around the reel
► insert the cable end (plug) into A
When sewing
► unwind the cable to the desired length and slip into B
or C
C
Preparation
(USA/Canada only):
Use only foot controller type LV1 or WFC1
with sewing computer model 830.
LED Sewing Light
The LED sewing light illuminates the sewing area with no
shadows and has a very long service life.
A defective sewing light must only be
replaced by a technician.
Take the sewing-/embroidery computer
to your BERNINA dealer.
13
Page 15
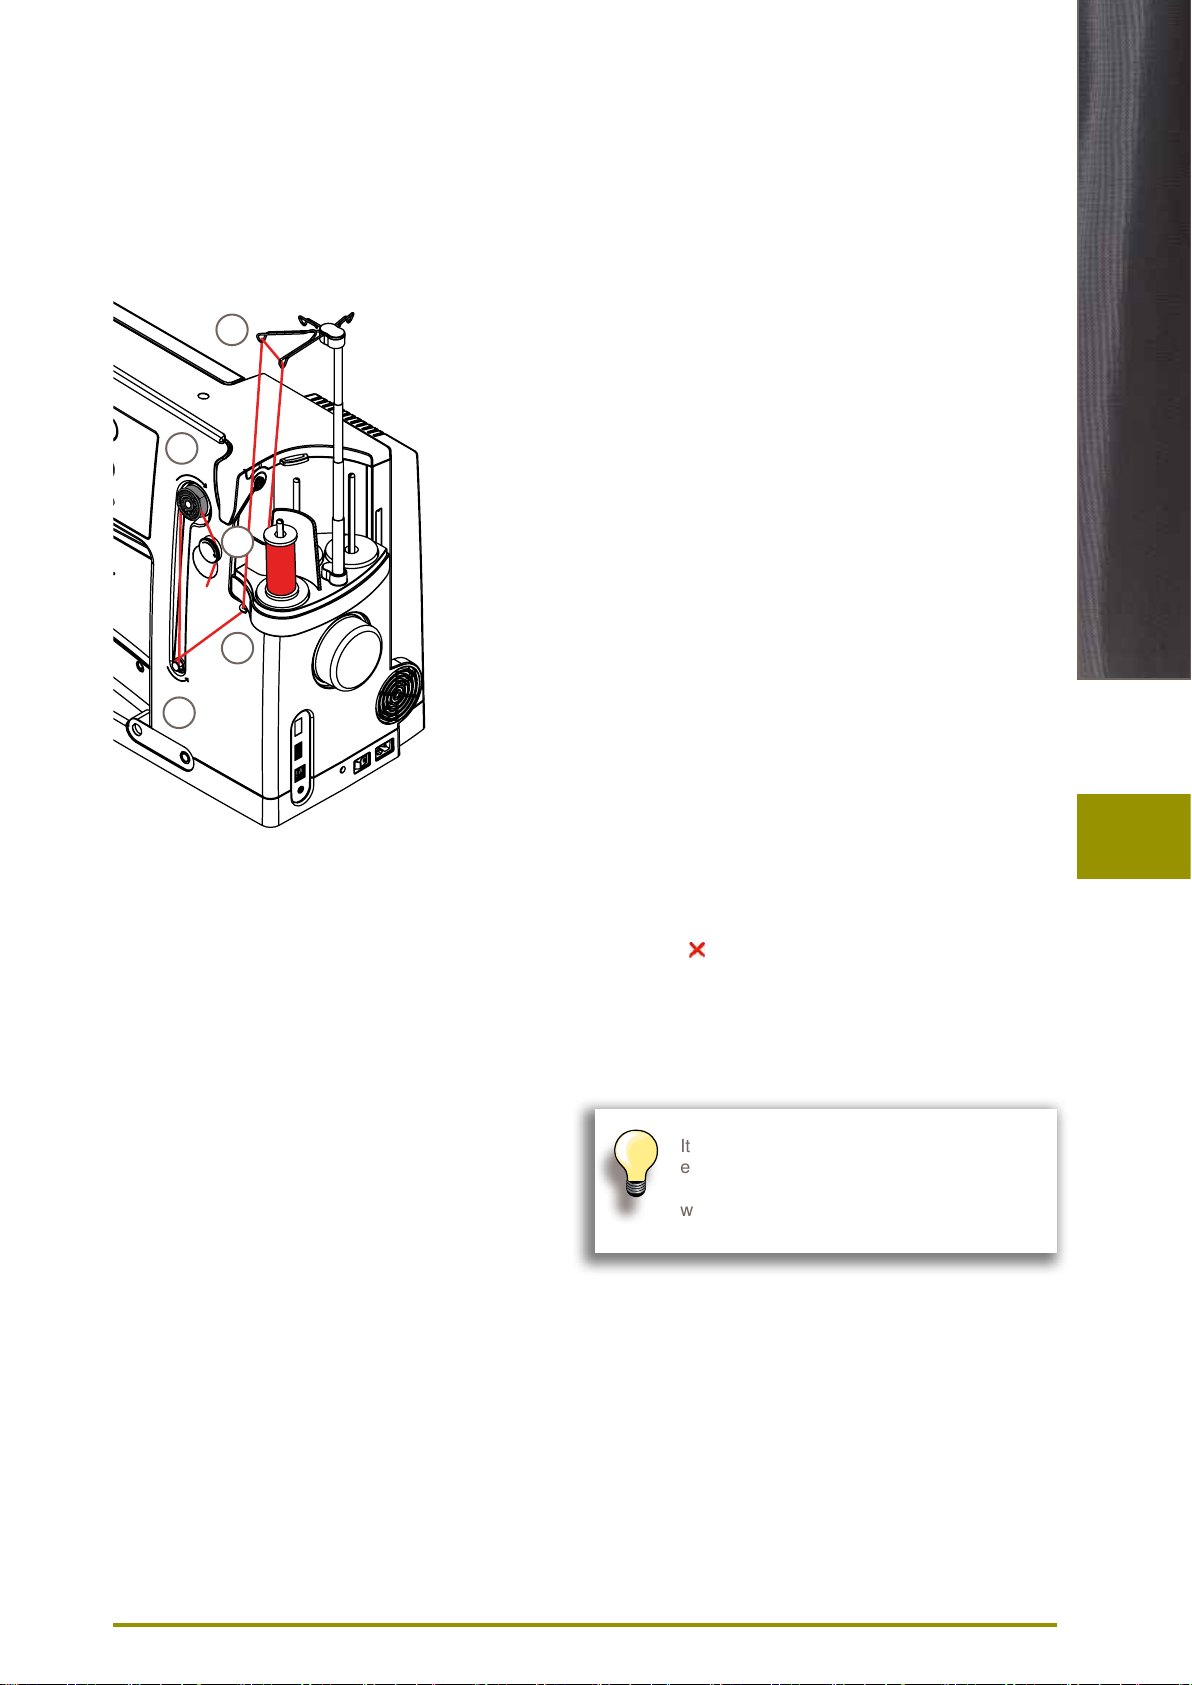
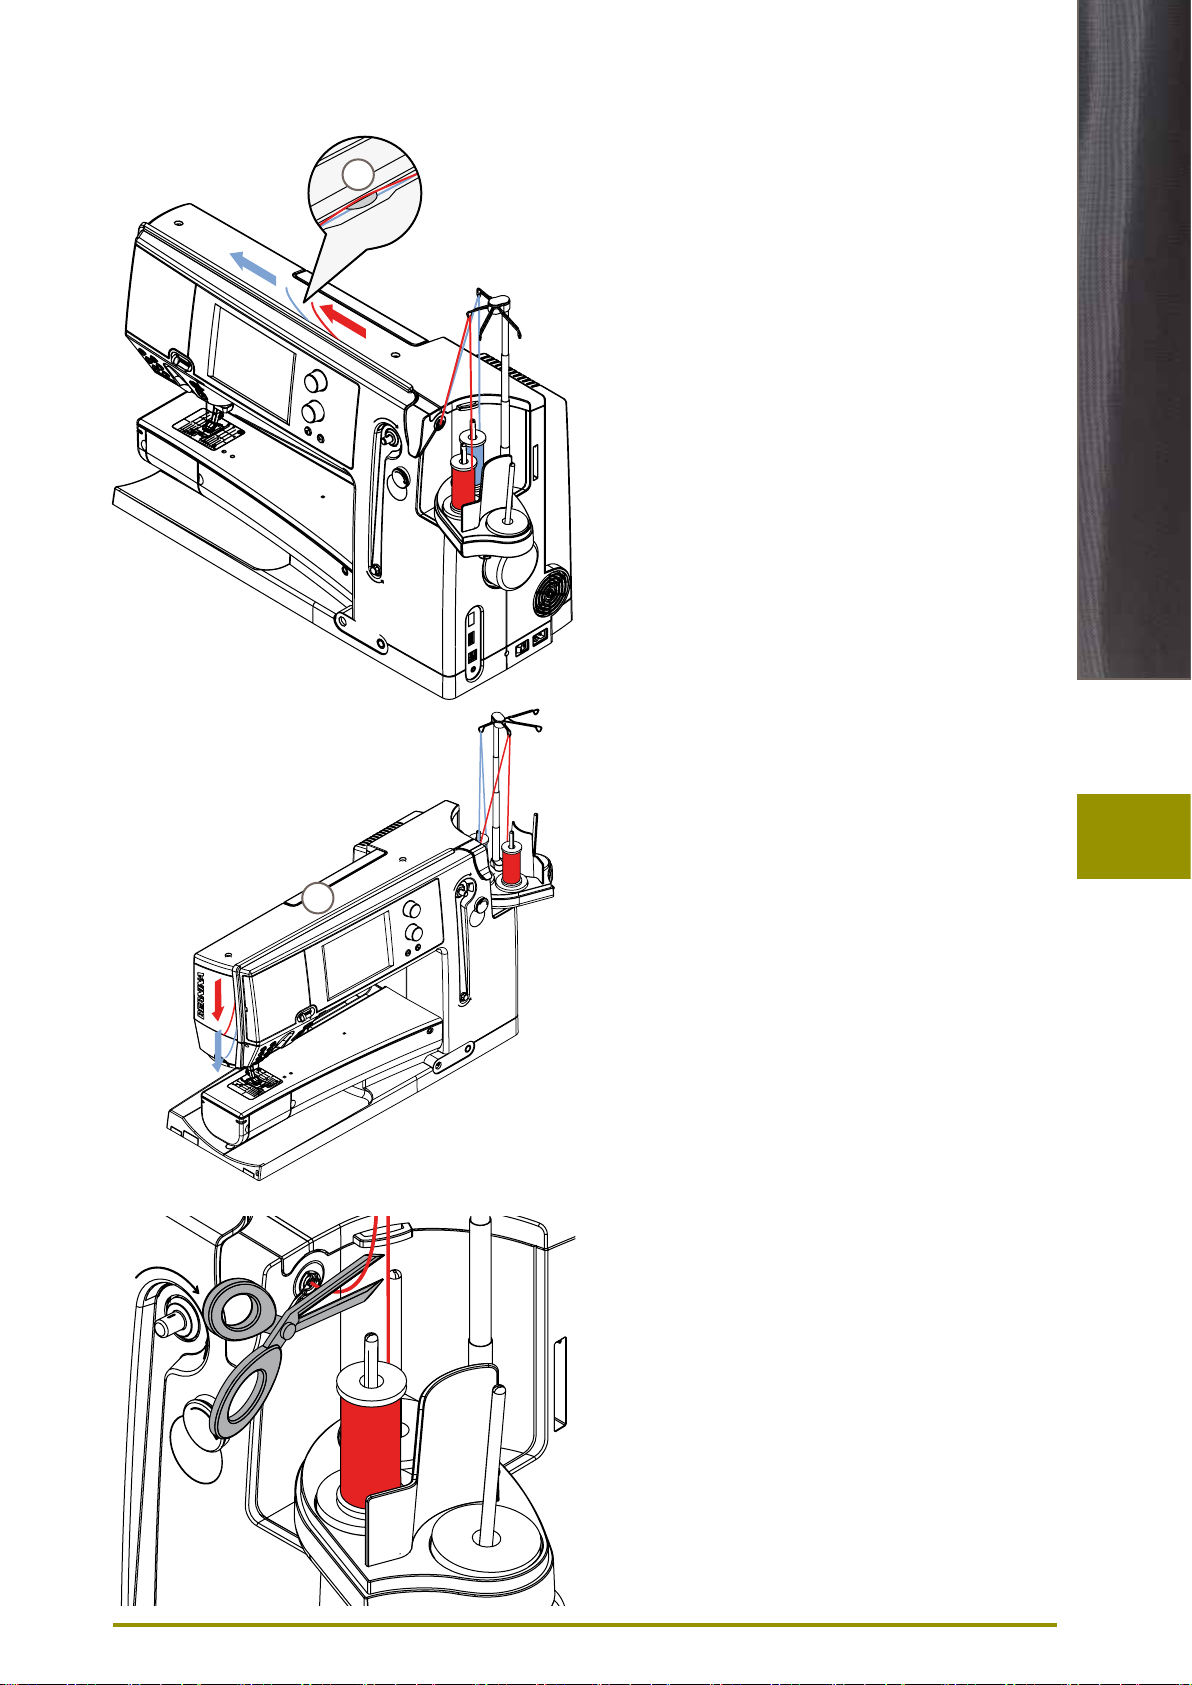
Pivotable Triple Spool Holder
032299.53.04_1204_B830_EN
A
► remove spool-pin cover vertically upwards
► pull out the telescopic rod and ensure that all the parts
snap into place
► swing spool pin to the right until it is engaged. This
ensures a good overall view and access to the spool
pins
► eyelet A is used when winding a bobbin
Preparation
Bobbin
The 830 bobbin, exclusive to BERNINA, supplies till 40%
more lower thread. If the bobbin is not inserted correctly,
an error message is displayed.
You can preselect a bobbin fill of 25%, 50%
or 100%.
Treat the bobbins with care. Keep the
white sensor surfaces free of scratches or
stains to ensure correct functioning of the
lower thread indicator. Store the bobbins
in the respective compartment of the
accessories box.
14
Page 16
Winding the Bobbin
032299.53.04_1204_B830_EN
1
4
5
2
3
Preparation
► turn power switch on (to «I»)
► place empty bobbin on Pin, white mark in front
► the bobbin winding screen appears
► the amount of bobbin fill is recognized by the system
and displayed by bar below the selectable bobbin fill
► place thread spool on the front spool pin and thread the
respective guides 1 on the telescope
Winding the Bobbin
► hold thread with both hands, guide the thread in the
thread guide on the swivel plate 2 in the direction of the
arrows and around the bobbin pre-tension 3
► wind the thread one to two times around the empty
bobbin 4 following the direction of the arrows and pull
any excess thread in the direction of the arrows, cut off
on the thread cutter 5
► select the bobbin filling, standard = 100%
► «Start» field = touch bobbin symbol
► adjust the winding speed with the «+» or «-» icon or with
the stitch width knob
► winding process stops as soon as the selected fill
percentage is reached
► remove the bobbin and pull the thread over the thread
cutter
► the screen is closed
Manual Winding Mode
► touch «man»
► the winder will run as long as the «bobbin» icon is
pressed
Preparation
Interrupting the winding process
► the winding process can be interrupted by touching
«Start»-(bobbin) icon, and the screen closed by
touching
► Continuing the winding process
‣ touch «bobbin» icon (it appears in the place of the
clock) = the winding screen opens
‣ touch «Start»-to start winding process
It is possible to wind the bobbin while
embroidering.
We recommend, however, to reduce the
winding speed.
15
Page 17
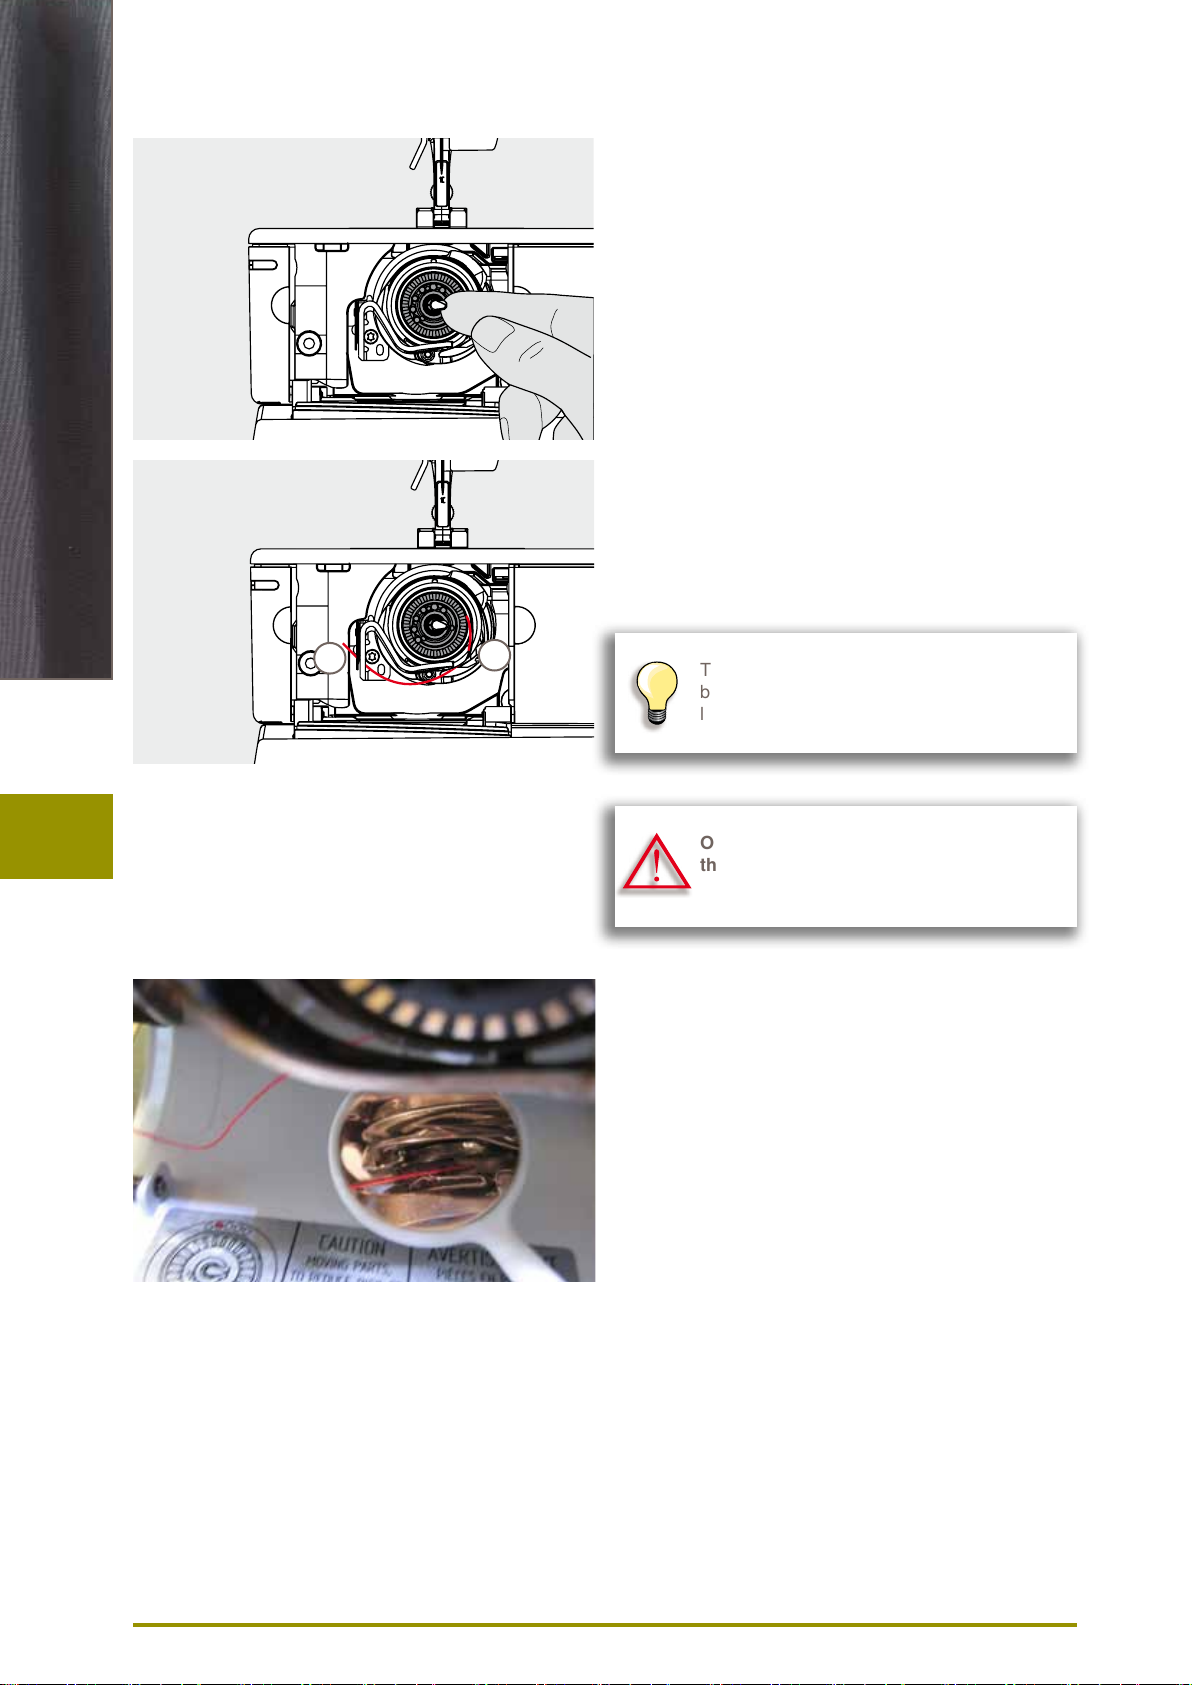
Removing/Inserting the Bobbin
032299.53.04_1204_B830_EN
Removing the Bobbin
► open bobbin cover, the hook system swings to the front
► push the latch in the center of the bobbin to the left, the
bobbin pops out and can be removed
Inserting the Bobbin
► with bobbin markings facing the front, place the bobbin
into the hook and push until it clicks into place
Threading Lower Thread
► pull the thread to the right into slit A, then left under the
spring
► pull thread over thread cutter B and cut
► close the bobbin cover slowly, the hook swings back to
the rear
Preparation
B
A
The bobbin thread does not have to be
brought up as the loose end is just the right
length to start sewing.
Only remove the bobbin if the hook is at
the end position (threading position).
Check the threading path
After threading the hook, hold the mirror under the
swung-out hook unit as shown in the pictures below.
► Position of bobbin thread when threaded for sewing
16
Page 18
Slide-on Table
032299.53.04_1204_B830_EN
The slide-on table increases the sewing surface.
Attaching the Table
► raise the needle and presser foot
► from the left, push table to the right over the free-arm
and push firmly so that it engages over the fixing cam
Removing the Table
► raise needle and presser foot
► press the button down and remove to the left
Remove the slide-on table only when
bobbin cover is closed.
Seam Guide
► press the release button and insert into the groove
(underside of table) from left or right
► can be moved over the entire table length
Preparation
Thread Cutter
Scale
► «0» corresponds to the center needle position
on Head Frame
► pull both threads from back to front over the cutter
► threads release automatically as soon as the first stitch
is sewn
at bobbin winder
► after winding bobbin, pull thread in direction of arrow
over thread cutter
17
Page 19
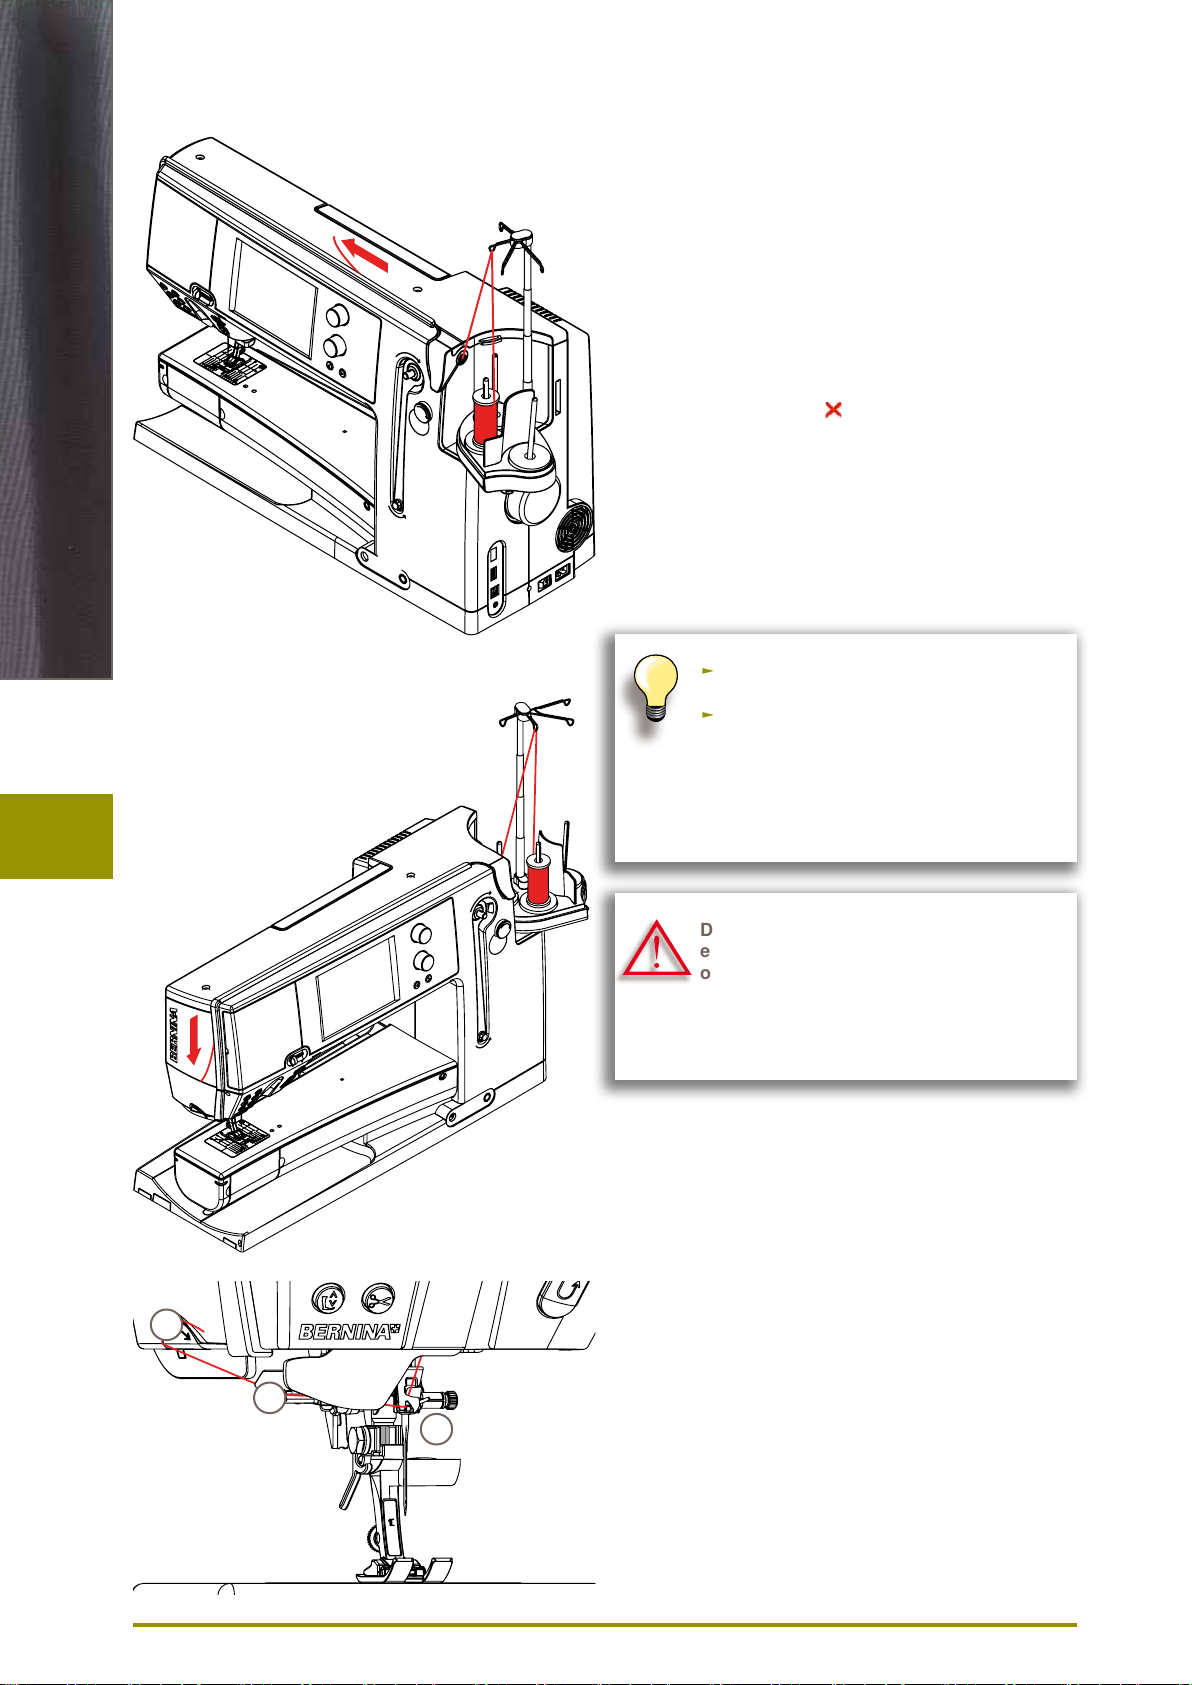
Threading the Upper Thread
032299.53.04_1204_B830_EN
Automatic threading
► place thread spool on the rear or center spool pin
► thread the corresponding guide on the telescopic rod,
hold with both hands and guide into the threading
opening of the sewing computer, taking it up to the
thread guide in the needle clamp A and B and pull from
back to front over the thread cutter C
► touch the automatic threader button, a message and an
animation appear
► during threading the start-stop button is illuminated red
► if the thread has not been threaded correctly, an error
message appears
► close the message with and start again
► if the thread has been threaded correctly the start-stop
button is illuminated green
Manual threading
► follow the two first steps as described above
► touch «Manual threading» icon on screen
► press «Automatic threading» button, then thread the
needle by hand
Preparation
► when using unruly threads, slip the net over
the upper thread spool
► large net for large spools, small net for
small spools
► this prevents the upper thread from slipping
and gives an even thread feed
► place the thread(s) under the presser foot
and to the back before starting to sew
Do not start the threaded sewing-/
embroidery computer if there is no fabric
on the stitch plate.
The sewing-/embroidery computer must
be switched ON for threading.
C
18
B
A
Page 20
Double/Triple Needle
032299.53.04_1204_B830_EN
Double Needle
A
► touch the «Security Program» icon
► touch the appropriate needle icon (double needle) in the
Security Program screen
► place a thread spool on the center spool pin and one on
the rear spool pin and thread the corresponding guides
on the telescopic rod
► insert the two threads together into the threading slit,
guiding the thread of the rear spool pin behind the
thread-tension disc A while guiding the thread of the
center spool pin in front of the tension disc A. Then
guide the two threads through the thread guide at the
needle clamp
► touch the icon «Manual Threading» on the threading
animation screen. Next touch the illuminated automatic
threading button
► using the manual threader in your accessory kit,
manually thread the left needle and then the right
needle
Triple Needle
► in the Security Program select triple needle
► place a thread spool on each spool pin and thread the
respective guides on the telescopic rod
► thread as usual, guiding the thread from the rear and
center spool pin in the threading slit to the rear of
thread tension disc A and the thread from the front
spool pin in front of the tension disc A
Preparation
A
Changing the thread
► cut the spool thread before the pre-tension and pull out
of the sewing computer to front near the needle
19
Page 21
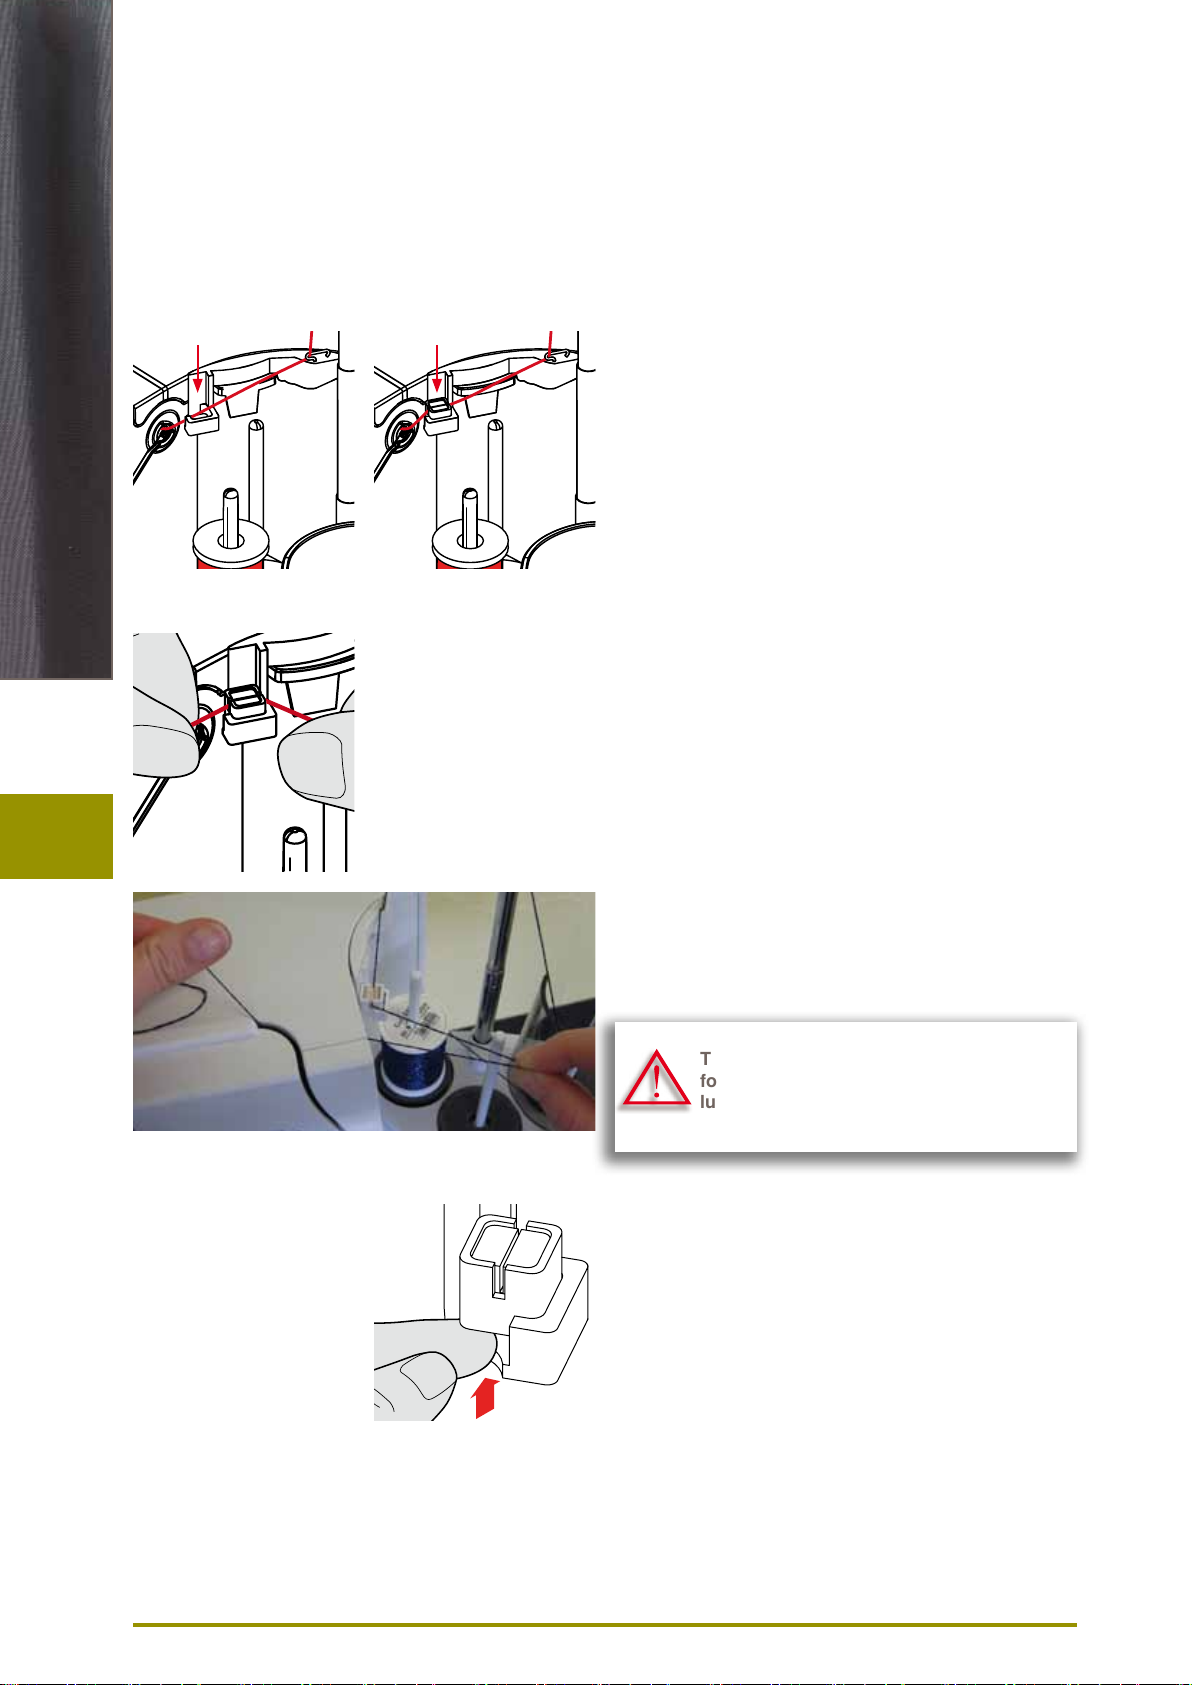
Thread-Guide-and-Lubricating Unit
032299.53.04_1204_B830_EN
As a thread-guide eyelet (Fig. 1)
Use the unit without lubricator for a controlled guiding of the thread into the pretensioner, e.g. when using lively thread
types.
As a thread lubricator (Fig. 2)
Using the lubricator is advisable when using e.g. threads with high function values, metallic threads, loosely twisted
thread types etc. The silicone fluid improves the threads‘ gliding properties considerably and therefore helps to produce
flawless stitching results.
Assembly
► insert the unit into the spool-holder cover fixture and
push down entirely (Fig. 1)
► insert the lubricator into the holder on the left side of the
unit, taking care to place the lubricator in such way that
the openings for the thread are in line with the thread
flow or thread direction (Fig. 2)
► moisten the felt, add a few drops of silicone fluid
1
2
► place the thread spool onto the middle or rear spool pin
as usual. Then guide the thread through the respective
eyelet of the telescopic rod and the eyelet of the
thread-guide-and-lubricating unit
Preparation
3
4
► hold the thread with both hands, pull it in to the slit of the
felt, pulling it down as far as it goes so that it‘ll stay in
the felt during machine operation (Fig. 3)
► continue and complete threading the sewing computer
as normal
► take care that the felt remains moistened. It mustn‘t dry
out. Apply some drops of silicone fluid once in a while to
keep it moist
► during the initial threading of the sewing computer and
when the radial thread release is used it is advisable to
pull an extra inch of thread from the spool before the
threader button is pushed (Fig. 4)
The silicone fluid must ONLY be used
for thread lubrication. Never use it to
lubricate the hook system!
When using the Thread-Guide-and-Lubrification Unit and
depending on the type of thread used it might be necessary to reduce the upper-thread tension slightly to achieve
perfect stitching results,
► to remove the Thread-Guide-and-Lubrification Unit,
push the entire unit up
20
Reattach the Thread-Guide-and-Lubrification Unit. Thread
the sewing computer as usual, including the eyelet of the
unit (Fig. 2).
Page 22
Various Options of Application
032299.53.04_1204_B830_EN
► Vertical thread unwinding (with or without lubricator)
from normal spool pin or optional multiple spool holder
(Fig. 1-3)
1
3
2
4
Radial Thread Guide
► Radial thread unwinding (with or without lubricator)
(Fig. 4)
► during the initial threading of the sewing computer and
when the radial thread release is used it is advisable to
pull an extra inch of thread from the spool before the
threader button is pushed (Fig. 5)
Preparation
How to use the thread guide
► it is preferable to replace the standard foam disc with
the foam rotary disc (with white plastic inner part) on
the rear spool pin
The extra thread guide ensures the consistent thread
release, when using threads i.e. metallic, lively or even
wounded thread spools.
► place thread spool on spool pin and guide thread
through thread guide. Then run thread via middle eyelet
of telescopic rod. Continue threading the sewing
computer as normal
► during the initial threading of the sewing computer and
when the radial thread release is used it is advisable to
pull an extra inch of thread from the spool before the
threader button is pushed
5
Any of the two spool pins (see arrow markings) can be
used. However, it is best to use the rear pin due to its more
favourable unwinding angle. Refrain from using the pin of
the winder.
In order to achieve perfect stitching results, it might be
necessary to reduce the upper-thread tension slightly when
using the radial thread unwinding and depending on the
thread used.
It is absolutely essential to use the
correct foam disc under the thread spool.
21
Page 23
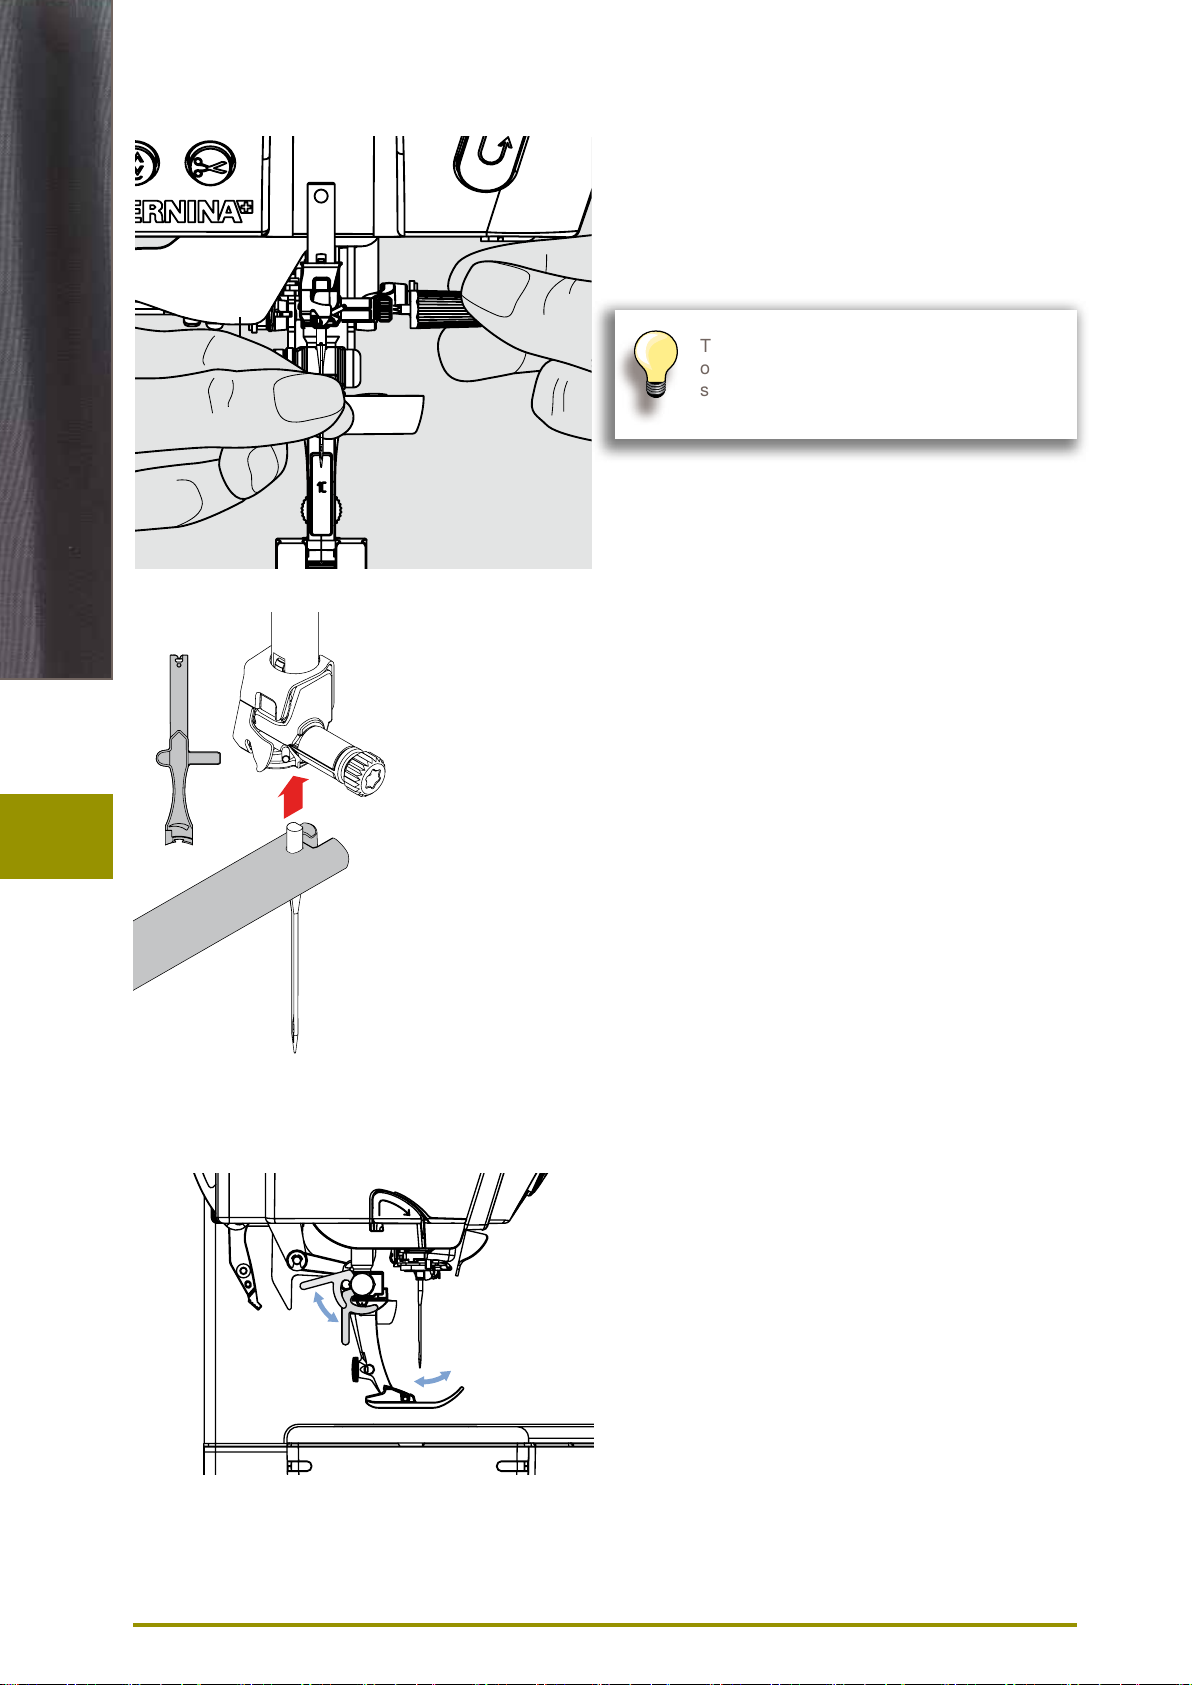
Changing the Needle
032299.53.04_1204_B830_EN
Preparation
► raise the needle
► lower the presser foot and turn the power switch to «0»
Removing the Needle
► loosen the clamp screw with the gray screwdriver and
pull needle down
Turn the handwheel to lower the needle in
order to get better access to the fastening
screw.
Inserting the Needle
► flat side of needle to the back
► insert the needle with the mulitfunction tool as far as it
will go
► tighten needle clamp screw
Changing the Presser Foot
22
► raise the needle and presser foot
► turn power switch to «0» (off)
Releasing the Presser Foot
► raise the clamping lever
► remove presser foot
Attaching the Presser Foot
► guide the presser foot upwards over the cone
► touch the clamping lever down
Page 24
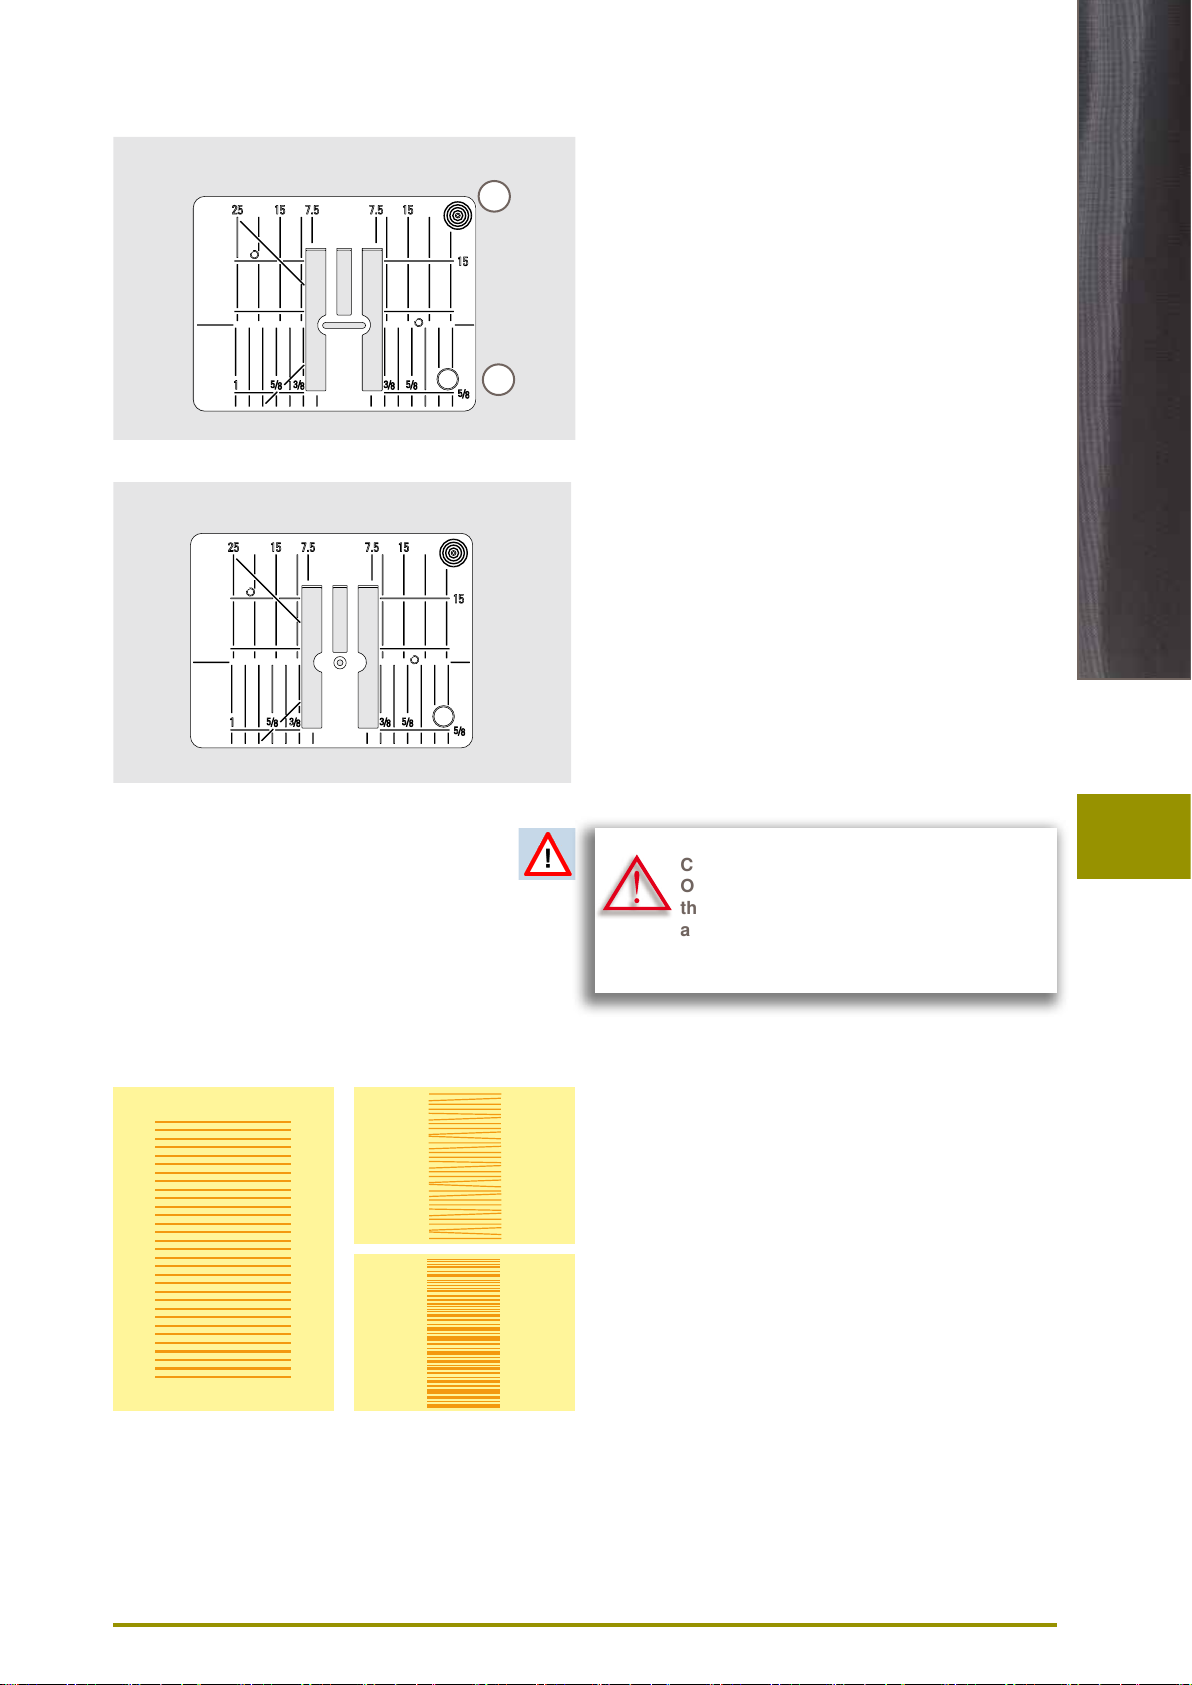
Stitch plates
032299.53.04_1204_B830_EN
9mm
Stitch Plate Markings
► the stitch plates are marked horizontally, vertically and
B
A
diagonaly in mm and inches
► markings help with sewing e.g. precise seaming and top
stitching
► horizontal markings are helpful for sewing corners and
buttonholes etc.
► diagonal markings are helpful for Quilt piecing
► the vertical markings refer to the distance from the
needle to the marking
► needle insertion point is position «0» (= center needle
position)
► measurements are marked to the right and to the left of
center needle position
Removing the Stitch Plate
► raise the presser foot and needle
► turn power switch to «0» (off)
► press the stitch plate down at the right back corner B
until it flips up
► remove stitch plate
Straight Stitch Plate
Feed-Dog and Fabric Feed
Replacing the Stitch Plate
► place the stitch plate over the opening A and press
down until it clicks into place
Changing the Stitch Plate
On attaching the straight-stitch plate or
the 5.5-mm stitch plate, it is imperative to
adjust the settings in Security Program
accordingly (see p. 35).
With each stitch the feed-dog moves forward one step. The
length of this step is determined by the stitch length
selected.
With a very short stitch length the steps are very short. The
fabric moves relatively slowly under the presser foot, even
at full sewing speed, e.g. buttonholes and satin stitch and
decorative stitches are sewn with a very short stitch length.
Preparation
Let the fabric feed fabric
evenly.
Pulling, pushing or holding
back the fabric will result in
uneven stitches.
23
Page 25
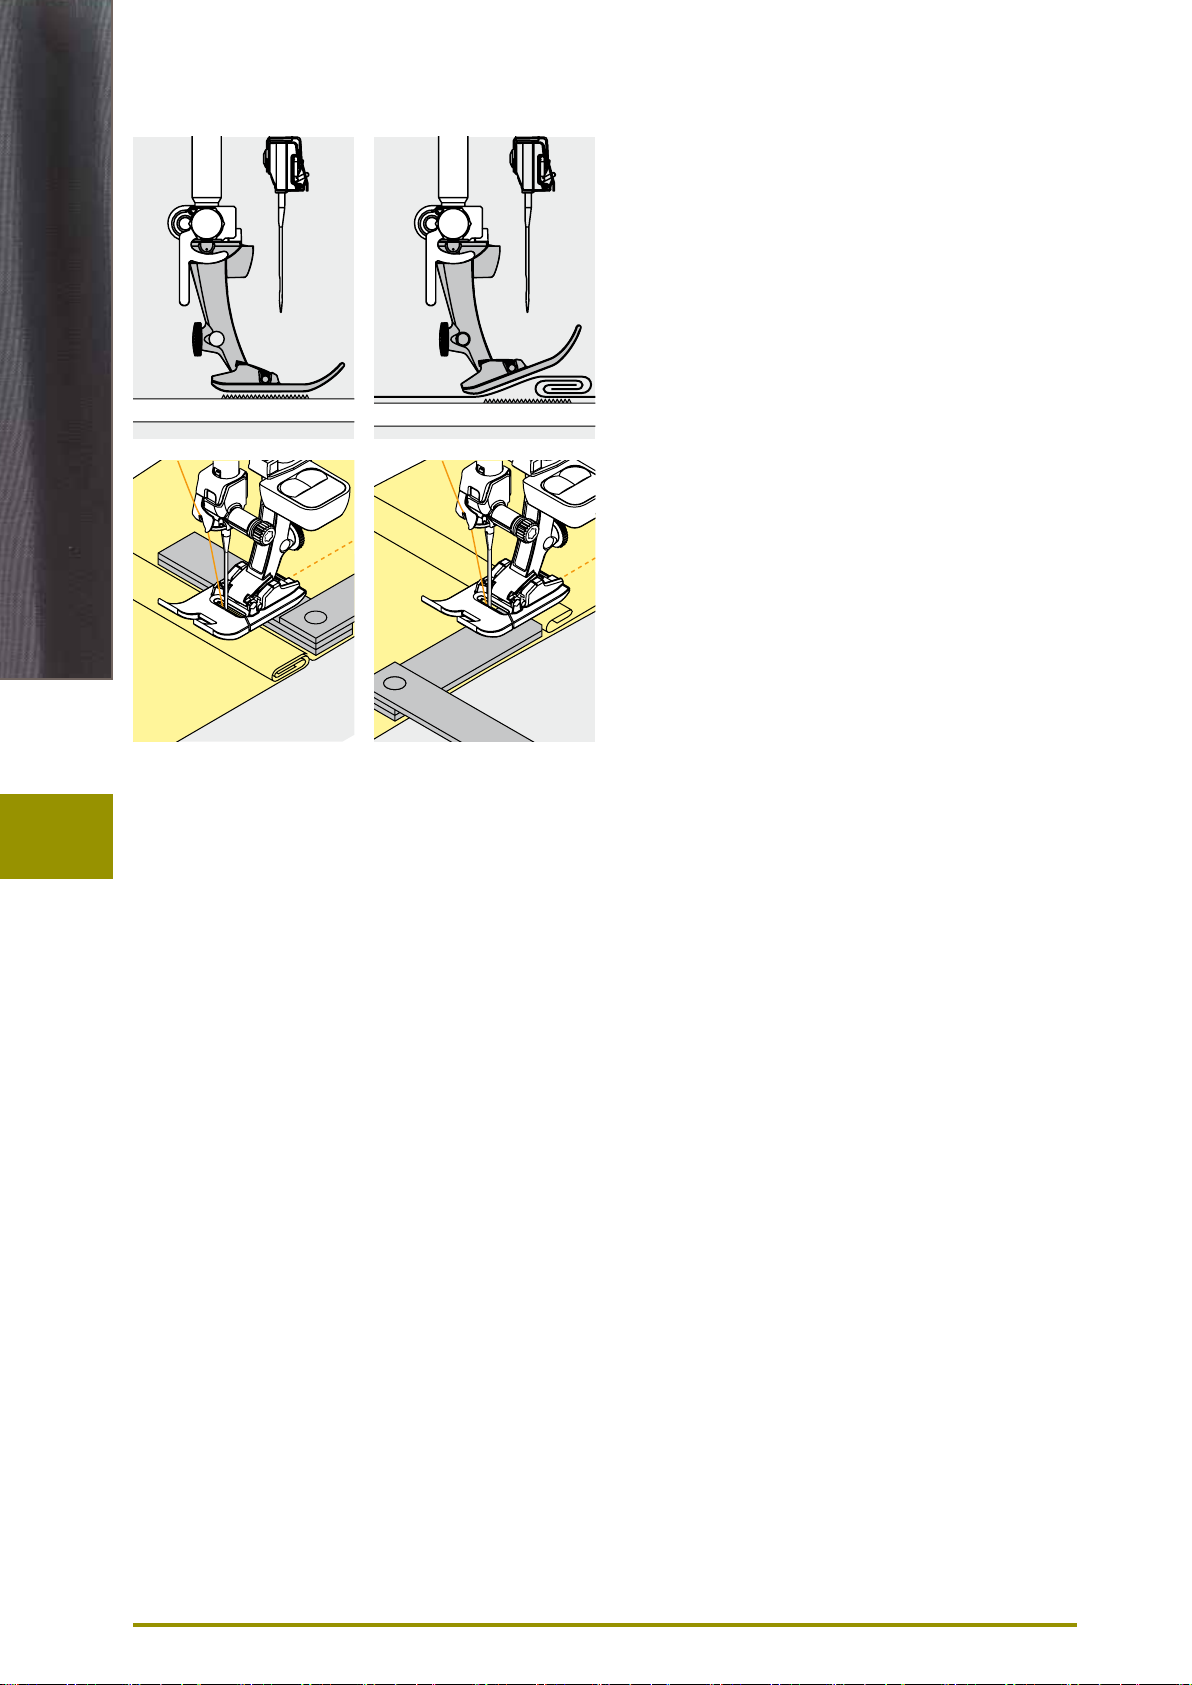
Sewing with the Height Compensation Tool
032299.53.04_1204_B830_EN
Preparation
The feed-dog works accurately if the presser foot is level.
If the presser foot is at an angle when sewing over a thick
seam, the feed-dog cannot grip. The fabric may jam.
To level the presser foot as required, place one, two or
three height-compensating plates behind the needle under
the presser foot.
To level the front of the foot, place one or more plates
under the right of the presser foot close to the needle.
Sew until the presser foot has passed the thick area and
remove the plates.
Sewing Corners
Due to the width of the stitch plate hole the outer feed-dog
rows are relatively far apart.
When sewing corners the fabric does not feed well, since
only a part of the fabric is on the feed-dog.
Correct this by placing one or more plates close to the
edge of the fabric.
24
Page 26
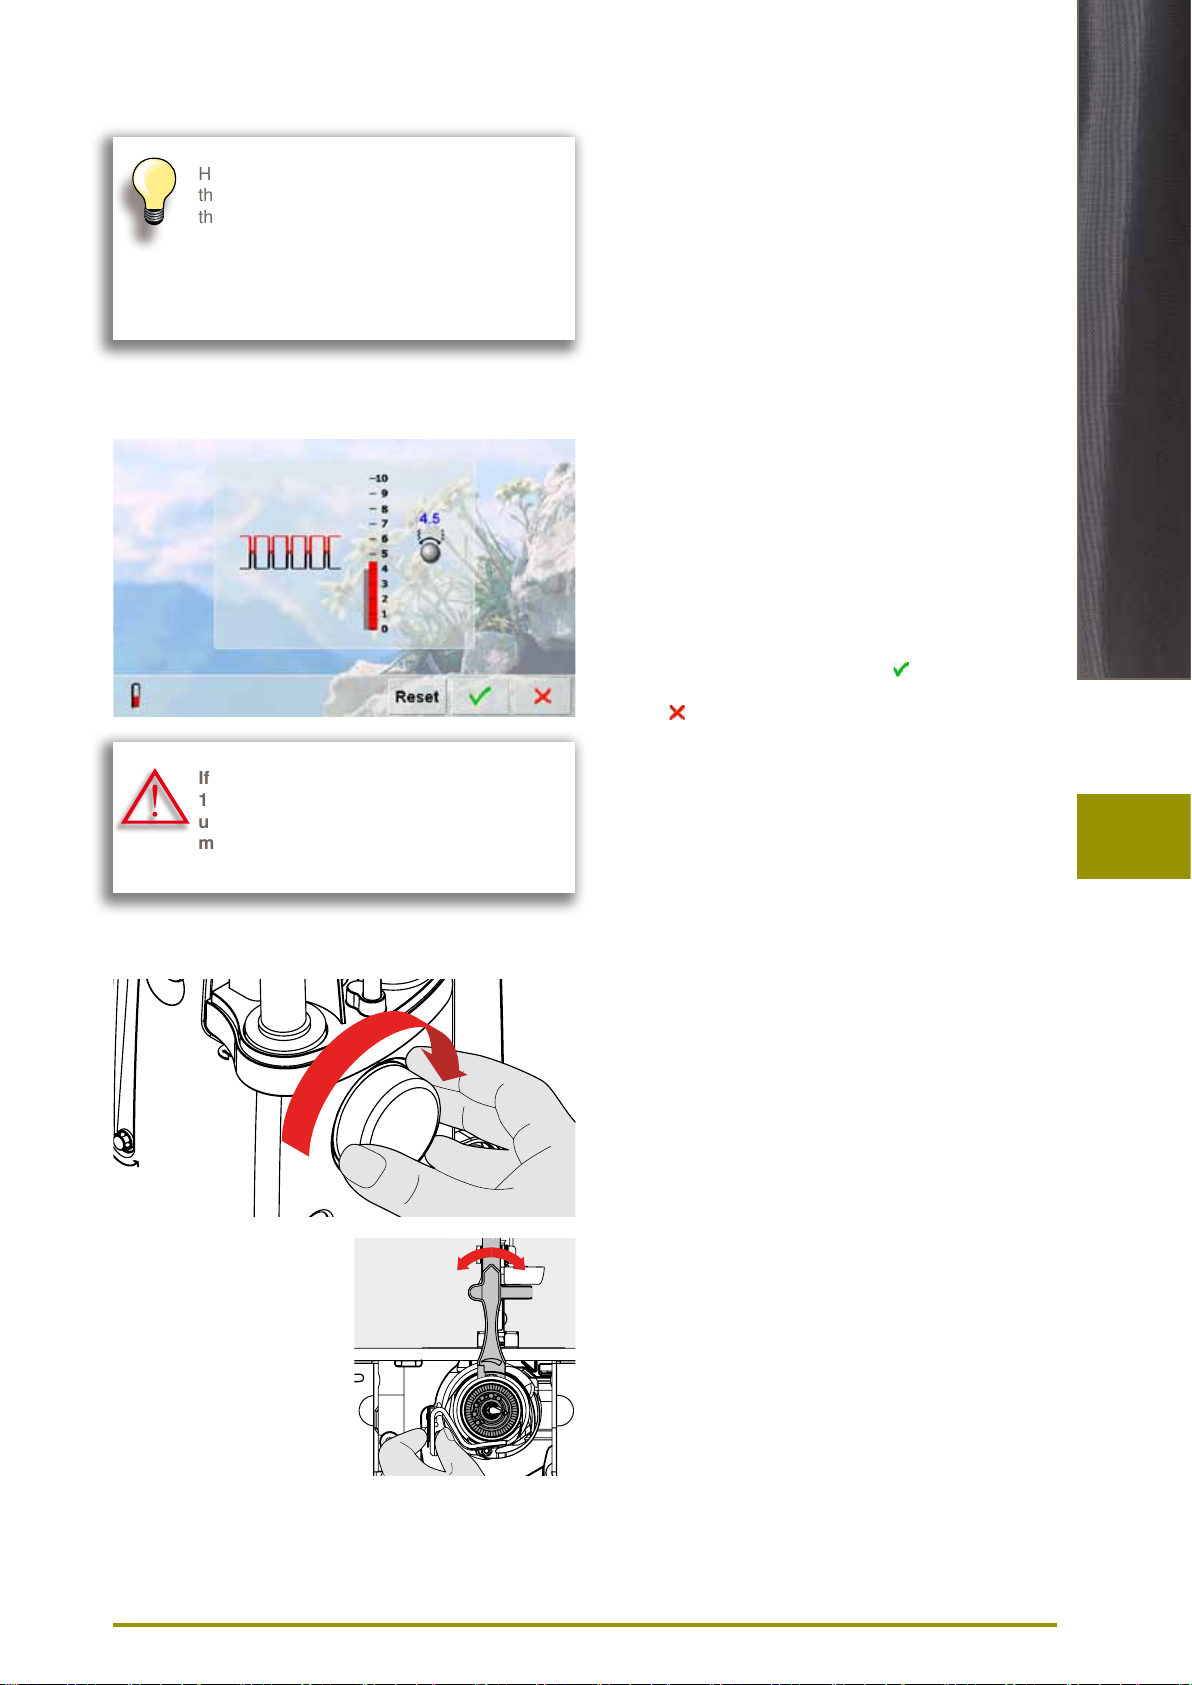
Thread Tension
032299.53.04_1204_B830_EN
Upper Thread Tension
Higher upper thread tension = the upper
thread is tightened, which pulls the lower
thread up to the topside of fabric.
Lower upper thread tension = the upper
thread is loosened, which enables it to be
pulled to the backside of the fabric.
If the thread tension is set to a value below
1 for embroidery, there is a higher risk of
unwanted loop occurrence. A warning
message will appear.
Basic settings are applied automatically when a stitch
pattern or program is selected.
Optimal upper thread tension is set in the factory. For this,
Metrosene threads 100/2 weight (Mettler, Switzerland) are
used in the bobbin and also in the upper thread.
When using decorative thread, tension adjustments may
be neccessary to receive optimal stitching results.
Altering the Tension
► touch the icon and the optimal stitch formation (stitch
formation in the fabric) is displayed
► the red bar on the scale shows the basic value
► turn the stitch width or stitch length knob to the left or
the right = the thread tension is loosened or tightened
► the tension alteration is indicated on the right side of the
thread tension scale
► the tension alteration only affects the stitch selected
► the alteration is shown on the scale (red) and in the
function icon
► the basic setting remains visible (gray) when a change
is made
► the settings are saved by touching
► touch «Reset» to return to basic settings
► touch , settings do not change
► delete: with «clr», «Reset», also when turning off the
sewing computer
Preparation
Lower Thread Tension
► hold bobbin case firmly with your left hand; with your
right hand, turn the hand wheel clockwise until the
setting tool can be slid over the lug at the slider
► basic value:
‣ lug of the slider matches with the marking of the
bobbin carrier, or
‣ lug is shifted 1-2 points to the right, or
‣ lug is shifted 1-2 points to the left
► turn lug to the left with the setting tool = thread tension
becomes looser
► turn lug to the right with the setting tool = thread tension
becomes tighter
► change per point = 4 g
► bring hook into the position shown in the illustration by
turning the handwheel clockwise in order to be able to
thread it properly
25
Page 27
Important facts about Thread and Needles
032299.53.04_1204_B830_EN
Thread
The thread is chosen according to its intended use. For a perfect sewing result,
thread and fabric quality play an important role. Use of quality brands is
recommended.
Cotton Thread
► cotton thread has the advantage of being a natural fiber and is therefore
particularly suited for sewing cotton fabrics
► mercerized cotton thread has a slight sheen and is preshrunk
Polyester Thread
► polyester thread has a high tensile strength and is particularly colorfast
► polyester thread is more resiliant than cotton thread and is recommended
where a strong and elastic seam is required
Needle, Thread and Fabric
Care should be taken when matching the needle and thread.
The correct needle size does not just depend on the thread selected but also
on the fabric to be used. The fabric weight and type determines which thread
weight, needle size and needle tip to use.
Needles
Needle/Thread
Checking Needle Condition
The condition of the sewing needle should be
checked and the needle replaced regularly.
A defective needle does not just damage the
fabric but also the sewing computer.
As a guide:
Replace the needle before starting a new
sewing project.
Correct Combination
To sew optimally, the thread should travel smoothly down the long groove on
the front of the needle.
Thread Too Thin or Needle Too Thick
The thread has too much clearance in the groove; there may be skipped
stitches or damage to the thread.
Thread Too Thick or Needle Too Thin
The thread rubs on the edges of the groove and can get jammed. This can
break the thread.
26
Page 28
Guidelines
032299.53.04_1204_B830_EN
Fabric/Thread Needle size
Fine fabrics:
Fine thread (darning thread,
embroidery thread) 70–75
Medium weight fabrics:
Normal thread 80–90
Heavy weight fabrics: 100, 110, 120
130/705 H - S / 70
130 Shank length
705 Flat shank
H Needle scarf
S Needle point (here e.g. medium ball point)
Needle
70 Needle size (shank diameter)
27
Page 29
Overview
032299.53.04_1204_B830_EN
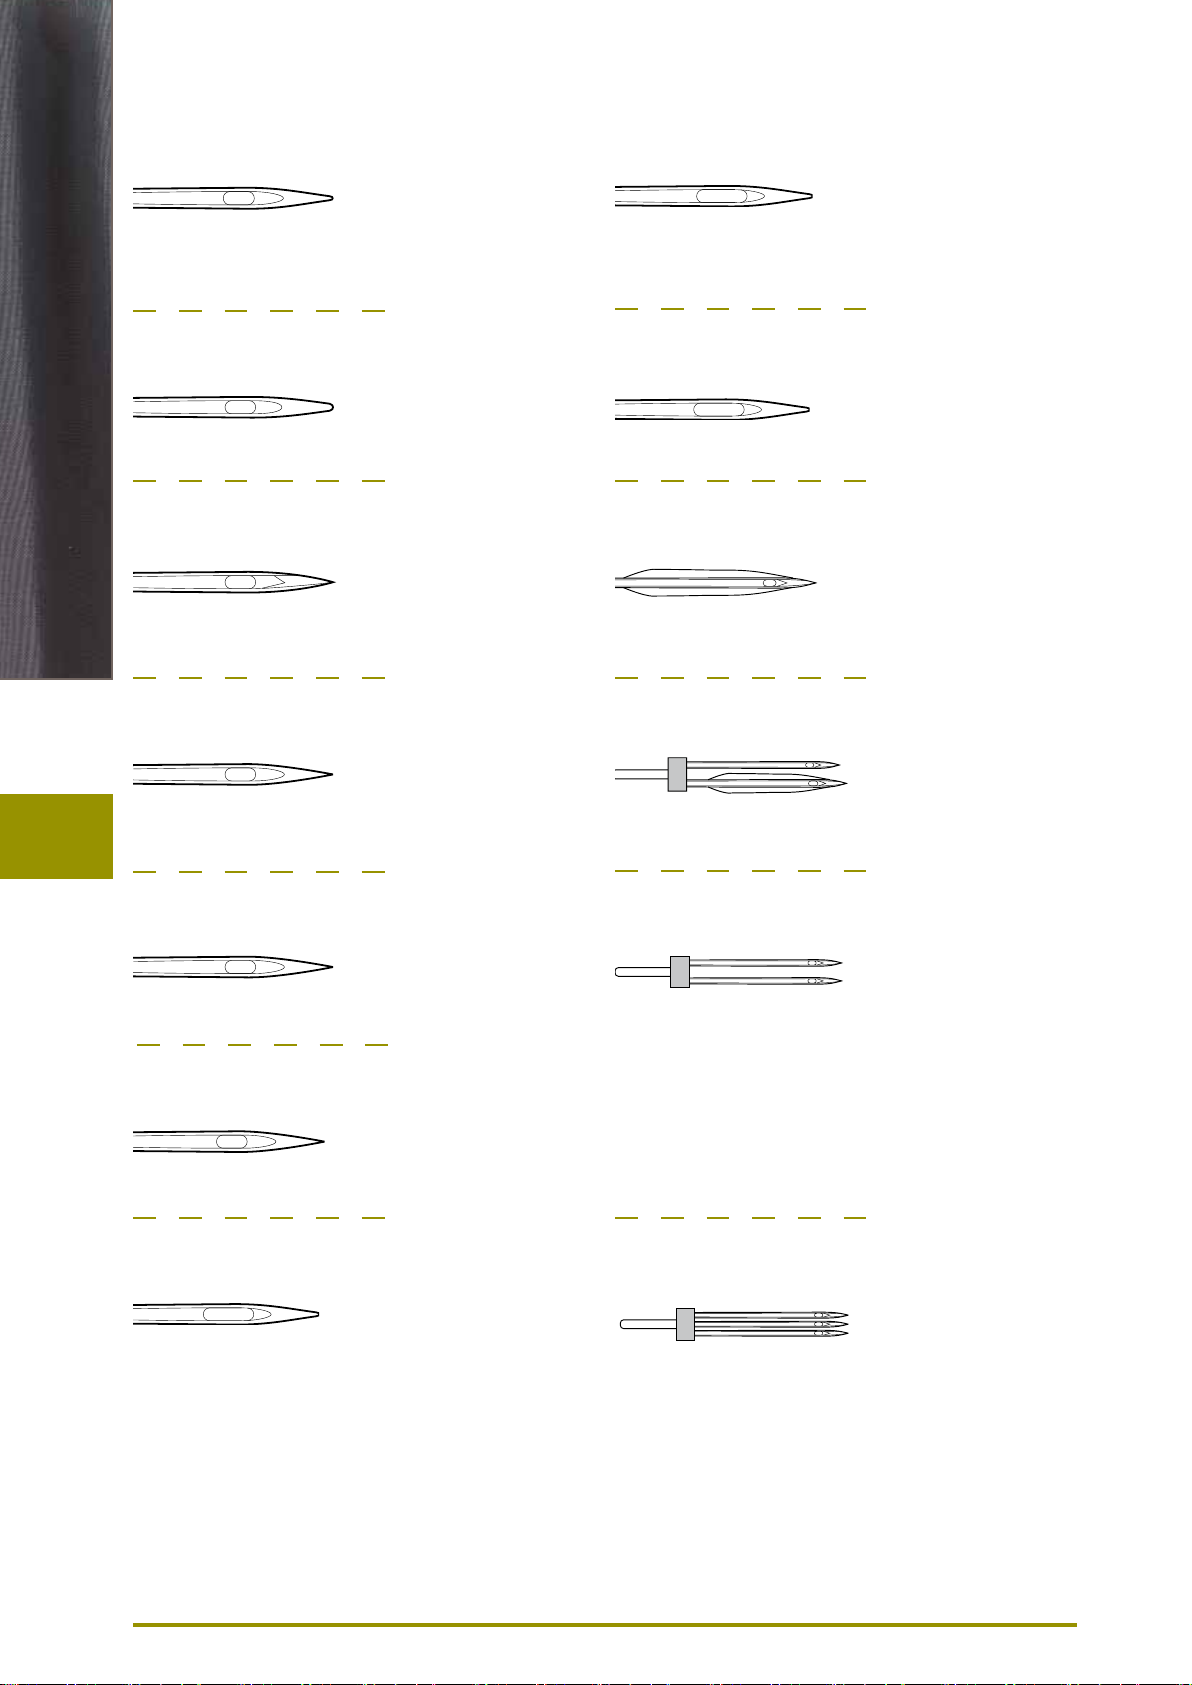
Needle
Universal
130/705 H/60 –100
Normal point,
slightly rounded
For nearly all natural and synthetic
fabrics (woven and knitted)
Jersey/Stretch
130/705 H-S, H-SES, H-SUK/70–90
Ball point
Jersey, stretch fabrics
Leather
130/705 H-LL, H-LR/90–100
With cutting point
All types of leather, synthetic leather,
plastic, sheeting
Metafil
130/705 H-MET/75-90 or H-SUK/90-100
Large eye
Sewing with metallic threads
Cordonnet (Topstitching)
130/705 H-N/80–100
Small ball point, long eye
Topstitching with thick thread
Wing needle (hemstitch needle)
130/705 HO/100–120
Wide needle (wing)
Hemstitching
Jeans
130/705 H-J/80–110
Very fine sharp point
Heavy weight fabrics such as jeans,
canvas, overalls
Microtex
130/705 H-M/60–90
Especially fine sharp point
Micro fiber fabrics and silk
Quilting
130/705 H-Q/75–90
Fine sharp point
Straight and topstitching
Embroidery
130/705 H-SUK/70–90
Double wing needle
130/705 H-ZWI-HO/100
For special effects with hemstitch
embroidery
Double needle
130/705 H-ZWI/70–100
Needle distance: 1.0/1.6/2.0/
2.5/3.0/4.0/6.0/8.0
Visible hems in stretch fabrics, pin tucks,
decorative sewing
Triple needle
130/705 H-DRI/80
28
Large eye, slight ball point
Embroidery on all natural and synthetic
fabrics
Needle distance: 3.0
For decorative sewing
Page 30
Functions & Settings
032299.53.04_1204_B830_EN
Overview 30
Function Buttons 30
Display 32
Functions 34
Sewing 34
Setup Program 36
Entry Screen 36
Display 37
Wallpaper 37
Sewing 38
Securing stitches on/off 38
Embroidery 40
Adjusting Embroidery Settings 40
Fabric Thickness 40
Calibrating the Hoop 40
Screen Calibration 41
Monitoring 42
Information 43
Version 44
Service Data 44
Update 44
Cleaning the sewing/embroidery computer 45
Cleaning 45
Cleaning the needle threading mechanism 45
Lubricating the hook 45
Packing position 46
Calibrating buttonhole foot no. 3A 46
Reset/Delete User Data 47
Creative Consultant 49
General 49
Help Program 50
General 50
Stitch Pattern 50
Functions 50
Balance 51
Balance Description 51
Practical and Decorative Stitches 51
Corrections 51
Sideways Motion Stitches 51
BERNINA Dual Feed 52
Balance/Presser Foot Pressure 52
Presser Foot Pressure Settings 52
ECO 53
ECO Description 53
Tutorial 48
Overview of Topics 48
Page 31

Function Buttons
032299.53.04_1204_B830_EN
Overview
Start/Stop Button
► starts and stops the sewing computer when
operating it without foot control
► slightly raise the presser foot when turning or
moving the project while sewing - hover
position
Quick Reverse Button/Backstepping
► secures the seam beginning and end: sews in
reverse as long as the button is pressed
► used to program the buttonhole length
► used to program the darning length
► used to determine end of stitching in straight
stitch Securing stitch no. 5
► used for securing in Quilters Securing
Program no. 1324
► switching for accurate stitch-by-stitch back-
stepping (exact retracing of the last 200
needle penetrations)
Pattern End
► a stop symbol which appears during sewing
indicates that the function is activated
► sewing computer stops at the end of the active
single pattern or the active pattern of a
combination
Automatic Thread Cutter
► upper and lower threads are cut automatically
► 2-6 securing stitches can be programmed in
the setup program - these are sewn before the
thread is cut
When using metallic or cordonnet thread,
use the thread cutter on the head frame
only.
Automatic Needle Threader
► touch button = completes the threading
process and threads the needle
Double, triple and wing needles require
manual threading after the button has been
pressed.
Use the automatic needle threader for needle
sizes 70 - 120. Metallic threads, thick threads
like cordonnet and difficult to work with
threads should be threaded by hand.
The automatic threader mustn‘t be
activated with one of these presser feet
attached:
nos. 50, 55, 80, 85 and 86.
Needle Stop Up/Down
In the default setting the needle symbol is
displayed above the presser foot indicator.
► touch the button briefly:
‣ the needle is raised or lowered (as when
tapping the foot control with your heel)
► touch the button longer:
‣ the needle is lowered, the needle symbol is
displayed below
‣ the sewing computer stops with the needle
down
‣ this becomes your default setting
► touch the button longer again:
‣ the needle is raised, the needle symbol is
displayed above
‣ the sewing computer stops with the needle
up
30
Page 32

Overview
032299.53.04_1204_B830_EN
Presser Foot Position
► touch the button = the presser foot is lowered
and raised slightly again so the fabric can be
easily positioned. When sewing starts the foot
is lowered on to the material
► touch the button again = the presser foot is
raised and the Feed-dog is simultaneously
lowered
Automatic Securing Program
► touch the button before the sewing starts or
during sewing = single patterns are secured at
the end, with the selected number of stitches
programmed
► touch the button before starting a combination
= the first pattern is secured at the end, with
the number of stitches programmed
► touch the button while stitching a combination
= the active pattern is secured at the end, with
the number of stitches programmed
► the sewing computer stops automatically after
all securing variations
► the number and type of the securing stitches
can be programmed in the setup program
Slide Speed Control
► the motor speed is infinitely
variable with the slide
Altering Needle Positions
► touch left button – the needle
moves to the left
► touch right button – the needle
moves to the right
► quick change – hold the button
down
► total of 11 needle positions
(5 left, 5 right, 1 center)
Stitch Width/Length (Multifunction) Knobs
► to adjust stitch width or length
► to alter thread tension
► to alter presser foot pressure
► to adjust the sewing direction when
in «directional sewing»
► to adjust button size or the slit size
of the buttonhole
► to adjust the balance
31
Page 33

Display
032299.53.04_1204_B830_EN
Menu Selection
A
B
C
D
E
F
G
A Practical stitches
B Decorative stitches
C Alphabets
D Buttonholes
E Quilt stitches
F Personal Program
G History
Overview
H
I
J
K
L
M
N
H Setup Program
I Tutorial
J Creative Consultant
K Help
L ECO
M Embroidery/Sewing
mode
N clr - Delete
Stitch Display
O Stitch Pattern
selections
System Settings
O
32
Page 34

Selection
032299.53.04_1204_B830_EN
P Single/Combi mode
P
Q
Q Scroll up/down
Stitch Altering Area
R Display of the stitch
pattern selected
Overview
R
Functions
S Balance
T Thread tension
U Pressure foot
pressure
V Multi-Directional
sewing
W Securing function
X Pattern repeat
Y Security program
Z Lower Feed Dog
Za Stitch selection by
number
S T U V
Zb Time/Alarm
W X Y Z ZbZa
33
Page 35

Sewing
032299.53.04_1204_B830_EN
Active functions are highlighted in blue, inactive functions are gray.
The multifunction keys are switched off by keeping them pressed a few seconds.
Functions
Confirm Selection
► activate or confirm change/selection
Leave Active Screen
► close application
► return to the last active screen
Long stitch
► the sewing computer sews every second
stitch (max. stitch length 12mm)
► can be used for practical and decorative
stitches
► exception: buttonholes and sideways motion
stitches
Mirror Image (Up/Down)
► the sewing computer sews the selected stitch
pattern in vertical Mirror Image (up/down – determined by the sewing direction)
Mirror Image (Left/Right)
► the sewing computer sews the selected stitch
pattern in horizontally Mirror Image (left/right
– determined by the sewing direction)
Stitch Counter
► when the desired length is achieved (e.g. first
buttonhole bead or straight stitch), touch the
Quick Reverse Button
► the display changes to «auto» (for the
buttonhole, only after length of second bead is
determined by pressing the Quick Reverse
Button)
► the stitch pattern selected is temporarily
programmed
Pattern Extend 2-5x
► touch the icon one or more times, the
numbers 2-5 appear
► stitch integrity is maintained
► stitch pattern is extended
Pattern begin
► the needle moves to the beginning of a stitch
pattern or program
Buttonhole Length Direct Entry
► enter buttonhole length via stitch width or
stitch length knob. Number in mm
Pattern repeat 1-9x
► touch the icon several times, the numbers 1-9
appear
► number 1: the sewing computer stops at the
end of an individual stitch or stitch combina-
tion
► numbers 2-9: the sewing computer stops at
the end of a stitch or stitch combination after
the number of repeats selected
Moving single stitch patterns
► move single stitch patterns of combinations
horizontally, vertically or diagonally
Moving multiple stitch patterns
► move parts of stitch patterns combinations
horizontally, vertically or diagonally
Retrieve
► switches between the stitches combined
► active stitch is shown in color and can be
moved
Manual Buttonhole
► special screen appears
► sew manual buttonhole in 5 or 7 steps
(depending on buttonhole type)
Programming Buttonhole Length
► icon is automatically highlighted in blue when
a buttonhole is selected
► set the buttonhole length with the Quick
Reverse Button or directly program the length
displayed by pressing the icon
► function turns inactive after programming the
length
► if a new length is to be programmed, touch
icon again
Feed-dog position
► touch the icon «lower feed-dog» = feed-dog is
lowered
► the lowered feed-dog is shown by the red,
flashing symbol
Buttonhole Slit Width
► set the buttonhole slit width to between 0.1mm
and 2.0mm using the Stitch Width or the Stitch
Length Knob
► the standard width is 0.6mm
Securing
► touch icon before sewing starts = single
pattern is secured at the start with 4 securing
stitches
► touch icon during sewing individual stitches =
individual stitches will be secured at the end,
the sewing computer stops
► program the function within a pattern combina-
tion = each individual pattern of the combination can be secured at the start or the end
Multi-function button
► only active in combination mode
► when selected, a screen with further functions
appears
Lettering size in alphabets
► when alphabet is selected, the lettering size is
9mm
► when the function is selected, «2» is activated
and the alphabet is sewn with 6mm lettering
size
34
Page 36

Lettering size in monograms
032299.53.04_1204_B830_EN
► when monogram is selected, the lettering size
is 30mm
► touch the icon several times
► the blue area shows the lettering size:
1 = 30mm (standard)
2 = 20mm
3 = 15mm
Thread tension
► change upper thread tension
► the respective value is visible in the icon
Presser foot pressure
► increase or decrease the presser foot pressure
using the multifunction knobs
► the respective value is visible in the icon
Connecting Stitches
► opens the screen to add connecting stitches
Combination subdivider (1)
► each combination or memory folder can be
subdivided into several parts
► only those parts where the cursor is located
will be sewn
► to sew another part, the cursor must be
placed in this part
Combination subdivider (2)
► each combination can be subdivided as
desired
► after stopping, the needle moves to the next
part to be sewn
Presser foot indicator
► number of presser foot recommended is
shown for the stitch pattern selected
► if the presser foot is raised it is indicated with
an animation
► touch the icon
► screen is opened with further presser foot
options
Back Stepping
► the last 200 needle penetrations of a stitch
pattern are retraced, i.e. sewn backwards
(see p. 80 on how to select the function)
Save
► save stitch pattern combinations and lettering
Delete
► e.g. single stitch pattern, pattern combina-
tions, memory bank contents, stitch pattern in
personal program etc.
Balance
► balance forward and reverse stitches
► balance sideways motion stitches
► balance dual feed
Stitch selection by numbers
► select individual stitch pattern by inputting the
stitch pattern number
Time/Alarm
► set the current time (hh:mm) in the upper part
of the screen using the «+» and «-» icons
► touch the alarm button in the lower part of the
display
► set the alarm time using the «+» and «-» or
the multifunction knobs. A personal message
can be input using the keyboard
► the current time now appears in red numbers
Multi-Directional Sewing
► use the stitch width knob to rotate the stitch
pattern or combination in 0.5° steps, the stitch
length knob for 1° steps or the direct-selection
buttons for rotating in 45° steps into the
desired direction
► the sewing direction is shown in the left part of
the display
► the start is marked with a green dot and the
end with a red cross
► the function only appears if the selected stitch
can be sewn in multiple directions
Test-sew first on a piece of the fabric you
intend to use for the sewing project.
Security Program
► when selecting the respective needle icon the
stitch width will be limited automatically
► this prevents the inserted special needle
(double needle etc.) from hitting the presser
foot or stitch plate = avoiding needle breakage
► the numbers on the needles represent the
distance in mm between the needles
► by selecting the standard needle icon the
standard needle is active again and the stitch
width limitation is switched off
► by selecting the corresponding stitch plate the
stitch width is automatically limited, so the
inserted standard needle cannot hit the stitch
plate
► the function remains active even when the
sewing computer is turned off and on
Functions
Permanent reverse sewing
Upper/Lower Case
File Drawers
► the sewing computer sews backwards
permanently (see p. 80 on how to select the
function)
► switch from upper case to lower case lettering
► saved stitches are visible
Single Mode
► the Single Mode is always active (blue) when
turning on the sewing computer and only the
selected stitch can be sewn
Combi Mode
► touch the button
► the Combi Mode is active (blue) and stitch
combinations can be programmed
35
Page 37

Entry Screen
032299.53.04_1204_B830_EN
The Setup Program enables you to personalize the touch screen according to your own
requirements and preferences.
After setting the sewing computer to your personal requirements, all changes made in the
Setup Program are saved, even when the sewing computer is switched off. Exceptions
from this rule are outlined within the description of the function concerned in each case.
Setup Program
1
4
7
2
5
8
3
6
9
Selection Menu
1 Display (screen) settings
2 Sewing settings
3 Embroidery settings
4 Display (screen) calibration
5 Monitoring settings
6 Information
7 Update sewing computer
8 Cleaning the sewing/embroidery computer
9 Reset basic settings
36
Customized alterations are saved even
when the sewing computer is switched off.
Alterations can be re-programmed at
any time.
The System Settings can be changed using
the stitch width and stitch length knobs and
the «+/-» icons.
«Reset» button resets to the basic System
Settings.
Page 38

Display
032299.53.04_1204_B830_EN
2
Brightness
1
► turn stitch width knob or touch the «+» or «-» icon the
brightness 1 of the screen is altered
► alterations are indicated by the number in the bar and
the blue background of the «+» or «-» icons
► the basic settings are indicated by a dark bar
3
4
Sewing Light
► when icon 2 is active, the sewing light is on
► when the icon is inactive, the sewing light is off
► the brightness can be set with the stitch length knob or
the «+» or «-» icon
Welcome Text
► create or change Welcome Text 3
► space bar is at the bottom of the letter keys
► welcome text 4 appears in the text icon above the letter
keys
► touch the text icon = text entered is completely deleted
► text entered is deleted from right to left
► «ABC» all in upper case (standard)
► «abc» all in lower case
► «1,2,3» numbers and mathematical
character
► «Ä À Á», «ä à á» and
«@ #» upper and lower special characters
Setup Program
Wallpaper
Select desired screen wallpaper.
► choose from different images
► default image = edelweiss
37
Page 39

Sewing
032299.53.04_1204_B830_EN
Motor Speed
1
2
► alter maximum sewing speed 1
► the number in the bar is the stitches per minute; the
basic value is indicated by a dark bar
Setup Program
3
The tension alteration affects all stitches and
stitch patterns and is saved even when the
sewing-/embroidery computer is switched off.
4
5 6
Thread Tension
► alter the basic setting (0) of the upper thread tension 2
by plus or minus 20%
0 = basic settings
Securing stitches on/off
► function 3 is active = standard
► if the automatic thread cutter is used to cut the threads,
4 securing stitches will be stitched when resuming
sewing
► function is inactive = no securing stitches will be stitched
Automatic Securing Program
► the number and type of the securing stitches can be
programmed
► standard = four securing stitches in the same place
► select function 4 for forward securing stitches
► 3-6 securing stitches can be programmed
38
Automatic Thread Cutter
► if function 5 is activated, the upper and lower thread are
automatically cut after sewing
Raise Presser Foot
► if function is activated 6 the presser foot is raised after
securing
► if function is not activated, the presser foot stays down
Page 40

Needle Stop Adjustment
032299.53.04_1204_B830_EN
► if the automatic thread cutter and the «raise presser
foot» function are switched off when securing, the
7
needle stop position 7 can be selected
► standard = sewing computer stops with the needle up
while the presser foot stays down after securing
► touch «Needle down» icon
► the sewing computer stops with the needle down after
securing
Automatic Thread Cutter and Securing
Stitches
► the number and type of securing stitches before the
thread is cut can be programmed
► touch function 8 for securing stitches in place or function
9 for forward securing stitches
► two to six securing stitches can be programmed
► standard = no securing stitches programmed
8
9
Setup Program
1 2 3
4
Presser foot position when needle stop
down
► with activated icon 1, the presser foot remains down
when the sewing computer stops
► with activated icon 2, the presser foot is raised enough
to pivot the fabric (hover position)
► with activated icon 3, the presser foot is raised into its
highest position
Hover position of presser foot
► the stitch width and stitch length multi-function knobs
can be used to set the clearance from 0mm to 7mm in
maximum (standard clearance is 2 mm)
► the set value, i.e. the clearance between the fabric and
the presser foot, is displayed in icon 4
39
Page 41

Embroidery
032299.53.04_1204_B830_EN
Setup Program
Adjusting Embroidery Settings
► the motor speed and thread tension can be adjusted the
same way as in sewing mode, and the automatic thread
cutter activated or deactivated (will cut the threads at
color changes if activated)
1
2 3
Fabric Thickness
► if the fabric 1 is more than 4mm thick, e.g. toweling,
select the 7.5mm or 10mm icon
► this ensures that the embroidery hoop is only moved
when the needle is no longer in the material
Thread-Cutting After Start of Embroidering
► with active field 2, the embroidery computer will stop
after approx. 7 stitches and the thread ends can be cut
► with inactive field, the embroidery computer won‘t stop
Securing Stitches
► function 3 is active = standard securing
► i.e. selecting a embroidery motif, threading or cutting the
threads using the automatic thread cutter will trigger the
stitching of 3 securing stitches
► function is inactive = no securing stitches will be
stitched, i.e. the lower thread must be taken up either
manually (handwheel) or by «back heel kicking» the foot
control. The threads must be held when starting to
embroider
To calibrate the hoop, select «Next Page».
Calibrating the Hoop
«Adjust Reference Position» calibrates the needle to the
center of the hoop.
Adjustments can only be done if the embroidery module is
attached.
40
► select the required hoop and follow the instructions on
the screen
Page 42

Screen Calibration
032299.53.04_1204_B830_EN
► place embroidery template into the embroidery hoop
► the hoop position is detected and the needle positioned
in the center
► if the needle is not positioned exactly in the center of the
embroidery template, use the arrow icons to position it
accurately
► touch until the selection menu appears
► the adjustment is saved
The calibration screen can also be opened
this way:
► switch sewing-/embroidery computer off
(to «0»)
► touch the two needle positioning buttons
on the front panel and keep them pressed
► switch sewing-/embroidery computer on
(to «I») and as soon as the calibration
screen is opened, release the two buttons
Setup Program
► touch the calibration icon
► another screen appears
► with touch pen touch the center of the cross. The cross
moves to the next position
► repeat this until all three positions shown are calibrated
► touch
to save settings
41
Page 43

Monitoring
032299.53.04_1204_B830_EN
Setup Program
Audio System
► sounds can be activated or deactivated 1
2
1
Selecting Stitch Pattern/Function/BSR
► stitch patterns and function selection 2 can be confirmed
acoustically
► touch the speaker icon until you hear the desired sound
► there are six different sounds to choose from
► this icon is blue and the sound is indicated by a number
(1-6)
► the sounds for functions (center) and the sound for
quilting with BSR (bottom) can be activated or deactiva-
ted in the same way
► deactivation is the last option shown when scrolling
through the different sounds
Monitoring Functions
The following monitoring functions can be activated or
deactivated:
Upper thread indicator
Lower thread indicator
Optimum interlocking of upper and lower thread
Sewing without thread
► blue with open eye = function active
► gray with closed eye = function inactive
► the sound type for the monitoring functions is set in the
audio settings for function
Sewing without thread
► don‘t thread the sewing computer with upper thread
(or remove it entirely)
► press the large field on the left
► sewing without thread is activated
► the other three monitoring functions are deactivated and
disappear
► the automatic thread cutter is deactivated
► selecting another presser foot or switching the sewing
computer off deactivates the function
42
Page 44

Information
032299.53.04_1204_B830_EN
Needle Chart
► select the needle inserted
► when the sewing computer is switched on, the needle
selected will be displayed
► touch the arrow icon to scroll through to the needle
types
Setup Program
Language
► scroll through the languages by touching the arrow
icons and select the language required
Dealer Details
► by pressing the respective gray bar the following
information about your BERNINA dealer can be entered:
‣ store name
‣ last name, first name
‣ telephone number
‣ website or e-mail address
43
Page 45

Setup Program
032299.53.04_1204_B830_EN
Version
► the current versions of the sewing computer and the
embroidery module (must be connected to the sewing
computer) can be seen
► the total number of stitches and the number of stitches
sewn since the last servicing by the BERNINA dealer
are displayed
Service Data
Service data of the actual condition of your sewing
computer can be saved on a USB stick and sent to your
authorized BERNINA dealer:
► insert the USB stick into your sewing-/embroidery
computer
► touch «LOG»
► after the data is saved remove the USB stick
Update
Updating
► insert BERNINA USB stick with the new software
version
► touch «Update»
► touch «Update» again to start the process
► it is then determined if:
‣ a BERNINA USB stick is inserted
‣ there is enough free space available (at least 10 MB)
‣ the correct software version is on the stick
► the data and settings are accepted
► if the update was successful, a message appears and
the sewing computer is ready to sew again
► if the update cannot be started or if there are problems
during the update process, an error message appears
Do not remove the BERNINA USB stick
until there is a message which indicates
the end of the update.
44
Page 46

Cleaning the sewing/embroidery computer
032299.53.04_1204_B830_EN
Cleaning
► clean the sewing-/embroidery computer according to the
instructions
► touch field 1
► the thread catcher of the automatic thread cutter moves
to the right
► carefully remove any thread remnants with the tweezers
► touch field 3
► the automatic thread cutter is re-initialized and then
ready for operation
Setup Program
Cleaning the needle threading
mechanism
► clean the needle threading mechanism according to the
instructions and animation
Lubricating the hook
► lubricating the hook according to the instructions and
animation
45
Page 47

Setup Program
032299.53.04_1204_B830_EN
Packing position
Do not move the embroidery arm of the embroidery module
by hand. Follow the on-screen instructions to fit the
embroidery module back into its original packaging.
Calibrating buttonhole foot no. 3A
► attach buttonhole foot no. 3A
► press the Start-/Stop button (green) on the head frame
► the buttonhole foot will move forward and backward
► buttonhole foot will calibrate and sewing computer will
indicate that the calibration has been successful
► the buttonhole foot is now set for this particular sewing
computer, and should only be used with this one
46
Page 48

Reset/Delete User Data
032299.53.04_1204_B830_EN
Choose from the following options by pressing the Reset
button:
1
2
A B C
1 Reset Settings
2 Delete User Data
Setup Program
Reset Settings
Choose from the following options by pressing bar 1:
A Reset Sewing
B Reset Embroidery
C Reset All
► touch the bar whose settings are to be returned to the
basic settings
► confirm with
► the previous screen appears
► touch until the selection menu appears
Delete User Data
Choose from the following options by pressing bar 2:
D
E
F
1
2
D Sewing «Personal Program»
E Embroidery «My Designs»
F Embroidery «Memory Stick» (the Memory Stick
must be inserted in the sewing computer)
► touch the bar that the settings are to be deleted
► confirm with
► the data is deleted and the previous screen appears
► touch
until the selection menu appears
47
Page 49

Overview of Topics
032299.53.04_1204_B830_EN
The Tutorial provides information and explanations about the different areas of sewing
and embroidering.
1
2
3
4
5
Tutorial
1 Threading
2 Needles
3 Presser foot
4 BERNINA Stitch Regulator (BSR)
5 Troubleshooting
6
6 Freehand system FHS
7 Miscellaneous
8 Embroidery
9 Buttonholes
10 Quilting
11 Techniques
11
10
9
8
7
► select desired topic, e.g. presser foot
► topic overview about the presser foot appears
► select desired topic, e.g. changing the presser foot
► information on the desired topic is shown
► use the stitch width or stitch length knob, the finger or the
touchscreen pen to scroll through the text in the screen
► animations can be stopped or replayed by touching the
icon in the bottom right corner
► touch the animation with your finger or the touchscreen
pen and travel to the right or left
► the playing of the animation is controlled manually now
► touch the animation again to switch back to automatic
playing mode
48
► use these two icons to go to the previous or next page
► touch to close the Tutorial screen
► the last active screen appears
Page 50

General
032299.53.04_1204_B830_EN
The Creative Consultant provides information and help with various sewing techniques.
After selecting the fabric and the desired sewing technique suggestions for suitable
needles, presser feet etc. are displayed.
Presser foot pressure and upper thread tension are set automatically.
Fabric Types
► the most commonly used fabric types are listed in three
categories
► select the desired fabric type e.g. Silk
► if the material used is not shown, select a similar fabric
Overview of Sewing Techniques
► the possible sewing techniques appear on selecting a
fabric type
‣ Seams
‣ Overcasting
‣ Blindhem
‣ Buttonholes
‣ Zippers
‣ Decorative stitching
‣ Machine quilting
‣ Free-motion stitching
‣ Appliqué
► select the desired sewing technique, e.g. buttonhole
► if the desired technique cannot be found on this list,
select a related technique
Creative Consultant
Recommendations
► recommendations for the fabric selected and the desired
technique are shown
► links to the respective topics in the Tutorial are
displayed
► additional information regarding engaging links for more
information
► select buttonhole link
► information on buttonholes appears
► use the stitch width or stitch length knob to scroll within
the text
► the Creative Consultant home screen is displayed
► select to display the screen containing the
suggested stitch pattern
► select to close the Creative Consultant screen
► the last active screen appears
49
Page 51

General
032299.53.04_1204_B830_EN
The Help Program contains information about individual stitch patterns and
functions in the screen. No matter which screen is displayed, the help feature for
stitches and functions of the screen can be opened.
► touch the «?» icon
► select the desired stitch pattern or the desired function
Stitch Pattern
This screen displays the following information:
► name of the stitch pattern
► suitable materials
► main areas of application
Help Program
Functions
This screen displays the following information:
► function name
► function explanation
► main areas of application
► select to close the Help screen
► the last active screen appears
50
Page 52

Balance Description
032299.53.04_1204_B830_EN
The sewing computer is tested and optimally set before it leaves the factory. Different
fabrics, threads, stabilizers and interfacings can affect programmed stitches so that they
are not sewn out properly.
These effects can be corrected with the electronic Balance so that the stitch formation
can be adjusted where necessary to suit the fabric.
Practical and Decorative Stitches
► in the left portion of the screen the stitch pattern is
displayed in its original form (as programmed)
► in the right portion of the screen the alterations made
are directly visible
► the corrections can be made while sewing (with opened
screen)
Corrections
► the stitch sewn on the fabric (e.g. the Honeycomb stitch)
opens up and it does not look correct:
‣ turn the stitch length knob until the stitch in the right
portion of the screen is identical with the stitch on the
fabric
Balance
Sideways Motion Stitches
► in the left portion of the screen the stitch is displayed in
its original form
► in the right portion of the screen the alterations made
are directly visible
► the corrections can be made while sewing (with opened
screen)
The stitch sewn on the fabric (e.g. stitch no. 809) is
vertically and horizontally distorted.
Vertical Corrections
► turn the stitch length knob until the stitch on the right
portion of the screen is identical with the stitch on the
fabric
Horizontal Corrections
► turn the stitch width knob until the stitch on the right
portion of the screen is identical with the stitch on the
fabric
51
Page 53

Presser Foot Pressure Settings
032299.53.04_1204_B830_EN
Balance/Presser Foot Pressure
BERNINA Dual Feed
► standard = the fabric is evenly fed by the dual feed and
the feed-dog together
Top layer of fabric is fed too slowly = «becomes» longer
compared to the bottom layer
► turn the stitch width or stitch length knob clockwise to
speed up the feeding of the top layer of fabric – evening
out the feeding speed difference between the two layers
Top layer of fabric is fed too quickly = «becomes» shorter
compared to the bottom layer
► turn the stitch width or stitch length knob counterclock-
wise to slacken the feeding speed of the top layer of
fabric – evening out the feeding speed difference
between the two layers
► changes made to the selected pattern or the dual feed
are deleted
► select to save the changes and close the screen
► select to close the screen; the original settings are
kept
Adjusting the Pressure
► the presser foot pressure scale appears on touching the
«Presser Foot Pressure» icon
► turning the stitch width or stitch length knob to the left or
the right decreases or increases the presser foot
pressure
52
► with thick or multilayered fabric (e.g. when quilting) turn
one of the multifunction knobs to the left to decrease the
pressure (minus value)
► the presser foot is slightly raised, making it easier to
move the fabric
► touch
► touch «Reset» to reset to the basic setting
to save the setting
Page 54

ECO Description
032299.53.04_1204_B830_EN
When work is interrupted for longer periods, the sewing-/embroidery computer can be put
into energy-saving mode.
► touch the button
► screen goes dark
► power consumption is reduced and the sewing light
turned off
► this mode also acts as a child safety feature
► nothing can be selected on screen (buttons are locked),
and the sewing-/embroidery computer cannot be started
► touch button again = sewing-/embroidery computer is
ready for use
ECO
53
Page 55

54
032299.53.04_1204_B830_EN
Page 56

Main Stitch Categories
032299.53.04_1204_B830_EN
Stitch Patterns 56
Selection 56
via Screen 56
by Stitch Number 56
Selecting a Presser Foot 56
Customizing Stitch Patterns 57
Altering Stitch Width and Stitch Length 57
Altering Needle Position 57
Securing with Quick Reverse Button on Head Frame 57
Temporary Altered Stitch Memory 57
For All Stitch Types and Materials 57
Resetting to the Factory Setting 57
Practical Stitches 58
Practical Stitches Description 58
Decorative Stitches 60
Decorative Stitches Description 60
Tapering 61
Setting 61
Combining with Functions 62
Mirroring Decorative Stitches 62
Long Stitch Function 62
Pattern Extend 62
Pattern Extend with Long Stitch 63
Double, Triple or Wing Needle 63
Automatic 72
Direct Entry Length 72
Button Measurement 72
Programming 73
Automatic Buttonhole 73
Standard and Stretch Buttonhole 73
Round and keyhole buttonholes 73
Hand-look buttonhole 74
Stitch Counter Buttonhole 74
All Buttonhole Types 74
In Long-Term Memory 75
Button Sew-On Program 75
Eyelet Program 76
Sewing Eyelets 76
Punching Eyelets 76
Quilt Stitches 77
Quilt Stitches Description 77
Personal Program 78
Creating a Customized Stitch Menu 78
Preparing Stitch Patterns 78
Personal Screen 78
Altering Stitch Patterns 79
Combi Mode 64
Combining Practical and Decorative Stitches 64
Alphabets 65
Alphabets Description 65
Lettering 65
Perfect Stitch Formation 65
Combining Lettering 66
Alphabets 66
Correcting Combinations 66
Combining Lettering and Functions 67
Select Lower Case 67
Change Size 67
Monograms 68
Monogram Sizes 68
Balance 68
Buttonholes 69
Buttonholes Description 69
Combining with Functions 70
Manual 5- or 7-Step Buttonhole 70
Balance 71
Deleting Stitch Patterns 80
Special Screen 80
History 81
History Description 81
Long Term Memory 82
Long Term Memory Description 82
Creating Stitch Combinations 82
Programming and Saving 82
Deleting Stitch Patterns 83
Deleting patterns in steps 83
Deleting a Combination 83
Opening Empty File Drawers 83
Drawer Content at a Glance 84
Opening a Saved Stitch Combination 84
Correcting a Stitch Combination 85
Inserting Stitch Patterns 85
Altering a Stitch Combination 85
Mirroring Entire Combinations 85
Combination Subdivider 1 86
Combination Subdivider 2 86
Connecting Stitches 86
Deleting a Stitch Combination 87
Overwriting 87
Deleting 87
Page 57

Selection
032299.53.04_1204_B830_EN
via Screen
by Stitch Number
Stitch Patterns
H
2 3
► select from main categories A - G
A Practical stitches
B Decorative stitches
C Alphabets
D Buttonholes
A
E Quilt stitches
F Personal Program
B
G History
C
I
J
► the available stitch patterns appear in display section H
► select desired stitch pattern
D
► scroll I to view all other stitch patterns of the category
E
F
G
Input
► select stitch pattern by entering the number after
touching the icon J
► number keys 1 appear in display section H
► the selected stitch number appears 2
► 3 to delete the previously entered number
► the entire number is deleted if you touch 2
► confirm entry 4
Selecting a Presser Foot
1
4 5
Cancel
► back to the previous screen without selecting stitch
pattern 5
An invalid stitch number will be indicated in
bar 2 with 3 question marks.
► any selected stitch pattern appears together with the
optimum presser foot in the stitch altering area
► attach the recommended presser foot
► touch the «Presser Foot Selection» icon top left in the
screen
► in the opened presser foot category, select the icon that
shows the attached presser foot, and confirm . As an
alternative, attach one of the options shown in the lower
portion of the screen, select the respective presser foot
icon and confirm
► the attached presser foot appears in the «Presser Foot
Selection» icon
► depending on the presser foot attached, the presser
foot category may change
56
It is IMPORTANT to select the attached
presser foot in the respective presser foot
category to enable the sewing computer
to recognize it and to activate the respective safety settings.
Page 58

Customizing Stitch Patterns
032299.53.04_1204_B830_EN
A stitch pattern can be individually altered according to the fabric and the application.
The adjustments described here are applicable for all practical and many decorative
stitches.
Altering Stitch Width and Stitch Length
Altering Needle Position
► alter stitch width and stitch length using the knobs
► stitch width and stitch length can be altered while
sewing
► touch the relevant button to move the needle position.
To move quickly hold the button down
► 11 needle positions in total (5 left, 5 right, 1 center)
► can be altered while sewing
Stitch Patterns
Securing with Quick Reverse Button on Head Frame
► secures the beginning and end of the seam
► touch the Quick Reverse button = sewing computer
sews in reverse (backstepping)
► release the Quick Reverse button = sewing computer
sews forwards
Temporary Altered Stitch Memory
For All Stitch Types and Materials
► altered stitch length, stitch width and needle position are
automatically saved as well as functions like mirror
image
► sew an altered stitch (e.g. zigzag stitch)
► select another stitch and sew (e.g. straight stitch)
► when retrieving the individually altered zigzag stitch, the
alterations are retained
► the temporary altered stitch memory can contain any
number of stitch patterns
The altered stitch memory can hold as many
stitch alterations as needed:
► Stitch length
► Stitch width
► Needle position
► Pattern extend
► Mirror images
► Long stitch function
► Thread tension
► Balance
► Pattern repeat 1 - 9x
Resetting to the Factory Setting
► option 1: touch «clr» button
► option 2: restore stitch width and stitch length by
touching the stitch width/stitch length bar (or manually
by turning the knob); reset other functions manually
► option 3: switch off sewing computer
57
Page 59

Practical Stitches Description
032299.53.04_1204_B830_EN
► touch the «Practical stitches» icon
► 15 practical stitches are visible in the display
► further practical stitches are visible by scrolling
Straight stitch
For non-elastic fabric; all straight stitch work,
such as seams, topstitching, sewing in a zipper
Zigzag
Zigzag work such as overcasting edges,
Practical Stitches
attaching elastic and lace
Vari-Overlock
For fine jerseys, stretch overlock seams, hems
and stretch seams
Running Stitch
Most types of fabric. Mending, patching,
reinforcing seams, sewing over decorative
threads
Securing Program
For all fabrics; secures the beginning and end of
seams by straight stitching
Double Overlock
For all types of knit; overlock stitch, finished
edge
Super Stretch Stitch
For highly elastic fabrics. Highly elastic open
seam for all types of clothing
Gathering Stitch
For most fabrics. Gathering with shirring elastic.
Butted seams (edge-to-edge) and decorative
stitches
Stretch Overlock
For medium weight knits, toweling and firm
wovens; overlock seam, flat joining seams
Jersey Stitch
For jersey fabrics; visible seams in lingerie,
sweaters; mending jerseys
58
Triple Straight Stitch
Reinforced seams in firm fabrics, visible hems
and seams
Triple Zig-Zag
Reinforced seams in firm fabrics, visible hems
and seams, couching, decorative stitching
Honeycomb Stitch
Most types of interlock and smooth fabrics,
visible seams, hems, linens and some types of
mending
Blindstitch
For most types of fabric; blind hems; shell
edging in soft jerseys and fine fabrics; decorative seams
Universal Stitch
For firmer fabrics such as felt and leather; flat
joining seam, visible seam, attaching elastic,
decorative seam
Sewn-out Zig-Zag
Oversewing woven fabrics, reinforcing edges,
decorative seam
Lycra Stitch
For lycra fabrics, flat joining seams, hems,
reinforcing seams on underwear
Stretch Stitch
For highly elastic fabrics, open seam for
sportswear
Page 60

Reinforced Overlock
032299.53.04_1204_B830_EN
For medium-weight knit fabrics and jerseys,
overlock seam, flat joining seam
Blindstitch narrow
Blind hems on fine fabrics
Knit Overlock
For knit fabrics, machine and hand-made items,
overlock seam: sewing and finishing in one step
Basting Stitch
Basting seams, hems, etc. temporarily
Darning Program
Automatic darning of fine to medium weight
fabrics
Reinforced Darning Program
Automatic darning of firm fabrics
Bartack Program
Reinforcing pocket openings, belt loops etc.
Triple Straight Stitch with Long
Stitch
Reinforced seams in heavy fabrics, visible
seams and topstitching
Single Straight Stitch
As a connecting stitch between two individual
decorative stitch patterns. Typically used in
Combi-Mode
Three Single Straight Stitches
As a connecting stitch between two individual
decorative stitch patterns in a combination
Darning Stitch
Use for darning in conjunction with the
Permanent Reverse function
Practical Stitches
Bartack Program
Reinforcing pocket openings, belt loops,
securing zippers and seam ends
Large Fly Stitch
For medium to heavy weight fabrics; reinforcing
pocket openings, zippers and slits
Small fly stitch
For fine to medium weight fabrics; reinforcing
pocket openings, zippers and slits
59
Page 61

Decorative Stitches Description
032299.53.04_1204_B830_EN
Cat. 100 = Florals
Cat. 200 = Florals sideways
Decorative Stitches
motion
Cat. 300 = Cross stitches
Cat. 400 = Satin stitches
Cat. 500 = Satin stitches
Sideways motion
Cat. 600 = Ornamental stitches
Cat. 700 = Heirloom stitches
Cat. 800 = Heirloom stitches
Sideways motion
Cat. 900 = Novelty
Cat. 1000 = Novelty
Sideways motion
Cat. 1100 = Tassel stitches
Cat. 1200 = Filigree stitches
Sideways motions
Cat. 1400 = Tapering stitches
Cat. 1500 = Skyline stitches
► touch the «Decorative stitch» button
► an overview of the categories appears in the display
► touch a button and the desired category is activated
► select a stitch pattern
For sideways motion stitches the fabric is fed forwards and
backwards in addition to being fed sideways
► sideways motion stitch patterns are displayed together
with a «4-arrow» icon and the size in mm that appear in
the top left corner of the stitch altering area
Application
Depending on the type of the fabric, simple or more
complex decorative stitches should be selected to best suit
the fabric
► simple decorative stitches in straight stitch design
formation are particularly appropriate for light weight
materials (e.g. decorative stitch no. 101)
► simple to more complex decorative stitches - program-
med with triple straight stitch or with a few satin stitches
- are particularly suitable for medium weight fabrics (e.g.
decorative stitch no. 107)
► more complex decorative stitches - programmed with
satin stitches - are well suited to heavy weight fabrics
(e.g. decorative stitch no. 401)
Perfect Stitch Formation
► use the same thread weight for upper and
lower threads
► for a perfect stitch formation reinforce the
fabric piece on the wrong side using
stabilizer
► use an additional, water-soluble stabilizer
on the right side of pile or longfiber fabrics
(e.g. wool, velvet etc.) which can be easily
removed after sewing
60
Page 62

Tapering
032299.53.04_1204_B830_EN
Setting
► tapering is a technique in which the stitch patterns come
to a point at the beginning and end
► four different angles are pre-programmed; you can set
the angle yourself on the fifth page
► select stitch no. 1401
► the tapering screen appears
► the first segment (1) is active
► segment (1) and (3) have a programmed length; you
can set the length of section (2) yourself
Programming the Length of Section 2
► field is blue (active) when a tapering pattern is
selected
► sew the first section
► use the Quick Reverse button on the head
frame to set the length of section 2
► once the length is programmed, the field is
turned off (inactive, gray)
► after the second section is programmed, the
third section is automatically sewn and the
sewing computer stops
► to program a new length, reselect the field
Programming the Length of Section 2
by Entering mm
► touch the icon
► program the length with the stitch width or
stitch length knob
► sew the stitch pattern
► all three sections are automatically sewn and
the sewing computer stops
► to program a new length, reselect the field
Decorative Stitches
► use the top «+» and «-» buttons to move the tips of the
pattern from -1.00 (far left) to 1.00 (far right)
► standard setting = -1.00
► touch the active field in the center to place the tips in the
center of the pattern (0.00)
► use the bottom «+» and «-» buttons to set the angle of
the tips between 0.00° and 90.00°
► standard setting = 60.00°
► touch the active field in the center to set the angle to
45.00°
Manually Setting the Length of
Section 2
► touch the icon
► sew first section
► use the Quick Reverse button on the head
frame to set the length of section 2
► the third section is automatically sewn and the
sewing computer stops
► the length is not programmed, and must be
reset each time a new tapered pattern is
started
Selecting the Tapering Angle
► touch the symbols to select another angle
Closing the Tapering Screen
► touch the icon
► the tapering screen is closed and the tapering
patterns appear
61
Page 63

Combining with Functions
032299.53.04_1204_B830_EN
Mirroring Decorative Stitches
Long Stitch Function
Decorative Stitches
Amazing effects can be created by combining decorative stitches and functions.
► touch Mirror Image (left/right) function
► the stitch pattern is mirrored left/right
► touch Mirror Image (up/down) function
► the stitch pattern is mirrored in the sewing direction, up/
down
► touch both mirror functions simultaneously
► the stitch pattern is mirrored vertically and horizontally
► touch Long Stitch function
► the sewing computer sews every second stitch in the
stitch sequence
Pattern Extend
► touch the Pattern Extend function once or several
times
► the stitch pattern selected is extended (i.e. stretched)
2 – 5 times, while retaining the consistency of the stitch
► some stitch patterns have a limited extension capability
and cannot be extended 3 – 5 times
62
Page 64

Pattern Extend with Long Stitch
032299.53.04_1204_B830_EN
Double, Triple or Wing Needle
► touch Pattern extend function one or more times
► additionally touch the Long Stitch function
► after inserting the special needle, activate the needle
limitation in the Security Program
► when selecting the stitch pattern, the stitch width is
automatically limited to match the needle selected
► the best effects are achieved with simple stitch
patterns
Decorative Stitches
Security Program
► icon must be manually reset to deactivate
► security remains engaged after sewing
computer is turned off
63
Page 65

Combi Mode
032299.53.04_1204_B830_EN
► select Combi Mode
► Combi Mode is opened, allowing you to create pattern combinations
Combining Practical and Decorative Stitches
► select desired stitch
► the stitch appears in the Stitch Altering Area
► select next stitch
► continue in this manner until the desired combination is
complete
► correcting in a combination, see page 85
► saving a combination, see page 82
Most of the practical and decorative stitches
can be combined. With the exception of these
special programs:
Securing programs
► No. 5, No. 1324
Complete combination mirrored sideways
► touch the «Multifunction» icon
Decorative Stitches
► touch the «Mirror image (left/right)» icon,
and the entire combination is mirrored
sideways
Add the Securing function
There are various options for securing stitch
patterns automatically:
► touch securing function before starting to
sew = pattern combination is secured at the
beginning
► to program the securing function within a
pattern combination = the stitch patterns
are secured accordingly
Basting stitch
► No. 21
Darning programs
► No. 22, No. 23
Bartacks
► No. 24, No. 25
Fly stitches
► No. 26, No. 27
Stitch programs in the buttonhole
category:
► No. 51-63
Example of a Stitch Pattern Combination
► touch stitch pattern no. 407 once
► touch stitch pattern no. 607 once
► touch stitch pattern no. 446 once
► sew combination, the patterns alternate continuously
64
Example of a Stitch Pattern and Function
Combination
► touch stitch pattern no. 427 once
► touch stitch pattern no. 402 once and activate «left/right
Mirror Image» function
► sew the combination, the patterns alternate, original
and mirrored
Page 66

Alphabets Description
032299.53.04_1204_B830_EN
Lettering
► 10 different alphabets are available
‣ Block
‣ Double Block
‣ Script (Italics)
‣ Quilting Text
‣ Comic Sans
‣ Monograms 30/20/15mm
‣ Kyrillic
‣ Hiragana
‣ Katakana
‣ Kanji
► each of these alphabets can be sewn in two different
sizes and in lower case (except for monograms)
(except Kyrillic, Hiragana, Katakana and Kanji)
► all capital letters, numbers, punctuation marks and
special characters can be viewed using the arrow icons
Perfect Stitch Formation
Alphabets
► use the same thread color for upper and lower threads
► use stabilizer on the wrong side of the fabric to reinforce
sewing project
► use additional, water-soluble stabilizer on the right side
of pile or longfibre fabrics (e.g. wool, velvet etc.)
► for lightweight fabrics more simple lettering types are
suitable (programmed with straight stitches) such as
double block letters. For heavyweight fabrics letter types
with satin stitches can be used (such as monograms)
65
Page 67

Combining Lettering
032299.53.04_1204_B830_EN
Alphabets
Alphabets
► individual letters and rows of the same letter of the
same alphabet are sewn in Single Mode
► letters for names, addresses, words, etc. are combined
and sewn in Combi Mode
Combinig Letters
► open Combi Mode
► select desired letter
► letter appears in Stitch Altering Area and on bar above
Alphabet menu
► cursor is below the letter
► select next letter by touching required button
► second letter appears in Stitch Altering Area, etc.
Correcting Combinations
Inserting Letters
► a letter is always inserted above the cursor
► cursor must be scrolled up (arrow) to insert an additional
letter at the beginning of lettering
► activate desired place by selecting required letter in
Stitch Altering Area or scroll to it
► select new letter
► letter is inserted above cursor
Deleting Letters
► a letter is always deleted above the cursor
► activate desired place by selecting required letter in
Stitch Altering Area, or scroll to it
► touch «Delete»
► letter is deleted
► saving and deleting combinations see pages 82 – 87
66
Page 68

Combining Lettering and Functions
032299.53.04_1204_B830_EN
Select Lower Case
Change Size
► touch the «Upper Case/Lower Case» icon
► the lower case «a» is highlighted in black, the lower
case is activated
► touch the «Upper Case/Lower Case» icon again, the
capital «A» is in black
► upper case is activated again
► touch the «Alphabet Size» icon; number 2 is highlighted
blue
► the letter is reduced to approx. 6 mm
► touch «Alphabet Size» again; larger size is activated
again (number 1 is highlighted blue)
Alphabets
More functions are described in the chapter
«Combining Decorative Stitches with
Functions», pages 62 – 63.
Creating Combinations, see page 82.
67
Page 69

Monograms
032299.53.04_1204_B830_EN
Monogram Sizes
► the monograms are symbolized with four arrows and the
size in mm in the upper left corner in the Stitch Altering
Area
► the monograms are stitched in sideways motion
► start (green dot) and end (red cross) are visible in the
Stitch Altering Area
► lettering size 1 = 30mm
► at the start of the monogram program size 1 is activated
► monograms in size 1 are individual letters = the sewing
computer sews and stops automatically
Alphabets
Sideways-Motion Stitch Patterns, e.g.
Sewing Monograms
► use the slide-on table to increase the
sewing surface
► when sewing Sideways Motion stitches
make sure that the fabric is fed evenly and
lightly, ensuring that it cannot push against
or catch on anything
► it is important to let the sewing computer
sew, without pulling, pushing or holding
back the fabric
► use the presser foot no. 40C
► lettering size 2 = 20mm
► touch «Alphabet Size»; number 2 is highlighted
► monograms in size 2 are continuously sewn in a
horizontal line
► lettering size 3 = 15mm
► touch «Alphabet Size»; number 3 is blue
► monograms in size 3 are continuously sewn in a
horizontal line
Sewing a test sample with the threads,
the actual fabric and stabilizer you intend to
use is recommended.
Balance
68
► stitch patterns may differ from the original shape
depending on the fabric, stabilizer and thread quality
► with the Balance function it is possible to adjust the
stitch pattern to suit the fabric used
Page 70

Buttonholes Description
032299.53.04_1204_B830_EN
Buttonholes are practical closures which can also be used for decorative purposes.
All buttonholes can be sewn and programmed in different ways.
► touch the «Buttonhole» button
► an overview of the buttonholes and eyelets appears in
the display
► select the desired buttonhole
Standard Buttonhole
For light- to mediumweight fabrics: blouses,
dresses, bed linen, etc.
Narrow Buttonhole
For light- to medium weight fabrics: blouses,
dresses, children’s and baby clothes, crafts
Stretch Buttonhole
For all highly elastic jersey materials made from
cotton, wool, silk and synthetic fibers
Round Buttonhole with Normal
Bartack
For medium- to heavy weight fabrics of all types:
dresses, jackets, coats, rainwear
Round Buttonhole with Horizontal
Bartack
For medium- to heavy weight fabrics of all types:
dresses, jackets, coats, rainwear
Straight Stitch Buttonhole
Program for staystitching buttonholes, for pocket
openings, reinforcing buttonholes; especially for
buttonholes in leather and imitation leather
Button Sew-on Program
Sewing on buttons with 2 and 4 holes
Buttonholes
Eyelet with Small Zig-zag
Opening for cords and narrow ribbons/bands
and decorative work
Straight Stitch Eyelet
Opening for cords and narrow ribbons/bands
and decorative work
Keyhole Buttonhole with Normal
Bartack
For heavy weight, non-stretch fabrics:
jackets, coats, leisure wear
Keyhole Buttonhole with
Pointed Bartack
For firmer, non-stretch fabrics:
jackets, coats, leisure wear
Keyhole Buttonhole with
Horizontal Bartack
For firm, non-stretch fabrics:
jackets, coats, leisure wear
Heirloom Buttonhole
For light- to medium weight woven fabrics:
blouses, dresses, leisure wear, bed linen
69
Page 71

Combining with Functions
032299.53.04_1204_B830_EN
Manual 5- or 7-Step Buttonhole
► attach foot no. 3C
Buttonholes
► select desired buttonhole type
► touch the «man» icon = manual
Sewing 5-Step Buttonhole
► the length of the beads is determined manually while
sewing
► bartack, eye and securing stitches are pre-programmed
► individual steps can also be selected by pressing the
Quick Reverse button
► step «1» is activated for the beginning of the buttonhole
► at the beginning of sewing, step «2» is activated
► sew first bead
► stop sewing at the desired bead length
► touch «3»
► sewing computer sews the eye or the keyhole
► touch «4»
► sewing computer sews 2nd bead in reverse
► stop sewing at the first stitch
► touch «5»
► sewing computer sews the top bartack and secures
stitches automatically
Sewing 7-Step Buttonhole
► step «1» is activated for the beginning of the buttonhole
► at the beginning of sewing, step «2» is activated
► sew first bead
► stop sewing at the desired bead length
► touch «3»
► sewing computer sews straight stitches in reverse
► stop sewing computer at the 1st stitch of the first bead
► touch «4»
► the sewing computer sews top bartack and stops
automatically
► touch «5»
► sewing computer sews the second bead
► stop sewing
► touch «6»
► the sewing computer sews bottom bartack and stops
automatically
► touch «7»
► sewing computer secures stitches and stops automati-
cally
70
Leave Program
► touch or «man»
► screen reverts to original Buttonhole screen
Buttonhole Stitch Counter
► select buttonhole
► touch the «Stitch Counter» icon
► when the desired length is achieved
(first bead) press the Quick Reverse button
► after the length of the second bead has
manually been set using the Quick Reverse
button, the display changes to «auto»
► the selected buttonhole is programmed
► for making very large repeatable buttonholes
Buttonhole Slit Width
► select buttonhole
► touch «Buttonhole Slit Width» icon
► set the cutting space width using the stitch
width or stitch length knobs (0.1 - 2mm)
► larger slit width will result in narrower beads
Programming Buttonhole Length
► the icon is automatically highlighted in blue
(= active) when a buttonhole is selected
► buttonhole length can be set with the Quick
Reverse button or the length can be programmed directly by touching the icon
► if the buttonhole is programmed the icon is
inactive, gray
► if a new length is to be programmed, touch the
icon again
Page 72

Balance
032299.53.04_1204_B830_EN
Balance for Direct Entry Length Standard Buttonhole
► balance alterations have the same effect on both beads
Balance for Manual Keyhole or Round Buttonhole
Balance alterations affect the two beads differently:
If left bead too dense (picture A):
‣ turn the stitch length knob counterclockwise = left bead will be longer, right bead
gets shorter
If left bead not dense enough (picture B):
A
‣ turn stitch length knob clockwise = left bead will be shorter, right bead will be longer
‣ the keyhole or eye is balanced as follows:
If keyhole is distorted to the right (picture C):
‣ turn the stitch length knob clockwise
If keyhole is distorted to the left (picture D):
B
‣ turn the stitch length knob counterclockwise
Balance for Manual Standard Buttonhole
► balance alterations have the same effect on both beads
Balance for Direct Entry Length Keyhole or Round Buttonhole
► balance alterations have the same effect on both beads
► the keyhole or eye is balanced as follows:
► straight stitch until the sewing computer changes to the keyhole or eye, then stop
sewing
► touch the «Balance» icon and adjust the picture in the right portion of the Balance
screen with the stitch length knob to match the sewn buttonhole
C D
If keyhole is distorted to the right (picture C):
‣ turn stitch length knob counterclockwise
If keyhole is distorted to the left (picture D):
‣ turn stitch length knob clockwise
‣ touch and complete buttonhole
Balance for Stitch Counter Buttonhole
► balance alterations have a different effect on both beads (see picture for manual
buttonhole)
► re-program the buttonhole after each alteration in balance
In all Direct Entry length and manual buttonholes each individual buttonhole sequence
can be balanced separately.
In stitch counter buttonholes the balance
affects both beads differently (left and right):
when altering the bead the keyhole or eye
are automatically altered accordingly.
Buttonholes
Clear Balance
► touch the «Reset» icon in the special Balance screen or
press the «clr» button («clr» also deletes the programmed buttonhole!)
Recommendation
► sew a test buttonhole on a piece of the original fabric
71
Page 73

Automatic
032299.53.04_1204_B830_EN
Direct Entry Length
Entering Buttonhole Length or
Button Measuring
Buttonholes can be sewn to a specific length with the
Automatic Buttonhole Foot with Slide No. 3A. Buttonhole
length = cutting length in mm
► select type of buttonhole
► touch the «Direct Entry Length» function
Determining Buttonhole Length
► enter the buttonhole length using the multifunction
knobs (stitch width or stitch length knob)
► the length entered appears below the buttonhole
► the number above the button is the exact button size
► confirm the desired length with ; the screen changes
automatically
► «auto» and the programmed length in mm appear on
the screen
Back to Buttonhole Menu
► touch to return to the buttonhole menu; the original
settings remain
Buttonholes
Button Measurement
Determining Button Size
► the sewing computer calculates the length of the
buttonhole directly from the diameter of the button
► 2 mm are automatically entered for the button thickness
► hold the button against the left side of the screen
► using the multifunction knobs, place the vertical black
line flush on the right side of the button
► the button size in mm is visible above the button,
between two arrows (e.g. 14mm)
► remove the button from the screen
► confirm the correct size with the
automatically changes
icon, the screen
Corrections for Thick Buttons
► match buttonhole length to buttonhole thickness (raised
buttons, etc.) e.g. buttonhole length + 1cm (incl. 2mm) if
button height is 1cm
► allow the button to pass through the buttonhole easily
Important in the event of an Error in
Manipulation
► touch the «Pattern begin» icon
► the sewing computer sets the program to the start of the
buttonhole again
72
Deleting Saved Buttonholes
► press the «clr» button or touch «recording»
► «auto» disappears and «recording» appears
► a new buttonhole length can be programmed
Page 74

Programming
032299.53.04_1204_B830_EN
Automatic Buttonhole
Standard and Stretch Buttonhole
► the length of the buttonhole is automatically measured
with the buttonhole foot with slide no. 3A. The sewing
computer automatically switches to the next sewing
stage after reaching the maximum length
► for buttonholes of 4-31mm, depending on the buttonhole
type
Both beads are sewn in the same direction.
No. 51, 52, 53
Sewing First Bead
► the stitching sequence is displayed in the Stitch Altering
Area
► sew the first bead forwards and stop at the required
length
Buttonholes
Round and keyhole buttonholes
Programming the Buttonhole
► press the Quick Reverse button, continue sewing
► «auto» and the programmed length (in mm) appears in
the display = buttonhole length is programmed
Auto Buttonhole
The sewing computer sews automatically:
► straight stitches in reverse
► first bartack
► 2nd bead forwards
► 2nd bartack
► secures stitches, stops and automatically goes to the
beginning of the buttonhole
All additional buttonholes are now automatically sewn in
the same length in one step.
No. 54 - 58
Sewing Straight Stitches
► sew straight stitches forwards, stop at required length
Programming the Buttonhole
► programming is done as for the other buttonholes
Auto Buttonhole
The sewing computer sews automatically:
► round or eye part of buttonhole
► first bead in reverse
► straight stitch forwards
► second bead in reverse
► bartack
► secures stitches, stops and automatically goes to the
beginning of the buttonhole
73
Page 75

Hand-look buttonhole
032299.53.04_1204_B830_EN
Double sewn keyhole buttonholes
► keyhole buttonholes can be sewn twice on
thick fabrics – the first lap is stitched with a
longer stitch length than the second
Buttonholes
► do not move the fabric after sewing the first
buttonhole; just tap the foot control once to
sew buttonhole again
No. 63
Sewing the first bead
► sew first bead forwards, stop at required length
Programming the Buttonhole
► programming is done as for the other buttonholes
Auto Buttonhole
The sewing computer sews automatically:
► round part of buttonhole
► second bead in reverse
► bartack and securing stitches, stops and automatically
goes to the beginning of the buttonhole
Stitch Counter Buttonhole
► attach foot no. 3C
► the first bead (left) is sewn forwards, the
second bead (right) is sewn in reverse
► the stitch counter buttonhole cannot be
saved in the long term Memory
All Buttonhole Types
Sewing the first bead
► sew first bead forwards, stop at required length
► press the Quick Reverse button on head frame
Bartack, Second Bead in Reverse
► bottom bartack and second bead are sewn in reverse
► stop sewing computer at the first stitch
► press Quick Reverse button on head frame
Bartack, Securing Stitches
► the sewing computer sews the top bartack, secures
stitches and stops automatically
► «auto 1,2,3» appear on the screen
► the buttonhole is saved
Each subsequent buttonhole will be sewn identically.
74
Page 76

In Long-Term Memory
032299.53.04_1204_B830_EN
Long-term saving of buttonhole programs is only possible for buttonholes originally
stitched as «auto» length buttonholes.
Saving Buttonhole
► touch the displayed buttonhole in the Stitch Altering
Area
► touch the «Save» function – the buttonhole is saved in
the Long Term Memory
Recalling Saved Buttonhole
► select the desired buttonhole type
► the length of the buttonhole appears in the «Direct Entry
Length» icon
► «auto» and the length in mm appear on the screen
Changing Saved Buttonhole
► select the desired buttonhole type
► touch the «Direct Entry Length» icon
► alter the length of the saved buttonhole; confirm with
► save buttonhole as described above
► the new buttonhole length overrides the existing one
Buttonholes
Button Sew-On Program
Deleting Saved Buttonhole
► select desired buttonhole type
► touch the «Direct Entry Length» icon and program a
new length or touch the buttonhole displayed in the
Stitch Altering Area
► touch «Reset» = the saved buttonhole is deleted
► a new buttonhole length can be programmed
Sewing on a 2-Hole Button
► check the distance between the holes by turning the
handwheel and adjust the stitch width if necessary
► hold the threads when starting to sew
► sew on the button
► the sewing computer automatically stops when program
is completed and is immediately ready for the next
button
If the stitch width is reduced too sharply (gray
area), the sewing computer cannot be
started. An animation appears.
► attach foot no. 18
75
Page 77

Buttonholes
032299.53.04_1204_B830_EN
Sewing on a 4-Hole Button
► sew the front holes first
► carefully move the button forward
► sew the back holes with the same program
Start and End Threads
► the threads have already been secured and can be
trimmed
For Secure Results
► pull both lower threads until the ends of the upper
threads are visible on the wrong side (knot if required)
► trim threads
Sewing on Buttons
A real time-saver for projects where several
buttons of the same type must be sewn on
(e.g. blouse, bed linen etc.).
For work which is subject to heavy wear or
washing, sew buttons on using button sew-on
program twice.
Eyelet Program
2- and 4-hole-buttons can be attached. The
thread shank (distance between the button
and the fabric) can be set as required using
foot no 18. Buttons for decorative purposes
are just sewn on, without the thread shank.
► select desired eyelet:
► no. 61 = zig-zag eyelet
► no. 62 = straight stitch eyelet
Sewing Eyelets
► position fabric under the presser foot and sew
► the sewing computer stops automatically when finished
and is immediately ready for the next eyelet
Punching Eyelets
► use an awl or punch to cut open the eyelet
76
Page 78

Quilt Stitches Description
032299.53.04_1204_B830_EN
Various stitch patterns are available which are used especially in quilting, for patchwork or
for appliqué:
Quilters securing program
Quilting straight stitch
Piecing stitch/Straight stitch
Stippling stitch
Handlook quilt stitch
Feather Stitch Variations
1333 - 1338
Decorative quilt stitches
1339 - 1345, 1351
Quilt stitch/Handlook quilt stitch
variations
1347, 1348, 1350
Blanket stitch (dual)
Double blanket stitch (dual)
Quilt Stitches
Blanket stitch
Double blanket stitch
Blind stitch
Feather stitch
Satin stitch
77
Page 79

Creating a Customized Stitch Menu
032299.53.04_1204_B830_EN
Use the Personal Program to create a file with stitches you use most for a special
project.
The following alterations can be saved:
► Stitch width
► Stitch length
► Needle position
► Thread tension
► Mirror Image
Personal Program
► Pattern extend
► Long stitch
► Balance
► Pattern repeat 1–9x
Personal Screen
► the programmed stitch patterns are shown with pattern
numbers
► when more than 15 stitches are programmed, use arrow
to scroll for viewing additional stitches
► the programmed stitch patterns in this screen can be
altered in the usual way
If the memory has already been filled with
embroidery motifs and stitch pattern combinations, no further stitch patterns can be saved
in the Personal Program. The content in the
memory must first be deleted to ensure there
is sufficient free space.
Preparing Stitch Patterns
1
Programming of first Stitch Pattern
► select in the practical stitch screen, e.g. zigzag stitch
► make alterations
► touch the Stitch Altering Area 1 (light blue)
► the following screen appears
► touch the «Add» icon 2
2
78
Page 80

► a screen with four files appears
032299.53.04_1204_B830_EN
► select the file where the stitch pattern is to be saved,
e.g. 1
► each file can accommodate 100 stitch patterns in
maximum
3
Altering Stitch Patterns
1
4
► touch the flashing «Save» Icon 3
► the altered zigzag stitch is saved and the screen closes
► the file can be named by pressing the large gray icon 4
and the name can be typed in using the keyboard
provided
► touch the «Return» icon to return to the file summary
Personal Program
Selecting Stitch Pattern
► alter stitch width and stitch length using the knobs
► the alterations and the basic settings are visible
► touch the Stitch Altering Area (light blue) 1
► touch the «Save Settings» bar 2
► all alterations are saved; the special screen closes
2
79
Page 81

Deleting Stitch Patterns
032299.53.04_1204_B830_EN
Selecting Stitch Pattern
► touch the «Personal Program» icon
► the screen appears with the four files
► select the file where the stitch pattern is to be deleted,
e.g. 1
► touch the Stitch Altering Area (light blue)
► touch the «Add» icon (as for programming)
► the content of the file selected is shown
► select the stitch pattern to be deleted
► the stitch pattern is deleted; all the remaining patterns
are moved by one position
► close the screen with
Personal Program
Special Screen
1
2
3
4 5
1 All alterations (stitch lengths, stitch widths, etc.) of the
stitch pattern selected are saved
2 All alterations of the stitch pattern selected are reset
to the original basic setting
3 Add a selected stitch pattern to your Personal
Program (with possible alterations)
4 The sewing computer sews continuously in reverse
5 The stitch pattern is sewn in reverse, retracing the
previously sewn stitches by the stitch
6 Close the screen
6
80
Page 82

History Description
032299.53.04_1204_B830_EN
► touch the ≪History≫ icon
► the last maximum 15 sewn stitches appear
► a stitch already contained in the History screen will be
overwritten when sewing restarts
History
81
Page 83

Long Term Memory Description
032299.53.04_1204_B830_EN
The sewing-/embroidery computer has a memory system where both, the sewing and
embroidery memories are saved.
In the sewing memory stitch patterns, lettering and numbers can be combined and saved.
In the embroidery memory personal embroidery designs can be saved.
In the sewing memory each «Drawer» can store a maximum of 70 stitch patterns as long
as there is sufficient free space (capacity) available. If the storage space (but not all
drawers) is full, there may be too many embroidery designs in the memory.
The memory is long-term, i.e. contents are kept until they are deleted. A power cut or
switching off the sewing-/embroidery computer does not have any effect on the stored
contents.
Creating Stitch Combinations
Long Term Memory
Programming and Saving
► select Combi Mode
► the Stitch Altering Area and the respective function
fields appear
► select the desired stitch pattern directly or type in the
number
► make any necessary changes such as stitch length,
stitch width, needle position and add functions such as
mirroring, etc.
► select further stitch patterns
► touch the flashing «File Drawers» icon
► the «Save» icon is activated
► the System Memory Capacity is shown in percent (%) in
a bar in the top right
► select the Drawer where you wish to save the stitch
combination
82
Page 84

Deleting Stitch Patterns
032299.53.04_1204_B830_EN
Deleting patterns in steps
► the stitch pattern above the cursor is deleted
► touch «Delete» as many times as required until the
Stitch Altering Area is empty
Deleting a Combination
► touch the «Multifunction» icon
► touch «Delete»
► confirm with
Opening Empty File Drawers
► touch the «File Drawers» icon
► Drawers screen appears
► touch «Open» in the top row
► select an empty Drawer
Long Term Memory
83
Page 85

Drawer Content at a Glance
032299.53.04_1204_B830_EN
3
4
1
5
6
2
7
8
9
10
12
► touch the «Multifunction» icon
► in the screen the following is displayed:
1 the complete stitch combination
2 the entire length of the stitch combination can be
viewed
3 turning Multifunction knobs
4 Mirror Combination
5 Combination Sub-Divider
11
6 Connecting stitch
7 Multi-Directional
8 Delete Combination
9 Backstepping
10 display of combination as a single motif
11 Scroll arrow
12
icon
► scroll through the combination with the arrow icons
► each stitch pattern can be directly selected e.g. for
alterations
► select stitch pattern and make the alterations directly in
the Stitch Altering Area
► close the screen with
Long Term Memory
Opening a Saved Stitch Combination
► touch the «File Drawers» icon
► a summary of the saved combinations appears
► scroll to the desired Drawer if necessary
► touch the desired Drawer
► the saved combination appears in the Stitch Altering
Area
84
Page 86

Correcting a Stitch Combination
032299.53.04_1204_B830_EN
Inserting Stitch Patterns
► select the desired position in the combination
► select a new stitch pattern
► the new stitch pattern will be added after the selected
stitch pattern
► to add a pattern at the beginning of a combination, the
cursor must be positioned above the first pattern
Altering a Stitch Combination
► select desired stitch in the combination
► select desired function e.g. Mirroring
The alterations always affect the Stitch above
the cursor that is active or light blue.
Saved stitch combinations can be altered or
corrected in the same way. To make corrections and alterations permanent, the combination must be saved again afterwards.
Mirroring Entire Combinations
► touch the «Multifunction» Icon
► the screen changes
► touch the «Mirror image» icon
Long Term Memory
85
Page 87

Long Term Memory
032299.53.04_1204_B830_EN
Combination Subdivider 1
► a combination can be subdivided into several sections
with the «Subdivider 1» function
► only the section where the cursor is positioned is sewn
► to sew the next section, the cursor must be placed in the
respective section
Combination Subdivider 2
► touch the «Multifunction» icon
► a combination can be split into various sections using
the «Combination Subdivider 2» function
► sew the first section, the sewing-/embroidery computer
stops automatically when it reaches the programmed
function
► reposition the fabric, press the foot control = the next
section is sewn etc.
Connecting Stitches
Move single Stitch Pattern
in a Combination
► touch the «Multifunction» icon
► touch «Move» icon
► touch the «Stitch selection» icon until the desired
pattern is activated
► using the stitch width and stitch length knobs, the touch
pen or a finger the individual stitch pattern in a combina-
tion can be moved horizontally, diagonally or vertically
Move multiple stitch pattern
of a Combination
► proceed as described in steps 1-3 above
► touch the «Move multiple stitch patterns» icon
► the active and any further stitch patterns are moved with
the stitch width and stitch length knobs, the touch pen or
a finger
86
Test-sew first on a piece of the fabric you
intend to use for the sewing project.
Page 88

Deleting a Stitch Combination
032299.53.04_1204_B830_EN
Overwriting
► program a new stitch combination
► touch the «File Drawers» icon
► select the Drawer which you want to overwrite
► confirm with
Deleting
► touch the «File Drawers» icon
► a summary of the saved combinations appears
► touch the «Delete» icon
► select the Drawers to be deleted
► confirm with ; deleting will be stopped by touching
► touch the icon – File Drawers summary closes
Long Term Memory
87
Page 89

Impressions
032299.53.04_1204_B830_EN
88
Page 90

BERNINA Sewing World
032299.53.04_1204_B830_EN
Practical Applications 90
Practical Stitches 90
Straight Stitch no. 1 90
Basting Stitch no. 21 90
Triple Straight Stitch no. 6 91
Securing Stitch no. 5 91
Patchwork, Appliqué, Quilting 92
Optimal Stitch Patterns 93
Edge Finishing 94
Narrow Edgestitching 94
Wide Edgestitching 94
Overcasting 95
Darning 96
Manual - Straight Stitch no. 1 96
Automatic - Simple Darning Program no. 22 97
Reinforced Darning Program no. 23 97
Reinforced Darning Program no. 34 97
Knits Neatening 98
With Double Overlock no. 10 98
Hem 99
Visible 99
Jersey Stitch no. 14 99
Blind 100
Flat Joining Seam 100
Stretch Overlock no. 13 100
Zippers 101
Inserting 101
With Straight Stitch no. 1 101
Decorative Applications 106
Cross Stitches 106
Bobbin-Play Sewing 107
Free Motion Sewing 107
Decorative Stitches 107
Sideways-Motion Stitches 108
Monogram 108
Decorative Stitches with Connection Stitches 109
Tapering 110
Skyline 111
Sewing in Different Directions 112
Sewing Pin Tucks 112
Quilt Techniques 113
Quilt Labels 113
Free Motion Quilting 113
BSR 114
BSR Description 114
Preparation 115
Functions in the BSR mode 116
Needle Stop Down (Default)/Up 116
Raise or Lower the Needle 116
Securing With the Start-Stop-Button (only Mode 1) 116
Securing Function (only Mode 2) 116
Free Motion Quilting (only Mode 2) 116
Free Motion Quilting without BSR activation 116
Buttonhole 102
Important Information 102
Preparation 102
Thread Tension 102
Test Sewing 102
Corrections 102
Manual Buttonholes 102
Automatic Buttonholes 102
Stabilizers and Interfacings 103
Corded Buttonholes 103
Keyhole Buttonholes 103
Automatic Buttonholes 103
Corded Buttonholes With Presser Foot no. 3C 104
Corded Buttonholes With Buttonhole Foot no. 3A 104
Cutting Open the Buttonhole 105
Securing the Cord 105
Beeper (Acoustic Signal) Deactivation/
Activation 117
Activating the BSR Sewing Function: 118
Deactivating the BSR Sewing Function
by using the Start - Stop - Button 118
Holding the Work 118
BSR Function Deactivation 118
BERNINA Dual Feed 119
BERNINA Dual Feed Description 119
Fabrics 120
Application 120
Page 91

Practical Stitches
032299.53.04_1204_B830_EN
Straight Stitch no. 1
Straight Stitch
► after turning the sewing computer on, the Practical
Stitch screen with the activated straight stitch appears
► for specialty work, program the seam length using the
stitch counter function, see page 34
Application
► suitable presser foot to be selected according to the
technique, e.g. manual darning
► suitable for all fabrics
Adjust the stitch length to suit the fabric
For example, use a longer stitch length
(approximately 3 - 4mm) with denim, a
shorter length (2 - 2.5mm) with batiste.
Adjust the stitch length to suit the thread
Practical Applications
For example, use a longer stitch length
(approximately 3 - 5mm) when using cordonnet thread for topstitching.
Activate Needle Stop Down
Prevents the fabric from slipping when you
stop to adjust or pivot project.
Basting Stitch no. 21
► Reverse pattern foot no. 1C/1D
Basting Stitch
► straight stitch, sews out every fourth stitch, i.e. longest
stitch possible is 24mm when the stitch length is set at
6mm. Recommended stitch length is 3.5 - 6mm
► for all work where a very long stitch is required
► quick and easy basting of seams, hems, quilts, etc.
► easy to remove
90
Securing/fixing the thread
► sew a few basting stitches at the beginning
and end of a seam
Basting
► use a fine darning thread for basting as it is
easier to remove
Preparation
► pin work horizontally to basting direction to prevent the
layers slipping
► Reverse pattern foot no. 1C/1D
Page 92

Triple Straight Stitch no. 6
032299.53.04_1204_B830_EN
For heavy layers or very densely woven
fabrics:
A Jeans needle and Jeans foot no. 8 will help
when sewing very heavy fabrics such as
denim or canvas.
Open Seam
► durable seam for firm and densely woven fabrics such
as denim and corduroy
► reinforced seam subjected to hard wear
► durable seam for high stress areas such as children‘s
clothing
► Reverse pattern foot no. 1C
► Jeans foot no. 8
Decorative top stitch
Lengthen stitch and use as a decorative top
stitch with denim.
Securing Stitch no. 5
Seaming or sewing long seams
► quicker securing at beginning and end of
seam
► even securing by defined stitch count
Practical Applications
Straight Stitch With Securing
► for all fabrics
► secures beginning and end of seam
Beginning the Seam
► the sewing computer secures the seam automatically
(5 stitches forward, 5 stitches reverse)
► the sewing computer continues straight stitching
forwards
Ending the Seam
► when coming to the end of the seam, press and release
the Quick Reverse button on head frame. The sewing
computer will then secure the seam automatically
(5 stitches reverse, 5 stitches forward)
► sewing computer stops automatically when securing is
completed
► Reverse pattern foot no. 1C
91
Page 93

Patchwork, Appliqué, Quilting
032299.53.04_1204_B830_EN
Accuracy is essential when sewing patches together. The
side edges of the Patchwork foot are exactly 1/4“ (6mm)
from the center needle position. The center indents on
either side of the foot indicate the needle insertion point
and the two additional indents are 1/4” (6mm) in front of
and behind the needle. When sewing at a foot’s width, the
seam allowances will always be the exact width and it is
easy to turn the work while maintaining the same width.
► Patchwork foot no. 37/37D (optional acces-
sory)
► Patchwork foot no. 57/57D (optional acces-
sory)
► Reverse pattern foot no. 1C
Practical Applications
92
Page 94

Optimal Stitch Patterns
032299.53.04_1204_B830_EN
for patchwork no. 37D/57D
► no. 1 Straight stitch (stitch length 1.5 - 2mm)
► no. 1326 Straight stitch
It is not necessary to secure the stitches for these relatively
short seam lengths. Attach the slide-on table for precise
and easier work.
for appliqué no. 1C/20C
► no. 1354 Satin stitch
► no. 1329, 1330, 1352, 1353 Blanket stitch
► no. 1331 Blind stitch
for quilting no. 1C
► no. 1324 Quilters securing program
► no. 1325 Quilting/straight stitch
► no. 1328, 1347 – 1350 Quilt stitch/hand-look quilt stitch
► no. 1327, 1331 – 1345, 1351 Decorative quilt stitch
► Free Motion quilting with or without BSR
Practical Applications
93
Page 95

Edge Finishing
032299.53.04_1204_B830_EN
Narrow Edgestitching
Practical Applications
Outer Edges
► place edge of fold against the guide on the Blindstitch
foot
► select needle position at desired distance from the
folded edge
► foot no. 5:
use any left or far right needle position
► foot no. 1C and no. 10/10C/10D:
any needle position is possible
Hem Edges
► place edge of fold against the guide on the Blindstitch
foot (inside upper edge of hem)
► select needle position to the right to sew along the
upper edge
► Reverse pattern foot no. 1C
► Blindstitch foot no. 5
► Edge stitch foot no. 10/10C/10D (optional
accessory)
Wide Edgestitching
There are three options for wide edge stitching
► guide the folded edge along the edge of the presser foot
► guide the folded edge along the marks on the stitch
plate (for stitching 3/8” to 1” from the edge (1 to 2.5cm)
► insert the adjustable seam guide into the hole on the
back of the presser foot shaft
► adjust as desired
► tighten the screw
► guide the folded edge along the seam guide
► to sew parallel wider lines, guide the seam guide along
a previously sewn line of stitches
94
Page 96

Overcasting
032299.53.04_1204_B830_EN
With Zig-Zag Stitch no. 2
► guide edge of fabric into the center of the presser foot
► do not select too wide a width or too long a stitch – the
edge should lie flat and not roll
► needle goes into fabric on one side and over the edge
into the air on the other side
► use a fine darning thread for lightweight fabric
Satin Stitch
► dense stitch used for appliqué, embroidery, etc.
► shorten stitch length, satin stitch setting will be indicated
by parallel lines on stitch length bar
► Reverse pattern foot no. 1C
If edges roll:
► use the Vari-overlock stitch and foot
no. 2A
The sewing computer has a programmed satin
stitch: no. 1354
Practical Applications
95
Page 97

Darning
032299.53.04_1204_B830_EN
Manual - Straight Stitch no. 1
Darning Holes or Worn Areas
Preparation
► lower the feed-dog
► attach the Slide-on table
► hoop the fabric into the darning hoop (optional acces-
sory). The darning area stays evenly taut and cannot be
distorted
Sewing
► work from left to right without using pressure
► when changing direction on top and on bottom, move in
curves (avoid points as this prevents holes and thread
breakage)
► work in different lengths so that the thread is better
spread over the fabric
► Darning foot no. 9
Practical Applications
1
2
3
Stitch Over the Hole 1
► sew the first rows to cover the hole (not too close, sewing beyond the worn area)
► work the rows in irregular lengths
► turn work by a quarter turn - 90°
Cover the First Rows 2
► sew over the first rows - not too close for a soft finish
► turn work by a half turn - 180°
Complete Darning 3
► sew loosely and in same direction as 2nd rows
Poor stitch formation
► if the thread is lying on the right side of the
fabric, the hoop is being moved too quickly
► if there are knots on the wrong side of the
fabric, the hoop is being moved too slowly
96
Thread breaks
If thread breakage is a problem, it could be
that the hoop is not being moved smoothly.
Page 98

Automatic - Simple Darning Program no. 22
032299.53.04_1204_B830_EN
If the darning becomes distorted
Correct with the Balance function see
page 51.
Reinforced Darning Program no. 23
Replaces threads along the lengthwise grain in all fabrics.
Preparation
► place a piece of lightweight stabilizer under the worn
area before darning if necessary
Sewing
► sew the first row and stop
► press and release the Quick Reverse button at the
desired length; this programs the first length
► continue sewing; the sewing computer stops automati-
cally
► Reverse pattern foot no. 1C
► Automatic buttonhole foot no. 3A
Practical Applications
Replaces threads along the lengthwise and crosswise
grains in all fabrics.
If the darning does not cover the whole
worn or damaged area
Reposition the work under the foot to continue
covering the worn or damaged area. Begin
sewing; the program will repeat as often as
desired (the length is saved).
Reinforced Darning Program no. 34
Preparation
► place a piece of lightweight stabilizer under the worn
area before darning if necessary
Sewing
► insert the needle in the top left of the worn area
► sew the first vertical row
► press and release the Quick Reverse button at the
desired length; this programs the length needed
► continue sewing; the sewing computer stops automati-
cally when finished
► Automatic buttonhole foot no. 3A
The Darning Program no. 34 is particularly useful for
mending heavy weight or durable garments, such as jeans
and overalls.
► Reverse pattern foot no. 1C
97
Page 99

Knits Neatening
032299.53.04_1204_B830_EN
With Double Overlock no. 10
Closed Seam
► overlock seam in loose knits and cross seams in knits
and jerseys
Sewing
► sew the overlock seam along the raw edge
► Reverse pattern foot no. 1C
► Overlock foot no. 2A
Practical Applications
Knits and jersey
► use a new ball point needle to prevent
damaging the loops
Sewing stretch fabrics
► if necessary use a stretch needle
(130/705H-S) = needle point slides
between the fibers
98
Page 100

Hem
032299.53.04_1204_B830_EN
Visible
Jersey Stitch no. 14
Stretch Hem
► for all types of cotton, wool, synthetic and mixed fiber
jerseys
Preparation
► fold hem, pin if necessary
Sewing
► sew hem at preferred depth on the right side of fabric
► trim excess fabric (wrong side)
► Reverse pattern foot no. 1C/1D
Practical Applications
99
 Loading...