

Page 1

L8542098
Rev. 09/05/00
RR.1WBV
RR.2WBV
RR.1WIV
RR.2WIV
Radioricevitori 433,92MHz mono/bicanale rolling-code
433.92MHz single/dual channel rolling-code radio receivers
1-/2-Kanal-Rolling-Code-Funkempfänger 433,92MHz
Récepteurs radio 433,92 MHz mono/bicanal à code variable
Radiorreceptores 433,92MHz mono/bicanal rolling-code
Odbiorniki radiowe 433,92MHz jedno/dwukanałowe rolling-code
Manuale istruzioni
Operating instructions
Betriebsanleitung
Livret d’instructions
Manual de instrucciones
Książeczka z instrukcjami
UNIONE NAZIONALE COSTRUTTORI
AUTOMATISMI PER CANCELLI, PORTE,
SERRANDE ED AFFINI
Page 2

3
Page 3
3
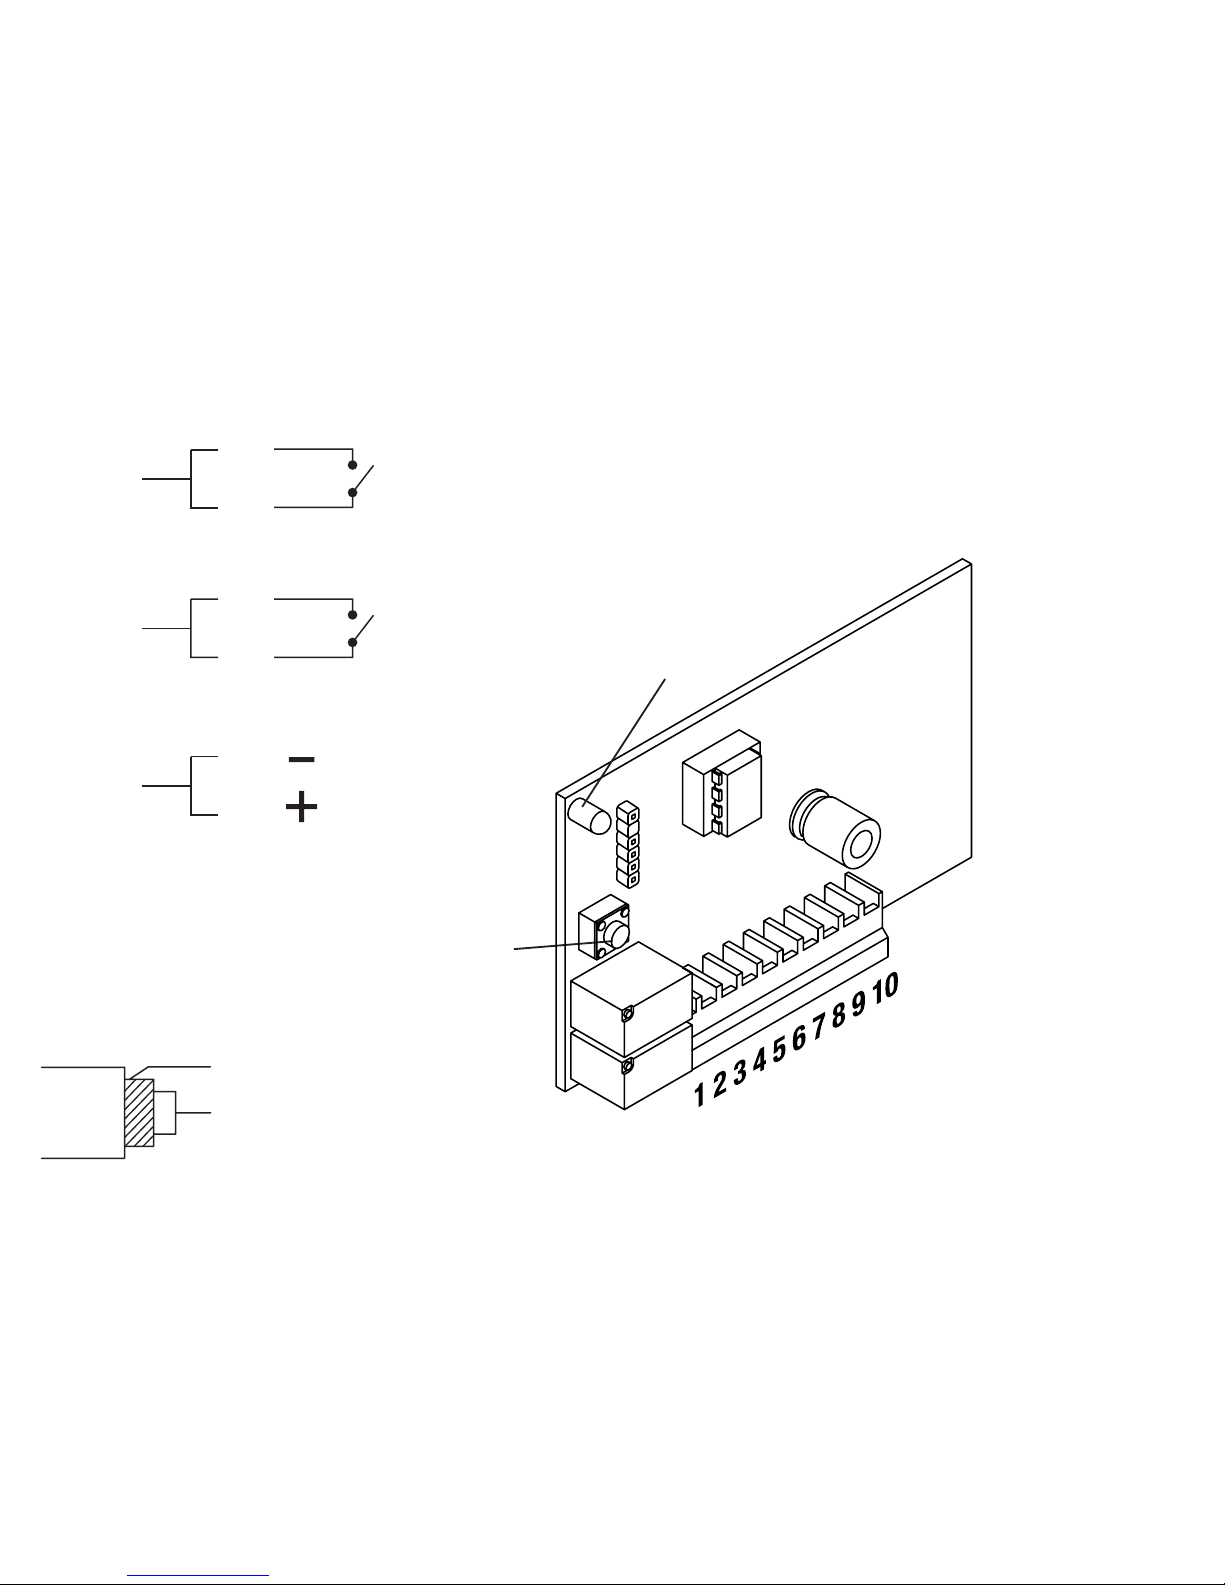
P
LED
RR.1WIV
RR.2WIV
�
�
*
*solo RR.2WIV
*only RR.2WBV
*nur RR.2WIV
*uniquement RR.2WIV
*sólo RR.2WIV
*tylko RR.2WIV
Page 4
4
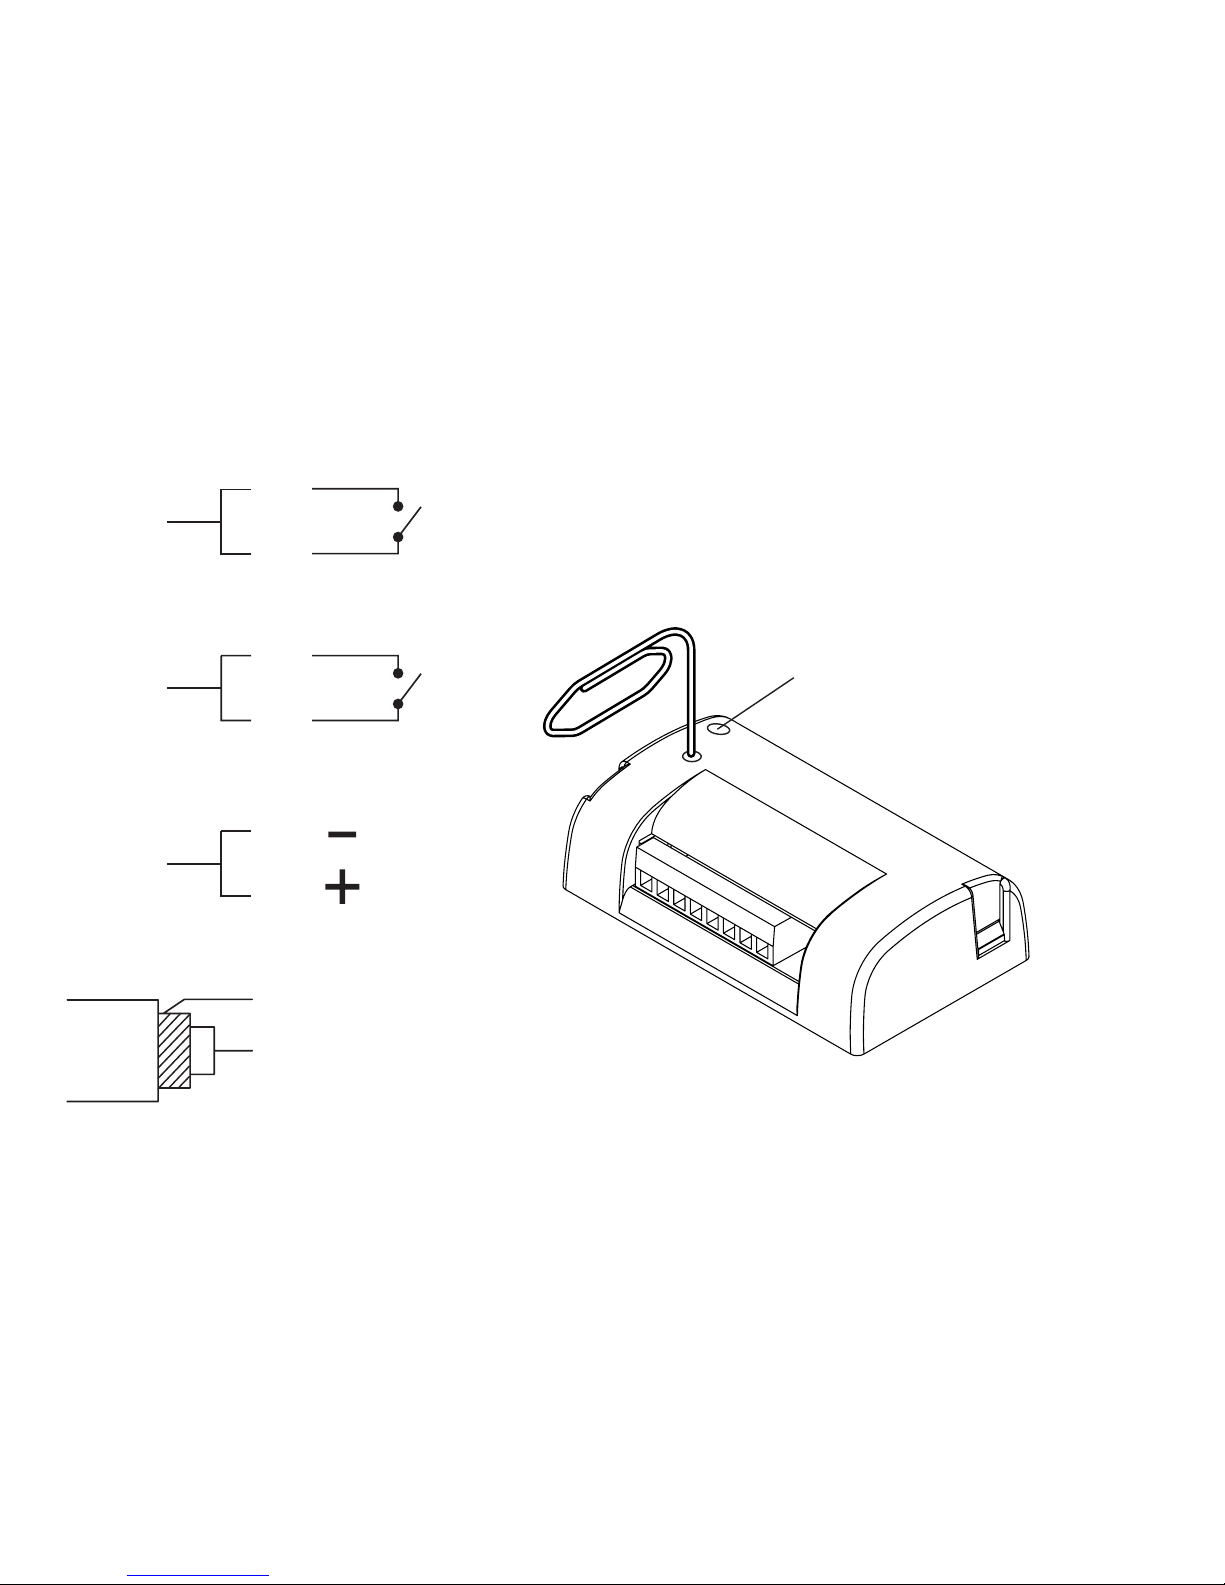
5
RR.1WBV
RR.2WBV
1 2 3 4 5 6 7
8
LED
P
�
�
*
*solo RR.2WBV
*only RR.2WBV
*nur RR.2WBV
*uniquement RR.2WBV
*sólo RR.2WBV
*tylko RR.2WBV
Page 5

5
ITALIANO
Radioricevitori 433,92MHz mono/bicanale rolling-code compatibili con il sistema ADVA N TAGE
Disponibili con innesto molex o in box plastico con morsettiera.
La memoria standard può contenere un massimo di 512 trasmettitori rolling-code. È disponibile una versione speciale con una
memoria che può contenere 2048 trasmettitori. Il completamento
della memoria viene indicato da 10 lampeggi Arancio.
Nota: Il programmatore palmare Advantage, ed il relativo software
di gestione, consentono l’utilizzo di alcune funzionalità avanzate, descritte nelle istruzioni specifiche, a cui vi rimandiamo per
ulteriori informazioni.
Consigli per l’utilizzo
Per avere una buona ricezione si consiglia di installare l’antenna
lontano da masse metalliche e di evitare il posizionamento ravvicinato di più ricevitori. In assenza di antenna la ricezione risulta
notevolmente ridotta.
Memorizzazione trasmettitori - Procedura semplificata
Se si desidera semplicemente inserire uno o più trasmettitori
per l’attivazione del primo canale, seguire questa procedura
semplificata:
1 Premere il pulsante P della ricevente e rilasciare.
2 Si accende il LED Rosso per 3s, quindi si spegne per 1s e si
riaccende per 5s.
3 Premere, con il LED Rosso acceso, il pusante del trasmettitore
che si vuole associare al canale 1.
4 Altri trasmettiori possono essere inseriti successivamente
premendo un tasto entro 5s dall’inserimento precedente.
5 Al termine attendere 5s, la ricevente esce dalla programma-
zione.
Memorizzazione trasmettitori - Apprendimento remoto
Se si dispone di un trasmettitore già memorizzato nella ricevente
è possibile effettuare l’apprendimento radio remoto (senza necessità di accedere al pulsante P della ricevente).
Procedere come segue:
1 Premere il tasto nascosto del trasmettitore già memorizzato.
2 Premere, entro 5s, il tasto del trasmettitore già memorizzato
corrispondente al canale da associare al nuovo trasmettitore.
3 Premere, entro 5s, il tasto del nuovo trasmettitore da associare
al canale scelto al punto 2.
4 La ricevente memorizza il nuovo trasmettitore ed esce imme-
diatamente dalla programmazione.
Programmazione
La memorizzazione dei trasmettitori e l’impostazione della
modalità dei singoli canali si effettua utilizzando il pulsante “P”
(vedi Fig.1/2).
Per passare da una fase di programmazione alla seguente
premere il pulsante P senza lasciare passare più di 3s tra una
pressione e la successiva.
Selezionata la fase desiderata, attendere per circa 3/4s, una segnalazione del LED indicherà l’ingresso nella programmazione
(vedi colonna “Operazioni”).
Nella Tabella 1 sono indicate le varie fasi di programmazione.
Page 6

6
7
TABELLA 1
Fase LED Funzione Operazioni
0 Spento Nessuna funzione Stato normale.
Premere il pulsante P
1 Rosso Memorizzazione del 1° canale radio
Si accende il LED Rosso, attendere 3s, il LED si spegne e si riaccende,
premere entro 5s il tasto del trasmettitore che si desidera associare al
canale 1.*
Premere entro 3s il pulsante P
2 Verde
Memorizzazione del 2° canale radio
(solo per ricevitori bicanali “RR.2”)
Si accende il LED Verde, attendere 3s, il LED si spegne e si riaccende,
premere entro 5s il tasto del trasmettitore che si desidera associare al
canale 2.*
Premere entro 3s il pulsante P
3 Arancio
Memorizzazione automatica del 1° e
2° canale radio
(solo per ricevitori bicanali “RR.2”)
Si accende il LED Arancio, attendere 3s, il LED si spegne e si riaccende,
premere entro 5s un tasto qualsisiasi del trasmettitore.
Il tasto 1 verrà associato al canale 1, il tasto 2 verrà associato al canale 2.*
Premere entro 3s il pulsante P
4
Rosso
lampeggiante
Settaggio tempi del canale 1
Il LED emette 5 lampeggi veloci. Premendo il pulsante P durante questi 5
lampeggi si passa alla fase successiva. Dopo i 5 lampeggi veloci si entra
nel menu Tempi. Vedi Paragrafo “Modalità tempi”
Premere entro 3s il pulsante P
5
Verde
lampeggiante
Settaggio tempi del canale 2
(solo per ricevitori bicanali “RR.2”)
l LED emette 5 lampeggi veloci. Premendo il pulsante P durante questi 5
lampeggi si passa alla fase successiva. Dopo i 5 lampeggi veloci si entra
nel menu Tempi. Vedi Paragrafo “Modalità tempi”
Premere entro 3s il pulsante P
0 LED spento Nessuna funzione Stato normale.
Page 7

7
* Dopo la pressione del tast o de l 1° trasm ettitore, la ricevente
resta in attesa p er 5s di un altro trasmettitore da memori zza re.
E’ pertanto possibile inserire in modo sequenziale tutti i trasmettitori da
associare al canale desiderato. Terminati i 5s di attesa la ricevente esce
dalla fase di programmazione. Nel caso di inserimenti sequenziali è consigliabile scollegare momentaneamente l’antenna, si riduce così la portata
della ricevente e la possibilità di ricevere dei segnali di disturbo.
Nota: Una volta entrata in una qualsiasi fase di programmazione, la
ricevente non consente il passaggio alla fase successiva.
Nel caso si desideri programmare più di una funzione, attendere il termine
della programmazione in corso, segnalato dallo spegnimento del LED, e
procedere con una nuova programmazione.
Modalità tempi
La programmazione di questa funzione è necessaria solo se si
vuole impostare uno dei due canali come temporizzato (da 1s a
10 min), oppure con funzionamento bistabile. Il modo di funziona-
mento di default è impostato impulsivo (1s di commutazione).
Per impostare la modalità tempi è necessario entrare nella fase
4 (per il canale 1) o nella fase 5 (per il canale 2) e attendere il
termine dei 5 lampeggi veloci.
Si entra così nel sottomenu Tempi, descritto nella seguente
tabella 2.
TABELLA 2
Fase LED Funzione Operazioni
1
1
lampeggio
veloce
Impostazione
modalità Impulsiva
Se non si preme il pulsante P, dopo 5s il canale viene ripristinato alla modalità
di default: Impulsivo (1s di commutazione).
Premere il pulsante P per almeno 2s
2
2
lampeggi
veloci
Selezione del tempo di
commutazione
Se non si preme il pulsante P, dopo 5s il LED inizia a lampeggiare con frequenza di 1 lampeggio al secondo, in attesa della pressione del pulsante P.
Il numero di lampeggi effettuati prima della pressione del pulsante P seleziona
il tempo di commutazione, come indicato nella tabella 3.
Premere il pulsante P per almeno 2s
3
3
lampeggi
veloci
Impostazione
modalità Bistabile
Se non si preme il pulsante P, dopo 5s il canale viene impostato con modalità
Bistabile: ad ogni impulso il relè cambia stato.
Premere il pulsante P per almeno 2s
4 Spento Nessuna funzione Stato normale.
Page 8

8
9
Caratteristiche tecniche RR.1/2WBV - RR.1/2WIV
Frequenza 433,92 MHz
Alimentazione
21÷28 Vac
12÷28 Vdc
Portata
senza antenna 30m
con antenna 100m
Canali 1/2
Contatto relè 1A/24Vdc
Temp. funzionamento -20/+70°C
Consumo a riposo 10 mA
Consumo 1 ch o 2 ch eccitato 42 mA
Consumo 1 ch e 2 ch eccitato 66 mA
TABELLA 3
N°
Lampeggi LED
Tempo di commu-
tazione
N°
Lampeggi LED
Tempo di commu-
tazione
N°
Lampeggi LED
Tempo di commu-
tazione
1
1s
11
30s
21
1m
2
2s
12
60s
22
2m
3
3s
13
1,5m
23
3m
4
4s
14
2m
24
4m
5
5s
15
2,5m
25
5m
6
6s
16
3m
26
6m
7
7s
17
3,5m
27
7m
8
8s
18
4m
28
8m
9
9s
19
4,5m
29
9m
10
10s
20
5m
30
10m
Cancellazione completa della memoria
Togliere alimentazione alla ricevente. Premere e mantenere premuto il pulsante P. Ridare alimentazione mantenendo premuto il
pulsante P sulla ricevente.
Il LED si accende con colore rosso, dopo 5s inizia a lampeggiare
velocemente con sequenza verde-rosso, rilasciare il pulsante.
Attendere lo spegnimento del LED. Ora la memoria è completamente cancellata.
Vengono cancellate anche le impostazioni effettuate in modalità
tempi e la password inserita dal programmatore ADVANTAGE,
se presente.
Page 9

9
ENGLISH
433.92MHz single/dual channel rolling-code radio receivers
compatible with the ADVANTAGE system.
They are available with Molex socket or in a plastic box with
terminal board. The standard memory can hold a maximum
of 512 rolling-code transmitters. A special version is available
with a memory that can hold 2048 transmitters. A full memory is
indicated by 10 orange blinks.
N.B: The Advantage palm programmer and related management
software permit the use of certain advanced functions, please
consult the relevant instruction manual for more information.
Note
To optimise reception install the antenna away from metal
bodies and avoid positioning several receivers next to each
other. If no antenna is used reception will be considerably
reduced.
Memorising transmitters – Simplified procedure
To merely record one or more transmitters to activate the first
channel, follow this simplified procedure:
1 Press and release the button P on the receiver.
2 The Red LED will light up for 3 secs, then go out for 1 sec and
then light up again for 5 secs.
3 While the red LED is on, press the button on the transmitter
to associate with channel 1.
4 Other transmitters can be then be recorded by pressing a
button within 5 secs from recording the previous transmitter.
5 To end wait 5 secs, the receiver will exit programming.
Memorising a transmitter – Remote self-learning
If a transmitter has already been memorised on the receiver the
remote radio self-learning feature can be used (without having
to use the receiver button P).
Proceed as follows:
1 Press the hidden button on the memorised transmitter.
2 Press, within 5 secs., the button on the memorised transmit-
ter corresponding to the channel to associate with the new
transmitter.
3 Press, within 5 secs., the button on the new transmitter to
associate with the channel selected at point 2 above.
4 The receiver will memorise the new transmitter and promptly
exit programming.
Programming
Transmitters can be memorised and separate channel modes
can be set using the button “P” (see Fig.1/2).
To go from one programming mode to the next press the button
P within 3 secs from one press and another.
Once having selected a programming mode, wait for about 3-4
secs and a LED signal with indicate that programming has been
entered (see “Operations” column).
Table 1 lists the various programming modes.
Page 10

10
11
TABLE 1
Mode LED Function Operations
0 Off No function Normal status.
Press the button P
1 Red Memorise channel 1
The red LED will light up, wait 3 secs, the LED will go out and light up again,
press within 5 secs the button on the transmitter to associate with channel 1.*
Press within 3 secs the button P
2 Green
Memorise channel 2 (only for
dual channel receivers “RR.2”)
The green LED will light up, wait 3 secs, the LED will go out and light up
again, press within 5 secs the button of the transmitter to associate with
channel 2.*
Press within 3 secs the button P
3 Orange
Memorise automatically
channels 1 and 2
(only for dual channel receivers
“RR.2”)
The orange LED will light up, wait 3 secs, the LED will go out and light up
again, press within 5 secs any button on the transmitter.
Button 1 will be associated with channel 1, button 2 with channel 2.*Il tasto 1
verrà associato al canale 1, il tasto 2 verrà associato al canale 2.*
Press within 3 secs the button P
4
Red
Blinking
Set channel 1 times
The LED will give 5 rapid blinks. If button P is pressed during these 5 blinks
the next mode is entered. After the 5 rapid blinks the Times menu is entered.
See section “Times Mode”
Press within 3 secs the button P
5
Green
Blinking
Set channel 2 times
(only for dual channel receivers
“RR.2”)
The LED will give 5 rapid blinks. If button P is pressed during these 5 blinks
the next mode is entered. After the 5 rapid blinks the Times menu is entered.
See section “Times Mode”
Press within 3 secs the button P
0 LED Off No function Normal status.
Page 11

11
* After pressing the button on the first transmitter the receiver will
wait 5 secs to memorise another transmitter.
In this way all the transmitters being associated with one channel
can be recorded in sequence. After the 5 secs the receivers exits
the programming mode. When using this method of recording in
sequence it is best to temporarily remove the antenna thereby
reducing the receiver’s range and limiting disturbance.
N.B.: Once a programming mode has been entered, other modes
cannot be accessed.
When programming several functions complete one programming
sequence, indicated by the LED going out, and restart with a new
programming mode.
Times Mode
This function is only necessary when one of the two channels
has to be set to be timed (from 1 sec to 10 min) or with bistable
operation. The pulse operating mode is set by default (1 sec
switching).
To set the times enter mode 4 (for channel 1) or mode 5 (for
channel 2) and wait until the end of the 5 rapid blinks.
The Times submenu is described in table 2 below.
TABLE 2
Mode LED Function Operations
1
1
rapid blink
Set pulse mode
If the P button is not pressed within 5 secs the channel is reset to the default
pulse mode (1 sec switching).
Press the button P for at least 2 secs
2
2
rapid blinks
Select switching time
If the P button is not pressed within 5 secs the LED will start blinking at a rate
of 1 blink/sec until the button P is pressed.
The number of blinks counted before pressing the P button selects the
switching time, as shown in table 3.
Press the button P for at least 2 secs
3
3
rapid blinks
Set
Bistable mode
If the P button is not pressed within 5 secs the channel is set to the bistable
mode: the relay changes status on each pulse.
Press the button P for at least 2 secs
4 Off No function Normal status.
Page 12

12
13
TABLE 3
LED Blinks
Switching
Time
LED Blinks
Switching
Time
LED Blinks
Switching
Time
1
1s
11
30s
21
1m
2
2s
12
60s
22
2m
3
3s
13
1,5m
23
3m
4
4s
14
2m
24
4m
5
5s
15
2,5m
25
5m
6
6s
16
3m
26
6m
7
7s
17
3,5m
27
7m
8
8s
18
4m
28
8m
9
9s
19
4,5m
29
9m
10
10s
20
5m
30
10m
Resetting the memory
Cut off the power to the receiver. Press and keep pressed the
button P. Restore the power keeping the button P pressed.
The LED will light up red, after 5 secs it will blink rapidly
alternating green-red, release the button. Wait for the LED to go
out. The memory is now completely erased.
Technical Characteristics RR.1/2WBV - RR.1/2WIV
Frequency
433,92 MHz
Power supply
21÷28 Vac
12÷28 Vdc
Range
Without antenna 30m
with antenna 100m
Channels 1/2
Relay contact 1A/24Vdc
Working temperature -20/+70°C
Consumption in standby 10 mA
Consumption ch. 1 or 2 actuated
42 mA
Consumption ch. 1 and 2 actuated
66 mA
Page 13

13
DEUTSCH
1-/2- Kanal- Rolling-Code-Funkempfä nger 433,92MHz
kompatibel mit dem System ADVANTAGE
Verfügbar mit Molex-Verbindung oder in Plastikbox mit
Klemmenleiste. Der Standardspeicher kann bis zu maximal
512 Rolling-Code-Sender aufnehmen. Daneben steht ein
Sonderspeicher mit einer Kapazität von 2048 Sendern zur
Verfügung. Das Vollsein des Speichers wird durch 10maliges
orangefarbenes Blinken angezeigt.
NB : D as Handheld-Programmiergerät und die entsprechende Betriebs-Software ermöglichen die Nutzung einiger
weiterführender Funktionen, die in den spezifischen Anleitungen beschrieben sind, auf die wir für weitere Informationen
verweisen.
Gebrauchsanweisung
Für guten Empfang empfiehlt es sich, die Antenne fern
von Metallmassen zu installieren und auch nicht mehrere
Empfänger nahe einander zu positionieren. Ohne Antenne ist
der Empfang wesentlich schlechter.
Speichern der Sender - Schnellverfahren
Wenn lediglich ein oder mehrere Sender für die Aktivierung
des ersten Kanals eingegeben werden sollen, kann dies mit
dem nachstehenden Schnellverfahren geschehen:
1 Die Taste P des Empfängers drücken und loslassen.
2 Die rote LED schaltet sich für die Dauer von 3 s ein, geht 1
lang aus und schaltet sich für 5 s wieder ein.
3 Bei eingeschalteter roter LED die Taste des Senders drü-
cken, der dem Kanal 1 zugeordnet werden soll.
4 In der Folge können weitere Sender einspeichert werden,
indem innerhalb von 5 s nach der vorherigen Eingabe eine
Taste gedrückt wird.
5 Zum Schluss 5 s abwarten, bis der Empfänger die Program-
mierung verlassen hat.
Speicherung der Sender – Fernprogammierung
Verfügt man über einen bereits im Empfänger gespeicherten
Sender, kann die Eingabe über Funk erfolgen (ohne die Taste
P des Empfängers zu betätigen).
Dazu wie folgt vorgehen:
1 Die verborgene Taste des bereits gespeicherten Senders
drücken.
2 Innerhalb von 5 s die Taste des gespeicherten Senders
drücken, der dem Kanal entspricht, der dem neuen Sender
zugeordnet werden soll.
3 Innerhalb von 5 s die Taste des neuen Senders drücken,
der dem unter Punkt 2 gewählten Kanal zugeordnet werden
soll.
4 Der Empfänger speichert den neuen Sender und verlässt
dann sofort die Programmierung.
Programmierung
Die Speicherung der Sender und die Einstellung des Modus
der einzelnen Kanäle erfolgt mit der Taste “P” (siehe Abb.1/2).
Um von der einen zur anderen Phase der Programmierung
zu wechseln, die Taste P mit Pausen von höchstens 3 s
drücken.
Nachdem die gewünschte Phase gewählt wurde, ungefähr
3-4 s warten, bis ein Signal der LED den Zugriff auf die
Programmierung meldet (siehe Spalte “Operationen”).
In der Tabelle 1sind die verschiedenen Phasen der
Programmierung beschrieben.
Page 14

14
15
TABELLE 1
Phase
LED
Funktion Operationen
0 Aus Keine Funktion Normaler Status.
Die Taste P drücken
1 Rot Speicherung des 1. Funkkanals
Die rote LED schaltet sich ein, 3 s warten, die LED schaltet sich aus und
wieder ein, innerhalb von 5 s die Taste des Senders drücken, der dem Kanal
1 zugeordnet werden soll.*
Innerhalb von 3 s die Taste P drücken
2 Grün
Speicherung des 2. Funkkanals
(nur bei 2-Kanal-Empfängern
“RR.2”)
Die grüne LED schaltet sich ein, 3 s warten, die LED schaltet sich aus und
wieder ein, innerhalb von 5 s die Taste des Senders drücken, der dem Kanal
2 zugeordnet werden soll.*
Innerhalb von 3 s die Taste P drücken
3 Orange
Automatische Speicherung des
1. und 2. Funkkanals
(nur bei 2-Kanal-Empfängern
“RR.2”)
Die orange LED schaltet sich ein, 3 s warten, die LED schaltet sich aus und
wieder ein, innerhalb von 5 s eine beliebige Taste des Senders drücken.
Die Taste 1 wird dem Kanal 1, die Taste 2 dem Kanal 2 zugeordnet.*
Innerhalb von 3 s die Taste P drücken
4
Rot
blinkend
Zeiteingabe des Kanals 1
Die LED blinkt 5 Mal schnell. Wird während dieser 5 Blinksignale die Taste
P gedrückt, wird zur folgenden Phase übergegangen. Nach den 5 schnellen
Blinksignalen erfolgt der Zugriff auf das Zeit-Menü. Siehe Absatz “Zeit-Modus”
Innerhalb von 3 s die Taste P drücken
5
Grün
blinkend
Zeiteingabe des Kanals 2
(nur bei 2-Kanal-Empfängern
“RR.2”)
Die LED blinkt 5 Mal schnell. Wird während dieser 5 Blinksignale die Taste
P gedrückt, wird zur folgenden Phase übergegangen. Nach den 5 schnellen
Blinksignalen erfolgt der Zugriff auf das Zeit-Menü. Siehe Absatz “Zeit-Modus”
Innerhalb von 3 s die Taste P drücken
0 LED aus Keine Funktion Normaler Status.
Page 15

15
* Nachdem die Taste des 1. Senders gedrückt wurde, wartet
der Empfänger 5 s auf einen weiteren zu speichernden Sender.
Auf diese Weise können nacheinander alle dem gewünschten Kanal
zuzuordnenden Sender eingespeichert werden. Nach Ablauf der 5
s Wartezeit verlässt der Empfänger die Phase der Programmierung.
Im Falle der sequentiellen Eingabe empfiehlt es sich die Antenne
momentan auszubauen, so dass die Reichweite des Empfängers
und die Möglichkeit des Empfangs von Störsignalen vermindert
werden.
NB: Sobald auf eine beliebige der Programmierungsphasen zugegriffen wurde, lässt der Empfänger den Übergang auf die folgende
Phase nicht mehr zu.
Falls mehr als eine Funktion programmiert werden soll, das Ende
der laufenden Programmierung abwarten, das durch das Verlöschen der LED angezeigt wird, und dann ein neue Programmierung
beginnen.
Zeit-Modus
Diese Funktion muss nur dann programmiert werden, wenn einer der beiden Kanäle zeitgeregelt (von 1s bis 10 min) sein soll,
oder bei bistabiler Funktion. Der Default-Funktionsmodus ist als
Impulsfunktion eingestellt (1 s Umschaltung).
Zur Eingabe des Zeit-Modus auf die Phase 4 (für Kanal 1) oder
die Phase 5 (für Kanal 2) zugreifen und warten, bis die 5 schnellen
Blinksignale verlöscht sind.
Auf diese Weise wird das Untermenü Zeiten geöffnet, das in der
nachstehenden Tabelle 2 beschrieben ist.
TABELLE 2
Phase LED Funktion Operationen
1
1 schnelles
Blinksignal
Eingabe
Impulsmodus
Wird die Taste P nicht gedrückt, wird der Kanal nach 5 s erneut auf Default-Modus gestellt: Impulsmodus (1 s des Umschaltens).
Die Taste P mindestens 2 s lang drücken
2
2 schnelle
Blinksignale
Wahl der
Umschaltzeit
Wird die Taste P nicht gedrückt, beginnt die LED nach 5 s einmal pro
Sekunde zu blinken, bis die Taste P gedrückt wird.
Die Zahl der vor dem Drücken der Taste P erfolgten Blinksignale selektiert
die Umschaltzeit, wie aus der Tabelle 3 hervorgeht.
Die Taste P mindestens 2 s lang drücken
3
3 schnelle
Blinksignale
Eingabe des
bistabilen Modus
Wird die Taste P nicht gedrückt, wird der Kanal nach 5 s auf den bistabilen
Modus gestellt: bei jedem Impuls wechselt das Relais seinen Status.
Die Taste P mindestens 2 s lang drücken
4 Aus Keine Funktion Normaler Status.
Page 16

16
17
TABELLE 3
Zahl der
Blinksignale LED
Umschaltzeit
Zahl der
Blinksignale LED
Umschaltzeit
Zahl der
Blinksignale LED
Umschaltzeit
1
1s
11
30s
21
1m
2
2s
12
60s
22
2m
3
3s
13
1,5m
23
3m
4
4s
14
2m
24
4m
5
5s
15
2,5m
25
5m
6
6s
16
3m
26
6m
7
7s
17
3,5m
27
7m
8
8s
18
4m
28
8m
9
9s
19
4,5m
29
9m
10
10s
20
5m
30
10m
Vollständiges Löschen des Speichers
Den Empfänger spannungslos machen. Die Taste P drücken
und gedrückt halten. Die Spannung wieder zuschalten, wobei
die Taste P am Empfänger weiterhin gedrückt gehalten wird.
Die LED leuchtet rot auf und beginnt nach 5 s ein schnelles
grün-rotes Blinken; die Taste loslassen. Das Verlöschen der LED
abwarten. Damit ist der Speicher vollständig gelöscht.
Technische Charakteristiken RR.1/2WBV - RR.1/2WIV
Frequenz
433,92 MHz
Versorgung
21÷28 Vac
12÷28 Vdc
Reichweite
ohne Antenne 30 m
mit Antenne 100 m
Kanäle
1/2
Relaiskontakt
1A/24Vdc
Betriebstemperatur
-20/+70°C
Verbrauch in Standby
10 mA
Verbrauch 1-K oder 2-K erregt
42 mA
Verbrauch 1-K und 2-K erregt
66 mA
Page 17

17
FRANÇAIS
Récepteurs radio 433,92 MHz mono/bicanal à code variable,
compatibles avec le système ADVANTAGE
Disponibles avec connexion molex ou dans boîtier plastique avec
bornier. La mémoire standard peut contenir un maximum de 512
émetteurs à code variable. Une version spéciale est disponible
avec une mémoire qui peut contenir 2048 émetteurs. La saturation de la mémoire est indiquée par 10 clignotements orange.
N.B. : Le programmateur portable Advantage et son logiciel
de gestion permettent l’utilisation de certaines fonctionnalités
avancées décrites dans les instructions spécifiques auxquelles
nous vous renvoyons pour plus de détails.
Conseils d’utilisation
Pour avoir une bonne réception, il est conseillé d’installer
l’antenne loin de masses métalliques et d’éviter le positionnement
rapproché de plusieurs récepteurs. En l’absence d’antenne, la
réception est considérablement réduite.
Mémorisation émetteurs – Procédure simplifiée
Si l’on souhaite simplement mémoriser un ou plusieurs
émetteurs pour l’activation du premier canal, suivre cette
procédure simplifiée :
1 Presser la touche P du récepteur et la relâcher.
2 La LED rouge s’allume pendant 3 s puis s’éteint pendant 1 s
et se rallume pendant 5 s.
3 Presser, avec la LED Rouge allumée, la touche de l’émetteur
que l’on veut associer au canal 1.
4 D’autres émetteurs peuvent être mémorisés ensuite en pressant
une touche dans les 5 s de la mémorisation précédente.
5 À la fin, attendre 5 s, le récepteur sort de la programmation
Mémorisation émetteurs – Apprentissage à distance
Si l’on dispose d’un émetteur déjà mémorisé dans le récepteur,
il est possible d’effectuer l’apprentissage radio à distance (sans
avoir besoin d’accéder à la touche P du récepteur).
Procéder comme suit :
1 Presser la touche cachée de l’émetteur déjà mémorisée.
2 Presser, dans les 5 s qui suivent, la touche de l’émetteur
déjà mémorisé correspondant au canal à associer au nouvel
émetteur.
3 Presser, dans les 5 s qui suivent, la touche du nouvel émetteur
à associer au canal choisi au point 2.
4 Le récepteur mémorise le nouvel émetteur et sort immédiate-
ment de la programmation.
Programmation
La mémorisation des émetteurs et le réglage du mode de
fonctionnement de chaque canal s’effectue en utilisant la
touche « P » (voir Fig.1/2).
Pour passer d’une phase de programmation à la suivante,
presser la touche P sans laisser passer plus de 3 s entre une
pression et la suivante.
Après avoir sélectionné la phase désirée, attendre environ 3-4 s,
une signalisation de la LED indiquera l’entrée en programmation
(voir colonne « Opérations »).
Le Tableau 1 indique les différentes phases de programmation.
Page 18

18
19
TABLEAU 1
Phase LED Fonction Opérations
0 Éteinte. Aucune fonction État normal.
Presser la touche P
1 Rouge Mémorisation du 1er canal radio
La LED Rouge s’allume, attendre 3 s, la LED s’éteint et se rallume, presser
encore 5 s la touche de l’émetteur que l’on souhaite associer au canal 1.*
Presser dans les 3 s qui suivent la touche P
2 Verte
Mémorisation du 2e canal radio
(uniquement pour les récepteurs bicanaux « RR.2 »)
La LED Verte s’allume, attendre 3 s, la LED s’éteint et se rallume, presser
encore 5 s la touche de l’émetteur que l’on souhaite associer au canal 2.*
Presser dans les 3 s qui suivent la touche P
3 Orange
Mémorisation automatique du
1er et du 2e canal radio
(uniquement pour les récepteurs bicanaux « RR.2 »)
La LED Orange s’allume, attendre 3 s, la LED s’éteint et se rallume, presser
encore 5 s une touche quelconque de l’émetteur.
La touche 1 sera associée au canal 1, la touche 2 sera associée au canal 2.*
Presser dans les 3 s qui suivent la touche P
4
Rouge
clignotante
Réglage temps du canal 1
La LED émet 5 clignotements rapides. En pressant la touche P durant ces 5
clignotements, on passe à la phase successive. Après les 5 clignotements
rapides, on entre dans le menu Temps. Voir Paragraphe « Modalités temps »
Presser dans les 3 s qui suivent la touche P
5
Verte
clignotante
Réglage temps du canal 2
(uniquement pour les récepteurs bicanaux « RR.2 »)
La LED émet 5 clignotements rapides. En pressant la touche P durant ces 5
clignotements, on passe à la phase successive. Après les 5 clignotements
rapides, on entre dans le menu Temps. Voir Paragraphe « Modalités temps »
Presser dans les 3 s qui suivent la touche P
0 LED éteinte Aucune fonction État normal.
Page 19

19
* Après la pression de la touche du 1er émetteur, le récepteur reste en
attente pendant 5 s d’un autre émetteur à mémoriser.
Il est donc possible de mémoriser de manière séquentielle tous les émetteurs à associer au canal désiré. À la fin des 5 s d’attente, le récepteur
sort de la phase de programmation.
Dans le cas de mémorisations séquentielles, il est conseillé de déconnecter momentanément l’antenne, on réduit ainsi la portée du récepteur
et la possibilité de recevoir des signaux parasites.
N.B. : Une fois que l’on est entré dans l’une des phases de programmation,
le récepteur ne permet pas le passage à la phase successive.
Si l’on souhaite programmer plus d’une fonction, attendre la fin de la
programmation en cours, signalée par l’extinction de la LED, et procéder
à une nouvelle programmation.
Modalité temps
La programmation de cette fonction n’est nécessaire que si l’on
veut programmer l’un des deux canaux comme étant temporisé
(d’1 s à 10 min), ou avec fonctionnement bistable. Le mode de
fonctionnement par défaut est programmé par impulsion (1 s
de commutation).
Pour régler la modalité temps il faut entrer dans la phase 4 (pour
le canal 1) ou dans la phase 5 (pour le canal 2) et attendre la fin
des 5 clignotements rapides.
On entre ainsi dans le sous-menu Temps, décrit dans le tableau
2 qui suit.
TABLEAU 2
Phase LED Fonction Opérations
1
1 clignotement
rapide
Paramétrage
mode par impulsions
Si on n’appuie pas sur la touche P, au bout de 5 s le canal est rétabli
dans le mode par défaut : Par impulsions (1 s de commutation).
Presser la touche P pendant au moins 2 s
2
2 clignotements
rapides
Sélection du temps de
commutation
Si on n’appuie pas sur la touche P, au bout de 5 s la LED commence à
clignoter à la fréquence d’1 clignotement à la seconde, en attente de la
pression de la touche P.
Le nombre de clignotements effectués avant la pression de la touche P
sélectionne le temps de commutation, comme l’indique le tableau 3.
Presser la touche P pendant au moins 2 s
3
3 clignotements
rapides
Paramétrage
Mode bistable
Si on n’appuie pas sur la touche P, au bout de 5 s le canal est réglé en
mode Bistable : à chaque impulsion le relais change d’état.
Presser la touche P pendant au moins 2 s
4 Éteinte. Aucune fonction État normal.
Page 20

20
21
TABLEAU 3
Nb Clignotements
LED
Temps de
commutation
Nb Clignotements
LED
Temps de
commutation
Nb Clignotements
LED
Temps de
commutation
1
1s
11
30s
21
1m
2
2s
12
60s
22
2m
3
3s
13
1,5m
23
3m
4
4s
14
2m
24
4m
5
5s
15
2,5m
25
5m
6
6s
16
3m
26
6m
7
7s
17
3,5m
27
7m
8
8s
18
4m
28
8m
9
9s
19
4,5m
29
9m
10
10s
20
5m
30
10m
Effacement complet de la mémoire
Couper l’alimentation au récepteur. Presser et maintenir
enfoncée la touche P. Rétablir l’alimentation en maintenant
enfoncée la touche P sur le récepteur. La LED s’allume avec
couleur rouge, au bout de 5 s elle commence à clignoter
rapidement avec une séquence vert-rouge, relâcher alors
la touche. Attendre l’extinction de la LED. Le contenu de la
mémoire est maintenant complètement effacé.
Caractéristiques techniques
RR.1/2WBV - RR.1/2WIV
Fréquence
433,92 MHz
Alimentation
21÷28 Vac
12÷28 Vdc
Portée
sans antenne 30 m
avec antenne 100 m
Canaux
1/2
Contact relais
1A/24Vdc
Temp. fonctionnement
-20/+70°C
Consommation au repos
10 mA
Consom.1 canal ou 2 canaux excités
42 mA
Consom. 1 canal et 2 canaux excités
66 mA
Page 21

21
ESPAÑOL
Radiorreceptores 433,92MHz mono/bicanal rolling-code
compatibles con el sistema ADVANTAGE.
Disponibles con acoplamiento molex o con caja de plástico
con terminal de bornes. La memoria estándar puede contener
un máximo de 512 transmisores rolling-code. Está disponible
una versión especial con memoria de hasta 2048 transmisores.
Diez destellos anaranjados señalan que la memoria se ha
completado.
Nota: el ordenador de mano Advantage con el relativo software
de gestión, permite utilizar algunas funciones avanzadas
indicadas en las instrucciones específicas, a consultar para más
informaciones.
Consejos de empleo
Para una buena recepción es conveniente instalar la antena
lejos de masas metálicas, así como evitar colocar varios
receptores a corta distancia unos de otros. Sin antena la
recepción se reduce considerablemente.
Memorización de los transmisores – Procedimiento simplificado
Si lo que se desea es simplemente insertar uno o varios
transmisores para activar el primer canal, hay que seguir este
procedimiento simplificado:
1 Pulsar el botón P del receptor y soltarlo.
2 Se enciende el LED rojo por 3 segundos, luego se apaga por
1 segundo y se enciende otra vez por 5 segundos.
3 Pulsar, con el LED rojo encendido, el botón del transmisor que
se desea asociar al canal 1.
4 Es posible insertar otros transmisores seguidamente, basta
pulsar una tecla antes de que se cumplan 5 segundos de la
inserción del transmisor anterior.
5 Al terminar, esperar 5 segundos, el receptor sale de la pro-
gramación.
Memorización de los transmisores – Aprendizaje remoto
Si se dispone de un transmisor ya memorizado en el receptor,
es posible efectuar el aprendizaje remoto por radio (sin tener
que acceder al pulsador P del receptor).
Para ello, hay que hacer lo siguiente:
1 Pulsar la tecla escondida del transmisor ya memorizado.
2 Pulsar dentro de 5 segs. la tecla del transmisor ya memorizado,
correspondiente al canal a asociar al nuevo transmisor.
3 Pulsar dentro de 5 segs. la tecla del nuevo transmisor a asociar
al canal seleccionado en el punto 2.
4 El receptor memoriza el nuevo transmisor y sale inmediata-
mente de la programación.
Programación
Tanto para guardar los transmisores como para programar la
modalidad de cada canal, hay que utilizar el botón “P” (véase
Fig.1/2). Para pasar de una fase de programación a la siguiente,
pulsar el botón P sin dejar pasar más de 3 segundos entre
presión y presión.
Una vez seleccionada la fase deseada, esperar por 3 ó 4
segundos, el LED indicará que se ha entrado en la programación
(véase la columna “Operaciones”).
En la tabla 1 aparecen las diferentes fases de programación.
Page 22

22
23
TABLA 1
Fase LED Función Operaciones
0 Apagado Ninguna función Estado normal.
Pulsar el botón P
1 Rojo Memorización del 1° canal radio
Se enciende el LED rojo, esperar 3 segs., el LED se apaga y se enciende otra
vez, pulsar dentro de 5 segs. la tecla del transmisor que se desea asociar al
canal 1.*
Pulsar dentro de 3 segs. el botón P
2 Verde
Memorización del 2° canal radio
(sólo para receptores bicanales
“RR.2”)
Se enciende el LED verde, esperar 3 segs., el LED se apaga y se enciende otra vez, pulsar dentro de 5 segs. la tecla del transmisor que se desea
asociar al canal 2.*
Pulsar dentro de 3 segs. el botón P
3 Anaranjado
Memorización automática del
1° y 2° canal radio (sólo para
receptores bicanales “RR.2”)
Se enciende el LED anaranjado, esperar 3 segs., el LED se apaga y se enciende otra vez, pulsar dentro de 5 segs. una tecla cualquiera del transmisor.
La tecla 1 se asociará al canal 1 y la tecla 2 al canal 2.*
Pulsar dentro de 3 segs. el botón P
4
Rojo
parpadeante
Para la configuración de los
tiempos del canal 1
El LED emite 5 destellos rápidos. Pulsando el botón P durante estos 5 destellos, se pasa a la fase siguiente. Después de estos 5 destellos rápidos, se
entra en el menú Tiempos. Véase el párrafo “Modalidad tiempos”.
Pulsar dentro de 3 segs. el botón P
5
Verde
parpadeante
Para la configuración de los
tiempos del canal 2 (sólo para
receptores bicanales “RR.2”)
El LED emite 5 destellos rápidos. Pulsando el botón P durante estos 5 destellos, se pasa a la fase siguiente. Después de estos 5 destellos rápidos, se
entra en el menú Tiempos. Véase el párrafo “Modalidad tiempos”.
Pulsar dentro de 3 segs. el botón P
0 LED apagado Ninguna función Estado normal.
Page 23

23
* Después de presionar la tecla del 1° transmisor, el receptor queda
en espera por 5 segundos para memorizar otro transmisor. Por tanto,
es posible insertar de forma secuencial todos los transmisores a
asociar al canal deseado. Al pasar los 5 segundos de espera, el
receptor sale de la fase de programación.
En el caso de inserciones secuenciales, es conveniente desconectar
la antena momentáneamente, pues así se reduce el alcance del
receptor y la posibilidad de recibir interferencias.
Nota: Una vez que el receptor haya entrado en cualquier fase de
programación, no permite pasar a la fase siguiente.
Si se desea programar más de una función, esperar a que termine
la programación en acto, momento en que se apagará el LED, y
efectuar luego la nueva programación.
Modalidad tiempos
La programación de esta función es necesaria solamente si se
desea configurar uno de los dos canales como temporizado (de
1 seg. a 10 min.), o bien con funcionamiento biestable. El modo
de funcionamiento por defecto está configurado por impulsos
(1 seg. de conmutación).
Para programar la modalidad tiempos, hay que entrar en la fase
4 (para el canal 1) o en la fase 5 (para el canal 2) y esperar a que
terminen los 5 destellos rápidos.
Se entra ahora en el submenú Tiempos, descrito en la siguiente
tabla 2.
TABLA 2
Fase LED Función Operaciones
1
1 destello
rápido
Programación
Modo por impulsos
Si no se pulsa el botón P, al cabo de 5 segundos se restablece por defecto la
modalidad por impulsos del canal (1 seg. de conmutación).
Pulsar el botón P por al menos 2 segs.
2
2 destellos
rápidos
Selección del tiempo de
conmutación
Si no se pulsa el botón P, al cabo de 5 segundos el LED comienza a parpadear con frecuencia de 1 destello al segundo, a la espera de que se presione
el botón P.
El número de destellos efectuados antes de presionar el botón P selecciona
el tiempo de conmutación, como se indica en la tabla 3.
Pulsar el botón P por al menos 2 segs.
3
3 destellos
rápidos
Programación
Modo Biestable
Si no se pulsa el botón P, al cabo de 5 segundos el canal se programa con
modo Biestable: con cada impulso el relé cambia de estado.
Pulsar el botón P por al menos 2 segs.
4 Apagado Ninguna función Estado normal.
Page 24

24
25
TABLA 3
N° Destellos LED
Tiempo de
conmutación
N° Destellos LED
Tiempo de
conmutación
N° Destellos LED
Tiempo de
conmutación
1
1s
11
30s
21
1m
2
2s
12
60s
22
2m
3
3s
13
1,5m
23
3m
4
4s
14
2m
24
4m
5
5s
15
2,5m
25
5m
6
6s
16
3m
26
6m
7
7s
17
3,5m
27
7m
8
8s
18
4m
28
8m
9
9s
19
4,5m
29
9m
10
10s
20
5m
30
10m
Características técnicas
RR.1/2WBV - RR.1/2WIV
Frecuencia
433,92 MHz
Alimentación
21÷28 Vac
12÷28 Vdc
Alcance
sin antena 30m
con antena 100m
Canales
1/2
Contacto del relé
1A/24Vdc
Temp. de funcionamiento
-20/+70°C
Consumo en reposo
10 mA
Consumo 1 canal o 2 canales excitados
42 mA
Consumo 1 canal y 2 canales excitados
66 mA
Cancelación completa de la memoria
Desconectar la corriente del receptor, pulsar y mantener
presionado el botón P. Volver a conectar la corriente de
alimentación manteniendo presionado el botón P del receptor.
El LED se enciende con color rojo y al cabo de 5 segundos
empieza a parpadear rápidamente con secuencia verde-rojo,
soltar el botón. Esperar a que se apague el LED, ahora la
memoria se ha cancelado completamente.
Page 25

25
POLSKI
Odbiorniki radiowe 433,92MHz jedno/dwukanałowe
rolling-code kompatybilne z systemem ADVANTAGE
Dostępne ze złączem sprzęgającym molex lub w skrzynce
plastykowej z listwą zaciskową. Pamięć standardowa może
pomieścić maksymum 512 modułów transmisyjnych rolling-code.
Dostępna jest wersja specjalna z pamięcią mogącą pomieścić 2048
modułów transmisyjnych. Wypełnienie pamięci sygnalizowane jest
przez 10 mignięć światła Pomarańczowego.
Uwaga: Ręczny komunikator programowania Advantage i
odpowiadający mu system sterowania umożliwiają stosowanie
niektórych funkcji zaawansowanych, opisanych w specjalnych
instrukcjach do których odsyłamy dla uzyskania dodatkowych
informacji.
Wskazówki dla użytkowania
Dla zapewnienia dobrego odbioru zaleca się instalowanie anteny z
dala od mas metalowych i ustawianie odbiorników z zachowaniem
należytych pomiędzy nimi odstępów. Przy braku anteny odbiór jest
znacznie ograniczony.
Wpisywanie do pamięci modułów transmisyjnych
Procedura uproszczona
Dla prostego wpisania do pamięci jednego lub kilku modułów
transmisyjnych służących do uaktywniania pierwszego kanału,
należy wykonać poniższą procedurę uproszczoną:
1 Nacisnąć przycisk P odbiornika po czym zwolnić go.
2 Zaświeci się na 3sek Czerwony LED, po czym zgaśnie on na 1sek i
ponownie zaświeci się na 5sek.
3 Nacisnąć, podczas świecącego się Czerwonego LEDA, przycisk
modułu transmisyjnego wybranego do zestawienia z kanałem 1.
4 Pozostałe moduły transmisyjne można w następnej kolejności
wpisywać do pamięci po naciśnięciu przycisku w przeciągu 5sek
od poprzedniego wpisywania.
5 Po zakończeniu procedury odczekać 5sek, odbiornik wyłączy się z
programowania.
Wpisywanie do pamięci modułów transmisyjnych
zdalne Przywoływanie
Jeśli któryś z modułów transmisyjnych został już wpisany do pamięci
odbiornika to można przywoływać go zdalnie radiem (bez używania
przycisku P na odbiorniku).
Postępować według poniższych wskazań:
1 Nacisnąć zakryty przycisk wywoławczy wpisanego już do pamięci
modułu transmisyjnego.
2 Trzymać wciśnięty, przez 5sek, przycisk wpisanego do
pamięci modułu transmisyjnego odpowiadającego kanałowi
wyznaczonemu do zestawienia z nowym modułem
transmisyjnym.
3 Trzymać wciśnięty, przez 5sek, przycisk nowego modułu
transmisyjnego do zestawienia z wybranym kanałem, zob. punkt 2.
4 Odbiornik utrwala w pamięci wpisywane moduły transmisyjne i
natychmiast wyłącza się z programowania.
Programowanie
Wpisywanie do pamięci modułów transmisyjnych i nastawianie
układów poszczególnych kanałów wykonywane jest za pomocą
przycisku “P” (zob. Rys.1/2). By przejść z jednej fazy programowania
do następnej należy naciskać przycisk P z przerwami nie dłuższymi
niż 3sek pomiędzy jednym naciśnięciem a drugim.
Po wybraniu odpowiedniej fazy, odczekać przez około 3/4sek,
sygnalizujący LED wskaże wejście do programu (zob. kolumna
“Czynności”).
W Tabeli 1 wskazane są różne fazy programowania.
Page 26

26
27
TABELA 1
Faza LED Funkcja Czynności
0 Zgaszony Bez funkcji Stan normalny.
Wcisnąć przycisk
1 Czerwony
Utrwalanie w pamięci 1-go kanału
radiowego
Zaświeci się Czerwony LED, odczekać3sek, LED zgaśnie i ponownie się
zaświeci, nacisnąć w przeciągu5sek przycisk modułu transmisyjnego
wybranego do zestawienia z kanałem 1.*
Nacisnąć w ciągu3sek przycisk P
2 Zielony
Utrwalanie w pamięci 2-go kanału
radiowego (tylko dla odbiorników
dwukanałowych “RR.2”)
Zaświeci się LED Zielony, odczekać3sek, LED zgaśnie i ponownie
się zaświeci, nacisnąć w ciągu5sek przycisk modułu transmisyjnego
wybranego do zestawienia z kanałem 2.*
Nacisnąć w ciągu3sek przycisk P
3 Pomarańczowy
Automatyczne wpisywanie
do pamięci 1-go i 2-go kanału
radiowego (tylko dla odbiorników
dwukanałowych “RR.2”)
Zaświeci się LED Pomarańczowy, odczekać3sek, LED zgaśnie i ponownie
się zaświeci, nacisnąć w ciągu5sek jakikolwiek przycisk modułu
transmisyjnego.
Przycisk 1 zostanie zestawiony z kanałem 1, przycisk 2 zostanie
zestawiony z kanałem 2.*
Nacisnąć w ciągu3sek przycisk P
4
Czerwony
migający
Nastawianie czasów kanału 1
LED mignie szybko 5 razy. Naciskając przycisk P podczas tych 5-ciu
mignięć przechodzi się do fazy następnej. Po 5-ciu szybkich mignięciach
wchodzi się do menu Czasowy. Zob. Paragraf “Układy czasowe
Nacisnąć w ciągu3sek przycisk P
5
Zielony
migający
Nastawianie czasów kanału 2
(tylko dla odbiorników
dwukanałowych “RR.2”)
LED mignie szybko 5 razy. Naciskając przycisk P podczas tych 5-ciu
mignięć przechodzi się do fazy następnej. Po upływie 5-ciu szybkich
mignięć wchodzi się do menu Czasowy. Zob. Paragraf “Układy czasow
Nacisnąć w ciągu3sek przycisk P
0 LED zgaszony Bez funkcji Stan normalny.
Page 27

27
* Po naciśnięciu przycisku 1-go modułu transmisyjnego, odbiornik odczekuje
przez 5sek na następny moduł transmisyjny do utrwalenia w pamięci. W
ten sposób możliwe jest wpisywanie po kolei wszystkich modułów transmisyjnych do zestawienia z obranym kanałem. Po upływie 5sek oczekiwania odbiornik wyłącza się z fazy programowania. W przypadku wpisywania
do pamięci w/g ustalonej sekwencji zaleca się chwilowe odłączenie anteny,
w ten sposób ogranicza się zasięg odbiornika a tym samym możliwość
odbierania zakłóceń.
Uwaga: Odbiornik, po wejściu do którejkolwiek z faz programowania,
uniemożliwia przejścia do fazy następnej.
W przypadku gdy zamierza się zaprogramować więcej funkcji, nale ży
odczeka ć na zakończenie dokonujące go się pro gramowani a, sygnalizowanego zgaśnięciem światła LED, i dopiero prz ystąpić do nowego
programowania.
Układ czasowy
Programowanie tej funkcji jest niezbędne tylko wówczas gdy
zamierza się nastawić jeden z dwóch kanałów na układ czasowy
(od 1sek do 10 min), lub na funkcjonowanie dwustabilne. Default
nastawiony jest na układ impulsowy (1sek komutacji).
By nastawić układ czasowy należy wejść do fazy 4 (dla kanału 1)
lub do fazy 5 (dla kanału 2) i odczekać do momentu wykonania 5
szybkich mignięć.
W ten sposób przechodzi się do okna dialogowego dla układu
Czasowego, opisanego w poniższej tabeli 2.
TABELA 2
Faza LED Funkcja Czynności
1
1 mignięcie
szybkie
Nastawienie
układu impulsowego
Jeśli przycisk P nie zostanie wciśnięty, to po 5sek zostanie przywrócone dla
kanału default: Impulsowe (1sek komutacji).
Wcisnąć przycisk Pna co najmniej 2sek
2
2 mignięcia
szybkie
Wybieranie czasu
Komutacji
Jeśli przycisk P nie zostanie wciśnięty, to po 5sek LED rozpocznie miganie z
częstotliwością 1 światła na sekundę, w oczekiwaniu na wciśnięcie przycisku P.
Ilość mignięć wykonanych przed wciśnięciem przycisku P decyduje o czasie
komutacji, jak wykazuje tabela
Wcisnąć przycisk Pna co najmniej 2sek
3
3 mignięcia
szybkie
Nastawienie
układu Dwustabilnego
Jeśli przycisk P nie zostanie wciśnięty, to po 5sek kanał zostanie nastawiony na
układ Dwustabilny: do każdego impulsu przekaźnik elektryczny zmienia stan.
Wcisnąć przycisk Pna co najmniej 2sek
4 Zgaszony Bez funkcji Stan normalny.
Page 28

28
TABELA 3
Ilość Mignięć LED Czas komutacji Ilość Mignięć LED Czas komutacji Ilość Mignięć LED Czas komutacji
1
1s
11
30s
21
1m
2
2s
12
60s
22
2m
3
3s
13
1,5m
23
3m
4
4s
14
2m
24
4m
5
5s
15
2,5m
25
5m
6
6s
16
3m
26
6m
7
7s
17
3,5m
27
7m
8
8s
18
4m
28
8m
9
9s
19
4,5m
29
9m
10
10s
20
5m
30
10m
Całkowite opróżnianie pamięci
Wyłączyć odbiornik z sieci zasilania. Wcisnąć przycisk P. Podłączyć
napięcie trzymając wciąż wciśnięty przycisk P na odbiorniku.
Zaświeci się czerwony LED, po 5sek rozpocznie on szybkie miganie
z sekwencją kolorów zielony-czerwony, po czym należy zwolnić
przycisk. Odczekać aż zgaśnie LED. W tym momencie pamięć jest już
kompletnie opróżniona.
Dane techniczne RR.1/2WBV - RR.1/2WIV
Częstotliwoś
433,92 MHz
Zasilanie
21÷28 Vac
12÷28 Vdc
Zasięg
bez anteny 30m
z anteną 100m
Kanały
1/2
Styk przekaźnika elektr.
1A/24Vdc
Temp. Działania
-20/+70°C
Pobór prądu podczas spoczynku
10 mA
Pobór prądu 1 ch lub 2 ch po pobudzeniu
42 mA
Pobór prądu 1 ch i 2 ch po pobudzeniu
66 mA
Page 29

Page 30

Page 31

Page 32

AUTOMATISMI BENINCÀ Srl
Via Capitello, 45 - 36066 Sandrigo (VI) - Tel. 0444 751030 r.a. - Fax 0444 759728
 Loading...