


DNE 61100 DPX
DNE 61120 DPX
No Frost

Contents |
|
|
1 |
The refrigerator |
|
|
|
> |
2 |
Warnings |
>4 |
|
Safety warnings............................................................................ |
4 |
|
Electrical safety............................................................................ |
4 |
3 |
Placing and assembly of your refrigerator |
>5 |
|
Preparation................................................................................... |
5 |
|
Points to be considered when transporting the product:.............. |
5 |
|
Dimensions of your refrigerator.................................................... |
6 |
|
Usage area measures.................................................................. |
6 |
|
Adjusting the legs......................................................................... |
6 |
|
Operating your refrigerator........................................................... |
7 |
4 |
Using your refrigerator |
>8 |
5
6
7
8
Temperature setting buttons and temperature control................. |
8 |
Full protection triangle:............................................................... |
11 |
Dual cooling system:.................................................................. |
11 |
Using the accessories................................................................ |
12 |
Freezing fresh food.................................................................... |
15 |
Recommendations for preservation of frozen food.................... |
15 |
Placing the food......................................................................... |
16 |
Replacing the interior light module............................................. |
16 |
Things to be done for saving energy.......................................... |
16 |
Deep-freeze information |
>17 |
Cleaning your refrigerator |
>18 |
Service |
>18 |
Recommended solutions for the problems |
>19 |
1 EN

1 he refrigerator
3
5 


 1
1 
6
4
7
8
7
29 
10
7
11
12
13
15
16
1Freezer compartment
2Fridge compartment
3Freezer compartment interior light
4Icematic
5Fresh Freeze compartment
6Freezer compartment shelf
7Odor filter (Carbon)
8Fridge compartment glass shelves
9Adjustable bottle holder
10Fridge compartment interior light
11Second floor crisper
17
22
17
20
18
23
18
19
18
18
21 14 16
12Crisper cover
13Crisper or chiller compartment
14Crisper or chiller compartment adjustment slider
15Ventilation lid
16Adjustable front legs
17Freezer compartment door racks
18Fridge compartment door racks
19Bottle holder
20Egg holder
21Blue light
22Temperature setting panel and indicator
23Water Spring
• Figures that take place in this instruction manual are schematic and may not correspond exactly with your product. If the subject parts are not included in the product you have purchased, then it is valid for other models.
2 EN

2 Warnings
Safety warnings
•When you want to dispose/scrap the product, we recommend you to consult the authorized service in order to learn the required information and authorized bodies.
•Do not damage the cooling circuit.
•Do not use any electrical tools other than those recommended by the manufacturer inside the food storage compartments of the product.
•Consult your authorized service for all
your questions and problems related to the refrigerator. Do not intervene or let someone intervene to the refrigerator without notifying the authorized services.
•Do not eat cone ice cream and ice cubes immediately after you take them out of the freezer compartment! (This may cause frostbite in your mouth.)
•Do not put bottled and canned liquid beverages in the freezer compartment. Otherwise, these may burst.
•Do not touch frozen food by hand; they may stick to your hand.
•Vapor and vaporized cleaning materials should never be used in cleaning and defrosting processes of your refrigerator. In such cases, the vapor might get in contact with the electrical parts and cause short circuit or electric shock.
•Never use the parts on your refrigerator such as kick plate or door as a means of support or step.
•Do not use electrical devices inside the refrigerator.
•Do not operate a damaged refrigerator. Consult your service if you have any doubts.
•Do not damage the parts, where the refrigerant is circulating, with drilling or cutting tools. The refrigerant that might blow out when the gas channels of the evaporator, pipe extensions or surface coatings are punctured may cause skin irritations and eye injuries.
•Do not cover or block the ventilation holes on your refrigerator with any material.
•Only authorized service personnel may make any repair on electrical appliances.
Repairs performed by incompetent persons may create a risk for the user.
•In case of any failure or during a maintenance or repair work, disconnect your refrigerator’s mains supply by either turning off the relevant fuse or unplugging your appliance.
•Be careful not to pull by the cable when pulling the plug out.
•Electrical safety of your refrigerator shall be guaranteed only if the earth system in your house complies with standards.
•Do not allow children play with your refrigerator. They might harm themselves and the refrigerator. (E.g. do not allow them hang from the door.)
•Place the beverage with higher proofs tightly closed and vertically.
•Flammable items or products that contain flammable gases (e.g. spray) as well as the explosive materials should never be kept in the appliance.
•Do not use mechanical devices or other means to accelerate the defrosting process, others than those recommended by the manufacturer.
Electrical safety
This product is designed for indoor use. It is not appropriate to use it outdoor even if the place is covered with a roof.
Exposing the product to rain, snow, sun and wind is dangerous with respect to electrical safety.
If the power cable is damaged, it must be changed by the manufacturer or customer services in order to avoid potential risks to you. Caution: Never plug the refrigerator into the wall outlet during installation. Otherwise, risk of death or serious injury may arise.
3 EN

This appliance is not intended for use by persons (including children) with reduced physical, sensory or mental capabilities, or lack of experience and knowledge,unless they have been given supervision or instruction concerning use of the appliance by a person responsible
for their safety.
HCA Warning
If your product is equipped with a cooling system that contains R600a:
This gas is flammable. Therefore, pay attention to not damaging the cooling system and piping during usage and transportation. In the event of damage, keep your product away from potential fire sources that can cause the product catch a fire and ventilate the room in which the unit is placed.
Ignore the warning.
If your product is equipped with a cooling system that contains R134a.
You can see the gas used in production of your product on the rating plate that is located on the left inner part of it.
Never dispose the product in fire.
4 EN

3 Placing and assembly of your refrigerator
• Please remember that the
manufacturer shall not be held
liable if the information given in the instruction manual is not observed. This product is designed for domestic use.
Prior to operating your refrigerator, please read the instruction manual carefully that includes important information such as installation, usage and maintenance of your product.
Preparation
Your refrigerator should be installed at least 30 cm away from heat sources such as hobs, ovens, central heater and stoves and at least 5 cm away from electrical ovens and should not be located under direct sunlight.
•The ambient temperature of the room where you install your refrigerator should at least be 10°C. Operating your refrigerator under cooler conditions than this is not recommended with regard to its efficiency.
•Please make sure that the interior of your refrigerator is cleaned thoroughly.
•If two refrigerators are to be installed side by side, there should be at least 2 cm distance between them.
•Your refrigerator must run smoothly without any vibration. To ensure this, maintain the balance of your refrigerator on the floor by turning the adjustable front legs clockwise or counterclockwise. This should be done before the food is placed in the refrigerator.
•When you operate your refrigerator for
the first time, please observe the following instructions during the initial six hours.
-Temperature adjustment button should not be turned off.
-The door should not be opened frequently.
-It must be operated empty without any food in it.
-Do not unplug your refrigerator; if a power failure occurs out of your control, please see the warnings in section “Things to be done before calling the authorized service”.
•Original packaging and foam materials
should be kept for future transportations or moving.
Points to be considered when transporting the product:
1.Your refrigerator must be emptied and cleaned prior to any transportation.
2.Shelves, accessories, crisper and etc. in your refrigerator must be fastened securely by adhesive tape against any jolt before repackaging.
3.Packaging must be tied with thick tapes and strong ropes and the rules of transportation printed on the package must be followed.
Please remember…
Every recycled material is an indispensable source for the nature and for our national resources.
If you wish to contribute to recycling the packaging materials, you can get further information from the environmental bodies or local authorities.
If the entrance door of the room where the refrigerator will be installed is not wide enough for the refrigerator to pass through, than call the authorized service to have them remove the doors of your refrigerator and pass it sideways through the door.
1.Install your refrigerator to a place that allows ease of use.
2.Keep your refrigerator away from heat sources, humid places and direct sunlight.
3.There must be appropriate air ventilation around your refrigerator in order to achieve an efficient operation.
If the refrigerator is to be placed in a recess in the wall, there must be at least 5 cm distance with the ceiling and at least 5 cm with the wall. If the floor is covered with a carpet, your product must be elevated 2.5 cm from the floor.
4.Place your refrigerator on an even floor surface to prevent jolts.
5.Do not keep your refrigerator in ambient temperatures under 10°C.
5 EN
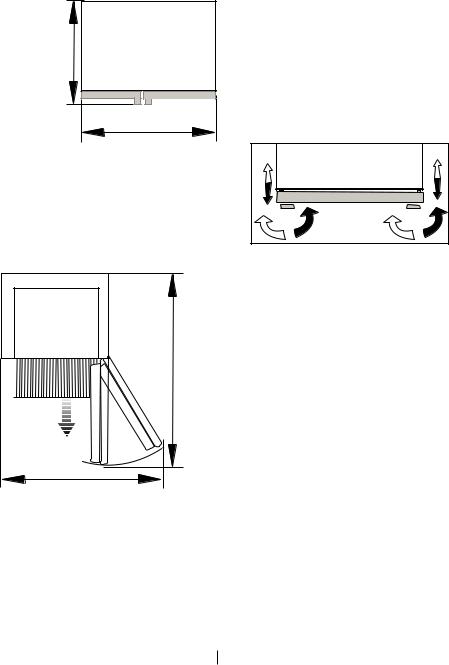
Dimensions of your refrigerator
74.5 cm
84 cm
Usage area measures
Following figure shows the required place to allow you use your refrigerator most efficiently.
134 cm
143.5 cm
Adjusting the legs
If your refrigerator is unbalanced;
1. You can balance your refrigerator by turning the front legs of it as illustrated in the figure. The corner where the leg exists is lowered when you turn in the direction of black arrow and raised when you turn in the opposite direction. Taking help from someone to slightly lift the refrigerator will facilitate this process.
Changing the door opening direction
Opening direction of your refrigerator’s door can not be changed.
6 EN

Operating your refrigerator
Before you start using the fridge/freezer check the following:
1.Have the feet been adjusted so that the product stands level?
2.Is the interior of the refrigerator dry and can the air circulate freely in the rear of it?
3.Clean the interior of the refrigerator
as recommended in the “Cleaning your refrigerator” section.
4.Plug the refrigerator into the wall outlet.
• When the door is open the respective interior light will come on.
5.You will hear a noise as the compressor starts up. The liquid and gases sealed within the refrigeration system may also give rise to noise, even if the compressor is not running and this is quite normal.
Due to the operation of fans inside the appliance, overall noise level is slightly higher in comparison to non-frost free appliances. This is quite normal and is not a fault.
6.Front edges of the refrigerator may feel warm. This is normal. These areas are designed to be warm to avoid condensation.
7.Do not fill the interiors of the refrigerator in initial operation for the first 12 hours.
8.When the compartments reach the desired temperatures fans will stop.
9.Especially pay special attention to prevent the foodstuffs, in particular, small pieces, such as rice, peas and beans from running into the fan protectors and air flow ducts. These may cause clogging of the cooling system and a decrease in the efficiency of the device.
10.The factory set temperature is 4°C in average for fridge compartment and -18°C maximum for freezer compartment.
11.The compressor will start running approximately 8 minutes after the refrigerator
is plugged in to protect the electronic components of your appliance. After startup of the compressor, compartment temperatures will reach to the setup temperatures in 24 hours depending on the ambient temperature and load status of your refrigerator.
12. Pay attention to the following points during the first 24 hours of the operation:
•Do not open the doors frequently.
•Do not overload your refrigerator.
•Do not put hot food.
7 EN
4 Using your refrigerator
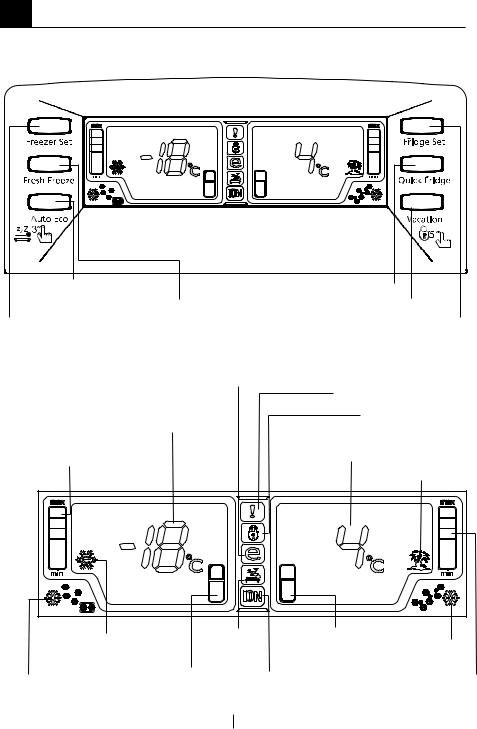
Temperature setting buttons and temperature control
Control buttons allow you to make the settings of your refrigerator easily and without opening the doors. Thus, heat loss is avoided.
Eco Extra /Sleep |
|
Quick Cool Button |
Function Button |
|
Vacation Button / Key Lock |
|
Fresh Freeze Button |
|
|
|
Freezer Set Button |
Fridge Set Button |
|
|
|
|
|
Economy Mode Indicator |
High Temperature/ Error Warning Indicator |
|
|
|
|
Freezer Compartment |
Key Lock Indicator |
|
Temperature Setting Indicator |
|
|
|
Fridge Compartment Temperature |
|
Freezer Compartment |
Setting Indicator |
|
Temperature indicator |
Vacation Indicator |
|
|
|
|
Sleep |
Fridge |
|
Eco Extra Indicator |
Function |
Compartment |
Quick Cool |
|
Indicator |
Indicator |
Function |
|
|
|
Indicator |
Fresh Freeze Function |
Freezer |
Ionizer Indicator |
Fridge Compartment |
|
Compartment |
||||
Light |
||||
Indicator |
Indicator |
Temperature Indicator |
||
|
8 EN

Fresh Freeze Function
Fresh Freeze indicator segments will flash when the Fresh Freeze function is active. To cancel this function, press the Fresh Freeze button again. Fresh Freeze indicator will turn off and return to its normal settings. Fresh Freeze will cancel itself automatically after about 12 hours if you do not cancel it.
If you want to freeze large amounts of fresh food, press the fresh freeze button 24 hours before putting the food into the freezer compartment.
Quick Cool Function
When you press the Quick Cool button, the temperature of the compartment will be colder than the adjusted values. This function can be used for food placed in the fridge compartment and required to be cooled down rapidly.
After activating the Quick Cool function by pressing the Quick Cool button, Quick
Cool indicator will glow. Quick Cool indicator segments will flash. To cancel this function press Quick Cool button again. Quick Cool indicator will turn off and return to its normal settings. Quick Cool function will cancel itself automatically within 2 hours in case you do not cancel it.
Vacation Function
In case the fridge compartment will not be used for a long time, the usage of the fridge compartment may be cancelled by pressing on the Vacation Button. By this way, the refrigerator may operate more economically. Press on Vacation Button to activate this function. Vacation indicator lights up, “-” is displayed in the Fridge Compartment indicator and Fridge Compartment temperature indicators and Fridge Compartment indicator go out. This function is cancelled when any button is pressed. Empty the
fridge compartment before switching your refrigerator to vacation status. Fridge
compartment door must be kept closed in this status.
Eco-Extra Function (Special Economy function)
When Eco Extra button is pressed, Eco Extra function is activated and Eco Extra indicator light comes on. If the door of the fridge compartment is kept closed for a long time when this function is selected, the fridge compartment will switch to a more economic operation mode to safe electricity automatically. When the Eco Extra button is pressed again and the Fresh Freeze button is pressed, this function is deactivated.
Key Lock Button
The key lock is activated and a short “beep” signal is heard when this button is pressed for 5 seconds. All buttons are deactivated. If you want to deactivate key lock press the button again for 5 seconds.
Sleep Function
Sleep function is activated and a short “beep” signal is heard when the Eco Extra button
is pressed for 3 seconds. Sleep Function indicator comes on as well. Your refrigerator operates in silent mode maximum for 45 minutes when this function is active. Press the Eco Extra button again for 3 seconds to cancel this function.
Ionizer Indicator Light
Ionizer indicator light lights up continuously. This light indicates that your refrigerator is protected against the bacteria.
9 EN
High Temperature/ Error Warning
Indicator Light
This light comes on during long lasting power failures, high temperature failures and error warnings.
Economy Function Indicator Light
This indicator light comes on when the freezer compartment is set to -18°C or the special economy function is activated.
Freezer Compartment Temperature
Setting Indicator
Indicates the temperature set for the Freezer Compartment.
Fridge Compartment Temperature
Setting Indicator
Indicates the temperature set for the Fridge Compartment.
Freezer Compartment Temperature
Indicator
Indicates the temperature in the Freezer Compartment.
Fridge Compartment Temperature
Indicators
Indicates the temperature in the Fridge Compartment.
10 EN

Operating your refrigerator |
|
Dual cooling system: |
|||||
The factory setup temperature during the first |
|
Your refrigerator is equipped with two |
|||||
operation is 4 °C for fridge compartment and |
|
separate cooling system to cool the fresh food |
|||||
-18 °C for freezer compartment. |
|
compartment and freezer compartment. Thus, |
|||||
Your refrigerator’s compressor will start |
|
air in the fresh food compartment and freezer |
|||||
|
compartment do not get mixed. Thanks to |
||||||
running approximately 1 minutes after the |
|
||||||
|
these two separate cooling systems, cooling |
||||||
refrigerator is plugged in for the first time. After |
|
||||||
|
speed is much higher then other refrigerators. |
||||||
startup of the compressor, compartment |
|
||||||
|
Odors in the compartments do not get mixed. |
||||||
temperatures will reach to the setup |
|
||||||
|
Also additional power saving is provided since |
||||||
temperatures in 24 hours depending on the |
|
||||||
|
the defrosting is performed individually. |
||||||
ambient temperature and load status of your |
|
||||||
|
|
|
|||||
refrigerator. |
|
|
|
|
Setting the fridge compartment |
||
When your refrigerator is in this mode, pay |
|
||||||
|
temperature |
||||||
attention to the following points during the |
|
||||||
first 12 hours, or 24 hours depending on the |
|
Fridge compartment temperature can be set at |
|||||
ambient temperature. |
|
|
|
|
one of the following temperatures: |
||
Full protection triangle: |
|
8, 7, 6, 5, 4, 3 and 2°C. Press the button to |
|||||
|
change. The temperature will decrease by |
||||||
Hygiene: Odor filter in the air duct of the fridge |
|
1°C. Every time you press the button, the |
|||||
|
temperature will go down and then return to |
||||||
compartment helps to clean the air in the |
|
||||||
|
the highest setting. Release at the desired |
||||||
refrigerator. This filter reduces the formation of |
|
||||||
|
temperature and the new set temperature will |
||||||
bad odors by means of its coating. |
|
||||||
|
be stored. |
||||||
Silver:Inner surfaces of the refrigerator are |
|
||||||
|
If you think that your food is colder than you |
||||||
rendered antibacterial by means of the silver- |
|
desired, you can adjust the temperature setting |
|||||
ion additive. Thus, growth and reproduction of |
|
of fridge compartment to 7 or 8. |
|||||
bacteria on interior body parts are prevented. |
|
Setting the freezer compartment |
|||||
Ion: Air is ionized by means of the ionizer |
|
||||||
|
temperature |
||||||
system in the fridge compartment air duct. |
|
||||||
Thanks to this system, air-borne bacteria and |
|
Freezer temperature can be set at one of the |
|||||
particles that cause odor are removed. |
|
following temperatures : -18, -19, -20, -21, -22, |
|||||
|
|
|
|
|
|
-23 and -24°C. Press the button to change. |
|
|
|
|
|
|
|
The temperature will decrease by 1°C. Every |
|
|
|
|
|
|
|
time you press the button, the temperature will |
|
|
|
|
|
|
|
go down and then return to the highest setting. |
|
|
|
|
|
|
|
Release at the desired temperature and the |
|
|
Freezer Compartment |
|
Fridge |
|
|
new set temperature will be stored. |
|
|
|
|
|
|
|||
|
|
|
|
|
|
||
|
|
Compartment |
|
|
Explanations |
|
|
|
Adjustment |
|
|
|
|
||
|
|
Adjustment |
|
|
|
|
|
|
|
|
|
|
|
|
|
|
-18°C |
|
4°C |
|
|
This is the normal recommended setting. |
|
|
-20,-22 or -24°C |
|
4°C |
|
|
These settings are recommended when the |
|
|
|
|
|
ambient temperature exceeds 30°C. |
|
||
|
|
|
|
|
|
|
|
|
Fresh Freeze indicator |
|
|
|
|
Use when you wish to freeze your food in a short |
|
|
|
4°C |
|
|
time. Your refrigerator will return to its previous |
|
|
|
flashes |
|
|
|
|
||
|
|
|
|
|
mode when the process is over. |
|
|
|
|
|
|
|
|
|
|
|
|
|
|
|
|
|
|
|
|
|
|
|
|
If you think that your fridge compartment is not |
|
|
-18°C or colder |
|
2°C |
|
|
cold enough because of the hot conditions or |
|
|
|
|
|
|
|
frequent opening and closing of the door. |
|
|
|
|
|
|
|
|
|
|
|
|
Quick Cool |
|
|
You can use it when your fridge compartment is |
|
|
-18°C or colder |
|
indicator |
|
|
overloaded or if you wish to cool down your food |
|
|
|
|
flashes |
|
|
rapidly. |
|
|
|
11 |
|
EN |
|||
|
|
|
|||||
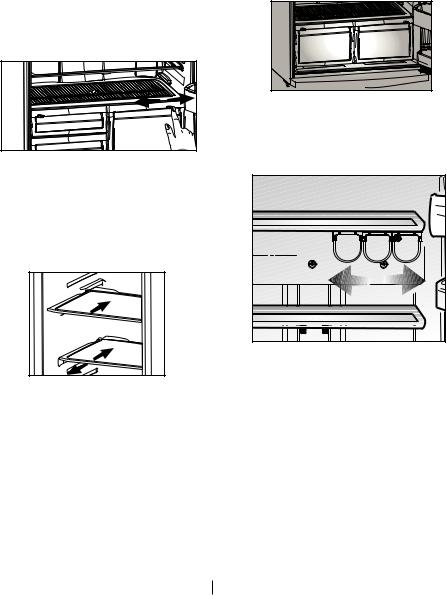
Using the accessories
Humidity control in the crisper
Humidity level can be adjusted by sliding the humidity adjustment slider to the right or left.
•If you want to maintain humidity in this compartment, set the humidity adjustment slider to the closed position. (Right)
•If you want to eliminate humidity in this compartment, set the humidity adjustment slider to the open position. (Left)
Blue light
Foodstuff stored in the crispers that are enlightened with a blue light continue their photosynthesis by means of the wavelength effect of blue light and thus, preserve their freshness and increase their vitamin content.
Sliding shelves
Sliding shelves can be pulled out a little bit in order to easily reach the food placed at the rear of the shelf in the fridge compartment and also for easier cleaning. Sliding shelves must be lifted up slightly before pulling forwards.
Adjustable bottle holder
You can use the adjustable bottle holders without sacrificing any place by sliding them to left or right or by interlacing them.
 1 2
1 2
Installing the adjustable bottle holders
You mast install the holders into the channels in the following order in order to use them appropriately.
-Bottle holder to remain at the left side to the front channel in the rail.
-Bottle holder to remain in the middle to the middle channel in the rail.
-Bottle holder to remain at the rear side to the rear channel in the rail.
Verify the position of the horizontal wires during installation.
Icematic
12 EN
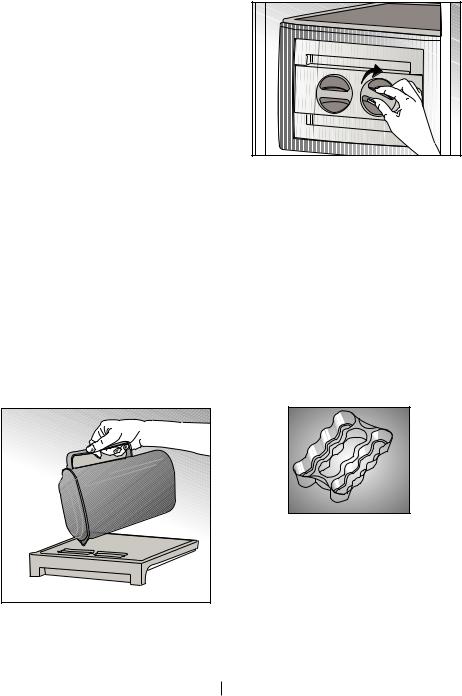
•When the Icematic water supply reservoir (1) is removed from its place in order to fill it up, it must be replaced within two minutes after it is filled with water. The nozzle of the system will open and the Icematic cells will be filled with water automatically as soon as the cartridge is seated in its place. Your ice will be ready approximately in two 2 hours.
•Do not remove the Icematic (2) from its seating to take ice.
•Turn the knobs on it clockwise as illustrated in the figure.
Ice cubes in the cells will fall down in to the ice bank (3) below.
•You may take out the ice bank and serve the ice cubes.
•If you wish, you may keep the ice cubes in the ice bank.
The ice bank is just for accumulating ice cubes. Do not put water in it. Otherwise, it will break.
About water supply reservoir
Remove the water supply reservoir and fill it up with water. After filled up with water, the reservoir must be pushed forward into its seating until a “click” sound is heard. If there is any ice in the reservoir, wait until it melts. Water supply reservoir has a capacity of approximately 190 ml.
Fresh Freeze compartment
1 |
2 |
3 |
This compartment freezes your food quickly and preserves their tastes and nutritional values.
This is activated by pressing the relevant button on the indicator panel. This compartment can be removed without using any tools when desired.
Ionizer
It is in the air channel of refrigerator back side of the crisper. With ionizing the air, airborne bacteria and the bad smell originated from these bacteria will be reduced.
Egg holder
You can install the egg holder to the desired door or body shelf except the freezer compartment.
13 EN
 Loading...