


CN 151120 |
CN151140ZX |
CN 151120 X |
|
CN151140ZW |
|
CN151140DZX |
|
EN EL |
|

Please read this manual first!
Dear Customer,
We hope that your product, which has been produced in modern plants and checked under the most meticulous quality control procedures, will provide you an effective service.
For this, we recommend you to carefully read the entire manual of your product before using it and keep it at hand for future references.
This manual
•Will help you use your appliance in a fast and safe way.
•Read the manual before installing and operating your product.
•Follow the instructions, especially those for safety.
•Keep the manual in an easily accessible place as you may need it later.
•Besides, read also the other documents provided with your product.
Please note that this manual may be valid for other models as well.
Symbols and their descriptions
This instruction manual contains the following symbols:
C Important information or useful tips.
AWarning against dangerous conditions for life and property.
BWarning against electric voltage.
1 EN
CONTENTS
1 Refrigerator |
3 |
2 Important Safety |
|
Warnings |
4 |
Intended use...................................... |
4 |
General safety................................... |
4 |
For products with a ........................... |
8 |
water dispenser;................................. |
8 |
Child safety........................................ |
9 |
Compliance with WEEE Directive and |
|
Disposing of the Waste Product: ....... |
9 |
Package information.......................... |
9 |
HC warning........................................ |
9 |
Things to be done for energy saving.10 |
|
Recommendations for the fresh food |
|
compartment................................... |
10 |
3 Installation |
11 |
Points to be considered when re- |
|
transporting your refrigerator............ |
11 |
Before operating your refrigerator..... |
11 |
Electric connection........................... |
11 |
Adjusting the legs............................. |
12 |
Changing the illumination lamp ........ |
12 |
Disposing of the packaging.............. |
12 |
Disposing of your old refrigerator...... |
12 |
Placing and Installation..................... |
12 |
Water connection............................. |
13 |
Connecting the water hose to the |
|
refrigerator....................................... |
13 |
Connecting of the water hose to the |
|
cold water mains line........................ |
14 |
Water filter........................................ |
15 |
Mounting the external filter onto the |
|
wall.................................................. |
15 |
4 Preparation |
16 |
5 Using your refrigerator 17 |
|
Indicator Panel................................. |
17 |
Indicator panel................................. |
19 |
Door Open Warning......................... |
24 |
Dual cooling system:........................ |
24 |
Freezing fresh food........................... |
24 |
Recommendations for preservation of |
|
frozen food....................................... |
25 |
Defrosting........................................ |
25 |
Placing the food............................... |
25 |
Deep-freeze information................... |
26 |
Water dispenser .............................. |
27 |
Water tray ....................................... |
28 |
Egg section...................................... |
29 |
Blue light.......................................... |
29 |
Rotary storage container.................. |
29 |
Movable Body shelf:......................... |
30 |
Icematic and ice storage container... |
31 |
Ice Machine ..................................... |
31 |
Description and cleaning of odor |
|
filter ................................................. |
32 |
Humidity Controlled Crisper.............. |
33 |
(FreSHelf)......................................... |
33 |
6 Maintenance and |
|
cleaning |
34 |
Protection of plastic surfaces .......... |
34 |
7 Troubleshooting |
35 |
8 Beko Customer Care |
38 |
2 EN
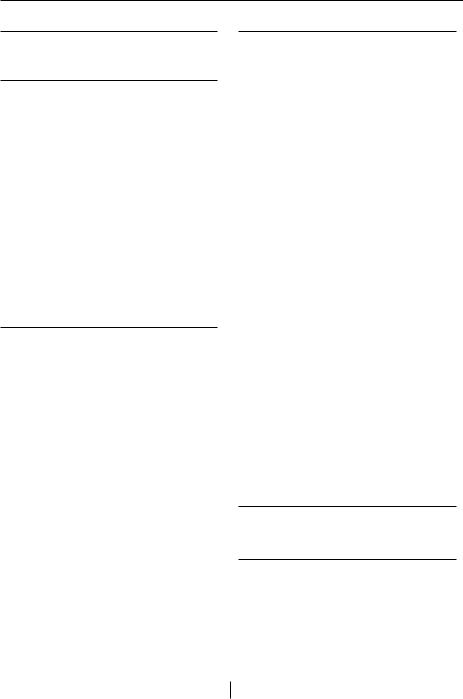
1 Refrigerator
1
 13
13 
12
14
*11 |
*2 |
*10 |
*3 |
|
|
*9 |
|
 *4
*4
*7 |
*8 |
*6
15
*5
1. |
|
|
|
|
|
Egg holder |
8. |
Drawer |
|||
2. |
Fridge compartment shelf |
9. |
Crisper |
||
3. |
Sliding and Rotary storage containers |
10. |
Adjustable glass shelves |
||
4. |
Bottle shelf |
11. |
Bottle holder |
||
5. |
Freezer compartment drawers |
12. |
Illumination lens |
||
6. |
Ice container |
13. |
Fan |
||
7. |
Ice machine |
14. |
Fridge compartment |
||
|
|
|
15. |
Freezer compartment |
|
*OPTIONAL
CFigures that take place in this instruction manual are schematic and may not correspond exactly with your product. If the subject parts are not included in the product you have purchased, then it is valid for other models.
3 EN

|
Important Safety Warnings |
|
2 |
||
Please review the |
• Consult your authorized |
|
following information. |
service for all your |
|
Failure to observe this |
questions and problems |
|
information may cause |
related to the refrigerator. |
|
injuries or material |
Do not intervene or let |
|
damage. Otherwise, all |
someone intervene to |
|
warranty and reliability |
the refrigerator without |
|
commitments will |
notifying the authorised |
|
become invalid. |
services. |
|
Intended use |
• For products with a |
|
This product is intended |
freezer compartment; |
|
to be used |
Do not eat cone ice |
|
• indoors and in closed |
cream and ice cubes |
|
areas such as homes; |
immediately after you |
|
• in closed working |
take them out of the |
|
environments such as |
freezer compartment! |
|
stores and offices; |
(This may cause frostbite |
|
• in closed |
in your mouth.) |
|
accommodation areas |
• For products with a |
|
such as farm houses, |
freezer compartment; |
|
hotels, pensions. |
Do not put bottled |
|
• It should not be used |
and canned liquid |
|
outdoors. |
beverages in the |
|
General safety |
freezer compartment. |
|
• When you want to |
Otherwise, these may |
|
dispose/scrap the |
burst. |
|
product, we recommend |
• Do not touch frozen food |
|
you to consult the |
by hand; they may stick |
|
authorized service |
to your hand. |
|
in order to learn the |
• Unplug your refrigerator |
|
required information and |
before cleaning or |
|
authorized bodies. |
defrosting. |
|
4 EN

•Vapor and vaporized cleaning materials should never be used in cleaning and defrosting processes of your refrigerator. In such cases, the vapor may get in contact with the electrical parts and cause short circuit or electric shock.
•Never use the parts on your refrigerator such as the door as a means of support or step.
•Do not use electrical devices inside the refrigerator.
•Do not damage the parts, where the refrigerant is circulating, with drilling or cutting tools. The refrigerant that might blow out when the gas channels of the evaporator, pipe extensions or surface coatings are punctured causes skin irritations and eye injuries.
•Do not cover or block the ventilation holes on your refrigerator with any material.
•Electrical devices must be repaired by only authorised persons.
Repairs performed by incompetent persons create a risk for the user.
•In case of any failure or during a maintenance or repair work, disconnect your refrigerator’s mains supply by either turning off the relevant fuse
or unplugging your appliance.
•Do not pull by the cable when pulling off the plug.
•Ensure highly alcoholic beverages are stored securely with the lid fastened and placed upright.
•Never store spray cans containing
flammable and explosive substances in the refrigerator.
•Do not use mechanical devices or other means to accelerate the defrosting process, other than those recommended by the manufacturer.
5 EN

•This product is not intended to be used by persons with physical, sensory or mental disorders or unlearned or inexperienced people (including children) unless they are attended by a person who will
be responsible for their safety or who will instruct them accordingly for use of the product
•Do not operate a damaged refrigerator. Consult with the service agent if you have any concerns.
•Electrical safety of your refrigerator shall be guaranteed only if the earth system in your house complies with standards.
•Exposing the product to rain, snow, sun and wind is dangerous with respect to electrical safety.
•Contact authorized service when there is a power cable damage to avoid danger.
•Never plug the refrigerator into the wall
outlet during installation. Otherwise, risk of death or serious injury may arise.
•This refrigerator is intended for only storing food items. It must not be used for any other purpose.
•Label of technical specifications is located on the left wall inside the refrigerator.
•Never connect your refrigerator to electricitysaving systems; they may damage the refrigerator.
•If there is a blue light on the refrigerator, do not look at the blue light with optical tools.
•For manually controlled refrigerators, wait for at least 5 minutes to start the refrigerator after power failure.
•This operation manual should be handed in to the new owner of the product when it is given to others.
•Avoid causing damage on power cable when transporting the
6 EN

refrigerator. Bending cable may cause fire. Never place heavy objects on power cable. Do not touch the plug with wet hands when plugging the product
•Do not plug the refrigerator if the wall outlet is loose.
•Water should not be sprayed on inner or outer parts of the product for safety purposes.
•Do not spray substances containing inflammable gases such as propane gas near the refrigerator to avoid fire and explosion risk.
•Never place containers filled with water on top of the refrigerator; in the event of spillages, this may cause electric shock or fire.
7
•Do not overload the refrigerator with food. If overloaded, the food
items may fall down and hurt you and damage refrigerator when you open the door.
•Never place objects on top of the refrigerator; otherwise, these objects may fall down when you open or close the refrigerator’s door.
•As they require a precise temperature, vaccines, heat-sensitive medicine and scientific materials and etc. should not be kept in the refrigerator.
•If not to be used for a long time, refrigerator should be unplugged. A possible problem in power cable may cause fire.
•The plug’s tip should be cleaned regularly with a dry cloth; otherwise, it may cause fire.
•Refrigerator may move if adjustable legs are not properly secured on the
floor. Properly securing adjustable legs on the floor can prevent the
EN refrigerator to move.
•When carrying the refrigerator, do not hold it from door handle. Otherwise, it may be snapped.
•When you have to place your product next to another refrigerator or freezer, the distance between devices should be at least 8cm. Otherwise, adjacent side walls may be humidified.
•The product shall never be used while the compartment which is located at the top or back of your product and in which electronic boards are available (electronic board box cover) (1) is open.
1 |
1
For products with a water dispenser;
•Pressure for cold water inlet shall be maximum 120 psi (8 bar). If your water pressure exceeds 80 psi (5.5 bar), use a pressure limiting valve in your mains system. If you do not know how to check your water pressure, ask for the help of a professional plumber.
•If there is risk of water hammer effect in your installation, always use a water hammer prevention equipment in your installation. Consult Professional
plumbers is you are not sure that there is no water hammer effect in your installation.
•Do not install on the hot water inlet. Take precautions against of the risk of freezing of the hoses. Water temperature operating interval shall be 33°F (0.6°C) minimum
and 100°F (38°C) maximum.
•Use only potable water.
8 EN
Child safety
•If the door has a lock, the key should be kept away from reach of children.
•Children must be supervised to prevent them from tampering
with the product.
Compliance with WEEE Directive and Disposing of the Waste Product:
This product complies
with EU WEEE Directive (2012/19/EU). This product
bears a classification symbol for waste electrical and electronic equipment
(WEEE).
This product has been manufactured with high quality parts and materials which can be reused and are suitable for recycling. Therefore, do not dispose the product with normal domestic waste at the end of its service life. Take it to a collection point for the recycling of electrical and electronic equipment. Please consult your local authorities
to learn the nearest collection point. Help protect the environment and natural resources by recycling used products. For children’s safety, cut the power cable and break the locking mechanism of the door, if any, so
that it will be non-functional before disposing of the product.
Package information
Packaging materials of the product are manufactured from recyclable materials in accordance with our
National Environment Regulations. Do not dispose of the packaging materials together with the domestic or other wastes. Take them to the packaging material collection points designated by the local authorities.
Do not forget...
Any recycled substance is an indispensable matter for nature and our national asset wealth.
If you want to contribute to the re-evaluation of the packaging materials, you can consult to your environmentalist organizations or the municipalities where you are located.
HC warning
If your product's cooling system contains R600a:
This gas is flammable. Therefore, pay attention to not damaging the cooling system and piping during usage and transportation. In the event of damage, keep your product away from potential fire sources that can cause the product catch a fire and ventilate the room in which the unit is placed.
Ignore this warning if your product's cooling system contains R134a.
Type of gas used in the product is stated in the type label which is on the left wall inside the refrigerator.
Never throw the product in fire for disposal.
9 EN
Recommendations for the fresh food compartment
*optional
Do not allow the food to touch the temperature sensor in fresh food compartment. To allow the fresh food compartment keep its ideal storage temperature, sensor must not be hindered by food.
Do not place hot foods in the product.
Things to be done for energy saving
•Do not leave the doors of your refrigerator open for a long time.
•Do not put hot food or drinks in your refrigerator.
•Do not overload your refrigerator so that the air circulation inside of it is not prevented.
•Do not install your refrigerator under direct sunlight or near heat emitting appliances such as ovens, dishwashers or radiators. Keep your refrigerator at least 30cm away from heat emitting sources and at least 5cm from electrical ovens.
•Pay attention to keep your food in closed containers.
•For products with a freezer compartment; You can store maximum amount of food items in the freezer when you remove the shelf or drawer of the freezer. Energy consumption value stated for your refrigerator has been determined
by removing freezer shelf or drawer and under maximum load. There is no harm to use a shelf or drawer
according to the shapes and size of food to be frozen.
•Thawing frozen food in fridge compartment will both provide energy saving and preserve the food quality.
10 EN

3 Installation
B Please remember that the manufacturer shall not be held liable if the information given in the instruction
manual is not observed.
Points to be considered when re-transporting your refrigerator
1.Your refrigerator must be emptied and cleaned prior to any transportation.
2.Shelves, accessories, crisper and etc. in your refrigerator must be fastened securely by adhesive tape against any jolt before repackaging.
3.Packaging must be tied with thick tapes and strong ropes and the rules of transportation printed on the package must be followed.
Please do not forget…
Every recycled material is an indispensable source for the nature and for our national resources.
If you wish to contribute to recycling the packaging materials, you can get further information from the environmental bodies or local authorities.
Before operating your refrigerator
Before starting to use your refrigerator check the following:
1.Is the interior of the refrigerator dry and can the air circulate freely in the rear of it?
2.Please keep 50 mm distance between the backside of the refrigerator and the wall”
3.Clean the interior of the refrigerator as recommended in the “Maintenance and cleaning” section.
4.Plug the refrigerator into the wall outlet. When the fridge door is open, the fridge compartment interior light will come on.
5.You will hear a noise as the compressor starts up. The liquid and gases sealed within the refrigeration system may also give rise to noise, even if the compressor is not running and this is quite normal.
6.Front edges of the refrigerator may feel warm. This is normal. These areas are designed to be warm to avoid condensation.
Electric connection
Connect your product to a grounded socket which is being protected by a fuse with the appropriate capacity.
Important:
•The connection must be in compliance with national regulations.
•The power cable plug must be easily accessible after installation.
•The specified voltage must be equal to your mains voltage.
•Extension cables and multiway plugs must not be used for connection.
B A damaged power cable must be replaced by a qualified electrician.
B Product must not be operated before it is repaired! There is danger of electric shock!
11 EN
Disposing of the packaging
The packing materials may be dangerous for children. Keep the packing materials out of the reach of children or dispose of them by classifying them in accordance with the waste instructions. Do not
dispose of them along with the normal household waste.
The packing of your refrigerator is produced from recyclable materials.
Disposing of your old refrigerator
Dispose of your old refrigerator without giving any harm to the environment.
•You may consult your authorised dealer or waste collection center of your municipality about the disposal of your refrigerator.
Before disposing of your refrigerator, cut out the electric plug and, if there are any locks on the door, make them inoperable in order to protect children against any danger.
Placing and Installation
A If the entrance door of the room where the refrigerator will be installed is not wide enough for the refrigerator to pass through, then call the authorised service to have them remove the doors of your refrigerator and pass it sideways through the door.
1.Install your refrigerator to a place that allows ease of use.
2.Keep your refrigerator away from heat sources, humid places and direct sunlight.
3.There must be appropriate air ventilation around your refrigerator in order to achieve an efficient operation. If the refrigerator is to be placed in a recess in the wall, there must be at least 50 mm distance with the ceiling
12
and at least 50 mm with the wall. If the floor is covered with a carpet, your product must be elevated 25 mm from the floor.
4. Place your refrigerator on an even floor surface to prevent jolts.
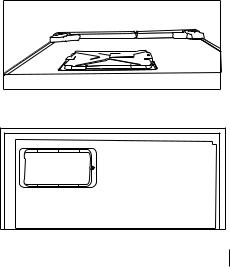
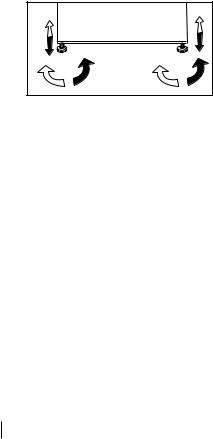
Adjusting the legs
If your refrigerator is unbalanced;
You can balance your refrigerator by turning its front legs as illustrated in the figure. The corner where the leg exists is lowered when you turn in the direction of black arrow and raised when you turn in the opposite
direction. Taking help from someone to slightly lift the refrigerator will facilitate this process.
Changing the illumination lamp
To change the Bulb/LED used for illumination of your refrigerator, call your AuthorisedService.
The lamp(s) used in this appliance is not suitable for household room
illumination. The intended purpose of this lamp is to assist the user to place foodstuffs in the refrigerator/freezer in a safe and comfortable way.
The lamps used in this appliance have to withstand extreme physical conditions such as temperatures below -20 °C.
(only chest and upright freezer)
EN
Water connection
Depending on the model of the refrigerator, you can connect it either to a demijohn or water mains.
First you must connect the water hose to the refrigerator.
In cases where a demijohn is used, a separate pump must also be used.
WARNING: Refrigerator and the pump, if any, must be unplugged during connection.
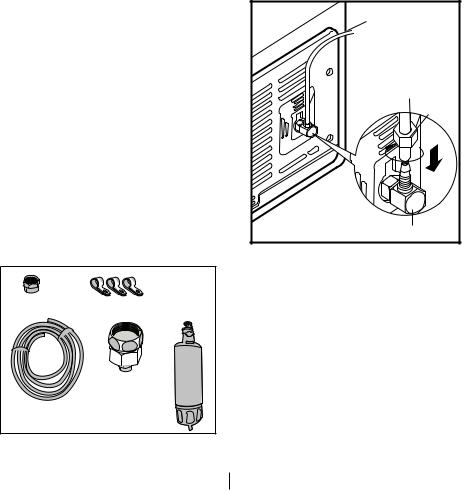
Following parts may not be supplied with your product since they are not required when using a demijohn.
Check that following parts have been delivered together with the product:
1.Union for connecting the water hose to the rear of the refrigerator
2.3 pieces of pipe clips (used to secure the water hose)
3.5-meter long water hose (1/4 inch in diameter)
4.Cold mains water valve with mesh filter (tap adapter)
5.External water filter. (If there is a demijohn connection; it is not necessary to use a water filter.)
1 |
2 |
|
3 |
4 |
*5 |
Connecting the water hose to the refrigerator
1.Slip the union (b) onto the water hose (a).
2.Push the water hose downwards firmly to slip it onto the water inlet valve
(c).
3.Tighten the union (c) by hand to secure it onto the water inlet valve.
Normally, you are not required to tighten the union with a tool. However, you can use a spanner or pliers to tighten the union if there is a leakage.
a |
a |
b |
2 |
c |
13 EN

Connecting of the water hose to the cold water mains line
(in some models)
If you will use the refrigerator by connecting it to the cold water mains line, you must install a standard 1/2” valve connector to the cold water installation of your home. If this valve is not present or you are not sure, consult a qualified plumber.
1.Separate the union from the tap adaptor.
2.Install the tap adaptor to standard 1/2” valve connector.
3.After inserting the water hose to the union, install it to the tap adaptor and insert to the union to the tap adapter.
4.Tighten the union by hand.
WARNING: Secure the water hose to suitable points by means of the clips supplied to avoid any damage or displacement or accidental disconnection.
WARNING: After turning on the water valve, make sure that there is no leakage at both connection points of the water hose. If there is a leakage, turn off the valve immediately and tighten all joints again using a spanner or a pliers.
WARNING: Make sure that standard 1/2” valve connector is available and completely turned off on your cold water mains line.
14 EN
Water filter
(in some models)
Your refrigerator may be equipped with an external or internal filter depending on its model. To fit the water filter, follow the instructions below referring to the figures supplied:
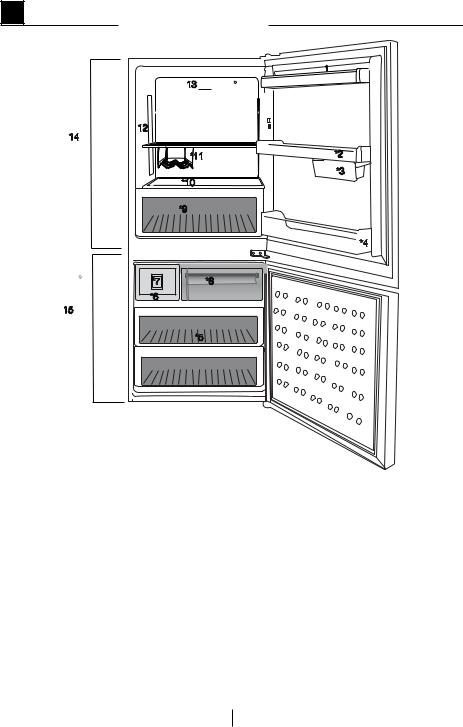
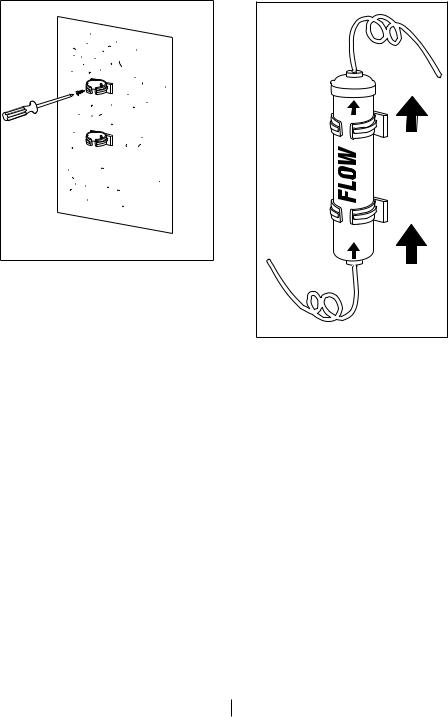
Mounting the external filter onto the wall
1.First, determine the location to mount the external filter.
2.Then, determine the distance between the filter and the tap and filter and the water inlet respectively. Prepare hoses at required lengths.
3.Mount the filter connection kit onto the wall by using a screwdriver and attach the filter.
WARNING: Water filter must be hold upright as shown in the figure. It is critical to connect the water inlet and outlet hoses on the filter correctly.
After connecting the filter, do not consume the first 10 glasses of water. WARNING: Never mount the filter onto the refrigerator. Coolant pipes might be pierced!
After connecting the filter, do not consume the first 10 glasses of water. WARNING: Never mount the filter onto the refrigerator. Coolant pipes might be pierced!
15 EN

4 Preparation
CYour refrigerator should be installed at least 300 mm away from heat sources such as hobs, ovens, central heater and stoves and at least 50 mm away from electrical ovens and should not be located under direct sunlight.
CThe ambient temperature of the room where you install your refrigerator should at least be 10°C. Operating your refrigerator under cooler conditions is not recommended with regard to its efficiency.
CPlease make sure that the interior of your refrigerator is cleaned thoroughly.
CIf two refrigerators are to be installed side by side, there should be at least 20 mm distance between them.
CWhen you operate your refrigerator for the first time, please observe the following instructions during the initial six hours.
-The door should not be opened frequently.
-It must be operated empty without any food in it.
-Do not unplug your refrigerator. If
a power failure occurs out of your control, please see the warnings in the “Recommended solutions for the problems” section.
COriginal packaging and foam materials should be kept for future transportations or moving.
16 EN

5 Using your refrigerator
Indicator Panel
Indicator panels may vary depending on your product's model.
Indicator panel aids in using your refrigerator with its audio and visual functions.
|
|
|
1 |
7 |
3 |
|
|
|
||||||||
|
|
|
|
|
|
|
|
|
|
|
|
|
|
|
|
|
|
|
|
|
|
|
|
|
|
|
|
|
|
|
|
|
|
|
|
|
|
|
|
|
|
|
|
|
|
|
|
|
|
|
|
|
|
|
|
|
|
|
|
|
|
|
|
|
|
|
|
|
|
|
|
|
|
|
|
|
|
|
|
|
|
|
|
|
|
|
|
|
|
|
|
|
|
|
|
|
|
|
|
|
|
|
|
|
|
|
|
|
|
|
|
|
|
|
|
|
|
|
|
|
|
|
|
|
|
|
|
|
|
|
|
|
|
|
|
|
|
|
|
|
|
|
|
|
|
|
|
|
|
|
|
|
|
|
|
|
|
|
|
|
|
|
|
|
|
|
|
|
|
|
|
|
|
|
|
|
|
|
|
|
|
|
|
|
|
|
|
2 |
*6 |
5 |
4 |
|
1. |
Freezer Compartment Temperature |
5. |
Economy Mode Indicator |
||
|
Indicator |
||||
2. |
6. |
Ioniser Indicator |
|||
Error Status Indicator |
|||||
7. |
Freezer Compartment Temperature |
||||
3. |
Fridge Compartment Temperature |
||||
|
Setting Button |
|
|||
|
Indicator |
|
|
||
|
|
|
|
||
4.Fridge Compartment Temperature
Setting Button
CFigures that take place in this instruction manual are schematic and may not correspond exactly with your product. If the subject parts are not included in the product you have purchased, then it is valid for other models.
17 EN

1.Freezer Compartment Temperature Indicator
It indicates the temperature set for Freezer compartment.
2.Freezer Compartment Temperature Setting Button
Press this button to set the temperature of the freezer compartment to -15, -18, -21, -24, -15... respectively. Press this button to set the desired temperature for the freezer compartment.
3.Fridge Compartment Temperature Indicator
Indicates the temperature set for Fridge compartment.
4.Fridge Compartment Temperature Setting Button
Press this button to set the temperature of the fridge compartment to 8, 6, 4, 2, 8... respectively.
Press this button to set the desired temperature for the fridge compartment.
5.Economy Mode Indicator
Indicates that the refrigerator is running in energy-efficient mode.
6.Ioniser Indicator
Indicator light lights up continuously. This light indicates that your refrigerator is protected against the bacteria.
7. Error Status Indicator
If your refrigerator does not cool adequately or if there is a sensor failure, this indicator will be activated. When this indicator is active, Freezer Compartment Temperature indicator will display “e” and Fridge Compartment Temperature Indicator
will display numbers such as “1,2,3…”. These numbers on the indicator provides information about the error to the service personnel.
18 EN
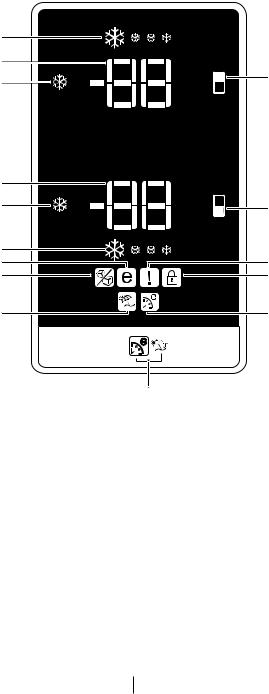
Indicator panel
Indicator panels may vary according to the product model.
Audio – visual functions on the indicator panel helps you in using your product.
8 |
|
|
|
|
1 |
|
2 |
|
|
3 |
|
|
|
|
|
|
||||||||||||||
|
|
|
|
|
|
|
|
|
|
|
|
|
|
|
|
|
|
|
|
|
|
|
|
|
|
|
|
|
|
|
|
|
|
|
|
|
|
|
|
|
|
|
|
|
|
|
|
|
|
|
|
|
|
|
|
|
|
|
|
|
|
|
|
|
|
|
|
|
|
|
|
|
|
|
|
|
|
|
|
|
|
|
|
|
|
|
|
|
|
|
|
|
|
|
|
|
|
|
|
|
|
|
|
|
|
|
|
|
|
|
|
|
|
|
|
|
|
|
|
|
|
|
|
|
|
|
|
|
|
|
|
|
|
|
|
|
|
|
|
|
|
|
|
|
|
|
|
|
|
|
|
|
|
|
9
7 |
6 |
5 |
4 |
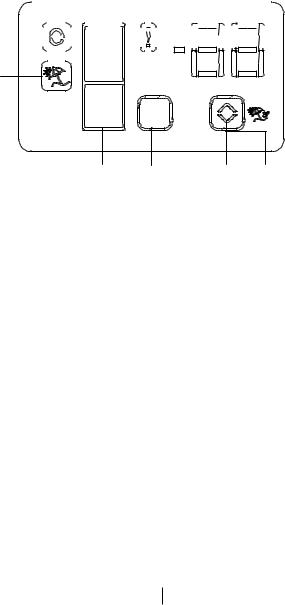
1.Fridge Compartment Indicator
2.Error status indicator
3.Temperature indicator
4.Vacation function button
5.Temperature setting button
6.Compartment selection button
7.Freezer compartment indicator
8.Economy mode indicator
9.Vacation function indicator
*optional
CFigures that take place in this instruction manual are schematic and may not correspond exactly with your product. If the subject parts are not included in the product you have purchased, then it is valid for other models.
19 EN
1. Fridge compartment indicator
Fridge compartment light is illuminated while the fridge compartment temperature is set.
2. Error status indicator
If your refrigerator does not perform enough cooling or in case of a sensor fault, this indicator is activated. When this indicator is activated, “E” is displayed on the freezer compartment temperature indicator, and numbers such as “1,2,3...” are displayed on the fridge compartment temperature indicator. These numbers on the indicator inform service personnel about the error.
3.Temperature indicator
Indicates freezer, fridge compartment temperature.
4.Vacation function button
Press on Vacation Button for 3 seconds to activate this function. When the vacation function is activated, “- -” is displayed on the fridge compartment temperature indicator and no active cooling is performed on the fridge compartment. It is not suitable to keep the food in the fridge compartment when this function is activated. Other compartments shall be continued to be cooled as per their set temperature.
To cancel this function press Vacation button again.
5. Temperature setting button
Changes the temperature of the relevant compartment between -24°C... -18°C and 8°C...1°C.
6. Compartment selection button
Selection button: Press compartment selection button to switch between fridge and freezer compartments.
7.Freezer compartment indicator
Fridge compartment light is illuminated while the freezer compartment temperature is set.
8.Economy mode indicator
Indicates that the refrigerator operates in energy saving mode. This display shall be activated if the freezer compartment temperature is set to -18°C.
9.Vacation function indicator
Indicates that vacation is activated.
20 EN
In some models
15
14
13
12
11
10
9
8*
7
1.Freezer compartment setting / Icematic on-off button
2.Fridge compartment setting button
3.Error status indicator
4.Key lock indicator
5.Eco Extra Function indicator
6.Eco Extra/Vacation Button
7.Vacation function indicator
8.Icematic off indicator (*in some models)
9.Economic usage indicator
1
2
3
4
5
6
10.Quick fridge function indicator
11.Quick fridge function button
12.Fridge compartment temperature setting indicator
13.Quick freeze function button
14.Freezer compartment temperature setting indicator
15.Quick freeze function indicator
CFigures that take place in this instruction manual are schematic and may not correspond exactly with your product. If the subject parts are not included in the product you have purchased, then it is valid for other models.
21 EN

1. Freezer Compartment Setting / Icematic On-Off Button
This function allows you to make the freezer compartment temperature setting. Press this button to set
the temperature of the freezer compartment to -15, -18, -21 and -24 respectively.
To stop ice formation, press Icematic on-off button for 3 seconds. Water flow from water tank will stop when this function is selected. However, ice made previously can be taken from the Icematic. To restart ice formation, press Icematic on-off button for 3 seconds.
2.Fridge Compartment Setting Button
This function allows you to make the fridge compartment temperature setting. Press this button to set the
temperature of the fridge compartment to 8, 6, 4, 2 respectively.
3.Error Status Indicator
If your refrigerator does not cool adequately or if there is a sensor failure, this indicator will be activated. When this indicator is active, Freezer Compartment Temperature indicator will display “E” and Fridge Compartment Temperature Indicator
will display numbers such as “1,2,3…”. These numbers on the indicator provides information about the error to the service personnel.
When you place hot food into the freezer compartment or if you leave the door open for a long time, exclamation mark can illuminate for some time. This is not a failure; this warning will disappear when the food cools down.
4. Key Lock Indicator
Use this function if you do not want your refrigerator temperature setting changed. Press Fridge compartment setting button and
Freezer compartment setting button simultaneously for a long time (3 sec) to activate this function.
5. Eco Extra Function Indicator
It indicates that the Eco-Extra function is active.
If this function is active, your refrigerator will automatically detect the least usage periods and energyefficient cooling will be performed during those times. Economy indicator will be active while energy-efficient cooling is performed.
Press the relevant button again to deactivate this function.
6.Eco Extra/Vacation Button
Press this button briefly to activate the Eco Extra function. Press and hold this button for 3 sec. to activate the Vacation function. Press this button again to deactivate the selected function.
7.Vacation Function Indicator
Indicates that the vacation function is active. If this function is active,
“- -” appears on the indicator of the fridge compartment and no cooling is performed in the fridge compartment. Other compartments will be cooled in accordance with the temperature set for them.
Press the relevant button again to deactivate this function.
8. Ice Off indicator
Icematic will not run when the indicator of this function is active. See Item 1 to enable the Icematic.
22 EN

9. Economy Mode Indicator
Indicates that the refrigerator is running in energy-efficient mode. Freezer Compartment temperature
This indicator will be active if the function is set to -15 or the energy efficient cooling is being performed due to Eco-Extra function.
10. Quick Fridge Indicator
This icon flashes in an animated style when the Quick Fridge function is active.
11. Quick Fridge Function
When you press the Quick Fridge button, the temperature of the compartment will be colder than the adjusted values.
This function can be used for food placed in the fridge compartment and required to be cooled down rapidly.
If you want to cool large amounts of fresh food, it is recommended to active this feature before putting the food into the fridge.
Quick Fridge indicator turns on when the Quick Fridge function is on. To cancel this function press Quick Fridge button again.
If you do not cancel it, Quick Fridge will cancel itself automatically after 4 hours or when the fridge compartment reaches to the required temperature.
This function is not recalled when power restores after a power failure.
12.Fridge Compartment Temperature Setting Indicator
Indicates the temperature set for the Fridge Compartment.
13.Freezer Compartment Temperature Setting Indicator
Indicates the temperature set for the Freezer Compartment.
14. Quick Freeze Function
Quick Freeze indicator turns on when the Quick Freeze function is active. To cancel this function press Quick Freeze button again. Quick Freeze indicator will turn off and return to its normal settings. If you do not cancel it, Quick Freeze will cancel itself automatically after 8 hours or when the freezer compartment reaches to the required temperature.
If you want to freeze large amounts of fresh food, press the Quick Freeze button before putting the food into the freezer compartment.
If you press the Quick Freeze button repeatedly with short intervals, the electronic circuit protection will be activated and the compressor will not start up immediately.
This function is not recalled when power restores after a power failure.
15. Quick Freeze Indicator
This icon flashes in an animated style when the Quick Freeze function is active.
23 EN
 Loading...