

Page 1
OPERATOR'S ADDENDUM
This addendum describes the software changes available in
release 2.0 of the Monarch
about
♦ using 12 inches per second (ips) printing.
♦ loading supplies.
♦ cleaning the printer.
♦ printing TrueType and bitmap Asian characters.
♦ defining the Quick Response bar code.
♦ using flash memory.
High Speed Printing Information
Keep in mind the following special printing considerations.
9850 printer. This addendum contains information
Print Speed (ips)
inches per second
2.5/4.0/6.0 ips thermal direct
8.0 ips thermal direct
10.0 ips thermal direct
12.0 ips thermal direct
♦ The minimum label feed length is 0.75 inches (19 mm) using 8, 10, or 12 ips
printing.
♦ You may need to clean the printhead and platen roller more frequently when
printing at high speeds. See “Cleaning the Printer” for more information.
TC9850AD Rev. AB 8/01 2001 Monarch Marking Systems, Inc. All rights reserved.
Printing Method Printhead
Density
203
thermal transfer
thermal transfer
thermal transfer
thermal transfer
300 dpi
203
300 dpi
203 only not supported not supported
203 only not supported not supported
Knife Peel Mode
supported supported
not supported supported
Page 2
Serial Bar Code Printing Information
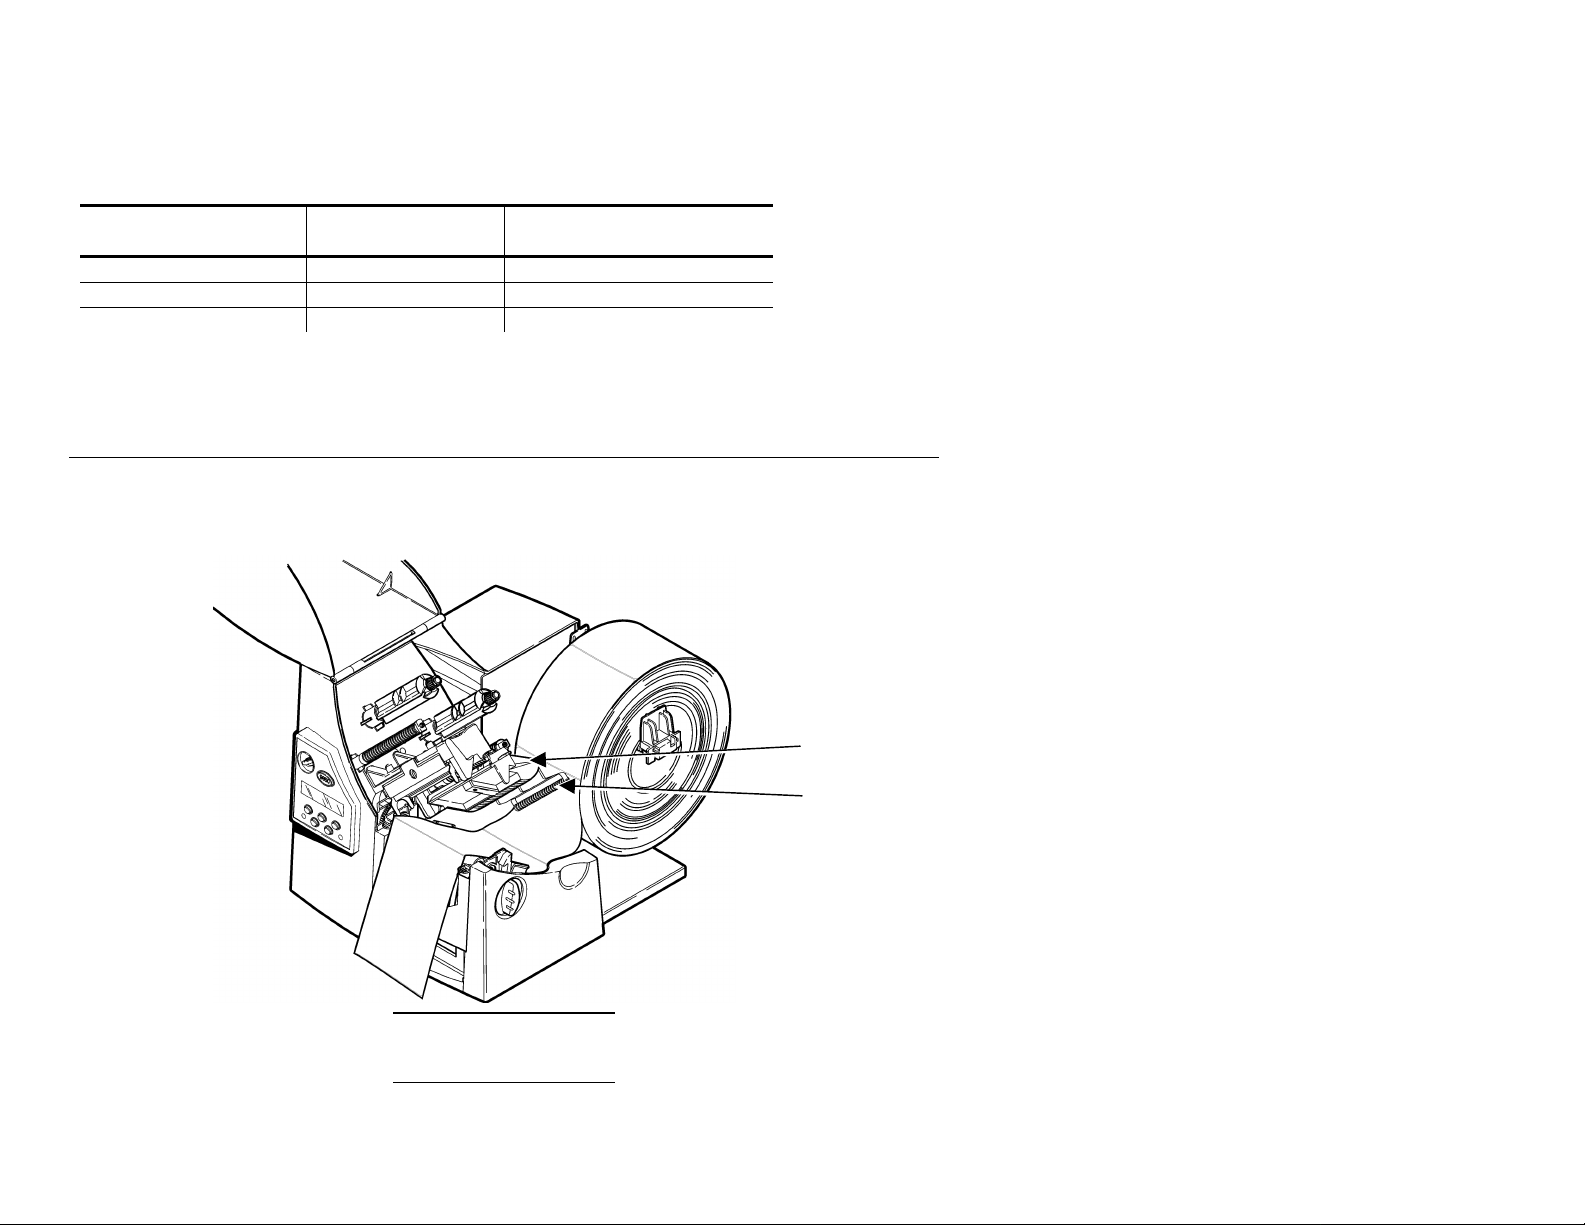
Deflector
Supply Roller
Use the following table when printing serial bar codes.
Print Speed (ips)
inches per second
2.5 ips 203/300 dpi Less than 3 dots
4.0 ips 203 only 3 dots
6.0/8.0/10.0 ips 203 only More than 4 dots
See your System Administrator for more information about bar code narrow
elements.
Printhead
Density
Minimum Bar Code
Narrow Element
Loading Supplies
Note the additional supply roller when loading supplies for 12 ips printing.
Lay the label strip across the supply guide so that a few inches extend past the
front of the printer.
2
Do not try to feed supply between the supply roller and
deflector.
Page 3

Changing the Print Speed
You can change the print speed at the printer or your System Administrator can
send the Print Control Packet.
At the Printer:
To change the setting, from the Main Menu, select Setup, then Supply. Then follow
these steps.
1. Press l or r until you see
Supply
l Speed r
2. Press Enter/Pause to set the speed option. You will see the current setting,
for example:
Speed
l 8.0 ips r
3. Press l or r to see the other options. After you display the option you want,
press Enter/Pause. Press Escape/Clear twice to exit to the Main Menu.
Using a Packet:
Your System Administrator can send the Print Control Packet to adjust the print
speed. Refer to the optional Packet Reference Manual available on our Web site
(www.monarch.com) for more information. You can also order part number
TC9800PM for a printed copy of the Packet Reference Manual.
Use the print control packet (C) to set the contrast, print, and margin adjustment,
print speed, and printhead width.
Syntax
{I,C,contrast,print_adj,margin_adjust,
speed_adj,ph_width¦}
C1. C Print Control Packet
C2. contrast -390 to 156. 0 is the default.
C3. print_adj -99 to 99 in 1/203 inch. 0 is the default. Adjusts where
data prints vertically on the supply. Increase the print
position to move print up, decrease to move print down.
3
Page 4

Voids
Streaks
C4. margin_adj -99 to 99 in 1/203 inch. 0 is the default. Adjusts where
data prints horizontally on the supply. Increase the
margin position to move print to the right, decrease to
move print to the left. Margin and print position are
format adjustments. They will not affect the supply
position, dispense position, or backfeed distance.
C5. speed_adj Print speed in inches per second (ips). Options:
0 Default (formats with serial bar codes
automatically print at 2.5 ips)
25 2.5 ips (default for serial bar codes)
40 4.0 ips
60 6.0 ips (default)
80 8.0 ips
100 10.0 ips
120 12.0 ips
NOTE: See “High Speed Printing Information” for more information.
C6. ph_width Width of the printhead in dots. Use 0.
Example
{I,C,0,-20,-10,120,0¦}
Uses the default contrast, moves print 0.1 inch closer to the bottom of the supply
(20/203 inches) and .05 inch to the left on the supply (10/203 inches), prints at
twelve inches per second, and uses the default printhead width.
Cleaning the Printer
The rate and frequency at which you print or how often you
receive supply errors determines how often you must clean the
printer. You may need to clean the printhead and platen roller:
♦ if there is any adhesive build-up in the supply path
♦ after printing approximately six rolls of supply, after using two
ribbons, or whenever you load new supplies
♦ daily if your printer is in an excessively dirty, hot, or humid
environment
♦ when you see voids or streaks in the print.
1. Turn off the printer and open the cover and printhead assembly.
2. Remove the label roll and ribbon (when cleaning the printhead).
4
Page 5

3. Press down on the exit cover tabs to open the exit cover on the front of the
printer.
4. Clean the platen roller with a clot h dampened with water. Turn the platen roller
with your finger and run the cloth across it. Make sure the platen roller is
clean all the way around.
5. Moisten another cotton swab with isopropyl alcohol. Rub the cotton swab
across the printhead and remove any build-up. You may need to use a
printhead CLEAN-STRIP (part number 120350) if the printhead is extremely
dirty or you see streaks on the supply.
6. Let the printer dry before you reload supplies.
7. Close the exit cover by pushing firmly on it. Both latches will click into pla ce.
8. Close the cover and printhead assembly.
9. Turn on the printer.
10. Press Feed/Cut to position the supply under the printhead. Resend your
format, batch, and check digit packets.
Asian (Double-Byte) Fonts Overview
Previously, Monarch printers supported downloadable fonts, but with limited code
pages. Characters are represented by character code pages. These fonts are
designed to be regionally specific; therefore, all code pages may not be supported
in a given font. For example, using Code Page 1252 (Latin 1), index 192
(represented as ~192 in an MPCL batch packet) prints this character,
printer previously supported single-byte character sets, which provided 255
different characters.
However, the 9850 printer now supports printing double-byte character sets, which
provide over 65,000 characters. Double-byte character sets are typically used in
Asian (Far East) countries. Code pages, such as 932 (Japanese Shift JIS) are
available. Each code page contains several thousand characters. To access these
characters in an MPCL batch packet, you need to pick a specific code page and a
specific type of font encoding.
À. The 9850
5
Page 6

One standard font encoding is Unicode. Unicode is a double-byte (16-bit) encoding
that includes many characters used throughout the world. Each Unicode index
refers to a particular character, just like the index in a code page. Other doublebyte font encodings exist for specific characters, such as BIG5 (Traditional
Chinese), GB2312 (Simplified Chinese) and SJIS (Japanese Shift-JIS).
Double-Byte Bitmap Fonts
Double-byte bitmap fonts, like single-byte bitmap fonts, are smaller and may image
faster than TrueType fonts. When you create a double-byte bitmap font, you must
specify a particular point size and code page. The batch data character mapping
must match the code page of the font. For example, a BIG5 bitmap font must use
BIG5 batch data.
Double-Byte TrueType Fonts
Asian TrueType font files are large and may image slower than bitmap fonts. The
size of the font file, in bytes, is the minimum amount of memory you must have
available for fonts in the printer's downloadable fonts buffer. Due to the size of
these files, you must store these fonts in the optional 8-Meg SIMM board. For
more information about using flash memory, see “Using Flash Memory.”
6
Page 7

Character Mapping Overview
The printer can accept TrueType fonts in UNICODE, BIG5, GB2312, SJIS, or
KSC5601 character mapping. Based on your data and code page selection, the
printer determines the type of encoding (UNICODE, BIG5, GB2312, SJIS, or
KSC5601) to use.
Character Mapping
Batch Data* TrueType Font
Encoding
UNICODE BIG5 102
UNICODE SJIS 102
UNICODE KSC5601 102
UNICODE GB2312 102
UNICODE UNICODE 102
BIG5 UNICODE 103
GB2312 UNICODE 104
SJIS SJIS 105 Japanese Shift-JIS (Code Page 932)
GB2312 GB2312 106 Simplified Chinese (Code Page 936)
BIG5 BIG5 107 Traditional Chinese (Code Page 950)
* Characters in batch data must be entered based on their UNICODE, BIG5,
etc. ID.
used in text or constant text fields
Code Page
Sample Asian (Double-Byte) Font Format and Batch
{F,3,A,R,E,140,400,"EXAMPLE"¦
T,1,40,V,50,0,0,1003,48,48,B,L,0,0,103¦}
{B,3,U,1¦
1,"~177~065~177~066~177~067"¦}
This example prints these three characters
with BIG5 batch data of ~177~065,
~177~066, and ~177~067.
7
Page 8

Refer to www.microsoft.com for a listing of the characters in each code page. For
example, search on a particular code page, such as
“codepage 936” and view the characters for that code page.
{F,3,A,R,E,600,400,"SIMPLE"¦
T,1,20,V,50,100,0,501,31,31,B,L,3,1,102¦}
{B,3,U,1¦
1,"~140~151"¦}
This example (using UNICODE batch data) prints the following character ~140~151
with an index of 35991 or 8C97 (hex).
{F,3,A,R,E,600,400,"SIMPLE"¦
T,1,20,V,50,100,0,501,31,31,B,L,3,1,103¦}
{B,3,U,1¦
1,"~165~064"¦}
This example (using BIG5 batch data with a Unicode TrueType font) prints the
following character ~165~064 with an index of 42304 or A540 (hex).
Note the text fields in bold type in the previous examples. The last parameter
specifies the code page in text or constant text fields. Following is a list of options
for the code page parameter:
T15 or C13 sym set Symbol set. Options:
0 Internal Symbol Set
1 ANSI Symbol Set
100 Macintosh
101 Wingdings
102 UNICODE (user input) for particular mapping
103 BIG5 (user input) for UNICODE mapping
104 GB2312 (user input) for UNICODE mapping
105 SJIS (user input) for SJIS mapping
Japanese Shift-JIS (Code Page 932)
106 GB2312 (user input) for GB2312 mapping
Simplified Chinese (Code Page 936)
107 BIG5 (user input) for BIG5 mapping
Traditional Chinese (Code Page 950)
437 DOS Code Page 437 (Domestic)
8
Page 9

850 DOS Code Page 850 (International)
852 DOS Code Page 852 (Latin 2)
855 DOS Code Page 855 (Russian)
857 DOS Code Page 857 (IBM Turkish)
860 DOS Code Page 860 (MS-DOS Portuguese)
1250 Code Page 1250 (Latin 2)
1251 Code Page 1251 (Cyrillic)
1252 Code Page 1252 (Latin 1)
1253 Code Page 1253 (Greek)
1254 Code Page 1254 (Turkish)
1255 Code Page 1255 (Hebrew)
1256 Code Page 1256 (Arabic)
1257 Code Page 1257 (Baltic)
1258 Code Page 1258 (Vietnam)
NOTE: Code pages 852-860 and 1250-1258 may only be used with
downloaded TrueType fonts or the resident TrueType font, Font
50. Code pages 932, 936, 949, and 950 may only be used with
downloaded double-byte fonts. TrueType fonts are designed to
be regionally specific; therefore, all code pages may not be
supported in a given font.
Defining the Quick Response Bar Code
Quick Response (QR Code) is a two-dimensional bar code, which is made up of
square modules arranged in an overall square pattern. A unique finder pattern is
located at three corners of the symbol. Four levels of error correction are
available, along with a wide range of symbol sizes.
The printer supports both models of QR Code:
Model 1 is the original specification.
Model 2 is an enhanced form that includes additional features.
QR Code can accommodate Japanese Kana and Kanji characters and has a variety
of applications, including marking spark plugs, radiators, printed circuit boards, and
test tubes.
Refer to the AIM International Symbology Specification for more details about data
requirements.
9
Page 10

Syntax B,field#,# of char,fix/var,row,column,
font,density,height,text,alignment,field rot¦
B1. B Bar Code Field.
B2. field# Unique number from 0-999 to identify this field.
B3. # of char Maximum number of characters, including header
information. The maximum depends on the type of
characters entered for the batch data and differs for the
two models of QR Code. The maximum number of
characters defined for this field is 2710.
Data Type Model1 Model2
Numeric data 1167 2710
Alphanumeric data 707 2710
8-bit byte data 486 2710
Kanji data 299 1817
NOTE: The maximum number of characters depends on the selected
level of error correction. As you increase the error correction
level, the maximum number of characters decreases.
B4. fix/var Variable (V) length field.
B5. row Distance from
bottom of the
print area to the
pivot point of the
field. The pivot
point varies,
depending on
how the field is
justified. Remember to include text or numbers that may
appear with the bar code for the
row measurement.
English 0-1599
Metric 0-4063
Dots 0-3247
10
Page 11

B6. column Distance from the lower left edge of
the print area to the pivot point.
Use the previous table for values.
English 0-399
Metric 0-1015
Dots 0-811
NOTE: Allow a minimum of 1/10 inch between the scan edge of
bar code and label edges or other data.
B7. font Use 36 for QR Code.
B8. density Bar code density. Use 0 for QR Code.
B9. height Bar code height, in 1/100 inches, 1/10 mm, or dots.
Minimum values:
English 19
Metric 48
203 Dots 38
300 Dots 57
For QR Codes, the symbol’s height depends on the
number entered for this parameter. For example, if you
enter 80, the symbol could be smaller than .80,” but it will
not be greater than the amount specified in this
parameter.
The printer determines the size of the symbol Small QR
Codes may not be scannable. The user's scanner
determines the functional size (minimum height) of the
symbol.
B10. text Appearance of text with bar code. Options:
0 Default (Model 2)
1 Model 1
2 Model 2
B11. alignment Use L to align data correctly in the field.
11
Page 12

B12. field rot Field rotation. Field rotation rotates the whole field, not
just the characters. Rotation is affected by the pivot
point, which varies depending on how text is justified.
Lower left corner of field is the pivot point. Options:
0 Top of field points to top of supply
1 Top of field points to left of supply
2 Top of field points to bottom of supply
3 Top of field points to right of supply
Example B,1,50,V,50,100,36,0,60,2,L,0¦
Defines a Bar code field (field #1) with 50 characters of variable length starting at
row 50, column 100. A Quick Response bar code (36) with a density of 0 and a
height of 60 (0.6 inches) is used. The QR Code is model 2. The bar code is Left
aligned without any field rotation (0).
Entering Batch Data for QR Code
QR Code requires certain parameters at the beginning of all batch data.
Syntax “
error_cor mask# data_input, char”
error_cor Level of error correction. Some damaged bar
codes may still be scannable if the error correction is
high enough. Options:
H Ultra high reliability level
Q High reliability level
M Standard level
L High density level
NOTE: As you increase the error correction level, the maximum number
of characters (in the field) decreases.
mask# Mask number. Undefined. Leave blank or use 0.
data_input Type of data input. Options:
A Automatic
M Manual
12
Page 13

char Type of characters. Options:
N Numeric A Alphanumeric
B Binary K Kanji
NOTE: In binary mode, the number of characters must be represented
by the 4-digit number in decimal.
Example 1,”HM,N0123456789012345”¦
Defines the following batch data for the QR Code: The error correction level is H,
which provides very high reliability. Leave the mask number blank. The data input
mode is Manual. The type of characters are Numeric and the data is
0123456789012345.
Sample QR Code
{F,1,A,R,E,200,200,”QRCODE”¦
B,1,200,V,50,50,36,0,100,2,B,0¦}
{B,1,N,1¦
1,”HM,N0123456789012345”¦}
13
Page 14

Structured Append Mode
QR Code offers a mode called structured append (or concatenated) that allows you
to collect data from multiple QR Code symbols and use that data elsewhere. For
example, the components of a sub-assembly can have individual QR Codes and the
QR Code for the entire assembly contains all the data from the individual codes.
This mode also requires certain parameters at the beginning of all batch data.
Syntax
“mode_id code# #of_div parity, error_cor mask#
data_input char”
mode_id Mode identifier. Use D to indicate the structured append
(or concatenated) mode.
code# Code number of the individual symbol in the
concatenated set. You must use a two-digit number in
decimal.
#of_div Total number of symbols in this concatenated set. You
must use a two-digit number in decimal.
parity Parity byte. You must use a two-digit number in
hexadecimal. There is no standard parity byte.
error_cor Error correction level. Some damaged bar
codes may still be scannable if the error correction is
high enough. Options:
H Ultra high reliability level
Q High reliability level
M Standard level
L High density level
NOTE: As you increase the error correction level, the maximum
number of characters (in the field) decreases.
mask# Mask number. Undefined. Leave blank or use 0.
data_input Type of data input. Options:
A Automatic
M Manual
14
Page 15
char Type of characters. Options:
N Numeric A Alphanumeric
B Binary K Kanji
NOTE: In binary mode, the number of characters must be represented
by the 4-digit number in decimal.
Example 1,”D0205E9,Q0A,”¦
C,”B006qrcode,”¦
Defines the structured append mode (D) for QR Code. This is symbol (02) of a
concatenated set containing (05) symbols. The parity byte is E9. The error
correction level is Q, which provides a high reliability. Use 0 for the mask number.
The data input mode is Automatic. The type of characters are binary (B) and there
will be six (06) data characters (qrcode).
Sample QR Code using a Structured Append
{F,2,A,R,E,200,200,”QRCODE2”¦
B,1,200,V,50,50,36,0,100,2,B,0¦}
{B,2,N,1¦
1,”D0202E9,Q0A”¦
C,”0123456789ABCD+ООвфы~129~064~159~252~224~064”¦}
Using Flash Memory
You can store fonts in the printer’s flash memory (1 Meg limit) or purchase an
optional 8-Meg SIMM board for your fonts. If you have a SIMM board installed, the
fonts stored in flash memory are saved to the SIMM board. If you do not have a
SIMM board installed, 1 Meg of fonts can be stored in the printer’s flash memory.
Read this information if you want to save fonts in flash memory. When
downloading (saving) fonts to flash memory, you must use the flash designator.
See “Using the Font Packet” for more information.
If you have purchased the optional SIMM board, you must
format the SIMM board before you can save fonts on it.
15
Page 16

Formatting Flash Memory
You can use the printer’s control panel or an immediate command to format the
SIMM Board. If you do not have the optional SIMM board, you can erase the fonts
saved in the printer’s flash memory by formatting flash memory.
When you format flash memory, ALL fonts saved in the
printer’s flash memory OR on the SIMM board are deleted.
At the Printer:
1. To format flash memory, from the Main Menu, press l or r until you see
MAIN MENU
l Setup r
2. Press Enter/Pause. You may see
SETUP
Supply r
3. Press l or r until you see
SETUP
l Flash Memory
4. Press Enter/Pause. You will see
FLASH MEMORY
Format Flash r
5. Press Enter/Pause. You will see
Are you sure?
No r
16
Page 17

6. Press r to display “Yes” and press Enter/Pause. You will see
CREATING FLASH
FILE SYSTEM 1
7. The SIMM board OR the printer’s flash memory is cleared and reformatted.
This process may take several minutes.
The printer reboots automatically after formatting flash memory. You need
to resend any fonts you want to save in flash memory again.
When you format flash memory, ALL fonts saved in the
printer’s flash memory OR on the SIMM board are deleted.
You will see
Print Mode
Ready
Using an Immediate Command:
Your System Administrator can send the
SIMM board, clear the printer’s flash memory, or check the amount of free memory
left in either the printer’s flash memory or on the SIMM board.
Command Description
^FF immediate command to format the
^FF1 Formats flash memory (either in the printer or the
optional SIMM board)
When the printer is first turned on, immediate commands are not available. To use
these commands, your System Administrator must first send the control characters
packet and define the immediate command control character.
Once the immediate command control character is defined, the immediate
commands are enabled. For more information about immediate commands, refer to
the optional Packet Reference Manual available on our Web site
(www.monarch.com) or order a printed copy (part number TC9800PM).
^FF2 Returns the amount (in bytes) of free memory in flash
17
Page 18

Checking for Available Flash Memory
1. From the Main Menu, press l or r until you see
MAIN MENU
l Setup r
2. Press Enter/Pause. You may see
SETUP
Supply r
3. Press l or r until you see
SETUP
l Flash Memory
4. Press Enter/Pause. You may see
FLASH MEMORY
Format Flash r
5. Press l or r until you see
FLASH MEMORY
l Unused Flash
6. Press Enter/Pause. You may see
Unused Flash
1048576_
This is the number (in bytes) of the available flash memory (either in the
printer or on the optional SIMM board).
7. Press Escape/Clear three times to return to the Main menu.
18
Page 19

Using the Font Packet
You can use a font packet to add or clear downloaded fonts from memory, upload
your font buffer, or upload the cell size information for a particular font. The font
packet is useful when you are downloading fonts. If you are using downloaded
fonts, the font number and the number of bytes each downloaded font uses is
listed.
This packet does not list the number of bytes the standard printer fonts use.
Syntax
{W,font#,action,device¦}
W1. W Writable Font Header.
W2. font# Font number from 0-9999.
0 is for all fonts. 1 - 5 digits is the font number.
Example: 11 is the standard printer font,
CG Triumvirate.
W3. action Action. Options:
A Adds the specified font.
C Clears all or specified fonts, except ones in
ROM.
H Uploads font size information.
M Uploads font memory usage information.
NOTE: C does not clear (erase) fonts saved in the printer’s flash
memory or on the SIMM board. You must format flash memory
to erase fonts from the printer’s flash memory or from the SIMM
board. However, when you format flash memory, ALL fonts
saved in the printer’s flash memory OR on the SIMM board are
deleted.
W4. device Device. Options:
F Flash
R Volatile RAM
Z All devices (use for upload).
19
Page 20

Example {W,105,A,F¦}
Adds the font (105) to the SIMM board (Flash memory).
If you are creating fonts, you need to have font data included
with this packet. Software is available to create the font data
and packet. Call Technical Support for more information.
20
 Loading...