

Page 1

OPERATOR'S ADDENDUM
This addendum describes the software changes available in
release 6.5 (or greater) of the Monarch
release 5.4 (or greater) of the Monarch
printers. This addendum contains information about
♦ using the new supply/feed length and the new supply width.
♦ using extended backfeed on printers with a knife.
♦ defining a new cut mode in the batch control field.
♦ defining a Data Matrix bar code.
♦ samples for MaxiCode Modes 0, 1, 2, and 3.
♦ printing TrueType Fonts.
♦ Using International characters sets/code pages.
For more information about using configuration packets,
bar code or text fields, refer to the optional Packet
Reference Manual available from our Web site or in a
printed version by ordering part number TC9800PM.
9840 printer and
9820, 9830, and 9835
Using the New Supply/Feed Length and Supply Width
For the 9820, 9830, and 9835 printers, the minimum supply length is 0.5
inches (12.7 mm), instead of 0.75 inches (19 mm). For the 9840 printer, the
minimum supply length is 0.32 inches (8 mm) and the minimum supply width
is 0.75 inches (19 mm) instead of 1.2 inches (30.5 mm).
When printing labels shorter than 0.75 inches on the
9840 printer, we recommend using a maximum print
speed of 4.0 inches per second (ips).
Make sure the values in the format header match the length and width of
your supply. Measure supply from left to right and top to bottom or from the
top of one black mark to the top of the next black mark.
TC9800AD3 Rev. AA 9/99 1999 Monarch Marking Systems, Inc. All rights reserved.
Page 2
Using Extended Backfeed
To use extended backfeed, you can use the optional keypad or your System
Administrator can define the Backfeed Control Packet. Use extended
backfeed on 9835 or 9840 printers with a knife installed. Extended backfeed
feeds a tag far enough out to be cut and backfeeds the next tag to the
printhead line. Extended backfeed works with the selected cut modes.
Refer to the optional Packet Reference Manual to learn how to define the
Backfeed Control Packet.
Extended backfeed eliminates printed tags being left
between the printhead and knife.
Extended backfeed does not work with non-indexed
(continuous) supply/mode.
Do not use backfeed (normal or extended) with supplies
less than 0.75 inches.
Using Extended Backfeed with the Optional Keypad
If you have purchased the optional keypad, you can use it to enable
extended backfeed. From the Main Menu, select Setup, then Supply. Then,
follow these steps:
1.
Press L or R until you see
SUPPLY
Backfeed
2. Press E to set the backfeed option. You will see the current setting,
for example:
BACKFEED
l On r
3. Press L or R to see the other options (Off or Extended). After you
display the option you want, press E. Press e twice to exit to the
Main Menu. You can only enable or disable backfeed/extended backfeed
using the optional keypad. You cannot set the backfeed or dispense
position.
2
Page 3
Changing the Cut Mode
This is only valid on 9835 or 9840 printers with the knife option. A new cut
mode has been added not to cut before the first tag, but cut between each
tag and after the last tag. The cut options are set through the optional
keypad or through the Batch Control Field. Refer to the optional Packet
Reference Manual to learn how to define the Batch Control Field.
Setting the Cut Options From the Optional Keypad
The optional keypad must be purchased separately.
The 9835 or 9840 printer can be set to cut after the last tag in a batch. After
you enter data for all the fields in your offline format, you will see
Number of parts
[1/5]: 1
♦ Type the number of times the data prints across the tag width and press
E, or accept the default value of 1 by pressing E. If your printer
has a knife, you will see
Cut option
l No r
If you want to cut tags, press R to display “Yes” and press E.
See “Cutting Tags” for more information.
♦ Type the number of times the data prints across the tag width and press
E, or accept the default value of 1 by pressing E. If your printer
does not have a knife, you will see
Print Multiple
[1/32000]: 1
Follow the rest of the prompts to print all the tags in one strip. You
do not see any cut prompts.
3
Page 4
Cutting Tags
and feeds one or two tags past the printhead when it cuts the
If you answer “Yes” to the cut option prompt, but do not specify a cut mode
(cut last ticket, cut after batch, or no cut before), the knife cuts after each
tag. This is the same as cut mode 1.
The knife uses the last selected cut mode. For example, if you select "Cut
Last Ticket" and then select "Yes" to "Cut After Batch," the knife only cuts
after each batch instead of after the last tag in the batch.
If you answered “Yes” to the cut option prompt, you need to select a cut
mode. There are several cut mode options:
Cut after tag
(Cut Mode 1)
Cut after batch
(Cut Mode 2)
Cut last ticket
(Cut Mode 3)
No cut before
(Cut Mode 4)
You will see
Cuts before first tag, cuts each tag, and cuts after last tag.
Cuts before first tag, cuts after batch. Cuts in strips, not
each tag.
Cuts before first tag, cuts each tag, cuts after the last tag
last tag in the last batch.
Does not cut before the first tag in a batch, but cuts between
each tag and after the last tag in the batch.
Cut multiple
[1/32000]: 1
♦ Type the number of tags to print before cutting and press E, or accept
the default value of 1 by pressing E. A cut multiple of one cuts after
each tag. This is the same as cut mode 1.
You will see
Cut Last Ticket:
No r
♦ If you want to cut the last tag in the batch, press R to display “Yes” and
press E. The printer feeds one or two tags past the printhead when it
cuts the last tag in the last batch. Depending on the length of your
supply, you may lose up to two tags after the last batch. This is the same
as cut mode 3.
4
Page 5

You will see
Cut After Batch:
No r
♦ If you want to cut after every batch, press R to display "Yes" and press
E. The knife cuts before the first tag and cuts after batch, so the tags
are cuts in strips. This is the same as cut mode 2.
You will see
No cut before?
No r
♦ If you do not want to cut before the first tag in a batch, press R to
display "Yes" and press E. The knife does not cut before the first tag
in a batch, but does cut between each tag and after the last tag in a
batch. This is the same as cut mode 4.
You will see
Quantity
[1/32000]: 1
Type the number of tags or sets of tags you want to print in this
batch and press E, or accept the default value of 1 by pressing
E. A cut multiple of two with a batch quantity of 30 prints 30 tags
(15 sets of two tags). You will see
MAIN MENU
l Print Mode r
Press E. The batch begins to print. The display counts the tags
as they print and how many tags are in the batch.
Setting Format Options with the Optional Keypad
The optional keypad must be purchased separately. You can select
Format Options to change which prompts appear during Batch Entry mode
and set default values for those prompts. You can also set a default value
for the prompts, "Cut After Batch" and "No Cut Before." Refer to your
keypad's Operating Instructions for more information about selecting which
prompts appear and default values for those prompts.
5
Page 6
About the Data Matrix Bar Code
Data Matrix (ECC-200) is a two-dimensional bar code which is made up of
square modules arranged within a perimeter finder pattern. There are 24
square symbol sizes available ranging from 10 rows by 10 columns to 144
rows by 144 columns. There are six rectangular symbol sizes available
ranging from 8 rows by 8 columns to 16 rows by 48 columns. The symbol
size is data dependent. Data Matrix automatically pads data.
The Data Matrix bar code is only available on the 9840
printer.
Make sure you do not overlay other fields when designing your Data Matrix
symbol. You should also allow a 3 or 4 dot "quiet zone" (blank space around
the bar code's perimeter) for scanning. Refer to the optional Packet
Reference Manual to learn how to define a Bar Code Field.
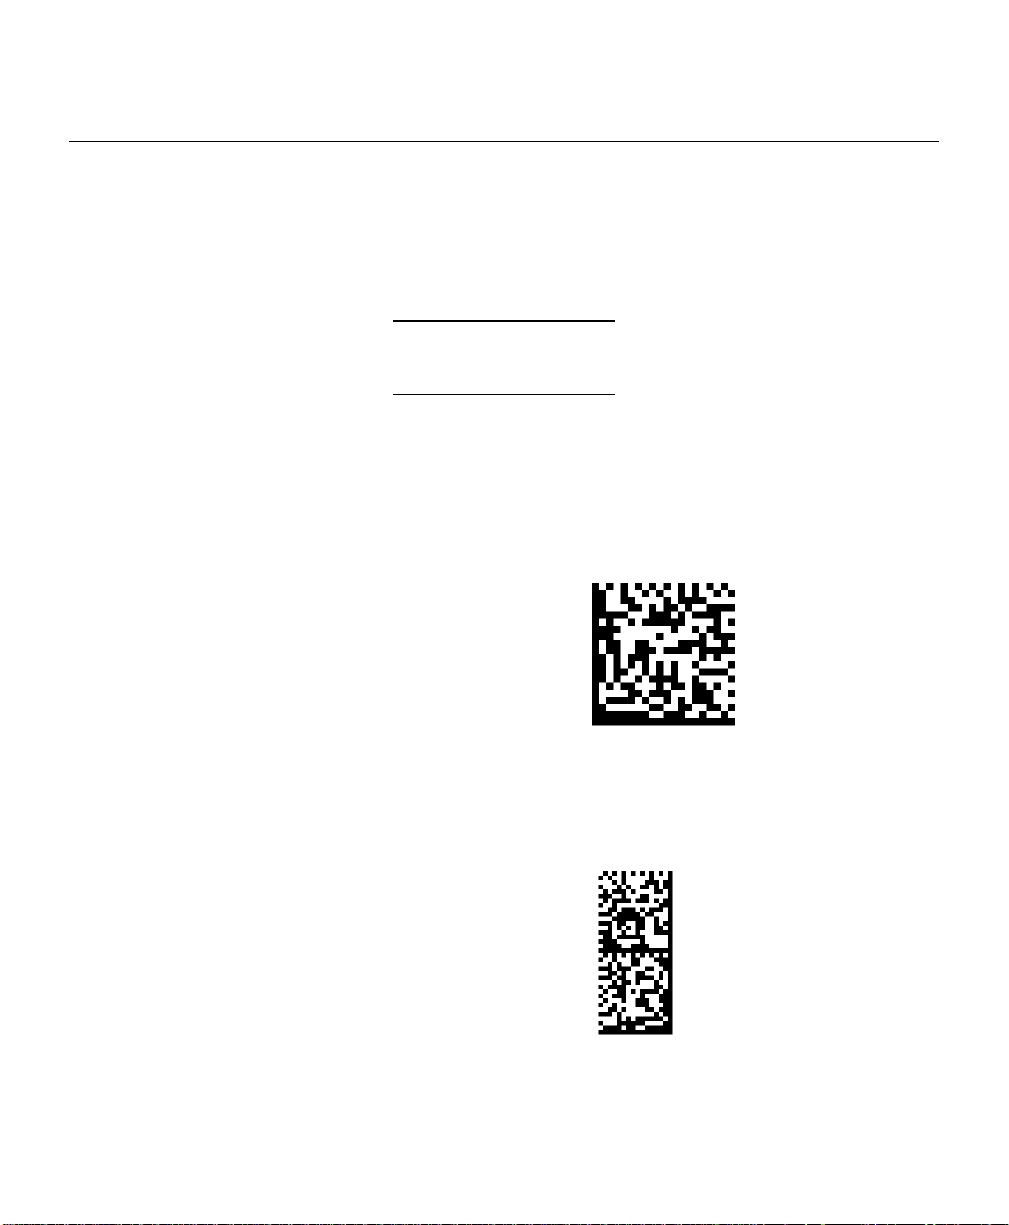
Data Matrix Square Example
{F,36,A,R,E,400,400,"DTMTRX1"¦
B,1,50,V,50,100,35,0,100,8,L,0¦}
{B,36,N,1¦
1,"1234567890ABCDEFGHIJKLMNOPQRST"¦}
This example prints a one-inch wide by one-inch tall (100) square Data
Matrix symbol using the default density (0) without any field rotation (0).
Data Matrix Rectangular Example
{F,36,A,R,E,400,400,"DTMTRX2"¦
B,1,400,V,100,200,35,29,50,8,L,1¦}
{B,36,N,1¦
1,"1234567890ABCDEFGHIJKLMNOPQRST"¦}
This example prints a one-inch by a half-inch tall (50) rectangular 16 rows by
36 columns (density 29) Data Matrix symbol rotated 90
6
° (1).
Page 7
About MaxiCode
MaxiCode is a two-dimensional bar code developed by UPS (United Parcel
Service, Inc.). Data must be defined in a specific way for UPS. Refer to the
Guide to Bar Coding with UPS or the AIM MaxiCode Specification for more
details about data requirements.
The printers support Modes 0, 1, 2, and 3. Contact Monarch for information
about additional MaxiCode modes.
Mode Description
0 Obsolete, use mode 2 or 3
1 Obsolete, use mode 4
2 Structured Message, Numeric Postal Code (U. S. destinations)
3
You can select which mode to use in the bar code field or allow the printer to
auto-select the mode (0, 2, or 3) based on your data. Refer to the optional
Packet Reference Manual to learn how the printer can auto-select the
MaxiCode mode. MaxiCode automatically pads data with the "!" character.
Modes 2 and 3 are defined by the way the postal code, class of service, and
country code fields are arranged. (The postal code, class of service, and
country code are required fields.) Begin with the message header, then the
primary data (15 characters), followed by the secondary message (up to 78
characters). Or, begin with the primary data, then the message header,
followed by the secondary data. If the postal code data characters are all
numeric then the MaxiCode symbol is set to Mode 2. If the characters are
alphanumeric, or only contain ASCII characters 65 to 90, then the MaxiCode
symbol is set to Mode 3.
If you receive an error 612, check your MaxiCode data. You may have not
correctly structured or left out one of the three required fields (postal code,
class of service, and country code) or the “~029” character.
Structured Message, Alphanumeric Postal Code (International
destinations)
MaxiCode does not support the NULL character.
7
Page 8
Mode 0 (Obsolete) Example
{F,1,A,R,E,0600,0400,"MAXICODE"¦
B,1,99,V,050,150,33,7,0,8,L,0¦} MaxiCode bar code (33)
{B,1,N,1¦ Batch header
1,"450660000"¦ Postal code (zip code)
This field determines Mode
C,"001"¦ Country code
C,"840"¦ Class of service
C,"[)~030"¦ Message header
C,"01~02996"¦ Transportation header
C,"1Z12345678~029"¦ Tracking number
C,"UPSN~029"¦ Origin carrier SCAC
C,"12345A~029"¦ UPS shipper number
C,"070~029"¦ Julian day of pickup
C,"~029"¦ Shipment ID (empty)
C,"1/1~029"¦ Package count
C,"15~029"¦ Weight (lb.)
C,"Y~029"¦ Address validation
C,"60 SADDLEBROOK CT.~029"¦ Street address (empty)
C,"DAYTON~029"¦ City (empty)
C,"OH~030"¦ State
C,"~004"¦} EOT
8
Page 9

Mode 2 Example
{F,1,A,R,E,400,400,"MAXI_M2"¦
B,1,99,V,040,140,33,7,0,8,L,0¦} MaxiCode bar-code (33)
{B,1,N,1¦
1,"[)>~030"¦ Message header
C,"01~02996"¦ Transportation header
C,"068100000~029"¦ Postal Code
This field determines Mode
C,"840~029"¦ Country code
C,"001~029"¦ Class of service
C,"1Z12345675~029"¦ Tracking number
C,"UPSN~029"¦ Origin carrier SCAC
C,"12345E~029"¦ UPS shipper number
C,"089~029"¦ Julian day of pickup
C,"~029"¦ Shipment ID (empty)
C,"1/1~029"¦ Package count
C,"10~029"¦ Weight (lb.)
C,"Y~029"¦ Address validation
C,"~029"¦ Street address (empty)
C,"~029"¦ City (empty)
C,"CT~030"¦ State
C,"~004"¦} EOT
9
Page 10

Mode 3 Example
{F,1,A,R,E,400,400,"MAXI_M3"¦
B,1,99,V,040,140,33,7,0,8,L,0¦} MaxiCode bar-code (33)
{B,1,N,1¦
1,"[)>~030"¦ Message header
C,"01~02996"¦ Transportation header
C,"M5E1G45~029"¦ Postal Code
This field determines Mode
C,"124~029"¦ Country code
C,"066~029"¦ Class of service
C,"1Z12345679~029"¦ Tracking number
C,"UPSN~029"¦ Origin carrier SCAC
C,"12345E~029"¦ UPS shipper number
C,"089~029"¦ Julian day of pickup
C,"~029"¦ Shipment ID (empty)
C,"1/1~029"¦ Package count
C,"10~029"¦ Weight (lb.)
C,"Y~029"¦ Address validation
C,"~029"¦ Street address (empty)
C,"TORONTO~029"¦ City (empty)
C,"ON~030"¦ State
C,"~004"¦} EOT
10
Page 11

About Fonts
Monarch printers support two types of fonts:
♦ Bitmapped (traditional printer fonts such as Standard and Reduced)
♦ Scalable (Font 50)
Now, TrueType fonts are available only on the 9840 printer. TrueType
fonts are scalable and the characters print smoothly, without the jagged
edges you see on bitmap fonts. When downloading a TrueType font, you
download the entire font. You cannot specify a subset (particular characters
or point size) of the font.
These font files may be very large and image slower than
bitmap fonts. The size of the font file, in bytes, is the
minimum amount of memory you must have available for
fonts in the printer's memory.
Your System Administrator may need to reconfigure the printer's memory to
use downloaded TrueType fonts. Refer to the optional Packet Reference
Manual to learn how to reconfigure the printer's memory. After reconfiguring
memory, resend the font, format, and batch packets.
Previously, the printers could accept a TrueType bitmap font that was
converted to a bitmapped file using the Monarch
However, you were limited to a particular character set and specific point
size.
quick-set Font Utility.
About Font 50
Only with version 6.5, font 50 has been replaced with EFF Swiss Bold, a
TrueType font. You can still use 50 as the designator for this font and old
formats using font 50 still print. However, there may be a slight difference in
the way the new font 50 looks. Font 50 now supports bold and italic printing.
11
Page 12

Using TrueType Fonts
Only the 9840 printer can accept a TrueType font file that has been
converted to Hex or Run-Length encoding using the new version (2.0) of
Font Utility. Font Utility is available on our Web site.
With the new version of Font Utility, you can select a TrueType font (such as
Arial), convert the font, download it to the printer, and print any character in
any point size you want. You can also use a wide variety of Code Pages
with International (Turkish, Latin, Spanish, etc.) characters.
Using Font Utility to Convert TrueType Fonts
Download the latest version of Font Utility from our Web site at
http://www.monarch.com/service/service_upgrades.htm. Copy the .exe file
to your hard drive and double click the file to unzip it.
To install Font Utility:
1.
Start Windows.
2.
From the Program Manager File menu, choose Run.
3. Go to the directory where you unzipped the Font Utility files and type
C:\FONTUTIL\SETUP.EXE and click f.
If the file is located in another drive, change the command line
accordingly.
4.
Respond to additional prompts as necessary. When Setup is complete, a
box displays Setup Succeeded! Click f.
To download a TrueType font:
There is no need to convert a TrueType font before downloading it to the
9840 printer.
1.
Double-click the Font Utility icon from the MONARCH quick-set program
group.
Make sure the printer is connected and ready to receive
data.
12
Page 13

2. Specify your printer by selecting Printer Type... from the Options menu.
You will see
3.
Highlight the printer you want and click f. 300 dpi is an option for
the 9840 printer.
4.
From the File menu, select Download TTF File.... You will see the
Download TTF File box.
5.
You can change the Font Number by entering a different number.
Otherwise, this number increments each time you download a font.
Make a note of the Font Number to reference the font in
your format.
13
Page 14

6. Click Select TTF File. You will see
7.
Select the .TTF file you want to download from the appropriate directory.
Click f when you are finished.
8.
The font file is sent to the printer. A message appears after the
download is completed. Click f.
If you experience problems downloading or printing the font file, you
may need to reconfigure the printer's memory. These fonts are
stored in either volatile or non-volatile RAM. If the fonts are stored
in volatile RAM, they are lost when you turn off the printer. Refer to
the optional Packet Reference Manual to learn how to reconfigure
the printer's memory or use the Font Utility's online help.
Font Error Messages
You may see the following printer errors when downloading TrueType font
files:
621 An error occurred opening the TrueType font file. Select a different
font to download. If the error message persists, call Technical
Support.
14
Page 15

622 Not enough memory to create the downloaded TrueType characters in
the scalable (vector) fonts buffer. Reconfigure the printer's memory
and increase the scalable (vector) fonts buffer. Resend the font,
format, and batch packet after reconfiguring the memory. If the error
message persists, call Technical Support
Licensing Your Fonts
Monarch provides Font Utility to help you create and download international
code pages/characters. However, it is your responsibility to license the fonts
you purchase and download to your Monarch
supplier for licensing information.
printer. Contact your font
Additional fonts that are
compatible with the 9840 printer
can be purchased from:
The Electronic Font Foundry
11 Silwood Road
Ascot
SL5 OPY
England
(0)1344 875 201
Korean, Chinese, and
Japanese fonts can be
purchased from:
Dynalab Inc.
2055 Gateway Place
Suite 400
San Jose, CA 95110
408-490-4224
www.dynalab.com
www.eff.co.uk
Special Memory Considerations For Downloaded TrueType Fonts
♦ The size of the TrueType font file, in bytes, is the minimum amount of
memory you must have available in the downloadable fonts buffer.
♦ The scalable (vector) fonts buffer is used to image the downloaded fonts
(TrueType or bitmapped). If you are using several downloaded TrueType
fonts, you may need 100K or more in this buffer. The printer does not
print the fonts if there is not enough memory in this buffer to image them.
♦ You can store downloaded TrueType or bitmapped fonts in volatile RAM;
however, they will be lost when you turn off the printer.
15
Page 16

Selecting a Different Character Set
Your System Administrator can specify a different code page in the System
Setup Packet (A) or in parameter T15 when you define a text field. Refer to
the optional Packet Reference Manual to define the System Setup Packet or
a text field.
International Code Pages/Symbol Sets
The following code pages/symbol sets are supported on the 9840 printer
using downloaded TrueType fonts or the resident TrueType font, Font 50
(EFF Swiss Bold).
♦ Wingding Characters ♦ Macintosh Characters
♦ Code Page 1250 (Latin 2) ♦ Code Page 1251 (Cyrillic)
♦ Code Page 1252 (Latin 1) ♦ Code Page 1253 (Greek)
♦ Code Page 1254 (Turkish) ♦ Code Page 1255 (Hebrew)
♦ Code Page 1256 (Arabic) ♦ Code Page 1257 (Baltic)
♦ Code Page 1258 (Vietnamese) ♦ DOS Code Page 852 (Latin 2)
♦ DOS Code Page 855 (Russian) ♦ DOS Code Page 857 (IBM Turkish)
♦ DOS Code Page 860 (MS-DOS Portuguese)
16
TrueType fonts are designed to be regionally specific;
therefore, all code pages may not be supported in a given
font. For example, you may need to find a TrueType font
that supports Turkish characters before you could use
Code page 1254 to print Turkish characters.
Page 17

Code Page 1250 (Latin 2) Characters
17
Page 18

Code Page 1251 (Cyrillic) Characters
Code Page 1252 (Latin 1) Characters
18
Page 19

Code Page 1253 (Greek) Characters
Code Page 1254 (Turkish) Characters
19
Page 20

Code Page 1255 (Hebrew) Characters
Code Page 1256 (Arabic) Characters
20
Page 21

Code Page 1257 (Baltic) Characters
Code Page 1258 (Vietnam) Characters
21
Page 22

Code Page 437 Characters
Code Page 850 Characters
22
Page 23

Code Page 852 (Latin 2) Characters
Code Page 855 (Russian) Characters
23
Page 24

Code Page 857 (IBM Turkish) Characters
Code Page 860 (MS-DOS Portuguese) Characters
24
Page 25

Code Page 101 (Wingding) Characters
Code Page 100 (Macintosh
) Characters
25
Page 26

26
 Loading...