


CDM-8600 ENG/FRH Cover.qxd 2003.6.24 5:39 PM Page 1
Owner’s
Manual
MANUEL
D’UTILISATION
La sécurité d'abord:
l'appel est lancé!
Les fournisseurs de services sans fil vous rappellent que la prudence au volant doit être votre priorité en tout temps
5155 Spectrum Way ¥ Unit 5 ¥ Mississauga, Ontario Canada L4W5A1 800.465.9672 ¥ www.audiovox.com ¥ LTCLOM269
'2003 Audiovox Communications Corporation

CDM-8600BM7/22 2003.7.22 3:0 PM Page 1
AUDIOVOX
CDM-8600BM
Tri Mode Digital CDMA/AMPS
Handheld Portable Telephone
In today’s fast paced world, it has become a necessity to have access to real time information. Your communications tools must provide you with this access from anywhere at anytime. With that in mind, Audiovox developed the CDM-8600, a tri mode handset with 65K colors display and voice activated dialing features.
Operating on the 800 MHz AMPS/CDMA and 1900 MHz PCS frequencies, the CDM-8600 allows for seamless nationwide coverage as well as offering state-of-the-art, user-friendly features. Voice activated dialing and 2-way speakerphone are great for enhancing hands-free use of this phone. T9TM Text Input, vibrating alert and dual LCD displays make the CDM-8600 easier to use.
Several optional accessories are available for the CDM8600, including : hands-free devices charging devices, data interface cables and belt clips.
Your new CDM-8600 provides you with something only an Audiovox phone can : the proven reliability that has made us a leading wireless handset provider. Please take a few moments to read the following pages of the owner’s manual. It will help you make the most efficient use of this valuable communications tool.
Preface

CDM-8600BM7/22 2003.7.22 3:0 PM Page 2
TABLE OF CONTENTS |
|
CHAPTER 1 BEFORE USING YOUR PHONE.......... |
5 |
Package Contents................................................... |
6 |
Handset Description ............................................... |
7 |
Function Keys ......................................................... |
8 |
Display Indicators ................................................... |
9 |
Using the Battery .................................................. |
11 |
Installing the Battery ............................................ |
11 |
Removing the Battery .......................................... |
11 |
Charging the Battery ............................................ |
12 |
Power Connection ............................................... |
12 |
Charging Display – On Phone............................. |
12 |
Battery Charging Time......................................... |
13 |
Battery Talk and Standby Times.......................... |
13 |
Battery Information............................................... |
14 |
CHAPTER 2 BASIC OPERATION ........................... |
15 |
Using the Phone ................................................... |
16 |
Turning the Phone On ......................................... |
16 |
Turning the Phone Off ......................................... |
16 |
Using the Menu ..................................................... |
17 |
Menu Summary ..................................................... |
18 |
Basic Functions .................................................... |
21 |
Making a Call....................................................... |
21 |
Pause Feature ..................................................... |
22 |
Speakerphone ..................................................... |
23 |
Answering Calls ................................................... |
23 |
Caller ID............................................................... |
23 |
Call Waiting.......................................................... |
24 |
Answering Machine Display................................. |
24 |
Adjusting the Volume ........................................... |
25 |
Lock ..................................................................... |
25 |
Vibrate ................................................................. |
26 |
Manner Mode ...................................................... |
26 |
Functions During a Call ....................................... |
27 |
Mute..................................................................... |
27 |
Silent.................................................................... |
27 |
Send My Phone #................................................ |
27 |
Table of Contents - Page 1

CDM-8600BM7/22 2003.7.22 3:0 PM Page |
4 |
TABLE OF CONTENTS |
|
My Profile............................................................. |
28 |
Voice Privacy ....................................................... |
28 |
Location ............................................................... |
28 |
CHAPTER 3 MEMORY & SETTINGS...................... |
29 |
Storing Phone Numbers....................................... |
30 |
Text Input Methods............................................... |
31 |
Entering Characters............................................. |
31 |
Alpha Mode [ABC] ............................................... |
31 |
T9TM Predictive Text Mode [T9ABC]..................... |
32 |
Numeric Mode [123] ............................................ |
34 |
Symbol Mode [SYM]............................................ |
34 |
Speed Dialing ........................................................ |
35 |
One-Touch/Two-Touch Dialing............................. |
35 |
Call History ............................................................ |
36 |
Outgoing Calls ..................................................... |
36 |
Incoming Calls ..................................................... |
37 |
Missed Calls ........................................................ |
38 |
Call Times............................................................ |
39 |
Phonebook ............................................................ |
40 |
Find...................................................................... |
40 |
Editing Your Phonebook ...................................... |
41 |
Edit Group ........................................................... |
42 |
Speed Dial ........................................................... |
44 |
My Profile............................................................. |
45 |
Messaging ............................................................ |
46 |
Two-Way SMS ..................................................... |
46 |
Send New ............................................................ |
47 |
Inbox .................................................................... |
49 |
Outbox ................................................................. |
51 |
Web Alerts ........................................................... |
53 |
Filed ..................................................................... |
54 |
Erase All .............................................................. |
55 |
Settings................................................................ |
56 |
Schedule ................................................................ |
60 |
Event.................................................................... |
60 |
Alarm.................................................................... |
61 |
TABLE OF CONTENTS
Roaming................................................................. |
62 |
Setting.................................................................... |
64 |
Sounds................................................................. |
64 |
Display ................................................................. |
70 |
Security................................................................ |
75 |
Others .................................................................. |
82 |
UP Proxy IP ......................................................... |
86 |
Tools ....................................................................... |
87 |
Calculator............................................................. |
87 |
World Clock ......................................................... |
88 |
Stopwatch ............................................................ |
89 |
Data SVC. .............................................................90 |
|
Connection........................................................... |
90 |
Data Speed.......................................................... |
91 |
Service Option ..................................................... |
92 |
Location ................................................................. |
93 |
Setting.................................................................. |
93 |
Voice SVC. ............................................................. |
94 |
Voice Memo......................................................... |
94 |
Call Answer.......................................................... |
95 |
Voice Command .................................................. |
96 |
Voice Dial............................................................. |
98 |
Voice Alert.......................................................... |
100 |
Voice Setting...................................................... |
101 |
Emergency Calling.............................................. |
103 |
E911 Calling ...................................................... |
103 |
CHAPTER 4 INTERNET BROWSER ..................... |
105 |
Start Internet Browser........................................ |
106 |
Wireless Internet................................................ |
106 |
Browser Menu ..................................................... |
107 |
Browser Menu ................................................... |
107 |
Page 2 - Table of Contents |
Table of Contents - Page 3 |

CDM-8600BM7/22 2003.7.22 3:0 PM Page 6
TABLE OF CONTENTS
CHAPTER 5 SAFETY INFORMATION ................... |
111 |
Safety Information for Wireless Handheld Phones.. |
112 |
Exposure to Radio Frequency Signals .............. |
112 |
Antenna Care..................................................... |
113 |
Phone Operation................................................ |
113 |
Driving Safety .................................................... |
113 |
Electronic Devices ............................................. |
114 |
Other Safety Guidelines..................................... |
116 |
Precautions and Warnings................................. |
117 |
Operating Procedures........................................ |
118 |
Safety Information for FCC RF Exposure......... |
119 |
Caution............................................................... |
119 |
SAR Information.................................................. |
120 |
FDA Consumer Update ...................................... |
122 |
CHAPTER 6 WARRANTY ...................................... |
131 |
Protect Your Warranty ........................................ |
132 |
12 Months Limited Warranty.............................. |
133 |
Chapter 1
BEFORE USING
YOUR PHONE
Please read and fully understand this manual before using your phone.
This chapter addresses your phone, its keys and display icons, and covers the charging and proper use of
the battery.
Once you have read this chapter, you can move on to the basic and advanced features of your phone.
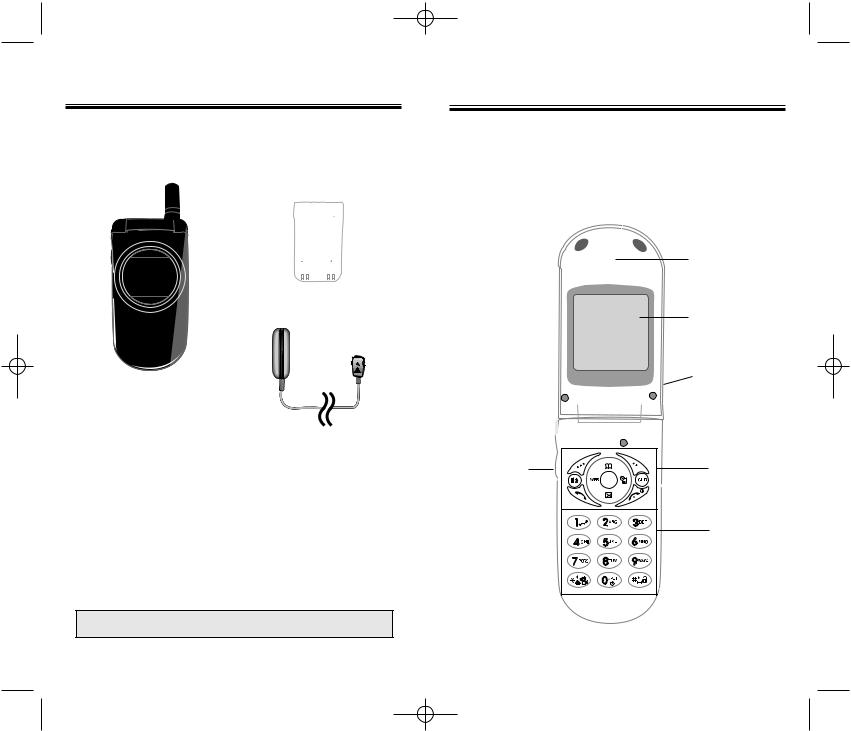
 Package Contents
 Handset Description
 Function Keys
 Display Indicators
 Using the Battery
 Charging the Battery
 Battery Information
Page 4 - Table of Contents |
Chapter 1 - Page 5 |
CDM-8600BM7/22 2003.7.22 3:0 PM Page 8
PACKAGE CONTENTS
Thank you for purchasing the CDM-8600 wireless handset. The phone’s giftbox contains all of the items listed below.
Standard Battery
Handset
Travel Charger
User Manual
Hand strap |
Belt Clip |
NOTE: Immediately report any product defects to the place of purchase
HANDSET DESCRIPTION
This phone is a tri mode (800MHz AMPS/CDMA, 1900MHz PCS) CDMA digital phone with data and web browsing capabilities. The CDM-8600 weighs at 3.2 Oz. and the dimensions are 1.65” x 3.26” x 1.01”.
Earpiece
65K colors STN LCD Display
Antenna
For best call quality, fully extend the antenna during the call.
Volume
Function
Button
Keys
Adjusts the
earpiece
and ringer |
Keypad |
volume.
 Microphone
Page 6 - Chapter 1 |
Chapter 1 - Page 7 |

CDM-8600BM7/22 2003.7.22 3:0 PM Page 10
FUNCTION KEYS
END KEY: Press to turn the handset on or off. Terminates a call or exits the current menu.
SEND KEY: Press to make or receive a call.
NAVIGATION KEY:
In Idle Mode - Press  to access the phonebook,
WEB to access the wireless Internet, to access the messaging menu, and to
to access the schedule. Inside the Menu - Press
  , WEB, and
 to scroll through the menu. Press
  to select a menu option or to select the option at the bottom middle of the screen.
SOFT KEYS: Press to perform the functions displayed above them on the LCD Display.
SPEAKERPHONE KEY: Press to enable the speakerphone mode.
CLEAR KEY: Press to clear characters.
LOCK KEY: Press and hold to enter lock mode.
MANNER MODE: Press and hold to enter manner (Vibration) mode.
DISPLAY INDICATORS
Signal Strength
Indicates current signal strength.
The more lines, the stronger the signal.
Roaming
Indicates the phone is outside of its home area.
Service Indicator
When a call is in progress,  is displayed. When
  is displayed, the phone is in idle mode. When
  is displayed, the phone is not receiving a signal from the system.
Message
Indicates a text or voice mail message is waiting.
Text |
Voice |
Voice & Text |
Message |
Message |
Message |
Digital Mode
Indicates the phone is operating in digital mode.
Battery
Indicates charge level status.
The more black line, the greater the charge.
Mute
Indicates the phone is mute during a call.
Silent
Mutes key tones during a call.
Phone is in the progress of UP Browser.
Phone has received an “Web Alert”.
Page 8 - Chapter 1 |
Chapter 1 - Page 9 |

CDM-8600BM7/22 2003.7.22 3:0 PM Page 12
DISPLAY INDICATORS
Phone has received an “Web Alert” and has a text message, which has not yet been checked.
Emergency call
Blinks when an emergency call is in progress.
Answering machine memo
Indicates new voice memos.
Answering machine
Phone is in answering machine mode.
Manner Mode
Indicates the phone is in manner mode.
Schedule
Indicates an event or alarm has been set.
Ring Mode
Ringer mode has been set as follows:
Ringer |
Ringer after |
Silent |
Vibrate |
|
vibrate |
|
|
GPS Icon
Location Off
Location On
1X
Indicates phone is operating in “CDMA2000 1X” digital mode.
Dormant
Indicates the phone is in disconnection condition while on “Server Connection”.
USING THE BATTERY
INSTALLING THE BATTERY
1.Insert the bottom of battery into groove at bottom of the handset.
2.Press the top of the battery until it clicks.
REMOVING THE BATTERY
1.Push the tab with one hand and lift the top of the battery to separate.
NOTE: If the battery is not correctly placed in the battery compartment, the handset will not turn on and/or the battery may detach during use.
Page 10 - Chapter 1 |
Chapter 1 - Page 11 |
CDM-8600BM7/22 2003.7.22 3:0 PM Page 14
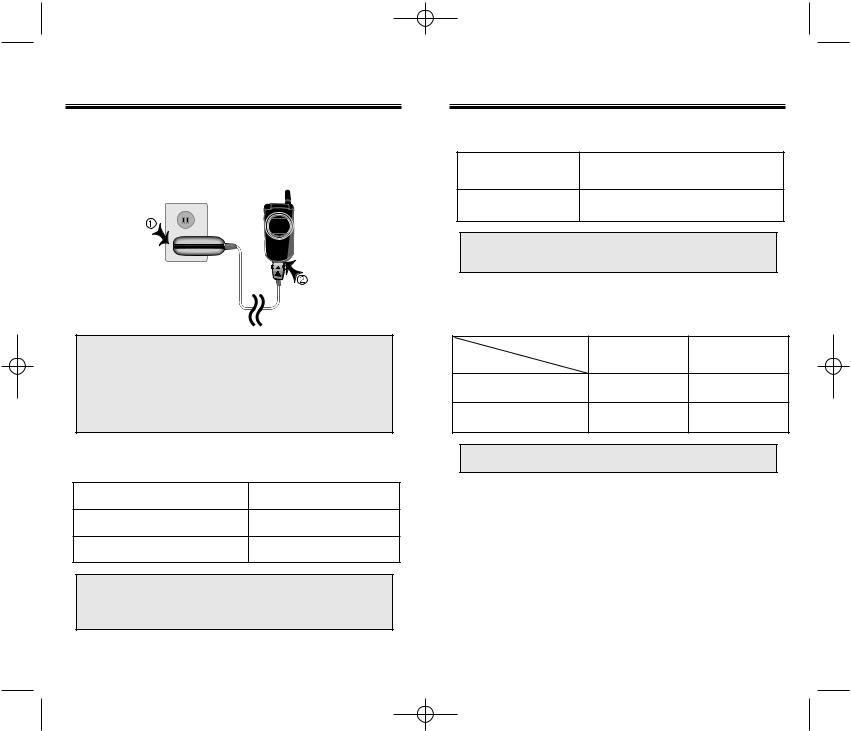
CHARGING THE BATTERY
POWER CONNECTION
Connect the charger to a standard 110V AC outlet.
NOTE: 1. It is more efficient to charge the battery with the handset off.
2.The battery must be connected to the phone in order to charge it.
3.Battery operating time gradually decreases over time.
4.If the battery fails to perform normally, you may need to replace the battery.
CHARGING DISPLAY – ON PHONE
“Charging .... “ |
Being Charged |
“Charging is Complete” |
Fully Charged |
“Check Charger” |
In Case of Error |
An error can occur for the following reasons:
●Battery is not correctly attached to the phone.
●Temperature is out of range for charging. (Charging Temperature : 0oC ~ 50oC)
CHARGING THE BATTERY
BATTERY CHARGING TIME
Battery Type |
BTR8600 |
|
(900 mAh) |
||
|
||
Charging Time |
200 minutes |
NOTE: Charging time applies only when your phone is turned off. Charging time may vary if your phone is turned on.
BATTERY TALK & STANDBY TIMES
Type |
Digital |
Analog |
|
Status |
|||
|
|
||
Talk Time (min) |
190min |
60min |
|
Standby Time (hrs) |
150hrs |
12hrs |
NOTE: These times are for a new battery.
Talk and standby time may decrease over time.
Page 12 - Chapter 1 |
Chapter 1 - Page 13 |

CDM-8600BM7/22 2003.7.22 3:0 PM Page 16
BATTERY INFORMATION
Use only manufacturer approved batteries.
Never use a damaged or worn out battery.
Use the battery only for its intended purpose.
Never expose the battery terminals to any other metal object. This can short circuit the battery.
Avoid exposure to temperature extremes. A phone with a hot or cold battery may temporarily not work (or charge), even if the battery is fully charged. Always allow it to cool down or warm up first and keep the battery between 41oF and 95oF (5oC and 35oC).
When not in use, store the battery uncharged in a cool, dark, dry place.
The battery is a self-contained unit. Do not attempt to open its case.
Battery operating time gradually decreases. You may need to buy a new battery.
Never dispose of a battery in a fire!
Dispose of used batteries in accordance with local regulations.
Recycle!
Chapter 2
BASIC OPERATION
This chapter addresses the phone’s basic functions including menus, volume levels, and call functions.
 Using the Phone
 Using the Menu
 Menu Summary
 Basic Functions
 Functions During a Call
Page 14 - Chapter 1 |
Chapter 2 - Page 15 |
CDM-8600BM7/22 2003.7.22 3:0 PM Page 18
USING THE PHONE
TURNING THE PHONE ON
1. Press 
 .
.
●If “PASSWORD” appears, the phone is locked. To unlock, enter your 4-digit password.
NOTE: The default password is the last 4 digits of your Phone number changed last.
TURNING THE PHONE OFF
1. Press and hold until power off animation appears.
NOTE: 1. If “LOW BATTERY WARNING POWER OFF” appears and the power goes off, there is a possibility of damaging your phone’s memory. Change or charge the battery .
2.If the battery is removed while the phone is on, information about the last call may be erased.
USING THE MENU
USING THE MENU
1.To enter the main menu from the idle screen, press 
 .
.
2.Use the navigation key to view menu selections.
3.To go back to previous screen, press [CNCL].
4.To exit the menu and return to the idle screen, press 
 .
.
5.To go into a submenu, press the corresponding number
or scroll to the desired item using the navigation key and press  .
.
6.The navigation key  ,
,  ,
,
 ,
,
 can be used for scrolling through the menu.
Page 16 - Chapter 2 |
Chapter 2 - Page 17 |

CDM-8600BM7/22 2003.7.22 3:0 PM Page 20
MENU SUMMARY |
MENU SUMMARY |
1 : CALL |
u 1 |
: Outgoing Calls |
|
|
|
HISTORY |
2 |
: Incoming Calls |
|
|
|
|
3 |
: Missed Calls |
|
|
|
|
|
|
|||
|
4 |
: Call Times |
1 : Last Call |
||
|
|
|
2 |
: All Calls |
|
|
|
|
3 |
: Home Calls |
|
|
|
|
4 |
: Roam Calls |
|
|
|
|
5 |
: Accumulated Calls |
|
|
u 1 |
: Find |
1 : By Group |
||
2 : PHONEBOOK |
|||||
|
|
2 |
: By Name |
||
|
|
|
3 |
: By Number |
|
|
2 |
: Edit Phonebook |
1 : Add New Entry |
||
|
|
|
2 |
: Edit Existing Entry |
|
|
3 |
: Edit Group |
1 : Add New Group |
||
|
|
|
2 |
: Change Group Name |
|
|
|
|
3 |
: Clear Group |
|
|
4 |
: Speed Dial |
|
|
|
|
5 |
: My Profile |
|
|
|
|
u 1 |
: Event |
|
|
|
3 : SCHEDULE |
|
|
|||
2 |
: Alarm |
|
|
||
|
u 1 |
: Set Mode |
|
|
|
|
|
|
|||
4 : ROAMING |
|
|
|||
2 |
: Force Analog |
|
|
||
|
3 |
: Nam Setting |
|
|
|
|
|
|
|||
|
4 |
: PRL ID |
|
|
|
|
u 1 : Sounds |
1 : Ringer Type |
|||
5 : SETTING |
|||||
|
|
2 |
: Ringer Mode |
||
|
|
|
3 |
: Volume |
|
|
|
|
|||
|
|
|
4 |
: Alert |
|
|
|
|
5 |
: Roam Ringer |
|
|
|
|
6 |
: Tone Length |
|
5 : SETTING |
u |
2 |
: Display |
1 : Animation Setting |
|
|
|
2 |
: Main Display |
||
|
|
|
|
||
|
|
|
|
3 |
: LCD Setting |
|
|
|
|
4 |
: Screen Saver |
|
|
|
|
5 |
: Sub LCD Setting |
|
|
3 |
: Security |
1 : Restrict |
|
|
|
|
|
2 |
: Special #'s |
|
|
|
|
3 |
: Clear Phonebook |
|
|
|
|
4 |
: Reset Phone |
|
|
|
|
5 |
: Change Password |
|
|
4 |
: Others |
1 : Answer Mode |
|
|
|
|
|
2 |
: Active Flip |
|
|
|
|
3 |
: Auto Retry |
|
|
|
|
4 |
: Auto Answer |
|
|
|
|
5 |
: Voice Privacy |
|
|
|
|
6 |
: Language |
|
|
|
|
7 |
: S/W Version |
|
|
5 |
: UP Proxy IP |
|
|
|
u 1 |
: Calculator |
|
|
|
6 : TOOLS |
|
|
|||
|
2 |
: World Clock |
|
|
|
|
|
|
|
||
|
u |
3 |
: Stopwatch |
|
|
|
1 |
: Connection |
|
|
|
7 : DATA SVC. |
|
|
|||
2 |
: Data Speed |
|
|
||
|
|
|
|
||
|
|
3 |
: Service Option |
|
|
|
u 1 |
: Settings |
|
|
|
8 : LOCATION |
|
|
|||
|
|
|
|
|
|
|
|
|
|
|
|
Page 18 - Chapter 2 |
Chapter 2 - Page 19 |
CDM-8600BM7/22 2003.7.22 3:0 PM Page 22
MENU SUMMARY
|
u 1 |
: Voice Memo |
|
|
|
9 : VOICE SVC. |
|
|
|||
2 |
: Call Answer |
1 : On/Off |
|||
|
|||||
|
|
|
2 |
: Inbox |
|
|
|
|
|||
|
|
|
3 |
: Call Speaker |
|
|
|
|
4 |
: Wait Time |
|
|
3 |
: Voice Command |
1 : Yes/No |
||
|
|
|
2 |
: Wake-Up |
|
|
4 |
: Voice Dial |
1 : List |
||
|
|
|
2 |
: Add |
|
|
|
|
3 |
: Clear All |
|
|
5 |
: Voice Alert |
1 : On/Off |
||
|
|
|
2 |
: Record |
|
|
|
|
3 |
: Play |
|
|
|
|
4 |
: Clear |
|
|
6 |
: Voice Setting |
1 : Untrain All |
||
|
|
|
2 |
: HFK Mode |
|
|
|
|
3 |
: Set Active |
|
BASIC FUNCTIONS
MAKING A CALL
1.Enter the phone number.
2.To place a call, press  .
.
●Retry by pressing  .
.
3.To end a call, press 
 .
.
●To erase the last entered number, press  .
.
●To erase all numbers and start again, press and
hold  .
.
●“CALL FAILED” will display if the call did notconnect.
●If the line is busy, press 
 .
.
●Selecting “AUTO RETRY” will automatically redial
the number for the time you have selected. (Refer to page 83)
Page 20 - Chapter 2 |
Chapter 2 - Page 21 |
CDM-8600BM7/22 2003.7.22 3:0 PM Page 24
BASIC FUNCTIONS
PAUSE FEATURE
Pauses are used for automated systems (i.e., voice mail and calling cards). Insert a pause after a phone number, then enter another group of numbers. The second set of numbers is dialed automatically after the pause. This feature is useful for dialing into systems that require a code.
1. Enter the phone number, then press |
. |
2.Select desired pause. "P" or "T" will appear after the number to represent the pause.
STANDBY MENU |
DURING CALL MENU |
|||||
|
|
|
|
1 |
: MUTE |
|
STO |
FIND |
PSE |
2 : SILENT |
|||
PAUSE INPUT: |
3 |
: SEND MY PHONE # |
||||
4 |
: MY PROFILE |
|||||
1 |
: PREFIX |
|||||
5 |
: VOICE PRIVACY |
|||||
2 |
: HARD PAUSE |
|||||
6 |
: LOCATION |
|||||
3 |
: TIME HYPHEN |
|||||
|
|
|||||
3. To dial, press . To store, press

 .
.
HARD PAUSE: If you enter the pause character (P), the number entered after the pause character will be sent after the number dialed.
TIME PAUSE: If you enter the pause character (T), the number entered after the pause character will be sent after 2sec/unit.
BASIC FUNCTIONS
SPEAKERPHONE
1.To activate the speakerphone in idle, answering or calling mode, press and hold  .
.
2.After you have ended your call, speakerphone mode turns off.
The phone resets to Speakerphone Off when it turns off and back on.
ANSWERING CALLS
1.To answer a call, press any key except 
 ,
, or
or  .
.
2.To end the call, press 
 .
.
NOTE: Calls can be automatically answered by activating the “ANSWER MODE” function. (Refer to page 82)
CALLER ID
Identifies caller by displaying that person’s phone number. If the caller’s name and number are stored in your phonebook, the name and number from the memory location are displayed.
NOTE: • The Caller ID numbers are saved in the call log. Caller ID is a system dependent feature. Please contact your service provider for details. (Refer to page 30)
•Calling name(CNAP) is not stored in recent call and in phonebook.
If the call is received with Secret :
1.The name will not be displayed and ringer will be a basic one.
2.The call will make after inputting password on phonebook.
Page 22 - Chapter 2 |
Chapter 2 - Page 23 |
CDM-8600BM7/22 2003.7.22 3:0 PM Page 26
BASIC FUNCTIONS
CALL WAITING
This function notifies you of an incoming call when you are on another call by sounding a beep tone.
1.When you hear the beep, press  to answer the call.
2.To switch back to the first caller, press  again.
NOTE: Call Waiting is a system dependent feature. Please contact your service provider for details.
ANSWERING MACHINE DISPLAY
Notifies you of unchecked recorded memos in the answering machine.
1.Displays the number of stored memos that are recorded in the answering machine.
To play the recorded voice memos, press  .
.
BASIC FUNCTIONS
ADJUSTING THE VOLUME
You can adjust the volume in two ways: by using the volume control keys on the side of the handset or by using the menu.
Pressing volume control keys:
●During a call : Adjusts earpiece volume.
●In idle mode : Adjusts ringer volume.
●When the phone rings : Adjusts ringer volume.
See page 66 for more detailed instructions.
LOCK
Locks phone and prevents unauthorized use. Phone can only be used after inputting the password.
1.To lock the phone, press and hold  .
.
2.To unlock the phone, input the password.
NOTE: The default password is the last 4 digits of your Phone number changed last.
Page 24 - Chapter 2 |
Chapter 2 - Page 25 |

CDM-8600BM7/22 2003.7.22 3:0 PM Page 28
BASIC FUNCTIONS
VIBRATE
Disables the ringer and vibrates when an incoming call is received. To enable this function:
1.Press

 .
.
2.Select “SOUND” by pressing .
.
3.Scroll to “RINGER MODE” and press .
.
4.Scroll to “VIBRATE” and press . “VIBRATE ACTIVATED” will be displayed.
MANNER MODE
Silences all phone sounds while attending a meeting, a movie, or any other time you do not want your phone to be heard. All phone sounds include the ringer, key beeps and notifications. Your phone will vibrate to notify you of an incoming call. To enable this function, press and hold .
.
FUNCTIONS DURING A CALL
MUTE
Mutes the microphone while you are on a call so the other party cannot hear you if you speak.
1. Press


 “MUTE”.
NOTE: To turn mute off, press |
, then |
“Mute” again. |
SILENT
Prevents the person you’re talking to from hearing DTMF tones when any key is pressed during a call.
1.While on a call, press

 “SILENT”.
2.To deactivate, press

 .
.
SEND MY PHONE #
Enables your phone number to be automatically transmitted to a pager. (Dependent on pager service.)
After calling a pager, when you are asked to enter your number, press


 “SEND MY PHONE #”.
Page 26 - Chapter 2 |
Chapter 2 - Page 27 |
CDM-8600BM7/22 2003.7.22 3:0 PM Page 30
FUNCTIONS DURING A CALL
MY PROFILE
Enables you to review and edit your profile. Please refer to page 45 for more details.
1. Press

 “MY PROFILE”.
VOICE PRIVACY
Enhances voice privacy during a call.
1.Press

 “VOICE PRIVACY”.
2.Select “STANDARD” or “ENHANCED” with the navigation key.
LOCATION
Enables the Bell Mobility network to locate your current location through Global Positioning System (GPS). Refer to page 93 for more details.
1. Press

 “LOCATION”.
Page 28 - Chapter 2
Chapter 3
MEMORY &
SETTINGS
This chapter addresses numerous functions including saving phone numbers to the internal phonebook, entering text and voice services.
 Storing Phone Numbers
 Text Input Methods
 Speed Dialing
 Call History
 Phonebook
 Messaging
 Schedule
 Roaming
 Setting
 Tools
Tools
 Data SVC.
 Location
 Voice SVC.
 Emergency Calling
Chapter 3 - Page 29

CDM-8600BM7/22 2003.7.22 3:0 PM Page 32
STORING PHONE NUMBERS
The CDM-8600 memory stores up to 300 frequently dialed numbers.
1.Enter the phone number and press [STO].
2.Press  “ADD NEW ENTRY”.
3.The phone number will appear next to a list of icons, indicating the phone number type. The name of the icon will be displayed above the list. Use the
navigation key to move the phone number to the number type, as indicated by the icon. Press  .
.
4.The Editor screen will be displayed automatically.
Follow the instructions for entering text on page 31.
To change the input mode, press [MODE]. Press
  to store the name.
5.Use the navigation key to scroll through the list of icons for mode options for the entry (VAD, email address, secret).
5.1To add an email address, scroll to the email address icon  . Press
 [EDIT] and type in the email address. Press
  [STO].
5.2To add a voice tag for voice activated dialing, scroll to the vice dial icon  . It will read “UNASSIGNED”. Press the navigation key left or right until the type of
number you are saving and you want the voice tag
for is displayed. Then press [REC]. “Enter voice tag?” appears. Press
  . Follow the voice prompts.
6.Press  to save the entry. “New entry is saved” will be displayed.
TEXT INPUT METHODS
ENTERING CHARACTERS
For convenient entry of memory location names and text messages, your phone offers several text input methods:
Alpha mode : Enter words by repeatedly tapping the corresponding key until the desired character is displayed.
T9TM mode : Tap each corresponding key only once and the phone predicts the word you are entering.
Numeric mode : Enter numbers only. Symbol mode : Enter symbols like @, #, %.
ALPHA MODE [ABC]
To choose Alpha mode, press 
 , then choose [ABC]. The chart below outlines the key presses needed to display each letter or number in this mode.
Key Pad |
1 Repetition |
2 Repetitions |
3 Repetitions |
4 Repetitions |
5 Repetitions |
|
|
|
|
|
|
1 |
1 |
|
|
|
|
|
|
|
|
|
|
|
|
|
|
|
|
2ABC |
A |
B |
C |
2 |
|
|
|
|
|
|
|
3DEF |
D |
E |
F |
3 |
|
|
|
|
|
|
|
4GHI |
G |
H |
I |
4 |
|
|
|
|
|
|
|
: |
: |
: |
: |
: |
: |
|
|
|
|
|
|
9WXYZ |
W |
X |
Y |
Z |
9 |
|
|
|
|
|
|
●Automatically moves the cursor to the next space two seconds after character input.
●To erase one letter, press  .
.
●To erase the entire entry, press and hold  .
.
●To switch between lowercase to uppercase letters, press  .
.
Page 30 - Chapter 3 |
Chapter 3 - Page 31 |
CDM-8600BM7/22 2003.7.22 3:0 PM Page 34
TEXT INPUT METHODS
T9TM PREDICTIVE TEXT MODE [T9ABC]
To choose T9 mode, press , then choose [T9ABC]. This mode predicts the words you are entering using a built-in dictionary. With T9 predictive text input, you press each key only once for each letter. The chart below outlines how to use T9TM text input.
KEY |
FUNCTION |
|
|
Press to change text input mode: |
|
Mode |
[T9Abc][Abc][123][Sym] |
|
Select [T9Abc] for predictive text |
||
|
||
|
input. |
|
|
Press to view the next matching |
|
Next |
word if the underlined word is not |
|
|
the word you intended. |
|
|
Press once to accept a word and |
|
Space |
add a space. |
|
|
Press once to delete the character |
|
Clear |
to the left of the cursor. |
|
|
To move cursor. |
|
Left, Right |
|
TEXT INPUT METHODS
1.Press each key once for each letter of the word you are entering.
●To enter John with the English dictionary selected:
1.Press 5 once - (for - k)
2.Press 6 once - (for - km)
3.Press 4 once - (for - log)
4.Press 6 once - (for - john)
NOTE: The display shows for each key pressed.
2.Press until the correct word is displayed.
3.To select the word and add a space after the word, press  .
.
Page 32 - Chapter 3 |
Chapter 3 - Page 33 |

CDM-8600BM7/22 2003.7.22 3:0 PM Page 36
TEXT INPUT METHODS
NUMERIC MODE [123]
Numeric mode allows you to add a number to your entry/message. To select numeric mode, press , then select [123].
SYMBOL MODE [SYM]
Symbol mode allows you to add various symbols to your entry. Whether you are adding an email address to your phonebook or sending an expressive message, symbols make these entries easier.
To choose symbol mode, press , then choose [SYM]. The symbols will appear on the display.
The corresponding key number for that symbol will appear as well. You can press the key to select the symbol or use the navigation key to highlight the symbol, then press  .
.
To move to the next screen of symbols press 

 .
.
SPEED DIALING
ONE-TOUCH/TWO-TOUCH DIALING
Ideal for frequently dialed numbers, this feature allows phonebook entries to be dialed via the keypad with only one or two key presses.
ONE-TOUCH DIALING:
1-9 : Press the corresponding memory number and hold for more than 1 second.
TWO-TOUCH DIALING:
01-20 : Press the first digit and second digits of the memory number short and long respectively.
●If no phone number is stored in the location entered, “There is no number” will appear on the screen.
●If a phone number is stored in secret, the number is not displayed when making the call.
NOTE: One-touch dialing must be turned on in the handset. See page 44.
Page 34 - Chapter 3 |
Chapter 3 - Page 35 |
CDM-8600BM7/22 2003.7.22 3:0 PM Page 38
CALL HISTORY
The CDM-8600 keeps a log of the 10 most recently missed, answered (incoming) and dialed (outgoing) calls.
OUTGOING CALLS
1.To view the 10 most recently dialed numbers,
press


 .
.
The most recent call will be listed first.
2.Use the navigation key to scroll through the list of
outgoing calls, then select the desired number. To view call details, press  .
.
●Detail information includes the phone number, its log number, time and date of the call.
3.To dial the number, press  .
.
4.Press  [OPTS] to add or edit the area code or to store the phone number into your phonebook.
CALL HISTORY
INCOMING CALLS
1. To view the 10 most recently answered calls, press 


 .
.
The most recent call will be listed first.
2.Use the navigation key to scroll through the list of
incoming calls, then select the desired number. To view call details, press  .
.
●Detail information includes the phone number, its log number, time and date of the call.
3.To dial the number, press  .
.
4.Press  [OPTS] to add or edit the area code or to store the phone number into your phonebook.
Page 36 - Chapter 3 |
Chapter 3 - Page 37 |

CDM-8600BM7/22 2003.7.22 3:0 PM Page 40
CALL HISTORY
MISSED CALLS
1.To view the 10 most recently missed calls,
press


 .
.
The most recent call will be listed first.
2.Use the navigation key to scroll through the list of
missed calls, then select the desired number. To view call details, press  .
.
●Detail information includes the phone number, its log number, time and date of the call.
3.To dial the number, press  .
.
4.Press  [OPTS] to add or edit the area code or to store the phone number into your phonebook.
CALL HISTORY
CALL TIMES
LAST CALL
Displays the total amount of time of your last call.
1. Press 


 .
.
ALL CALLS
Displays the total amount of time of all your calls.
1. Press 


 .
.
HOME CALLS
Displays the total amount of time for calls placed within your home area.
1. Press 


 .
.
ROAM CALLS
Displays the total amount of time for calls placed outside your home area.
1. Press 


 .
.
ACCUMULATED CALLS
Displays talk time of accumulated calls.
1. Press 


 .
.
Page 38 - Chapter 3 |
Chapter 3 - Page 39 |

CDM-8600BM7/22 2003.7.22 3:0 PM Page 42
PHONEBOOK
FIND
BY GROUP
1.Press


 .
.
2.Select one of the options (Family, Friends, Work, Etc., All) using the navigation key, then press  .
.
3.All the entries under that group will be displayed.
Use the navigation key to select the entry.
You can delete the entry by pressing [DEL]. You can view or edit the entry by pressing
  .
.
4.To call the selected number, press  .
.
BY NAME
1.Press


 .
.
2.Enter the name or part of the name, then press  . (Please refer to page 31 about the usage of Alpha Editor)
3.All matched entries will be displayed. Use the
navigation key to select the entry. You can delete the
entry by pressing [DEL]. You can view or edit the entry by pressing
  .
.
4.To call the selected number, press  .
.
PHONEBOOK
BY NUMBER
Recall saved phone numbers by searching the phonebook. Search results include the name and phone number saved to the phonebook.
1.Press


 .
.
2.Enter the phone number or part of the phone number, then press  . All matched entries will be displayed
3.To dial the number, press  .
.
EDITING YOUR PHONEBOOK
ADD NEW ENTRY
1.To add a new entry to the phonebook, press


 .
.
2.Enter the name of the entry and press  [STO]. Scroll to the icon for the type of phone number you
are entering and press 
 [EDIT]. Enter the phone number and press
  [STO].
3.To save the entry, press  .
.
Page 40 - Chapter 3 |
Chapter 3 - Page 41 |
CDM-8600BM7/22 2003.7.22 3:0 PM Page 44
PHONEBOOK
EDIT EXISTING ENTRY |
|
1. To edit an existing entry, press |
. |
The 5 entry groups appear – Family, Friends, Work, Etc., All.
2.Use the navigation key to select one of the groups, then press  .
.
3.Select an entry under the group. To view or edit the
entry, press  . To delete the entry, press
 [DEL]. “Delete [entry name]?” will be displayed. To accept, press
  .
.
4.To save, press  .
.
EDIT GROUP
Adds, changes and deletes a group.
ADD NEW GROUP
1.To add a new group, press


 . A maximum of 7 groups is allowed.
2.Input a new group name.
3.To save press  .
.
PHONEBOOK
CHANGE GROUP NAME
1.To change a group name, press 


 .
.
2.Use the navigation key to select an existing group name.
3.Input or edit the new name.
4.To save it, press  .
.
CLEAR GROUP
1.To delete an existing group, press 


 .
.
2.Use the navigation key to select the group to be deleted.
3.To delete it, press  .
.
4.“Clear [group name]?” will be displayed. To confirm, press  .
.
Page 42 - Chapter 3 |
Chapter 3 - Page 43 |
CDM-8600BM7/22 2003.7.22 3:0 PM Page 46
PHONEBOOK
SPEED DIAL
Links a phone number of a phonebook entry to a location number and enables you to make a call simply by pressing its location number in the idle mode.
1.Press


 .
.
2.To link a phone number to the location, select the location, then press  . If a phone number already exists in the location, press
 , then the navigation key to delete it.
3.Select the group where the phone number is saved, then press  .
.
4.Select the entry, then press  .
.
5.Select the phone number, then press  .
.
PHONEBOOK
MY PROFILE
Saves and edits your personal information.
1.To review and edit your personal information (Name, My phone number, Birthday, Blood Type, Address,
Home number, E-Mail, Work Phone number, Memo, Set Secret), press 


 .
.
2.To edit a selected item, press 
 .
.
NOTE: To edit a selected item of Blood type, press 

 .
.
3. To confirm and save, press  .
.
Page 44 - Chapter 3 |
Chapter 3 - Page 45 |
CDM-8600BM7/22 2003.7.22 3:0 PM Page 48
MESSAGING
TWO-WAY SMS
Your Audiovox wireless handset features Two-Way Short Message Service (SMS). This feature sends and receives text messages through your phone. Voice mail notification is also supported.
MESSAGE INDICATORS
The following symbols indicate the status of message received by your phone. These symbols appear for voice mail and text messages.
Single Duplicate
Message Message
: Urgent New Msg
: Urgent Read Msg
: New Msg (unread)
: Old Msg (read)
: Lock (unread)
: Lock (read)
: Voice mail
: Voice & Text Message
RECEIVED MESSAGE NOTIFICATION
When your phone receives a message, the screen displays the number of new text messages and voice mail messages.
1.To display the received message, press the key under .
.
MESSAGING
CHECKING RECEIVED VOICE MAIL MESSAGE
1.Press 
 for “VOICE”.
2.The number of voice mail messages currently received in your mailbox appears. To access your voice mailbox, press  .
.
CHECKING RECEIVED TEXT MESSAGE
1.Press 
 “INBOX”.
2.Highlight the message you want to view and press
 . The text message is displayed.
3.To view the Inbox Option Menu, press .
.
You can reply, erase, forward, save, save address or lock & unlock the message.
SEND NEW
1.Press 
 “SEND NEW”.
2.Input the phone number, then press  [NEXT].
3.Input text message. (To use a canned message,
press . Use the navigation key to select a canned message and press
 [SEL].) Press
  [NEXT] to display the Outbox Message Menu.
SEND
1. To send the text message, press  or
or  “SEND”.
NOTE: If the message failed to reach the other party, the display will read “Delivery Failed. Retry in 3mins?”. Press “YES” to have the
phone automatically send the message again.
Page 46 - Chapter 3 |
Chapter 3 - Page 47 |
CDM-8600BM7/22 2003.7.22 3:0 PM Page 50
MESSAGING
EDIT RECIPIENT
1.To change the recipient, press  “EDIT RECIPIENT”.
2.Input the phone number, then press  [NEXT]. Press
 [PB] to get a phone number from your phonebook.
3. The “SEND NEW” Menu appears. To send, press


 .
.
EDIT MESSAGE
1.To change the text message, press 

 “EDIT MESSAGE”.
2.Input text message, then press  [NEXT].
PRIORITY
1.To set the priority, press  “PRIORITY”.
2.Select “NORMAL” or “URGENT” by using the navigation key, then press  .
.
CALL BACK
1.To change the call back number, press  “CALL BACK”.
2.Input call back number, then press  .
.
SAVE
1. To save the text message, press  “SAVE”.
MESSAGING
INBOX
To enter the Inbox menu, follow the procedures for “CHECKING RECEIVED TEXT MESSAGES” on page 47.
REPLY
1.To reply to the text message, press  “REPLY”.
2.Enter your message, then press  [NEXT].
3.Press 


 to send.
ERASE
1. To erase the text message, press “ERASE”.
2. “Erase this message?” will be displayed. Press |
to |
|
erase and |
to keep the message. |
|
FORWARD
1.To forward the text message, press  “FORWARD”.
2.Input the phone number of the person you are sending the message to, then press  [NEXT].
3.Input any text message to go long with the forwarded message, then press  [NEXT].
4.Press  to send.
SAVE
1.To save the text message in your phone, press  “SAVE”.
Page 48 - Chapter 3 |
Chapter 3 - Page 49 |

CDM-8600BM7/22 2003.7.22 3:0 PM Page 52
MESSAGING
SAVE ADDRESS
1.To save the callback number and the number in the text message, press  “SAVE ADDRESS”.
2.Press 
 to select the number.
3.To save the the selected number into phonebook, follow the procedures for “STORING PHONE NUMBERS” on page 30.
LOCK & UNLOCK
1.To lock or unlock the text message, press  “LOCK/UNLOCK”.
2.Select “LOCK” to lock the message or “UNLOCK” to unlock the message, then press  .
.
MESSAGING
OUTBOX
1.To enter the Outbox Menu, press 
 for “OUTBOX”.
2.Select the stored message, then press 
 . The text message will be displayed.
3.To enter the Outbox Options Menu, press [OPTS]. You can resend, send to, erase, save address, save, lock & unlock, or display the sent message status.
RESEND
1. To send the message, press  “RESEND”.
SEND TO
1.To edit the message, press “SEND TO”.
2.Input the phone number, then press  [NEXT]. To select a phone number from your phonebook, press
 [PB].
[PB].
3.Input the text message, then press  [NEXT] to display the Send New Message Menu.
4.Press  to send.
ERASE
1. To erase the message, press  “ERASE”.
2. “Erase this message” will be displayed. Press |
to |
|
erase or press |
to keep the message. |
|
Page 50 - Chapter 3 |
Chapter 3 - Page 51 |
CDM-8600BM7/22 2003.7.22 3:0 PM Page 54
MESSAGING
SAVE ADDRESS
1.To save the callback number and the number in the text message, press  for “SAVE ADDRESS”
2.The phone number will be displayed. Press [SEL] to select.
3.To save the the selected number into phonebook, follow the procedures for “STORING PHONE NUMBERS” on page 30.
SAVE
1. To save the message, press  “SAVE”.
LOCK & UNLOCK
1.To lock or unlock the text message, press “LOCK/UNLOCK”.
2.Select “LOCK” to lock the message or “UNLOCK” to unlock the message, then press  .
.
STATE
1.To display the state if the sent message, press  . Press
  to return to the Outbox Options Menu.
MESSAGING
WEB ALERTS
1.To enter the Web Alert Menu, press 
 for “WEB ALERTS”.
2.To select GoTo, press .
.
To select Erase Message, press . The text message will be displayed.
• [ V] : Read Message.
•[  ] : Unread Message.
•[  ] : Displays that text remains.
•GoTo : Connecting Selected Site.
•Erase : Erase Selected Message.
Page 52 - Chapter 3 |
Chapter 3 - Page 53 |
CDM-8600BM7/22 2003.7.22 3:0 PM Page 56
MESSAGING
FILED
Manages saved messages from the Inbox/Outbox.
1.Press 
 for “FILED”.
Select a text message with the navigation key, then press [SEL].
2.The text message is displayed. Press 
 display the Filed Options Menu.
3.If the text message is saved
from “INBOX” menu, the following will be displayed:
[OPTS] to
Filed Option |
|
Reply |
▲ |
Forward |
|
Erase |
|
Save Address |
|
Lock & Unlock |
▲ |
OK CNCL
If the text message is saved
from “OUTBOX” menu, the following will be displayed:
4. Select one by pressing  .
.
Filed Option
Resend |
▲ |
Send To |
|
Erase |
|
Save Address |
|
Lock & Unlock |
|
State |
▲ |
OK |
CNCL |
MESSAGING
ERASE ALL
1. Press 
 for “ERASE ALL”.
2.1. To erase the inbox messages, press 


 .
.
NOTE: Select “Entire Inbox” or “Entire Outbox”.
2.2.To erase the outbox messages, press  .
.
2.3.To erase the filed messages, press  .
.
2.4.To erase the voice messages, press 
 .
.
2.5.To erase the web alerts messages, press  .
.
3. Select “YES” or “NO” with or .
.
Page 54 - Chapter 3 |
Chapter 3 - Page 55 |
 Loading...