


-1-
Released: 9-15-05

Congratulations
Thank you for purchasing the Audiovox Xpress XM® Satellite Receiver. You are one step closer to experiencing the
latest innovation in XM® Satellite Radio. XM® Satellite Radio will revolutionize your vehicle or in-home entertainment.
XM® features over 150 digital channels — 100% commercial-free music, over 30 channels of news, sports, talk and entertainment, over 20 dedicated channels of XM® Instant Traffic & Weather, and the deepest play-list in the industry with access to over 2 million titles!
XM® Satellite Radio service gives you the power to choose what you want to hear - wherever and whenever you want it. XM® is America’s #1 Satellite Radio provider with over 4 million customers.
Your Audiovox Xpress XM® receiver must be used with an accessory kit, such as the Audiovox Home Kit, Boom Box or Vehicle Kit as required by your specific installation needs. These kits are available at retailers where Audiovox main units are sold.
Required subscription for service sold separately.
Installation costs and other fees and taxes may apply, including a one-time activation fee. All fees and programming subject to change. College sports games subject to availability. Subscriptions subject to Customer Agreement included with the XM Welcome Kit and available at www.xmradio.com. Only available in the 48 contiguous United States.
© 2005 XM® Satellite Radio Inc. XM® is a trademark of XM® Satellite Radio. All rights reserved. All other trademarks are the property of their respective owners.
-2-

Cautions and Warnings
•This device complies with Part 15 of the FCC Rules. Operation is subject to the following two conditions: (1) this device may not cause harmful interference, and (2) this device must accept any interference received, including interference that may cause undesired operation.
•The owner or operator shall not make any changes to the unit, antenna, or accessories, as this will void operator’s authority to operate this equipment.
•By adhering to these warnings and safety considerations, stated in the manual and by XM7, accidents and/or personal injury can be avoided.
-3-

TABLE OF CONTENTS |
|
Congratulations ................................................................................... |
2 |
Cautions and Warnings ....................................................................... |
3 |
TABLE OF CONTENTS ....................................................................... |
4 |
TABLE OF FIGURES .......................................................................... |
5 |
Xpress SYSTEM COMPONENTS ........................................................ |
6 |
INTRODUCTION ................................................................................ |
7 |
OPTIONAL ACCESSORIES ............................................................... |
7 |
GETTING STARTED ............................................................................ |
8 |
XM Activation ...................................................................................... |
8 |
Controls ............................................................................................... |
10 |
Receiver Control Features ................................................................. |
10 |
BASIC OPERATION ............................................................................ |
12 |
Turning Xpress ON and OFF ............................................................... |
12 |
Menu Options ...................................................................................... |
13 |
FM Frequency ..................................................................................... |
14 |
FM ON or OFF Feature ...................................................................... |
14 |
Brightness + Contrast ......................................................................... |
15 |
Audio Level ......................................................................................... |
15 |
Antenna Aiming (Home Installation) ................................................... |
16 |
Direct Tune .......................................................................................... |
17 |
Search Mode ....................................................................................... |
17 |
Channel Skip/Add ................................................................................ |
18 |
Memory Recall .................................................................................... |
18 |
Tune Select ......................................................................................... |
19 |
Tune Select Erase All .......................................................................... |
19 |
Tune Select Erase Some .................................................................... |
19 |
Select By-Song ................................................................................... |
20 |
Select By Artist ................................................................................... |
20 |
Stock Ticker ........................................................................................ |
21 |
Add Stock ........................................................................................... |
21 |
Erase Stock ........................................................................................ |
22 |
Erase All Stock ................................................................................... |
22 |
Erase Some Stock .............................................................................. |
23 |
Info Extras .......................................................................................... |
23 |
Display Screen Mode .......................................................................... |
24 |
Scrolling Display ................................................................................. |
25 |
Background Mode ................................................................................ |
25 |
Set Clock ............................................................................................ |
26 |
Time Zone ........................................................................................... |
26 |
12 / 24 ................................................................................................. |
27 |
Savings Selection ............................................................................... |
27 |
Auto-On ............................................................................................... |
28 |
Auto-Off / Sleep Timer ....................................................................... |
28 |
Set Factory Defaults .......................................................................... |
29 |
Exit Menu ............................................................................................ |
30 |
Search Button ..................................................................................... |
30 |
Memory ............................................................................................... |
31 |
Pre./Dir ................................................................................................ |
32 |
Turning The Xpress Unit OFF ............................................................. |
33 |
REMOTE CONTROL ........................................................................... |
34 |
Remote Control Features ................................................................... |
34 |
CARE AND CLEANING ...................................................................... |
37 |
TROUBLESHOOTING ......................................................................... |
37 |
SPECIFICATIONS .............................................................................. |
38 |
WARRANTY ....................................................................................... |
39 |
-4-

TABLE OF FIGURES |
|
Figure 1. Your Receiver 8-Character Alphanumeric ID ...................... |
8 |
Figure 2. Xpress Receiver Unit ........................................................... |
9 |
Figure 3. Xpress Receiver Unit Display Screen ................................. |
11 |
Figure 4. XM and Audiovox Logos Power ON Screen ........................ |
12 |
Figure 5. Active Channel Screen ........................................................ |
12 |
Figure 6. Main Menu Screen ............................................................... |
13 |
Figure 7. FM OFF Screen ................................................................... |
14 |
Figure 8. FM Frequency Screen ......................................................... |
14 |
Figure 9. Brightness and Contrast Screen ......................................... |
15 |
Figure 10. Audio Level Screen ........................................................... |
16 |
Figure 11. Antenna Aiming Screen ...................................................... |
16 |
Figure 12. Direct Tuning Screen ......................................................... |
17 |
Figure 13. Search Mode Screen ......................................................... |
17 |
Figure 14. Skip/Add Channel Screen .................................................. |
18 |
Figure 15. Memory Recall Screen ...................................................... |
18 |
Figure 16. Tune Select Screen ........................................................... |
19 |
Figure 17. Tune Select Erase All Screen ............................................ |
19 |
Figure 18. Tune Select Erase Some Screen ....................................... |
19 |
Figure 19. Select bySong ConfirmationScreen .................................. |
20 |
Figure 20. Select by Artist ConfirmationScreen ................................ |
20 |
Figure 21. Stock Ticker Screen .......................................................... |
21 |
Figure 22. Add Stock Screen .............................................................. |
21 |
Figure 23. Erase Stock Screen ........................................................... |
22 |
Figure 24. Erase All Stock Screen ...................................................... |
22 |
Figure 25. Erase Some Stock Screen ................................................ |
23 |
Figure 26. Info Extra Screen .............................................................. |
24 |
Figure 27. Display Screen .................................................................. |
24 |
Figure 28. Scrolling Display Screen ............................................... |
25 |
Figure 29. Background Setting Screen ........................................... |
25 |
Figure 30. Set Clock Screen Setting Time Zone ............................ |
26 |
Figure 31. Time Zone Set Screen ................................................... |
26 |
Figure 32. 12 / 24 Hour Selection Screen ....................................... |
27 |
Figure 33. Daylight Savings Selection Screen ............................... |
27 |
Figure 34. Auto-On Screen ............................................................. |
28 |
Figure 35. Auto-Off / Sleep Timer Screen ...................................... |
29 |
Figure 36. Setting Factory Defaults Screen .................................. |
29 |
Figure 37. Category Search Screen ............................................... |
30 |
Figure 38. Scanning Search Screen ............................................... |
30 |
Figure 39. Memory Selection Screens ............................................ |
31 |
Figure 40. Memory Selection Screens ............................................ |
31 |
Figure 41. Direct Channel Entry Screen ......................................... |
32 |
Figure 42. Exit Screen .................................................................... |
33 |
Figure 43. Xpress Receiver Remote Control .................................. |
34 |
-5-
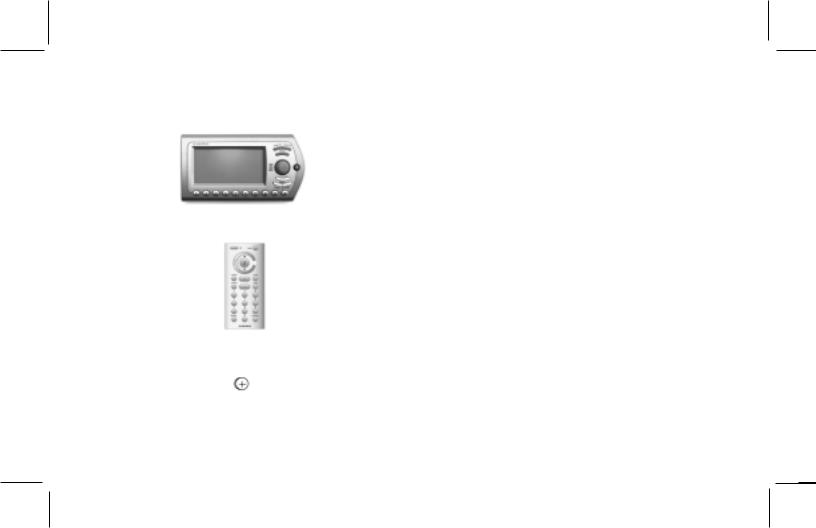
Xpress SYSTEM COMPONENTS
XM7 Receiver Model Xpress
Part Number 136-4040
Remote Control Unit
Part Number 136-4042
3 Vdc Battery for Remote,
(1) CR2032
-6-

INTRODUCTION
The Audiovox Xpress XM7 unit processes the XM satellite signals received by the externally mounted antenna (purchased separately for Home or Boom Box Kits). The Xpress XM7 unit recognizes and decodes the incoming XM program information and provides an audio signal to your radio or other audio output equipment.
NOTE: When installed in a vehicle, the XM signal can be received and processed virtually anywhere as long as there are no obvious satellite signal obstructions such as nearby tall buildings, high terrain, parking garages or tunnels.
The Xpress XM7 unit is typically installed in an accessible location of the vehicle (dash area), consistent with line-of-sight operation of the remote control, and/or within easy reach of the driver. For home use, situate the Xpress XM7 unit close to your stereo receiving equipment.
OPTIONAL ACCESSORIES
o |
Audiovox Home Kit: |
Part Number XMH-10 |
o |
Audiovox Boom Box: |
Part Number XMB-10 |
o Audiovox 2nd Vehicle Kit: |
Part Number XMC-10 |
|
o Audiovox FM Direct Adaptor: |
Part Number XMFM-1 |
|
o |
Audiovox RCA Cables: |
Part Number SAT RCA |
-7-

GETTING STARTED
XMActivation
Activating your XM7 radio service is easy. You have one of two choices to activate your service: Online or by Phone.
Online Activation Process
First, please make sure the Xpress XM7 unit is working properly by tuning to the XM7 Preview channel (#1). If you can hear
XM7 Preview, your equipment is ready. NOTE: The antenna must be installed on the outside of your vehicle for best performance.
Next, make sure you have a credit card and your XM7 Radio
Hardware ID handy. You can display your ID by tuning your
XM7 Radio to channel ‘0’, one down from XM7 Preview (For tuning instructions see the Receiver Control Features section of this guide.)
To obtain the XM7 identification (ID) number, tune to channel 0 and press the Rotary/Select Knob. The 8-character alphanumeric XM7 ID will appear on the screen. Write the alphanumeric ID below (Figure 1) for future reference.
NOTE: No adjustments are allowed in this mode. To exit the
Radio ID screen, tune to any channel by turning the rotary knob and press.
Please check your 8-character alphanumeric XM7 ID code carefully. There is no “I” (eye), “o” (oh), “S” or “F” used. You may wish to double-check your ID code on the outside of your tuner box. Enter the ID code below:
Figure 1. Your Receiver 8-character alphanumeric ID
-8-
Online Activation Process Once the ID code is obtained, log on to XM7 at http://activate.xmradio.com and follow the easy instructions to activate your Xpress XM7 unit.
Call-in Activation Process
Call XM7 at 1-800-XM RADIO (1-800-967-2346). One of XM7’s friendly Customer Care representatives will take the necessary information and walk you through the activation process. After the activation form is submitted you should keep your receiver
ON for at least 1 hour. This will complete the activation process.
When the Xpress XM7 unit is activated, you will be able to access over 150 digital radio channels.
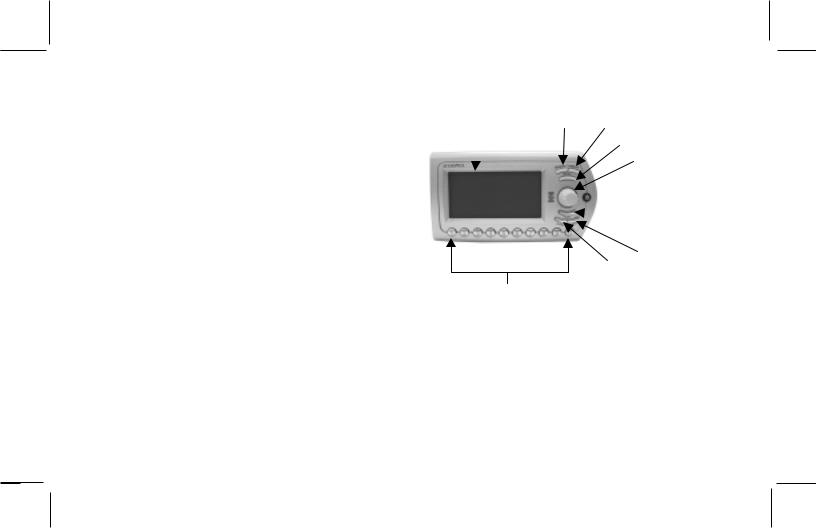
The Audiovox Xpress XM7 unit provides 7 control buttons, 1
Rotary/Select Knob and 10 number keys.
LCD |
DISPLAY |
||
DISPLAY |
|||
BUTTON |
|||
|
|
||
|
|
|
|
PRESET KEYPAD (NUMBER) BUTTON
SEARCH
BUTTON
MENU
BUTTON
ROTARY /
SELECT
KNOB
 POWER / IR EYE BUTTON
 MEMORY
BUTTON
PRESET/DIRECT JUMP BUTTON
BUTTON
Figure 2. Xpress Receiver Unit
-9-

Controls
Receiver Control Features
Display Button - This button allows the user to choose one of four (4) different formats to present the Artist, Song Title and data service information on the LCD screen.
Search Button - This button allows the user to search the next channel category as well as between preset channels or perform a continuous search. The continuous search will scan all available channels in all categories or all channels within a Preset group stopping at each one for four (4) seconds until the user presses the search button again to make a selection.
Menu Button - The MENU button is used to access
“Menu Options” which allows the user to make feature function adjustments for personal preferences. Upon entering the main menu mode, use the Rotary/Select Knob or the Remote Control UP and DOWN buttons to highlight the desired function and then press the Rotary/Select Knob or press the (XM) Select Button on the Remote Control to enter.
Rotary/Select Knob – The Rotary/Select Knob is the primary control for navigating through the various lists and option menus available. This knob has a dual purpose. In the default mode, this knob provides sequential tuning through the available program channels. When the knob is turned in a clockwise (CW) direction the unit tunes up one channel at a time. When the knob is turned in a counter clockwise (CCW) direction the unit tunes down one channel at a time. When in the list or menu mode, turning the knob (CW) and (CCW) scrolls UP and DOWN through the various menus and lists. The current selection from the list will be highlighted on the display. When the item is highlighted, press the Rotary/Select Knob to enter the selection.
Power Button - This button applies power to and removes power from the Xpress XM7 unit. This button is also the Xpress
XM7 unit’s receiver eye (IR).
Memory Button (mem.) - This button allows the user to capture and store the current program data information (Artist & Song Title). You can store up to 20 Artist/Song Title combinations.
-10-
Jump Button – This button allows the user to jump to the
Previous Channel (i.e., switch between the current and previous channel.
Preset/Direct Button (pre./dir.) - Each momentary press of the PRESET button allows the user to switch between (3) banks of Channel presets (10 presets each A, B, and C) plus Direct channel entry. When in any of the three preset banks, momentarily pressing any of the number buttons will recall the stored channel. In the Direct (Dir) mode, use the number buttons to directly enter the desired channel number followed by pressing the Rotary/ Select Knob.
Keypad Buttons 0-9 - These buttons are used to directly enter a desired channel number. They are also used when entering and recalling preset channel numbers into memory.
Display Screen Features - Shown to the right is an example of an active Display Screen (see Figure 3). Pressing the DIS-
PLAY button from the Default display switches between the artist name/song title screen, artist name/song title with stock screen, artist name/song title with sports screen, or large letter format. When the letter size changes, the field will scroll. This feature is useful when viewing the display at a distance.
|
|
|
|
Momentary Preset Indicator |
Signal |
|
|
|
Time |
(Stays on for 2-seconds) |
Strength |
||
|
|
|
|
|
|
Channel |
Channel |
|
|
||||
Number |
|
|
Name |
|||
Artist |
|
|
|
|||
Song |
|
|
|
|
|
|
Title |
|
|
|
|||
Stock, Sports,
and More Info
Figure 3. Xpress Receiver Unit Display Screen
-11-
BASIC OPERATION
With the Xpress XM7 unit properly installed, activated and connected to your home/vehicle audio system or boom box, proceed as follows:
Turning Xpress ON and OFF
Set up your Audiovox Xpress XM7 unit using the installation instructions included in this Kit (Home Kit, or Boom Box Kit), or with the help of a professional installer.
NOTE: Refer to Antenna Aiming during the installation procedure.
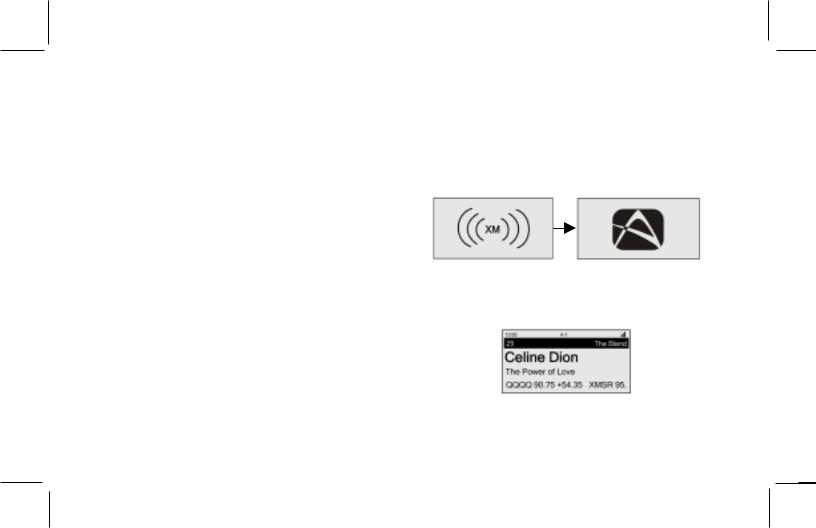
Press the Power button to turn the unit ON. When the unit turns
ON the XM7 logo will appear for 3-seconds (curved lines on either side of the XM7 logo gradually appear) (see Figure 4) followed by the Audiovox logo. These screens will be followed by the active channel (see Figure 5), which defaults to the last tuned channel setting prior to power being turned OFF. When the unit is shut OFF the XM logo will appear and the curved lines on either side of the XM7 logo gradually disappear.
NOTE: If this is the first time using the Xpress XM7 unit, the screen will alternately display the preview channel screen and a number of messages, including: “Activate Your XM7 1-800- XM RADIO”. If not, go to channel 1 using the Rotary/Select
Knob on the Xpress XM7 unit or the CH Up/Down buttons on the remote control.
Figure 4. XM and Audiovox Logo Power ON Screen
Figure 5. Active Channel Screen
-12-
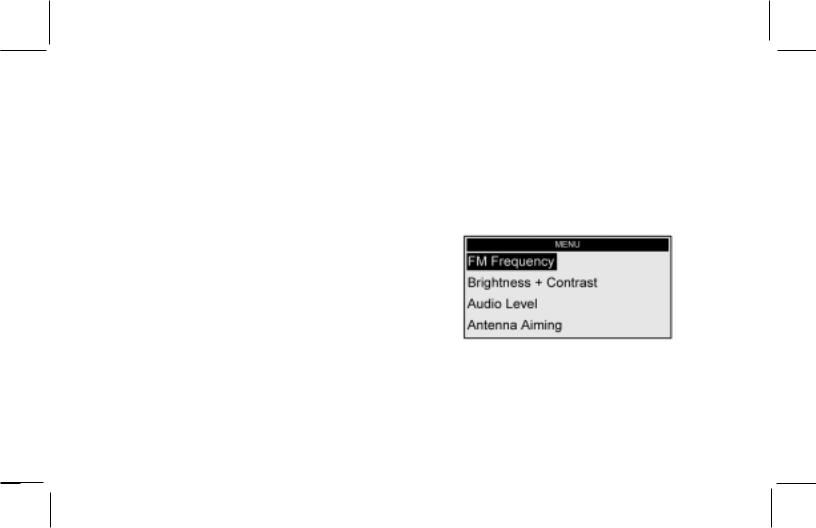
Menu Options
To enter the Menu Options page, press the MENU Button on either the remote control or the main unit. The Main Menu list will appear on the screen (see Figure 6). Using the Rotary/Select
Knob, highlight the option you wish to adjust turning (CW) scrolls DOWN and (CCW) will scroll UP through the various menus and lists. The current selection from the list will be highlighted on the display. When the item is highlighted, press the Rotary/Select Knob to enter the adjust mode.
The following options are available:
• |
FMFrequency |
• |
Stock Ticker |
• |
Brightness + Contrast |
• |
Info Extras |
• |
Audio Level |
• |
Display Screen Mode |
• |
Antenna Aiming |
• |
Set Clock |
• |
Direct Tune |
• |
Auto-On |
• |
Search Mode |
• |
Auto-Off / Sleep Timer |
• |
Channel Skip/Add |
• |
Set Factory Defaults |
• |
Memory Recall |
• |
-Exit Menu- |
•TuneSelect7
While in the menu screen function, if a button is not pressed within 12-seconds from the previously selected function, the unit exits the menu screen function and reverts to the default screen display.
NOTE:Upon setting and confirmation of a Menu selection, pressing the Menu button will exit the Xpress XM7 unit to the active screen (See Figure 5).
Figure 6. Main Menu Screen
-13-
 Loading...