

Page 1

AT&T Voice DNA® Quick Reference Guide
for the Aastra® 6731i Phone
Important Details
Description
Detail
Your phone number (for external calls)
Your 4-digit extension number (for internal calls)
Your voicemail access number
Your AT&T Voice DNA Administrator
Name:
Phone number:
Email address:
AT&T Voice DNA®
Quick Reference Guide for the
Aastra® 6731i Phone
This guide contains the key information you need to get started
using your Aastra® 6731i desktop phone with the AT&T Voice DNA
service. It explains how to access features using the buttons, line
keys, and soft keys on your Internet Protocol (IP) phone.
AT&T Voice DNA is a Voice over IP system that transports calls over
the AT&T IP network rather than over the traditional public
switched telephone network. AT&T Voice DNA can be used exactly
like a traditional phone system.
For more detailed information about using this phone, see the
Aastra 6731i User Guide, available from Aastra. Not all the Aastra
6731i features are available with the AT&T Voice DNA solution.
Your organization determines which AT&T Voice DNA features you
can use and can also impose dialing restrictions. If you have questions about the features available to
you or about any dialing restrictions that may apply to you, check with your AT&T Voice DNA
Administrator.
Your AT&T Voice DNA Administrator can provide the following important information:
®
AT&T, the AT&T logo and all other AT&T marks contained herein are trademarks of AT&T Intellectual Property and/or AT&T affiliated companies. All other
marks contained herein are the property of their respective owners. The information in this document is provided by AT&T for informational purposes
only. AT&T does not warrant the accuracy or completeness of the information or commit to issue updates or corrections to the information. AT&T is not
responsible for any damages resulting from use of or reliance on the information.
© 2012 AT&T Intellectual Property. All rights reserved.
Page 2
AT&T Voice DNA® Quick Reference Guide
for the Aastra® 6731i Phone
Page 2
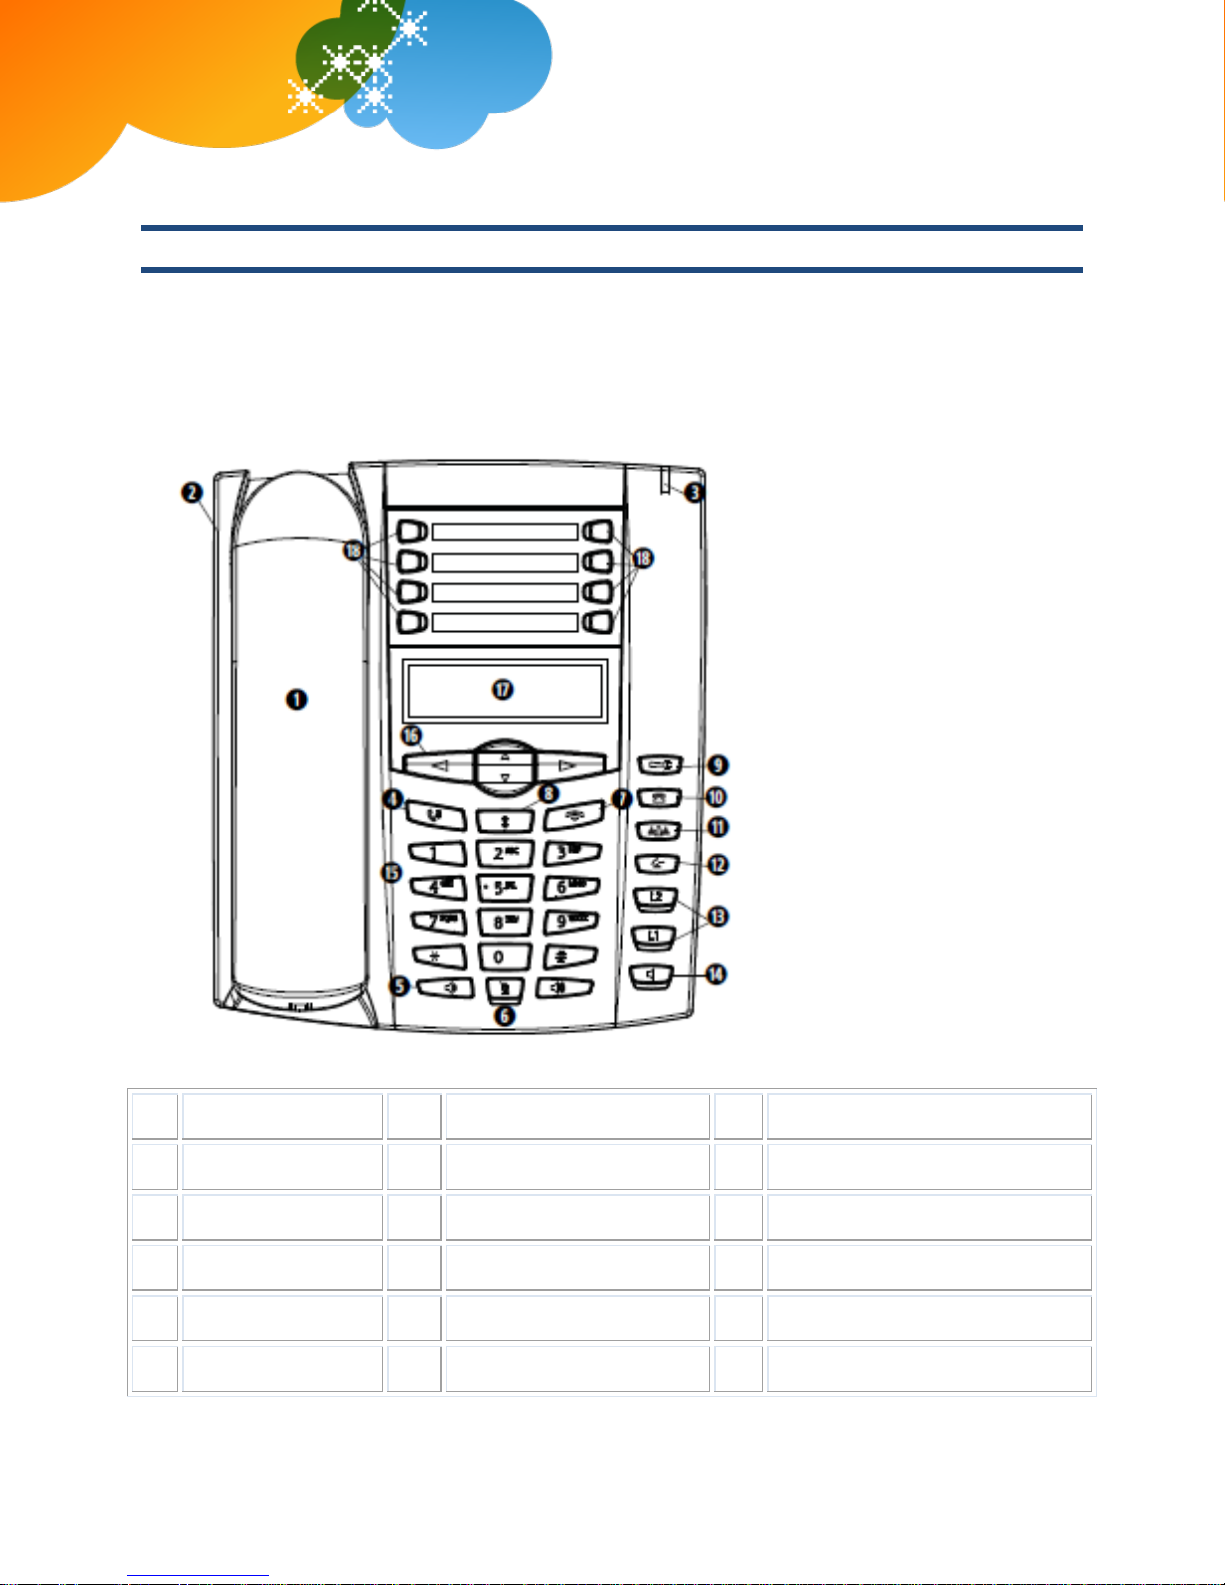
1
Handset
7
Goodbye button
13
Line/Call Appearance keys
2
Speaker
8
Redial button
14
Speakerphone button
3
Message Indicator
9
Options button
15
Keypad
4
Hold button
10
Callers List button
16
Navigation keys
5
Volume control
11
Conference button
17
Display
6
Mute button
12
Transfer button
18
Programmable keys
Selecting a Feature or Option
Your Aastra 6731i phone that works with AT&T Voice DNA has a standard phone keypad and a few additional
buttons (for example, a Hold button). It also has two hard line keys with lights that show which ones are
active.
The phone also has options and features that appear in the display window. To select a function, use the
navigation keys (above the keypad), and then follow the directions in the display window. In this guide, we
refer to soft keys by the label that appears in the display window describing the function at a particular time.
AT&T, the AT&T logo and all other AT&T marks contained herein are trademarks of AT&T Intellectual Property and/or AT&T affiliated companies. All other
marks contained herein are the property of their respective owners. The information in this document is provided by AT&T for informational purposes
only. AT&T does not warrant the accuracy or completeness of the information or commit to issue updates or corrections to the information. AT&T is not
responsible for any damages resulting from use of or reliance on the information.
© 2012 AT&T Intellectual Property. All rights reserved.
Page 3

AT&T Voice DNA® Quick Reference Guide
for the Aastra® 6731i Phone
Page 3
Make a call by
pre-dialing
1. Enter the number you want to call.
2. Do one of the following:
Pick up the handset.
Press the Speakerphone button.
Press a line key.
3. Press Send.
Make a call
1. Do one of the following:
Pick up the handset.
Press the Speakerphone button.
Press a line key.
2. When you hear a dial tone, enter the number you want to call.
3. Press Send.
Make an internal call
Enter the extension dialing prefix plus the extension number.
Make a local call
Enter a 10-digit number, a 7-digit number within your own area
code, or a special number (such as 411 or 911).
Make a long distance
Enter a 10-digit number. (You can enter 1 and the 10-digit phone
1
Line 3
5
Save
2
Line 4
6
Delete
3
Line 5
7
Directory
4
Line 6
8
Do Not Disturb
Your phone also has eight programmable buttons. The first four are reserved by AT&T Voice DNA for
additional line keys (lines 3–6). Line keys 1 and 2 are hard keys at the lower-right of your phone. Your
Administrator programs these line keys.
The next four buttons (on the right) are set up as short-cut keys for commonly used settings, such as Save,
Delete, Directory, or Do Not Disturb. For example:
Dialing Basics
With AT&T Voice DNA, you don’t need to use an out-of-network prefix (such as 9) when making calls.
AT&T, the AT&T logo and all other AT&T marks contained herein are trademarks of AT&T Intellectual Property and/or AT&T affiliated companies. All other
marks contained herein are the property of their respective owners. The information in this document is provided by AT&T for informational purposes
only. AT&T does not warrant the accuracy or completeness of the information or commit to issue updates or corrections to the information. AT&T is not
responsible for any damages resulting from use of or reliance on the information.
© 2012 AT&T Intellectual Property. All rights reserved.
Page 4

AT&T Voice DNA® Quick Reference Guide
for the Aastra® 6731i Phone
Page 4
call
number, but 1 isn’t required.)
Make an international
call
Enter 011 (the international code) + country code + phone
number.
For more information, see the AT&T International Long Distance Dialing
Guide at www.att.com/gen/general?pid=1881.
Return the most recent
incoming call
1. Enter *69.
2. Press Send.
Return a call from the
call logs on your phone
1. Press the Callers List button.
To scroll through the list, press the up and down navigation
keys.
To see the most recent call, press the up navigation key.
To see the oldest call, press the down navigation key.
2. Select a number from the list, and then press the Speakerphone
button, lift the handset, or press a line key.
Redial the last number
called
Press the Redial button. (For speakerphone, press the Redial
button twice.)
Redial a number called
earlier
1. Press the Redial button.
2. Scroll through the list and select the number.
To scroll up, press the up navigation key.
To scroll down, press the down navigation key.
3. Press the Speakerphone button, lift the handset, or press a line
key.
Put a call on hold
Press the Hold button.
Resume a call
Press the line key where the call is being held.
If you have more than one call on hold, press the left and right
navigation keys to scroll through the list of held calls. Then press the
line key where the call is being held.
End a call
Hang up or press the Goodbye button.
AT&T, the AT&T logo and all other AT&T marks contained herein are trademarks of AT&T Intellectual Property and/or AT&T affiliated companies. All other
marks contained herein are the property of their respective owners. The information in this document is provided by AT&T for informational purposes
only. AT&T does not warrant the accuracy or completeness of the information or commit to issue updates or corrections to the information. AT&T is not
responsible for any damages resulting from use of or reliance on the information.
© 2012 AT&T Intellectual Property. All rights reserved.
Page 5

AT&T Voice DNA® Quick Reference Guide
for the Aastra® 6731i Phone
Page 5
Auto Call Back Busy
If you call a phone number that's busy, Auto Call
Back Busy checks the busy number for the next 30
minutes. When the phone number becomes free,
Auto Call Back Busy rings you and then connects
the call. If you change your mind, you can cancel
Auto Call Back Busy at any time. Note that you can
have multiple Auto Call Back Busy sessions running
at the same time.
Note: If you place a call to a number that has
voicemail, you'll be sent to voicemail and Auto Call
Back Busy doesn’t check the number.
Turn on Auto Call Back Busy:
1. Make your call. When a number is busy, a voice prompt
offers Auto Call Back Busy.
2. Follow the voice instructions. The voice prompt then
confirms that Auto Call Back Busy is turned on.
3. Hang up.
4. When the number you called becomes free, your phone
rings. Answer the call to connect to the number you
originally called.
Cancel all Auto Call Back Busy sessions:
Enter *86 and then press Send.
Call Waiting
If you see a new caller's ID in your phone's display
window while you’re on a call, Call Waiting is
turned on, and you have an incoming call.
If you don't answer the new call, it will be routed to
your voicemail (if available) or to your chosen
"when I don't answer" call treatment.
If you don't want to be notified when callers are
waiting, you can turn Call Waiting off for the
current call.
For information about turning off Call Waiting for
all calls, see the “Manage Miscellaneous Settings”
help topic online.
Turn Call Waiting off for the current call:
1. Enter *70 and the number you want to call.
2. Press Send.
Account codes
An account code enables your AT&T Voice DNA
service to track call data by account or category for
outbound calls made from your organization. You
may be assigned one of the following types of
account codes:
Mandatory—For all calls except 911, you're
Call using a mandatory account code:
1. Enter the phone number you want to call.
2. When prompted, enter the account code.
3. Press Send.
Call using an optional account code:
Special Features
The following sections detail special features of AT&T Voice DNA that can save you time.
With some features, you press buttons or soft keys. With some others, you enter special feature codes (for
example, *82) from your phone's keypad. In some cases, you can access features in multiple ways. For
more information about feature codes, see the Feature Codes Quick Reference Guide.
Note: When using a star (*) feature code, you must press Send. The call won't be dialed automatically.
AT&T, the AT&T logo and all other AT&T marks contained herein are trademarks of AT&T Intellectual Property and/or AT&T affiliated companies. All other
marks contained herein are the property of their respective owners. The information in this document is provided by AT&T for informational purposes
only. AT&T does not warrant the accuracy or completeness of the information or commit to issue updates or corrections to the information. AT&T is not
responsible for any damages resulting from use of or reliance on the information.
© 2012 AT&T Intellectual Property. All rights reserved.
Page 6

AT&T Voice DNA® Quick Reference Guide
for the Aastra® 6731i Phone
Page 6
always prompted and must enter an account code
when calling outside your organization.
Optional—You can enter a feature access code
followed by the account code when calling outside
your organization.
1. Enter *50.
2. When prompted, enter the account code.
3. Enter the phone number you want to call.
4. Press Send.
Block and unblock Caller ID
When Caller ID is turned on, your number and
name appear on the phones you call. If permitted
by your organization, you can block your Caller ID
for a single call outside your organization. Or your
Administrator can block your line’s Caller ID for all
calls.
Note: Your AT&T Voice DNA Administrator
determines the organization's practice for Caller ID
and Caller ID blocking.
Temporarily block Caller ID:
1. Enter *67 and the number you want to call.
2. Press Send.
Temporarily unblock Caller ID:
1. Enter *82 and the number you want to call.
2. Press Send.
Call transfer
You can transfer a call to any extension within your
organization or to any 10-digit phone number. Call
Transfer has two forms:
Blind transfer—Transfers your call to the new
caller directly and drops you from the call.
Consultative transfer—Enables you to speak with
the person you're transferring the call to before
you transfer the call. If there's no answer or the
person doesn't want to take the call, you can
cancel the transfer and talk with the caller.
Make a blind transfer:
1. During a call, press the Transfer button.
2. Enter the phone number to which the call will be
transferred.
3. Press the Transfer button.
The call is transferred and you're dropped from the call.
Make a consultative transfer:
1. During a call, press the Transfer button.
2. Enter the phone number to which the call will be
transferred.
3. Wait for the person to answer, and then speak.
4. If the person agrees to accept the call, press the
Transfer button again. The call is then transferred
from your phone.
If the person isn't available or doesn't want to accept the
transferred call, press the Cancel soft key to resume the
original call.
Conference calls
You can conduct a conference call with 3
participants from your phone.
Note: If you have a Premium feature package, you
can conduct a call with up to 15 participants from
the AT&T Voice DNA User. For more information,
see the “Place a Conference Call from the User
Make a 3-way conference call by phone:
1. Call the first person.
2. After the first person answers, press the Conference
button. The call is placed on hold.
3. Call the second person.
4. When the second person answers, press the
Conference button to establish the conference.
AT&T, the AT&T logo and all other AT&T marks contained herein are trademarks of AT&T Intellectual Property and/or AT&T affiliated companies. All other
marks contained herein are the property of their respective owners. The information in this document is provided by AT&T for informational purposes
only. AT&T does not warrant the accuracy or completeness of the information or commit to issue updates or corrections to the information. AT&T is not
responsible for any damages resulting from use of or reliance on the information.
© 2012 AT&T Intellectual Property. All rights reserved.
Page 7

AT&T Voice DNA® Quick Reference Guide
for the Aastra® 6731i Phone
Page 7
Dashboard” help topic online.
Do Not Disturb
When you don't want to be bothered, you can turn
on the Do Not Disturb feature.
Private lines—If you have voicemail, all incoming
calls are immediately routed to your voicemail. If
you don't have voicemail, calls are routed to your
"when I’m busy" call treatment.
Shared lines—Your phone won't ring but the line
blinks and you or someone else can answer the
call.
Turn Do Not Disturb on or off:
1. Press the Do Not Disturb soft key.
"Do Not Disturb" appears in the display window.
2. Press the Do Not Disturb soft key again.
"Do Not Disturb" disappears from the display window.
Intercom Over Speakerphone
You can initiate an Intercom Over Speakerphone
call to other AT&T Voice DNA users in your
organization.
The phone of the person you're calling
automatically answers the call in speakerphone
mode. You can then have a conversation.
Make an Intercom Over Speakerphone call:
1. Enter *96.
2. Enter an extension number.
3. Press Send.
4. Wait to hear a beep, and then speak.
Reject a call
If you don't want to answer a call while it's ringing,
you can reject the call. If you have voicemail, the
call is then routed to your voicemail. If you don't
have voicemail, the call is routed to your chosen
"when I don't answer" call treatment.
Note: If the ringing line is a shared line, your
phone will stop ringing, but the shared lines will
continue to ring on other phones.
Reject a call:
If you are not currently on a call:
Press the Goodbye button.
If you are currently on a call:
Press 2 on the keypad.
Multiple line appearances and line keys
A phone number assigned to a line key on an IP
phone is called a line appearance. The line keys on
your phone can have repeated numbers, different
numbers that belong to you, or numbers that
belong to others. When a call comes in to a
number, all phones with that number as a line
appearance ring at the same time. When the call is
answered, how it’s handled depends on the line's
call presence.
Shared call presence—When a call is answered and
put on hold, any other phone with that line
appearance can take the call off hold.
Move between calls on different line appearances:
1. While on a call, press the line key associated with
another line. If necessary, use the navigation keys to
scroll through the list of currently active calls.
The call on the first line is put on hold.
2. Talk with the second caller.
3. To return to the first caller, press the line key
associated with the first call. The second call is
automatically put on hold.
AT&T, the AT&T logo and all other AT&T marks contained herein are trademarks of AT&T Intellectual Property and/or AT&T affiliated companies. All other
marks contained herein are the property of their respective owners. The information in this document is provided by AT&T for informational purposes
only. AT&T does not warrant the accuracy or completeness of the information or commit to issue updates or corrections to the information. AT&T is not
responsible for any damages resulting from use of or reliance on the information.
© 2012 AT&T Intellectual Property. All rights reserved.
Page 8

AT&T Voice DNA® Quick Reference Guide
for the Aastra® 6731i Phone
Page 8
Not shared call presence—When a call is answered,
it becomes exclusive to the phone that answered it
and no longer appears on the other phones.
Call Forwarding
You can forward calls to other numbers. The
forward-to number can be an extension or any 10digit phone number.
AT&T Voice DNA provides these types of Call
Forwarding:
Call Forwarding Always—All calls to your phone
are forwarded. This is also referred to as Send All
Calls.
Call Forwarding No Answer—If you don't
answer, the call is forwarded.
Call Forwarding Busy—Calls that come in while
your phone is busy are forwarded.
Another type of call forwarding, Call Forwarding
Not Reachable, applies when your phone can't be
reached by the AT&T Voice DNA network (not
simply when you don't answer or are busy). You
can set it up in advance.
Note: Your AT&T Voice DNA Administrator
establishes your access to the Call Forwarding
features. If you have any questions about your
access to Call Forwarding features, check with
your Administrator. If you have access to the AT&T
Voice DNA User Dashboard, you can manage
advanced call forwarding through your Dashboard.
For more information, see the “Manage Locate Me
Settings” help topic online.
Turn on Call Forwarding:
1. When your phone is idle, enter:
*72 for Call Forwarding Always.
*92 for Call Forwarding No Answer.
*62 for Call Forwarding Busy.
*94 for Call Forwarding Not Reachable.
2. Enter the phone number to which calls will be
forwarded.
3. Press Send.
A voice prompt confirms that Call Forwarding is turned
on.
Turn off Call Forwarding:
1. When your phone is idle, enter:
*73 for Call Forwarding Always.
*93 for Call Forwarding No Answer.
*63 for Call Forwarding Busy.
*95 for Call Forwarding Not Reachable.
2. Press Send.
A voice prompt confirms that Call Forwarding is turned
off.
AT&T, the AT&T logo and all other AT&T marks contained herein are trademarks of AT&T Intellectual Property and/or AT&T affiliated companies. All other
marks contained herein are the property of their respective owners. The information in this document is provided by AT&T for informational purposes
only. AT&T does not warrant the accuracy or completeness of the information or commit to issue updates or corrections to the information. AT&T is not
responsible for any damages resulting from use of or reliance on the information.
© 2012 AT&T Intellectual Property. All rights reserved.
Page 9

AT&T Voice DNA® Quick Reference Guide
for the Aastra® 6731i Phone
Page 9
Message waiting
A message waiting light on the phone alerts you
that you've received a voicemail message.
Retrieve your messages from voicemail:
Press and hold 1 on your keypad.
Transfer a call to your voicemail
Without answering, you can transfer a ringing call
immediately to your voicemail. However, if Call
Forwarding No Answer settings are enabled, the
call is first routed through your chosen "when I
don't answer" call treatment.
Transfer a call to your voicemail:
Press the Goodbye button.
A voicemail icon appears in your phone’s display window.
Transfer a call to another user's
voicemail
You can transfer a call to another AT&T Voice DNA
user’s voicemail.
Transfer a call to another user's voicemail:
1. While on a call, press the Transfer button.
2. Enter *90 and the other user’s extension number.
3. Press the Transfer button again, and then hang up.
Voicemail
AT&T Voice DNA offers voicemail options for users with the Premium feature package. You can listen to your
AT&T Voice DNA voicemail messages using your Internet Protocol (IP) phone or any touch-tone phone
(wireline or wireless). You can also have your messages sent to you as an email attachment, or you can
access them through your AT&T Voice DNA User Dashboard. If you don’t want to take an incoming call, you
can reject it and send the caller to your voicemail. After answering a call, you can transfer the caller to
another user's voicemail.
Voicemail is preconfigured on your phone as a speed dial number. Use the number 1 on your keypad to
access voicemail.
AT&T, the AT&T logo and all other AT&T marks contained herein are trademarks of AT&T Intellectual Property and/or AT&T affiliated companies. All other
marks contained herein are the property of their respective owners. The information in this document is provided by AT&T for informational purposes
only. AT&T does not warrant the accuracy or completeness of the information or commit to issue updates or corrections to the information. AT&T is not
responsible for any damages resulting from use of or reliance on the information.
© 2012 AT&T Intellectual Property. All rights reserved.
 Loading...