

Page 1
Quick reference guide
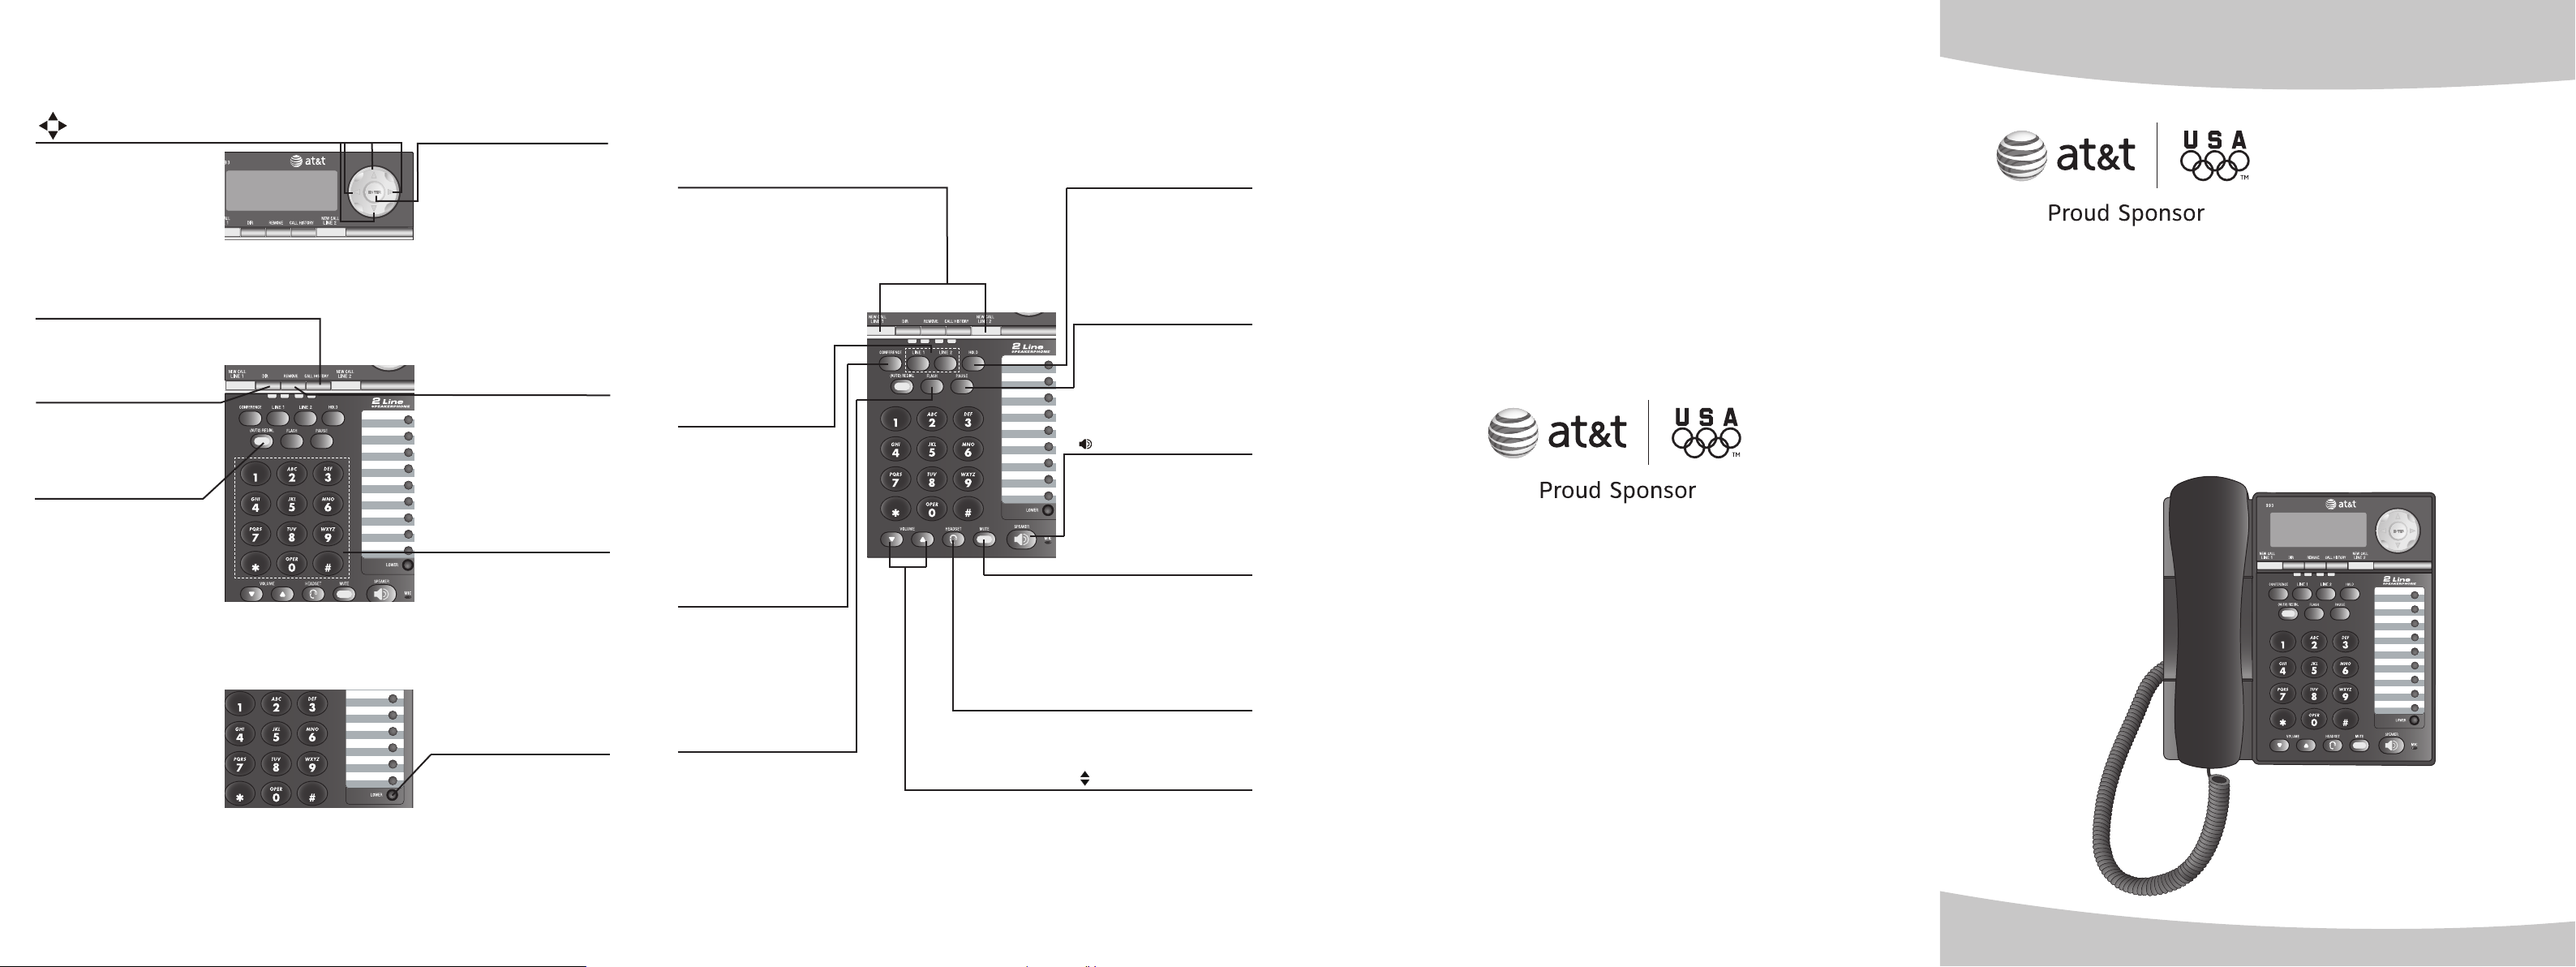
Press to scroll up,
down, left or right
while in menus.
ENTER
Press to display a menu,
select a displayed item
from the menu, or save
an entry.
Quick reference guide
NEW CALL LINE 1, LINE 2
Indicates new calls
and/or voice messages
for line 1 and line 2.
HOLD
Press to place a call
on hold.
CALL HISTORY
Press to display caller
ID information.
DIR
Press to store or
display directory
entries.
(AUTO) REDIAL
Press to activate
auto-redial.
REMOVE
Press to delete the
displayed directory or
caller ID entry.
Dial pad keys
Press to start a quick
name search while in
the directory.
LOWER
Press to dial the
telephone number
stored in the lower
locations of the onetouch keys.
LINE 1, LINE 2
Press, then lift
handset to make or
answer a call on line
1 or 2.
CONFERENCE
Press to enter a threeway conference call.
FLASH
During a call, press to
receive an incoming
call if call waiting is
activated.
PAUSE
Press to insert a pause
in the dialing sequence
of a number stored in
the memory.
SPEAKER
Press to turn the base
speakerphone on or off.
MUTE
Press to silence the
microphone; press
again to resume
the telephone
conversation.
HEADSET
Press to activate the
headset.
VOLUME
During a call, press
to adjust the listening
volume.
While the telephone
is not in use, press to
adjust ringer volume.
Quick start guide
993
Two-line speakerphone with
caller ID/call waiting
www.telephones.att.com
For customer service or product information,
visit our website at www.telephones.att.com
or call 1 (800) 222-3111. In Canada, dial 1 (866) 288-4268.
© 2008-2009 Advanced American Telephones. All Rights Reserved.
AT&T and the AT&T logo are trademarks of AT&T Intellectual Property licensed to
Advanced American Telephones, San Antonio, TX 78219.
Printed in China. Issue 7 AT&T 09/09
Page 2
Telephone installation
Telephone installation
Telephone installation
Menu operation
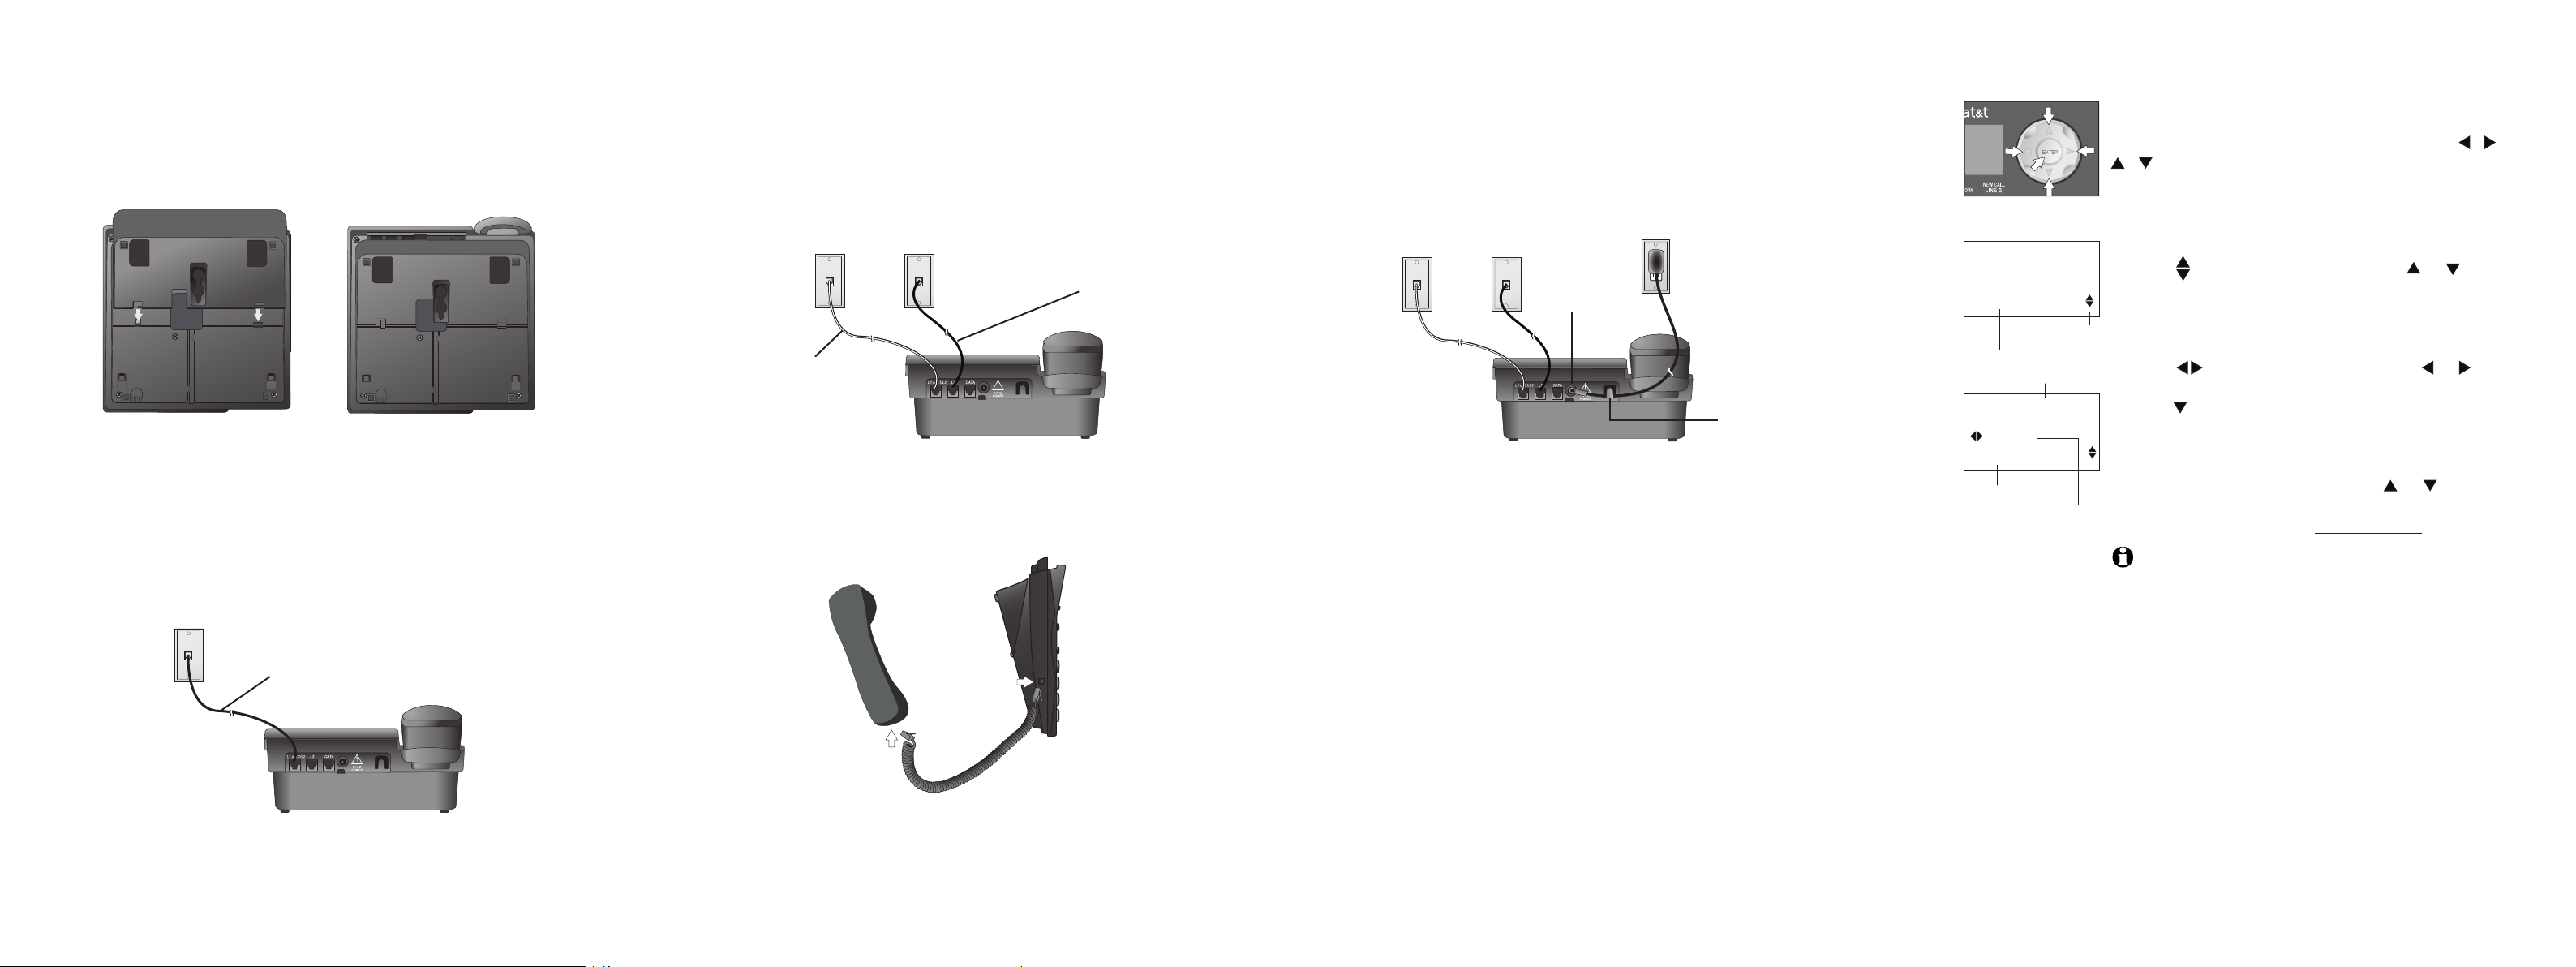
Attach the mounting bracket.
1.
If the mounting bracket is not already attached, slide the tabs into the
holes as shown. Snap the mounting bracket onto the base.
Connect the telephone line cord(s) to the telephone and the modular
2.
wall jack(s).
If there is a single two-line modular wall jack, use only the black
telephone line cord (4-conductor). Plug one end into the jack labeled
L1 or L1/L2 on the back of the telephone. Plug the other end into the
wall jack. Make sure the telephone line cord snaps firmly into place at both
ends.
Two-line modular
wall jack
Black telephone line
cord (4-conductor)
If there are two one-line wall jacks, use both telephone line cords. Insert
one end of the clear telephone line cord into the jack labeled L1 or L1/L2
on the back of the telephone. Plug the other end into the modular wall jack
for Line 1. Insert one end of the black telephone line cord into the jack on
the back of the telephone labeled L2. Then, plug the other end into the
modular wall jack for Line 2. Make sure the telephone line cords snap firmly
into place at both ends.
Modular
wall jack
for Line 1
Clear telephone
line cord
Connect the handset to the telephone.
3.
Plug the coiled handset cord into the handset jack on the left side of the
telephone. Plug the other end of the coiled handset cord into the handset,
then hang up.
Modular wall
jack for Line 2
Black telephone line
cord (4-conductor)
Connect the power adapter.
4.
Thread the power adapter cord behind the slot at the back of the
telephone base. Then plug the smaller end of the power adapter into the
jack labeled 9V AC POWER on the back of the telephone. Plug the power
adapter into a standard electrical outlet not controlled by a wall switch.
Electrical outlet not controlled
by a wall switch.
Power adapter
POWER jack
slot
Check for a dial tone.
5.
Press LINE 1, then lift the handset or press SPEAKER and listen for a dial
tone. Then press LINE 2 and listen for a dial tone.
Confirm Lines 1 and 2.
6.
Press LINE 1 and dial one of the telephone numbers. If there is a busy
signal, line 1 is the number you called. If line 2 rings, line 2 is the number
you called.
Menu topic or data
FEATURE SETUP
ONE TOUCH
Menu scroll
Menu item
indicator
Menu
PHONE SETTINGS
LINE 1
PRIMARY LINE
Feature
Current Setting
Feature setup, memory programming and a few individual
feature operations for the 993 use the menus shown in
the screen display. Use the navigation buttons ( , ,
, , ENTER) to begin, end and move through menu
operations (for example, FEATURE SETUP).
Press ENTER to activate a menu operation. The first
1.
menu item for this topic or data will appear in line four
of the screen.
When is displayed on screen, press or
2.
repeatedly to move through the menu.
Press ENTER to choose the menu item currently
3.
displayed. This may be a lower level menu, an action,
or a feature settings screen.
When is displayed on screen, press or to scroll
4.
through setting options.
Press or ENTER to store the current setting
5.
and show the next option for the feature currently
displayed. When you successfully change a setting,
there is a high pitch tone to indicate confirmation.
To return to the main menu, press or until the
6.
screen displays MAIN MENU and then press ENTER.
To exit FEATURE SETUP, press and hold ENTER.
7.
NOTES:
If you do not press a key to continue menu operations within
1.
approximately 30 seconds, the telephone automatically exits the
menu.
If there is a low pitch (error) tone, repeat the steps to program the
2.
feature.
 Loading...