

Page 1
1
QUICK START GUIDE
AT&T Small Business System
Speakerphone with Intercom and
Caller ID/Call Waiting 974
This Quick Start Guide provides basic instructions. For additional
installation options and complete instructions which allow you to
use all features of this phone, refer to your AT&T Small Business
System Speakerphone with Intercom and Caller ID/Call Waiting 974
User's Manual, Part 2.
Installation
Installation of a DSL splitter may be required to use the advanced
features of this telephone if you have DSL (digital subscriber line)
service. Please see DSL users starting on page 4 of your User’s
Manual, Part 2 for details.
If you are installing multiple phones in your phone system, you must
install and program one set at a time. Each phone MUST be assigned
a unique extension number.
Battery installation
Install a 9V alkaline battery (purchased separately) in order to use some features
of this telephone in the event of a power failure. If power fails and a working
battery is installed, all four lines of this phone will work only to answer calls
with the handset or headset, and to dial calls using the dial pad keys and the one
touch or redial features. No other features will work until power is restored.
1. Remove the wedge from the underside of the base unit. Press
on the tabs and pull the wedge away from the phone.
2. Remove the battery compartment screw with a small Phillips
head screwdriver.
3. Pull on the tab to remove the battery compartment cover.
4. Insert a 9V battery (purchased separately) following the
polarity markings in the battery compartment.
5. Replace the battery compartment cover and the screw.
6. Reattach the wedge to the base unit by sliding the tabs into the
holes. Snap the wedge onto the base.
974QSG_(Rev14)ml_23.5.06 5/23/06 11:28 AM Page 1
Page 2
2
Table/desk installation
For best results, follow the directions in Battery installation beginning on
page 1 of this Quick Start Guide before installing the phone.
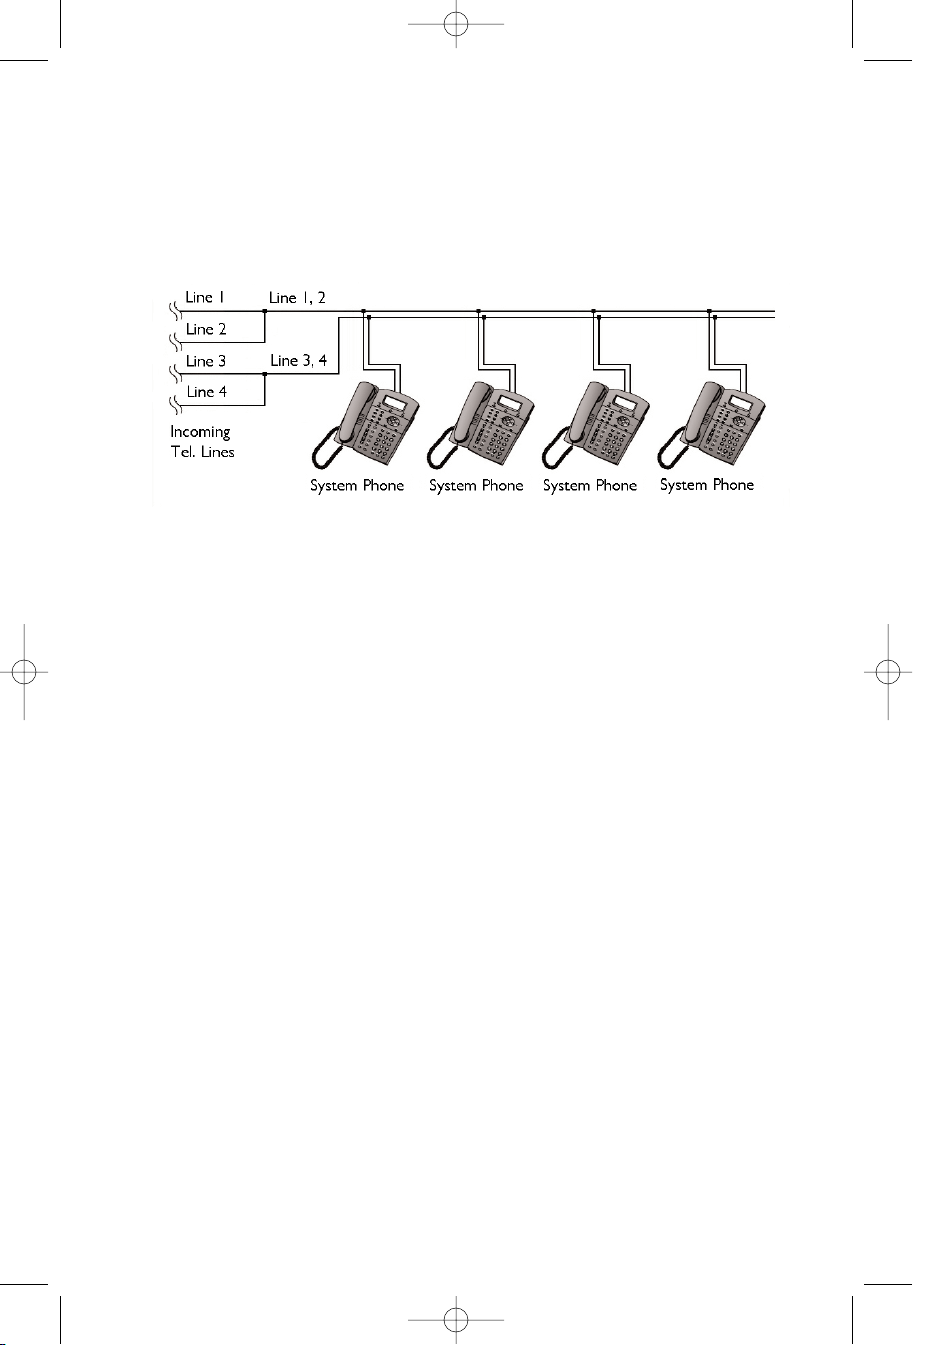
Recommended wiring configuration for phone system
NOTE: The total length of telephone wire used in your system should not
be more than 600 feet as it may cause interference with the advanced
features of this telephone.
NOTE: Users should use ONLYthe line cords provided.
1. Connect the telephone line cords to the telephone and
wall jacks as shown in the following illustration on page 3.
974QSG_(Rev14)ml_23.5.06 5/23/06 11:28 AM Page 2
Page 3
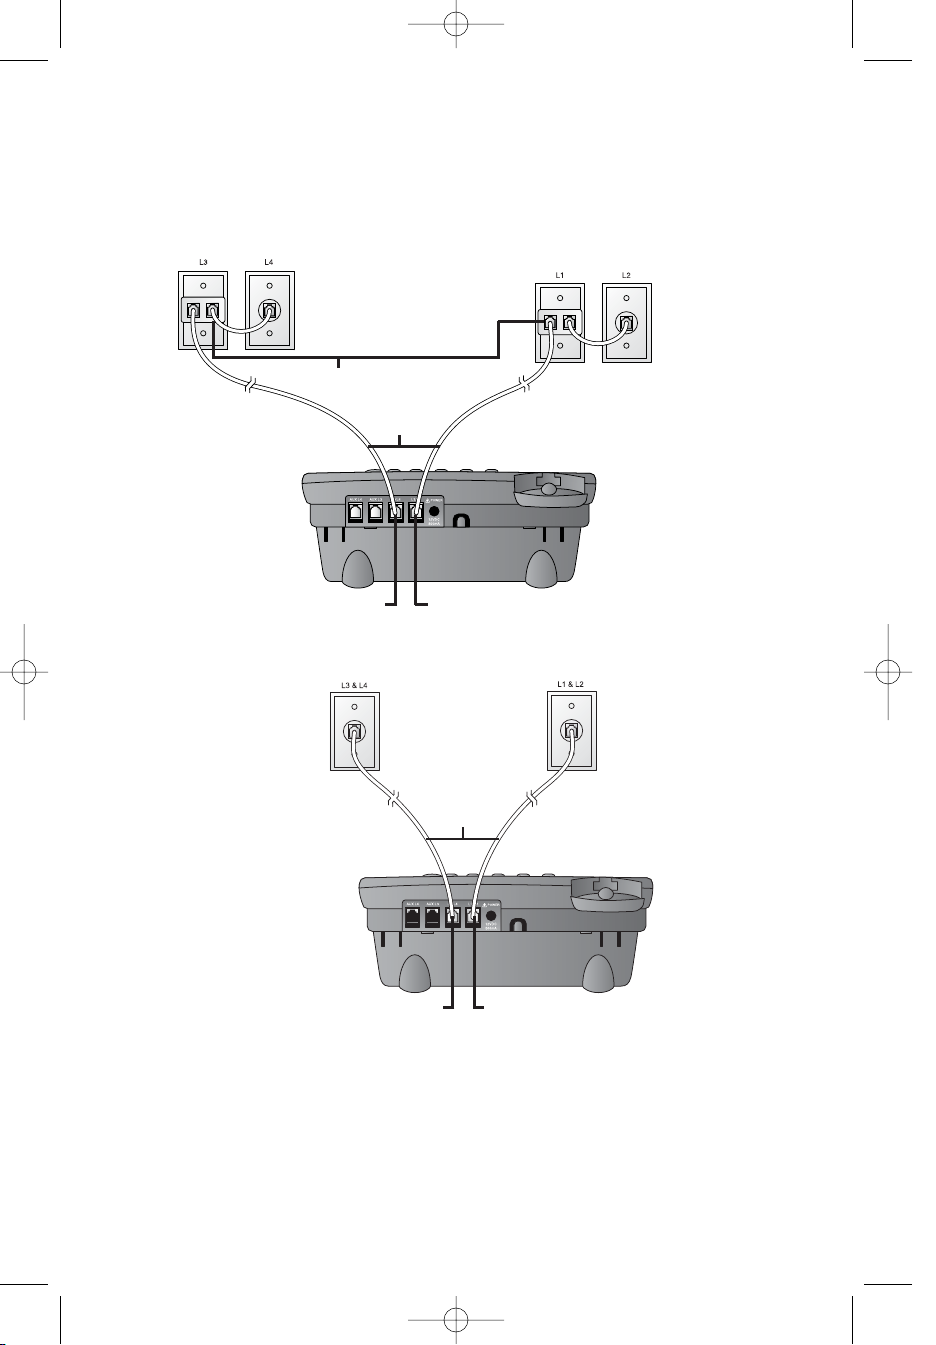
• Four one-line jacks (To use this installation option, you’ll need
to purchase two two-line adapters. Adapters are available at retail
stores or by calling 1 (800) 222–3111.)
• Two two-line jacks
2. Connect the handset cord.
Plug one end of the coiled handset cord into the jack on the left
side of the phone. Plug the other end into the handset and hang up.
3
Two-line adapters
Telephone
line cords
Modular telephone
jacks lines 3 and 4
Modular
telephone jacks
lines 1 and 2
L1/L2 jack
L3/L4 jack
Modular
telephone jacks
lines 3 and 4
Modular telephone
jacks lines 1 and 2
Telephone
line cords
L1/L2 jack
L3/L4 jack
974QSG_(Rev14)ml_23.5.06 5/23/06 11:28 AM Page 3
Page 4
4
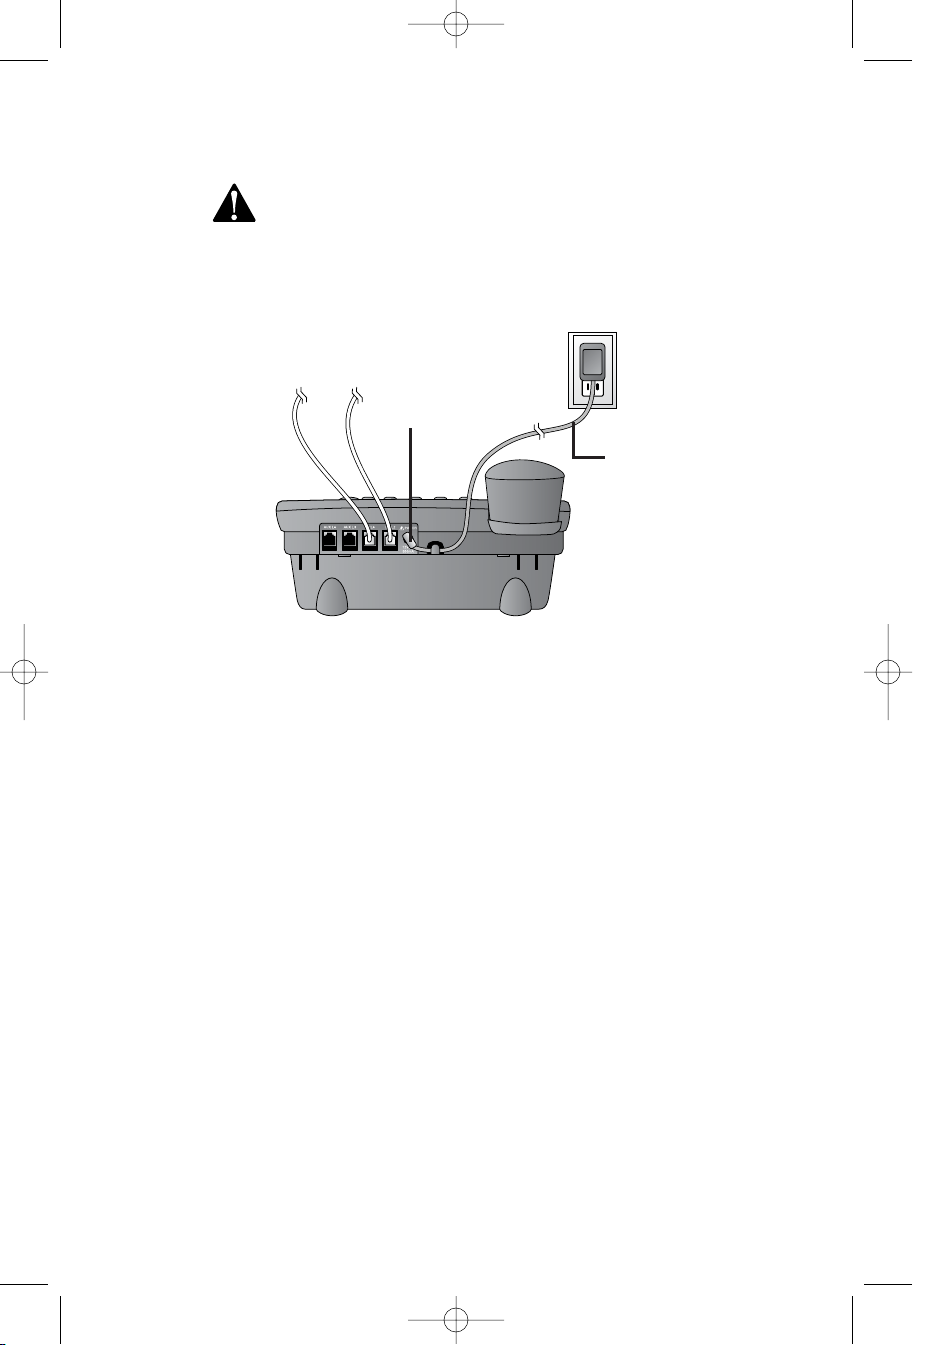
3. Connect the power adapter to the telephone.
Use only the power adapter provided with this product.
To obtain a replacement, call 1 (800) 222–3111.
Plug one end of the power adapter into the jack labeled POWER
on the back of the phone. Plug the other end into a standard
electrical outlet not controlled by a wall switch.
4. Initialization.
If no battery is installed when you connect the power cord, the phone
runs a quick self-test and the screen displays Initializing for
about seven seconds.
NOTE: The phone will run through this same initialization any time it is
reconnected to AC power if a working battery is not installed (for example,
after a power failure or when the unit has been unplugged).
5. Check for dial tone.
Lift the handset and listen for a dial tone. If you cannot hear a dial
tone, please see In case of difficulty starting on page 88 of your
User’s Manual, Part 2 for details.
Standard
electrical
outlet
Power adapter
Power jack
974QSG_(Rev14)ml_23.5.06 5/23/06 11:28 AM Page 4
Page 5
5
Feature setup
Feature setup, memory programming and some individual
feature operations for the 974 use menus shown in the
screen display. For detailed instructions for using the menus,
see Menu operation beginning on page 20 of your User’s
Manual, Part 2.
Assign an extension number to
your phone
Every individual phone in your telephone system MUST be
assigned a unique extension number for the intercom feature
to work.
1. Press E to begin feature setup.
2. Press - until the screen display includes
PHONEHSETTINGS.
3. Press E. The screen display includes
EXTENSIONHNO and the current setting.
4. Press < or > to change the extension
number (11h…h26).
5. When the desired extension number is shown,
press - to save your choice. The screen display
includes RINGERHON/OFF.
NOTE: If you duplicate an extension number already in
use, you will hear a repeating shor t ring (error ring) and
the screen display will include EXTHXXHisHalready
usedHAssignHnewHEXTH#Hif the phone is in idle mode.
If the phone is in the programming mode, you will hear
the repeating short ring only. Repeat steps 1-5 at the
ringing phone to assign a different extension number
(from 11-26).
6. Press and hold E to return to the idle screen.
NOTE: You can exit feature setup and return to the idle
screen any time. Simply press and hold E.
i
ii
ii
k
kk
kk
ooooo
mmmmm
jjjjj
974QSG_(Rev14)ml_23.5.06 5/23/06 11:28 AM Page 5
Page 6

Turn line usage on or off for each
line
If you are not using all four phone lines at this extension,
you need to turn off line usage for the unused lines. If you
expand to a second, third or fourth line, turn line usage back
on. Line 1 must be turned on for the intercom to work.
NOTE: You may use any combination of lines. Lines
used do not need to be in order. For example, line usage
can be turned on for Lines 1 and 3 and turned off for
Lines 2 and 4.
You may also restrict the use of certain lines on this phone to
intercom and paging only, by turning off line usage for each
line you want restricted. When line usage is turned off, that
line cannot be used to answer incoming calls or to make
outgoing or transfer calls.
1. Press E to begin feature setup.
2. Press - until the screen display includes
SPECIALHOPTIONS.
3. Press E. The screen display includes
LINEHUSAGE.
4. Press E. The screen display includes
L1HUSAGE and the current setting for this line.
5. Press < or > to toggle between On and Off for
the line shown.
6. Press - to save the current setting for this line
and move to the next line with its current line
usage setting.
7. Repeat steps 5 and 6 to set line usage for other
lines at this extension.
8. When you are finished setting line usage, press until the screen display includes DONE.
9. Press E. The screen display includes
LINE USAGE.
10. Press and hold E to return to the idle
screen.
NOTE: You can exit feature setup and return to the idle
screen any time. Simply press and hold E.
6
i
ii
ii
kkkkk
ooooo
nnnnn
974QSG_(Rev14)ml_23.5.06 5/23/06 11:28 AM Page 6
Page 7

7
Program home and local area
codes
You can program this phone to recognize one home and
up to five local area codes. See Home area code and
Local area code on page 6 of your User’s Manual, Part 2
for definitions.
1. Press E to begin feature setup.
2. Press - until the screen display includes SPECIAL
OPTIONS.
3. Press E. The screen display includes LINE
USAGE.
4. Press - until the screen display includes AREA
CODES.
5. Press E. The screen display includes HOME AC
and a prompt to enter a three-digit home area
code.
6. Use the dial pad keys to enter your home area
code, then press -. The screen display includes
LOCALHAC1 and a prompt to enter a three-digit
local area code.
If you need to enter any local area codes, use the
dial pad keys and then press - to scroll to the next
screen (LOCALHAC2,HLOCALHAC3,HLOCALHAC4,
andHLOCALHAC5).
NOTE: If you must dial the area code to place calls
within your own area code, enter 000 for the home area
code and enter your area code as a local area code.
7. When you are finished entering all of the area
codes you need to program, press - until the
screen display includes DONE.
8. Press E. The screen display includes AREA
CODES.
9. Press and hold E to return to the idle screen.
NOTE: You can exit feature setup and return to the idle
screen any time. Simply press and hold E.
iiiii
n
nn
nn
974QSG_(Rev14)ml_23.5.06 5/23/06 11:28 AM Page 7
Page 8

8
Telephone operation
NOTE: This phone comes programmed to use line 1
(default prime line) for calls if you do not press a LINE
button. (To change the prime line, see Assign the
prime line on page 32 of your User’s Manual, Part 2.)
When you answer a call, the phone automatically selects
the ringing line.
Make or answer a call using the
handset
NOTE: If you dial a phone number longer than 15 digits,
the screen will display only the last 13 digits.
To make a call, lift the handset and dial the call.
To answer a call, lift the handset.
To end a call, replace the handset.
To override automatic line selection, press the LINE
button for the line you wish to select, then lift the handset.
Make or answer conference calls
Please refer to page 51 of your User's Manual, Part 2 for
more details in setting up conference calls.
NOTE: The outside line call must be established first
because an intercom call cannot be placed on hold.
NOTE: If you are experiencing difficulty in using the
conference features on this phone, please consider using
AT&T's complete line of teleconference services to find a
solution that best meets your needs. AT&T
TeleConference Services reduces travel time and expense
while increasing productivity wherever people are located,
allowing you to host truly virtual meetings and share
important information in real time. To sign up for AT&T
TeleConference Services, go to:
www.att.com/orderconference for details.
i
ii
ii
i
ii
ii
i
ii
ii
i
ii
ii
974QSG_(Rev14)ml_23.5.06 5/23/06 11:28 AM Page 8
Page 9

9
One touch operation
This telephone has 32 one touch locations where you can store phone numbers
you wish to dial using fewer keys than usual. You can store up to 24 digits in
each location. The steps used to dial numbers stored in one touch locations
vary according to how you programmed the one touch preference. See Set
one touch preference on page 23 and Dial a one touch number on page
59 of your User’s Manual, Part 2 for more details.
The first 16 locations can be accessed using only the EXT buttons. To access
the remaining 16 locations, press W and then the EXT button for the
desired location.
NOTE: The EXT buttons are also used to place intercom calls. See
Intercom operation beginning on page 67 of your User’s Manual,
Part 2 for details.
You may wish to write the names or telephone numbers of one touch entries
on the directory card, using the light gray spaces for the first 16 locations and
the dark gray spaces for the second 16 locations.
locations
(all dark gray spaces)
EXT buttons
LOWER button
16 one touch locations
(all light gray spaces)
l
ll
ll
p
pp
pp
16 lower one touch
974QSG_(Rev14)ml_23.5.06 5/23/06 11:28 AM Page 9
Page 10

10
Store a number in a one touch
location
For information about using the screen menus, see Menu
operation beginning on page 20 of your User’s Manual,
Part 2.
1. Press E to enter the feature menu. The
screen displays ONE TOUCH.
2. Press E. The screen display includes
PREFERENCE and the current setting.
3. Press - until the screen display includes
PROGRAM.
4. Press E. The screen display includes
<EnterHnumber>.
5. Enter the phone number using the dial pad keys.
—OR—
Press R to copy the last number dialed
from this phone to this location.
The screen will show the number as you enter it.
You can press < to backspace.
6. When you are finished entering the number, choose
a one touch location:
Press the EXT button.
—OR—
Press W, then press the EXT button.
The screen displays the number entered and
Stored!.
NOTE: Only the last number dialed from this extension
can be copied to a one touch location. The other
numbers in the redial stack cannot be copied.
NOTE: You can store a pause, flash or touch tone
signals in a one touch entry. Please refer to page 57 of
your User's Manual, Part 2 for more details.
NOTE: You can exit storing a number at any time.
Press - until the screen shows CANCEL, then press
E.
—OR—
Press and hold E.
p
pp
pp
l
ll
ll
i
ii
ii
i
ii
ii
n
nn
nn
974QSG_(Rev14)ml_23.5.06 5/23/06 11:28 AM Page 10
Page 11

Dial a one touch number
This phone comes with One touch preference programmed
to INTERCOM. These instructions apply only if you have not
changed One touch preference.
NOTE: To change One touch preference, see Set one
touch preference on page 23 of your User’s Manual,
Part 2. To make a one touch call if One touch preference
is set to TELEPHONE, see Dial a one touch number
on page 59 of your User’s Manual, Part 2.
1. Lift the handset.
—OR—
Press
K.
—OR—
Press h and listen for the dial tone.
2. Press the EXT button.
—OR—
Press W, then press the EXT button for the
number you want to call.
The screen displays the number as it is dialed.
11
ppppp
n
nn
nn
ooooo
ooooo
974QSG_(Rev14)ml_23.5.06 5/23/06 11:28 AM Page 11
Page 12

12
Intercom operation
This 974 telephone is fully compatible with any AT&T Four-Line Small Business
System Speakerphone 945 or 984 units you may have installed. You can use a
total of 16 945/974/984 units together as extensions in your phone system.
For details regarding this telephone’s compatibility with other AT&T phones,
please refer to Before you begin starting on page 2 of your User’s Manual,
Part 2.
Each individual phone in your telephone system MUST be assigned
a unique extension number for the intercom feature to work. See
Assign an extension number to your phone on page 5 of this Quick Start
Guide for instructions.
NOTE: If you subscribe to DSL service, please read DSL users beginning
on page 4 of your User’s Manual, Part 2 for information about minimizing
problems with this phone caused by DSL signals.
This intercom features both a single-phone page and a system-wide page. A
single-phone page alerts only one phone. A system-wide page alerts all
system phones. Any phone with the Do not disturb (DND) feature activated
will not receive a page. For detailed intercom instructions, see Intercom
operation beginning on page 67 of your User’s Manual, Part 2.
An intercom call rings at the extension called with a repeating double-ring
pattern.
A single-phone page automatically activates the speakerphone on the receiving
phone. You can deactivate the speakerphone by lifting the handset.
NOTE: If a line is in use, pressing I will place the line on hold and
activate the intercom.
974QSG_(Rev14)ml_23.5.06 5/23/06 11:28 AM Page 12
Page 13

13
Make an intercom call with the
handset
This phone comes with One touch preference programmed
to INTERCOM. These instructions apply only if you have not
changed the One touch preference.
NOTE: To change One touch preference, see Set one
touch preference on page 23 of your User’s Manual,
Part 2. To make an intercom call if One touch preference
is set to TELEPHONE, see Make an intercom call with
the handset on page 69 of your User’s Manual, Part 2.
Press the EXT button for the party you wish to call, then lift
the handset. The screen display includeshINTERCOMhTOhand
the extension number you called.
If the extension you called is idle or set to Do not disturb,
you will hear long beeps. If the other extension is on a call,
you will hear a busy signal.
NOTE: The intercom call is automatically canceled if you
do not press an EXT button within 10 seconds.
NOTE: When you direct an intercom call to one
extension, any extension in the system can answer the
call by pressing I.
n
nn
nn
j
jj
jj
974QSG_(Rev14)ml_23.5.06 5/23/06 11:28 AM Page 13
Page 14

Answer an intercom call
NOTE: An intercom call can be answered at any
extension in the phone system by pressing I.
When you receive an intercom call, you will hear a repeating
double-ring pattern and your screen displays INTERCOM
FROM with the extension number of the caller. Answer the
intercom call by lifting the handset, or by pressing I,
K or h to take the call hands-free.
NOTE: If you press I to answer the call, the
phone will automatically use the speakerphone unless you
have changed the automatic mode (See Set automatic
mode on page 33 of your User’s Manual, Part 2).
End an intercom or page call
To end the intercom or page call, press I.
—OR—
Hang up or press K or h again.
14
k
kk
kk
k
kk
kk
j
jj
jj
k
kk
kk
k
kk
kk
j
jj
jj
974QSG_(Rev14)ml_23.5.06 5/23/06 11:28 AM Page 14
Page 15

© 2006 Advanced American Telephones.
All rights reserved.
AT&T and the Globe Design are
trademarks of AT&T Corp., licensed to
Advanced American Telephones.
Printed in Singapore. Issue 4AT&T 05/06
In case of difficulty, visit our service center at
www.telephones.att.com or call 1 (800) 222–3111.
974QSG_(Rev14)ml_23.5.06 5/23/06 11:28 AM Page 15
 Loading...