

Page 1
REVISED 11/3/98
1
User’s Manual for
900 MHz Cordless Caller ID/
Call W aiting 9340
Please read Part 1 — Important Product
Information, included in your package.
AT&T 9340 cover_1ATT 11/3/98, 12:45 PM3
Part 2
Page 2

© 1998 Philips Consumer Communications L.P. All rights reser ved.
Printed in Mexico. COMCODE Issue 1AT&T
AT&T 9340 cover_1ATT 11/3/98, 12:45 PM2
Page 3

CONTENTS
INSTALLATION................................. 3
Belt Clip ................................................5
FEATURE SETUP.............................. 6
About Softkeys ...................................... 6
Dial Mode.............................................. 6
Ringer Off / Battery Save....................... 7
Handset Ringer Selection ......................7
Programming Home and
Local Area Codes ............................... 8
Turning Off Caller ID with
Call Waiting........................................ 8
Call List Options.................................... 9
Message W aiting Indicator..................... 9
TELEPHONE OPERATION................10
Making a Call....................................... 10
Preview a Number Before Calling ....... 10
Answering a Call ................................. 11
Ending a Call ....................................... 11
Redial .................................................. 11
Redial Plus........................................... 11
Handset V olume .................................. 11
Tempor ary Tone .................................. 11
Mute .................................................... 12
Flash .................................................... 12
Page..................................................... 12
Handset Locator .................................. 12
Changing Channels ............................. 13
Headset Jack........................................ 13
TELEPHONE MEMORY ....................14
Memory Guard .................................... 14
Storing Numbers In Memory .............. 14
Storing a Name with a Number...........14
Replacing a Stored Number ................ 15
Storing a Pause in a Memory Number ..15
Storing a Number and Name from
Call History in Telephone Memory ...15
Viewing Numbers in Memory ............. 15
Deleting/Editing Memory Numbers ....15
Priority Ring Numbers ........................ 16
Dialing Memory Numbers ................... 16
CALLER ID OPERATION ..................17
About Caller Identification.................. 17
Call W aiting ......................................... 17
NEW CALL Light ................................. 17
Incoming Call History ......................... 18
Reviewing Call History........................ 18
Display Dial ......................................... 18
Deleting Call Records from
Call History...................................... 19
Caller ID Display Messages..................19
BATTERIES.................................... 20
Charging the Handset Battery Pack.....20
Replacing the Handset Battery Pack ... 21
OPERATING RANGE........................22
IN CASE OF DIFFICULTY .................23
AT&T 9340 book_1ATT 11/3/98, 1:06 PM1
1
Page 4

2
AT&T 9340 book_1ATT 11/3/98, 12:39 PM2
Page 5
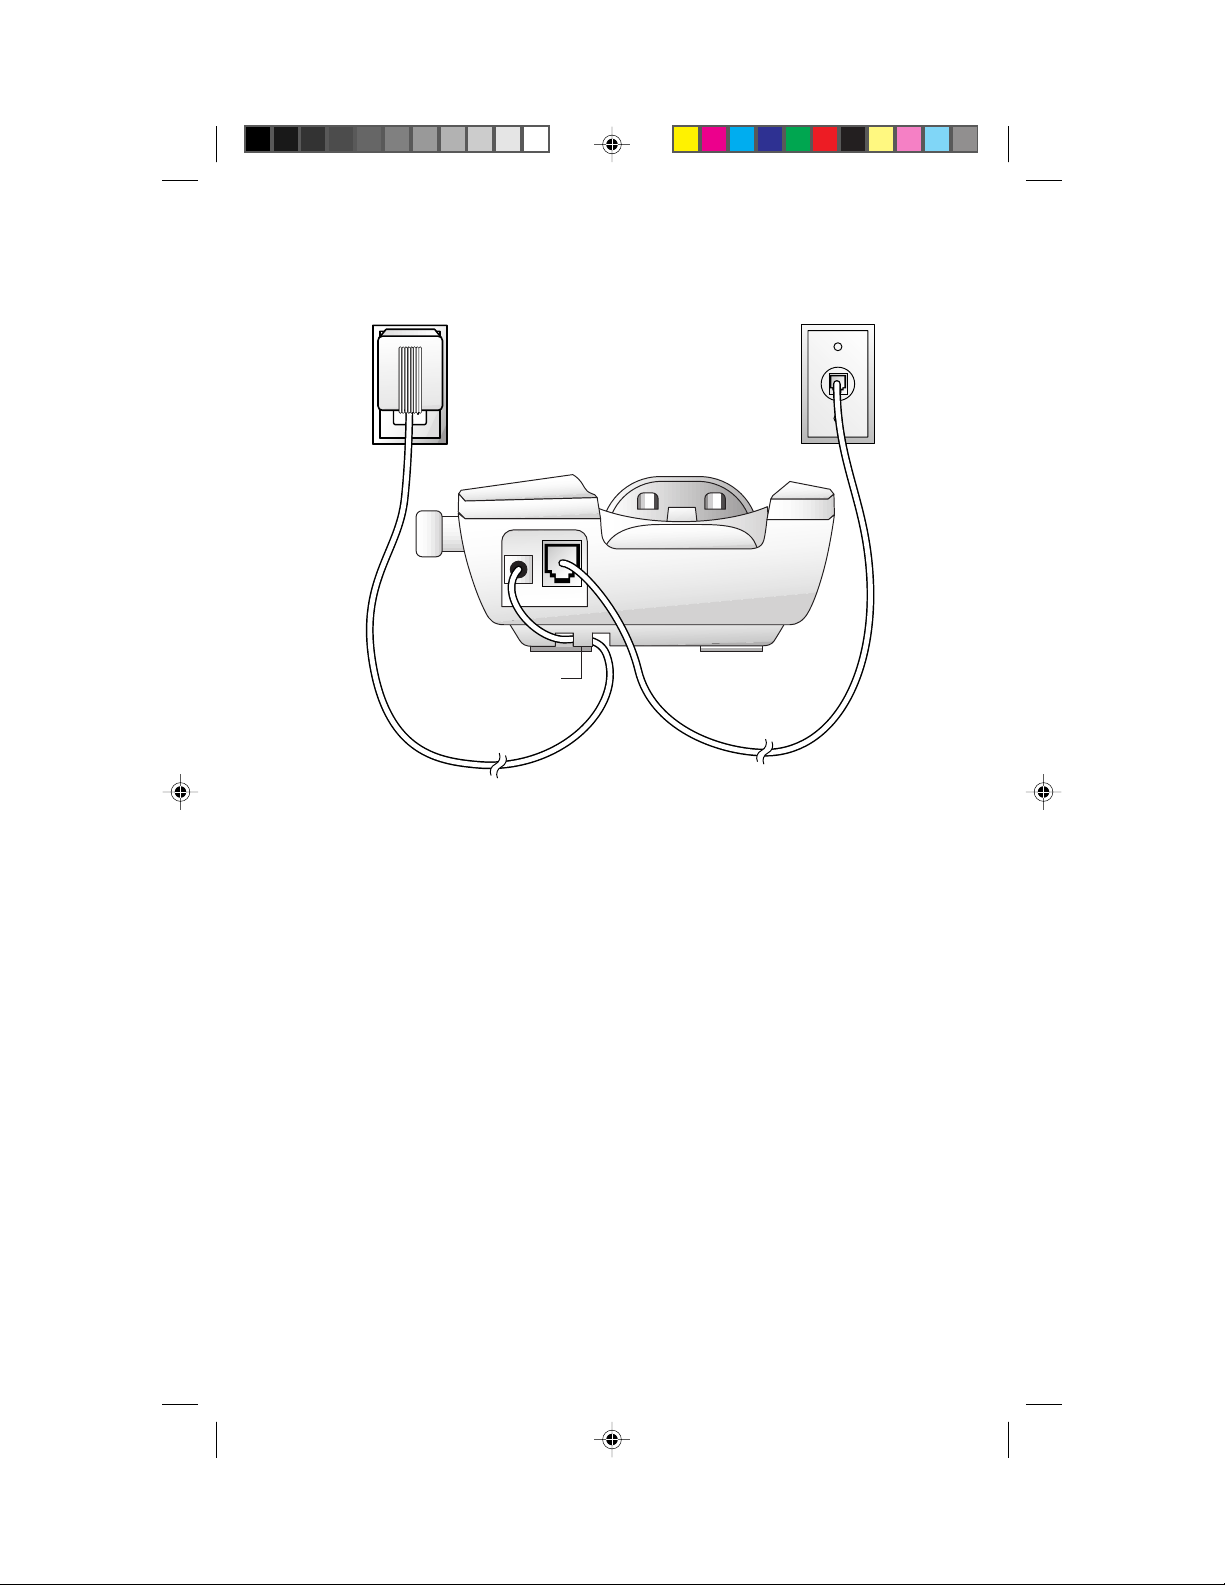
INSTALLATION
Standard
electrical
outlet
Strain-relief
groove
Power cord
The instructions below are for both table and wall installation.
1 Choose a spot near an electrical outlet and a telephone jack.
This phone requires a modular telephone jack and a standard
electrical outlet (110v AC) not controlled by a wall switch.
2 Install the handset battery.
(For an illustration of battery installation, see the BATTERIES section
in this manual.)
• Remove the battery cover by pressing on the indentation and
sliding downward.
• Plug the battery pack connector into the handset, and place the
battery pack and wires into the compartment.
• Replace the battery cover by sliding it on its track up over the
battery compartment until it snaps firmly into place.
3 Connect the telephone line cord.
Make sure the plugs snap firmly into place. (If you are wall
mounting the phone, use the short line cord, and press the excess
cord into the groove on the bottom of the base.)
4 Connect the power cord as shown above.
Long telephone line cord
Modular
telephone
jack
NOTE: Connect power to the base unit before placing the handset in
the cradle.
AT&T 9340 book_1ATT 11/3/98, 12:40 PM3
3
Page 6
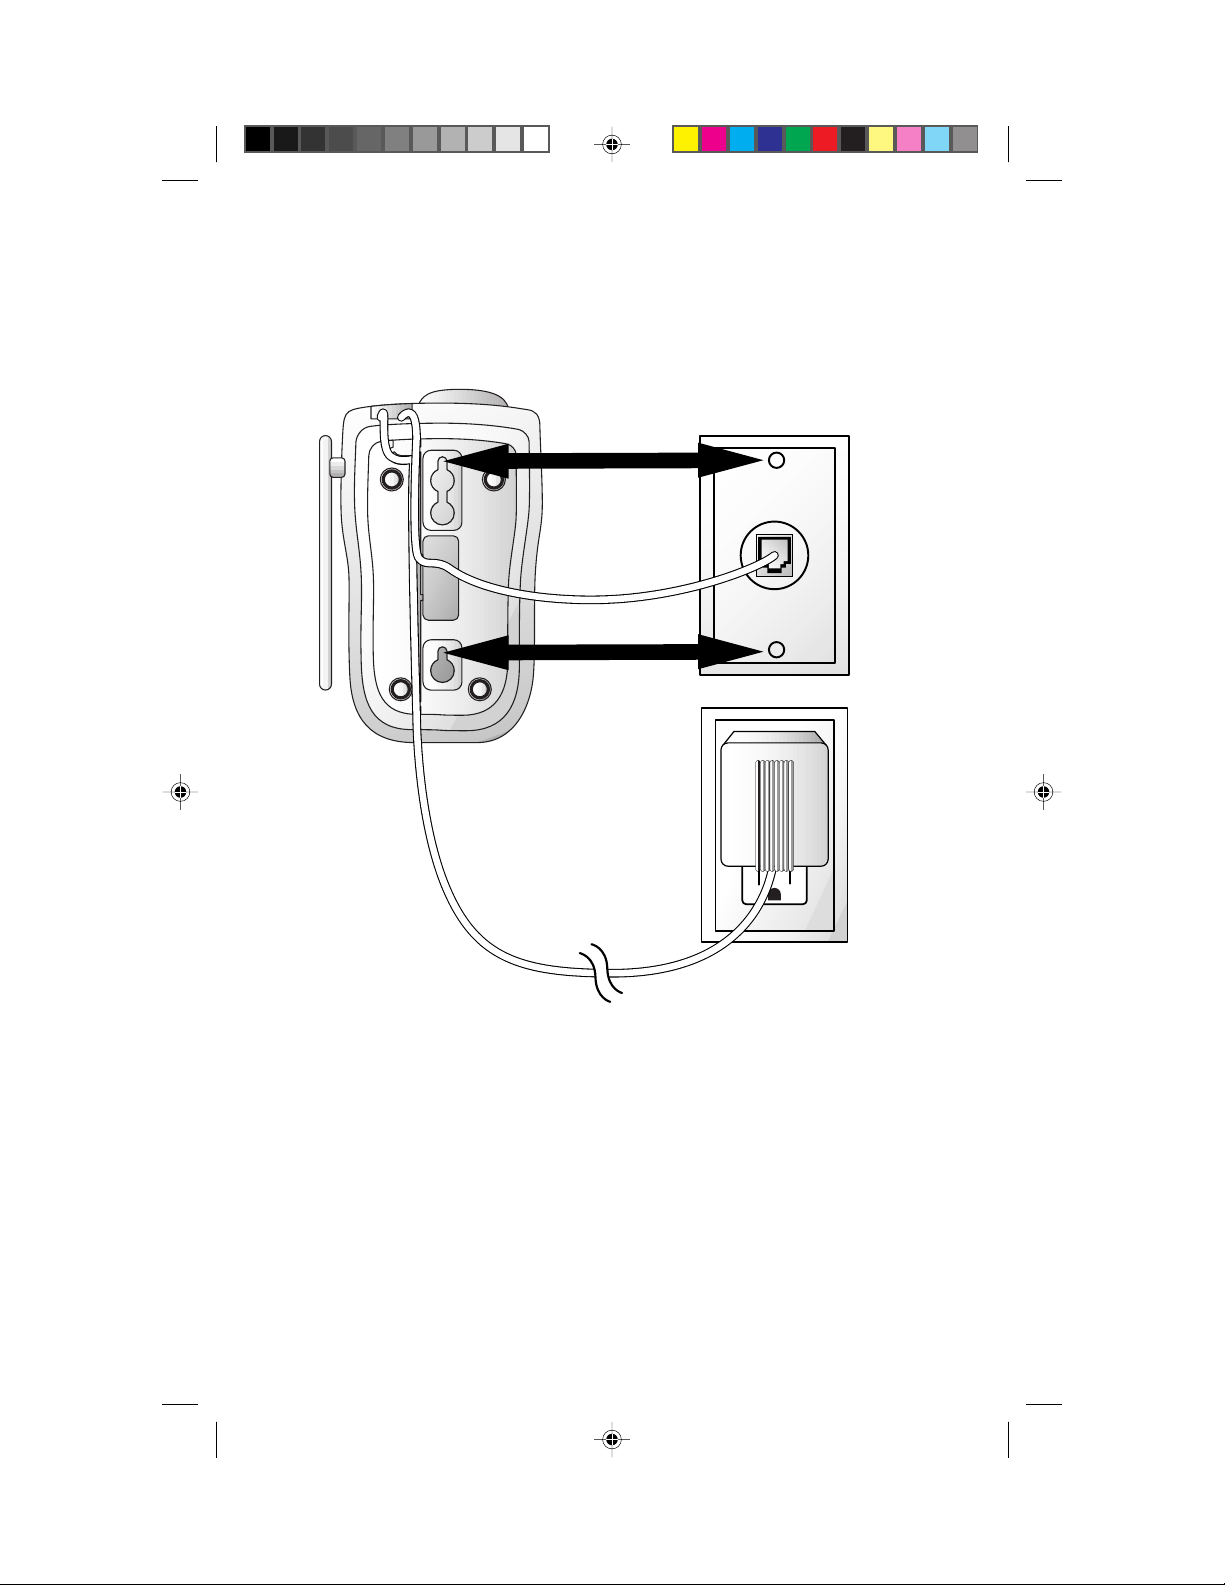
INSTALLATION
5 Mount the base on the wall.
(WALL MOUNTING ONLY)
Modular
telephone
jack
Short
telephone
line cord
Standard
electrical
outlet
6 Charge the handset batteries for six hours.
Place the handset face up or face down in the base. The
CHARGING/HANDSET IN USE light on the base goes on to show
the handset is in the right position to charge the batteries.
7 Check for dial tone.
After the batteries are charged, pick up the handset. Check for a
dial tone by pressing P; you should hear a dial tone.
4
AT&T 9340 book_1ATT 11/3/98, 12:40 PM4
Power cord
Page 7
INSTALLATION
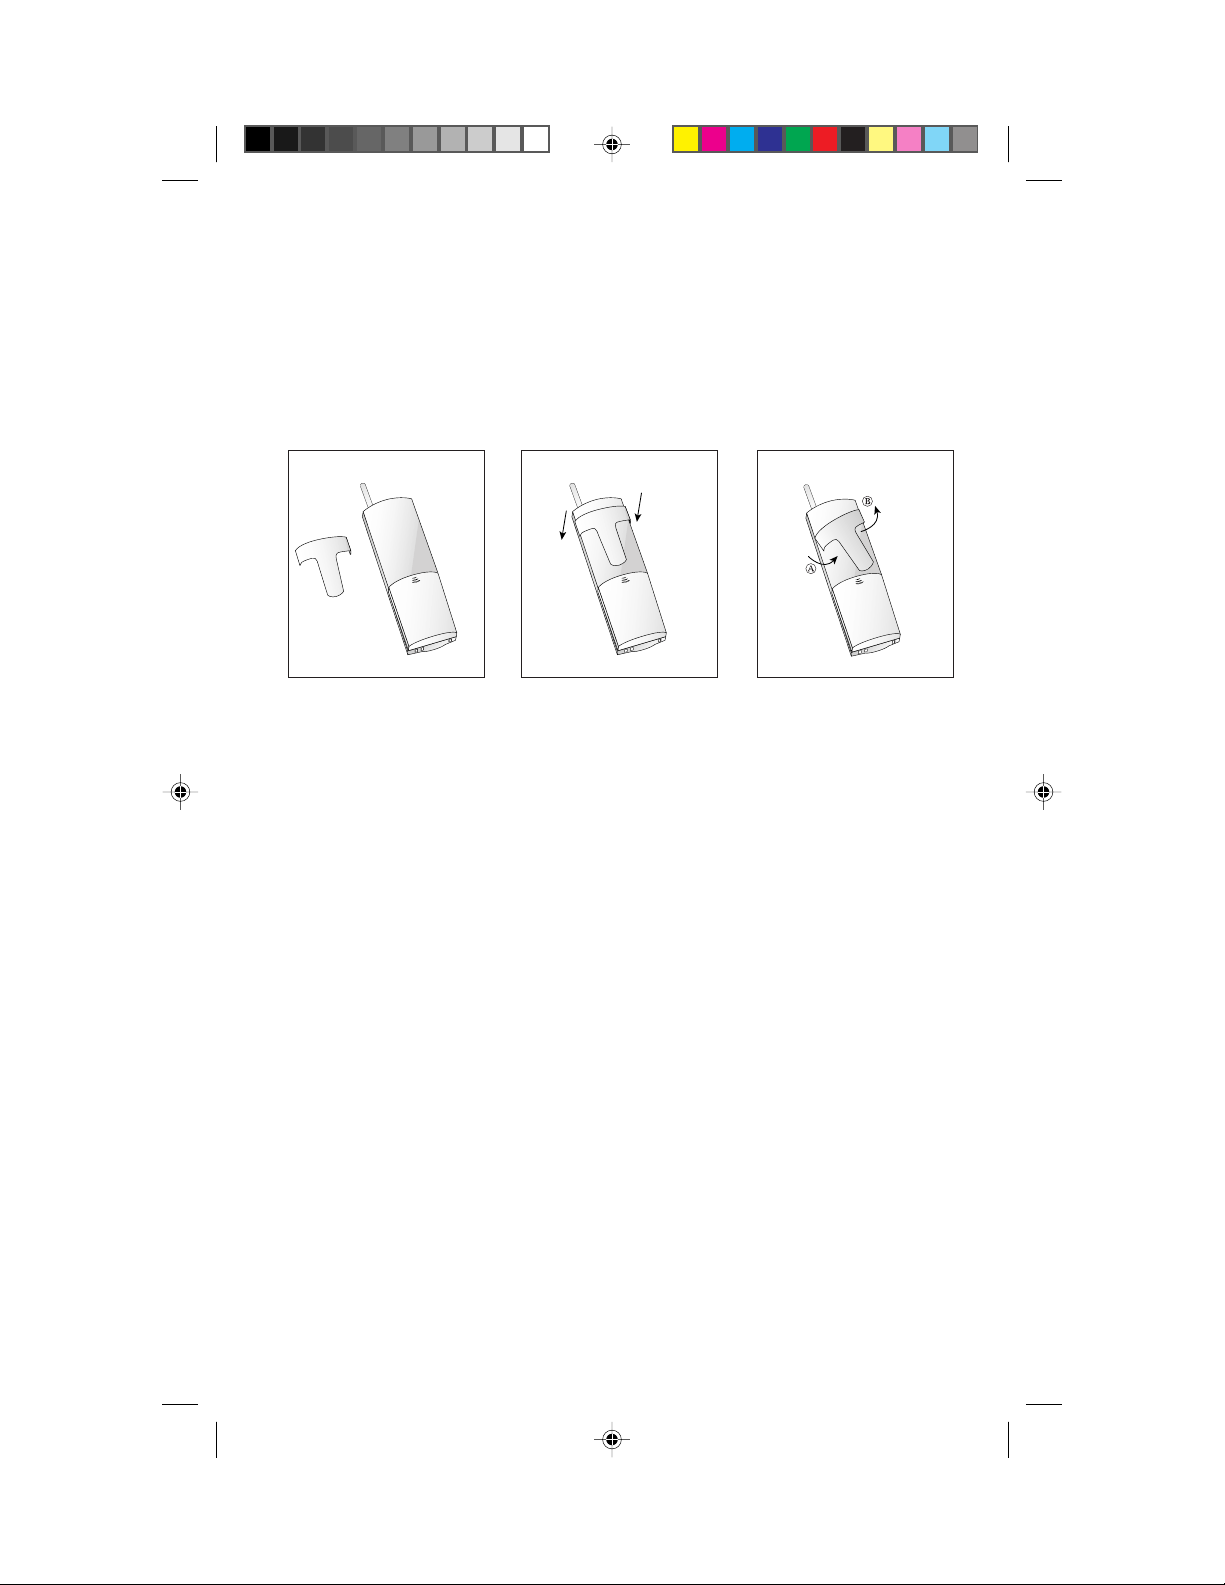
Belt Clip
If you wish, you can attach the belt clip to the cordless handset, following
the illustrations below. (The handset cannot be charged in the face-up
position if the belt clip is attached.)
To RemoveTo Attach
AT&T 9340 book_1ATT 11/3/98, 12:40 PM5
5
Page 8
FEATURE SETUP
You can set up one feature at a time as described below, or you can set up
a feature, and then move on to set up another feature. After you change
one feature, press U to exit, or select the DONE softkey to move to the
next feature.
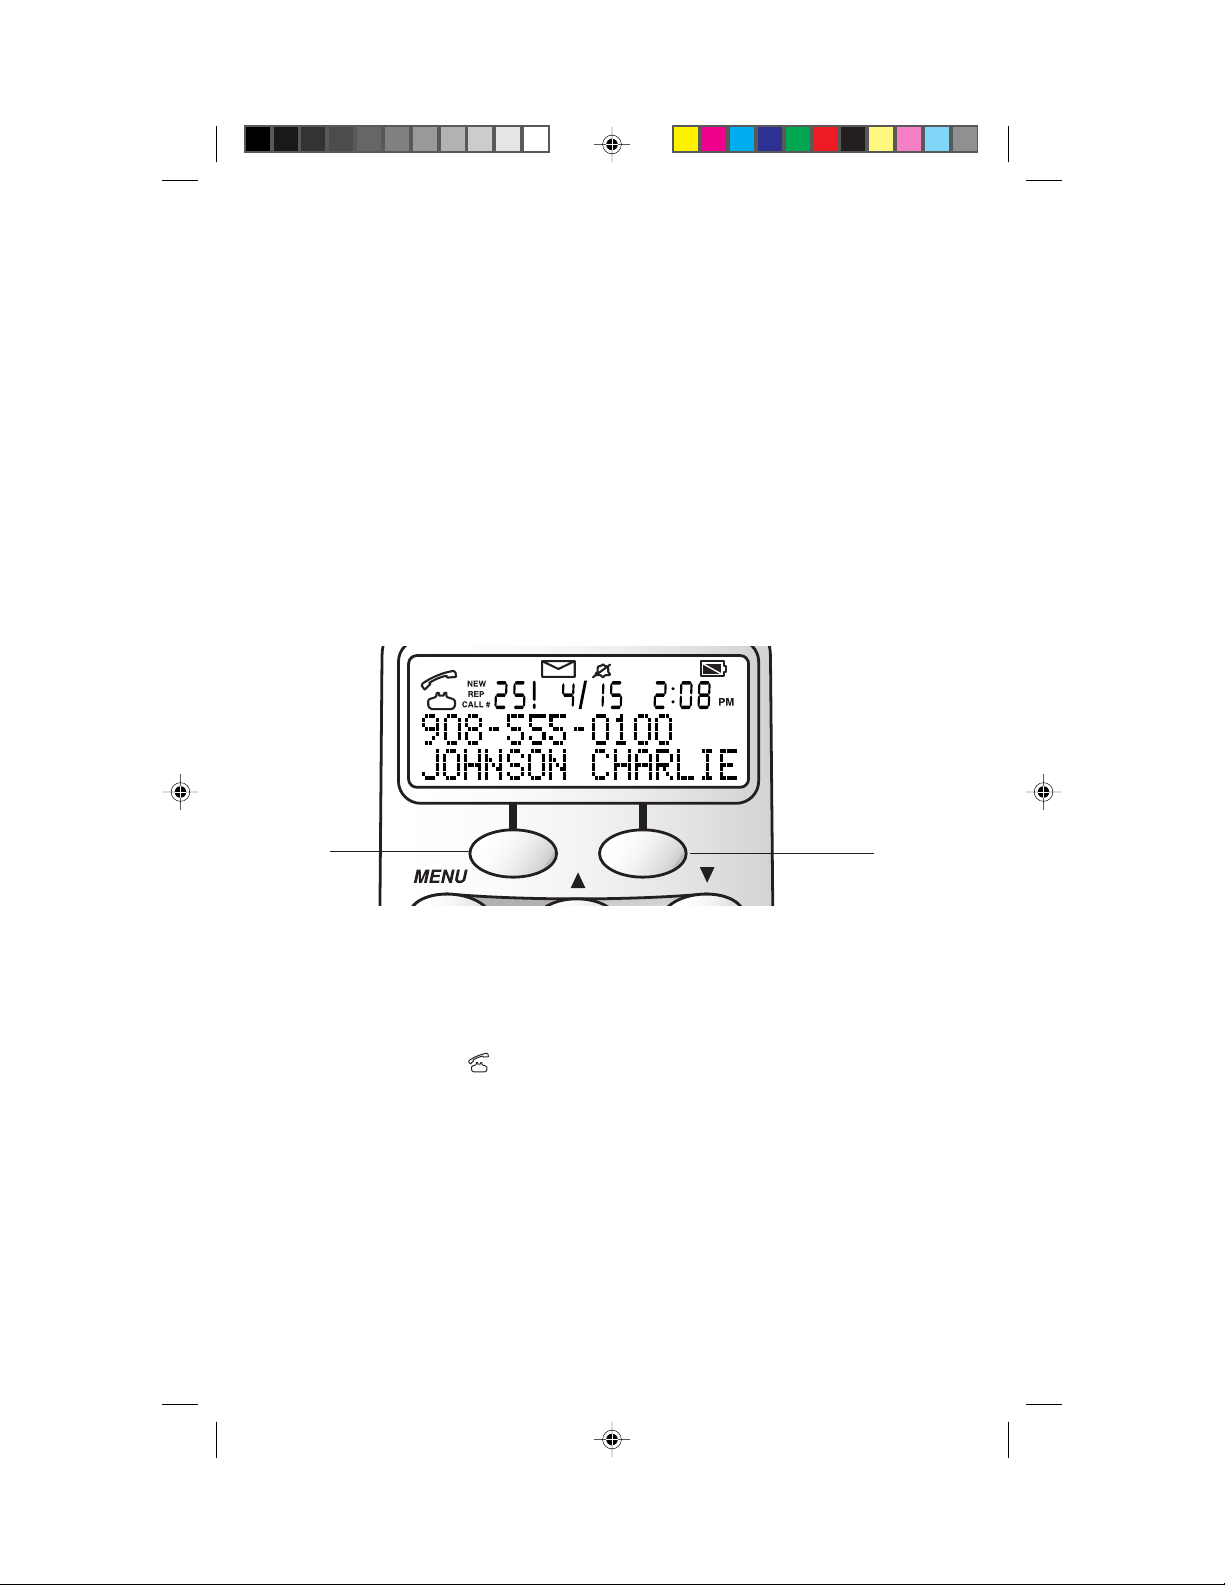
About Softkeys
This telephone has been designed with your convenience in mind, offering
you many features which you can access using the two “softkeys” shown
in the illustration. Press U to begin viewing options. Use < and > to
scroll through the choices or to move to the next display. By pressing the
softkey below the operation indicated on the display screen, you select
that operation.
L2L1
Softkey
Softkey
Dial Mode
If you have touch tone service, the phone will be ready to use as soon as the
battery is charged. If you have dial pulse (rotary) service, you’ll need to set
the dial mode.
1 Make sure the is not displayed.
2 Press U >.
3 Use the softkey to select SETUP (see “About Softke ys”). The screen
displays DIAL MODE: TONE.
4 Use the softkey to select CHANGE. The screen displays DIAL
MODE:PULSE.
5 Select DONE to move to the next feature
— OR —
Press U to exit.
To change back to touch tone dialing, repeat Steps 1 through 5. The screen
displays DIAL MODE:TONE.
6
AT&T 9340 book_1ATT 11/3/98, 12:40 PM6
Page 9

FEATURE SETUP
Ringer Off / Battery Save
When the Ringer is set to OFF, the handset stays ready to use for up to
30 days in the standby mode before you have to return it to the base for
recharging. When the Ringer is off, the Page/Handset Locator feature does
not work, and the screen does not display incoming call infor mation.
However, the call information is stored in the call history. The Ringer Off
Icon, , is displayed only when the phone is on.
When the Ringer is on, the handset stays ready to use for up to 15 days, and
all features are active.
1 Make sure the is not displayed.
2 Press U >.
3 Use the softkey to select SETUP.
4 Select DONE until the screen displays RINGER.
5 Select CHANGE to turn the Ringer ON or OFF.
6 Select DONE to move to the next feature
— OR —
Press U to exit.
Handset Ringer Selection
You can select from four different handset ringer styles. You can also turn
off the ringer.
1 Make sure the is not displayed.
2 Press U >.
3 Use the softkey to select SETUP.
4 Select DONE until the screen displays RING TYPE.
5 Select CHANGE. Each time you select CHANGE, you hear a sample
of the ringer style.
6 Select DONE to save the last ringer style you heard and move to
the next feature
— OR —
Press U to exit.
AT&T 9340 book_1ATT 11/3/98, 12:40 PM7
7
Page 10

FEATURE SETUP
Programming Home and Local Area Codes
Your “home area code” is the area code from which you are dialing.
Numbers called within your home area code do not require you to dial a
“1” or the area code before dialing the telephone number. “Local area
codes” are area codes that require no “1” before dialing the telephone
number; however, the area code must be dialed.
Always program your home area code, and, if you need them, your local area
codes (up to four). Programming these area codes will change how numbers
are displayed in the call history, and will allow for correct operation of the
Display Dial feature (see below).
1 Make sure the is not displayed.
2 Press U >.
3 Use the softkey to select SETUP.
4 Select DONE until the screen displays AREA CODE 1. Use the keypad
to enter your home area code.
5 Select CODE 2 to reach AREA CODE 2 (the screen displays any
current local area code stored here). Use the keypad to enter the
three-digit local area code.
6 Continue as in Step 4 for area codes 3, 4 and 5 as needed
— OR —
Select DONE to move to the next feature
— OR —
Press U to exit.
Turning Off Caller ID with Call Waiting
If you don’t have Caller ID with Call Waiting service, you can turn this feature
off (the phone comes with the feature on).
1 Make sure the is not displayed.
2 Press U >.
3 Use the softkey to select SETUP.
4 Select DONE until the screen displays CIDCW: ON.
5 Select CHANGE. The screen displays CIDCW: OFF.
6 Select DONE to move to the next feature
— OR —
Press U to exit.
8
AT&T 9340 book_1ATT 11/3/98, 12:40 PM8
Page 11

FEATURE SETUP
Call List Options
You can customize how the phone stores call information. Select whether
the system stores information about ALL CALLS received, or for NO CALLS.
The system comes set to ALL CALLS.
1 Make sure the is not displayed.
2 Press U >.
3 Use the softkey to select SETUP.
4 Select DONE until the screen displays LIST:ALL CALLS.
5 Select CHANGE to display ALL CALLS or NO CALLS.
6 Select DONE to move to the next feature
— OR —
Press U to exit.
Message W aiting Indicator
If you subscribe to voice mail service from your telephone service provider,
the handset displays when there is a message waiting and the NEW
CALL light flashes on the base. Voice mail signals are sent in one of two
ways: FSK (or Light) signaling or “stutter” (Tone) signaling. (Your service
provider can give you more information about your service.) The phone
comes set to receive either service (FSK or stutter) your telephone company
provides. However, you can follow the directions below to set the phone
to receive only FSK signals, or to receive no signals. If the NEW Call light
flashes even when you have no messages waiting, see the IN CASE OF
DIFFICULTY section of this manual.
1 Make sure the is not displayed.
2 Press U >.
3 Use the softkey to select SETUP.
4 Select DONE until the screen displays MW:BOTH.
5 Select CHANGE until the screen displays FSK, BOTH (receives either
kind of voice mail signal), or OFF (receives no voice mail signals).
6 Select DONE to exit Feature Setup menu.
NOTE: To re-enter Feature Setup, press U.
AT&T 9340 book_1ATT 11/3/98, 12:40 PM9
9
Page 12

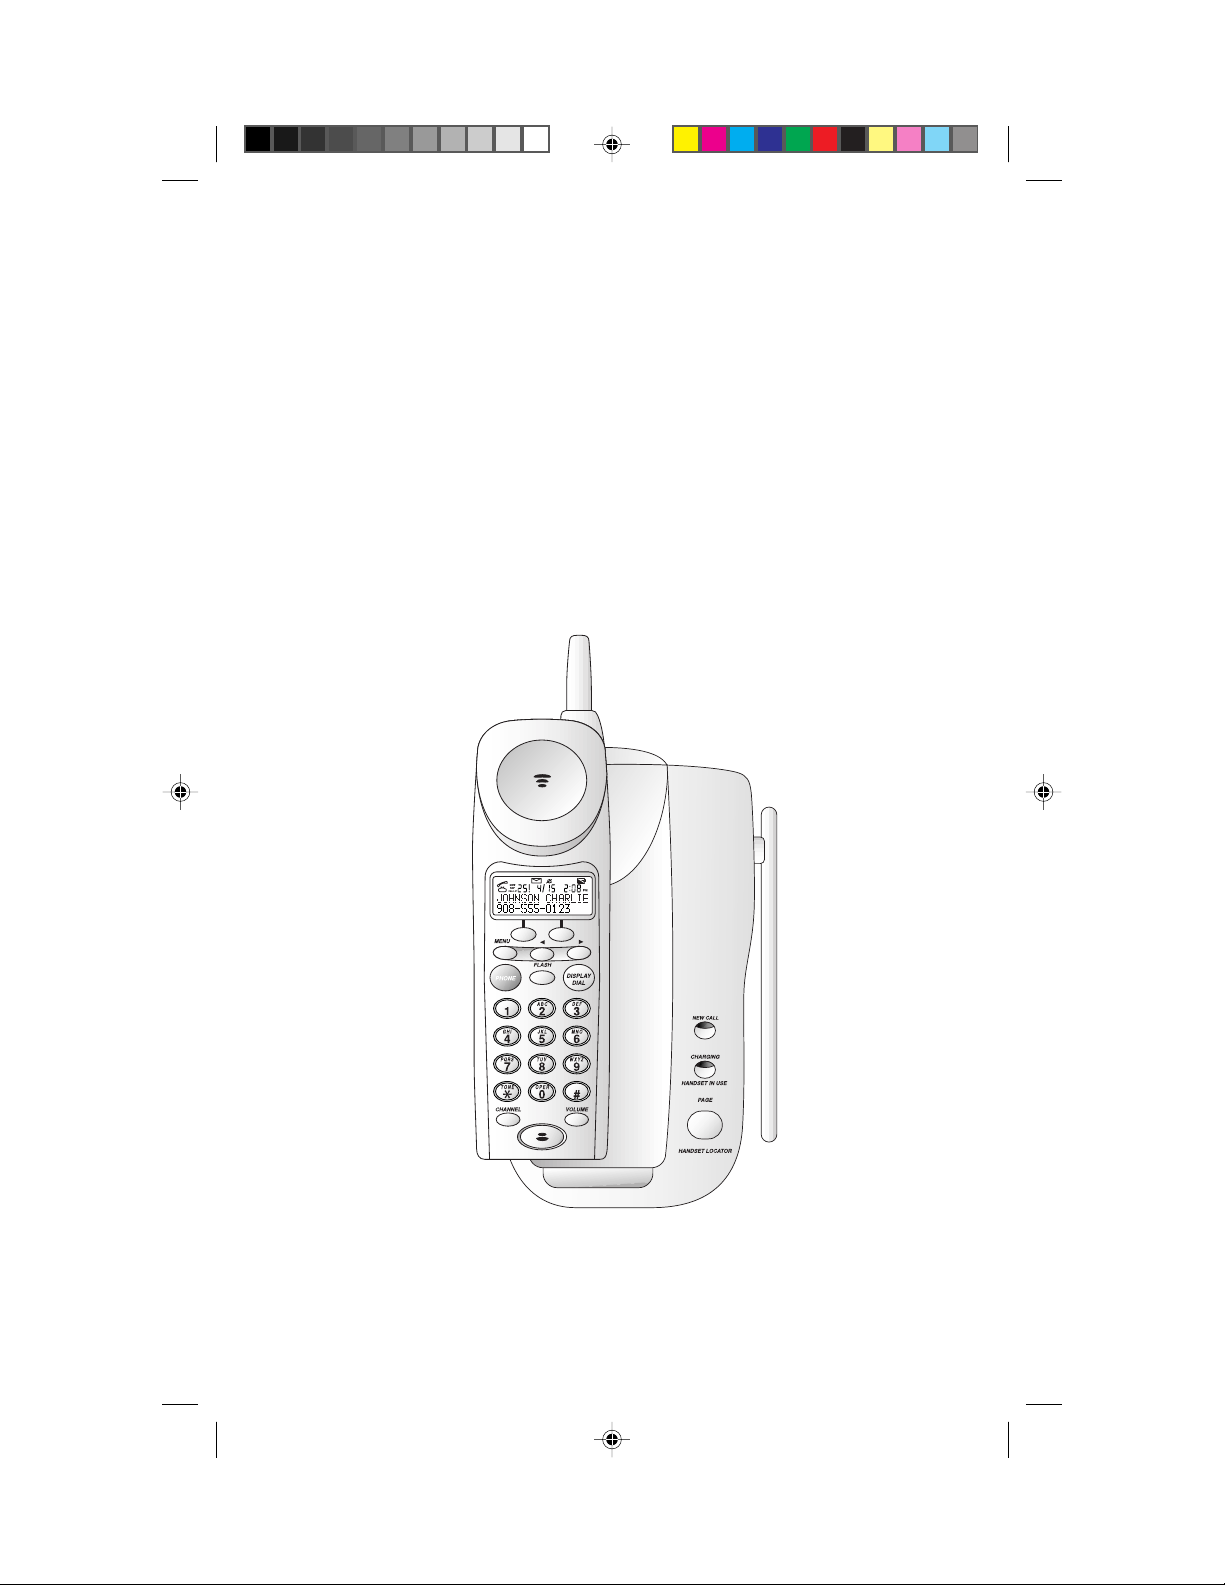
TELEPHONE OPERATION
L2L1
Antenna
Softkey
Access special
programming features
Make or
answer a call
Temporary Tone
Change channel
Scroll through
screen information
Dial number
displayed on screen
subscriber services
Adjust handset
Making a Call
1 Press P, and wait for to appear on the display. As the phone
is selecting a channel, the screen may display SEARCHING....
2 When you hear a dial tone, dial the number.
3 See the TELEPHONE MEMORY and CALLER ID sections of this
manual for more calling options.
Preview a Number Before Calling
1 Enter the digits of the number you are calling (do not press P
first). The screen displays the dialed digits. If you make an error
while entering a digit, use < to backspace and enter the correct digit.
2 Press D to make the call.
10
Softkey
Access
volume
AT&T 9340 book_1ATT 11/3/98, 12:40 PM10
Page 13

TELEPHONE OPERATION
Answering a Call
Press P on the handset.
The appears and the call is connected.
Ending a Call
Press P on the handset. The disappears.
— OR —
Place the handset in the cradle.
Redial
The last number dialed on this phone (up to 24 digits) is stored in redial
memory until you dial another number.
1 Press P.
2 Wait for the dial tone and for the to appear.
3 When you hear a dial tone, use the softkey to select REDIAL.
(REDIAL does not appear on the screen if there is no number in
redial memory.)
Redial Plus
The last five phone numbers (up to 24 digits each) dialed on the handset are
stored in the Redial Plus log.
1 Make sure the is not displayed.
2 Press m >.
3 Use the softkey to select REDIAL +.
4 Use < or > to scroll through numbers in the Redial Plus log.
5 Press D to make the call.
Handset V olume
The handset volume can be set to five different levels. Each time you press
V the level of what you hear through the handset changes. When you
reach the highest level you’ll hear a beep. Chang ing this setting does not
affect what the other party hears.
T emporary Tone
NOTE: If you have touch tone service, you don’t need to use the
T emporary T one featur e.
If you have dial pulse (rotary) service, this feature allows you to enter codes
or tones needed to operate answering machines, or use electronic banking
services, calling cards, and other special ser vices. This feature will operate
AT&T 9340 book_1ATT 11/3/98, 12:40 PM11
11
Page 14

TELEPHONE OPERATION
most special services; however, some services may actually require a touch
tone line. To be sure, ask the company that provides the special ser vice.
1 Dial the call, then press *. Any buttons pressed after this send
tone signals.
2 When you hang up or press F, the phone automatically returns
to dial pulse (rotary) dialing.
Mute
Mute allows you to hear your caller, but prevents the caller from hearing you.
1 Press > while on a call, until the screen displays MUTE; select MUTE.
2 To return to your conversation, select UNMUTE.
Flash
Press F to activate custom-calling services such as Call Waiting or ThreeWay Calling. You might have to press other buttons before or after F as
explained in custom-calling instructions provided by your local telephone
company.
Page
The Page feature allows you to signal someone at the handset from the base.
• Make sure the CHARGING/HANDSET IN USE light is not lit on
the base.
• Press G on the base. A three-part paging tone will
sound at the handset.
NOTE: When the handset is in use or the Ringer is turned off, the Page
and Handset Locator features are inactive.
Handset Locator
This feature is useful if you misplace the handset.
To locate the handset using this feature: Press and hold G
on the base for approximately four seconds. A repeating paging tone is
sounded in the handset.
To cancel the Handset Locator feature: Press any button on the handset
or G on the base. This feature turns itself off in approximately
three minutes if you haven’t turned it off before then.
NOTE: You can press P at any time to cancel this feature and make
or answer a call.
12
AT&T 9340 book_1ATT 11/3/98, 12:40 PM12
Page 15

TELEPHONE OPERATION
Changing Channels
This cordless telephone has an advanced AutoSelect feature that minimizes the
chance of interference. When the phone is looking for a clear channel, the
screen displays SEARCHING.... If it is unable to locate a clear channel, the
screen displays TRY AGAIN. Hang up and try your call again.
In the unlikely event that you notice noise or interference while using the
handset:
1 Press h.
2 If the interference does not clear, move closer to the base and press
h again until you find a clear channel (your call will not be
interrupted).
NOTE: You must be in range to change channels.
Headset Jack
You can use this telephone hands-free when you install a 2.5 mm headset
(purchased separately, SKU# 24099).
1 Plug the headset into the jack located on the left side of the handset
(under the small rubber flap). Do not force the connection, but
make sure the plug fits securely.
2 Follow instructions under “Making a Call” or “Answering a Call.”
3 If you wish, attach the belt clip (see “Belt Clip” in the INSTALLATION
section of this manual).
NOTE: The earpiece and microphone on the handset are disabled when
the headset is plugged in.
AT&T 9340 book_1ATT 11/3/98, 12:40 PM13
13
Page 16

TELEPHONE MEMOR Y
You can store up to 10 telephone numbers and names in memor y. The
telephone memory works with the Memory Match and Priority Ring features.
When you receive a call from a number you’ve stored in memory, the screen
displays the name information as you’ve stored it, not as the ser vice sends it
(for example, “MOM AND DAD”). Additionally, the phone alerts you to calls
from priority numbers you’ve stored in memory with a special Priority Ring.
For more information about these features, see the CALLER ID section of
this manual.
Memory Guard
Information stored in telephone memory is protected even in the event of a
power failure.
Storing Numbers In Memory
1 Make sure the is not displayed.
2 Press U.
3 Use the softkey to select DIR.
4 Use the softkey to select ADD.
5 Enter the number you want to store (up to 24 digits)
— OR —
Select REDIAL to store the last number dialed.
6 Select DONE.
7 Follow the directions below to store a name
— OR —
Select DONE if you don’t want to store a name.
8 Enter a memory location from 0–9.
9 Select DONE.
Storing a Name with a Number
1 Follow Steps 1 through 6 under “Storing Numbers in Memory.”
2 Use the keypad to enter a name. To enter the first letter on a key,
press the key once. To enter the second letter on the key, press the
key twice. To enter the third or four th letter on the key, press the
key three or four times. (To enter subsequent letters from the same
key, press > once to move the cursor; to enter a space, press > >.)
3 Use the softkey to select DONE when you’re finished entering letters.
4 Enter a memory location from 0–9.
14
AT&T 9340 book_1ATT 11/3/98, 12:40 PM14
Page 17

TELEPHONE MEMOR Y
Replacing a Stored Number
You can replace a stored number by storing a new number in its place.
Follow the directions for “Storing Numbers in Memory.”
Storing a Pause in a Memory Number
While storing a memory number (see “Storing Numbers in Memory”) use the
softkey to select PAUSE where you want dialing to pause for two seconds.
Storing a Number and Name from call history in
Telephone Memory
You can store information received from Caller ID in the telephone memory.
(See CALLER ID OPERATION.)
1 Use < or > to scroll to the number you want to store.
2 Press U.
3 Use the softkey to select STORE.
4 Enter a memory location from 0–9.
Viewing Numbers in Memory
1 Press U.
2 Use the softkey to select DIR.
3 Select VIEW.
4 Press < or > to scroll through memory
— OR —
Enter the memory location from 0–9.
5 Press U to exit.
NOTE: When viewing numbers in memory, you can press D to
dial the number displayed on the screen.
Deleting/Editing Memory Numbers
1 Follow Steps 1 through 4 in “Viewing Numbers in Memory.”
2 To delete a number, use the softke y to select DELETE. The screen
prompts DELETE LOC.? Use the softkey to select YES.
3 The screen displays DELETED.
AT&T 9340 book_1ATT 11/3/98, 12:40 PM15
15
Page 18

TELEPHONE MEMOR Y
Priority Ring Numbers
When you view a number stored in memory, you can label it so that when a
call is received from that number, the handset alerts you with a special ring
that this is a priority call. The special r ing beg ins after the first nor mal ring
on the line.
1 While viewing numbers in memory, use < or > to scroll to the
desired location.
2 Press * to activate Priority Ring for the displayed number
(the screen displays !). To deactivate Priority Ring, press #.
Dialing Memory Numbers
1 Press P.
2 Use the softkey to select MEM.
3 Enter the memory location from 0–9.
16
AT&T 9340 book_1ATT 11/3/98, 12:40 PM16
Page 19

CALLER ID OPERATION
Unreviewed Call
information
Phone in use
Call Number
Caller’s
Number
Caller’s
Name
Repeat Call information
Priority Call
L2L1
Voice
Mail
Ringer
is off
Battery status
indicator
Date
Time
About Caller Identification
This telephone has a Caller ID feature that works with Caller Identification
service provided by your local telephone company. There is a fee for this
service, and it may not be available in all areas. This phone can provide
information only if both you and the caller are in areas offering Caller
Identification service, and if both telephone companies use compatible
equipment. Depending on your service, you will be able to see the number,
or the name and number, of your caller. Additionally, if you subscribe to
combined Call Waiting with Caller ID service, this phone lets you see who’s
calling while you’re on another call (your telephone company must provide
the service needed for this feature to work). To turn off Caller ID with Call
Waiting, see the FEATURE SETUP section of this manual. The time and date
are sent by the provider, along with the call information.
Call Waiting
If you have Call Waiting with Caller ID service, the screen will display
information about your Call Waiting call when you hear the call signal. Press
F to access the call. Press F again to return to the original call.
NOTE: If you are using an extension phone when you receive a Call
Waiting signal, the screen displays MULTIPLE PHONES IN USE: NO DATA.
NEW CALL Light
This light on the base stays on when you have received call information but
have not yet reviewed it. The handset screen displays NEW when showing
unreviewed call information as you scroll through the call history. If you
subscribe to voice mail service from your local service provider, see
“Message Waiting Indicator.” (If the light stays on even after you’ve reviewed
all calls, see IN CASE OF DIFFICULTY in this manual.)
AT&T 9340 book_1ATT 11/3/98, 12:40 PM17
17
Page 20

CALLER ID OPERATION
Incoming Call History
This telephone assigns each incoming call a number from 1 to 99. The most
recent call will have the highest number (for example, if 10 calls have been
received, call number 10 is the most recent, and call number 1 is the oldest).
When the call history is full, the oldest call information is deleted to make
room for new incoming call information.
Reviewing Call History
You can review information in the call history at any time by pressing either
< or >, or by pressing U, then selecting CALL ID. The screen displays
the number of calls in the call history and how many, if any, are new. You
can continue to use < or > to scroll through the call history. The screen
displays the name (if your service provides this), number, date, and time of
call simultaneously, beginning with the most recent call.
When you reach the end of the call history, the screen displays END OF
LIST. Press < or > to continue reviewing the call history.
To exit the review, you can press either soft key or wait 30 seconds.
Display Dial
NOTE: To use the Display Dial feature, you must follow the directions for
“Programming Home and Local Area Codes” in the FEATURE SETUP
section of this manual.
As you review calls in call history, you can dial a displayed phone number by
pressing D on the handset. The screen displays the number being
called. If the screen displays an error indicator (for example Er), you cannot
dial any displayed digits.
If the call came from your home area code, then the screen displays only the
seven digits of the number you’re calling (without an area code). When you
press D, the phone dials the seven displayed digits. You must
program your home area code for this to work.
You can also program up to four other local area codes. These are area codes
that do not require dialing a “1” before them. After stor ing these area codes,
if you receive a call from one of these area codes, the screen displays the ten
digits (three digits of area code plus seven digits of phone number). When
you press D, the phone dials ten dig its, without inserting a “1”
before the area code. If you receive a call from an area code not programmed
in the phone, you will see ten digits on the screen (the area code and the
phone number). The phone will automatically dial “1” before the number
when you press D.
18
AT&T 9340 book_1ATT 11/3/98, 12:40 PM18
Page 21

CALLER ID OPERATION
If you try to use the Display Dial feature, but your call cannot be completed
unless you dial “1” before the number, follow the steps below:
1 Press < or > to locate the number you want to call.
2 Press M.
3 Press > until the screen displays DIAL 1+. (Select DIAL 1+ to dial
the number.)
Deleting Call Records from call history
NOTE: Once you delete a call from call history, you cannot retrieve the
call information.
Deleting a Specific Call Record
1 Press < or > to scroll to the record you want to remov e.
2 Press M.
3 Use the softkey to select DELETE. The handset beeps and deletes
the call record, and the screen displays ARE YOU SURE?.
4 Select YES. The screen displays DELETED.
Deleting All Call Records
1 Press < or > to display the number of calls in the call history.
2 Press M.
3 The screen displays REMOVE ALL?. Select YES to remove all calls.
4 The screen displays ARE YOU SURE?. Select YES to remove all calls.
The screen displays NO CALLS, and the information is permanently
deleted.
Caller ID Display Messages
PRIVATE NAME The other party is blocking name information.
PRIVATE NUMBER The other party is blocking telephone number
information.
PRIVATE CALLER The other party is blocking name and number
information.
UNKNOWN CALLER Your phone company is unable to receive
information about this caller’s name and number.
UNKNOWN NAME Caller’s number is available, but name is not.
UNKNOWN NUMBER Caller’s name is available, but number is not.
AT&T 9340 book_1ATT 11/3/98, 12:41 PM19
19
Page 22

BATTERIES
Charging the Handset Battery Pack
This battery should remain charged up to 15 days with the Ringer turned on
and up to 30 days with the Ringer off. A fully charged battery provides an
average talk time of about 12 hours.
The battery pack needs charging when:
• A new battery is installed in the handset.
• The phone beeps four times when you press P.
• The battery status symbol on the screen is only partly displayed.
• The phone does not respond when you press P.
Place the handset in the base either in the face-down or face-up position so
the CHARGING/HANDSET IN USE light turns on. The batter y pack is
typically fully charged in six hours.
You can keep the batter y fully charged by returning the handset to the base
after each use.
If you repeatedly get a low battery indicator, even after six hours of
charging, the battery should be replaced.
CAUTION: To reduce the risk of fire or injury to persons or damage
to the telephone, read and follow these instructions carefully:
• Use only Replacement Battery 3300 (SKU# 90556).
• Do not dispose of the battery in a fire. The cell might explode.
Check with local codes for special disposal instructions.
• Do not open or mutilate the battery. Released electrolyte is
corrosive and may cause damage to the eyes or skin. It may be toxic
if swallowed.
• Exercise care in handling batteries in order not to short the battery
with conducting materials such as rings, bracelets, and keys. The
battery or conductor may overheat and cause harm.
• Char ge the battery provided with or identified for use with this
product only in accordance with the instructions and limitations
specified in this manual.
• Observe proper polarity orientation between the battery and battery
charger.
20
AT&T 9340 book_1ATT 11/3/98, 12:41 PM20
Page 23

BATTERIES
Replacing the Handset Battery Pack
1 Remove the battery compartment cover on the handset by
pressing on the indentation and sliding the cover downward.
2 Lift out the old battery pack.
3 Hold the new battery pack and plug the connector into the
handset. Place the battery pack into the case.
4 Replace the cover by sliding it on its track up over the battery case
until it snaps firmly into place.
5 The new battery pack must be charged before using the
phone. Place the handset face up or face down in the base and
allow it to charge for at least six hours. The telephone might
operate before that, but for best performance, let the batter y pack
charge fully.
AT&T 9340 book_1ATT 11/3/98, 12:41 PM21
21
Page 24

OPERATING RANGE
This cordless telephone operates within the maximum power allowed b y the
Federal Communications Commission (FCC). Even so, the handset and base
can communicate over only a certain distance — which can vary with the
locations of the base and handset, the weather, and the construction of your
home or office.
If the handset is moved to a point where the base and handset can no longer
communicate, the handset will sound two short beeps when you make a
call, indicating that you are out of range. Move closer to the base to restore
normal operation.
If you receive a call while you are out of range, the handset might not
ring — or, if it does ring, the call might not connect when you press P.
Move closer to the base, then press P again to answer the call.
If you move out of range during a phone conversation, you will be
interrupted by silence, noise or interference. To improve reception, move
closer to the base.
If you move out of range without pressing P, the phone will be left
“off the hook.” To hang up properly, walk back into range, per iodically
pressing P until the disappears from the display.
22
AT&T 9340 book_1ATT 11/3/98, 12:41 PM22
Page 25

IN CASE OF DIFFICULTY
If you have difficulty operating this phone, try the suggestions below. If you
still have trouble, call 1 800 722–9125.
If the phone does not work at all, check these items first:
• Make sure the power cord is plugged into the base and an electrical
outlet not controlled by a wall switch.
• Make sure the telephone line cord is plugged firmly into the base unit
and the telephone jack.
• If the phone does not beep, or beeps four times when you press P,
the battery pack might need recharging or replacement.
• If the battery does not charge after six hours, replace it with
Replacement Battery 3300 (SKU# 90556).
• Make sure the battery pack is installed correctly.
If the above suggestions do not solve the problem, try re-initializing the
handset and base (see “To re-initialize the handset and base”).
If you have no dial tone:
Check all the previous suggestions. If you still do not hear a dial tone,
disconnect the phone and try another phone in the same jack. If there is no
dial tone on that phone either, the problem is probably in your wiring or
local service.
If you hear a two-beep signal when you try to use the handset:
• The handset and base are not communicating properly. You might be out
of range. Move closer to the base and try a gain.
• If moving closer to the base does not help, follow the directions below
to re-initialize the handset and base.
To re-initialize the handset and base:
1 Disconnect the power to the base.
2 Remove the handset battery pack.
3 Wait at least 15 seconds.
4 Connect the power to the base.
5 Insert the handset battery pack.
6 Put the handset in the base to re-initialize.
AT&T 9340 book_1ATT 11/3/98, 12:41 PM23
23
Page 26

IN CASE OF DIFFICULTY
If you hear a two-beep signal when you try to use the handset:
• You might be out of range. Move closer to the base and tr y a gain.
• If moving closer to the base doesn’t help, try following the directions
above for re-initializing the handset and base.
If you hear noise or interference when using the phone:
• Make sure the base antenna is fully upright.
• You may be out of range. Move closer to the base.
• Press and release h to change to another channel. Move closer to
the base before changing channels.
• Household appliances plugged into the same circuit as the base can
sometimes cause interference. Try moving the appliance or the base to
another outlet.
• The layout of your home or office may be limiting the operating range.
Try moving the base to another location, preferably on an upper floor.
If the phone does not ring when you receive a call:
• Make sure the handset Ringer is on.
• Make sure the telephone line cord is connected firmly to the base and
the telephone jack.
• Make sure the AC adapter is plugged firmly into an electrical outlet not
controlled by a wall switch.
• You might be too far from the base; move closer.
• You might have too many extension phones on your telephone line to
allow all of them to ring. Try unplugging some of them.
If your telephone misdials or you don’t hear the other person
right away:
• It might take a few seconds for your handset to find a good connection
to the phone line. While it is searching, the screen displays SEARCHING....
Do not start dialing until the appears and you hear the dial tone.
• If you have dial pulse (rotary) service, you’ll need to set the dial mode to
PULSE. Follow the instructions under “Dial Mode” in the FEATURE
SETUP section of this manual.
• If you have touch tone service and you hear clicks while you are dialing,
you’ll need to set the dial mode to TONE. Follow the instructions under
“Dial Mode” in the FEATURE SETUP section of this manual.
24
AT&T 9340 book_1ATT 11/3/98, 12:41 PM24
Page 27

IN CASE OF DIFFICULTY
If the caller’s name or phone number is not displayed:
• Make sure you subscribe to Caller ID service or Caller Name service
from your local telephone company.
• Make sure the Ringer is on.
• Make sure the battery is charged.
• Caller ID and Visual Message Waiting service might not work when the
phone is connected to a Private Branch Exchange (PBX).
• Press < or >.
If the caller’s name or phone number is not displayed during
Call Waiting:
• Make sure you subscribe to combined Caller ID with Call Waiting service.
• The screen may not display the call information if someone is on an
extension phone.
• The Caller ID with Call Waiting feature is inactive during a power
interruption.
• Make sure the battery is charged.
• Make sure Caller ID with Call Waiting is turned on (see the CALLER ID
OPERATION section of this manual).
If the Message Waiting Indicator (NEW CALL Light) flashes when you
have no voice mail waiting:
If the NEW CALL light on the base flashes even when you have no voice mail
waiting, you can stop it from flashing.
1 Make sure the is not displayed.
2 Press U >.
3 Use the softkey to select SETUP. The screen displays CALL LIGHT
OFF?.
4 Select YES. The screen displays CALL LIGHT OFF, and the light stops
flashing. If you have new calls in the call history, the light goes on
steadily. If you have no new calls, the light goes off.
5 Press U to exit.
AT&T 9340 book_1ATT 11/3/98, 12:41 PM25
25
 Loading...