

Page 1
Wireless WL-HDD
¤
(
For 802.1 1g/b
Wireless Clients)
Quick Start Guide
QE2013 / Apr 2005
Page 2
Hardware Components
1
234
12345
6
1
2
3
4
5
612
3
4
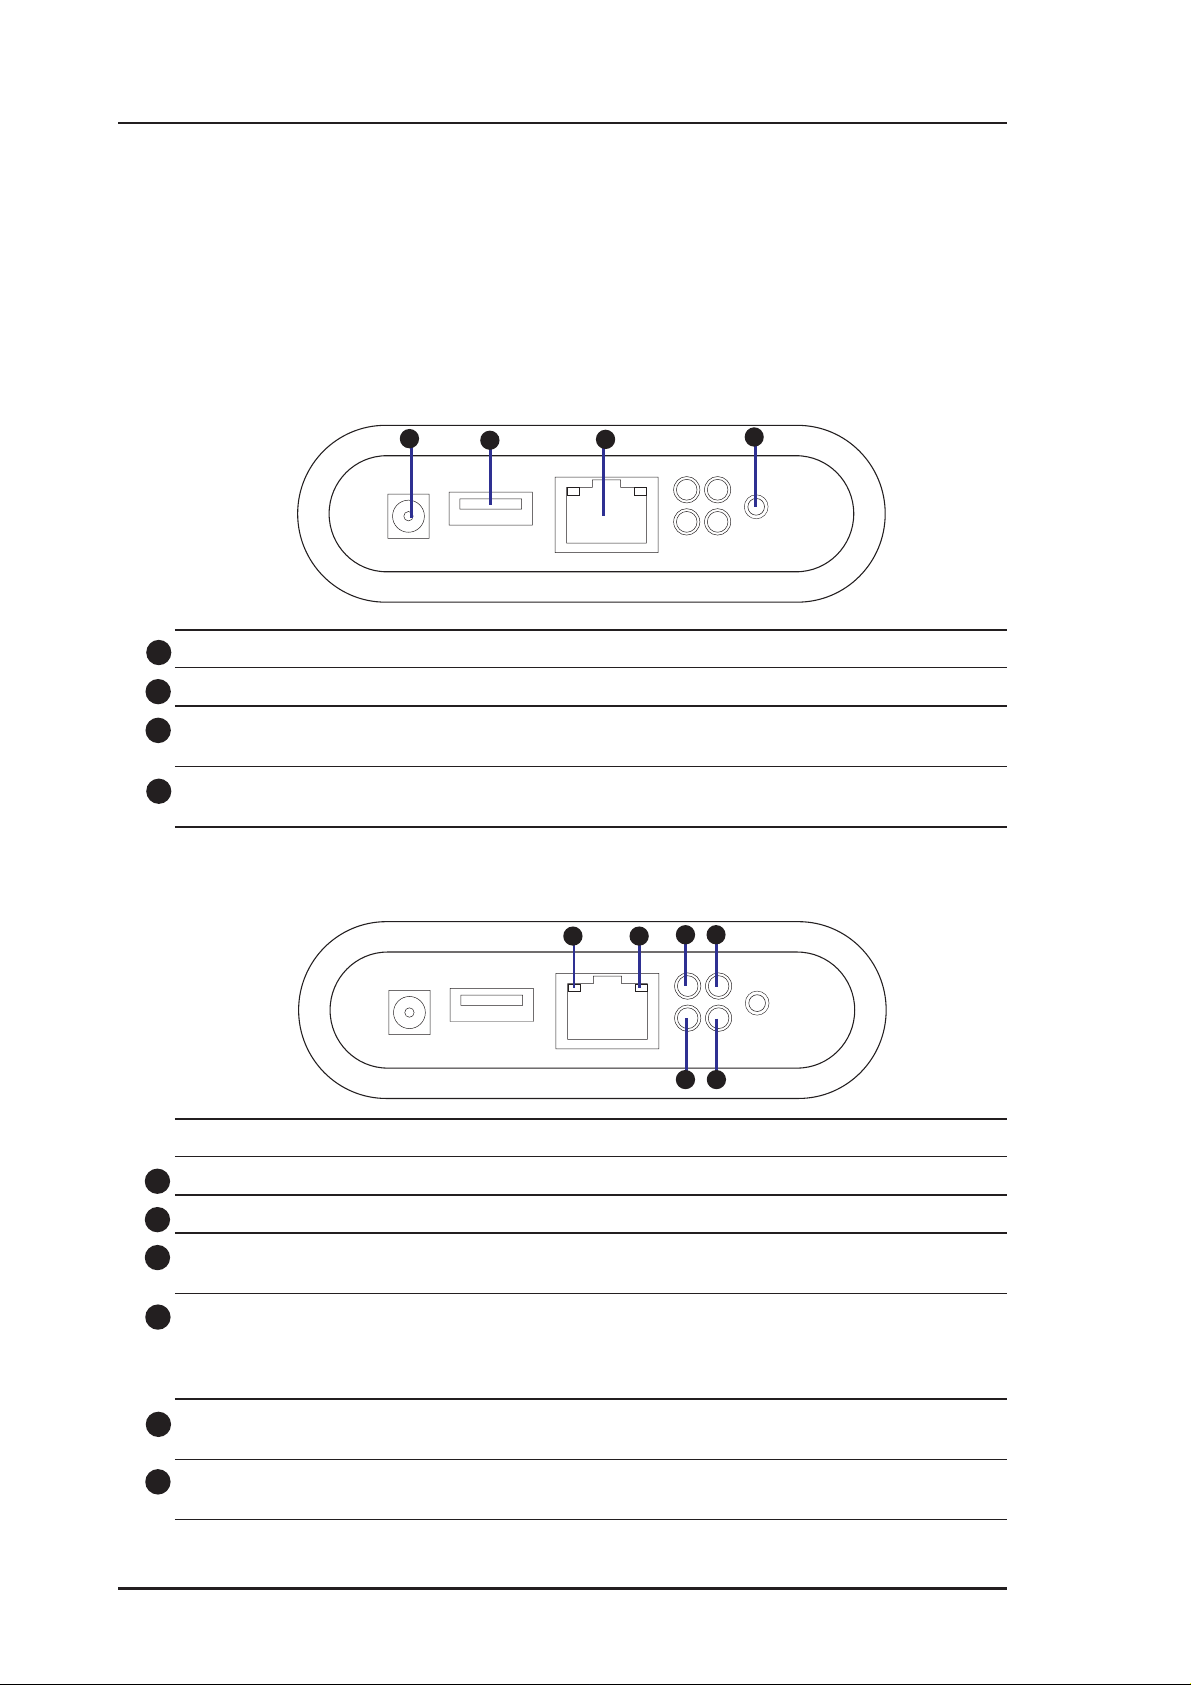
This section gives you a tour of the different ports and status indicators of
the ASUS Wireless "WL-HDD". Refer to this section when installing and
operating your device.
Ports and Buttons
Power Connector: Connect the power adapter here.
USB Port: Insert a USB flash disk here.
LAN Port: Connect one end of the RJ-45 Ethernet cable here and the other end to the RJ-45 port
of a network hub, switch, or router.
Reset Button: Press this button for 5 seconds to shut down the ASUS Wireless "WL-HDD".
Press this button for 30 seconds to reset the ASUS Wireless "WL-HDD".
Status Indicators
LED Status Indication
Green Blinking Data is being transferred with a speed of 10Mbps
Yellow Blinking Data is being transferred with a speed of 100Mbps
POWER On Power adapter is plugged in and the device is powered on
Blinking (slow) File system on the hard disk drive is inconsistent
USB Off No USB device found
Blinking (fast) Copying from the USB device to the hard disk drive
Blinking (slow) Partition 1 of the hard disk drive is full
On USB device found
WLAN On Normal state
Blinking Wireless packets are being transmitted or received
HDD Off Normal state
Blinking Hard disk drive is being accessed
2 ASUS Wireless "WL-HDD" Quick Start
Page 3
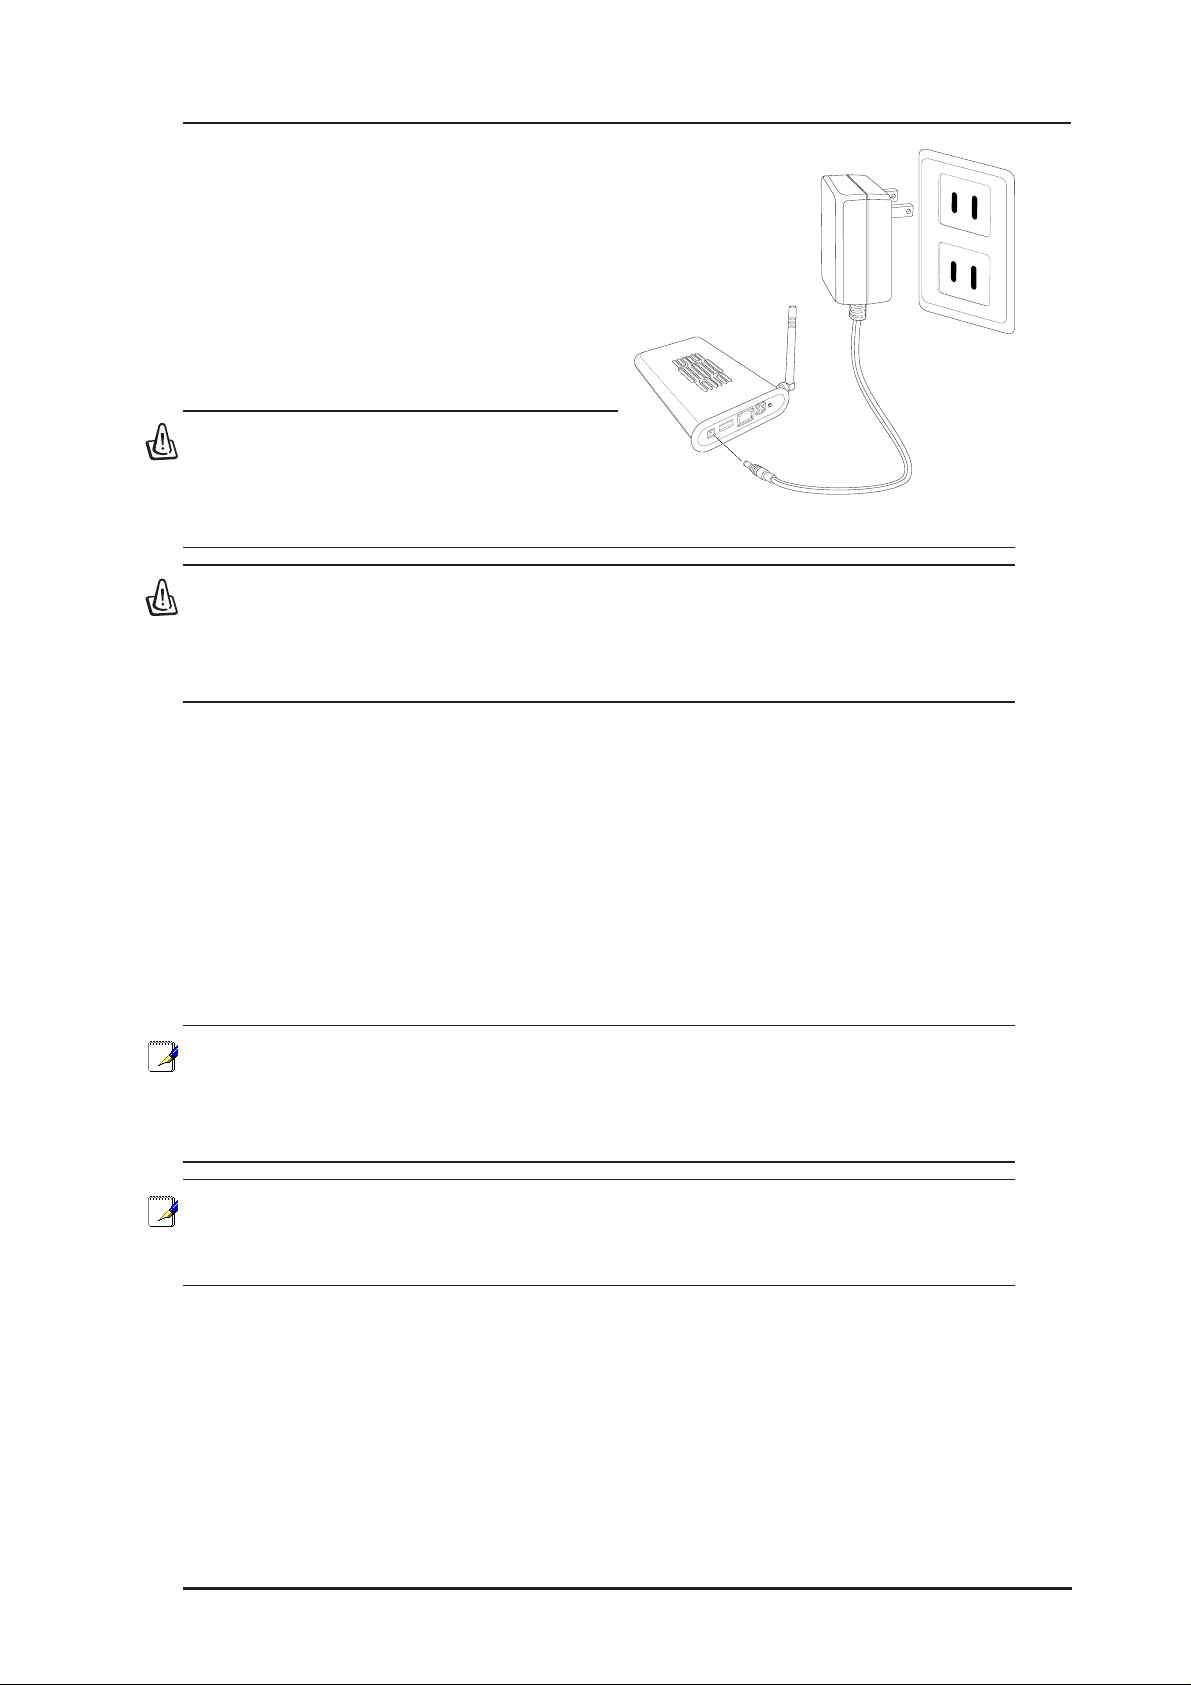
Connecting Power
Attach one end of the AC power
adapter, included in the product
package, to the power jack on the device
and the other end to a power outlet. The
POWER LED lights up when the unit
is powered ON.
Warning: Use the product only with
the power adapter supplied in the
product package. Using another
power supply may damage the device.
Warning: To shut down the ASUS Wireless WL-HDD, click the Shutdown button on the web manager. This prevents damage to the
hard disk. Unplug the power cord only after shutting down the device. See “Shutting down the ASUS Wireless WL-HDD” for details.
Configuring the Wireless Client
TCP/IP Settings
In order to access the shared hard disk drive of the ASUS Wireless "WLHDD" or to use the device as an AP, you may need to configure the TCP/IP
settings. The TCP/IP settings should be on the IP subnet of the ASUS
Wireless "WL-HDD".
Note: Change the TCP/IP settings only if the wireless network does
not support automatic IP addresses or if there is a problem operating the device. If you are not sure about the settings, use the default settings where the client obtains the IP address automatically .
Note: Changing TCP/IP settings may require rebooting your PC
(wireless client). When rebooting, the ASUS Wireless "WL-HDD"
should be switched ON and in the ready state.
The following are the default IP settings of the ASUS Wireless WL-HDD:
• IP address 192.168.1.220
• Subnet Mask 255.255.255.0.
ASUS Wireless "WL-HDD" Quick Start 3
Page 4
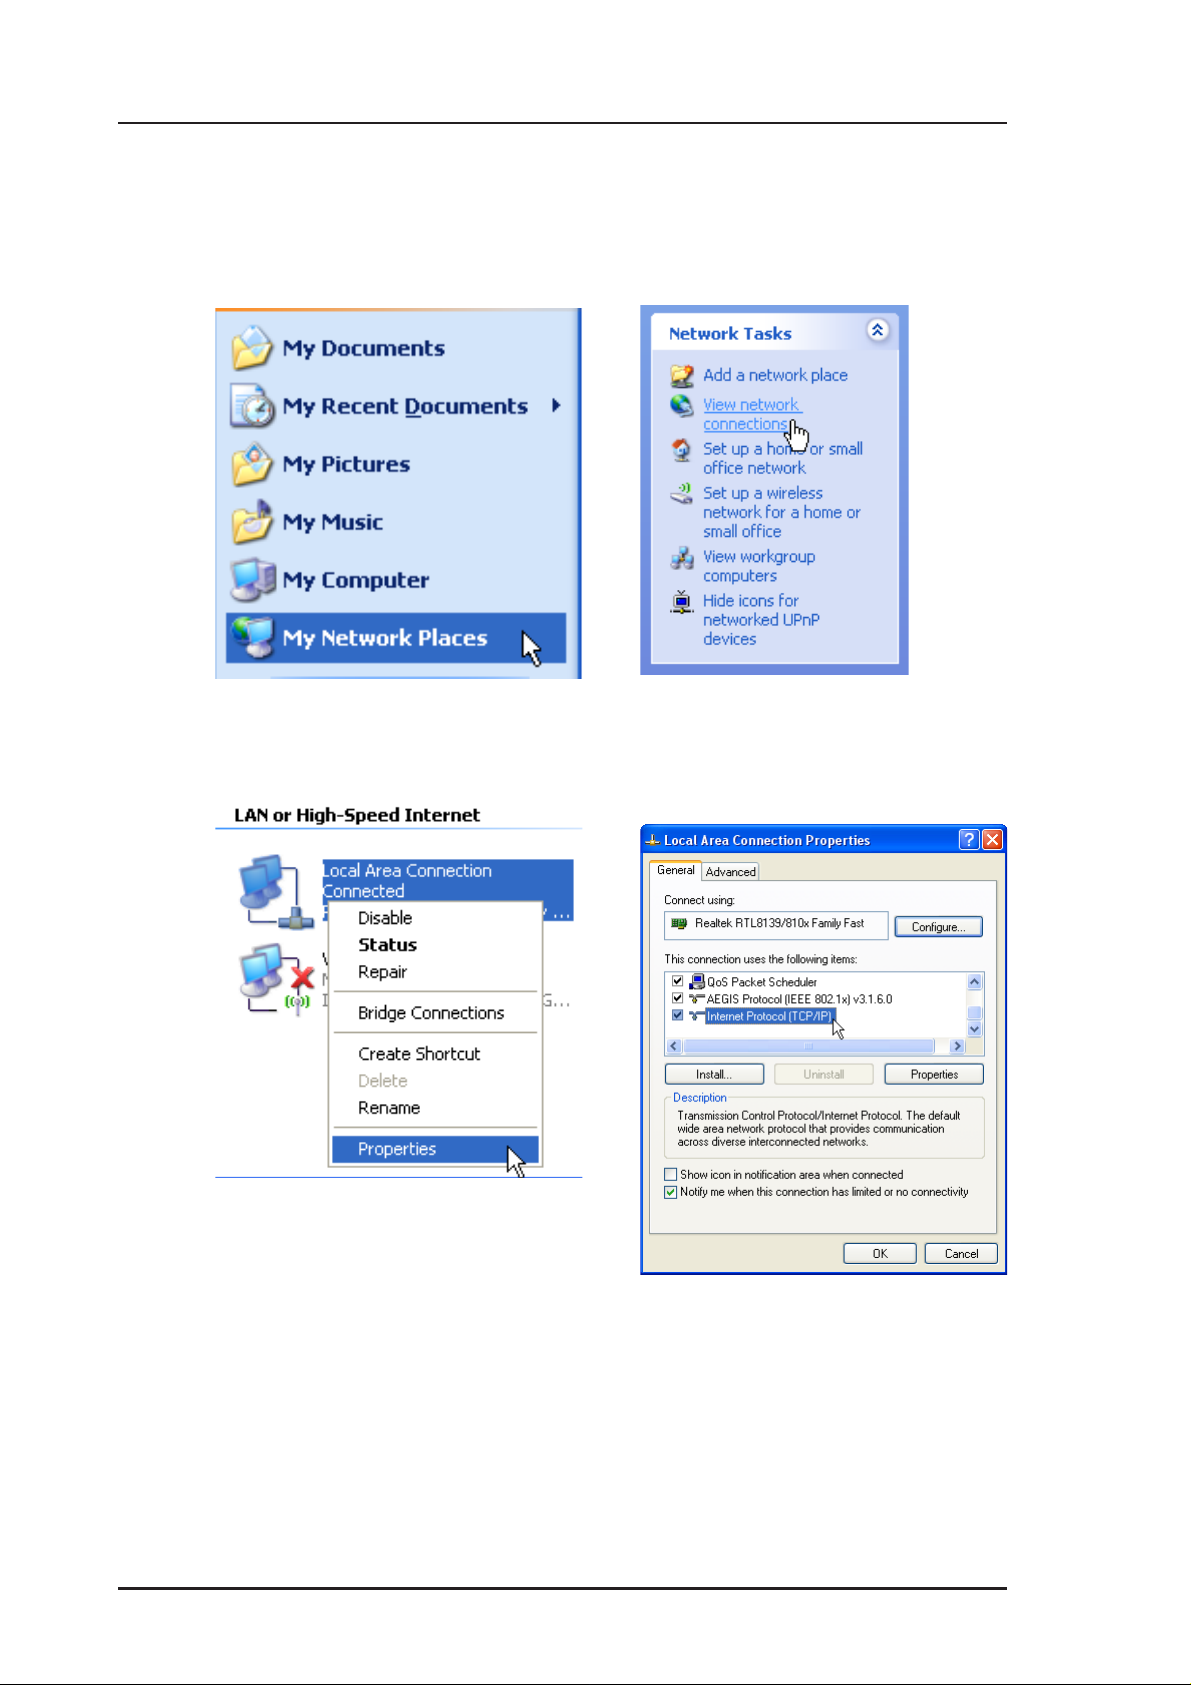
If you set your computer’s (wireless client) IP manually, it needs to be on
the same segment as the ASUS Wireless "WL-HDD". To set the TCP/IP
settings, use the Network and Dialup Connections wizard to create a new
LAN connection and configure its TCP/IP settings as follows:
1. Select “My Network Places” from
Windows start.
2. Click View network connections.
3. Right-click the Local Area
Connection.
4 ASUS Wireless "WL-HDD" Quick Start
4. Double-click Internet Protocol
(TCP/IP)
Page 5

SSID Settings
The SSID or the network name of the
WLAN adapter must be configured
correctly for proper operation. Click
the LAN icon under “Network and
Dialup Connections” and right-click
to view its Properties. Click
Configure under the General tab.
Then select the Wireless Network
tab. Make sure that the Network Name
is set to “WL-HDD” and click OK.
4. Select “Use the following...”
IP address: 192.168.1.xxx (xxx
can be any number between 1 and
254 that is not used by another
device except 192.168.1.220 which
is used by the “WL-HDD”)
Subnet Mask: 255.255.255.0
Note: Disable WEP and set the
SSID to default for any existing
wireless LAN device connected
to your computer.
Note: The procedure described here may be slightly different for
various wireless adapter utilities. Refer to the documentation for
your wireless client (notebook or PDA) as well as that for the wireless adapter for specific instructions.
When the wireless client is
configured correctly, connection to
the “WL-HDD” should be
automatic.
ASUS Wireless "WL-HDD" Quick Start 5
Page 6

Using the Hard Disk Drive
Now that you have installed the ASUS W ireless "WL-HDD" and connected
it as required, you are ready to start using the hard drive as a network
storage device as described in the following sections.
Accessing the Hard Disk Drive
You can access the hard drive in any of the following ways:
Searching for the Device
The easiest method to locate the hard disk from the
network is to search for all computers on the network
and then locate the hard drive as follows:
1. Select “My Network Places” from W indows start.
2. Click the Search button on the toolbar.
3. Enter "WL-HDD" and click Search.
Windows may or may not have
already found the “WL-HDD”.
4. When ASUS Wireless "WL-HDD"
is found, double-click to view the
contents of the drive.
The hard disk shows the
configuration folder and the
partitions (part1, part2, etc.) on the
hard disk drive. You can set the
access permissions for the hard disk
drive using the configuration utility.
6 ASUS Wireless "WL-HDD" Quick Start
Page 7

Using the ASUS Utility
We recommend that you install the ASUS utility provided on the software
CD included in your package. The utility enables you to search for the
device and connect to the device to access the hard drive and configure the
settings. Follow these steps to use the ASUS utility:
1. Using W indows, click Start | Programs | ASUS
Utility | W ireless HD | Device Discovery.
2. The utility displays the ASUS Wireless "WL-HDD" and other available
wireless devices in the device list. Select the ASUS Wireless "WL-HDD"
and click Configure to access the device.
Note: You can also enter the “WL-HDD” default IP address (http://
192.168.1.220) manually in Internet Explorer . The default IP address
is not applicable if a DHCP server assigned an IP addresses to the
ASUS Wireless “WL-HDD”. The IP address of the ASUS Wireless
“WL-HDD” is shown in the Device Discovery utility.
3. Default User name:admin
Default Password: admin
ASUS Wireless "WL-HDD" Quick Start 7
Page 8

Hard Drive Pre-scan Function
When the ASUS W ireless "WL-HDD" is first turned on, it performs a prescan of the hard disk drive to ensure that it is functioning correctly and
does not have any corrupt data. If the hard drive is not working, has not
been formatted, or has been corrupted, a message is displayed on the screen
asking you to format the hard disk.
Note: We recommend that you format the hard disk at least once
before using it.
Formatting the Hard Disk
To format the hard disk, do the following:
1. The pre-scan function detects the
unformatted disk and prompts you
to start formatting. Click OK.
2. The Disk Tool from the Storage
Setting menu opens in your
browser . This tool formats the hard
disk and creates up to four (4)
partitions. Specify the size of the
partitions in megabytes and click
Apply to start formatting.
3. A message is displayed on the
screen to warn you that formatting
will erase all data on the disk. Click
OK to continue.
4. Formatting of the hard disk begins
and the browser window displays
the formatting status.
5. After formatting is completed, you are asked to restart the system. Click
Save&Restart to restart the system.
6. The browser window displays the status while the ASUS Wireless "WLHDD" restarts. Wait till the screen is refreshed before using the system.
8 ASUS Wireless "WL-HDD" Quick Start
Page 9

Setting up Permissions
You can set up the hard drive permissions so that only the specified users
can access it and write data to hard drive. This is a useful feature so as to
limit the data that is put on the network storage.
Click the Storage Setting icon in the left pane to display the hard disk
settings. Refer to the next two sections to learn how to edit the user and
shared file lists.
Editing the User List
The user list is a list of people who are allowed to access
to the ASUS Wireless "WL-HDD". You can add users
and their passwords to the list and you can also specify how many users are
allowed simultaneous access to the hard drive for optimum performance.
To add users to the user list, do the following:
1. Under the User List on the Storage Setting - “Shared Nodes” page, type the
desired User Name and Password. Click Add to add the user to the list.
2. Select a User Name from the list, then click Del to delete the user from the
list.
3. Click Apply to apply the changes or Finish to save the changes and restart
the device.
Editing the Shared Nodes List
The shared nodes list is a list of all the folders and partitions on the ASUS
Wireless "WL-HDD" showing the sharing and writing permissions for each
node. You can specify which folder or partition is shared and which can be
written to. To modify the shared nodes list, do the following:
ASUS Wireless "WL-HDD" Quick Start 9
Page 10

1. Under the Shared Nodes List on the Storage Setting - Shared Nodes page,
scroll to select the desired folder or partition from the Folders and Partitions
drop-down box.
2. T ype the desired name in the Shared Name field. This is the name by which
users can access a specific folder or partition using their wireless clients
and even map them as logical drives if needed.
3. Click the Shared check box to enable the folder or partition to be shared
between all users.
4. Click the Write check box to enable all users to write data to the folder or
partition.
5. Click Add to add the folder or partition to the shared nodes list.
6. Select a folder or partition from the list, then click Del to delete it from the
list.
7. Select a folder or partition from the list and click Edit to modify permissions
for the user in user list.
10 ASUS Wireless "WL-HDD" Quick Start
Page 11

The Access Right screen is displayed. Type in the Shared Name and any
Comments if required. Set the user permissions for the Guest account and
up to six user accounts. Select the appropriate user account names from the
drop-down box and check the Share and W rite check boxes to enable sharing
and writing to the folder. Click Apply to apply the changes to the access
rights to the folder .
8. Click Apply to apply the changes or Finish to save the changes and restart
the device.
Applying permissions
After adding users who can access the hard drive and setting up access
rights for the hard drive’s partitions and folders, use the Network
Neighborhood Mode option to apply the permissions. Scroll to select Apply
rules in shared node list from the field and click Finish to save the changes
and restart the system.
ASUS Wireless "WL-HDD" Quick Start 11
Page 12

Sharing files on the ASUS Wireless WL-HDD
The ASUS Wireless "WL-HDD" is primarily designed to help you share
data, music, video, or other files over the wireless LAN. You can set up this
device in your house, office, or dormitory, such that anyone can access
media files from it using a wireless connection. In order to share data from
the ASUS W ireless WL-HDD, you must access the hard disk drive using a
valid user name. See “Editing the User List” for more details about creating
users. If you want to copy any data to the hard drive, the destination folder
or partition must be write-enabled. Make sure that the access rights (see
“Editing the Shared Nodes List”) are set to Share – on and Write – on and
then copy data to the drive.
Transferring Data from External Flash Memory
The ASUS W ireless "WL-HDD" supports USB flash disks or external flash
memory cards through a USB connection to enable you to transfer data.
The device copies data automatically from the flash memory to the hard
disk when inserted into the USB slot.
Auto-copy Function
To transfer data automatically from the flash
memory, connect the USB flash memory disk to
the USB port of the ASUS Wireless "WL-HDD".
Alternatively , to transfer the contents of other types
of flash memory cards such as CF, SD, MMC, and
so on, insert the card into an external card reader
(not supplied) and connect it to the USB port using
a USB cable.
The device copies the contents of the memory disk automatically to the
hard disk. The USB light blinks quickly when copying data.
The data from the USB flash memory is copied to a folder named
USBpartxxx, where xxx is a number from 001 to 999 indicating the order
in which the data was transferred.
Notes: When copying data automatically from a flash disk, the first
partition – part1 – is used first. All the data is copied as long as
there is free space in the first partition.
12 ASUS Wireless "WL-HDD" Quick Start
Page 13

Notes: If you remove the flash disk from the ASUS Wireless "WLHDD" and insert it again, the data is copied again to the hard disk
in a new folder with the folder name incremented by 1. For instance,
if the first time the data was copied under USBpart005, then after
removing and inserting the disk, the data is copied again to a new
folder named USBpart006.
Locating the Copied Files on the Hard Disk Drive
To view the data transferred to the
hard disk from your flash memory,
double-click the hard drive partition
(part1) icon (see “Accessing the Hard
Disk Drive” for more details). The
contents of the flash memory are
stored under the USBpartxxx folder
(where xxx is a number from 001 to
999 indicating the order in which the
data was transferred).
Shutting down the ASUS Wireless WL-HDD
Use the SHUTDOWN link to shut down the ASUS Wireless "WL-HDD"
after using it to prevent damage to the hard disk and loss of data.
1. Click the SHUTDOWN link.
2. The device shuts down and the
following message is displayed.
3. Disconnect the power cord and shut
down the system safely.
ASUS Wireless "WL-HDD" Quick Start 13
Page 14

System Setting
Click the System Setting option on the left panel to display its submenus.
This set of menus enables you to make changes to the system parameters
of the ASUS W ireless "WL-HDD". You can change the password, upgrade
the firmware from a file provided by ASUS, or restore the device to its
default factory settings using this set of menus.
Change Password
The Change Password menu allows you to change the
system password of the ASUS Wireless "WL-HDD".
(The default password is admin.) To change the
password, enter the new password in the New Password field and enter it
again for confirmation in the Retype New Password field. Click Save to
confirm your changes. You can enter
any password between 1-16
characters long (cannot be left blank).
If you forget the password at any
time, you can use the Factory Default
menu (see “Factory Default”) to restore the password to its default (admin)
value.
Note: The password is case sensitive.
Factory Default
Use this menu to restore the ASUS Wireless "WL-HDD"
to its default factory settings. Click the Restore button
to clear all settings and restore the factory defaults. The
device reboots after this function.
Note: You can also clear all settings and restore factory default
values by pressing and holding down the Reset button for 5 seconds.
14 ASUS Wireless "WL-HDD" Quick Start
 Loading...