

Page 1
CAMagic Mobile
User’s Manual
Page 2

Table of Contents
Welcome.................................................................................................................... 3
Installing CAMagic Mobile ....................................................................................... 4
System Requirements.......................................................................................................................... 4
Installing Software................................................................................................................................5
Pairing.................................................................................................................................................. 6
Operating CAMagic Mobile Application.................................................................. 8
Main Panel........................................................................................................................................... 8
P.I.M..................................................................................................................................................... 9
Phonebook ....................................................................................................................................... 9
Calendar......................................................................................................................................... 13
To Do List....................................................................................................................................... 17
Sync Manager................................................................................................................................19
Message............................................................................................................................................. 24
SMS Manager................................................................................................................................. 24
Internet Connection........................................................................................................................ 27
GPRS Manager .......................................................................................................................... 27
Multimedia.......................................................................................................................................... 30
Media Manager............................................................................................................................ 30
Print Lab ....................................................................................................................................... 32
Setup..................................................................................................................................................34
Select Phone Model....................................................................................................................... 34
Supported Phones.......................................................................................................................... 37
Software Upgrade .......................................................................................................................... 38
CAMagic Mobile CAMagic Mobile Help Page 2 of 38
Page 3

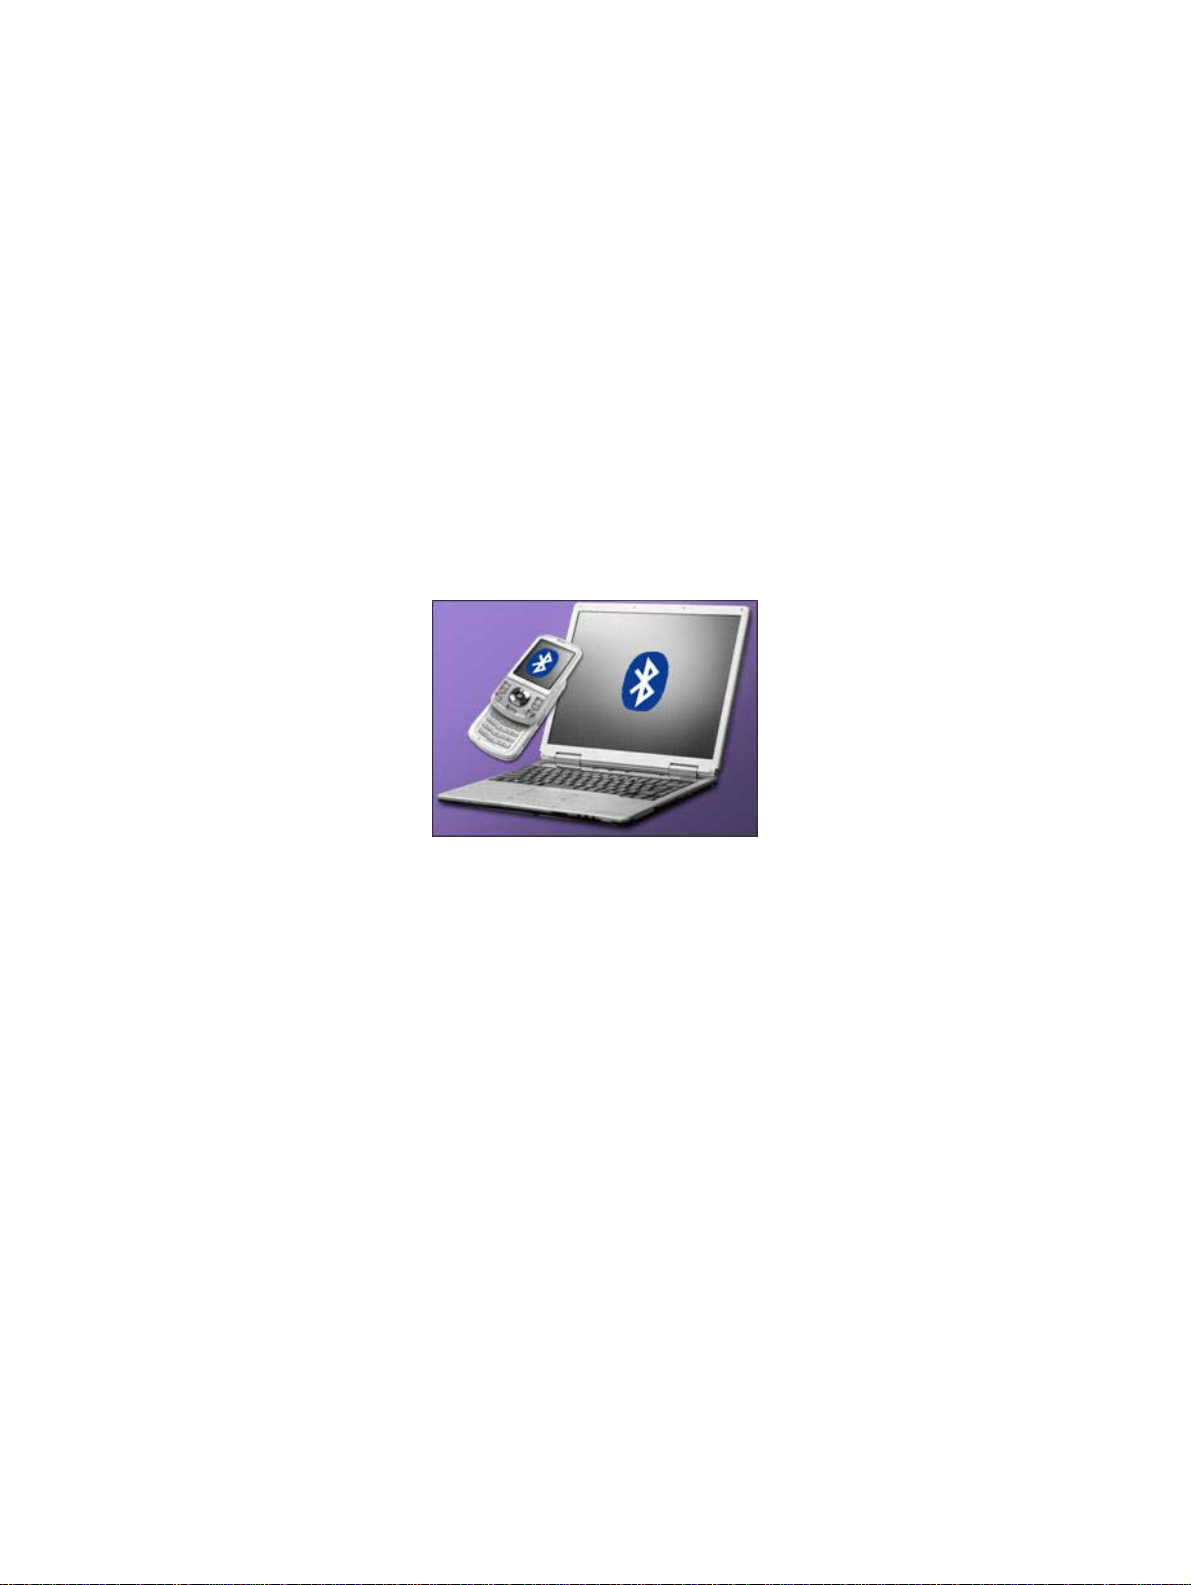
Welcome
Welcome to CAMagic Mobile, the Desktop Solution for Mobile Phone. With this
integrated Mobile tool application, you can edit and creat e the phonebook or
messages for your mobile phone in your PC.
To use this helpful mobile-managing tool, follow the steps below:
1. Installing CAMagic Mobile
2. Operating CAMagic Mobile application
Note: The functions in CAMagic Mobile may vary according to the version.
CAMagic Mobile CAMagic Mobile Help Page 3 of 38
Page 4

Installing CAMagic Mobile
System Requirements
-A personal computer with Pentium III 800 MHz or higher processor
-Microsoft Windows XP or above, or Windows 2000 with SP4
-Minimum 150 MB free hard disk space to run the program
-256 MB of RAM or more
-A display card supporting 16-bit high color mode
-A Bluetooth USB dongle
-A mobile phone with Bluetooth capability (please check the supported phones
listed in Supported Phones on the main panel of CAMagic Mobile.)
-A CD-ROM drive
Products and company names mentioned herein are the trademarks of their
respective owners. All rights are reserved.
CAMagic Mobile CAMagic Mobile Help Page 4 of 38
Page 5

Installing Software
Note: Please make sure the dongle has been installed and plugged
correctly and work properly in your computer before installing CAMagic
Mobile.
To install CAMagic Mobile, please insert the installation CD into the CD-ROM, follow
the on-screen instructions to complete the installation.
CAMagic Mobile CAMagic Mobile Help Page 5 of 38
Page 6
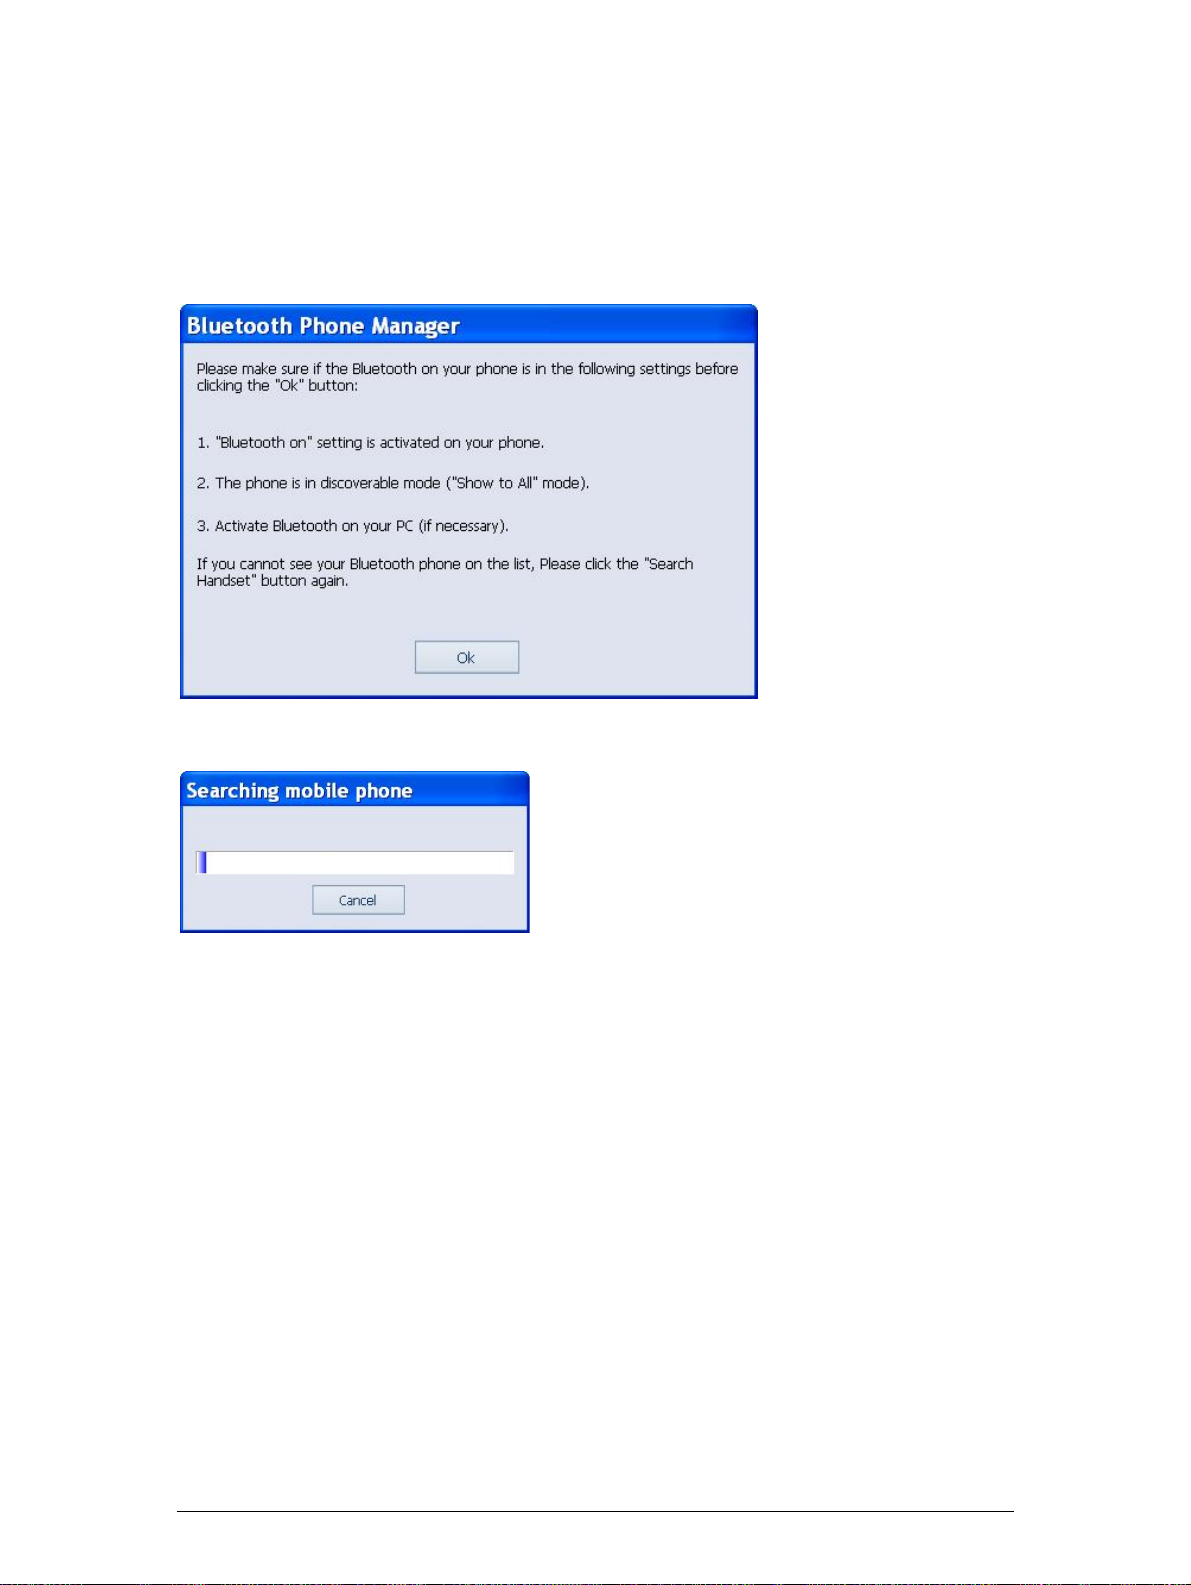
Pairing
Note: Before pairing, please make sure you have the Bluetooth dongle properly
plugged into your PC.
After finishing the software installation, you can launch the CAMagic Mobile icon,
and the dialog box below will appear for pairing.
Step 1. Click OK to move on to next step. It will start searching the available mobile
phones.
Step 2. To begin the pairing process, you can take the default PIN Code or enter
your own PIN Code, click Pair and then follow the on-screen instruction on your
handset. When you see the request of entering passkey on your handset, enter the
PIN Code you've chosen.
CAMagic Mobile CAMagic Mobile Help Page 6 of 38
Page 7
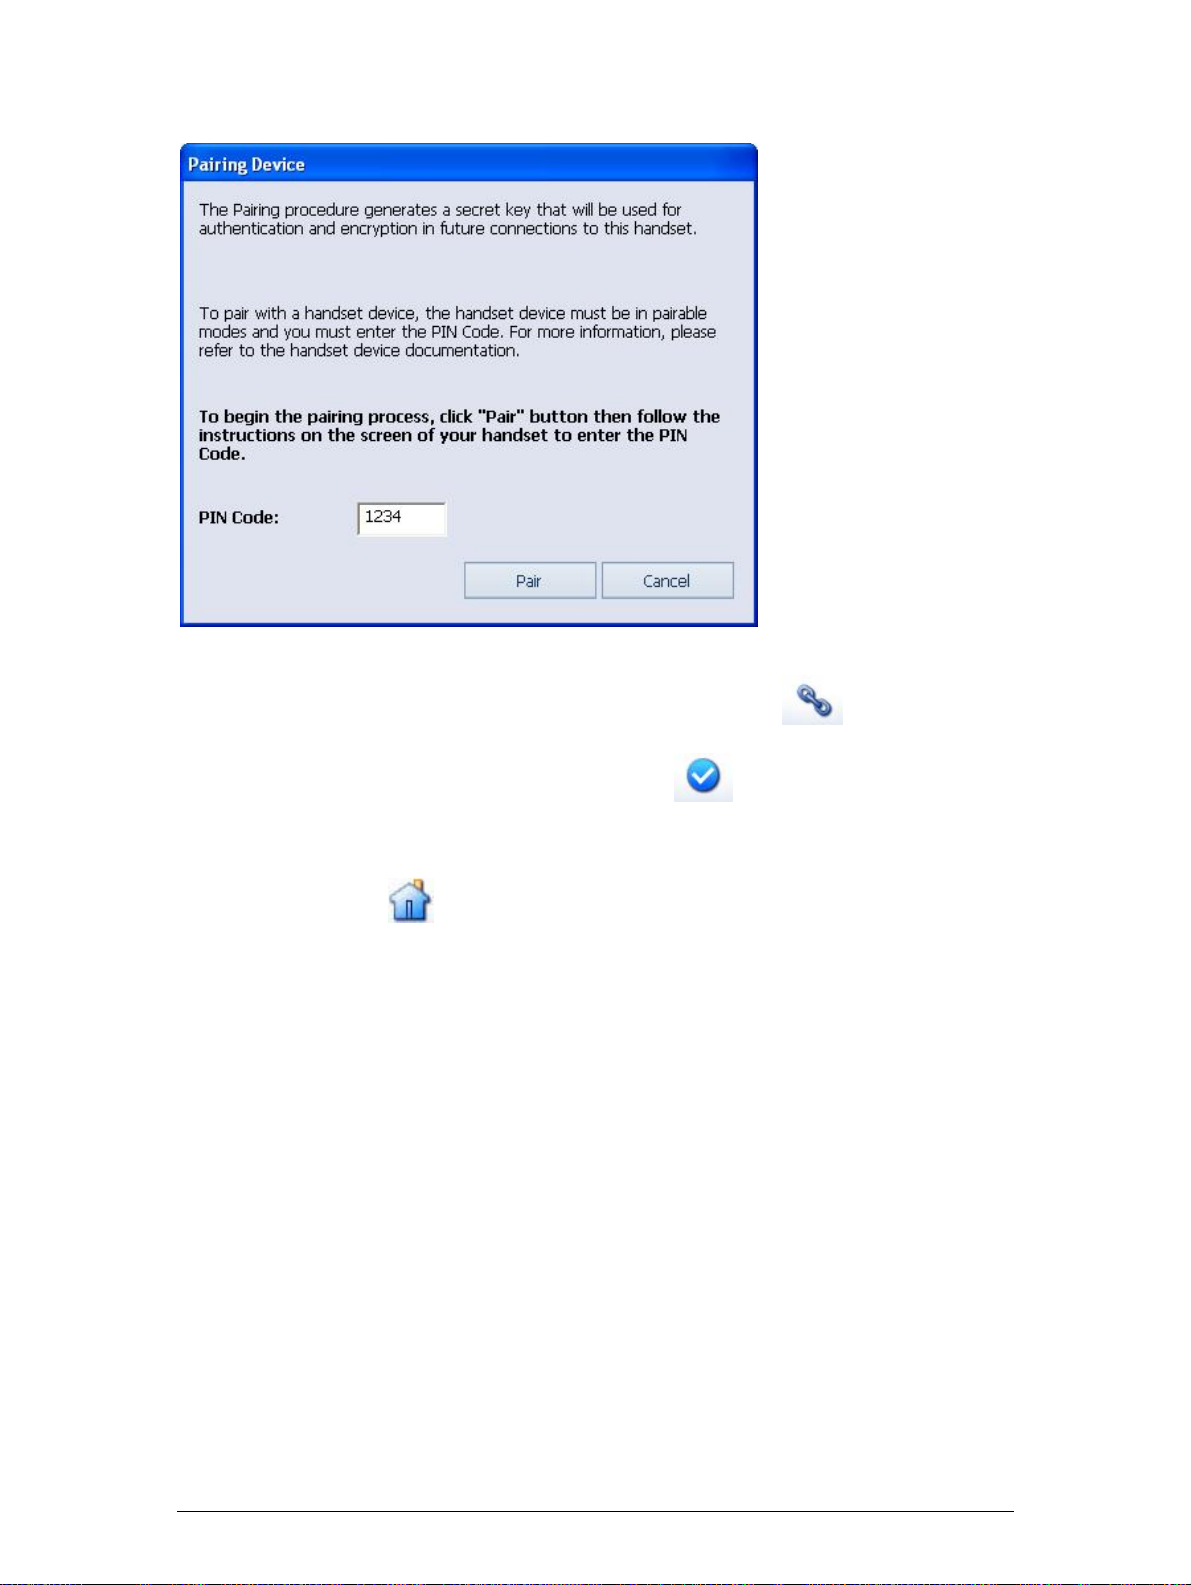
Note: 1. If more than one mobile phone has been found, first click on the phone
model you wish to use, and the dialog box will appear.
2. If the dialog box doesn't appear, click "Pairing device" icon
in the Tool Bar.
Step 3. Click "Set as default connection handset"
in the Tool Bar to get
connected to your handset.
Step 4. After the phone is connected, the process has completed. You can click
"Back to Main Panel"
for operating the applications.
Note: Pairing function is also provided in Setup on Main Panel.
CAMagic Mobile CAMagic Mobile Help Page 7 of 38
Page 8
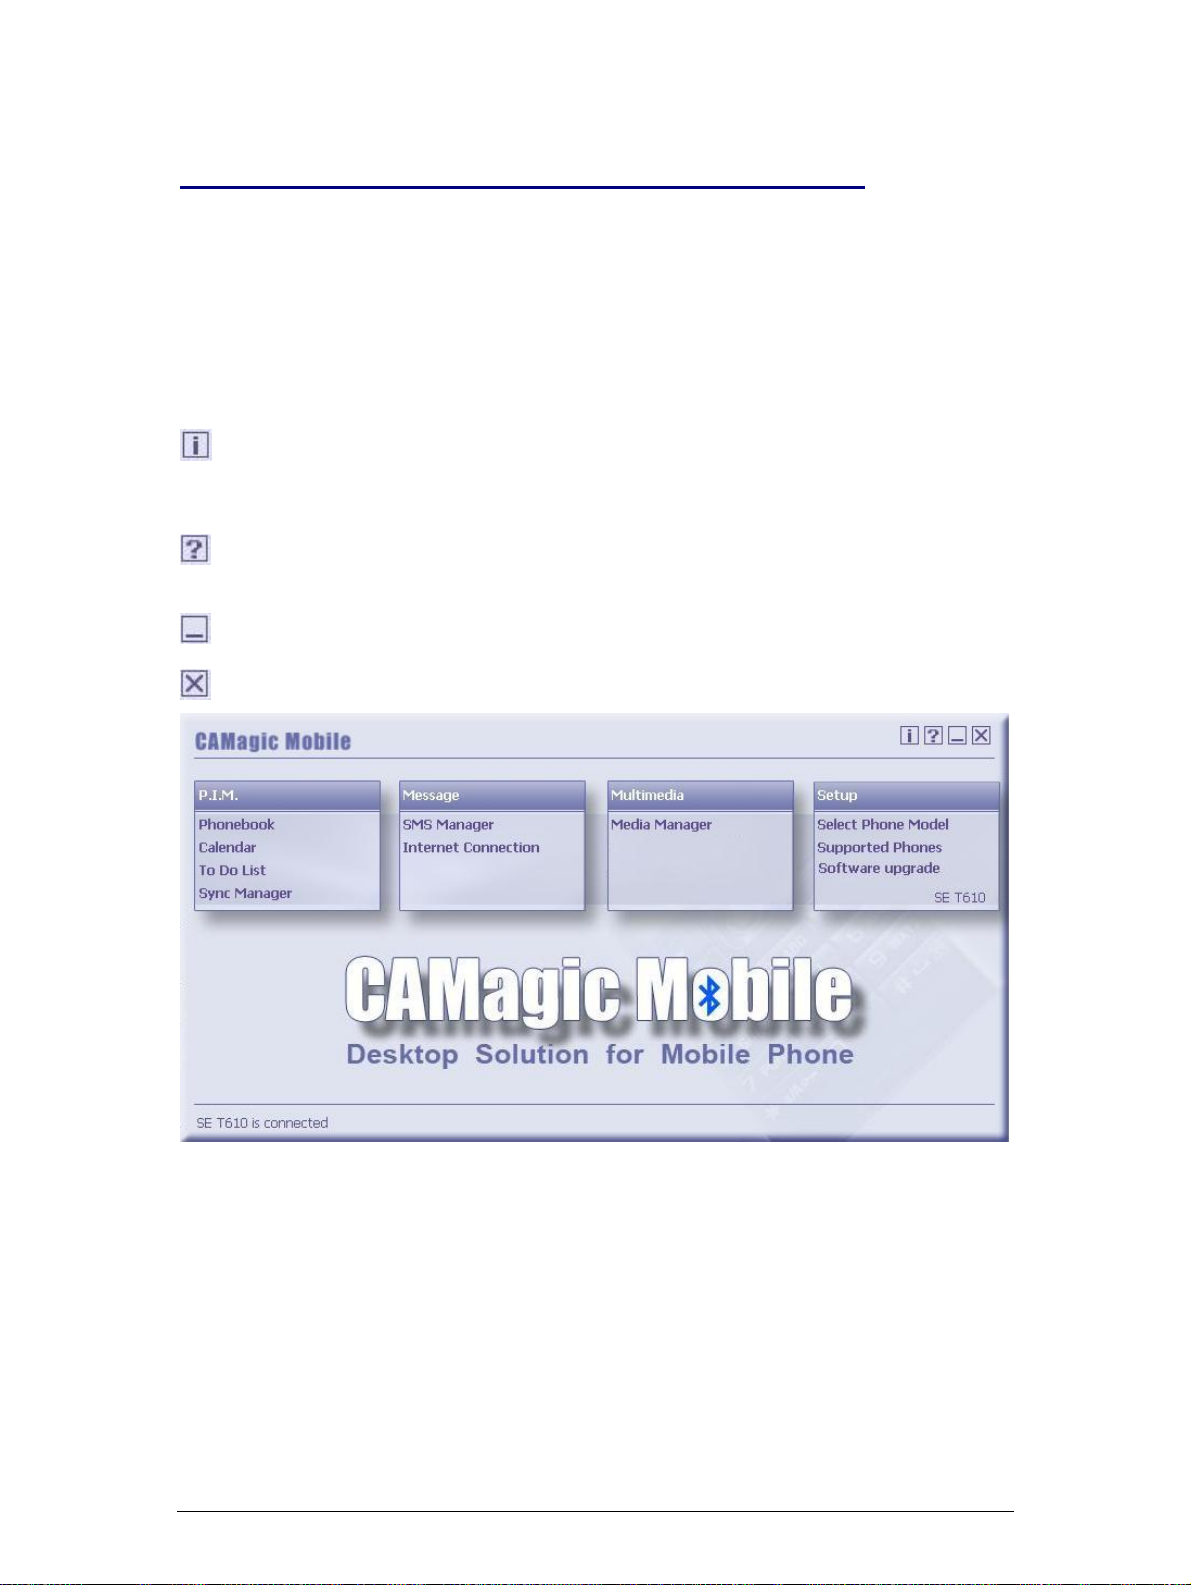
Operating CAMagic Mobile Application
Main Panel
This is the Main Panel of CAMagic Mobile application, providing useful functions for
your mobile management: PIM (Phonebook, Calendar, To Do List, and Sync
Manager), Message (SMS Manager and Internet Connection), Multimedia (Media
Manager), and Setup (Select Phone Model, Supported Phones, and Software
Upgrade).
The icons on the top-right corner are:
(About): Click this icon to learn about the detailed information of CAMagic Mobile
version; also click on the company website listed below, you can get
more product and upgrade related information.
(Help): click this icon to see the online help and learn more about CAMagic
Mobile.
(Minimize): click this icon to minimize CAMagic Mobile.
(Close): click this icon to close CAMagic Mobile.
CAMagic Mobile CAMagic Mobile Help Page 8 of 38
Page 9
P.I.M.
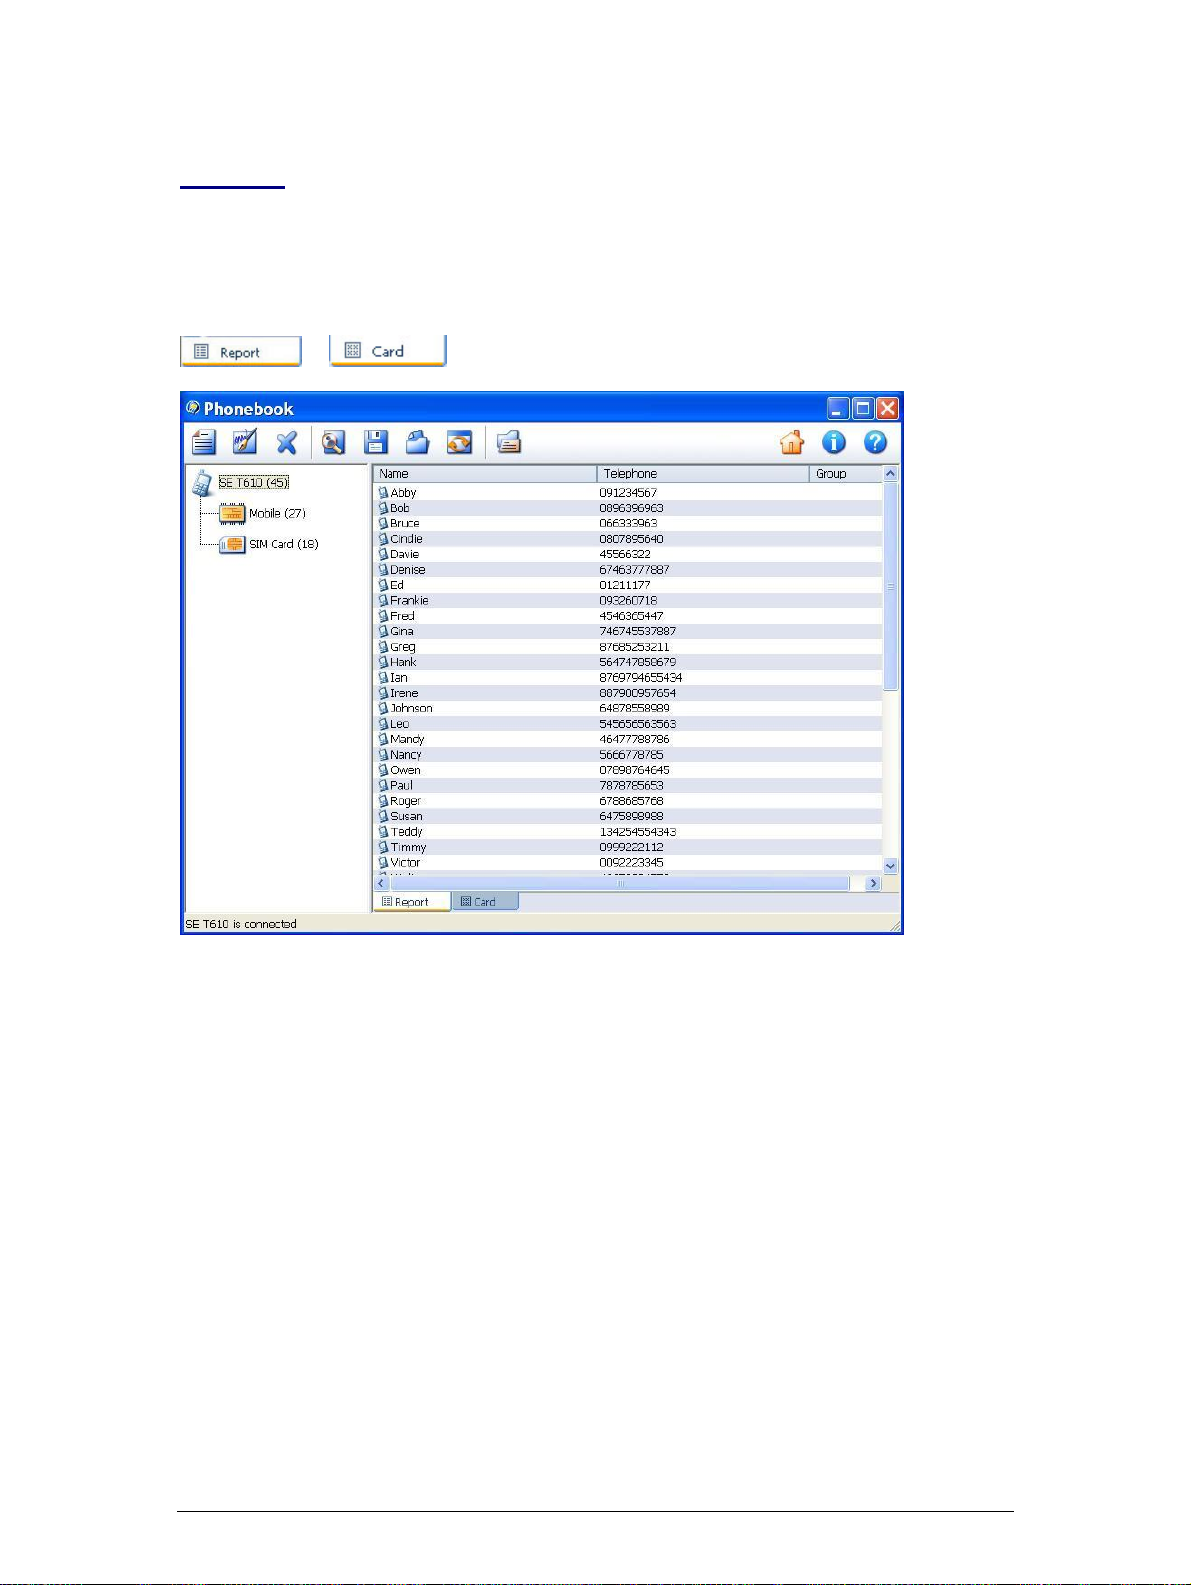
Phonebook
You can easily operate your phonebook entries. Read, edit, add and delete them
from the phone, and upload changes back to the phone. There are two ways to
display the phonebook, including: Report and Card formats. Click on the
or icons to select your preferred phonebook display format.
CAMagic Mobile CAMagic Mobile Help Page 9 of 38
Page 10
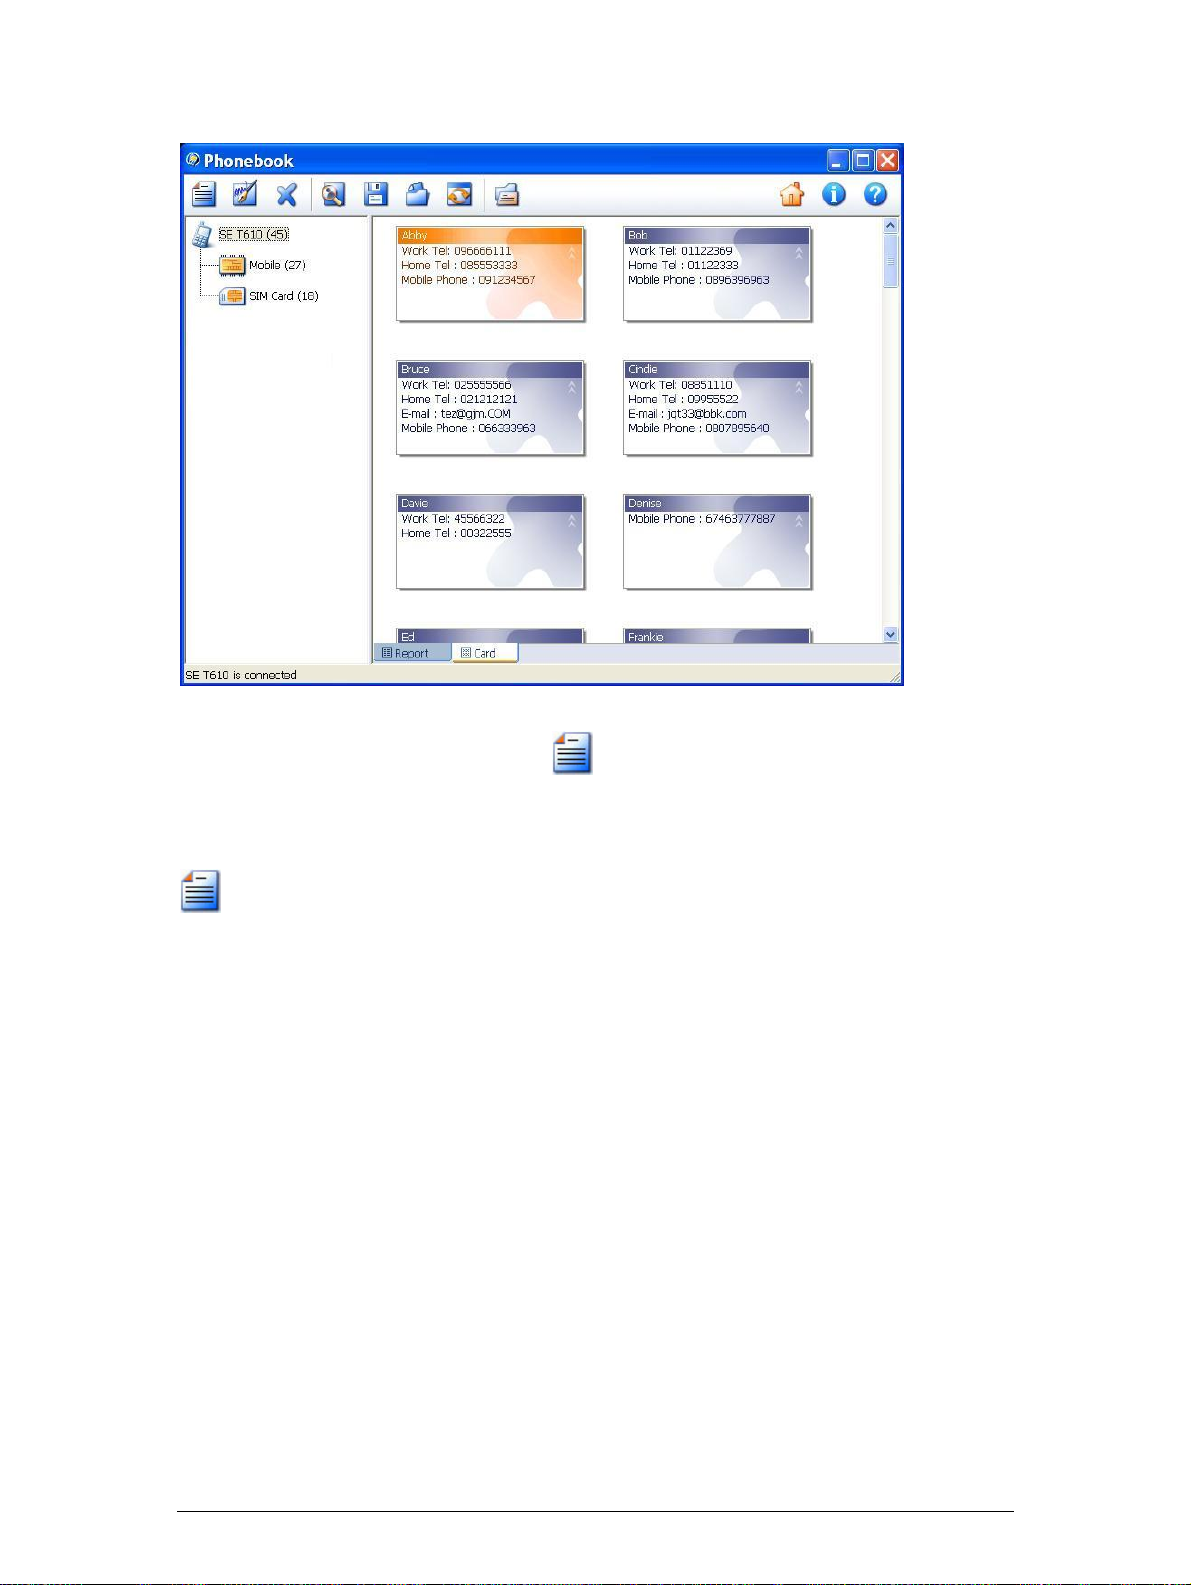
Listed are the contacts stored in your phonebook. Double click on one of the
contacts to edit its contents, or click
Note: The categories of New Contact and Edit Contact will vary according to the
phone models.
Click to add new contact to your phonebook. You can input phone numbers by
categories, e-mail and location address. Select to store this information in your
mobile phone or in the SIM card. Upon completion, click "Save to handset" to save
and exit.
to add new contact to your phonebook.
CAMagic Mobile CAMagic Mobile Help Page 10 of 38
Page 11
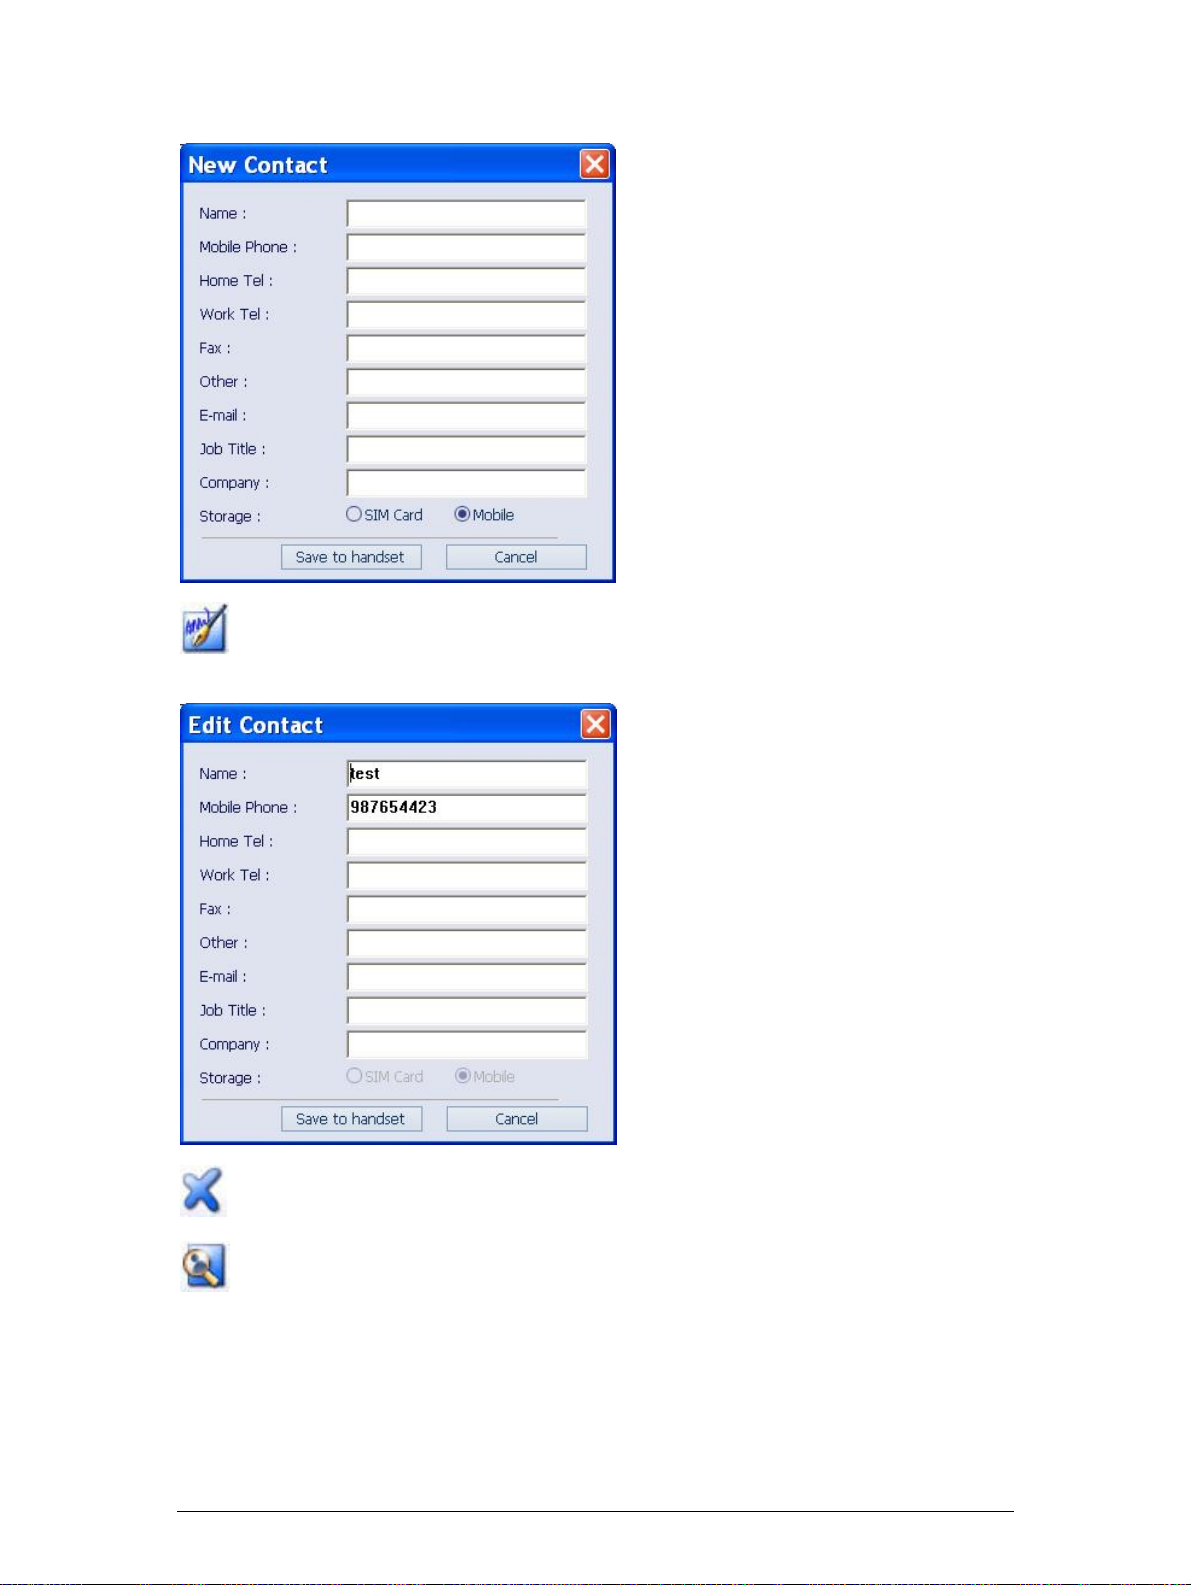
Select one from your contact list and click to edit. Upon completion, click "Save
to handset" to save and exit.
Select the unwanted one from your contact list and click to delete it.
Click to find any contact in your phonebook. In the following window, input the
contact's name to look for in your phonebook and click "Find Next" to start
searching.
CAMagic Mobile CAMagic Mobile Help Page 11 of 38
Page 12
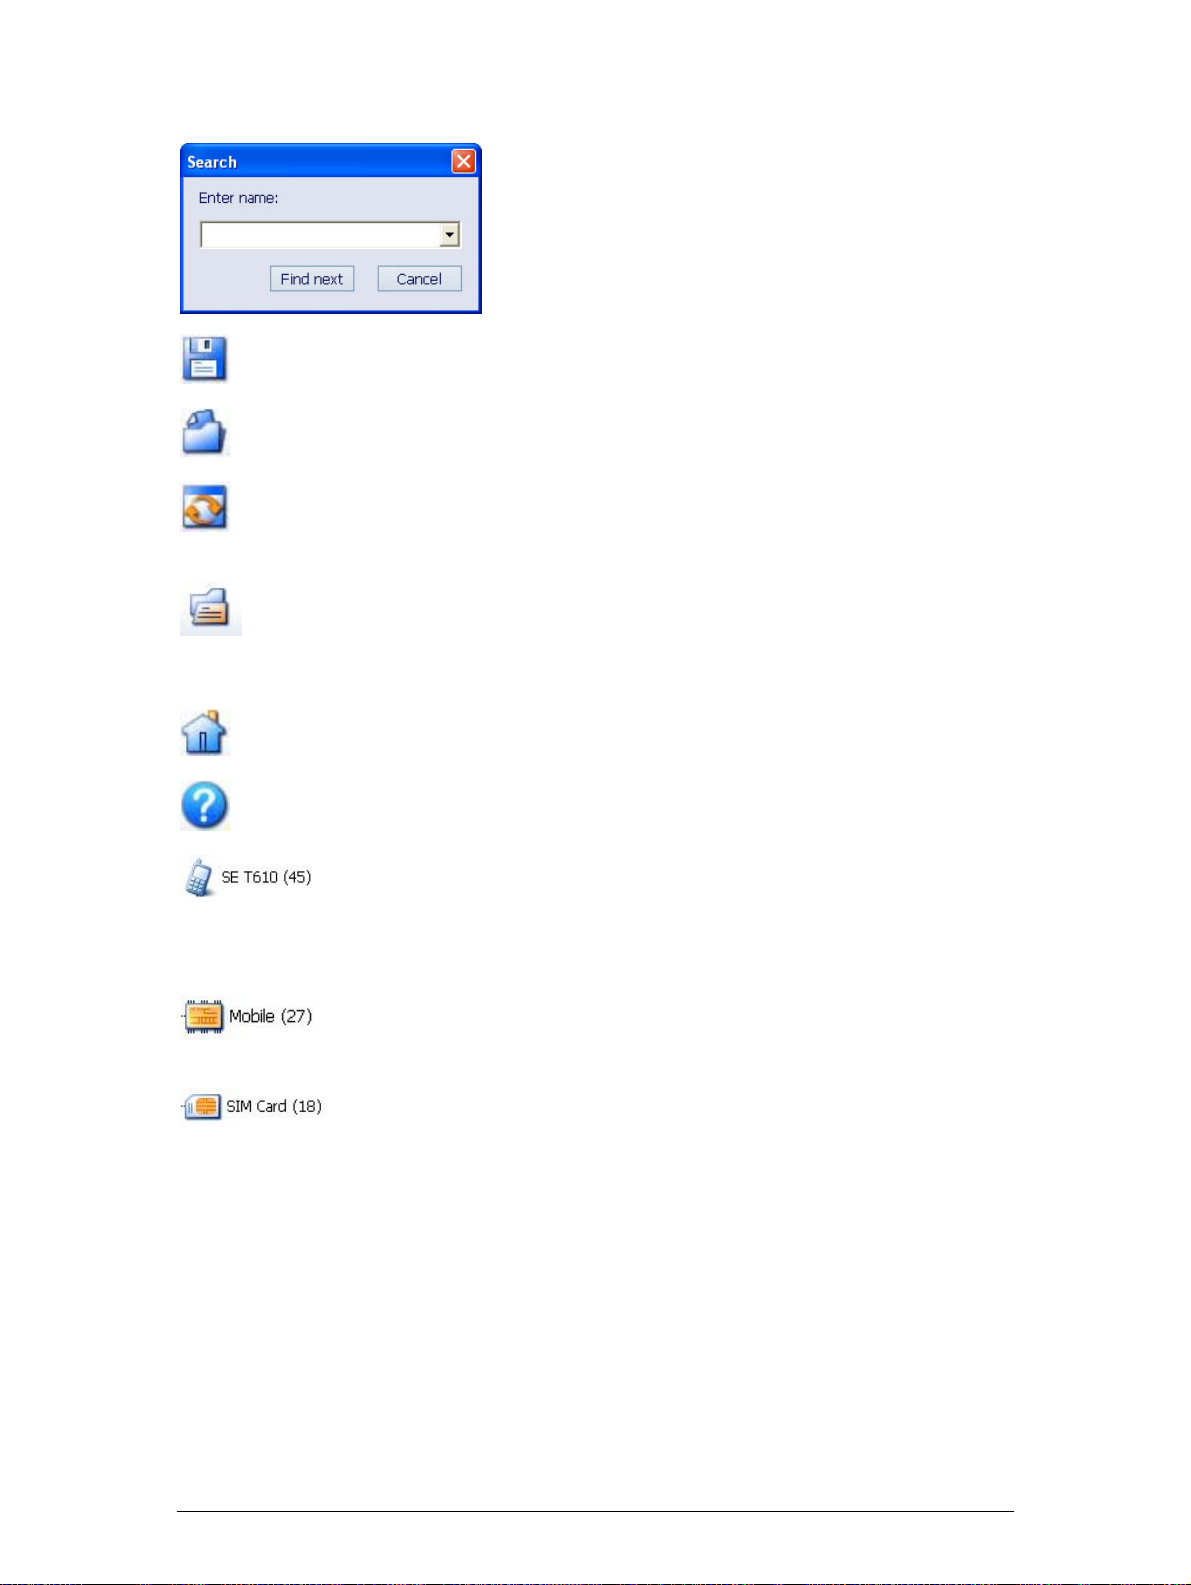
Click to save your phonebook as .CSV file.
Click to load contacts to your phonebook.
After done with your phonebook editing, click to refresh your phonebook. This
process may take a few seconds to be finished.
Select the contact(s) you'd like to send SMS to, cli ck on this i con to open the
new message window. When you finish the message, click "Send" to send the
message or "Cancel" to exit.
Click to go back to Main Panel.
Click to obtain the version of the program.
Click to display the contacts stored in your mobile phone and your SIM
card . The number (45) here represents the total numbers of the contacts added up
together in your mobile phone and your SIM card. Double-click to select to hide or
display its following items.
Click to display the contacts stored in your mobile phone. The number
(27) here represents the total numbers of the contacts in your mobile phone.
Click to display the contacts stored in your SIM card. The number
(18) here represents the total numbers of the contacts in your SIM card.
CAMagic Mobile CAMagic Mobile Help Page 12 of 38
Page 13

Calendar
Calendar enables you to plan your doings and make reminding notes. You are able
to read, edit, delete and add the date from your phone and write changes back to
your phone. There are four ways to display the calendar, including: Day, Week,
Month and List formats. Click on
the
calendar display format.
icons to select your preferred
CAMagic Mobile CAMagic Mobile Help Page 13 of 38
Page 14

CAMagic Mobile CAMagic Mobile Help Page 14 of 38
Page 15

Double click on the event to view its complete information.
Note: The categories of Calendar will vary according to the phone models.
Click to add new events to your calendar, including type of your information, its
subject, place, start/end time, reminding alarm time/tone, and the repeating
interval. Upon completion, click "Save" to finish the setting or click "Cancel" to leave
without adding new events to your calendar.
Click or double click on the selected information to open its window and start
editing the contents.
CAMagic Mobile CAMagic Mobile Help Page 15 of 38
Page 16

Select the unwanted event from your calendar and click to delete it.
After done with your calendar editing, click to refresh all t he information just
added. This process may take a few seconds to be finished.
CAMagic Mobile CAMagic Mobile Help Page 16 of 38
Page 17

To Do List
To Do List helps you to keep all your tasks well-organized so you don't miss any
details, such as the due date or the priority.
Note: The categories of New task and Edit task will vary according to the phone
models.
Click to add a new task. Upon completion, click "Save to handset" to save and
exit.
Select one from your list and click to edit. Upon completion, click "Save to
handset" to save and exit.
CAMagic Mobile CAMagic Mobile Help Page 17 of 38
Page 18

Select the unwanted one from your list and click to delete it.
After done with the editing, click to refresh your To DO List. This process may
take a few seconds to be finished.
CAMagic Mobile CAMagic Mobile Help Page 18 of 38
Page 19

Sync Manager
Sync Manager provides synchronization between your PC and your mobile phone,
including Contact, Calendar, and Work, to ensure that both media have complete
up-to-date data at the same time.
For using Microsoft Outlook:
After CAMagic Mobile is installed, you can launch Microsoft Outlook, click the Sync
Manager button
If you haven't selected any phone models to set as the default connection handset,
a dialog box will appear to remind you that you need to connect your handset first.
Click Next in the dialog box to move on to the connection process. The Bluetooth
Phone Manager window will appear automatically to help getting the connection to
your handset. For more connection details, see the "Select Phone Model" section.
to operate the Sync Manager.
For using CAMagic Mobile:
Click Sync Manager on the mainpanel, the following dialog will show up. Click "OK"
to start the synchronization, or "Cancel" to start with the setting fisrt.
Sync: click Start to start synchronizing the selected items. After synchronization is
finished, click "OK" to save and exit Sync Manager.
CAMagic Mobile CAMagic Mobile Help Page 19 of 38
Page 20

While synchronizing your data, the dialog from Outlook 2003 or above will show up
to check if you allow the program to access the data you have stored in Outlook. You
can check the box and allow it access for a certain time, or cl ick Yes to accept, No to
deny the access.
Setting: check the item(s) you want to synchronize, then select MS Outlook,
Outlook Express or Lotus Notes R6/R7 from the drop-do wn l ist. Cli ck Setting to set
up each item before synchronization; click OK when you are finished.
CAMagic Mobile CAMagic Mobile Help Page 20 of 38
Page 21

Setting for Contact/Work: Set up the common settings, such as the data file, the
folder, the server, or the database. Click Advanced for more settings; click OK when
you are finished.
CAMagic Mobile CAMagic Mobile Help Page 21 of 38
Page 22

Setting for Calendar: Select the data file, the folder, the date range, the server, or
the database. Click Advanced for more settings; click OK when you are finished.
CAMagic Mobile CAMagic Mobile Help Page 22 of 38
Page 23

CAMagic Mobile CAMagic Mobile Help Page 23 of 38
Page 24

Message
SMS Manager
SMS (Short Message Service) Messager is a handy tool that allows you to read,
delete, send and receive messages from and to the mobile phone.
Click to start a new message. Type in the phone number to be sent, or click
"Contacts ..." to select one or more to be sent from your phonebook, and then type
in the contents (content limit: 160 characters). Upon completion, click "Send" to
send the message or "Save to draft" to save the message to the draft f older without
sending the message. You can still edit this message from the draft folder later on.
Click "Cancel" to exit.
CAMagic Mobile CAMagic Mobile Help Page 24 of 38
Page 25

Select the message you wish to reply and click. The original message and its
sender will be shown on the following wind ow. Rewrite the message and click
"Send" to reply the message, or "Save to draft" to save the message to the draft
folder without sending the message. You can still edit this message from t he draft
folder later on. Click "Cancel" to exit.
Select one message from any of the message folders and click to save the
sender, time and contents of this message as the text file.
Select the message to be printed and click to print the message.
Select the unwanted message and click to delete the message.
Click on the Draft folder. Select one message from the Draft folder and click.
The contents last edited will be shown on the Reply Window. Continue to edit the
contents or click "Send" to reply the message. Click "Cancel" to exit.
After done with your message editing, click to refresh your SMS Messager.
This process may take a few seconds to be finished.
Click to display the messages stored in your mobile phone and your SIM
card. Double click to select to hide or display its following items.
All the messages stored in your mobile phone are categorized here as incoming
messages ( in the Inbox folder ) and outcoming messages ( in the Outbox folder).
Click
or to read or edit the stored messages.
Click
to display the messages stored in your PC. Double click to select to
CAMagic Mobile CAMagic Mobile Help Page 25 of 38
Page 26

hide or display its following items.
All the messages stored in your PC are categorized as follows:
Incoming messages -- located in the Inbox folder
Outcoming messages -- located in the Outbox folder
Sent messages -- located in the Sent Items folder
Draft messages -- located in the Drafts folder
Click Inbox
, Outbox , or drafts to read or edit the stored
messages.
Click Sent Items or Trash Can to check the messages which were sent or
deleted already.
Select any of the messages and use Drag and Drop to move/add the message to
your desired folder(s).
CAMagic Mobile CAMagic Mobile Help Page 26 of 38
Page 27

Internet Connection
GPRS Manager
For getting the GPRS connection, click Internet Connection on the Main Panel for
GPRS Manager.
For getting new connection, click Add a GPRS Entry. You can check Use Default
Setting or setup manually.
CAMagic Mobile CAMagic Mobile Help Page 27 of 38
Page 28

Click Save after you finish, then you will see the GPRS icon .
Click the icon(s) to edit, delete, dial up, hang up, or set as default GPRS entry.
For dialing up, click the Dial Up icon in the Tool Bar and the following picture will
show up.
Enter the number you'd like to dial, and click Properties first before clicking Dial.
Note: The number is provided by the network operator, it will vary according to the
system you use.
Before clicking Dial, please click Properties to make sure you've selected the correct
CAMagic Mobile CAMagic Mobile Help Page 28 of 38
Page 29

modem and enter the other settings provided by the network operator correctly.
Click OK after you finish setting.
After getting the connection, you'll see the picture as follow showing the status of
connection.
Click the Hang Up icon for disconnection.
CAMagic Mobile CAMagic Mobile Help Page 29 of 38
Page 30

Multimedia
Media Manager
Media Manager helps you to manage your media files, then you can save and enjoy
or send to share with friends.
click to send in mail.
click to print photo(s).
click to delete the selected file(s).
after editing, click to refresh all files.
Select one or more files stored in the Mobile Phone and click
selected file(s) to the appointed folder of the PC.
Select one or more files stored in your PC and click
file(s) to your mobile phone.
CAMagic Mobile CAMagic Mobile Help Page 30 of 38
to download the selected
to upload the
Page 31

click to view the content as the thumbnail/list format.
CAMagic Mobile CAMagic Mobile Help Page 31 of 38
Page 32

Print Lab
Highlight one or more picture(s) from the thumbnails and click to open the
following Print Lab Window.
You can still add pictures now by clicking the "Open File" button to select files to be
added on. Click on each picture to view its related information shown on the left,
including file name, file location, file size and its pixel dimension. To print the pictures,
click on each picture and press to decide the numbers of pages to be printed
individually, or simply click on the "Batch Printing" icon to set numbers of copies for
all pictures.
Select the picture(s) to be printed by clicking the check box on top of each picture.
Click on the picture to view its related information shown on the left, including file
name, file location, file size and its pixel dimension. Highlight the picture first and click
on the
Click the "Open File" button to select files to be added on.
Click on the "Batch Printing" icon and select the total printing numbers for all pictures.
Click "OK" to apply the setting or click "Cancel" to exit.
Click on the "Reset" button to clear all pictures and the related printing settings.
or icon to add or decrease the numbers of printing.
Select printer name and the paper size. For more quality settings, click "Property".
CAMagic Mobile CAMagic Mobile Help Page 32 of 38
Page 33

Click "Next" to continue with the setting.
Select the preferred paper layout. View the result in the left preview window. Click
"Print" to start printing.
CAMagic Mobile CAMagic Mobile Help Page 33 of 38
Page 34

Setup
Select Phone Model
If you'd like to use a different phone, click "Select Phone Model" on Main Panel to
launch Bluetooth Phone Manager for pairing.
Click OK to move on to next step. It will start searching the available mobile
phones.
After searching mobile phones, select the phone model you'd like to pair then click
"Pairing device"
in the Tool Bar.
CAMagic Mobile CAMagic Mobile Help Page 34 of 38
Page 35

To begin the pairing process, you can take the default PIN Code or enter your own
PIN Code, click Pair and then follow the on-screen instruction on your handset.
When you see the request of entering passkey on your handset, enter the PIN Code
you've chosen.
Click "Set as default connection handset" in the Tool Bar to get connected to
your handset.
CAMagic Mobile CAMagic Mobile Help Page 35 of 38
Page 36

After the phone is connected, the process has completed. You can click "Back to
Main Panel"
for operating the applications.
For unpairing, please click "Unpairing device" .
CAMagic Mobile CAMagic Mobile Help Page 36 of 38
Page 37

Supported Phones
Click Supported Phones on the mainpanel to see the list of the supported phones.
Support for new phone models is added on a continuing basis.
CAMagic Mobile CAMagic Mobile Help Page 37 of 38
Page 38

Software Upgrade
To experience the Premium Version of CAMagic Mobile, you can click on Software
Upgrade on the main panel to link to our website and purchase the software online.
CAMagic Mobile CAMagic Mobile Help Page 38 of 38
 Loading...