

Page 1
Multifunctional Wireless Storage Router
®
WL-700gE
Quick Start Guide
(For 802.11g and 802.11b wireless network)
ASUS Wireless Router i
Page 2

Table of contents
1 Introduction ......................................................................................................................1
1.1 System requirement .............................................................................................................. 1
1.2 Package content ...................................................................................................................
1.3 Rear panel ..............................................................................................................................
1.4 Front panel ............................................................................................................................
2 Software features ............................................................................................................3
2.1 Installing ASUS utility for WL-700gE ..................................................................................... 3
2.2 Setting up the wireless router using EZSetup .......................................................................
2.3 Connecting WL-700gE from a wirless client .........................................................................
2.4 USB auto copy function ........................................................................................................
2.5 Wireless data sh
2.6 Using Download Master ........................................................................................................
2.7 Sharing your photos on your Website .................................................................................
2.8 Setting up the Message Board ............................................................................................
2.9 Setting up DDNS .................................................................................................................
2.10 Setting up shared printer ....................................................................................................
aring ...........................................................................................................7
11
13
15
18
1
2
3
6
7
9
3 Troubleshooting ............................................................................................................19
4 Appendix ........................................................................................................................
4.1 User notes ........................................................................................................................... 20
4.2 ASUS warranty policy .........................................................................................................
ASUS Wireless Router ii
20
21
Page 3
About this guide
This quick start guide contains the information you need for installing and conguring the wireless router.
How this guide is organized
Chapter 1:
This chapter describes the features of WL-700gE Wireless Router
Chapter 2:
This chapter tells how to setup the basic functions and features of WL-700gE.
Chapter 3:
This chapter provides solutions to possible problems you may encounter during setting up and using WL-700gE.
Product introduction
Software
Troubleshooting
Conventions in this guide
To make sure that you perform certain tasks properly, take note of the following symbols used throughout this manual.
Warning: Information to prevent injury to yourself when trying to complete a task.
Caution: Information to prevent damage to the components when trying to complete a task.
Note: Tips and additional information to help you complete a task.
Where to nd more information
Refer to the following sources for additional information and for product and software updates.
1. ASUS website
The ASUS website provides updated information on ASUS hardware and software products. Refer to the ASUS contact
information.
2. Optional documentation
Your product package may include optional documentation, such as warranty yers, that may have been added by your
dealer. These documents are not part of the standard package.
ASUS Wireless Router iii
Page 4
1 Introduction
1.1 System requirement
To use the WL-700gE Wireless Router, you must have:
• An ADSL or Cable modem and an account for these service;
• A computer with an Ethernet adapter pre-installed for connecting the local area network (LAN);
• A wireless client with a pre-installed 802.11b/g wireless adapter, such as PDA or notebook computer;
• Your computer and the wireless client must have installed TCP/IP protocol component and a Web browser.
1.2 Package content
Check your wireless router package for the following items:
• WL-700gE Wireless Router x 1
• White antenna (2dbi) x 1
• Power cable x 1
• RJ-45 Ethernet cable (straight-through) x 1
• Support CD (with full version user manual) x 1
• Router stand x 1
• Quick start guide x 1
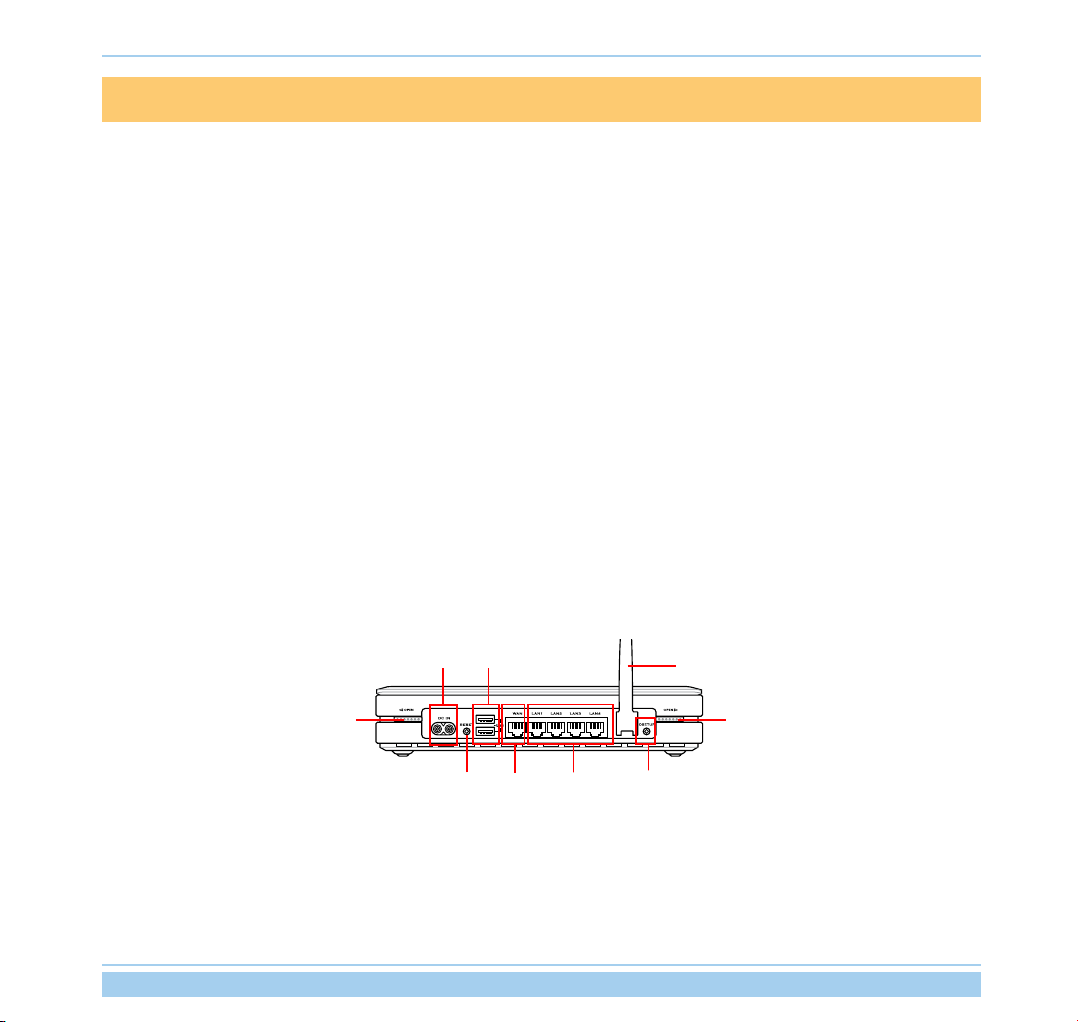
USB 2.0
AC IN
Antenna
Cover lock
RESET
LAN 1-4
RESET
Push the RESET button for 10 seconds to restore the factory default.
EZSetup
This button is for using EZSetup setting wizard.
ASUS Wireless Router 1
Cover lock
EZSetupWAN
Page 5
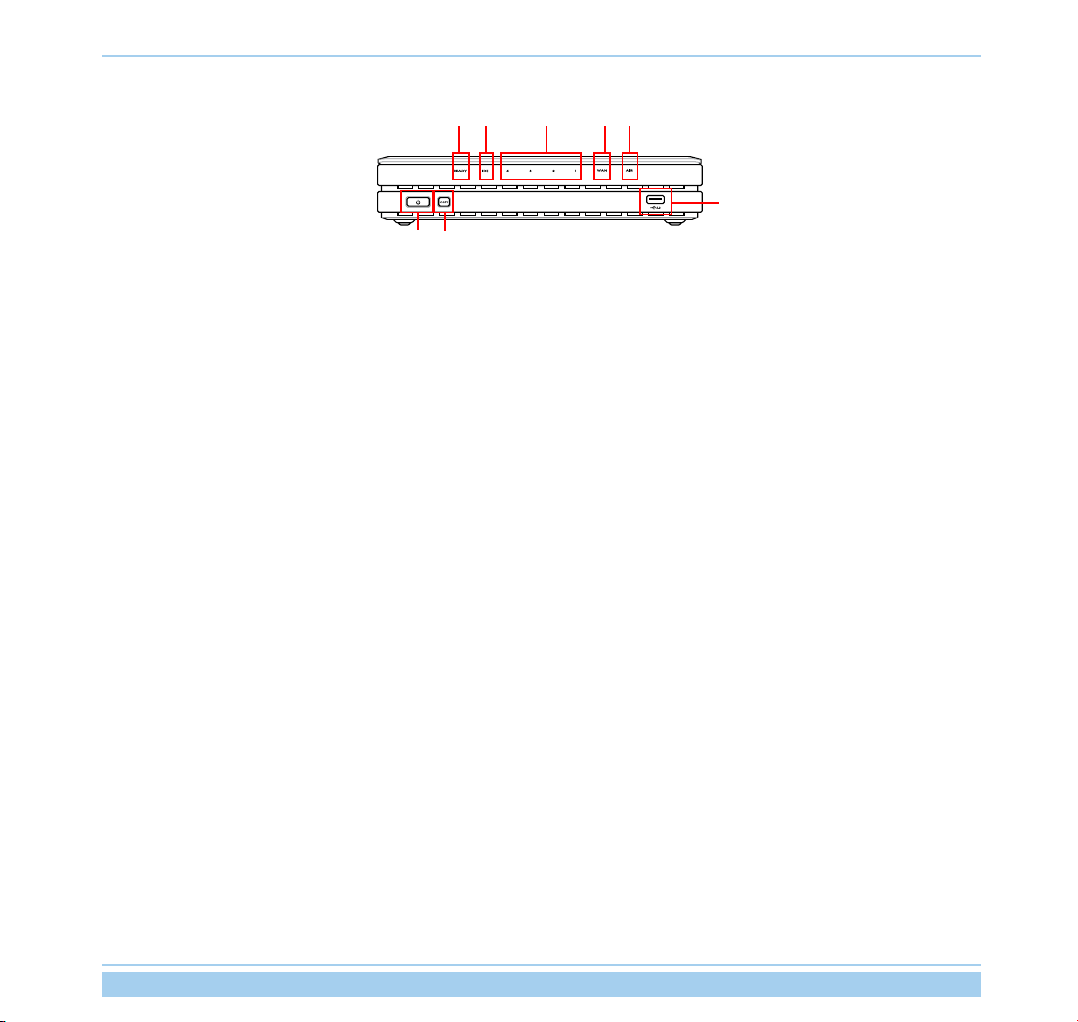
1.4 Front panel
LAN 1-4IDE AIR
COPY
PWR
PWR (Hard disk power indicator/ power switch)
OFF Hard disk unmounted or no power
ON Hard disk mounted
*Push this button and wait for 10 seconds to shut down the hard disk.
COPY
This button is for copying the data in your USB storage to the hard disk of WL-700gE.
READY
OFF No power
ON The system is powered on and in ready state
Flashing slowly USB storage inserted to the USB2.0 port
Flashing quickly Copying data from USB storage
LAN (Local Area Network) 1-4
OFF No power
ON An Ethernet device is connected to the port
Flashing Transmitting data via wired LAN
WANREADY
USB 2.0
AIR (Wireless LAN)
OFF No power
ON Wireless LAN ready
Flashing Transmitting data via wireless LAN
WAN (Wide Area Network)
OFF No power
ON Connected to ADSL or Cable modem
Flashing Communicating with WAN
USB2.0
For connecting USB storage, such as USB hard disk and USB ash.
ASUS Wireless Router 2
Page 6
ADSL Modem
WL-700gE Wireless Router
2 Software features
2.1 Installing ASUS utility for WL-700gE
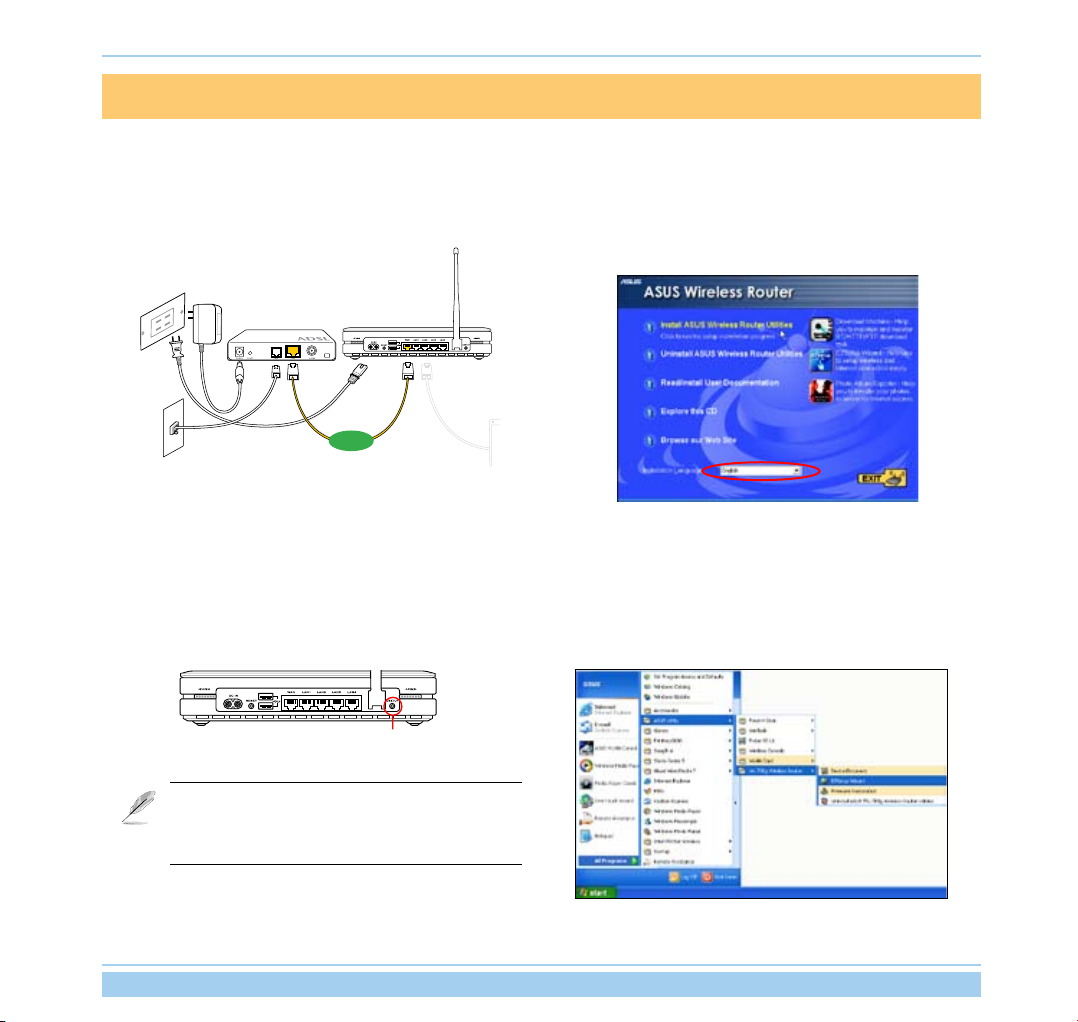
1. Connect your WL-700gE wireless router to your ADSL or
Cable modem. Refer to the illustration below to wire your
network devices.
WAN
2. Insert the support CD into the optical drive of your computer
to run the utility installation program. Select your language
and click Install ASUS Wireless Router Utilities to install.
Follow the instructions to complete the utility installation.
2.2 Setting up the wireless router using EZSetup
Before start, prepare an Ethernet and wireless enabled computer with ASUS utility pre-installed.
1. Press the EZSetup button on the rear panel of the wireless
router until the READY LED indicator is ashing.
EZSETUP
2. Launch the EZSetup utility by clicking Start -> ASUS Utility
-> WL-700gE Wireless Router -> EZSetup Wizard.
If you use wireless connection for EZSetup and nd
the connection is not stable, use wired connection
instead EZSetup.
ASUS Wireless Router 3
Page 7
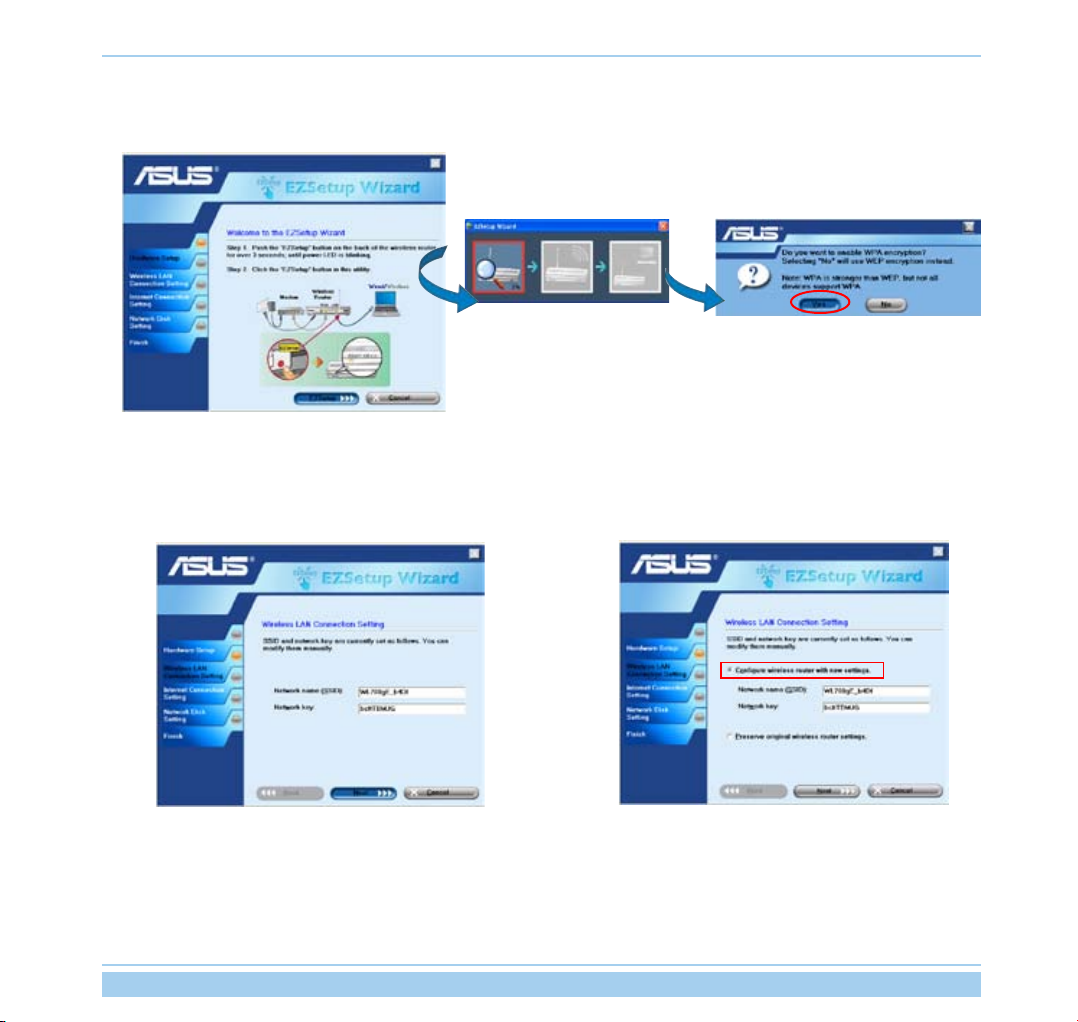
3. Click the EZSetup button in the utility to search for WL-700gE
Wireless Router. This action takes several seconds.
4. A window prompts out asking for the encryption mode you
want to use. If you want to use WPA, select Yes; to use WEP,
select No.
5. If it is the rst time you set up the wireless router, the
screen below appears. You can manually setup the SSID
and network key for the wireless router or accept the
automatically generated values. Click Next to continue.
ASUS Wireless Router 4
If you have congured the wireless router before, the screen
below appears. You can choose to modify the SSID and
network key or preserve the previous settings. Click Next
to continue.
Page 8
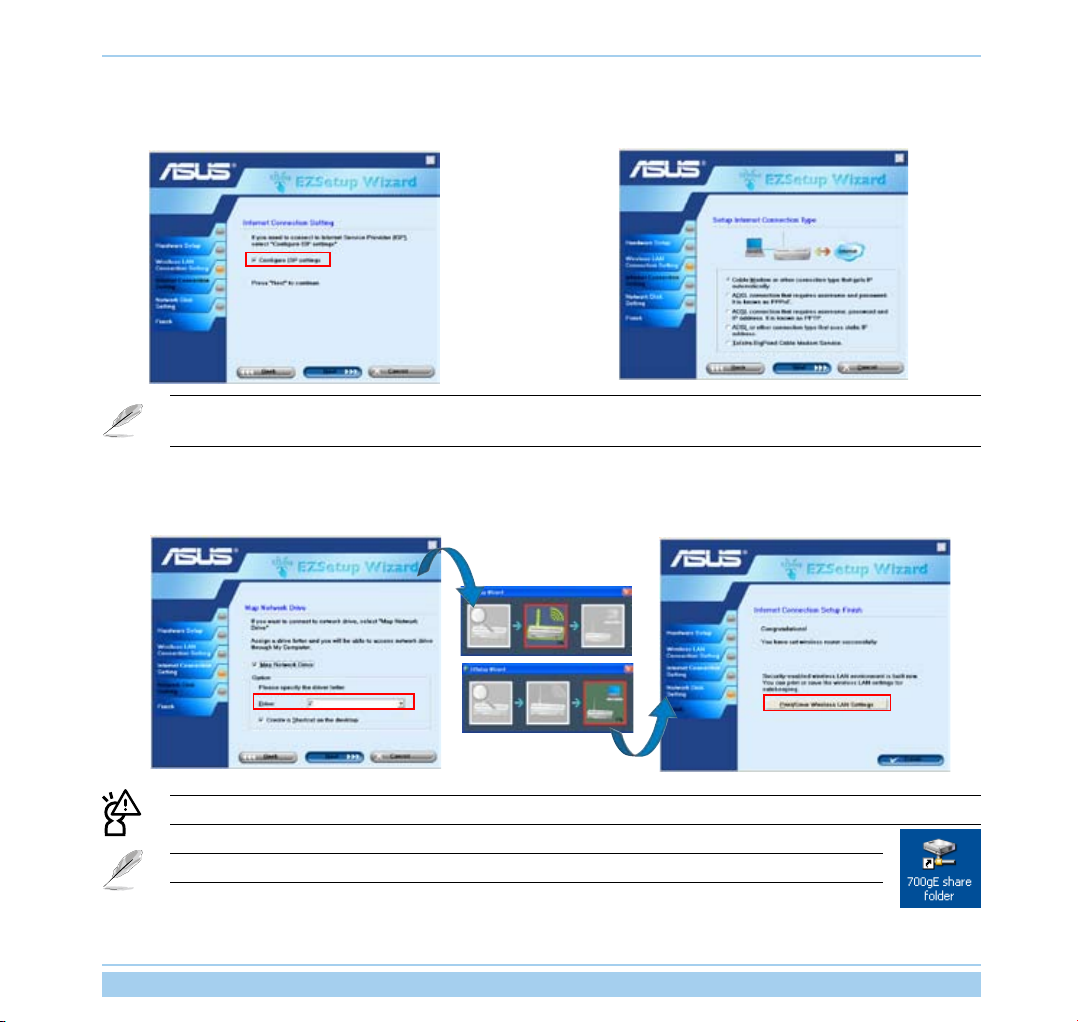
6. To connect your Internet Service Provider (ISP), select
Cong ISP settings. Click Next to set up ISP information.
According to the requirements of ISPs, you may need to input information such as IP address, username, and
password. Refer to your ISP for detailed setup information.
7. Select the connection type of your ISP service and click Next
to ll in the ISP information.
8. This page is for setting up network mass storage. Specify a
drive letter for the hard disk in WL-700gE and check Create
shortcut on desktop, then click Next.
Save and print network information is highly recommended for future wireless connection setup.
When conguration is complete, a 700gE share folder icon appears on desktop.
ASUS Wireless Router 5
9. Wait for several seconds to complete the setup, and you
can see the screen below. Click Print/Save wireless LAN
settings for future reference. Click Finish to quit EZSetup.
Page 9

2.3 Connecting WL-700gE from a wirless client
You can connect to WL-700gE from a wireless-enabled computer. Make sure the wireless card driver is correctly
installed and the card functions normally.
1. Click Control panel -> Network connection, right-click the
wireless icon -> Property -> Wireless Network tab. Select
WL-700gE and click Connect button.
3. For authentication setup, select
a RADIUS server in your network for authentication, check
Enable IEEE80.211X authentication to this network.
Authentication tab. If you have
2. If you have setup WEP encryption for your wireless router,
you need to ll the WEP keys into the Network Key eld for
connecting the router. Click OK to continue.
ASUS Wireless Router 6
Page 10

2.4 USB auto copy function
Follow the steps below to copy les from your USB storage to the hard disk in WL-700gE. The les are saved under
the
USBCopy
directory.
1. Plug the USB storage to the USB2.0 port of WL-700gE.
2. Wait for several seconds until the READY LED indicator
ashes slowly. Press the COPY button on the front panel and
the LED ashes quickly. This means WL-700gE is copying
data from your USB storage. When the LED stops ashing
and stays ON, it means data duplication is complete.
2.5 Wireless data sharing
This sections describes how to share the les in WL-700gE hard disk to your LAN users.
1. Connect a computer to WL-700gE and open the Web browser. Input 192.168.1.1 (the default IP address of WL-700gE) in the
address box and press Enter..
2. Login to the WL-700gE Web conguration interface. Login
Name: admin; Password: admin (default).
3. Click
Conguration to enter Web conguration page.
Step 4 and 5 are for rst conguration. Skip step 4 and 5 if you have congured the wireless router via EZSetup.
ASUS Wireless Router 7
Page 11

4. Click Advance Setting and select Basic. If you want to
disable encryption, set Wireless Mode to Auto and WEP
Encryption to None. Click Apply and skip to step 6. If you
want to enable encryption, go to step 5.
6. Double-click the 700gE share folder short cut on your desktop to access WL-700gE share space. Copy the les
you want to share into the share folder.
5. To enable encryption protection, set Authentication method
to WEP 64-bits, WEP 128-bits, or WPA. For WEP encryption,
you need to input four WEP keys (10 hexadecimal digits for
WEP-64bits; 26 digits for WEP-128bits). You can also let the
system generate the WEP keys by inputting a Passphrase.
Take down all keys and passphrase in your note.
How to download the shared documents
1. Connect your computer to WL-700gE, open My Network place and
click view workgroup computers (make sure WL-700gE and your
computer are within the same workgroup, the default workgroup of
WL-700gE is WORKGROUP).
The default workgroup setting of WL-700gE is Workgroup.
If your computer and WL-700gE are not within the
same workgroup, you cannot nd WL-700gE from your
computer. Set WL-700gE within your workgroup by
modifying the workgroup settings in Share Management
-> Windows Setup page.
ASUS Wireless Router 8
Page 12

2. Double-click the WL700gE icon to enter the share folder. The les you
copied from the USB storage are saved in USBCopy directory and are
listed by time/date.
2.6 Using Download Master
You can use Download Master function in ASUS Utility to organize HTTP, FTP, and BT download tasks.
1. Open Download Master from Start -> All Programs -> ASUS Utility -> WL-700gE
Wireless Router -> Download Master. Click
WL-700gE.
2.
HTTP download (1)
Right-click the download link on the Web page and select
Download using ASUS Download
File -> Connect
.
to associate with
HTTP download (2)
Right click the download link on the Web page and select
Properties.
Copy the download
Address (URL)
.
.
ASUS Wireless Router 9
Page 13

If you select
the download task is added to the
indicate the progress of download tasks.
3.
FTP download
Click
in the Options eld. Input the FTP site address, Port number,
User Name, Password. Click
Download using ASUS Download
button of the Download Master and select
Transfer
Transfer
Download
, you can see
list. The blue bars
to start.
FTP
If you copy the download address, click
utility. Paste the address into
from Option, and click
HTTP
4.
BT download
Save the BT seed on your computer. Click
the Download Master and select BT in the Options eld. Click
to locate the seed le and click
Browse
Download
Getting File From
Assign
button to start.
Transfer
Download
button in the
box, select
button of
to start.
5. Cl ick
Complete
hard disk. The incomplete tasks are kept in
butt on t o v iew the dow n loa d fi le. Ope n th e
Fo lder
folder to view or copy the nished les to your local
InComplete
folder.
ASUS Wireless Router 10
Page 14

2.7 Sharing your photos on your Website
You can upload your photos to WL-700gE to share them with your friends.
1. Click Start -> All Programs -> ASUS Utility -> WL-700gE Wireless Router -> Photo Album Exporter to open the photo upload utility.
2. Name your new album and add descriptions to the album.
Click Next to continue.
4. Locate the photos you want to upload and browse them in
the preview window. Select the photos you want to upload
and click Add.
3. Click
5. The photos you have selected appear in the lower window,
Add to add photos from your local hard drive.
click the arrows to adjust the sequence of the photos. Click
OK to continue.
ASUS Wireless Router 11
Page 15

6. Click Description to add description for individual photos.
Click Next to continue.
7. The utility starts to upload the photos, this action takes
several seconds.
8. Login your Web configuration interface. Login Name:
admin; Password: admin (default).
10. You can see the album is already added to you personal
website. To view the photos, click the album.
ASUS Wireless Router 12
9. Click
11. Your friends can view these photos and leave comments
Personal Webpage.
to them.
Page 16

2.8 Setting up the Message Board
You can create your own Blog site by setting up the Message Board to share you stories to your friend.
1. Click Login at the lower left corner.
3. Click the Message Board tab and click New topic.
2. Login Name: admin; Password: admin. Click Login to
enter the website home page again.
4. Input the subject for discussion and click
Add.
ASUS Wireless Router 13
Page 17

5. When nished, click Add Message to enter the subject and
leave a message.
7. Your message board is ready.
6. Input your information to the elds and write your message in
the Message box. Click Submit to send out the message.
ASUS Wireless Router 14
Page 18

2.9 Setting up DDNS
For static IP users who need to make a host or server available to Internet users, they need to have a static IP
address and register a domain name for easy memory. However, dynamic IP user cannot map their address to DNS
server because their IP addresses keep changing. To solve this problem, WL-700gE provides Dynamic DNS (DDNS)
function. DDNS enables dynamic IP users to map the domain name to dynamic IP address by a registered account.
To realize this function, you must rst register at DDNS service provider, such as DynDNS.org.
1. Enter the Web conguration page of WL-700gE and click
Advanced Settings at the upper right corner. Then click IP
Conig -> Miscellaneous in the left side menu. Select Yes radio
button to enable DDNS client and select a DDNS server.
2. If you do not have a DDNS account, you can apply for a free trial
account at DynDNS.org. Click Free Trial to open the registration
page of DynDNS.org.
Due to website update, the registration steps and screens
here below may be different from the actual website.
3. After you click Free Trail, you are directed to registration
page of DynDNS. Check the two checkboxes as shown in
the picture below.
ASUS Wireless Router 15
4. Scroll down and enter the Username you want to use for your
account, such as “account”. Enter your E-mail address to receive
the conrmation letter from DynDNS. Enter the Password for
your account. Then press Create Account button.
Page 19

5. After pressing Create Account you can see a message
telling you that a conrmation letter has been sent to your
e-mail address. Open your mail box to check the mail.
6. Check your mail box for the conrmation letter, open the mail
and click the link to re-enter the DynDNS registration page
and activate your account.
7. Click Login.
9. After logging in, you can see this welcome message.
11. Click
13. Your hostname is successfully created.
Add Dynamic DNS Host.
8. Input username and password to login.
10. Select Services tab.
12. Enter the host name then click
Add Host.
ASUS Wireless Router 16
Page 20

14. Return to WL-700gE DDNS conguration page. Enable
DDNS Client, set “Server” to WWW.DYNDNS.ORG and input
your user name, password and host name to the elds. Click
Apply to activate the settings.
16. Type ping account.dyndns.org and press Enter. If you
get reply from a certain IP address, it means your host is
accessible from Internet.
15. To test whether DDNS functions or not, ping the domain
name to see whether your host is accessible. Click Start ->
Run... -> type cmd, and enter the command line interface.
ASUS Wireless Router 17
Page 21

2.10 Setting up shared printer
You can connect a USB printer to the USB2.0 port on WL-700gE Wireless Router and share the printer within your
network. Follow the steps below to setup your shared printer on your .
1. Connect a USB printer to the USB2.0 port of WL-700gE. Make sure the printer is powered ON.
2. Enter the Web conguration page of WL-700gE. Click
Applications -> Printer. You can see your printer is
recognized by WL-700gE.
3. Open a Web browser window and type
press Enter. You can see the printer icon. Double click the
printer icon.
//192.168.1.1 then
4. A warning window prompts out. Click
5. Select the printer driver from the vendor-model list and click
Next to install. If your printer is not in the list, click Have
Disk to locate the driver.
OK to continue.
ASUS Wireless Router 18
6. The printer is ready for share.
Page 22

3. Troubleshooting
1. Power ON the WL-700gE Wireless Router and make sure
the LED indicators light up normally.
3. Ping WL-700gE at your computer. Click Start on the desktop
and select Run..., type cmd and press OK. Then type ping
192.168.1.1 and press Enter. If ping times out, it means the
router could not been reached by your computer. You need
to reset the router if you do not remember the IP address.
5. Check whether you can access the Web conguration page
of WL-700gE and set up features via Web interface.
2. Make sure the ASUS Wireless Router Utility is correctly
installed.
4. Press the RESET button on the rear panel for more than 5
seconds.
6. Check whether you can congure the wireless router and
access Internet via wireless.
ASUS Wireless Router 19
Page 23

4 Appendix
4.1 User notes
No part of this manual, including the products and software described in it, may be reproduced, transmitted, transcribed, stored in a retrieval
system, or translated into any language in any form or by any means, except documentation kept by the purchaser for backup purposes,
without the express written permission of ASUSTeK COMPUTER INC. (“ASUS”).
ASUS PROVIDES THIS MANUAL “AS IS” WITHOUT WARRANTY OF ANY KIND, EITHER EXPRESS OR IMPLIED, INCLUDING BUT NOT
LIMITED TO THE IMPLIED WARRANTIES OR CONDITIONS OF MERCHANTABILITY OR FITNESS FOR A PARTICULAR PURPOSE.
IN NO EVENT SHALL ASUS, ITS DIRECTORS, OFFICERS, EMPLOYEES OR AGENTS BE LIABLE FOR ANY INDIRECT, SPECIAL,
INCIDENTAL, OR CONSEQUENTIAL DAMAGES (INCLUDING DAMAGES FOR LOSS OF PROFITS, LOSS OF BUSINESS, LOSS OF
USE OR DATA, INTERRUPTION OF BUSINESS AND THE LIKE), EVEN IF ASUS HAS BEEN ADVISED OF THE POSSIBILITY OF SUCH
DAMAGES ARISING FROM ANY DEFECT OR ERROR IN THIS MANUAL OR PRODUCT.
Product warranty or service will not be extended if: (1) the product is repaired, modied or altered, unless such repair, modication of
alteration is authorized in writing by ASUS; or (2) the serial number of the product is defaced or missing.
Products and corporate names appearing in this manual may or may not be registered trademarks or copyrights of their respective
companies, and are used only for identication or explanation and to the owners’ benet, without intent to infringe.
SPECIFICATIONS AND INFORMATION CONTAINED IN THIS MANUAL ARE FURNISHED FOR INFORMATIONAL USE ONLY, AND
ARE SUBJECT TO CHANGE AT ANY TIME WITHOUT NOTICE, AND SHOULD NOT BE CONSTRUED AS A COMMITMENT BY ASUS.
ASUS ASSUMES NO RESPONSIBILITY OR LIABILITY FOR ANY ERRORS OR INACCURACIES THAT MAY APPEAR IN THIS MANUAL,
INCLUDING THE PRODUCTS AND SOFTWARE DESCRIBED IN IT.
Copyright © 2006 ASUSTeK COMPUTER INC. All Rights Reserved.
Note: Product warranty or service will not be extended if the serial number is defaced or missing.
Product name: ASUS WL-700gE Wireless Router
Manual version: QE2393 / V1.0
Publication date: April 2006
ASUS Wireless Router 20
Page 24

4.2 ASUS warranty policy
Thank you for purchasing ASUS wireless product. This apparatus is tested and approved by ASUS and enjoy two
years’ warranty subject to use within the warranty scope.
Warranty scope
ASUS provides two years’ limited warranty subject to correct use and maintenance. ASUS can charge fee for repairation or
maintenance if damage is caused by:
1). Force majeure;
2). Abnormal voltage;
3). Disassembling, modifying by non-ASUS approved agent or personnel;
4). Using non-ASUS manufactured accessories;
5). Installing pirated software;
6). Computer virus;
7). Drop, smash;
8). Product serial number label removed, defaced, forged or changed.
ASUS Wireless Router 21
 Loading...