

Page 1
WL-566gM Wireless Router
®
User Manual
E 2306/ Dec 2005
Page 2

WL-566gM Wireless Router User Manual
Index
1. Package contents ................................................................................3
2. Connecting ADSL modem and wireless router .................................3
1) Cable connection ...............................................................................3
2) Status indicators ............................................................................... 4
3) Wall mount option ..............................................................................4
3. Configuring the wireless router .......................................................... 5
1) ASUS Wireless Router wired connection ...........................................5
2) Setting IP address for wired or wireless connection ..........................5
3) Configuring the wireless router ..........................................................6
4) Quick setup ........................................................................................ 7
4. Commonly used advanced features .................................................12
1) How to setup encryption .................................................................. 12
2) Setting up a virtual server in your LAN ............................................ 12
3) Setting up vitual DMZ in your LAN ..................................................13
4) Setting up DDNS .............................................................................13
5) Setting up Bandwidth Management ................................................. 17
5. TroubleShooting ................................................................................. 19
6. Additional Information: EZSetup .........................................................21
1) Utility Installation for WL-566gM ......................................................21
2) EZSetup ........................................................................................... 22
7. Appendix ............................................................................................. 24
2
Page 3
WL-566gM Wireless Router User Manual
1
3
2
Modem
Wall telephone outlet
Wall power outlet
Phone
Power
Wall power outlet
LAN
Power
ASUS Wireless Router
Modem
Wall telephone outlet
Wall power outlet
LAN
Power
Phone
Power
ASUS Wireless Router
WAN
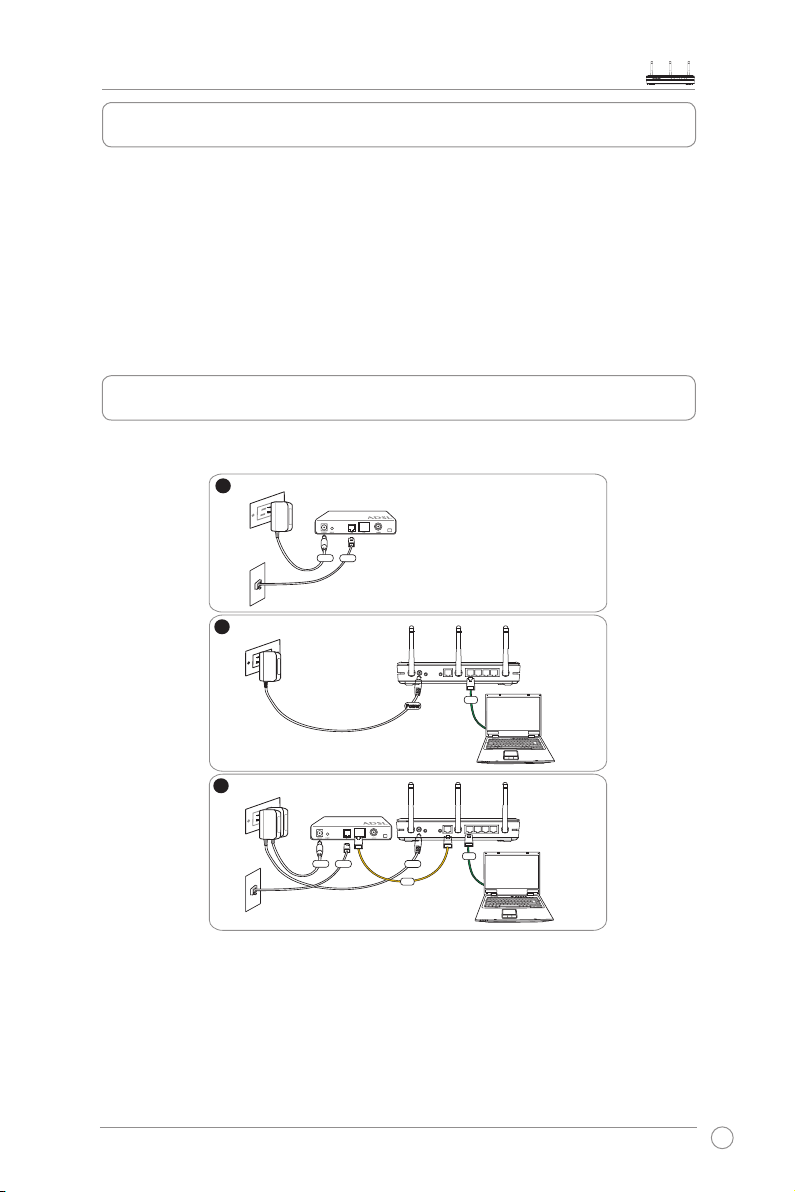
1. Package contents
• WL-566gM wireless router x 1
• Power adapter x 1
• Utility CD x 1
• RJ45 cable x 1
• Quick Start Guide x 1
2. Connecting ADSL modem and wireless router
1) Cable connection
3
Page 4
WL-566gM Wireless Router User Manual
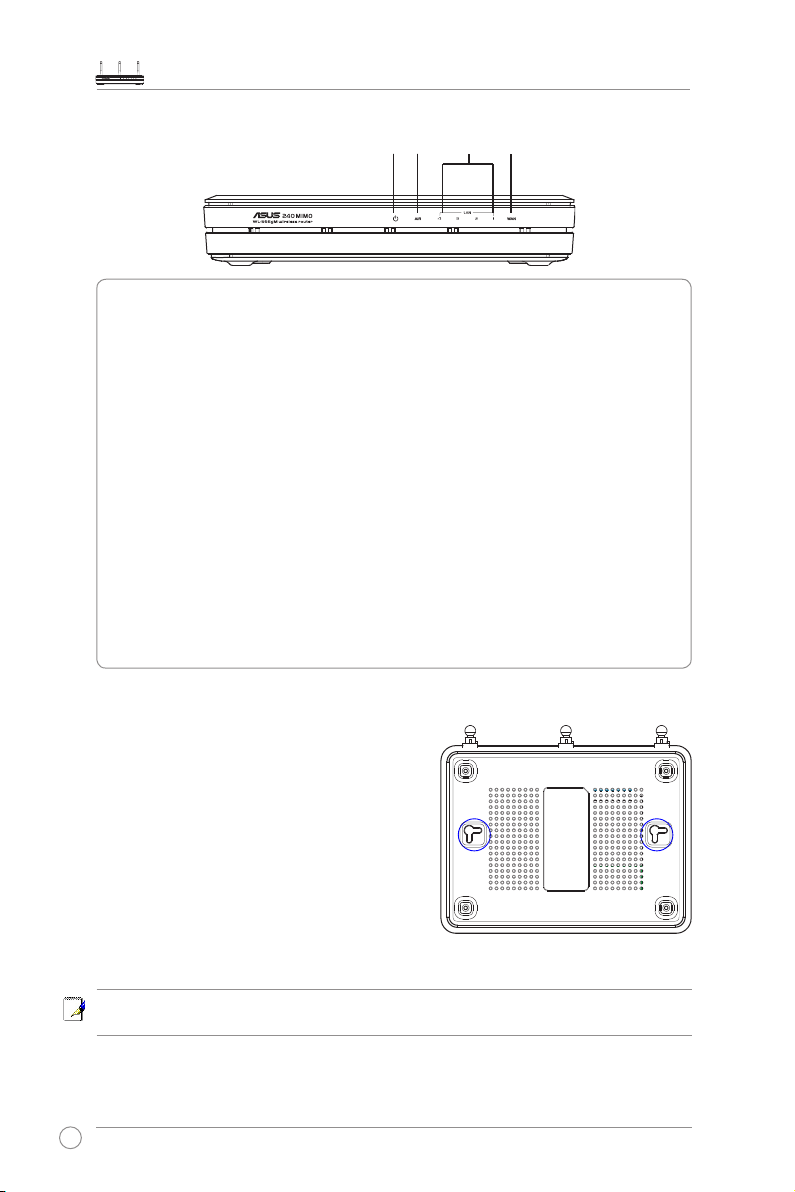
2) Status indicators
PWR
PWR (Power)
Off No power
On System ready
Flashing-slow Firmware upgrade failed
Flashing-quick EZsetup processing
AIR (Wireless Network)
Off No power
On Wireless system ready
Flashing Transmitting or receiving data (wireless)
WAN (Wide Area Network)
Off No power or no physical connection
On Has physical connection to an Ethernet network
Flashing Transmitting or receiving data (through Ethernet cable)
LAN 1-4 (Local Area Network)
Off No power or no physical connection
On Has physical connection to an Ethernet network
Flashing Transmitting or receiving data (through Ethernet cable)
LAN
AIR WAN
3) Wall mount option
Ou t of the box, the A SU S Wi re le ss R outer is
de si gn ed to sit on a r ai se d fl at surface l ik e a
file cabinet or book shelf. The unit may a lso be
converted for mounting to a wall or ceiling.
Follow these steps to mount the ASUS Wireless
Router to a wall:
1. Look on the underside for the two m ounting
hooks.
2. Mark two upper holes in a flat surface.
3. Tighten two screws until only 1/4'' is showing.
4. Latch the hooks of the ASUS Wireless Router onto the screws.
Note: Re-adjust the screws if you cannot latch the ASUS Wireless Router onto the
screws or if it is too loose.
4
Page 5
WL-566gM Wireless Router User Manual
3. Configuring the wireless router
Note: 1) Before you start, we recommend using a wired connection for initial
configuration, which may avoid possible setup problems due to wireless
uncertainty.
2) ASUS also provides an EZSetup button for fast wireless configuration.
If you would like to use EZSetup for your wireless network configuration,
please refer to chapter 6 for more information.
The ASUS Wireless Router can meet various working scenarios with proper configuration. The
default settings of the wireless router may need change so as to meet the individual needs;
therefore, before using the ASUS Wireless Router, check the basic settings to make sure they all
work in your environment.
You can configue the ASUS Wireless Router via your web browser. Connect a notebook PC or
desktop PC to your ASUS Wireless Router (either directly or through a hub) with an Ethernet cable,
or to establish a wireless connection between the terminal and the wireless router.
For the wireless connection, you need an IEEE 802.11b/g compatible device, such as an ASUS
WLAN card. Disable encryption and set the SSID to “default” on your wireless card. If you want to
configure the ASUS Wireless Router so as to access the Internet, you must have correct TCP/IP
settings. Set the IP address of your terminal within the same subnet of your ASUS Wireless Router.
1) ASUS Wireless Router wired connection
The ASUS Wireless Router is supplied with an Ethernet cable in the package. Since the ASUS
Wireless Router has integrated auto-crossover function, therefore, you can use either straightthrough or crossover cable for wired connection. Plug one end of the cable to the WAN port on the
rear panel of the router and the other end to the Ethernet port of your ADSL or Cable modem.
Wireless-Connection
Refer to your wireless adapter user manual for how to associate with a wireless router. The
default SSID of the ASUS Wireless Router is “default” (in lower case), encryption is disabled
and open system authentication is used.
Note: If configuration is done via wired connection, ignore this.
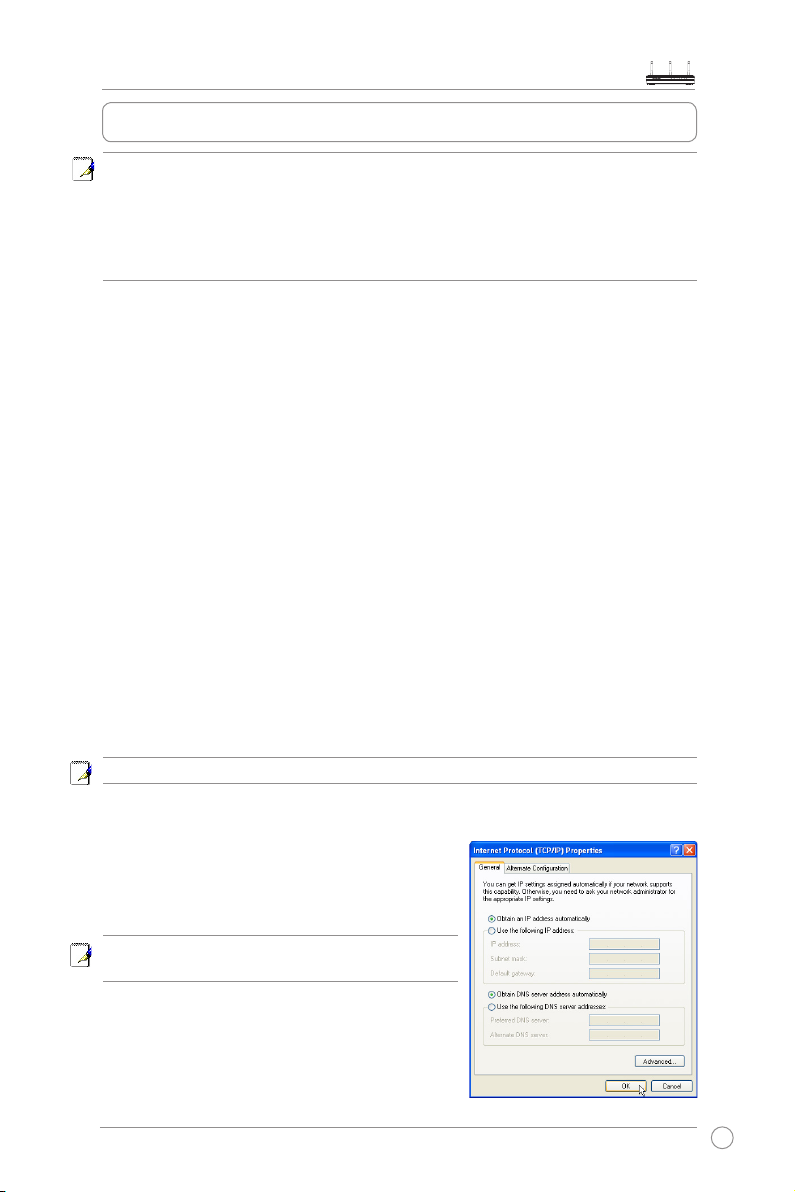
2) Setting IP address for wired or wireless connection
Getting IP address Automatically
The ASUS Wi reless R out er in teg rates DH CP server
functions, therefore, you can make your PC to get the IP
address automatically from the ASUS Wirelesss Router.
Note: Before rebooting your PC, the ASUS Wireless
Router should be switched ON and in ready state.
5
Page 6
WL-566gM Wireless Router User Manual
2
1
3
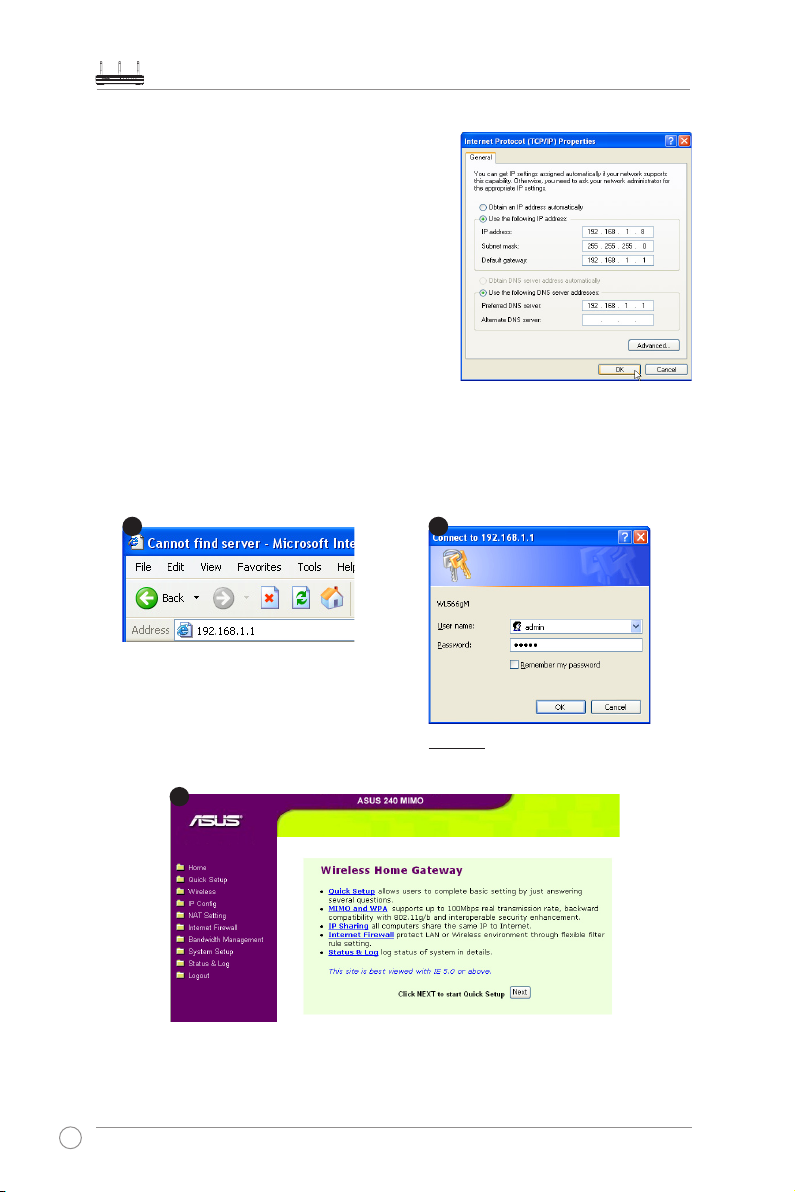
Setting IP Manually
To set IP address manually, you need to know the
default settings of the ASUS Wireless Router:
• IP address 192.168.1.1
• Subnet Mask 255.255.255.0
To set up the connection with a manually assigned
IP address, the address of your PC and the wireless
router must be within the same segment:
• IP address of your PC is 192.168.1.xxx (xxx can
be any number between 2 and 254. Make sure
the IP address is not used by other device)
• Su bne t Mas k is 255.2 55. 255.0 (same as th e
ASUS Wireless Router)
• Gateway 192.168.1.1 (this is the ASUS Wireless Router)
• DNS 192.168.1.1 (ASUS Wireless Router IP address or your own).
3) Configuring the wireless router
Enter the following address in your
web browser: http://192.168.1.1
Defaults
User name:
After logging in, you can see the ASUS Wireless Router home page.
The homepage displays quick links to configure the main features of the wireless router.
6
admin
Password:
admin
Page 7
WL-566gM Wireless Router User Manual
1
2
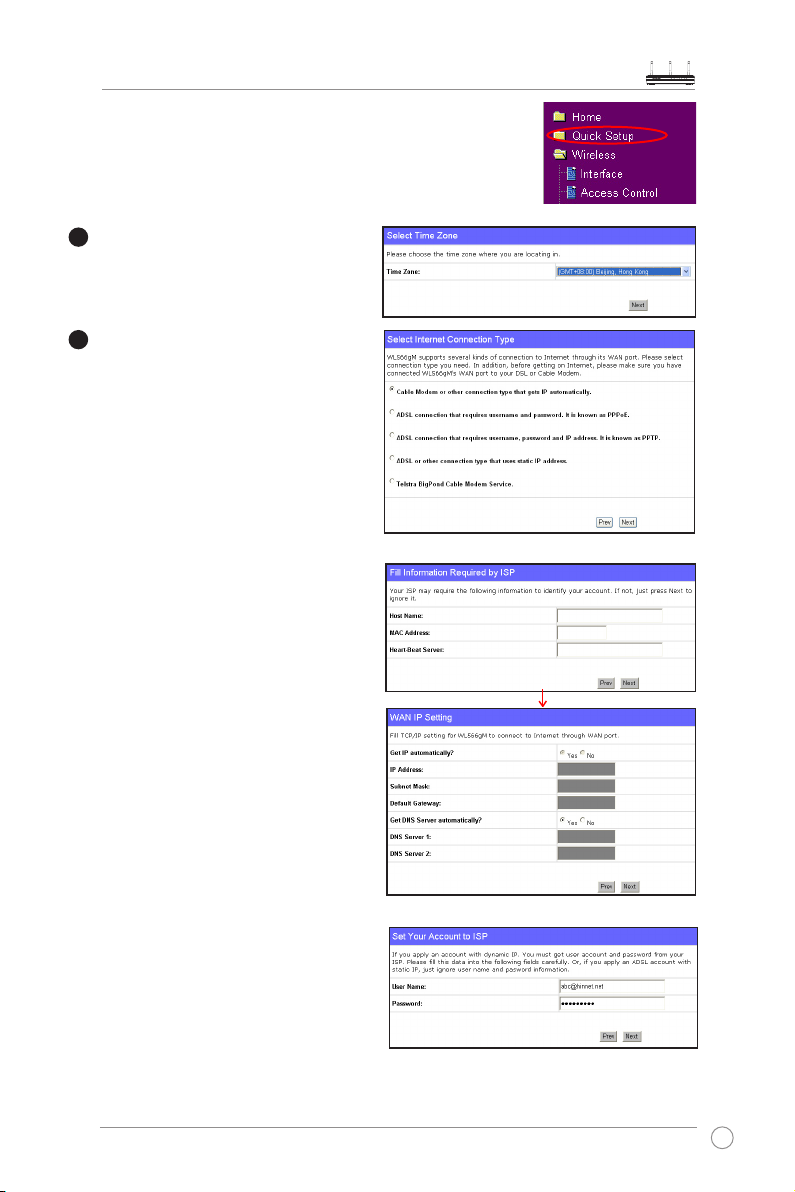
4) Quick setup
To start quick setup, click
page. Follow the instructions to setup the ASUS Wireless
Router.
to enter the “Quick Setup”
Next
Select your time zone and click
ASUS wireless router supports five types
of ISP services: cable, PPPoE, PPTP,
static WAN IP, an d Telstra BigPond .
Select the correct connection type and
click
Next
to continue.
Next
.
Cable user
If you are using services provided by
cable ISP, select
connection that gets IP automatically
If your ISP provides you hostname, MAC
address, and heartbeat server address,
fill these information into the boxes on
the setting page; if not, click
this step.
Cable Modem or other
to skip
Next
.
PPPoE user
If you use PPPoE service, select
connection that requires username
and password. It is know as PPPoE
You need to input the username and
password provided by your ISP. Click
to continue.
Next
ADSL
.
7
Page 8
WL-566gM Wireless Router User Manual
3
PPTP user
If you are using PPTP services, select
ADS L co nn ect i on tha t req uir e s
username, password and IP address.
It is know as PPTP
. Fill in the username,
password and IP address provided by your
ISP into the fields. Click
to continue.
Next
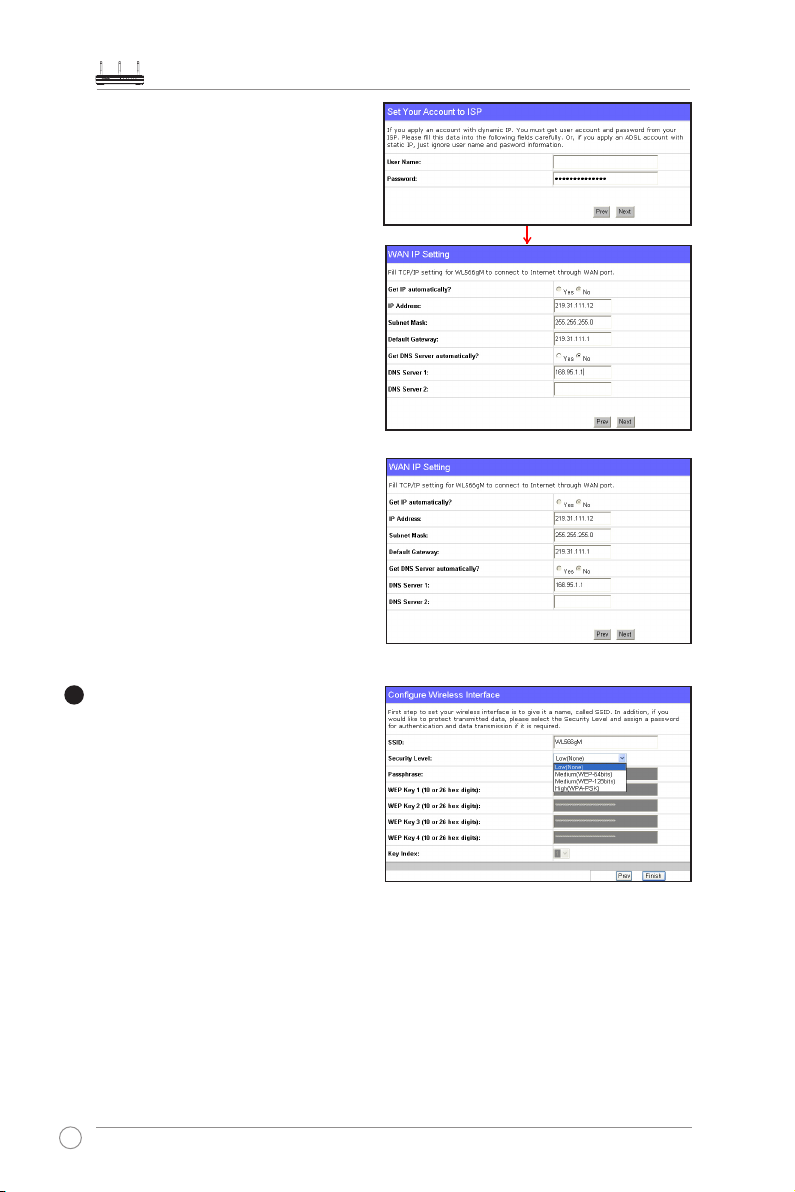
Static IP user
If you are using ADSL or other connection
ty pe t ha t us es static IP a dd re ss es ,
select
ADSL or other connection type
that uses static IP address
IP address, subnet mask, and default
gateway provided by your ISP. You can
choose to specify DNS servers, or select
to get DNS information automatically.
. Input the
herk036@adsl-comfort
After th e conne ct io n type se tt in g is
complete, you are to set up your wireless
interface. Specify to your wireless router
an SSID (Service Set Identifier), which
is a unique identifier attached to packets
sent over WLAN. This identifier emulates
a password when a device attempts to
communicate with your wireless router via
WLAN. To connect to a wireless router,
your wireless card must use the same
SSID.
If you want to protect transmitted data, select a middle or high
Security Level
to enable
encryption methods.
Medium:
Only users with the same WEP key settings can connect to your wireless router and
transmit data using 64bits or 128bits WEP key encryption.
Only users with the same WPA pre-shared key settings can connect to your wireless
High:
router and transmit data using TKIP encryption.
8
Page 9

WL-566gM Wireless Router User Manual
5
4
6
The ASUS wireless router configuration page
provides a convenient approach to setup the
WEP Keys: you can set up a Passphrase
and let the system use certain algorithm to
generate four WEP keys. Thus, instead of
inputting long WEP keys, you can set up the
encryption by fill in a single Passphrase.
Fo r exa mple, if we selec t WEP 64bi ts
encryption mode and input 11111 as the
Passphrase, the WEP Keys are generated
as shown in the right picture. Record the
Passphrase and the WEP keys in your
notebook, then cl ick
pro mpt s out as kin g you to sa ve the
settings. Click
the new settings.
After the settings on the wireless router are complete, we are to setup encrypted wireless
connection between the wireless router and your PCs pre-installed with wireless cards. If your use
ASUS Wireless Card, you can use ASUS One Touch Wizard to setup the connection.You can also
choose Windows® XP Wireless Zero Configuration service to configure the wireless connection.
Note: We recommend using 240 MIMO wireless adpaters to connect WL-566gM so
as to achieve high speed data transmission.
Save&Restart
Fi nish
. A wi ndow
to activate
Configure WLAN Card with ASUS One Touch Wizard
If you have installed ASUS wireless card together with its utilities and drives on your PC, click
-> Programes -> ASUS Utility-> WLAN Card -> One Touch Wizard
Wizard utility.
to launch the One Touch
Start
9
Page 10

WL-566gM Wireless Router User Manual
1. Select
Connect to an existing wireless
LA N (St ati on)
to continue.
Next
radio button and click
3. Next, we are to set up the encryption for
the wireless adapter. Set
to
64 bits (10digits)
Generation
into the
radio button and input
Passphrase
Key Length
, select
Automatic
box and click
11111
Next
Note: The encryption settings on your
WLAN Card and your wireless router
must be the same.
2. ASUS One Touch Wizard searches and
displays all the available stations in the
Available Networks
window as shown
in the picture. Select your wireless router
and press
to continue.
Next
4. Wai t for s ev eral se co nds to ge t the
wir el es s adap te r c on ne cte d to th e
wireless router. Press
Next
.
to continue.
5. An IP confi guratio n scr ee n pro mp ts
out. Setup the IP address of your PC
according t o your n etwork cond iti on.
After the setup is complete, click
Finish
to exit the One Touch Wizard.
10
Page 11

WL-566gM Wireless Router User Manual
7
8
Windows® Wireless Zero Configuration service
For non-ASUS wireless adaptor user, you can set up the wireless connection via Windows®
Wireless Zero Configuration (WZC) service.
1. Double-click the wireless network icon on
the task bar to view available networks.
Select your wirel ess ro ute r a nd cli ck
.
Connect
To adjust other settings of the wireless router, click
on items on the menu to open a submenu and follow
the instructions to setup the router. Tips are given
when you move your cursor over each item.
2. A window prompts out aski ng for the
encryption keys. Input the 10-digit keys
yo u ha ve set on t he wirel es s router
and click
complete.
Connect
. The connection is
11
Page 12

WL-566gM Wireless Router User Manual
1
2
3
4
4. Commonly used advanced features
The following pages are setup examples of commonly used advanced features.
You can setup these features via a web browser.
1) How to setup encryption
WL-566gM encryption setup
Please refer to Page 9-11 for encryption setup information or to use ASUS EZSetup features
which enable a quick encryption setup through several mouse clicks (Chapter 6).
2) Setting up a virtual server in your LAN
Virtual Server is a kind of technology which enables a computer within a local area network
(LAN) to receive specialized packets from network, for example, when you need to make a
host into an FTP server or Web server for outside user to access. Virtual DMZ is quite similar
to Virtual Server, but it allows all incoming data packets instead of using policy to filter the
packets.
Click
Virtual Server
configuration page.
Select
Yes
server. F or example, if host
192 .1 68. 1. 100 ne ed to be
set to FT P ser ver (V irt ua l
server) which is accessible by
outside user, we shall direct
all incoming packets with 21
as the destination ports to the
host. Therefore, FTP access
request from outside users are
forwarded to the host.
Click
Finish
Click
Save & Restart
the wireless router and activate
the settings.
in NAT Setting folder to open the NAT
to enable virtual
.
to restart
12
Page 13

WL-566gM Wireless Router User Manual
2
3
1
2
1
3) Setting up virtual DMZ in your LAN
You can enable all internet service such as Netmeeting, MSN and online games by enabling
Virtual DMZ on the hosts in your LAN.
Click
Virtual DMZ
En ter the IP add ress of the
host and click
Cli ck
Sav e & Re s tar t
restart the wireless router and
activate the settings.
in the NAT Setting menu.
.
Finish
t o
4) Setting up DDNS
Dynamic DNS (DDNS) allows user to expose host to Internet through DDNS service provider.
This function facilitates users who use dynamic IP service, i.e. the router receives a new IP
address once the IP address release is expired. If you set up DDNS service on the wireless
router, each time the wireless router connect to the Internet and get an IP address from ISP
IP address pool, this function automatically updates your IP address information to DDNS
service provider so that user on Internet can access the hosts and servers in your local area
network through a predefined domain name registered at the DDNS service provider.
Click
Miscellaneous
S ele c t
Ye s
DDNS service. If you have not
a DDN S acco unt, click
to apply for one.
Trial
from IP Config folder.
t o ena b le t he
Free
13
Page 14

WL-566gM Wireless Router User Manual
3
4
5
6
7
8
After clicking Free Trial, you
are directed to the homepage
of www. DynDNS.o rg, w here
you can register and apply for
DDNS services.
Read the policy and select "
have read...
Enter your user name, e-mail
address, password, then click
Create Account
A m e s s a g e prompts o u t
informing that you account has
been created. An e-mail is sent
to your mailbox entered in the
last step. Open your mailbox
and read the mail.
".
.
I
Open you r e-mail to find the
act iva tio n l et ter. Cli ck th e
hyp e rli nk to a cti vat e yo u r
account.
The link directs you to a login
page. Clink
E nte r t he us er n ame a nd
password then click
14
login
.
Login
.
Page 15

9
11
12
13
After logging in, you can see
10
this welcome message.
WL-566gM Wireless Router User Manual
Select
Cli ck
Host
Services
.
tab.
Add Dy nam i c D NS
Enter the host name then click
Add Host
.
You can see this message when
your hostname is successfully
created.
15
Page 16

WL-566gM Wireless Router User Manual
15
16
17
18
14
Fill the account information into
the DDNS setting fields of your
wireless router.
Click
Click
.
Finish
Save & Restart
to restart
the wireless router and activate
the settings.
Now we are to verify whether
DDNS is working. Click Start
menu and select
and click OK to open the
cmd
Run...
.Type
CLI console.
Type
ping account.dyndns.org
(your DDNS domain name). If
you can see the reply like what
is sh own in t he right pi ctu re,
DDNS is working correctly.
16
Page 17

WL-566gM Wireless Router User Manual
1
2
3
5) Setting up Bandwidth Management
Bandwidth Management provides a mechanism to setup bandwidths according to IP address
or port or both. You can define the bandwidth policy, including minimum bandwidth and
maximum bandwidth, to a fixed IP address or a fixed port or both for controlling the download
traffic. You could also define upload bandwidth by setting up the NAT.
Click
Basic Config
Select
Yes
Management function.
page in Bandwidth Management folder.
to enable Bandwidth
Download stream
If we want to limit the download bandwidth of a host within a speed range, for example,
100 to 200kbps, we need to fill in the host IP address, the maximum and the minimum data
speeds into the download policy field. If the minimum speed is defined, the host can transmit
data at a minimum data speed of 100kbps regardless of the network conditions.
1. To apply on all host an FTP
dow nl oad sp ee d pol ic y,
leave the IP address field
blank, input "20" in the
field and define the speeds,
then click
2. To set up we b acc ess
download policy, input "80"
in the
speeds and click
.
Add
field, define the
Port
Add
.
Port
3. T o s e t u p d o w n l o a d
bandwidth policy of a certain
service for a host, input the
ho st I P ad dr es s an d th e
port number of the service,
define the speeds and click
.
Add
17
Page 18

WL-566gM Wireless Router User Manual
4
5
6
4. T o s e t u p d o w n l o a d
bandwidth policy for the all
hosts in your LAN, leave the
IP address and port fields
bl ank, de fine the spe eds
(the speeds are higher than
their counterparts in other
entries), then click
Add
.
Upload stream
If you want to set up upload traffic control policy, for example, to
limit the upload bandwidth of port 2100 of 192.168.1.2 within 10 to
80kbps, we shall first set up NAT policy.
1. S elect
2. Press
3. Return to the Upload Policy List in Bandwidth
4. Set the
Yes
Virtual Server. In the Vitual
Server List field, fill the port,
IP address int o the fields
and press
Apply
Management setting page.
Port
as "80",
(kbps)
as "10", then click
to en able the
.
Add
button.
as "2100",
Min.(kbps)
.
Add
Max
Press
Click
the wireless router and activate
the settings.
18
button.
Finish
Save & Restart
to restart
Page 19

WL-566gM Wireless Router User Manual
5. Troubleshooting
1. Cannot access to web browser for router configuration
1. Open a web browser and open
"Internet Options" dialog box.
2. Click on "Delete Cookies" and "Delete
Files".
2. Cannot Establish Connection via Wireless
Out of Range:
• Put the router closer to the wireless client.
• Try to change the channel setting.
Authentication:
• Use wired connection to connect to router.
• Check the wireless security setting.
• Do the hard reset on the wireless router by pressing the Reset button on the rear panel
for more than 5 seconds.
Couldn't find the router:
• Do the hard reset on the wireless router by pressing the Reset button on the rear panal for
more than 5 seconds.
• Check the setting in the wireless adapter such as SSID and encryption setting.
3.Cannot get access to the Internet via wireless LAN adapter
• Move the router closer to the wireless client.
• Check whether the wireless adapter is connected to the correct AP.
• Check whether the wireless channel in use conforms to the channels available in your
country/ area.
• Check encryption setting.
• Check whether the ADSL or Cable connection is correct.
• Retry using another Ethernet cable.
19
Page 20

WL-566gM Wireless Router User Manual
4.Internet is not accessible
• Check the lights on ADSL modem and the Wireless Router
• Check whether the "WAN" LED on the Wireless Router is ON. If the LED is not ON,
change the cable and try again.
4.1. When ADSL Modem "Link" light is ON (not blinking), this means
Internet Access is Possible.
• Restart your computer.
• Refer to the Quick Setup Guide of the wireless router and reconfigure the settings.
• Check whether the WAN LED on the router is ON or not.
• Check wireless encryption settings.
• Check whether the computer can get the IP address or not (via both wired network and
wireless network).
• Make sure your Web browser is configured to use the local LAN, and is not configured to
use a proxy server.
4.2. If the ADSL "LINK" light blinks continuously or stays off, Internet
access is not possible - the Router is unable to establish a connection
with the ADSL network.
• Make sure your cables are all correctly connected .
• Disconnect the power cord from the ADSL or Cable modem, wait a few minutes, then
reconnect the cord.
• If the ADSL light continues to blink or stays OFF, contact your ADSL service provider.
5.Network name or encryption keys are forgotten
• Try to setup the wired connection for setup the wireless encryption again.
• Do the hard reset on the wireless router by pressing the Reset button on the rear panel for
more than 5 seconds.
6.How to reset to defaults
The following are factory default values. If you push the Restore button on the back of the
ASUS Wireless Router for over 5 seconds, or click the “Restore” button on the “Factory Default”
page under “ Advanced Setup”, the following default settings overwrite the old settings on your
wireless router.
User Name: admin Subnet Mask: 255.255.255.0
Password: admin DNS Server 1: 192.168.1.1
Enable DHCP: Yes (if plug in Wan cable) DNS Server 2: (Blank)
IP address: 192.168.1.1 SSID: default
Domain Name: (Blank)
20
Page 21

WL-566gM Wireless Router User Manual
6. Additional Information: EZSetup
1) Utility Installation for WL-566gM
1. Cl ick
Install A SUS Wireless R outer
to ru n the setup ins tallation
Utili tie s
program.
3. Click
designated location.
5. Select
computer.
to insta ll th e utilit y in the
Ne xt
and press
Yes
Finish
to restart your
2. Click
4. Select a program folder and click
6.Open the
to continue.
Next
EZSetup Wizard
.
Next
.
21
Page 22

WL-566gM Wireless Router User Manual
1
3
2
2) EZSetup
Wireless LAN setup will complete in two easy steps. First open the EZSetup utility
form Start menu, then push the EZSetup button on the rear panel for 3 seconds.
Push
3 sec. and release.
EZSetup
over
1) If the setup button is pushed without running the EZsetup wizard utility, the PWR
indicator will flash and Internet connections will pause for a short period but will
then return to normal operation without change.
2) To use EZSetup, you must have an ASUS wireless adapter such as WL-106gM.
Click the
EZSetup
button in the utility.
Note: Use E ZSe tup Wi zar d w ith one
wireless client at a time. If the wireless
client computer cannot discover the
wireless router while in EZSetup mode,
please shorten the distance between
the client and the router.
Wireless settings, including network name and network keys, are generated automatically.
You can modify these settings manually. Note if your wireless router is configured before,
select
Preserve original wireless router settings
continue.
22
to use the current value. Click
Next
to
Page 23

WL-566gM Wireless Router User Manual
4
5
If you need to configure the ISP settings for your wireless router, select
, click
settings
Setup is complete, press
LAN Setti ngs
Click Finish to exit the EZSetup utility.
and follow the instructions to complete the settings.
Next
button for f uture refe rence.
Print/Save Wireless
Configure ISP
23
Page 24

WL-566gM Wireless Router User Manual
7. Appendix
FCC Warning Statement
This device complies with Part 15 of the FCC Rules. Operation is subject to the following two
conditions:
(1) this device may not cause harmful interference, and
(2) this device must accept any interference received, including interference that may cause
undesired operation.
This equipment has been tested and found to comply with the limits for a class B digital
device, pursuant to part 15 of the FCC Rules. These limits are designed to provide reasonable
protection against harmful interference in a residential installation.
This equipment generates, uses and can radiate radio frequency energy and, if not installed
and used in accordance with the instructions, may cause harmful interference to radio
communications. However, there is no guarantee that interference will not occur in a particular
installation. If this equipment does cause harmful interference to radio or television reception,
which can be determined by turning the equipment off and on, the user is encouraged to try to
correct the interference by one or more of the following measures:
- Reorient or relocate the receiving antenna.
- Increase the separation between the equipment and receiver.
- Connect the equipment into an outlet on a circuit different from that to which the receiver
is connected.
- Consult the dealer or an experienced radio/TV technician for help.
CAUTION:
Any changes or modifications not expressly approved by the party responsible for compliance
could void the userʼs authority to operate the equipment.
Prohibition of Co-location
This device and its antenna(s) must not be co-located or operating in conjunction with any other
antenna or transmitter
Safety Information
To maintain compliance with FCCʼs RF exposure guidelines, this equipment should be
installed and operated with minimum distance 20cm between the radiator and your body. Use
on the supplied antenna.
Declaration of Conformity for R&TTE directive 1999/5/EC
Essential requirements – Article 3
Protection requirements for health and safety – Article 3.1a
24
Page 25

WL-566gM Wireless Router User Manual
Testing fo r electric safety a cco rdi ng to EN 60950-1 h as been con duc ted . These are
considered relevant and sufficient.
Protection requirements for electromagnetic compatibility – Article 3.1b
Testing for electromagnetic compatibility according to EN 301 489-1 and EN 301 489-17 has
been conducted. These are considered relevant and sufficient.
Effective use of the radio spectrum – Article 3.2
Testing for radio test suites according to EN 300 328- 2 has been conducted. These are
considered relevant and sufficient.
CE Mark Warning
This is a Class B product, in a domestic envi ron men t, this pro duc t may ca use radio
interference, in which case the user may be required to take adequate measures.
25
 Loading...