

Page 1

Content
English .......................................................................... . . . 1
Français........................................................................10
Deutsch
...........................................................................19
Italiano............................................................................28
Español.................................................................. ........37
Русский
....................................................................... . . .. 4 6
Português .................................................................. .. .. 5 5
Български........................................................................64
Česky..............................................................................73
Nederlands......................................................................82
Eesti................................................................................91
Suomi.............................................................................100
Ελληνικά........................................................................109
Magyar...........................................................................118
Bahasa Indonesia.......................................................... 127
Latviski........................................................ ...............136
Lietuvių.......................................................................145
Polski..............................................................................154
Română ....................................................... ................163
Slovensky......................................................................172
Українська ........................................................ ..........181
Page 2
FCC Warning Statement
This device complies with Part 15 of the FCC Rules. Operation is subject to the following two
conditions:
1. this device may not cause harmful interference, and
2. this device must accept any interference received, including interference that may cause
undesired operation.
This equipment has been tested and found to comply with the limits for a class B digital
device, pursuant to part 15 of the FCC Rules. These limits are designed to provide reasonable
protection against harmful interference in a residential installation.
This equipment generates, uses and can radiate radio frequency energy and, if not installed
and used in accordance with the instructions, may cause harmful interference to radio
communications. However, there is no guarantee that interference will not occur in a particular
installation. If this equipment does cause harmful interference to radio or television reception,
which can be determined by turning the equipment off and on, the user is encouraged to try to
correct the interference by one or more of the following measures:
- Reorient or relocate the receiving antenna.
- Increase the separation between the equipment and receiver.
- Connect the equipment into an outlet on a circuit different from that to which the receiver
is connected.
- Consult the dealer or an experienced radio/TV technician for help.
CAUTION
Any changes or modications not expressly approved by the party responsible for compliance
could void the user’s authority to operate the equipment.
Prohibition of Co-location
This device and its antenna(s) must not be co-located or operating in conjunction with any other
antenna or transmitter.
Safety Information
To maintain compliance with FCC’s RF exposure guidelines, this equipment should beinstalled
and operated with minimum distance 20cm between the radiator and your body. Use on the
supplied antenna.
Page 3
Declaration of Conformity for R&TTE directive 1999/5/EC
Essential requirements – Article 3
Protection requirements for health and safety – Article 3.1a
Testing for electric safety according to EN 60950-1 has been conducted. These are
considered relevant and sufcient.
Protection requirements for electromagnetic compatibility – Article 3.1b
Testing for electromagnetic compatibility according to EN 301 489-1 and EN 301 489-17 has
been conducted. These are considered relevant and sufcient.
Effective use of the radio spectrum – Article 3.2
Testing for radio test suites according to EN 300 328- 2 has been conducted. These are
considered relevant and sufcient.
CE Mark Warning
This is a Class B product, in a domestic environment, this product may cause radio
interference, in which case the user may be required to take adequate measures.
DGT 警語
經型式認證合格之低功率射頻電機,非經許可,公司、商號或使用者均不得擅自變更頻率、
加大功率或變更原設計之特性及功能。
低功率射頻電機之使用不得影響飛航安全及干擾合法通信;經發現有干擾現象時,應立即
停用,並改善至無干擾時方得繼續使用。
前項合法通信,指依電信法規定作業之無線電通信。
低功率射頻電機須忍受合法通信或工業、科學及醫療用電波輻射性電機設備之干擾。
Page 4
English
Pocket Wireless Router
(
WL-530g V2
for 802.11g/b wireless clients)
Quick Setup Guide
®
Page 5

English
Quick Setup
2 ASUS Pocket Wireless Router
Installation Procedure
Follow these steps to install the ASUS Wireless Router.
1. Determine the best location for the ASUS Wireless Router. Keep in mind
the following considerations:
• The length of the Ethernet cable that connects the ASUS Wireless
Router to the network must not exceed 100 meters.
• Try to place the ASUS Wireless Router on a at, sturdy surface as far
from the ground as possible, such as on top of a desk or bookcase,
keeping clear of obstructions and away from direct sunlight.
• Try to centrally locate the ASUS Wireless Router so that it will provide
coverage to all of the wireless mobile devices in the area. Orientating
the antenna vertically should provide the best reception.
• Use only the power supply that came with this unit. Other power
supplies may t but the voltage and power may not be compatible.
2. Wall mounting or vertical standing is also possible.
Warning: It is the responsibility of the installer and users of the ASUS
Wireless Router to guarantee that the antenna is operated at least
20 centimeters from any person. This is necessary to insure that the
product is operated in accordance with the RF Guidelines for Human
Exposure which have been adopted by the Federal Communications
Commission.
3. LAN Connection: Attach one end of an RJ-45 Ethernet cable to the
ASUS Wireless Router’s LAN port (any one of the four) and attach the
other end to the RJ-45 Ethernet cable to your desktop computer.
4. Power Connection: The ASUS Wireless Router requires power from
an external power supply. The ASUS Wireless Router ships with a UL
listed, Class 2 power supply. Attach one end of the DC power adapter
to the back of the ASUS Wireless Router and the other end to a power
outlet.
The Power LED on the front of the ASUS Wireless Router will light up
when the unit is powered ON. In addition, the green LAN or WAN LEDs
will turn ON to indicate that the ASUS Wireless Router has a physical
Ethernet network connection.
Page 6

English
ASUS Pocket Wireless Router 3
Quick Setup
Software Conguration
Conguring the ASUS Wireless Router
The ASUS Wireless Router can be configured to meet various usage
scenarios. Some of the factory default settings may suit your usage; however,
others may need changing. Prior to using the ASUS Wireless Router, you
must check the basic settings to guarantee it will work in your environment.
Conguring the ASUS Wireless Router is done through a web browser.
You need a Notebook PC or desktop PC connected to the ASUS Wireless
Router (either directly or through a hub) and running a web browser as a
conguration terminal. The connection can be wired or wireless. For the
wireless connection, you need an IEEE 802.11g/b compatible device, e.g.
ASUS WLAN Card, installed in your Notebook PC. You should also disable
WEP and set the SSID to “default” for your wireless LAN device. If you want
to congure the ASUS Wireless Router or want to access the Internet through
the ASUS Wireless Router, TCP/IP settings must be correct. Normally, the
TCP/IP setting should be on the IP subnet of the ASUS Wireless Router.
Note: Before rebooting your computer, the ASUS Wireless Router
should be switched ON and in ready state.
Connecting to the ASUS Wireless Router
Wired Connection
One RJ-45 cable is supplied with the ASUS Wireless Router. Auto crossover
function is designed into the ASUS Wireless Router so you can use either
a straight-through or a crossover Ethernet cable. Plug one end of the cable
into the WAN port on the rear of the ASUS Wireless Router and the other
end into the Ethernet port of your ADSL or Cable modem.
Wireless-Connection
Refer to your wireless adapter user’s manual on associating with the ASUS
Wireless Router. The default SSID of the ASUS Wireless Router is “default”
(lower case), encryption is disabled and open system authentication is
used.
Page 7
English
Quick Setup
4 ASUS Pocket Wireless Router
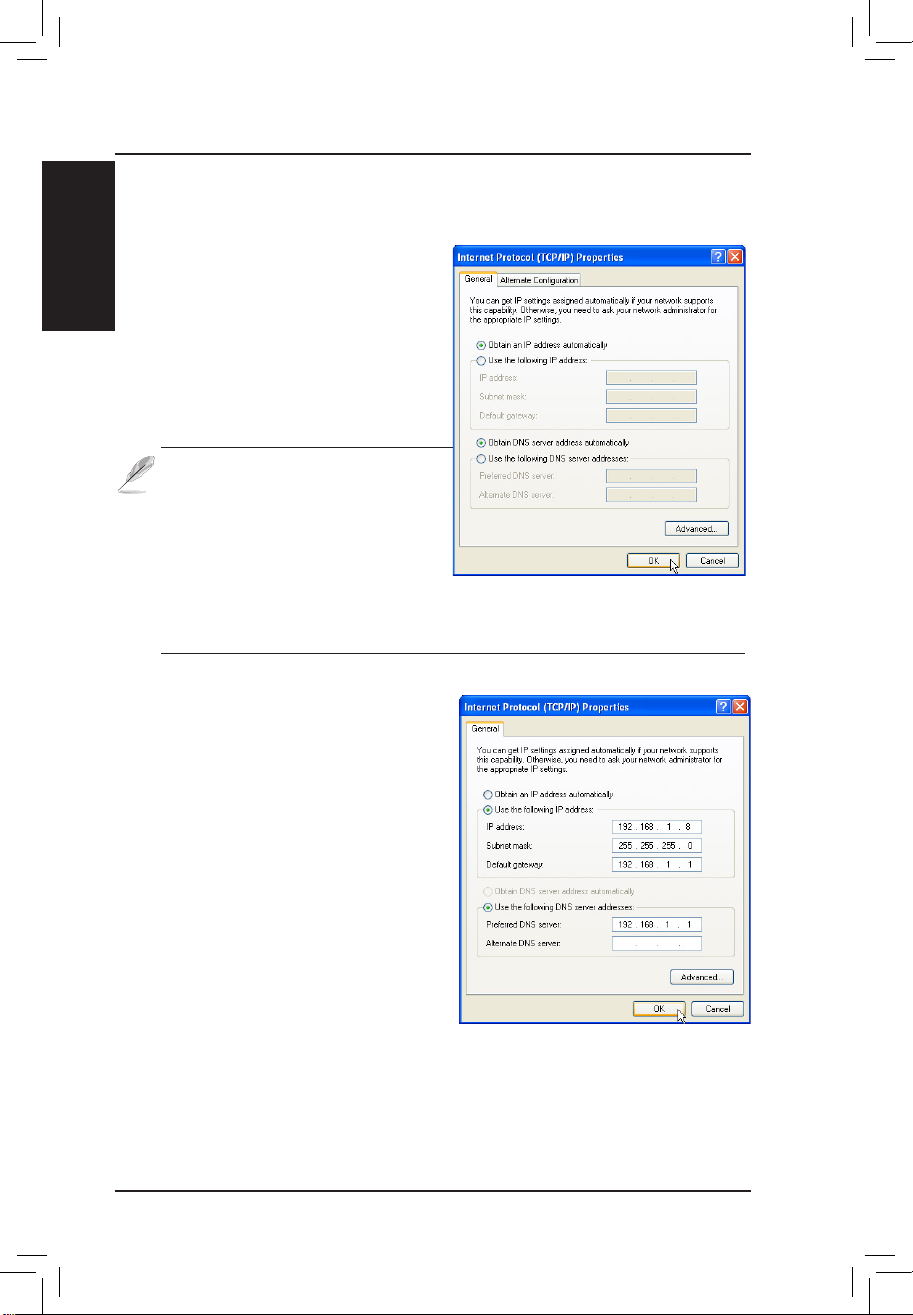
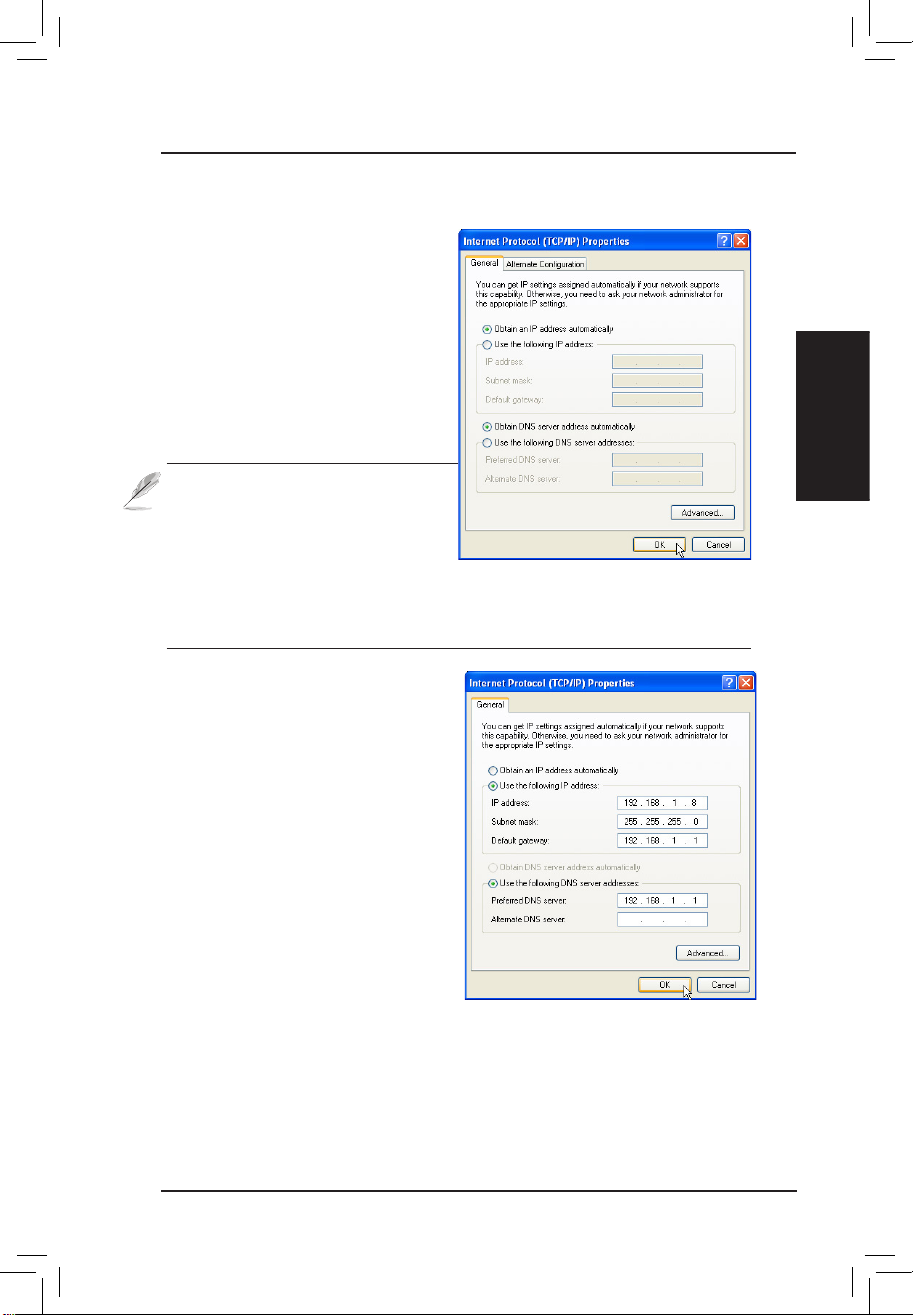
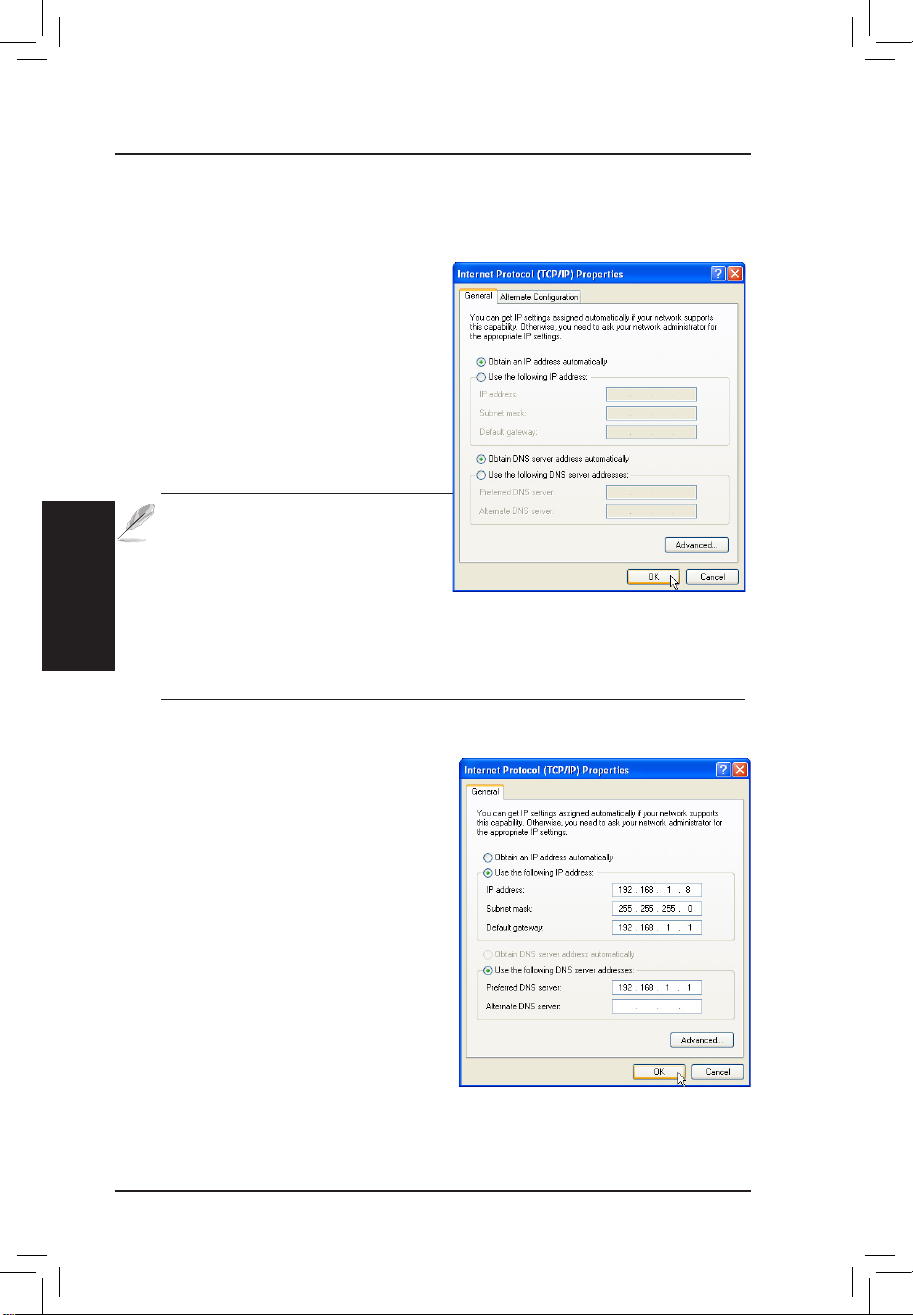
Setting IP Manually
If you want to set your IP address
manuall y, the follow ing def ault
settings of the ASUS Wireless Router
should be known:
• IP address 192.168.1.1
• Subnet Mask 255.255.255.0.
If you set your computer ’s IP
manually, it needs to be on the same
segment. For example:
• IP address 192.168.1.xxx (xxx
can be any number between 2 and
254 that is not used by another
device)
• Subnet Mask 255.255.255.0 (same as the ASUS Wireless Router)
• Gateway 192.168.1.1 (this is the ASUS Wireless Router)
• DNS 192.168.1.1 (ASUS Wireless Router IP address or your own).
Setting IP address for Wired or Wireless Connection
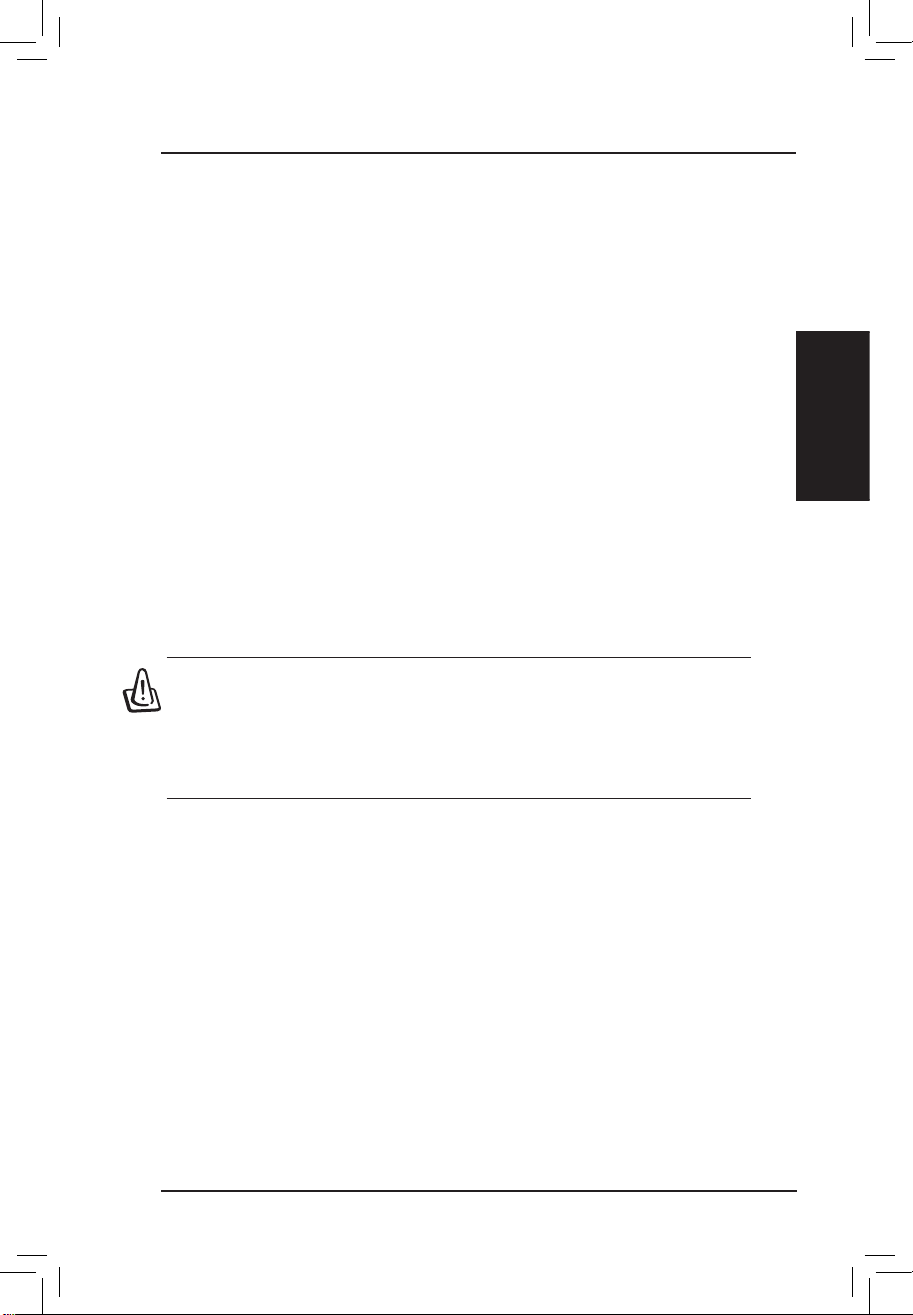
Get IP Automatically
Th e AS US Wi re le ss Ro ut er
incorporates a DHCP server so the
easiest method is to set your PC to
get its IP address automatically and
reboot your computer. So the correct
IP address, gateway, DNS (Domain
Name System Server) can be obtained
from the ASUS Wireless Router.
Note: The Wireless Router will
act as a router and provide IP
address only when the physical
connection of WAN port exists.
You must connect the WAN port
on the ASUS Wireless Router with
the Ethernet port on your ADSL or Cable modem with a network
cable. Before rebooting your PC, the ASUS Wireless Router should
be switched ON and in the ready state.
Page 8
English
ASUS Pocket Wireless Router 5
Quick Setup
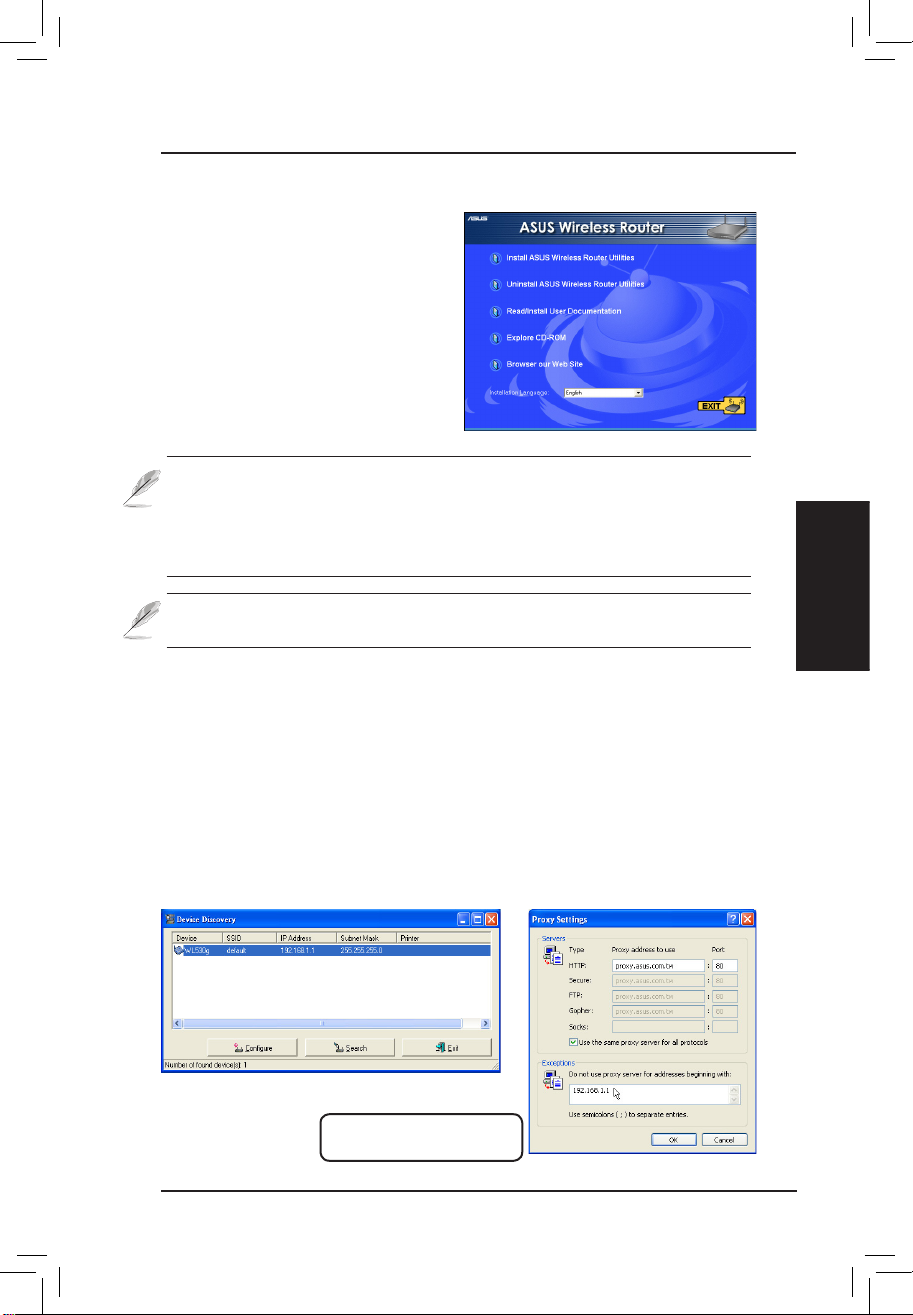
Using the Wireless Router for the First Time
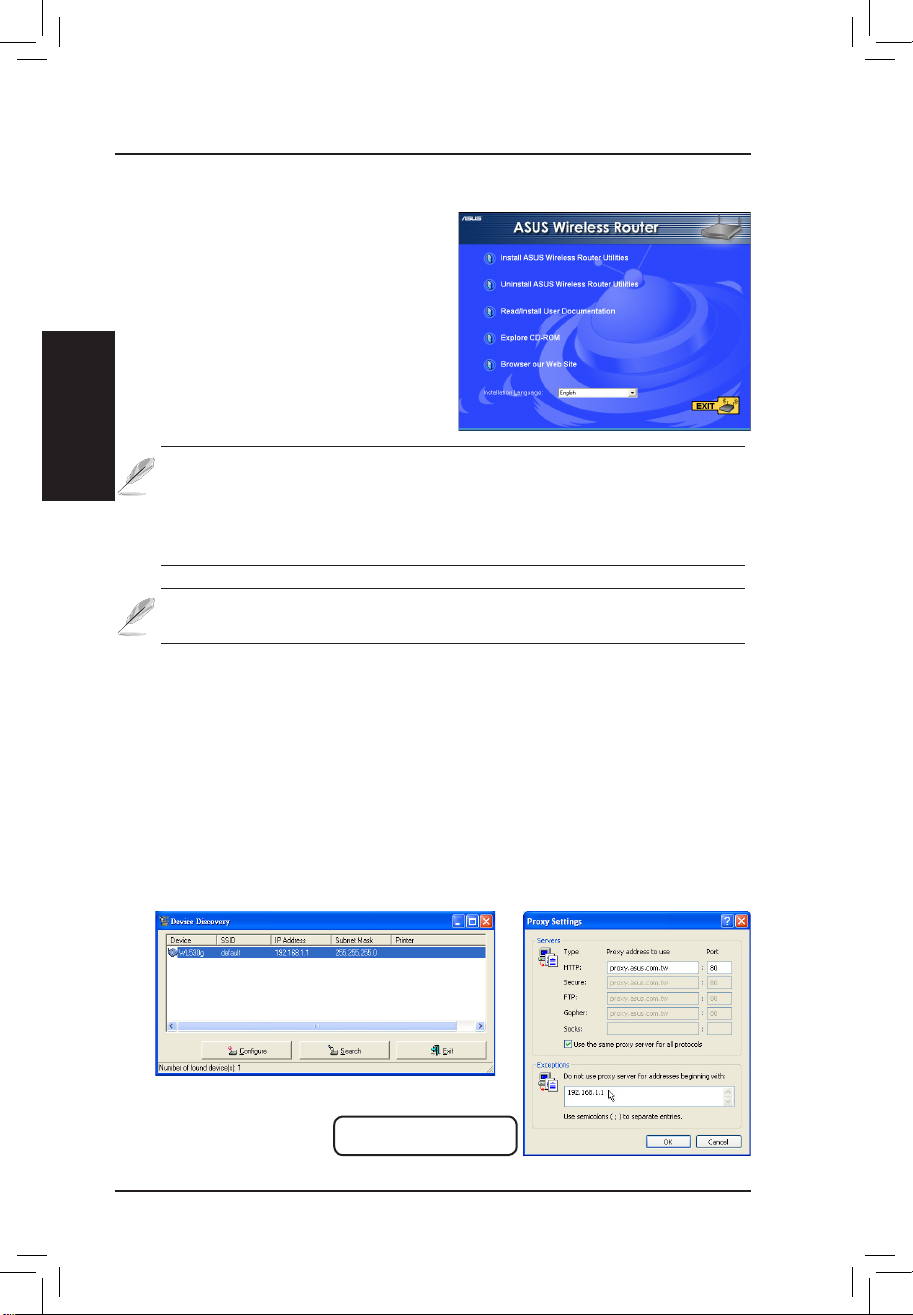
1. ASUS Wireless Router Utilities
Run Device Discovery from “ASUS Utility” in Windows Start Programs.
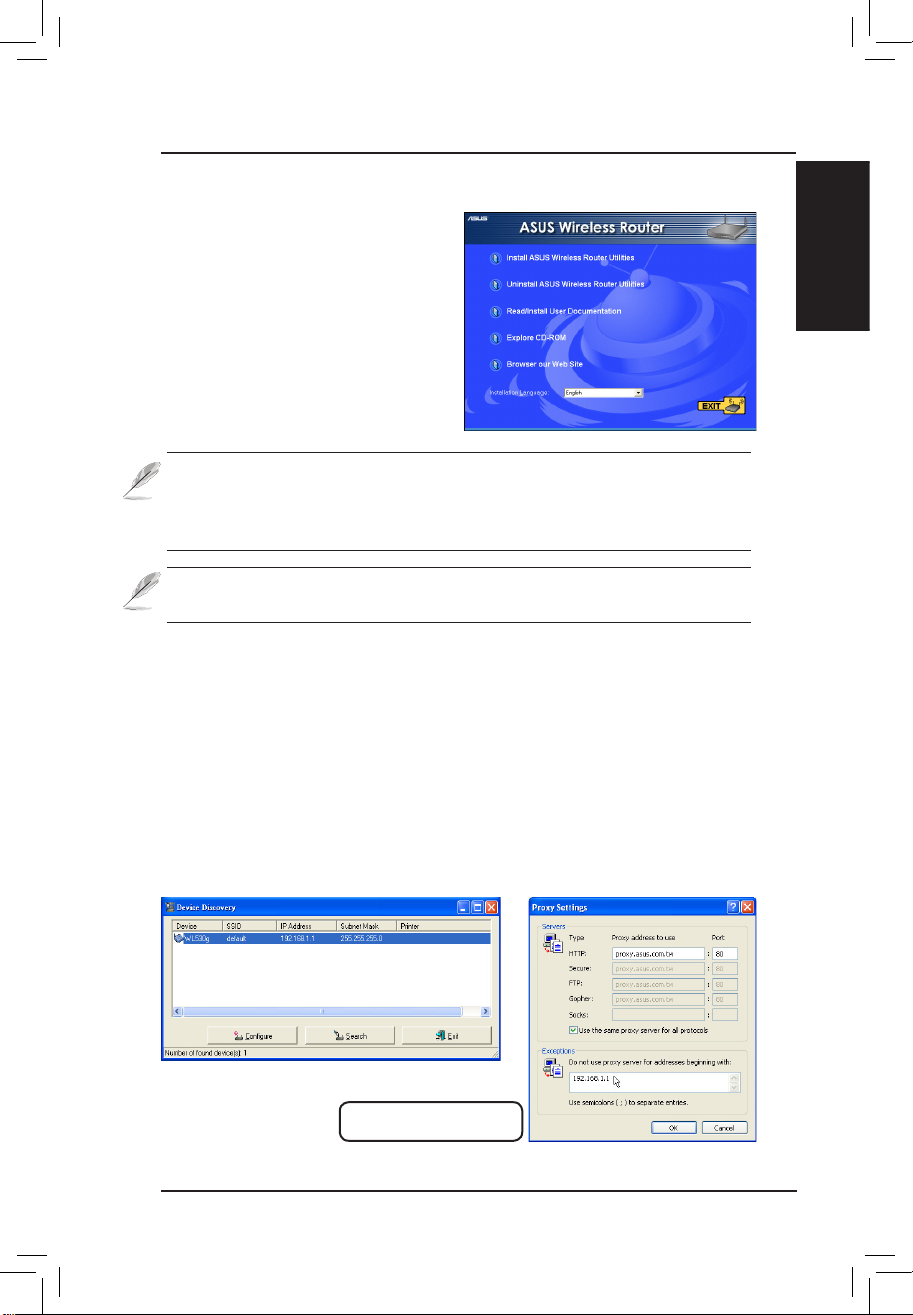
2. Connect to the ASUS WLAN Web Manager
Run the ASUS WLAN Device Discovery from the Start menu and click
Cong when the device is found.
Add 192.168.1.1 in the Exceptions
box if you are using a proxy server.
Note: By default, the Wireless Router will act as a router and provide
an IP address only when a physical connection on the WAN port
exists. You must connect the Wireless Router’s WAN port with your
ADSL or Cable modem using a network cable.
Note: Before rebooting your PC, the ASUS Wireless Router should
be switched ON and in the ready state.
Installing the ASUS Wireless Router Utilities
Follow these steps to install the ASUS
Wireless Router Utilities in Microsoft
Windows. Insert the support CD provided
with the ASUS Wireless Router and
the menu will appear. (Double-click
setup.exe if your autorun has been
disabled.)
Page 9
English
Quick Setup
6 ASUS Pocket Wireless Router
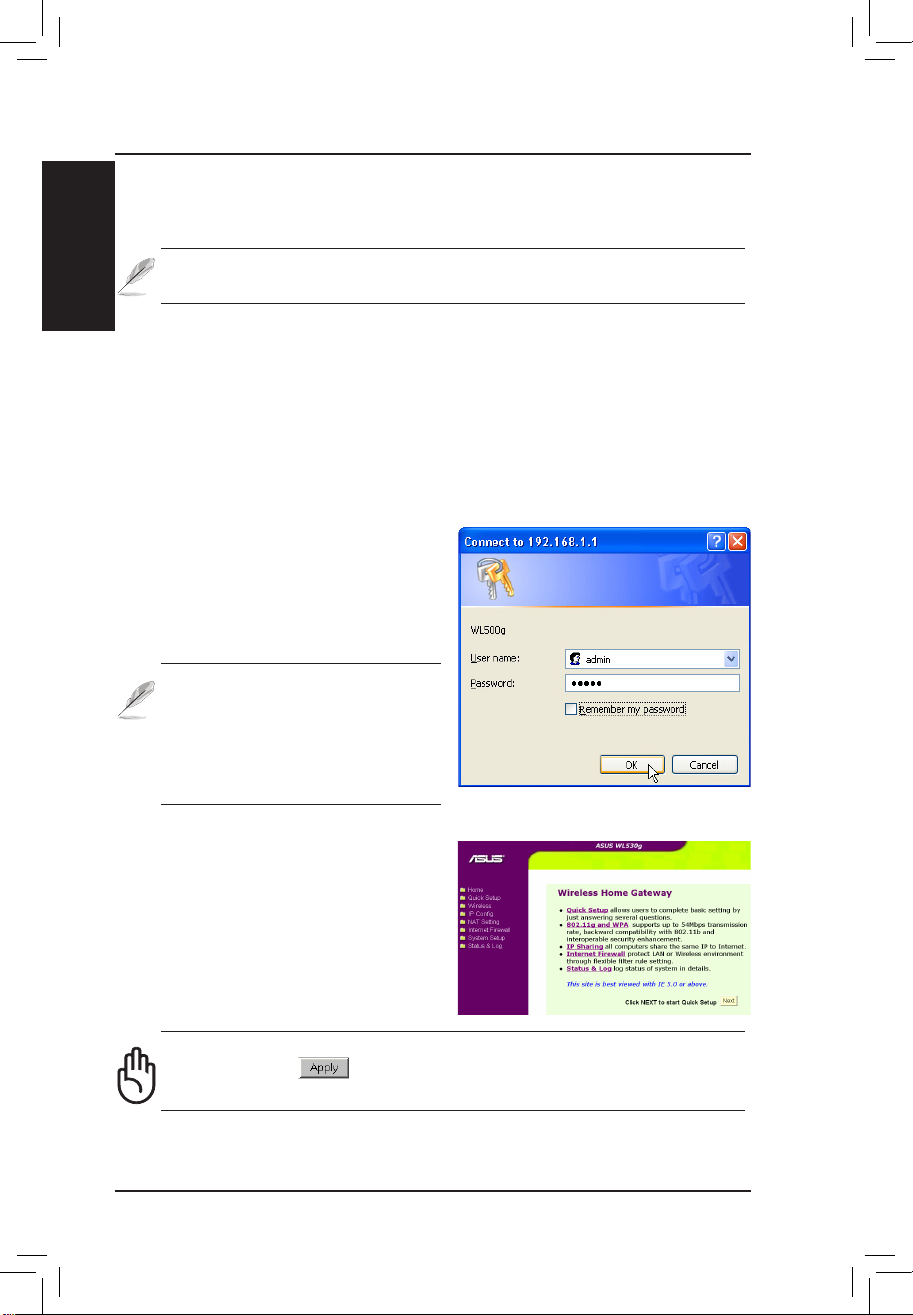
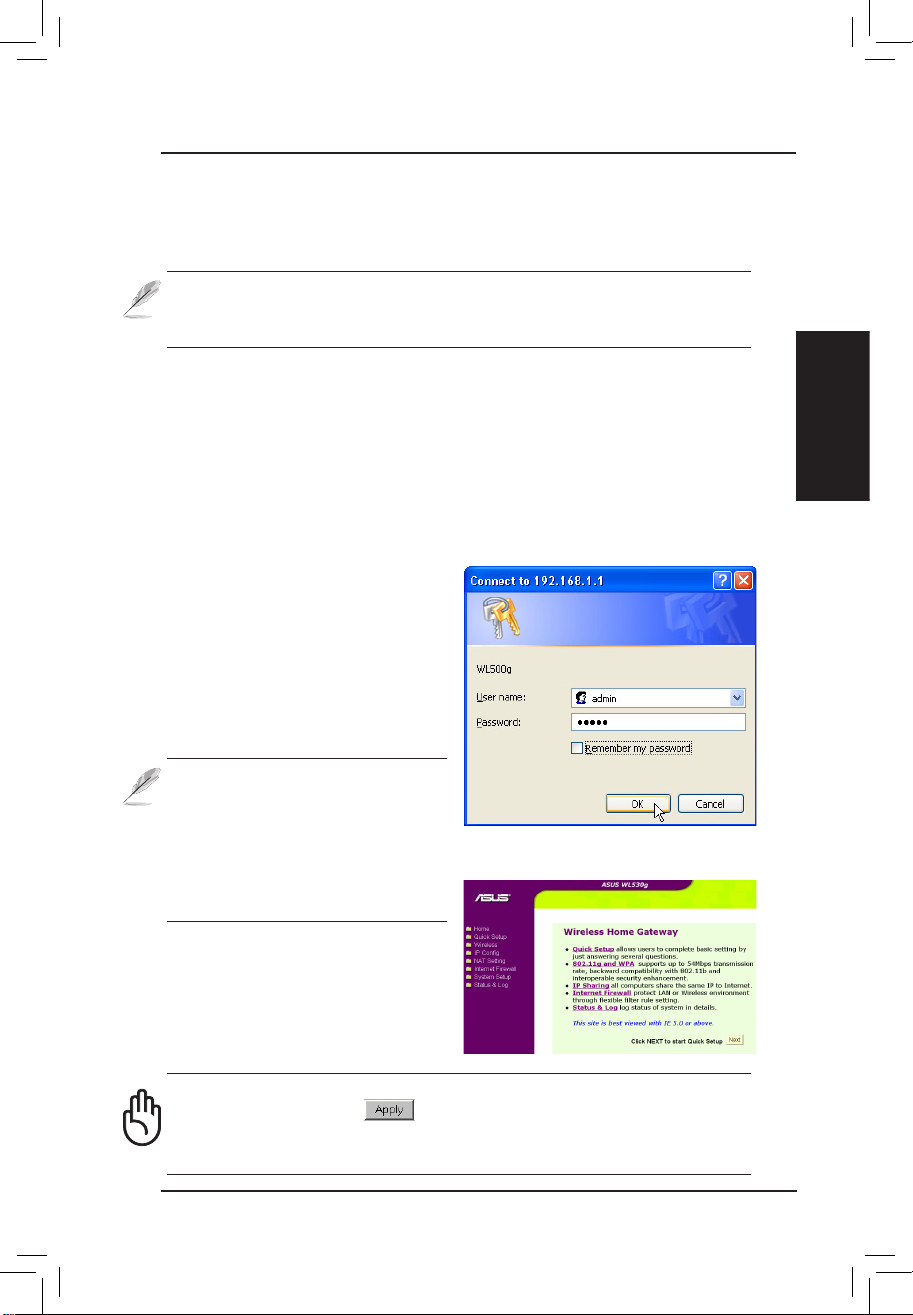
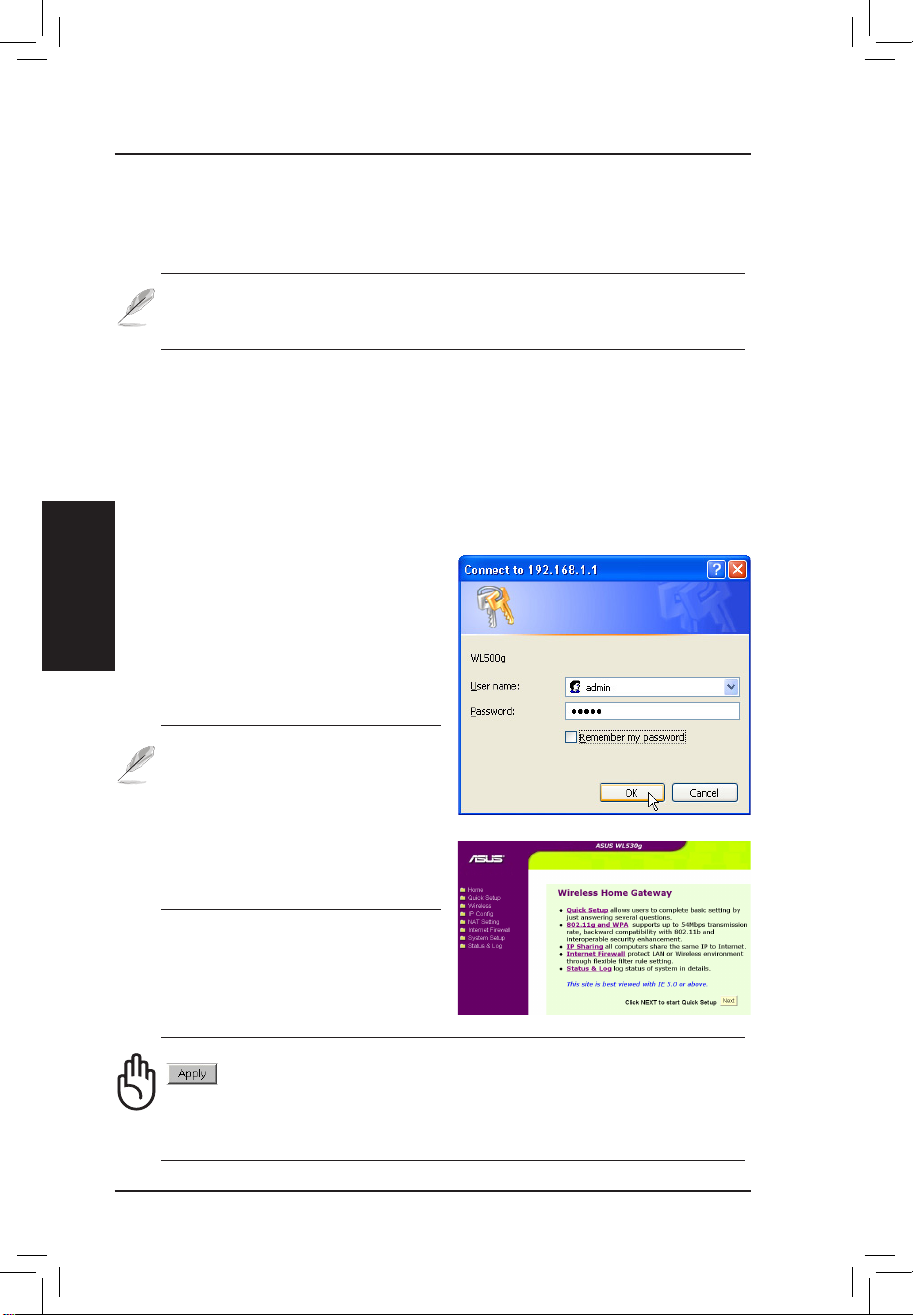
User Name & Password
Once connected, a window will ask
for the User name and Password in
order to log in. The factory default
values are “admin” and “admin”.
Note: If you cannot nd any the
ASUS Wireless Routers due to a
problem in the IP settings, push
and hold the “Restore” button
over five seconds to restore
factory default settings.
Enter Address or Name Manually
You can also open your PC’s web browser and enter the name or the default
IP address of the ASUS Wireless Router:
WL530g V2
http://my.router or http://my.WL530g V2 or http://192.168.1.1
Home Page
After logging in, you will see the
ASUS Wireless Router home page.
Important: After entering information on any page, click the
“Apply” button . If you click any other link, you will be directed
to another page and lose your new settings.
If your computer’s IP is not on the same subnet as the ASUS Wireless Router
(192.168.1.X), you will be asked to change it. The IP address can be any number
from 2 to 254 that is not used by another device. Gateway is not required.
Note: Using a proxy server for your LAN requires that you set an exception for the ASUS Wireless Router or else connection will fail.
Page 10
English
ASUS Pocket Wireless Router 7
Quick Setup
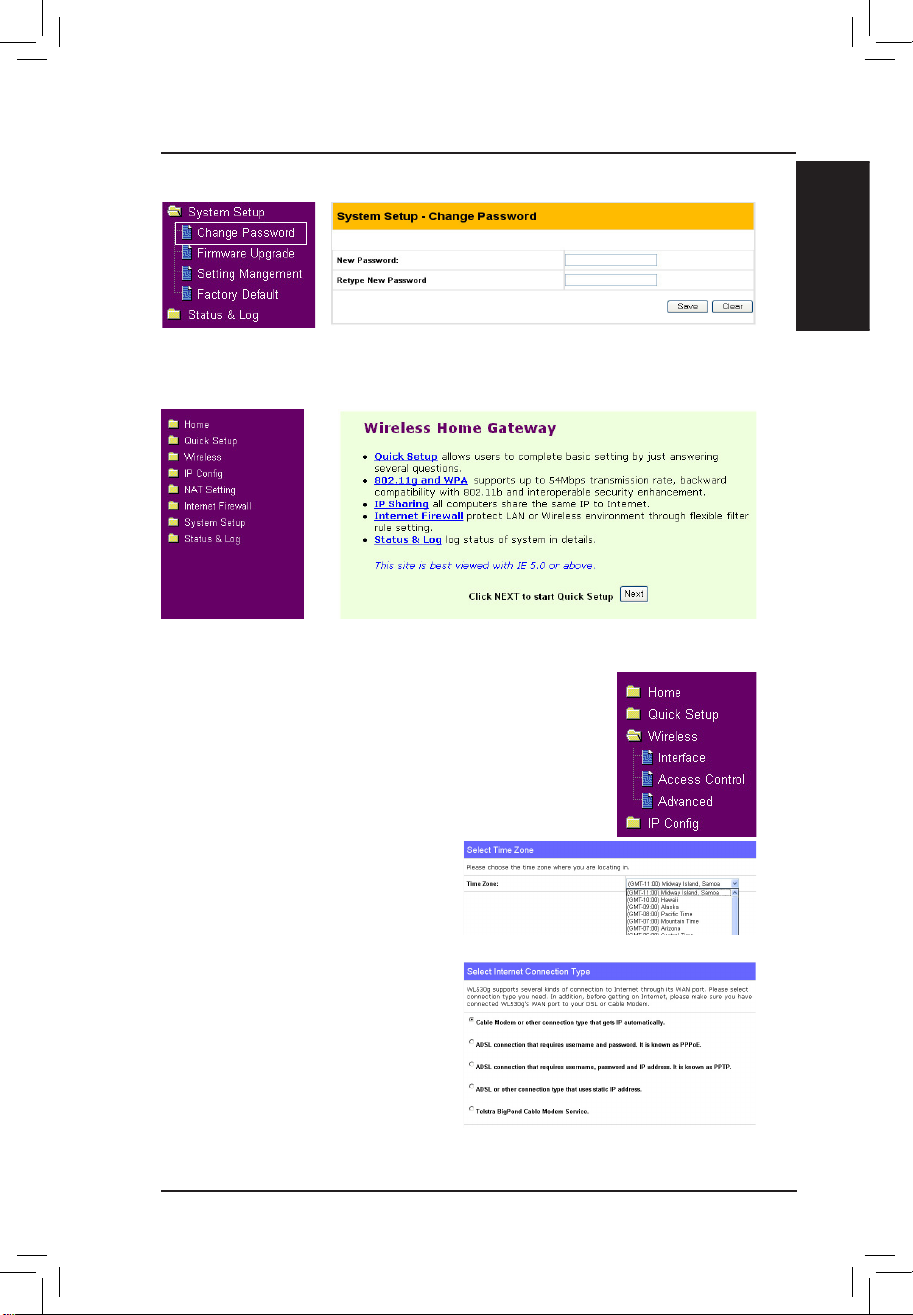
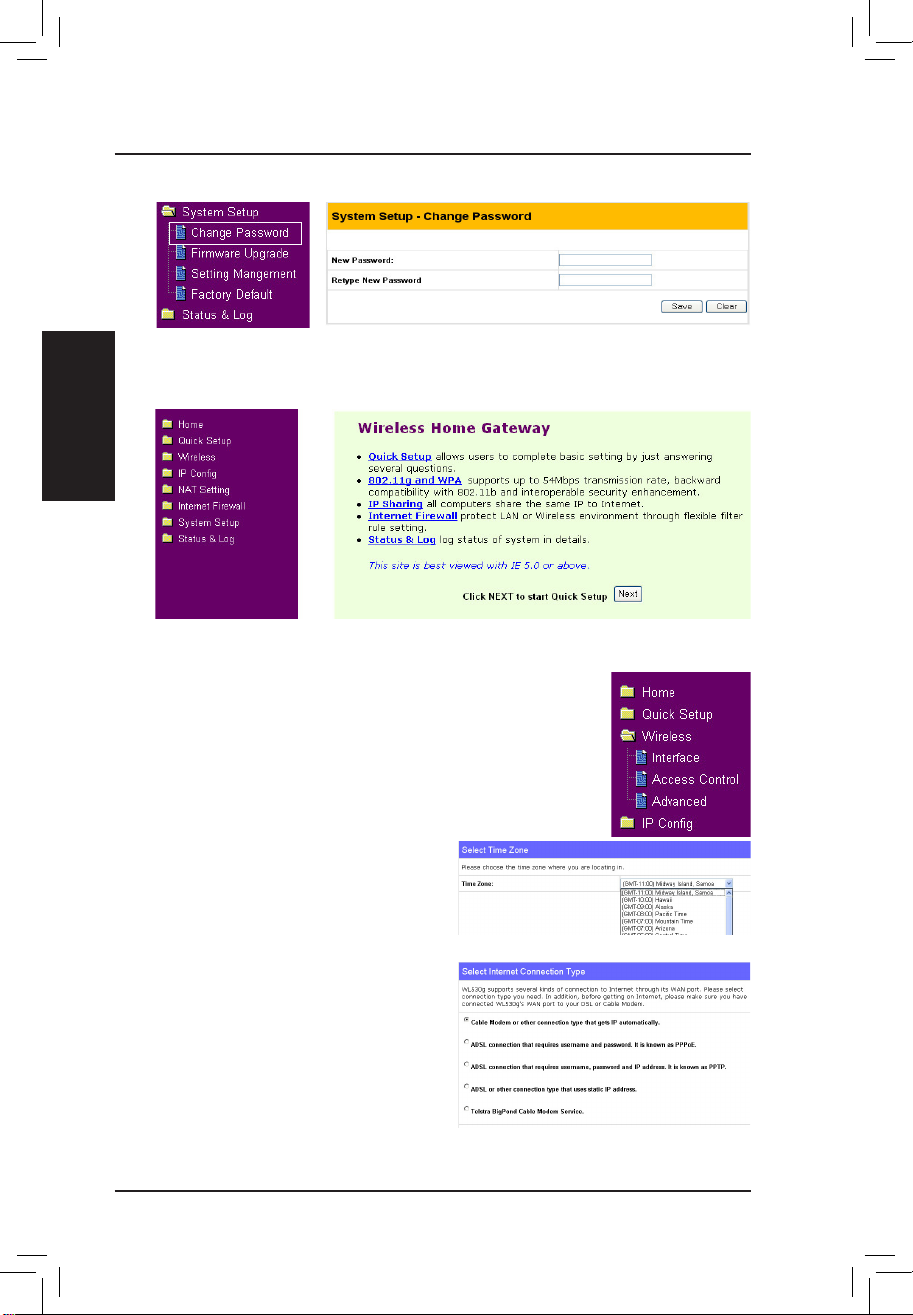
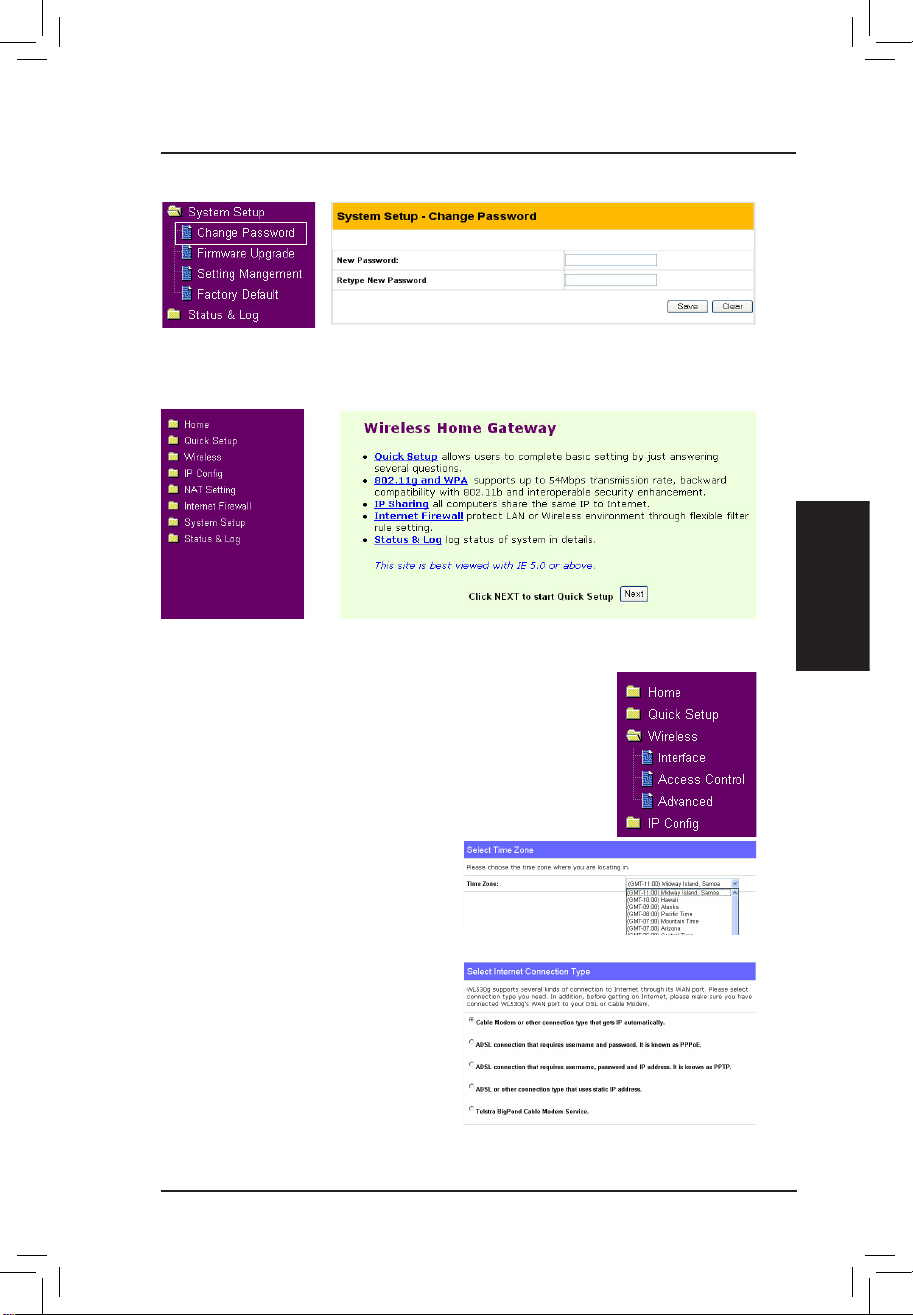
3. Set your own password
4. Use Quick Install
Select your time zone or the closest
region. Click Next to continue.
Quick Setup
To start quick setup, click Next to enter the “Quick
Setup” page. Follow the instructions to setup the ASUS
Wireless Router.
Select the connection type. Click
Next to continue.
Page 11
English
Quick Setup
8 ASUS Pocket Wireless Router
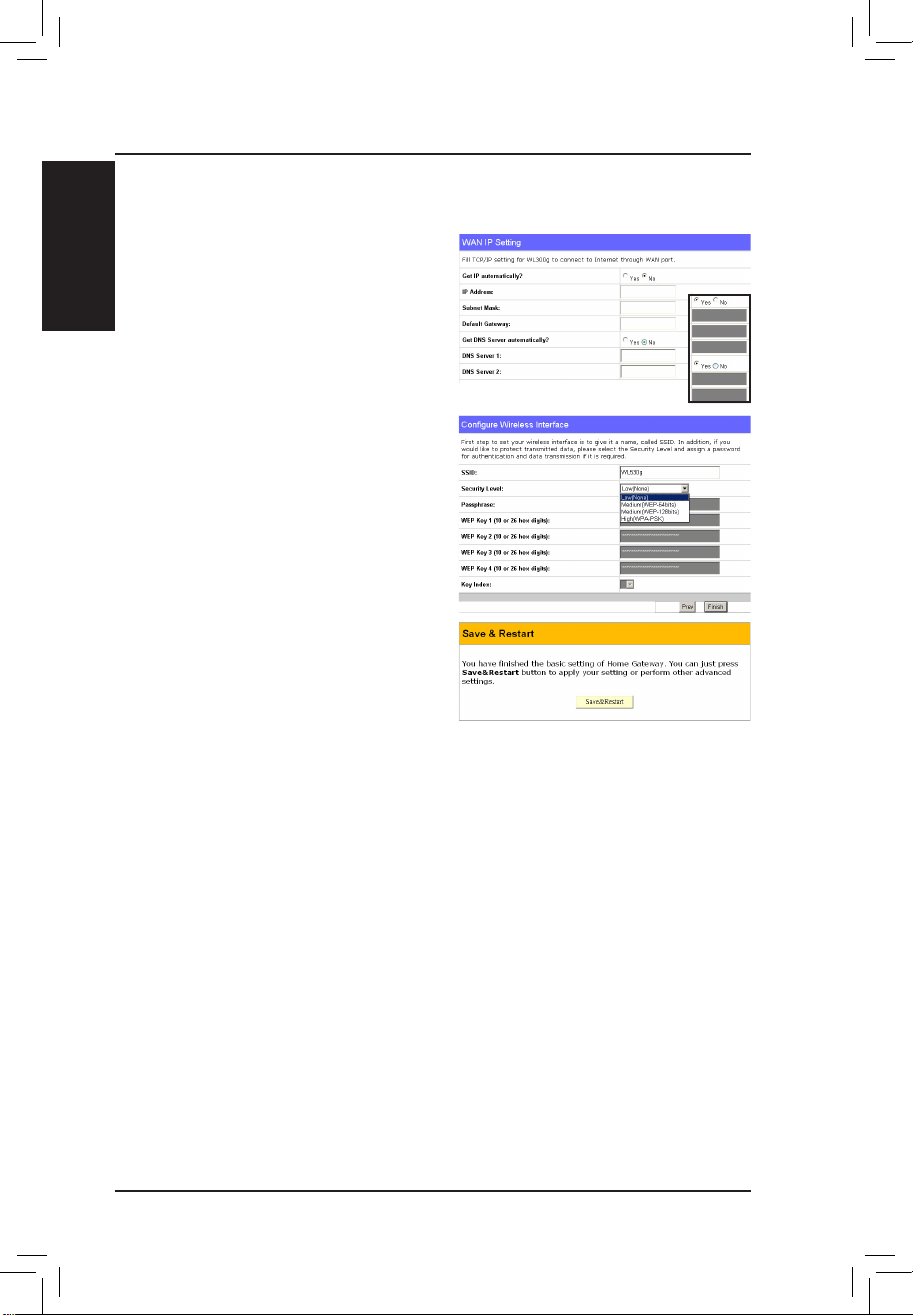
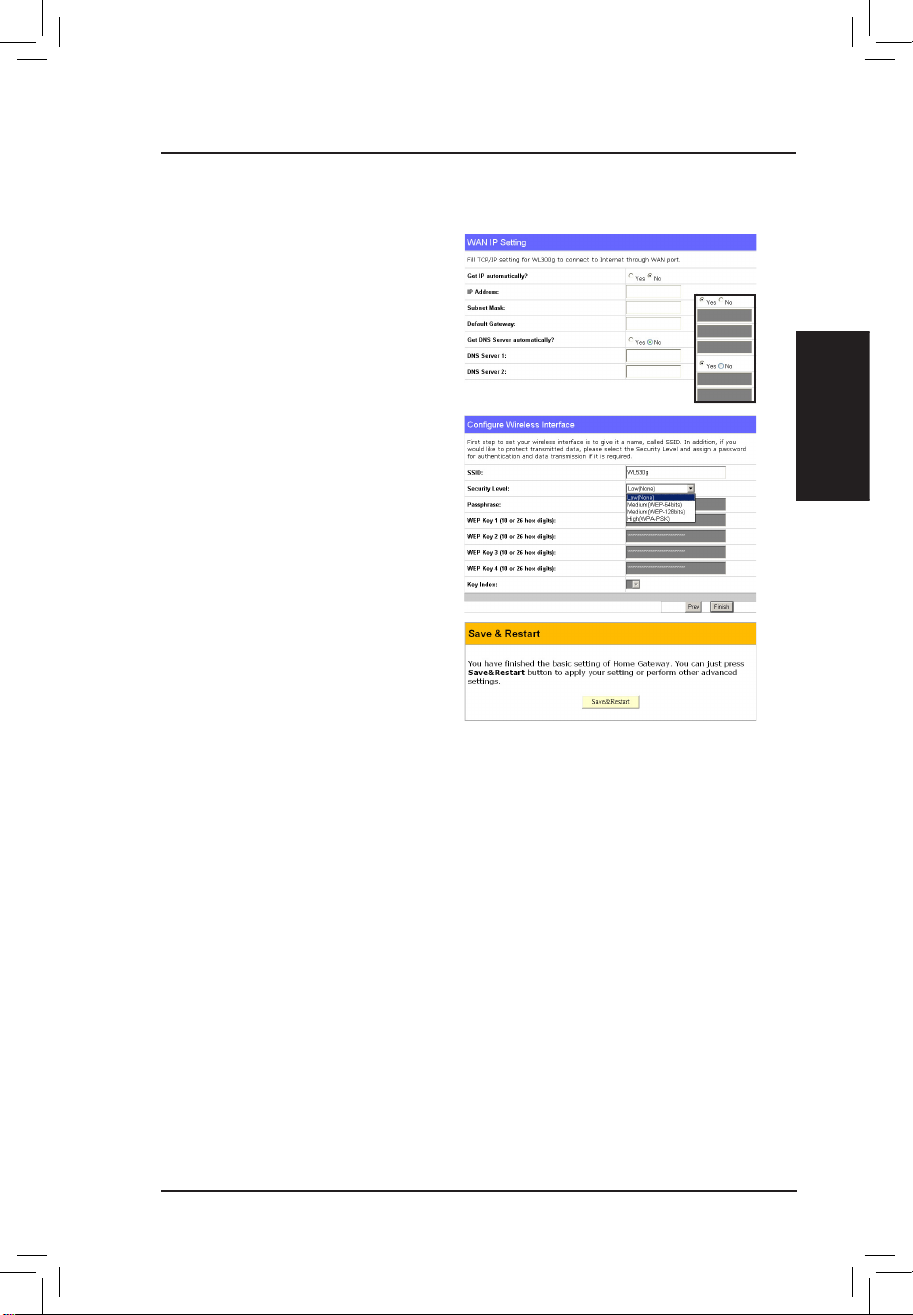
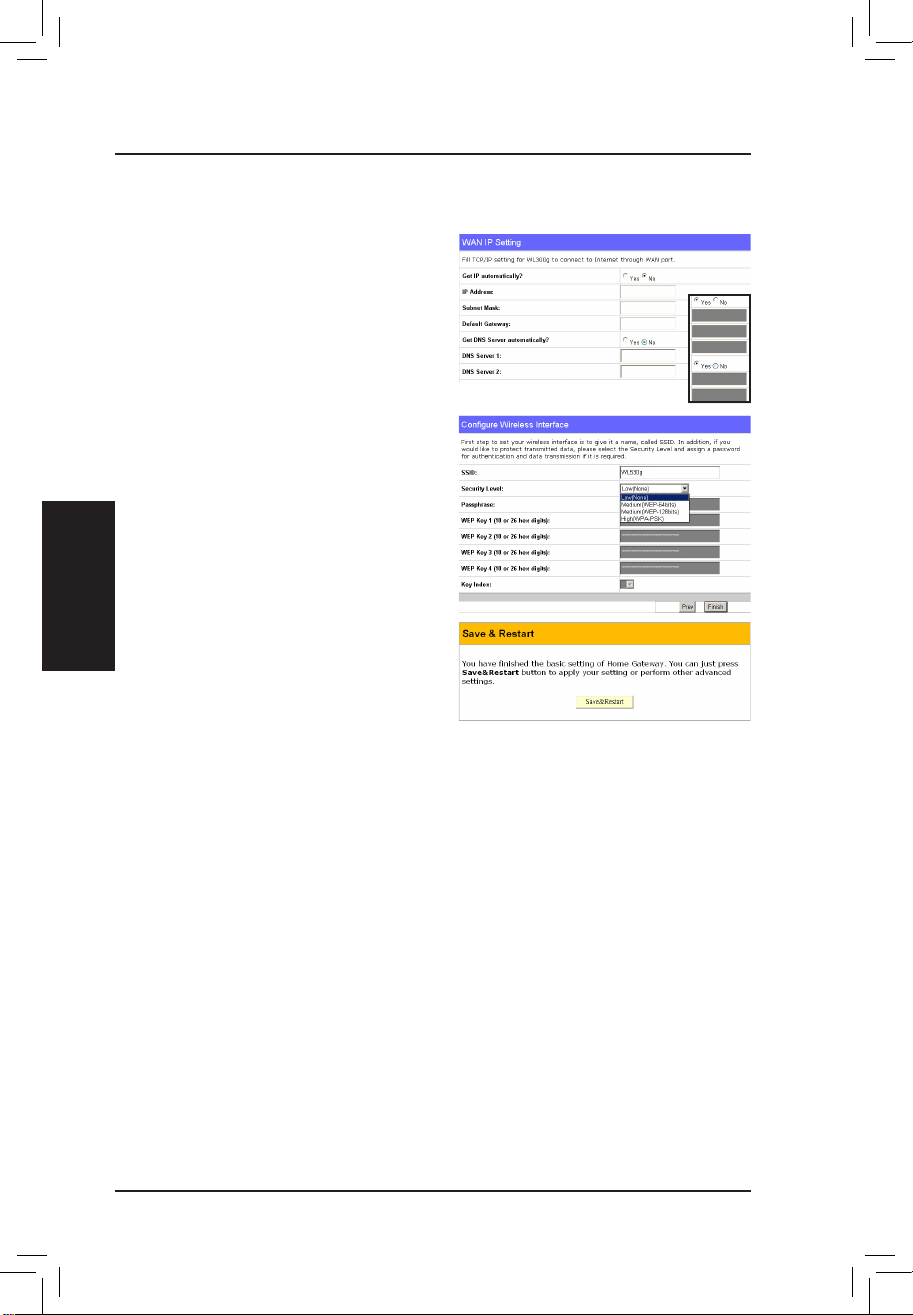
Quick Setup (Cont.)
To set up your wireless interface,
you must first give it an SSID
(Service Set Identier). The SSID is
a unique identier attached to packets
sent over WLANs. This identifier
emulates a password when a wireless
device attempts communication
on the WLAN. Because an SSID
distinguishes WLANs from each
other, access points and wireless
devices trying to connect to a WLAN
must use the same SSID.
Also, if you want to protect transmitted
data, select a middle or high Security Level.
Medium : allows only those users with the same WEP key to connect to
this access point and to transmit data using 64bits or 128bits WEP key
encryption.
High: allows only those users with the same WPA pre-shared key to connect
to this access point and to transmit data using TKIP encryption.
Click Finish to continue. You are prompted to save the settings. Click
Save&Restart to save the settings to the ASUS Wireless Router and enable
the new settings.
Select “No” to enter the information
manually. “Yes” will disable the eld.
Click Next to continue.
Page 12
English
ASUS Pocket Wireless Router 9
Quick Setup
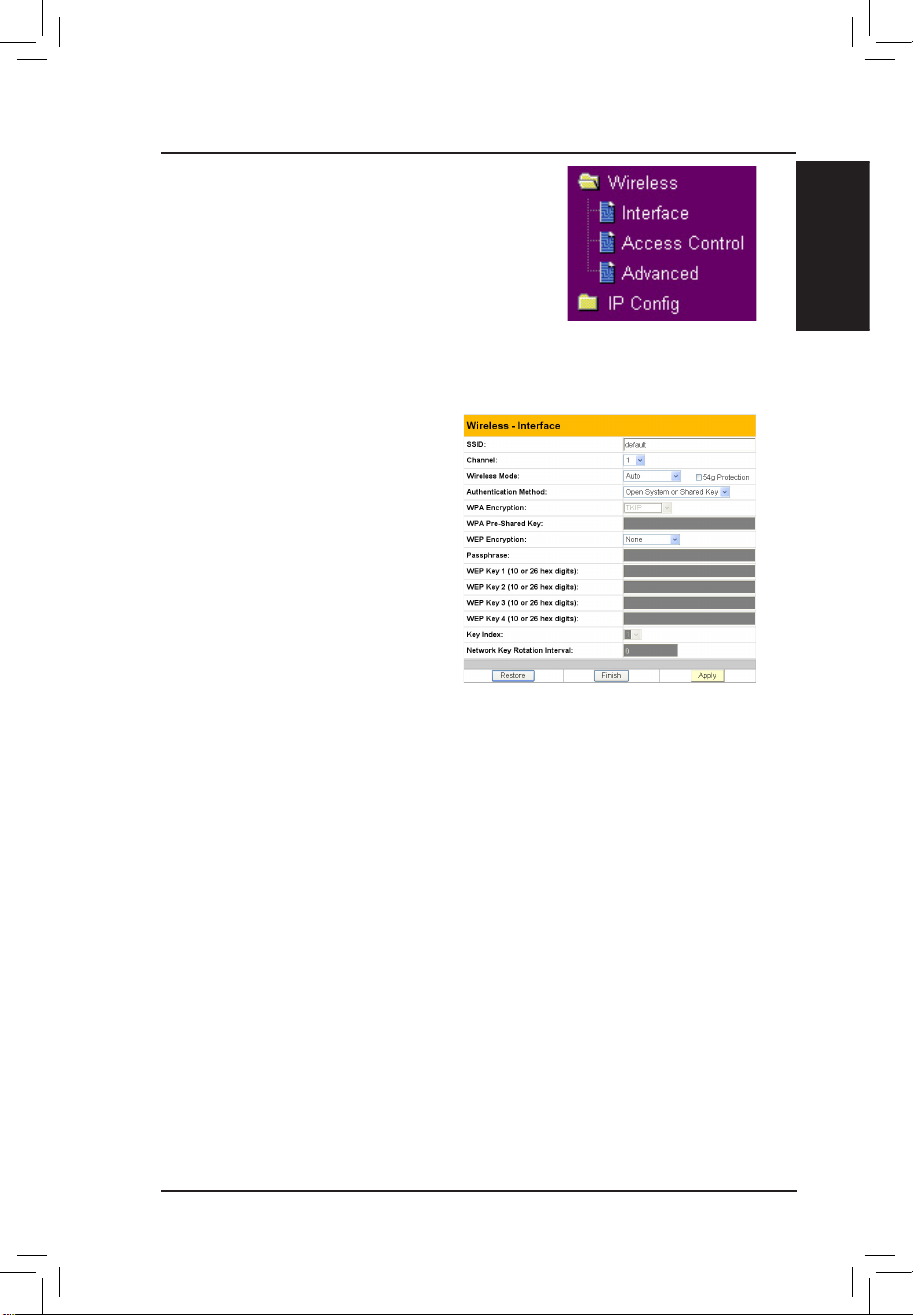
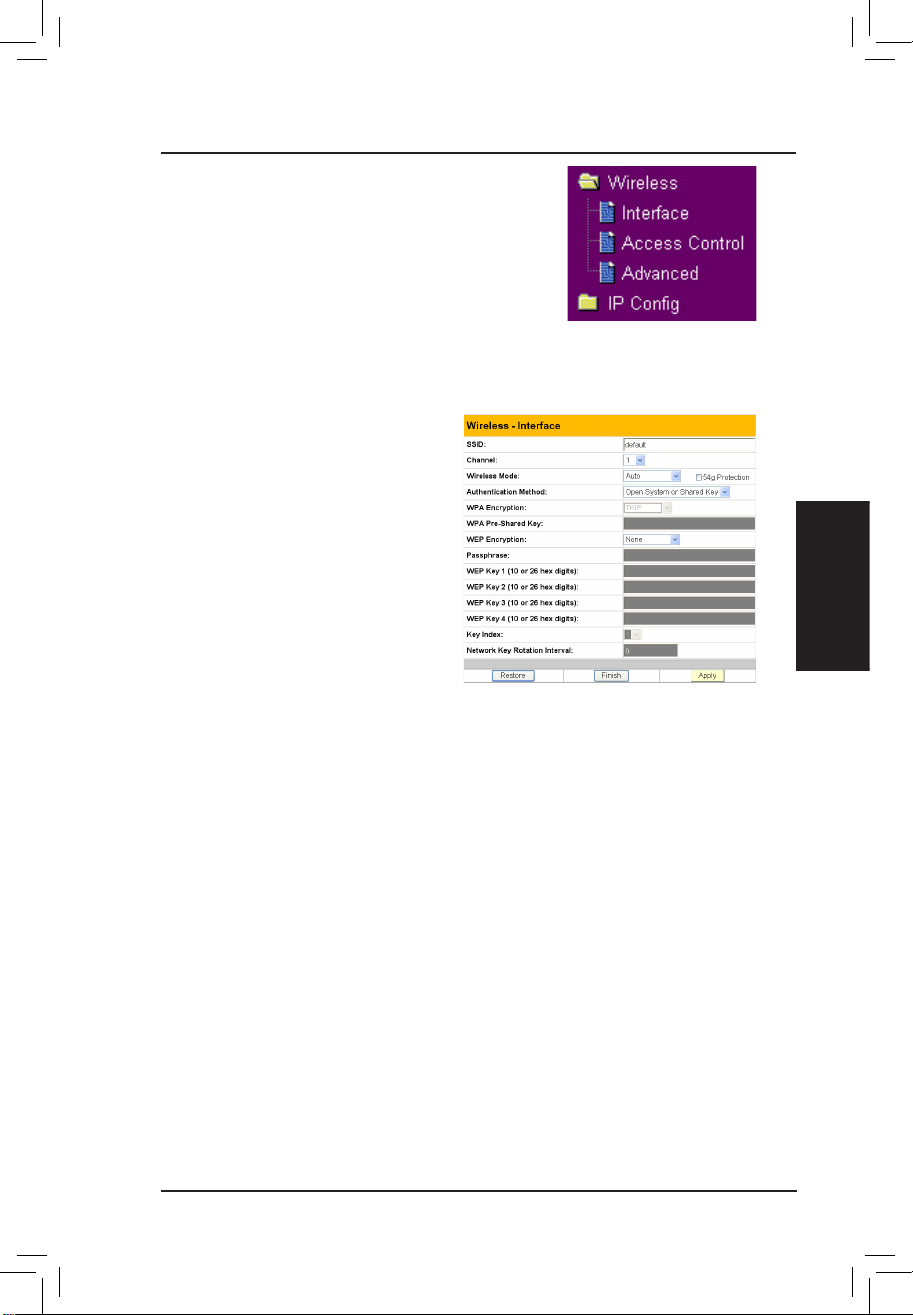
Authentication and Security
Click Wire l e s s on the menu to reveal a
submenu.
This eld enables you to set different authentication
methods which determine different encryption
schemes. If all your clients support WPA,
using “WPA-PSK” is recommended for better
security.
WPA Encryption
When “WPA-PSK” authentication
method is used, the newly proposed
TKIP (Temporal Key Integrity
Protocol) encryption schemes are
applied.
TKIP: TKIP uses an encryption
algorithm, which is more stringent
than the WEP algorithm and also
uses existing WLAN calculation
facilities to perform encryption
operations. TKIP veries the security
conguration after the encryption keys are determined.
WPA Pre-Shared Key
Selecting “TKIP” in the WPA Encryption, this eld is used as a password to
begin the encryption process. Note: 8 to 63 characters are required.
Page 13
Français
Routeur sans l de poche
(
WL-530g
pour clients 802.11g/b)
Guide de démarrage rapide
®
Page 14
11
Français
Routeur sans l de poche ASUS
Démarrage rapide
Procédure d’installation
Suivez ces étapes pour installer le routeur sans l ASUS.
1. Déterminez l’emplacement optimal du routeur sans l ASUS. Gardez à
l’esprit les considérations suivantes:
• La longueur du câble Ethernet qui relie le routeur sans l au réseau
ne doit pas excéder 100 mètres.
• Essayez de placer le routeur sans l ASUS sur une surface plane,
aussi loin du sol que possible (comme par exemple sur un bureau ou
sur une étagère), sans obstruction et non exposé à la lumière directe
du soleil.
• Essayez de positionner le routeur sans l de manière centrale, de
sorte qu’il offre la meilleure couverture possible de la zone. Orienter
l’antenne verticalement devrait offrir la meilleure réception.
• N’utilisez que l’alimentation livrée avec ce produit. D’autres alimentations peuvent y être branchées, mais la tension ou la puissance pourraient ne pas être compatibles avec l’appareil et l’endommager.
2. Une xation murale ou un positionnement vertical sont possibles.
Attention: il est de la responsabilité de l’installateur et des utilisa-
teurs du routeur sans l ASUS de garantir que l’antenne opère à
au moins vingt centimètres de toute personne. Ceci est nécessaire
pour assurer que le produit est utilisé en concordance avec les “RF
Guidelines for Human Exposure” adoptées par la Federal Communications Commission.
4. Connexion LAN: reliez un bout d’un câble Ethernet RJ-45 à un port
LAN du routeur (n’importe lequel des quatre) et connectez l’autre bout
du câble RJ-45 au connecteur réseau de votre ordinateur.
5. Alimentation: le routeur sans l ASUS requiert une source d’alimentation
externe. Il est livré avec une alimentation de classe 2. Reliez un bout de
l’adaptateur d’alimentation à la prise située au dos du routeur sans l
ASUS, et l’autre bout à une prise de courant.
Le témoin d’alimentation (Power LED) du routeur sans l ASUS s’allume
lorsque l’appareil est allumé. En plus, les témoins lumineux verts LAN
ou WAN s’allument pour indiquer l’existence de connexions réseau
physiques du routeur.
Page 15

Français
Démarrage rapide
12 Routeur sans l de poche ASUS
Conguration logicielle
Congurer le routeur sans l ASUS
Le routeur sans l ASUS peut être conguré pour répondre à divers usages.
Certains des réglages d’unsine par défaut peuvent parfaitement répondre à
vos besoins spéciques. D’autres devront être modiés. Avant d’utiliser le
routeur sans l ASUS vous devez vérier les réglages de base pour vous
assurer qu’il fonctionnera dans votre environnement. La conguration du
routeur sans l ASUS se fait via une interface web. Il vous faut un PC (de
bureau ou portable) relié au routeur, soit directement soit via un hub, et faisnt
opérer un navigateur Internet. La connexion peut être laire ou sans l. Pour
une connexion sans l, il vous faut une carte compatible IEEE 802.11g/b ,
installée sur votre portable. Il vous faudra également désactiver le WEP et
régler le SSID sur “défault”. Si vous voulez congurer le routeur sans l
ASUS ou si vous voulez accéder à Internet via le routeur sans l ASUS, les
paramètres TCP/IP doivent être corrects. Normalement, le paramétrage IP
doit être sur le même sous-réseau que le routeur sans l ASUS.
Note: Avant de rebooter votre ordinateur, le routeur sans l ASUS
doit être allumé et prêt.
Se connecter au routeur sans l ASUS
Connexion laire
Un câble RJ-45 est fourni avec le routeur sans l ASUS. La fonction “Auto
crossover” est implémentée dans le routeur sans l ASUS de sorte que vous
pouvez utiliser un câble droit ou un câble Ethernet croisé. Branchez un bout
du câble au port WAN situé sur l’arrière du routeur sans l ASUS, et branchez
l’autre bout sur le port Ethernet de votre modem Câble ou ADSL.
Connexion sans l
Reportez-vous au manuel de votre adaptateur sans l pour savoir comment
l’associer au routeur sans l ASUS. Le SSID par défaut du routeur sans
fil ASUS est “default” (en minuscules); le cryptage est désactivé et
l’authentication “open system” est utilisée.
Page 16
Français
Routeur sans l de poche ASUS 13
Démarrage rapide
Réglage manuel de l’IP
Si vous voulez régler l’adresse IP à
la main, les paramètres par défaut du
routeur doivent être connus:
• Adresse IP: 192.168.1.1
• MAsque de sous-réseau:
255.255.255.0.
Si vous réglez votre IP manuellement,
vous devez mettre l’IP de l’ordinateur
sur le le mêm e se gm en t. P ar
exemple:
• Adresse IP 192.168.1.xxx (xxx
étant un nombre compris entre 2
et 254 et qui ne soit pas utilisé par un autre ordinateur)
• Masque de sous-réseau 255.255.255.0 (le même que celui du routeur
sans l ASUS)
• Passerelle192.168.1.1 (c’est le routeur sans l ASUS)
• DNS 192.168.1.1 (Adresse IP du routeur sans l ou votre propre adresse
DNS).
Réglage de l’adresse IP pour connexions laires ou
sans l
Obtention automatique de l’IP
Le routeur sans l ASUS incorpore un
serveur DHCP; le plus simple est donc
de régler votre PC pour qu’il obtienne
une adresse IP automatiquement.
Ainsi, la bonne adresse IP, passerelle,
DNS seront attribués par le routeur
sans l ASUS.
Note: le routeur sans l fournira
une adresse IP uniquement si la
connexion physique au port WAN
existe. Vous devez relier le port
WAN du routeur sans l ASUS
au port Ethernet de votre modem câble ou ADSL par l’intermédiaire
d’un câble réseau. Avant de rebooter votre PC, le routeur sans l
doit être allumé et prêt.
Page 17
Français
Démarrage rapide
14 Routeur sans l de poche ASUS
Première utilisation du routeur sans l
1. Utilitaires ASUS Wireless Router
Lancez le “Device Discovery” depuis “ASUS Utility” dans les programmes
du menu démarrer de Windows.
2. Connexion à ”ASUS WLAN Web Manager”
Lancez l’ASUS WLAN Device Discovery depuis le menu Démarrer et
cliquez sur Cong lorsque le périphérique est trouvé.
Add 192.168.1.1 in the Exceptions
box if you are using a proxy server.
Note: par défaut, le routeur sans l fonctionnera comme un routeur et
fournira une adresse IP uniquement lorsqu’une connexion physique
existe sur le port WAN. Vous devez relier le port WAN du routeur
sans l au port LAN de votre modem ADSL ou câble en utilisant un
câble réseau.
Note: avant de rebooter votre PC, le routeur sans l ASUS doit être
allumé et prêt.
Installer les utilitaires du routeur sans l ASUS
Suivez ces étapes pour installer les
utilitaires du routeur sans l ASUS
sous Microsoft Windows. Insérez le
CD de support fourni avec le routeur
sans l et le menu apparaît. (Double
cliquez sur setup.exe si votre autorun
est désactivé.)
Page 18
Français
Routeur sans l de poche ASUS 15
Démarrage rapide
Nom d’utilisateur & mot de
passe
Un e fois conne c t é , un e fen ê t r e
demande le nom d’utilisateur et le
mot de passe permettant d’entrer dans
l’interface. Par défaut, ces valeurs
sont: ”admin” et ”admin”.
Note: si vous ne trouvez pas le
routeur sans l ASUS à cause
d’un mauvais paramétrage IP,
appuyez et maintenez enfoncé
cinq secondes le bouton “Restore” pour revenir au paramétrage d’usine.
Entrer l’adresse ou le nom à la main
Vous pouvez également ouvrir le navigateur internet de votre PC et entrer
le nom ou l’adresse IP du routeur sans l ASUS:
WL530g
http://my.router ou http://my.WL530g ou http://192.168.1.1
Page d’accueil
Après être entré, vous verrez la
page d’accueil du routeur sans l
ASUS.
Important: après avoir entré des informations sur une page, cliquez
sur le bouton “Apply” . Si vous cliquez sur un autre lien sans
le faire, vous irez sur la nouvelle page, mais vous perdriez les
paramètres fraichement entrés.
Si l’IP de votre ordinateur n’est pas sur le même sous-réseau que le routeur
sans l ASUS (192.168.1.X), il vous sera demandé de le modier. L’adresse
IP peut être comprise entre 2 et 254 et non utilisée par un autre appareil. La
passerelle n’est pas requise.
Note: l’utilisation d’un serveur proxy pour votre LAN requiert que
vous régliez une exception pour le routeur sans l ASUS, sinon votre
connexion échouera.
Page 19
Français
Démarrage rapide
16 Routeur sans l de poche ASUS
3. Entrez votre propre mot de passe
4. Utiliser le “Quick Install”
Choisissez la zone d’heure qui vous
convient (ou la plus proche). Cliquez
sur Next pour continuer.
Quick Setup
Pour lancer le quick setup (paramétrage rapide), cliquez
sur Next pour entrer dans la page “Quick Setup”. Suivez
les instructions pour bien congurer le routeur sans l
ASUS.
Choisissez votre type de connexion.
Cliquez sur Next pour continuer.
Page 20
Français
Routeur sans l de poche ASUS 17
Démarrage rapide
Quick Setup (suite)
Pour régler votre interface sans l,
vous devez commencer par lui donner
un SSID (Service Set Identier). Le
SSID est un identiant unique attaché
aux paquets envoyés par WLANs.
Cet identifiant émule un mot de
passe lorsqu’un périphérique sans
l essaie de communiquer avec le
WLAN. Puisqu’un SSID distingue les
WLANs entre eux, les points d’accès
et les périphériques sans l essayant
de se connecter à un WLAN doivent
utiliser le même SSID.
De même, si vous voulez protéger les données transmises, choisissez un
niveau de sécurité moyen ou élevé.
Medium : n’autorise que les utilisateurs ayant la même clef WEP à se
connecter à ce point d’accès et à transmettre des données en utilisant une
clef de cryptage WEP 64 ou 128 bits.
High: n’autorise que les utilisateurs ayant la même clef WPA pré-partagée
à se connecter à ce point d’accès et à transmettre des données en utilisant
le cryptage TKIP.
Cliquez sur Finish pour continuer. Il vous est demandé de sauvegarder les
résultats. Cliquez sur Save&Restart pour enregistrer les paramètres sur le
routeur sans l ASUS et pour activer ces nouveaux réglages.
Choisissez “No” pour entrer les
inform a t io n s à la mai n . “Yes”
désactive ce champ. Cliquez sur Next
pour continuer.
Page 21

Français
Démarrage rapide
18 Routeur sans l de poche ASUS
Authentication et sécurité
Cliquez sur Wireless dans le menu pour dévoiler
le sous-menu.
Ce champ vous permet de choisir différentes
méthodes d’authentification qui déterminent
différents schémas de cryptage. Si tous vos
clients supportent le WPA, utiliser “WPA-PSK”
est recommandé pour une meilleure sécurité.
WPA Encryption (cryptage
WPA)
Lorsque la méthode d’authentication
“WPA-PSK” est utilisée, les schémas
de cryptage TKIP (Temporal Key
Integrity Protocol) sont appliqués.
TKIP: TKIP utilisa un algorithme de
cryptage plus pointu que l’algorithme
WEP et utilise les capacités de
calcul du WLAN pour effectuer les
opérations de cryptage. TKIP vérie
la conguration de sécurité une fois
les clefs de cryptage déterminées.
WPA Pre-Shared Key
Choisir “TKIP” dans WPA Encryption; ce champ est utilisé comme mot
de passe pour démarrer un processus de cryptage. Note: 8 à 63 caractères
sont requis.
Page 22
Pocket Wireless Router
(
WL-530g V2
für 802.11g/b Wireless Clients)
Kurzanleitung
(Ein ausführliches Handbuch im PDF-Format
bendet sich in der Support-CD)
®
Deutsch
Page 23
Deutsch
Kurzanleitung
20 ASUS Pocket Wireless Router
Installationsvorgang
Folgen Sie diesen Schritten, um den ASUS Wireless Router zu installieren.
1. Suchen Sie die beste Installationsposition für den ASUS Wireless Router aus.
Berücksichtigen Sie bitte dabei die folgenden Konditionen:
• Die Länge des Ethernetkabels, das den ASUS Wireless Router mit dem
Netzwerk verbindet, darf nicht länger als 100 m sein.
• Versuchen Sie den ASUS Wireless Router an eine ebene, stabile Oberäche,
die möglichst fern vom Boden liegt, wie z.B. auf einen Tisch oder Bücherregal
zu stellen. Halten Sie das Gerät frei von Hindernisse und setzen es keiner
direkten Sonneneinstrahlung aus.
• Versuchen Sie den ASUS Wireless Router zentral zu stellen, so dass alle draht-
losen Mobilgeräte innerhalb des Abdeckungsbereichs liegen. Eine vertikale
Ausrichtung der Antenne bietet den besten Empfang an.
• Verwenden Sie nur den beigefügten Stromadapter für dieses Gerät. Ein
anderer Stromadapter hat möglicherweise passende Anschlüsse aber eine
falsche Eingangsspannung und falschen Eingangsstrom.
2. Eine Wandmontage oder ein vertikales Aufstellen ist auch möglich.
Warnung: Es ist Aufgabe des Installateurs und der Benutzer des ASUS
Wireless Routers, einen Abstand von mindestens 20 cm zwischen
der Antenne und Personen sicherzustellen. Dies ist erforderlich, um
hinsichtlich der Funkstrahlenaussetzung der Menschen sicherzustellen, dass das Produkt gemäß den von Federal Communications
Commission festgelegten RF-Richtlinien betrieben wird.
3. LAN-Verbindung: Verbinden Sie ein Ende eines RJ-45 Ethernetkabels mit
einem der vier LAN-Ports am ASUS Wireless Router und das andere Ende mit
dem RJ-45 Ethernetkabel an Ihrem Desktop-Computer.
4. Stromversorgungsverbindung: Der ASUS Wireless Router benötigt eine
externe Stromversorgung. Ein UL-genehmigter, Klasse 2 Stromadapter ist
dem ASUS Wireless Router beigelegt. Verbinden Sie ein Ende des Wechsel-
/Gleichstromadapters mit der Rückseite des ASUS Wireless Routers und das
andere Ende mit einer Netzsteckdose.
Die Power-LED an der Frontseite des ASUS Wireless Routers leuchtet auf, wenn
das Gerät eingeschaltet wird. Zudem leuchten die grüne LAN- oder WAN-LEDs,
wenn der ASUS Wireless Router eine physische Ethernet-Netzwerkverbindung
hat.
Page 24

Deutsch
ASUS Pocket Wireless Router 21
Kurzanleitung
Softwarekonguration
Kongurieren des ASUS Wireless Routers
Sie können de n AS US Wireless Router ents pre che nd ve rschied ene n
Verwendungskonditionen kongurieren. Manche werkseitige Standardeinstellungen
passen möglicherweise zu Ihrer Verwendung, und manche benötigen möglicherweise
Änderungen. Sie müssen vor dem Verwenden des ASUS Wireless Routers die
Grundeinstellungen überprüfen, um sicherzustellen, dass er in Ihrer Umgebung
funktioniert. Die Konfiguration des ASUS Wireless Routers läuft über einen
Webbrowser. Sie müssen einen Notebook- oder Desktop-PC (direkt oder über
einen Hub) mit dem ASUS Wireless Router verbinden und einen Webbrowser als
Kongurationsterminal öffnen. Die Verbindung kann verdrahtet oder drahtlos sein.
Für die drahtlose Verbindung muss ein IEEE 802.11g/b kompatibles Gerät wie z.B.
ASUS WLAN-Karte in Ihrem Notebook- oder Desktop-PC installiert sein. Zudem
müssen Sie die WEP-Funktion deaktivieren und die SSID auf “default” für Ihr
drahtloses LAN-Gerät einstellen. Die TCP/IP-Einstellungen müssen stimmen, wenn
Sie den ASUS Wireless Router kongurieren oder über den ASUS Wireless Router
auf das Internet zugreifen möchten. Normalerweise muss die TCP/IP-Einstellung
das selbe IP-Subnetz wie der ASUS Wireless Router haben.
Hinweis: Der ASUS Wireless Router sollte eingeschaltet und betriebsbereit sein, bevor Sie Ihren Computer neu starten.
Verbinden mit dem ASUS Wireless Router
Verdrahtete Verbindung
Ein RJ-45 Kabel ist dem ASUS Wireless Router beigelegt. Die Auto-CrossoverFunktion ist im ASUS Wireless Router integriert, so dass Sie sowohl ein Straightthrough als auch ein Crossover-Ethernetkabel verwenden können. Verbinden Sie ein
Ende des Kabels mit dem WAN-Port an der Rückseite des ASUS Wireless Routers
und das andere Ende mit dem Ethernet-Port an Ihrem ADSL- oder Kabel-Modem.
Drahtlose Verbindung
Anweisungen zur Assoziation mit dem ASUS Wireless Router entnehmen Sie bitte
dem Benutzerhandbuch Ihres drahtlosen Adapters. Die Standard-SSID des ASUS
Wireless Routers ist “default” (alles kleingeschrieben), die Verschlüsselung ist
deaktiviert und das offene System wird als Authentizierungsmethode verwendet.
Page 25
Deutsch
Kurzanleitung
22 ASUS Pocket Wireless Router
Manuelles Einstellen der IP-Adresse
Wollen Sie Ihre IP-Adresse manuell
einstellen, dann müssen Sie die folgenden
Standardeinstellungen des ASUS Wireless
Routers verwenden.
• IP-Adresse 192.168.1.1
• Subnetzmaske 255.255.255.0.
Wenn Sie die IP-Adresse Ihres Computers
manuell einstellen, muss sie in dem selben
Segment liegen. Zum Beispiel:
• IP-Adresse 192.168.1.xxx (xxx kann
eine beliebige Zahl zwischen 2 und
254 sein, die nicht von einem anderen
Gerät verwendet wird)
• Subnetzmaske 255.255.255.0 (wie die
des ASUS Wireless Routers)
• Gateway 192.168.1.1 (dies ist der ASUS Wireless Router)
• DNS 192.168.1.1 (ASUS Wireless Router IP-Adresse oder Ihre eigene).
Einstellen der IP-Adresse für eine verdrahtete oder drahtlose
Verbindung
Automatisches Beziehen einer IP-Adresse
Der ASUS Wireless Router verwendet
einen DHCP-Server. Die einfachste
Methode ist deshalb, die “IP-Adresse
automatisch beziehen”-Funktion an Ihrem
Computer zu aktivieren und dann Ihren
Computer neu starten. So erhalten Sie die
richtige IP-Adresse, den Gateway und
DNS (Domain Name System Server) von
dem ASUS Wireless Router.
Hinweis: Der Wireless Router
funktioniert als Router und bietet
die IP-Adresse nur an, wenn die
physische Verbindung mit dem
WAN-Port existiert. Sie müssen
den WAN-Port am ASUS Wireless Router über ein Netzwerkkabel mit
dem Ethernet-Port an Ihrem ADSL- oder Kabel-Modem verbinden. Der
ASUS Wireless Router sollte eingeschaltet und betriebsbereit sein,
bevor Sie Ihren Computer neu starten.
Page 26
Deutsch
ASUS Pocket Wireless Router 23
Kurzanleitung
Erstmaliges Verwenden des Wireless Routers
1. ASUS Wireless Router Utilities
Starten Sie Device Discovery von “ASUS Utility” unter Start/ Programmen in
Windows.
2. Verbinden mit dem ASUS WLAN Web Manager
Starten Sie ASUS WLAN Device Discovery vom Start-Menü und klicken
anschließend aufCong (Kong.) , wenn das Gerät gefunden wurde.
Hinweis: In der Standardeinstellung funktioniert der Wireless Router
als Router und bietet die IP-Adresse nur an, wenn die physische
Verbindung mit dem WAN-Port existiert. Sie müssen den WAN-Port
am Wireless Router über ein Netzwerkkabel mit dem Ethernet-Port
an Ihrem ADSL- oder Kabel-Modem verbinden.
Hinweis: Der ASUS Wireless Router sollte eingeschaltet und betriebsbereit sein, bevor Sie Ihren Computer neu starten.
Installieren der ASUS Wireless Router Utilities
Folgen Sie den nachstehenden Schritten,
um die ASUS Wireless Router Utilities
unter Microsoft Windows zu installieren.
Legen Sie die dem ASUS Wireless
Router beigefügte Support-CD ein. Das
Installationsmenü wird geöffnet. (Klicken
Sie doppelt auf die Datei setup.exe, falls
Ihre Autorun-Funktion deaktiviert ist.)
192.168.1.1 in das Feld unter “Exceptions” (Ausnahmen) hinzufügen, wenn
Sie einen Proxyserver verwenden.
Page 27
Deutsch
Kurzanleitung
24 ASUS Pocket Wireless Router
Benutzername & Kennwort
Sobald die Verbindung besteht, erscheint
ein Dialo g f e nste r , i n das Si e d e n
Benutzernamen und das Kennwort für
die Anmeldung eingeben müssen. Die
werkseitigen Standardwerte sind “admin”
und “admin”.
Hinweis: Können Sie wegen eines
Problems in den IP-Einstellungen
keinen ASUS Wireless Router
nden, dann drücken Sie bitte die
“Restore”-Taste für fünf Sekunden, um die werkseitigen Standardeinstellungen wiederherzustellen.
Manuelles Eingeben der Adresse oder des Namens
Sie können auch den Webbrowser Ihres PCs öffnen und den Namen oder die
Standard-IP-Adresse des ASUS Wireless Routers eingeben:
WL530g V2
http://my.router oder http://my.WL530g V2 oder http://192.168.1.1
Startseite
Nach dem Anmelden sehen Sie die
Startseite des ASUS Wireless Routers.
Wichtig: Klicken Sie auf die ”Apply” (Übernehmen)-Schaltäche
, nachdem Sie auf einer Seite Informationen eingegeben haben.
Wenn Sie stattdessen auf einen Link klicken, werden Sie zu einer
anderen Seite gebracht und Ihre Einstellungsänderungen werden
nicht gespeichert.
Wenn sich die IP-Adresse Ihres Computers nicht in dem selben Subnetz wie das des
ASUS Wireless Routers (192.168.1.X) bendet, werden Sie aufgefordert die Adresse
zu ändern. Die IP-Adresse kann eine beliebige Zahl zwischen 2 und 254 sein, die
nicht von einem anderen Gerät verwendet wird. Ein Gateway ist nicht notwendig.
Hinweis: Wenn Sie einen Proxyserver für Ihr LAN verwenden, müssen
Sie eine Ausnahme für den ASUS Wireless Router einstellen. Andernfalls kann die Verbindung nicht hergestellt werden.
Page 28
Deutsch
ASUS Pocket Wireless Router 25
Kurzanleitung
3. Einstellen Ihres eigenen Kennwortes
4. Verwenden der Schnellinstallationsfunktion
Wählen Sie Ihre Zeitzone oder die
nächste Region aus. Klicken Sie zum
Fortfahren auf Weiter.
Schnell-Setup
Klicken Sie auf Weiter, um die “Schnell-Setup”-Seite
zu öffnen. Folgen Sie den Anweisungen, um den ASUS
Wireless Router einzustellen.
Wählen Sie Ihren Verbindungstyp
aus. Klicken Sie zum Fortfahren auf
Weiter.
Page 29
Deutsch
Kurzanleitung
26 ASUS Pocket Wireless Router
Schnell-Setup (Fortsetzung)
Um Ihre drahtlose Schnittstelle
einzustellen, müssen Sie ihr zuerst
eine SSID (Service Set Identier)
zuweisen. Die SSID ist eine einmalige
Identizierungsnummer, die in die über
WLANs gesendeten Pakete eingefügt
wird. Die Identifizierungsnummer
emuliert ein Kennwort, wenn ein
drahtloses Gerät versucht eine
Kommun ikat ion im WLAN zu
haben. Da eine SSID die WLANs
voneinander unterscheidet, müssen
die Access Points und drahtlosen
Geräte, die eine Verbindung mit einem WLAN herstellen möchten, die selbe
SSID verwenden.
Wollen Sie die übertragenen Daten schützen, dann wählen Sie dazu eine
mittlere oder hohe Sicherheitsstufe.
Mittel: Nur die Benutzer, die den selben WEP-Schlüssel verwenden, können
auf diesen Access Point zugreifen und Daten mit der 64Bits oder 128Bits
WEP-Verschlüsselung senden.
Hoch:
Nur die Benutzer, die den selben gemeinsamen WPA-Schlüssel verwenden,
können auf diesen Access Point zugreifen und Daten mit der TKIPVerschlüsselung senden.
Klicken Sie zum Fortfahren auf Fertig stellen. Sie werden aufgefordert die
Einstellungen zu speichern. Klicken Sie auf Speichern & Neu starten, um
die Einstellungen in dem ASUS Wireless Router zu speichern und die neuen
Einstellungen wirksam zu machen.
W ä hl en Si e “ Ne in ” , u m di e
Informationen manuell einzugeben.
Die Option “Ja” deaktiviert das
Feld. Klicken Sie zum Fortfahren
auf Weiter.
Page 30
Deutsch
ASUS Pocket Wireless Router 27
Kurzanleitung
Authentizierung und
Sicherheit
Klicken Sie auf Wireless im Menü, um ein Untermenü
zu öffnen.
D a s Fe ld e r lau bt I h ne n ve rs ch ie de ne
Authent ifizierungs methoden, die vers chiedene
Verschlüsselungsschemen verwenden, einzustellen. Für eine bessere Sicherheit ist
es ratsam “WPA-PSK” zu verwenden, wenn alle ihrer Clients WPA unterstützen.
WPA-Verschlüsselung
W e n n d i e “ W P A - P S K ”
Authentifizierungsmethode verwendet
wird, werden die neulich eingebrachten
TKIP (Temporal Key Integrity Protocol)Verschlüsselungsschemen angewendet.
T KI P : TK IP v er we nd et ei ne n
Ver sc h lü ss e lu n gs al g or i th mu s , d e r
strenger als der WEP-Algorithmus
is t und a uc h d ie ex is ti erend en
WLAN-Berechnungsfähigkeiten zur
Ausführung von Verschlüsselungsoperationen verwendet. TKIP überprüft die
Sicherheitskonfiguration, nachdem die Verschlüsselungsschlüssel bestimmt
wurden.
WPA gemeinsamer Schlüssel
Wenn Sie “TKIP” für die WPA-Verschlüsselungsoption ausgewählt haben, geben Sie
ein Kennwort in das Feld ein, um den Verschlüsselungsprozess zu starten. Hinweis:
Page 31

Italiano
Router Wireless Tascabile
(
WL-530g V2
per client wireless 802.11g/b)
Guida alla Consultazione Veloce
®
Page 32

Italiano
29Router Wireless Tascabile
Guida alla Consultazione Veloce
Procedura d’Installazione
Seguirequesti passaggi per installare il Router Wireless ASUS.
1. Determinare la posizione migliore per il Router Wireless ASUS. Tenete
presente le seguenti considerazioni:
• La lunghezza del cavo Ethernet che collega il Router Wireless Asus
alla rete non deve superare i 100 metri.
• Tentare di posizionare il Router Wireless ASUS su di una supercie
piana, robusta e lontana il più possibile da terra, come una scrivania, una libreria, libero da ostruzioni e lontano dalla luce diretta del
sole.
• Tentare di posizionare centralmente il Router Wireless ASUS in
modo tale che possa fornire una copertura a tutti i dispositivi wireless
mobili nell’area. Orientare l’antenna verticalmente per ottenere una
ricezione migliore.
• Utilizzare solo l’alimentatore fornito con l’unità. Altri alimentatori
potrebbero collegarsi, ma il voltaggio e la potenza potrebbero non
essere compatibili.
2. E’ possibile inoltre il montaggio a muro o verticale.
Attenzione: E’ responsabilità dell’installatore e degli utenti del Router
Wireless ASUS garantire che l’antenna operi ad almeno 20 centimetri
dalle persone. Tutto ciò è necessario per garantire che il prodotto
operi in conformità con le direttive della RF Guidelines for Human
Exposure che sono state adottate dalla Federal Communications
Commission.
3. Connessione LAN: Attaccare un’estremità del cavo Ethernet RJ-45
alla porta LAN del Router Wireless ASUS (una delle quattro porte)
ed attaccare l’altra estremità del cavo Ethernet RJ-45 al computer
desktop.
4. Connessione Alimentazione: Il Router Wireless ASUS richiede
alimentazione da un alimentatore esterno. Il Router Wireless ASUS
è equipaggiato con un alimentatore di Classe 2 UL listed. Attaccare
l’estremità dell’alimentatore DC sul retro del Router Wireless ASUS e
l’altra estremità ad una presa di corrente.
Il LED Alimentazione sul frontale del Router Wireless ASUS si accenderà
quando l’unità è alimentata elettricamente. In aggiunta, i LED verdi di
LAN o WAN si accenderanno per indicare che il Router Wireless ASUS
ha stabilito una connessione sica con la rete Ethernet.
Page 33

Italiano
Guida alla Consultazione Veloce
30 Router Wireless Tascabile
Congurazione Software
Congurazione del Router Wireless ASUS
Il Router Wireless ASUS può essere congurato per essere utilizzato in vari
scenari. Alcune delle impostazioni predenite di fabbrica possono essere
già adatte per il vostro utilizzo; tuttavia, altre potrebbero richiedere delle
modiche. Prima di utilizzare il Router Wireless ASUS, dovete vericare
le impostazioni di base per assicurarsi che possa funzionare nel vostro
ambiente. La congurazione del Router Wireless ASUS viene effettuata
tramite un browser web. E’ necessario un PC Notebook o desktop connesso
al Router Wireless ASUS (direttamente o tramite un hub) con un web
browser funzionante come terminale per la congurazione. La connessione
può essere di tipo cablata o wireless. Per la congurazione wireless, è
necessario un dispositivo compatibile con IEEE 802.11g/b, e.s. Scheda
WLAN ASUS, installata sul PC Notebook. Si dovrebbe inoltre disabilitare
WEP ed impostare il SSID a “default” sul dispositivo LAN wireless. Se
desiderate congurare il Router Wireless ASUS o desiderate accedere ad
Internet tramite esso, le impostazioni del TCP/IP devono essere corrette.
Normalmente, le impostazioni del TCP/IP devono essere impostate in modo
tale che siano sull’IP della subnet del Router Wireless ASUS.
Nota: Prima di riavviare il computer, il Router Wireless ASUS dovrebbe essere acceso e nello stato pronto.
Connessione al Router Wireless ASUS
Connessione Cablata
Con il Router Wireless ASUS viene fornito un cavo RJ-45. All’interno
del Router Wireless ASUS è implementata la funzione di auto crossover
cosicché è possibile utilizzare indifferentemente un cavo Ethernet diritto
(straight-through) o incrociato (crossover) . Inserire un’estremità del cavo
nella porta WAN sul retro del Router Wireless ASUS e l’altra nella porta
Ethernet del vostro modem ADSL o via Cavo.
Connessione Wireless
Far riferimento al manuale utente del vostro adattatore wireless per collegarlo
con il Router Wireless ASUS. Il SSID predenito del Router Wireless
ASUS è “default” (minuscolo), la codica è disabilitata e viene utilizzata
l’autenticazione open system.
Page 34

Italiano
Router Wireless Tascabile 31
Guida alla Consultazione Veloce
Impostazione Manuale IP
Se desiderate impostare manualmente
l’indirizzo IP, si devono conoscere le
seguenti impostazioni predenite del
Router Wireless ASUS:
• Indirizzo IP 192.168.1.1
• Subnet Mask 255.255.255.0.
Se impostate l’indirizzo IP del computer
manualmente, esso deve essere posto
nello stesso segmento. Per esempio:
• Indirizzo IP 192.168.1.xxx (xxx
può essere un numero qualsiasi tra
2 e 254 non utilizzato da nessun
altro dispositivo)
• Subnet Mask 255.255.255.0 (la stessa del Router Wireless ASUS)
• Gateway 192.168.1.1 (l’indirizzo del Router Wireless ASUS)
• DNS 192.168.1.1 (Indirizzo IP di Router Wireless ASUS o il vostro).
Impostazione dell’ indirizzo IP per la connessione
Cablata o Wireless
Ottieni IP Automaticamente
Il Router Wireless ASUS incorpora
un server DHCP che è il modo più
semplice per impostare il PC in modo
tale che possa ottenere il suo indirizzo
IP automaticamente e riavviare il
computer. In questo modo possono
essere ottenuti correttamente dal
Router Wireless ASUS l’indirizzo IP,
il gateway e il DNS (Domain Name
System Server).
Nota: Il Router Wireless agirà come
un router e fornirà indirizzi IP solo
quando esiste una connessione
fisica sulla porta WAN. Si deve
quindi connettere la porta WAN del Router Wireless ASUS con una
porta Ethernet presente sul vostro modem ADSL o via Cavo con
un cavo di rete. Prima di riavviare il PC, il Router Wireless ASUS
dovrebbe essere acceso e in stato pronto.
Page 35

Italiano
Guida alla Consultazione Veloce
32 Router Wireless Tascabile
Utilizzo del Router Wireless per la Prima Volta
1. Utilità Router Wireless ASUS
Eseguire Ricerca Dispositivi dalle “Utilità ASUS” nel menu Programmi
di Windows.
2. Connessione a Web Manager di WLAN ASUS
Eseguire Ricerca Dispositivi ASUS WLAN dal menu Start e fare clic su
Congura quando viene trovato un dispositivo.
Aggiunge re 192.168 .1.1 nel riquadro Eccezioni se utilizzate un
server proxy.
Nota: Per default, Il Router Wireless agirà come un router e fornirà
indirizzi IP solo quando esiste una connessione sica sulla porta
WAN. Si deve quindi connettere la porta WAN del Router Wireless
ASUS con una porta Ethernet presente sul vostro modem ADSL o
via Cavo con un cavo di rete.
Nota: Prima di riavviare il PC, il Router Wireless ASUS dovrebbe
essere acceso e in stato pronto.
Installazione utilità per Router Wireless ASUS
Seguire questi passaggi per installare in Microsoft Windows le Utilità per
il Router Wireless ASUS. Inserire il
CD di supporto fornito con il Router
Wireless ASUS ed apparirà un menu.
(Doppio clic su setup.exe se avete
disabilitato l’autorun.)
Page 36

Italiano
Router Wireless Tascabile 33
Guida alla Consultazione Veloce
Nome Utente & Password
Una volta connessi, una finestra
vi chiederà il Nome Utente e la
Password per poter accedere. I valori
di fabbrica predeniti sono “admin”
e “admin”.
Nota: Se non trovate alcun
Router Wireless ASUS a causa
di problemi nelle impostazioni
IP, premere e tenere premuto il
pulsante “Ripristina” per più di
cinque secondi per ripristinare
le impostazioni predefinite in
fabbrica.
Inserimento Indirizzo o Nome Manualmente
E’ possibile inoltre avviare il browser web del PC ed inserire il nome o
l’indirizzo IP predenito per il Router Wireless ASUS:
WL530g V2
http://mio.router o http://mio.WL530g V2 o http://192.168.1.1
Pagina Iniziale
Dopo aver effettuato l’accesso,
verrà visualizzata la pagina iniziale
del Router Wireless ASUS.
Importante: Dopo aver inserito le impostazioni in ogni pagina, fare
clic sul pulsante “Applica” . Se fate clic su qualsiasi altro col-
legamento, verrete indirizzati in un’altra pagina e perderete le nuove
impostazioni.
Se l’IP del vostro computer non è nella stessa subnet del Router Wireless
ASUS (192.168.1.X), vi sarà chiesto di modicarla. L’indirizzo IP può essere
un numero qualsiasi da 2 a 254 non utilizzato già da un altro dispositivo. Il
Gateway non è richiesto.
Nota: L’utilizzo di un server proxy nella LAN richiede che venga
impostata un’eccezione per il Router Wireless ASUS o la connes-
sione fallirà.
Page 37

Italiano
Guida alla Consultazione Veloce
34 Router Wireless Tascabile
3. Impostazione della password personale
4. Utilizzo dell’Installazione Veloce
Selezionare la vostra zona oraria
oppure quella più vicina. Fare clic
su Avanti per continuare.
Impostazione Veloce
Per avviare l’impostazione veloce, fare clic su Avanti
per entrare nella pagina “Impostazione Veloce”. Seguire
le istruzioni per impostare il Router Wireless ASUS.
Selezionare il tipo di connessione.
Fare clic su Avanti per continuare.
Page 38

Italiano
Router Wireless Tascabile 35
Guida alla Consultazione Veloce
Installazione Veloce (Cont.)
Per impostare l’interfaccia wireless,
si deve prima assegnare ad essa un
SSID (Service Set Identifier). Il
SSID è un identificatore univoco
assegnato ai pacchetti inviati tramite
le WLAN. L’indenticatore simula
una password quando un dispositivo
wireless tenta una comunicazione
WLAN. Poiché un SSID caratterizza
una WLAN dalle altre, gli access
point ed i dispositivi wireless che
tentano di collegarsi ad una WLAN
devono utilizzare lo stesso SSID.
Inoltre, se desiderate proteggere i dati trasmessi, selezionare un Livello di
Sicurezza medio o alto.
Medio : consente solo agli utenti con la stessa chiave WEP di connettersi
a questo access point e di trasmettere i dati utilizzando una chiave WEP di
codica a 64bits o 128bits.
Alta: consente solo agli utenti con la stessa chiave WPA pre-shared di
connettersi a questo access point e di trasmettere i dati utilizzando la codica
TKIP.
Fare clic su Fine per continuare. Verrà richiesto di salvare le impostazioni.
Fare clic su Salva&Riavvia per salvare le impostazioni nel Router Wireless
ASUS ed attivarle.
Selez ionar e “N o” per ins eri re
manualmente le informazioni. “Sì”
disabiliterà il campo. Fare clic Avanti
per continuare.
Page 39

Italiano
Guida alla Consultazione Veloce
36 Router Wireless Tascabile
Autenticazione e Sicurezza
Fare clic su Wireless sul menu per far apparire
un sottomenu.
Questo campo vi abilita ad impostare diversi
metodi di autenticazione che deniscono diversi
schemi di codica. Per una maggiore sicurezza è
raccomandato l’utilizzo di “WPA-PSK” se tutti
i vostri client supportano WPA.
Codica WPA
Quando viene utilizzato il metodo di
autenticazione“WPA-PSK”, vengono
applicati i recenti schemi di codica
TKIP (Temporal Key Integrity
Protocol) proposti.
TKIP: TKIP utilizza un algoritmo
di codica, più severo dell’algoritmo
WEP ed utilizza anche per eseguire
le operazioni di codica i vantaggi di
calcolo della WLAN esistente.TKIP
inoltre verica la congurazione di
sicurezza dopo che sono state determinate le chiavi.
Chiave WPA Pre-Shared
Selezionando “TKIP” nella Codica WPA, questo campo è utilizzato come
password per iniziare il processo di codica. Note: sono richiesti da 8 a 63
caratteri.
Page 40

Enrutador inalámbrico de bolsillo
(WL-530g V2 para clientes inalámbricos 802.11g/b)
Guía rápida de conguración
®
Español
Page 41

Español
Conguración rápida
38 Enrutador inalámbrico de bolsillo ASUS
Procedimiento de instalación
Siga estos pasos para instalar el Enrutador inalámbrico ASUS.
1. Determine cuál es la mejor ubicación para el Enrutador inalámbrico ASUS. Tenga
en cuenta las consideraciones siguientes:
• La longitud del cable Ethernet que conecta el Enrutador inalámbrico ASUS
a la red no debe exceder los 100 metros.
• Intente colocar el Enrutador inalámbrico ASUS sobre una supercie plana y
estable, lo más lejos posible del suelo, como por ejemplo, sobre un escritorio
o librería, dejándolo libre de obstrucciones y lejos de la luz solar directa.
• Intente colocar el Enrutador inalámbrico ASUS en un lugar central, de forma
que proporciona cobertura a todos los dispositivos móviles inalámbricos del
área. Al orientar la antena verticalmente debería obtener la mejor recepción
posible.
• Utilice únicamente la fuente de alimentación que acompaña a esta unidad.
Otras fuentes de alimentación pueden ajustar pero es posible que el voltaje
y la potencia no sean compatibles.
2. También es posible realizar el montaje en la pared o en posición vertical.
Advertencia: Es responsabilidad del instalador y de los usuarios
del Enrutador inalámbrico ASUS garantizar que la antena se opera
a una distancia de al menos 20 centímetros de cualquier persona.
Es necesario asegurar que el producto se utilice siguiendo las Di-
rectrices de RF para Exposición humana , que han sido adoptadas
por la Comisión federal de comunicaciones.
3. Conexión LAN: Adjunte un extremo del cable Ethernet RJ-45 al puerto LAN
del Enrutador inalámbrico ASUS (cualquiera de los cuatro disponibles) y conecte
el otro extremo del cable Ethernet RJ-45 en su equipo de sobremesa.
4. Conexión de la alimentación: El Enrutador inalámbrico ASUS recibe
alimentación desde una fuente de alimentación externa. El Enrutador inalámbrico
ASUS se envía con una fuente de alimentación listada como UL, Clase 2. Conecte
un extremo del adaptador de alimentación CD a la parte posterior del Enrutador
inalámbrico ASUS y el otro extremo a la toma de electricidad.
El indicador LED de encendido situado en la parte frontal del Enrutador
inalámbrico ASUS se iluminará cuando se encienda la unidad. Asimismo, los
indicadores verdes LAN y WAN se encenderán para indicar que el Enrutador
inalámbrico ASUS dispone de conexión de red Ethernet física.
Page 42

Español
Enrutador inalámbrico de bolsillo ASUS 39
Conguración rápida
Conguración del software
Conguración del Enrutador inalámbrico ASUS
El Enrutador inalámbrico ASUS puede congurarse para utilizarse en diversos
escenarios. Algunos de los valores congurados de fábrica pueden adecuarse a sus
necesidades, sin embargo, es posible que necesite cambiar otros. Antes de utilizar el
Enrutador inalámbrico ASUS, debe comprobar la conguración básica para garantizar
que funciones dentro de su entorno. La conguración del Enrutador inalámbrico
ASUS se realiza a través de un explorador Web. Debe disponer de un PC portátil
o de sobremesa conectado al Enrutador inalámbrico ASUS (ya sea directamente o
a través de un concentrador) y ejecutar un explorador Web como una terminal de
conguración. La conexión puede ser mediante cable o inalámbrica. Para la conexión
inalámbrica, se necesita un dispositivo compatible con IEEE 802.11g/b, como por
ejemplo: una tarjeta ASUS WLAN, instalada en el PC portátil. Debería también
desactivar WEP y ajustar el SSID en “default” para su dispositivo LAN inalámbrico.
Si desea congurar el Enrutador inalámbrico ASUS o si desea acceder a Internet a
través del Enrutador Inalámbrico ASUS, la conguración TCP/IP debe ser correcta.
Normalmente, la conguración TCP/IP debería encontrarse sobre la subred IP del
Enrutador inalámbrico ASUS.
Nota: Antes de reiniciar el equipo, el Enrutador inalámbrico ASUS
debería estar encendido y encontrarse en estado preparado.
Conexión al Enrutador inalámbrico ASUS
Conexión con cable
Se suministra un cable RJ-45 con el Enrutador inalámbrico ASUS. La función de
cruce automático está diseñada en el Enrutador inalámbrico ASUS de forma que
pueda utilizar un cable Ethernet cruzado o directo. Conecte un extremo del cable en
el puerto WAN situado en la parte posterior del Enrutador inalámbrico ASUS y el
otro extremo en el puerto Ethernet del módem ADSL o del módem con cable.
Conexión inalámbrica
Consulte el manual del usuario del adaptador inalámbrico para obtener información
sobre cómo asociarse con el Enrutador inalámbrico ASUS. El SSID predeterminado
del Enrutador inalámbrico ASUS es “default” (en minúsculas), el cifrado está
desactivado y se utiliza la autenticación de sistema abierto.
Page 43

Español
Conguración rápida
40 Enrutador inalámbrico de bolsillo ASUS
Conguración IP manual
Si de sea aj ustar la dir ecci ón IP
man u a lm en t e, d eb er í a c o no ce r la
siguiente conguración predeterminada
del Enrutador inalámbrico ASUS:
• Dirección IP 192.168.1.1
• Máscara de subred 255.255.255.0.
Si ajusta la dirección IP de su equipo
manualmente, necesita encontrarse sobre
el mismo segmento. Por ejemplo:
• Dirección IP 192.168.1.xxx (xxx puede
ser cualquier número entre 2 y 254 que
no esté utilizando otro dispositivo)
• Máscara de subred 255.255.255.0 (la misma que el Enrutador inalámbrico
ASUS)
• Pasarela 192.168.1.1 (este es el Enrutador inalámbrico ASUS)
Ajuste de la dirección IP para conexiones mediante cable
o inalámbricas
Obtener IP automáticamente
En Enrutador inalámbrico ASUS incorpora
un servidor DHCP de forma que el método
más fácil ES establecer su equipo para que
obtenga automáticamente su dirección IP
y reiniciar su equipo. De forma que la
dirección IP, pasarela, DNS (Servidor de
sistema de nombre de dominio) correctas
pueden obtenerse desde el Enrutador
inalámbrico ASUS.
Nota: El Enrutador inalámbrico
actuará como un enrutador y
proporcionará una dirección IP
sólo cuando exista una conexión
física del puerto WAN. Debe conectar el puerto WAN del Enrutador
inalámbrico ASUS con el puerto Ethernet de su módem ADSL o con
un módem de cable mediante un cable de red. Antes de reiniciar el
equipo, el Enrutador inalámbrico ASUS debería estar encendido y
encontrarse en estado preparado.
Page 44

Español
Enrutador inalámbrico de bolsillo ASUS 41
Conguración rápida
Utilización del Enrutador inalámbrico por
primera vez
1. Utilidades del Enrutador inalámbrico ASUS
Ejecute Descubrir dispositivo desde “ASUS Utility” en Windows Inicio Programas.
2. Conecte ASUS WLAN Web Manager
Ejecute ASUS WLAN Descubrir dispositivo desde el menú Inicio y haga clic en
Cong cuando se encuentre el dispositivo.
Nota: De forma predeterminada, el Enrutador inalámbrico actuará
como un enrutador y proporcionará una dirección IP sólo cuando
exista una conexión física sobre el puerto WAN. Debe conectar el
puerto WAN del Enrutador inalámbrico con el módem ADSL o de
cable utilizando un cable de red.
Nota: Antes de reiniciar el equipo, el Enrutador inalámbrico ASUS
debería estar encendido y encontrarse en estado preparado.
Instalación de las utilidades del Enrutador
inalámbrico ASUS
Siga estos pasos para instalar las Utilidades
del Enrutador inalámbrico ASUS en
Microsoft Windows. Inserte el CD de soporte
suministrado con el Enrutador inalámbrico
ASUS y aparecerá automáticamente el
menú. (Haga doble clic en setup.exe si está
desactivada la ejecución automática)
Agregue 192.168.1.1 en el cuadro
Excepciones si está utilizando un
servidor proxy.
Page 45

Español
Conguración rápida
42 Enrutador inalámbrico de bolsillo ASUS
Nombre de usuario y contraseña
Una vez conectado, una ventana le
preguntará el Nombre nombre de
usuario y Contraseña para iniciar la
sesión. Los valores predeterminados
de fábrica son “admin” y “admin”.
No ta: Si no puede encontrar
ningún Enrutador inalámbrico
ASUS debido a un problema en
la configuración IP, mantenga
pulsado el botón “Restaurar”
durante más de cinco segundos
para restaurar la configuración
predeterminada de fábrica.
Introduzca la dirección o el nombre manualmente
Puede también abrir el explorador Web del equipo e introducir el nombre y la dirección
IP predeterminada del Enrutador inalámbrico ASUS:
WL530g V2
http://my.router o http://my.WL530g V2 o http://192.168.1.1
Página de inicio
Tras iniciar sesión, aparecerá la
página de inicio del Enrutador
inalámbrico ASUS.
Importante: Tras introducir información en cualquier página, haga clic en
el botón “Aplicar” . Si hace clic en cualquier otro vínculo, se dirigirá
a otra página y perderá la nueva conguración.
Si la IP de su equipo no se encuentra sobre la misma subred que el Enrutador inalámbrico
ASUS (192.168.1.X), se le solicitará que la cambie. La dirección IP puede ser cualquier
número entre 2 y 254 que no utilice ningún otro dispositivo. No se requiere pasarela.
Nota: La utilización de un servidor proxy para su LAN requiere que establezca una excepción para el Enrutador inalámbrico ASUS, o si no fallará
la conexión.
Page 46

Español
Enrutador inalámbrico de bolsillo ASUS 43
Conguración rápida
3. Establezca su propia contraseña
4. Utilización de la Instalación rápida
Seleccione su zona horaria o la región
más cercana. Haga clic en Siguiente
para continuar.
Conguración rápida
Para iniciar la conguración rápida, haga clic en Siguiente
para entrar en la página “Conguración rápida”. Siga las
instrucciones para configurar el Enrutador inalámbrico
ASUS.
Seleccione el tipo de conexión. Haga
clic en Siguiente para continuar.
Page 47

Español
Conguración rápida
44 Enrutador inalámbrico de bolsillo ASUS
Conguración rápida (Cont.)
Para congurar su interfaz inalámbrica,
debe primero darle un SSID (Identicador
de servicio establecido). El SSID es un
identificador exclusivo adjunto a los
paquete enviados sobre WLAN. Este
identificador emula a una contraseña
cuando un dispositivo inalámbrico
intenta ponerse en comunicación sobre
la WLAN. Dado que un SSID distingue
una WLAN de otra, los puntos de acceso
y los dispositivos inalámbricos que están
intentando conectarse a una WLAN deben
utilizar el mismo SSID.
Asimismo, si desea proteger los datos transmitidos, seleccione un Nivel de seguridad
medio o alto.
Medio : permite sólo a los usuarios con la misma clave WEP conectarse a este punto
de acceso y transmitir datos utilizando cifrado de clave WEP de 64 bits o 128 bits.
Alto: permite sólo a los usuarios con la misma clave precompartida WPA conectarse
a este punto de acceso y transmitir datos utilizando cifrado TKIP.
Haga clic en Terminar para continuar. Se le solicita que guarde la conguración.
Haga clic en Guardar y Reiniciar para guardar la conguración del Enrutador
inalámbrico ASUS y activar la nueva conguración.
Seleccione “No” para introducir la
in for ma ció n m anu alm en te. “S í”
desactivará el campo. Haga clic en
Siguiente para continuar.
Page 48

Español
Enrutador inalámbrico de bolsillo ASUS 45
Conguración rápida
Autenticación y seguridad
Haga clic en Inalámbrico en el menú para que
aparezca el submenú.
Este campo le permite establecer distintos métodos
de autenticación que determinan diversos esquemas
de cifrado. Si todos sus clientes admiten WPA, se
recomienda la utilización de WPA-PSK” para una
mejor seguridad.
Cifrado WPA
Cu a ndo se ut il iza el mé to do d e
autenticación “WPA-PSK”, se aplican los
esquemas de cifrado TKIP (Protocolo de
integridad de clave temporal) que acaban
de proponerse.
TKIP: TKIP utiliza un algoritmo de
cifrado , que es más estricto que el
algoritmo WEP y también utiliza los
servicios de cálculo WLAN existentes
para realizar operaciones de cifrado. TKIP
verica la conguración de seguridad después de determinar las claves de cifrado.
Clave WPA precompartida
Seleccione “TKIP” en el Cifrado WPA, este campo se utiliza como una contraseña
para comenzar el proceso de cifrado. Nota: Se requiere entre 8 y 63 caracteres.
Page 49

Русский
Портативный маршрутизатор для беспроводных
сетей
(WL-530g V2 для клиентов беспроводных сетей 802.11g/b)
Краткое руководство по установке
®
Page 50

Русский
47 Портативный маршрутизатор для беспроводных сетей ASUS
Краткое руководство по установке
Процедура установки
Для установки маршрутизатора для беспроводных сетей ASUS выполните следующие действия:
1. Определите оптимальное место для установки маршрутизатора для беспроводных сетей ASUS,
учитывая следующие соображения:
• Длина кабеля Ethernet, соединяющего маршрутизатор для беспроводных
сетей ASUS и проводную сеть не должна превышать 100 метров.
• Постарайтесь разместить маршрутизатор для беспроводных сетей ASUS на
плоской надежной поверхности как можно выше над поверхность земли,
например, на столе или книжном шкафу. Не размещайте маршрутизатор там,
где существуют препятствия для распространения радиоволн, не допускайте
попадания прямых солнечных лучей на маршрутизатор.
• Постарайтесь разместить маршрутизатор для беспроводных сетей ASUS в
центральной области, чтобы все беспроводные мобильные устройства могли
установить с ним соединение. Вертикальное расположение антенны должно
обеспечить оптимальное качество приема.
• Используйте только блок питания, входящий в комплект поставки. Разъемы
др угих бл оков пи тани я могут подойт и к разъ е мам, од нако значен ия
напряжения и потребляемой мощности могут оказаться неподходящими.
2. Возможна также установка маршрутизатора на стене или вертикальном стенде.
Предупреждение: Ответственность за то, что антенна маршрутизатора для беспроводных
сетей ASUS находится на расстоянии не менее 20 сантиметров от ближайшего человека,
лежит на лице, выполняющем установку и на пользователях маршрутизатора. Необходимо
убедиться, что изделие используется в соответствии с рекомендациями по использованию
радиооборудования “RF Guidelines for Human Exposure”, принятым федеральной комиссией
по вопросам коммуникаций США.
3. Подключение к сети: Подключите один разъем RJ-45 кабеля Ethernet к сетевому порту
маршрутизатора для беспроводных сетей ASUS (любому из четырех), а другой разъем
RJ-45 кабеля Ethernet к настольному компьютеру.
4. Подключение питания: Для работы маршрутизатора для беспроводных сетей ASUS
требуется внешний блок питания. В комплект поставки маршрутизатора входит блок
питания класса 2, включенный в список UL. Подключите один кабель адаптера питания к
разъему на задней панели маршрутизатора, а другой кабель к розетке сети питания.
При вклю че ни и устройства на передней пане ли маршрутизатора для беспроводн ых
сетей ASUS загорится светодиодный индикатор Power. Кроме того, при подключении
маршрутизатора для беспроводных сетей ASUS к проводной сети Ethernet загорится
зеленый светодиод LAN или WAN.
Page 51

Русский
Краткое руководство по установке
48 Портативный маршрутизатор для беспроводных сетей ASUS
Русский
Конфигурирование программного обеспечения
Задание конфигурации маршрутизатора для беспроводных сетей
ASUS
Возможна настройка маршрутизатора для беспроводных сетей ASUS на использование в
различных ситуациях. Некоторые из установленных по умолчанию значений могут подойти для
рабо ты, однако , мож ет потр ебо ват ься мод ифи кац ия друг их. Пер ед началом рабо ты с
маршрутизатором для беспроводных сетей ASUS необходимо проверить основные параметры
для того, чтобы убедиться, что они подойдут для работы в соответствующей сети. Настройка
маршру ти затор а для бес прово дн ых сет ей A SUS выполняет ся с помощью обозрев ат еля
Инте рнет. Нео бхо димо подк люч ить к маршрут изато ру для бесп ровод ных сет ей ASUS
портативный или настольный компьютер (непосредственно или через сетевой концентратор) и
запустить обозреватель Интернет. Подключиться к маршрутизатору можно по проводной или
беспрово дн ой сети. Для установк и беспрово дн ого соедин ен ия потре бу ется уст ро йство,
совместимое с требованиями стандарта IEEE 802.11g/b, например, адаптер беспроводной сети.
Кроме того, необходимо отключить WEP и задать в качестве значения SSID слово “default”.
При необходимости выполнить настройку маршрутизатора для беспроводных сетей ASUS или
обратиться к Интернет через маршрутизатор для беспроводных сетей ASUS следует убедиться
в правильности параметров протокола TCP/IP. Как правило, основным параметром, влияющим
на успешность работы, является маска подсети маршрутизатора для беспроводных сетей ASUS.
Примечание: Перед перезагрузкой компьютера необходимо включить маршрутизатор для
беспроводных сетей ASUS и дождаться его перехода в состояние готовности.
Подключение к маршрутизатору для беспроводных сетей ASUS
Проводное подключение
В комплект поставки маршрутизатора для беспроводных сетей ASUS входит один кабель RJ-
45. В маршрутизаторе предусмотрена функция автоматического определения перекрестного
кабеля, следовательно, возможно использование стандартного и перекрестного кабеля Ethernet.
Подк лючит е один раз ъем кабел я к п орт у WAN на задней пан ели маршр утиза тора для
беспроводных сетей ASUS, а другой разъем – к порту Ethernet ADSL-модема или модема для
выделенных линий.
Беспроводное подключение
Сведения о беспроводном подключении приведены в руководстве пользователя адаптера для
бе с п р оводн ы х сет е й . При н я т ое по умол ч а н ию зн а ч ение S SID ма р шрути з а т ора дл я
бе спр ово дных сете й A SUS - “def aul t” (в нижн ем регист ре) , шиф ров а ние откл юче но,
используется аутентификация для открытой системы.
Page 52

Русский
Портативный маршрутизатор для беспроводных сетей ASUS 49
Краткое руководство по установке
Русский
Установка IP-адреса вручную
При н е о б х о д и м о с т и ус т а н о в и т ь IP - а д р е с
вручную пол ьзовате лю следует располагать
ин ф о рм а ци е й о сл е д ую щ их ус т а но в ка х
маршрутизатора для беспроводных сетей по
умолчанию:
• IP-адрес 192.168.1.1
• Маска подсети 255.255.255.0.
При задании IP-адреса компь ютера вручную
необходимо, чтобы он оказался в той же подсети.
Например,
• IP-адрес 192.168.1.xxx (где xxx может быть
любым числом от 2 до 254, не используемым
другим устройством)
• Маск а п одсе т и 25 5 . 2 5 5 .25 5 . 0 (к а к у
маршрутизатора для беспроводных сетей ASUS)
• Шлюз по умолчанию 192.168.1.1 (маршрутизатор для беспроводных сетей ASUS)
• DNS 192.168.1.1 (IP-адрес маршрутизатора для беспроводных сетей ASUS или другой).
Установка IP-адреса для проводной или беспроводной сети
Автоматическое получение IP-адреса
В состав маршрут из атора для беспр оводных
сете й ASU S входи т DHCP- сер вер, кото рый
обесп еч ив ае т про ст ей ши й спо со б пол уч ен ия
IP-адр еса для компью тера. Соответ ст венно ,
корректный IP-адрес, адрес шлюза и DNS-сервера
могут быть получены от маршрутизатора для
беспроводных сетей ASUS.
П р им е ч а ни е: Ма рш ру т и з ат о р дл я
беспроводных сетей будет функционировать
в роли маршрутизатора и предоставлять
IP-адрес только в том случае, если к порту
WAN выполнено физическое подключение. К
п о р т у WA N м ар ш р у т и за то ра д л я
беспроводных сете й ASUS подключается
с е те во й ка б ел ь о т по р та E th e rn et
ADSL-модеме или модема для выделенных
линий. Перед перезагрузкой компьютера
маршрутизатор для беспроводных сетей ASUS должен быть включен и находиться в
рабочем состоянии.
Page 53

Русский
Краткое руководство по установке
50 Портативный маршрутизатор для беспроводных сетей ASUS
Русский
Использование маршрутизатора для беспроводных сетей в первый
раз
1. Утилиты маршрутизатора для беспроводных сетей ASUS
За п у с тите п р ограм м у Обна р у ж ение у с тройс т в из гр у ппы “A S US Ut i lity” в ме н ю
Пуск->Программы ОС Windows.
2. Подключение к ASUS WLAN Web Manager
Запустите программу ASUS WLAN Обнаружение устройств из меню Пуск и нажмите кнопку
Конфигурирование после того, как устройство будет обнаружено.
Примечание: По умолчанию маршрутизатор для беспроводных сетей будет
функционировать в роли маршрутизатора и предоставлять IP-адрес только в том
случае, если к порту WAN выполнено физическое подключение. Необходимо
подключить к порту WAN маршрутизатора для беспроводных сетей сетевой
кабель от ADSL-модема или модема для выделенных линий.
Примечание: Перед перезагрузкой компьютера маршрутизатор для беспроводных
сетей ASUS должен быть включен и находиться в рабочем состоянии.
Установка утилит маршрутизатора для беспроводных сетей ASUS
Д л я у с т а н о в к и у т и л и т м а р ш р у т и з а т о р а д л я
беспроводных сетей ASUS в операционной
си сте ме Mi cro soft Windo ws вы пол н ите
с л е д ую щ и е д е й с тв ия : П о ме с т и те
компа к т - д и с к , вх о д я щ и й в к о м п л е кт
по с тав к и ма ршр у т иза т о ра, в дис к овод
компакт-дисков. На экране появится меню
компакт-диска. (Если в системе отключен
механизм автозапуска, дважды щелкните
файл setup.exe).
При использовании прокси-сервера
добавьте адрес 192.168.1.1 в список
Page 54

Русский
Портативный маршрутизатор для беспроводных сетей ASUS 51
Краткое руководство по установке
Русский
Имя пользователя и пароль
После подключения к маршрутизатору для
беспроводных сетей на экране появится окно, в
котором следует указать имя пользователя и
пароль. По умолчанию установлены значения
“admin” и “admin”.
Примечание: Если в результате изменения
IP-параметров не удается обнаружить
маршрутизатор для беспроводных сетей
AS U S , на ж м ите кн опку “ Resto r e” и
удерживайте ее в нажатом состоянии пять
секунд для восстановления значений по
умолчанию.
Ввод адреса или имени вручную
Вы так же може те запусти ть об озр евате ль Ин тер нет и ввест и имя или адрес
маршрутизатора для беспроводных сетей ASUS вручную.
WL530g V2
http://my.router или http://my.WL530g V2 или http://192.168.1.1
Домашняя страница
П о с ле п р оц е ду ры р е ги с тр ац ии н а
эк р а н е поя в и т с я дом а ш н я я стр а н и ц а
маршрутизатора для беспроводных сетей
ASUS.
Важно! После ввода информации на любой странице нажимайте кнопку “Применить
. При щелчке на любой другой ссылке произойдет переход на другую
страницу, новые значения будут утеряны.
Если IP-адрес компьютера принадлежит не к одной подсети с IP-адресом маршрутизатора для
беспроводных сете ASUS Wireless Router (192.168.1.X), то программа предложит сменить его.
Чис ло X в IP-адресе может быть любым числ ом от 2 до 254, не используемым друг им
устройством. Указывать IP-адрес шлюза необязательно.
Примечание: При использовании прокси-сервера в сети необходимо добавить адрес
маршрутизатора для беспроводных сетей ASUS в список исключений, в противном
случае установить соединение не удастся.
Page 55

Русский
Краткое руководство по установке
52 Портативный маршрутизатор для беспроводных сетей ASUS
Русский
3. Задание собственного пароля
4. Использование процедуры быстрой установки
Выберите свой часовой пояс (или часовой
пояс ближайшего региона). Для продолжения
нажмите кнопку Далее.
Быстрая настройка
Дл я запус к а проц е д у р ы бы с т р о й на с т р ойки на ж мите к н опку
Далее для перехода на страницу быстрой настройки “Quick Setup”.
Сл е д у й те и нс т р у кц и я м по на ст р о й к е м ар ш р у т из а т о ра д ля
беспроводных сетей ASUS.
Выберите тип подключения. Для продолжения
нажмите кнопку Далее.
Page 56

Русский
Портативный маршрутизатор для беспроводных сетей ASUS 53
Краткое руководство по установке
Русский
Процедура быстрой настройки (продолжение)
В пр оце с се на стро йки бе спр ово д ной сети
не обх одим о зад а ть SS I D (Ид е нти фик а тор
набора служб; Service Set Identier) интерфейса.
S S ID – у н ик ал ь ны й и д ен т иф ик а то р,
х а р а кт е р и зу ющ и й п е р е да в а е мы е п о
беспроводн ым сетям пакеты . При попытке
п о д к л ю че ни я к б ес п р о в о дн ой с е т и
идентификатор играет роль пароля. Поскольку
SSID позволяет различать беспроводные сети,
точ ки дост упа и беспроводные устройства,
вх о д ящие в од н у сет ь , до л ж н ы об л а дать
одинаковыми SSID.
Кроме тог о, при необ ходимости защищать
передаваемые данные, выберите средний или
высокий уровень безопасности.
Средний: позволяет подключа ться к точке доступа тольк о тем пользователям , кото рые
ра с п о л а г а ют со о т в е т с т в ующим кл ю ч о м WEP. Переда ч а д а н ных ос у щ е с т в л яется с
шифрованием по 64-разрядному или 128-разрядному ключу WEP.
Высокий: позволяет подключаться к точке доступа только тем пользователям, которые
располагают распространенным заранее ключом WPA. Передача данных осуществляется с
шифрованием TKIP.
Для продол жения нажми те кно пку Закончи ть. Появитс я окно с запросо м сохр анени я
па рам етр ов. Нажм ите кноп ку Сох ран ить и пере зап уст ить дл я сохран ени я нас тро ек
маршрутизатора для беспроводных сетей и вступления новых настроек в силу.
Выберите “Нет” для ввода и н ф о р м а ц и и
вруч ную . При выборе знач ени я “Да” поле
будет заблокировано. Для продолжения
нажмите кнопку Далее.
Page 57

Русский
Краткое руководство по установке
54 Портативный маршрутизатор для беспроводных сетей ASUS
Аутентификация и безопасность
Выберите пун кт ме ню Бесп ров одные сети дл я вызов а
подменю.
В э т ом п о ле в ы б и р а ю т с я р а з л и ч ны е с х е м ы
аутентификации, з а д е й с т в у ю щ и е р а зличные схе м ы
ши ф р о в ания. Е сли вс е клие н т ы под д е р ж ивают WPA,
то для оптимального обеспечения безопасности рекомендуется
выбрать “WPA-PSK”.
Шифрование WPA
При выборе метода аутентификации WPA-PSK
применяются современные схемы шифрования
TKIP (Temporal Key Integrity Protocol, протокол
обеспечения целостности с использованием
временных ключей).
TKIP: TKIP использует алгоритм шифрования,
обеспечивающий большую криптостойкость,
чем алгоритм WEP, и также использующий
с у щ е ст в у ю щи е р ес у р с ы W LA N д ля
выполнения шифрования. TKIP обеспечивает
проверку конфигурации системы безопасности
после определения ключей шифрования.
Заранее распространяемый ключ
WPA
При выборе “TKIP” в поле WPA Encryption(шифрование WPA) это поле используется для
ввода пароля для начала процесса шифрования. Примечание: Допускается указывать пароль
длиной от 8 до 63 символов.
Page 58

Pocket Wireless Router
(WL-530g V2 para clientes da especicação sem os 802.11g/b)
Guia de instalação rápida
®
Português
Page 59

Português
Instalação rápida
56 O ASUS Pocket Wireless Router
Procedimento de instalação
Siga estas etapas para instalar o ASUS Wireless Router.
1. Determine a melhor localização para o ASUS Wireless Router. Tenha
em atenção os seguintes aspectos:
• O comprimento do cabo Ethernet que liga o ASUS Wireless Router
à rede não deve ter mais de 100 metros.
• Tente colocar o ASUS Wireless Router sobre uma superfície plana e
resistente o mais afastada possível do chão, tal como, por exemplo,
uma secretária ou estante, mantendo o dispositivo afastado de quais-
quer obstruções e longe da luz solar directa.
• Tente colocar o ASUS Wireless Router num local central de forma
a cobrir todos os dispositivos portáteis sem os existentes na área. A
colocação da antena na vertical deve proporcionar uma melhor recepção.
• Utilize apenas a fonte de alimentação que acompanha a unidade.
As outras fontes de alimentação podem ser ligadas sem problemas
mas ser incompatíveis devido a diferenças ao nível da voltagem e da
tensão.
2. É também possível montar o router na parede ou num suporte vertical.
Advertência: Cabe ao instalador e aos utilizadores do ASUS Wireless
Router garantirem a colocação da antena a uma distância mínima
de 20 centímetros de qualquer pessoa. Isto é necessário para garantir o funcionamento do produto de acordo com as orientações de
radiofrequência relativamente à exposição humana adoptadas pela
FCC (Federal Communications Commission).
4. Ligação LAN: Ligue uma das extremidades de um cabo Ethernet RJ-
45 à porta LAN do ASUS Wireless Router (a qualquer uma das quatro
portas existentes) e ligue a outra extremidade do cabo Ethernet RJ-45
ao seu computador desktop.
5. Ligação da alimentação: O ASUS Wireless Router tem de ser alimentado
por uma fonte de alimentação externa. O ASUS Wireless Router inclui
uma fonte de alimentação UL de classe 2. Ligue uma das extremidades
do transformador d.c. à parte de trás do ASUS Wireless Router e a outra
extremidade à tomada eléctrica.
O LED de alimentação existente na parte da frente do ASUS Wireless
Router acende quando a unidade é ligada. Para além disso, os LEDs
verdes da LAN ou da WAN acendem para indicar que o ASUS Wireless
Router tem uma ligação de rede Ethernet física.
Page 60

Português
O ASUS Pocket Wireless Router 57
Instalação rápida
Conguração do software
Conguração do ASUS Wireless Router
O ASUS Wireless Router pode ser congurado para satisfazer vários
cenários de utilização. Algumas das opções predenidas na fábrica podem
corresponder à forma como pretende utilizar a unidade; mas outras podem ter
de ser alteradas. Antes de utilizar o ASUS Wireless Router, deve vericar as
denições básicas para ter a certeza de que estas funcionarão no seu ambiente
de trabalho. A conguração do ASUS Wireless Router é feita através de um
browser da web. Terá de ter um PC Notebook ou Desktop ligado ao ASUS
Wireless Router (quer directamente quer através de um hub) e dispor de
um browser da web que funcione como terminal de conguração. A ligação
pode ser feita com ou sem os. Para uma ligação sem os, precisa de um
dispositivo compatível com a norma IEEE 802.11g/b, e.g. uma placa de
WLAN da ASUS instalada no seu PC Notebook. Deve também desactivar a
função WEP e denir a opção SSID para “default” (predenição) ao nível do
seu dispositivo LAN sem os. Se quiser congurar o ASUS Wireless Router
ou aceder à Internet através do ASUS Wireless Router, as denições TCP/IP
têm de estar correctas. Normalmente, a denição TCP/IP deve encontrar-se
na sub-rede IP do ASUS Wireless Router.
Nota: Antes de reiniciar o computador, o ASUS Wireless Router deve
estar ligado e pronto para funcionar.
Ligação ao ASUS Wireless Router
Ligação com os
Um cabo RJ-45 é fornecido juntamente com o ASUS Wireless Router. A
função de cruzamento automático foi incluída no ASUS Wireless Router
para que possa utilizar quer um cabo Ethernet directo quer um cabo Ethernet
cruzado. Ligue uma das extremidades do cabo à porta WAN existente na parte
de trás do ASUS Wireless Router e a outra extremidade à porta Ethernet do
seu modem ADSL ou por cabo.
Ligação sem os
Consulte o manual do utilizador da sua placa de rede sem os para saber
como fazer a ligação do ASUS Wireless Router. O SSID predenido do
ASUS Wireless Router é “default (predenido)” (em letras minúsculas), a
função de encriptação está desactivada e o método de autenticação utilizado
é o de sistema aberto.
Page 61

Português
Instalação rápida
58 O ASUS Pocket Wireless Router
Denição manual do endereço IP
Se quiser definir o seu endereço
IP manualmente, deve conhecer as
seguintes opções predefinidas do
ASUS Wireless Router:
• Endereço IP: 192.168.1.1
• M á s c a r a d e s u b - r e d e :
255.255.255.0.
Se denir manualmente o endereço
IP do seu computador, certique-se
de que este se encontra no mesmo
segmento. Por exemplo:
• Endereço IP: 192.168.1.xxx (os
xxx podem representar qualquer
número entre 2 e 254 que não
esteja a ser utilizado por outro
dispositivo)
• Máscara de sub-rede: 255.255.255.0 (igual à do ASUS Wireless Router)
• Gateway: 192.168.1.1 (este é o endereço do ASUS Wireless Router)
• DNS: 192.168.1.1 (endereço IP do ASUS Wireless Router ou o seu
próprio endereço).
Denição do endereço IP para uma ligação com ou
sem os
Obter o endereço IP automaticamente
O ASUS Wireless Router inclui um servidor DHCP, pelo que o método
mais fácil consiste em denir o PC
para obter o respectivo endereço
IP automaticamente e reiniciar o
computador. Assim, o endereço IP,
o gateway e o DNS (Domain Name
System Server) correctos podem ser
obtidos a partir do ASUS Wireless
Router.
Nota: O router sem os funcionará como um router e obterá
o endereço IP apenas quando
existir uma ligação física à porta
WAN. Tem de ligar a porta WAN
no ASUS Wireless Router com
a porta Ethernet no seu modem
ADSL ou por cabo utilizando um cabo de rede. Antes de reiniciar o PC,
o ASUS Wireless Router deve estar ligado e pronto para funcionar.
Page 62

Português
O ASUS Pocket Wireless Router 59
Instalação rápida
Utilização do router sem os pela primeira vez
1. Utilitários do ASUS Wireless Router
Execute o utilitário Device Discovery a partir da pasta “ASUS Utility”
existente em Start, Programs (Iniciar, Programas) no Windows.
2. Ligação ao gestor web da ASUS WLAN
Execute o utilitário Device Discovery da ASUS WLAN a partir do menu
Start (Iniciar) e clique em Cong (Congurar) quando o dispositivo for
encontrado.
Adicione 192.168.1.1 na caixa Exceptions (Excep-
ções) se estiver a utilizar um servidor proxy.
Nota: Por predenição, o router sem os funcionará como um router
e obterá o endereço IP apenas quando existir uma ligação física
à porta WAN. Tem de ligar a porta WAN do router sem os ao seu
modem ADSL ou por cabo através de um cabo de rede.
Nota: Antes de reiniciar o PC, o ASUS Wireless Router deve estar
ligado e pronto para funcionar.
Instalação dos utilitários do ASUS Wireless
Router
Siga estas etapas para instalar os
utilitários do ASUS Wireless Router
no Microsoft Windows. Introduza o
CD de suporte fornecido juntamente
com o ASUS Wireless Router, o menu
de instalação deve aparecer. (Faça um
duplo clique sobre o cheiro setup.exe se
a função de execução automática estiver
desactivada.)
Page 63

Português
Instalação rápida
60 O ASUS Pocket Wireless Router
Nome de utilizador & Senha
Após feita a ligação, uma janela
pedirá a introdução do nome de
utilizador e da senha para poder
iniciar a sessão. O nome de utilizador
e a senha predenidos são “admin”
e “admin”.
Nota: Se não conseguir encontrar nenhum dos ASUS Wireless
Routers devido a problemas nas
denições IP, mantenha premido
o botão “Restore” (Restaurar)
durante mais de cinco segundos
para restaurar as predenições
de fábrica.
Introdução manual do nome ou do endereço
Pode também abrir o browser da web que tem instalado no seu PC e introduzir
o nome ou o endereço IP predenido do ASUS Wireless Router:
WL530g V2
http://my.router ou http://my.WL530g V2 ou http://192.168.1.1
Página principal
Após feito o início de sessão, verá a
página principal do ASUS Wireless
Router.
Importante: Após introdução de informação em qualquer uma das
páginas, clique no botão “Apply” (Aplicar) . Se clicar numa
qualquer outra ligação, será reencaminhado para outra página e
perderá as suas novas denições.
Se o IP do seu computador não estiver na mesma sub-rede do ASUS Wireless
Router (192.168.1.X), ser-lhe-á pedido que faça as devidas alterações. O
endereço IP pode ser composto por qualquer número entre 2 e 254 que não esteja
a ser utilizado por outro dispositivo. O gateway não é necessário.
Nota: A utilização de um servidor proxy para a sua LAN requer a
denição de uma excepção para o ASUS Wireless Router, pois caso
contrário a ligação falhará.
Page 64

Português
O ASUS Pocket Wireless Router 61
Instalação rápida
3. Denir a sua própria senha
4. Utilização do Guia de instalação rápida
Seleccione o seu fuso horário ou
a região mais próxima. Clique em
Next (Seguinte) para continuar.
Instalação rápida
Para iniciar a instalação rápida, clique em Next
(Seguinte) para aceder à página “Quick Setup (Instalação
rápida)” . Siga estas etapas para instalar o ASUS Wireless
Router.
Seleccione o tipo de ligação. Clique
em Next (Seguinte) para continuar.
Page 65

Português
Instalação rápida
62 O ASUS Pocket Wireless Router
Instalação rápida (cont.)
Para instalar a sua interface sem os,
terá de lhe atribuir primeiro um SSID
(Service Set Identier). O SSID é
um identificador único anexado a
pacotes enviados através de WLANs.
Este identificador emula a senha
quando um dispositivo sem os tenta
comunicar através da WLAN. Uma
vez que o SSID distingue as WLANs
umas das outras, os pontos de acesso
e os dispositivos sem os que estejam
a tentar ligar a uma WLAN têm de
utilizar o mesmo SSID.
Para além disso, se quiser proteger os dados transmitidos, seleccione um
nível de segurança médio ou alto.
Medium (Médio): permite que apenas os utilizadores que partilham a mesma
chave WEP liguem a este ponto de acesso e transmitam dados utilizando
uma chave de encriptação WEP de 64 ou 128 bits.
High (Alto): permite que apenas os utilizadores com a mesma chave WAP
pré-partilhada liguem a este ponto de acesso e transmitam dados utilizando
a encriptação TKIP.
Clique em Finish (Concluir) para continuar. É-lhe pedido para guardar as
denições. Clique em Save&Restart (Guardar & Reiniciar) para guardar
as denições no ASUS Wireless Router e activá-las.
Seleccione a opção “No (Não)” para
introduzir a informação manualmente.
A opção “Yes (Sim)” desactiva o
campo. Clique em Next (Seguinte)
para continuar.
Page 66

Português
O ASUS Pocket Wireless Router 63
Instalação rápida
Autenticação e segurança
Clique em Wireless (Sem os) no menu para
aceder a um sub-menu.
Este campo permite-lhe denir os diferentes
métodos de autenticação que determinam os
diferentes esquemas de encriptação. Se todos
os seus clientes suportarem a especificação
WPA, recomendamos a utilização da opção “WPA-PSK” para uma melhor
segurança.
Encriptação WPA
Quando o método de autenticação “WPA-PSK” é utilizado, são aplicados
os novos esquemas de encriptação TKIP (Temporal Key Integrity Protocol)
propostos.
TKIP: O método TKIP utilize um
algoritmo de encriptação, que é mais
estrito do que o algoritmo WEP e
que utiliza também as capcidades
de cálculo da WLAN para execução
das operações de encriptação. O
método TKIP verica a segurança da
conguração após determinação das
chaves de encriptação.
Chave WPA pré-partilhada
Ao seleccionar “TKIP” na opção WPA Encryption (Encriptação WPA), este
campo é utilizado como uma senha para dar início ao processo de encriptação.
Nota: são necessários entre 8 e 63 caracteres.
Page 67

Български
Български
Джобен безжичен маршрутизатор
(WL-530g V2 за 802.11g/b безжични клиенти)
Ръководство за бърза инсталация
®
Page 68

Български
65Джобен безжичен маршрутизатор на ASUS
Бърза настройка
Бърза инсталация
Следвайте тези стъпки, за да инсталирате безжичния маршрутизатор
на ASUS.
1. Определете най-доброто място за безжичния маршрутизатор на
ASUS. Имайте предвид следните съображения:
• Дължината на Ethernet кабела, който свързва безжичния
маршрутизатор на ASUS към мрежата, не трябва да надвишава
100 метра.
• Постарайте се да разположите безжичния маршрутизатор
на ASUS върху равна, стабилна повърхност, възможно подалеч от пода, като например върху бюро или библиотека,
като отстраните препятствията и го предпазвате от директно
слънчево греене.
• Постарайте се да разположите безжичния маршрутизатор на
ASUS на централно място, така че да осигурява покритие за
всички безжични мобилни устройства в района. Вертикалното
ориентиране на антената трябва да осигури най-добро
приемане.
• Използвайте само захранването, което е доставено с този
уред. Други захранвания може да изглеждат подходящи, но
напрежението и мощността може да не са съвместими.
2. Монтиране на стена или вертикално поставяне също е
възможно.
Внимание: Отговорност на инсталиращия и на потребителя на безжичния
маршрутизатор на ASUS е да гарантират, че антената работи на минимум 20
см от всяко лице. Това е необходимо, за да се гарантира, че продуктът ще
работи в съответствие с Указанията за излагане на хора на РЧ излъчване
(RF Guidelines for Human Exposure), които са приети от Федералната
комисия по комуникациите на САЩ (FCC).
3. LAN връзка: Свържете единия край на RJ-45 Ethernet кабела към
LAN порта (който и да е от четирите) на безжичния маршрутизатор
на ASUS, а другия край на RJ-45 Ethernet кабела свържете към
вашия настолен компютър.
4. Свързване на захранването: Безжичният маршрутизатор на
ASUS изисква захранване от външен източник. Безжичният
маршрутизатор на ASUS се доставя със захранване по списъка на
UL, клас 2 (UL listed, Class 2). Включете единия край на захранващия
постояннотоков адаптер към гърба на безжичния маршрутизатор
на ASUS, а другия край – към захранващ контакт.
Светодиодът на захранването в предната част на безжичния
маршрутизатор на ASUS светва, когато уредът бъде ВКЛЮЧЕН.
Освен това зелените LAN или WAN светодиоди светват, за да
покажат, че безжичният маршрутизатор на ASUS има физическа
Ethernet мрежова връзка.
Page 69

Бърза настройка
66 Джобен безжичен маршрутизатор на ASUS
Български
Софтуерна конфигурация
Конфигуриране на безжичния маршрутизатор на ASUS
Безжичният маршрутизатор на ASUS може да бъде конфигуриран
така, че да удовлетворява различни потребителски изисквания.
Някои от фабричните настройки може да отговарят на вашите
нужди, обаче други потребители може да се нуждаят от промени.
Преди да използвате безжичния маршрутизатор на ASUS, трябва да
проверите основните настройки, за да гарантирате, че той ще работи
във вашата среда. Конфигурирането на безжичния маршрутизатор
на ASUS се извършва през уеб браузър. Нуждаете се от ноутбук
или настолен компютър, свързан към безжичния маршрутизатор
на ASUS (или директно, или през концентратор) и работещ браузър
като конфигурационен терминал. Връзката може да бъде по кабел
или безжична. За безжична връзка се нуждаете от устройство,
съвместимо с IEEE 802.11g/b, например WLAN карта на ASUS,
инсталирана във вашия ноутбук компютър. Трябва така също да
дезактивирате WEP и да настроите SSID на стойност „default“ (по
подразбиране) за вашето безжично LAN устройство. Ако желаете
да конфигурирате безжичния маршрутизатор на ASUS или желаете
да получите достъп до интернет през безжичния маршрутизатор на
ASUS, настройките на TCP/IP трябва да са правилни. Обикновено
настройките на TCP/IP трябва да са в IP подмрежата (IP subnet) на
безжичния маршрутизатор на ASUS.
Забележка: Преди да презаредите своя компютър, безжичният
маршрутизатор на ASUS трябва да бъде ВКЛЮЧЕН и в състояние на
готовност.
Свързване към безжичния маршрутизатор на ASUS
Връзка чрез кабел
С безжичния маршрутизатор на ASUS се доставя един RJ-45 кабел.
Безжичният маршрутизатор на ASUS има интегрирана функция за
автоматично превключване на кръстосан кабел, така че можете
да използвате или прав (straight-through), или кръстосан (crossover)
Ethernet кабел. Включете единия край на кабела в WAN порта на
задния панел на безжичния маршрутизатор на ASUS, а другия край
– в Ethernet порта на вашия ADSL или кабелен модем.
Безжична връзка
Вижте ръководството за потребителя на вашия безжичен адаптер
относно свързването към безжичния маршрутизатор на ASUS.
По подразбиране SSID на безжичния маршрутизатор на ASUS е
„default“ (с малки букви), криптирането е дезактивирано и се използва
автентикация на отворена система.
Page 70

Джобен безжичен маршрутизатор на ASUS 67
Бърза настройка
Български
Ръчна настройка на IP адрес
Ако желаете да настроите своя
IP адрес ръчно, трябва да знаете
следните фабрични настройки
на безжичен маршрутизатор на
ASUS:
•
IP адрес 192.168.1.1
•
Маска на подмрежа 255.255.255.0.
Ако настроите IP адреса на вашия
компютър ръчно, необходимо
е да бъде в същия сегмент .
Например:
• IP адрес 192.168.1.xxx (xxx
може да бъде всяко число
между 2 и 254, което не се
използва от друго устройство)
• Маска на подмрежа: 255.255.255.0 (същото като безжичния
маршрутизатор на ASUS)
• Портал (Gateway): 192.168.1.1 (това е безжичният маршрутизатор
на ASUS)
• DNS: 192.168.1.1 (IP адреса на безжичния маршрутизатор на ASUS
или вашия собствен IP адрес)..
Настройка на IP адрес за безжична или кабелна връзка
Автоматично получаване на IP адрес
Безжичният маршрутизатор на
ASUS включва функции на DHCP
сървър, така че най-лесният
метод е да настроите вашия PC да
получи автоматично IP адрес и да
презаредите компютъра си. Така от
вашия безжичен маршрутизатор на
ASUS може да се получи правилният
адрес: IP, шлюз (gateway), DNS
(Domain Name System Server –
сървър от системата за имена на
домейни).
З а б е л е ж к а : Б е з ж и ч н и я т
маршрутизатор ще действа като
маршрутизатор и ще осигури IP адрес
само когато съществува физическа
връзка на WAN порта. Трябва да свържете WAN порта на безжичния
маршрутизатор на ASUS с Ethernet порта на вашия ADSL или кабелен модем.
Преди презареждане на вашия компютър безжичният маршрутизатор на
ASUS трябва да бъде ВКЛЮЧЕН и в състояние на готовност.
Page 71

Бърза настройка
68 Джобен безжичен маршрутизатор на ASUS
Български
Използване на безжичния маршрутизатор за пръв път
1. Помощни програми за безжичния маршрутизатор на ASUS
Стартирайте Device Discovery (откриване на устройство) от “ASUS
Utility” от Windows Start Programs.
2. Свързване към интернет управлението ASUS WLAN
Стартирайте ASUS WLAN Device Discovery от меню Start и щракнете
върху Cong, когато устройството бъде открито.
Добавете 192.168.1 .1 в кутийката
Exceptions, ако използвате прокси
сървър.
Забележка: Безжичният маршрутизатор ще действа като маршрутизатор
и ще осигури IP адрес само когато съществува физическа връзка на WAN
порта. Трябва да свържете WAN порта на безжичния маршрутизатор с
вашия ADSL или кабелен модем, като използвате мрежов кабел.
Забележка: Преди да презаредите своя компютър, безжичният
маршрутизатор на ASUS трябва да бъде ВКЛЮЧЕН и в състояние на
готовност.
Инсталиране на помощните програми за безжичния
маршрутизатор на ASUS
Сле два йте те зи с тъпк и, з а
да и нст али рат е бе зжи чни я
маршрутизатор на ASUS в Microsoft
Windows. Поставете поддържащия
CD диск, доставен с безжичния
маршрутизатор на ASUS, и ще се
появи меню. (Щракнете двукратно
върху setup.exe, ако автоматичното
задействане (autorun) при вас е
дезактивирано).
Page 72

Джобен безжичен маршрутизатор на ASUS 69
Бърза настройка
Български
Потребителско име и парола
Щом връзката бъде осъществена,
ще се появи прозорец, който ще
иска въвеждане на потребителско
име и парола з а в лизане.
Фабричните стойности са “admin”
и “admin”.
Забележка: Ако не можете да
от кр ие те н ика къ в б езж иче н
маршрутизатор на ASUS поради
проблем с настройката на IP адреса,
нати сн ет е и задр ъж те буто н
“Restore” в продължение на повече
от пет секунди, за да възстановите
фабричните настройки.
Въведете адрес или име ръчно
Можете така също да отворите уеб браузъра на вашия компютър
и да въведете името или фабричния IP адрес на безжичния
маршрутизатор на ASUS.
WL530g V2
http://my.router или http://my.WL530g V2 или http://192.168.1.1
Начална страница
След като влезете, можете да
видите началната страница на
безжичния маршрутизатор на
ASUS.
Важно: След въвеждане на информация на която и да било страница
щракнете върху бутон “Apply” . (приложи). Ако щракнете върху която
и да било друга препратка, ще бъдете пренасочени към друга страница и
ще изгубите новите си настройки.
Ако IP адресът на вашия компютър не е в една и съща подмрежа
с безжичния маршрутизатор на ASUS (192.168.1.X), ще бъдете
помолени да го промените. IP адресът може да бъде което и да е
число от 2 до 254, което не е използвано от друго устройство. Не
е задължително да има шлюз.
Забележка: Използването на прокси сървър за вашата локална мрежа (LAN)
изисква да настроите изключение (exception) за безжичния маршрутизатор
на ASUS, иначе свързването ще бъде неуспешно.
Page 73

Бърза настройка
70 Джобен безжичен маршрутизатор на ASUS
Български
3. Поставете своя парола
4. Използвайте бърза инсталация
Из берете вашия часови
пояс или най-близък регион.
Щра кн е те Ne x t , за да
продължите.
Бърза настройка
За да започнете бързата настройка, щракнете
върху Next (следващ), за да влезете в страница
„Quick Setup“ (бърза настройка). Следвайте
указанията, за да настроите безжичния
маршрутизатор на ASUS.
Изберете типа на връзката.
Щ р акне те N e x t , з а д а
продължите.
Page 74

Джобен безжичен маршрутизатор на ASUS 71
Бърза настройка
Български
Бърза настройка (Продълж.)
За да на ст ро ите в ашия
безжичен интерфейс, първо
тря бва да му з ада дет е
SSID (Service Set Identifier –
идентификатор на набора
от услуги). SSID е уникален
и д е н т и ф и ка то р, к о й то
се прикачва към п акети,
и зпращ ан и п р е з W LA N
мрежите. Този идентификатор
ем улира п ар ол а, кога то
безжично устройство се опитва
да комуникира в WLAN. Понеже
SSID разграничава WLAN мрежите една от друга, точките за
достъп и безжичните устройства, опитващи се да се свържат
към дадена WLAN мрежа, трябва да използват същия SSID.
Също така, ако желаете да предпазите предаваните данни,
изберете средно (middle) или високо (high) ниво на сигурност
(Security Level).
Medium (средно): позволява само на потребители с един и
същ WEP ключ да се свържат към тази точка на достъп и да
предават данни, като използват 64-битово или 128-битово
криптиране на WEP ключ.
High (високо): позволява само на потребители с един и същ
предварително споделен WPA ключ да се свържат към тази
точка на достъп и да предават данни, като използват TKIP
криптиране.
Щракнете Finish (край), за да продължите. Показва се
подсещащо съобщение да съхраните настройките. Щракнете
върху Save&Restart (съхрани и рестартирай), за да съхраните
настройките в безжичния маршрутизатор на ASUS и да
активирате новите настройки.
Изберете “No” (не), за да
въведете информацията ръчно.
„Yes“ (да) ще дезактивира
полето. Щракнете Next, за да
продължите.
Page 75

Бърза настройка
72 Джобен безжичен маршрутизатор на ASUS
Български
Удостоверяване на
самоличност и защита
Щракнете Wireless в менюто, за да се
покаже подменю.
Това поле ви позволява да настройвате
различни методи на удостоверяване
на самоличност (authentication), които обуславят различни
схеми на криптиране. Ако всичките ви клиенти поддържат
WPA , препо ръ чи телно е
използването на “WPA-PSK”
за по-добра защита.
WPA криптиране
Когато се използва метод
н а у д о с т о в е р я в а н е н а
са молич но ст “WPA -P SK”,
се прилага новата схема за
криптиране TKIP (Temporal Key
Integrity Protocol – протокол
на временен интегритет на
ключ).
TKIP : TKIP използва методите на алгоритми за кодиране,
които са по-стриктни от WEP алгоритъма. Той също използва
съществуващите средства за изчисление на WLAN за да се
извърши кодирането. TKIP потвърждава конфигурацията на
сигурност след като ключовете за кодиране се определят.
Предварително споделен WPA ключ
Като изберете “TKIP” от WPA Encryption, това поле се използва
като парола, за да започне процесът на криптиране. Забележка:
Необходими са от 8 до 63 символа.
Page 76

Kapesní bezdrátový směrovač
(WL-530g V2 pro bezdrátové klienty 802.11g/b)
Stručný návod k obsluze
®
Česky
Page 77

Rychlá Instalace
74 Kapesní bezdrátový směrovač ASUS
Česky
Rychlá instalace
Při instalaci Bezdrátového směrovače ASUS postupujte podle
následujících pokynů.
1. Určete nejlepší umístění Bezdrátového směrovače ASUS.
Dodržujte následující zásady:
• Délka ethernetového kabelu, který připojuje bezdrátový
směrovač ASUS k síti, nesmí přesáhnout 100 metrů.
• Pokuste se umístit bezdrátový směrovač ASUS na rovný a
pevný povrch co nejdále od země, například na stůl nebo skříň,
mimo překážek a bezdrátového.
• Pokuste se umístit bezdrátový směrovač ASUS centrálně tak,
aby poskytoval pokrytí všech bezdrátových mobilních zařízení
v oblasti. Nejlepšího příjmu lze dosáhnout při svislé orientaci
antény.
• Používejte pouze zdroj napájení dodaný s tímto zařízením. Jiné
zdroje napájení mohou mít stejné napětí, ale výkon nemusí být
kompatibilní.
2. Zařízení lze rovněž připevnit na zeď nebo svisle.
Varování: Instalátor a uživatelé Bezdrátového směrovače ASUS
musí zajistit, aby byla anténa používána minimálně 20 centimetrů od
jakékoli osoby. Tato podmínka musí být splněna, aby bylo zajištěno,
že je výrobek používán v souladu se směrnicemi pro vystavení lidského organizmu vysokofrekvenčnímu záření přijatými Federálním
úřadem pro komunikace FCC.
3. Připojení k místní síti LAN: Připojte jeden konec ethernetového
kabelu RJ-45 k síťovému portu LAN (některému ze čtyř)
bezdrátového směrovače ASUS a připojte druhý konec
ethernetového kabelu RJ-45 ke stolnímu počítači.
4. Připojení napájení: Bezdrátový směrovač ASUS vyžaduje externí
zdroj napájení. Bezdrátový směrovač ASUS je dodáván se zdrojem
napájení s certikací UL třídy 2. Připojte jeden konec napájecího
adaptéru k zadní straně bezdrátového směrovače ASUS a druhý
konec k elektrické zásuvce.
Po zapnutí zařízení se ROZSVÍTÍ indikátor LED napájení na
přední straně Bezdrátového směrovače ASUS. Kromě toho se
ROZSVÍTÍ zelený indikátor místní sítě LAN nebo bezdrátové sítě
(WAN), který ukazuje, že bezdrátový směrovač ASUS je fyzicky
připojen k ethernetové síti.
Page 78

Kapesní bezdrátový směrovač ASUS 75
Rychlá Instalace
Česky
Kongurace softwaru
Kongurování Bezdrátového směrovače ASUS
Bezdrátový směrovač ASUS lze nakongurovat pro různé způsoby
používání. Některá výchozí nastavení výrobce mohou vyhovovat
vašemu způsobu používání; nicméně jiná je třeba změnit. Před
používáním Bezdrátového směrovače ASUS musíte zkontrolovat
základní nastavení a ověřit, zda budou fungovat ve vašem
prostředí. Kongurování Bezdrátového směrovače ASUS se provádí
prostřednictvím webového prohlížeče. Je zapotřebí notebook nebo
stolní počítač připojený k bezdrátovému směrovači ASUS (přímo
nebo prostřednictvím rozbočovače) a spuštěný webový prohlížeč jako
kongurační terminál. Připojení může být pevné nebo bezdrátové. Pro
bezdrátové připojení je zapotřebí zařízení kompatibilní se standardem
IEEE 802.11g/b, například karta ASUS WLAN, nainstalované v
notebooku. Rovněž je třeba deaktivovat šifrování WEP a nastavit
síťový název SSID bezdrátového síťového zařízení na „výchozí“.
Chcete-li bezdrátový směrovač ASUS kongurovat nebo jej použít k
připojení k Internetu, musí být provedeno správné nastavení protokolu
TCP/IP. Za normálních okolností by nastavení protokolu TCP/IP mělo
být na IP podsítě Bezdrátového směrovače ASUS.
Poznámka: Před restartováním počítače musí být Bezdrátový
směrovač ASUS zapnutý a musí se nacházet v připraveném stavu.
Připojení k bezdrátovému směrovači ASUS
Kabelové připojení
Bezdrátový směrovač ASUS je dodáván s jedním kabelem RJ-45.
Bezdrátový směrovač ASUS je vybaven funkcí automatického křížení,
která umožňuje použít přímý nebo křížený ethernetový kabel. Připojte
jeden konec kabelu k portu WAN na zadní straně Bezdrátového
směrovače ASUS a druhý konec k ethernetovému portu na modemu
připojení ADSL nebo kabelového připojení.
Bezdrátové připojení
Pokyny pro připojení Bezdrátového směrovače ASUS najdete v
uživatelské příručce k vašemu bezdrátovému adaptéru. Ve výchozí
konfiguraci má bezdrátový směrovač ASUS výchozí síťový název
“default” (malá písmena), šifrování je deaktivováno a používá se otevřené
ověřování systému.
Page 79

Rychlá Instalace
76 Kapesní bezdrátový směrovač ASUS
Česky
Ruční nastavení adresy IP
Chcete-li nastavit vaši adresu IP
ručně, je třeba znát následující
výchozí nastavení Bezdrátového
směrovače ASUS:
• Adresa IP 192.168.1.1
• Maska podsítě 255.255.255.0
Nastavíte-li adresu IP vašeho
poč íta če r u čn ě , mu sí s e
nacházet na stejném segmentu.
Například:
•
Adresa IP: 192.168.1.xxx (xxx
může být jakékoli číslo od 2
do 254, které není používáno
jiným zařízením)
• Maska podsítě 255.255.255.0 (stejné jako bezdrátový směrovač
ASUS)
• Brána: 192.168.1.1 (toto je bezdrátový směrovač ASUS)
• DNS: 192.168.1.1 (adresa IP Bezdrátového směrovače ASUS
nebo vaše vlastní).
Nastavení adresy IP pro pevné nebo bezdrátové
připojení
Automatické přidělování adresy IP
Tento bezdrátový směrovač ASUS
je vybaven serverem DHCP, takže
nejsnadnější je nastavit počítač na
automatické přidělování adresy IP
a potom restartovat počítač. Tím
lze z Bezdrátového směrovače
ASUS získat správnou adresu
IP, bránu, DNS (Domain Name
System Server).
Poznámka: Bezdrátový směrovač
bude fungovat jako směrovač a bude
poskytovat adresy IP pouze, když
existuje fyzické připojení portu WAN.
Musíte připojit síťový kabel k portu
WAN na bezdrátovém směrovači
ASUS a k ethernetovému portu na modemu připojení ADSL nebo kabelového
připojení. Před restartováním počítače musí být bezdrátový směrovač ASUS
zapnutý a musí se nacházet v připraveném stavu.
Page 80

Kapesní bezdrátový směrovač ASUS 77
Rychlá Instalace
Česky
První použití Bezdrátového směrovače
1. První použití Bezdrátového směrovače
V operačním systému Windows klepněte na tlačítko Start > Programs
(Programy) > ASUS Utility (Nástroj ASUS) > Device Discovery
(Vyhledání zařízení).
2. Připojení k ASUS WLAN Web Manager
Spusťte nástroj ASUS WLAN Device Discovery(Vyhledání zařízení)
z nabídky Start a po vyhledání zařízení klepněte na tlačítko Cong
(Kongurovat).
Používáte-li server proxy, zadejte 192.168.1.1
do pole Exceptions (Výjimky).
Poznámka: Bezdrátový směrovač bude fungovat jako směrovač a bude
poskytovat adresy IP pouze, když existuje fyzické připojení portu WAN. Musíte propojit port WAN Bezdrátového směrovače s modemem připojení ADSL
nebo kabelového připojení pomocí síťového kabelu.
Poznámka: Před restartováním počítače musí být Bezdrátový směrovač ASUS
zapnutý a musí se nacházet v připraveném stavu.
Instalace nástrojů Bezdrátového směrovače ASUS
Při instalaci nástrojů Bezdrátového
směrovače ASUS v operačním
systému Microsoft Windows
postupujte podle těchto pokynů.
Po vložení podpůrného disku
CD dodaného s bezdrátovým
směrovačem ASUS se zobrazí
nabí dka. (Po kud je funkce
aut o ma t ick é ho s pou š těn í
deaktivována, poklepejte na
soubor setup.exe.)
Page 81

Rychlá Instalace
78 Kapesní bezdrátový směrovač ASUS
Česky
Uživatelské jméno a heslo
Po připojení se zobrazí okno s
dotazem na uživatelské jméno
a heslo pro připojení. Výchozí
hodnoty výrobce jsou „admin“ a
„admin“.
Poznámka: Pokud nelze nalézt
žádné bezdrátové směrovače
ASUS z důvodu problému v nastavení IP, stisknutím a podržením
tlačítka „Restore“ (Obnovit) déle
než pět sekund obnovte výchozí
hodnoty výrobce.
Ruční zadání adresy nebo názvu
Rovněž můžete spustit webový prohlížeč ve vašem počítači a zadat
název nebo výchozí adresu IP Bezdrátového směrovače ASUS:
WL530g V2
http://my.router nebo http://my.WL530g V2 nebo http://192.168.1.1
Domovská stránka
Po přihlášení se zobrazí hlavní
stránka Bezdrátového směrovače
ASUS.
Důležité: Po vložení informací na jakoukoli stránku klikněte na tlačítko
“Použít” .“. Kliknete-li na jiný link, budete přesměrováni na
jinou stránku a ztratíte nová nastavení.
Pokud se adresa IP vašeho počítače nenachází na stejné podsíti,
jako bezdrátový směrovač ASUS (192.168.1.X), budete vyzváni,
abyste ji změnili. Adresa IP může být jakékoli číslo od 2 do 254, které
nepoužívá žádné jiné zařízení. Brána není vyžadována.
Poznámka: Používáte-li server proxy ve vaší místní síti, musíte
nastavit výjimku pro bezdrátový směrovač ASUS, jinak se nepodaří
připojení navázat.
Page 82

Kapesní bezdrátový směrovač ASUS 79
Rychlá Instalace
Česky
3. Nastavení vlastního hesla
4. Použití rychlé instalace
Vyberte vaše časové pásmo
nebo nejbližší region. Pokračujte
klepnutím na tlačítko Nex t
(Další).
Rychlá instalace
Chcete-li zahájit rychlou instalaci, klepnutím na
tlačítko Next (Další) přejděte na stránku “Quick
Setup” (Rychlá instalace). Podle zobrazených
pokynů proveďte instalaci bezdrátového směrovače
ASUS.
Vyberte typ připojení. Pokračujte
kle pnutím na tlačítko Ne xt
(Další).
Page 83

Rychlá Instalace
80 Kapesní bezdrátový směrovač ASUS
Česky
Rychlá instalace (Pokračování)
Chcete-li nastavit bezdrátové
rozhraní, musíte nejdříve zadat
identifikátor SSID (Service Set
Identifier). SSID je jedinečný
identikátor přiřazovaný k paketům
odesílaným prostřednictvím
sítě WLAN. Tento identifikátor
emuluje heslo, když se bezdrátové
zařízení pokusí o komunikaci
prostřednictvím WLAN. Vzhledem
k tomu, že identifikátor SSID
rozlišuje jednotlivé sítě WLAN,
musí přístupové body a bezdrátová
zařízení, která se pokoušejí připojit k síti WLAN, používat stejný
identikátor SSID.
Chcete-li chránit přenášená data, vyberte střední nebo vysokou
úroveň zabezpečení.
Medium : (Střední): pouze uživatelé se stejným klíčem WEP se
mohou připojit k tomuto přístupovému bodu a přenášet data pomocí
šifrování 64bitovým nebo128bitovým klíčem WEP.
High: (Vysoká): pouze uživatelé se stejným předsdíleným klíčem
WPA se mohou připojit k tomuto přístupovému bodu a přenášet data
pomocí šifrování TKIP.
Pokračujte klepnutím na tlačítko Finish (Dokončit). Budete vyzváni
k uložení nastavení. Klepnutím na tlačítko Save&Restart (Uložit a
restartovat) uložte nastavení do Bezdrátového směrovače ASUS a
aktivujte nová nastavení.
Chcete-li zadat informace ručně,
vyberte možnost „No“ (Ne).
Výběrem možnosti „Yes“ (Ano)
bude toto pole deaktivováno.
Pokračujte klepnutím na tlačítko
Next (Další).
Page 84

Kapesní bezdrátový směrovač ASUS 81
Rychlá Instalace
Česky
Ověřování a zabezpečení
Klepnutím na položku Wireless (Bezdrát) v
nabídce přejděte do podnabídky.
Toto pole umožňuje nastavit různé metody
ověřování, které určují různá schémata
šifrování. Pokud všichni vaši klienti podporují
šifrování WPA, pro lepší zabezpečení
doporučujeme „WPA-PSK“.
Šifrování WPA
Při použití metody ověřování
„WPA-PSK“ budou použita nově
navržená schémata šifrování
TKIP (Temporal Key Integrity
Protocol).
TKIP: Šifrování TKIP používá
šifrovací algoritmus, který je
přísnější, než algoritmus WEP.
K provádění šifrovacích operací
ro vn ěž používá v ýp oč etní
možnosti WLAN. Šifrování TKIP
ověřuje konguraci zabezpečení po určení šifrovacích klíčů.
Předsdílený klíč WPA
Výběrem možnosti „TKIP“ v části šifrování WPA bude toto pole použito
jako heslo pro zahájení procesu šifrování. Poznámka: do tohoto pole
je třeba zadat 8 až 63 znaků.
Page 85

Draadloze pocketrouter
(WL-530g V2 voor 802.11g/b draadloze clients)
Beknopte installatiehandleiding
®
Nederlands
Page 86

83ASUS draadloze pocketrouter
Snelle startgids
Snelle instelling
Volg deze stappen om de ASUS Draadloze Router te installeren.
1. Bepaal de beste locatie voor de ASUS Draadloze Router. Onthoud
het volgende:
• De lengte van de ethernetkabel die de ASUS Draadloze Router
met het netwerk verbindt, mag niet langer zijn dan 100 meter.
• Probeer de ASUS Draadloze Router, zover mogelijk van de
grond, op een plat, stevig oppervlak, zoals een bureau of
boekenkast te plaatsen. Zorg dat er geen obstakels zijn en
houd de router uit direct zonlicht.
• Probeer de ASUS Draadloze Router centraal te plaatsen zodat
dekking wordt voorzien voor alle draadloze mobiele apparaten
binnen bereik. Als u de antenne verticaal plaatst, zou dit de beste
ontvangst moeten geven.
• Gebruik alleen de voeding die bij het apparaat is geleverd.
Andere voedingen kunnen eventueel passen, maar de spanning en de stroom zullen mogelijk niet compatibel zijn.
2. Het is ook mogelijk het toestel aan de muur te monteren of verticaal
te plaatsen.
Waarschuwing: Het is de verantwoordelijkheid van de installateur en gebruikers van de ASUS Draadloze Router om te garanderen dat de antenne op een
afstand van minstens 20 centimeter van aanwezige personen wordt gebruikt.
Dit is noodzakelijk om ervoor te zorgen dat het product wordt gebruikt in
overeenstemming met de RF-richtlijnen voor menselijke blootstelling die zijn
opgelegd door de Federale Communicatiecommissie.
3. LAN-verbinding: Sluit het ene uiteinde van een RJ-45-
ethernetkabel aan op de LAN-poort (een van de vier) van de
ASUS Draadloze Router en sluit het andere uiteinde aan op uw
computer.
4. Voedingsaansluiting: De ASUS Draadloze Router vereist stroom
van een externe voeding. De ASUS Draadloze Router wordt
geleverd met een UL-geclassiceerde voeding van Klasse 2. Sluit
het ene uiteinde van de gelijkstroomadapter aan op de achterkant
van de ASUS Draadloze Router en het andere uiteinde op een
stopcontact.
De voedings-LED op de voorkant van de ASUS Draadloze Router
zal oplichten wanneer het apparaat wordt INGESCHAKELD.
Daarnaast zullen de groene LAN- of WAN-LED’s OPLICHTEN
om aan te geven dat de ASUS Draadloze Router een fysieke
ethernet-netwerkverbinding heeft.
Nederlands
Page 87

Snelle startgids
84 ASUS draadloze pocketrouter
Nederlands
Nederlands
Softwareconguratie
De ASUS Draadloze Router congureren
De ASUS Draadloze Router kan worden geconfigureerd om te
voldoen aan de verschillende gebruiksscenario’s. Sommige standaard
fabrieksinstellingen kunnen voldoen voor uw gebruik, maar het is
mogelijk dat u andere instellingen moet wijzigen. Voordat u de ASUS
Draadloze Router gebruikt, moet u de basisinstellingen controleren
om zeker te zijn dat het apparaat in uw omgeving zal werken.
De conguratie van de ASUS Draadloze Router gebeurt via een
webbrowser. U hebt een notebook of desktopcomputer nodig die
verbonden is met de ASUS Draadloze Router (direct of via een hub)
en die een webbrowser gebruikt als conguratieterminal. De verbinding
kan bekabeld of draadloos zijn. Voor de draadloze verbinding moet een
IEEE 802.11g/b-compatibel apparaat, zoals een ASUS WLAN-kaart op
uw notebook of pc zijn geïnstalleerd. U moet WEP uitschakelen en de
SSID op “standaard” instellen voor uw draadloos LAN-apparaat. Als
u de ASUS Draadloze Router wilt congureren of toegang wilt krijgen
tot het internet via de ASUS Draadloze Router, moeten de TCP/IPinstellingen correct zijn. De TCP/IP-instelling moet zich normaal op het
IP-subnet van de ASUS Draadloze Router bevinden.
Opmerking: Voordat u uw computer opnieuw opstart, moet de ASUS Draadloze
Router worden INGESCHAKELD en gereed zijn voor gebruik.
Verbinden met de ASUS Draadloze Router
Bedrade verbinding
Bij de ASUS Draadloze Router wordt één RJ-45-kabel geleverd. De
automatische kruislingse functie is voorzien in de ASUS Draadloze
Router zodat u zowel een rechte als een gekruiste ethernetkabel kunt
gebruiken. Sluit het ene uiteinde van de kabel aan op de WAN-poort
op de achterkant van de ASUS Draadloze Router en sluit het andere
uiteinde aan op ethernetpoort van uw ADSL- of kabelmodem.
Draadloze verbinding
Raadpleeg de gebruikershandleiding van uw draadloze adapter
voor meer informatie over het koppelen met de ASUS Draadloze
Router. De standaard is dat de SSID van de ASUS draadloze router
“default” is (met kleine letters), codering is uitgeschakeld en een open
systeemauthenticatie wordt gebruikt.
Page 88

ASUS draadloze pocketrouter 85
Snelle startgids
Nederlands
Nederlands
Het IP-adres handmatig instellen
Als u het IP-adres handmatig wilt
instellen, moeten de volgende
standaardinstellingen van de ASUS
Draadloze Router bekend zijn.
• IP-adres 192.168.1.1
• Subnetmasker 255.255.255.0
Als u het IP-adres van uw computer
handmatig instelt, moet het
adres zich in hetzelfde segment
bevinden. Bijvoorbeeld:
• IP-adres 192.168.1.xxx (xxx
kan elk getal tussen 2 en 254
zijn dat niet door een ander
apparaat wordt gebruikt)
• Subnetmasker 255.255.255.0 (idem als de ASUS Draadloze Router)
• Gateway 192.168.1.1 (dit is de ASUS Draadloze Router)
• DNS: 192.168.1.1 (IP-adres van de ASUS Draadloze Router of uw
persoonlijk IP-adres).
Het IP-adres instellen voor een bekabelde of
draadloze verbinding
IP automatisch ophalen
De ASUS Draadloze Router
bevat een DHCP-server, zodat
de eenvoudigste methode eruit
bestaat uw pc in te stellen om
zijn IP-adres automatisch op te
halen en uw computer opnieuw
op te starten. Hierdoor kunnen het
correcte IP-adres, de gateway en
de DNS (Domain Name System
Server) via de ASUS Draadloze
Router worden opgehaald.
Opmerking: De Draadloze Router zal
alleen optreden als een router en het
IP-adres leveren wanneer een fysieke verbinding met de WAN-poort bestaat.
U moet de WAN-poort op de ASUS Draadloze Router via een netwerkkabel
verbinden met de ethernetpoort op uw ADSL- of kabelmodem. Voordat u uw
computer opnieuw opstart, moet de ASUS Draadloze Router worden INGESCHAKELD en gereed zijn voor gebruik.
Page 89

Snelle startgids
86 ASUS draadloze pocketrouter
Nederlands
Nederlands
De Draadloze Router voor de eerste keer gebruiken
1. Hulpprogramma’s ASUS Draadloze Router
Start Device Discovery (Detectie starten) onder “ASUS Utility”
(ASUS-hulpprogramma) via het menu Start > Programma’s van
Windows.
2. Verbinden met het WLAN-webbeheer van ASUS
Start ASUS WLAN Device Discovery (Detectie WLAN-apparaat)
in het menu Start en klik op Config wanneer het apparaat is
gevonden.
Voeg 192.168.1.1 toe in het vak Exceptions
(Uitzonderingen) als u een proxyserver gebruikt.
Opmerking: De Draadloze Router zal alleen optreden als een router en het IPadres leveren wanneer een fysieke verbinding met de WAN-poort bestaat. U
moet de WAN-poort van de Draadloze Router via een netwerkkabel verbinden
met uw ADSL- of kabelmodem.
Opmerking: Voordat u uw computer opnieuw opstart, moet de ASUS Draadloze
Router worden INGESCHAKELD en gereed zijn voor gebruik.
De hulpprogramma’s voor de ASUS Draadloze
Router installeren
Vo lg de ze st appen o m de
hulpprogramma’s voor de ASUS
Draadloze Router te installeren
in Microsoft Windows. Plaats
de ondersteunings-cd die bij
de ASUS Draadloze Router is
geleverd in het cd-romstation.
Het menu wordt weergegeven.
(Dubbelklik op setup.exe als de
functie Autorun is uitgeschakeld.)
Page 90

ASUS draadloze pocketrouter 87
Snelle startgids
Nederlands
Nederlands
Gebruikersnaam en Wachtwoord
Nadat de verbinding is gemaakt,
verschijnt een venster met de
vraag de gebruikersnaam en het
wachtwoord voor het aanmelden
in te voeren. De standaard
fabriekswaarden zijn “admin”
en “admin”.
Opmerking: Als u geen ASUS Draadloze
Router kunt vinden vanwege een
probleem in de IP-instellingen, houdt
u de knop “Restore” (Herstellen)
langer dan vijf seconden ingedrukt om
de standaard fabrieksinstellingen te herstellen.
Het adres of de naam handmatig invoeren
U kunt de webbrowser van uw pc ook openen en de naam van het
standaard IP-adres van de ASUS Draadloze Router invoeren:
WL530g V2
http://my.router of http://my.WL530g V2 of http://192.168.1.1
Startpagina
Na het aanmelden ziet u de
st ar tp ag in a va n de A SU S
Draadloze Router.
Belangrijk: Nadat u informatie hebt ingevoerd op een pagina, klikt u op de
knop “Apply” (Toepassen) . Als u op een andere koppeling klikt, wordt
u omgeleid naar een andere pagina en verliest u de nieuwe instellingen.
Als het IP-adres van uw computer zich niet op hetzelfde subnetwerk
van de ASUS Draadloze Router bevindt (192.168.1.X), wordt u
gevraagd dit te wijzigen. Het IP-adres kan elke waarde tussen 2 en
254 zijn dat niet door een ander apparaat wordt gebruikt. De gateway
is niet vereist.
Opmerking: Als u een proxyserver gebruikt voor uw LAN, moet u een uitzondering
instellen voor de ASUS Draadloze Router, anders zal de verbinding mislukken.
Page 91

Snelle startgids
88 ASUS draadloze pocketrouter
Nederlands
Nederlands
3. Uw persoonlijk wachtwoord instellen
4. Snelle installatie gebruiken
Selecteer uw tijdzone of de
dichtstbijliggende regio. Klik op
Next (Volgende) om door te
gaan.
Snelle startgids
Om de quick setup te starten, klik u op Next
(Volgende)om naar de pagina “Quick Setup” te
gaan. Volg de instructies om de ASUS draadloze
router in te stellen.
Selecteer het verbindingstype.
Klik op Next (Volgende) om door
te gaan.
Page 92

ASUS draadloze pocketrouter 89
Snelle startgids
Nederlands
Nederlands
Snelle startgids
(Vervolg)
Om uw draadloze interface in te
stellen, moet u eerst een SSID
(Service Set Identier) opgeven.
De SSID is een unieke ID die
gekoppeld is aan pakketten die via
WLAN’s worden verzonden. Deze
ID emuleert een wachtwoord
wanneer een draadloos apparaat
probeert te communiceren op het
WLAN. Omdat een SSID WLAN’s
kan onderscheiden van elkaar,
moeten toegangspunten en
draadloze apparaten die proberen
een verbinding maken met een WLAN dezelfde SSID gebruiken.
Als u verzonden gegevens wilt beveiligen, moet u een gemiddeld of
hoog beveiligingsniveau selecteren.
Medium (Gemiddeld): Alleen gebruikers met dezelfde WEP-sleutel
kunnen een verbinding maken met dit toegangspunt en gegevens
verzenden met 64-bits of 128-bits WEP-sleutelcodering.
High (Hoog): alleen gebruikers met dezelfde vooraf gedeelde
WPA-sleutel kunnen een verbinding maken met dit toegangspunt en
gegevens verzenden met TKIP-codering.
Klik op Finish (Voltooien) om door te gaan U wordt gevraagd de
instellingen op te slaan. Klik op Save&Restart (Opslaan en opnieuw
opstarten) om de instellingen op de ASUS Draadloze Router op te
slaan en de nieuwe instellingen te activeren.
Selecteer “No” (Nee) om de
informatie handmatig in te voeren.
Als u op “Yes” (Ja) klikt, wordt het
veld uitgeschakeld. Klik op Next
(Volgende) om door te gaan.
Page 93

Snelle startgids
90 ASUS draadloze pocketrouter
Nederlands
Vericatie en beveiliging
Klik in het menu op Wireless (Draadloos)
om een submenu weer te geven.
In dit ve ld ku nt u de verschillende
verificatiemethoden die de verschillende
coderingsschema’s bepalen instellen. Als al
uw clients WPA ondersteunen, is het gebruik
van “WPA-PSK” aanbevolen voor een betere beveiliging.
WPA Encryption (WPA-codering)
Wanneer de vericatiemethode
“WPA-P SK” wo rdt ge bruikt,
worden de nieuw voorgestelde
T KIP- co de r i n gssc he ma ’ s
(Temporal Key Integrity Protocol)
toegepast.
TK I P: T KIP g ebr ui kt een
coderingsalgoritme dat strenger
is dan het WEP-algoritme en
gebruikt ook bestaande WLANberekeningsmogelijkheid om
de codeerbewerkingen uit te
voeren. TKIP controleert de beveiligingsconfiguratie nadat de
coderingstoetsen zijn vastgesteld.
WPA Pre-Shared Key (Vooraf gedeelde WPA-sleutel)
Als u “TKIP¨” selecteert onder WPA Encryption (WPA-codering),
wordt dit veld gebruikt als een wachtwoord om het coderingsproces
te starten. Opmerking: er zijn 8 tot 63 tekens vereist.
Page 94

Eesti
Kantav traadita ruuter
(WL-530g V2: 802.11g/b traadita klientidele)
Häälestamise lühijuhend
®
Page 95

Kiirhäälestus
92 ASUS kantav traadita ruuter
Eesti
Kiirhäälestus
ASUS Traadita Ruuteri häälestamiseks järgige alltoodud samme.
1. Määrake parim asukoht ASUS Traadita Ruuteri jaoks. Arvestage
järgmist:
• ASUS Traadita Ruuterit võrguga ühendav Etherneti kaabel ei
tohi olla pikem kui 100 meetrit.
• Paigutage ASUS Traadita Ruuter tasasele, toekale pinnale
võimalikult kõrgele maapinnast, nt lauale või raamatukapile,
vältides selle katmist ja hoides seda otsese päikesevalguse
eest kaitstult.
• Üritage paigutada ASUS Traadita Ruuter tsentraalselt, et selle
kattealasse jääksid kõik mobiilsed traadita seadmed. Vertikaalselt paigutatud antenn peaks tagama parima vastuvõtu.
• Kasutage ainult seadmega kaasnenud toiteplokki. Võimalik, et
ka teised toiteplokid toimivad, kuid sellisel juhul pole tagatud
voolupinge ja tarbitava võimsuse ühilduvus.
2. Ka seinapaigaldus ja vertikaalne asend on võimalikud.
Hoiatus: Paigadaja ja ASUS Traadita Ruuteri kasutajate kohustuseks
on tagada, et antenni kasutatakse ruumis viibijatest vähemalt 20 cm
kaugusel. Sellega tagatakse, et toote kasutamine toimub kooskõlas
raadiosagedusliku kiirguse piirnormidega, mis on sätestatud Föderaalse Sidekomisjoni (FCC) poolt.
3. LAN ühendus: Ühendage RJ-45 Etherneti kaabli üks ots ASUS
Traadita Ruuteri LAN pordiga (ükskõik, missugusega neljast) ja
RJ-45 Etherneti kaabli teine ots arvutiga.
4. Toiteühendus: ASUS Traadita Ruuter saab toidet välisest
toiteallikast. ASUS Traadita Ruuter tarnitakse koos klassi
2 toiteplokiga, mis vastab UL standarditele. Ühendage
alalisvooluadapteri üks ots ASUS Traadita Ruuteri tagaküljele ja
teine ots vooluvõrku.
Toite LED indikaator ASUS Traadita Ruuteri esiküljel süttib, kui
seade on SISSE lülitatud. Lisaks sellele lülituvad SISSE ka
rohelised LAN või WAN indikaatortuled, kinnitamaks et ASUS
Traadita Ruuter on loonud ühenduse Etherneti võrguga.
Page 96

ASUS kantav traadita ruuter 93
Kiirhäälestus
Eesti
Tarkvara konguratsioon
ASUS Traadita Ruuteri kongureerimine
ASUS Traadita Ruuterit saab konfigureerida erinevateks
kasutustingimusteks. Mõned tehase vaikesätted võivad teie
vajadustele sobida, kuid teisi tuleb muuta. Enne ASUS Traadita Ruuteri
kasutamist tuleb kontrollida põhiseadeid, et tagada seadme toimivus
olemasolevas keskkonnas. ASUS Traadita Ruuteri kongureerimine
toimub veebibrauseri kaudu. Vajalik on ASUS Traadita Ruuteriga
ühendatud süle- või lauaarvuti (kas otse või jaoturi kaudu) ja
veebibrauser, mis toimib kongureerimisterminalina. Ühendus võib
olla traadiga või traadita. Traadita ühenduseks on vajalik, et lauavõi sülearvutisse on installitud standardiga IEEE 802.11g/b ühilduv
võrgukaart, nt ASUS WLAN Card. Samuti peaksite te keelama traadita
LAN seadme WEP krüpteeringu ja seadma SSID sätte väärtuseks
“vaikimisi”. Kui soovite ASUS Traadita Ruuterit kongureerida või
soovite saada Interneti-ligipääsu ASUS Traadita Ruuteri kaudu, siis
peavad TCP/IP sätted olema õigesti häälestatud. Tavaliselt on TCP/IP
sätted häälestatud ASUS Traadita Ruuteri IP alamvõrgule.
Märkus: Enne arvuti taaskäivitamist peab ASUS Traadita Ruuter
olema SISSE lülitatud ja töövalmiduses.
ASUS Traadita Ruuteri ühendamine
Traadiga ühendus
ASUS Traadita Ruuteriga kaasneb üks RJ-45 kaabel. ASUS
Traadita Ruuter on varustatud automaatse crossover funktsiooniga,
seepärast on võimalik kasutada straight-through (otse-) või crossover
(risti-) Etherneti kaablit. Ühendage kaabli üks ots ASUS Traadita
Ruuteri tagaküljel paiknevasse WAN porti ja teine ots ADSL- või
kaabelmodemi Etherneti porti.
Traadita ühendus
Teavet traadita adapteri sidumise kohta ASUS Traadita Ruuteriga
leiate adapteri kasutusjuhendist. Vaikimisi on ASUS traadita ruuteri SSID
väärtuseks “default” (väiketähed), krüptimine on keelatud ja kasutatakse
süsteemi avatud autentimist.
Page 97

Kiirhäälestus
94 ASUS kantav traadita ruuter
Eesti
IP aadressi käsitsi sisestamine
Kui soovite sisestada IP aadressi
käs i ts i , pe a ksi t e tea d ma
järgmisi ASUS Traadita Ruuteri
vaikesätteid:
• IP-aadress 192.168.1.1
•
Alamvõrgu mask 255.255.255.0.
Kui te määrate arvuti IP aadressi
käsitsi, siis peab see jääma
samasse segmenti. Näiteks:
• IP-aadress: 192.168.1.xxx (xxx
võib olla mis tahes number
vahemikus 2 kuni 254, mida
ei kasuta mõni teine seade)
• Alamvõrgu mask: 255.255.255.0 (sama kui ASUS Traadita
Ruuter)
• Lüüs: 192.168.1.1 (see on ASUS Traadita Ruuter)
• DNS: 192.168.1.1 (ASUS Traadita Ruuteri või teie IP aadress).
IP-aadressi määramine traadiga või traadita
ühenduse jaoks
IP aadressi automaatne toomine
Kuna ASUS Traadita Ruuter
hõlmab DHCP serverit, siis on
lihtsaimaks meetodiks seada
arvuti automaatselt IP aadressi
tooma ja taaskäivituma. Seega
saab õige IP aaddressi, lüüsi ja
DNS-i (Domain Name System
Server) hankida ASUS Traadita
Ruuterilt.
Märkus: Traadita ruuter toimib
marsruuterina ja saab IP aadressi
anda ainult siis, kui eksisteerib
füüsiline ühendus WAN pordiga.
Te peate omavahel võrgukaabliga ühendama ASUS Traadita Ruuteril
paikneva WAN pordi ja ADSL- või kaabelmodemi Etherneti pordi.
Enne arvuti taaskäivitamist peab ASUS Traadita Ruuter olema SISSE
lülitatud ja töövalmiduses.
Page 98

ASUS kantav traadita ruuter 95
Kiirhäälestus
Eesti
Traadita ruuteri esmakordne kasutamine
1. ASUS Traadita Ruuteri utiliidid
Käivitage rakendus Device Discovery (Seadme tuvastaja) üksuses
“ASUS Utility” Windowsi menüü Start programmiloendis.
2. Looge ühendus rakendusega ASUS WLAN Web
Manager
Käivitage tööriist ASUS WLAN Device Discovery (Seadme
tuvastaja) menüüst Start ja klõpsake käsku Cong (Kongureeri),
kui seade on leitud.
Sisestage boksi Exceptions (Erandid) väärtus
192.168.1.1, kui kasutate puhverserverit.
Märkus: Traadita ruuter toimib marsruuterina ja saab IP aadressi
anda ainult siis, kui eksisteerib füüsiline ühendus WAN pordiga. Te
peate omavahel võrgukaabliga ühendama traadita ruuteril paikneva
WAN pordi ja ADSL- või kaabelmodemi.
Märkus: Enne arvuti taaskäivitamist peab ASUS Traadita Ruuter
olema SISSE lülitatud ja töövalmiduses.
ASUS Traadita Ruuteri utiliitide installimine
Järgige alltoodud samme, et
installida ASUS Traadita Ruuteri
utiliidid Microsoft® Windowsis.
Si ses ta ge A SUS Tr aad it a
Ruuteriga kaasnenud tugi-CD;
ilmub menüü. (Topeltklõpsake faili
setup.exe , kui funktsioon autorun
Page 99

Kiirhäälestus
96 ASUS kantav traadita ruuter
Eesti
Kasutajanimi ja parool
Kui ühendus on loodud, palutakse
teil sisselogimiseks sisestada oma
kasutajanimi ja parool. Tehase
vaikeväärtusteks on “admin” ja
“admin”.
Märkus: Kui te ei leia ühtegi
ASUS Traadita Ruuterit tulenevalt IP sätetega seotud probleemidest, siis vajutage ja hoidke
nuppu “Restore” (Taasta) rohkem kui viis sekundit, et taastada tehase vaikesätted.
Sisestage aadress või nimi käsitsi
Saate ka arvutis veebibrauseri avada ja sisestada nime või ASUS
Traadita Ruuteri vaikimisi kasutatava IP aadressi:
WL530g V2
http://my.router või http://my.WL530g V2 või http://192.168.1.1
Koduleht
Pärast sisselogimist avaneb ASUS
Traadita Ruuteri koduleht.
Oluline: Pärast mis tahes lehel andmete sisestamist klõpsake nuppu
“Apply” (Rakenda) . Kui klõpsate mõnda muud linki, siis suu-
natakse teid teisele lehele ja te kaotate oma uued sätted.
Kui teie arvuti IP aadress ei kattu ASUS Traadita Ruuteri alamvõrguga
(192.168.1.X), siis palutakse teil seda muuta. IP-aadressis võib olla
mis tahes number vahemikus 2 kuni 254, mida ei kasuta mõni teine
seade. Lüüs ei ole vajalik.
Märkus: Kasutades LAN-i jaoks puhverserverit, tuleb ühenduse toimimiseks määratleda erand ASUS Traadita Ruuteri jaoks.
Page 100

ASUS kantav traadita ruuter 97
Kiirhäälestus
Eesti
3. Määake oma parool
4. Kasutage kiirinstalli
Valige oma ajavöönd või lähim
regioon. Jätkamiseks klõpsake
käsku Next (Edasi).
Kiirhäälestus
Kiirhäälestuse alustamiseks klõpsake nuppu
Nex t (Ed asi) , et si seneda leh ele “Quick
Setup” (Kiirhäälestus). ASUS traadita ruuteri
Valige ühenduse tüüp. Jätkamiseks
klõpsake käsku Next (Edasi).
 Loading...