

Page 1

WL-520g Quick Reference Guide
1
Index
1. Package Contents .........................................................3
2. Connecting ADSL Modem and Wireless Router ........5
1) Cable Connection ..................................................5
2) Status Indicators ...................................................6
3. Clients Setup:
Example: Installing WL-167g USB WLAN Adapter ....7
4. Router and Client Wireless Connection Setup ......... 11
1) Utility Installation for WL-520g ............................. 11
2) EZSetup (default) ................................................14
3) EZSetup (customized) .........................................17
5. Configuring the Wireless Router ...............................20
1) Connecting the ASUS Wireless Router ...............20
2) Setting IP address for Wired and Wireless .............
Connection ..........................................................21
3) Configuring the Wireless Router ..........................23
6. Commonly Used Features ..........................................24
1) How to Setup Encryption .....................................24
2) Setting up a Server in Your LAN ..........................27
3) Setting up Switching Hub & Pure AP (not IP Share
NAT) ....................................................................28
Page 2
WL-520g Quick Reference Guide
2
4) Setting up Netmeeting, MSN, Online Gaming and
Remote Control Program .....................................29
5) Setting up DDNS .................................................31
6) Setting up WDS ...................................................35
7. Trouble Shooting .........................................................36
8. Appendix ......................................................................40
Index
Page 3

WL-520g Quick Reference Guide
3
1. Package Contents
• WL-520g wireless router*1
• Power adaptor*1
• External antenna*1
• Driver and Utility CD*1
• RJ45 cable*1
• Quick Start Guide*1
Page 4

WL-520g Quick Reference Guide
4
Manufacturer Contact Information
ASUSTeK COMPUTER INC. (Asia-Pacific)
Company address: 15 Li-Te Road, Beitou, Taipei 11259
General (tel): +886-2-2894-3447 Web site address: www.asus.com.tw
General (fax): +886-2-2894-7798 General email: info@asus.com.tw
ASUS COMPUTER INTERNATIONAL (America)
Company address: 44370 Nobel Drive, Fremont, CA 94538, USA
General (fax): +1-510-608-4555 Web site address: usa.asus.com
Technical support
General support: +1-502-995-0883 Support (fax): +1-502-933-8713
Online support: http://vip.asus.com/eservice/techserv.aspx
ASUS COMPUTER GmbH (Germany & Austria)
Company address: Harkort Str. 25, D-40880 Ratingen, Germany
General (tel): +49-2102-95990 Web site address: www.asuscom.de
General (fax): +49-2102-959911 Online contact: www.asuscom.de/sales
Technical support
Components: +49-2102-95990 Online support: www.asuscom.de/support
Notebook: +49-2102-959910 Support (fax): +49-2102-959911
Page 5
WL-520g Quick Reference Guide
5
2. Connecting ADSL Modem and Wireless Router
ASUS Wireless Router
LAN4
LAN3
LAN2
LAN1
WA
N
Modem
Wall telephone outlet
Wall power outlet
Phone
Power
1
Modem
Wall telephone outlet
Wall power outlet
WAN
Power
Phone
Power
2
1) Cable Connection
Page 6
WL-520g Quick Reference Guide
6
PWR (Power)
Off No power
On System ready
Flashing-slow Firmware upgrade failed
Flashing-quick EZsetup processing
AIR (Wireless Network)
Off No power
On Wireless system ready
Flashing Transmitting or receiving data (wireless)
WAN (Wide Area Network)
Off No power or no physical connection
On Has physical connection to an Ethernet network
Flashing Transmitting or receiving data (through Ethernet wire)
LAN 1-4 (Local Area Network)
Off No power or no physical connection
On Has physical connection to an Ethernet network
Flashing Transmitting or receiving data (through Ethernet wire)
Note: If the setup button is pushed without running the EZsetup
wizard utility, the PWR indicator will flash and Internet connections
will pause for a short period but will then return to normal operation without changes.
2) Status Indicators
Page 7
WL-520g Quick Reference Guide
7
3. Client Setup:
Example: Installing WL-167g USB WLAN Adaptor
1 . C l i c k t h e f i r s t l i n e
"Install ASUS WLAN Card
Utilities/ Driver" to run the
installation program.
* Caution: Before plugging the WL-167g into the USB port of your
computer, please first insert the support CD to your CD drive and run the
installations program of ASUS Wireless LAN Card Utilities .
2. Click "Next" to continue.
Page 8

WL-520g Quick Reference Guide
8
3. Click "Next" to accept
the designated location for
files to be installed.
4. Please select a Program
Folder and click "Next"
to continue.
3. Client Setup:(Cont.)
Example: Installing WL-167g USB WLAN Adaptor
Page 9
WL-520g Quick Reference Guide
9
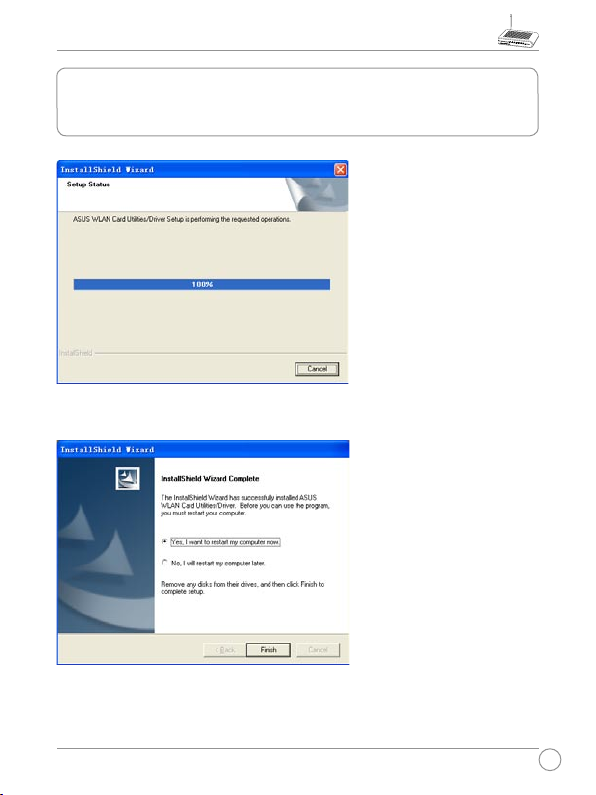
5. Instal latio n is now in
pr ocess, please wait fo r
several seconds.
6. Af te r complet in g the
install at ion, a "R estar t
Computer" dialog box will
appear. Connect WL-167g
WL AN adaptor to US B
port, then select "Yes" and
press "Finis h" to restart
your computer.
3. Client Setup:(Cont.)
Example: Installing WL-167g USB WLAN Adaptor
Page 10
WL-520g Quick Reference Guide
10
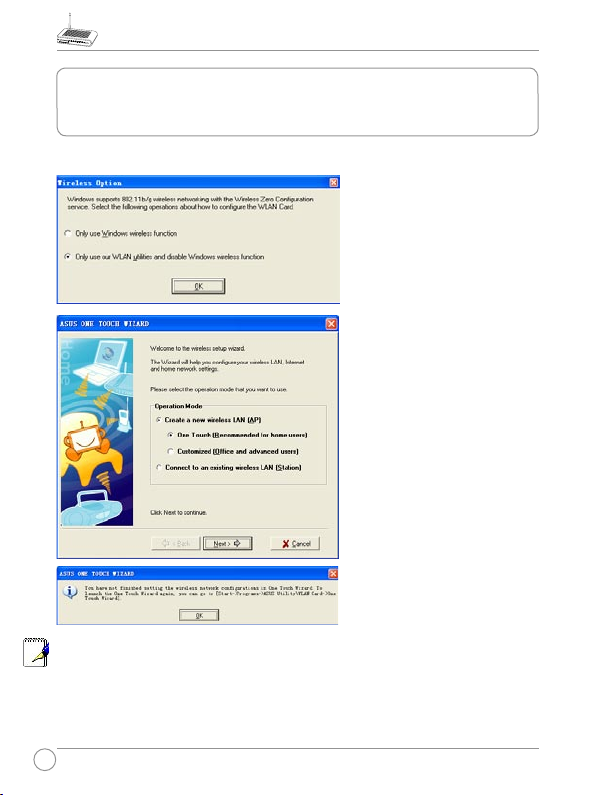
**For Windows XP users, there are some more steps to click through.
7. Af ter reboo ting your
Windows XP, a "Wireless
Option" message box will
appear. Please click "OK".
8 . T h en "AS US O N E
T O U C H W I Z A R D "
will appear, please click
"Cancel".
9. A warning box fr om
" ASUS O N E TO UC H
WI ZA RD " wi ll appear.
Please click "OK" to shut
it down.
* If wireless adaptor of other manufacturers is deployed, please comply
with the setup guide of those companies.
* When using Centrino notebook, please make sure that the internal
wireless LAN is enabled.
3. Client Setup:(Cont.)
Example: Installing WL-167g USB WLAN Adaptor
Page 11
WL-520g Quick Reference Guide
11
4. WL-520g (Router), WL-167g (Client) Wireless
Connection Setup
1) Utility Installation for WL-520g
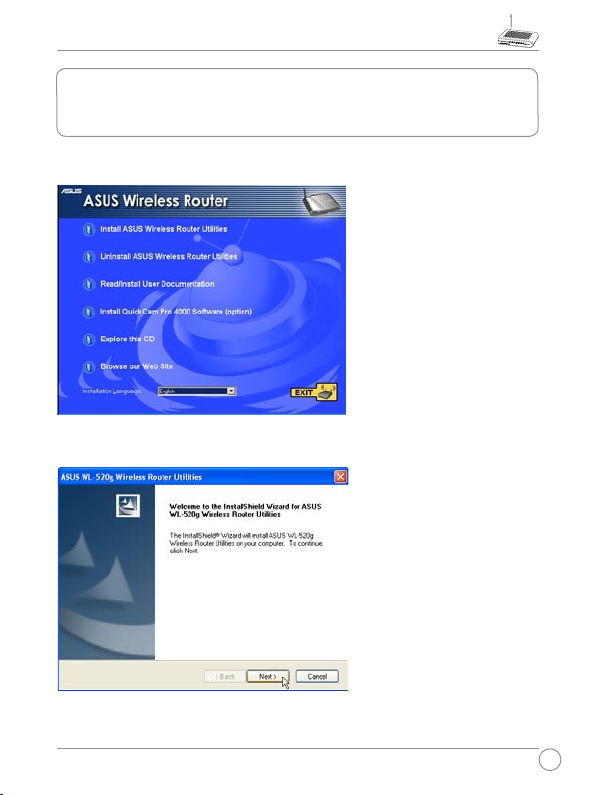
1 .Cl ic k the f irs t l i ne
"Install ASUS Wireless
Route r Utilit ies " to run
the set up in sta l lat ion
program.
2 . C l i c k " N e x t " t o
continue.
Page 12
WL-520g Quick Reference Guide
12
4. WL-520g (Router), WL-167g (Client) Wireless
Connection Setup (Cont.)
1) Utility Installation for WL-520g (Cont.)
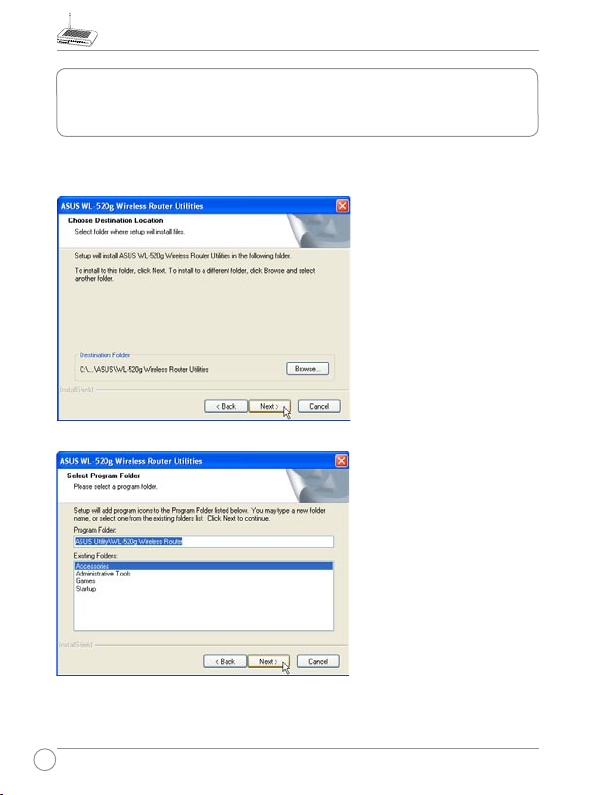
3. Click "Next" to confirm
the designated location for
installation.
4. Select a program folder
and click "Next".
Page 13
WL-520g Quick Reference Guide
13
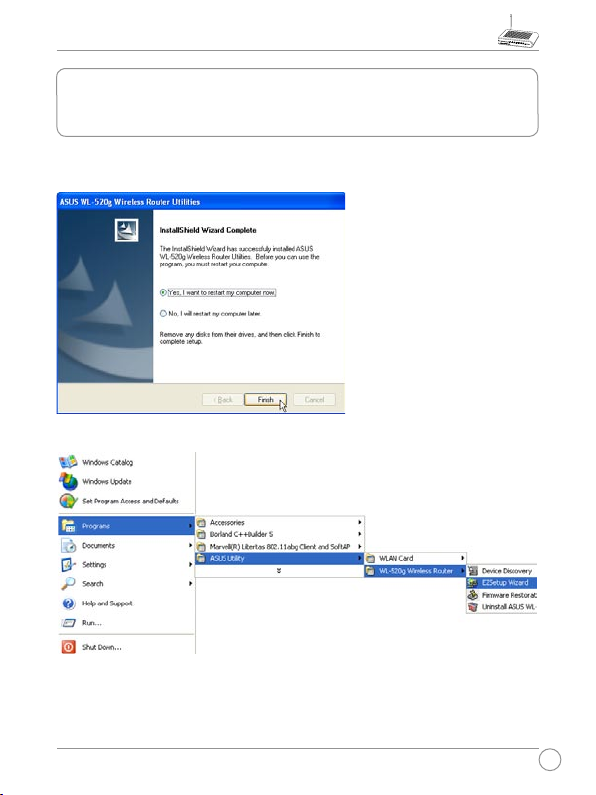
5 . A f t e r c o mpl e t i n g
i nst al l a tio n, "Res ta r t
Computer" dialog box will
appear. Select "Yes" and
press "Fin ish" to restart
your computer.
6.Open the "EZSetup Wizard".
4. WL-520g (Router), WL-167g (Client) Wireless
Connection Setup (Cont.)
1) Utility Installation for WL-520g (Cont.)
Page 14
WL-520g Quick Reference Guide
14
LAN4
LAN3
LAN2
LAN1
WA
N
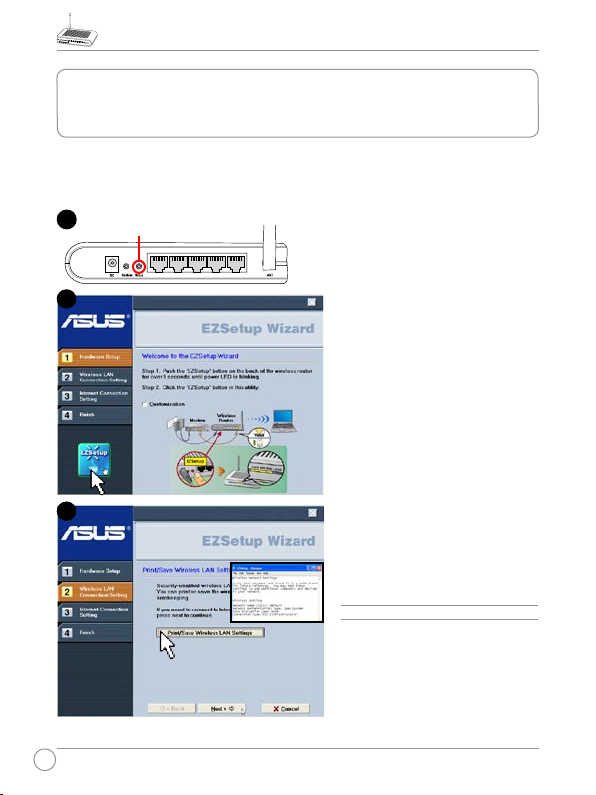
Push “Setup” over 3
sec. and release.
1
Secur it y- en ab le d wi rele ss LA N
en vir onm ent is built now.You can
print your key and your other network
settings for your reference.
Wirel ess L AN set up is com ple te.
C li c k
N ex t
t o m a ke In t e rn e t
connection settings.
Click the EZSetup button in the
utility.
2) EZSetup (Default)
Wireless LAN setup will complete in two easy steps.
3
2
4. WL-520g (Router), WL-167g (Client) Wireless
Connection Setup (Cont.)
Page 15

WL-520g Quick Reference Guide
15
Depending on the connection type
yo u selec ted, yo u may requi re
additional information from your
ISP. Some fields are optional and
may be left blank.
Choose the time zone where you
are located in.
Select the connection type (Cable
or A DS L) you us e. (Exam pl e:
Cable modem or other connection
type that gets IP automatically )
2) EZSetup (Default) (Cont.)
(ISP requ ir em ents de pe nd on
selection in the connection type.)
4
5
6
Page 16

WL-520g Quick Reference Guide
16
7
2) EZSetup (Default) (Cont.)
8
Depending on the service level you applied for with your ISP, your IP may be
random (automatic) or fixed (enter manually).
Ex am pl e 1: Ca bl e Modem or oth er
c o n n ec t i o n t y p e t h a t g e ts I P
automatically.
Example 2: ADSL or other connection
type that uses static IP address.
Page 17

WL-520g Quick Reference Guide
17
2
You can check for automatic or
un ch eck for manual wi re less
network naming. You must enter
a name if unchecked.
1
Only differences between the default setup will be shown below. Select the “
Customization” check box for advanced wireless LAN functions.
3) EZSetup (Customized)
Page 18

WL-520g Quick Reference Guide
18
If you chose “Manually assign”,
enter a WEP (Wired Equivalent
P ri va cy ) ke y fol lo wi ng th e
guideline as shown.
(WEP or WPA depends on security selection in the previous screen.)
4
3
You can choose to use automatic
or manual security key. If all your
cl ie nt s are u si ng ASUS WP A
capable wireless network adapters,
yo u c an selec t
WPA
fo r ex tr a
strength security. (This selection
will only be available for ASUS
WPA adapters.)
3) EZSetup (Customized) (Cont.)
Page 19

WL-520g Quick Reference Guide
19
Note: Use EZSetup Wizard with one wireless client at a time. If the
wireless client computer cannot discover the wireless router while
in EZSetup mode, decrease the distance between the client and the
router.
If you chose “Manually assign”
and selected the WPA check box
, enter a WPA (Wi-Fi Protected
A cc es s) key fol l ow in g th e
guideline as shown.
3) EZSetup (Customized) (Cont.)
5
6
Secur it y- en ab le d wi re le ss LA N
en vironme nt is bui lt now. You can
print your key and your other network
settings for your reference.
Wirel ess LAN s etu p i s c omple te.
C l ick
N ex t
t o m ake Int e r net
connection settings.
*For the following steps of Internet
se tti ngs, ple ase r efe r to P14 ~P15
Step 4~8.
Page 20

WL-520g Quick Reference Guide
20
The ASUS Wireless Router can be configured to meet various usage
scenarios. Some of the factory default settings may suit your usage;
however, others may need changing. Prior to using the ASUS Wireless
Router, you must check the basic settings to guarantee it will work in your
environment. Configuring the ASUS Wireless Router is done through a
web browser. You need a Notebook PC or desktop PC connected to the
ASUS Wireless Router (either directly or through a hub) and running a
web browser as a configuration terminal. The connection can be wired
or wireless. For the wireless connection, you need an IEEE 802.11g/b
compatible device, e.g. ASUS WLAN Card, installed in your Notebook
PC. You should also disable WEP and set the SSID to “default” for your
wireless LAN device. If you want to configure the ASUS Wireless Router
or want to access the Internet through the ASUS Wireless Router, TCP/IP
settings must be correct. Normally, the TCP/IP setting should be on the IP
subnet of the ASUS Wireless Router.
Note: Before rebooting your computer, the ASUS Wireless Router
should be switched ON and in ready state.
1) Connecting to the ASUS Wireless Router
Wired Connection
One R J-4 5 cable is supplied with the ASUS Wire less Router. Auto
crossover function is designed into the ASUS Wireless Router so you can
use either a straight-through or a crossover Ethernet cable. Plug one end
of the cable into the WAN port on the rear of the ASUS Wireless Router
and the other end into the Ethernet port of your ADSL or Cable modem.
5. Configuring the ASUS Wireless Router
Page 21

WL-520g Quick Reference Guide
21
Wireless-Connection
Refer to your wireless adapter user ʼs manual on associating with the
ASUS Wireless Router. The default SSID of the ASUS Wireless Router
is “default” (lo wer c ase), e ncryp tion is disabled and open sys tem
authentication is used.
2) Setting IP address for Wired or Wireless Connection
Get IP Automatically
T h e AS U S W i r e les s R o ut e r
incorporates a DHCP server so the
ea siest m ethod is to set your PC
to get its IP address automatically
and reboot your computer. So the
correct IP address, gateway, DNS
(Domain Name System Server) can
be obtained from the ASUS Wireless
Router.
Note: Before rebooting your PC, the ASUS Wireless Router should be
switched ON and in ready state.
Page 22

WL-520g Quick Reference Guide
22
Setting IP Manually
If you wa nt to set yo ur
IP addr ess manua ll y, the
following default settings of
the ASUS Wireless Router
should be known:
• IP address 192.168.1.1
• Subnet Mask 255.255.255.0.
If you set your computerʼs
IP manually, it needs to be
on the same segment. For
example:
• IP address 192 .168.1.xxx
(xxx can be an y nu mb er
between 2 and 254 that is not used by another device)
• Subnet Mask 255.255.255.0 (same as the ASUS Wireless Router)
• Gateway 192.168.1.1 (this is the ASUS Wireless Router)
• DNS 192.168.1.1 (ASUS Wireless Router IP address or your own).
2) Setting IP address for Wired or Wireless Connection
(Cont.)
Page 23

WL-520g Quick Reference Guide
23
Defaults
User name:
admin
Password:
admin
3) Configuring the Wireless Router
2
Enter the following address in your web
browser: http://192.168.1.1
3
After logging in, you will see the ASUS Wireless Router home page.
The homepage displays quick links to configurate the main features of the router.
1
Page 24

WL-520g Quick Reference Guide
24
6. Commonly Used Features
The following pages are setup examples for your reference, you could
setup these features in web browser.
1-2) WL-167g Encryption Setup
*To enable the configuration of WL-520g, please search for WL-167g
again. Please refer to WL-520g/WL-167g connection setup steps, a
default program will run automatically for config settings.
1) How to Setup Encryption
1-1) WL-520g Encryption Setup
ASUS WL-520g provides a short cut to set up encryption f or your
wireless router via EZSetup features. Please refer to P.16-P.17 EZSetup
(customized) procedures to set up WEP or WPA encryptions.
Page 25

WL-520g Quick Reference Guide
25
1. Click "Yes" and jump to config page, then set the config indentical with
the router. (Use WEP-64bit Key: 2627F68597 as shown)
2. Click "Apply" when finish.
1-2) WL-167g Encryption Setup (Cont.)
Page 26

WL-520g Quick Reference Guide
26
3. Click "Status" button to verify if the device is connected.
4. Remember to save the settings, click "Save as profile" and click "Save",
then click "OK" to finish the setup.
1-2) WL-167g Encryption Setup (Cont.)
Page 27

WL-520g Quick Reference Guide
27
2) Setting up a Server in Your LAN
1
2
3
4
1
2
3
4
Virtual Ser ver is a kind of tec hnol ogy which enables a c ompu ter to receive
specialized packets from network. It is to assign a certain host to act as a link
between inner LAN and outside Web, FTP server. Virtual DMZ provides an allport-match function, which grants specified computers unlimited authority to get
access to network resources. The difference between Virtual Server and Virtual
DMS lies on the ports they enable respectively: Virtual Server just open serveral
ports while Virtual DMZ open all ports to the network.
Page 28

WL-520g Quick Reference Guide
28
3) Setting up Switching Hub & Pure AP(No IP Share NAT)
ASUS Wireless Router
DSL or Cable Modem
LAN4
LAN3
LAN2
LAN1
WA
N
WAN
1
2
3
4
5
Page 29

WL-520g Quick Reference Guide
29
(More on next page)
1
2
3
4) Setting up Net Meeting, MSN, Online Gaming, and
Remote Control Programs (Cont.)
Page 30

WL-520g Quick Reference Guide
30
4) Setting up Net Meeting, MSN, Online Gaming, and
Remote Control Programs (Cont.)
4
5
6
8
7
Page 31

WL-520g Quick Reference Guide
31
5) Setting up DDNS
1
2
3
(More on next page)
1
2
3
4
4
Page 32

WL-520g Quick Reference Guide
32
5) Setting up DDNS (Cont.)
(More on next page)
9
5
6
8
7
5
6
7
8
9
10
11
12
Page 33

WL-520g Quick Reference Guide
33
5) Setting up DDNS (Cont.)
(More on next page)
10
11
12
13
14
13
14
15
Page 34

WL-520g Quick Reference Guide
34
5) Setting up DDNS (Cont.)
15
16
17
18
19
Page 35

WL-520g Quick Reference Guide
35
1
2
6
6) Setting up WDS
1
2
3
4
5
Page 36

WL-520g Quick Reference Guide
36
7. Trouble Shooting
1. Cannot access to web browser for router configuration
1. Op en a web browser
a n d o p e n " I n t e r n e t
Options" dialog box.
2 . C l i c k o n " D e l e t e
Coo ki es" an d "De le te
Files".
Page 37

WL-520g Quick Reference Guide
37
2. Cannot Establish Connection via Wireless
Out of Range:
Put the router closer to the client.
Try to change the czhannel setting.
Authentication:
Can use a wire-connected computer to connect to router.
Check the wireless security setting,
Or can do a hard reset on the router.
Couldn't find the router:
Do the hard restore on the router and test again.
Check the setting in the wireless adapter.
Such as SSID and encryption setting.
3.Cannot get access to the Internet via wireless LAN
adapter
• Move the router closer to the client.
• Check whether the wireless adapter is connected to the correct AP.
• Check whether the wireless channel in use conforms to the channels
available in your country/ area.
• Check encryption setting.
• Check whether the ADSL cable is plugged to the correct port.
• Retry by another Ethernet cable.
7. Trouble shooting (Cont.)
Page 38

WL-520g Quick Reference Guide
38
7. Trouble shooting (Cont.)
4.Internet is not accessible
Check the lights on ADSL modem and Wireless Router
Check the "WAN" led on the router is on or not. If the led isn't on,
please change the cable to try again.
4.1. When ADSL Modem "Link" light is on (not blinking),
this means Internet Access is Possible.
Restart your computer.
Reconfigurate the settings for ASUS Router and please refer to the
Quick Setup Guide of the WL-520g.
Check whether the WAN LED on the router is on or not.
Check wireless encryption settings
Check whether the computer can get the IP address or not. (via both
wired network and wireless network)
Check whether your Web browser is configurated to use the local
LAN, and is not configured to use a proxy server.
4.2. If the ADSL "LINK" light blinks continuously or stays
off, Internet access is not possible - the Router is
unable to establish a connection with the ADSL network.
Check that your cables are connected properly.
Disconnect the power cable from the modem, wait a few minutes,
then reconnect the cable.
If the ADSL light continues to blink or stays off, contact your ADSL
service provider.
Page 39

WL-520g Quick Reference Guide
39
5.Network name or encryption keys are unknown
Can try to setup the wired connection for setup the wireless
encryption again.
Can do the hard reset on the router.
6.How to reset to defaults
The following are factory default values. These values will be present
when you first receive your ASUS Wireless Router, if you push the restore
button on the back of the ASUS Wireless Router over 5 seconds, or if
you click the “Restore” button on the “Factory Default” page under “
Advanced Setup”.
User Name: admin
Password: admin
Enable DHCP: Yes (if plug in Wan cable)
IP address: 192.168.1.1
Subnet Mask: 255.255.255.0
DNS Server 1: 192.168.1.1
DNS Server 2: (Blank)
SSID: default
Domain Name: (Blank)
7. Trouble shooting (Cont.)
Page 40

WL-520g Quick Reference Guide
40
8. Appendix
FCC Warning Statement
This device complies with Part 15 of the FCC Rules. Operation is subject
to the following two conditions:
(1) this device may not cause harmful interference, and
(2 ) th is device mu st a cc ep t an y interference received , in cl ud in g
interference that may cause undesired operation.
This equipment has been tested and found to comply with the limits for a
class B digital device, pursuant to part 15 of the FCC Rules. These limits
are designed to provide reasonable protection against harmful interference
in a residential installation.
This equipment generates, uses and can radiate radio frequency energy
and, if not installed and used in accordance with the instructions, may
cause harmful interference to radio communications. However, there is
no guarantee that interference will not occur in a particular installation.
If this equipment does cause harmful interference to radio or television
reception, which can be determined by turning the equipment off and on,
the user is encouraged to try to correct the interference by one or more of
the following measures:
-Reorient or relocate the receiving antenna.
-Increase the separation between the equipment and receiver.
-Connect the equipment into an outlet on a circuit different from that to
which the receiver is connected.
-Consult the dealer or an experienced radio/TV technician for help.
Page 41

WL-520g Quick Reference Guide
41
CAUTION:
Any c hanges or modificati ons not expressly approved b y the party
responsible for compliance could void the userʼs authority to operate the
equipment.
Prohibition of Co-location
This device and its antenna(s) must not be co-located or operating in
conjunction with any other antenna or transmitter
Safety Information
To maint ain c ompli ance with FC Cʼs RF e xposu re gu ideli nes, th is
equipment should be installed and operated with minimum distance 20cm
between the radiator and your body. Use on the supplied antenna.
Declaration of Conformity for R&TTE directive 1999/5/EC
Essential requirements – Article 3
Protection requirements for health and safety – Article 3.1a
Testing for electric safety according to EN 60950-1 has been conducted.
These are considered relevant and sufficient.
Protection requirements for electromagnetic compatibility – Article 3.1b
8. Appendix (Cont.)
Page 42

WL-520g Quick Reference Guide
42
Testing for electromagnetic compatibility according to EN 301 489-1 and
EN 301 489-17 has been conducted. These are considered relevant and
sufficient.
Effective use of the radio spectrum – Article 3.2
Testin g for r adio test suites accor ding to EN 3 00 32 8- 2 ha s bee n
conducted. These are considered relevant and sufficient.
CE Mark Warning
This is a Class B product, in a domestic environment, this product may
cause radio interference, in which case the user may be required to take
adequate measures.
8. Appendix (Cont.)
Page 43

WL-520g Quick Reference Guide
43
8. Appendix (Cont.)
Page 44

WL-520g Quick Reference Guide
44
8. Appendix (Cont.)
 Loading...