

Page 1
Page 2
Page 3

1
WL-520g Quick Start Guide
English
Index
1. Package Contents .....................................................................2
2. Connecting ADSL Modem and Wireless Router ....................
3
1) Cable Connection ...................................................................
3
2) Status Indicators ....................................................................
3
3. Configuring the Wireless Router .............................................
4
1) ASUS Wireless Router Wired Connection ..............................
4
2) Setting IP address for Wired and Wireless Connection ..........
4
3) Configuring the Wireless Router .............................................
5
4) Qucik Setup ............................................................................
6
Page 4

WL-520g Quick Start Guide
2
English
1. Package Contents
• WL-520g wireless router*1
• Power adaptor*1
• External antenna*1
• Utility CD*1
• RJ45 cable*1
• Quick Start Guide*1
Manufacturer Contact Information
ASUSTeK COMPUTER INC. (Asia-Pacific)
Company address: 15 Li-Te Road, Beitou, Taipei 11259
General (tel): +886-2-2894-3447 Web site address: www.asus.com.tw
General (fax): +886-2-2894-7798 General email: info@asus.com.tw
ASUS COMPUTER INTERNATIONAL (America)
Company address: 44370 Nobel Drive, Fremont, CA 94538, USA
General (fax): +1-510-608-4555 Web site address: usa.asus.com
Technical support
General support: +1-502-995-0883 Support (fax): +1-502-933-8713
Online support: http://vip.asus.com/eservice/techserv.aspx
ASUS COMPUTER GmbH (Germany & Austria)
Company address: Harkort Str. 25, D-40880 Ratingen, Germany
General (tel): +49-2102-95990 Web site address: www.asuscom.de
General (fax): +49-2102-959911 Online contact: www.asuscom.de/sales
Technical support
Components: +49-2102-95990 Online support: www.asuscom.de/support
Notebook: +49-2102-959910 Support (fax): +49-2102-959911
Page 5
3
WL-520g Quick Start Guide
English
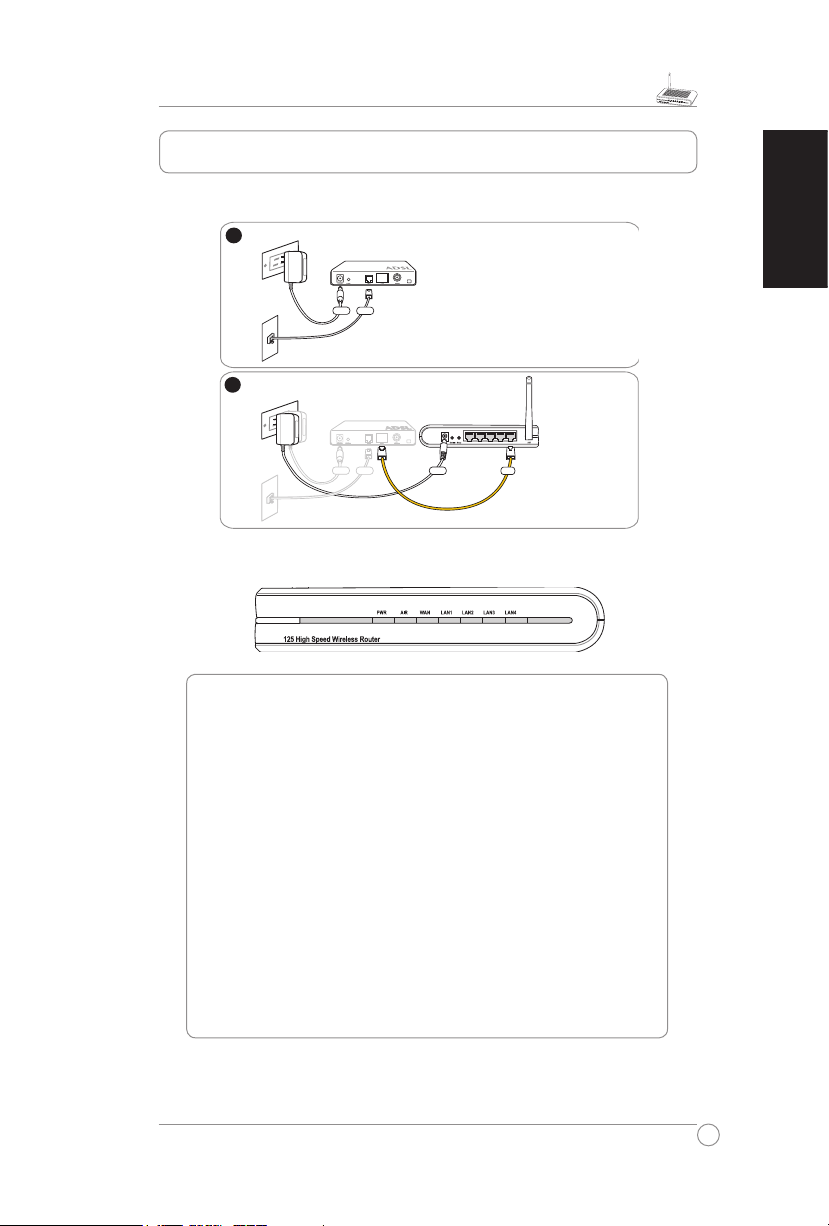
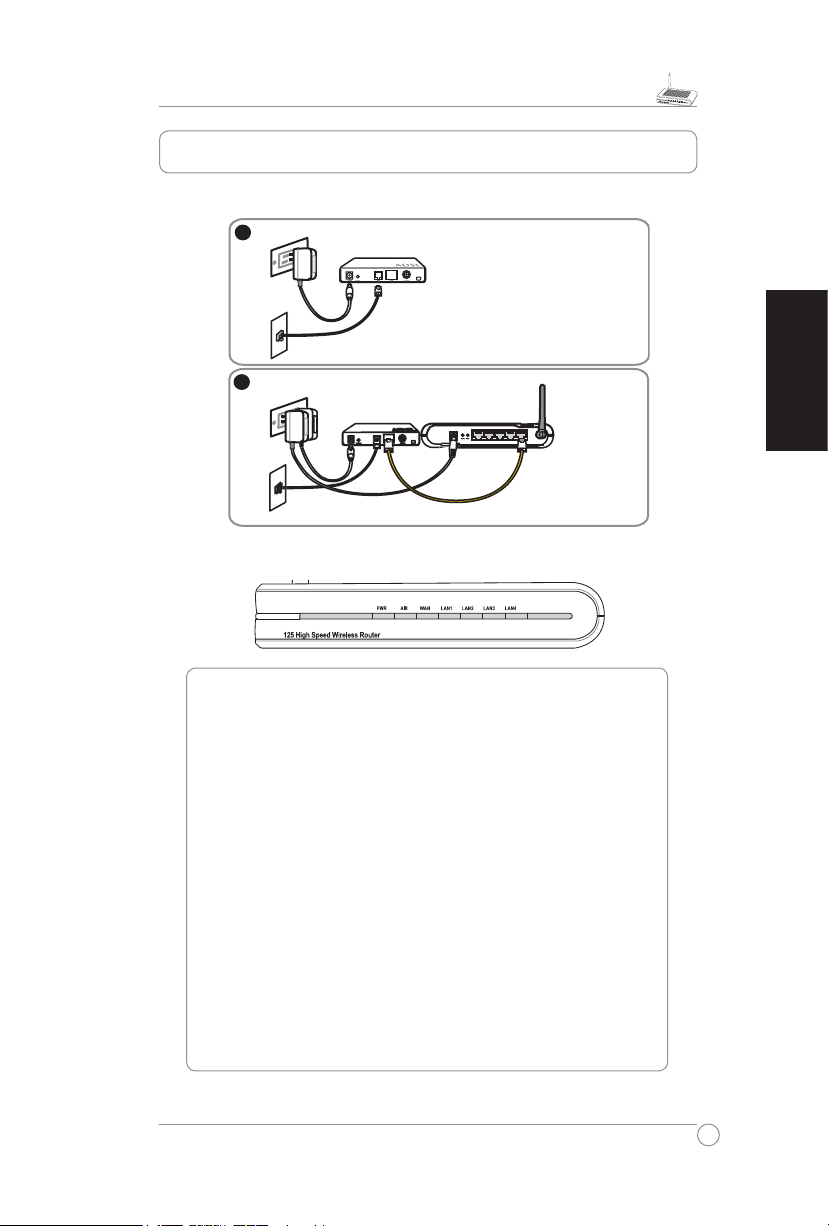
2. Connecting ADSL Modem and Wireless Router
ASUS Wireless Router
LAN4
LAN3
LAN2
LAN1
WAN
Modem
Wall telephone outlet
Wall power outlet
Phone
Power
1
Modem
Wall telephone outlet
Wall power outlet
WAN
Power
Phone
Power
2
1) Cable Connection
PWR (Power)
Off No power
On System ready
Flashing-slow Firmware upgrade failed
Flashing-quick EZsetup processing
AIR (Wireless Network)
Off No power
On Wireless system ready
Flashing Transmitting or receiving data (wireless)
WAN (Wide Area Network)
Off No power or no physical connection
On Has physical connection to an Ethernet network
Flashing Transmitting or receiving data (through Ethernet wire)
LAN 1-4 (Local Area Network)
Off No power or no physical connection
On Has physical connection to an Ethernet network
Flashing Transmitting or receiving data (through Ethernet wire)
2) Status Indicators
Page 6
WL-520g Quick Start Guide
4
English
Note:
1) Before you start, we recommend using a wired connection for initial
configuration, which will avoid possible setup problem due to wireless uncertainty.
2) ASUS also provides an EZSetup button for fast wireless configuration. If you
prefer EZSetup to arrange for your wireless network configuration, please refer to
chapter 6 of WL520g userʼs manual included in the support CD.
The ASUS Wireless Router can be configured to meet various usage scenarios. Some
of the factory default settings may suit your usage; however, others may need changing.
Prior to using the ASUS Wireless Router, you must check the basic settings to guarantee
it will work in your environment. Configuring the ASUS Wireless Router is done through a
web browser. You need a Notebook PC or desktop PC connected to the ASUS Wireless
Router (either directly or through a hub) and running a web browser as a configuration
terminal. The connection can be wired or wireless. For the wireless connection, you need
an IEEE 802.11g/b compatible device, e.g. ASUS WLAN Card, installed in your Notebook
PC. You should also disable WEP and set the SSID to “default” for your wireless LAN
device. If you want to configure the ASUS Wireless Router or want to access the Internet
through the ASUS Wireless Router, TCP/IP settings must be correct. Normally, the TCP/
IP setting should be on the IP subnet of the ASUS Wireless Router.
Note: Before rebooting your computer, the ASUS Wireless Router should be
switched ON and in ready state.
1) ASUS Wireless Router Wired Connection
One RJ-45 cable is supplied with the ASUS Wireless Router. Auto crossover function is
designed into the ASUS Wireless Router so you can use either straight-through or crossover
Ethernet cable. Plug one end of the cable into the WAN port on the rear of the ASUS
Wireless Router and the other end into the Ethernet port of your ADSL or Cable modem.
Wireless-Connection
Note: If configuration is done via wired connection, ignore this.
Refer to your wireless adapter userʼs manual on associating with the ASUS Wireless
Router. The default SSID of the ASUS Wireless Router is “default” (lower case),
encryption is disabled and open system authentication is used.
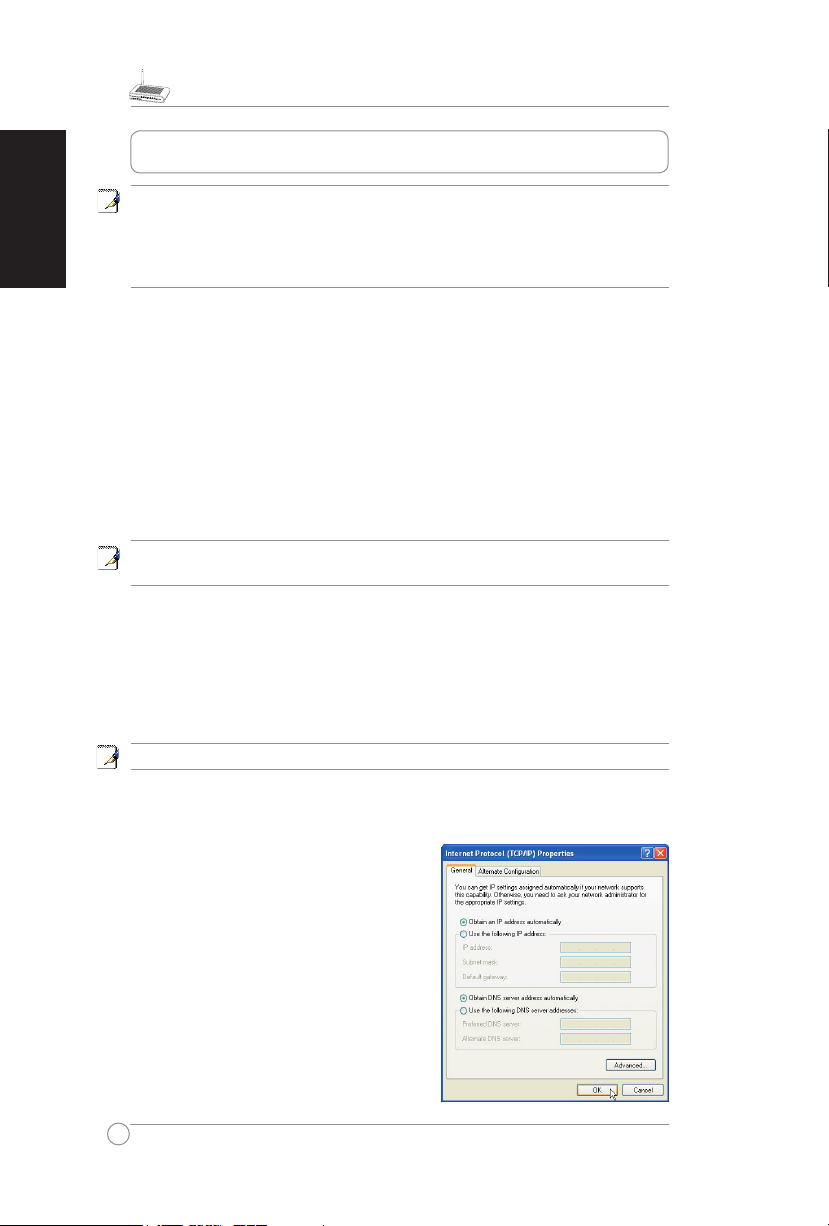
2) Setting IP address for Wired or
Wireless Connection
Get IP Automatically
Th e ASU S Wireless Router incorpo ra tes a
DHCP server so the easiest method is to set
your PC to get its IP address automatically and
reboot your computer. So the correct IP address,
gateway, DNS (Domain Name System Server)
can be obtained from the ASUS Wireless Router.
3. Configuring the Wireless Router
Page 7
5
WL-520g Quick Start Guide
English
Note: Before rebooting your PC, the ASUS Wireless Router should be switched
ON and in ready state.
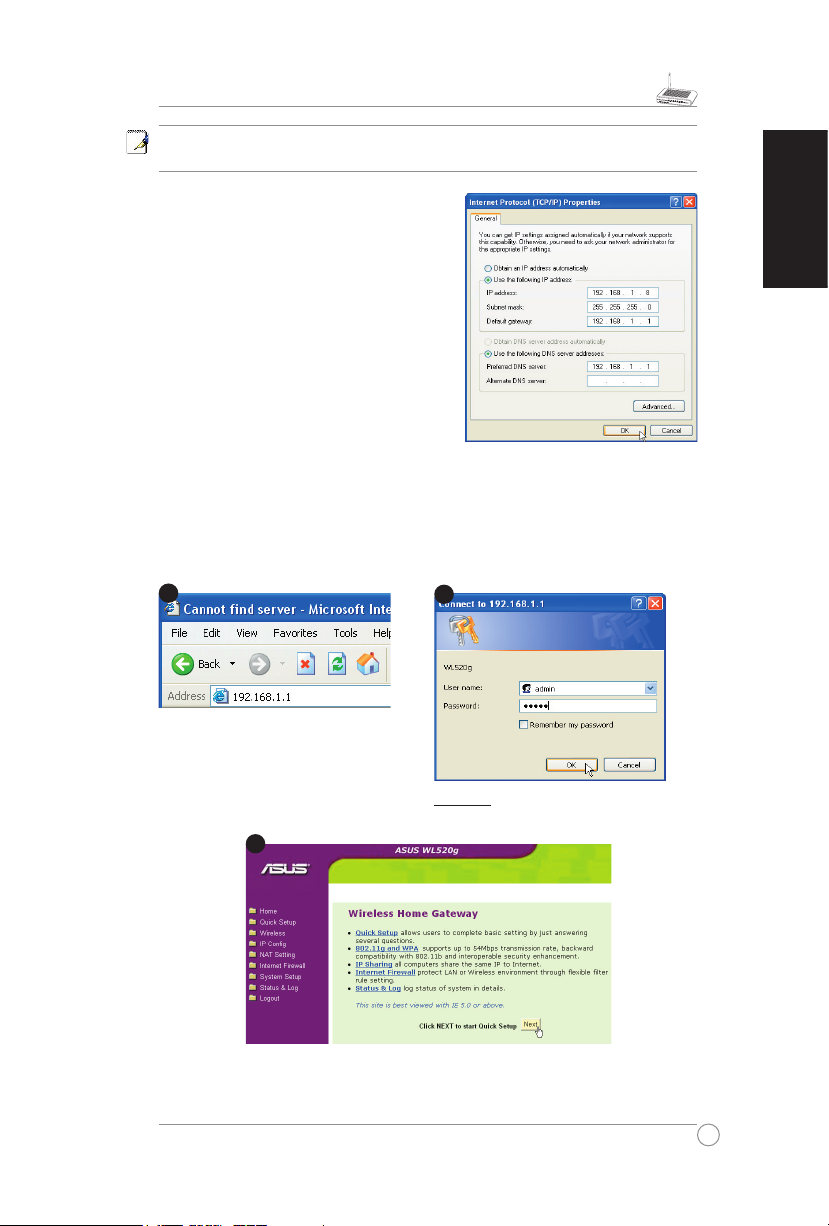
Setting IP Manually
If you want to set your IP address manually,
the following default settings of the ASUS
Wireless Router should be known:
• IP address 192.168.1.1
• Subnet Mask 255.255.255.0.
If you set your computerʼs IP manually, it
needs to be on the same segment. For
example:
• IP address 192.168.1.xxx (xxx can be any
number between 2 and 254 that is not used
by another device)
• Subnet Mask 255.255.255.0 (same as the ASUS Wireless Router)
• Gateway 192.168.1.1 (this is the ASUS Wireless Router)
• DNS 192.168.1.1 (ASUS Wireless Router IP address or your own).
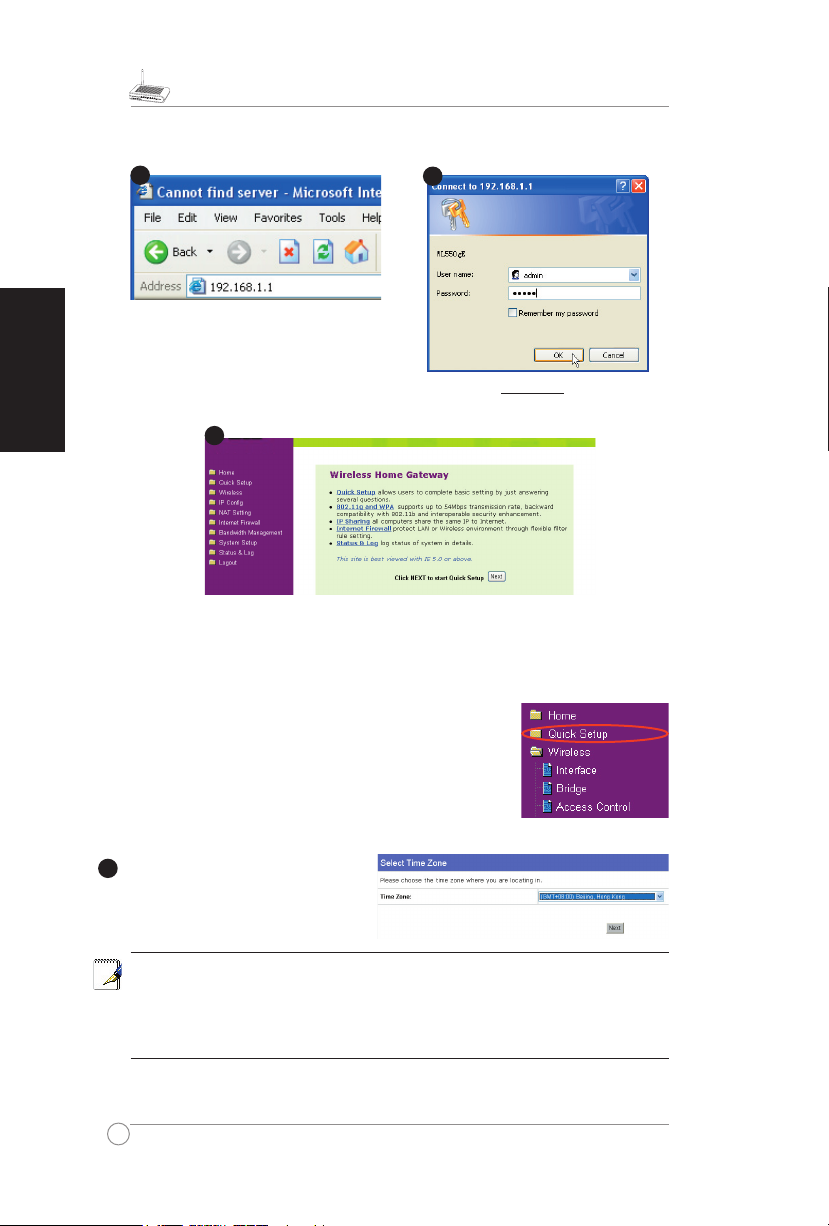
3) Configuring the Wireless Router
Defaults
User name:
admin
Password:
admin
Enter the following address in your
web browser: http://192.168.1.1
After logging in, you will see the ASUS Wireless Router home page.
The homepage displays quick links to configurate the main features of the router.
2
3
1
Page 8
WL-520g Quick Start Guide
6
English
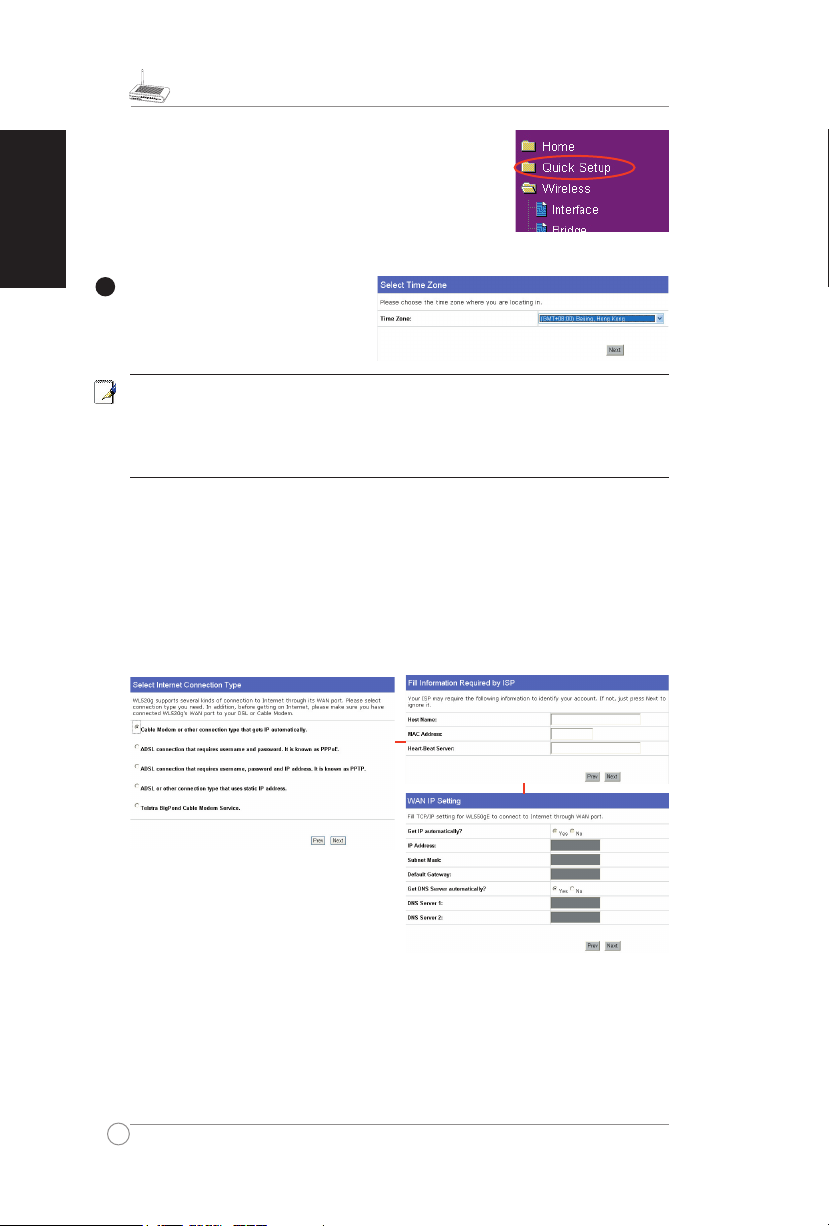
4) Quick Setup
To start quick setup, click
Next
to enter the “Quick Setup”
page. Follow the instructions to setup the ASUS Wireless
Router.
Select your time zone or the closest
region. Click
Next
to continue.
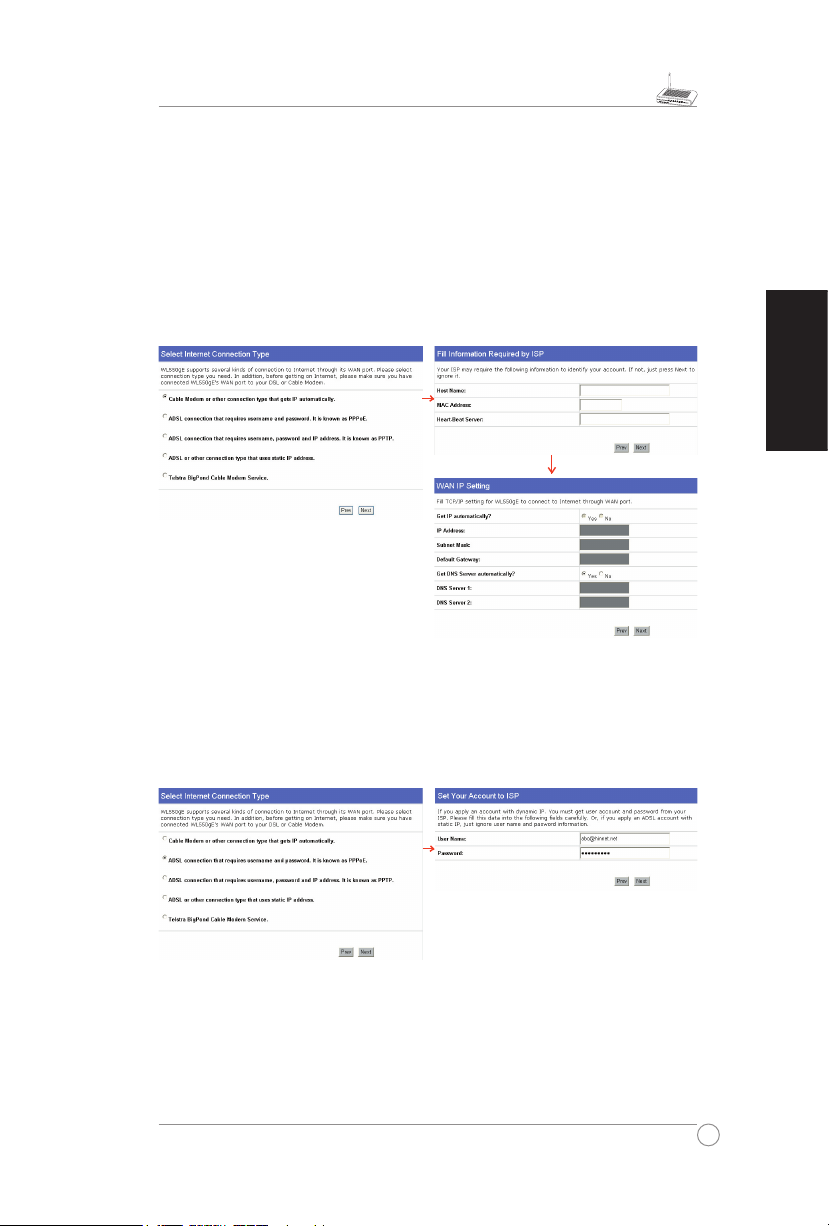
ASUS wireless router WL520g supports five types of ISP services— cable, ADSL
(PPPoE, PPTP, static IP address), and Telstra BigPond. Since each service has its
own protocols and standards, therefore, during the setup process, there are different
identity settings demanded by WL-520g. Select the correct connection type. Click
Next
to continue.
Cable User
If you are receiving services from cable or other ISP assigning IP addresses
automatically, please select
Cable Modem or other connection that gets IP
automatically
. If you are using cable services, your ISP may have provided you with
hostname, MAC address, and heartbeat server, if true, please fill these information
into the boxes on the setting page; if not, click
Next
to skip this step.
1
Page 9
7
WL-520g Quick Start Guide
English
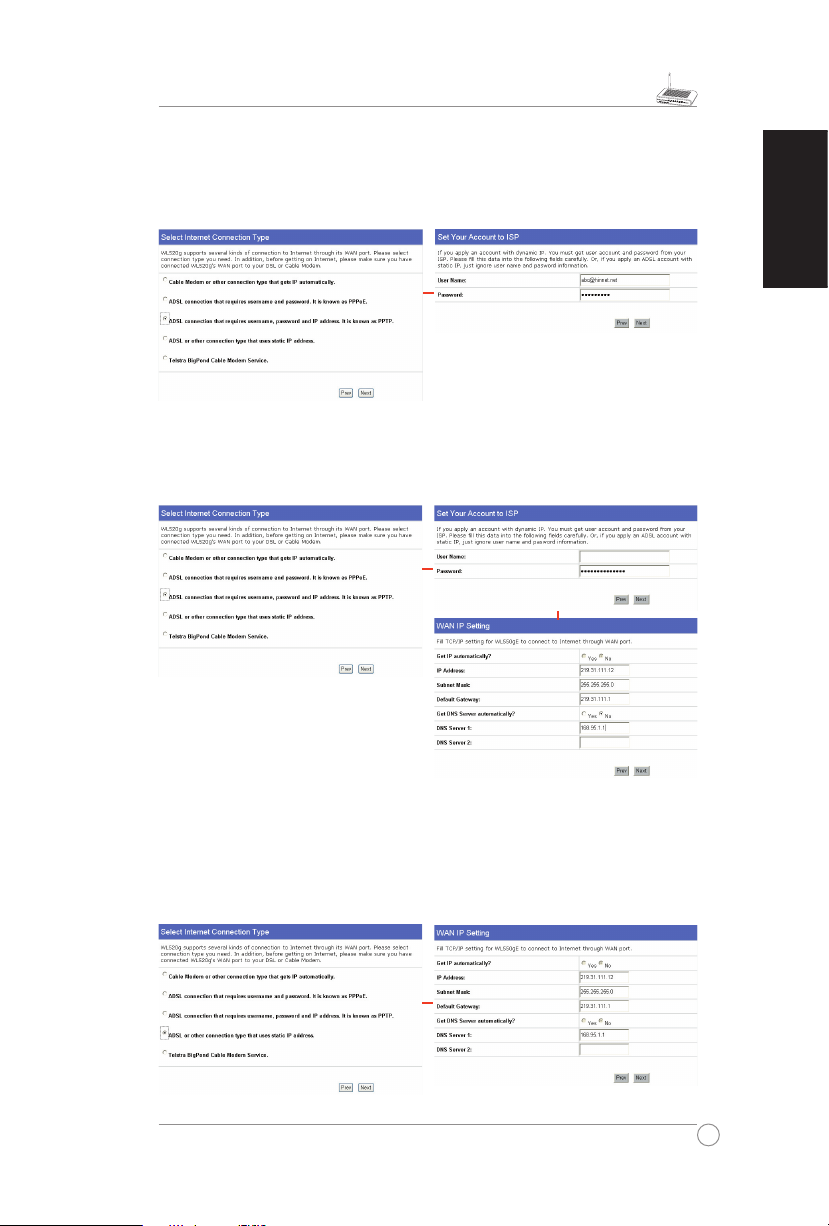
PPPoE User
If you are PPPoE service user, pleae select the second line. You would be required
to input the username and password provided by your ISP.
PPTP User
If you are using PPTP services, you would be asked to input the username, password,
as well as IP address provided by your ISP.
Static IP User
If you are using ADSL or other connection type that uses static IP addresses, please
select the fourth line, then input the IP address, subnet mask, and default gateway
provided by your ISP. You could choose to specify certain DNS servers, or select to
get DNS automatically.
herk036@adsl-comfort
Page 10
WL-520g Quick Start Guide
8
English
After setting the connection type, you are
to set up your wireless interface,. First, give
an SSID (Service Set Identifier), which is a
unique identifier attached to packets sent
over WLANs. This identifier emulates a
password when a wireless device attempts
communication on the WLAN. Because
an SSID distinguishes WLANs from each
other, access points and wireless devices
trying to connect to a WLAN must use the same SSID.
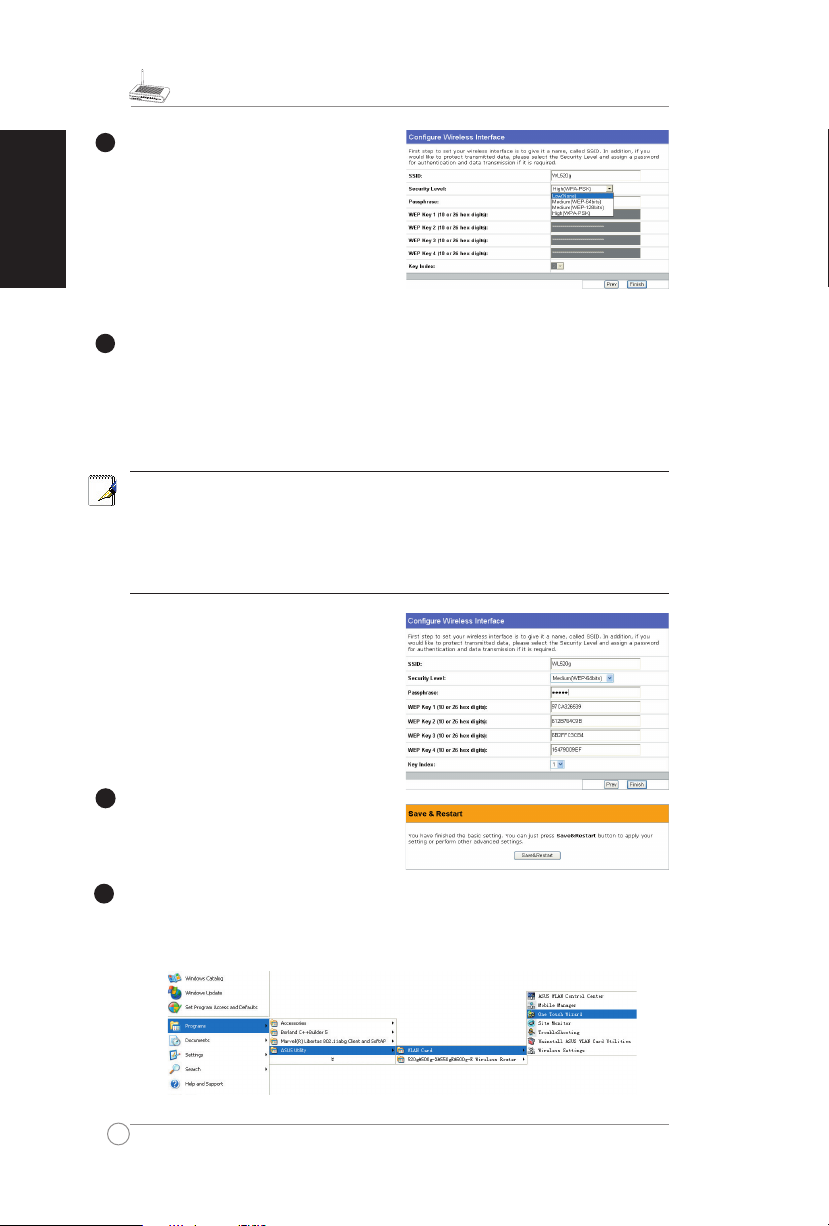
Also, if you want to protect transmitted data, select a middle or high Security Level.
Medium :
only users with the same WEP key are to connect to this access point and
to transmit data using 64bits or 128bits WEP key encryption.
High:
only users with the same WPA pre-shared key are to connect to this access
point and to transmit data using TKIP encryption.
The ASUS wireless router configuration page features a convienient approach to
setup the WEP Keys: with only a few taps on your keyboard to define the Passphrase,
the system will automatically generate four strings of WEP Keys. For ASUS wireless
adaptor users, it is no longer necessary to input long and complicated WEP Keys
when connecting the router with the wireless client; the Passphrase provides an easy
way for setting up your wireless environment!
For example, if we input select WEP64bits encryption mode, input 11111 as
Passphrase, then the following WEP Keys
are generated as shown in the right picture.
Record the Passphrase and the WEP keys
on your notebook, then click Save.
Click
Finish
to continue. You are prompted
to save the settings. Click
Save&Restart
to save the settings to the ASUS Wireless
Router and enable the new settings.
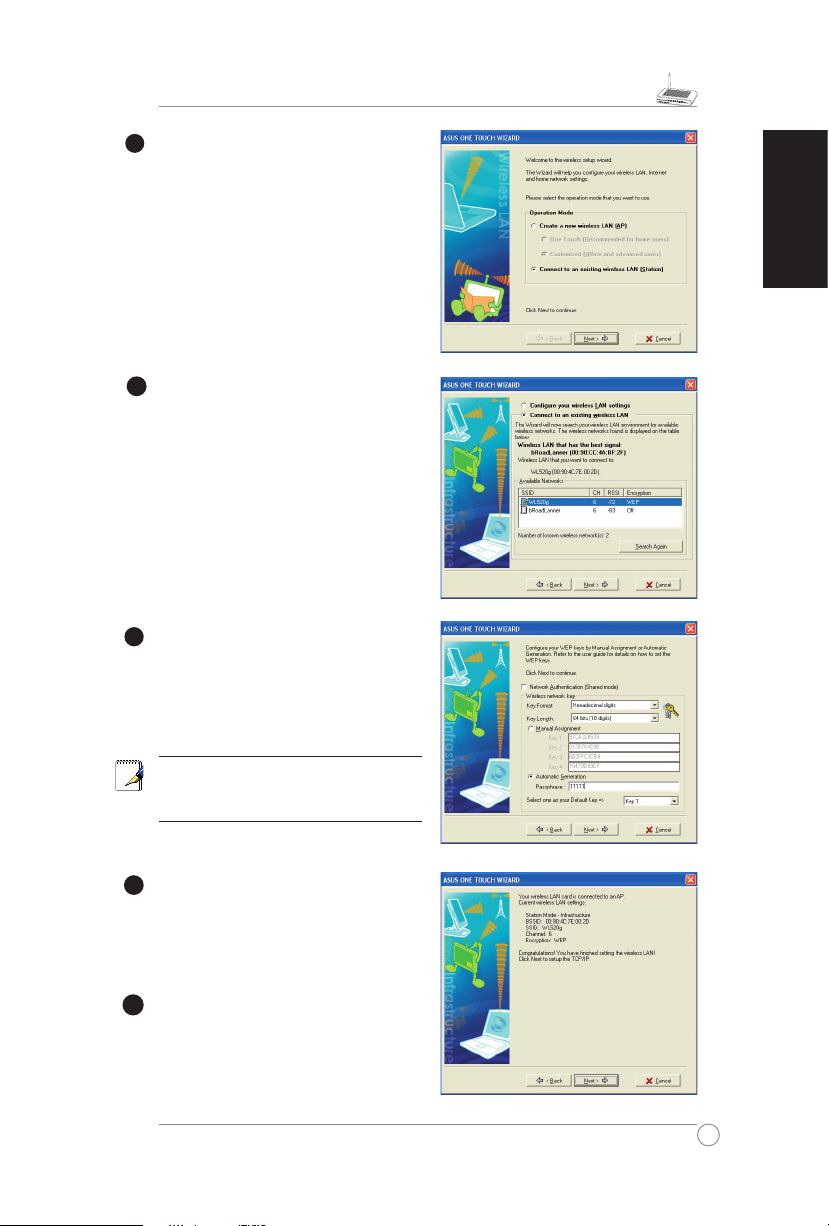
Next we are to setup encrypted wireless connection for wireless router and wireless
client. If you have installed ASUS wireless adaptor as well as the utility, click
Start
->
Programes
->
ASUS Utility
->
WLAN Card
->
One Touch Wizard
to open the
connection setup utility on the client end.
5
3
4
2
Page 11
9
WL-520g Quick Start Guide
English
Select
Connect to an existing wireless
LAN (St ati on)
when th e wel com e
window appears, then click
Next
.
ASUS ONE TOUCH WIZARD searches
and displays all the available stations as
shown in the picture. Select WL520g and
press
Next
to continue.
T h e s e t u p w i z a r d t h e n a s k s f o r
encryption setup. Set Key Length as
64
bits (10digits)
as we have previously
set on WL-520g, then select
Automatic
Generation
and i nput
11111
into the
Passphrase box.
No te :
The encryptio n mode on yo ur
client must be the same with that on your
wireless router.
Wait for several seconds to get the client
connected to the wireless router. Then
a screen informing the result of the
connection would appear. Press Next to
continue.
Then you will see the IP configuration
sc reen. Setup the client IP address
according to your network condition. After
the setup is completed, Click
Finish
.
7
8
9
10
6
Page 12
WL-520g Quick Start Guide
10
English
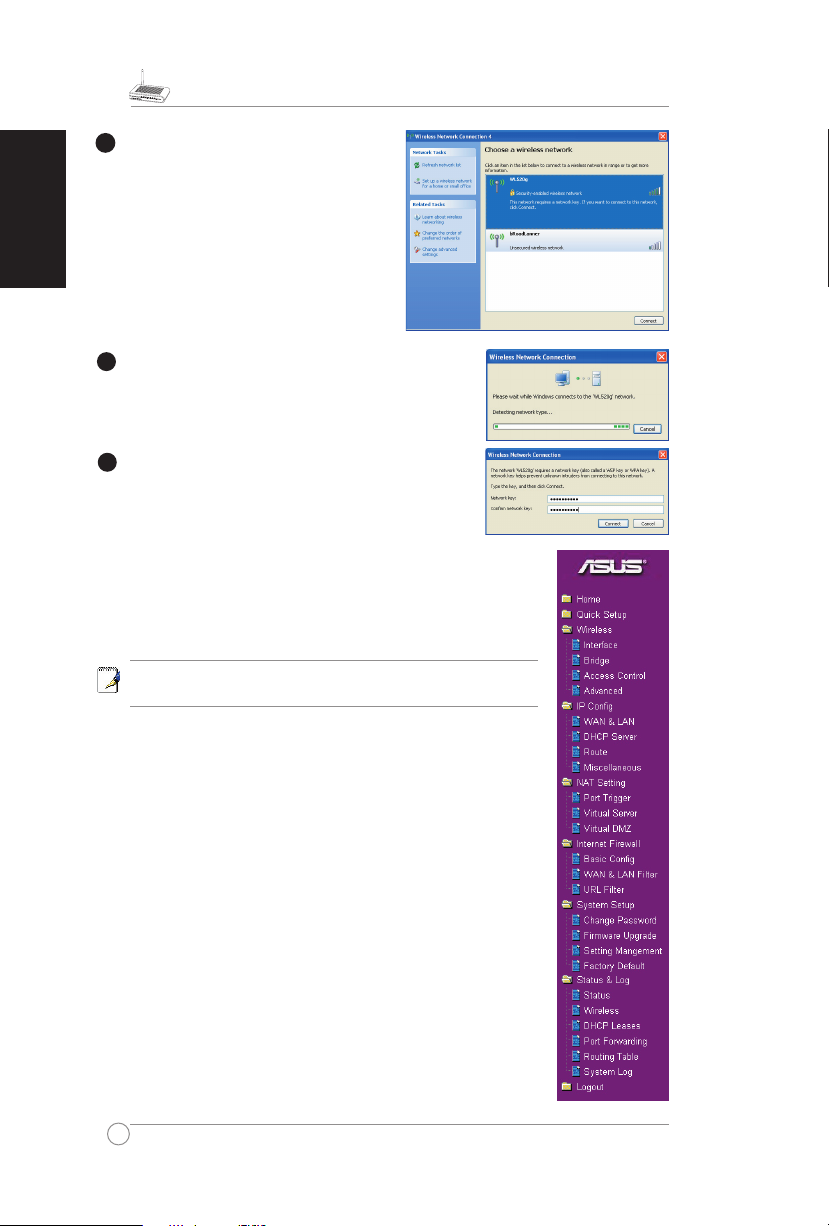
For non-ASUS wireless adaptor users, you
can set up the wireless connection between
your computer and the wireless router
with Windows
®
Zero-Configure function.
Ri ght click the
Ne twork Neighbou
r
on the desktop of your client and click
Property
, then in the Network Connection
window, double-click
Wireless Network
Co nn ec ti on
ic on , a wi nd ow with all
available stations appears. Select WL520g
and click
Connect
.
The connection process would take about several
seconds.
Then a window prompts out asking you to input
the network keys, input the 10-digit key you have
previously recorded in your notebook, then click
connect to complete connection.
7
6
To adjust other settings, click on items on the menu to reveal a
submenu and follow the instructions to setup the ASUS Wireless
Router. Tips are given when you move your cursor over each item.
Note: To setup your wireless router, please refer to the userʼs
manual in the support CD.
5
Page 13

11
WL-520g Schnellstarthilfe
Deutsch
1. Paketinhalt ...............................................................................12
2. Verbindung des ADSL-Modems und Wireless Routers .......
13
1) Kabelverbindung ...................................................................
13
2)
Statusanzeigen .....................................................................13
3. Wireless Router-Konfiguration ..............................................
14
1) Verbinden des ASUS Wireless Routers ................................
15
2) Einstellen der IP-Adresse für Kabel- und kabellose Verbind
-
ung ........................................................................................15
3) Konfigurieren des Wireless Routers .....................................
16
4) Schnelleinstellung .................................................................
16
Inhalt
Page 14

WL-520g Schnellstarthilfe
12
Deutsch
• WL-520g Wireless Router*1
• Netzteil*1
• externe Antenne*1
• CD mit Treibern und Hilfsprogrammen*1
• RJ45-Kabel*1
• Schnellstarthilfe*1
Kontaktinformationen des Herstellers
ASUSTeK COMPUTER INC. (Südostasien)
Adresse: 15 Li-Te Road, Beitou, Taipeh11259
Tel. (allg.): +886-2-2894-3447 Website: www.asus.com.tw
Fax (allg.): +886-2-2894-7798 eMail: info@asus.com.tw
ASUS COMPUTER INTERNATIONAL (USA)
Adresse: 44370 Nobel Drive, Fremont, CA 94538, USA
Fax (allg.):+1-510-608-4555 Website: usa.asus.com
Technische Unterstützung
Allgemeine Unterstützung: +1-502-995-0883 Fax (Unterstützung):+1-502-933-8713
Online-Unterstützung: http://vip.asus.com/eservice/techserv.aspx
ASUS COMPUTER GmbH (Deutschland & Österreich)
Adresse: Harkort Str. 25, D-40880 Ratingen, Deutschland
Tel.
(allg.): +49-2102-95990 Website: www.asuscom.de
Fax (allg.): +49-2102-959911 Online-Kontakt: www.asuscom.de/sales
Technische Unterstützung
Komponenten: +49-2102-95990 Online-Unterstützung: www.asuscom.de/support
Notebooks: +49-2102-959910 Fax (Unterstützung): +49-2102-959911
1. Paketinhalt
Page 15
13
WL-520g Schnellstarthilfe
Deutsch
PWR (Power)
Aus Aus
An System bereit
langsames Blinken Firmware-Upgrade fehlgeschlagen
schnelles Blinken EZsetup (Schnelleinstellung) in Bearbeitung
AIR (Réseau sans fil)
Aus Aus
An kabelloses Netzwerk bereit
Blinken Senden oder Empfangen von Daten (kabellos)
WAN (Wide Area Network)
Aus Aus oder keine physikalische Verbindung
An physikalische Verbindung zum Ethernet-Netzwerk
Blinken Senden oder Empfangen von Daten (über Ethernet-
Kabel)
LAN 1-4 (Local Area Network)
Aus Aus oder keine physikalische Verbindung
An physikalische Verbindung zum Ethernet-Netzwerk
Blinken Senden oder Empfangen von Daten (über Ethernet-
Kabel
)
1) Kabelverbindung
2) Statusanzeigen
2. Verbindung des ADSL-Modems und Wireless Routers
LAN4
LAN3
LAN2
LAN1
WAN
ASUS Wireless Router
Modem
Telefonanschluss
Steckdose
Telefon
Strom
1
Modem
2
Telefonanschluss
Steckdose
Strom
Strom
Telefon
WAN
Page 16
WL-520g Schnellstarthilfe
14
Deutsch
Hinweis:
1) Für die erste Konfiguration empfehlen wir, eine Kabelverbindung zu
verwenden, um Einstellungsprobleme durch eine instabile kabellose
Verbindung zu umgehen
2) ASUS bietet Ihnen die EZSetup-Schaltfläche für eine schnelle kabellose
Konfiguration. Wenn Sie EZSetup für die Konfiguration Ihres kabellosen
Netzwerks verwenden möchten, beziehen Sie sich bitte auf Kapitel 6 des
WL550gE Benutzerhandbuchs auf der Support-CD.
Der kabellose ASUS Router kann für viele verschiedene Szenarien konfiguriert
werden. Einige der Werkseinstellungen können Ihrer Benutzung entsprechen; andere
jedoch müssen ggf. verändert werden. Vor dem Verwenden des kabellosen ASUS
Routers müssen Sie die Grundeinstellungen überprüfen, um zu garantieren, dass er in
Ihrem Umfeld arbeitet. Die Konfiguration des kabellosen ASUS Routers erfolgt durch
einen Webbrowser. Sie benötigen einen Notebook-PC oder Desktop-PC, die an den
kabellosen ASUS Router angeschlossen werden (entweder direkt oder durch einen
Hub) und einen Webbrowser als Konfigurationsterminal. Der Anschluß kann mit oder
ohne Kabel erfolgen. Für den kabellosen Anschluß benötigen Sie ein IEEE 802.11g/b
kompatibles Gerät, z.B. eine im Notebook-PC installierte ASUS WLAN-Karte. Sie sollten
WEP sperren und für Ihr kabelloses LAN-Gerät das SSID auf “default” stellen. Wenn Sie
den kabellosen ASUS Router konfigurieren oder durch den kabellosen ASUS Router
auf das Internet zugreifen möchten, müssen die TCP/IP-Einstellungen korrekt sein.
Normalerweise sollte die TCP/IP-Einstellung auf dem IP-Subnetz des kabellosen ASUS
Routers sein.
Hinweis:
Vor dem Neustart des Computers muss der ASUS Wireless Router
eingeschaltet und sein Status “Bereit” sein.
1) Verbinden des ASUS Wireless Routers (Kabel)
Ein RJ-45-Kabel ist dem kabellosen ASUS Router beigefügt. Die Auto-Crossover-Funktion
ist im kabellosen ASUS Router integriert. Sie können also entweder ein direktes oder ein
Crossover-Ethernet-Kabel benutzen. Stecken Sie ein Ende des Kabels in den WAN Kanal
auf der Rückseite des kabellosen ASUS Routers und das andere Ende in den EthernetKanal Ihres ADSL oder Kabelmodems ein.
Kabellose Verbindung
Hinweis: Falls Sie lieber eine Kabelverbindung benutzen wollen, bitte
ignorieren.
Beziehen Sie sich zum Verbinden mit dem kabellosen ASUS Router auf das
Benutzerhandbuch des kabellosen Adapters. Die Standard-SSID des kabellosen
ASUS Routers ist “default” (Kleinschreibung), die Verschlüsselung ist ausgeschaltet
und eine offene Systemauthentisierung wird verwendet.
3. Wireless Router-Konfiguration
Page 17

15
WL-520g Schnellstarthilfe
Deutsch
2)
Einstellen der IP-Adresse für Kabel- und kabellose
Verbindung
Automatische IP-Einstellung
Der kabellose ASUS Router enthält einen
DHCP-Server, also ist es die einfachste
Methode, Ihren Computer neu zu starten,
um Ihren PC einzustellen und seine IPAdresse automatisch zu beziehen. So erhält
der kabellose ASUS Router die korrekte
IP-Adresse, Gateway und DNS (DomainName Systemserver).
Hinweis: Vor dem Neustart des Computers muss der ASUS Wireless Router
eingeschaltet und sein Status “Bereit” sein.
Manuelle IP-Einstellung
Wenn S i e I h r e I P - A d r esse m a nuell
einstellen möchten, sollten die folgenden
Standardeinstellungen des kabellosen ASUS
Routers bekannt sein:
• IP-Adresse 192.168.1.1
• Subnetz-Maske 255.255.255.0
Wenn Sie Ihre IP-Adresse manuell einstellen,
muss sie in den gleichen Segmenten stehen.
Beispiel:
• IP-Ad resse 192.16 8.1.xxx (xxx kann ein e
beliebige Zahl zwischen 2 und 254 sein, diese Adresse wird von keinen anderen Gerät
benutzt.)
• Subnetz-Maske 255.255.255.0 (die gleiche wie der kabellose ASUS Router)
• Gateway 192.168.1.1 (dies ist der kabellose ASUS Router)
• DNS 192.168.1.1 (die IP-Adresse des ASUS Routers oder Ihre eigene).
Page 18
WL-520g Schnellstarthilfe
16
Deutsch
Nach dem Login sehen Sie die ASUS Wireless Router Homepage. Die Homepage
zeigt direkte Links, um die Hauptfunktionen des Routers zu konfigurieren.
2
1
3
3) Konfiguration des Wireless Routers
Geben Sie die folgende Adresse in Ihren
Webbrowser ein: http://192.168.1.1
Standard
Benutzername:
admin
Passwort:
admin
Wäh len Si e Ihre Ze itzon e, und
klicken Sie
Next (Weiter)
.
4) Schnelleinstellung
Um die Schnelleinstellung zu starten, klicken Sie
Next
(Weiter)
, um zur
Quick Setup
-Seite zu gelangen. Folgen
Sie den Anweisungen, um den ASUS Wireless Router zu
installieren.
Der ASUS Wireless Router WL550gE unterstützt fünf Arten von ISP-Service
— Kabel, ADSL (PPPoE, PPTP, statische IP-Adresse), und Telstra BigPond.
Da jeder Service andere Protokolle und Standards verwendet, werden bei der
Routerinstallation verschiedene Einstellungen vom WL-550gE angefragt. Wählen
Sie die betreffende Verbindungsart und klicken Sie
Next (Weiter)
.
1
Page 19
17
WL-520g Schnellstarthilfe
Deutsch
Kabelverbindung
Falls Sie eine Kabelverbindung verwenden, oder Ihr ISP Ihnen automatisch eine IPAdresse zuweist, wählen Sie bitte
Cable Modem or other connection that gets
IP automatically (Kabelmodem oder andere Verbindung mit automatischer
IP-Adresse)
. Falls Sie einen Kabelservice in Anspruch nehmen, hat Ihnen Ihr ISP
evtl. Hostnamen, MAC-Adresse und Heartbeat-Server zur Verfügung gestellt. In
diesem Fall geben Sie diese Informationen bitten in den jeweiligen Feldern auf der
Einstellungsseite ein. Falls Sie nicht über diese Informationen verfügen, klicken Sie
bitte auf
Next (Weiter)
, um diesen Schritt zu überspringen.
PPPoE
Falls Sie einen PPPoE -Service benutzen, wählen Sie bitten die zweite Option. Sie
werden aufgefordert, die von Ihrem ISP zur Verfügung gestellten Benutzernamen
und Passwort einzugeben.
Page 20

WL-520g Schnellstarthilfe
18
Deutsch
herk036@adsl-comfort
PPTP
Falls Sie einen PPTP-Service verwenden, werden Sie aufgefordert, die von Ihrem
ISP zur Verfügung gestellten Benutzernamen, Passwort und IP-Adresse einzugeben.
Benutzer mit statischer IP-Adresse
Falls Sie ADSL oder eine andere Verbindungsart mit statischen IP-Adressen
verwenden, wählen Sie bitte die vierte Option und geben Sie die von Ihrem ISP zur
Verfügung gestellte IP-Adresse, Subnetz-Maske, und Standardgateway ein. Sie
können spezielle DNS-Server festlegen, oder sich dafür entscheiden, einen DNSServer automatisch zugewiesen zu bekommen.
Nachdem Sie die Verbindungsart festgelegt
haben , mü ss en S ie Ihre k abell os e
Schnittstelle einstellen. Legen Sie zuerst
eine SSID (Service Set Identifier) fest, eine
individuelle Kennung für Datenpakete, die
über ein WLAN verschickt werden. Diese
Kennung emuliert ein Passwort, wenn ein
anderes kabelloses Gerät versucht, mit
dem WLAN zu kommunizieren. Da sich
die SSID von WLAN zu WLAN unterscheiden, müssen Access Points und WirelessGeräte, die sich mit einem WLAN verbinden wollen, dieselbe SSID verwenden.
2
Page 21

19
WL-520g Schnellstarthilfe
Deutsch
Falls Sie Ihr kabelloses Netzwerk mit einer Sicherheitseinstellung schützen wollen, wählen
Sie eine der Sicherheitsstufen (Mittel oder Hoch) im Security Level-Menü; danach müssen
Sie die WEP-Schlüssel in den folgenden Fenstern festlegen.
Medium (Mittel):
Nur Benutzer mit dem gleichen WEP-Schlüssel können sich
mit diesem Access Point verbinden und Daten mit 64bits-oder 128bits-WEPVerschlüsselung übertragen.
High (Hoch):
Nur Benutzer mit dem gleichen WPA Pre-Shared Key (WPAPSK) können sich mit diesem Access Point verbinden und Daten mit TKIPVerschlüsselung übertragen.
Hinweis
:
Auf der ASUS Wireless Router-Konfigurationsseite finden Sie eine praktische
Möglichkeit, WEP-Schlüssel festzulegen: allein durch das Eingeben der Passphrase
erstellt Ihnen das System automatisch vier WEP-Schlüssel-Zeichenfolgen. Benutzer
des ASUS Wireless Adaptor müssen nun nicht mehr lange und komplizierte WEPSchlüssel eingeben, wenn Sie den Router mit dem Wireless Client verbinden wollen.
Die Passphrase allein liefert Ihnen den einfachsten Weg, Ihr kabelloses Netzwerk
einzurichten.
Wenn wir zum Beispiel den WEP-64bits
Verschlüsselungsmodus wählen, und 11111
als Passphrase eingeben, werden die
folgenden WEP-Schlüssel wie im Bild rechts
erstellt. Speichern Sie die Passphrase und
die WEP-Schlüssel in Ihrem Notebook und
klicken Sie
Save (Speichern)
.
Klicken Sie auf
Finish (Beenden)
, um
fortzufahren. Sie werden aufgefordert, die
Einstellungen zu speichern. Klicken Sie
auf
Save & Restart (Speichern & Neu
starten)
, um die ASUS Wireless Router-
Einstellungen zu speichern und zu aktivieren.
Als nächstes stellen wir eine verschlüsselte kabellose Verbindung zwischen Wireless
Router und Wireless Client ein. Wenn Sie den ASUS Wireless Adaptor und das
Hilfsprogramm installiert haben, klicken Sie
Start
->
Programme
->
ASUS Utility
->
WLAN Card
->
One Touch Wizard
, um das Hilfsprogramm beim Client zu öffnen.
3
4
5
Page 22

WL-520g Schnellstarthilfe
20
Deutsch
Wählen Sie
Connect to an existing
wireless LAN (Station) (mit bereits
existierender LAN-Station verbinden)
s obald d a s Willko mm en -Fe ns ter
erscheint, und klicken Sie
Next (Weiter)
.
Der ASUS ONE TOUCH WIZARD sucht
nach verfügbaren Stationen und zeigt
di e Ergebni sse in einer Liste, wie in
der Darstellun g gezeigt. Wählen S ie
WL550gE, und klicken Sie
Next (Weiter)
.
Dann werden Sie nach den Verschlüsselungseinstellungen gefragt. Legen
Sie die Schlüssellänge auf
64 Bits (10
Zeichen)
fest, wie schon im WL-550gE,
wählen Sie dann
Automatic Generation
(Automatische Erzeugung)
, und geben
Sie
11111
in das Passphrase-Feld ein.
Hinweis
:
Der Verschlüsselungsmodus
Ihres Clients muss derselbe wie der des
Routers sein.
War t en Si e eini g e Sek unde n, bis
der Client mit dem Wi re le ss Router
verbunden ist. Ein Fe ns te r mit dem
Verbin dungs-resultat wird angezeigt.
Klicken Sie
Next (Weiter)
.
Der IP-Konfigurationsbildschirm wird
angezeigt. Legen Sie die IP-Adresse des
Clients je nach der Art Ihres Netzwerks
fest. Wenn die Einstellung beendet ist,
klicken Sie
Finish (Beenden)
.
7
8
9
10
6
Page 23

21
WL-520g Schnellstarthilfe
Deutsch
Um andere Einstellungen zu verändern, klicken Sie auf die
jeweiligen Menüelemente und folgen Sie den Anweisungen im
daraufhin erscheinenden Untermenü. Wenn Sie Ihren Cursor
über ein Element bewegen, werden Tipps zur Benu tzung
angezeigt.
Hinweis: Bitte beziehen Sie sich bei der Einstellung Ihres
Wireless Routers auf das Benutzerhandbuch auf der SupportCD.
Benutzer von kabellosen Adaptern anderer
Hersteller können die kabellose Verbindung
zwischen ihrem Computer dem Wireless
Router mit der Windows
®
Zero-Configure-
Funktion herstellen. Rechtsklicken Sie das
Network Neighbou
r
-Symbol auf dem
Desktop Ihres Clients, und klicken Sie dann
auf
Property (Eigenschaften)
. Klicken Sie
im Fenster "Network Connection" doppelt
auf das
Wireless Network Connection
Symbol, und es öffnet sich ein Fenster
mit allen zur Verfügung stehenden Routern. Wählen Sie WL550gE, und klicken Sie
Connect (Verbinden)
.
Der Verbindungsvorgang nimmt einige Sekunden in
Anspruch.
Daraufhin erscheint ein Fenster, das Sie auffordert,
den 10-stelligen Netzwerkschlüssel, den Sie zuvor
auf Ihrem Notebook gespeichert haben, einzugeben.
Kl ic ke n Si e auf
Co nn ec t (Verbinde n)
, um d ie
Verbindung herzustellen.
7
6
5
Page 24

Guida allʼavviamento rapido WL-550gE
22
Italiano
Indice
1. Contenuto della confezione ...................................................23
2. Collegamento del modem ADSL e del Router Wireless ......
24
1) Connessione cavo ................................................................
24
2) Indicatori Stato .....................................................................
24
3. Configurazione del Router Wireless ASUS ...........................25
1) Connessione al Router Wireless ASUS ................................25
2) Impostazione dellʼ indirizzo IP per la connessione Cablata o
Wireless ................................................................................26
3) Configurazione del Router Wireless .....................................
27
4) Impostazione rapida .............................................................
27
Page 25

Guida allʼavviamento rapido WL-550gE
23
Italiano
• 1 router wireless WL-520g
• 1 adattatore di alimentazione
• 1 antenna esterna
• 1 CD utilità
• 1 cavo RJ45
• 1 guida rapida
1. Contenuto della confezione
Info contatto produttore
ASUSTeK COMPUTER INC. (Asia-Pacifico)
Indirizzo società: 15 Li-Te Road, Beitou, Taipei 11259
Generale (tel): +886-2-2894-3447 Indirizzo sito web: www.asus.com.tw
Generale (fax): +886-2-2894-7798 Email: info@asus.com.tw
ASUS COMPUTER INTERNATIONAL (America)
Indirizzo società: 44370 Nobel Drive, Fremont, CA 94538, USA
Generale (fax): +1-510-608-4555 Indirizzo sito web: usa.asus.com
Supporto tecnico
Supporto generico: +1-502-995-0883 Supporto (fax): +1-502-933-8713
Supporto online: http://vip.asus.com/eservice/techserv.aspx
ASUS COMPUTER GmbH (Germania e Austria)
Indirizzo società: Harkort Str. 25, D-40880 Ratingen, Germania
Generale (tel): +49-2102-95990 Indirizzo sito web: www.asuscom.de
Generale (fax): +49-2102-959911 Contatto online: www.asuscom.de/sales
Supporto tecnico
Componenti: +49-2102-95990 Supporto online: www.asuscom.de/support
Notebook: +49-2102-959910 Supporto (fax): +49-2102-959911
Page 26

Guida allʼavviamento rapido WL-550gE
24
Italiano
2. Collegamento del modem ADSL e del Router Wireless
1) Connessione cavo
PWR (Power-Accensione)
Off Sistema spento
On Sistema acceso
Lampeggia Aggiornamento firmware non riuscito
lentamente
Lampeggia EZsetup in elaborazione
velocemente
AIR (Wireless Network)
Off Sistema spento
On Sistema wireless attivo
Lampeggia Trasmissione o ricezione dati in corso (wireless)
WAN (Wide Area Network)
Off Sistema spento o connettori fisici non presenti
On Connessione fisica a Ethernet
Lampeggia Trasmissione o ricezione dati in corso (tramite Ethernet)
LAN 1-4 (Local Area Network)
Off Sistema spento o connettori fisici non presenti
On Connessione fisica a Ethernet
Lampeggia Trasmissione o ricezione dati in corso (tramite Ethernet)
2) Indicatori Stato
Broad Range
125 High Speed Mode
PWR
AIR WAN
LAN
LAN4
LAN3
LAN2
LAN1
WAN
ASUS Wireless Router
Modem
Wall telephone outlet
Wall power outlet
Phone
Power
1
Modem
Wall telephone outlet
Wall power outlet
WAN
Power
Phone
Power
2
Page 27

Guida allʼavviamento rapido WL-550gE
25
Italiano
Il Router Wireless ASUS può essere configurato per essere utilizzato in vari
scenari. Alcune delle impostazioni predefinite di fabbrica possono essere
già adatte per il vostro utilizzo; tuttavia, altre potrebbero richiedere delle
modifiche. Prima di utilizzare il Router Wireless ASUS, dovete verificare
le impostazioni di base per assicurarsi che possa funzionare nel vostro
ambiente. La configurazione del Router Wireless ASUS viene effettuata
tramite un browser web. Eʼ necessario un PC Notebook o desktop connesso
al Router Wireless ASUS (direttamente o tramite un hub) con un web
browser funzionante come terminale per la configurazione. La connessione
può essere di tipo cablata o wireless. Per la configurazione wireless, è
necessario un dispositivo compatibile con IEEE 802.11g/b, e.s. Scheda
WLAN ASUS, installata sul PC Notebook. Si dovrebbe inoltre disabilitare
WEP ed impostare il SSID a “default” sul dispositivo LAN wireless. Se
desiderate configurare il Router Wireless ASUS o desiderate accedere ad
Internet tramite esso, le impostazioni del TCP/IP devono essere corrette.
Normalmente, le impostazioni del TCP/IP devono essere impostate in modo
tale che siano sullʼIP della subnet del Router Wireless ASUS.
Nota:
Prima di riavviare il computer, il Router Wireless ASUS dovrebbe
essere acceso e nello stato pronto.
1)
Connessione al Router Wireless ASUS
Con il Router Wireless ASUS viene fornito un cavo RJ-45. Allʼinterno
del Router Wireless ASUS è implementata la funzione di auto crossover
cosicché è possibile utilizzare indifferentemente un cavo Ethernet diritto
(straight-through) o incrociato (crossover) . Inserire unʼestremità del cavo
nella porta WAN sul retro del Router Wireless ASUS e lʼaltra nella porta
Ethernet del vostro modem ADSL o via Cavo.
3. Configurazione del Router Wireless ASUS
Nota:
1) Prima di iniziare, si raccomanda si usare la connessione cablata
per la configurazione iniziale che evita possibili problemi
provocati dallʼinstabilità della comunicazione senza fili.
2) AS US met te anc he a dis pos izi one un ta sto EZ Set up
(Impostazione facile) per una rapida configurazione wireless. Se
si preferisce usare EZSetup (Impostazione facile) per eseguire
la configurazione della WLAN, fare riferimento al Capitolo 6 del
Manuale dellʼutente WL520g, incluso nel CD di supporto.
Connessione Wireless
Nota: I
gnorare q ueste i struzioni se la conf igurazione è esguita tr amite
connessione cablata.
Far riferimento al manuale utente del vostro adattatore wireless per
collegarlo con il Router Wireless ASUS. Il SSID predefinito del Router
Wireless ASUS è “default” (minuscolo), la codifica è disabilitata e viene
utilizzata lʼautenticazione open system.
Page 28

Guida allʼavviamento rapido WL-550gE
26
Italiano
Impostazione manuale dellʼIP
Se si desidera impostare lʼindirizzo IP
manualmente, è necessario conoscere
le seguenti impostazioni predefinite
del Router Wireless ASUS:
• Indirizzo IP 192.168.1.1
• Subnet Mask 255.255.255.0.
Se s i i mposta lʼin diri zzo IP
del co mput er manu alm ent e, è
necessario che si trovi sullo stesso
segmento. Ad esempio:
• Indirizzo IP 192.168.1.xxx(xxx può
essere qualsiasi numero compreso tra 2 e 254 purchè non utilizzato da
un altro dispositivo)
• Subnet Mask 255.255.255.0 (stesso di Router Wireless ASUS)
• Gateway 192.168.1.1 (Router Wireless ASUS)
• DNS 192.168.1.1 (indirizzo IP Router Wireless ASUS o proprio
indirizzo).
Nota: Prima di riavviare il computer, il Router Wireless ASUS
dovrebbe essere acceso e nello stato pronto.
2) Impostazione dellʼ indiri z z o IP per la
connessione Cablata o Wireless
Ottieni IP Automaticamente
Il Rout er Wir eless ASUS incorpora
un serve r DH CP che è il mo do pi ù
semplice per impostare il PC in modo
tale che possa ottenere il suo indirizzo IP
automaticamente e riavviare il computer.
In questo modo possono essere ottenuti
cor rettamen te dal Ro ute r Wi rel ess
ASUS lʼindirizzo IP, il gateway e il DNS
(Domain Name System Server).
Page 29

Guida allʼavviamento rapido WL-550gE
27
Italiano
4) Impostazione rapida
Per avviare lʼimposta zione r apida, fare clic su
Ne xt ( Ava nt i) p er a cc ed er e al la p ag in a Qu ic k
Setup(Impostazione rapida). Seguire le istruzioni per
impostare il Router Wireless ASUS.
Selezionare il proprio fuso orario o la
zona più vicina. Fare clic su Next (Avanti)
per continuare.
Il router wireless ASUS WL520g supporta cinque tipi di servizi ISP –
via cavo, ADSL (PPPoE, PPTP, indirizzo IP statico) e Telstra BigPond.
Poiché ciascun servizio ha il suo protocollo ed i suoi standard, durante
le procedure dʼimpostazione WL-520g richiede impostazioni diverse.
Selezionare il tipo di connessione corretto e poi fare clic su Next (Avanti)
per continuare.
Predefiniti
Nome utente: admin Password: admin
3) Configurazione del Router Wireless
Inserire il seguente indirizzo nel web
browser: http://192.168.1.1
A registrazione avvenuta, viene visualizzata la home page del Router Wireless
ASUS.
La homepage visualizza colle gamenti rapid i per la configurazione del le
funzionalità principali del router.
1
1
2
3
Page 30

Guida allʼavviamento rapido WL-550gE
28
Italiano
Utenti PPPoE
Se si è un utente PPPoE, selezionare la seconda riga. Sarà richiesto di
inserire il nome utente e la password forniti dal proprio ISP.
Utenti via Cavo
Se si ricevono i servizi via Cavo o altri ISP che assegnano gli indirizzi
IP automaticamente, selezionare Cable Modem or other connection that
gets IP automatically (Modem via cavo o altra connessione che ottiene
lʼindirizzo IP automaticamente). Se si usano i servizi via Cavo, lʼISP
dovrebbe avere fornito i dati relativi a nome host, indirizzo MAC e server
HeartBeat; in questo caso inserire queste informazioni nei relativi campi
della pagina dʼimpostazione; in caso contrario fare clic su Next (Avanti)
per passare alla fase successiva.
Page 31

Guida allʼavviamento rapido WL-550gE
29
Italiano
Utenti PPTP
Se si usano i servizi PPTP, sarà richiesto di inserire il nome utente,
password forniti e lʼindirizzo IP forniti dal proprio ISP.
Utenti IP statico
Se si usa la connessione ADSL o altri tipi di connessione che usano
indirizzi IP statici, selezionare la quarta riga; quindi indirizzo IP, Subnet
mask e Gateway predefinito forniti dal proprio ISP. Si può scegliere
di s pecificare alc un i server DNS, op pu re selezionare d i ot tenere
automaticamente il DNS.
Dopo avere impostato il tipo di connessione, bisogna impostare lʼinterfaccia
wireless. Per prima cosa assegnare un SSID (Service Set Identifier), che
è un identificatore unico allegato ai pacchetti inviati sulla WLAN. Questo
identificatore emula una password quando un dispositivo wireless tenta
di comunicare con la WLAN. Poiché un SSID distingue una WLAN dalle
altre, i punti dʼaccesso ed i dispositivi wireless che tentano di collegarsi
alla WLAN devono usare lo stesso SSID.
herk036@adsl-comfort
2
Page 32

Guida allʼavviamento rapido WL-550gE
30
Italiano
Se si vogliono applicare soluzioni
d i p r ote z io n e a l l a W LA N ,
selezionare un livello appropriato
(medio o alto) nel menu Scurity
Level (Livello di protezione); poi
specificare le chiavi WEP nei capi
che seguono.
Medium (Medio):
solo gli utenti
con la stessa chiave WEP possono collegarsi a questo punto dʼaccesso e
trasmettere dati usando una chiave di codifica WEP 64 bit o 128 bit.
High (Alto):
solo gli utenti con la stessa chiave WPA precondivisa (WPAPSK) possono collegarsi a questo punto dʼaccesso e trasmettere dati
usando una chiave di codifica TKIP.
4
Nota: la pagina di configurazione del router wireless ASUS mette a
disposizione un metodo comodo per impostare le chiavi WEP: con
pochi tocchi sulla tastiera per definire la Passphrase, il sistema
genererà automaticamente quattro stringhe di chiavi WEP. Gli
unenti della scheda wireless ASUS non devono più inserire lunghe
e complicate chiavi WEP quando collegano il router al client
wireless; la Passphrase fornisce un modo semplice per impostare
lʼambiente wireless!
Per esempio: se selezioniamo la
modalità di codifica WEP - 64 bit, ed
inseriamo 11111 come Passphrase,
sa ranno generate le chiav i WEP
mostrate ne llʼillust razione sulla
destra. Registrare la Passphrase e le
chiavi WEP sul Notebook, e poi fare
clic su Save (Salva).
Far e cli c su Fini sh (F ine) per
continuare. Sarà richiesto di salvare
le imp os ta zi on i . Fare cl i c su
Save&Restart (Salva e riavvia) per
salvare le impostazioni nel Router Wireless ASUS ed abilitare le nuove
impostazioni.
Ora bisogna impostare la connessione wireless codificata per router
e client wireless. Se, oltre allʼutilità, è stata installata anche la scheda
wi reless ASUS, fare clic su St art (Start*/Avvio**) -> Progr ames
(Programmi) -> ASUS Utility (Utilità Asus)-> WLAN Card (Scheda
WLAN) -> One Touch Wizard (Procedura guidata One touch***) per
aprire lʼutilità sʼimpostazione della connessione sul lato del client.
5
3
Page 33

Guida allʼavviamento rapido WL-550gE
31
Italiano
6
Quando app are la fi ne str a di
benvenuto, selezionare Connect to
an existing wireless LAN (Station)
(Connetti ad una WLAN (Stazione)
esistente), e poi fare clic su Next
(Avanti).
ASU S ONE TO UCH WIZ ARD
cerca e visualizza tutte le stazioni
d i spo n i bi l i , c ome m ost r a to
n el l ʼillu strazio ne . Selez ionare
WL520g e premere Next (Avanti)
per continuare.
La procedura guidata dʼimpostazione
chiederà dʼimpostare la codifica.
Impostare Key Length (Lunghezza
chiave) su 64 bits (10digits) (64
bit (10 cifre)), come impostato in
precedenza sul router WL-520g; poi
selezionare Automatic Generation
(Generazione automatica) ed inserire
11111 nel campo Passphrase.
Nota:
la modalità di codifica del
client deve essere uguale a quella
del router wireless.
Arren de r e alcu ni s econ di p er
permettere al client di connettersi
al router wireless. Poi apparirà una
schermata che informa sul risultato
della connessione. Premere Next
(Avanti) per continuare.
Quindi si vedrà la schermat a di
configurazione dellʼIP. Impostare
lʼindirizzo IP del client in base alle
condizioni della rete. Al termine
del lʼimpost azi one , fare cl ic su
Finish (Fine).
7
8
9
10
Page 34

Guida allʼavviamento rapido WL-550gE
32
Italiano
Utenti con scheda wireless diversa
da ASUS: impostare la connessione
wire less tra il com pute r ed il
router wireless usando la funzione
Windows® Zero-Configure. fare
clic col tasto destr o su Networ k
Neighbour (Risorse di rete) sul
de sk to p de l cl ie nt e fare clic su
Prope rty (P rop rietà ), po i nell a
fine st r a Netw o rk Con n ecti on
(Connessioni di rete), fare doppio
clic sullʼicona Wireless Network Connection (Connessione WLAN),
apparirà una finestra con tutte le stazioni disponibili. Selezionare
WL550gE e fare clic su Connect (Connetti).
La procedura di connessione impiegherà diversi
secondi.
Poi una finestra chiederà di inserire le chiavi
di rete; inserire la chiave di 10 cifre registrata
pr ec ed en te me nt e su l Notebook e poi fare
clic su Connect (Connetti) per completare la
connessione.
per regolare altre impostazioni, fare clic sulle voci
del menu per mostrare i menu secondari; seguire le
istruzioni per impostare il Router Wireless ASUS. I
suggerimenti sono dati quando si sposta il cursore su
ciascuna voce.
Nota:
fare riferimento al manuale dellʼutente, nel CD di
supporto, per impostare il router wireless.
7
6
5
Page 35

33
Guía de Instalación Rápida para WL-520g
Español
Índice
1. Contenido del paquete ...........................................................34
2. Conectando el Modem ADSL y el Enrutador Inalámbrico ..
35
1) Conexión de los cables .........................................................
35
2) Indicadores de estado .........................................................
35
3. Configurando el Enrutador Inalámbrico ................................
36
1) Conectando en Enrutador Inalámbrico ASUS ......................
36
2) Estableciendo una dirección de IP para conexiones por cable
e inalámbricas ...........................................................................
36
3) Configurando el enrutador inalámbrico .................................
37
4) Configuración rápida .............................................................
38
Page 36

Guía de Instalación Rápida para WL-520g
34
Español
1. Contenido del Paquete
• Enrutador inalámbrico WL-550gE*1
• Adaptador de corriente*1
• Antena externa*1
• CD de utilidades*1
• Cable RJ45*1
• Guía Rápida*1
Información de Contacto del Fabricante
ASUSTeK COMPUTER INC. (Asia-Pacífico)
Dirección: 15 Li-Te Road, Beitou, Taipei 11259
General (tel): +886-2-2894-3447 Página Web: www.asus.com.tw
General (fax):+886-2-2894-7798 Correo electrónico: info@asus.com.tw
ASUS COMPUTER INTERNATIONAL (America)
Dirección: 44370 Nobel Drive, Fremont, CA 94538, USA
General (fax):+1-510-608-4555 Web site address: usa.asus.com
ASUS COMPUTER ESPAÑA
Dirección: C/ Plomo 5-7, 4, Barcelona. ESPAÑA
General (tel): 902 889 688
(Desde España) / +34 934 929 806 (Internacional)
General (fax): +34 949 929 801
Página Web: http://es.asus.com
Page 37

35
Guía de Instalación Rápida para WL-520g
Español
2. Conectando el Modem ADSL y el Enrutador Inalámbrico
LAN4
LAN3
LAN2
LAN1
WAN
Enrutador inalámbrico ASUS
Módem
Toma de teléfono
Toma de corriente alterna
Teléfono
Alimentación
1
Módem
2
Toma de teléfono
Toma de corriente alterna
Alimentación
Alimentación
Teléfono
WAN
1) Conexión de los cables
PWR (Energía)
Apagado No hay energía
Encendido Sistema preparado
Parpadeo lento Fallo en actualización de Firmware
Parpadeo rápido Procesando EZsetup
AIR (Red inalámbrica (WLAN))
Apagado No hay energía
Encendido Sistema inalámbrico listo
Parpadeando Transmitiendo o recibiendo datos (en modo inalámbrico)
WAN (Red de Area Extensa)
Apagado No hay energía / No hay conexión física
Encendido No hay conexión física a Red Ethernet
Parpadeando Transmitiendo o recibiendo datos (con cable Ethernet)
LAN 1-4 (Red de Area Local)
Apagado No hay energía / No hay conexión física
Encendido Hay conexión física a Red Ethernet
Parpadeando Transmitiendo o recibiendo datos (con cable Ethernet)
2) Indicadores de estado
Page 38

Guía de Instalación Rápida para WL-520g
36
Español
Not as:
1) Ant es de comen za r, recomend am os que util ic e la cone xi ón
por ca bl e pa ra una con fig urac ión in icia l y así evi tar po s ibl es
problemas de configuración provocados por la conexión inalámbrica.
2) ASUS también incluye un botón llamado EZSetup para una configuración
inalámbrica rápida. Por favor refiérase al capítulo 6 del manual del usuario de
WL550gE incluido en el CD de soporte si desea utilizar EZSetup para organizar
su configuración de Red inalámbrica (WLAN).
El enrutador inalámbrico ASUS puede ser configurado para ajustarse a diversos
escenarios de utilización. Algunos de los valores por defecto de fábrica podrían
ajustarse a sus necesidades; sin embargo otros deberán ser modificados. Antes de
usar el
enrutador inalámbrico ASUS, deberá comprobar los ajustes básicos para
garantizar que funcionará en su entorno. La configuración del enrutador inalámbrico
ASUS se llava a cabo a través de una interfaz basada en Web. Necesitará un PC
de sobremesa o portátil conectado al enrutador inalámbrico ASUS (directamente o
a través de un hub) y usando un navegador Web como terminal de configuración. La
conexión puede ser cableada o inalámbrica. Para conexiones inalámbricas necesitará un
dispositivo compatible con IEEE 802.11g/b (Ej: Tarjeta de Red inalámbrica (WLAN) ASUS
instalada a un PC Portátil). También necesitará desactivar WEP y establecer SSID en
modo “defecto” para su dispositivo LAN inalámbrico. Si desea configurar el enrutador
inalámbrico ASUS o acceder a Internet a través del enrutador inalámbrico ASUS, los
ajustes de TCP/IP deben ser correctos. Normalmente los ajustes deben ser hechos
desde una IP que esté en la misma red/subred del enrutador inalámbrico ASUS.
Nota:
Antes de reiniciar su ordenador, el enrutador inalámbrico ASUS debe estar
encendido y en modo Preparado.
1) Conectando el Enrutador inalámbrico ASUS
El paquete del enrutador inalámbrico ASUS incluye un cable RJ-45. La función
cruzada automática ha sido integrada en el enrutador inalámbrico ASUS para que
pueda utilizar un cable Ethernet normal o cruzado. Conecte un extremo del cable en
el puerto De Red inalámbrica (WLAN) de la parte trasera del enrutador inalámbrico
ASUS y el otro extremo en el puerto Ethernet de su Modem ADSL o Cable Modem.
Conexión inalámbrica
Nota:
Si la configuración se hace a través de conexión por cable, ignore esta
sección.
Refi
érase al manual del usuario de su adaptador inalámbrico para información
sobre cómo asociarlo con el enrutador inalámbrico ASUS. El SSID por defecto del
enrutador inalámbrico ASUS es "default" (en minúsculas). La encriptación ha sido
desactivada y se utiliza un sistema de autentificación abierta.
2) Estableciendo una dirección
de IP para conexiones por cable
e inalámbricas
Adquisición de IP automática
El Enrutador inal ám br ico ASUS incorpora
un serv ido r DH CP po r lo que el mét odo
mas sencillo para adquirir una IP es ajustar
su PC para qu e obten ga la d irecció n de IP
automáticamente y reiniciar éste. De este modo,
la dirección de IP correcta y el DNS (Servidor
de Nombres de Dominio) pueden ser obtenidos
a través del Enrutador inalámbrico ASUS.
3. Configurando el Enrutador Inalámbrico
Page 39

37
Guía de Instalación Rápida para WL-520g
Español
Nota:
Antes de reiniciar el PC el
Enrutador inalámbrico ASUS deberá estar encendido
y en modo Preparado
.
Estableciendo la IP manualmente
Si desea establecer la dirección de IP de
forma manual, los ajustes por defecto del
Enrutador inalámbrico ASUS deberán ser
tenidos en cuenta
:
• Dirección de IP 192.168.1.1
• Máscara de Subred 255.255.255.0.
Si desea establece r la di rección de IP
manuálmente, necesitará que esté en el
mismo segmento. Por ejemplo:
• Dirección de IP 192.168.1.xxx (xxx puede
ser cualquier número entre 2 y 254 que no
esté en uso por otro dispositivo)
• Máscara de Subred 255.255.255.0 (la misma que la del
Enrutador inalámbrico ASUS
)
• Gateway 192.168.1.1 (este es el
Enrutador inalámbrico ASUS
)
• DNS 192.168.1.1 (la dirección de IP del
Enrutador inalámbrico ASUS o la suya propia
).
3) Configurando el enrutador inalámbrico
Valores por defecto
Usuario:
admin
Contraseña:
admin
Introduzca la siguiente dirección
de IP en el navegador de Internet:
http://192.168.1.1
Tras iniciar la sesión verá la página principal del
enrutador inalámbrico ASUS
. Ésta
página muestra enlaces rápidos para configurar las características principales del
enrutador.
2
3
1
Page 40

Guía de Instalación Rápida para WL-520g
38
Español
4) Configuración rápida
Para iniciar la configuración rápida, haga clic en
Next
(Siguiente)
para acceder a la página de
Quick Setup
.
Siga las instrucciones para configurar el enrutador
inalámbrico ASUS.
Seleccion e la zona horaria o la
región más cercana. Haga clic en
Next (Siguiente)
para continuar.
Nota:
El enrutador inalámbrico ASUS WL550gE soporta cinco tipos de servicios
de ISP— cable, ADSL (PPPoE, PPTP, dirección estática de IP), y Telstra BigPond.
Como cada servicio tiene sus propios métodos y estándares, durante el proceso de
configuración será necesario establecer diferentes ajustes de identidad para el WL550gE. Seleccione el tipo de conexión adecuado y haga clic en
Next (Siguiente)
para continuar.
Usuario de Cable
Si utiliza servicios de IP por Cable u otros ISP que asignen IPs automáticamente, por
favor seleccione
Cable Modem or other connection that gets IP automatically
. Si
utiliza servicios por Cable y su ISP le ha indicado un nombre de host, dirección MAC
y Servidor Heartbeat, por favor rellene las casillas de la página de configuración con
estos datos. Si no es así, haga clic en
Next (Siguiente)
para saltar esta página.
1
Page 41

39
Guía de Instalación Rápida para WL-520g
Español
Usuario PPPoE
Si utiliza servicios PPPoE, por favor seleccione la segunda opción, Necesitará
insertar un nombre de usuario y contraseña que le serán proporcionadas por su ISP.
Usuario PPTP
Si utiliza servicios PPTP, deberá introducir nombre de usuario, contraseña y
dirección de IP proporcionadas por su ISP.
Usuario de IP Estática
Si utiliza ADSL u otro tipo de conexión que utilice direcciones de IP estáticas, por
favor seleccione la cuarta opción. Introduzca la dirección de IP, máscara de Subred,
y Gateway por defecto proporcionados por su ISP. Puede escoger entre especificar
ciertos DNS o tomarlos automáticamente.
herk036@adsl-comfort
Page 42

Guía de Instalación Rápida para WL-520g
40
Español
Tras seleccionar el tipo de conexió n
deberá configurar el interfaz inalámbrico.
En primer lugar, indique un SSID (Service
Set Identifier - Indicador de Ajustes de
Servicio), que es un identificador único
adjunto a paquetes enviados a través de
Redes inalámbricas. Este identificador
emula una contraseña cada vez que un
dispositivo inalámbrico intenta establecer
comunicaciones con la Red inalámbrica (WLAN). Debido a que un SSID puede
distinguir entre diferentes Redes inalámbricas, puntos de acceso y dispositivos
Inalámbricos que deseen contactar a la Red inalámbrica (WLAN) deberán usar el
mismo SSID.
Si desea aplicar seguridad a su Red inalámbrica (WLAN), seleccione el nivel
apropiado (Middle - medio o High - alto) en el menú de los niveles de seguridad
(Security Level menu).
Medium :
Sólo usuarios con la misma clave WEP podrán conectar a este punto de
acceso y transmitir datos usando 64bits o 128bits con clave WEP de encriptación.
High:
Sólo usuarios con la misma clave pre-compartida WPA (WPA-PSK) podrán
conectar a este punto de acceso y transmitir datos usando encriptación TKIP
Nota:
El enrutador inalámbrico ASUS incluye un sencillo sistema para crear claves
WEP: Con un par de pulsaciones de teclado puede definir una frase de control, y
el sistema generará automáticamente cuatro cadenas de caracteres para la clave
WEP. Usuarios de adaptadores Inalámbricos ASUS no necesitarán introducir largos
y complejos claves WEP para conectar el enrutador con el cliente inalámbrico; ¡la
frase de control proporciona una manera fácil de establecer su entorno inalámbrico!
Por eje mplo , si sel e cci ona el m odo de
encriptación WEP-64bits e introduce 11111
como frase de control, las claves WEP serán
generadas como se muestra en la ilustración.
Guarde la frase de control y las claves WEP en
su ordenador y haga clic en
Save
.
Haga clic en
Finish (Finalizar)
para continuar.
Un a pantalla aparecerá p ara pregunt ar si
desea gu ardar lo s ajust es. Haga clic en
Save&Restart
para guardar los ajustes del
en rutador inalá mbrico ASUS y acti var los
nuevos cambios.
El paso siguiente es definir la conexión inalámbrica encriptada para el enrutador y el
cliente inalámbrico. Si tiene instalado un adaptador inalámbrico ASUS y su utilidad,
haga clic en
Inicio
->
Programas
->
ASUS Utility
->
WLAN Card
->
One Touch
Wizard
para lanzar la aplicación de configuración de conexión en el cliente
.
5
3
4
2
Page 43

41
Guía de Instalación Rápida para WL-520g
Español
C uando apa rez ca la ven tan a de
bienvenida, seleccione
Connect to an
existing wireless LAN (Station)
, y
haga clic en
Next (Siguiente)
.
ASUS ONE TOUCH WIZARD buscará
y m ostr ará t odas la s est ac io ne s
disponi bl es como se mues tr a en la
ilustración. Seleccione WL550gE y pulse
Next (Siguiente)
para continuar.
El asistente de configuración solicitara
establecer la información de seguridad,
Se leccione la lon gi tud de la clave a
64 bits (10digits)
tal y como ha sido
definido en el WL-550gE. Seleccione
Automatic Generation
e introduzca
11111
en la casilla "Passphrase" .
Nota:
El modo de encriptación del cliente
debe ser el mismo que el del enrutador
inalámbrico.
Espere unos segundos para conectar el
cliente con el enrutador inalámbrico. Una
pantalla aparecerá indicando el resultado
de la conexión. Pulse
Next (Siguiente)
para continuar.
Finalmente apa recerá la pantalla de
con fi gur aci ón de IP. Es table zca la
dirección de IP del cliente de acuerdo a
las condiciones de su red. Tras terminar
est os ajus tes ha ga cl ic en
Fin ish
(Finalizar)
.
7
8
9
10
6
Page 44

Guía de Instalación Rápida para WL-520g
42
Español
P a ra u su a r i os d e a dap t a dor e s
Inal á mbr ic o s que no se an ASUS ,
es pos ible es tab lece r la co nex i ón
inalámbrica entre el ordenador y el
enrutador c on la funció n Windows®
Zero-Configure. Haga clic con el botón
derecho del ratón en
Mis sitios de red
en el escritorio del cliente. Luego haga
clic en
Propiedades
, y en la ventana de
Conexiones de red, haga doble clic en el
icono de
Conexión de Red inalámbrica
(WLA N)
. Una v enta n a apar e cerá
con todas las estaciones disponibles.
El proceso de conexión tardará algunos segundos.
Finalmente, una ventana aparecerá solicitando las
claves de la red. Introduzca la clave de 10 dígitos
que ha guardado en su ordenador y haga clic en
Conectar
para completar la conexión.
7
6
Para ajustar otros parametros haga clic en los elementos del
menú para revelar submenús. Siga las instrucciones para
ajustar el enrutador inalámbrico ASUS. Si mueve el cursor a
través de los elementos podrá visualizar pistas de ayuda.
Nota:
Por favor refiérase al manual del usuario contenido en el
CD de soporte para ajustar su enrutador inalámbrico.
5
Page 45

43
WL-520g Quick Start Guide
Русский
1. Комплектность .................................................................................. .........44
2. Соединение ADSL модема и маршрутизатора ......................................
45
1) Соединения................................................................................................45
2) Индикаторы ..............................................................................................
45
3. Настройка маршрутизатора ....................................................................... 46
1) Подключение к беспроводному маршрутизатору ASUS ......................
46
2) Установка IP адреса для проводного и беспроводного
подключения .............................................................................................
46
3) Конфигурация беспроводного маршрутизатора ...................................
47
4) Быстрая установка ...................................................................................
48
Содержание
Page 46

WL-520g Quick Start Guide
44
Русский
1. Комплектность
• WL-520g беспроводный маршрутизатор*1
• Адартер питания*1
• Внешняя антенна*1
• CD с драйверами и утилитами*1
• Кабель RJ45*1
• Руководство по быстрой установке*1
Контактная информация изготовителя
ASUSTeK COMPUTER INC. (Азия-Тихоокеания)
Адрес компании:
: 15 Li-Te Road, Beitou, Taipei 11259
Телефон:
+886-2-2894-3447
сайт:
www.asus.com.tw
Факс:
+886-2-2894-7798
email:
info@asus.com.tw
ASUS COMPUTER INTERNATIONAL (Америка)
Адрес компании:
44370 Nobel Drive, Fremont, CA 94538, USA
Факс:
+1-510-608-4555
сайт:
usa.asus.com
Техподдержка
Телефон:
+1-502-995-0883
Факс:
+1-502-933-8713
Онлайн:
http://vip.asus.com/eservice/techserv.aspx
ASUS COMPUTER GmbH (Германия и Австрия)
Адрес компании:
Harkort Str. 25, D-40880 Ratingen, Germany
Телефон:
+49-2102-95990
сайт:
www.asuscom.de
Факс:
+49-2102-959911
Онлайн:
www.asuscom.de/sales
Техподдержка
Компоненты:
+49-2102-95990
Онлайн:
www.asuscom.de/support
Ноутбуки:
+49-2102-959910
Факс:
+49-2102-959911
Page 47

45
WL-520g Quick Start Guide
Русский
2. Соединение ADSL модема и маршрутизатора
ASUS Wireless Router
LAN4
LAN3
LAN2
LAN1
WAN
Modem
Wall telephone outlet
Wall power outlet
Phone
Power
1
Modem
Wall telephone outlet
Wall power outlet
WAN
Power
Phone
Power
2
1) Соединения
PWR (Питание)
Выключен Нет питания
Включен Система готова к работе
Мигает медленно Обновление прошивки прошло неудачно
Мигает быстро Идёт процесс установки
AIR (Беспроводная сеть)
Выключен Нет питания
Включен Готовность беспроводной системы
Мигает Передача данных (посредством Wireless)
WAN (Глобальная сеть)
Выключен Нет питания или физического соединения
Включен Есть соединение с сетью Ethernet
Мигает Передача данных (через кабель Ethernet)
LAN 1-4 (Локальная сеть)
Выключен Нет питания или физического соединения
Включен
Есть соединение с сетью Ethernet
Мигает Передача данных (через кабель Ethernet)
2) Индикаторы
Page 48

WL-520g Quick Start Guide
46
Русский
Примечание: 1) П еред за пу ск ом , для начально й ко нф игурациимаршру ти за то р
а, мы ре ко ме ндуе м ва м ис по ль зо ва ть пров од но е по дк лю че ни е
2) Также имеется кнопка EZSETUP для быстрой настройки беспроводной
сети. Если вы предпочитаете EZSetup, для настройки конф игурации
беспр ово дной сети, пожалуйста обр атитесь к 6 г лав е руководст ва
пользователя WL550gE, на компакт-диске поддержки.
Возможна настройка маршрутизатора на использование в различных ситуациях. Некоторые
из уста новленных по умолчанию значений могу т п одойти для работы, однак о, может
потребоваться модификация других. Перед началом работы с маршрутизатором необходимо
проверить основные параметры для того, чтобы убедиться, что они подойдут для работы
в соответствующей сети. Настройка маршрутизатора выполняется с помощью интернет
брауз ера. Необхо димо подклю чить к м арш рутизато ру портативный или настольный
компьютер (неп осредственно или через сетевой концентрат ор) и запус тить интер нет
браузер. Подключиться к маршрутизатору можно по проводной или беспроводной сети. Для
установки беспроводного соединения потребуется устройство, совместимое с требованиями
стандарта EEE 802.11g/b, например, адаптер беспроводной сети. Кроме того, необходимо
отключить WEP и задать в качестве значения SSID слово “default”. При необходимости
выполнить настройку маршрутизатора или подключиться к Интернет через маршрутизатор,
следует убедиться в правильности параметров протолкола TCP/IP. Как правило, основным
параметром, влияющим на успешность работы, является значение подсети маршрутизатора.
Примечание
: Перед перезагрузкой компьютера необходимо включить маршрутизатор и
дождаться его перехода в состояние готовности.
1) Подключение к беспроводному маршрутизатору ASUS
В комплект поставки маршрутизатора входит один кабель RJ-45. В маршрутизаторе
предусмотрена функция автоматического определения перекрестного кабеля, следовательно,
возможно использование стандартного и перекрестного кабеля Ethernet. Подключите один
разъем кабеля к порту WAN на задней панели маршрутизатора , а другой разъем - к ADSLмодему или модему для выделенных линий.
Беспроводное подключение
Примечание: Если вы используете проводное подключение, игнорируйте это.
Сведение о беспроводном подключении приведены в руководстве пользователя адаптера
для беспроводных сетей. Принятое по умолчанию значение SSID маршрутизатора - “default”
(в нижнем регистре), шифрование отключено, используется аутентификация для открытой
системы.
2 ) У с т а н о в к а I P а д р е с а д л я
пр о в о д н о г о и бе с п р о в о д н о г о
подключения
Автоматическое получение IP адреса
В с ост а в м ар шрут и зат о ра вхо д ит D HCP
сер ве р, ко то ры й об ес пе чи ва ет про стей ши й
сп особ пол учени я IP адреса д ля ком пьюте ра.
Следовательно корректный IP адрес, адрес шлюза,
адрес DN S се рв ера мо гу т бы ть п олуч ен ы от
маршрутизатора.
3. Настройка маршрутизатора
Page 49

47
WL-520g Quick Start Guide
Русский
Примечание: Перед перезагрузкой компьютера необходимо включить маршрутизатор и
дождаться его перехода в состояние готовности.
Установка IP адреса вручную
При нео бх од им ос ти уст ан ов ит ь IP ад ре с
вручную, пользователю необходимо располагать
инф ор ма ци ей о сле ду ющи х уст ано вк ах
маршрутизатора по умолчанию:
• IP адрес 192.168.1.1
• Маска подсети 255.255.255.0.
При задании IP адреса ком пьютера вручную
необходим о, чт обы он ок азался в том же
сегменте. Например:
• IP адре с 192.168.1. xxx (где xxx мож ет
быть лю бым чи слом от 2 до 254, н е
используемым другим устройством)
• Маска подсети 255.255.255.0 (одинаковая с маршрутизатором)
• Шлюз по умолчанию 192.168.1.1 (IP адрес маршрутизатора)
• DNS 192.168.1.1 (IP адрес маршрутизатора или другой).
3) Конфигурация беспроводного маршрутизатора
По умолчанию
Имя пользователя: admin Пароль: admin
Введите следующий адрес в ваш
интернет браузер: http://192.168.1.1
После регистрации вы увидите домашнюю страницу маршрутизатора.
Домашняя страница показывает пункты настройки основных функций маршрутизатора.
2
3
1
Page 50

WL-520g Quick Start Guide
48
Русский
4) Быстрая установка
Для запуска быстрой установки, щелкните Next для перехода
на страницу быстрой установки. Следуйте инструкциям для
установки маршрутизатора ASUS.
Выберите часовой пояс или ближайший
регион. Для продолжения нажмите Next.
Маршрутизатор поддерживает пять типов подключений: кабель, ADSL (PPPoE, PPTP,
статический IP а дре с), и Telstra BigPond. Поск оль ку каждое подключение имее т свои
собственные прото колы и стандарт ы, они потребуются во время установки WL-550gE.
Выберите тип соединения и нажмите Next для продолжения.
Пользователь кабельного подключения
Если вы подключ ае тесь по кабел ю ил и друг ом у подк лю чению, ис по ль зу ющему
автоматическую IP адресацию, пожалуйста выберите Cable Modem or other connection
that gets IP automatically. Если вы пользуетесь кабельным подключением, ваш провайдер
возможно предоставил вам имя узла, MAC адрес, и heartbeat сервер, если да, пожалуйста
заполните поля; если нет, щелкните Next чтобы пропустить этот шаг.
1
Page 51

49
WL-520g Quick Start Guide
Русский
PPPoE пользователь
Если вы используете подключение PPPoE, вам потребуется ввести имя пользователя и пароль,
предоставленные вашим провайдером.
PPTP пользователь
Если вы используете подключение PPTP, вам потребуется ввести имя пользователя, пароль и
IP адрес, предоставленные вашим провайдером.
Пользователь подключения со статическим IP адресом
Если вы используете ADSL или другой тип соединения, использующий статический IP адрес,
пожалуйста выберите четвертую строчку, затем введите IP адрес, маску подсети и шлюз
по умолчанию, предоставленные вашим пр овайдером. Вы можете выбрать ручное или
автоматическое определение DNS серверов.
herk036@adsl-comfort
Page 52

WL-520g Quick Start Guide
50
Русский
По сле установк и ти па по дключения, вы
должн ы уста но вить ва ш бе спро во дный
инт ер фе йс . Сн ач ал а, пр ис во йт е SS ID
(И ден тиф ик атор набора усл уг) , к ото ры й
яв ляется уника льным и денти фик аторо м,
прилагаемый к пакетам, посылаемым через
WLA N. Этот иде нт ифик атор эму ли рует
па роль, к огд а бес прово дное устро йство
пы таетс я связат ься п о WLAN. Поско льку
SSID определяет конкретный WLAN, точка доступа и беспроводные устройства, пытающиеся
подключиться к WLAN должны использовать один и тот же SSID.
Есл и Вы хотите использовать безоп асность для вашей беспроводной сети, выберите
соответствующий уровень (Средний или Высокий)
Средний: только пользователи с одинаковым WEP- ключом подключаются к этой точкой
доступа и передают данные используя 64 иди 128-битный WEP-ключ шифрования.
Высокий: только пользователи с одинаковым WPA предварительно распространяемым
ключом (WPA-PSK) подключаются к этой точке доступа и передают данные, используя TKIP
шифрование.
Примечание: страница конфигурации беспроводного маршрутизатора ASUS имееет удобные
возможности для установки WEP-ключей: нажмите только несколько клавиш на вашей
клавиатуре для определения ключевого слова, система автоматически сгенерирует четыре
строки WEP-ключей. Для пользователей беспроводных адаптеров ASUS, больше не нужно
вводить длинные и сложные WEP-ключи, подключая к маршрутизатору беспроводных
клиентов; Ключевое слово обеспечивает легкую настройку вашей беспроводной сети!
Например, если мы выберем 64-битное
W E P ш ифро в ание и в вед е м 1 111 1
к ак кл ю че в ое сл о во , т огда б уду т
сгенерированы следующие WEP-ключи
ка к п ока зано на изобр аже нии с пра ва.
Запишите ключевое слово, и WEP-ключи
в ваш ноут бу к, за тем щелкни те Sa ve
.
На жмите Finish для п родолжения. Вас
спросят, сохранить ли параметры настройки.
Щелкните Save&Restart, чтобы сохр анить
параме тры настройки маршрутизатора и
включить новые параметры.
Д алее м ы у с тановим ш и ф р о в ан и е д л я с оединени я м а рш р утизато р а и
бес пр ов од но го кл ие нт а. Если вы ус та нови ли ут ил ит у бе сп ро во дн ог о ад ап те ра
A SU S, ще лкн ит е Sta rt -> Pr og ram es -> Ут ил ита ASU S- > Кар та WL AN -> On e
Touch Wi zard дл я запуск а ут илиты ус та новки со ед инения со стор он ы клиент а.
5
3
4
2
Page 53

51
WL-520g Quick Start Guide
Русский
Ког да появится окно выберите Connect to
an existi ng wireless LAN (Station), з ате м
нажмите Next.
A SUS O N E T O UCH W I ZARD и щ ет и
по каз ыва ет все дос туп ные с танции как
показано на картинке. Выберите WL550gE и
нажмите Next для продолжения.
Затем мастер установки попросит установить
шифрование. Установит е д лин у к люча 64
бита (10 цифр) как мы до этого установили в
WL-550gE, затем выберите автоматическую
генерацию и введите ключевое слово 11111.
При меч ан ие : Реж им ши фр ов ан ия на
в аш ем кл иен те до лж ен бы ть дол же н
быть оди нак овым с вашим б есп роводным
маршрутизатором.
Подождите несколько секу нд пока клиент
со еди ня ется с мар шру тиз ат ором. Зат ем
появится экран с информацией о результатах
соединения. Для продолжения нажмите Next.
Затем вы увидите экран конфигурации IP.
Установите IP адрес клиента в соответствии
с се ть ю. По сл е за ве ршения устан ов ки ,
щелкните Finish.
7
8
9
10
6
Page 54

WL-520g Quick Start Guide
52
Русский
П оль зо ват ел и др уги х бес про во дны х
адаптеров могут установить беспроводное
под кл юч ен ие ме жд у ко мп ьют ер ом и
беспроводным маршрутизатором с помощью
функции Windows Zero-Configure. Щелкните
правой кнопкой на сетевом окружени и на
рабочем столе вашего клиента и щелкните
свойства, затем в окне сетевые соединения,
дв ажды щелкн ите з нач ок беспров одное
с оед ин ени е, по яви тся окн о со все ми
дос ту пн ым и AP. Вы бе рит е WL5 50g E и
Процесс подключения займет несколько секунд.
За тем вас поп росят в вес ти сетевы е ключи, введите
10-тизначный ключ, которой вы предварительно записали
в ноутбук , з атем щелкните Connect для завершения
подключения.
7
6
Для настройки других параметров, нажмите элемент в меню, для
показа подменю и следуйте инструкциям по установке беспроводного
маршрутиз атора. Подсказ ки появляются, при нав едении курсора
элемент.
Пр имечание: Для установки беспроводного маршрутизатора
пожалуйста обратитесь к руководству пользователя на CD поддержки.
5
Page 55

53
Guide dʼinstallation rapide WL-520g
Français
1. Contenu de la boîte .................................................................54
2. Connecter un modem ADSL et un routeur sans fil ..............
55
1) Connexion des câbles ..........................................................
55
2)
Témoins d'activité ................................................................55
3. Configurer le routeur sans fil .................................................
56
1) Connexion filaire du routeur sans fil dʼASUS .......................
56
2) Définir lʼadresse IP pour une connexion avec et sans fil ......
56
3) Configurer le routeur sans fil .................................................
57
4) Configuration rapide .............................................................
58
Table des matières
Page 56

Guide dʼinstallation rapide du WL-520g
54
Français
• Routeur sans fil WL-520g*1
• Adaptateur secteur*1
• Antenne extérieure*1
• CD d'utilitaires et de pilotes*1
• Câble RJ45*1
• Guide de démarrage rapide*1
Contacts Constructeur
ASUSTeK COMPUTER INC. (Asie-Pacifique)
Adresse: 15 Li-Te Road, Beitou, Taipei 11259
Général (tel): +886-2-2894-3447 Site Web: www.asus.com.tw
Général (fax):+886-2-2894-7798 Email: info@asus.com.tw
ASUS COMPUTER INTERNATIONAL (Amériques)
Adresse: 44370 Nobel Drive, Fremont, CA 94538, USA
Général (fax):+1-510-608-4555 Site Web: usa.asus.com
Support technique
Support Général: +1-502-995-0883 Support (fax):+1-502-933-8713
Support en ligne: http://vip.asus.com/eservice/techserv.aspx
ASUS COMPUTER GmbH (Allemagne & Autriche)
Adresse: Harkort Str. 25, D-40880 Ratingen, Allemagne
Général (tél): +49-2102-95990 Site Web: www.asuscom.de
Général (fax): +49-2102-959911 Contact en ligne: www.asuscom.de/sales
Support technique
Composants: +49-2102-95990 Support en ligne: www.asuscom.de/support
PC portables: +49-2102-959910 Support (fax): +49-2102-959911
1. Contenu de la boîte
Page 57

55
Guide dʼinstallation rapide WL-520g
Français
PWR (Power)
Eteint Pas dʼalimentation
Allumé Système prêt
Clignotement lent Echec de la mise à jour du firmware
Clignotement rapide EZSetup en cours
AIR (Réseau sans fil)
Eteint Pas dʼalimentation
Allumé Système sans fil prêt
Clignotement Transmission ou réception de données en cours
(via le réseau sans fil)
WAN (Wide Area Network)
Eteint Pas dʼalimentation ou de connexion physique
Allumé Connexion physique à un réseau Ethernet
Clignotement Transmission ou réception de données en cours (via
le câble Ethernet)
LAN 1-4 (Local Area Network)
Eteint Pas d'alimentation ou de connexion physique
Allumé Connexion physique avec un réseau Ethernet
Clignotement Transmission ou réception de données en cours (via
le câble Ethernet)
1) Connexion des câbles
LAN4
LAN3
LAN2
LAN1
WAN
Routeur sansfil ASUS
Modem
Prise téléphoniquemurale
Prise secteurmurale
Tél.
Alim.
1
Modem
Prise téléphoniquemurale
Prise secteurmurale
WAN
Alim.
Alim.
Tél.
2
2) Témoins d'activité
2. Connecter un modem ADSL et un routeur sans fil
Page 58

Guide dʼinstallation rapide du WL-520g
56
Français
Note:
1) Avant de commencer, nous vous recommandons dʼutiliser la connexion
fi laire en tant que con figuration initiale afin dʼéviter les évent uels
problèmes de configuration dus
aux aléas de la connexion sans fil.
2) ASUS propose également un bouton EZSetup pour une configuration sans fil
rapide. Si vous préférez utiliser EZSetup pour mettre en place la configuration
de votre réseau sans fil, veuillez vous référer au Chapitre 6 du manuel de lʼutilisateur
du WL520g, inclus dans le CD de support.
Le routeur sans fil dʼASUS peut être configuré pour répondre à divers scénar
ii dʼutilisation.
Certains paramètres dʼusine peuvent convenir à votre usage; cependant, dʼautres
devront éventuellement être modifiés. Avant dʼutiliser le routeur sans fil dʼASUS, vous
devrez vérifier ses paramètres par défaut pour sʼassurer quʼil fonctionnera sous votre
environnement. La configuration du routeur sans fil dʼASUS se fait à partir dʼun navigateur
Internet. Vous aurez besoin dʼun PC portable ou de bureau, connecté au routeur sans fil
dʼASUS (directement ou au travers dʼun hub), ainsi que dʼun navigateur Internet comme
interface de configuration. La connexion peut être avec ou sans fil. Pour la connexion
sans fil, vous aurez besoin dʼun périphérique compatible IEEE802.11g/b, telle quʼune
carte ASUS WLAN, installée sur votre PC portable. Vous devez également désactivé le
WEP, et définir le SSID de votre périphérique LAN sans fil en “default” (par défaut). Si
vous voulez configurer le routeur sans fil dʼASUS ou accéder à Internet via le routeur,
les paramètres TCP/IP doivent être exacts. Habituellement, les paramètres TCP/IP sont
sur lʼadresse IP sous-réseau du routeur sans fil ASUS.
Note: Avant de redémarrer votre ordinateur, le routeur sans fil ASUS doit
être allumé (position ON) et prêt.
1) Connexion filaire du routeur sans fil d'ASUS
Un câble RJ-45 câble est fourni avec le routeur sans fil. La fonction Auto-crossover est
intégrée au routeur sans fil pour que vous puissiez aussi bien utiliser un câble Ethernet droit
que croisé. Connectez une des extrémités du câble au port WAN à lʼarrière du routeur, et
lʼautre extrémité au port Ethernet de votre modem ADSL ou câble.
Connexion sans fil
Note: Si la configuration se fait à partir dʼune connexion filaire, ignorez ceci.
Référez-vous a
u manuel de lʼadaptateur sans fil accompagnant le routeur sans fil. Le
SSID par défaut du routeur est “default”; le cryptage est désactivé et une authentification en
système ouvert est employée.
2) Définir lʼadresse IP pour une
connexion avec et sans fil
Obtenir une adresse IP automatiquement
Le routeur sans fil ASUS inclut un serveur DHCP,
donc le plus simple est que votre ordinateur obt
ienne
une adresse IP automatiquement par ce biais. Puis,
redémarrez-le. Ainsi, les adresses IP, passerelle,
et DNS correctes peuvent être obtenues à partir du
routeur sans fil dʼASUS.
3. Configurer le routeur sans fil
Page 59

57
Guide dʼinstallation rapide WL-520g
Français
Note: Avant de redémarrer votre ordinateur, le routeur sans fil dʼASUS doit
être allumé (position ON) et prêt
Définir lʼadresse IP manuellement
Si vous souhaitez définir votre adresse IP
manuellement, les réglages par défaut du
routeur sans fil doivent être renseignés (cf. cidessous):
• Adresse IP 192.168.1.1
• Masque de sous-réseau 255.255.255.0.
Si vous dé fi ni ss ez v otre ad re ss e IP
manuellement, celle-ci doit être sur le même
segment IP. Par exemple:
• Ad resse I P 192.168.1. xxx (xx x étant tout
nombre compris entre 2 et 254 et nʼétant pas
utilisé par un autre périphérique)
• Masque de sous-réseau 255.255.255.0 (le même que celui du routeur sans fil)
• Passerelle 192.168.1.1 (ceci étant le routeur sans fil dʼASUS)
• DNS 192.168.1.1 (Adresse IP du routeur sans fil dʼASUS ou celle de votre ordinateur).
Après vous être connecté, vous apercevrez la page d'accueil du routeur sans
fil d'ASUS.La page d'accueil propose des liens rapides afin de configurer les
principales fonctions du routeur.
2
1
3
3) Configurer le routeur sans fil
Entrez l'adresse suivante dans votre
navigateur Internet: http://192.168.1.1
Par défaut
User name:
admin
Password:
admin
Page 60

Guide dʼinstallation rapide du WL-520g
58
Français
Choisissez votre fuseau horaire ou
la zone la plus proche. Cliquez sur
Next
(Suivant)
pour continuer.
4) Configuration rapide
Pour commencer la configuration rapide, cliquez sur
Next
(Suivant)
afin dʼaccéder à la page
Quick Setup
. Suivez
les instructions pour configurer votre routeur sans fil.
Le routeur sans fil WL520g dʼASUS supporte cinq types de connexion— câble,
ADSL (PPPoE, PPTP, adresse IP fixe), et Telstra BigPond. Puisque chaque type
de connexion dispose de ses propres protocoles et standards, le WL-520g vous
demandera plusieurs informations durant le processus de configuration. Choisissez
le bon type de connexion et cliquez sur
Next
(Suivant) pour continuer.
Connexion à un modem câble
Si vous êtes abonné au câble ou à d'autres FAI (Fournisseur d'Accès à Internet)
assignant des adresses IP automatiquement, veuillez sélectionner
Cable Modem
or other connection that gets IP automatically
(Modem câble ou autre connexion
attribuant une adresse IP automatiquement). Si vous êtes abonné au câble,
votre FAI vous a probablement fourni votre nom d'hôte, adresse MAC, et serveur
Heartbeat. Si oui, veuillez remplir les champs de la page d'information; sinon, cliquez
sur
Next
(Suivant) pour ignorer cette étape.
1
Page 61

59
Guide dʼinstallation rapide WL-520g
Français
herk036@adsl-comfort
Connexion PPPoE
Si vous utilisez une connexion PPPoE, veuillez sélectionner la seconde ligne. Il vous
sera demandé de saisir le nom d'utilisateur et le mot de passe fournis par votre FAI.
Connexion PPTP
Si vous utilisez une connexion PPTP, il vous sera demandé de saisir le nom
d'utilisateur, le mot de passe, ainsi que l'adresse IP fournis par votre FAI.
Utilisateur d'adresse IP fixe
Si vous utilisez une connexion ADSL ou tout autre type de connection qui a recours
aux adresses IP fixes, veuillez sélectionner la quatrième ligne, puis saisir l'adresse
IP, le masque de sous-réseau, et la passerelle par défaut fournis par votre FAI. Vous
pouvez aussi choisir de spécifier certains serveurs DNS ou sélectionner
Get DNS
automatically
(Obtenir DNS automatiquement).
Page 62

Guide dʼinstallation rapide du WL-520g
60
Français
Après avoir défini votre type de connexion,
vous allez maintenant établir votre interface
sans fil. Dʼabord, attribuez un SSID (Service
Set Identifier) qui est un identifiant unique
attaché à tous les paquets envoyés par via
les WLAN. Cet identifiant émule un mot de
passe quand un périphérique sans fil tente
de communiquer avec le WLAN. Comme
un SSID distingue un WLAN dʼun autre
,
les points dʼaccès et les périphériques essayant de se connecter au WLAN doivent
utiliser le même SSID.
De plus, si vous souhaitez sécuriser la transmission de données, sélectionnez le
niveau le plus adapté (Medium ou High; Moyen ou Elevé) dans le menu Security
Level.
Medium
(Moyen): Seuls les utilisateurs utilisant la même clé WEP peuvent se
connecter à ce point dʼaccès et transmettre des données grâce à une clé de cryptage
de 64 ou 128 bits.
High
(Haute): Seuls les utilisateurs utilisant la même WPA Pre-Shared Key (WPAPSK) peuvent se connecter à ce point dʼaccès et transmettre des données grâce à
un cryptage TKIP.
Note:
La page de configuration du routeur sans fil propose une approche commode
pour configurer les clés WEP
: en tapant seulement une Passphrase (phrase
secrète), le système va générer automatiquement quatre clés
WEP. Pour les
utilisateurs dʼadaptateurs sans fil ASUS, il nʼest plus nécessaire de saisir des clés
WEP longues et compliquées lors de la connexion du routeur avec le client sans
fil; la phrase secrète offre un moyen facile de mettre en place votre environnement
sans fil !
Pa r ex em ple, si
no us sélectionnons
WEP-64 bis encryption mode, et 11111
com me Pas sphrase, le s cl és WE
P
su ivantes sont alors géné ré es ( vo ir
image c
i-contre). Notez la Passphrase et
les c
lés WEP sur un bout de papier, puis
cli
quez sur
Save
(Sauvegarder).
Cli
quez sur
Finish
(Terminer) pour continuer.
Il vous est demandé de sauvegarder vos
paramètres. Cliquez sur
Save&Restart
(Sauvegarder & Redémarrer
) pour enregistrer
les par
am
ètres vers le routeur sans fil et les
activer.
Ensuite, nous allons configurer la connexion sans fil cryptée entre le routeur sans fil et le
client. Si vous avez installé lʼadaptateur sans fil dʼASUS, ainsi que son utilitaire, cliquez sur
Démarrer
->
Programmes
->
ASUS Utility
->
WLAN Card
->
One Touch Wizard
pour ouvrir
lʼutilitaire de configuration des connexions
.
3
4
5
2
Page 63

61
Guide dʼinstallation rapide WL-520g
Français
Sélectionnez
Connect to an existing
wireless LAN (Station)
(Se connecter à
une station LAN sans fil existante) quand
la fenêtre de bienvenue apparaît, puis
cliquez sur
Next
(Suivant).
ASUS ONE TOUCH WIZARD cherche
et affiche toutes les stations disponibles
co mme le montre l'image ci-contre.
Sélectionnez WL520g et pressez
Next
(Suivant) pour continuer.
L'assistant de configuration s'enquiert
alors de la configuration du cryptage.
Choisissez comme Key Length (Longueur
de Clé)
64 bits (10 chiffres)
comme
déf i ni pré cé dem ment po ur le WL 520g, ensuite sélectionnez
Automatic
Generation
(Génération automatique)
et sai siss ez
11111
dans le cha mp
Passphrase ( Phrase secrète).
Note:
Le mode de cryptage de votre
client doi t être le même que celui du
routeur.
Attendez quelques secondes pour que
le client se connecte au routeur sans
fil. Ensuite, un écran vous informant du
résultat de la connexion va apparaître.
Pressez Next pour continuer.
Puis vous verrez l'écran de configuration
de l'IP. Configurez l'adresse IP
du client
d'après votre environnement réseau. A la
fin de configuration. Cliquez sur
Finish
(Terminer
).
7
8
9
10
6
Page 64

Guide dʼinstallation rapide du WL-520g
62
Français
Pour ajuster dʼautres paramètres, cliquez sur des éléments
du menu pour faire apparaître les sous-menus, et suivez les
instructions pour configurer le routeur sans fil. Des astuces
vous sont données quand vous passez le curseur sur chaque
élément.
Note: Pour configurer votre routeur sans fil, veuillez vous
référer au manuel de lʼutilisateur sur le CD de support
.
Si vous n'utilisez pas l'adaptateur sans fil
d'ASUS, vous pouvez mettre en place la
connexion sans fil entre votre ordinateur
et le routeur sans fil grâce à la fonction
Windows® Zero-Configure. Faites un clic
droit sur
Network Neighbou
r
(Voisinage
réseau) sur le bureau de votre client. Puis
cliquez sur
Property
(Propriétés). Ensuite
dans la fenêtre
Network Connection
(Connexions réseau), double-cliquez sur
l'icône
Wireless Network Connection
(Connexion réseau sans fil). Sélectionnez
WL55 0g E et cl i quez sur
Conn ec t
(Connexion).
La procédure de connexion devrait prendre quelques
secondes.
Puis, une fenêtre vous demandera de saisir les clés
réseau, saisissez la clé à 10 chiffres que vous avez
auparavant noté sur un bout de papier. Ensuite cliquez
sur
Connect
(Connexion
) pour achever la connexion.
7
6
5
Page 65

63
Guide dʼinstallation rapide WL-520g
Français
Page 66

Guide dʼinstallation rapide du WL-520g
64
Français
 Loading...