

Page 1
Page 2
Page 3

1
WL-520g Quick Start Guide
Index
1. Package Contents .....................................................................2
2. Connecting ADSL Modem and Wireless Router ....................3
1) Cable Connection ...................................................................3
2) Status Indicators ....................................................................3
3. Configuring the Wireless Router .............................................4
1) ASUS Wireless Router Wired Connection ..............................4
2) Setting IP address for Wired and Wireless Connection ..........4
3) Configuring the Wireless Router .............................................5
4) Qucik Setup ............................................................................6
Page 4

WL-520g Quick Start Guide
2
1. Package Contents
• WL-520g wireless router*1
• Power adaptor*1
• External antenna*1
• Utility CD*1
• RJ45 cable*1
• Quick Start Guide*1
Manufacturer Contact Information
ASUSTeK COMPUTER INC. (Asia-Pacific)
Company address: 15 Li-Te Road, Beitou, Taipei 11259
General (tel): +886-2-2894-3447 Web site address: www.asus.com.tw
General (fax): +886-2-2894-7798 General email: info@asus.com.tw
ASUS COMPUTER INTERNATIONAL (America)
Company address: 44370 Nobel Drive, Fremont, CA 94538, USA
General (fax): +1-510-608-4555 Web site address: usa.asus.com
Technical support
General support: +1-502-995-0883 Support (fax): +1-502-933-8713
Online support: http://vip.asus.com/eservice/techserv.aspx
ASUS COMPUTER GmbH (Germany & Austria)
Company address: Harkort Str. 25, D-40880 Ratingen, Germany
General (tel): +49-2102-95990 Web site address: www.asuscom.de
General (fax): +49-2102-959911 Online contact: www.asuscom.de/sales
Technical support
Components: +49-2102-95990 Online support: www.asuscom.de/support
Notebook: +49-2102-959910 Support (fax): +49-2102-959911
Page 5
3
WL-520g Quick Start Guide
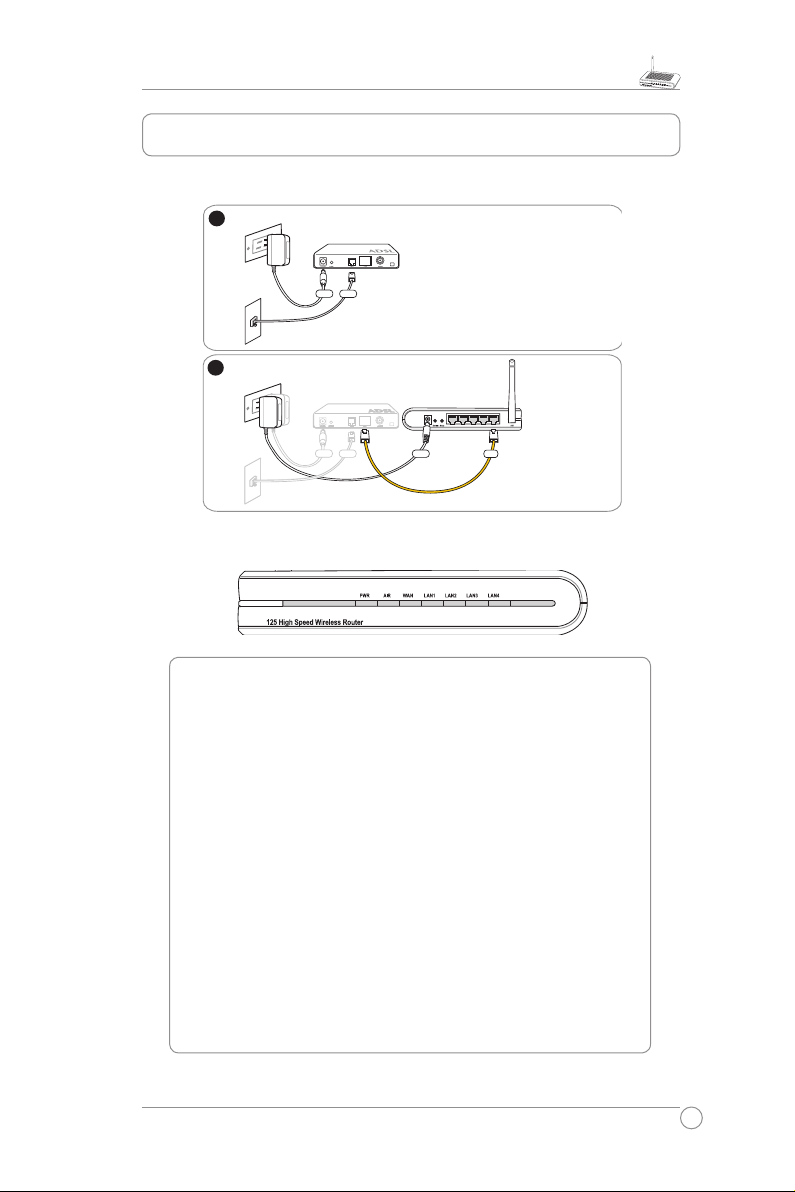
2. Connecting ADSL Modem and Wireless Router
ASUS Wireless Router
LAN4
LAN3
LAN2
LAN1
WA
N
Modem
Wall telephone outlet
Wall power outlet
Phone
Power
1
Modem
Wall telephone outlet
Wall power outlet
WAN
Power
Phone
Power
2
1) Cable Connection
PWR (Power)
Off No power
On System ready
Flashing-slow Firmware upgrade failed
Flashing-quick EZsetup processing
AIR (Wireless Network)
Off No power
On Wireless system ready
Flashing Transmitting or receiving data (wireless)
WAN (Wide Area Network)
Off No power or no physical connection
On Has physical connection to an Ethernet network
Flashing Transmitting or receiving data (through Ethernet wire)
LAN 1-4 (Local Area Network)
Off No power or no physical connection
On Has physical connection to an Ethernet network
Flashing Transmitting or receiving data (through Ethernet wire)
2) Status Indicators
Page 6

WL-520g Quick Start Guide
4
Note:
1) Before you start, we recommend using a wired connection for initial configuration,
which will avoid possible setup problem due to wireless uncertainty.
2) ASUS also provides an EZSetup button for fast wireless configuration. If you
prefer EZSetup to arrange for your wireless network configuration, please refer to
chapter 6 of WL520g userʼs manual included in the support CD.
The ASUS Wireless Router can be configured to meet various usage scenarios. Some
of the factory default settings may suit your usage; however, others may need changing.
Prior to using the ASUS Wireless Router, you must check the basic settings to guarantee
it will work in your environment. Configuring the ASUS Wireless Router is done through a
web browser. You need a Notebook PC or desktop PC connected to the ASUS Wireless
Router (either directly or through a hub) and running a web browser as a configuration
terminal. The connection can be wired or wireless. For the wireless connection, you need
an IEEE 802.11g/b compatible device, e.g. ASUS WLAN Card, installed in your Notebook
PC. You should also disable WEP and set the SSID to “default” for your wireless LAN
device. If you want to configure the ASUS Wireless Router or want to access the Internet
through the ASUS Wireless Router, TCP/IP settings must be correct. Normally, the TCP/
IP setting should be on the IP subnet of the ASUS Wireless Router.
Note: Before rebooting your computer, the ASUS Wireless Router should be
switched ON and in ready state.
1) ASUS Wireless Router Wired Connection
One RJ-45 cable is supplied with the ASUS Wireless Router. Auto crossover function is
designed into the ASUS Wireless Router so you can use either straight-through or crossover
Ethernet cable. Plug one end of the cable into the WAN port on the rear of the ASUS
Wireless Router and the other end into the Ethernet port of your ADSL or Cable modem.
Wireless-Connection
Note: If configuration is done via wired connection, ignore this.
Refer to your wireless adapter userʼs manual on associating with the ASUS Wireless
Router. The default SSID of the ASUS Wireless Router is “default” (lower case),
encryption is disabled and open system authentication is used.
2) Setting IP address for Wired or
Wireless Connection
Get IP Automatically
Th e ASU S Wi re less Router incorpo ra te s a
DHCP server so the easiest method is to set
your PC to get its IP address automatically and
reboot your computer. So the correct IP address,
gateway, DNS (Domain Name System Server)
can be obtained from the ASUS Wireless Router.
3. Configuring the Wireless Router
Page 7

5
WL-520g Quick Start Guide
Note: Before rebooting your PC, the ASUS Wireless Router should be switched
ON and in ready state.
Setting IP Manually
If you want to set your IP address manually,
the following default settings of the ASUS
Wireless Router should be known:
• IP address 192.168.1.1
• Subnet Mask 255.255.255.0.
If you set your computerʼs IP manually, it
needs to be on the s ame segment. For
example:
• IP address 192.168.1.xxx (xxx can be any
number between 2 and 254 that is not used
by another device)
• Subnet Mask 255.255.255.0 (same as the ASUS Wireless Router)
• Gateway 192.168.1.1 (this is the ASUS Wireless Router)
• DNS 192.168.1.1 (ASUS Wireless Router IP address or your own).
3) Configuring the Wireless Router
Defaults
User name:
admin
Password:
admin
Enter the following address in your
web browser: http://192.168.1.1
After logging in, you will see the ASUS Wireless Router home page.
The homepage displays quick links to configurate the main features of the router.
2
3
1
Page 8

WL-520g Quick Start Guide
6
4) Quick Setup
To start quick setup, click
Next
to enter the “Quick Setup”
page. Follow the instructions to setup the ASUS Wireless
Router.
Select your time zone or the closest
region. Click
Next
to continue.
ASUS wireless router WL520g supports five types of ISP services— cable, ADSL
(PPPoE, PPTP, static IP address), and Telstra BigPond. Since each service has its
own protocols and standards, therefore, during the setup process, there are different
identity settings demanded by WL-520g. Select the correct connection type. Click
Next
to continue.
Cable User
If you a re receivi ng service s from cable or other I SP assigning IP addresses
automatically, please select
Cable Modem or other connection that gets IP
automatically
. If you are using cable services, your ISP may have provided you with
hostname, MAC address, and heartbeat server, if true, please fill these information
into the boxes on the setting page; if not, click
Next
to skip this step.
1
Page 9

7
WL-520g Quick Start Guide
PPPoE User
If you are PPPoE service user, pleae select the second line. You would be required
to input the username and password provided by your ISP.
PPTP User
If you are using PPTP services, you would be asked to input the username, password,
as well as IP address provided by your ISP.
Static IP User
If you are using ADSL or other connection type that uses static IP addresses, please
select the fourth line, then input the IP address, subnet mask, and default gateway
provided by your ISP. You could choose to specify certain DNS servers, or select to
get DNS automatically.
herk036@adsl-comfort
Page 10

WL-520g Quick Start Guide
8
After setting the connection type, you are
to set up your wireless interface,. First, give
an SSID (Service Set Identifier), which is a
unique identifier attached to packets sent
over WLANs. This identifier emulates a
password when a wireless device attempts
communication on the WLAN. Because
an SSID distinguishes WLANs from each
other, access points and wireless devices
trying to connect to a WLAN must use the same SSID.
Also, if you want to protect transmitted data, select a middle or high Security Level.
Medium :
only users with the same WEP key are to connect to this access point and
to transmit data using 64bits or 128bits WEP key encryption.
High:
only users with the same WPA pre-shared key are to connect to this access
point and to transmit data using TKIP encryption.
The ASUS wireless router configuration page features a convienient approach to
setup the WEP Keys: with only a few taps on your keyboard to define the Passphrase,
the system will automatically generate four strings of WEP Keys. For ASUS wireless
adaptor users, it is no longer necessary to input long and complicated WEP Keys
when connecting the router with the wireless client; the Passphrase provides an easy
way for setting up your wireless environment!
For example, if we input select WEP64bits encryption mode, input 11111 as
Passphrase, then the following WEP Keys
are generated as shown in the right picture.
Record the Passphrase and the WEP keys
on your notebook, then click Save.
Click
Finish
to continue. You are prompted
to save the settings. Click
Save&Restart
to save the settings to the ASUS Wireless
Router and enable the new settings.
Next we are to setup encrypted wireless connection for wireless router and wireless
client. If you have installed ASUS wireless adaptor as well as the utility, click
Start
->
Programes
->
ASUS Utility
->
WLAN Card
->
One Touch Wizard
to open the
connection setup utility on the client end.
5
3
4
2
Page 11

9
WL-520g Quick Start Guide
Select
Connect to an existing wireless
LAN (Station)
when the welcome
window appears, then click
Next
.
ASUS ONE TOUCH WIZARD searches
and displays all the available stations as
shown in the picture. Select WL520g and
press
Next
to continue.
The setup wizard then asks for
encryption setup. Set Key Length as
64
bits (10digits)
as we have previously
set on WL-520g, then select
Automatic
Generation
and input
11111
into the
Passphrase box.
Note:
The encryption mode on your
client must be the same with that on your
wireless router.
Wait for several seconds to get the client
connected to the wireless router. Then
a screen informing the result of the
connection would appear. Press Next to
continue.
Then you will see the IP configuration
screen. Setup the client IP address
according to your network condition. After
the setup is completed, Click
Finish
.
7
8
9
10
6
Page 12

WL-520g Quick Start Guide
10
For non-ASUS wireless adaptor users, you
can set up the wireless connection between
your computer and the wireles s router
with Windows® Zero-Configure function.
Ri ght click the
Ne twork Neighbour
on the desktop of your client and click
Property
, then in the Network Connection
window, double-click
Wireless Network
Co nn ec ti on
ic on , a wi nd ow with all
available stations appears. Select WL520g
and click
Connect
.
The connection process would take about several
seconds.
Th en a win dow prompt s out as king you to input
the network keys, input the 10-digit key you have
previo usly r ecorded in your notebo ok, th en click
connect to complete connection.
7
6
To adjust other settings, click on items on the menu to reveal a
submenu and follow the instructions to setup the ASUS Wireless
Router. Tips are given when you move your cursor over each item.
Note: To setup your wireless router, please refer to the userʼs
manual in the support CD.
5
Page 13

Page 14

 Loading...