


Quick Start Guide
(JP)
Guide de démarrage rapide (FR) Schnellstartanleitung (GR) Guida rapida (IT)
Краткое руководство (RU)
)ARB( عيرسلا ليغشتلا ليلد
Guia de Início Rápido (BP) Vodič za brzi početak (CR) Rychlý průvodce (CZ)
Beknopte handleiding (DU) Οδηγός γρήγορης εκκίνησης (GK)
Gyors üzembe helyezési útmutató (HUG)
Q16338
Panduan Singkat (ID)
(KR) Przewodnik szybkiego startu (PL) Ghid de pornire rapidă (RO) Guía de inicio rápido (ES)
Kratko uputstvo za početak (SB) Vodič za hitri začetek (SL) Snabbstartshandbok (SW) Hızlı Başlangıç Kılavuzu (TR) Hurtigt i gang aktiviteter (DA)
)HB( הריהמ הלחתהל ךירדמ
Hurtigstartveiledning (NW) Guia de consulta rápida (PG)
Стисле керівництво для початку експлуатації (UA)
Contents |
|
English ........................................................................................................................ |
3 |
........................................................................................................................ |
6 |
........................................................................................................................ |
9 |
...................................................................................................................... |
12 |
Français ...................................................................................................................... |
15 |
Deutsch ...................................................................................................................... |
18 |
Italiano ...................................................................................................................... |
21 |
Русский ...................................................................................................................... |
24 |
عربيةيبرعلا ...................................................................................................................... |
27 |
Português do Brasil......................................................................................................... |
30 |
Hrvatski ...................................................................................................................... |
33 |
Čeština ...................................................................................................................... |
36 |
Nederlands ...................................................................................................................... |
39 |
Ελληνικά ...................................................................................................................... |
42 |
Magyar ...................................................................................................................... |
45 |
Bahasa Indonesia............................................................................................................. |
48 |
...................................................................................................................... |
51 |
Polski ...................................................................................................................... |
54 |
Română ...................................................................................................................... |
57 |
Español ...................................................................................................................... |
60 |
Srpski ...................................................................................................................... |
63 |
Slovenščina ...................................................................................................................... |
66 |
Svenska ...................................................................................................................... |
69 |
Türkçe ...................................................................................................................... |
72 |
Dansk ...................................................................................................................... |
75 |
עברית ...................................................................................................................... |
78 |
Norsk ...................................................................................................................... |
81 |
Português ...................................................................................................................... |
84 |
Українська ...................................................................................................................... |
87 |

Conventions used in this guide
To ensure that you perform certain tasks properly, take note of the following symbols used throughout this manual.
DANGER/WARNING: Information to prevent injury to yourself when trying to complete a task.
NOTE: Tips and additional information to help you complete a task.
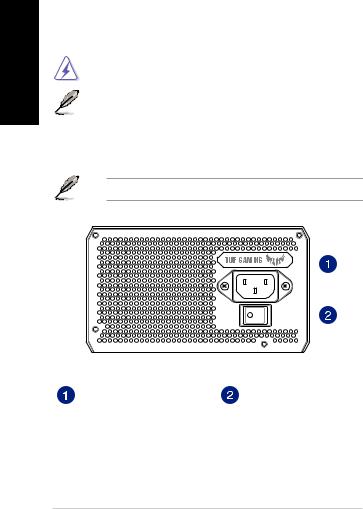
Product overview
The device illustration is for reference only. Actual product specifications may vary with models.
<![endif]>English
|
|
|
|
|
|
|
|
|
|
|
|
|
|
|
|
|
|
|
|
|
|
|
|
|
|
|
|
|
|
|
|
|
|
|
|
|
|
|
|
|
|
|
|
|
|
|
|
|
|
|
|
|
|
|
|
|
|
|
|
|
|
|
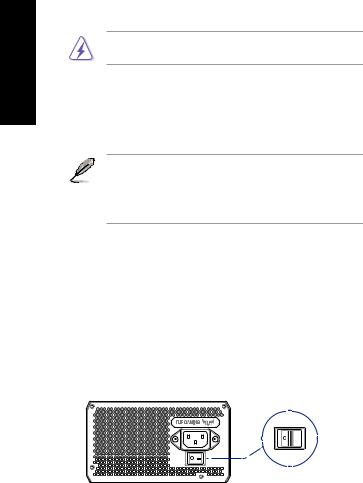
Power connector |
Power switch |
|||||||
TUF GAMING PSU |
3 |

<![endif]>English
Installing your TUF GAMING Power Supply Unit
Before installing or removing cables, ensure that the system is turned off, and all power cables for the system and all attached devices are unplugged.
1.Follow the directions of your chassis manual and secure your TUF GAMING power supply unit into your chassis using the mounting screws.
2.Connect the bundled cables to your TUF GAMING power supply unit.
3.Connect the power connectors to your motherboard and peripheral devices according to your preference. You may refer to the list below to check which devices each power connector can be connected to.
• The power connectors may vary between different models of TUF GAMING power supply units.
•Refer to your motherboard’s user manual for more information on the location and connecting the power connectors mentioned below.
•Connect the 24-pin or 20-pin Main Power Connector to the motherboard’s 24-pin or 20-pin power connector.
•Connect the 4+4 pin CPU +12V Power Connector to the CPU power socket on the motherboard.
•Connect the 4-pin Peripheral Power Connector to peripheral devices if needed.
•Connect the 6+2 pin PCI-E +12V Power Connector to the PCI-E graphics card.
•Connect the SATA Power Connector to devices with a Serial ATA interface.
4.Connect your TUF GAMING power supply unit to a power source using the bundled power cord.
5.Flip the Power Switch to the “I” position to turn on your power supply unit.
|
|
|
|
|
|
|
|
|
|
|
|
|
|
|
4 |
|
|
|
TUF GAMING PSU |

Safety information
• High voltages are present in the power supply unit, it is extremely dangerous to |
|
|||||||||||
|
|
open the power supply case or attempt to repair/clean the power supply unit. You |
<![if ! IE]> <![endif]>English |
|||||||||
|
|
should NEVER, under any circumstances, open the power supply unit. |
||||||||||
|
|
|
||||||||||
• The Warranty will become void if the cover of the power supply unit is opened; there |
|
|||||||||||
|
|
are no serviceable components inside the power supply unit. |
|
|||||||||
• DO NOT insert any objects into the power supply unit. |
|
|||||||||||
• DO NOT place any objects in front of the fan or the ventilation area of the power |
|
|||||||||||
|
|
supply unit that may obstruct or restrict the airflow. |
|
|||||||||
• USE ONLY the modular cables bundled with the power supply unit. |
|
|||||||||||
• DO NOT use the power supply unit near water, or in high temperature or high |
|
|||||||||||
|
|
humidity environments. |
|
|||||||||
• The power supply unit should be operated in suitable environment. |
|
|||||||||||
|
|
(Operating temperature: 0°C to 40°C, Relative Humidity: 5% to 95%) |
|
|||||||||
• The power supply unit is for integration into a computer, and not intended for |
|
|||||||||||
|
|
external or outdoor usage. |
|
|||||||||
• Failure to comply with any manufacturer instructions and any of the safety |
|
|||||||||||
|
|
instructions will immediately void all warranties and guarantees. |
|
|||||||||
Notice labels |
|
|||||||||||
|
|
|
|
|
|
|
|
|
|
|
|
|
|
|
|
|
|
|
|
|
|
|
|
|
|
|
|
|
|
|
|
|
|
|
|
|
|
|
|
|
|
|
|
|
|
|
|
|
|
|
|
|
|
|
|
|
|
|
|
|
|
|
|
|
|
|
|
|
|
|
|
|
|
|
|
|
|
R45625
RoHS
TUF GAMING PSU |
5 |
|
|
|
|
|
|
|
|
|
|
|
|
|
|
|
|
|
|
|
|
|
|
|
|
|
|
|
|
|
|
|
|
|
|
|
|
|
|
|
|
|
|
|
|
|
|
|
|
|
|
|
|
|
|
|
|
|
|
|
|
|
|
|
|
|
|
|
|
|
|
|
|
|
|
|
|
|
|
|||
6 |
TUF GAMING |

TUF GAMING
和連線裝置的電源線。
1.TUF GAMING
2.TUF GAMING
• TUF GAMING
•24-pin 20-pin 24-pin 20-pin
•4+4 pin CPU +12V CPU
•4-pin
•6+2 pin PCI-E +12V PCI-E
•SATA Serial ATA
4.TUF GAMING
5.I
|
|
|
TUF GAMING |
7 |
|

| <![if ! IE]> <![endif]> |
• |
||||||||||||
|
|
|
|||||||||||
| <![if ! IE]> <![endif]> |
• |
||||||||||||
| <![if ! IE]> <![endif]> |
|
|
|
||||||||||
• |
|||||||||||||
| <![if ! IE]> <![endif]> |
|||||||||||||
• |
|||||||||||||
|
|||||||||||||
|
• |
||||||||||||
|
• |
||||||||||||
|
• 0°C - 40°C |
||||||||||||
|
|
|
5% - 95% |
||||||||||
|
• |
||||||||||||
|
• |
||||||||||||
|
|
||||||||||||
|
|
|
|
|
|
|
|
|
|
|
|
|
|
|
|
|
|
|
|
|
|
|
|
|
|
|
|
|
|
|
|
|
|
|
|
|
|
|
|
|
|
|
|
|
|
|
|
|
|
|
|
|
|
|
|
|
|
|
|
|
|
|
|
|
|
|
|
|
|
|
|
|
|
|
|
|
|
|
|
|
|
|
|
R45625
RoHS
8 |
TUF GAMING |

本手冊中出現的標示符號所代表的特殊含意。
|
|
|
|
|
|
|
|
|
|
|
|
|
|
|
|
|
|
|
|
|
|
|
|
|
|
|
|
|
|
|
|
|
|
|
|
|
|
|
|
|
|
|
|
|
|
|
|
|
|
|
|
|
|
|
|
|
|
|
|
|
|
|
|
|
|
|
|
|
|
|
|
|
|
|
|
|
||||
TUF GAMING |
9 |

TUF GAMING
和連接設備的電源線。
1.TUF GAMING
2.TUF GAMING
• TUF GAMING
•
•24-pin 20-pin“ ” 24-pin 20-pin
•4+4 pin“CPU +12V ” CPU
•4-pin“ ”
•6+2 pin“PCI-E +12V ”
•“SATA ” Serial ATA
4.TUF GAMING
5.“ ” “I”
|
|
|
|
10 |
TUF GAMING |
||
• |
<![if ! IE]> <![endif]> |
|||||||||||
|
|
“ ” |
||||||||||
• |
|
|||||||||||
• “ ” |
|
|||||||||||
• “ ” |
|
|||||||||||
• “ ” |
|
|||||||||||
• “ ” |
|
|||||||||||
• 0°C- 40°C 5% |
|
|||||||||||
|
|
- 95% |
|
|||||||||
• |
|
|||||||||||
• |
|
|||||||||||
|
|
|||||||||||
|
|
|
|
|
|
|
|
|
|
|
|
|
|
|
|
|
|
|
|
|
|
|
|
|
|
|
|
|
|
|
|
|
|
|
|
|
|
|
|
|
|
|
|
|
|
|
|
|
|
|
|
|
|
|
|
|
|
|
|
|
|
|
|
|
|
|
|
|
|
|
|
|
|
|
|
|
|
R45625
RoHS
TUF GAMING |
11 |

|
|
|
|
|
|
|
|
|
|
|
|
|
: |
|
|
|
: |
|
|
|
|
|
|
|
|
|
|
|
|
|
|
|
|
|
|
|
|
|
|
|
|
|
|
|
|
|
|
|
|
|
|
|
|
|
|
|
|
|
|
|
|
|
|
|
|
|
|
|
|
|
|
|
|
|
|
|
|
|
|
|
|
||||||
12 |
TUF GAMING PSU |

ことを確認し、必ず電源プラグを電源コンセントから抜いて行なってくだ さい。
ないでください。
• .
•
•20 /24 20 /24
•4 ATX12V/8 EPS12V CPU
•4
•6 /8 PCIExpress
•SATA HDD SSD
|
|
|
|
|
|
|
|
|
|
|
|
|
|
|
TUF GAMING PSU |
13 |
|||

•
や感電の原因となります。
えることがあります。特にストレージドライブ等記憶装置のデータ破壊の恐れがあ ります。
PC
R45625
RoHS
14 |
TUF GAMING PSU |
Conventions utilisées dans ce manuel
Pour être sûr d'effectuer certaines tâches correctement, veuillez prendre note des symboles suivants.
DANGER/AVERTISSEMENT : Ces informations vous permettront d'éviter de vous blesser lors de la réalisation d'une tâche.
REMARQUE : Astuces et informations pratiques pour vous aider à mener une tâche à bien.
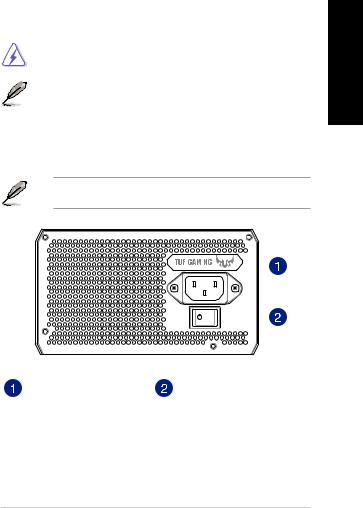
Présentation du produit
Les illustrations de l'appareil sont données à titre indicatif uniquement. Les caractéristiques du produit peuvent varier en fonction du modèle.
<![endif]>Français
|
|
|
|
|
|
|
|
|
|
|
|
|
|
|
|
|
|
|
|
|
|
|
|
|
|
|
|
|
|
|
|
|
|
|
|
|
|
|
|
|
|
|
|
|
|
|
|
|
|
|
|
|
|
|
|
|
|
|
|
|
|
|
|
|
|
|
|
|
|
Connecteur d'alimentation |
Interrupteur d'alimentation |
||||||||
Bloc d'alimentation TUF GAMING |
15 |

<![endif]>Français
Installation de votre bloc d'alimentation TUF GAMING
Avant d'installer ou de retirer des câbles, assurez-vous que le système est hors tension et que tous les câbles d'alimentation de l'ordinateur et de tous les
périphériques sont débranchés.
1.Suivez les instructions du manuel de votre châssis et fixez le bloc d'alimentation TUF GAMING dans le châssis en utilisant les vis de montage.
2.Connectez les câbles fournis à votre bloc d'alimentation TUF GAMING.
3.Reliez les connecteurs d'alimentation à votre carte mère et vos périphériques selon vos préférences. Vous pouvez vous référer à la liste ci-dessous pour vérifier à quel type de périphérique correspond chaque connecteur d'alimentation.
• Les connecteurs d'alimentation peuvent varier en fonction des différents modèles de blocs d'alimentation TUF GAMING.
•Consultez le manuel d'utilisation de votre carte mère pour plus d'informations sur l'emplacement et la façon de connecter les connecteurs d'alimentation mentionnés ci-dessous.
•Connectez le Connecteur d'alimentation principale 24 broches ou 20 broches au connecteur d'alimentation 24 broches ou 20 broches de la carte mère.
•Connectez le Connecteur d'alimentation CPU +12V 4+4 broches à la prise d'alimentation du processeur de la carte mère.
•Connectez le Connecteur d'alimentation périphérique 4 broches aux périphériques, si nécessaire.
•Connectez le Connecteur d'alimentation PCIE +12V 6+2 broches à la carte graphique PCI-E.
•Connectez le Connecteur d'alimentation SATA aux périphériques avec interface SATA.
4.Connectez votre bloc d'alimentation TUF GAMING à une source d'alimentation en utilisant le cordon d'alimentation fourni.
5.Faites basculer l'interrupteur d'alimentation sur la position "I" pour placer le bloc d'alimentation sous tension.
|
|
|
|
|
|
|
|
|
|
|
|
|
|
|
16 |
|
Bloc d'alimentation TUF GAMING |
||
Consignes de sécurité
• De hautes tensions électriques traversent le bloc d'alimentation, il est extrêmement |
<![if ! IE]> <![endif]>Français |
|||||||||||
|
|
dangereux d'ouvrir son boîtier ou de tenter un nettoyage ou une réparation. Vous ne |
||||||||||
|
|
devriez JAMAIS, sous aucun prétexte, ouvrir le bloc d'alimentation. |
||||||||||
|
|
|
||||||||||
• La garantie du produit sera annulée si le couvercle du bloc d'alimentation a été ouvert; |
|
|||||||||||
|
|
il n'y a aucun composant nécessitant un entretien dans le bloc d'alimentation. |
|
|||||||||
• NE PAS insérer d'objet dans le bloc d'alimentation. |
|
|||||||||||
• NE placez PAS d'objets devant le ventilateur ou la zone de ventilation du bloc |
|
|||||||||||
|
|
d'alimentation qui pourraient obstruer ou restreindre la circulation de l'air. |
|
|||||||||
• UTILISEZ UNIQUEMENT les câbles modulaires fournis avec le bloc d'alimentation. |
|
|||||||||||
• N'utilisez PAS le bloc d'alimentation à proximité de l'eau, ou dans un environnement |
|
|||||||||||
|
|
à haute température/humidité. |
|
|||||||||
• L’utilisation du bloc d’alimentation doit se faire dans un environnement adapté. |
|
|||||||||||
|
|
(Température de fonctionnement : 0°C à 40°C, Humidité relative : 5% à 95%) |
|
|||||||||
• Le bloc d'alimentation est destiné à être intégré dans un ordinateur et n'est pas |
|
|||||||||||
|
|
destiné à une utilisation externe ou en extérieur. |
|
|||||||||
• Le non respect des instructions et consignes de sécurité fournies par le fabricant |
|
|||||||||||
|
|
annulera immédiatement toutes les garanties relatives au produit. |
|
|||||||||
Étiquettes d'avertissement |
|
|||||||||||
|
|
|
|
|
|
|
|
|
|
|
|
|
|
|
|
|
|
|
|
|
|
|
|
|
|
|
|
|
|
|
|
|
|
|
|
|
|
|
|
|
|
|
|
|
|
|
|
|
|
|
|
|
|
|
|
|
|
|
|
|
|
|
|
|
|
|
|
|
|
|
|
|
|
|
|
|
|
R45625
RoHS
Bloc d'alimentation TUF GAMING |
17 |
<![endif]>Deutsch
Anmerkungen zu diesem Handbuch
Um sicherzustellen, dass Sie die richtigen Schritte ausführen, beachten Sie die folgenden Symbole, die in diesem Handbuch benutzt werden.
GEFAHR/WARNUNG: Informationen zur Vermeidung von Verletzungen beim Versuch, eine Aufgabe abzuschließen.
HINWEIS: Tipps und zusätzliche Informationen, die Ihnen helfen, die Aufgabe zu vollenden.
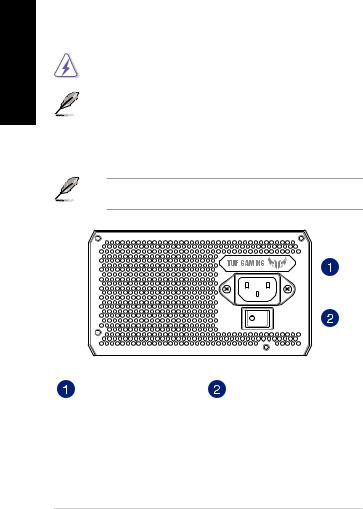
Produktübersicht
Die Geräteabbildung dient nur der Veranschaulichung. Tatsächliche
Produktspezifikationen können je nach Modell variieren.
|
|
|
|
|
|
|
|
|
|
|
|
|
|
|
|
|
|
|
|
|
|
|
|
|
|
|
|
|
|
|
|
|
|
|
|
|
|
|
|
|
|
|
|
|
|
|
|
|
|
|
|
|
|
|
|
|
|
|
|
|
|
|
Netzanschluss |
Netzschalter |
|||||||
18 |
TUF GAMING Netzteil |

Einbau Ihres TUF GAMING Netzteils
Stellen Sie vor dem Installieren oder Entfernen von Kabeln sicher, dass das System ausgeschaltet ist und sämtliche Stromkabel und angeschlossenen Geräte getrennt
wurden.
1.Befolgen Sie die Anweisungen in Ihrem Gehäusehandbuch und befestigen Sie Ihr TUF GAMING Netzteil mit den Montageschrauben in Ihrem Gehäuse.
2.Schließen Sie die mitgelieferten Kabel an Ihr TUF GAMING Netzteil an.
3.Verbinden Sie die Stromanschlüsse nach Ihren Wünschen mit dem Motherboard und Ihren Peripheriegeräten. Sie können in der untenstehenden Liste sehen, mit welchen Geräten die Stromanschlüsse verbunden werden können.
• Die Stromanschlüsse können sich je nach Modell des TUF GAMING Netzteils unterscheiden.
•Weitere Informationen zur Position der Stromanschlüsse und zu den unten erwähnten Verbindungen finden Sie im Benutzerhandbuch Ihres Motherboards.
•Verbinden Sie den 24-poligen oder 20-poligen Hauptstromanschluss mit dem entsprechenden 24-poligen oder 20-poligen Stromanschluss auf dem Motherboard.
•Verbinden Sie den 4+4-poligen CPU +12V Stromanschluss mit dem CPU-Stromsockel auf dem Motherboard.
•Verbinden Sie den 4-poligen Peripheriegerätestromanschluss mit Peripheriegeräten, wenn nötig.
•Verbinden Sie den 6+2-poligen PCI-E +12V Stromanschluss mit der PCI-E-Grafikkarte.
•Verbinden Sie den SATA-Stromanschluss mit Geräten, die über eine Serielle ATASchnittstelle verfügen.
4.Schließen Sie Ihr TUF GAMING Netzteil mit dem mitgelieferten Stromkabel an eine Steckdose an.
5.Kippen Sie den Stromschalter in die Position“I”, um Ihr Netzteil einzuschalten.
<![endif]>Deutsch
|
|
|
|
|
|
|
|
|
|
|
|
|
|
|
TUF GAMING Netzteil |
19 |
|||

Sicherheitsinformationen
| <![if ! IE]> <![endif]>Deutsch |
• Im Netzteil sind hohe Stromspannungen vorhanden. Es ist extrem gefährlich, das |
|
|
Netzteilgehäuse zu öffnen oder zu versuchen, das Netzteil zu reparieren oder zu |
|
|
reinigen. Sie dürfen NIEMALS, egal unter welchen Umständen, das Netzteil öffnen. |
|
|
|
|
|
• Die Garantie erlischt, wenn die Abdeckung des Netzteils geöffnet wurde. Im Inneren |
|
|
|
des Netzteils befinden sich keine wartungsfähigen Komponenten. |
|
• |
Stecken Sie KEINE Gegenstände in das Netzteil. |
• Legen Sie KEINE Gegenstände vor den Lüfter oder in den Belüftungsbereich des Netzteils, da dies die Luftzirkulation behindern oder einschränken kann.
• VERWENDEN SIE NUR die Modulkabel, die mit dem Netzteil geliefert wurden.
• Verwenden Sie das Netzteil NICHT in der Nähe von Wasser, bei hohen Temperaturen oder hoher Luftfeuchtigkeit.
• Das Netzteil sollte in geeigneter Umgebung betrieben werden. (Betriebstemperatur: 0 °C bis 40 °C, relative Luftfeuchtigkeit: 5% bis 95%)
• Das Netzteil ist für den Einbau in einen Computer und nicht für den externen Einsatz oder die Benutzung im Freien vorgesehen.
• Die Nichteinhaltung von Herstelleranweisungen und Sicherheitshinweisen führt sofort zum Erlöschen der Garantie.
Hinweisetiketten
R45625
RoHS
20 |
TUF GAMING Netzteil |
Note e messaggi del manuale
Per assicurarvi di portare a termine le varie operazioni nel modo corretto vi consigliamo di prendere nota dei seguenti simboli che saranno usati in questo manuale.
AVVERTIMENTO/PERICOLO: Messaggio contenente informazioni utili per prevenire lesioni a voi stessi durante il completamento di un'operazione.
NOTA: Suggerimenti e informazioni addizionali per il completamento di un'operazione.
Panoramica del prodotto
Le immagini del dispositivo hanno scopo puramente illustrativo. Le specifiche reali del prodotto potrebbero variare a seconda del modello.
<![endif]>Italiano
|
|
|
|
|
|
|
|
|
|
|
|
|
|
|
|
|
|
|
|
|
|
|
|
|
|
|
|
|
|
|
|
|
|
|
|
|
|
|
|
|
|
|
|
|
|
|
|
|
|
|
|
|
|
|
|
|
|
|
|
|
|
|
|
|
|
|
|
|
|
Connettore di alimentazione |
Interruttore di alimentazione |
||||||||
Alimentatore TUF GAMING |
21 |
<![endif]>Italiano
Installazione dell'alimentatore TUF GAMING
Prima di installare o rimuovere i cavi assicuratevi che il sistema sia spento, e che tutti i cavi di alimentazione di sistema e dispositivi periferici siano scollegati.
1.Seguite le istruzioni presenti sul manuale del vostro case per installare correttamente l'alimentatore TUF GAMING all'interno del case con le viti in dotazione.
2.Collegate i cavi in dotazione all'alimentatore TUF GAMING.
3.Collegate i connettori di alimentazione alla scheda madre e alle periferiche a seconda delle vostre esigenze. Per conoscere le tipologie dei connettori di alimentazione potete fare riferimento all'elenco seguente.
• I connettori di alimentazione potrebbero variare a seconda del modello di alimentatore TUF GAMING.
•Per ulteriori informazioni sulla posizione e sul collegamento dei connettori di alimentazione indicati di seguito fate riferimento al manuale della vostra scheda madre.
•Collegate il Connettore di alimentazione principale a 24 o 20 pin al connettore di alimentazione della scheda madre.
•Collegate il Connettore di alimentazione CPU +12V a 4+4 pin al socket di alimentazione per la CPU sulla scheda madre.
•Collegate il Connettore di alimentazione periferica a 4 pin ai dispositivi periferici se necessario.
•Collegate il Connettore di alimentazione PCI-E +12V alla scheda grafica PCI-E.
•Collegate il Connettore di alimentazione SATA ai dispositivi con interfaccia Serial ATA.
4.Collegate l'alimentatore TUF GAMING ad una presa di corrente tramite il cavo di alimentazione in dotazione.
5.Spostate l'Interruttore di alimentazione nella posizione“I”per accendere l'alimentatore..
|
|
|
|
|
|
|
|
|
|
|
|
|
|
|
22 |
|
Alimentatore TUF GAMING |
||

Informazioni sulla sicurezza
• |
All'interno dell'alimentatore sono presenti tensioni elevate, è estremamente |
|
|
pericoloso aprire l'alimentatore per tentare di ripararlo o pulirlo. Non aprite MAI, in |
<![if ! IE]> <![endif]>Italiano |
|
nessuna circostanza, l'alimentatore. |
|
|
|
|
• |
La garanzia sarà nulla se aprite la cover dell'alimentatore; all'interno dell'alimentatore |
|
|
non ci sono parti riparabili. |
|
• |
NON inserite alcun oggetto all'interno dell'alimentatore. |
|
• |
NON posizionate alcun oggetto di fronte alla ventola, o all'area di ventilazione |
|
|
dell'alimentatore, che potrebbe ostruire o limitare il flusso dell'aria. |
|
• |
USATE SOLAMENTE i cavi modulari forniti in dotazione con l'alimentatore. |
|
• |
NON usate l'alimentatore se nelle vicinanze è presente dell'acqua, o in ambienti ad |
|
|
elevata temperatura o umidità. |
|
• |
L’alimentatore deve essere utilizzato in ambienti con condizioni adeguate. |
|
|
(Temperatura operativa: da 0°C a 40°C, umidità relativa: da 5% a 95%). |
|
• |
L'alimentatore è stato progettato per essere utilizzato all'interno di un computer e non |
|
|
all'esterno o all'aperto. |
|
• |
La mancata osservanza delle istruzioni del produttore e/o delle istruzioni sulla |
|
|
sicurezza annullerà immediatamente tutte le garanzie relative. |
|
Etichette di conformità e avviso
R45625
RoHS
Alimentatore TUF GAMING |
23 |

<![endif]>Русский
Обозначения, используемые в руководстве
В руководстве встречаются выделенные жирным шрифтом примечания и предупреждения, которые следует иметь в виду.
ОПАСНО/ВНИМАНИЕ: Информация о действиях, которые могут привести к бытовым травмам.
ПРИМЕЧАНИЕ: Советы и полезная информация, которая поможет при выполнении задач.
Обзор продукта
Изображения предназначены только для справки. Спецификации продукта может отличаться в зависимости от модели.
|
|
|
|
|
|
|
|
|
|
|
|
|
|
|
|
|
|
|
|
|
|
|
|
|
|
|
|
|
|
|
|
|
|
|
|
|
|
|
|
|
|
|
|
|
|
|
|
|
|
|
|
|
|
|
|
|
|
|
|
|
|
|
Разъем питания |
Кнопка питания |
|||||||
24 |
TUF Gaming PSU |

Установка блока питания
Перед подключением или отключением кабелей, убедитесь, что система выключена и питающие кабели системы и всех подключенных устройств
отключены.
1.Следуйте инструкциям из руководства пользователя корпуса для закрепления блока питания в корпусе с помощью крепежных винтов.
2.Подключите поставляемые в комплекте кабели к блоку питания.
3.Подключите разъемы питания к материнской плате и периферийным устройствам. Список устройств, к которым подключаюся разъемы блока питания приведен ниже.
• Разъемы питания могут отличаться для разных моделей блоков питания.
•Дополнительную информацию о расположении и подключении разъемов питания смотрите в руководстве пользователя материнской платы.
•Подключите 24-контактный или 20-контактный основной разъем питания к 24-контактному или 20-контактному разъему материнской платы.
•Подключите 4+4-контактный разъем разъем питания процессора 12В к разъему питания процессора на материнской плате.
•При необходимости подключите 4-контактный разъем питания периферийных устройств к периферийным устройствам.
•Подключите 6+2-контактный разъем разъем питания PCI-E 12В к видеокарте PCI-E.
•Подключите разъем питания SATA к устройствам с интерфейсом Serial ATA.
4.С помощью поставляемого в комплекте шнура питания подключите блок питания к источнику питания.
5.Переместите тумблер питания в положение "I" для включения блока питания.
<![endif]>Русский
|
|
|
|
|
|
|
|
|
|
|
|
|
|
|
TUF Gaming PSU |
25 |
|||
Информация о правилах безопасности
| <![if ! IE]> <![endif]>Русский |
• В блоке питания присутствует высокое напряжение, крайне опасно открывать |
|||||||||||
|
|
корпус блока питания или пытаться его ремонтировать или чистить. НИКОГДА ни |
||||||||||
|
|
при каких обстоятельствах, не вскрывайте блок питания. |
||||||||||
|
|
|
||||||||||
|
• Гарантия теряет силу, если крышка блока питания открыта; внутри блока питания |
|||||||||||
|
|
|
нет деталей, обслуживаемых пользователем. |
|||||||||
|
• НЕ вставляйте какие-либо предметы в блок питания. |
|||||||||||
|
• НЕ ставьте предметы перед вентилятором или вентиляционными отверстиями, которые |
|||||||||||
|
|
|
могут воспрепятствовать или ограничить поток воздуха. |
|||||||||
|
• ИСПОЛЬЗУЙТЕ ТОЛЬКО кабели, поставляемые в комплекте с блоком питания. |
|||||||||||
|
• НЕ используйте блок питания рядом с водой или в условиях высокой |
|||||||||||
|
|
|
температуры или высокой влажности. |
|||||||||
|
• Блок питания должен работать в соответствующих условиях. |
|||||||||||
|
|
|
Рабочая температура: от 0°C до 40°C, относительная влажность: от 5% до 95%) |
|||||||||
|
• Блок питания предназначен для установки в компьютер и не предназначен для |
|||||||||||
|
|
|
внешнего или вне помещений использования. |
|||||||||
|
• Несоблюдение инструкций производителя или инструкций по технике |
|||||||||||
|
|
|
безопасности аннулирует гарантию. |
|||||||||
|
Значки уведомлений |
|||||||||||
|
|
|
|
|
|
|
|
|
|
|
|
|
|
|
|
|
|
|
|
|
|
|
|
|
|
|
|
|
|
|
|
|
|
|
|
|
|
|
|
|
|
|
|
|
|
|
|
|
|
|
|
|
|
|
|
|
|
|
|
|
|
|
|
|
|
|
|
|
|
|
|
|
|
|
|
|
|
R45625
RoHS
26 |
TUF Gaming PSU |

عربي
<![if ! IE]><![endif]>ةيبرعلا
جتنملا ىلع ةماع ةرظن
.زارطلا بسح ةيقيقحلا جتنملا تافصاوم فلتخت دق .طقف حيضوتلل عجرم يه ةيحيضوتلا روصلا 
|
|
|
|
|
|
|
|
|
|
|
|
|
|
|
|
|
|
|
|
|
|
|
|
|
|
|
|
|
|
|
|
|
|
|
|
|
|
|
|
|
|
|
|
|
|
|
|
|
|
|
|
|
|
|
|
|
|
|
|
|
|
|
ةقاطلا حاتفم |
|
|
|
|
ةقاطلا لصوم |
|||
TUF GAMING PSU |
27 |
 Loading...