

Asus RT-N10E User Manual
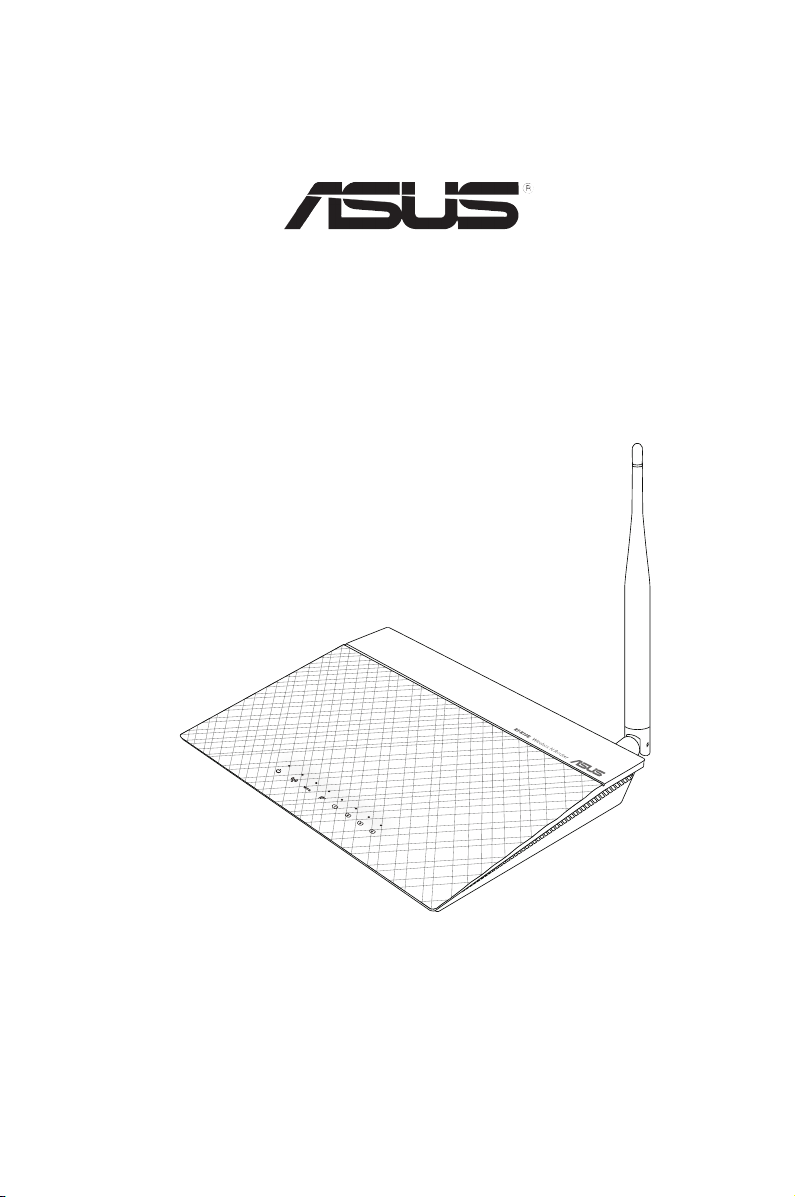
User Manual
RT-N10E EZ N Router

2
Copyright © 2013 ASUSTeK Computer Inc. All Rights Reserved.
No part of this manual, including the products and software described in it, may be
reproduced, transmitted, transcribed, stored in a retrieval system, or translated into any
language in any form or by any means, except documentation kept by the purchaser for
backup purposes, without the express written permission of ASUSTeK Computer Inc.
(“ASUS”).
Product warranty or service will not be extended if: (1) the product is repaired, modied or
altered, unless such repair, modication of alteration is authorized in writing by ASUS; or (2)
the serial number of the product is defaced or missing.
ASUS PROVIDES THIS MANUAL “AS IS” WITHOUT WARRANTY OF ANY KIND, EITHER
EXPRESS OR IMPLIED, INCLUDING BUT NOT LIMITED TO THE IMPLIED WARRANTIES
OR CONDITIONS OF MERCHANTABILITY OR FITNESS FOR A PARTICULAR PURPOSE.
IN NO EVENT SHALL ASUS, ITS DIRECTORS, OFFICERS, EMPLOYEES OR AGENTS BE
LIABLE FOR ANY INDIRECT, SPECIAL, INCIDENTAL, OR CONSEQUENTIAL DAMAGES
(INCLUDING DAMAGES FOR LOSS OF PROFITS, LOSS OF BUSINESS, LOSS OF USE
OR DATA, INTERRUPTION OF BUSINESS AND THE LIKE), EVEN IF ASUS HAS BEEN
ADVISED OF THE POSSIBILITY OF SUCH DAMAGES ARISING FROM ANY DEFECT OR
ERROR IN THIS MANUAL OR PRODUCT.
SPECIFICATIONS AND INFORMATION CONTAINED IN THIS MANUAL ARE FURNISHED
FOR INFORMATIONAL USE ONLY, AND ARE SUBJECT TO CHANGE AT ANY TIME
WITHOUT NOTICE, AND SHOULD NOT BE CONSTRUED AS A COMMITMENT BY
ASUS. ASUS ASSUMES NO RESPONSIBILITY OR LIABILITY FOR ANY ERRORS OR
INACCURACIES THAT MAY APPEAR IN THIS MANUAL, INCLUDING THE PRODUCTS
AND SOFTWARE DESCRIBED IN IT.
Products and corporate names appearing in this manual may or may not be registered
trademarks or copyrights of their respective companies, and are used only for identication or
explanation and to the owners’ benet, without intent to infringe.
Offer to Provide Source Code of Certain Software
This product contains copyrighted software that is licensed under the General Public License
(“GPL”), under the Lesser General Public License Version (“LGPL”) and/or other Free Open
Source Software Licenses. Such software in this product is distributed without any warranty
to the extent permitted by the applicable law. Copies of these licenses are included in this
product.
Where the applicable license entitles you to the source code of such software and/or other
additional data, such data should have been shipped along with this product.
You may also download it for free from http://support.asus.com/download.
The source code is distributed WITHOUT ANY WARRANTY and licensed under the same
license as the corresponding binary/object code.
ASUSTeK is eager to duly provide complete source code as required under various Free
Open Source Software licenses. If however you encounter any problems in obtaining the
full corresponding source code we would be much obliged if you give us a notication to the
email address gpl@asus.com, stating the product and describing the problem (please do
NOT send large attachments such as source code archives etc to this email address).
E8350
First Edition
May 2013

3
Table of contents
About this guide .................................................................................... 4
How this guide is organized .............................................................. 4
Conventions used in this guide ......................................................... 5
Knowing your wireless router
Package contents .................................................................................. 6
System requirements ............................................................................ 6
Before you proceed ............................................................................... 6
Hardware features ................................................................................. 7
Top panel ........................................................................................... 7
Rear panel ......................................................................................... 8
Bottom panel ..................................................................................... 9
Mounting options ................................................................................. 10
Getting started
Setting up the wireless router .............................................................11
Using the Quick Internet Setup (QIS) ..................................................11
Setting up the wireless router in Router mode ................................ 12
Setting up the wireless router in Repeater mode ............................ 14
Setting up the wireless router in AP mode ...................................... 15
Conguring the network clients
Accessing the wireless router ............................................................ 17
Setting an IP address for wired or wireless clients .......................... 17
Conguring via the web GUI
Conguring via the web GUI ............................................................... 21
Using the Network Map ....................................................................... 23
Creating multiple SSID proles ....................................................... 24
Managing bandwidth with EzQoS ...................................................... 25
Upgrading the rmware ...................................................................... 26
Restoring/Saving/Uploading settings ................................................ 27
Installing the utilities

4
Table of contents
About this guide
This user guide contains information that you need to install and congure the
ASUS Wireless Router.
How this guide is organized
This guide contains the following parts:
• Chapter 1: Knowing your wireless router
This chapter provides information on the package contents, system
requirements, hardware features, and LED indicators of the ASUS Wireless
Router.
• Chapter 2: Getting started
This chapter provides instructions on setting up the Router, Repeater and
Access Point modes of the ASUS Wireless Router.
• Chapter 3: Conguring the network clients
This chapter provides instructions on setting up the clients in your network to
work with your ASUS Wireless Router.
Installing the utilities ........................................................................... 28
Device Discovery ................................................................................. 30
Firmware Restoration .......................................................................... 31
WPS Wizard .......................................................................................... 32
Using WPS Wizard .......................................................................... 32
Troubleshooting
Troubleshooting ................................................................................... 38
ASUS DDNS Service ............................................................................ 41
Frequently Asked Questions (FAQs) ............................................... 41
Appendices
Notices .................................................................................................. 43
ASUS Contact Information .................................................................. 51

5
• Chapter 4: Conguring via the web GUI
This chapter provides instructions on conguring the ASUS Wireless Router
using its web graphics user interface (web GUI).
• Chapter 5: Installing the utilities
This chapter provides information on the utilities that are available from
http://support.asus.com.
• Chapter 6: Troubleshooting
This chapter provides you with a troubleshooting guide for solving common
problems you may encounter when using the ASUS Wireless Router.
• Appendices
This chapter provides you with the regulatory Notices and Safety Statements.
Conventions used in this guide
WARNING: Information to prevent injury to yourself when trying to
complete a task.
CAUTION: Information to prevent damage to the components when
trying to complete a task.
IMPORTANT: Instructions that you MUST follow to complete a task.
NOTE: Tips and additional information to aid in completing a task.

6
RT-N10E Chapter 1: Knowing your wireless router
1
Knowing your
wireless router
Package contents
Check the following items in your ASUS Wireless Router package.
RT-N10E Wireless Router x1
Power adapter x1
RJ45 cable x1
Quick Start Guide x1
Note: If any of the items is damaged or missing, contact your retailer.
System requirements
Before installing the ASUS Wireless Router, ensure that your system/network
meets the following requirements:
• An Ethernet RJ-45 port (10Base-T/100Base-TX)
• At least one IEEE 802.11b/g/n device with wireless capability
• An installed TCP/IP and Internet browser
Before you proceed
Take note of the following guidelines before installing the ASUS Wireless Router:
• The length of the Ethernet cable that connects the device to the network (hub,
ADSL/cable modem, router, wall patch) must not exceed 100 meters.
• Place the device on a at and stable surface as far from the ground as
possible.
• Keep the device clear from metal obstructions and away from direct sunlight.
• Keep the device away from transformers, heavy-duty motors, uorescent lights,
microwave ovens, refrigerators, and other industrial equipment to prevent
signal loss.
• Install the device in a central area to provide ideal coverage for all wireless
mobile devices.
• Install the device at least 20cm from a person to insure that the product is
7
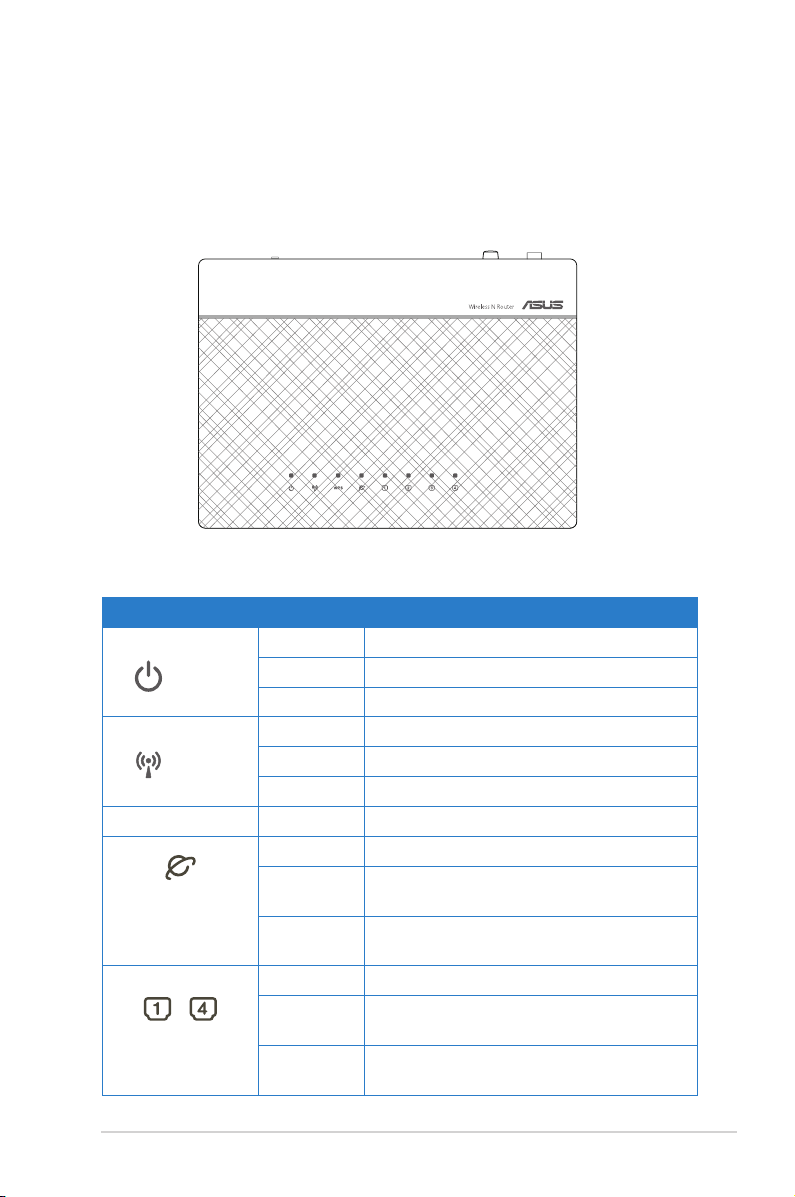
Chapter 1: Knowing your wireless router RT-N10E
Status indicators
LED Status Indication
(Power)
Off No power
On System ready
Flashing Rescue mode
(WLAN)
Off No power
On Wireless system ready
Flashing Transmitting or receiving data (wireless)
WPS Flashing WPS processing
(WAN [Wide Area
Network])
Off No power or no physical connection
On Has physical connection to an Ethernet
network
Flashing Transmitting or receiving data (through
Ethernet cable)
~
(LAN 1-4 [Local
Area Network])
Off No power or no physical connection
On Has physical connection to an Ethernet
network
Flashing Transmitting or receiving data (through
Ethernet cable)
operated in accordance with the RF Guidelines for Human Exposure adopted
by the Federal Communications Commission.
Hardware features
Top panel
RT-N10E
8
RT-N10E Chapter 1: Knowing your wireless router
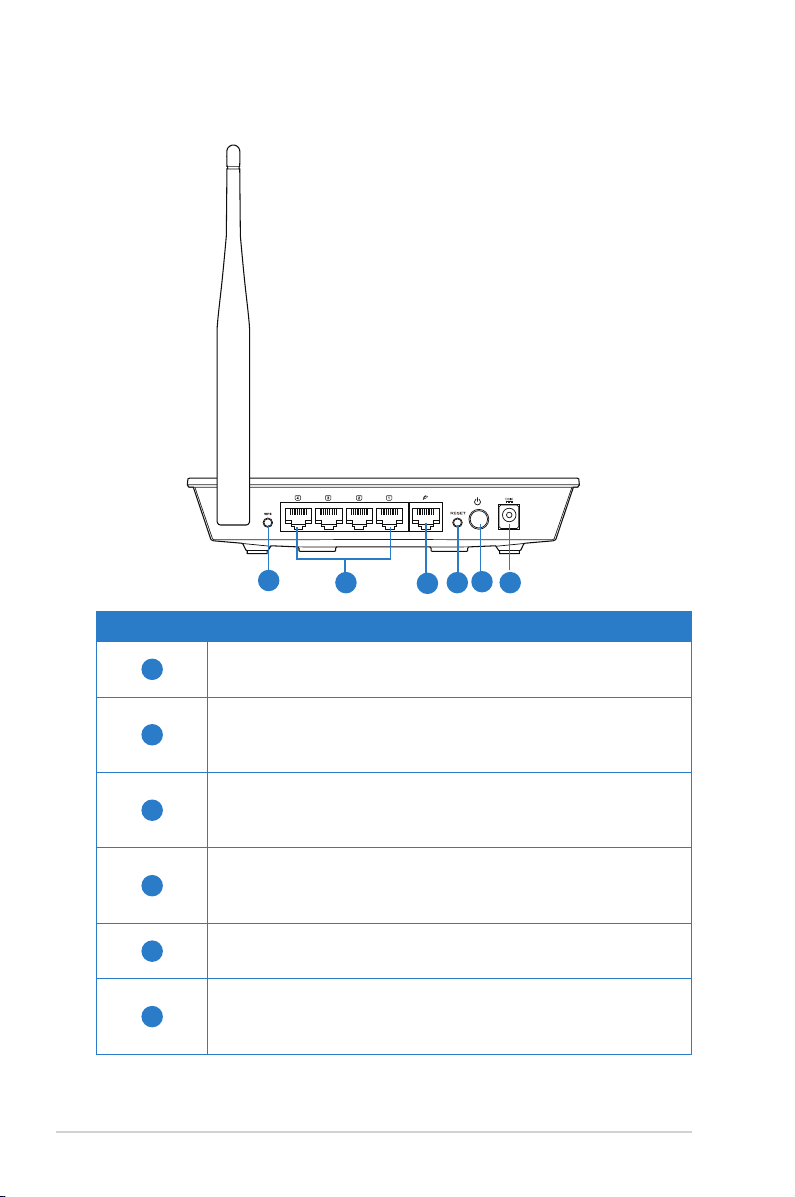
Rear panel
Item Description
1
WPS button
Press this button to establish wireless connection.
2
LAN 1 ~ 4 ports
Connect RJ-45 Ethernet cables to these ports to establish LAN
connection.
3
WAN port
Connect an RJ-45 Ethernet cable to this port to establish WAN
connection.
4
Reset button
Press this button for more than ve seconds to reset the system
to its factory default settings.
5
Power button
Press this button to power on or off the stystem.
6
Power (DC-In) port
Insert the AC adapter into this port to connect your router to a
power source.
1
2
3
4
5
6
9
Chapter 2: Setting up the hardware RT-N10E
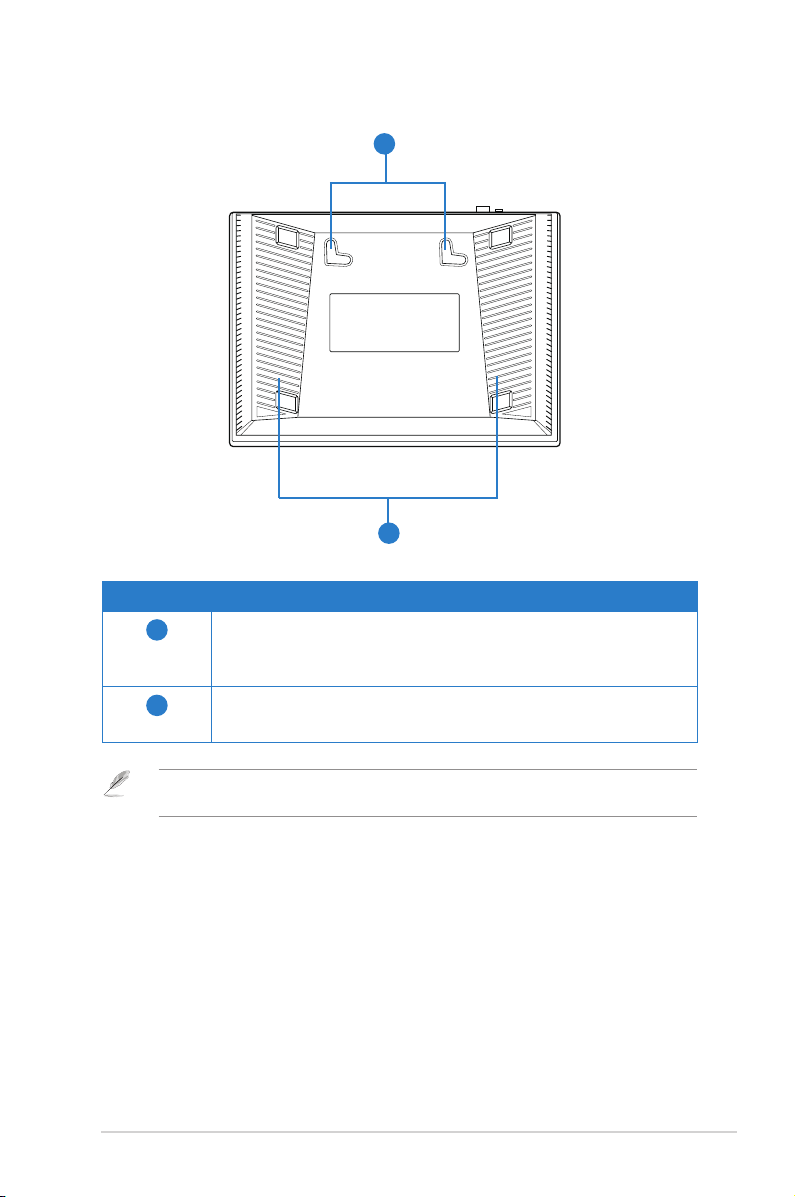
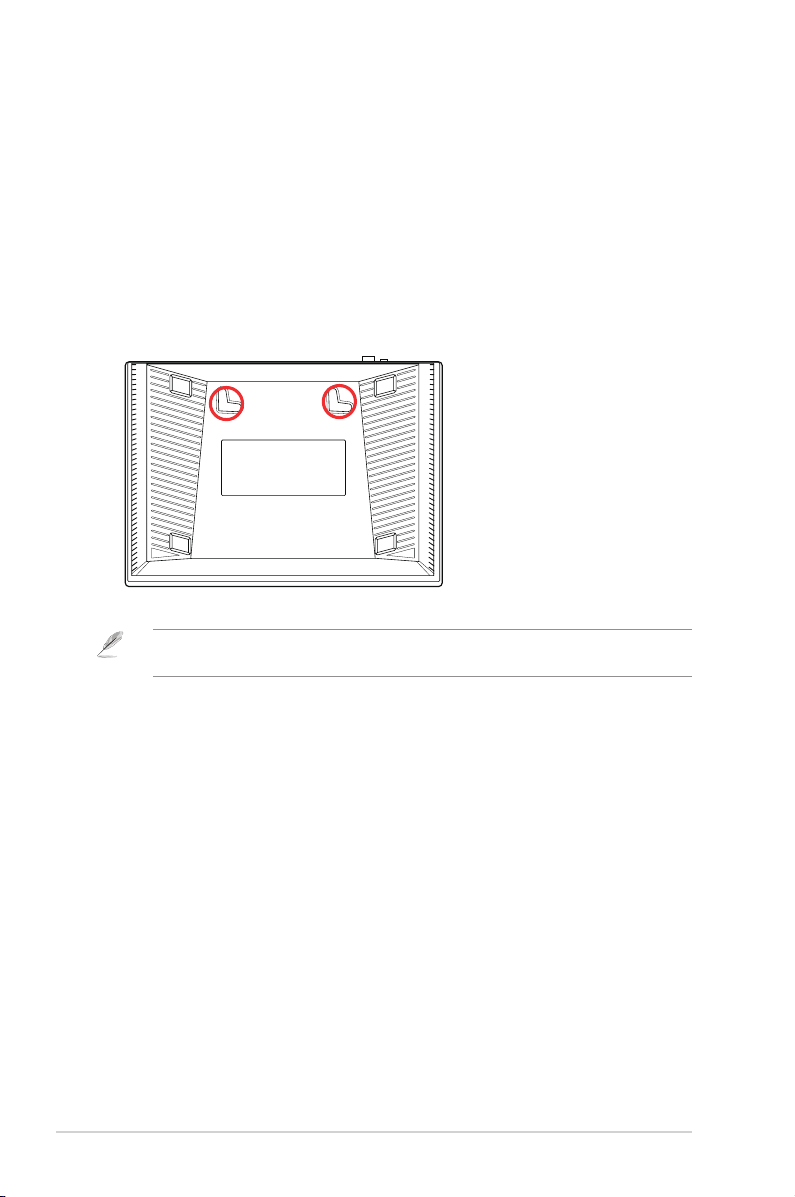
Bottom panel
Item Description
1
Mounting hooks
Use the mounting hooks to mount your router on concrete or
wooden surfaces using two round head screws.
2
Air vents
These vents provide ventilation to your router.
Note: For details on mounting your router on a wall or ceiling, refer to the section Mounting
options on the next page of this user manual.
1
2
10
RT-N10E Chapter 2: Setting up the hardware
Mounting options
Out of the box, the ASUS Wireless Router is designed to sit on a raised at surface
like a le cabinet or book shelf. The unit may also be converted for mounting to a
wall or ceiling.
To mount the ASUS Wireless Router:
1. Look on the underside for the two mounting hooks.
2. Mark two upper holes in a at surface.
3. Tighten two screws until only 1/4'' is showing.
4. Latch the hooks of the ASUS Wireless Router onto the screws.
Note: Re-adjust the screws if you cannot latch the ASUS Wireless Router onto the screws or if
it is too loose.

11
Chapter 2: Setting up the hardware RT-N10E
2
Getting started
Setting up the wireless router
The ASUS Wireless Router includes a web graphics user interface (web GUI)
that allows you to congure the wireless router using your web browser on your
computer.
Note: For details on conguring your wireless router using the web GUI, refer to Chapter 4:
Conguring via the web GUI.
You can set up the wireless router in any of these three operation modes: Router
(IP Sharing), Repeater, and Access Point (AP). Set up these three operation
modes via the Quick Internet Setup (QIS).
Using the Quick Internet Setup (QIS)
The Quick Internet Setup (QIS) function, which is integrated in the wireless router’s
web GUI, detects the Internet connection type automatically and guides you in
setting up your network quickly.
The QIS web page appears automatically after you connected all your devices and
launched your web browser. You may also launch the QIS from the Network Map
page in the web GUI. To do this, click Go in the QIS eld under Internet status.
12
RT-N10E Chapter 2: Setting up the hardware
2. Launch your web browser and the QIS web page appears automatically. Select
Wireless Router mode, then click Save.
Note: If the QIS web page does not appear after you launched your web browser, disable the
proxy settings on your web browser.
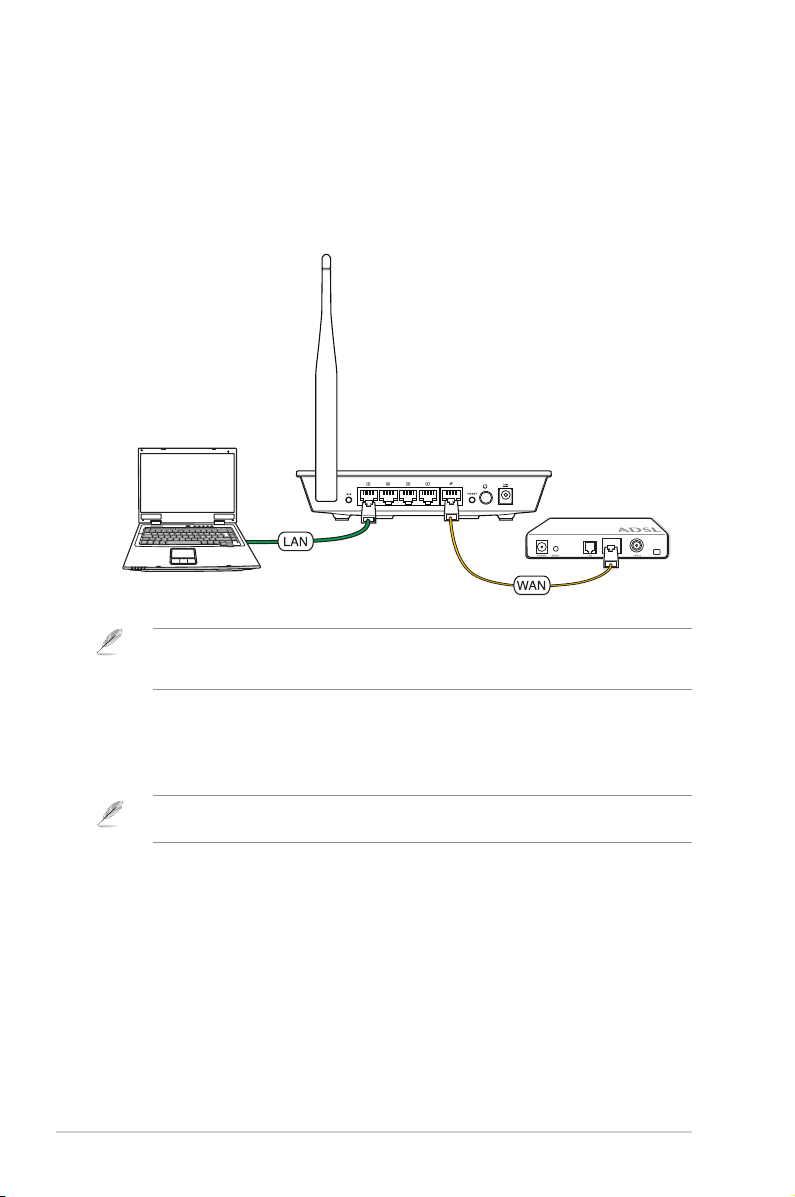
Setting up the wireless router in Router mode
In the Router mode, the wireless router connects to the Internet via PPPoE,
Automatic IP, PPTP, L2TP, or Static IP, and provides you with wireless radio
signals. The NAT, rewall, and IP sharing services for LAN clients are enabled.
To set up the wireless router in Router mode:
1. Connect your devices.
RT-N10E
Modem
Note: We recommend that you use an Ethernet cable (wired connection) to connect your
computer to the wireless router for initial conguration to avoid possible setup problems due to
wireless uncertainty.

13
Chapter 2: Setting up the hardware RT-N10E
Note:
• The PPPoE Internet connection type is used in this setup case. The setup screen varies with
different Internet connection types.
• Obtain the required information such as the user name and password from your Internet
Service Provider (ISP).
Then the QIS starts to detect your Internet connection type.
3. Key in the user name and password. Click Apply all settings.
4. The Internet connection setup is completed.
• Click Going to Internet to surf the Internet.
• Click Advanced Setting page to manually congure advanced settings
including the SSID, authentication, and encryption methods for the wireless
router.
• Click Add to Favorites to add this URL to your Favorites list for quick access
to the web GUI.
14
RT-N10E Chapter 2: Setting up the hardware
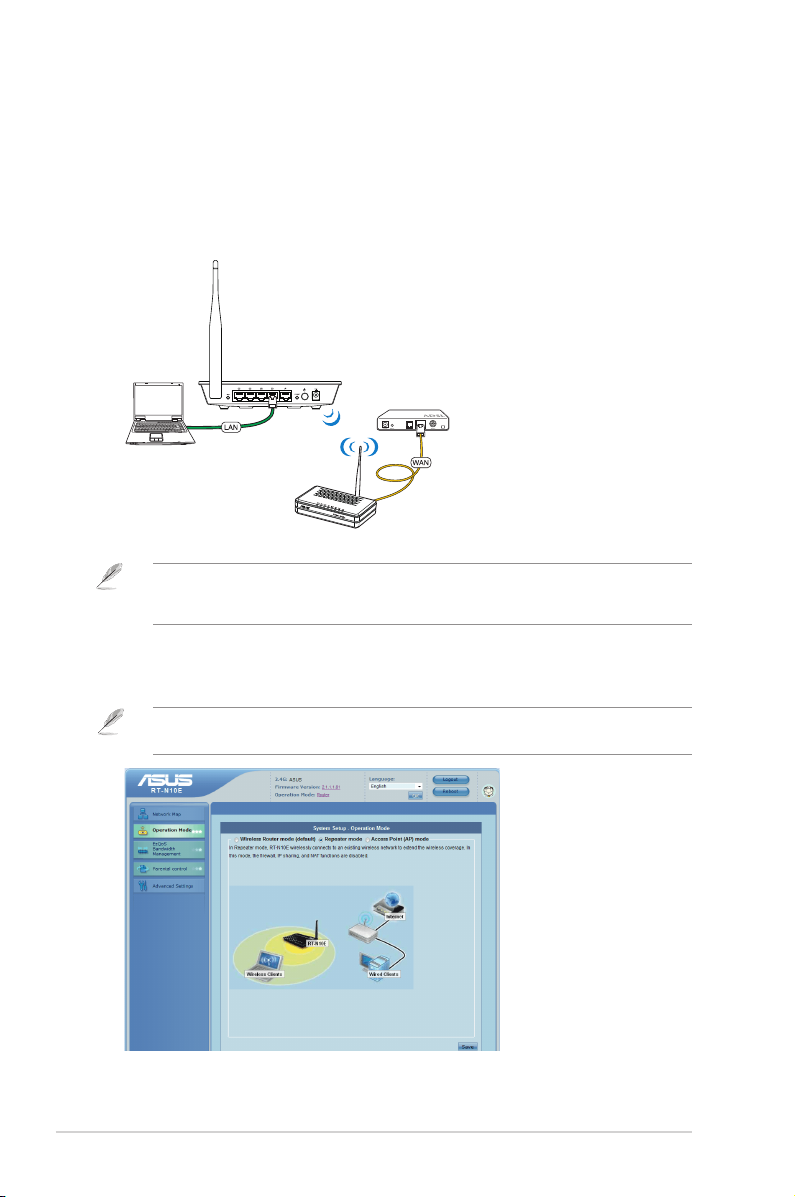
Setting up the wireless router in Repeater mode
In the Repeater mode, the wireless router extends your wireless network coverage
and provides you with higher quality wireless radio signals. The NAT, rewall, and
IP sharing services are disabled.
To set up the wireless router in Repeater mode:
1. Connect your devices.
2. Launch your web browser and the QIS web page appears automatically. Select
Repeater mode, then click Save.
Note: If the QIS web page does not appear after you launched your web browser, disable the
proxy settings on your web browser.
RT-N10E
Client
Modem
Wireless Router
Note: We recommend that you use an Ethernet cable (wired connection) to connect your
computer to the wireless router for initial conguration to avoid possible setup problems due to
wireless uncertainty.
3. Select the AP whose wireless signal you want to extend, then click Connect.
15
Chapter 2: Setting up the hardware RT-N10E
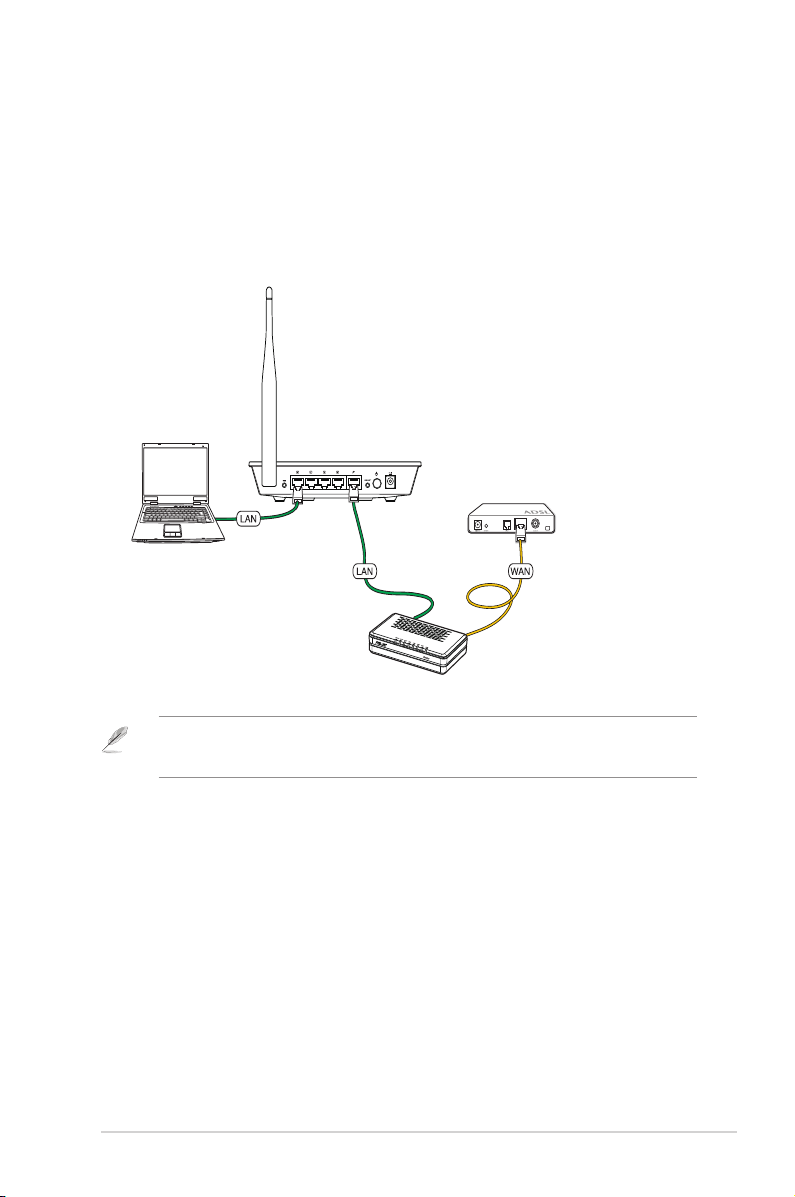
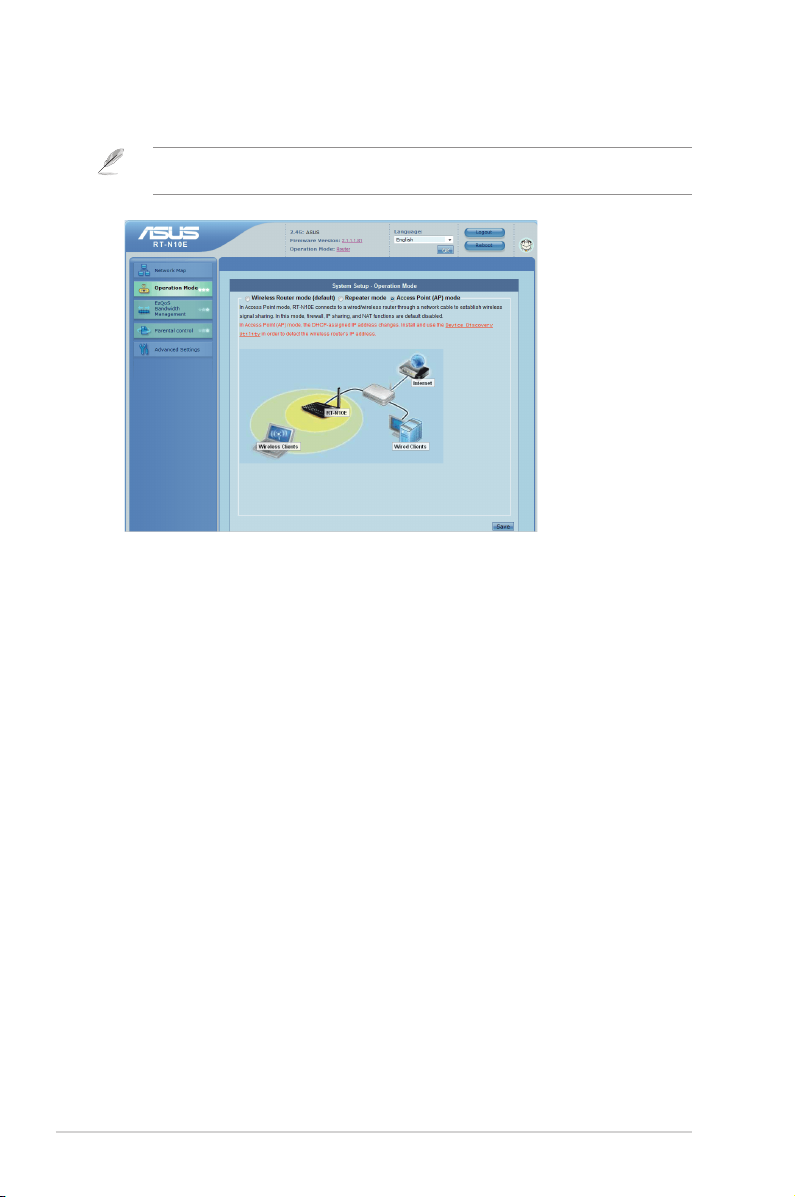
Setting up the wireless router in AP mode
In the AP mode, the wireless router receives the WAN IP address from the router
connected to the WAN port and provides you with wireless radio signals. The NAT,
rewall, and IP sharing services are disabled.
To set up the wireless router in AP mode:
1. Connect your devices.
Client
Modem
Router
RT-N10E
Note: We recommend that you use an Ethernet cable (wired connection) to connect your
computer to the wireless router for initial conguration to avoid possible setup problems due to
wireless uncertainty.
16
RT-N10E Chapter 3: Conguring the clients
2. Launch your web browser and the QIS web page appears automatically. Select
Access Point mode, then click Save.
Note: If the QIS web page does not appear after you launched your web browser, disable the
proxy settings on your web browser.
3. Congure the wireless security settings including the SSID and security key.
Click Finish.
 Loading...