

Page 1
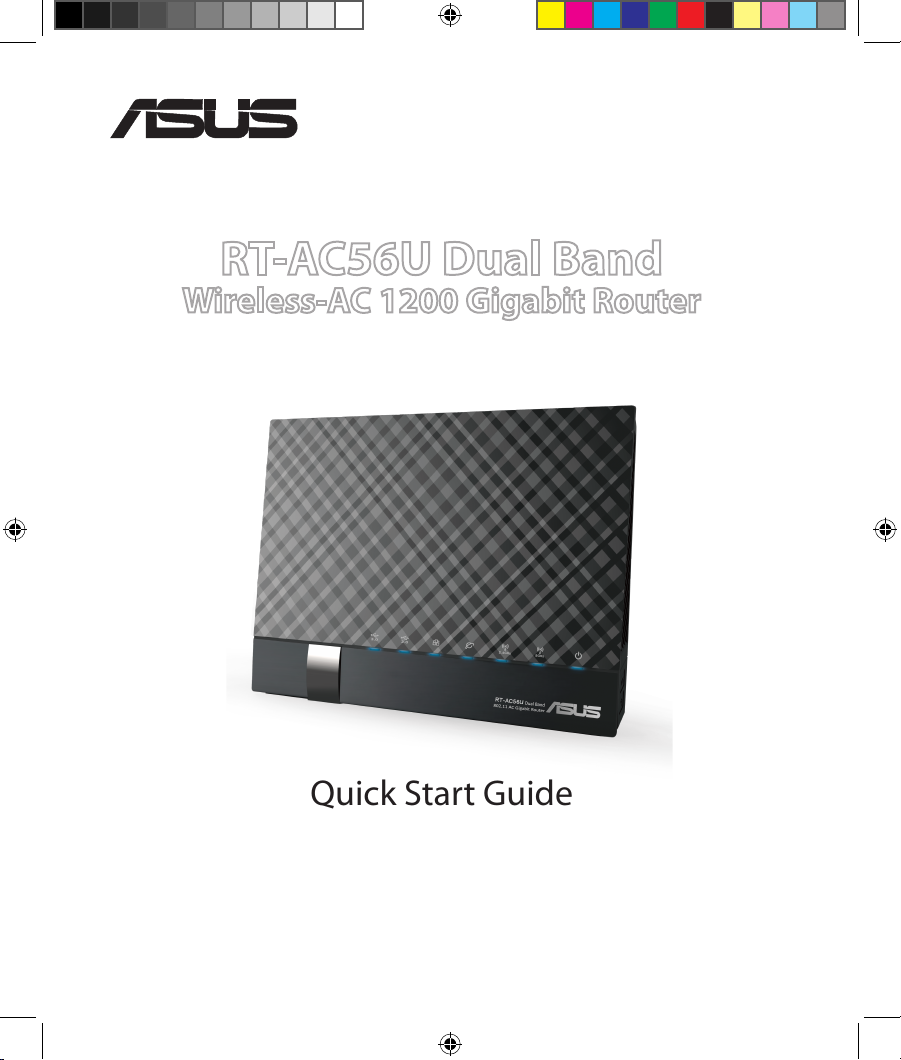
Quick Start Guide
RT-AC56U Dual Band
Wireless-AC 1200 Gigabit Router
®
WEU7966 / Second Edition / August 2013
WEU8555_RT-AC56U_QSG_v2.indd 1 8/9/13 9:23:00 AM
Page 2
English .............................................................................................4
Nederlands ....................................................................................17
Suomi ...............................................................................................30
Français ...........................................................................................43
Deutsch ........................................................................................... 56
Norsk ................................................................................................69
Dansk ...............................................................................................81
Svenska ...........................................................................................95
Ελληνικά ..........................................................................................108
Italiano ............................................................................................121
Português .......................................................................................134
Español ............................................................................................147
Русский ...........................................................................................160
Table of contents
NOTE
•
For more details, refer to the user manual included in the support
CD.
• Für weitere Details beziehen Sie sich auf das Handbuch auf der
Support-CD.
• Katso lisätietoja tuki-CD-levyllä olevasta käyttöoppaasta.
• Pour plus de détails, consultez le manuel de l'utilisateur contenu
dans le CD de support.
• Für weitere Details beziehen Sie sich auf das Handbuch auf der
Support-CD.
• For mer detaljert informasjon, se brukerveiledningen som fulgte
med på støtte CD-en.
• For yderligere oplysninger herom, bedes du venligst se i
brugervejledningen på den medfulgte cd.
WEU8555_RT-AC56U_QSG_v2.indd 2 8/9/13 9:23:01 AM
Page 3
• För ytterligare detaljer, se bruksanvisningen på support-CD:
n.
•
Για περισσότερες λεπτομέρειες, ανατρέξτε στο εγχειρίδιο
χρήστη που περιλαμβάνεται στο CD υποστήριξης.
• Per approfondimenti. consultare il manuale utente nel CD
di supporto.
• Para mais detalhes, consulte o manual do utilizador
incluído no CD de suporte.
• Para obtener más detalles, consulte el manual del usuario
incluido en el CD de soporte.
• Дляполученияподробнойинформации.обратитеськ
руководствупользователянакомпакт-диске.
WEU8555_RT-AC56U_QSG_v2.indd 3 8/9/13 9:23:01 AM
Page 4
4
English
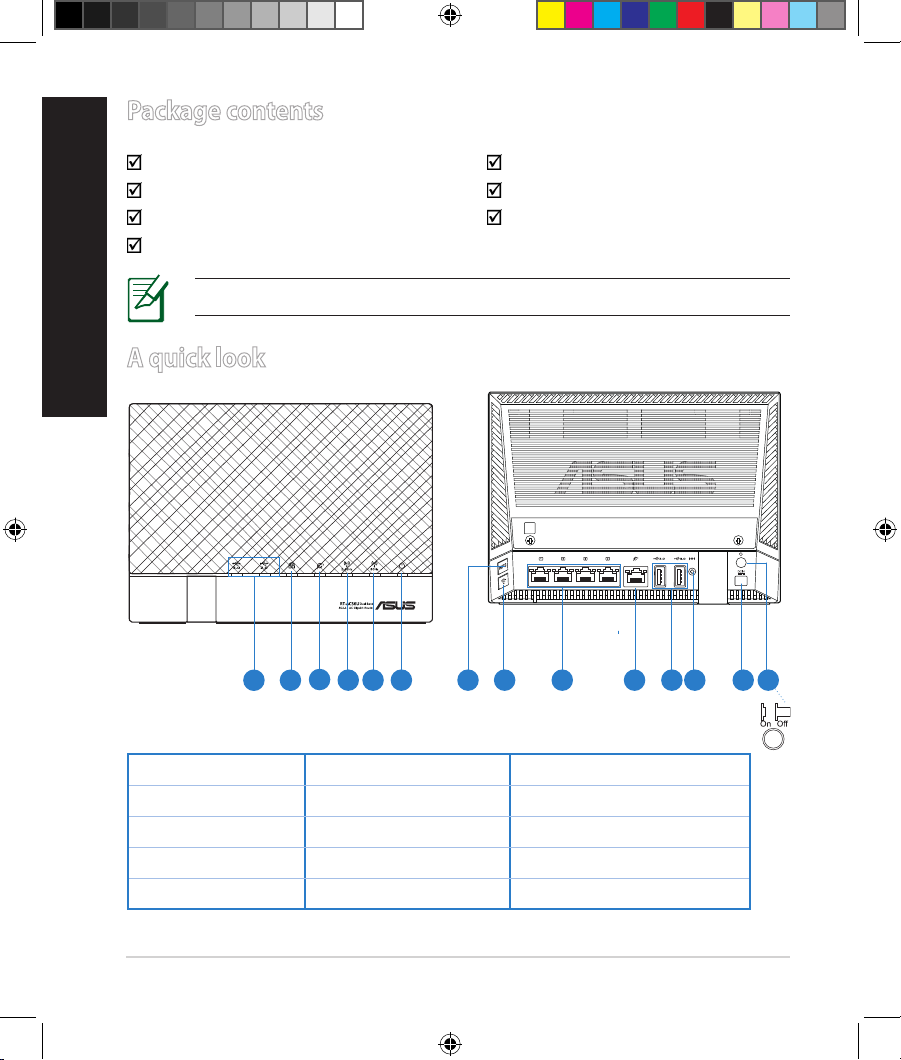
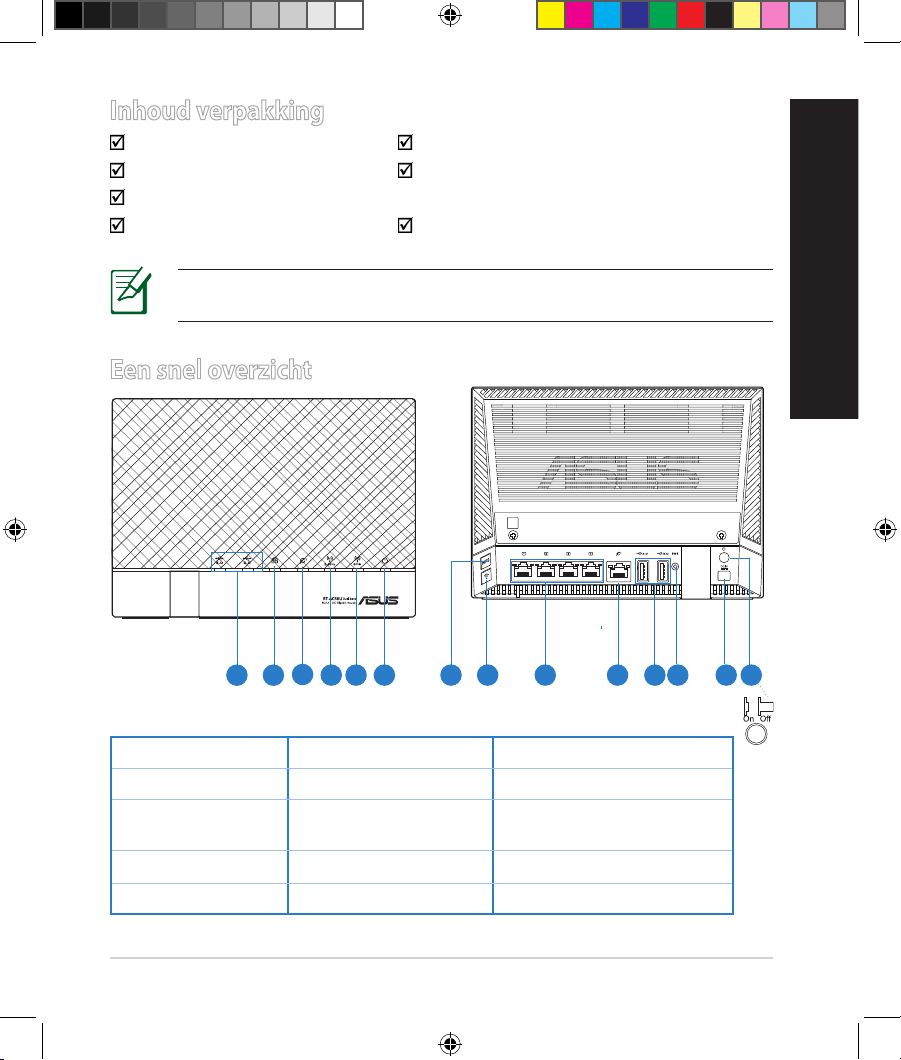
Package contents
RT-AC56U AC adapter
Network cable Quick Start Guide
Support CD (User Manual/utilities) Warranty card
Stand
A quick look
NOTE: If any of the items is damaged or missing, contact your retailer.
1) USB 3.0/2.0 LED 6) Power LED 11) USB 3.0/2.0 ports
2) LAN LED 7) WPS button 12) Reset button
3) WAN LED 8) Wi-Fi button 13) Power (DC-IN) port
4) 2.4GHz LED 9) LAN ports 14) Power switch
5) 5GHz LED 10) WAN port
7 9 10 13118
1 2
3
5 64 1412
WEU8555_RT-AC56U_QSG_v2.indd 4 8/9/13 9:23:18 AM
Page 5
5
English
NOTES:
•
USB External HDD/Flash disk:
• The wireless router works with most USB HDDs/Flash disks up to
2TB and supports read-write access for FAT16, FAT32, EXT2, EXT3,
and NTFS.
• To safely remove the USB disk, launch the web GUI (
http://routers.
asus.com or http://192.168.1.1), then in the Network Map
page's upper right corner, click the USB icon and click Eject USB 1.
• Incorrect removal of the USB disk may cause data corruption.
• For the list of le system and hard disk partitions that the
wireless router supports, visit http://event.asus.com/networks/
disksupport
• For the list of printers that the wireless router supports, visit
http://event.asus.com/networks/printersupport
WEU8555_RT-AC56U_QSG_v2.indd 5 8/9/13 9:23:18 AM
Page 6
6
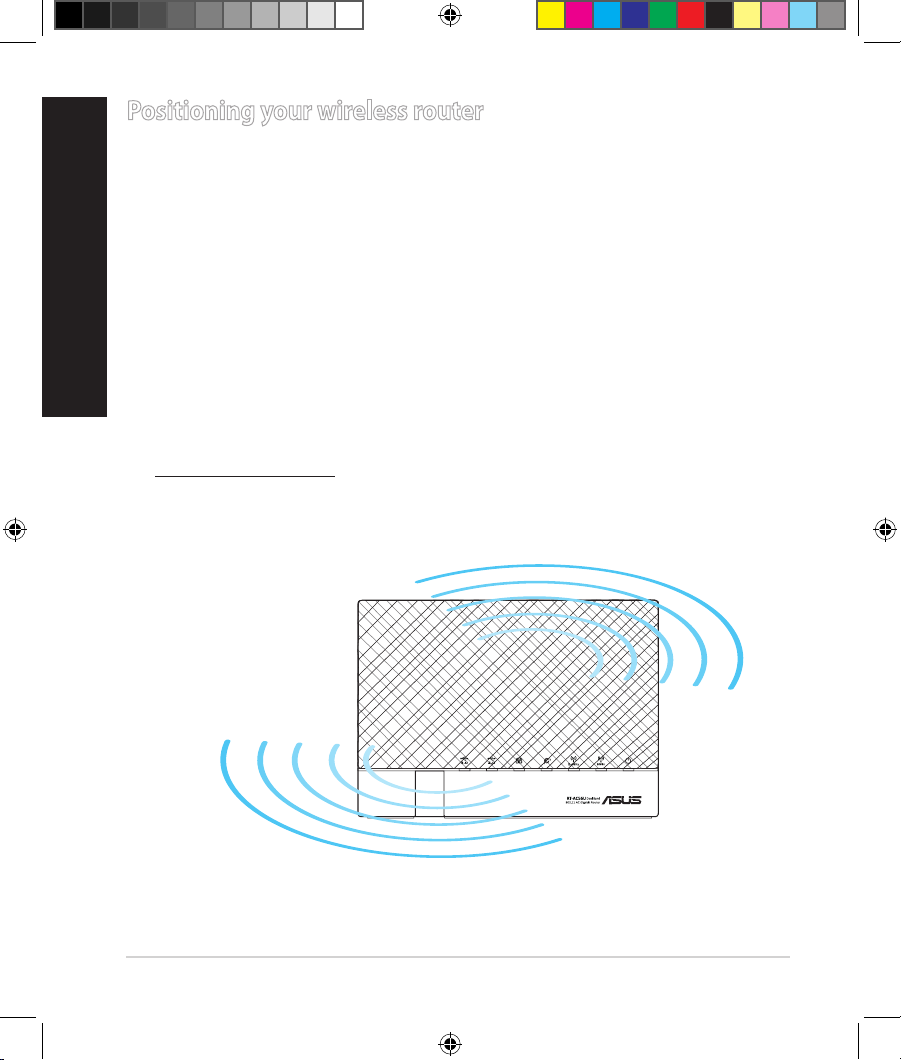
Positioning your wireless router
For the best wireless signal transmission between the wireless router and the
network devices connected to it, ensure that you:
• Place the wireless router in a centralized area for a maximum wireless coverage
for the network devices.
• Keep the device away from metal obstructions and away from direct sunlight.
• Keep the device away from 802.11g or 20MHz only Wi-Fi devices, 2.4GHz
computer peripherals, Bluetooth devices, cordless phones, transformers,
heavy-duty motors, uorescent lights, microwave ovens, refrigerators, and other
industrial equipment to prevent signal interference or loss.
• To ensure the best wireless signal, orient the three detachable antennas as
shown in the drawing below.
• For optimum performance, adjust the internal cooling system. Refer to the user
manual for details.
• Always update to the latest rmware. Visit the ASUS website at
http://www.asus.com to get the latest rmware updates.
English
WEU8555_RT-AC56U_QSG_v2.indd 6 8/9/13 9:23:20 AM
Page 7
7
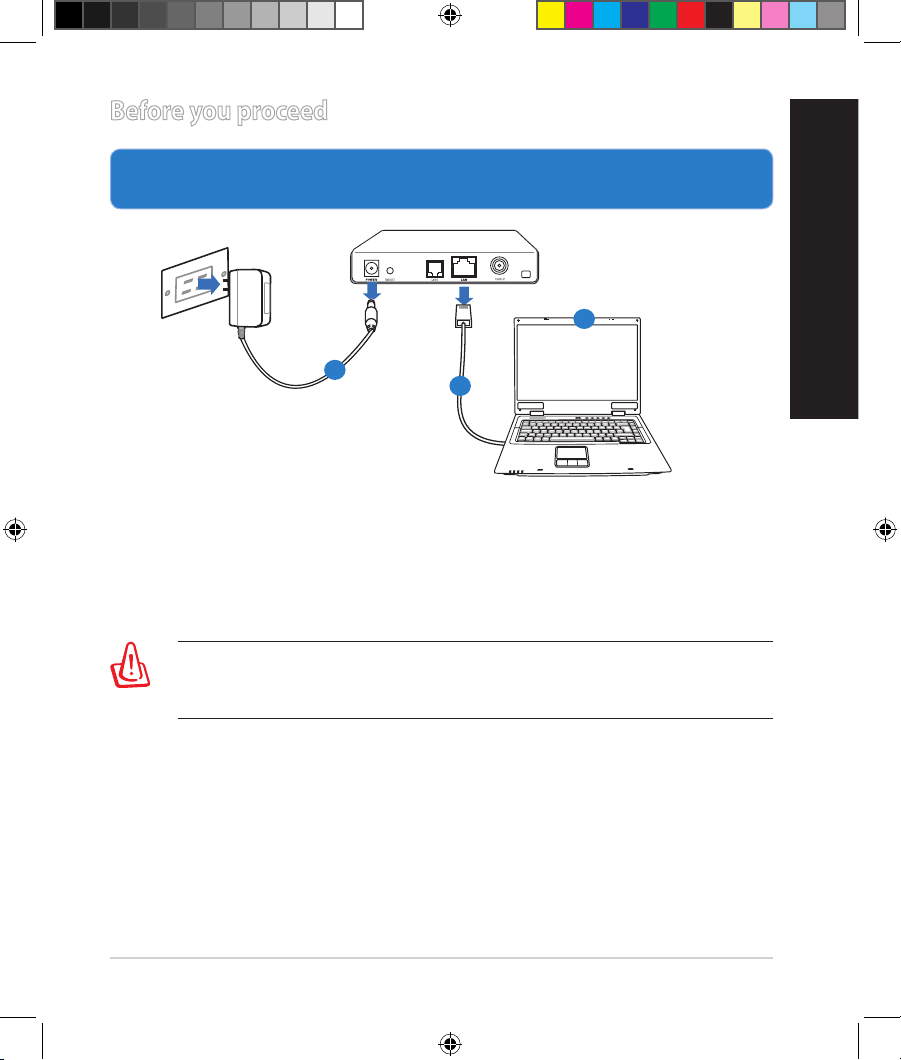
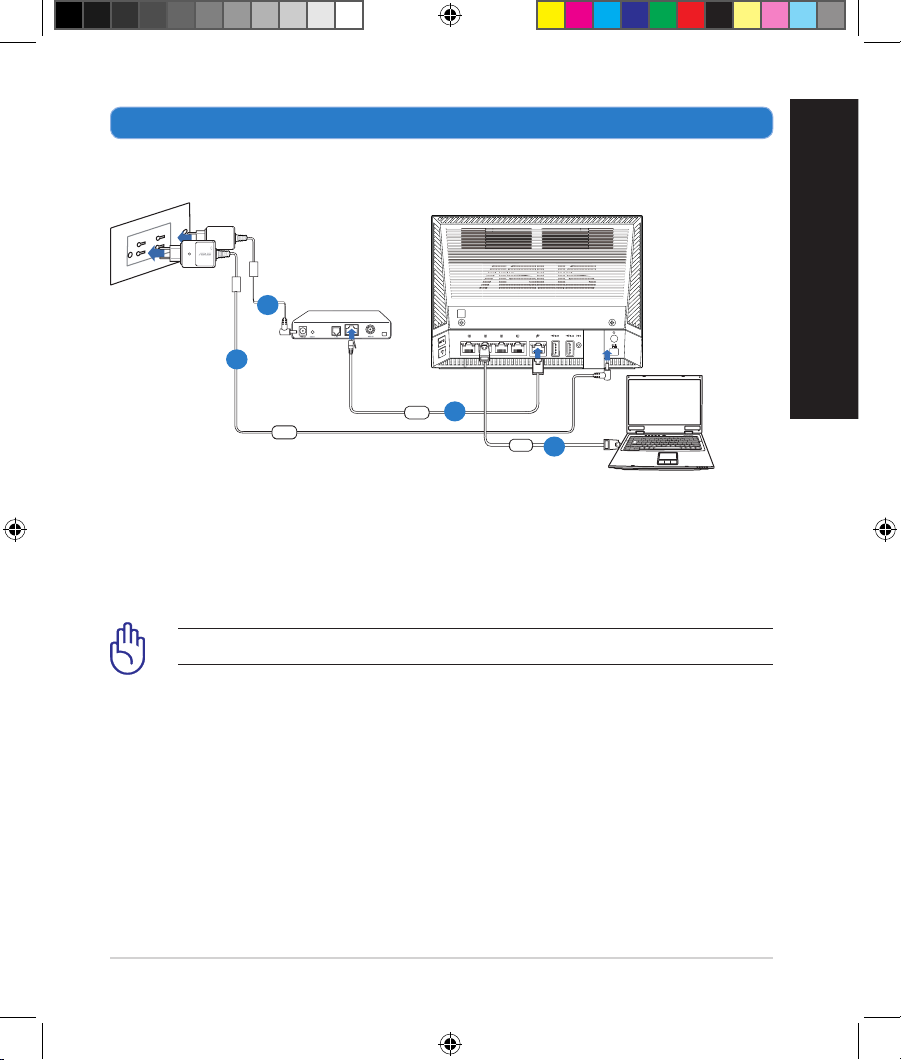
Before you proceed
1. Unplug and disconnect the wires/cables from your existing modem setup
and release your computer’s outmoded IP address.
a: Unplug the AC adapter from the power outlet and disconnect it from your
cable/ADSL modem.
b: Disconnect the network cable from your cable/ADSL modem.
c: Reboot your computer (recommended).
Modem
OFF
!
a
b
c
English
WARNING! Before disconnecting the wires/cables, ensure that your
cable/ADSL modem has been turned o for at least two minutes. If your
modem has a backup battery, remove it as well.
WEU8555_RT-AC56U_QSG_v2.indd 7 8/9/13 9:23:21 AM
Page 8
8
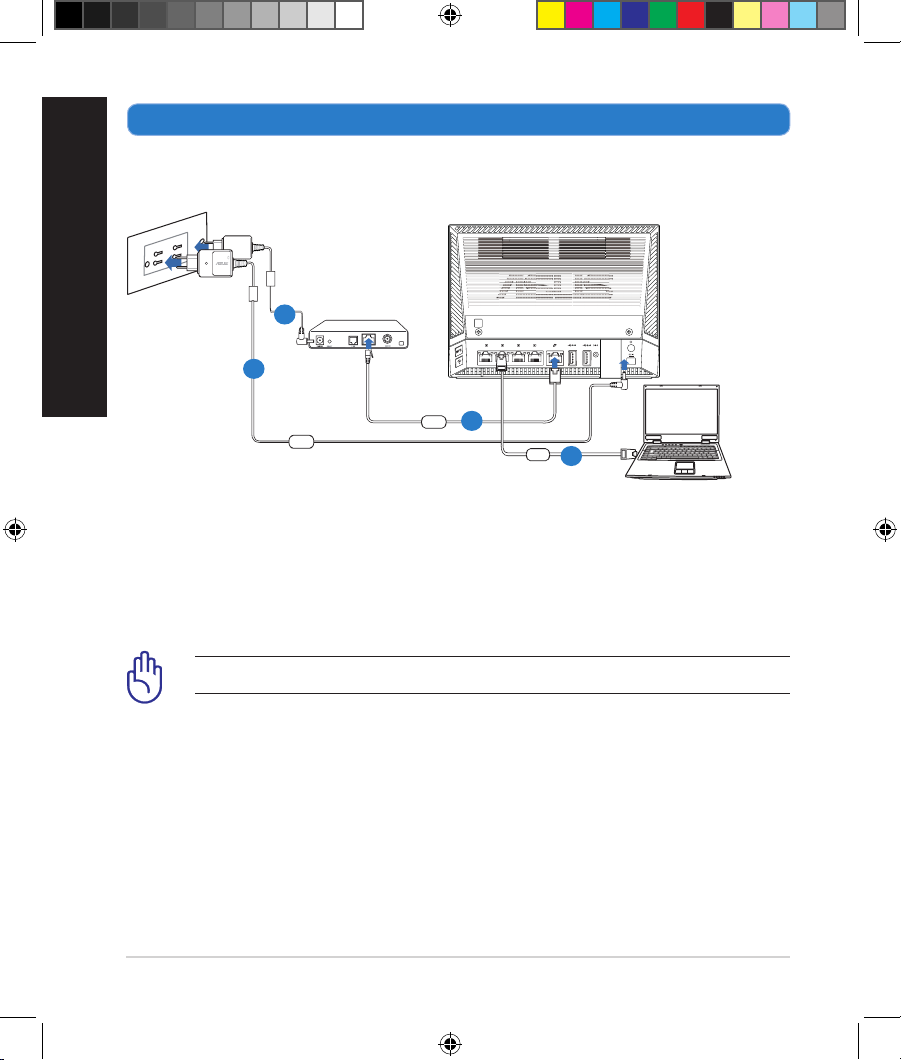
2. Set up your wireless environment.
a: Insert your wireless router’s AC adapter to the DC-IN port and plug it to a
power outlet.
b: Using the bundled network cable, connect your computer to your wireless
router’s LAN port.
IMPORTANT! Ensure that the WAN and LAN LEDs are blinking.
c: Using another network cable, connect your modem to your wireless router’s
WAN port.
d: Insert your modem’s AC adapter to the DC-IN port and plug it to a power
outlet.
English
Computer
Wall Power Outlet
Mode
m
RT-AC56U
WAN
Power
LAN
a
b
c
d
WEU8555_RT-AC56U_QSG_v2.indd 8 8/9/13 9:23:24 AM
Page 9
9
3. Disable some settings on your computer.
A. Disable the proxy server, if enabled.
B. Set the TCP/IP settings to automatically obtain an IP address.
C. Disable the dial-up connection, if enabled.
NOTE: For more details on disabling your computer settings, refer to
Frequently Asked Questions (FAQs).
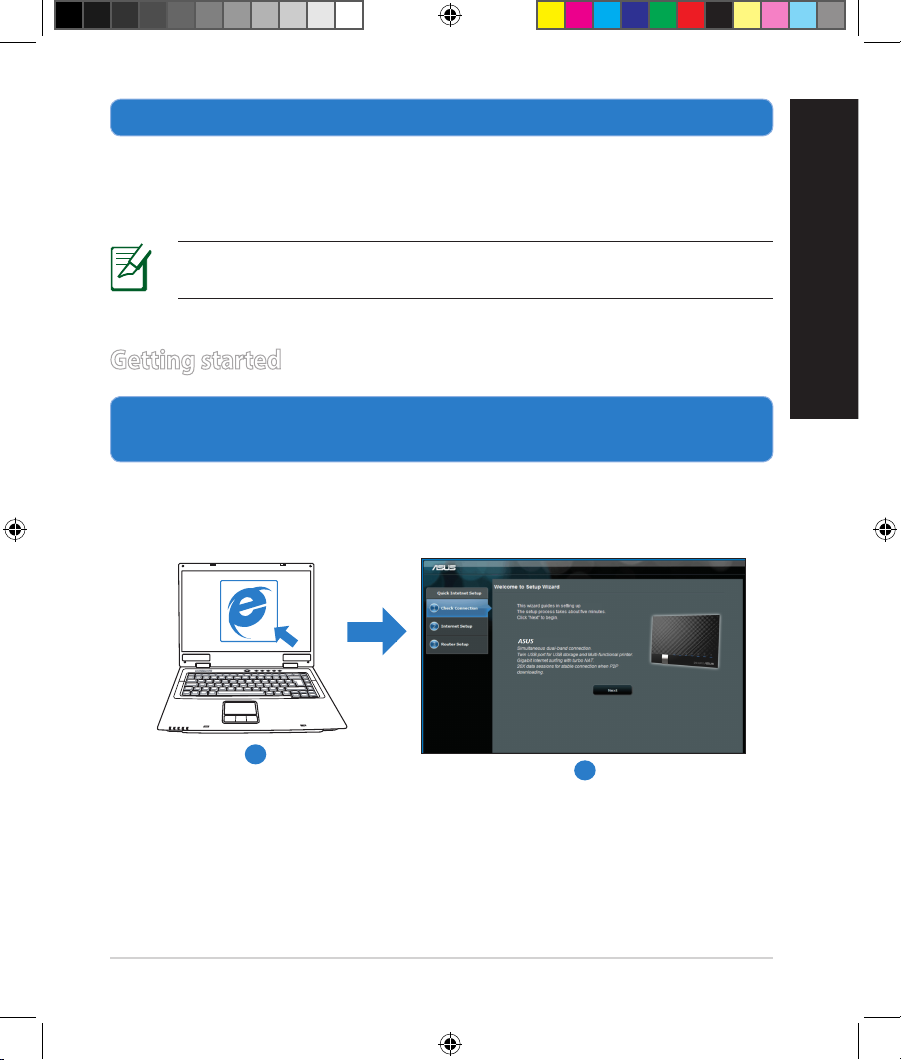
1. Congure your wireless settings via the wireless router’s web graphics
user interface (web GUI).
a: Launch your web browser such as Internet Explorer, Firefox, Google Chrome,
or Safari.
Getting started
English
RT-AC56U
RT-AC56U
b
a
WEU8555_RT-AC56U_QSG_v2.indd 9 8/9/13 9:23:27 AM
Page 10
10
NOTE: If QIS does not launch automatically, follow these steps to
manually launch QIS:
• On your web browser, key in
http://routers.asus.com or
http://192.168.1.1 and run the Quick Internet Setup (QIS) Wizard
again.
• Disable the proxy settings, dial-up connection, and set your TCP/IP
settings to automatically obtain an IP address. For more details, refer
to the FAQs section or use the Setup Wizard in the support CD for
auto-diagnosis.
b: The wireless router’s Quick Internet Setup (QIS) feature automatically detects
if your ISP connection type is Dynamic IP, PPPoE, PPTP, L2TP, and Static IP.
Key in the necessary information for your connection type.
IMPORTANT! Obtain the necessary information about your Internet
connection type from your Internet Service Provider (ISP).
NOTE: The auto-detection of your ISP connection type takes place
when you congure the wireless router for the rst time or when your
wireless router is reset to its default settings.
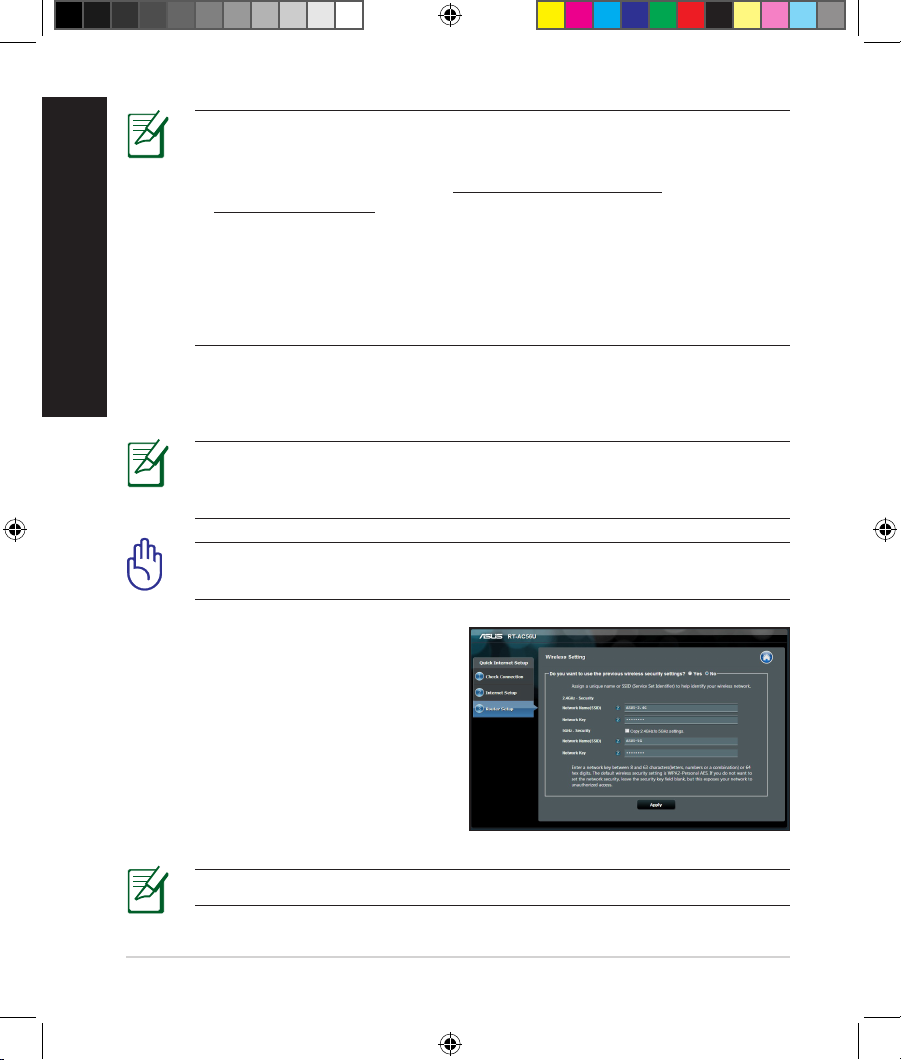
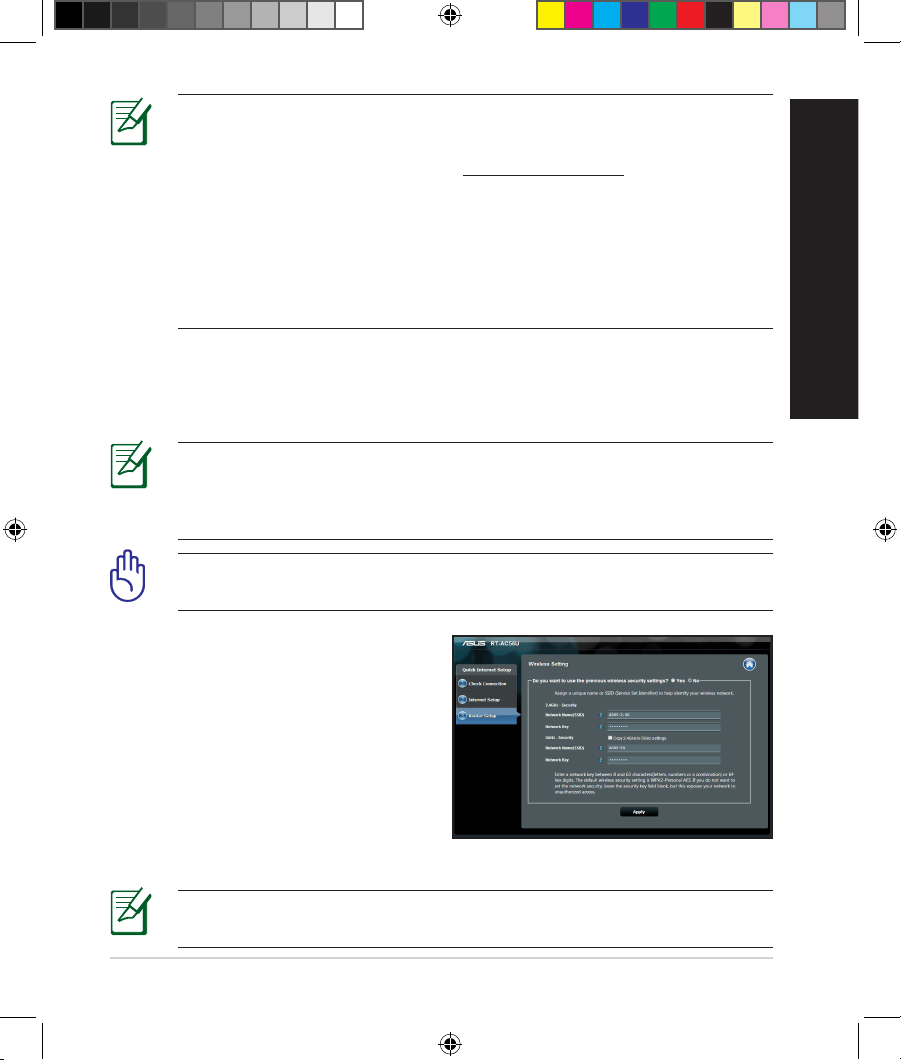
NOTE: You can assign a network name with up to 32 characters.
c: Assign the network name (SSID) and
security key for your 2.4GHz and
5GHz wireless connection. Click Ap-
ply when done.
d: Your Internet and wireless settings
are displayed. Click Next to continue.
e: Read the wireless network con-
nection tutorial. When done, click
Finish.
English
WEU8555_RT-AC56U_QSG_v2.indd 10 8/9/13 9:23:29 AM
Page 11
11
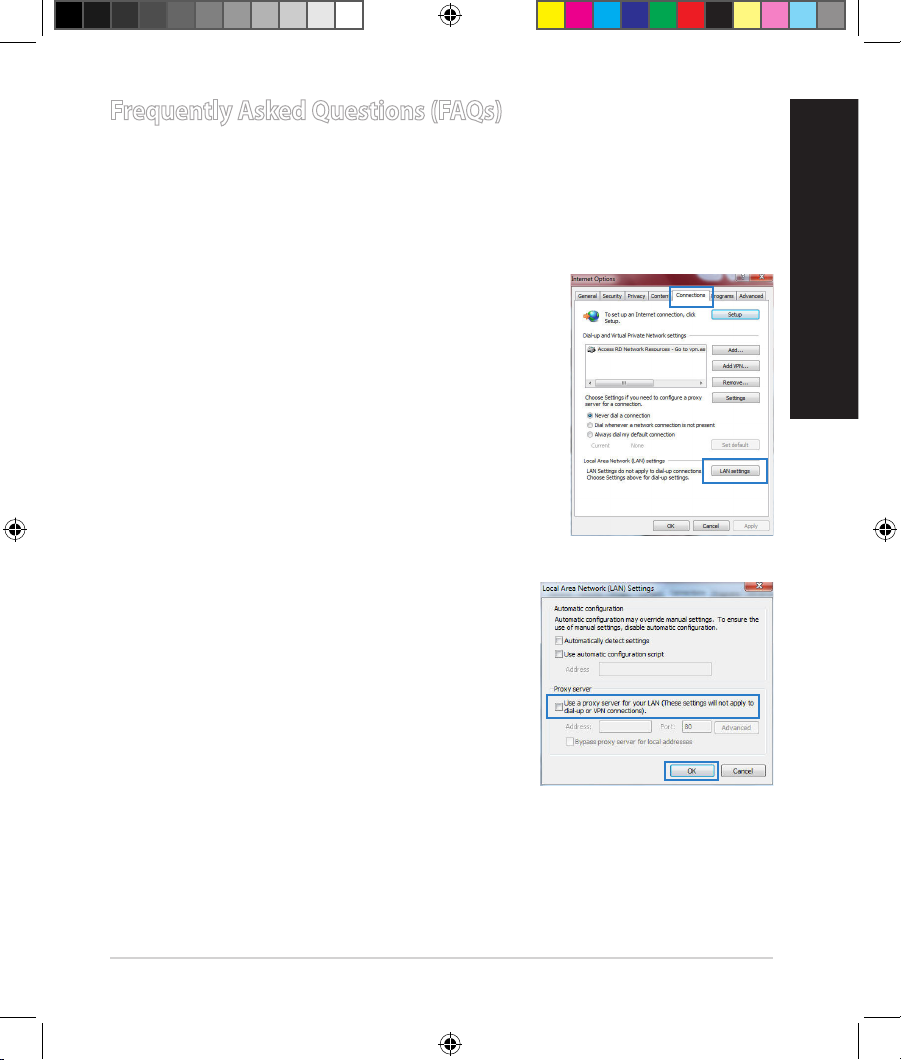
Frequently Asked Questions (FAQs)
After following the steps, I still cannot access the wireless router’s web
graphics user interface (web GUI) to congure the wireless router settings.
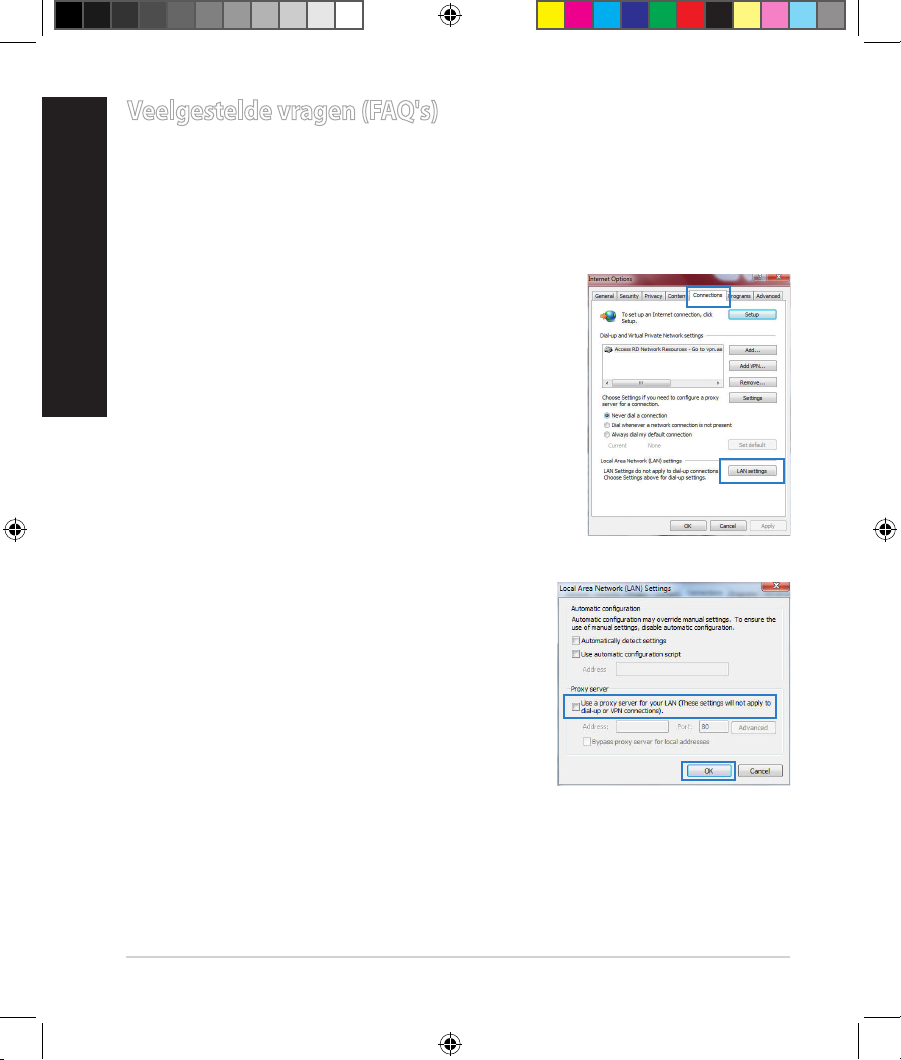
A. Disable the proxy server, if enabled.
Windows® 7
1. Click Start > Internet Explorer to launch the web
browser.
2. Click Tools > Internet options > Connections tab
> LAN settings.
3. From the Local Area Network (LAN) Settings
screen, untick Use a proxy server for your
LAN.
4. Click OK when done.
English
WEU8555_RT-AC56U_QSG_v2.indd 11 8/9/13 9:23:30 AM
Page 12
12
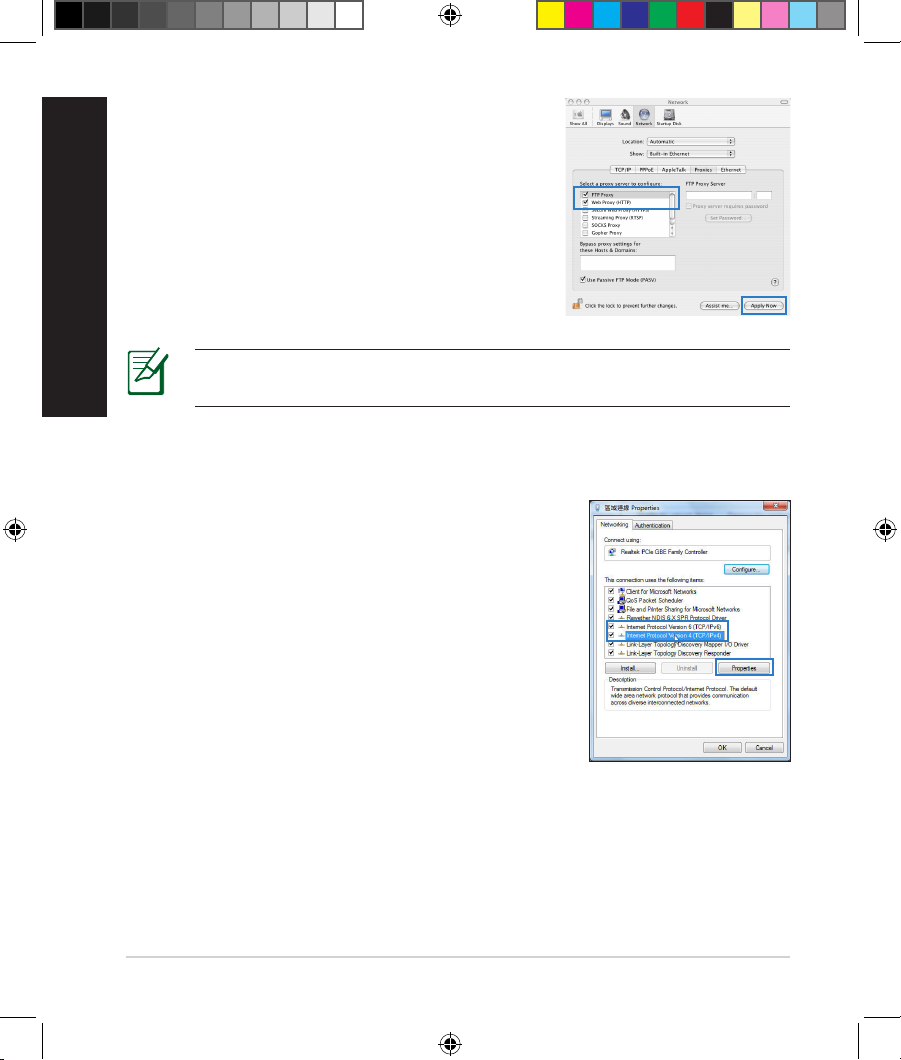
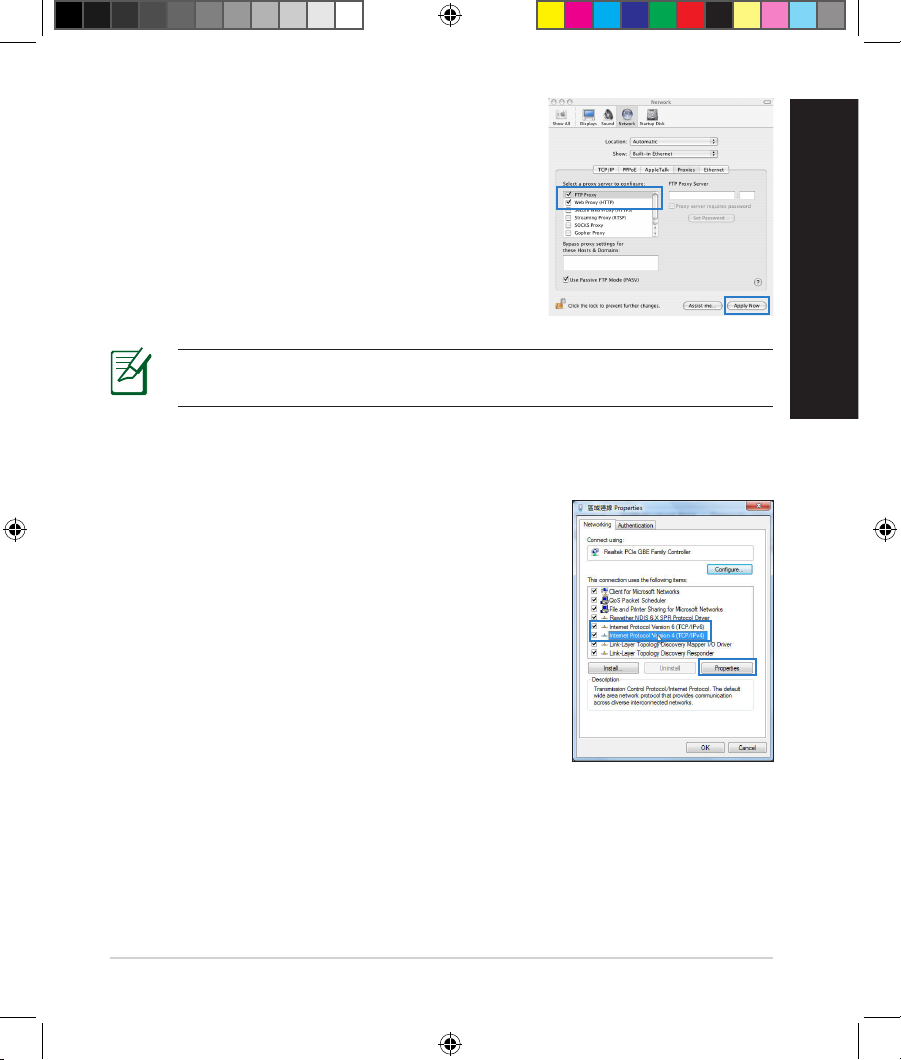
MAC OS
1. From your Safari browser, click Safari > Preferences > Advanced > Change Settings...
2. From the Network screen, deselect FTP Proxy
and Web Proxy (HTTP).
3. Cllick Apply Now when done.
NOTE: Refer to your browser's help feature for details on disabling the
proxy server.
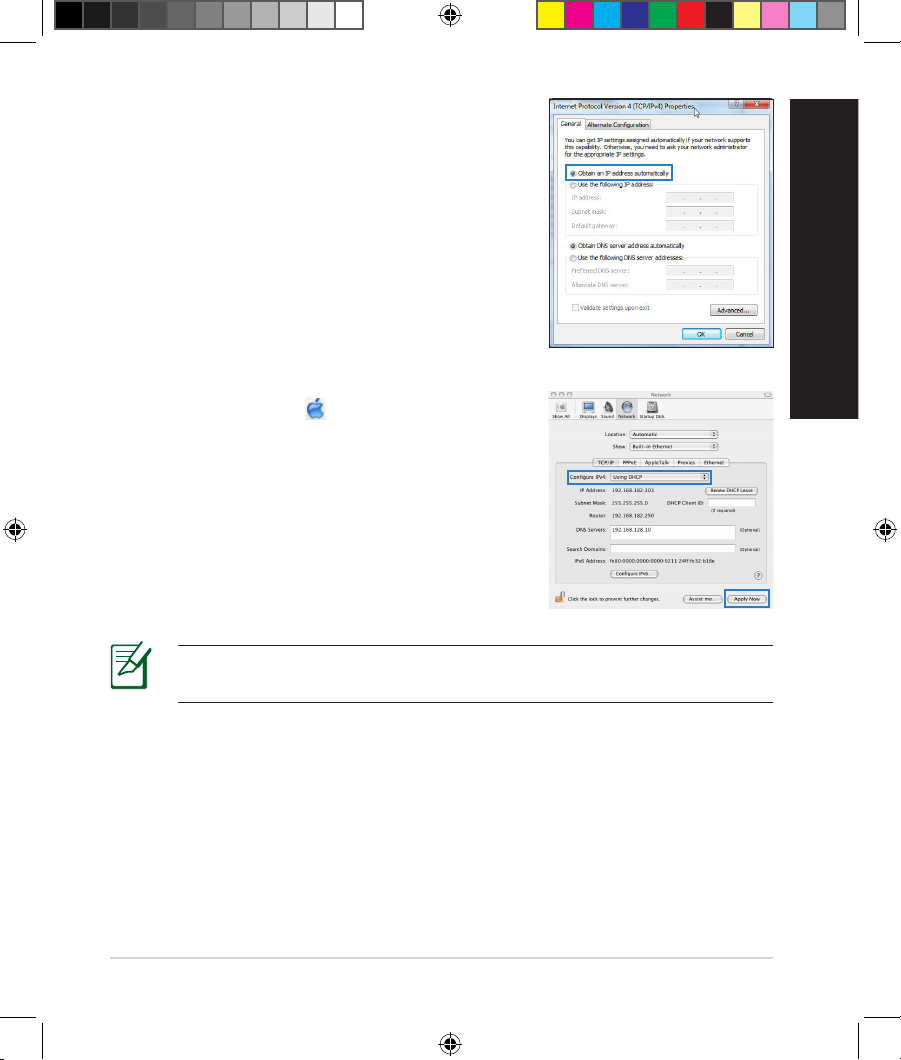
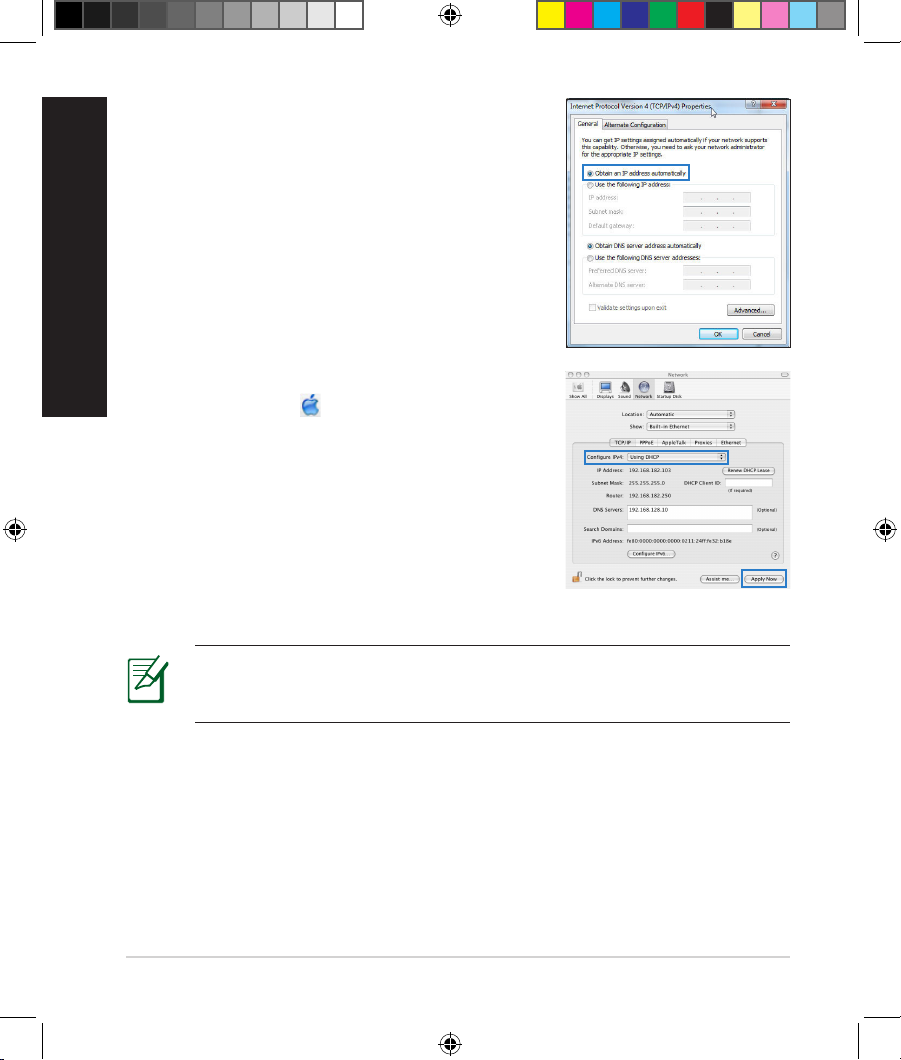
B. Set the TCP/IP settings to automatically obtain an IP address.
Windows® 7
1. Click
Start > Control Panel > Network and
Internet > Network and Sharing Center >
Manage network connections.
2. Select Internet Protocol Version 4 (TCP/IPv4),
then click Properties.
English
WEU8555_RT-AC56U_QSG_v2.indd 12 8/9/13 9:23:32 AM
Page 13
13
3. To obtain the iPv4 IP settings automatically, tick
Obtain an IP address automatically.
4. Click OK when done.
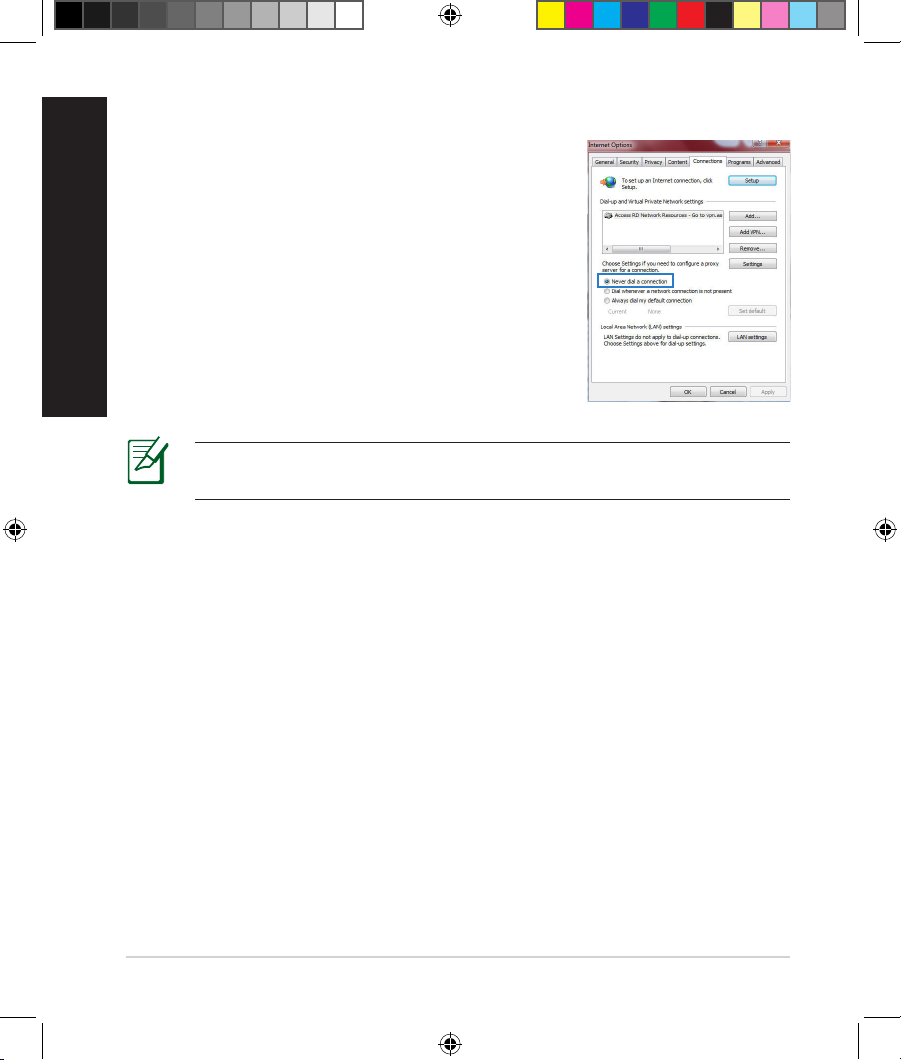
MAC OS
1. Click the Apple icon located on the top left of
your screen.
2. Click System Preferences > Network >
Congure...
3. From the TCP/IP tab, select Using DHCP in the
Congure IPv4 dropdown list.
4. Cllick Apply Now when done.
NOTE: Refer to your operating system’s help and support feature for
details on conguring your computer’s TCP/IP settings.
English
WEU8555_RT-AC56U_QSG_v2.indd 13 8/9/13 9:23:33 AM
Page 14
14
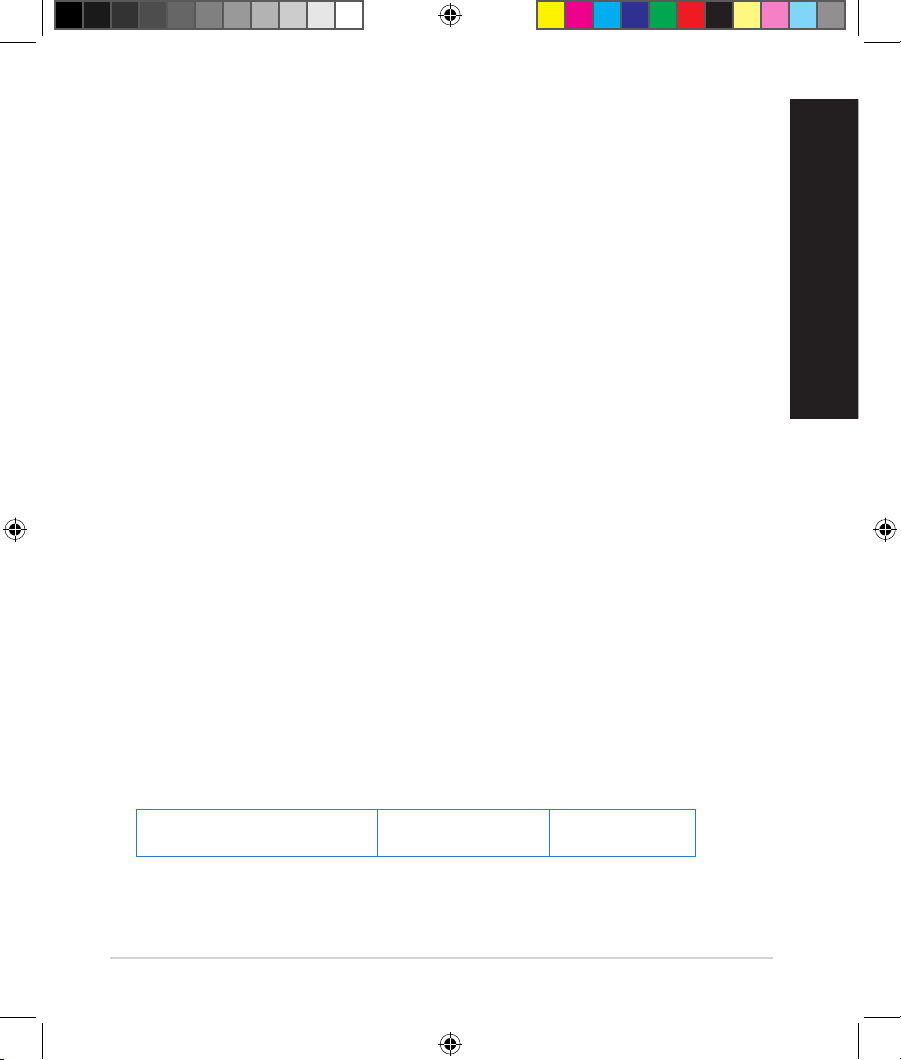
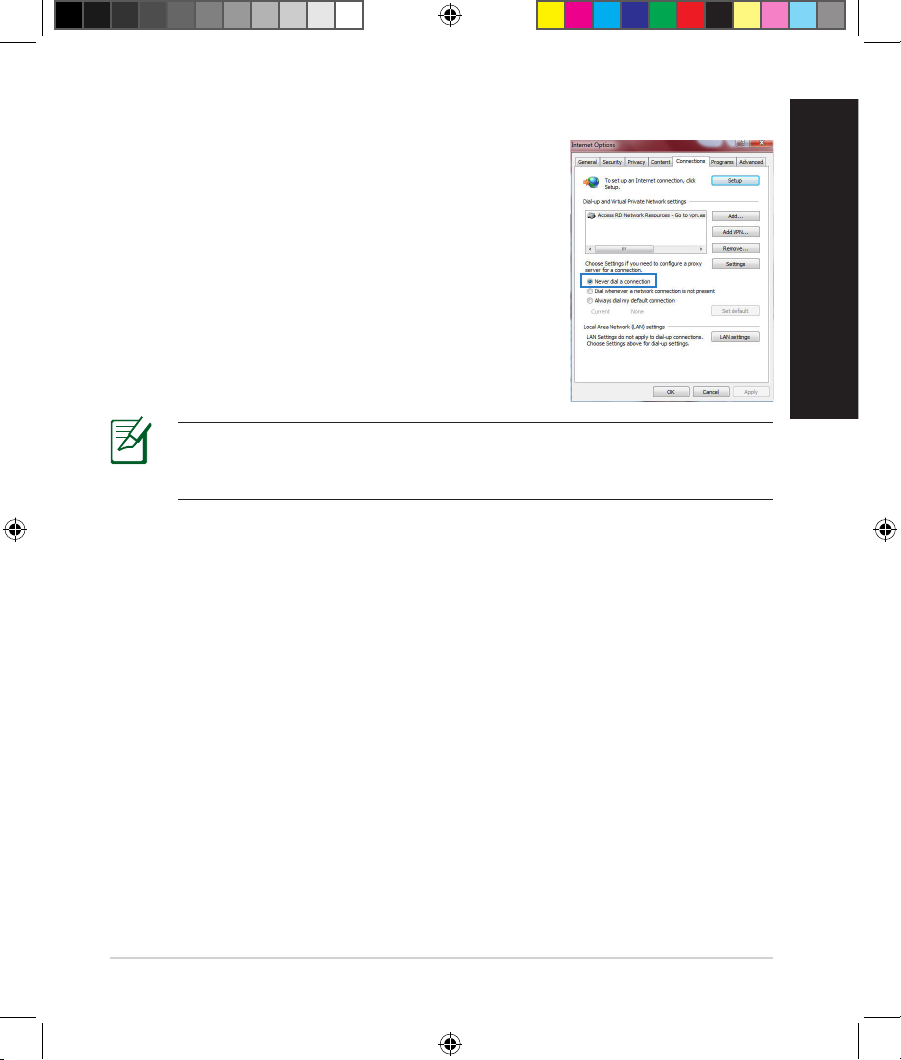
C. Disable the dial-up connection, if enabled.
D. Close all running web browsers.
NOTE: Refer to your browser's help feature for details on disabling
the dial-up connection settings.
Windows® 7
1. Click Start > Internet Explorer to launch the
browser.
2. Click Tools > Internet options > Connections tab.
3. Tick Never dial a connection.
4. Click OK when done.
The client cannot establish a wireless connection with the router.
Out of Range:
• Put the router closer to the wireless client.
• Try to change the channel settings.
Authentication:
• Use wired connection to connect to the router.
• Check the wireless security settings.
• Press the Reset button at the rear panel for more than ve seconds.
English
WEU8555_RT-AC56U_QSG_v2.indd 14 8/9/13 9:23:34 AM
Page 15
15
Cannot nd the router:
• Press the Reset button at the rear panel for more than ve seconds.
• Check the setting in the wireless adapter such as SSID and encryption
settings.
Cannot access the Internet via wireless LAN adapter.
• Move the router closer to the wireless client.
• Check whether the wireless adapter is connected to the correct wireless
router.
• Check whether the wireless channel in use conforms to the channels avail-
able in your country/area.
• Check the encryption settings.
• Check if the ADSL or Cable connection is correct.
• Retry using another Ethernet cable.
If the ADSL “LINK” light blinks continuously or stays o, Internet access is
not possible - the Router is unable to establish a connection with the ADSL
network.
• Ensure that all your cables are all properly connected .
• Disconnect the power cord from the ADSL or cable modem, wait a few min-
utes, then reconnect the cord.
• If the ADSL light continues to blink or stays OFF, contact your ADSL service
provider.
Network name or encryption keys are forgotten.
• Try setting up the wired connection and conguring the wireless encryption
again.
• Press the Reset button of the wireless router for more than ve seconds.
• Factory default settings:
User name / Password:
admin / admin
IP address:
192.168.1.1
SSID: ASUS
English
WEU8555_RT-AC56U_QSG_v2.indd 15 8/9/13 9:23:34 AM
Page 16
16
Where can I nd more information about the wireless router?
• User Manual in the support CD
• Online FAQ site: http://support.asus.com/faq
• Technical Support site: http://support.asus.com/techserv
• Customer Hotline: Refer to the Support Hotline in this Quick Start Guide
English
SUPPORT HOTLINE
Area Hotline Number Support
Languages
Availability
Taiwan 0800-093-456;
02-81439000
Traditional
Chinese
Mon. to Fri.
9:00-12:00;
13:30-18:00
USA/
Canada
1-812-282-2787 English Mon. to Fri.
8:30-12:00am EST
(5:30am-9:00pm PST)
Sat. to Sun.
9:00am-6:00pm EST
(6:00am-3:00pm PST)
Brazil 4003 0988 (Capital) Portuguese
Mon. to Fri.
9:00am-18:00
0800 880 0988
(demais localidades)
WEU8555_RT-AC56U_QSG_v2.indd 16 8/9/13 9:23:35 AM
Page 17
17
Inhoud verpakking
RT-AC56U Wisselstroomadapter
Netwerkkabel Beknopte handleiding
Ondersteuningscd (handleiding, hulpprogramma's)
Garantiekaart Voetstuk
Een snel overzicht
OPMERKING: als een van de items beschadigd is of ontbreekt, moet u contact
opnemen met uw leverancier.
Nederlands
7 9 10 13118
1 2
3
5 64 1412
1) USB 3.0/2.0 LED 6) Voedings-LED 11) USB 3.0/2.0-poorten
2) LAN-LED 7) WPS-knop 12) Reset-knop
3) WAN-LED 8) Wi-Fi-knop
13) Voedingsaansluiting
(DC-IN)
4) 2.4GHz LED 9) LAN-poorten 14) Power switch
5) 5GHz LED 10) uit-schakelaar
WEU8555_RT-AC56U_QSG_v2.indd 17 8/9/13 9:23:52 AM
Page 18
18
OPMERKINGEN:
•
Extere USB-HDD/Flashdisk:
• De draadloze router werkt met de meeste USB-HDD’s/Flashdisks
tot 2TB en ondersteunt lees-schrijftoegang voor FAT16, FAT32,
EXT2, EXT3 en NTFS.
• Om de USB-disk veilig te verwijderen, start u de grasche
webinterface (http://router.asus.com of http://192.168.1.1). Klik
vervolgens in de rechterbovenhoek van de pagina Network Map
(Netwerkkaart) op het USB-pictogram en klik daarna op Eject
USB 1 (USB 1 uitwerpen).
• Wanneer u de USB-schijf op de verkeerde manier verwijdert, kan
dit uw gegevens beschadigen.
• De lijst van bestandssystemen en harde schijfpartities die de
draadloze router ondersteunt, vindt u op http://event.asus.com/
networks/disksupport
• De lijst van printers die de draadloze router ondersteunen, vindt u op
http://event.asus.com/networks/printersupport
Nederlands
WEU8555_RT-AC56U_QSG_v2.indd 18 8/9/13 9:23:52 AM
Page 19
19
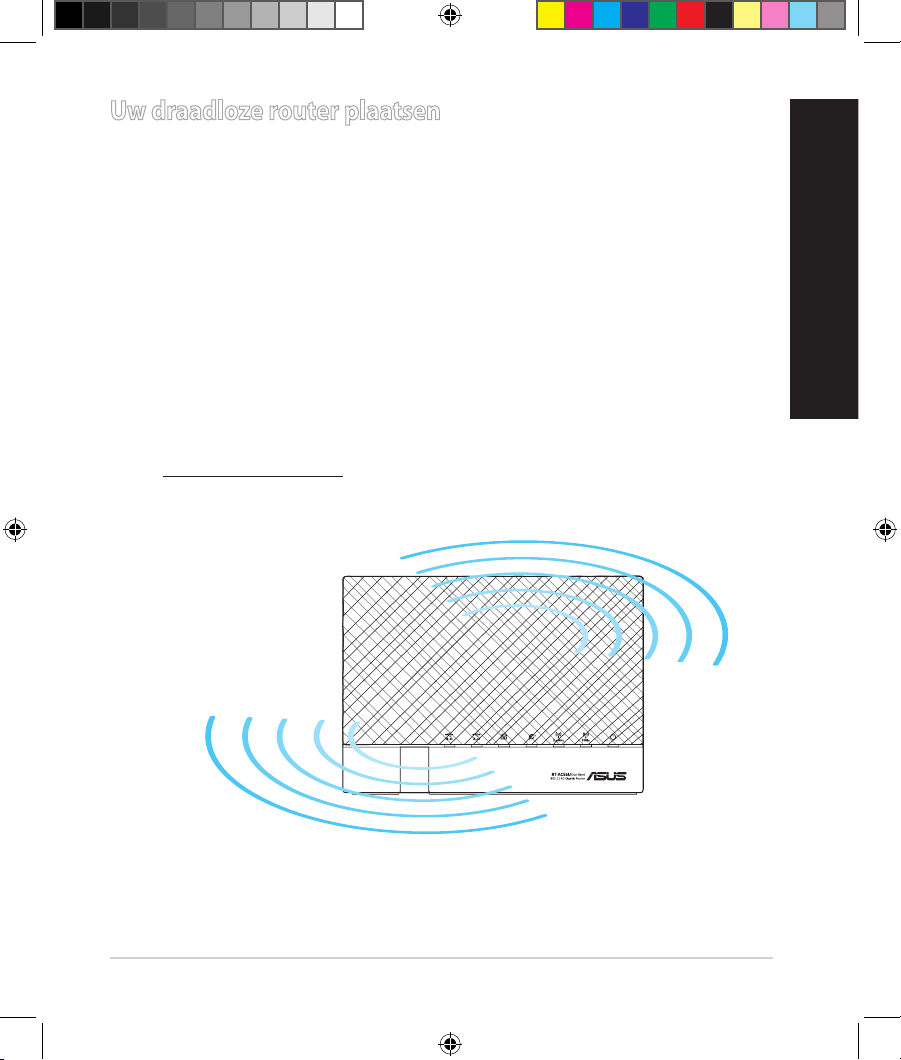
Uw draadloze router plaatsen
Voor de beste draadloze signaaltransmissie tussen de draadloze router en de
netwerkapparaten die erop zijn aangesloten, moet u het volgende doen:
• Plaats de draadloze router in een centraal gebied voor een maximaal draadloos
bereik voor de netwerkapparaten.
• Houd het apparaat uit de buurt van metalen obstakels en uit direct zonlicht.
• Houd het apparaat uit de buurt van 802.11g of 20MHz WiFi-apparaten alleen,
2.4GHz computerrandapparatuur, Bluetooth-apparten, draadloze telefoons,
transformators, zware motoren, TL-lampen, magnetrons, koelkasten en andere
industriële apparatuur om signaalverlies te voorkomen.
• Voor het beste draadloze signaal, moet u de drie afneembare antennes richten
zoals weergegeven in de onderstaande afbeelding.
• Pas het interne koelsysteem aan voor optimale prestaties. Raadpleeg de
handleiding voor details.
• Voer altijd een update uit naar de nieuwste rmware. Bezoek de ASUS-website
op http://www.asus.com voor de nieuwst rmware-updates.
Nederlands
WEU8555_RT-AC56U_QSG_v2.indd 19 8/9/13 9:23:53 AM
Page 20
20
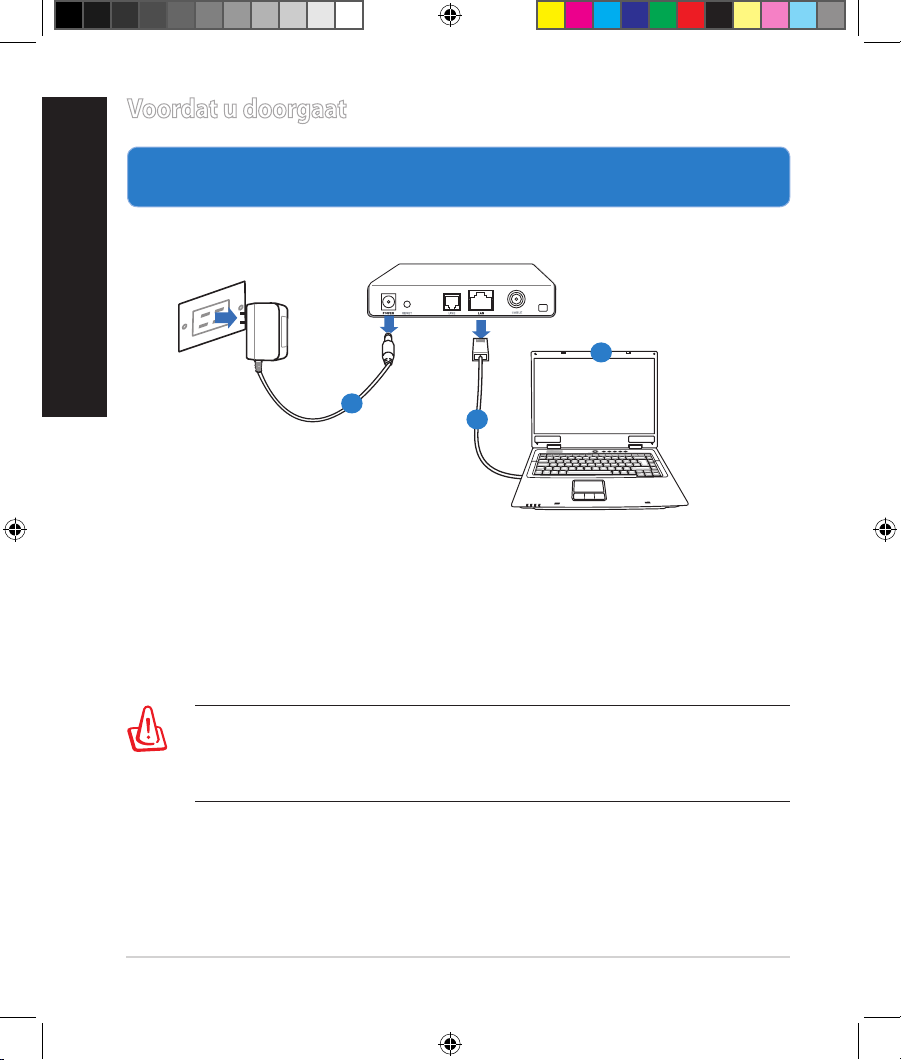
Voordat u doorgaat
1. Koppel de draden/kabels los van uw bestaande modeminstallatie en
geeft het verouderde IP-adres van uw computer vrij.
a: Koppel de wisselstroomadapter los van de voeding en an de kabel/ADSL-
modem.
b: Koppel de netwerkkabel los van uw kabel/ADSL-modem.
c: Start uw computer opnieuw op (aanbevolen).
Nederlands
Modem
OFF
!
a
b
c
WAARSCHUWING! Zorg ervoor dat uw kabel/ADSL-modus
minstens twee minuten is uitgeschakeld voordat u de draden/
kabels loskoppelt. Als uw modem een reservebatterij heeft, moet u
deze ook verwijderen.
WEU8555_RT-AC56U_QSG_v2.indd 20 8/9/13 9:23:54 AM
Page 21
21
2. Uw draadloze omgeving instellen.
a: Stop de wisselstroomadapter van uw draadloze router in de gelijkstroomin-
gang en sluit deze aan op een stopcontact.
b:
Sluit uw computer met de netwerkkabel aan op de LAN-poort van uw draadloze router.
BELANGRIJK! Controleer of de WAN- en LAN-LED's knipperen.
c: Sluit uw modem met een andere netwerkkabel aan op de WAN-poort van
uw draadloze router.
d: Stop de wisselstroomadapter van uw modem in de gelijkstroomingang en
sluit deze aan op een stopcontact.
Nederlands
Computer
Wall Power Outlet
Mode
m
RT-AC56U
WAN
Power
LAN
a
b
c
d
WEU8555_RT-AC56U_QSG_v2.indd 21 8/9/13 9:23:56 AM
Page 22

22
3. Schakel enkele instellingen op uw computer uit.
A. Schakel de proxyserver uit indien deze is ingeschakeld.
B. De TCP/IP-instellingen instellen om automatisch een IP-adres te verkrijgen.
C. Schakel de inbelverbinding uit indien deze is ingeschakeld.
OPMERKING: Raadpleeg Veelgestelde vragen (FAQ’s) voor meer de-
tails over het uitschakelen van uw computerinstellingen.
1. Congureer uw draadloze instellingen via de grasche
webgebruikersinterface (web GUI).
a: Start uw webbrowser, zoals Internet Explorer,Firefox, Google Chrome of
Safari
Aan de slag
Nederlands
RT-AC56U
RT-AC56U
b
a
WEU8555_RT-AC56U_QSG_v2.indd 22 8/9/13 9:23:56 AM
Page 23
23
OPMERKING: Als QIS niet automatisch wordt gestart, moet u deze
stappen volgen om QIS handmatig te starten:
• Voer
http://router.asus.com of http://192.168.1.1 in uw
webbrowser in en start de QIS-wizard (Quick Internet Setup) opnieuw
op.
• Schakel de proxy-instellingen en de inbelverbinding uit en
stel uw TCP/IP-instellingen in om automatisch een IP-adres te
verkrijgen. Raadpleeg de sectie Veelgestelde vragen of gebruik de
installatiewizard op de ondersteunings-cd voor een autodiagnose.
b: De QIS-functie (Quick Internet Setup) detecteert automatisch of uw ISP-
verbindingstype Dynamic IP (Dynamisch IP), PPPoE, PPTP, L2TP en Static
IP (Statisch IP) is. Voer de benodigde informatie in voor uw verbindingstype.
BELANGRIJK! Vraag uw Internet-provider (ISP) naar de
benodigde informatie over uw internetverbindingstype.
OPMERKING: De automatische detectie van uw ISP-verbindingstype
vindt plaats wanneer u de draadloze router voor de eerste keer congureert of wanneer uw draadloze router opnieuw wordt ingesteld naar de
standaardinstellingen.
OPMERKING: U kunt een netwerknaam van maximaal 32 tekens
toewijzen.
c: Wijs de netwerknaam (SSID) en
de beveiligingscode toe voor uw
2.4GHz en 5GHz draadloze verbinding. Klik op Apply (Toepassen) wan-
neer u klaar bent.
d: Uw internet- en draadloze instellin-
gen worden
weergegeven. Klik op Next (Vol-
gende) om door te gaan.
e: Toont de zelfstudie voor de draad-
loze netwerkverbinding. Klik op
Finish (Voltooien) wanneer u klaar bent.
Nederlands
WEU8555_RT-AC56U_QSG_v2.indd 23 8/9/13 9:23:57 AM
Page 24
24
Veelgestelde vragen (FAQ's)
Nadat ik de stappen heb gevolgd, krijg ik nog steeds geen toegang tot de
grasche webinterface (Web GUI) van de draadloze router om deze in te
stellen.
A. Schakel de proxyserver uit indien deze is ingeschakeld.
Windows® 7
1. Klik op Start > Internet Explorer om de webbrowser te starten.
2. Klik op Tools (Extra) > Internet options (Inter-
netopties) >tabblad Connections (Verbindingen) > LAN settings (LAN-instellingen).
3. Schakel in het scherm LAN-instellingen het
selectievakje Use a proxy server for your LAN
(Een proxyserver voor het LAN-netwerk
gebruiken) uit.
4. Klik op
OK wanneer u klaar bent.
Nederlands
WEU8555_RT-AC56U_QSG_v2.indd 24 8/9/13 9:23:59 AM
Page 25
25
MAC OS
1. Klik in de menubalk op Safari > Preferences...
(Systeemvoorkeuren...) > tabblad Advanced
(Geavanceerd)> Change Settings...(Wijzig
instellingen...)
2. Schakel in de lijst van protocollen FTP Proxy
(FTP-proxy) en Web Proxy (HTTPS) (Webproxy (HTTPS)) uit.
3. Klik op Apply Now (Schrijf nu in) wanneer u
klaar bent.
OPMERKING: Raadpleeg de Help-functie van uw browser voor meer
informatie over het uitschakelen van de proxyserver.
B. De TCP/IP-instellingen instellen om automatisch een IP-adres te verkrijgen.
Windows® 7
1. Klik op Start > Control Panel (Conguratiescherm) > Network and Internet (Netwerk
en internet) > Network and Sharing Center
(Netwerkcentrum) > Manage network connections (Netwerkverbindingen beheren).
2. Selecteer Internet Protocol Version 4 (TCP/IPv4)
(Internet Protocol Versie 4 (TCP/IPv4)) en klik
vervolgens op Properties (Eigenschappen).
Nederlands
WEU8555_RT-AC56U_QSG_v2.indd 25 8/9/13 9:24:00 AM
Page 26
26
MAC OS
1. Klik bovenaan links op het scherm op het
Apple-pictogram .
2. Klik opSystem Preferences (Systeemvoorkeur-
en) > Network (Netwerk) > Congure ...
(Congureer ...)
3. Selecteer op het tabblad TCP/IP de optie Using
DHCP (DHCP gebruiken) in het veld Congure
IPv4 (Congureer IPv4).
4. Klik op Apply Now (Schrijf nu in) wanneer u
klaar bent.
3. Om de iPv4 IP-instellingen automatiscch te ver
-
krijgen, schakelt u het selectievakje Obtain an
IP address automatically (Automatisch een
IP-adres verkrijgen) in.
4. Klik op OK wanneer u klaar bent.
OPMERKING: Raadpleeg de help- en ondersteuningsfunctie van uw
besturingssysteem voor details over het congureren van de TCP/IP-instellingen van uw computer.
Nederlands
WEU8555_RT-AC56U_QSG_v2.indd 26 8/9/13 9:24:02 AM
Page 27
27
C. Schakel de inbelverbinding uit indien deze is ingeschakeld.
D. Sluit alle actieve webbrowsers.
OPMERKING: Raadpleeg de Help-functie van uw browser voor
meer informatie over het uitschakelen van de instellingen voor de
inbelverbinding.
Windows® 7
1. Klik op Start > Internet Explorer om de webbrowser te starten.
2. Klik op Tools (Extra) > Internet options (Inter-
netopties) > tabblad Connections (Verbindingen).
3. Tik op Never dial a connection (Nooit een
verbinding kiezen).
4. Klik op OK wanneer u klaar bent.
De client kan geen draadloze verbinding maken met de router.
Buiten bereik:
• Plaats de router dichter bij de draadloze client.
• Probeer de kanaalinstellingen te wijzigen.
Vericatie:
• Gebruik een bekabelde verbinding om de router te verbinden.
• Controleer de draadloze beveiligingsinstellingen.
• Houd de Reset-knop op het achterpaneel langer dan vijf seconden inge-
drukt.
Nederlands
WEU8555_RT-AC56U_QSG_v2.indd 27 8/9/13 9:24:02 AM
Page 28
28
Kan de router niet vinden:
•Houd de Reset-knop op het achterpaneel langer dan vijf seconden ingedrukt.
• Controleer de instelling van de draadloze adapter, zoals de
SSID- en coderingsinstellingen.
Kan geen toegang krijgen tot het internet via de draadloze
LAN-adapter.
• Plaats de router dichter bij de draadloze client.
• Controleer of de draadloze adapter verbonden is met de correcte draadloze
router.
• Controleer of het draadloze kanaal dat wordt gebruikt, overeenstemt met de
kanalen die beschikbaar zijn in uw land/regio.
• Controleer de codeerinstellingen.
• Controleer of de ADSL- of kabelverbinding correct is.
• Probeer het opnieuw met een andere ethernetkabel.
Als het "LINK"-lampje van de ADSL blijft knipperen of uit blijft, is er geen
internettoegang mogelijk. De router kan geen verbinding maken met het
ADSL-netwerk.
• Controleer of al uw kabels correct zijn aangesloten.
• Koppel de voedingskabel van de ADSL- of kabelmodem los, wacht enkele
minuten en sluit de kabel vervolgens opnieuw aan.
• Als het ADSL-lampje blijft knipperen of UIT blijft, moet u contact
opnemen met uw ADSL-serviceprovider.
Ik ben mijn netwerknaam of beveiligingssleutels vergeten.
• Probeer de bekabelde verbinding tot stand te brengen en congureer de
coderingsinstellingen opnieuw.
• Houd de Reset-knop gedurende meer dan vijf seconden ingedrukt om het
systeem opnieuw in te stellen of terug te zetten naar de standaard
•fabriekswaarden.
• Standaard fabrieksinstellingen:
Nederlands
WEU8555_RT-AC56U_QSG_v2.indd 28 8/9/13 9:24:03 AM
Page 29
29
Gebruikersnaam /
wachtwoord:
admin / admin
IP-adres:
192.168.1.1
SSID: ASUS
Waar kan ik meer informatie vinden over de draadloze router?
• Handleiding op ondersteunings-cd
• Online site voor veelgestelde vragen (FAQ): http://support.asus.com/faq
• Site voor technische ondersteuning: http://support-org.asus.com/
• Hotline klantendienst: raadpleeg de nummers voor de ondersteuningshotline in de Aanvullende handleiding
Nederlands
SUPPORT HOTLINE
Area Hotline Number Support
Languages
Availability
Taiwan 0800-093-456;
02-81439000
Traditional
Chinese
Mon. to Fri.
9:00-12:00;
13:30-18:00
USA/
Canada
1-812-282-2787 English Mon. to Fri.
8:30-12:00am EST
(5:30am-9:00pm PST)
Sat. to Sun.
9:00am-6:00pm EST
(6:00am-3:00pm PST)
Brazil 4003 0988 (Capital) Portuguese
Mon. to Fri.
9:00am-18:00
0800 880 0988
(demais localidades)
WEU8555_RT-AC56U_QSG_v2.indd 29 8/9/13 9:24:03 AM
Page 30

30
Suomi
Contenu de la boîte
RT-AC56U Verkkolaite
Verkkokaapeli Pikaopas
Tuki-CD (käyttöopas, apuohjelmat) Takuukortti
Jalusta
Pikasilmäys
HUOMAA: Jos jokin nimike puuttuu tai on vahingoittunut, ota yhteys jälleen-
myyjään.
7 9 10 13118
1 2
3
5 64 1412
1) USB 3.0/2.0 LED-valo 6) Power LED-valo 11) USB 3.0/2.0 portit
2) LAN LED -valo 7) WPS- painike 12) Nollauspainike
3) WAN LED -valo 8) Wi-Fi - painike
13) Virtakaapelin liitäntä
(DC-IN)
4) 2,4 GHz LED -valo 9) LAN portit 14) virtakytkin
5) 5GHz LED -valo 10) WAN portit
WEU8555_RT-AC56U_QSG_v2.indd 30 8/9/13 9:24:17 AM
Page 31

31
Suomi
HUOMAA:
•
Ulkoinen USB-kovalevy/-muistitikku:
• Langaton reititin toimii useimpien USB-kovalevyjen/muistitikkujen kanssa 2TB asti ja tukee FAT16-, FAT32-, EXT2-, EXT3ja NTFS-tiedostojärjestelmiä (luku ja kirjoitus).
• Poista USB-laite turvallisesti käynnistämällä WebGUI (
http://
routers.asus.com tai http://192.168.1.1), ja napsauta sitten
Network Map -sivun oikeassa yläreunassa olevaa USB-kuvaketta
ja sitten kohtaa Eject USB 1.
• USB-laitteen poistaminen väärin voi vaurioittaa sillä olevia tietoja.
• Luettelo langattoman reitittimen tukemista tiedostojärjestelmistä
ja kovalevypartitioista on osoitteessa http://event.asus.com/
networks/disksupport
• Luettelo langattoman reitittimen tukemista tulostimista on
osoitteessa http://event.asus.com/networks/printersupport
WEU8555_RT-AC56U_QSG_v2.indd 31 8/9/13 9:24:18 AM
Page 32

32
Reitittimen sijoittaminen
Varmistaaksesi parhaan signaalin lähetyksen langattoman reitittimen ja siihen
liitettyjen verkkolaitteiden välillä, tarkista, että:
• Asetat langattoman reitittimen keskelle aluetta saadaksesi maksimipeitto
-
alueen verkkolaitteille.
• Pidät laitteen vapaana metalliesteistä ja poissa suorasta auringonpaisteesta.
• Pidät laiteen etäällä 802.11g:n tai 20 MHz:in vain Wi-Fi -laitteista, 2,4 GHz:in
tietokoneen oheislaitteista, Bluetooth-laitteista, langattomista puhelimista,
muuntajista, raskaista moottoreista, loistelampuista, mikroaaltouuneista,
jääkaapeista ja muista teollisista laitteista estääksesi signaalin häiriöt tai
menetyksen.
• Parhaan mahdollisen langattoman signaalin aikaansaamiseksi suuntaa kolme
lisäantennia alla olevan piirroksen mukaisesti.
• Parhaan mahdollisen suorituskyvyn varmistamiseksi säädä sisäinen
viilennysjärjestelmä oikein. Katso lisätiedot käyttöoppaasta.
•
Päivität aina uusimman laiteohjelmiston. Hae viimeisimmät
laitteistopäivitykset ASUS-web-sivustolta osoitteesta
http://www.asus.com.
Suomi
WEU8555_RT-AC56U_QSG_v2.indd 32 8/9/13 9:24:18 AM
Page 33

33
Ennen kuin aloitat
1. Kytke irti olemassa olevat modeemikaapelit/-johdot ja poista tietokoneesi
vanhentunut IP-osoite.
a: Irrota verkkolaite virtalähteestä ja irrota se kaapeli/ADSL-modeemista.
b: Irrota verkkokaapeli kaapeli/ADSL-modeemista.
c: Käynnistä tietokone uudelleen (suositus).
Modem
OFF
!
a
b
c
Suomi
VAROITUS! Ennen kaapeleiden/johtojen irrotusta varmista, että
kaapeli-/ADSL-modeemi on ollut pois päältä ainakin kaksi minuuttia.
Jos modeemissa on vara-akku, irrota myös se.
WEU8555_RT-AC56U_QSG_v2.indd 33 8/9/13 9:24:19 AM
Page 34

34
2. Aseta langaton ympäristösi.
a: Liitä langattoman reitittimen verkkolaite DC-IN-porttiin ja liitä se virtalähtee-
seen.
b: Liitä tietokone verkkokaapelilla langattoman reitittimen LAN-porttiin.
TÄRKEÄÄ! Varmista, että WAN- ja LAN LED -valot vilkkuvat.
c: Liitä modeemi toisella verkkokaapelilla langattoman reitittimen WAN-port-
tiin.
d: Liitä modeemin verkkolaite DC-IN-porttiin ja liitä se virtalähteeseen.
Suomi
Computer
Wall Power Outlet
Mode
m
RT-AC56U
WAN
Power
LAN
a
b
c
d
WEU8555_RT-AC56U_QSG_v2.indd 34 8/9/13 9:24:20 AM
Page 35

35
3. Désactivez certaines fonctionnalités de votre ordinateur.
A. Ota välityspalvelin pois käytöstä, jos se on otettu käyttöön.
B. Aseta TCP/IP-asetukset hakeaksesi IP-osoitteen automaattisesti.
C. Ota modeemiyhteys pois käytöstä, jos se on otettu käyttöön.
HUOMAA: Lisätietoa toimintojen poistamisesta käytöstä on kohdassa
Usein kysyttyä (FAQ).
1.
Määritä langattomat asetukset graasella web-käyttöliittymällä (web GUI).
a: Käynnistä web-selain, kuten Internet Explorer, Firefox, Google Chrome, tai
Safari.
Näin pääset alkuun
Suomi
RT-AC56U
RT-AC56U
b
a
WEU8555_RT-AC56U_QSG_v2.indd 35 8/9/13 9:24:21 AM
Page 36

36
HUOMAA: Jos QIS ei käynnisty automaattisesti, käynnistä se
manuaalisesti seuraavasti:
• Näppäile WWW-selaimeesi
http://routers.asus.com tai
http://192.168.1.1 ja suorita Quick Internet Setup (QIS) Wizard
uudelleen.
• Ota pois käytöstä välityspalvelinasetukset ja modeemiyhteys ja aseta
TCP/IP-asetukset hankkimaan IP-osoitteen automaattisesti. Katso
lisätietoja
Usein kysyttyä
-osasta tai käytä tuki-CD-levyn Ohjattu
asennus -toimintoa automaattista diagnoosia varten.
b: Langattoman reitittimen Quick Internet Setup (QIS) -toiminto tunnistaa
automaattisesti, onko Iinternet-palveluntuottajasi yhteystyyppi
dynaaminen IP, PPPoE, PPTP, L2TP vai staattinen IP. Näppäile
yhteystyyppiäsi koskeva tieto.
TÄRKEÄÄ! Saat tarvittavat Internet-yhteyttäsi koskevat tiedot Internetpalveluntuottajaltasi.
HUOMAA: Internet-palveluntuottajan yhteystyypin automaattinen
tunnistus käynnistyy, kun konguroit langattoman reitittimen
ensimmäistä kertaa sekä silloin, kun reitittimen oletusasetukset
palautetaan.
HUOMAA: Annettava verkkonimi voi olla enintään 32 merkin
pituinen.
c: Anna langattomalle 2,4GHz- ja
5GHz-yhteydelle verkkonimi (SSID)
ja turva-avain. Napsauta Käytä, kun
olet valmis.
d: Internet-asetukset ja langattoman
yhteyden asetukset näytetään. Jatka
napsauttamalla Seuraava.
e: Lue langattoman verkkoyhteyden
opaste. Kun olet valmis, napsauta
Lopeta.
Suomi
WEU8555_RT-AC56U_QSG_v2.indd 36 8/9/13 9:24:22 AM
Page 37

37
Usein kysyttyä (FAQ)
Olen noudattanut ohjeita, mutta en pääse WWW-selainpohjaiseen
käyttöliittymään (WebGUI) määrittämään langattoman reitittimen
asetuksia.
A. Ota välityspalvelin pois käytöstä, jos se on otettu käyttöön.
Windows® 7
1. Käynnistä web-selainta napsauttamalla Start
(Käynnistä) > Internet Explorer.
2. Napsauta
Tools (Työkalut) > Internet options
(Internet-asetukset) >
Connections (Yhteydet) -välilehti > LAN settings
(Lähiverkon asetukset).
3. Poista Lähiverkkoasetukset (LAN) -näytöstä
valintamerkki kohdasta Use a proxy server for
your LAN (Käytä välityspalvelinta lähiverkossa).
4. Napsauta OK, kun olet valmis.
Suomi
WEU8555_RT-AC56U_QSG_v2.indd 37 8/9/13 9:24:24 AM
Page 38

38
MAC OS
1. Osoita valikkopalkin Safari > Preferences...
(Asetukset...) > Advanced (Lisävalinnat) >
Change Settings... (Muuta asetuksia...) -väli-
lehteä.
2. Poista protokollaluettelosta valinta FTP Proxy
(FTP-välityspalvelin) ja Web Proxy (HTTPS)
(Web-välipalvelin (HTTPS)).
3. Napsauta Käytä nyt , kun olet valmis.
HUOMAA: Katso lisätiedot koskien välimuistipalvelimen poistamista
käytöstä WWW-selaimesi Ohje-toiminnosta.
B. Aseta TCP/IP-asetukset hakeaksesi IP-osoitteen automaattisesti.
Windows® 7
1. Napsauta Start (Käynnistä) > Control Panel
(Ohjauspaneeli) > Network and Internet (Verkko ja Internet) > Network and Sharing Center
(Verkko ja
jakamiskeskus) > Manage network connections (Hallitse verkkoyhteyksiä).
2. Valitse Internet Protocol Version 4 (TCP/IPv4)
(Internet-protokolla Versio 4 (TCP/IPv4)) ja
napsauta sitten Properties (Ominaisuudet).
Suomi
WEU8555_RT-AC56U_QSG_v2.indd 38 8/9/13 9:24:26 AM
Page 39

39
3. Saadaksesi iPv4 IP-asetukset automaattisesti,
valitse Hanki IP-osoite automaattisesti.
4. Napsauta OK, kun olet valmis.
MAC OS
1. Napsauta näytön vasemmassa yläreunassa
olevaa Apple-kuvaketta .
2. Osoita System Preferences (Järjestelmäase-
tukset) > Network (Verkko) > Congure...
(Kytkentä ...)-kentässä.
3. Valitse TCP/IP-välilehden Määritä IPv4-pudostusvalikosta käyttäen DHCP:tä.
4. Napsauta Käytä nyt , kun olet valmis.
HUOMAA: Katso tietokoneesi TCP/IP-asetuksia koskevat lisätiedot
käyttöjärjestelmän Ohje ja tuki -toiminnosta.
Suomi
WEU8555_RT-AC56U_QSG_v2.indd 39 8/9/13 9:24:27 AM
Page 40

40
C. Ota modeemiyhteys pois käytöstä, jos se on otettu käyttöön.
D. Sulje kaikki käynnissä olevat WWW-selaimet.
HUOMAA: Katso lisätiedot koskien dial-up-yhteyden poistamista
käytöstä WWW-selaimesi Ohje-toiminnosta.
Windows® 7
1. Käynnistä web-selainta napsauttamalla
Start
(Käynnistä) > Internet Explorer.
2. Napsauta
Tools (Työkalut) > Internet options
(Internet-asetukset) > Connections (Yhteydet)
-välilehti.
3. Poista valintamerkki kohdasta Never dial a
connection (Älä koskaan muodosta yhteyttä
puhelinverkon kautta).
4. Napsauta
OK, kun olet valmis.
Asiakas ei saa muodostettua langatonta yhteyttä reitittimeen.
Kantaman ulkopuolella:
• Aseta reititin lähemmäs langatonta asiakasta.
• Yritä muuttaa kanava-asetuksia.
Varmennus:
• Kytke reititin langallisen yhteyden avulla.
• Tarkasta langattoman yhteyden turvallisuusasetukset.
• Paina takapaneelissa olevaa Reset-painiketta yli viisi sekuntia..
Suomi
WEU8555_RT-AC56U_QSG_v2.indd 40 8/9/13 9:24:27 AM
Page 41

41
Reititin ei löydy:
• Paina takapaneelissa olevaa Reset-painiketta yli viisi sekuntia.
• Tarkasta langattoman sovittimen kuten SSID:n asetus sekä
salausasetukset.
Ei Internet-yhteyttä langattoman LAN-sovittimen kautta.
• Siirrä reititin lähemmäs langatonta asiakasta.
• Tarkista onko langaton sovitin liitetty oikeaan langattomaan reitittimeen.
• Tarkista vastaako käytössä oleva langaton kanava käyttömaassa/-alueella
käytössä olevia kanavia.
• Tarkista salausasetukset.
• Tarkista onko ADSL- tai kaapeliyhteys toimiva.
• Yritä uudelleen käyttäen muuta Ethernet-kaapelia.
Jos ADSL:n LINK-valo vilkkuu jatkuvasti tai ei pala, Internet-yhteys ei ole
mahdollinen – reititin ei voi muodostaa yhteyttä ADSL-verkkoon.
• Varmista, että kaikki kaapelit on kytketty oikein.
• Kytke ADSL:n tai kaapelimodeemin virtakaapeli irti, odota muutama
minuutti ja kytke kaapeli uudelleen modeemiin.
• Jos ADSL-valo vilkkuu edelleen tai ei pala, ota yhteyttä ADSLpalveluntarjoajaasi.
Verkkonimi tai suojausavain on unohtunut.
• Yritä luoda langallinen yhteys ja määrittää salausasetukset uudelleen.
• Paina nollauspainiketta yli viisi sekuntia nollataksesi tai palauttaaksesi
järjestelmän tehtaan oletusasetuksiin.
• Tehtaan oletusasetukset:
Käyttäjänimi/Salasana: admin / admin
IP-osoite:
192.168.1.1
SSID: ASUS
Suomi
WEU8555_RT-AC56U_QSG_v2.indd 41 8/9/13 9:24:28 AM
Page 42

42
Suomi
Mistä saan lisätietoja langattomasta reitittimestä?
• Tuki-CD-levyllä oleva Käyttäjän käsikirja
• Online-usein kysyttyä-sivusto: http://support.asus.com/faq
• Teknisen tuen sivusto: http://support-org.asus.com/
• Tukipalvelunumero: Katso tukipalvelunumero kohdasta Supplementary
Guide (Lisäopas).
SUPPORT HOTLINE
Area Hotline Number Support
Languages
Availability
Taiwan 0800-093-456;
02-81439000
Traditional
Chinese
Mon. to Fri.
9:00-12:00;
13:30-18:00
USA/
Canada
1-812-282-2787 English Mon. to Fri.
8:30-12:00am EST
(5:30am-9:00pm PST)
Sat. to Sun.
9:00am-6:00pm EST
(6:00am-3:00pm PST)
Brazil 4003 0988 (Capital) Portuguese
Mon. to Fri.
9:00am-18:00
0800 880 0988
(demais localidades)
WEU8555_RT-AC56U_QSG_v2.indd 42 8/9/13 9:24:28 AM
Page 43

43
Français
Contenu de la boîte
Routeur sans l RT-AC56U Câble réseau
Adaptateur secteur Guide de démarrage rapide
CD de support (Manuel + utilitaires) Carte de garantie
Socle
Caractéristiques matérielles
REMARQUE : Contactez votre service après-vente ASUS si l’un des
éléments est manquant ou endommagé.
1) LED USB 2.0/3.0 6) LED d’alimentation 11) ports USB 3.0/2.0
2) LED réseau
local
7) Bouton WPS
12) Bouton de
réinitialisation
3) LED réseau
étendu
8) Bouton Wi-Fi
13) Prise d’alimentation
(CC)
4) LED 2.4GHz 9) Ports LAN 14) Bouton d’alimentation
5) LED 5GHz 10) port WAN
7 9 10 13118
1 2
3
5 64 1412
WEU8555_RT-AC56U_QSG_v2.indd 43 8/9/13 9:24:43 AM
Page 44

44
Français
NOTES:
•
Périphérique de stockage USB externe :
• Le routeur sans l fonctionne avec la plupart des périphériques de
stockage USB d'une taille maximum de 2To et supporte la lecture/
écriture pour les formats de chiers FAT16, FAT32, EXT2, EXT3 et
NTFS.
• Pour retirer le périphérique de stockage USB en toute sécurité,
ouvre le Gestionnaire de conguration du routeur (http://router.
asus.com ou http://192.168.1.1), puis dans la page Network Map
(Carte réseau), cliquez d'abord sur l'icône USB située sur le coin
supérieur puis sur Eject USB 1 (Éjecter le périphérique USB 1).
• Une mauvaise éjection du périphérique de stockage peut
endommager les données contenues sur le disque.
• Pour consulter la liste des systèmes de chiers et de partitions de
disques supportés par le routeur sans l, visitez le site http://event.
asus.com/networks/disksupport
• Pour consulter la liste des imprimantes supportéss par le routeur sans
l, visitez le site http://event.asus.com/networks/printersupport
WEU8555_RT-AC56U_QSG_v2.indd 44 8/9/13 9:24:44 AM
Page 45

45
Français
Positionner le routeur sans l
Pour optimiser la transmission du signal sans l entre votre routeur et les
périphériques réseau y étant connecté, veuillez vous assurer des points suivants
:
• Placez le routeur sans l dans un emplacement central pour obtenir une
couverture sans l optimale.
• Maintenez le routeur à distance des obstructions métalliques et des rayons du
soleil.
• Maintenez le routeur à distance d’appareils ne fonctionnant qu’avec les
standards/fréquences Wi-Fi 802.11g ou 20MHz, les périphériques 2.4GHz et
Bluetooth, les téléphones sans l, les transformateurs électriques, les moteurs
à service intense, les lumières uorescentes, les micro-ondes, les réfrigérateurs
et autres équipements industriels pour éviter les interférences ou les pertes de
signal sans l.
• Orientez les trois antennes amovibles comme illustré ci-dessous pour améliorer
le qualité de couverture du signal sans l.
• Pour obtenir des performances optimales, ajustez le système de refroidissement
interne. Consultez le manuel d’utilisation pour plus de détails.
• Mettez toujours le routeur à jour dans la version de rmware la plus récente.
Visitez le site Web d’ASUS sur http://www.asus.com pour consultez la liste des
mises à jour.
WEU8555_RT-AC56U_QSG_v2.indd 45 8/9/13 9:24:45 AM
Page 46

46
Français
Avant de commencer
1. Déconnectez tous les câbles de votre conguration modem actuelle et
renouvelez l’adresse IP de votre ordinateur.
a: Débranchez l’adaptateur secteur de la prise électrique et du modem câble/
ADSL.
b: Déconnectez le câble réseau du modem câble/ADSL.
c: Redémarrez votre ordinateur (recommandé).
Modem
OFF
!
a
b
c
AVERTISSEMENT ! Avant de débrancher les câbles du modem, assu-
rez-vous que votre modem câble/ADSL est éteint depuis au moins 2
minutes. Si votre modem possède une batterie de secours, retirez-la.
WEU8555_RT-AC56U_QSG_v2.indd 46 8/9/13 9:24:46 AM
Page 47

47
Français
2. Congurez votre environnement réseau sans l.
a: Reliez une extrémité de l’adaptateur secteur au port d’alimentation du
routeur et l’autre extrémité à une prise électrique.
b: À l’aide d’un câble réseau, connectez votre ordinateur au port réseau local
(LAN) du routeur sans l.
IMPORTANT ! Vériez que les LED (voyants lumineux) de réseau
étendu et de réseau local clignotent.
c: À l’aide d’un autre câble réseau, connectez votre modem au port réseau
étendu (WAN) du routeur sans l.
d: Reliez une extrémité de l’adaptateur secteur au port d’alimentation du
modem et l’autre extrémité à une prise électrique.
Computer
Wall Power Outlet
Mode
m
RT-AC56U
WAN
Power
LAN
a
b
c
d
WEU8555_RT-AC56U_QSG_v2.indd 47 8/9/13 9:24:48 AM
Page 48

48
Français
3. Désactivez certaines fonctionnalités de votre ordinateur.
A. Désactivez le serveur proxy si celui-ci est activé.
B. Congurez les paramètres TCP/IP pour l’obtention automatique d’une adresse
IP.
C. Désactivez la numérotation de votre connexion à distance si celle-ci existe.
REMARQUE : Pour plus de détails, consultez la section FAQ de ce guide.
1. Congurez les paramètres sans l via le Gestionnaire de conguration
Web du routeur.
a: Ouvrez votre navigateur Internet (ex : Internet Explorer, Google Chrome,
Safari ou Firefox).
Mise en route
RT-AC56U
RT-AC56U
b
a
WEU8555_RT-AC56U_QSG_v2.indd 48 8/9/13 9:24:49 AM
Page 49

49
Français
REMARQUE : Si l'Assistant de conguration rapide ne s'exécute pas
automatiquement, suivez les étapes ci-dessous :
•
Entrez http://router.asus.com ou http://192.168.1.1 dans la
barre d’adresse de votre explorateur Web, et lancez l'Assistant de
conguration rapide.
• Désactivez votre serveur proxy et la numérotation de votre
connexion à distance (si disponibles), puis congurez vos paramètres
TCP/IP de sorte à obtenir une adresse IP automatiquement. Pour plus
de détails, consultez la section
Dépannage
ou utilisez l’Assistant
de conguration contenu dans le CD de support pour obtenir un
diagnostic de connexion.
b: Le routeur sans détecte automatiquement si votre connexion utilise une
IP dynamique ou statique, le protocole PPPoE, PPTP ou L2TP. Entrez les
informations nécessaires en fonction de votre type de connexion.
IMPORTANT ! Vous pouvez obtenir vos informations de connexion
auprès de votre FAI (Fournisseur d’accès à Internet).
REMARQUE : L’auto-détection de votre type de connexion a lieu
lorsque vous congurez le routeur sans l pour la première fois ou
lorsque vous restaurez les paramètres par défaut du routeur.
REMARQUE : Vous pouvez assigner un nom réseau composé d’un
maximum de 32 caractères.
c: Assignez un nom (SSID) au réseau
sans l ainsi qu’une clé de sécurité
pour votre connexion sans l
2.4GHz et 5GHz. Cliquez sur Apply
(Appliquer) une fois terminé.
d: Les paramètres Internet et de
connexion sans l apparaissent.
Cliquez sur Next (Suivant) pour
continuer.
e: Lisez le tutoriel de connexion réseau.
Une fois terminé, cliquez sur Finish
(Terminé).
WEU8555_RT-AC56U_QSG_v2.indd 49 8/9/13 9:24:49 AM
Page 50

50
Français
Foire aux questions (FAQ)
Même après avoir suivi les instructions de ce guide, je ne parviens toujours
pas à accéder au Gestionnaire de conguration du routeur.
A. Désactivez le serveur proxy si celui-ci est activé.
Sous Windows® 7
1. Cliquez sur
Démarrer > Internet Explorer pour
lancer le navigateur.
2. Cliquez sur Outils > Options Internet > onglet
Connexions > Paramètres réseau.
3. À partir de l’écran Paramètres du réseau local,
décochez l’option Utiliser un serveur proxy
pour votre réseau local.
4. Cliquez sur OK une fois terminé.
WEU8555_RT-AC56U_QSG_v2.indd 50 8/9/13 9:24:50 AM
Page 51

51
Français
Sous MAC OS
1. Dans la barre des menus, cliquez sur Safari >
Préférences > Avancée > Modier les réglages...
2. Dans la liste des protocoles, décochez les
options Proxy FTP et Proxy web sécurisé
(HTTPS).
3. Cliquez sur OK une fois terminé.
REMARQUE : Consultez le chier d’Aide de votre explorateur Internet
pour plus de détails sur la désactivation du serveur proxy
B. Congurez les paramètres TCP/IP pour l’obtention automatique d’une adresse
IP.
Sous Windows® 7
1. Cliquez sur Démarrer > Panneau de conguration > Réseau et Internet > Centre réseau et
partage > Gérer les connexions réseau.
2. Sélectionnez Protocole Internet version 4 (TCP/
IPv4), puis cliquez sur Propriétés.
WEU8555_RT-AC56U_QSG_v2.indd 51 8/9/13 9:24:51 AM
Page 52

52
Français
3. Cochez l’option Obtenir une adresse IP automatiquement.
4. Cliquez sur OK une fois terminé.
Sous MAC OS
1. Cliquez sur la Pomme localisée en haut à
gauche de votre écran.
2. Cliquez sur Préférences Système > Réseau >
Congurer...
3. Dans l’onglet TCP/IP, sélectionnez Via DHCP
dans le menu déroulant Congurer IPv4.
4. Cllick Appliquer maintenant une fois terminé..
REMARQUE : Consultez l’Aide de votre système d’exploitation pour
plus de détails sur la conguration des paramètres TCP/IP de votre ordinateur ainsi que sur la désactivation du serveur proxy et de la numérotation de connexion.
WEU8555_RT-AC56U_QSG_v2.indd 52 8/9/13 9:24:52 AM
Page 53

53
Français
C. Désactivez la numérotation de votre connexion à distance (si disponible).
D. Fermez tous les navigateurs Internet en cours d’exécution.
REMARQUE : Consultez le chier d’Aide de votre explorateur Internet
pour plus de détails sur la désactivation d’une connexion à distance.
Sous Windows® 7
1. Cliquez sur Démarrer > Internet Explorer pour
lancer le navigateur.
2. Cliquez sur Outils > Options Internet > onglet
Connexions.
3. Cochez l’option Ne jamais établir de connexion.
4. Cliquez sur OK une fois terminé.
Le client ne peut pas établir de connexion sans l avec le routeur.
Hors de portée :
• Rapprochez le client du routeur.
• Essayez d’autres paramètres de canaux.
Authentication :
• Utilisez une connexion laire pour vous connecter au
routeur.
• Vériez les paramètres de sécurité sans l.
• Appuyez sur le bouton Reset situé sur l’arrière du routeur pendant plus
de 5 secondes.
WEU8555_RT-AC56U_QSG_v2.indd 53 8/9/13 9:24:53 AM
Page 54

54
Français
Routeur introuvable :
• Appuyez sur le bouton de réinitialisation situé sur l’arrière du routeur
pendant plus de 5 secondes.
• Vériez les paramètres SSID et de chirement de l’adaptateur sans l.
Impossible d’accéder à Internet via un adaptateur sans l local.
• Rapprochez le client du routeur.
• Vériez que l’adaptateur sans l est connecté au bon routeur sans l.
• Vériez que le canal sans l que vous utilisez appartient aux canaux disponi-
bles dans votre pays/région.
• Vériez les paramètres de chirement.
• Vériez la connexion ADSL ou au Câble.
• Utilisez un autre câble Ethernet.
Si la LED “LINK” du modem ADSL clignote ou reste éteinte en permanence,
cela signie alors qu’il n’est pas possible d’accéder à Internet - le routeur
n’est pas en mesure d’établir une connexion au réseau ADSL.
• Vériez que les câbles sont correctement connectés.
• Débranchez le câble d’alimentation du modem. Patientez quelques secon-
des, puis reconnectez le câble.
• SI la LED ADSL clignote ou reste éteinte en permanence, contactez votre
fournisseur d’accès ADSL.
Nom de réseau et/ou clé de cryptage oubliés.
• Essayez de congurer une connexion laire et congurez à nouveau les para-
mètres de chirement sans l.
• Appuyez sur le bouton de réinitialisation situé sur l’arrière du routeur pen-
dant plus de 5 secondes.
• Paramètres par défaut :
Nom d’utilisateur / Mot de
passe :
admin / admin
Adresse IP :
192.168.1.1
SSID : ASUS
WEU8555_RT-AC56U_QSG_v2.indd 54 8/9/13 9:24:53 AM
Page 55

55
Français
Où puis-je obtenir plus d’informations sur le routeur sans l ?
• Manuel d’utilisation contenu dans le CD de support
• FAQ en ligne : http://support.asus.com/faq
• Site de support technique : http://support.asus.com
• Hotline : consultez la liste des centres d'appels ASUS en n de guide.
SUPPORT HOTLINE
Area Hotline Number Support
Languages
Availability
Taiwan 0800-093-456;
02-81439000
Traditional
Chinese
Mon. to Fri.
9:00-12:00;
13:30-18:00
USA/
Canada
1-812-282-2787 English Mon. to Fri.
8:30-12:00am EST
(5:30am-9:00pm PST)
Sat. to Sun.
9:00am-6:00pm EST
(6:00am-3:00pm PST)
Brazil 4003 0988 (Capital) Portuguese
Mon. to Fri.
9:00am-18:00
0800 880 0988
(demais localidades)
WEU8555_RT-AC56U_QSG_v2.indd 55 8/9/13 9:24:54 AM
Page 56

56
Deutsch
Verpackungsinhalt
RT-AC56U AC-Adapter
Netzwerkkabel Schnellstarthilfe
Support-CD (Handbuch/Anwendungen) Garantiekarte
Standhalterung
Erste Schritte
HINWEIS: Sollten Artikel beschädigt oder nicht vorhanden sein,
wenden Sie sich an Ihren Händler.
7 9 10 13118
1 2
3
5 64 1412
1) USB 3.0/2.0 LED 6) Strom-LED 11) USB 3.0/2.0 Anschlüsse
2) LAN LED 7) WPS-Taste 12) Reset-Taste
3) WAN LED 8) Wi-Fi-Taste 13) Netzanschluss (DC-IN)
4) 2.4GHz LED 9) LAN Anschlüsse 14) Einschalttaste
5) 5GHz LED 10) WAN Anschlüsse
WEU8555_RT-AC56U_QSG_v2.indd 56 8/9/13 9:25:10 AM
Page 57

57
Deutsch
HINWEISE:
•
Externe USB-Festplatte/Flashlaufwerk:
• Der drahtlose Router läuft mit den meisten USB-Festplatten/
Flashlaufwerken (bis zu 2TB) und unterstützt Lese-/Schreibezugri
in FAT16, FAT32, EXT2, EXT3 und NTFS.
• Um USB-Datenträger sicher zu entfernen, laden Sie die WebGUI (http://192.168.1.1), und klicken Sie oben rechts im Fenster
Network Map (Netzwerkübersicht) auf das USB-Symbol und
dann auf Eject USB 1 (USB 1 auswerfen).
• Falsches Entfernen von USB-Datenträgern kann zu Datenverlust
führen.
• Für weitere Details zu Dateisystemen und Festplattenpartitionen,
die der drahtlose Router unterstützt, besuchen Sie bitte
http://event.asus.com/networks/disksupport
• Für weitere Details zu Druckern, die der drahtloses Router unterstützt,
besuchen Sie bitte
http://event.asus.com/networks/printersupport
WEU8555_RT-AC56U_QSG_v2.indd 57 8/9/13 9:25:11 AM
Page 58

58
Positionierung
Für beste Funksignalqualität zwischen dem drahtlosen Router und der damit
verbundenen Geräte, beachten Sie bitte folgende Hinweise:
• Stellen Sie das Gerät an einer zentralen Stelle auf, um eine ideale Reichweite für
sämtliche drahtlose mobile Geräte zu erzielen.
• Stellen Sie sicher, dass das Gerät nicht von Metallgegenständen blockiert wird.
Halten Sie das Gerät von direkter Sonneneinstrahlung fern.
• Halten Sie das Gerät von 802.11g oder nur 20MHz Wi-Fi-Geräten, 2.4GHz
Computer-Peripherie, Bluetooth-Geräten, Schnurlostelefonen, Transformatoren,
Hochleistungsmotoren, uoreszierenden Leuchten, Mikrowellen, Kühlschränken
und sonstigen industriellen Anlagen fern, um einen Signalverlust zu vermeiden.
• Um beste Signalabdeckung sicherzustellen, richten Sie die drei montierbare
Antennen wie unten abgebildet aus.
• Für optimalen Betrieb sollten Sie das interne Kühlsystem anpassen. Details
hierzu nden Sie im Benutzerhandbuch.
• Halten Sie die Firmware immer auf dem neuesten Stand. Die aktuellste Firmware
nden Sie auf der ASUS-Webseite unter http://www.asus.com.
Deutsch
WEU8555_RT-AC56U_QSG_v2.indd 58 8/9/13 9:25:11 AM
Page 59

59
Bevor Sie beginnen
1. Trennen & entfernen Sie alle Kabel/Leitungen Ihrer alten Modemkonguration & entfernen Sie die alte IP-Adresse Ihres Computers.
a: Ziehen Sie den AC-Adapter aus der Steckdose und trennen Sie ihn vom
Kabel/ADSL-Modem.
b: Trennen Sie das Netzwerkkabel vom Kabel/ADSL-Modem.
c: Starten Sie den Computer neu (empfohlen).
Modem
OFF
!
a
b
c
Deutsch
WARNUNG! Bevor Sie die Kabel/Leitungen entfernen, sollte Ihr Kabel/
ADSL-Modem für mindestens zwei Minuten ausgeschaltet werden. Falls
Ihr Modem eine Batterie hat, entfernen Sie diese auch.
WEU8555_RT-AC56U_QSG_v2.indd 59 8/9/13 9:25:12 AM
Page 60

60
2. Richten Sie die Netzwerkumgebung ein.
a: Verbinden Sie den AC-Adapter ihres drahtlosen Routers mit dem DC-IN-An-
schluss sowie mit der Stromversorgung.
b: Verwenden Sie ein Netzwerkkabel, um den Computer mit dem LAN-An-
schluss Ihres drahtlosen Routers zu verbinden.
WICHTIG! Die WAN und LAN LEDs sollten blinken.
c: Verwenden Sie ein weiteres Netzwerkkabel, um den Modem mit dem WAN-
Anschluss Ihres drahtlosen Routers zu verbinden.
d: Verbinden Sie den AC-Adapter ihres Modems mit dem DC-IN-Anschluss
sowie mit der Stromversorgung.
Deutsch
Computer
Wall Power Outlet
Mode
m
RT-AC56U
WAN
Power
LAN
a
b
c
d
WEU8555_RT-AC56U_QSG_v2.indd 60 8/9/13 9:25:14 AM
Page 61

61
3. Deaktivieren Sie nicht benötigte Einstellungen am Computer.
A. Deaktivieren Sie den Proxy-Server (falls aktiviert).
B. Stellen Sie die TCP/IP-Einstellungen auf automatische IP-Erkennung ein.
C. Deaktivieren Sie die DFÜ-Verbindung (falls aktiviert).
HINWEIS: Für weitere Details zur Aktivierung/Deaktivierung der
Computer-Einstellungen beziehen Sie sich auf Häug gestellte Fragen
(FAQ).
1. Kongurieren Sie die Drahtloseinstellungen über die webbasierende
grasche Benutzeroberäche (web GUI).
a: Starten Sie einen Webbrowser wie Internet Explorer, Google Chrome, Firefox
oder Safari.
Erste Schritte
Deutsch
b
a
RT-AC56U
RT-AC56U
WEU8555_RT-AC56U_QSG_v2.indd 61 8/9/13 9:25:15 AM
Page 62

62
HINWEIS: Falls QIS (Schnelleinstellung) nicht automatisch geladen
wird, gehen Sie wie folgt vor, um QIS manuell zu laden:
•
Geben Sie http://192.168.1.1 in Ihren Browser ein und laden Sie Qick
Internet Setup (Schnelleinstellung, QIS)-Assistenten.
•
Deaktivieren Sie Proxy-Einstellungen, DFÜ-Verbindung und setzen
Sie die TCP/IP-Einstellungen auf automatische IP-Erkennung. Für
weitere Details beziehen Sie sich auf den Abschnitt
Häug gestellte
Fragen (FAQ)
oder verwenden Sie den Einstellungsassistenten auf
der Support-CD für eine automatische Diagnose.
b: Quick Internet Setup (Schnelleinstellung, QIS) des drahtlosen Routers
erkennt automatisch, ob die Verbindungsart Ihres Internet Dienstanbieters
(ISP) Dynamische IP (Dynamic IP), PPPoE, PPTP, L2TP oder Statische IP
(Static IP) ist. Geben Sie zusätzlich die nötigen Daten Ihrer Verbindung ein.
WICHTIG! Beziehen Sie die nötigen Informationen zur Ihrer Verbin-
dungsart von Ihrem Internet-Dienstanbieter (ISP).
HINWEIS: Die autom. Erkennung der Verbindungsart Ihres ISP wird
bei der ersten Konguration des drahtlosen Routers oder nach dem
Reset (Zurücksetzen) Ihres drahtlosen Routers zu seinen Standardeinstellungen durchgeführt.
HINWEIS: Netzwerkname darf bis zu 32 Zeichen enthalten.
c: Weisen Sie der 2.4GHz- und 5GHz-
Verbindung einen Netzwerknamen
(SSID) und einen Sicherheitsschlüssel zu. Klicken Sie auf Apply (Über-
nehmen), wenn Sie fertig sind.
d: Ihre Internet und Drahtloseinstel-
lungen werden angezeigt. Klicken
Sie auf Next (Weiter), um fortzufahren.
e: Lesen Sie sich die Anleitung für
drahtlose Netzwerkverbindungen durch. Wenn abgeschlossen, klicken Sie
auf Finish (Fertigstellen).
Deutsch
WEU8555_RT-AC56U_QSG_v2.indd 62 8/9/13 9:25:17 AM
Page 63

63
Häug gestellte Fragen (FAQ)
Nachdem ich den Anweisungen folgte, kann ich immer noch nicht auf
die web GUI zugreifen, um die Einstellungen des drahtlosen Routers zu
kongurieren.
A. Deaktivieren Sie den Proxyserver (falls aktiviert).
Windows® 7
1. Klicken Sie auf Start > Internet Explorer, um den
Webbrowser zu laden.
2. Klicken Sie auf Extras (Tools) > Internetoptionen
(Internet options) > Auswahl Verbindungen (Con-
nections) > LAN-Einstellungen (LAN settings).
LAN).
3. Im Fenster
Einstellungen für lokales Netz-
werk, deaktivieren Sie Proxyserver für LAN
verwenden (Use a proxy server for your
LAN).
4. Wenn abgeschlossen, klicken Sie auf OK.
Deutsch
WEU8555_RT-AC56U_QSG_v2.indd 63 8/9/13 9:25:17 AM
Page 64

64
MAC OS
1. Klicken Sie in Safari-Browser auf Safari >
Einstellungen... (Preferences...) > Auswahl Er-
weitert (Advanced) > Einstellungen ändern...
(Change Settings...).
2. Deaktivieren Sie in der Protokollliste FTP Proxy
und Web Proxy (HTTP).
3. Wenn abgeschlossen, klicken Sie auf Jetzt An-
wenden (Apply Now).
HINWEIS: Für Details zur Deaktivierung eines Proxy-Server beziehen
Sie sich auf die Hilfsfunktion Ihres Browsers.
B. Setzen Sie die TCP/IP-Einstellungen auf automatische IP-Erkennung.
Windows® 7
1. Klicken Sie auf
Start > Systemsteuerung (Control Panel) > Netzwerk und Internet (Network
and Internet) > Netzwerk- und Freigabecenter
(Network and Sharing Center) > Netzwerkverbindungen verwalten (Manage network
connections).
2. Wählen Sie Internetprotokoll Version 4 (TCP/
IPv4) (Internet Protocol Version 4 (TCP/IPv4))
und klicken Sie dann auf Eigenschaften (Properties).
Deutsch
WEU8555_RT-AC56U_QSG_v2.indd 64 8/9/13 9:25:18 AM
Page 65

65
3. Wählen Sie IP-Adresse automatisch beziehen
(Obtain an IP address automatically), um die
iPv4 IP-Einstellungen automatisch zu beziehen.
4. Wenn abgeschlossen, klicken Sie auf OK.
MAC OS
1. Klicken Sie oben links im Bildschirm auf das
Apple-Symbol .
2. Klicken Sie auf Systemeinstellungen... (System
Preferences) > Netzwerk (Network)
3. Klicken Sie im Tab TCP/IP unter der DropdownListe IPv4 kongurieren (Congure IPv4) auf
DHCP (Using DHCP).
4. Wenn abgeschlossen, klicken Sie auf Jetzt An-
wenden (Apply Now).
HINWEIS: Für Details zur Konguration der TCP/IP-Einstellungen bezie-
hen Sie sich auf Hilfe und Support des jeweiligen Betriebssystems.
Deutsch
WEU8555_RT-AC56U_QSG_v2.indd 65 8/9/13 9:25:19 AM
Page 66

66
C. Deaktivieren Sie die DFÜ-Verbindung, falls aktiviert.
D. Schließen Sie alle geöneten Webbrowser.
HINWEIS: Für Details zur Deaktivierung einer DFÜ-Verbindung bezie-
hen Sie sich auf die Hilfsfunktion Ihres Browsers.
Windows® 7
1. Klicken Sie auf Start > Internet Explorer, um den
Browser zu starten.
2. Klicken Sie auf Extras (Tools) > Internetoptionen
(Internet options) > Auswahl Verbindungen (Con-
nections).
3. Wählen Sie Keine Verbindung wählen (Never
dial a connection).
4. Wenn abgeschlossen, klicken Sie auf OK.
Der Client kann keine drahtlose Verbindung mit dem Router herstellen.
Außerhalb der Reichweite:
• Stellen Sie den Router näher an den drahtlosen Client.
• Versuchen Sie, die Kanaleinstellungen zu ändern.
Authentizierung:
• Stellen Sie eine Kabelverbindung mit dem Router her.
• Prüfen Sie die drahtlosen Sicherheitseinstellungen.
• Drücken Sie die Reset-Taste an der Rückseite für mindestens fünf Sekun-
den
Deutsch
WEU8555_RT-AC56U_QSG_v2.indd 66 8/9/13 9:25:19 AM
Page 67

67
Deutsch
Der Router wird nicht erkannt.
• Drücken Sie die Reset-Taste an der Rückseite für mindestens fünf Sekunden.
• Prüfen Sie die Einstellung am drahtlosen Adapter wie z.B. die SSID- und
Verschlüsselungseinstellungen.
Es kann keine Verbindung mit dem Internet über den Drahtlos-LANAdapter hergestellt werden.
• Stellen Sie den Router näher an den drahtlosen Client.
• Prüfen Sie, ob der drahtlose Adapter mit dem richtigen drahtlosen Router
verbunden ist.
• Prüfen Sie, ob der verwendete Funkkanal konform mit den verfügbaren
Kanälen in Ihrem Land/Ihrer Region ist.
• Prüfen Sie die Verschlüsselungseinstellungen.
• Prüfen Sie, ob die ADSL- oder Kabelverbindung richtig ist.
• Verwenden Sie ein anderes Ethernet-Kabel und versuchen es erneut.
Wenn die LED „Link“ am ADSL-Modem fortwährend blinkt oder erlischt, ist
das Internet nicht zugänglich - der Router kann keine Verbindung mit dem
ADSL-Netzwerk herstellen.
• Stellen Sie sicher, dass sämtliche Kabel richtig verbunden sind.
• Trennen Sie das Netzkabel von dem ADSL- oder Kabel-Modem, warten für
ein paar Minuten und schließen das Kabel wieder an.
• Falls die LED am ADSL-Modem weiterhin nur blinkt oder erlischt, wenden Sie
sich bitte an Ihren ADSL-Dienstanbieter.
Der Netzwerkname oder das Verschlüsselungskennwort wurde vergessen.
• Versuchen Sie, eine Kabelverbindung herzustellen und die Drahtlos-Ver-
schlüsselung erneut zu kongurieren.
• Drücken Sie die Reset-Taste an der Rückseite für mindestens fünf Sekunden.‘
• Werkseinstellungen
WEU8555_RT-AC56U_QSG_v2.indd 67 8/9/13 9:25:19 AM
Page 68

68
Deutsch
Nombre de usuario / Contraseña: admin / admin
Dirección IP:
192.168.1.1
SSID: ASUS
Wo kann ich weitere Informationen über den drahtlosen Router erhalten?
• Benutzerhandbuch auf der Support-CD
• Online FAQ: http://support.asus.com/faq
• Technische Unterstützung: http://support-org.asus.com/
• Kunden-Hotline: Beziehen Sie sich auf die Support-Hotline in dieser Schnellstarthilfe.
SUPPORT HOTLINE
Area Hotline Number Support
Languages
Availability
Taiwan 0800-093-456;
02-81439000
Traditional
Chinese
Mon. to Fri.
9:00-12:00;
13:30-18:00
USA/
Canada
1-812-282-2787 English Mon. to Fri.
8:30-12:00am EST
(5:30am-9:00pm PST)
Sat. to Sun.
9:00am-6:00pm EST
(6:00am-3:00pm PST)
Brazil 4003 0988 (Capital) Portuguese
Mon. to Fri.
9:00am-18:00
0800 880 0988
(demais localidades)
WEU8555_RT-AC56U_QSG_v2.indd 68 8/9/13 9:25:20 AM
Page 69

69
Norsk
Innhold i pakken
RT-AC56U AC-adapter
Nettverkskabel Hurtigstartguide
Support CD (Brukerveiledning/verktøy) Garantikor
Stand
Et overblikk
MERK: Hvis noen av elementene mangler eller er skadet, kontakt
forhandleren din.
1) USB 3.0/2.0 LED 6) Strøm LED 11) USB 3.0/2.0-porter
2) LAN LED 7) WPS -knapp 12) Reset (Nullstill)-knapp
3) WAN LED 8) Wi-Fi -knapp 13) Strømport (DC)
4) 2.4GHz LED 9) LAN-porter 14) strømbryter
5) 5GHz LED 10) WAN-porter
7 9 10 13118
1 2
3
5 64 1412
WEU8555_RT-AC56U_QSG_v2.indd 69 8/9/13 9:25:41 AM
Page 70

70
Norsk
MERK:
•
USB ekstern HDD/ashdisk:
• Den trådløse ruteren fungerer med de este USB
HDD-er/ashdisker opptil 2 TB og støtter
lese-skrivetilgang for FAT16, FAT32, EXT2, EXT3 og NTFS.
• For trygg erning av USB-disken, start det nettbaserte
brukergrensesnittet (http://router.asus.com eller
http://192.168.1.1), deretter i Network Map (Nettverkskart)sidens øvre høyre hjørne, klikk på USB-ikonet og klikk på Eject
USB 1 (Løs ut USB 1).
• Feil erning av USB-disken kan føre til korrupt data.
• For listen over lsystemer og harddiskpartisjoner som den
trådløse ruteren støtter, besøk http://event.asus.com/ networks/
disksupport
• For listen over skrivere som den trådløse ruteren støtter, besøk
http://event.asus.com/networks/printersupport
WEU8555_RT-AC56U_QSG_v2.indd 70 8/9/13 9:25:42 AM
Page 71

71
Norsk
Plassere ruteren
For best mulig trådløs signaloverføring mellom den trådløse ruteren og nettverksenhetene som er koblet til den, må du sørge for at du:
• Plasserer den trådløse rutere i et sentralt område for maksimal trådløs dek
-
ning for nettverksenhetene.
• Hold enheten unna metallhindringer og direkte sollys.
• Hold enheten unna Wi-Fi-enheter med bare 802.11g eller 20MHz, 2,4 GHzdatamaskinutstyr, Bluetooth-enheter, trådløse telefoner, transformatorer,
tunge motorer, uorescerende lys, mikrobølgeovner, kjøleskap og annet
industriutstyr for å forhindre signalinterferens eller -tap.
• For å forsikre best mulig trådløst signal, må du orientere de tre avtakbare
antennene som vist på tegningen under.
• For optimal prestasjon, må du justere det interne kjølingssystemet. Se
brukerhåndboken for ere detaljer.
• Alltid oppdater til den siste fastvaren. Besøk ASUS-websiden på http://www.
asus.com for de aller siste fastvareoppdateringene.
WEU8555_RT-AC56U_QSG_v2.indd 71 8/9/13 9:25:43 AM
Page 72

72
Norsk
Før du fortsetter
1. Koble fra ledningene/kablene fra ditt eksisterende modemoppsett og
frigjør datamaskinens utdaterte IP-adresse.
a: Koble fra AC-adapteren fra stikkontakten og koble den fra kabel-/ADSL- mo-
demet.
b: Koble nettverkskabelen fra kabel-/ADSL-modemet.
c: Start datamaskinen din på nytt (anbefales).
Modem
OFF
!
a
b
c
ADVARSEL! Før du kobler fra ledningene/kablene, sørg for at kabel-/
ADSL-modemet har vært slått av i minst to minutter. Hvis modemet ditt
har et reservebatteri, erner du også dette.
WEU8555_RT-AC56U_QSG_v2.indd 72 8/9/13 9:25:44 AM
Page 73

73
Norsk
2.
Sett opp det trådløse miljøet.
a: Sett inn den trådløse ruterens AC-adapter i DC-inntaksporten og koble til et
strømuttak.
b: Med nettverkskabelen, koble datamaskinen til den trådløse ruterens LAN-
port.
ADVARSEL! Sørg for at WAN og LAN LED-lampene blinker.
c: Med en annen nettverkskabel, koble modemet til den trådløse ruterens
WANport.
d: Sett inn modemets AC-adapter i DC-inntaksporten og koble til et strømuttak.
Computer
Wall Power Outlet
Mode
m
RT-AC56U
WAN
Power
LAN
WEU8555_RT-AC56U_QSG_v2.indd 73 8/9/13 9:25:45 AM
Page 74

74
Norsk
3. Deaktiver noen innstillinger på datamaskinen.
A. Deaktiver proxyserveren, hvis denne er aktivert.
B. Still inn TCP/IP-innstillingene til å automatisk innhente en IP-adresse.
C. Deaktver den eksterne oppringingen, hvis denne er aktivert.
MERK: For ere detaljer om deaktivering av
datamaskininnstillingene, henvis til Spørsmål og svar.
1. Kongurer de trådløse innstillingene dine via det nettbaserte gren-
sesnittet.
a: Start nettleseren din, f.eks. Internet Explorer, Firefox, Google Chrome, eller
Safari.
Komme i gang
RT-AC56U
RT-AC56U
b
a
WEU8555_RT-AC56U_QSG_v2.indd 74 8/9/13 9:25:47 AM
Page 75

75
Norsk
MERK: Hvis QIS ikke starter automatisk, følger du disse trinnene for å
manuelt starte QIS:
• I nettleseren din, skriv inn
http://router.asus.com eller
http://192.168.1.1 og kjør Quick Internet Setup (QIS)-veiviseren
igjen.
•
Deaktiver proxy-innstillingene, ekstern oppringing, og sett opp
TCP/IP-innstillingene til å automatisk hente inn en IP-adresse. For mer
informasjon, henvis til Spørsmål og svar-delen eller bruk oppsettsveiviseren på support CD-en for automatisk problemløsning.
b: Den trådløse ruterens Quick Internet Setup (QIS)-funksjonen
registrerer automatisk om ISP-tilkoblingstypen din er Dynamic IP (Dyna-
misk IP), PPPoE, PPTP, L2TP og Static IP (Statisk IP). Tast inn nødvendig
informasjon for tilkoblingstypen din.
ADVARSEL! Få nødvendig informasjon om
Internett-tilkoblingstypen din fra Internettleverandøren din (ISP).
MERK: Auto-detection (Automatisk registrering) av
ISP-tilkoblingstypen din skjer når du kongurerer den trådløse ruteren
for første gang eller når den trådløse ruteren er nullstilt til standardinnstillingene.
MERK: Du kan tilordne et nettverksnavn med opptil 32 tegn.
c: Tilordne nettverksnavnet (SSID) og
sikkerhetsnøkkelen for din 2,4 GHz
og 5 GHz trådløse
tilkobling. Klikk på Apply (Bruk) når
du er ferdig.
d: Innstillingene for Internett og
trådløst vises. Klikk Next (Neste) for
å fortsette.
e: Les opplæringen for trådløs nett-
verkstilkobling. Når du er ferdig klikk
på Finish (Avslutt).
WEU8555_RT-AC56U_QSG_v2.indd 75 8/9/13 9:25:48 AM
Page 76

76
Norsk
Spørsmål og svar
Etter at å ha fulgt trinnene, kan jeg fremdeles ikke få tilgang til den trådløse
ruterens nettbaserte brukergrensesnitt for å kongurere den trådløse
ruterens innstillinger.
A. Deaktiver proxyserveren, hvis denne er aktivert
.
Windows® 7
1. Klikk på
Start > Internet Explorer for å åpne nett-
leseren.
2. Klikk på Tools (Verktøy) > Internet options (Al-
ternativer for Internett) >
Connections (Tilkoblinger)-kategorien > LAN
settings (LAN-innstillinger).
3. Fra Local Area Network (LAN) Settings (Innstil
-
linger for lokalt nettverk)
-skjermen, ern krysset for Use a proxy server
for your LAN (Bruk en proxy-server til lokalnettet).
4. Klikk på OK når du er ferdig.
WEU8555_RT-AC56U_QSG_v2.indd 76 8/9/13 9:25:48 AM
Page 77

77
Norsk
MAC OS
1. Fra menylinjen, klikk på Safari > Preferences...
(Valg...) > Kategorien Advanced (Avansert) >
Change Settings... (Endre innstillinger...).
2. Fra listen over protokoller, fravelg FTP Proxy og
Web Proxy (HTTPS).
3. Klikk på Apply Now (Bruk nå) når du er ferdig.
MERK: Henvis til nettleserens hjelpefunksjon for detaljer om deakti-
vering av proxyserveren.
B. Still inn TCP/IP-innstillingene til å automatisk innhente en IP-adresse.
Windows® 7
1. Klikk på Start > Control Panel (Kontrollpanel) >
Network and Internet (Nettverk og Internett)
> Network and Sharing Center (Nettverks- og
delingssenter) > Manage network connections
(Administrere nettverkstilkoblinger).
2. Velg Internet Protocol Version 4(TCP/IPv4) og
klikk deretter på Properties (Egenskaper).
WEU8555_RT-AC56U_QSG_v2.indd 77 8/9/13 9:25:49 AM
Page 78

78
Norsk
3. For å automatisk hente inn IPv4 IP-innstillingene, kryss av for Obtain an IP address auto-
matically (Motta en IP-adresse automatisk).
4. Klikk på OK når du er ferdig.
MAC OS
1. Klikk på Apple-ikonet øverst til venstre på
skjermen.
2. Klikk på System Preferences (Systemvalg) >
Network (Nettverk) > Congure... (Kongurer
...).
3. Fra TCP/IP-kategorien, velg Using DHCP (Bruke
DHCP) i Congure IPv4
(Kongurer IPv4)-rullegardinlisten.
MERK: Henvis til operativsystemets hjelp- og støttefunksjon for de-
taljer om kongurering av datamaskinens TCP/IP-innstillinger.
WEU8555_RT-AC56U_QSG_v2.indd 78 8/9/13 9:25:50 AM
Page 79

79
Norsk
C. Deaktver den eksterne oppringingen, hvis denne er aktivert.
D. Lukk alle åpne nettleservinduer.
MERK: Henvis til nettleserens hjelpefunksjon for detaljer om deakti-
vering av innstillingene for ekstern tilkobling.
Windows® 7
1. Klikk på Start > Internet Explorer for å åpne nettleseren.
2. Klikk på Tools (Verktøy) > Internet options (Al-
ternativer for Internett) > Connections (Tilkoblinger)-kategorien.
3. Kryss av for Never dial a connection (Slå aldri
opp et nummer).
4. Klikk på OK når du er ferdig.
Klienten kan ikke etablere en trådløs tilkobling med ruteren.
Utenfor rekkevidde:
• Plasser ruteren nærmere den trådløse klienten.
• Prøv å endre kanalinnstillingene.
Autentisering:
• Bruk kablet tilkobling for å koble til ruteren.
• Sjekk de trådløse sikkerhetsinnstillingene.
• Trykk på Reset-knappen på bakpanelet i mer enn fem sekunder.
WEU8555_RT-AC56U_QSG_v2.indd 79 8/9/13 9:25:50 AM
Page 80

80
Norsk
Kan ikke nne ruteren:
• Trykk på Reset-knappen på bakpanelet i mer enn fem sekunder.
• Sjekk innstillingen i den trådløse adapteren som SSID og
krypteringsinnstillinger.
Kan ikke få tilgang til Internett via en trådløs LAN-adapter.
• Flytt ruteren nærmere den trådløse klienten.
• Sjekk om den trådløse adapteren er koblet til den rette trådløse ruteren.
• Sjekk om den trådløse kanalen som brukes samsvarer med kanalene som er
tilgjengelige i landet/området ditt.
• Sjekk krypteringsinnstillingene.
• Sjekk om ADSL- eller kabeltilkoblingen stemmer.
• Prøv på nytt med en annen Ethernet-kabel.
Dersom ADSL "LINK"-lyset blinker kontinuerlig eller slukkes, er ikke
Internettilgang mulig - ruteren kan ikke etablere en tilkobling med ADSLnettverket.
• Kontroller at kablene dine er riktig koblet til.
• Koble strømledningen fra ADSL- eller kabelmodemet, vent et par minutter,
koble deretter til ledningen igjen.
• Hvis ADSL-lyset fortsetter å blinke eller forblir AV, kontakter du
ADSL-tjenesteleverandøren.
Nettverksnavn eller sikkerhetsnøkler er glemt.
• Prøv å sette opp den kablede tilkoblingen og kongurer krypteringsinnstil-
lingene på nytt.
• Trykk på Reset-knappen i mer enn fem sekunder for å nullstille eller gjen-
opprette systemet til fabrikkinnstillingene.
• Fabrikkinnstillinger:
Brukernavn/passord: admin / admin
IP-adresse:
192.168.1.1
SSID: ASUS
WEU8555_RT-AC56U_QSG_v2.indd 80 8/9/13 9:25:50 AM
Page 81

81
Norsk
Hvor kan jeg nne mer informasjon om den trådløse ruteren?
• Bruksanvisning i support CD-en
• Online side med spørsmål og svar: http://support.asus.com/faq
• Side for teknisk støtte: http://support-org.asus.com/
• Kundehjelp: Henvis til støttetelefonnummeret i tilleggsguiden.
SUPPORT HOTLINE
Area Hotline Number Support
Languages
Availability
Taiwan 0800-093-456;
02-81439000
Traditional
Chinese
Mon. to Fri.
9:00-12:00;
13:30-18:00
USA/
Canada
1-812-282-2787 English Mon. to Fri.
8:30-12:00am EST
(5:30am-9:00pm PST)
Sat. to Sun.
9:00am-6:00pm EST
(6:00am-3:00pm PST)
Brazil 4003 0988 (Capital) Portuguese
Mon. to Fri.
9:00am-18:00
0800 880 0988
(demais localidades)
WEU8555_RT-AC56U_QSG_v2.indd 81 8/9/13 9:25:51 AM
Page 82

82
Dansk
Pakkens indhold
RT-AC56U AC adapter
Netværkskabel Kvikstartguide
Support-cd (med brugervejledning/værktøjer) Garantibevis
Stativ
En hurtig oversigt
BEMÆRK: Du bedes venligst kontakte din forhandler, hvis nogen af delene
mangler eller er beskadiget.
1) USB 3.0/2.0 LED 6) Strøm LED 11) USB 3.0/2.0 porte
2) LAN LED 7) WPS knap 12) Nulstillingsknap
3) WAN LED 8) Wi-Fi knap 13) Strøm (DC-IN) port
4) 2.4GHz LED 9) LAN porte 14) Afbryder
5) 5GHz LED 10) WAN porte
7 9 10 13118
1 2
3
5 64 1412
WEU8555_RT-AC56U_QSG_v2.indd 82 8/9/13 9:26:11 AM
Page 83

83
Dansk
BEMÆRKINGER:
•
USB ekstern HDD/Flashdrev:
• Den trådløse router virker med de este USB HDD/Flashdrev (op til
2TB i størrelse), og understøtter læs-skriv adgang på FAT16, FAT32,
EXT2, EXT3 og NTFS.
• For sikker ernelse af USB-disken, skal du starte
internetgrænseade (http://router.asus.com eller
http://192.168.1.1), øverst til højre på siden Network Map
(Netværkskort), klik på
USB-ikonet og klik herefter på Eject USB 1 (Fjern USB 1).
• Fjernes USB drevet på en forkert måde, kan det medfølge
ødelæggelse af data.
• For at se en liste over hvilke lsystemer og hardiskpartitioner, som
den trådløse router understøtter, bedes du venligst besøge http://
event.asus.com/ networks/disksupport
• For at se en liste over hvilke printere, som den trådløse router
understøtter, bedes du venligst besøge
http://event.asus.com/networks/printersupport
WEU8555_RT-AC56U_QSG_v2.indd 83 8/9/13 9:26:13 AM
Page 84

84
Placering af din router
For at opnå den bedste trådløse signaloverførsel mellem den trådløse router og
netværksenhederne, som er forbundet til den, skal du søre for at:
• Stil den trådløse router på et centralt sted for, at få størst trådløs dækning til
netværksenhederne.
• Hold enheden væk fra metalforhindringer, og væk fra direkte sollys.
• Hold enheden væk fra Wi-Fi enheder, der kun kører på 802.11g eller 20MHz,
2,4GHz computerudstyr, Bluetooth enheder, trådløse telefoner, transformatorer, kraftige motorer, uorescerende lys, mikrobølgeovne, køleskab og
andet industriudstyr for, at forhindre forstyrrelser eller signaltab.
• For at sikre det bedst mulige trådløse signal, skal du rette de tre aftagelige
antenner, som vist på tegningen nedenfor.
• For at opnå en optimal ydelse, skal du justere det indbyggede kølesystem. Se
brugermanualen for yderligere oplysninger.
•
Sørg altid for, at opdatere til den nyeste rmware. Besøg ASUS' hjemmeside
på http://www.asus.com for, at hente de seneste rmwareopdateringer.
Dansk
WEU8555_RT-AC56U_QSG_v2.indd 84 8/9/13 9:26:14 AM
Page 85

85
Før du fortsætter
1. Træk ledningerne/kablerne ud af dit eksisterende
modemsopsætning, og frigiv dem forældede IP-adresse på din computer.
a: Træk stikket ud af stikkontakten, og træk stikket ud af dit kabel/ADSL mo-
dem.
b: Træk netværkskablet ud af dit kabel/ADSL modem.
c: Genstart din computer (anbefales).
Modem
OFF
!
a
b
c
Dansk
ADVARSEL! Før du trækker ledningerne/kablerne ud, bedes du sørge
for at dit kabel/ADSL modem har været slukket i mindst to minutter.
Hvis dit modem har et backup-batteri, bedes du også erne dette.
WEU8555_RT-AC56U_QSG_v2.indd 85 8/9/13 9:26:15 AM
Page 86

86
2. Opsætning af dit trådløst miljø.
a: Slut den ene ende af el-ledningen til DC-IN stikket, og den anden til en stik-
kontakt.
b: Hvis du bruger en netværkskabel, skal du forbinde din computer til LAN por-
ten på din trådløse router.
VIGTIGT! Sørg for, at WAN og LAN LED lamperne blinker.
c: Hvis du bruger en anden netværkskabel, skal du forbinde dit modem til WAN
porten på din trådløse router.
d: Slut den ene ende af el-ledningen til DC-IN stikket på modemmet, og den
anden til en stikkontakt.
Dansk
Computer
Wall Power Outlet
Mode
m
RT-AC56U
WAN
Power
LAN
a
b
c
d
WEU8555_RT-AC56U_QSG_v2.indd 86 8/9/13 9:26:16 AM
Page 87

87
3. Deaktiver nogle indstillinger på din computer.
A. Deaktiver proxyserveren, hvis den er aktiveret.
B. Indstil TCP/IP indstillingerne til at hente en IP-adresse automatisk.
C. Deaktiver opkaldsforbindelsen, hvis den er aktiveret.
BEMÆRK: For yderligere oplysninger om deaktivering af dine comput-
erindstillinger, bedes du venligst se Ofte stillede spørgsmål (FAQ).
1.
Kongurer dine trådløse indstillinger via den graske brugergrænseade
på internettet (web GUI).
a: Start din internetbrowser, såsom Internet Explorer, Firefox, Google Chrome
eller Safari
Kom godt i gang
Dansk
RT-AC56U
RT-AC56U
b
a
WEU8555_RT-AC56U_QSG_v2.indd 87 8/9/13 9:26:17 AM
Page 88

88
BEMÆRK: Hvis QIS ikke starter automatisk, bedes du følge disse trin
for at starte den manuelt:
• Indtast
http://router.asus.com eller http://192.168.1.1 i din
internetbrowser, og kør installationsguiden til den hurtige
internetopsættelse (QIS) igen.
•
Deaktiver proxyindstillingerne, opkaldsforbindelsen og sæt dine
TCP/IP-indstillinger til at hente en IP-adresse automatisk. For yderli-
gere oplysninger, bedes du venligst se Ofte stillede spørgsmål (FAQ).
afsnittet, eller brug opsætningsvejledningen på support-cd'en for at
få en diagnose automatisk.
b: Den hurtige internetopsæting (QIS) nder automatisk din
ISP-forbindelsestype, som enten kan være Dynamic IP (Dynamisk IP), PP-
PoE, PPTP, L2TP eller Static IP (Statisk IP). Indtast de nødvendige oplysninger til din forbindelsestype.
VIGTIGT! Få de nødvendige oplysninger om din
internetforbindelsestype hos din internetudbyder (ISP).
BEMÆRK: Den automatisk identikation af din ISP-forbindelsestype
nder sted, når du kongurer din trådløse router for første gang, samt
hvis du nulstiller routeren til den standardindstillinger.
BEMÆRK: Du kan tildele et netværksnavn på op til 32 tegn.
c: Tildel netværksnavnet (SSID), og
sikkerhedsnøglen til din 2,4GHz og
5GHz trådløse forbindelse. Klik på
Apply (anvend) når du er færdig.
d: Herefter vises dine
internet- og trådløse
indstillinger. Klik på Next (Næste)
for at fortsætte.
e: Læs guiden vedrørende den
trådløse netværksforbindelse. Klik
på Finish (udfør), når du er færdig.
Dansk
WEU8555_RT-AC56U_QSG_v2.indd 88 8/9/13 9:26:18 AM
Page 89

89
Ofte stillede spørgsmål (FAQ)
Når jeg har gennemgået trinnene, er det stadig ikke muligt for mig, at åbne
internetgrænseaden (web GUI), hvor jeg kan kongurere indstillingerne
på den trådløse router.
A. Deaktiver proxyserveren, hvis den er aktiveret.
Windows® 7
1. Klik på Start > Internet Explorer for, at starte
internetbrowseren.
2. Klik på Tools (Funktioner) > Internet options
(Internetindstillinger) > Connections (Forbindelser) fane > LAN settings (LAN indstillinger).
3. I LAN Indstillinger-vinduet, skal du fravælge
Use a proxy server for your LAN (Brug en
proxyserver til LAN).
4. Klik på OK når du er færdig.
Dansk
WEU8555_RT-AC56U_QSG_v2.indd 89 8/9/13 9:26:18 AM
Page 90

90
MAC OS
1. I menubjælken, skal du klikke på
Safari > Preferences... (Indstillinger...) > Advanced (Avanceret) > Change Settings... (Skift indstillinger...) fanen.
2. På listen af protokoller, skal du fravælge FTP
Proxy og Web Proxy (HTTPS).
3. Klik på
Apply Now (Anvend nu) når du er fær-
dig.
BEMÆRK: Brug hjælp-funktionen i din browser for, at se hvordan du
deaktivere proxyserveren.
B. Indstil TCP/IP indstillingerne til at hente en IP-adresse automatisk
.
Windows® 7
1. Klik på Start > Control Panel (Kontrolpanel) >
Network and Internet (Netværk og Internet)
> Network and Sharing Center (Netværks- og
delingscenter) > Manage network connections
(Administrer netværksforbindelser).
2. Vælg Internet Protocol Version 4 (TCP/IPv4), og
klik herefter på Properties (Egenskaber).
Dansk
WEU8555_RT-AC56U_QSG_v2.indd 90 8/9/13 9:26:19 AM
Page 91

91
3. For at hente iPv4 IP-indstillingerne
automatisk, skal du afkrydse Obtain an IP ad-
dress automatically (Hent
automatisk en IP-adresse).
4. Klik på OK når du er færdig.
MAC OS
1. Klik på Apple ikonet øverst til venstre på din
skærm.
2. Klik på System Preferences (Systemindstil-
linger) > Network (Netværk)> Congure...
(Kongurer ...)
3. Under TCP/IP fanen, skal du vælge Using DHCP
(Brug DHCP) på Congure IPv4 (Kongurer
IPv4) rullelisten.
4. Klik på Apply Now (Anvend nu) når du er færdig.
BEMÆRK: Se hjælp og support funktionen i dit operativsystem for, at
se hvordan du kongurerer TCP/IP indstillingerne på din computer.
Dansk
WEU8555_RT-AC56U_QSG_v2.indd 91 8/9/13 9:26:20 AM
Page 92

92
C. Deaktiver opkaldsforbindelsen, hvis den er aktiveret.
D. Luk alle åbne internetbrowsere.
BEMÆRK: Brug hjælp-funktionen i din browser for, at se hvordan du
deaktivere opkaldsforbindelsen.
Windows® 7
1. Klik på Start > Internet Explorer for, at starte
internetbrowseren.
2. Klik på Tools (Funktioner) > Internet options
(Internetindstillinger) > Connections (Forbindelser) fanen.
3. Vælg Never dial a connection (Ring aldrig til en
opkaldsforbindelse).
4. Klik på OK når du er færdig.
Klienten kan ikke etablere en trådløs forbindelse til routeren.
Udenfor rækkevidde:
• Stil routeren tættere på den trådløse klient.
• Prøv at skifte kanalindstillingerne.
Godkendelse:
• Brug en kabelforbindelse til, at oprette forbindelse til routeren.
• Tjek de trådløse sikkerhedsindstillinger.
• Hold nulstillingsknappen bagpå routeren nede i mere end fem sekunder.
Dansk
WEU8555_RT-AC56U_QSG_v2.indd 92 8/9/13 9:26:20 AM
Page 93

93
Kan ikke nde routeren:
• Hold nulstillingsknappen bagpå routeren nede i mere end fem sekunder.
• Tjek den trådløse adapters indstilling såsom SSID og kryptering.
Kan ikke få adgang til internettet via den trådløse LAN adapter.
• Flyt routeren tættere på den trådløse klient.
• Tjek om den trådløse adapter er forbundet til den rigtige trådløse router.
• Tjek om den trådløse kanal, som du bruger, stemmer overens med de kanaler, der er tilgængelige i dit land/område.
• Tjek krypteringsindstillingerne.
• Tjek om ADSL eller Kabel-forbindelsen virker korrekt.
• Prøv igen med en anden ethernet-kabel.
Hvis ADSL "LINK" lyset blinker konstant eller er slukket, er internetadgang
ikke mulig - routeren kan ikke etablere en forbindelse med ADSL
netværket.
• Sørg for, at alle dine kabler er ordentligt tilsluttet.
• Træk stikket til ADSL- eller kabelmodemmet ud af stikkontakten, vent iet par
minutter, og sæt det til igen.
• Hvis ADSL lyset stadig blinker eller er SLUKKET, bedes du venligst
kontakte din ADSL udbyder.
Jeg har glemt mit netværksnavn eller sikkerhedskode.
• Prøv, at opsætte kabelforbindelsen og kongurere krypteringsindstillingerne
igen.
• Hold nulstillingsknappen nede i mere end fem sekunder for, at nulstille eller
gendanne systemet til fabriksindstillingerne.
• Fabriksindstillingerne:
Brugernavn/Adgangskode: admin / admin
IP-adresse:
192.168.1.1
SSID: ASUS
Dansk
WEU8555_RT-AC56U_QSG_v2.indd 93 8/9/13 9:26:21 AM
Page 94

94
Dansk
Hvor kan jeg nde yderligere oplysninger om min trådløs router?
• I brugervejledningen på support-cd'en.
• Ofte stillede spørgsmål på nettet: http://support.asus.com/faq
• Teknisk support: http://support-org.asus.com/
• Kunde hotline: Se venligst Kunde hotline i den medfølgende vejledning.
SUPPORT HOTLINE
Area Hotline Number Support
Languages
Availability
Taiwan 0800-093-456;
02-81439000
Traditional
Chinese
Mon. to Fri.
9:00-12:00;
13:30-18:00
USA/
Canada
1-812-282-2787 English Mon. to Fri.
8:30-12:00am EST
(5:30am-9:00pm PST)
Sat. to Sun.
9:00am-6:00pm EST
(6:00am-3:00pm PST)
Brazil 4003 0988 (Capital) Portuguese
Mon. to Fri.
9:00am-18:00
0800 880 0988
(demais localidades)
WEU8555_RT-AC56U_QSG_v2.indd 94 8/9/13 9:26:21 AM
Page 95

95
Svenska
Förpackningens innehåll
RT-AC56U Nätadapter
Nätverkskabel Snabbstartguide
Support-CD (bruksanvisning/ hjälp program) Garantikort
Ställning
En snabbtitt
OBS: Om någon av posterna är skadade eller saknas, kontakta din
återförsäljare.
1) USB 3.0/2.0 LED 6) Power LED 11) USB 3.0/2.0 Portar
2) LAN LED 7) WPS knapp 12) Återställningsknapp
3) WAN LED 8) Wi-Fi knapp
13) Internet- och LANportar
4) 2.4GHz LED 9) LAN Portar 14) strömbrytare
5) 5GHz LED 10) WAN Portar
7 9 10 13118
1 2
3
5 64 1412
WEU8555_RT-AC56U_QSG_v2.indd 95 8/9/13 9:26:40 AM
Page 96

96
Svenska
NOTERA:
•
USB externt HDD-/ashminne:
• Den trådlösa routern fungerar med de esta USB HDD-/
ashminnen upp till 2TB och stöder läs-/skriv-åtkomst för FAT16,
FAT32, EXT2, EXT3 och NTFS.
• För att avlägsna USB-minnet säkert ska du lansera webb-GUI
(http://router.asus.com eller http://192.168.1.1); i övre högra
hörnet på sidan Nätverkskarta klickar du på USB-ikonen och
klickar på Mata ut USB1.
• Felaktig borttagning av USB-minne kan orsaka korruption av data.
• För att se en lista över lsystem och hårddiskpartitioner som stöds
av den trådlösa routern, gå till http://event.asus.com/networks/
disksupport
• För att se en lista över skrivare som stöds av den trådlösa routern, gå
till http://event.asus.com/networks/printersupport
WEU8555_RT-AC56U_QSG_v2.indd 96 8/9/13 9:26:41 AM
Page 97

97
Svenska
Placera din router
För bästa trådlösa signalsändning mellan den trådlösa routern och nätverksenheterna som är anslutna till den, se till att du:
• Placerar den trådlösa routern på en central plats för maximal trådlös täck
-
ning för nätverksenheterna.
• Håll enheten undan från metallhinder och undan från direkt solljus.
• Håll enheten borta från 802.11g eller 20MHz endast Wi-Fi-enheter, 2,4 GHz
datorkringutrustning, Bluetooth-enheter, sladdlösa telefoner, transformatorer, kraftiga motorer, uorescerande ljus, mikrovågsugnar, kylskåp och andra
industriella utrustningar för att förhindra signalstörningar eller signalförluster.
• För bästa trådlösa signal ska du rikta de tre losstagbara antennerna på det sätt
som visas i ritningen nedan.
• För optimala prestanda ska det interna kylsystemet justeras. Se
användarmanualen för detaljer.
•
Uppdatera alltid till den senaste rmware-versionen. Besök ASUS webbsida
på http://www.asus.com för att hämta den senaste uppdateringen av
enhetens rmware.
WEU8555_RT-AC56U_QSG_v2.indd 97 8/9/13 9:26:42 AM
Page 98

98
Svenska
Innan du fortsätter
1. Koppla ur ledningar/kablar från det bentliga modemet och frigör
datorns gamla IP-adress.
a: Koppla ifrån strömadaptern från strömuttaget och koppla ifrån den från ditt
kabel-/ADSL-modem.
b: Kopla ifrån nätverkskabeln från ditt kabel-/ADSL-modem.
c: Starta om datorn (rekommenderas).
Modem
OFF
!
a
b
c
VARNING! Innan du kopplar ut ledningarna/kablarna ska du se till
att kabel-/ADSL-modemet har varit avstängt i minst två minuter. Om
modemet är försett med ett reservbatteri ska detta också avlägsnas.
WEU8555_RT-AC56U_QSG_v2.indd 98 8/9/13 9:26:42 AM
Page 99

99
Svenska
2. Ställ in din trådlösa miljö.
a: Sätt in din trådlösa routers strömadapter i DC-IN porten och koppla in den i
ett strömuttag.
b:
Använd nätverkskabeln och anslut din dator till din trådlösa routers LANport.
VIKTIGT! Se till att WAN och LAN LED blinkar.
c: Använd en annan nätverkskabel och anslut ditt modem till din trådlösa rou-
ters WAN-port.
d: Sätt in ditt modems strömadapter i DC-IN porten och koppla in den i ett
strömuttag.
Computer
Wall Power Outlet
Mode
m
RT-AC56U
WAN
Power
LAN
a
b
c
d
WEU8555_RT-AC56U_QSG_v2.indd 99 8/9/13 9:26:44 AM
Page 100

100
Svenska
3. Inaktivera vissa inställningar på datorn.
A. Avaktivera proxyservern, om den är aktiverad.
B. Ställ in TCP/IP inställningarna till erhåll en IP-adress automatiskt.
C. Avaktivera uppringningsanslutningen om den är aktiverad.
OBS: För ytterligare detaljer om hur du inaktiverar datorns inställnin-
gar, se Vanliga frågor.
1.
Kongurera din trådlösa inställning via webbgrakens användargränssnitt
(web GUI).
a: Starta din webbläsare såsom Internet Explorer, Firefox, Google Chrome, eller
Safari.
Komma igång
RT-AC56U
RT-AC56U
b
a
WEU8555_RT-AC56U_QSG_v2.indd 100 8/9/13 9:26:45 AM
 Loading...