

Page 1

Splendid HD
Graphics card
User manual
Page 2

E3697
First Edition V1
June 2008
Copyright © 2008 ASUSTeK COMPUTER INC. All Rights Reserved.
No part of this manual, including the products and software described in it, may be reproduced,
transmitted, transcribed, stored in a retrieval system, or translated into any language in any form or by any
means, except documentation kept by the purchaser for backup purposes, without the express written
permission of ASUSTeK COMPUTER INC. (“ASUS”).
Product warranty or service will not be extended if: (1) the product is repaired, modified or altered, unless
such repair, modification of alteration is authorized in writing by ASUS; or (2) the serial number of the
product is defaced or missing.
ASUS PROVIDES THIS MANUAL “AS IS” WITHOUT WARRANTY OF ANY KIND, EITHER EXPRESS
OR IMPLIED, INCLUDING BUT NOT LIMITED TO THE IMPLIED WARRANTIES OR CONDITIONS OF
MERCHANTABILITY OR FITNESS FOR A PARTICULAR PURPOSE. IN NO EVENT SHALL ASUS, ITS
DIRECTORS, OFFICERS, EMPLOYEES OR AGENTS BE LIABLE FOR ANY INDIRECT, SPECIAL,
INCIDENTAL, OR CONSEQUENTIAL DAMAGES (INCLUDING DAMAGES FOR LOSS OF PROFITS,
LOSS OF BUSINESS, LOSS OF USE OR DATA, INTERRUPTION OF BUSINESS AND THE LIKE),
EVEN IF ASUS HAS BEEN ADVISED OF THE POSSIBILITY OF SUCH DAMAGES ARISING FROM ANY
DEFECT OR ERROR IN THIS MANUAL OR PRODUCT.
SPECIFICATIONS AND INFORMATION CONTAINED IN THIS MANUAL ARE FURNISHED FOR
INFORMATIONAL USE ONLY, AND ARE SUBJECT TO CHANGE AT ANY TIME WITHOUT NOTICE,
AND SHOULD NOT BE CONSTRUED AS A COMMITMENT BY ASUS. ASUS ASSUMES NO
RESPONSIBILITY OR LIABILITY FOR ANY ERRORS OR INACCURACIES THAT MAY APPEAR IN THIS
MANUAL, INCLUDING THE PRODUCTS AND SOFTWARE DESCRIBED IN IT.
Products and corporate names appearing in this manual may or may not be registered trademarks or
copyrights of their respective companies, and are used only for identification or explanation and to the
owners’ benefit, without intent to infringe.
ii
Page 3

Contents
Contents ...................................................................................................... iii
Notices ......................................................................................................... iv
Safety information ....................................................................................... v
About this guide ......................................................................................... vi
1. Introduction ..................................................................................... 1
1.1 Package contents .............................................................. 1
1.2 Recommended system requirements ................................ 1
2. About hardware ............................................................................... 2
3. Installing the hardware ................................................................... 3
3.1 Preparing your computer ................................................... 3
3.2 Installing the Splendid HD graphics card ........................... 4
4. Installing the software .................................................................... 8
5. Splendid HD .................................................................................... 9
5.1 Launching Splendid HD ..................................................... 9
5.2 Using Splendid HD ........................................................... 10
6. ASUS GamerOSD .......................................................................... 15
6.1 Enabling ASUS GamerOSD ............................................. 15
6.2 Setting ASUS GamerOSD ............................................... 16
6.3 Using ASUS GamerOSD ................................................. 18
6.4 Broadcasting games with ASUS GamerOSD .................. 22
7. ASUS SmartDoctor ....................................................................... 26
7.1 Functions ......................................................................... 26
7.2 Launching ASUS SmartDoctor ......................................... 26
7.3 Voltage status .................................................................. 27
7.4 Temperature status .......................................................... 27
7.5 Fan speed status ............................................................. 28
7.6 Engine and memory clock settings .................................. 28
7.7 Advanced setup features ................................................. 29
8. ASUS VideoSecurity Online ......................................................... 34
8.1 System requirements ....................................................... 34
8.2 What’s New ...................................................................... 34
8.3 Launching ASUS VideoSecurity ....................................... 35
8.4 Setup ................................................................................ 37
8.5 Video Source.................................................................... 52
8.6 Set detect region .............................................................. 53
8.7 History ............................................................................. 55
8.8 Limitations ........................................................................ 56
iii
Page 4

Notices
Federal Communications Commission Statement
This device complies with Part 15 of the FCC Rules. Operation is subject to the
following two conditions:
•
This device may not cause harmful interference, and
•
This device must accept any interference received including interference that
may cause undesired operation.
This equipment has been tested and found to comply with the limits for a
Class B digital device, pursuant to Part 15 of the FCC Rules. These limits are
designed to provide reasonable protection against harmful interference in a
residential installation. This equipment generates, uses and can radiate radio
frequency energy and, if not installed and used in accordance with manufacturer’s
instructions, may cause harmful interference to radio communications. However,
there is no guarantee that interference will not occur in a particular installation. If
this equipment does cause harmful interference to radio or television reception,
which can be determined by turning the equipment off and on, the user is
encouraged to try to correct the interference by one or more of the following
measures:
•
Reorient or relocate the receiving antenna.
•
Increase the separation between the equipment and receiver.
•
Connect the equipment to an outlet on a circuit different from that to which the
receiver is connected.
•
Consult the dealer or an experienced radio/TV technician for help.
The use of shielded cables for connection of the monitor to the graphics card is
required to assure compliance with FCC regulations. Changes or modifications
to this unit not expressly approved by the party responsible for compliance
could void the user’s authority to operate this equipment.
Canadian Department of Communications Statement
This digital apparatus does not exceed the Class B limits for radio noise emissions
from digital apparatus set out in the Radio Interference Regulations of the
Canadian Department of Communications.
This class B digital apparatus complies with Canadian ICES-003.
iv
Page 5

Safety information
Electrical safety
• When adding or removing devices to or from the system, ensure that the
power cables for the devices are unplugged before the signal cables are
connected. If possible, disconnect all power cables from the existing system
before you add a device.
• Make sure that your power supply is set to the correct voltage in your area.
If you are not sure about the voltage of the electrical outlet you are using,
contact your local power company.
• If the power supply is broken, do not try to fix it by yourself. Contact a
qualified service technician or your retailer.
Operation safety
• Before installing devices on your motherboard, carefully read all the manuals
that came with the package.
• Before using the product, make sure all cables are correctly connected and
the power cables are not damaged. If you detect any damage, contact your
dealer immediately.
• To avoid short circuits, keep paper clips, screws, and staples away from
connectors, slots, sockets and circuitry.
• Avoid dust, humidity, and temperature extremes. Do not place the product in
any area where it may become wet.
• Place the product on a stable surface.
• If you encounter technical problems with the product, contact a qualified
service technician or your retailer.
This symbol of the crossed out wheeled bin indicates that the product (electrical,
electronic equipment, and mercury-containing button cell battery) should not
be placed in municipal waste. Check local regulations for disposal of electronic
products.
v
Page 6

About this guide
Conventions
To make sure that you perform certain tasks properly, take note of the following
symbols used throughout this manual.
WARNING: Information to prevent injury to yourself when trying to
complete a task.
CAUTION: Information to prevent damage to the components when trying
to complete a task.
IMPORTANT: Instructions that you MUST follow to complete a task.
NOTE: Tips and information to aid in completing a task.
Where to nd more information
Refer to the following sources for additional information and for product and
software updates.
1. ASUS Websites
The ASUS websites worldwide provide updated information on ASUS
hardware and software products. The ASUS websites are listed in the ASUS
Contact Information on the inside front cover of this installation guide.
2. Optional Documentation
Your product package may include optional documentation, such as warranty
flyers, that may have been added by your dealer. These documents are not
part of the standard package.
Macrovision Corporation Product Notice
This product incorporates copyright protection technology that is protected
by method claims of certain U.S. patents and other intellectual property rights
owned by Macrovision Corporation and other rights owners. Use of this copyright
protection technology must be authorized by Macrovision Corporation, and
is intended for home and other limited viewing uses only unless otherwise
authorized by Macrovision Corporation. Reverse engineering or disassembly is
prohibited.
vi
Page 7

1. Introduction
1.1 Package contents
• ASUS Splendid HD graphics card
• ASUS Splendid HD graphics card support CD
• DVI-to-HDMI adapter x1
• USB cable x1
• S/PDIF cable x1 (only for some models)
• Quick installation guide
1.2 Recommended system requirements
• PCI Express expansion slot
• One available 6-pin ATX power cable from the PC power supply unit (optional)
• Microsoft® Windows® 32-/64-bit Vista or Microsoft® Windows® 32-bit XP
• 512 MB DRAM system memory
• Optical Drive (CD/DVD) for software installation
ASUS Splendid HD graphics card
1
Page 8
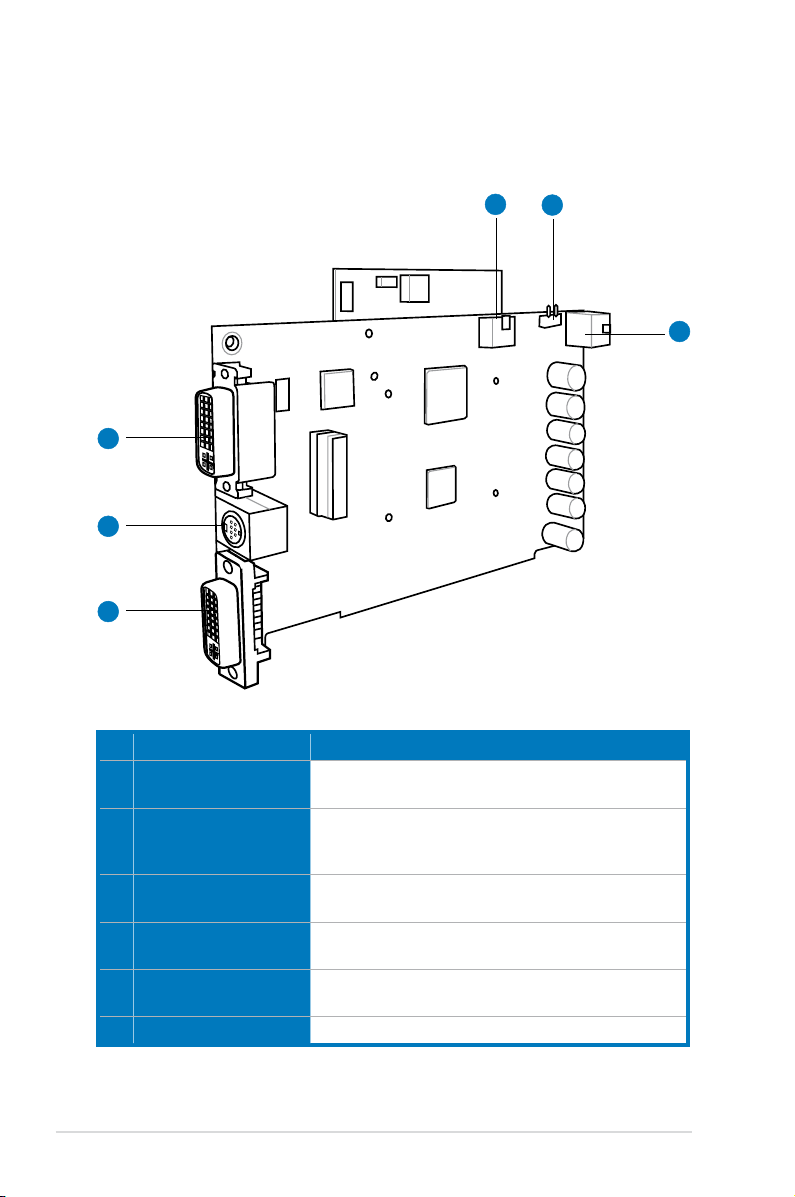
2. About hardware
Splendid HD graphics card layout
1
2
13
3
4
5
6
No Item Description
DVI-D Out port
1
(Splendid HD support)
HDTV-out & TV-out
2
port
DVI-I Out port
3
4 USB Input header
S/PDIF In connector
5
(only for some models)
6 ATX power connector
2
ASUS Splendid HD graphics card
This port connects to a monitor with DVI/HDMI output
support.
This port connects to a video device with HDTV or
TV input support such as TVs, DVD players, game
consoles, etc.
This port connects to a monitor with DVI-I output
support.
Connects to the USB connector on your motherboard
using a USB cable.
Connects to the S/PDIF Out connector on your
motherboard using the bundled SPDIF cable.
This connector is for an ATX power supply plug.
Page 9
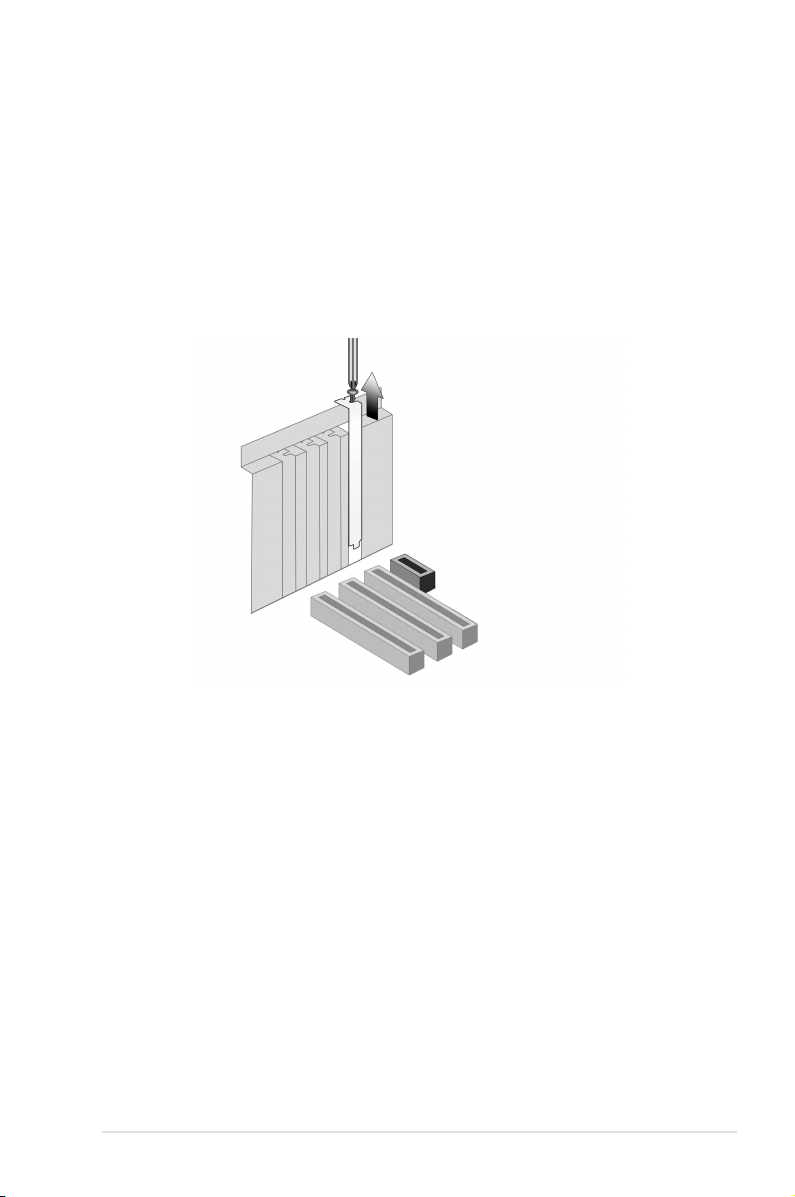
3. Installing the hardware
3.1 Preparing your computer
1. Power off your computer and disconnect the power cord.
2. Open the computer chassis.
3. Remove the metal cover of an available PCI Express expansion slot.
ASUS Splendid HD graphics card
3
Page 10
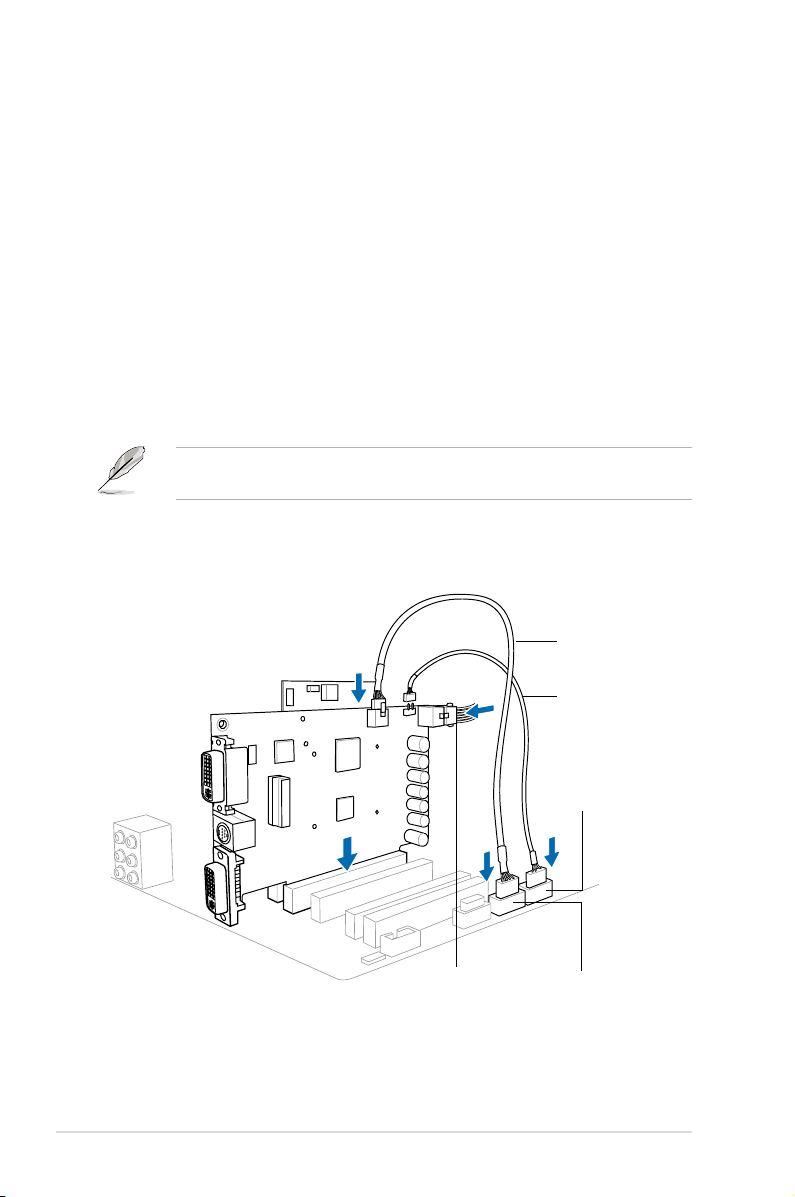
3.2 Installing the Splendid HD graphics card
Securing the Splendid HD card:
1. Carefully insert the Splendid HD graphics card into the PCI Express slot.
Ensure that the card sits properly in place.
2. Secure the card with a screw or a metal bracket.
Connecting cables:
1. Connect one end of the bundled USB cable to the USB port of the card and
connect the other end to a USB connector on your motherboard.
2. Connect one end of the bundled S/PDIF cable to the S/PDIF In connector
of the card and connect the other end to a S/PDIF Out connector on your
motherboard. (only for some models)
3. Connect a 6-pin ATX power cable to the ATX power connector on the card.
The Splendid HD graphics card requires additional power to work. Ensure that
you connect the ATX power connector to the card to provide ample power.
USB cable
S/PDIF cable
S/PDIF connector on
your motherboard
ATX power cable
4
ASUS Splendid HD graphics card
USB connector on
your motherboard
Page 11
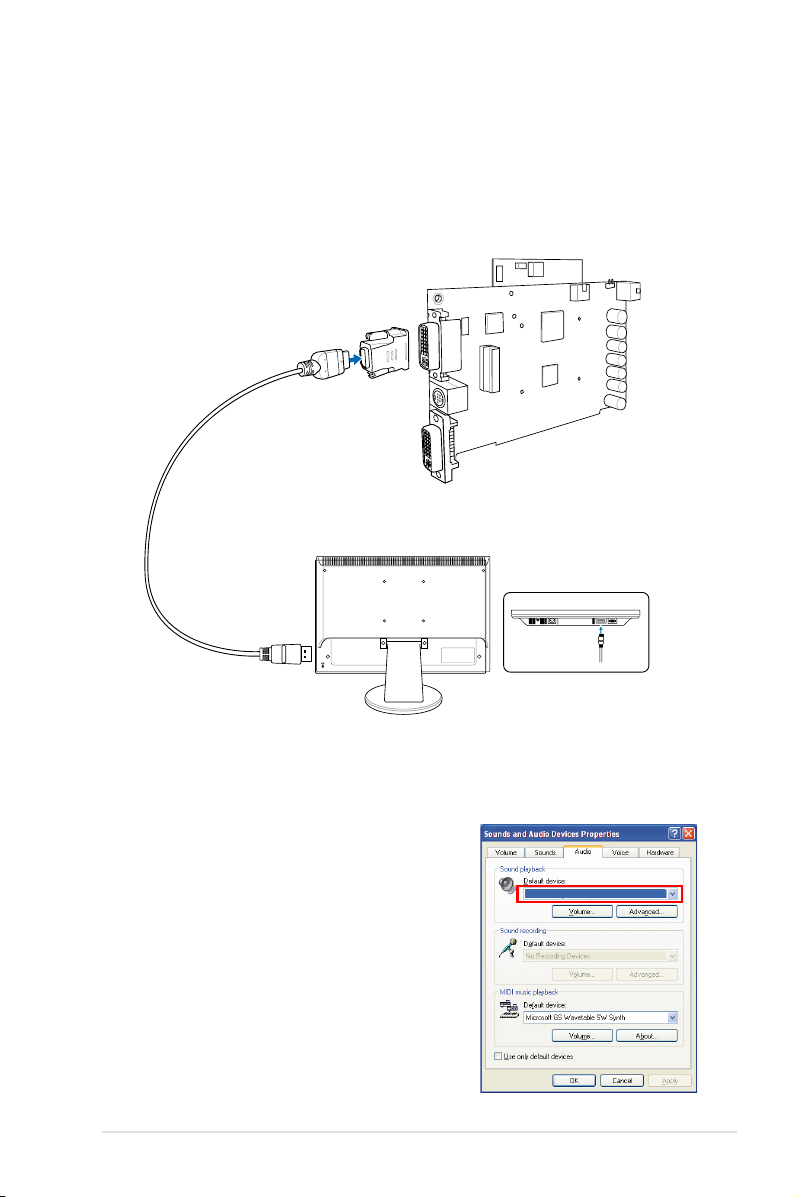
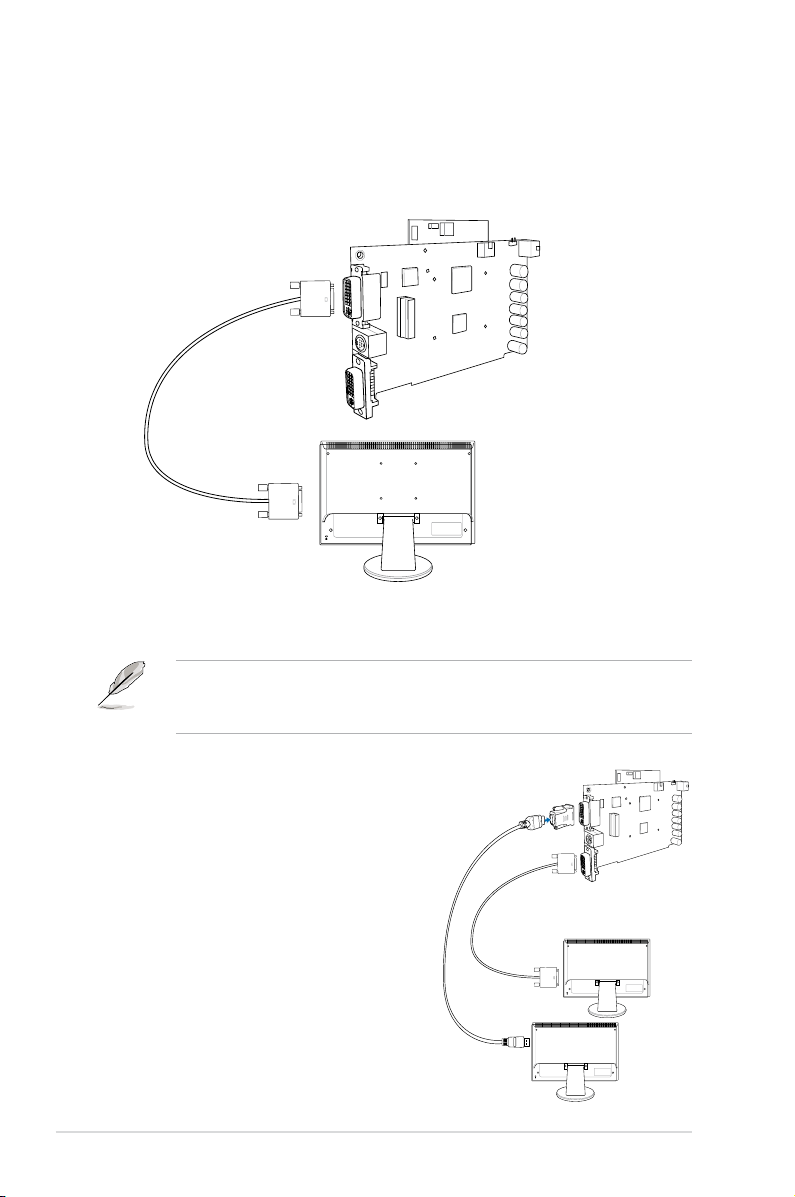
3.2.1 Connecting to your monitor with an HDMI port
ATI HD Audio rear output
1. Connect the bundled DVI-to-HDMI adapter to the DVI-D out port of the
Splendid HD graphics card.
2. Using an HDMI cable, connect the DVI-to-HDMI adapter to your monitor with
an HDMI port.
3. After hardware installation is complete, select the audio source from the
Windows® desktop by clicking Start > Control Panel > Sounds, Speech,
and Audio Devices > Sounds and Audio Devices Properties.
4. Click the Audio tab, then click the Sound
playback dropdown list to select the ATI HD
Audio rear output.
5. Restart your computer.
ASUS Splendid HD graphics card
5
Page 12
3.2.2 Connecting to your monitor with a DVI port
1. Using a DVI cable, connect the DVI-D out port of the Splendid HD graphics
card to your monitor with a DVI port.
3.2.3 Connecting to two monitors
If you use two monitors, always connect the primary monitor to the DVI-D out
port of the Splendid HD graphics card. Otherwise, the Splendid utility will not
work.
To connect one monitor with an HDMI port,
the other with a DVI port
1. Follow step 1 and 2 in section 3.2.1 to
connect the Splendid HD graphics card
to your primary monitor.
2. Using a DVI cable, connect one end to
the DVI-I out port of the Splendid HD
graphics card, and the other end to the
secondary monitor.
6
ASUS Splendid HD graphics card
Secondary
monitor
Primary
monitor
Page 13
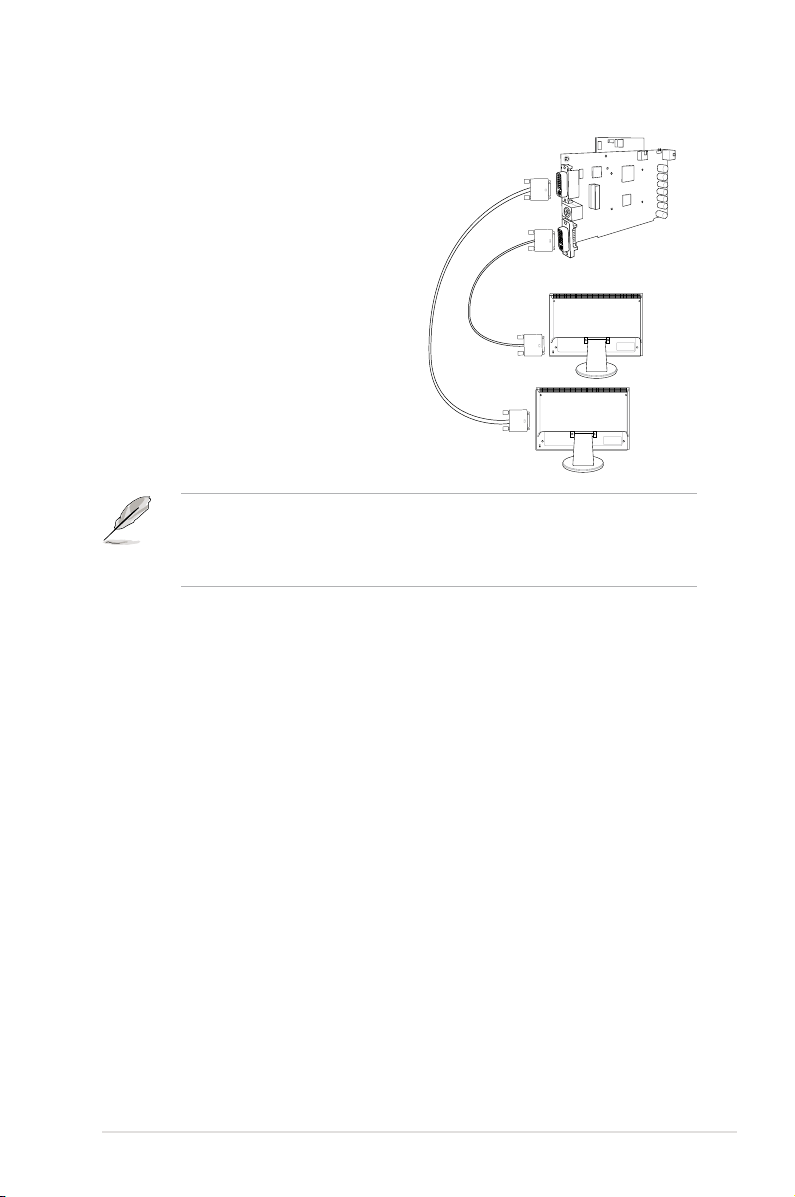
To connect two monitors with DVI ports
1. Follow step 1 and 2 in section 3.2.2 to
connect the Splendid HD graphics card
to your primary monitor.
2. Using a DVI cable, connect one end to
the DVI-I out port of the Splendid HD
graphics card, and the other end to the
secondary monitor.
Some LCD TVs with HDMI inputs do not support PC video resolutions and may
lose audio signals as well, excepting on such video resolutions as 480p, 720p,
and 1080i/p. Hence, it is suggested that you set your LCD TV to one of these
TV resolutions.
Secondary
monitor
Primary
monitor
ASUS Splendid HD graphics card
7
Page 14
4. Installing the software
Installing the Splendid HD graphics card driver
1. After you have installed the Splendid HD graphics card, turn on your
computer. Windows® automatically detects the Splendid HD graphics card
and searches for device drivers. When prompted for the drivers, click Cancel.
2. Insert the support CD into the optical drive. If Autorun is enabled in your
system, the setup starts automatically. If not, locate the setup.exe file in the
support CD, then double-click the setup.exe file to start the installation.
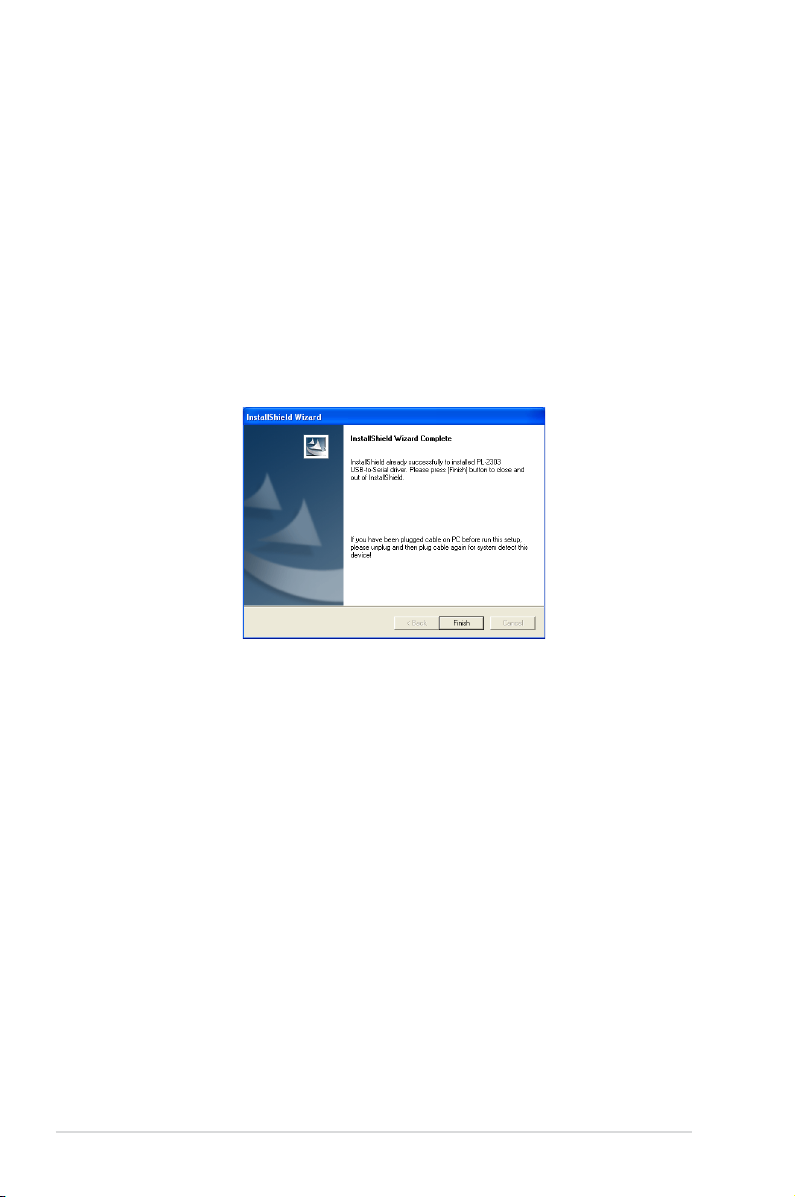
3. Follow the screen instructions to finish the installation.
4. The following screen is displayed after the installation is completed.
8
ASUS Splendid HD graphics card
Page 15
5. Splendid HD
Splendid HD is a utility that upgrades the visual performance for your LCD monitor
or LCD TV with the advanced HDMI (High-Definition Multimedia interface) output.
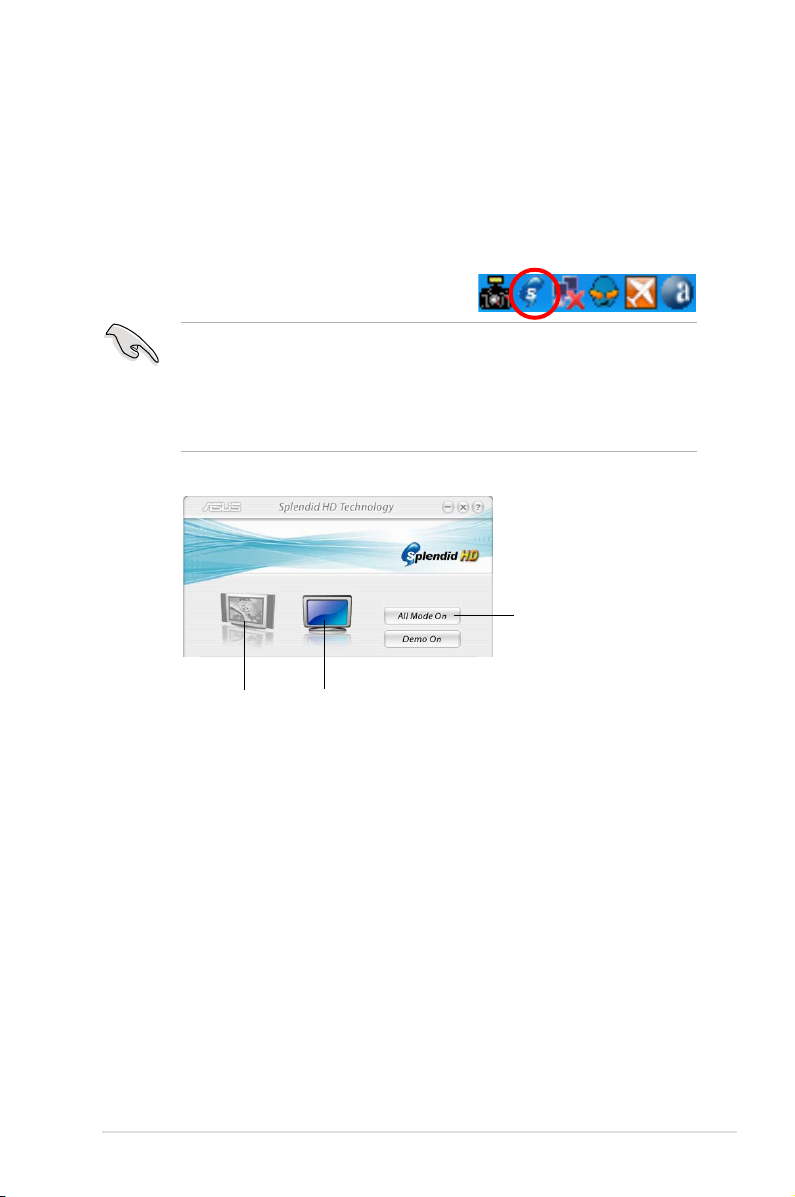
5.1 Launching Splendid HD
If the Splendid HD utility is correctly installed, you will find the blue-colored
Splendid HD icon on the taskbar.
Double-click the icon to launch the utility and
display the Splendid HD main screen.
The Splendid HD icon turns red if the Splendid HD graphics card is not
detected.
To solve this problem, do the following:
1. Ensure that the USB cable is plugged to the 8-pin USB connector on the
motherboard.
2. Restart the utility.
Utility switch
Click if your
display is an
LCD TV
Click if your
display is an
LCD monitor
ASUS Splendid HD graphics card
9
Page 16
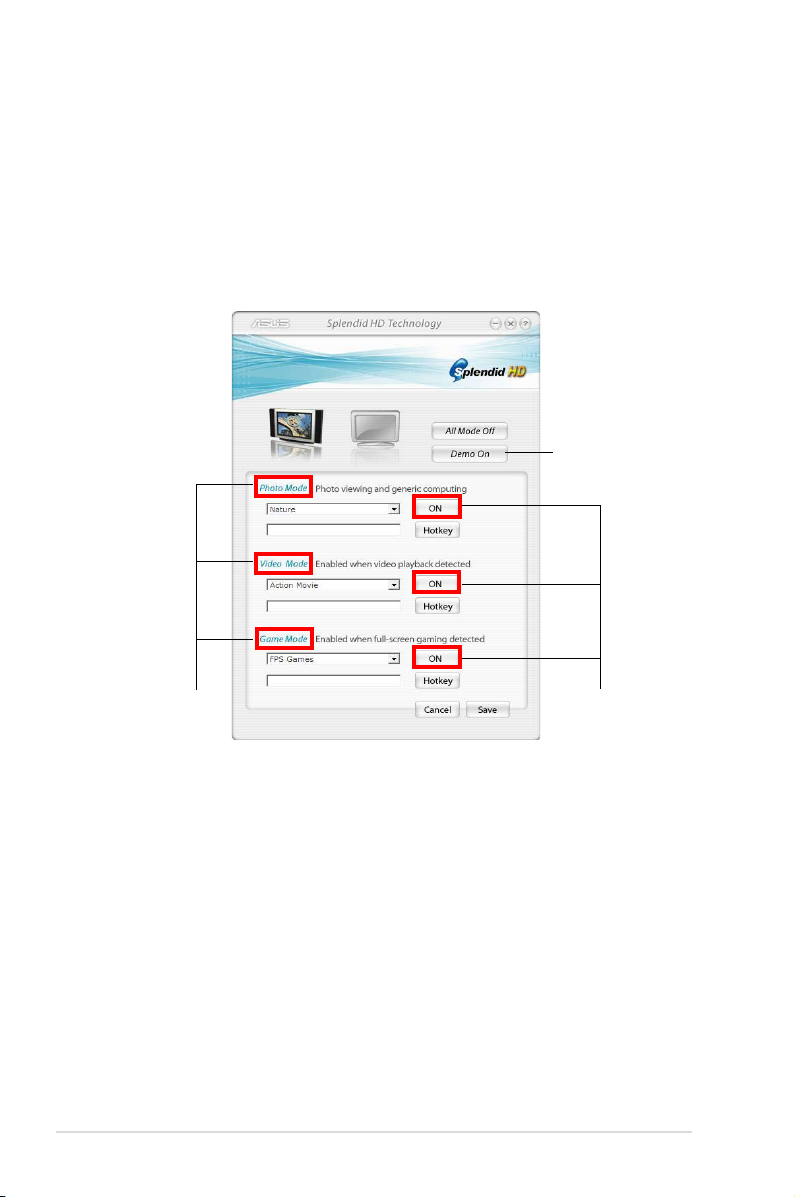
5.2 Using Splendid HD
Main menu
The Splendid HD main menu allows you to view the status of the utility
configurations. Click the LCD monitor / LCD TV icon depending on which display
you use.
Full window
Demo button
Three major modes
ON/OFF buttons
Click All Mode On/Off to enable or disable this utility. The utility is enabled when
the utility switch is set to All Mode Off, and the full window is displayed.
The Splendid HD utility provides three modes that allow you to change the
configurations according to different viewing conditions, such as viewing photos,
watching movies, and playing games.
Click ON / OFF to enable or disable the mode you like.
You can also set hotkeys for each mode, which enables you to switch modes
quickly.
10
ASUS Splendid HD graphics card
Page 17
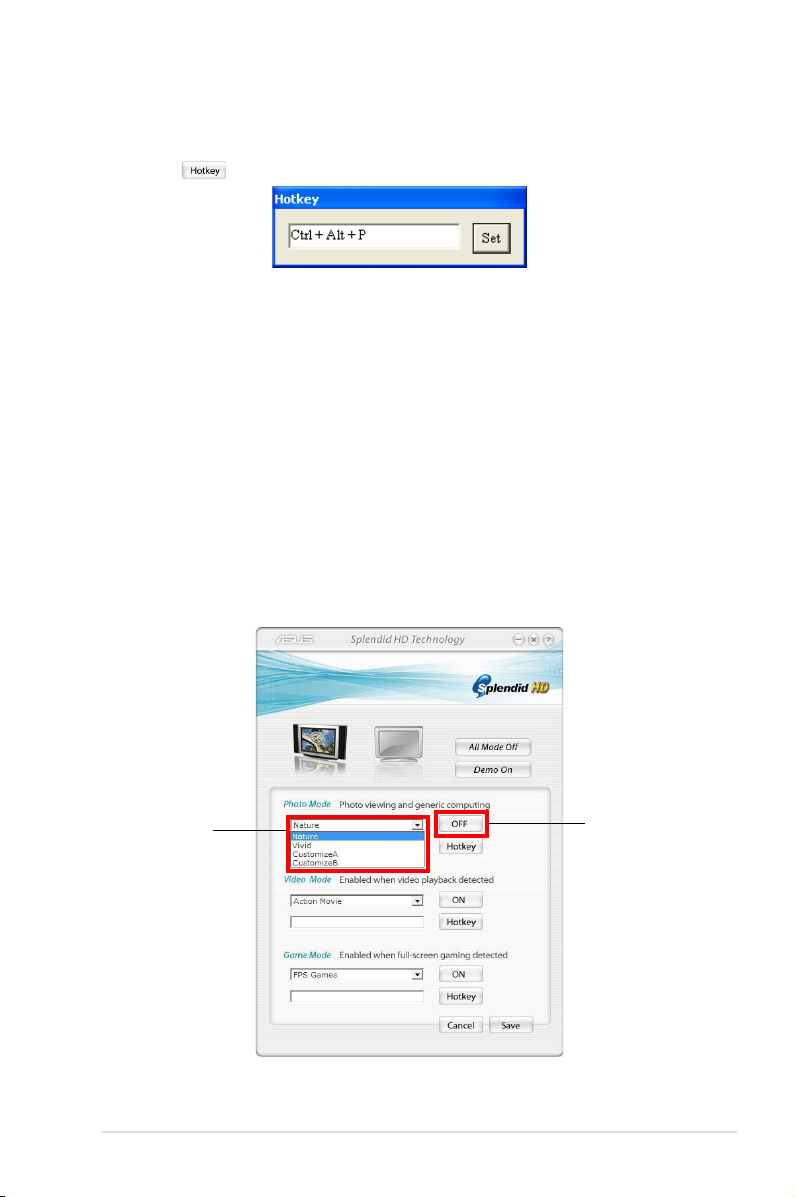
To set a hotkey:
1. Click to display the following:
2. Click on the Hotkey textbox then press desired keys. Ctrl and Alt keys are
the default keys.
3. Click Set to apply settings.
Photo Mode
To enable the Photo Mode, click the corresponding ON/OFF button. The button
displays OFF when Photo Mode is on. Select desired settings from the two default
color-enhanced settings: Nature and Vivid.
If you want to see the comparison between the original screen and the
color-enhanced screen, set the Demo button to Demo Off. When the demo starts,
a vertical green line divides the screen. The left side of the green line is the original
screen and the right side the color-enhanced screen. Click Demo again to stop
scanning.
Photo Mode list
ASUS Splendid HD graphics card
ON/OFF button
11
Page 18
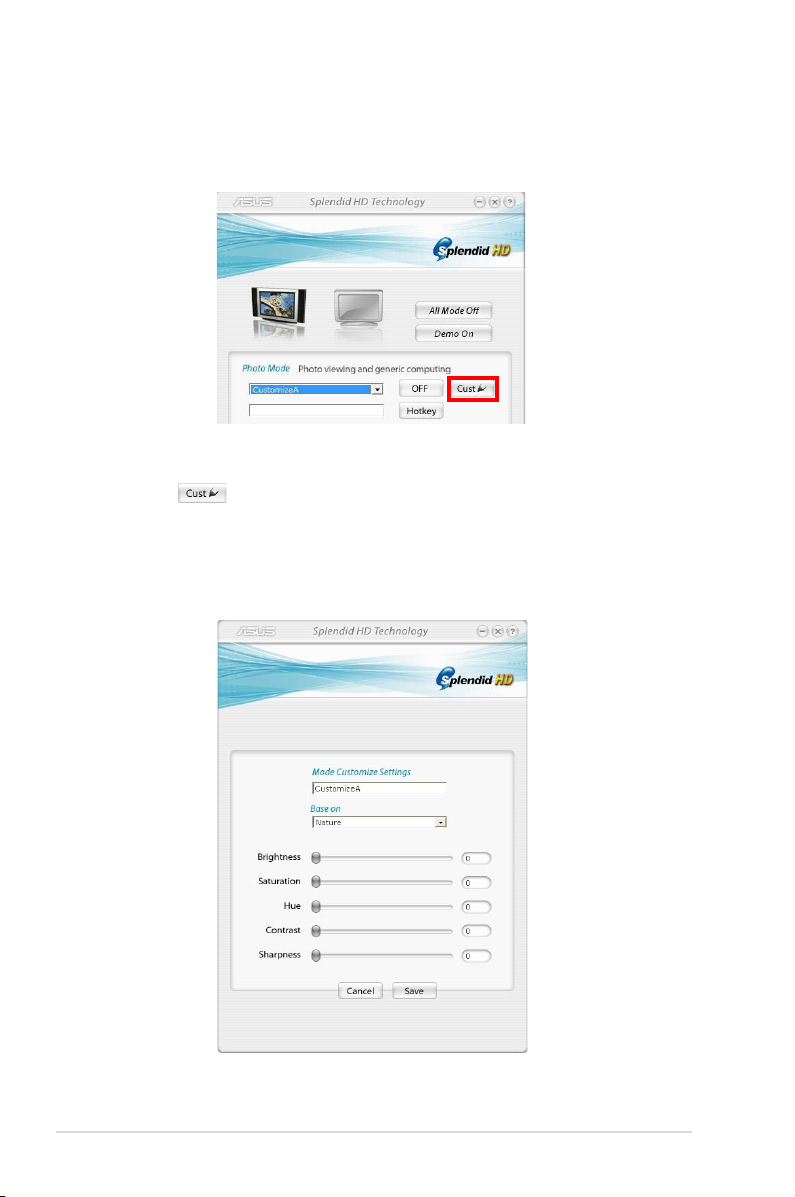
You can customize two more settings based on your needs.
To add customized settings, select CustomizeA / Customize B then click the
pencil icon .
From the customize settings screen, adjust the brightness, saturation, hue,
contrast, and sharpness according to your desired settings. Click Save then done.
12
ASUS Splendid HD graphics card
Page 19
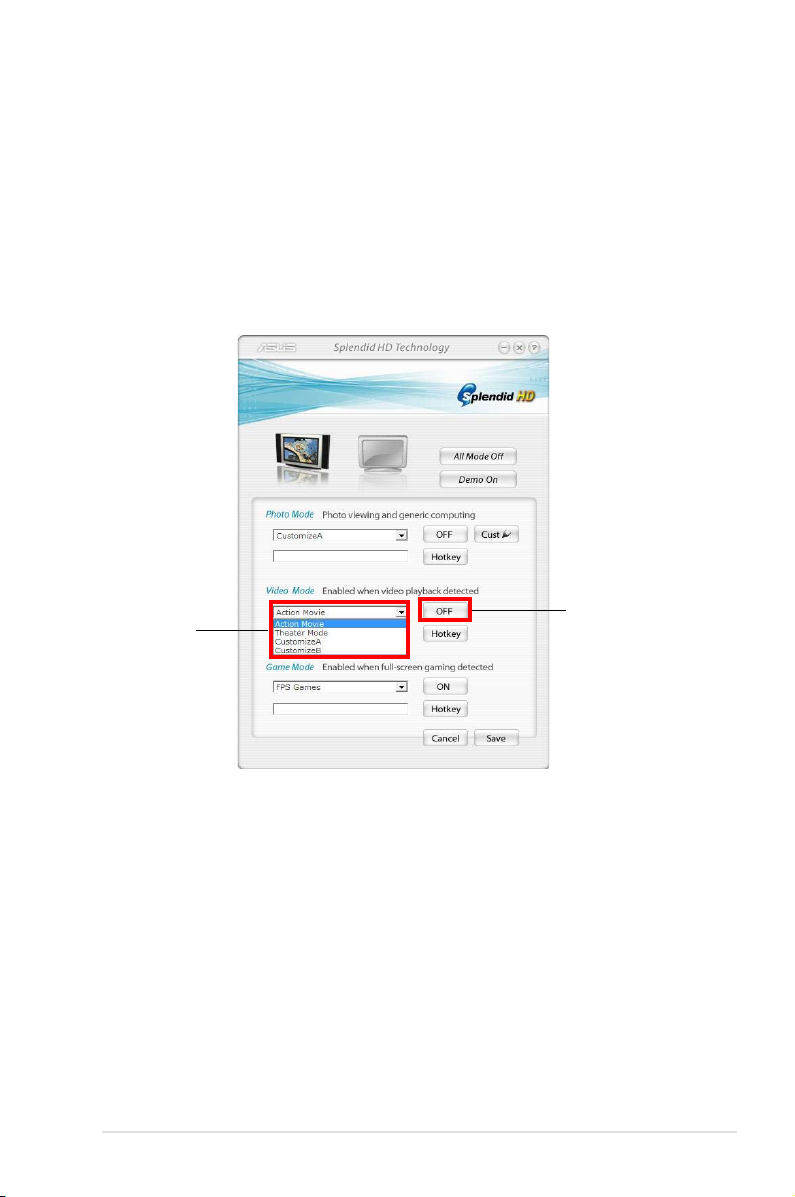
Video Mode
To enable the Video Mode, click the corresponding ON/OFF button. The button
displays OFF when Video Mode is on. Select desired settings from the two default
color-enhanced settings: Action Movie and Theater Mode.
You can customize two more settings based on your configuration. Follow the
instructions in the Photo Mode section on how to create customized settings.
Video Mode list
ASUS Splendid HD graphics card
ON/OFF button
13
Page 20

Game Mode
Your system must have the following two items installed before using Game
Mode:
1. ASUS graphics card
2. ASUS GamerOSD utility.
To enable the Game Mode, click the corresponding ON/OFF button. The button
displays OFF when Game Mode is on. Select desired settings from the two default
color-enhanced settings: FPS Games (First Personal Shooting Game) and RPG
(Role-Playing Game) /RTS Games (Real-Time Strategy Game).
You can customize two more settings based on your needs. Follow the instructions
in the Photo Mode section on how to create customized settings.
14
ON/OFF button
Game Mode list
ASUS Splendid HD graphics card
Page 21

6. ASUS GamerOSD
ASUS GamerOSD allows you to share real-time gaming experience while playing
full-screen games. Users can remotely monitor a live broadcast using the Internet
Explorer.
6.1 Enabling ASUS GamerOSD
Enable ASUS GamerOSD after installing the utility from the support CD.
To launch ASUS GamerOSD:
1. Right click on an empty space of the Windows® desktop and select
Properties. From the Display Properties dialog box, select the Settings tab
then click Advanced.
2. Select the ASUS tab then ASUS OSD to display the properties window.
3. Click the Enable ASUS OSD check box.
4. Click on the Hotkey textbox then press desired keys. Ctrl and Alt keys are
the default keys.
5. Click Apply to apply settings or click OK to apply settings then exit. Click
Cancel if you want to discard settings and exit.
ASUS Splendid HD graphics card
15
Page 22

6.2 Setting ASUS GamerOSD
After installing and enabling ASUS GamerOSD, click on the GamerOSD icon
on the Windows® taskbar and select Setting to display the setup menu. If you exit
the utility, go to Start > Programs > ASUS > GamerOSD AP > GamerOSD to
relaunch the program.
The GamerOSD setup menu is as follows:
Capture Mode
16
Broadcast
Select to have live broadcasts of the games you are playing on the Internet.
Movie
Select to record games and save the videos.
Advanced Setting
Allows yout to set the Video Capture Size, Video Capture Frame Rate, Sound
Capture Device, Broadcast Port, and Movie Format.
Start Broadcasting
Click to start live broadcasts of games. When selected, the broadcasting icon
appears on the WindowsWindows® taskbar. This item is disabled when you select
Movie.
For detailed instructions on how to broadcast games and the related Internet
Explorer security settings, refer to section 6.8 Broadcasting games with ASUS
GamerOSD.
ASUS Splendid HD graphics card
Page 23

HotKeys
Allows you to set the hotkeys to launch GamerOSD in full-screen games, to start/
stop recording games, and to capture game screens.
The default hotkeys are:
• GamerOSD: Ctrl + Alt + O
• Record Movie: Ctrl + Alt + S
• Screen Shot: Ctrl + Alt + C
To set a hotkey:
1. Click the pencil icon to display the
hotkey textbox.
2. Click on the hotkey textbox then press
desired keys. Ctrl and Alt keys are the
default keys.
3. Click OK to apply or click Cancel to discard settings.
View
Movie
Click to open the Movie folder
where the recorded games are
saved. Double-click an item to play.
Screen Shot
Click to open the ScreenShot folder
where the captured images are
saved. Double-click an item to view.
The Movie and Screenshot
folders are stored in \\My
Documents\ASUS\GamerOSD.
ASUS Splendid HD graphics card
17
Page 24

6.3 Using ASUS GamerOSD
In a full-screen game, launch ASUS GamerOSD using the GamerOSD hotkeys.
6.3.1 3D Display Setting
Show FPS
Allows you to show/hide FPS on your monitor and choose where to display
FPS. Configuration options: OFF, L/T (left top), R/T (right top), R/B (right
bottom), L/B (left bottom).
Even if you choose not to display FPS on your monitor, you can see the FPS
from the OC GEAR screen.
18
FPS Text Color
Changes the text color of FPS.
Configuration options: R (red), G (green), B (blue), Y (yellow), W (white).
GPU Speed
Allows you to adjust the GPU speed.
Enable Display Adjustment
Click the right arrow key to enable and the left arrow key to disable this
function. The following three items become configurable when you enable
Display Adjustment.
Gamma
Adjusts the current Gamma value of the game.
Brightness
Adjusts the current brightness of the game.
Contrast
Adjusts the current contrast of the game.
ASUS Splendid HD graphics card
Page 25

6.3.2 Video Capturing
The items in this menu are mostly controlled by the GamerOSD setup menu.
Refer to section 6.2 Setting ASUS GamerOSD for further informaiton.
Capture Mode
Displays Movie if you select Movie in the GamerOSD setup menu. This itemThis item
shows Broadcast if you previously selected Broadcast.
Start/Stop
When Movie mode is selected, this item shows the hotkeys for starting/
stopping recording games. In Broadcast mode, this item shows N/A.
Current Client(s)
Shows 0 in Movie mode. In Broadcast mode, this item shows the number of
connected viewers watching your broadcast.
Capture Size
Shows the resolution of the captured videos. This item is set in Advanced
Setting in the GamerOSD setup menu.
ASUS Splendid HD graphics card
19
Page 26

Capture Rate
Shows the frame rate of the captured videos. This item is set in Advanced
Setting of the GamerOSD setup menu.
Start Capturing
In Movie mode, press the right/left arrow key or the set
hotkeys to start/stop recording games. A red blinking
dot appears on the bottom left corner of your screen
when recording. The recorded videos are automatically
saved in the Movie folder and named by date.
In Broadcast mode, press the right/left arrow key to start/stop broadcasting
games.
For detailed instructions on how to broadcast games and the related Internet
Explorer security settings, refer to section 6.8 Broadcasting games with ASUS
GamerOSD.
6.3.3 Screenshots
20
Screenshot Mode
Allows you to shift the image capturing mode between Single and Multiple.
Files Format
Allows you to select the image files format.
Configuration options: bmp, gif, jpg.
ASUS Splendid HD graphics card
Page 27

The following two items are enabled when you select Multiple screenshot mode.
Capture Numbers
Allows you to set the number of screenshots captured consecutively.
Configuration options: 3, 4, – 9, 10.
Capture Interval (sec)
Allows you to set the capture interval in seconds.
Configuration options: 1, 2, – 5.
Hot Key
Shows the hotkeys for capturing screens. Press the hotkeys to capture
screens. The images are automatically saved in the ScreenShot folder and
named by date.
ASUS Splendid HD graphics card
21
Page 28

6.4 Broadcasting games with ASUS GamerOSD
ASUS GamerOSD allows you to broadcast the games you are playing live on the
Internet. Before broadcasting, you need to configure your Internet Explorer security
options.
6.4.1 Internet Explorer browser setup
To configure your IE browser:
1. Launch Internet Explorer.
2. Go to Tools > Internet Options.
3. From the Internet Options dialog
box, select the Security tab then
click the Trusted Sites icon.
4. Click Sites to display the Trusted
sites window.
5. Key in the Internet Protocol (IP) of
the broadcast host on the text box
then click Add.
6. Click OK when done or Cancel to
discard changes.
22
ASUS Splendid HD graphics card
Page 29

7. Click Custom Level to display the
Security Settings window.
8. Enable all items then click OK.
9. Click OK to exit the Internet Options
dialog box.
ASUS Splendid HD graphics card
23
Page 30

6.4.2 GamerOSD broadcast setup
To enable broadcasting in GamerOSD:
1. Click on the GamerOSD icon
on the Windows® taskbar and select
Setting to display the setup menu.
2. Select Broadcast. Click Advanced
Setting to configure related settings
and click Start Broadcasting. AA
broadcasting icon appears on
the Windows® taskbar.
3. Start a full-screen game. Launch the
GamerOSD using the hotkeys.
4. Press the Page Up/Down key toPage Up/Down key to
go to the Video Capturing menu
and use the Up/Down arrow key to
highlight Start Capturing.
5. Press the right arrow key to start
broadcasting.
24
ASUS Splendid HD graphics card
Page 31

6.4.3 Watching broadcasts
Remote clients can watch the game you’re playing via live broadcast on the
Internet.
To watch broadcasts:
1. From the IE Address box, key in the IP address of the computer that is
broadcasting a game.
2. Click the play button to start preview.
ASUS Splendid HD graphics card
25
Page 32

7. ASUS SmartDoctor
ASUS SmartDoctor is designed to monitor the temperature, voltage and fan
condition of your graphics card. This utility also smartly cools down your Graphics
Processing Unit (GPU) temperature and allows you to adjust the graphics card
clock settings.
7.1 Functions
• Monitors graphic chip temperature, fan speed and voltage.
• Notifies user of irregular hardware events, such as overheating, fan
malfunction and out-of-safe-range voltage.
• Smartly cools down the graphic chip when its temperature is over the limit.
• Automatically adjusts the fan speed according to the GPU temperature.
• Allows manual adjustment of GPU core and memory clock.
7.2 Launching ASUS SmartDoctor
The ASUS SmartDoctor utility is a memory resident program that is launched
everytime you start Windows® and remains in the computer memory to check the
graphics card status.
If you minimize the SmartDoctor window, click the SmartDoctor iconSmartDoctor window, click the SmartDoctor iconwindow, click the SmartDoctor iconclick the SmartDoctor icon on the
Windows® taskbar and select Popup SmartDoctor to access the menu.o access the menu.
If you exit the utility, go to Start > Programs > ASUS > ASUS SmartDoctor >
ASUS SmartDoctor to relaunch the program.
Voltage status tab
VGA status
Temperature
status tab
Fan speed tab
26
Minimize
Exit
Help
Default
Set clock
clock
If your graphics card does not support voltage, temperature, and fan speed
monitoring, you will only see the clock settings panel display. Refer to 7.6
Engine and memory clock settings for details.
ASUS Splendid HD graphics card
GPU clock
slider
Memory clock
slider
Setup
Page 33

7.3 Voltage status
Click the Voltage status tab to display the voltage status of your graphics card.
The item is grayed or disabled if your graphics card does not support voltage
monitoring.
7.4 Temperature status
Click the Temperature status tab to display the GPU and RAM temperature status
of your graphics card.
If your graphics card does not support temperature monitoring, the item is
dimmed.
ASUS Splendid HD graphics card
27
Page 34

7.5 Fan speed status
Click the Fan speed tab to display the current fan speed of your graphics card.
If your graphics card does not support fan speed monitoring, the item is
dimmed.
7.6 Engine and memory clock settings
You can manually adjust the Graphics Processing Unit (GPU) and memory clock to
enhance your graphics card performance.
To adjust the engine and memory clock:
1. Move the Engine clock slider to adjust the engine clock.
2. Move the Memory clock slider to adjust the memory clock.
Engine clock slider
Memory clock slider
3. Click to set.
4. SmartDoctor prompts a warning message. Click OK.
5. The engine clock you set appears on a dialog box. Click OK.
28
ASUS Splendid HD graphics card
Page 35

7.7 Advanced setup features
To launch the SmartDoctor Settings dialog box, click on the SmartDoctor
menu.
7.7.1 Settings
To change the settings, click the Settings tab from the SmartDoctor Settings dialog
box.
Monitor Settings
To change monitor settings:
1. Click the combo list box to set Monitor polling time interval.
2. Click the check box to enable or disable any of the monitor setting features.
3. Click Apply or OK to save settings.
ASUS Splendid HD graphics card
29
Page 36

7.7.2 Monitor
To change voltage, temperature and fan monitor settings:
1. Click the Monitor tab from the SmartDoctor Settings dialog box.
Voltage Alarm Settings
• Click the check box to enable or disable the alarm for AGPVDDQ (for AGP
cards) or PCIE 12V (for PCIe cards), VCC, FBVDDQ or VCORE voltages.
• Move the slider to adjust the Voltage Error Bound percentage.
Temperature Alarm Settings
• Click the check box to enable or disable the alarm for the GPU and Video
RAM temperature.
• When enabled, you can move the slider to adjust the GPU or Video RAM
alarm temperature.
Fan Alarm Settings
• Click the check box to enable or disable the Fan speed alarm.
• When enabled, you can move the slider to adjust the fan speed.
Click the Default button to load optimum values for stable performance.
2. Click Apply to apply settings or click OK to save settings and exit. Click
Cancel to discard changes and exit.
30
ASUS Splendid HD graphics card
Page 37

7.7.3 Fan Control
To change the fan control settings:
1. Click the Fan Control tab from the SmartDoctor Settings dialog box.
2. Click the option buttons to select fan control feature. The fan control has
three features: Manual mode, SmartCooling and Auto Fan Control.
Manual mode: You can manually change the fan speed by adjusting the
slider of each temperature mode.
Enable Smartcooling: SmartDoctor will automatically adjust the fan speed
according to the GPU temperature. For example, if the GPU temperature
rises over 60 degrees Celsius, SmartDoctor will raise the fan speed to the
fastest level to cool the GPU. Move the slider to adjust the temperature for
fan speeds or click Default to load optimum settings.
Auto Fan Control: SmartDoctor automatically adjusts the fan speeds for
optimum performance.
The Fan Control tab is not displayed if your graphics card does not support the
Fan Speed Control feature.
3. Click Apply to apply settings or click OK to save settings and exit. Click
Cancel to discard changes and exit.
ASUS Splendid HD graphics card
31
Page 38

7.7.4 HyperDrive
To change the ASUS HyperDrive settings:
1. Click the HyperDrive tab from the SmartDoctor Settings dialog box.
ASUS HyperDrive
To activate HyperDrive:
1. Click the Enable HyperDrive check box to enable or disable the HyperDrive
feature.
2. Click the option buttons to select the HyperDrive Mode.
32
Make sure to install the ASUS Enhanced driver when using the HyperDrive 3D
mode.
HyperDrive Modes
• 3D Game mode: In 3D Game mode, ASUS SmartDoctor automatically
sets the GPU clock to its highest possible value when playing 3D games
for better 3D performance. It reverts to its normal GPU core clock after
playing 3D games.
• CPU usage mode: When set to this mode, ASUS SmartDoctor
dynamically adjusts the GPU core clock depending on the Central
Processing Unit (CPU) work load. ASUS SmartDoctor increases the
GPU core clock when the CPU is busy and decreases it when your CPU
is idle.
• GPU Temperature mode: In Temperature mode, ASUS SmartDoctor
smartly adjusts the GPU clock according to its temperature. If the GPU
temperature increases, ASUS SmartDoctor automatically decreases the
GPU core clock, and vice versa.
ASUS Splendid HD graphics card
Page 39

3. When the HyperDrive is enabled, you can enable the Manual HyperDrive
Clock Rate and move the slider to adjust the frequency.
4. Click Default to load optimum settings.
5. Click Apply to apply settings or click OK to save settings and exit. Click
Cancel discard changes and exit.
7.7.5 Information
Click the Information tab to display the card informaiton.
ASUS Splendid HD graphics card
33
Page 40

8. ASUS VideoSecurity Online
8.1 System requirements
Software:
• Microsoft WINDOWS 2000/XP/Vista with DirectX 9.0a or above.
• WDM Capture Driver for your capture devices.
• Internet Connection with Microsoft IE 6 SP1 or above.
• Microsoft Media Player 9.0 or above.
Hardware:
• Video capture devices, like Webcams, CCD, V8 or Hi-8, which support
UYVY video format.
• A sound card or onboard chip is necessary if you want to play the
warning wave file.
See also the ReadMe text file for more details.
8.2 What’s New
34
ASUS Splendid HD graphics card
Page 41

• VideoSecurity Online works with all kinds of video capture devices, which
support UYVY video format. It can also handle many different video connectors
or interfaces such as USB, IEEE1394.
• When VideoSecurity Online detects something abnormal, it starts tracing the
object and recording its movement.
• A more user friendly History Logging interface gives you a clear idea of what’s
going on.
• Remote monitoring. With web browser and ASUS WebRTP ActiveX control,
you will be able to receive the streaming video data that has been transmitted
from your local system through the Internet.
• New VideoSecurity Online supports dual devices with the functionality of
preview, motion detection, tracing, snapshot, video recording and remote
surveillance. It displays the History, Screen, and Main panel windows in one
screen, making operating more convenient.
• VideoSecurity supports SkypeOut through Skype and brings you convenience.
8.3 Launching ASUS VideoSecurity
To launch ASUS VideoSecurity:
From the Windows taskbar, click the Start button then select All Programs >
ASUS > ASUS Video Security > ASUS Video Security to display the following
menu.
ASUS Splendid HD graphics card
35
Page 42

Setup: opens the Setup dialog. You can’t change settings while VideoSecurity
Online is executing watchdog or tracing function.
Video source: changes the Video connector type.
Set detect region: use mouse to drag a rectangular region you want to detect.
ASUS VideoSecurity Online supports two video sizes, 320x280 and 680x880. Click
to change the size.
History: When VideoSecurity Online detects any abnormal event, it records the
date, time and other information.
VideoSecurity Online working modes include Standby, Watchdog and Tracing.
• StandBy: in this mode, VideoSecurity Online does nothing but broadcast the
video. You can only change settings in this mode.
• WatchDog: press Start to start detecting. You can press the Stop button to
switch to the Standby mode.
• Tracing: When the tracing option is enabled, VideoSecurity Online starts trying
catch the motion object(s), which cause any unusual situation. Users can
manually stop tracing. VideoSecurity Online also stops tracing when the object
is too small.
• Streaming: When Enable HTTP server option is enabled, ASUS VideoSecurity
Online starts streaming if any remote client is connected to your local system.
The streaming will be stopped while there’s no client connection to your local
system. To manually stop streaming, press the Stop button.
36
ASUS Splendid HD graphics card
Page 43

8.4 Setup
To display the ASUS VideoSecurity setup window, click from
the ASUS VideoSecurity menu.
8.4.1 Main
The main settings section allows you to adjust the detecting sensibility, detecting
interval and working directory. This section also contains the check boxes to
enable various features including the alarm, autorun, use of multi-devices, and
setting of detecting delay. You can also set the detect region and windows style in
this section.
To modify the Main setup options, click Main Setting from the Video Security setup
dialog box. The following submenu appears:
Adjusting the detecting sensibility parameter
To adjust the detecting sensibility:
Move the slider to adjust the Detecting sensibility parameter. This item sets the
receptibility of VideoSecurity to environment changes.
- OR -
Press Default to set pre-assigned values based on normal light and temperature
conditions.
ASUS Splendid HD graphics card
37
Page 44

• Temperature and lighting may affect monitoring.
• The quality of the video capture device is also very important in
setting the sensibility.
• Test different values to fine-tune this parameter for optimum performance.
Setting the detecting interval parameter
To set the detecting interval parameter:
Move the Detecting interval slider. The interval (times/sec) or scan rate has four
configuration options: 1 times/sec, 2 times/sec, 3 times/sec and 4 times/sec.
- OR -
Click Default to set the recommended scan rate.
The default value of Detecting interval is 2 frames/sec. The higher the scan rate
is, the more accuracy the detection could be, the more CPU usage you need.
If you want VideoSecurity Online and other applications (like Office, network)
to run simultaneously, choose a lower scan rate to release CPU usage to other
applications.
Set to a higher scan rate for a more accurate detection.
Setting the working directory
To set the working directory:
Key in the working directory on the textbox or click Browse to locate and set the
working directory.
The default working directory is C:\VideoSec, if Windows roots in disk C. Everytime
you launch ASUS VideoSecurity, a new folder is created. The folder filename
indicates the current time and date the application was launched. For example,
“2005.06.16_04.20.10” means that ASUS VideoSecurity was launched on June 06,
2005 at 4:20:10 AM.
Do not change the working directory name while ASUS VideoSecurity is
running. Doing so will cause a runtime error!
38
ASUS Splendid HD graphics card
Page 45

Setting other features
To enable or disable the autorun feature, alarm, use of multi-devices and/or set the
detecting delay:
• Click the Autorun detect when program run check box to
enable or disable the autorun feature of ASUS VideoSecurity. When this
item is enabled, VideoSecurity Online will auto-run when system boots. This
option is helpful when you use remote control over your computer.
• Click the Enable alarm check box to enable or disable the alarm feature.
When this item is enabled, VideoSecurity Online can alert user when
VideoSecurity Online detects any unusual condition. Before use this option,
make sure your PC has properly installed a sound card.
• Click the Delay detecting for XXX seconds check box to
enable or disable the delay feature when a motion is detected. Key in or click
the arrows to set the delay (in seconds).
• Click the Enable multi-devices check box to enable or disable the alarm
feature. This option allows you to switch to single device mode or double
devices mode for VideoSecurity Online.
Setting the detection region
To set the detect region, click the Detect Region option buttons.
If you select Full Window, VideoSecurity Online will monitor the whole visible
area. If you select User Defined Region, VideoSecurity Online will only detect
changes within the specific region you set. The default value is Full window.
ASUS Splendid HD graphics card
39
Page 46

Setting the Windows display style
To set the Windows display style, click the Window Style option buttons.
Make sure to click OK after making changes.
8.4.2 Mode
The Mode section allows you to configure the Detecting and Tracing method. To
modify the mode settings, click the Mode item from the ASUS VideoSecurity setup
dialog box. The following submenu appears:
40
ASUS Splendid HD graphics card
Page 47

Setting the detecting mode
To set the detecting mode:
Click the option button of your desired mode. The following describes the available
configuration options:
• Stay in the detecting mode until users press “Stop” - when a condition is
detected, VideoSecurity will continue detecting the region until you press the
Stop button on the main menu.
• Leave the detecting mode whenever the number of conditions reaches n
times - this option allows you to set the maximum number of conditions n
before VideoSecurity stops detecting a region. To set n, key in your desired
number in the text box or click the arrows to adjust the desired maximum
number.
• Leave the detecting mode immediately - This is the default option. If any
unusual condition is detected, VideoSecurity Online stops watchdog function
immediately.
Setting the tracing method
To set the tracing method:
Click the Start tracing whenever a condition is detected check box to have
VideoSecurity Online not only detects conditions, but also can trace the motion
object. The tracing modes are:
ASUS Splendid HD graphics card
41
Page 48

• Stop tracing when user’s press “Stop” - When there is an event,
VideoSecurity online starts to trace the motion object(s) and prompt a Tracing
Box to provide you with more options.
• Stop tracing when the target stays still for x seconds - automatically stops
tracing when the detect region remains still for x seconds. To set x, key in the
number in the text box or click the arrows keys to adjust value.
• Make sure to click OK after making changes.
• When Tracing Box prompts, users can snapshot or capture by
themselves, all the recorded files are saved at the current working
directory you specified.
8.4.3 Email setting
The Email setting section contains the email parameters necessary to send an
email when the email alarm feature is enabled. To modify the email settings, click
the Email Setting item from the setup dialog box, the submenu appears.
42
ASUS Splendid HD graphics card
Page 49

Using the email warning feature
To use the email warning feature:
1. From the Main Setting section, click to check Enable alarm.
2. Click the Email Setting item from the setup dialog box then click to enable
Send out an email as warning.
ASUS Splendid HD graphics card
43
Page 50

3. Key in the email address(es) of the recipient(s), the subject, and body
content. The following describes these email parameters:
• To
• CC
• BCC
• Subject
• Body
4. Click Sending Mail Settings to configure the email parameters. The
following window appears:
44
If necessary, consult your system administrator for authorization and other
server parameter settings.
Server
Contains the parameters and protocols necessary to send your email. Key
in the host name/address, port number, mail address, authentication method,
username, and password. The following describes the server parameters:
ASUS Splendid HD graphics card
Page 51

Host Name/Address - refers to the simple mail transfer protocol (SMTP)
server address that is used to transfer mail over the Internet. Example:
exchange.companyname.com or 149.112.144.153.
Port Number - the number identifying the type of connection requested by a
remote computer on the Internet. The default value is 25.
Mail Address - refers to the sender’s email address.
Authentication method - refers to preferred server authentication method
when checking the user name and password.
Username - refers to your user account name.
Password - secret set of characters and/or numbers required to access a
computer system. In this case, to allow you to send and receive emails.
Misc
The Misc group contains miscellaneous parameters and server settings.
Refer to the following parameter descriptions:
Auto Connect to the Internet - when enabled, the utility will check if an
Internet connection already exists. If the connection between the IP you
bind and the destination mail server can’t be established, the utility will
automatically dial-up. Click the check box to enable or disable this feature.
Bind to - selects your local IP to bind for Internet connection. Click the list box
to select IP.
Encoding - sets the encoding method for the character set of email sent.
Click the list box to select encoding method.
Send All messages MIME encoded - allows support for
multipurpose Internet mail extensions (MIME) character sets. Click the check
box to enable or disable this feature.
Send All messages as HTML - allows you to send your messages in
hypertext markup language (HTML) format. Click the check box to enable or
disable this feature.
Message Priority - sets the email message priority level. Click the check box
to enable or disable this feature.
5. Click OK to save the configuration or Cancel to abort.
6. Click Test Mail to test your email configuration.
7. When finished, click OK to save settings and exit.
ASUS Splendid HD graphics card
45
Page 52

8.4.4 Record setting
The Record setting section contains parameters that allows you to configure
the recording duration whenever condition is detected. To set the recording
parameters, click the Record setting item from the setup dialog box. The following
submenu appears:
To set the recording parameters:
1. Click to enable Start recording whenever there’s an unusual condition occurs.
2. When enabled, key in or use the arrows to set the recording duration in
seconds. The default value is 2 seconds.
3. Click OK to save settings and exit.
46
ASUS Splendid HD graphics card
Page 53

8.4.5 Device
The Device section allows you to set the video capture devices and color settings.
To select a video capture device or adjust color settings, click the Device Setting
item from the ASUS VideoSecurity setup dialog box. The following sub-menu
appears:
ASUS Splendid HD graphics card
47
Page 54

Configuring capture device
To configure device:
1. Click the Devices list box to select video capture device.
2. Click the Video Standard list box to set the video standard in your area.The
default video standard is chosen based on your system location.
3. Move the slider to adjust the brightness, saturation, contrast or color hue.
Click on the Default button to restore the default settings.
- OR -
Click Default to load recommended values.
4. Click OK to save settings and exit.
48
ASUS Splendid HD graphics card
Page 55

8.4.6 Skype Setting
Enable Skype: When enabled, ASUS VideoSecurity works with Skype. If any event
is detected, Skype will notify you.
Before using this function, you need to install Skype in the system and properly
configure the settings.
When Skype is enabled in the first time, a dialog box pops up as the following.
Select “Allow this program to use Skype”, and then click OK. If you select “Do
not allow this program to use Skype”, VideoSecurity will be blocked from hosting
Skype.
ASUS Splendid HD graphics card
49
Page 56

To configure the video settings of Skype:
1. Launch Skype.
2. Click the Tools tab and select
Options....
3. Click Video in the left part.
4. Select Select webcam: and choose ASUSTek Video Capture Filter.
5. Click Enable Skype Video and Start my video automatically.
6. Click Save.
50
ASUS Splendid HD graphics card
Page 57

The operation of remote surveillance from Skype appears as the following screens
(figure 1, 2 and 3).
If you have two webcams enabled in the server, you can use chat command
“change source” (figure 3) to switch the webcam you want to see.
Figure 1: home PC
Figure 2: remote side PC
Figure 3: remote side PC
ASUS Splendid HD graphics card
51
Page 58

8.5 Video Source
The Video Source lists available video devices installed to your system. When
available, you can exchange the different video source types.
Video source setting
To set the video source:
1. Click Video Source from the VideoSecurity main menu.
2. From the pop-up menu, select from the available video sources. The selected
video source output is displayed on the upper screen.
52
ASUS Splendid HD graphics card
Page 59

8.6 Set detect region
The Detect Region is a user-defined area or areas that VideoSecurity will monitor
for condition changes.
To set detect region:
1. From the Main Setting section, select User Dened under the Detect
Region group.
2. Click Set detect region from the VideoSecurity main menu to display the
Shape Properties dialog box.
3. Click the desired option buttons to configure the settings in the Region Type,
Shape Type, and Draw Mode fields.
4. Click OK to apply settings.
ASUS Splendid HD graphics card
53
Page 60

5. Drag the mouse to an area to set the detect region.
Detect region
You can set up to ten (10) detect regions.
8. Click to begin surveillance.
54
ASUS Splendid HD graphics card
Page 61

8.7 History
History contains the list of recorded conditions in the detect region. The following
labels the history section from the main menu.
Click to select previously recorded
conditions
Click to delete all history les
Click to view image or video
Click to delete condition
1. To select other recorded conditions, click the list box labeled with the date
and time of recording.
2. To delete a recorded condition, select the folder from the list box and click
.
3. To preview image or video, click from a listed condition.
4. To delete a recorded condition, click .
ASUS Splendid HD graphics card
55
Page 62

8.8 Limitations
Before using VideoSecurity Online, there are some limitations you have to
understand so that you can appropriately use this application.
• While using Webcams or CCDs, the high temperature and luminance
sensibility often cause distorted CCDs of the images, which might result in
erroneous detection.
• If the features (e.g. color, luminance) of the object are much similar with that
of the background, the object might not be detected.
• The Webcams or CCD cannot successfully capture the object if the object
moves too fast.
• VideoSecurity Online can only process UYVY, YUY2 and I420 video format.
• Due to the limitation of Video Mixing Renderer in Win2000,
VideoSecurity3500 doesn’t support User Defined Motion Detection and
Tracing features in Win2000.
• VideoSecurity does not support 256 color. We suggest that you run the
program under 16-bit color environment or above.
Known Issues
• If you want to connect two USB devices to the system, we recommend that
you connect them to USB ports of different USB port modules. Do not use
two USB ports in the same USB port module, for example, using port 1 and 2
at the same time.
56
ASUS Splendid HD graphics card
 Loading...