

Page 1

ASUS M303ASUS M303
ASUS M303ASUS M303
ASUS M303
2 BASIC INFORMATION2 BASIC INFORMATION
2 BASIC INFORMATION2 BASIC INFORMATION
2 BASIC INFORMATION
Page 2

Chapter summaryChapter summary
Chapter summaryChapter summary
Chapter summary
Phone layout ..................................................................................... 11
Function keys .................................................................................... 13
Multi-color LED indicator ................................................................... 14
Subscriber Identity Module (SIM) card .............................................. 15
Battery .............................................................................................. 17
Battery power levels .................................................................. 17
Installing and removing the battery ........................................... 18
Charging the battery.................................................................. 20
Signal strength .................................................................................. 22
LCD displays ...................................................................................... 22
Camera .............................................................................................. 23
Switching the phone ON or OFF ........................................................ 24
Page 3
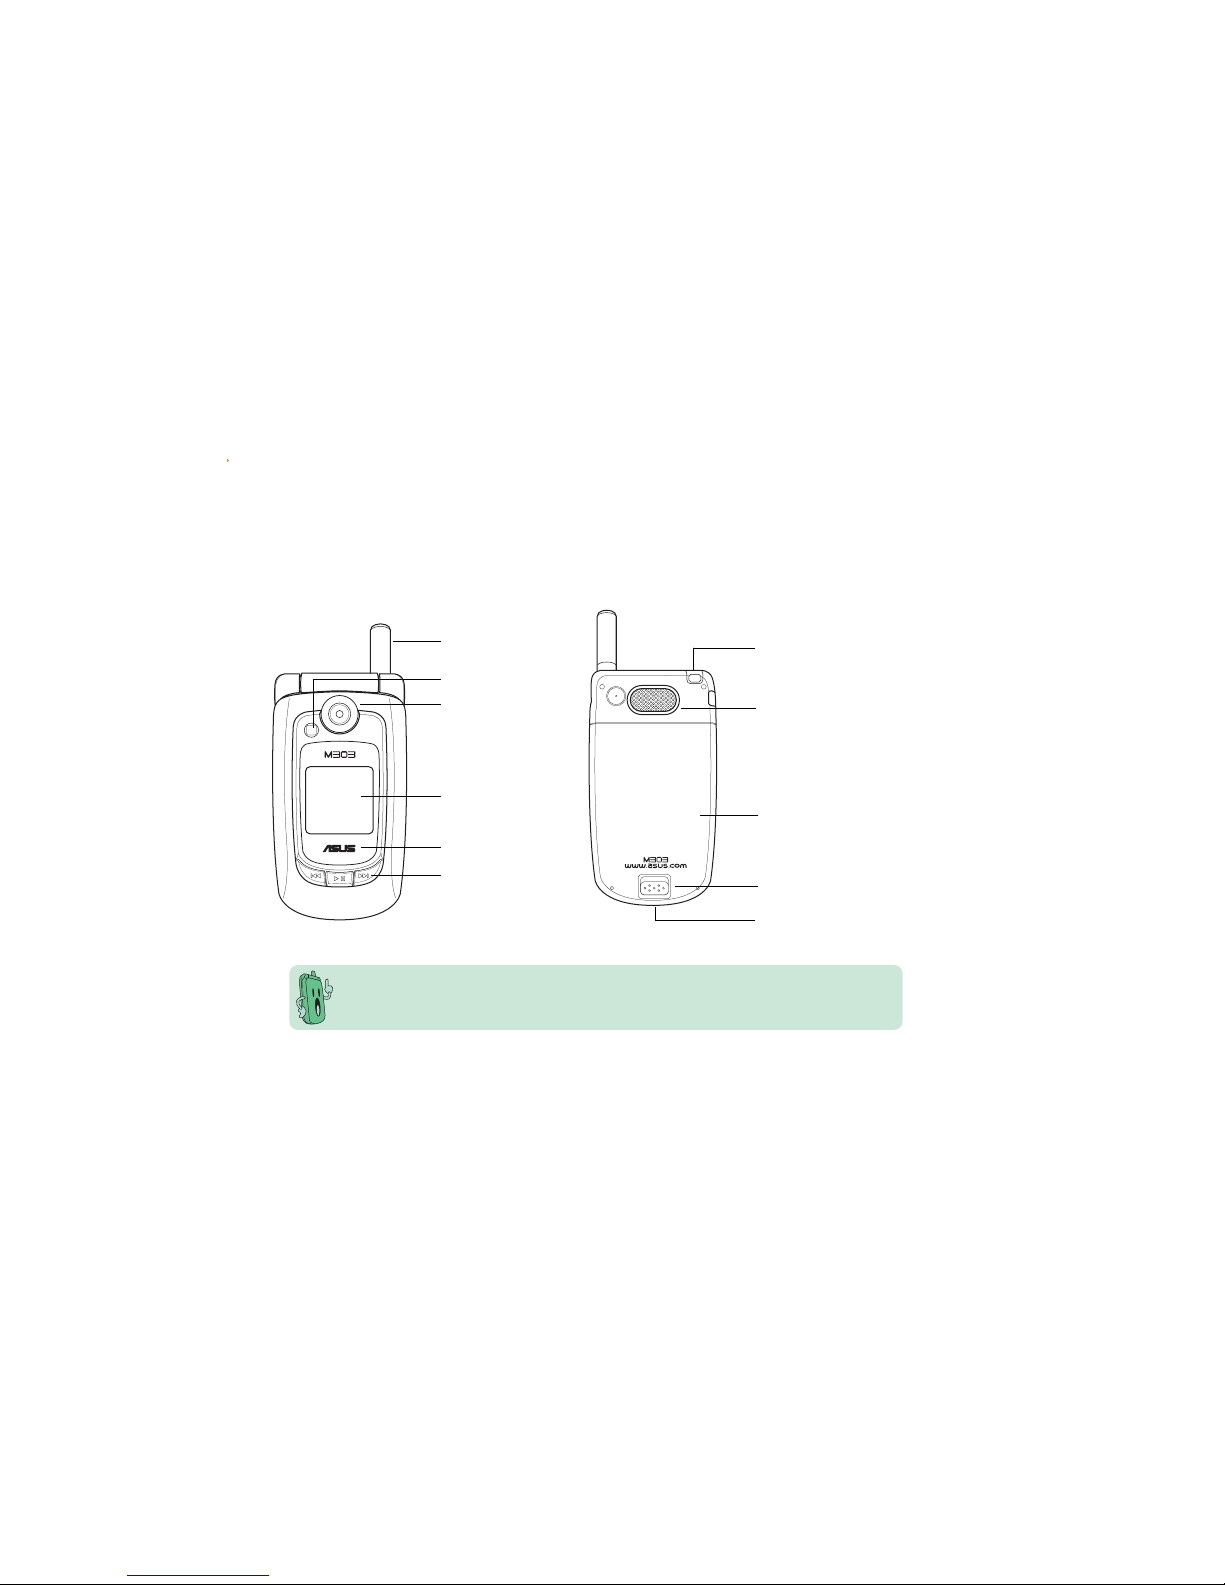
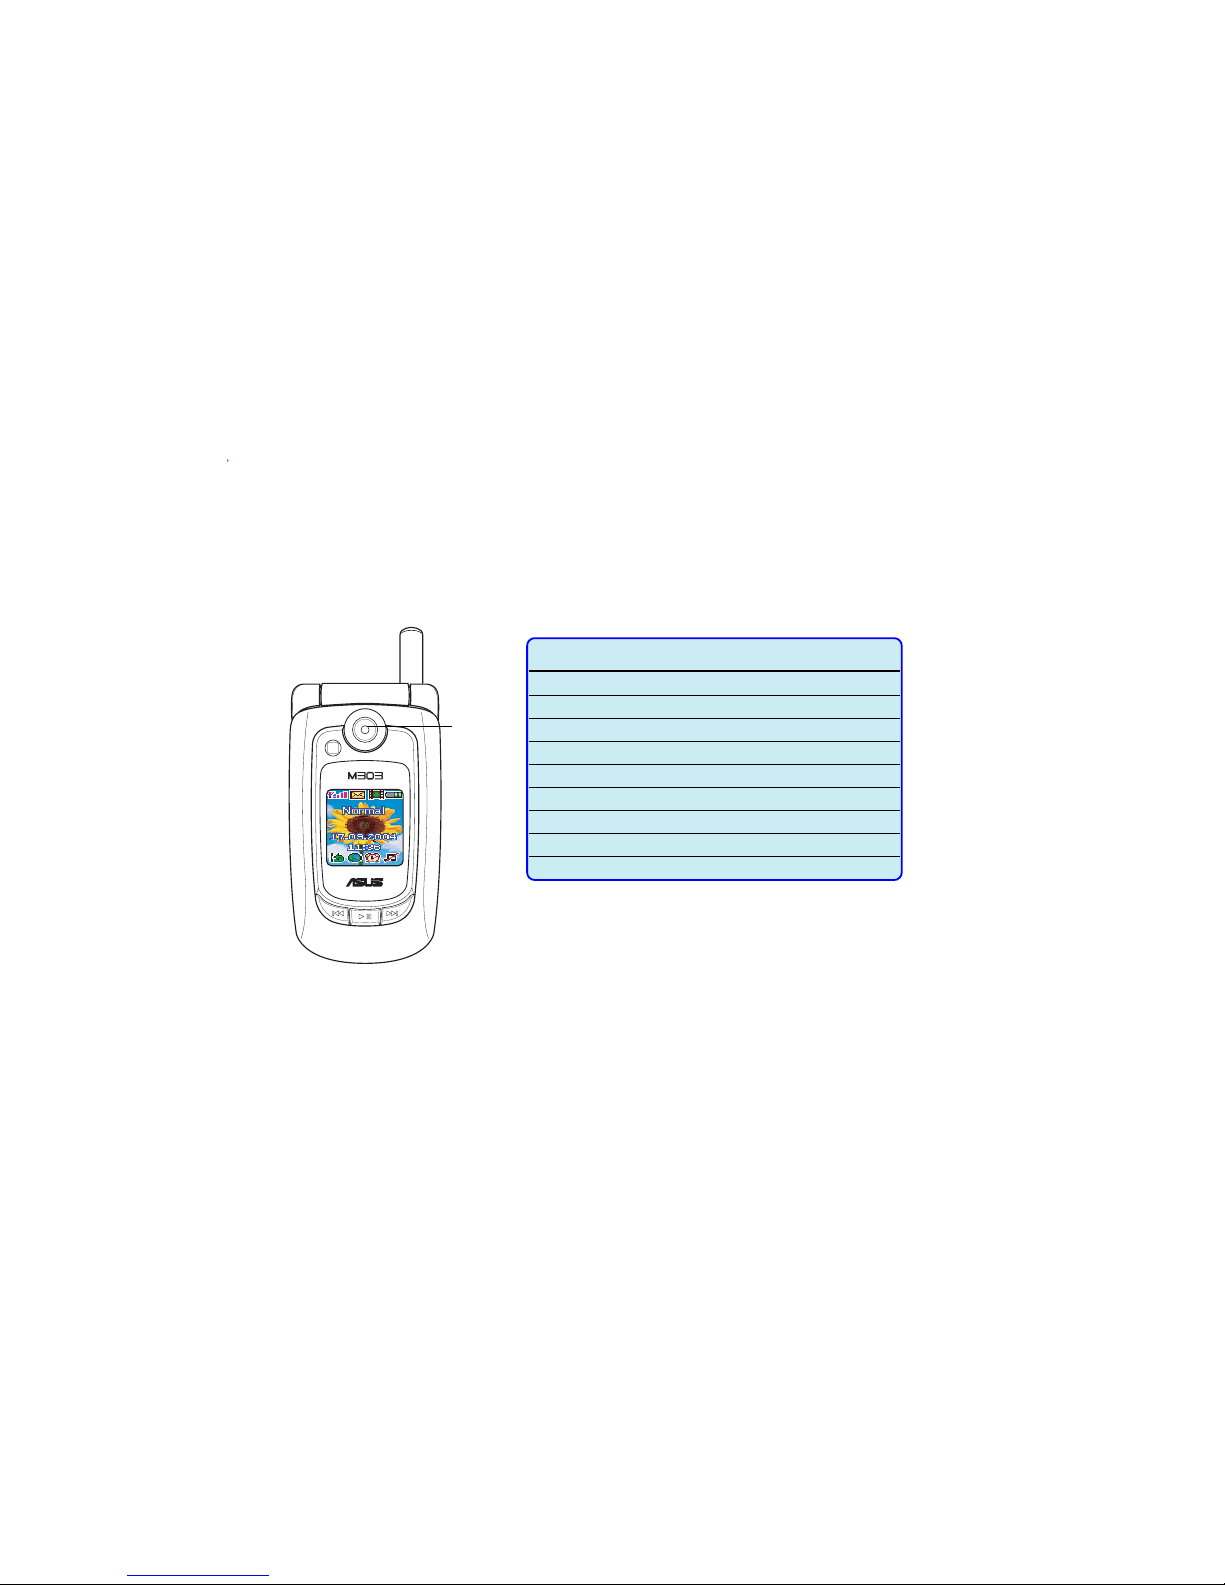
Phone layout
AntennaAntenna
AntennaAntenna
Antenna
CameraCamera
CameraCamera
Camera
FlashFlash
FlashFlash
Flash
External displayExternal display
External displayExternal display
External display
Cover and built-inCover and built-in
Cover and built-inCover and built-in
Cover and built-in
battery*battery*
battery*battery*
battery*
Back cover latchBack cover latch
Back cover latchBack cover latch
Back cover latch
Strap holderStrap holder
Strap holderStrap holder
Strap holder
MP3 controlsMP3 controls
MP3 controlsMP3 controls
MP3 controls
Front ViewFront View
Front ViewFront View
Front View
Back ViewBack View
Back ViewBack View
Back View
* The battery comes uninstalled on your mobile phone. Refer to the battery
installation section for instructions on how to install the battery.
LED indicatorLED indicator
LED indicatorLED indicator
LED indicator
SpeakerSpeaker
SpeakerSpeaker
Speaker
Power adaptor/ Power adaptor/
Power adaptor/ Power adaptor/
Power adaptor/
USB socket USB socket
USB socket USB socket
USB socket
Page 4
Side View (Left)Side View (Left)
Side View (Left)Side View (Left)
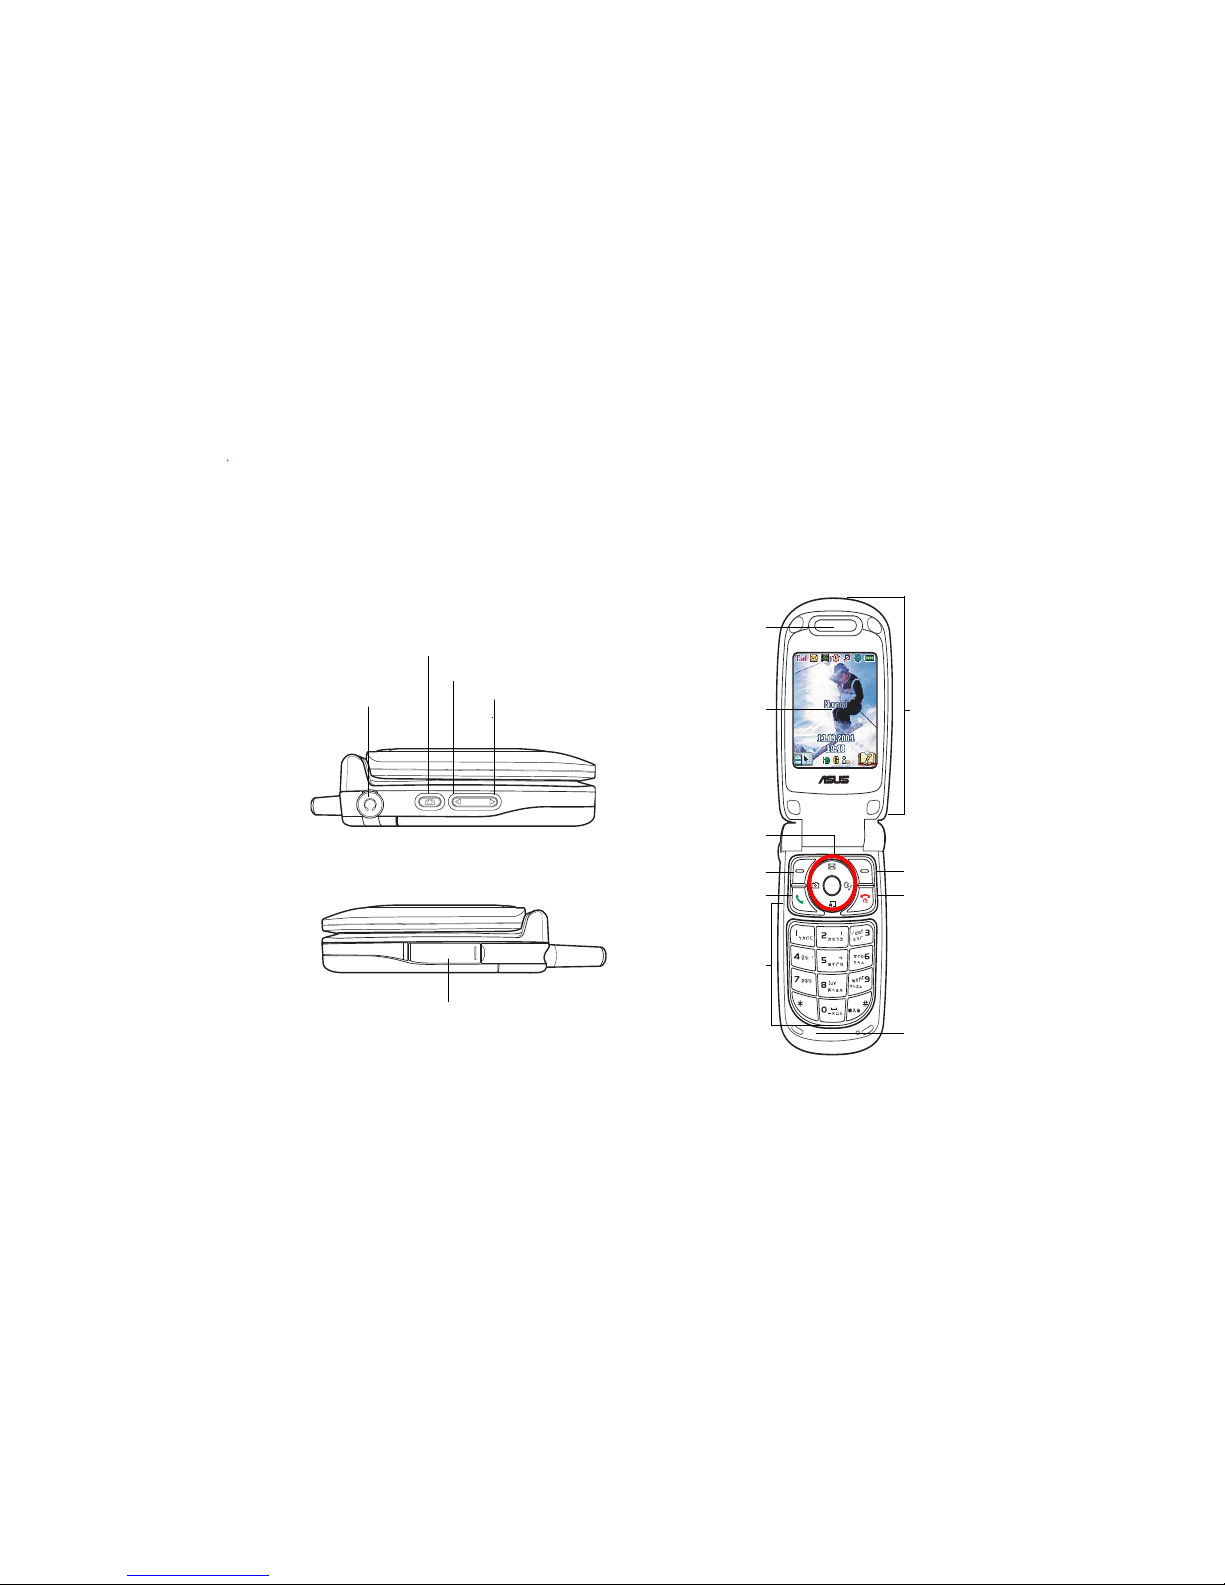
Side View (Left)
Phone layout
Camera/VoiceCamera/Voice
Camera/VoiceCamera/Voice
Camera/Voice
dial buttondial button
dial buttondial button
dial button
Volume up buttonVolume up button
Volume up buttonVolume up button
Volume up button
Volume down button Volume down button
Volume down button Volume down button
Volume down button
˘
abc
ɺɻɼ
ʄʅʆʇ
,
0ࡻ
jkl
@
EarpieceEarpiece
EarpieceEarpiece
Earpiece
Main displayMain display
Main displayMain display
Main display
Navigation/Navigation/
Navigation/Navigation/
Navigation/
Quicklaunch keysQuicklaunch keys
Quicklaunch keysQuicklaunch keys
Quicklaunch keys
AlphanumericAlphanumeric
AlphanumericAlphanumeric
Alphanumeric
keyskeys
keyskeys
keys
MicrophoneMicrophone
MicrophoneMicrophone
Microphone
Soft key (left)Soft key (left)
Soft key (left)Soft key (left)
Soft key (left)
Call keyCall key
Call keyCall key
Call key
Flip topFlip top
Flip topFlip top
Flip top
Soft keySoft key
Soft keySoft key
Soft key
(right)(right)
(right)(right)
(right)
On/Off/EndOn/Off/End
On/Off/EndOn/Off/End
On/Off/End
callcall
callcall
call
keykey
keykey
key
Front View (Open flip top)Front View (Open flip top)
Front View (Open flip top)Front View (Open flip top)
Front View (Open flip top)
HeadphoneHeadphone
HeadphoneHeadphone
Headphone
JackJack
JackJack
Jack
MiniSD Card Slot
Side View (Right)Side View (Right)
Side View (Right)Side View (Right)
Side View (Right)
Page 5
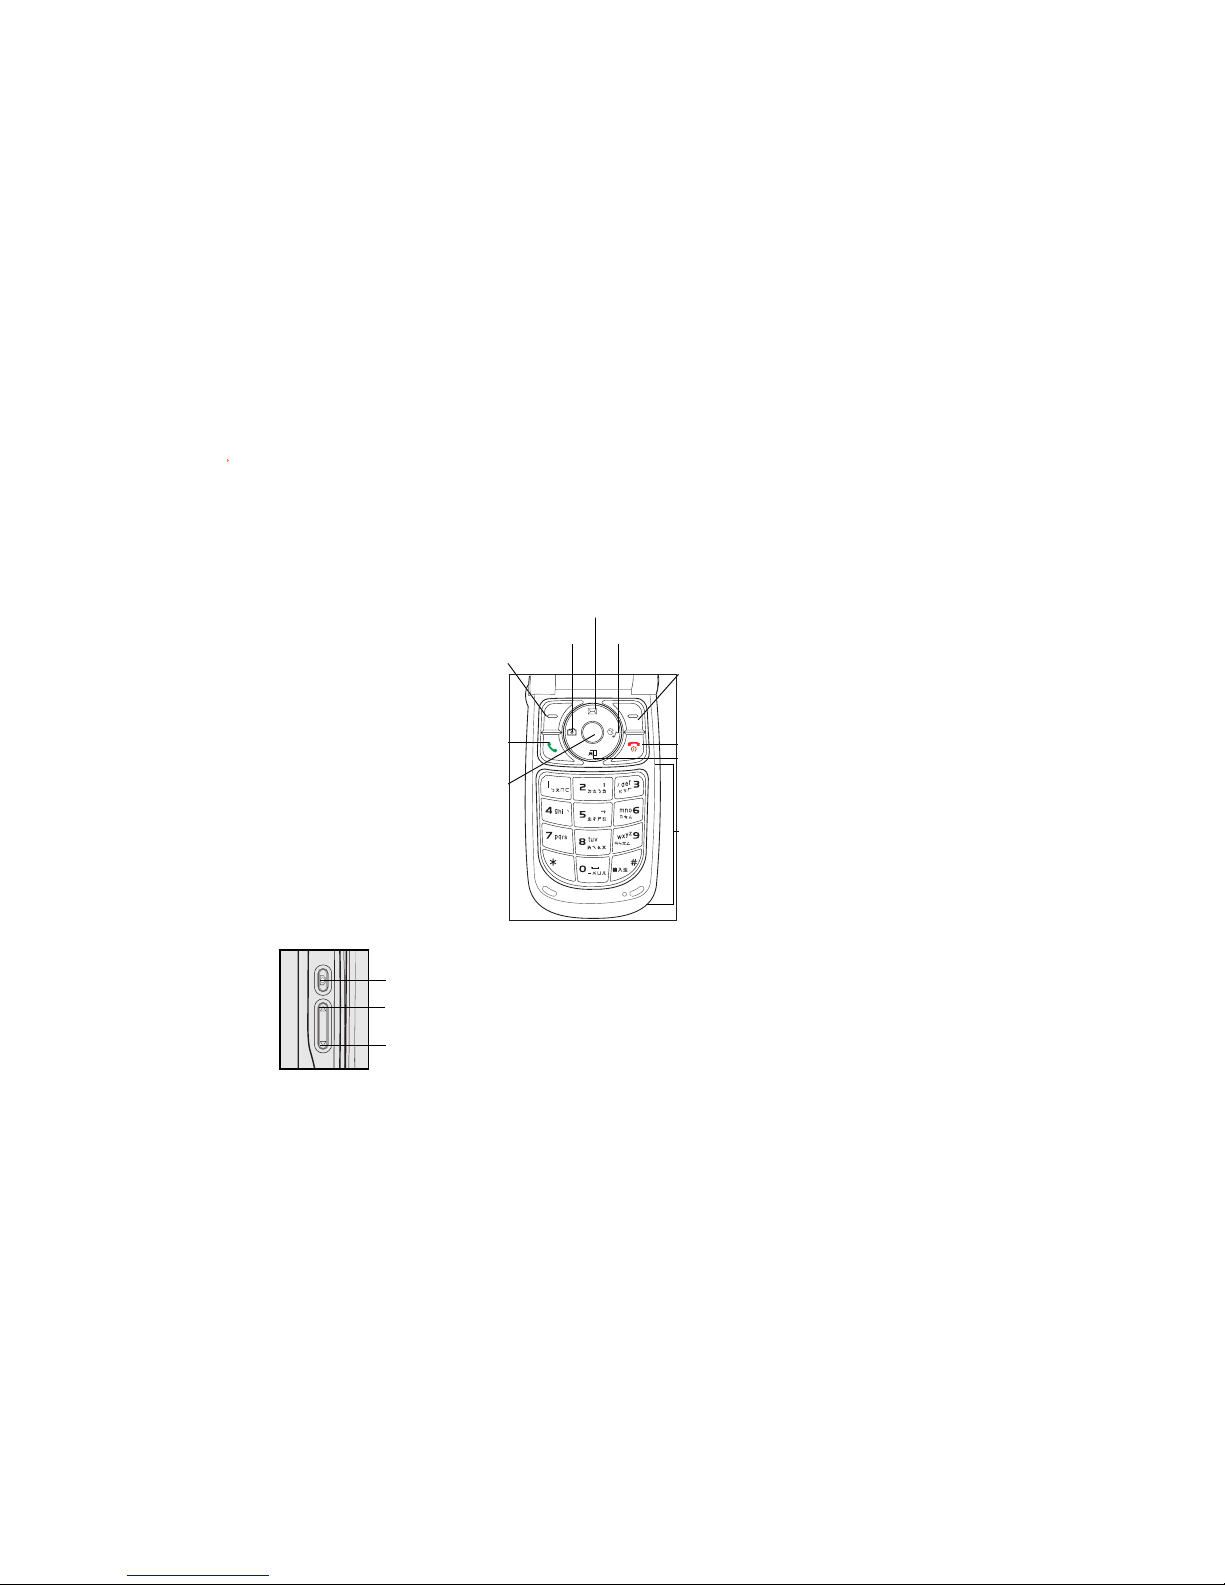
Function keys
When the phone is in idle mode, you can press the following function keys to launch some of
the most common phone functions.
Displays the phone book when in idle
mode; performs various functions
depending on the menu level and
screen display
Ends a call; turns the phone ON or OFF
Enters numbers, alphanumeric
characters, and symbols
Launches the phone menu; performs
various functions depending on the
menu level and screen display
Displays the SMS/MMS inbox
Displays the Fun menuDisplays the Camera menu
Answers a call; displays dialed numbers
Puts the phone in active mode;
selects an option; enters data; long
press to launch WAP; shows the
wallpaper in full screen mode
Displays your shortcuts
Press once to launch the camera. Long press to launch the voice command function.
Press this button to decrease the ring tone volume.
Side keysSide keys
Side keysSide keys
Side keys
Press this button to increase the ring tone volume.
˘
abc
ɺɻɼ
ʄʅʆʇ
,
0ࡻ
jkl
@
Page 6
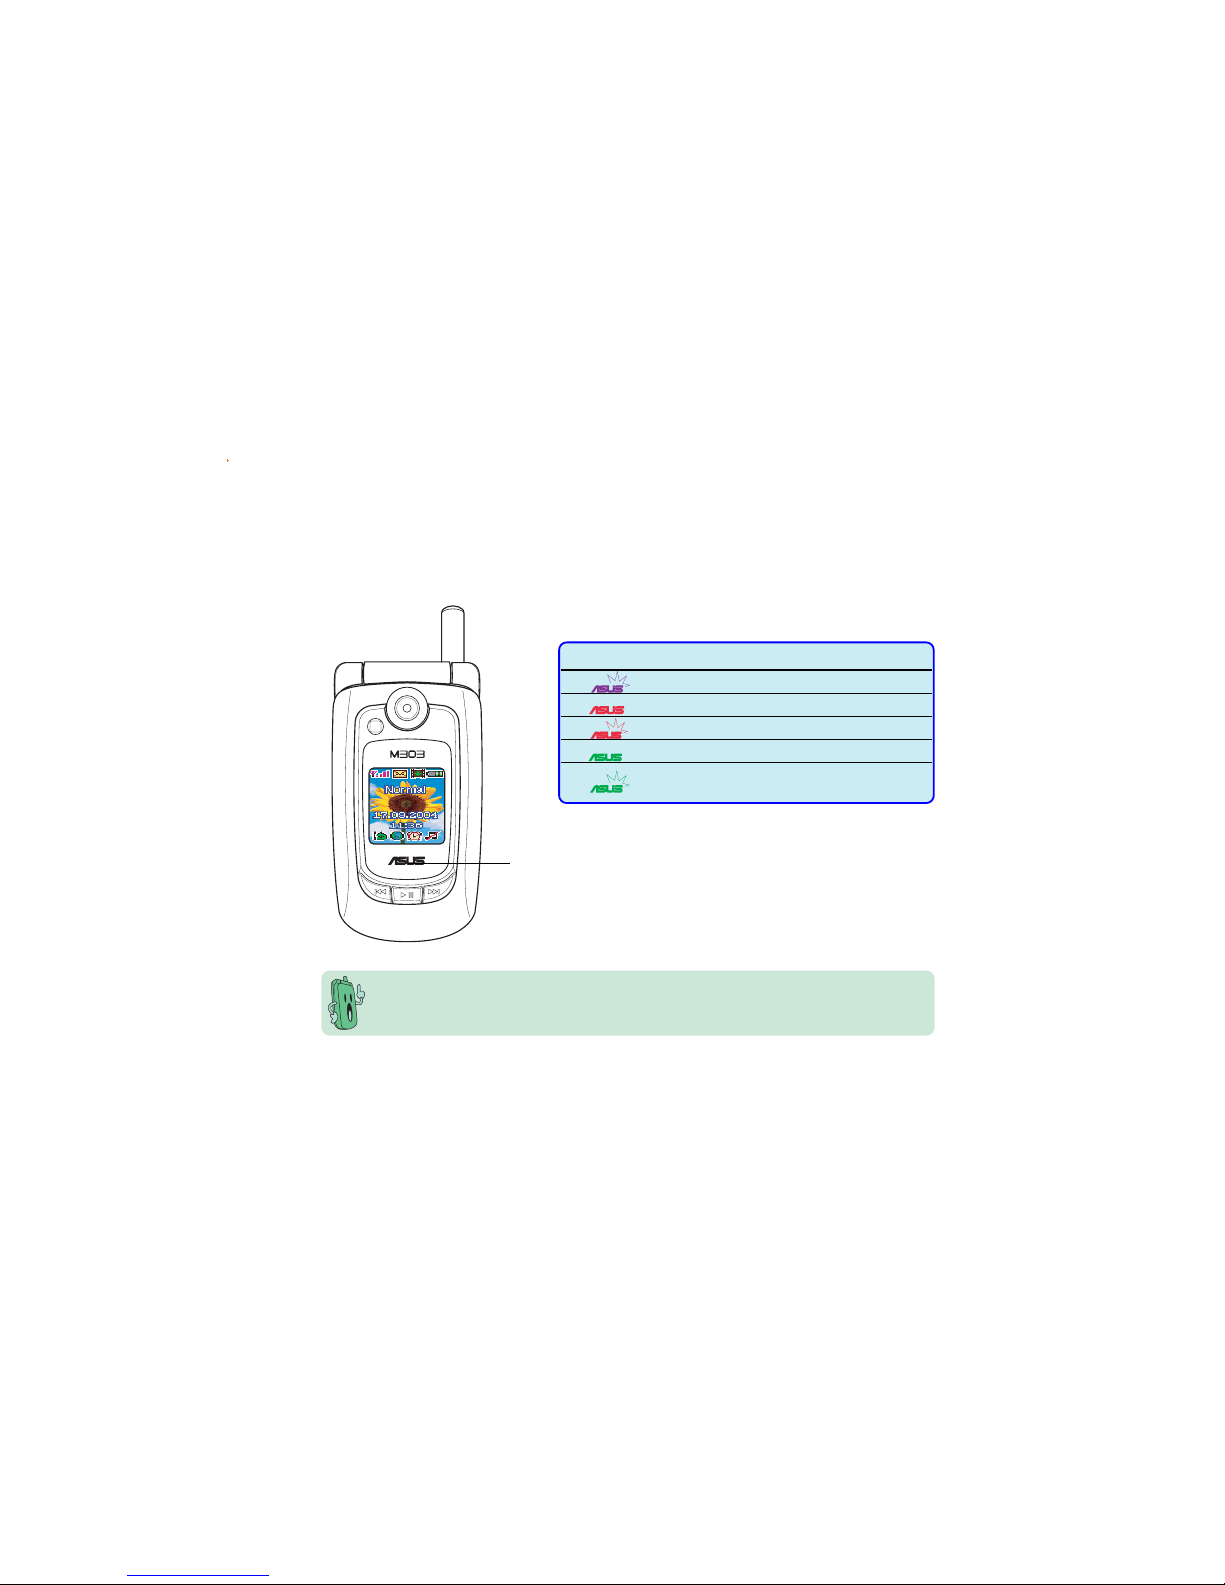
Multi-color LED indicator
The phone comes with a multi-color LED located below the external display. This LED displays
the phone, message, or call status in four different color indications.
LED indicatorLED indicator
LED indicatorLED indicator
LED indicator
Aside from the four-color LED indicator, seven colors are available for caller
identification. You may assign a specific LED color to a phone book entry. See Chapter 9
“Organizing your stuff” for details.
ColorColor
ColorColor
Color
StatusStatus
StatusStatus
Status
Purple (flashing) Default (Idle)
Red Battery is charging
Red (flashing) Battery low warning
Green Battery is fully charged
Green (flashing) Missed call
New SMS/MMS message
Page 7
Subscriber Identity Module (SIM) card
The phone operator provides you with a Subscriber Identity Module (SIM) card that stores your
mobile phone number, phone book entries, SMS/MMS messages, graphics, etc. Install the SIM
card before you install the battery.
The SIM card usually comes embedded on a plastic card. Read the SIM card documentation
before removing the SIM card. Remove any rough edges on the SIM card before you install
it to the phone.
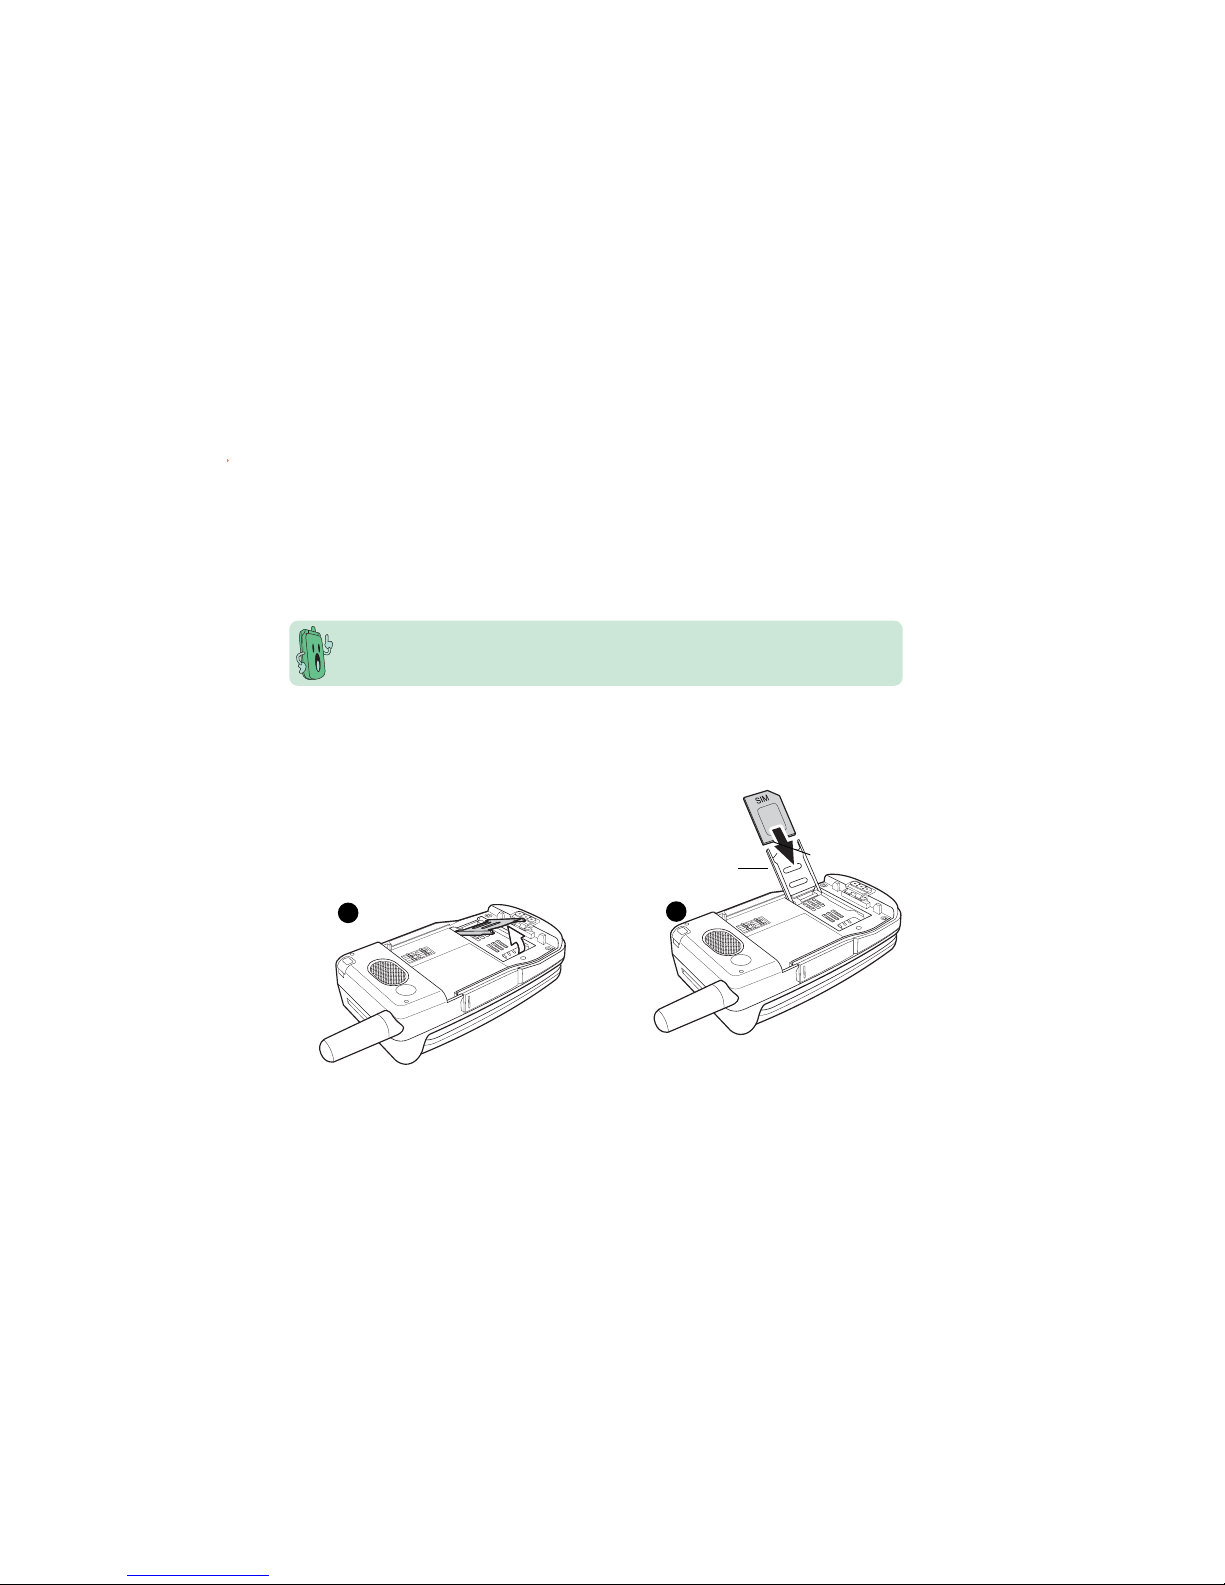
To install the SIM card:
1. Lift the SIM card case.
BB
BB
B
AA
AA
A
11
11
1
22
22
2
2. Slide the SIM card in the grooves on the
underside of the case.
The metallic side should face down (A). The
notched edge should be at the top (B).
3. Close the SIM card case.
Page 8
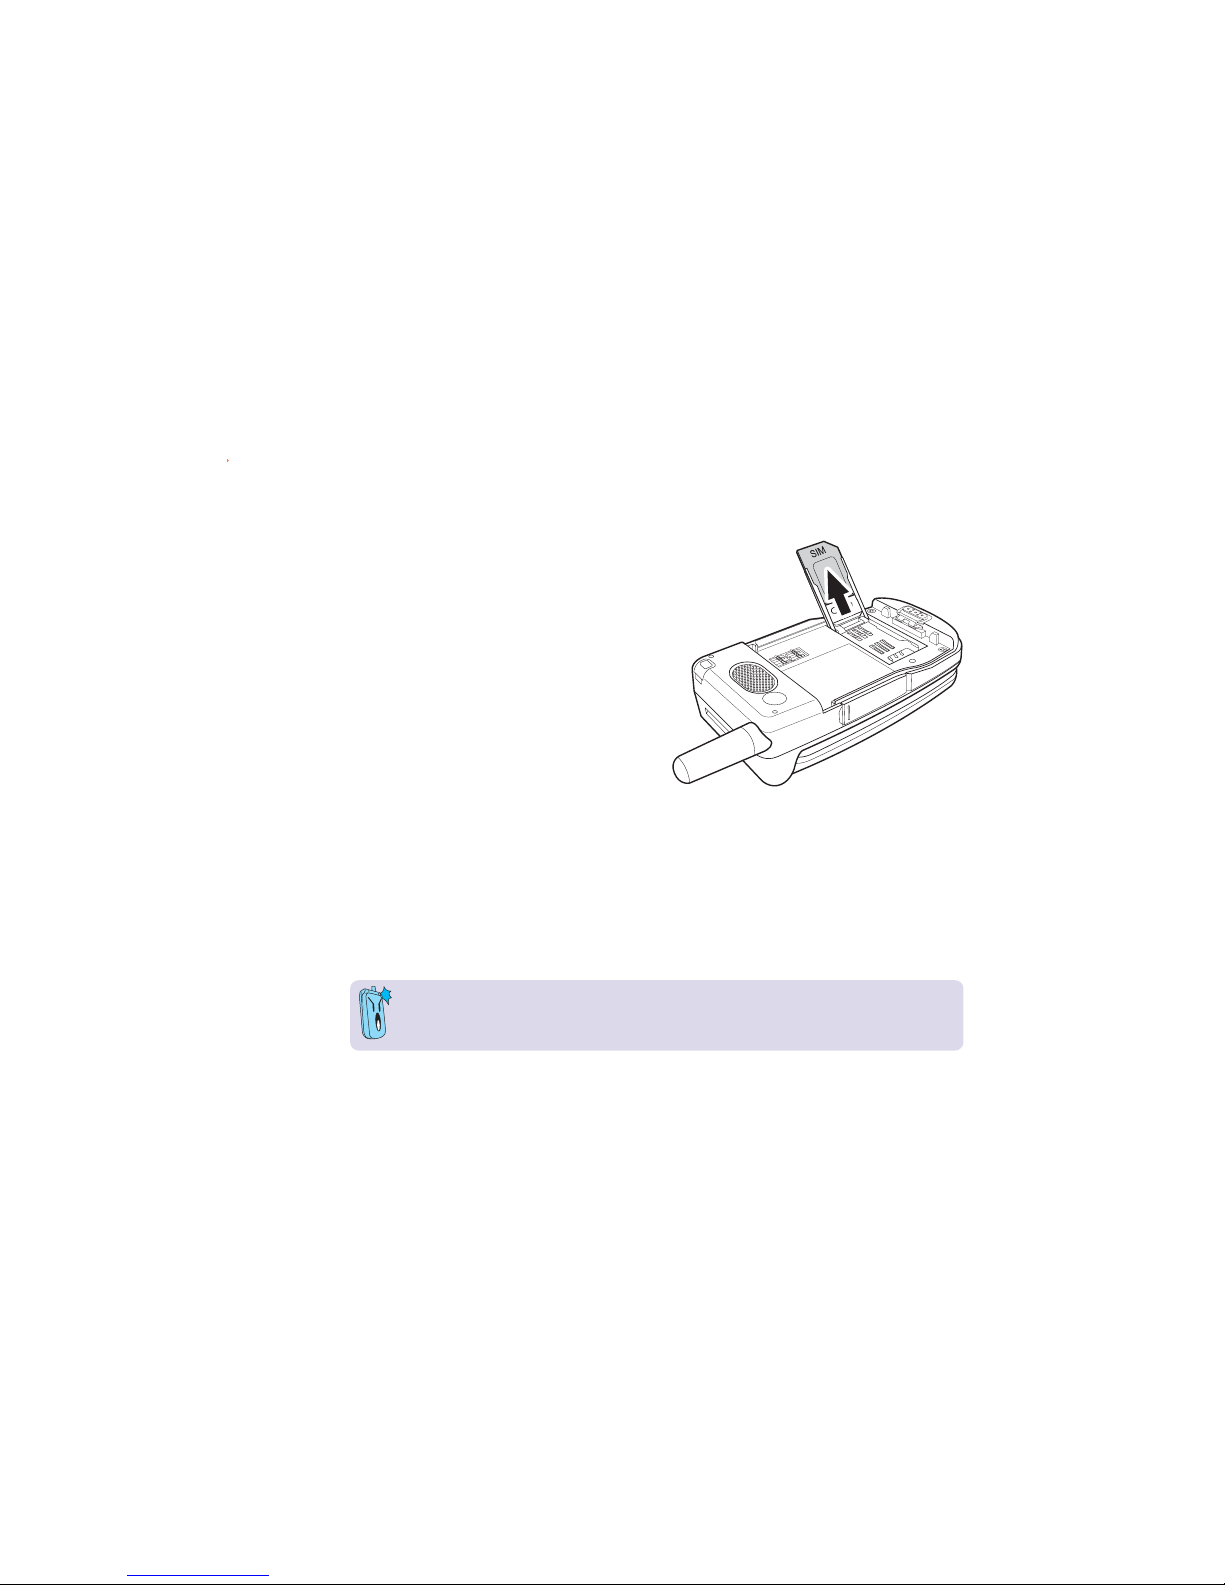
To remove or replace a SIM card:
1. If a battery is installed, first remove the it
according to the instructions in the battery
section which follows.
2. Place your finger on the notched side of
the SIM card and push the SIM card and
case upwards.
3. Carefully pull the SIM card out from the SIM
card slot. Set the SIM card aside.
4. Replace the SIM card according to the
instructions in the previous section.
• Keep SIM cards out of children’s reach.
• Be careful when handling, inserting, or removing a SIM card to avoid damaging its
contacts.
Page 9
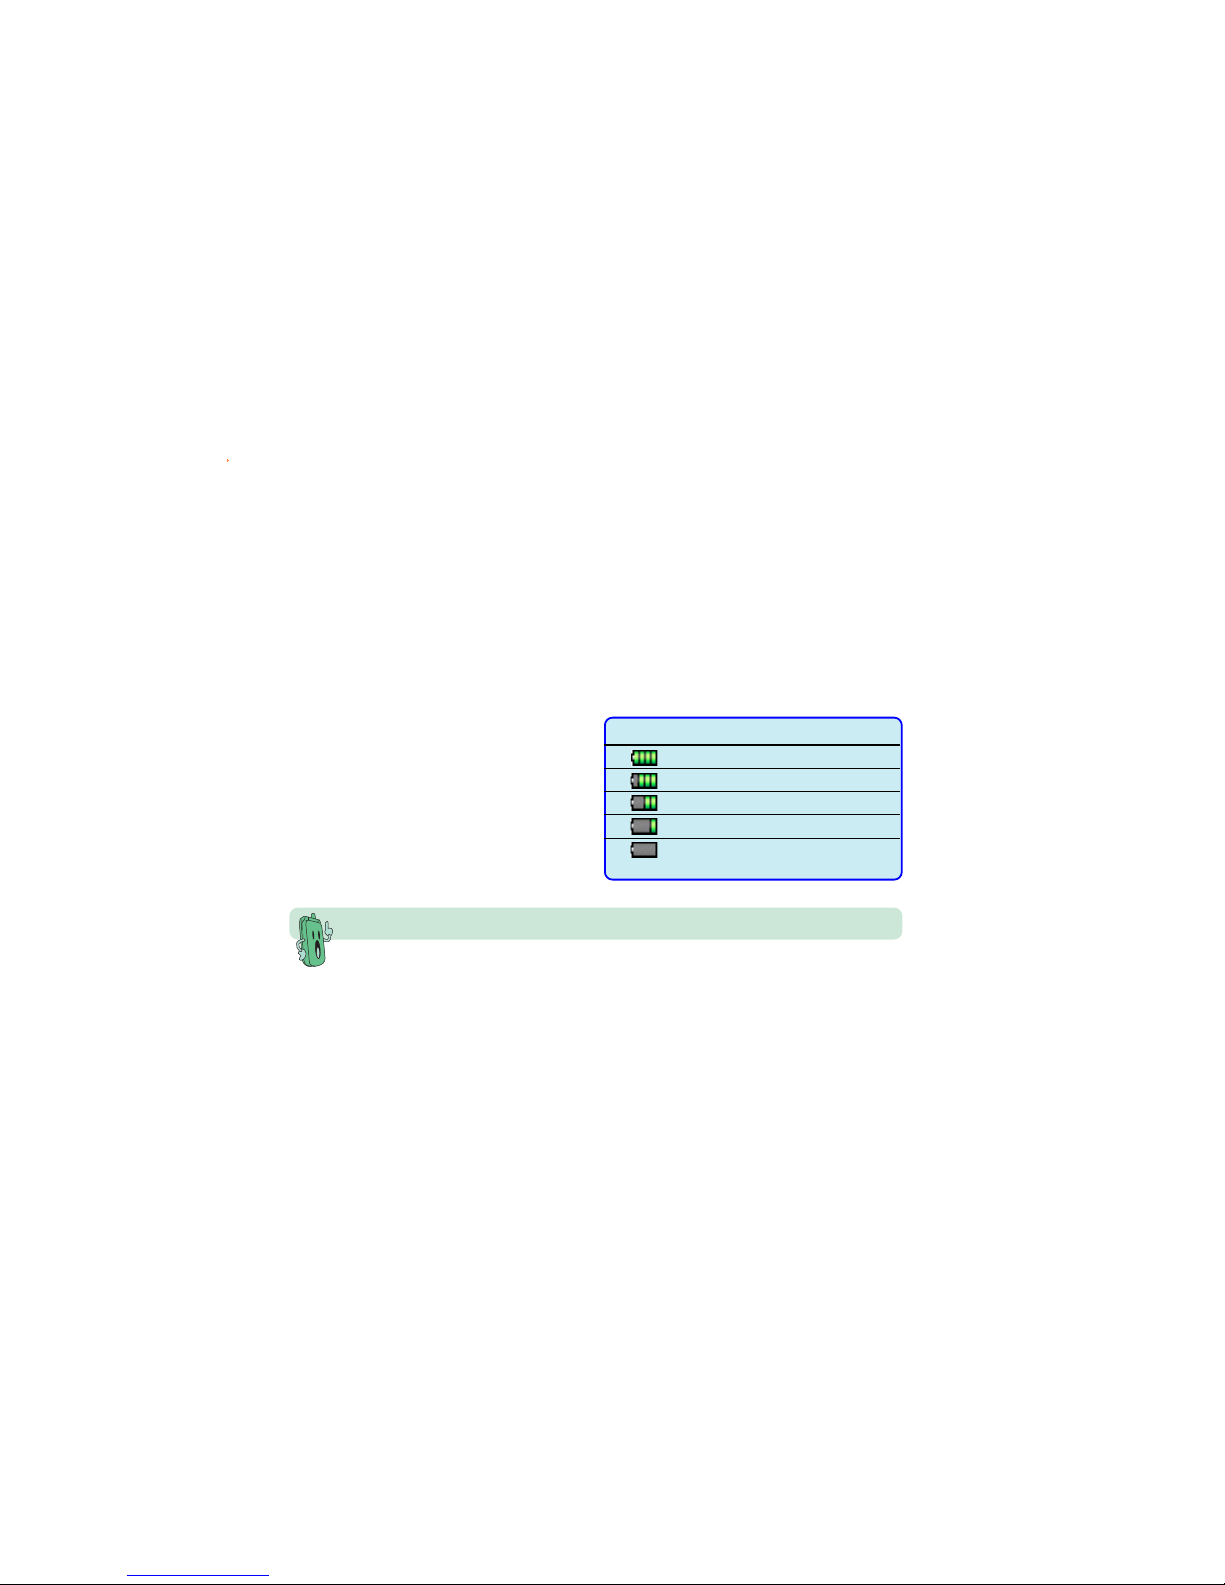
Battery power levelsBattery power levels
Battery power levelsBattery power levels
Battery power levels
The battery icon on both displays helps you
keep track of the remaining battery power, so
you will know when to charge the battery.
Take note of the battery icon indicating the
battery power levels.
Icon IndicationIcon Indication
Icon IndicationIcon Indication
Icon Indication
Battery is 55% to 100% full
Battery is 25% to 55% full
Battery is 10% to 25% full
Battery is 0% to 10% full
Battery has low power.
Charging is needed.
Battery
A rechargable Lithium-Ion battery powers your mobile phone. The battery is built into the
back cover. Make sure that the battery is fully charged before using the phone for the first
time. Initial battery charging may take about eight (8) hours. You can charge the battery
when the phone is either on or off.
A battery icon on the main and external displays indicates the battery power level. Refer to
the table below for battery icon indications.
Dispose of old or defective batteries properly.
Page 10
Removing and installing the batteryRemoving and installing the battery
Removing and installing the batteryRemoving and installing the battery
Removing and installing the battery
Follow these instructions to install the battery to the mobile phone.
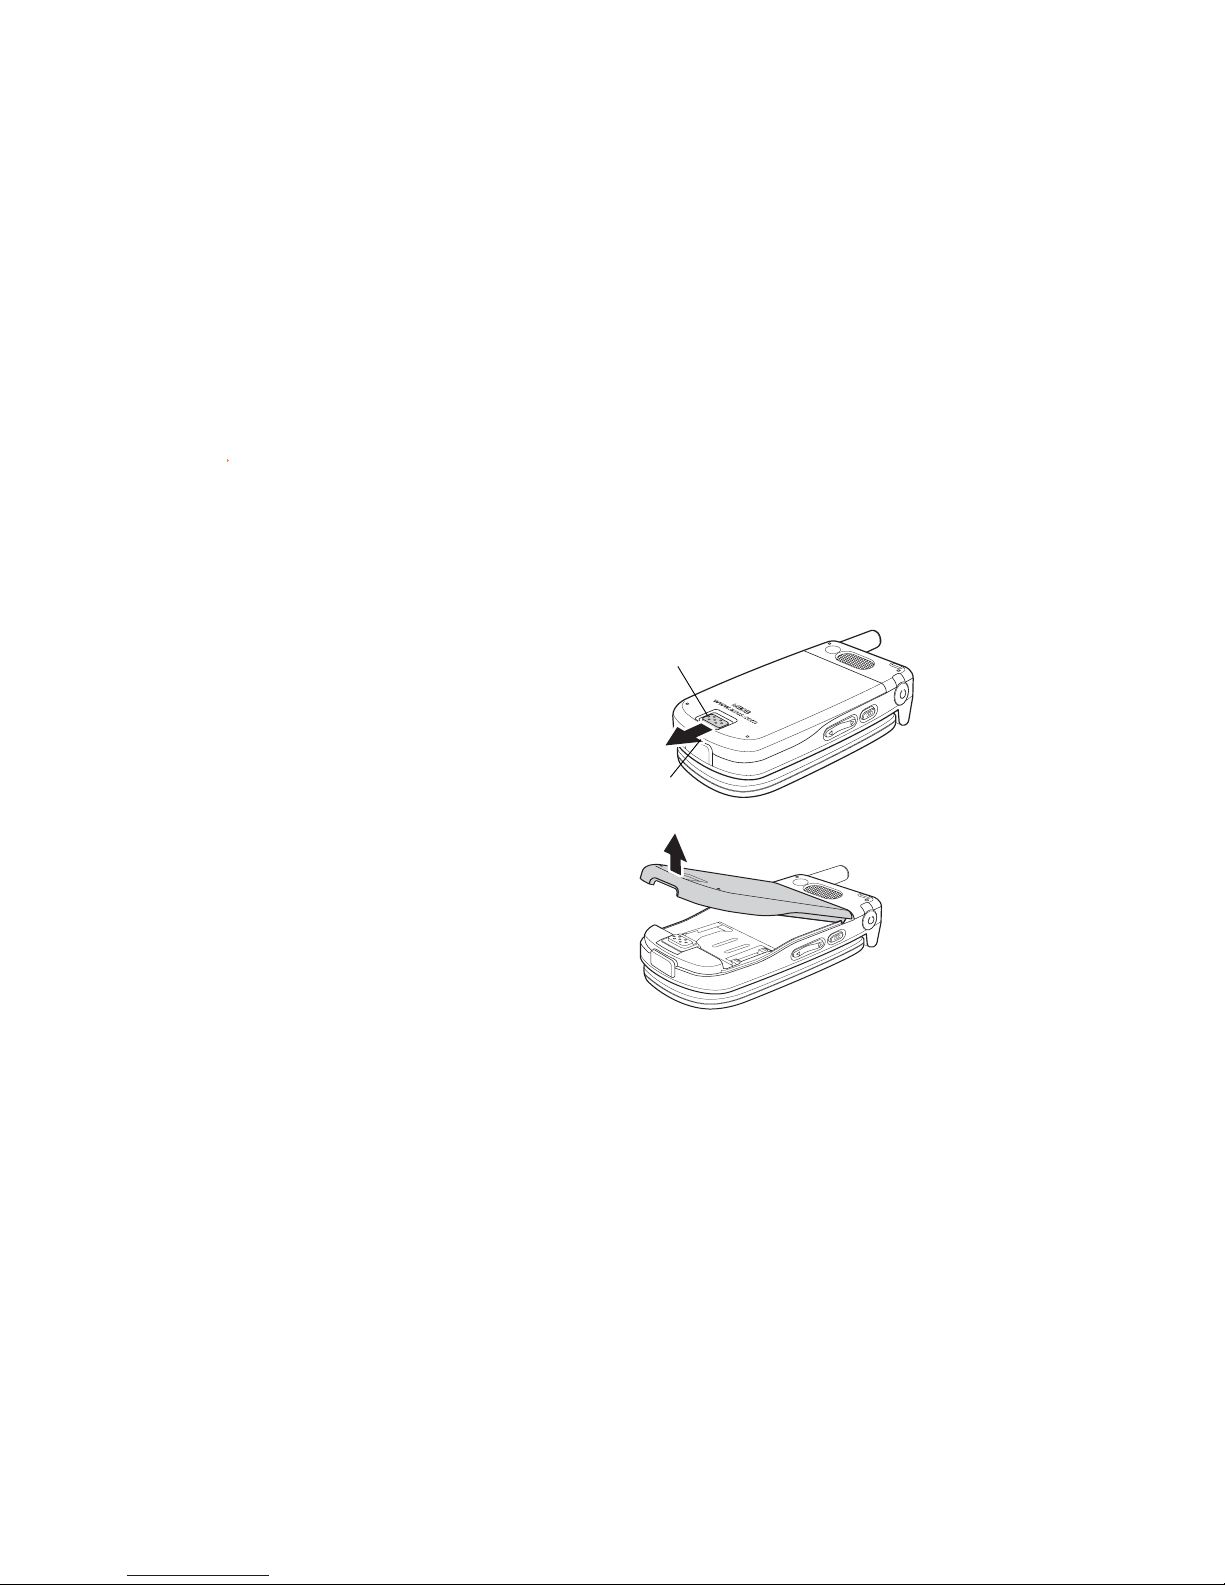
To remove the back cover and built-in battery:
1. To remove the back cover, push the back
cover latch forward with your thumb (A).
2. Continue to hold the latch forward and
place one finger in the notch under the
latch (B).
3. Lift the cover upwards.
AA
AA
A
BB
BB
B
Page 11
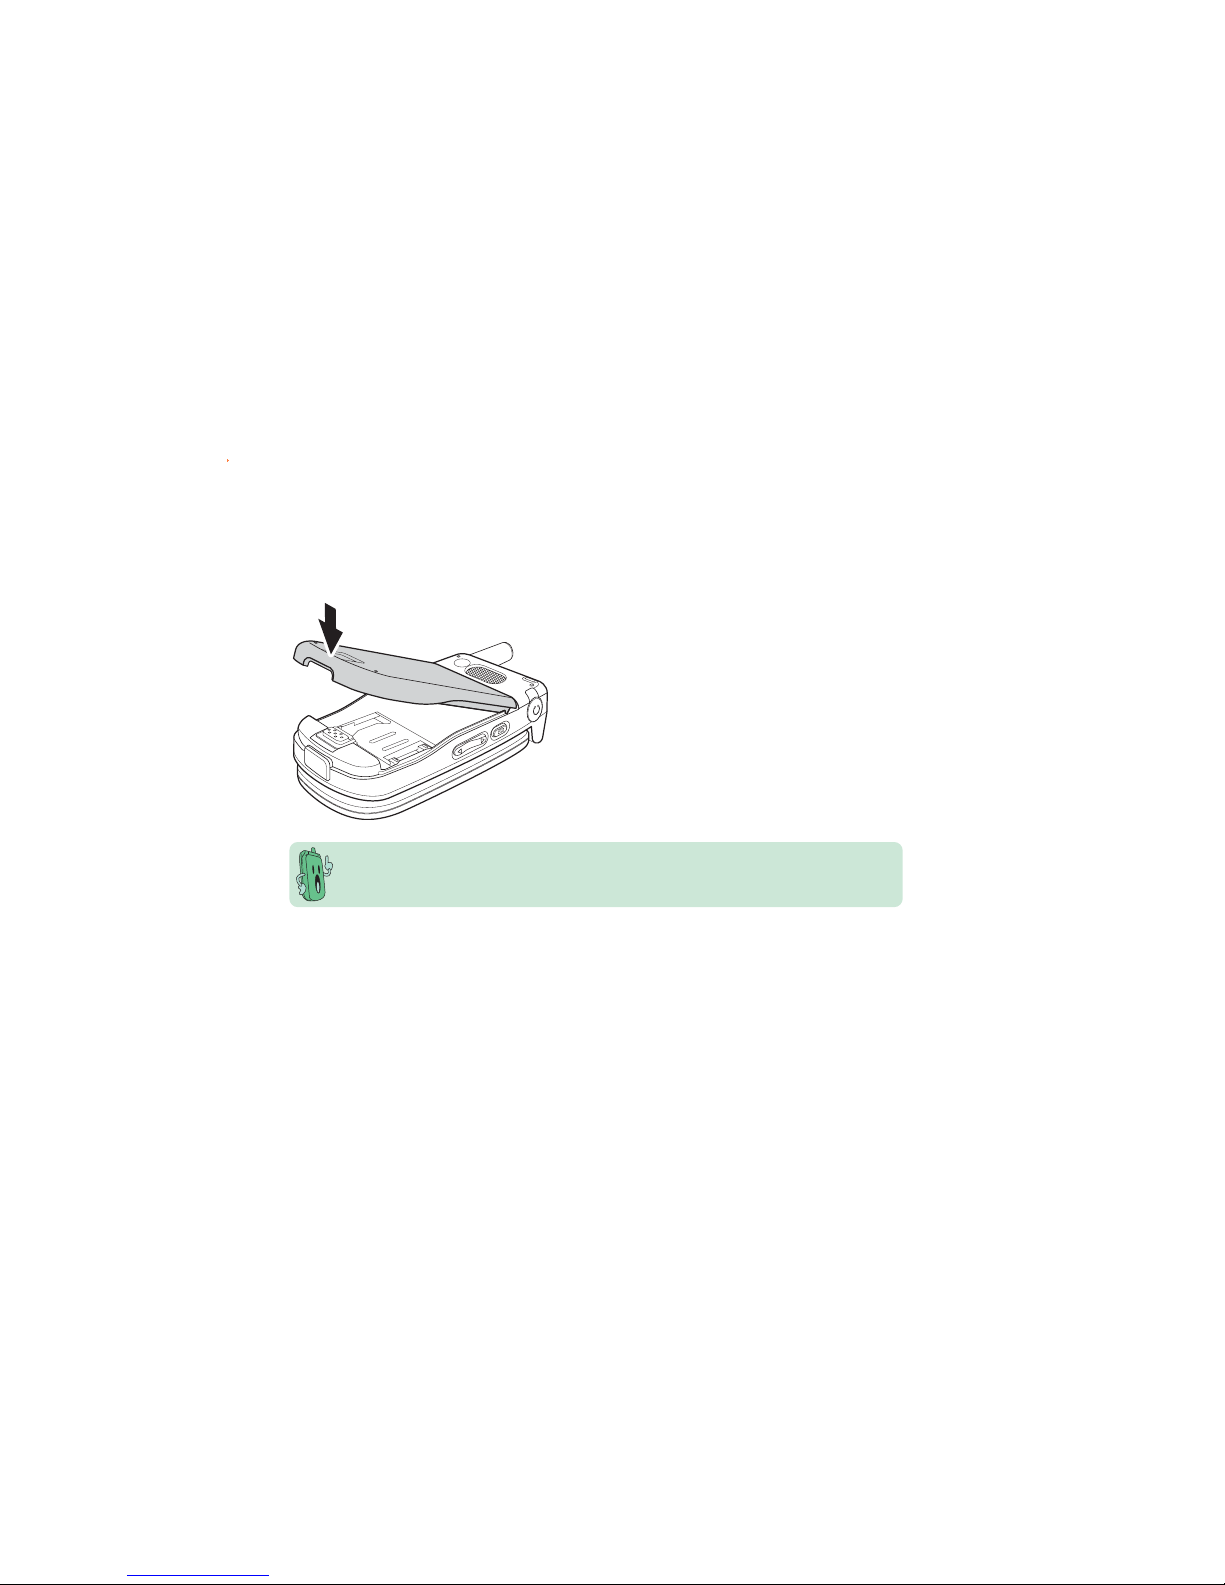
To install or replace the battery:
These illustrations are for reference only and may not exactly show the actual unit. Colors
were used for emphasis.
1. Align the notches of the back cover with
the notches in the phone.
2. Make sure the cover is aligned correctly,
then press downward. The back cover latch
snaps into place, securing the cover.
Page 12
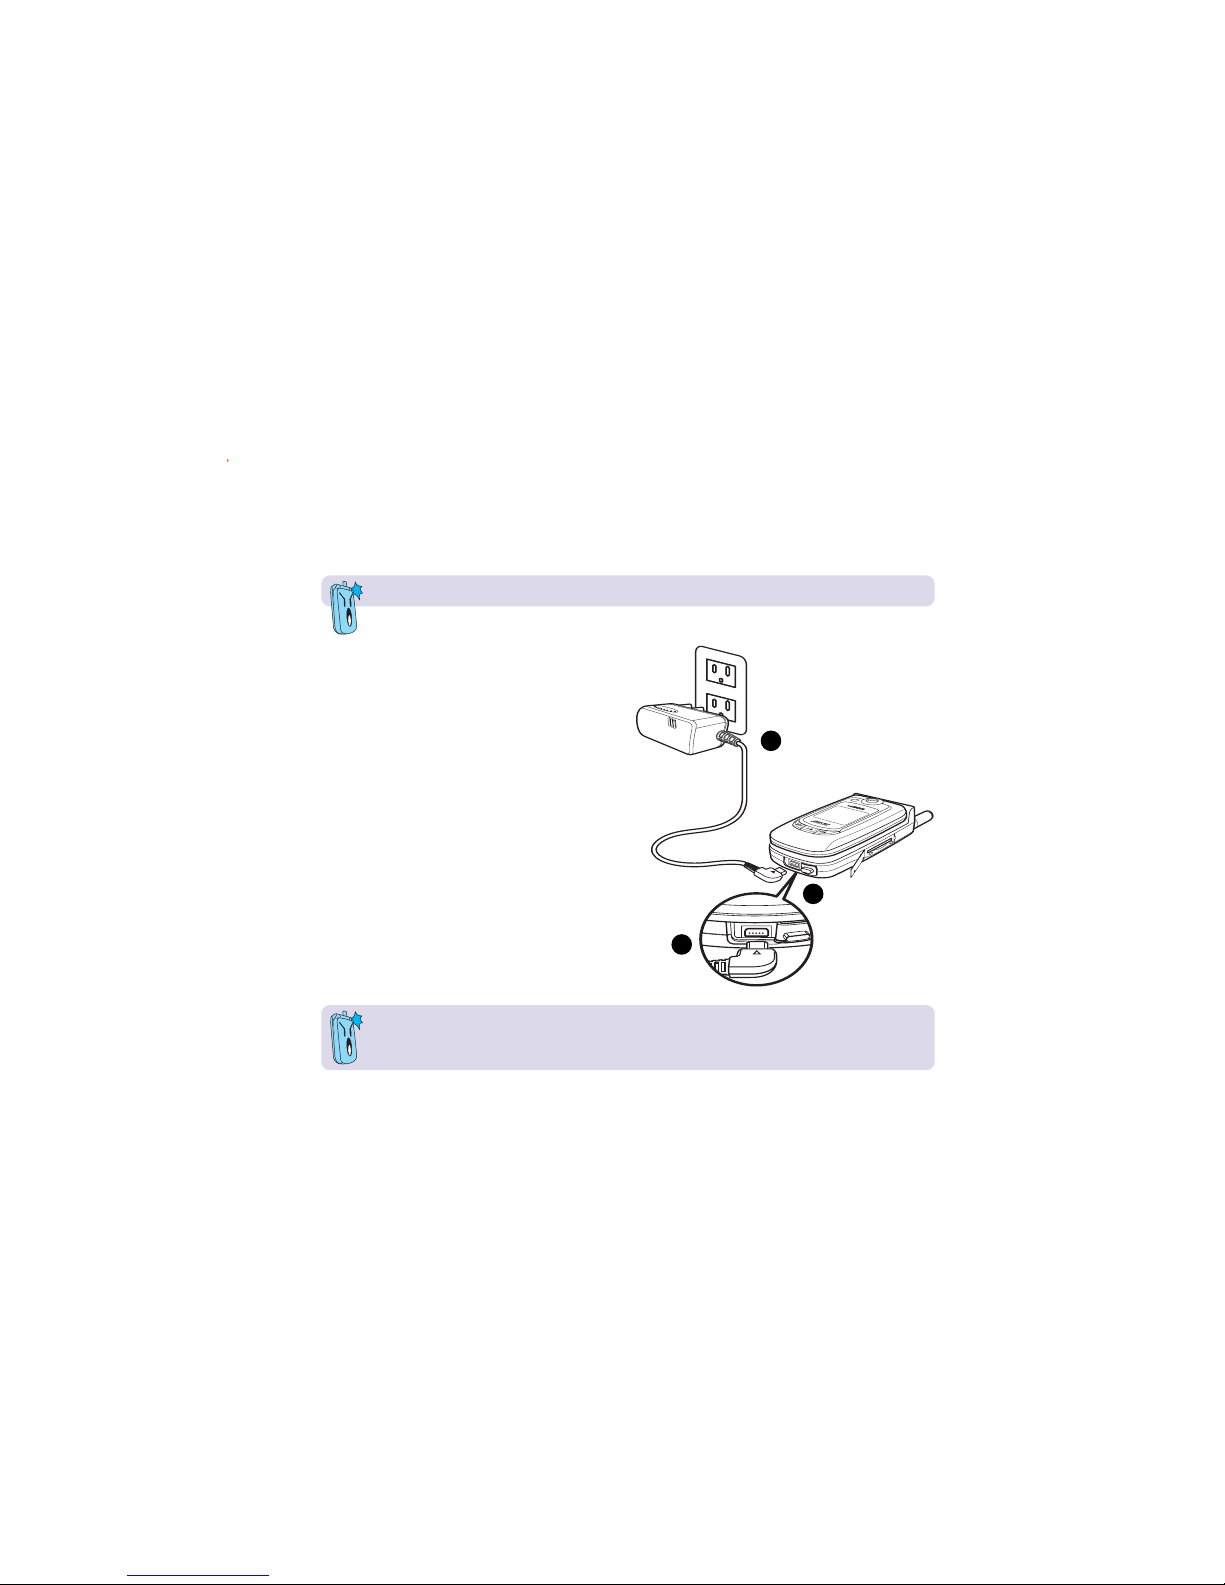
Charging the batteryCharging the battery
Charging the batteryCharging the battery
Charging the battery
Make sure that the battery is properly installed before charging.
Disconnect the charger from the power source and the plug from the mobile phone
when charging is complete.
To charge the battery:
1. Connect the charger to a power source.
2 Flip open the I/O connector cover on the
side of the phone.
3. Connect the power cable plug to the I/O
connector.
11
11
1
22
22
2
33
33
3
Page 13
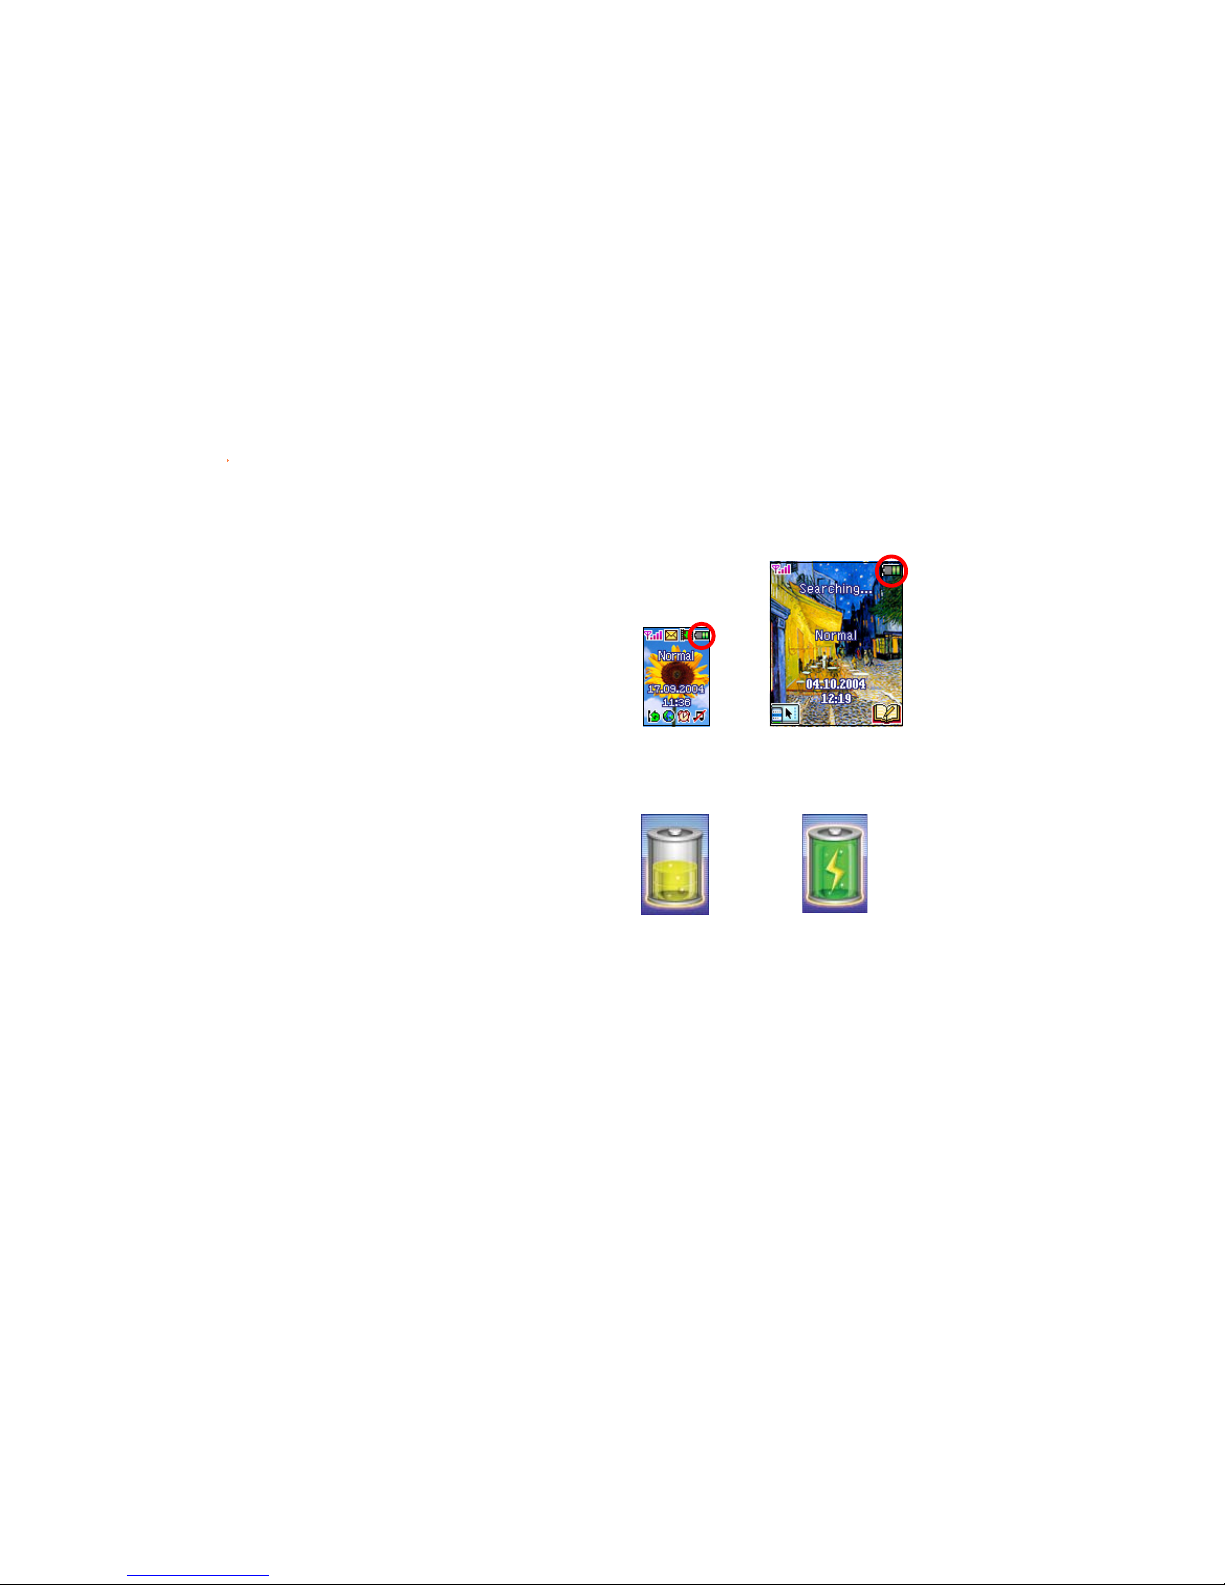
When the phone is onWhen the phone is on
When the phone is onWhen the phone is on
When the phone is on
The battery icon on both external and main
displays animates to indicate that the battery
is charging. It takes about two to three hours
to fully charge the battery. A message
appears on the display to tell you that the
battery is fully charged. The battery icon now
shows four green bars.
When the phone is offWhen the phone is off
When the phone is offWhen the phone is off
When the phone is off
Both displays show an animated battery icon
to indicate the battery is charging. When the
battery is fully charged, both displays show a
fully charged battery icon.
External displayExternal display
External displayExternal display
External display
Main displayMain display
Main displayMain display
Main display
Battery is chargingBattery is charging
Battery is chargingBattery is charging
Battery is charging
Battery is fullyBattery is fully
Battery is fullyBattery is fully
Battery is fully
chargedcharged
chargedcharged
charged
Page 14
2222
2222
22
LCD displays
This phone includes two LCD displays: external and main. Both displays are illuminated by a
backlight that automatically turns on or off after a certain period of time depending on your
setting. Refer to the next chapter for details on adjusting the LCD backlight.
Do not apply too much pressure on the phone to avoid damaging the LCD displays. Avoid
putting the phone in your pockets, cramped bags, and in areas where it is pressed on hard
surfaces.
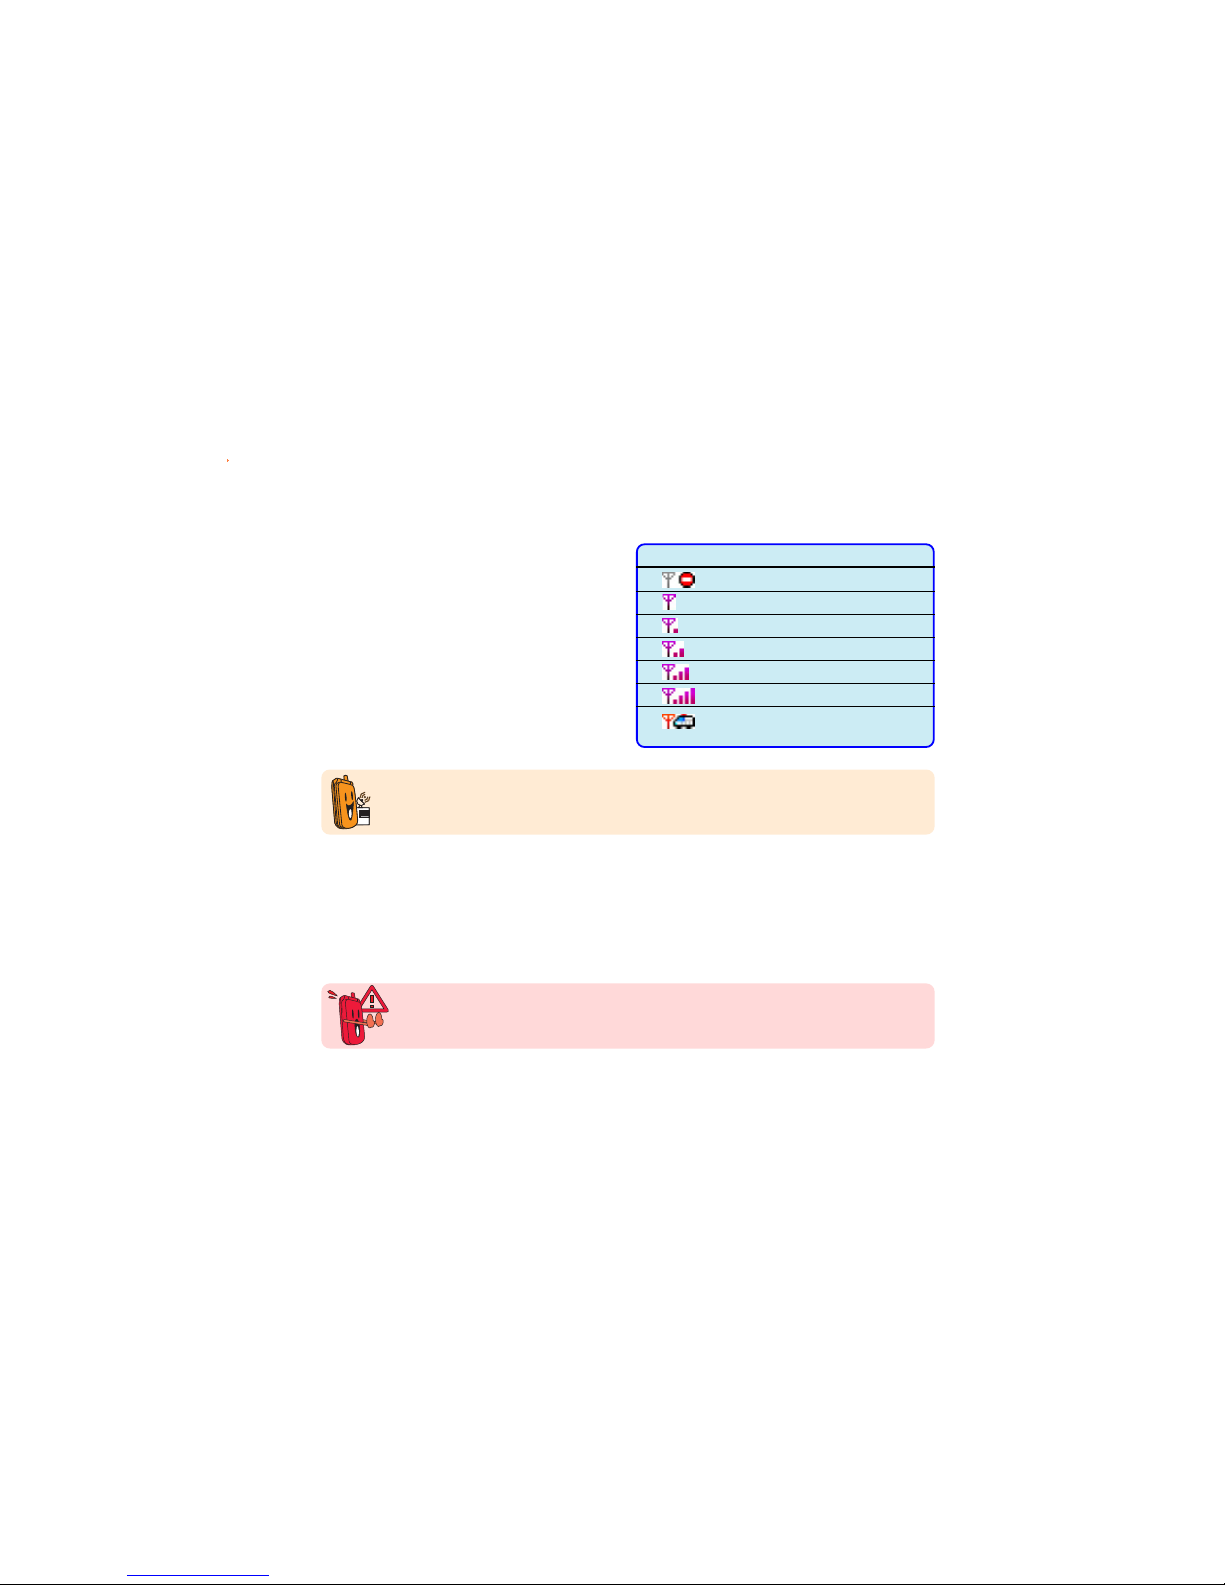
Signal strength
Your phone has an external antenna and
signal strength icon in both main and
external LCD displays to indicate the signal
level. Refer to the table for signal strength
indications.
The signal strength depends on your proximity to your phone operator signal station. Ask
assistance from your phone operator if the signal level in your location is weak or
fluctuating.
IconIcon
IconIcon
Icon
IndicationIndication
IndicationIndication
Indication
No service (dead spot)
Poor signal
Low signal
Fair signal
Good signal
Strong signal (ideal)
Emergency outgoing calls only;
No SIM card installed
Page 15
2323
2323
23
SpecificationSpecification
SpecificationSpecification
Specification
DescriptionDescription
DescriptionDescription
Description
SensorSensor
SensorSensor
Sensor CMOS type
PixelPixel
PixelPixel
Pixel 300K
Self-captureSelf-capture
Self-captureSelf-capture
Sel f - c aptu r e Supported thru the external display
Preview functionPreview function
Preview functionPreview function
Preview function Supported
TimerTimer
TimerTimer
T i m er Supported
Low light supportLow light support
Low light supportLow light support
Low light support Built-in flash
Digital ZoomDigital Zoom
Digital ZoomDigital Zoom
Digital Zoom Supported
Multi-captureMulti-capture
Multi-captureMulti-capture
Mul t i - capt u r e Supports 4, 6, 9, and 16 captures
VideoVideo
VideoVideo
V i d eo 15-second AVI video (no audio)
CameraCamera
CameraCamera
Camera
Camera
Your phone comes with a built-in camera that allows you to capture, edit, and share photos
and videos with other mobile phone, PDA, notebook, or PC users. Refer to Chapter 5 “Having
fun” for more information.
Page 16

Switching the phone ON or OFF
To turn
ONON
ONON
O N the phone:
1 Open the phone flip top to access the keypad.
2. Press and hold
for a few seconds until the display turns on.
3. If you are asked for a Personal Identification Number (PIN) code, key-in the code using the
keypad, then press
. The main display shows the idle screen.
To turn
OFFOFF
OFFOFF
O F F the phone:
1. Open the phone flip top.
2. Set the phone in idle mode, then press and hold
for a few seconds until the display
turns off.
• Some SIM cards come with a default PIN code. Read the SIM card documentation
before entering the PIN code.
• The phone allows you to enter the PIN code in three attempts. You must enter the
PIN Unlocking Key (PUK) if you fail to key-in the correct PIN in three attempts. The
PUK is provided by your phone operator.
Page 17

This chapter provides information on
the display layout, screen icons, and
basic phone operations so you can
start using your mobile phone.
M303M303
M303M303
M303
Getting StartedGetting Started
Getting StartedGetting Started
Getting Started
Page 18

2626
2626
26
Chapter summaryChapter summary
Chapter summaryChapter summary
Chapter summary
Display layout ................................................................................... 28
Other display modes .................................................................. 29
Indicator icons ................................................................................... 30
Main menu ......................................................................................... 32
Navigating the main menu ......................................................... 33
Sub-menu .......................................................................................... 33
Changing initial settings .................................................................... 34
Setting the date and time.......................................................... 34
Setting the time zone ................................................................ 35
Setting the date format ............................................................. 36
Setting the time format ............................................................. 37
Selecting a language .................................................................. 38
Creating a greeting text ............................................................ 39
Basic operations ................................................................................ 40
Placing a local call ...................................................................... 40
Placing an international call ........................................................ 41
Calling a number from your phone book .................................... 42
Calling a recently dialed number ................................................ 42
Initiating a conference call ......................................................... 45
Answering a call ......................................................................... 52
Page 19

2727
2727
27
Adjusting the ring volume .......................................................... 53
Saving a phone number in the phone book ................................ 54
Entering text .............................................................................. 56
Page 20

2828
2828
28
Display layout
The phone display area has three parts when in idle mode.
Text and graphic areaText and graphic area
Text and graphic areaText and graphic area
Text and graphic area
In
idleidle
idleidle
i d l e mode, this area
shows the name of the
service provider, the date
and time (if you chose to
display them), manner,
and your selected
wallpaper.
In either
menumenu
menumenu
menu,
sub-menusub-menu
sub-menusub-menu
sub-menu, or
functionfunction
functionfunction
function
modes, this area displays
text, graphics, or both.
Icon/Title barIcon/Title bar
Icon/Title barIcon/Title bar
Icon/Title bar
In
idleidle
idleidle
i d l e mode, this bar shows
the indicator icons.
In either
menumenu
menumenu
menu,
sub-menusub-menu
sub-menusub-menu
sub-menu,
or
functionfunction
functionfunction
fu n c t i on modes, this bar
shows the name of the
currently selected menu,
sub-menu, or function.
Soft key barSoft key bar
Soft key barSoft key bar
Soft key bar
This bar shows the current
functions of the left and
right soft keys. The
functions vary depending on
the selected menu.
The soft key bar also displays the available functions of the 4-way navigation keys when in
sub-menu or function display. The arrows (left/right/up/down) appears or disappears
depending on the current sub-menu, function, or application. When a directional arrow
appears, you can press the corresponding button on the navigation key to move the cursor or
selection to that direction.
Page 21

2929
2929
29
Menu modeMenu mode
Menu modeMenu mode
Menu mode
Other display modesOther display modes
Other display modesOther display modes
Other display modes
The phone display varies according to menu levels and modes.
Text input modeText input mode
Text input modeText input mode
Text input mode
Selection modeSelection mode
Selection modeSelection mode
Selection mode
Sub-menu modeSub-menu mode
Sub-menu modeSub-menu mode
Sub-menu mode
Page loading modePage loading mode
Page loading modePage loading mode
Page loading mode
Function modeFunction mode
Function modeFunction mode
Function mode
Phone book modePhone book mode
Phone book modePhone book mode
Phone book mode
Camera modeCamera mode
Camera modeCamera mode
Camera mode
Page 22

3030
3030
30
Indicator icons
The icons that appear on the displays indicate the activated phone features and alert you of
an SMS/MMS message or other useful information. The screen displays below show all the
icons in the main and external displays. Refer to the table on the next page for icon
descriptions.
Main displayMain display
Main displayMain display
Main display
(silent mode and
privilege list activated)
Main displayMain display
Main displayMain display
Main display
(vibrate mode and
ignore list activated)
External displayExternal display
External displayExternal display
External display
(silent mode)
External displayExternal display
External displayExternal display
External display
(vibrate mode)
The indicator icons appear only after you have installed a SIM card and turned on the phone.
Page 23

3131
3131
31
IconIcon
IconIcon
Icon
DescriptionDescription
DescriptionDescription
Description
Indicates the signal strength level;
permanently positioned on the top
left corner of both displays. See
page 22 for other indications.
Appears when a new SMS message
is received; blinks if the SIM card
has reached its maximum capacity*
Appears when a new MMS message
is received
Appears when a new MMS message
is downloaded to your phone
Appears if you set an alarm
Appears if you set the phone to
silent mode
Appears if you set the ring mode
to Vibrate
Appears if your phone has an
activated roaming feature**
IconIcon
IconIcon
Icon
DescriptionDescription
DescriptionDescription
Description
Indicates the battery level;
permanently positioned on the top
right corner of both displays. See
page 17 for other indications
Appears if you activated the call
forwarding feature**
Appears when you are connected
to a GPRS network**
Appears if you activate the call
filter Ignore list
Appears if you activate the call
filter Privilege list
Main menu icon; permanently
positioned on the lower left corner
of the main display
Phonebook icon; permanently
positioned on the lower right
corner of the main display
* The maximum SMS/MMS capacity of SIM cards vary. Refer to the SIM card documentation for details.
** Network-dependent or subscribed feature.
Page 24

3232
3232
32
Main menu
The icons in the main menu represents all the functions and features of
your mobile phone. You can open the main menu by pressing
[ ]
when the phone is in idle mode. When selected, the menu icon animates
and the screen shows the menu description on the bottom left corner of
the display.
Refer to the table below for a brief description of the menu icons and
the their functions.
IconIcon
IconIcon
Icon
DescriptionDescription
DescriptionDescription
Description
NetworkNetwork
NetworkNetwork
N e t w o rk. Allows you to surf the
Internet using the WAP feature of the
phone and access other services offered
by your phone operator.
MessageMessage
MessageMessage
M e s s age. Allows you to compose, edit,
send, and manage SMS and MMS
messages to almost any mobile phone.
MannerManner
MannerManner
M a n n er. Allows you to select from five
preset manners or to customize the
manner ring tone, volume, etc.
SettingsSettings
SettingsSettings
S e t t i ngs. Allows you to adjust the
phone ringtone, display, security,
connectivity, memory, and network
settings.
IconIcon
IconIcon
Icon
DescriptionDescription
DescriptionDescription
Description
CameraCamera
CameraCamera
C a m e r a. Allows you to capture, manage,
and share photos and videos.
FunFun
FunFun
F u n. Allows you to play Java games,
compose ring tones, and access the
Image Gallery.
OrganizerOrganizer
OrganizerOrganizer
Organizer. Allows you to organize
your daily schedule using the Calendar,
Alarm, World Clock, Text/Voice Memo,
Currency Exchange, and other features.
PhonebookPhonebook
PhonebookPhonebook
P h o n e b ook. Allows you to add,
organize, search contacts saved in the
phone and SIM memory.
CallsCalls
CallsCalls
C a l ls. Allows you to manage missed,
dialled, and answered call information.
Page 25

3333
3333
33
Navigating the main menuNavigating the main menu
Navigating the main menuNavigating the main menu
Navigating the main menu
To navigate the main menu:
Use the navigation buttons to select a menu icon, then press
to display the sub-menu. For example, if you want to select
SettingsSettings
SettingsSettings
Settings, press
(left) once to select, then press .
OROR
OROR
OR
Press the corresponding menu icon number in the keypad to launch
the menu. For example, if you want to select
SettingsSettings
SettingsSettings
Settings, press
to
display the Settings menu.
Sub-menu
Each main menu item has a sub-menu that lists the specific
functions of that menu. There are two ways to open the sub-menu:
•Press (up) or (down) to select an item, then press to
open the sub-menu functions.
• Press the corresponding item number in the keypad to open the
sub-menu functions.
By default, the
CameraCamera
CameraCamera
C a m e r a icon is selected everytime you open the main menu.
Page 26

3434
3434
34
Changing initial settings
You need to change some initial phone settings such as the date, time,
time zone, and greeting text before using the phone. These initial
settings are important so you can synchronize the mobile phone and
your current location time.
Setting the date and timeSetting the date and time
Setting the date and timeSetting the date and time
Setting the date and time
To set the date and time:
1. From the
Phone SettingsPhone Settings
Phone SettingsPhone Settings
Phone Settings sub-menu, select
Date/TimeDate/Time
Date/TimeDate/Time
Date/Time to display
the date and time options.
2. Press
(up) or (down) to select
Set Date/TimeSet Date/Time
Set Date/TimeSet Date/Time
Set Date/Time. The
current date and time is displayed above the soft key bar.
3. If the date or time is incorrect, press
to display the
SetSet
SetSet
Set
Date/TimeDate/Time
Date/TimeDate/Time
Date/Time screen.
4. On the date field, key-in the current date in DD.MM.YYYY format.
For example, key-in 2-8-0-9-2-0-0-4 to set the date to 28 September
2004. You can press (Back) to select and replace an incorrect entry.
5. When finished setting the date, press
(down) to move to the time
field.
6. On the time field, key-in the current time in HH:MM 24-hour format.
For example, key-in 1-1-3-1 to set the time to 11:31 AM.
7. When finished setting the time, press . A
Set successfully!Set successfully!
Set successfully!Set successfully!
Set successfully!
message appears indicating that you have successfully changed the date
and time.
The display returns to the
Date/TimeDate/Time
Date/TimeDate/Time
Date/Time menu.
Page 27

This chapter provides information on
how to change the phone settings. It
tells you how to change or
customize your call, display, ring
tone, and phone security settings.
4: M303
Changing the Settings
Page 28

6666
6666
66
Chapter summaryChapter summary
Chapter summaryChapter summary
Chapter summary
Settings ............................................................................................ 68
Phone settings .................................................................................. 69
Security ................................................................................ 70
Shortcuts ................................................................................ 77
LED ................................................................................ 79
My Phone Number ...................................................................... 80
Factory Settings ........................................................................ 81
Firmware Version ....................................................................... 82
Display settings ................................................................................ 83
Brightness ................................................................................ 84
Theme ................................................................................ 85
Wallpaper ................................................................................ 86
Power On/Off Animation ............................................................ 88
Main Idle Screen ......................................................................... 89
Sub Idle Screen .......................................................................... 90
Clean Wallpaper .......................................................................... 93
Backlight Timer .......................................................................... 94
Sleep Timer ................................................................................ 95
Ringtone settings .............................................................................. 96
Incoming ................................................................................ 97
Page 29

6767
6767
67
Power On Ringtone .................................................................... 98
Power Off Ringtone .................................................................... 98
Keytone ................................................................................ 99
Composer .............................................................................. 100
Ring mode .............................................................................. 103
Volume .............................................................................. 104
Misc Tones Switch.................................................................... 106
Call settings .................................................................................... 107
Auto Redial .............................................................................. 108
Speed Dial .............................................................................. 109
Call Waiting .............................................................................. 112
Hide My No. .............................................................................. 113
Call Barring .............................................................................. 114
Call Forwarding ......................................................................... 115
Fixed Dialing ............................................................................. 117
Money Keeper .......................................................................... 119
Call Summary ........................................................................... 122
Answering mode ............................................................................. 123
Accessory Devices .......................................................................... 124
Transmit .......................................................................................... 126
Network Selection ........................................................................... 127
Page 30

6868
6868
68
Settings
The
SettingsSettings
SettingsSettings
Se t t i n gs menu allows you to change and customize most of the
phone settings and configuration. Through this menu, you can change
the settings for the phone display, ring tone, call features, security, and
connectivity.
To access the
SettingsSettings
SettingsSettings
Settings menu:
1. Put the phone in idle mode, then press to display the main menu.
2. Use the navigation keys to select the
SettingsSettings
SettingsSettings
Settings icon , then
press to display the
SettingsSettings
SettingsSettings
Settings menu.
OROR
OROR
OR
Press
to display the
SettingsSettings
SettingsSettings
Settings menu.
The
SettingsSettings
SettingsSettings
Se t t i n gs menu consists of eight menu items that you can select
using (up) or (down), or by using the keypad to press the
number preceding each menu item.
Page 31

6969
6969
69
Phone Settings
You can change the basic phone settings such as the time, date,
language, phone security, and other phone configuration using this
menu.
To access the
Phone SettingsPhone Settings
Phone SettingsPhone Settings
Phone Settings menu:
From the
SettingsSettings
SettingsSettings
Se t t i n gs menu, use (up) or (down) to select
PhonePhone
PhonePhone
Phone
SettingsSettings
SettingsSettings
Se t t i ng s, then press
.
OROR
OROR
OR
Press to display the
CalendarCalendar
CalendarCalendar
Calendar.
The
Phone Settings Phone Settings
Phone Settings Phone Settings
Pho n e S e t t in gs menu has nine functions that you can select
using (up) or (down).
Refer to the previous chapter on how to set the date/time,
language, and greeting text. Proceed to the succeeding sections on
setting the phone security, creating shortcuts, changing the LED,
restoring defaults, and viewing the firmware version.
Page 32

7070
7070
70
SecuritySecurity
SecuritySecurity
Security
The
SecuritySecurity
SecuritySecurity
Se c u r i ty menu allows you to activate, deactivate, or change the
phone security settings.
DO NOT change the security settings of your phone if not
necessary. Keep a record of your PIN, PIN2, and other security
codes in a safe place.
Menu itemMenu item
Menu itemMenu item
Menu item
Allows you toAllows you to
Allows you toAllows you to
Allows you to
PINPIN
PINPIN
P I N activate, deactivate, or change your Personal
Identification Number (PIN)
PIN2PIN2
PIN2PIN2
P I N 2 change the second PIN
Network CodeNetwork Code
Network CodeNetwork Code
N e t w o r k Code change the network code
Phone Lock CodePhone Lock Code
Phone Lock CodePhone Lock Code
Ph one Loc k C ode activate, deactivate, or change the phone lock code
Page 33

7171
7171
71
The default PIN and PIN2 codes come with the SIM card package.
You must key-in the default codes before you can change them.
Refer to the SIM card documentation for information on the PIN
codes and PIN Unblocking Keys (PUK).
To activate the PIN:
1. Highlight
PINPIN
PINPIN
P I N from the menu, then press (Option).
2. Select
ActivateActivate
ActivateActivate
Ac t i v a te from the menu, then press
.
A
Set successfully!Set successfully!
Set successfully!Set successfully!
Set s u c c e s s fu l ly ! message appears on screen to indicate that
you have successfully activated the PIN. The display returns to the
SecuritySecurity
SecuritySecurity
Se c u r i ty menu. The PIN status on top of the soft key bar now
shows
ActivatedActivated
ActivatedActivated
Activated.
• If you have activated the PIN, you are prompted to enter the
PIN everytime you turn on the phone.
• If you have activated the PIN2, you are prompted to enter the
PIN2 before you can modify some vital phone settings such as
FDN, call costs, etc.
Activating your PINActivating your PIN
Activating your PINActivating your PIN
Activating your PIN
3. When prompted, key-in the PIN using the numeric keypad, then
press
.
The SIM card locks if you fail to enter the correct PIN in three
attempts. You need to enter the PIN Unlocking Key (PUK) to unlock
the SIM card.
22
22
2
11
11
1
33
33
3
Page 34

7272
7272
72
Changing the PINChanging the PIN
Changing the PINChanging the PIN
Changing the PIN
To change the PIN:
1. Highlight
PINPIN
PINPIN
P I N from the menu, then press (Option).
2. Select
ModifyModify
ModifyModify
M o d i fy from the menu, then press .
3. When prompted, key-in the current PIN using the numeric keypad,
then press
.
4. Key-in the new PIN using the numeric keypad, then press
(down)
to move to the confirmation field.
5. Key-in the new PIN again using the numeric keypad, then press
.
A
Set successfully!Set successfully!
Set successfully!Set successfully!
Set s u c c e s s fu l ly ! message appears on screen to indicate that
you have successfully changed the PIN. The display returns to the
SecuritySecurity
SecuritySecurity
Security menu.
33
33
3
22
22
2
44
44
4
55
55
5
Page 35

7373
7373
73
Changing the PIN2Changing the PIN2
Changing the PIN2Changing the PIN2
Changing the PIN2
To change the PIN2:
1. Highlight
PIN2PIN2
PIN2PIN2
P I N 2 from the menu, then press (Modify).
2. When prompted, key-in the current
PIN2PIN2
PIN2PIN2
P I N 2 using the numeric keypad,
then press .
22
22
2
11
11
1
If you are not able to enter the correct PIN in three attempts, the
SIM card locks. You need to enter the PIN Unlocking Key 2 (PUK2)
to unlock the SIM card.
3. Key-in the new PIN2 using the numeric keypad, then press
(down) to move to the confirmation field.
4. Key-in the new PIN2 again using the numeric keypad, then press
.
A
Set successfully!Set successfully!
Set successfully!Set successfully!
Set s u c c e s s fu l ly ! message appears on screen to indicate that
you have successfully changed the PIN2. The display returns to the
SecuritySecurity
SecuritySecurity
Security menu.
You can assign a PIN/PIN2 of up to eight numeric characters.
Page 36

7474
7474
74
Changing the network codeChanging the network code
Changing the network codeChanging the network code
Changing the network code
The network code is supplied by your phone operator. The network
code is required when enabling some call security features such as
call barring.
To change the network code:
1. Highlight
Network Code Network Code
Network Code Network Code
Ne t w o r k Co de from the menu, then press (Option).
2. Select
ModifyModify
ModifyModify
M o d i fy from the menu, then press .
3. When prompted, key-in the network code provided by your phone
operator, then press
.
4. Key-in the new network code using the numeric keypad, then press
(down) to move to the confirmation field.
5. When prompted, key-in the new network code again, then press
.
A
Set successfully!Set successfully!
Set successfully!Set successfully!
Set s u c c e s s fu l ly ! message appears on screen to indicate that
you have successfully changed the network code. The display
returns to the
SecuritySecurity
SecuritySecurity
Security menu.
22
22
2
11
11
1
Page 37

7575
7575
75
22
22
2
11
11
1
To activate the phone lock code:
1. Highlight
Phone Lock Code Phone Lock Code
Phone Lock Code Phone Lock Code
Pho n e L o c k C o de from the menu, then press
.
2. When prompted, key-in the default phone lock code (0000) using
the numeric keypad, then press
.
A
Set successfully!Set successfully!
Set successfully!Set successfully!
Set s u c c e s sf u ll y! message appears on screen to indicate that
you have successfully activated the PIN. The display returns to the
SecuritySecurity
SecuritySecurity
Security menu.
The phone lock code status on top of the soft key bar now shows
ActivatedActivated
ActivatedActivated
Activated.
Activating the phone lock codeActivating the phone lock code
Activating the phone lock codeActivating the phone lock code
Activating the phone lock code
• When, you are prompted to enter the code everytime you
turn on the phone.
• You may use a phone lock code of up to eight numeric
characters.
• The default phone lock code is 0000.
Page 38

7676
7676
76
Changing the phone lock codeChanging the phone lock code
Changing the phone lock codeChanging the phone lock code
Changing the phone lock code
To change the phone lock code:
1. Highlight
Phone Lock Code Phone Lock Code
Phone Lock Code Phone Lock Code
Phone Lock Code from the menu, then press (Options).
2. Select
ModifyModify
ModifyModify
Mo d i f y from the menu, then press .
3. When prompted, key-in the current phone lock code using the
numeric keypad, then press
.
4. Key-in the new phone lock code using the numeric keypad, then
press (down) to move to the confirmation field.
5. Key-in the new phone lock code again using the numeric keypad,
then press
.
A
Set successfully!Set successfully!
Set successfully!Set successfully!
Set s u c c e s sf u ll y! message appears on screen to indicate that
you have successfully changed the phone lock code . The display
returns to the
SecuritySecurity
SecuritySecurity
Security menu.
22
22
2
44
44
4
11
11
1
33
33
3
55
55
5
Page 39

7777
7777
77
ShortcutsShortcuts
ShortcutsShortcuts
Shortcuts
The
ShortcutsShortcuts
ShortcutsShortcuts
Sh o r t c u ts menu allows you to create shortcuts for common phone
features and applications. You can quickly launch the
ShortcutsShortcuts
ShortcutsShortcuts
Shortcuts menu
by pressing
when the phone is in idle mode.
Creating shortcutsCreating shortcuts
Creating shortcutsCreating shortcuts
Creating shortcuts
To create a shortcut
1. Select
ShortcutShortcut
ShortcutShortcut
Shortcut from the
Phone Settings Phone Settings
Phone Settings Phone Settings
Phone Settings menu, then press .
2. Select an (EMPTY) shortcut, press
(Option), then select
EditEdit
EditEdit
Edit
from the menu.
3. Press to display the Shortcut List. The Shortcut List shows all
available phone features such as SMS, MMS, Camera, etc.
4. Highlight a feature, then press
to display all specific commands or
functions. For example, highlight
SMSSMS
SMSSMS
S M S, then press
to display all
SMS commands/functions such as SMS Inbox, SMS Outbox, Edit SMS,
etc.
22
22
2
11
11
1
44
44
4
33
33
3
Page 40

7878
7878
78
5. Select a command or
function from the
list, then press
.
The Shortcut menu
shows the created
shortcut.
7. Use the keypad to press the number preceding the shortcut to launch the command or
function. Otherwise, press
(Back) to return to the phone to idle mode.
66
66
6
55
55
5
6. Put the phone in idle
mode, then press
to display the
shortcut list.
Deleting shortcutsDeleting shortcuts
Deleting shortcutsDeleting shortcuts
Deleting shortcuts
To delete a shortcut:
1. Select
ShortcutShortcut
ShortcutShortcut
Shortcut from the
Phone Settings Phone Settings
Phone Settings Phone Settings
Phone Settings menu, then press .
2. Highlight the shortcut you want to delete, then press
(Option),.
3. Select
DeleteDelete
DeleteDelete
D e l e te from the menu, then press
to delete the
highlighted shortcut.
OROR
OROR
OR
Select
Delete All Delete All
Delete All Delete All
De l e t e All from the menu, then press
to delete all
created shortcuts.
4. When prompted, press (Yes) to delete the shortcut(s). A
SetSet
SetSet
Set
successfully!successfully!
successfully!successfully!
suc c e s s f u ll y! message appears indicating that you have deleted
the shortcut(s). The display returns to the Shortcut menu.
33
33
3
Page 41

7979
7979
79
LEDLED
LEDLED
LED
This menu allows you to activate the LED for several phone events and
status.
Activating the LEDActivating the LED
Activating the LEDActivating the LED
Activating the LED
To activate the LED for phone events or status:
1. Select
LEDLED
LEDLED
L E D from the
Phone Settings Phone Settings
Phone Settings Phone Settings
Phone Settings menu, then press . The
display shows the available phone events or status.
2. Highlight an item, then press
to activate the LED on the specified
event or status. A check appears on the box preceding the event or
function.
3. The LED is now activated for the phone event or status.
Refer to the table below for LED indications on phone events or
functions. Press
(Back) to return to the previous menu.
LEDLED
LEDLED
LED
If activated, the LEDIf activated, the LED
If activated, the LEDIf activated, the LED
If activated, the LED
MTC LED flashes when there is an incoming call
Event LED flashes when you have a missed call/unread SMS/MMS message
Charging LED flashes red when the battery is charging
Low Battery flashes red when the battery power is low
Normal LED flashes purple to indicate that the phone is in normal condition
11
11
1
22
22
2
All event or status LED indications are activate by default. To
deactivate the LED for an event or status, highlight the item, then
press to uncheck.
Page 42

8080
8080
80
My Phone NumberMy Phone Number
My Phone NumberMy Phone Number
My Phone Number
This menu allows you to save and easily retrieve your mobile phone numbers.
To add a phone number:
1. Select
My PhoneMy Phone
My PhoneMy Phone
My Phone
NumberNumber
NumberNumber
Nu m b e r from the
Phone SettingsPhone Settings
Phone SettingsPhone Settings
Phone Settings
menu, then press .
2. Press (Option),
select
AddAdd
AddAdd
A d d from the
menu, then press .
11
11
1
22
22
2
3. Key-in the contact
name using the
keypad, then press .
4. Key-in the contact
number using the
keypad, then press .
The screen displays
the contact name in
the list.
44
44
4
33
33
3
5. Press (Back) to return to the previous menu.
Page 43

8181
8181
81
Factory SettingsFactory Settings
Factory SettingsFactory Settings
Factory Settings
The
Factory SettingsFactory Settings
Factory SettingsFactory Settings
Fac t o r y S et t in gs menu allows you to reset the device and revert
all settings to their default values.
Reverting the phone to factory settings erases all previously saved
data in the phone memory and resets all customized settings such
as display, ring tone, and manners. Back up all your contact
information to the SIM card or to your PC (using PC transmit) before
your revert to the factory settings.
Restoring the default settingsRestoring the default settings
Restoring the default settingsRestoring the default settings
Restoring the default settings
To restore the default (factory) settings:
1. Select
Factory Settings Factory Settings
Factory Settings Factory Settings
Factory Settings from the
Phone Settings Phone Settings
Phone Settings Phone Settings
Phone Settings menu, then
press .
2. When prompted, enter the phone lock code, then press
.
3. A confirmation window appears. Press
(Yes). A
SetSet
SetSet
Set
successfully!successfully!
successfully!successfully!
suc c e s s f u ll y! message appears to indicate that the phone has
been restored to its original settings. The display returns to the
Phone Settings Phone Settings
Phone Settings Phone Settings
Phone Settings menu.
11
11
1
22
22
2
Page 44

8282
8282
82
Firmware VersionFirmware Version
Firmware VersionFirmware Version
Firmware Version
To view the phone firmware version:
1. Highlight
Firmware Version Firmware Version
Firmware Version Firmware Version
Firmware Version from the
Phone Settings Phone Settings
Phone Settings Phone Settings
Phone Settings menu to
show the firmware version on top of the soft key bar.
2. Press
(Back) to return to the previous menu.
11
11
1
Page 45

8383
8383
83
Display settings
The
Display Settings Display Settings
Display Settings Display Settings
Dis p l a y S e tt i ng s menu allows you to change various display
properties including the theme, wallpaper, animation, backlight,
brightness, and display elements.
To access the
Display Settings Display Settings
Display Settings Display Settings
Display Settings menu:
From the
SettingsSettings
SettingsSettings
Se t t i n gs menu, use (up) or (down) to select
DisplayDisplay
DisplayDisplay
Display
SettingsSettings
SettingsSettings
Se t t i ngs, then press .
OROR
OROR
OR
Press
to display the
Display Settings Display Settings
Display Settings Display Settings
Display Settings menu.
The
Display Settings Display Settings
Display Settings Display Settings
Dis p l a y S e tt i ng s has ten functions that you can select using
(up) or (down).
Page 46

8484
8484
84
BrightnessBrightness
BrightnessBrightness
Brightness
The
BrightnessBrightness
BrightnessBrightness
Br i g h t n e ss menu allows you to adjust the main display brightness
level. The display brightness is set to 80% by default.
Adjusting the display brightnessAdjusting the display brightness
Adjusting the display brightnessAdjusting the display brightness
Adjusting the display brightness
To adjust the display brightness:
1. Select
BrightnessBrightness
BrightnessBrightness
Brightness from the
Display Settings Display Settings
Display Settings Display Settings
Dis p l a y S e t t in g s menu, then press .
2. Press (left) to decrease, or (right) to increase the
brightness. Compare the screens below for reference.
3. When finished, press
(Back) to return to the
DisplayDisplay
DisplayDisplay
Display
SettingsSettings
SettingsSettings
Settings menu.
10 % brightness10 % brightness
10 % brightness10 % brightness
10 % brightness
80 % brightness80 % brightness
80 % brightness80 % brightness
80 % brightness
100 % brightness100 % brightness
100 % brightness100 % brightness
100 % brightness
Page 47

9595
9595
95
To set the sleep timer:
1. Select the
Sleep Timer Sleep Timer
Sleep Timer Sleep Timer
Sl e e p T im er item from the
Display Settings Display Settings
Display Settings Display Settings
Display Settings menu,
then press
.
2. From the
Sleep Timer Sleep Timer
Sleep Timer Sleep Timer
Sl e e p T im er options, highlight the desired time before
the main and external display turns off, then press
to select.
3. Press (Back) to return to the
Display Settings Display Settings
Display Settings Display Settings
Display Settings menu.
Sleep TimerSleep Timer
Sleep TimerSleep Timer
Sleep Timer
The sleep timer allows you to specify a time before the main and
external display turns off.
Setting a shorter sleep timer saves battery power.
11
11
1
22
22
2
Page 48

9696
9696
96
Ringtone
The
RingtoneRingtone
RingtoneRingtone
Ri n g t on e menu allows you to select, change, adjust, and compose
the phone ring tone
To access the
RingtoneRingtone
RingtoneRingtone
Ringtone menu:
From the
SettingsSettings
SettingsSettings
Se t t i n gs menu, use (up) or (down) to select
RingtoneRingtone
RingtoneRingtone
Ringtone, then press .
OROR
OROR
OR
Press to display the
RingtoneRingtone
RingtoneRingtone
Ringtone menu.
The
RingtoneRingtone
RingtoneRingtone
Ri n g t on e has eight options that you can select using
(up) or
(down).
Page 49

9797
9797
97
IncomingIncoming
IncomingIncoming
Incoming
The phone comes with 20 pre-installed polyphonic ring tones that you
can select using the
IncomingIncoming
IncomingIncoming
Incoming menu.
To set the incoming ring tone:
1. Select
IncomingIncoming
IncomingIncoming
In c o m in g from the
RingtoneRingtone
RingtoneRingtone
Ri n g t one menu, then press .
2. Highlight a ring tone to play using
(up) or (down), then
press
to select.
3. Click (Back) to return to the
RingtoneRingtone
RingtoneRingtone
Ri n g t one menu, or (Option)
to rename, compose, or delete a ring tone.
11
11
1
22
22
2
You may assign a different incoming ring tone for a particular phone
number. See Chapter 5 “Managing your phone book” for details.
Page 50

9898
9898
98
Power On RingtonePower On Ringtone
Power On RingtonePower On Ringtone
Power On Ringtone
The
Power On Ringtone Power On Ringtone
Power On Ringtone Power On Ringtone
Power O n R i n g t o n e menu allows you to select the tone played everytime you turn on the phone.
To set the power on ring tone:
1. Select
Power OnPower On
Power OnPower On
Power On
RingtoneRingtone
RingtoneRingtone
Ringtone from the
RingtoneRingtone
RingtoneRingtone
Ringtone menu,
then press .
2. Highlight a ring tone
to play using
(up) or (down),
then press
to
select.
3. Click (Back) to
return to the
RingtoneRingtone
RingtoneRingtone
Ringtone menu.
Power Off RingtonePower Off Ringtone
Power Off RingtonePower Off Ringtone
Power Off Ringtone
The
Power Off Ringtone Power Off Ringtone
Power Off Ringtone Power Off Ringtone
Power O f f R i n g t o n e menu allows you to select the tone played everytime you turn off the phone.
To set the power off ring tone:
1. Select
Power OPower O
Power OPower O
Power O
ffff
ffff
ff
RingtoneRingtone
RingtoneRingtone
Ringtone from the
RingtoneRingtone
RingtoneRingtone
Ringtone menu,
then press
.
2. Highlight a ring tone
to play using
(up) or (down),
then press to
select.
3. Click
(Back) to
return to the
RingtoneRingtone
RingtoneRingtone
Ringtone menu.
 Loading...