

Page 1
Merci d'avoir choisi un produit Ariston, fiable et facile à utiliser. Pour apprendre à bien connaître votre appareil, à
250
150
200
100
40
C
PI ZZ
A
2
6
1013 912
111
8
14
7
435
l'utiliser et à le conserver longtemps, lisez attentivement cette notice avant toute utilisation car elle contient des instructions
très importantes concernant sa sécurité d'installation, d'usage et d'entretien. Conservez avec soin cette brochure pour
toute consultation ultérieure.
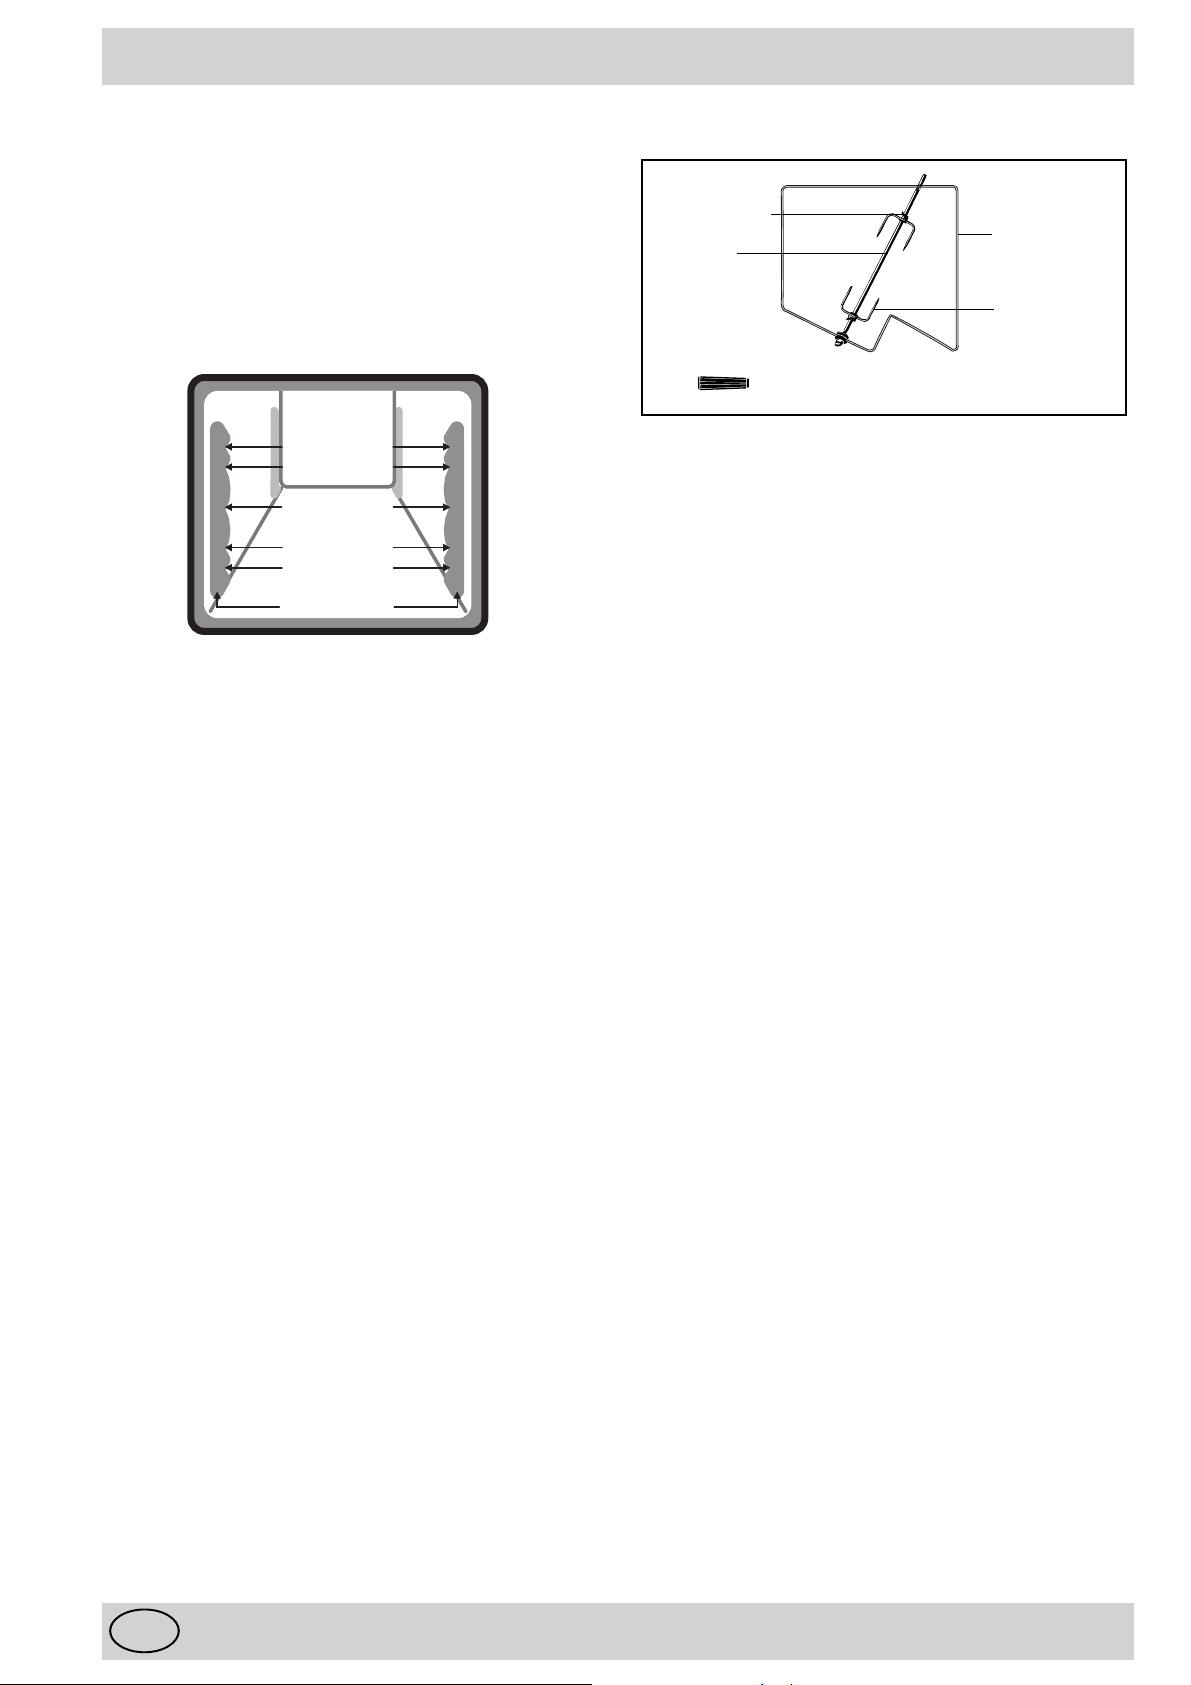
Vue de près
250
C
200
150
100
A
PI ZZ
40
A
G
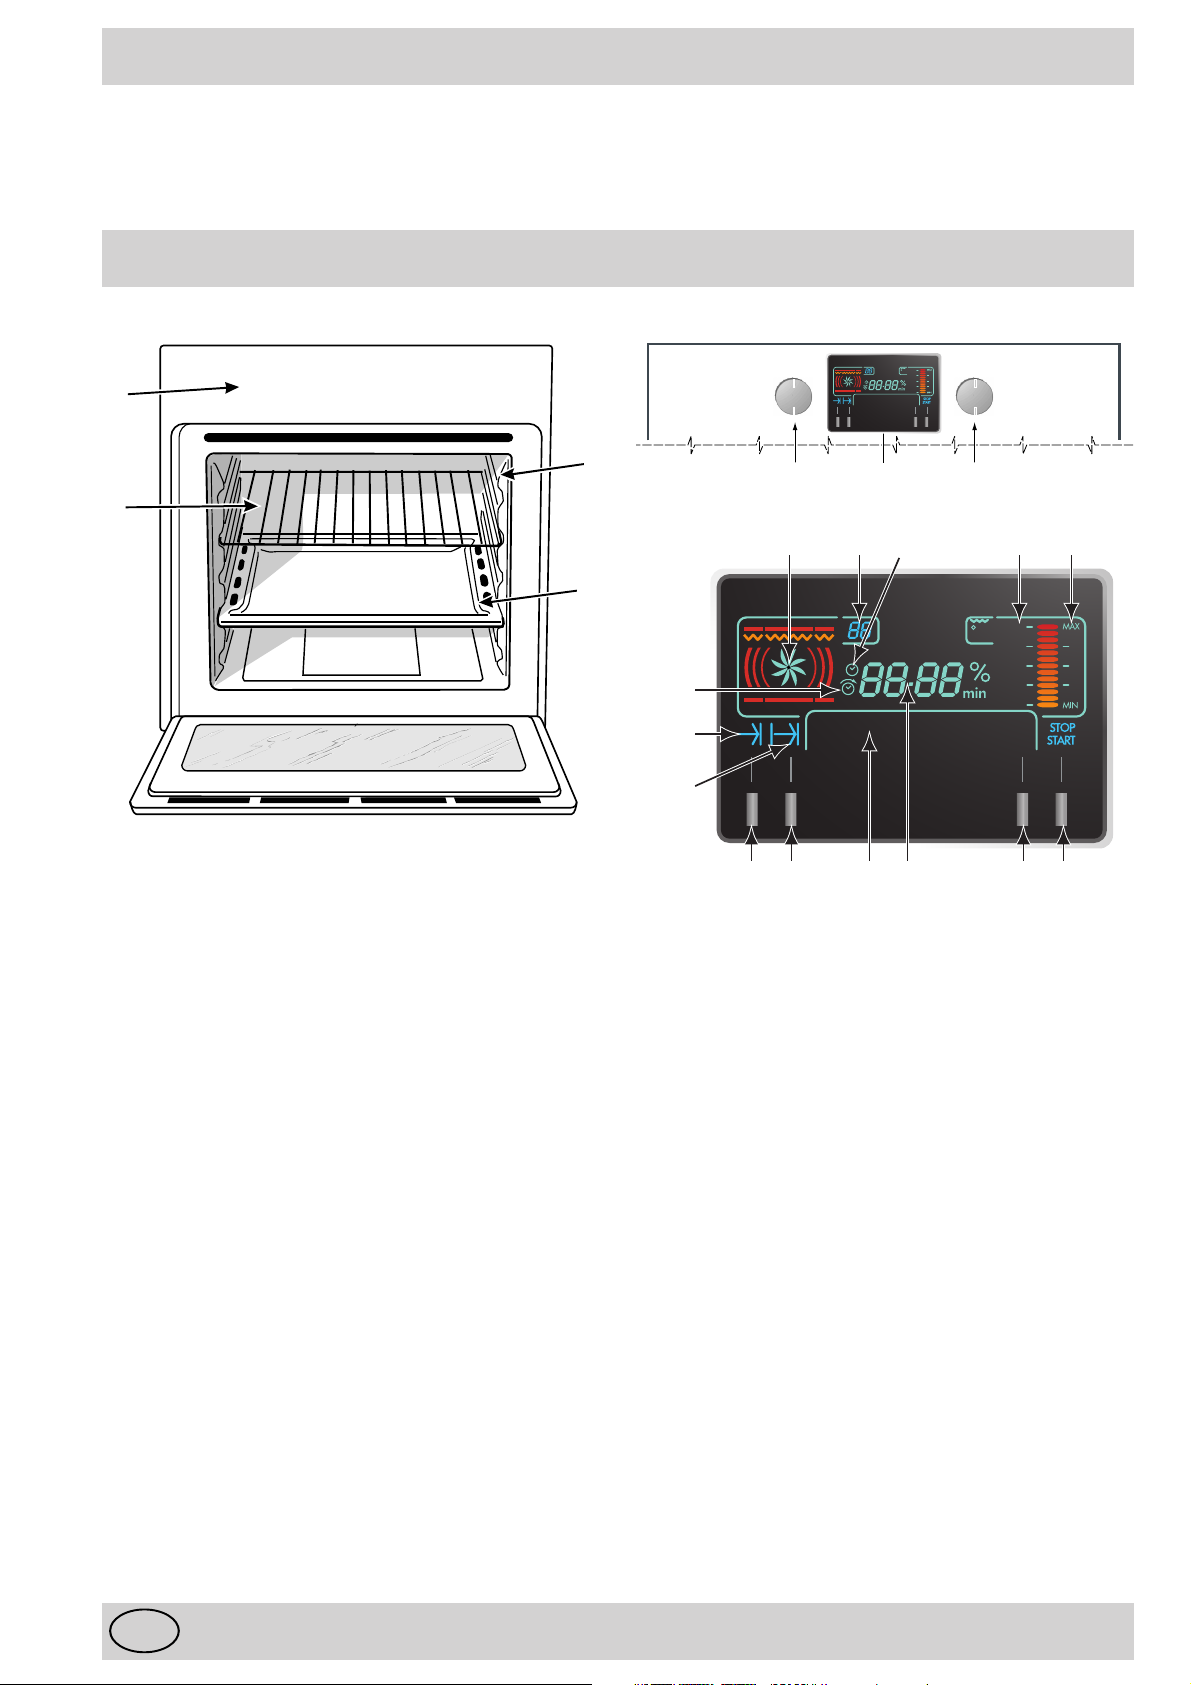
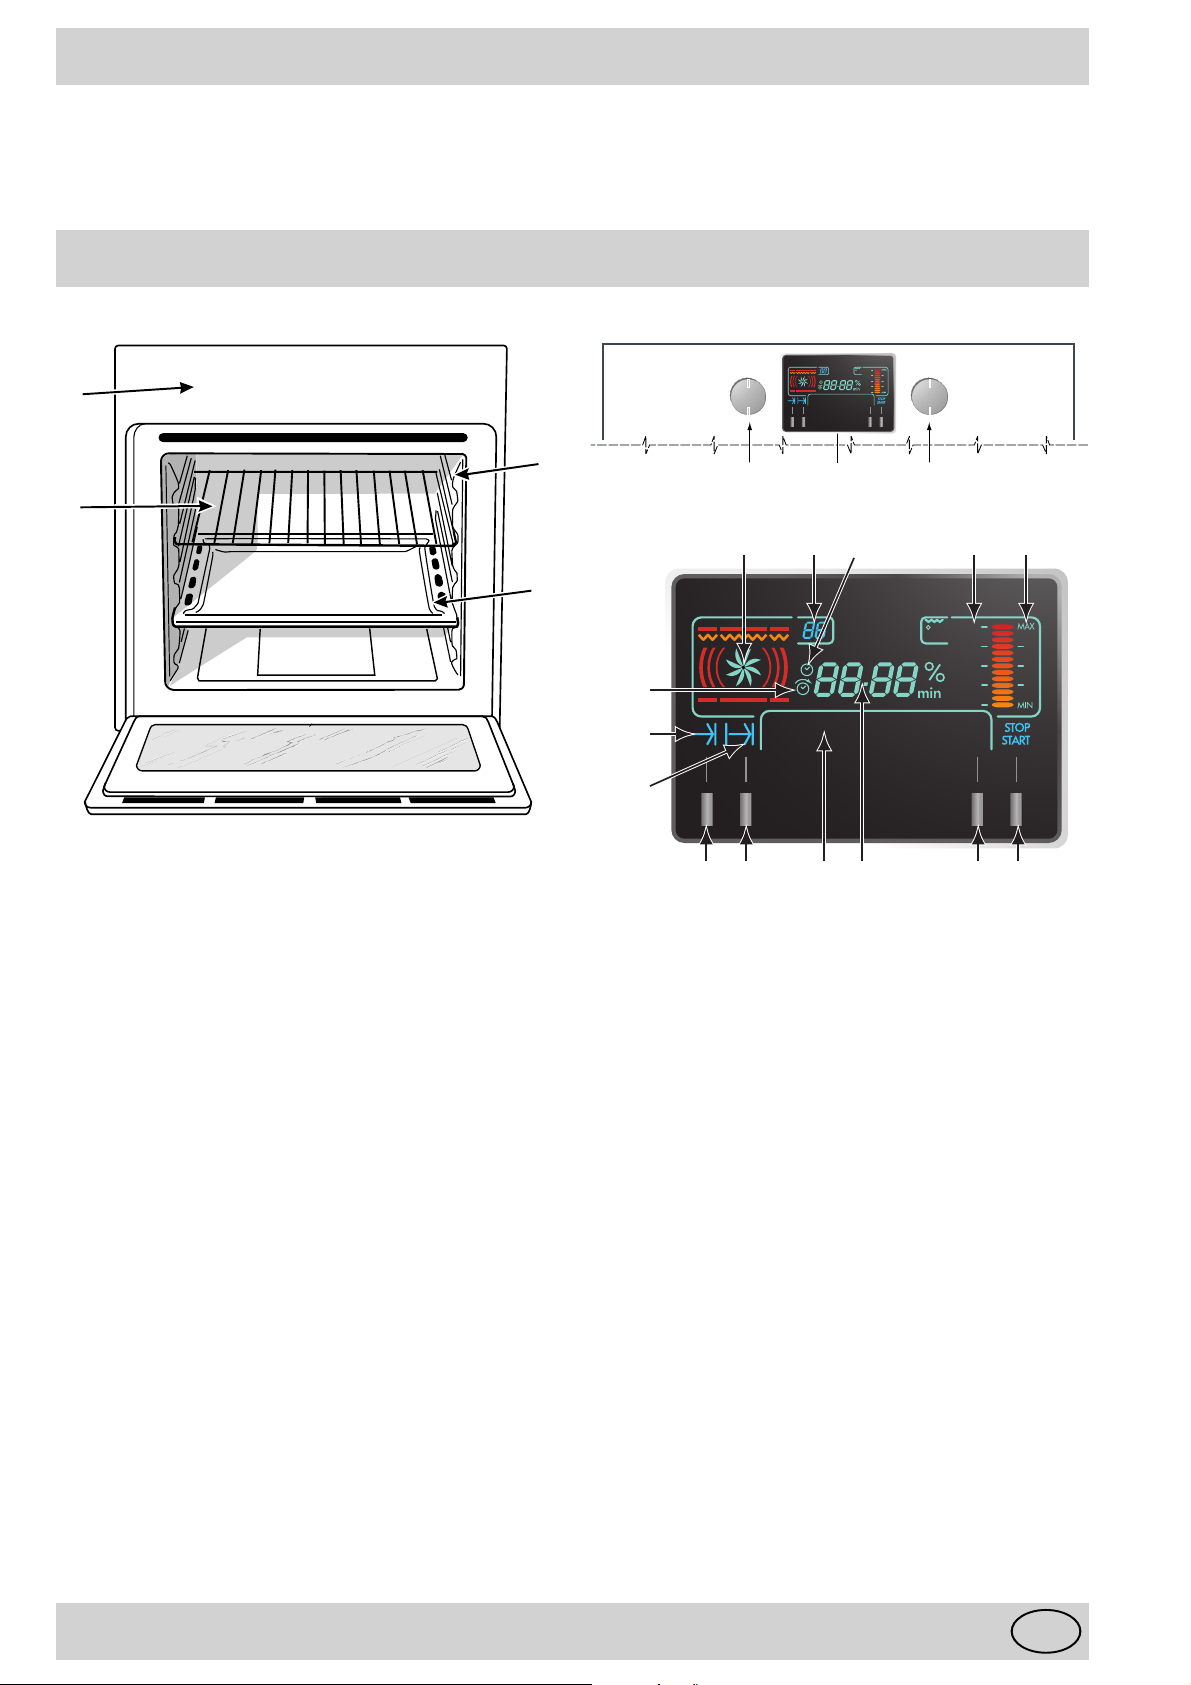
A. Tableau de bord
B. Sélecteur de fonctions
C. Sélecteur de températures / durée cuisson
D. Programmateur électronique
F. Lèchefrite ou plateau de cuisson
G. Grille du four
H. Crémaillères pour lèchefrites et grilles
H
B
D
C
F
1. Sélection fin de cuisson/horloge/date
2. Sélection durée cuisson / programmateur /
verrouillage clavier
3. Sélection langue
4. Démarrage cuisson / Arrêt cuisson / éclairage four
/ luminosité écran
5. Description fonction
6. Numéro fonction
7. Durée cuisson
8. Fin de cuisson
9. Echelle graduée des températures
10.Niveau d'énergie pour les fonctions gril
11.Heure ou température / Poucentage d'énergie
12.Eléments électriques branchés
13.Indicateur horloge
14.Indicateur cuisson programmée
FR
2
Page 2

Mode d'emploi
Le four 7 Cuochi réunit en un seul appareil les avantages
des fours traditionnels à convection naturelle (statiques)
à ceux des fours modernes à air pulsé (ventilés).
Il s'agit d'un appareil extrêmement performant qui vous
permet de choisir facilement et sans vous tromper parmi
différents modes de cuisson. Pour sélectionner les
fonctions disponibles, utilisez le sélecteur "B" du tableau
de bord.
Mise à l'heure de l'horloge
La mise à l'heure n'est possible que quand le four est
éteint.
Après raccordement à la ligne ou coupure de courant,
l'afficheur clignote sur 12:00 ou sur la dernière heure
mémorisée.
Toute mise à l'heure doit être effectuée en appuyant sur
la touche 1 et à l'aide du bouton "C", l'heure peut être
modifiée jusqu'à disparition complète des inscriptions
déroulantes.
Sélection de la date
Pour mettre à jour la date, appuyez 3 secondes sur la
touche 1 jusqu'à ce que l'écran affiche "AN" Pour
sélectionner l'année, tournez le bouton "C" puis appuyez
sur la touche 1.
Pour sélectionner le mois, utilisez à nouveau le bouton
"C" . Appuyez une nouvelle fois sur la touche 1 pour régler,
à l'aide du bouton "C", le jour. Appuyez sur la touche 1
pour mémoriser la date sélectionnée.
Fonction minuterie
La minuterie ne fonctionne que quand le four est éteint.
N'oubliez pas que la minuterie ne contrôle pas l'allumage
et l'arrêt du four mais émet seulement un signal acoustique
une fois le temps écoulé. Pour arrêter l'alarme, appuyez
sur une touche quelconque.
Pour sélectionner la minuterie, appuyez sur la touche 2
puis procédez au réglage à l'aide du bouton "C".
Appuyez sur la touche 4 pour démarrer la minuterie.
Pendant le fonctionnement de la minuterie, vous pouvez
à tout moment :
• modifier la durée à l'aide du bouton "C" ;
• arrêter le décompte en appuyant pendant 3 secondes
sur la touche 4 ou en tournant le bouton "B" dans le
sens inverse des aiguilles d'une montre ;
• activer ou désactiver le verrouillage des commandes
en appuyant 3 secondes sur la touche 2 (voir
paragraphe verrouillage/déverrouillage des
commandes).
Sélection de la langue
Appareil éteint, appuyez quelques secondes sur la touche
3. Les langues disponibles seront affichées l'une après
l'autre dans la fenêtre. Pour sélectionner la langue désirée,
appuyez encore sur la touche 3.
Sélection de la luminosité de l'écran d'affichage
Appareil éteint, appuyez 3 secondes sur la touche 4
jusqu'à ce que l'écran affiche "LUMINOSITE"
Tournez le bouton "C" vers la droite ou vers la gauche
selon que vous désirez augmenter ou diminuer la
luminosité de l'écran. Quelques secondes après la
sélection, le four est de nouveau en attente de commande.
Verrouillage / Déverrouillage des commandes
Cette opération vous permet d'exclure les fonctions des
touches et des boutons. Utilisez-la surtout si vous avez
des enfants.
Pour activer le verrouillage, appuyez quelques secondes
sur la touche 2 jusqu'à l'apparition de l'affichage
VERROUILLE".
Pour rétablir le fonctionnement normal des commandes
de l'appareil, appuyez à nouveau pendant quelques
secondes sur la touche 2 jusqu'à l'apparition de l'affichage
"DEVERROUILLE".
Eclairage du four
A tout moment (préchauffage et cuisson en cours), il est
possible d'allumer ou d'éteindre la lampe du four en
appuyant sur la touche "4".
Four éteint, la lumière s'éteint automatiquement 10
minutes après la dernière opération effectuée à l'aide des
commandes du bandeau.
Système de refroidissement
Pour réduire la température à l'extérieur du four, le four
est équipé d'un système de refroidissement. Le ventilateur
fonctionne pendant toute la durée de la cuisson et envoie
de l'air à l'extérieur par une fente située entre le bandeau
et la porte du four.
Pour accélérer la montée en température à l'intérieur du
four en phase de préchauffage, la vitesse de sortie de
l'air est réduite de moitié par rapport à celle enregistrée
pendant la cuisson.
Si une table de cuisson est installée au-dessus du four, il
arrive que le système de refroidissement se mette en
marche automatiquement pour protéger les composants
électroniques même si l'appareil est éteint.
Remarque : le ventilateur continue à tourner après
l'arrêt du four jusqu'à ce qu'il se soit suffisamment
refroidi.
Utilisation du four
Tournez le bouton "B" dans le sens des aiguilles d'une
montre pour choisir l'une des fonctions de cuisson prévues
ou l'une des recettes programmées (voir recueil de
recettes Ariston).
Pour chaque fonction, l'écran affichera :
• le nom de la fonction (ou de la recette) ;
• le numéro de la fonction (ou de la recette) ;
• la température prédéfinie ;
• les sources de chaleur.
Si la température conseillée n'est pas celle que vous
souhaitez, vous pouvez la modifier à l'aide du bouton "C".
A chaque fonction de cuisson correspond aussi une durée
conseillée que vous pouvez régler, entre 1 minute et 10
heures, en appuyant sur la touche 2 et en tournant ensuite
le bouton "C" jusqu'à ce que la valeur souhaitée soit atteinte.
Vous pouvez modifier la durée jusqu'à ce que les inscriptions
déroulantes disparaissent complètement. Le temps de
cuisson préprogrammé n'inclut pas la phase de préchauffage.
Pour démarrer la cuisson appuyez sur la touche 4 de
démarrage cuisson.
Fonctions "Cuisson rapide" et "Gril " mises à part, le four
démarre la phase de préchauffage au cours de laquelle vous
pouvez toujours :
• modifier la température à l'aide du bouton "C" ;
3
FR
Page 3

• modifier la durée de cuisson en appuyant sur la touche 2
et en tournant ensuite le bouton "C" ;
• verrouiller/déverrouiller les commandes en appuyant 3
secondes sur la touche 2 (voir paragraphe "Verrouillage/
Déverrouillage commandes") ;
• interrompre la cuisson et éteindre le four en tournant le
bouton "B" dans le sens inverse des aiguilles d'une
montre.
Remarque : le préchauffage est effectué par l'appareil en
automatique, sa durée est réglée en fonction de la
température choisie par l'utilisateur. L'écran affiche le temps
qui devra s'écouler avant que ne commence la phase de
cuisson.
Dés que la température sélectionnée est atteinte, le four
démarre la phase de cuisson au cours de laquelle vous
pouvez toujours :
• modifier la température à l'aide du bouton "C". Si la hausse
de température dépasse 25°C, le four revient à la phase
de préchauffage ;
• modifier la durée de cuisson en appuyant sur la touche 2
et en tournant ensuite le bouton "C" ;
• verrouiller/déverrouiller les commandes en appuyant 3
secondes sur la touche 2 (voir paragraphe "Verrouillage/
Déverrouillage commandes") ;
• interrompre la cuisson et éteindre le four en tournant le
bouton "B" dans le sens inverse des aiguilles d'une
montre.
En fin de cuisson, l'écran affichera le message "FIN-PRET" et
vous entendrez un signal sonore qui cessera au bout d'une
minute, après avoir appuyé sur une touche ou avoir tourné
un des deux boutons.
Attention : lors de son premier allumage, faites fonctionner
le four à vide pendant au moins une demi-heure en réglant
le thermostat à son maximum, puis ouvrez la porte et ventilez
la pièce. L'odeur qui se dégage parfois pendant cette
opération est due à l'évaporation des produits utilisés pour
protéger le four pendant le laps de temps qui s'écoule entre
la fabrication et l'installation du produit.
Attention : Installez la lèchefrite sur le premier gradin du
bas pour recueillir les graisses et les jus uniquement en cas
de cuissons au gril ou au tournebroche. Pour les autres
modes de cuisson n'utilisez jamais le gradin du bas et ne
posez jamais d'objets à même la sole du four, vous risqueriez
d'abîmer l'émail. Enfournez toujours vos plats de cuisson
(plats pyrex, papier alu, etc. etc.) sur la grille fournie avec
l'appareil et montée dans les gradins de la crémaillère à
l'intérieur de l'enceinte du four.
Attention : l'appareil monte un système de diagnostic qui
permet de détecter tout défaut de fonctionnement. L'utilisateur
est informé par des messages du genre :
• "F nn" (nn=numéro composé de 2 chiffres) : dans ce cas,
faites appel au service d'assistance technique car votre
four ne fonctionne pas;
• "W nn" (nn=numéro composé de 2 chiffres) : dans ce cas,
il vaut mieux appeler le service d'assistance technique
car votre four, tout en continuant à fonctionner, a détecté
un défaut de fonctionnement.
Description des fonctions
Pour sélectionner les fonctions, utilisez le bouton "B".
: «Traditionnel»
C'est le mode de cuisson le plus ancien qui convient aux
cuissons individuelles. Deux résistances (l'une visible située
sous la voûte au plafond, l'autre invisble en bas sous la sole)
fonctionnent ensemble.
L'air s'échauffe au contact de ces sources de chaleur, se
déplace à l'intérieur de l'enceinte du four selon un phénomène
qui fait que l'air chaud, plus léger, a tendance à remonter.
C'est le phénomène de convection naturelle. Ce mode de
cuisson est particulièrement recommandé pour les plats
mijotés en cocotte fermée (backenhof, tripes, ...) ou la
cuisson au bain-marie (crème caramel, terrine, ...).
Il convient d'utiliser le plateau émaillé comme support de
plat au gradin 2.
L'enfournement à chaud est préconisé.
: "Pâtisserie"
Seules la résistance chauffante circulaire et la turbine sont
sollicitées de façon à fournir une chaleur délicate, propice à
la cuisson des préparations de pâtisseries telles que
brioches, gâteau au chocolat, cake, génoise, petits fours,
meringues, ...
Il convient d'utiliser le plateau émaillé comme support de
plat au gradin 2.
L'enfournement à chaud est préconisé.
: «Cuisson rapide»
La combinaison de tous les éléments chauffants associés à
la turbine garantit la répartition de la chaleur dans l'enceinte
du four.
Ce mode de cuisson est recommandé pour les cuissons
rapides (ne nécessitant pas de préchauffage), les plats
cuisinés (surgelés, précuits).
Il convient d'utiliser le plateau émaillé comme support de
plat au gradin 2.
: «Multicuisson»
La combinaison de tous les éléments chauffants associés à
la turbine vous garantit une répartition de la chaleur dans
l'enceinte du four.
Ce mode de cuisson est recommandé pour cuire des
préparations placées sur plusieurs niveaux.
Si les préparations sont de natures différentes, la cuisson
se fait sans altération de leur saveur respective.
L'utilisation de cette fonction implique que toutes les
préparations requièrent la même température de cuisson
(vous retirerez les plats au fur et à mesure de leur cuisson).
Pour une cuisson sur deux niveaux par exemple, il convient
d'utiliser le plateau émaillé comme support de plat au gradin
1 et la grille au gradin 3.
L'enfournement à chaud est préconisé.
FR
4
Page 4
: «Pizza»
Les éléments chauffants (sole et circulaire) sont sollicités
afin de faire chauffer le four rapidement.
Vos pizzas ainsi que vos tartes bénéficieront d'un apport
de chaleur plus important sur le dessous de façon à garantir
une bonne saisie de la pâte durant la cuisson. La turbine,
quant à elle,permettra d'apporter la coloration nécessaire
sur le dessus afin d'obtenir une préparation appétissante.
Il convient d'utiliser le plateau émaillé au gradin 1 comme
support de plat.
L'enfournement à chaud est préconisé.
: «Gril»
Seule la résistance de voûte fonctionne : le gril est porté au
rouge et émet des rayonnements infrarouges tels ceux
contenus dans le rayonnement solaire.
En effet, on ne vise pas essentiellement à chauffer l'air
contenu dans l'enceinte du four, mais surtout à exposer
l'aliment directement à ces rayons.
La cuisson se fait porte fermée et le départ à froid est
recommandé.
La chaleur rayonnée est réglable avec le sélecteur de
températures.
Il convient de placer le plateau émaillé au gradin 1 afin de
récupérer les graisses et jus de cuisson et la grille en gradin
supérieur en fonction de l'épaisseur de votre viande.
: "Gratin"
Seule la résistance de voûte fonctionne avec émission
d'infrarouges. La turbine de fond de four, par brassage, assure
une répartition uniforme de la température, ainsi les aliments
sont soumis en même temps à l'action :
• des infrarouges qui saisissent la préparation en
surface,
• de l'air chaud qui permet une cuisson en profondeur
par conduction.
Ce mode de cuisson est recommandé pour la cuisson des
rôtis (viandes rouges ou blanches), et de la volaille.
La grille sera positionnée au gradin 2 comme support de
viande et le plateau émaillé viendra au gradin 1 pour
récupérer les graisses et les jus.
L'enfournement à froid est préconisé.
: Chaleur brassée
Seules la résistance chauffante circulaire et la turbine sont
sollicitées de façon à fournir une chaleur délicate, propice à
la cuisson des préparations très peu humides telles que
sablés, tarte à la confiture, salés apéritif, ...
Il convient d'utiliser le plateau émaillé comme support de
plat au gradin 2.
L'enfournement à chaud est préconisé.
Votre appareil est doté d'un tournebroche, que vous pouvez
utiliser avec les fonctions "gril" et "gratin".
La cuisson se fait porte fermée et le départ à froid est
recommandé afin d'éviter de se brûler lors de la mise en
place de la broche.
Il convient de placer le plateau émaillé au gradin 1 pour la
récupération des graisses et jus de cuisson et le tournebroche
au gradin 3 (voir paragraphe suivant pour la mise en place
du tournebroche).
En cuisson "gril" et "gratin", les parties accessibles
peuvent être chaudes, éloignez les jeunes enfants.
Autonettoyage par fast clean
C’est le nettoyage intégral du four.
Pour ce qui concerne les informations concernant
l’autonettoyage par fast clean voir page 8.
Comment programmer la cuisson
Pour programmer une cuisson, procédez comme suit:
• sélectionnez le programme de cuisson à l'aide du
bouton "B" et la température souhaitée à l'aide du
bouton "C".
• sélectionnez la durée en appuyant sur la touche 2.
L'écran affiche la durée de cuisson conseillée que vous
pouvez modifier en tournant le bouton "C". N'oubliez
pas que le temps entré ne comprend pas la durée du
préchauffage.
• sélectionnez l'heure de fin de cuisson en appuyant sur
la touche 1. Vous obtiendrez l'heure de fin de cuisson
obtenue en additionnant à l'heure courante la durée
de cuisson sélectionnée et la durée de préchauffage
calculée automatiquement par l'appareil selon la
fonction sélectionnée. Tournez le bouton "C" jusqu'à
affichage de l'heure de fin de cuisson désirée.
Dès que les sélections sont terminées, l'écran affiche
à la suite, l'heure de démarrage du préchauffage
(quand il est prévu) et l'heure de fin de cuisson que
vous pouvez modifier tant que vous ne voyez pas
réapparaître le nom de la fonction et la température
sélectionnée. Pour corriger des erreurs commises lors
de la sélection, refaites les opérations susmentionnées.
• programmez en appuyant sur la touche "4".
Pour modifier les sélections, appuyez 3 secondes sur
la touche 4 et refaites les opérations décrites plus haut.
Pour annuler une cuisson déjà programmée
Pour annuler toute programmation déjà effectuée, tournez
le bouton "B" dans le sens inverse des aiguilles d'une
montre jusqu'à affichage de l'inscription "
5
OFFOFF
OFF".
OFFOFF
FR
Page 5
Entretien
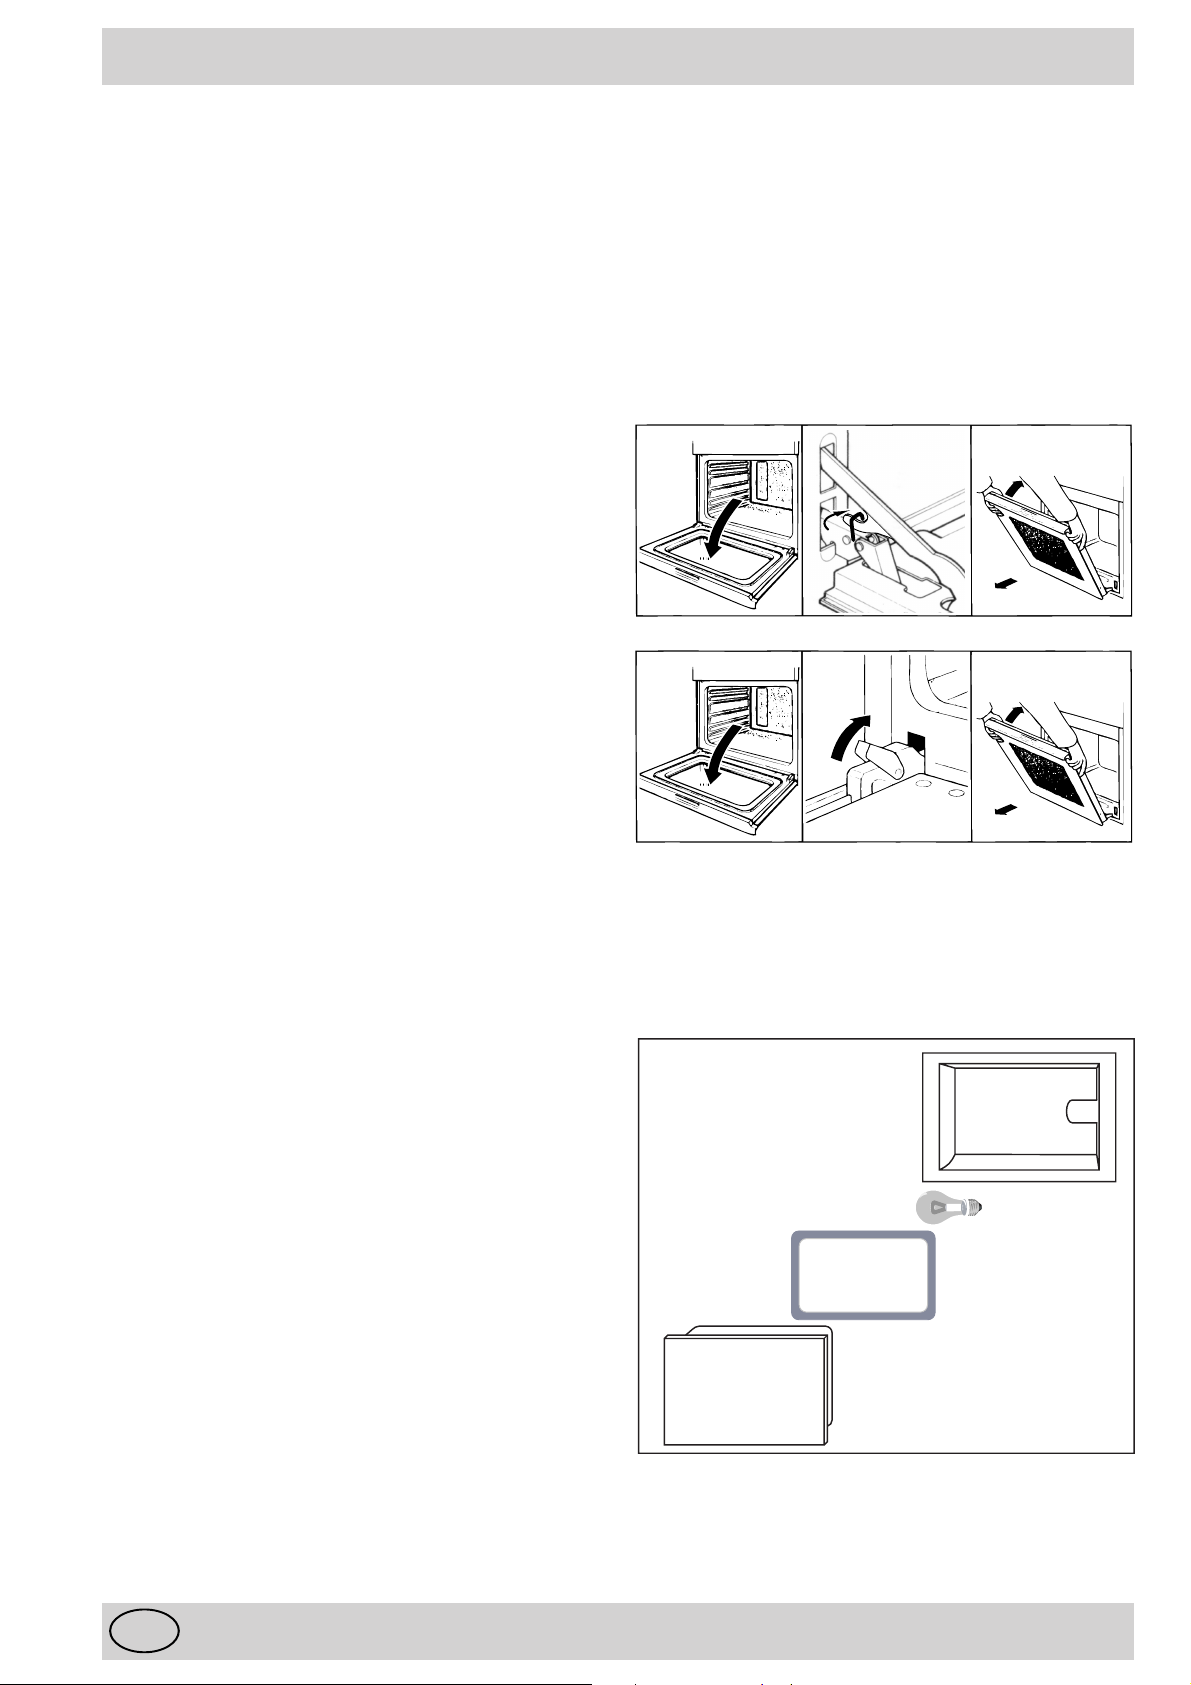
hublot
joint
lampe
cavité
Avant toute opération de nettoyage ou d'entretien, coupez
l'alimentation électrique de l'appareil.
Pour prolonger la durée de vie de votre appareil, nettoyez-
le fréquemment.
L'intérieur du four
Il est recommandé de nettoyer le four après chaque usage
surtout après la cuisson de rôtis. Il faut en effet éviter de
laisser s’accumuler les salissures projetées pendant la
cuisson: celles-ci recuiraient à chaque nouvel usage et se
carboniseraient en dégageant de la fumée et des
odeurs désagréables.
L'extérieur du four
Nettoyez les parties extérieures émaillées ou inox avec une
éponge imbibée d'eau savonneuse en ayant soin de les
rincer et les essuyer parfaitement, sans utiliser de produits
abrasifs ou corrosifs qui pourraient les endommager.
L'inox
Rincez les parties en inox et essuyez-les soigneusement
avec un chiffon doux et humides. Pour les taches
résistantes, utilisez un produit spécifique non abrasif.
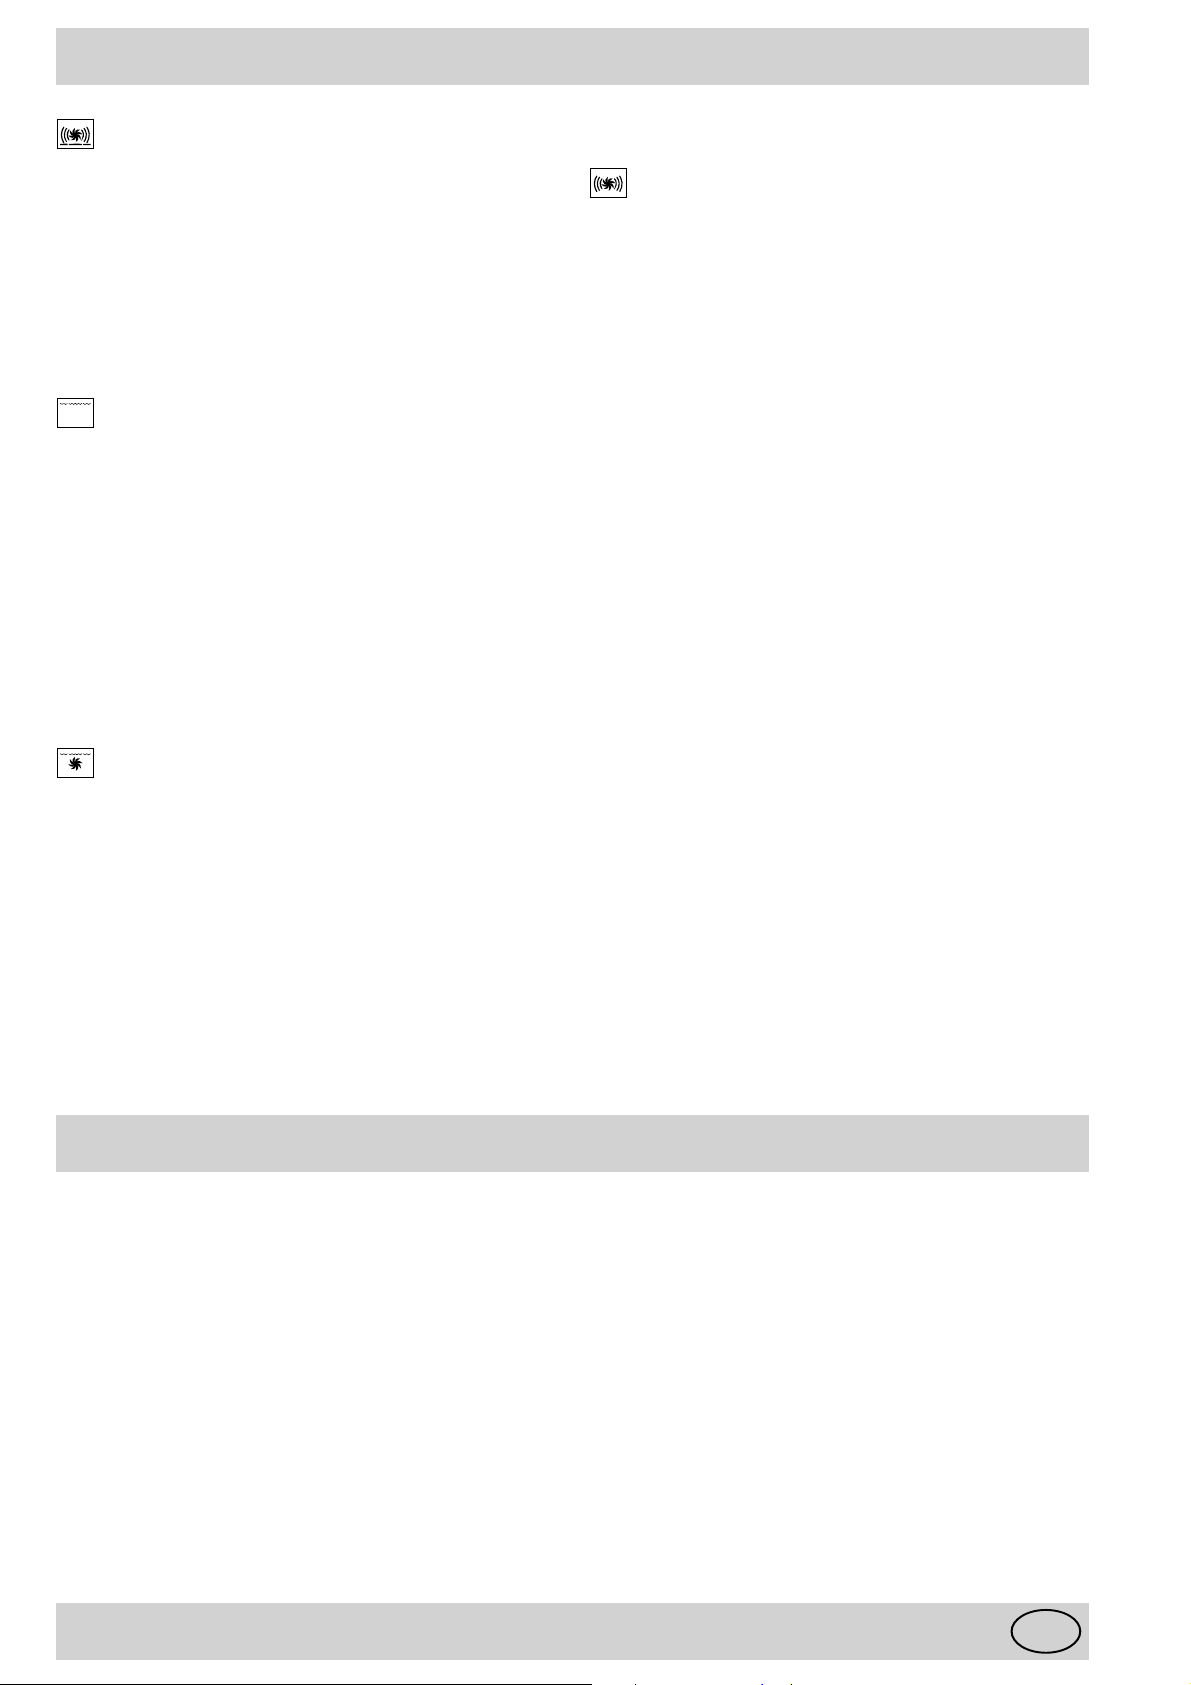
Dépose de la porte du four
Pour nettoyer plus à fond, vous pouvez déposer la porte du four.
Procédez comme suit :
• ouvrez la porte complètement ;
• soulevez et faites pivoter les leviers situés sur les deux
charnières ;
• saisissez la porte par les côtés extérieurs, refermez-la
lentement mais pas complètement ;
• tirez-la vers vous en la sortant de son logement;
Remontez la porte en refaisant en sens inverse les opérations
indiquées ci-dessus.
Démontage porte FO - FD 98 P
132
Démontage porte FC 98 P
123
Usage de papier aluminium
Pour éviter d’avoir à nettoyer la sole, vous pourriez être
tenté de tapisser cette surface d’un papier aluminium. Nous
vous le déconseillons vivement. La feuille d’aluminium
en contact direct avec l’émail chauffé risque de fondre
et de détériorer irréversiblement l’émail du moufle.
Nettoyage du tournebroche et des autres accessoires
Le tournebroche est entièrement démontable grâce à ses
2 vis papillon. Les éléments du combiné tournebroche se
nettoient avec les autres accessoires (plateau émaillé, grille)
dans l'évier à l'aide d'une éponge humide et d'un détersif
courant ou dans votre lave-vaisselle.
Remplacement de la lampe du four
• Avant toute opération, déconnectez l'appareil en le
débranchant ou en agissant sur l'interrupteur général
pour couper l'électricité.
• A l'aide d'un objet étroit et plat (tournevis, manche de
cuillère,...), retirez le couvercle en verre.
• Dévissez la lampe et remplacez-la par une lampe de
même type:
- tension 230/240 W
- puissance 15 W
- culot E 14
• Remettez en place la vitre en prenant bien soin de
repositionner correctement le joint.
FR
6
Page 6
Le nettoyage par fast clean
Sécurités
En fonction fast clean la température intérieure de
l’enceinte atteint 500° nécessaires à la destruction des
salissures, voir ci-dessus.
Aussi votre four est-il doté de dispositifs de sécurité:
• la porte est automatiquement verrouillée dès que
la température est élevée afin d’éviter des risques
de brûlure.
• les éléments chauffants ne sont plus alimentés
si un événement anormal survenait.
Remarque:
Il peut arriver que, à travers le hublot, vous observiez des
particules qui s’illuminent lors de leur destruction par
pyrolyse au contact des résistances, il s’agit d’une
combustion instantanée, phénomène très normal et
sans danger.
Précautions à prendre avant le nettoyage
1- Veillez à éliminer les projections alimentaires
importantes avec une éponge humide. Il est vivement
déconseillé d’utiliser des produits détergents ou tout autre
produit conseillé pour le nettoyage des fours.
2- Sortez tous les accessoires : ils ne sont en effet pas
conçus pour résister à de telles températures. De plus,
certains d’entre eux altéreraient le résultat de la pyrolyse
en faisant obstacle à la circulation de la chaleur sur toutes
les parois. Les accessoires peuvent être facilement
nettoyés comme de la vaisselle courante y compris en
lave-vaisselle.
3- Ne laissez pas de torchon de cuisine sur la poignée.
Comment enclencher le nettoyage ?
– Fermez la porte.
– Tournez la manette B sur FAST CLEAN
– Prévoyez 90 minutes environ pour la phase de
nettoyage. Vous avez la possibilité de régler le temps
de l'opération (60 - 90 - 120 mn) en fonction de l'état
de salissure de votre four.
– appuyez sur la touche 4 pour démarrer.
Vous pouvez, comme pour la cuisson, programmer
l'opération de fast clean en départ différé.
⇒ La porte du four se verrouille automatiquement
dès que vous lancez l'opération de fast clean.
⇒ Le voyant clé clignote durant le blocage de la porte
et la durée se décrémente.Le voyant devient fixe dès
que la porte est bloquée.
Vous pouvez, tant que la température intérieure du four
est inférieure à 125°, déverrouiller la porte du four en
appuyant sur la touche 3 durant 3 secondes. Le
déverrouillage est immédiat.
Si vous oubliez de reverrouiller la porte après cette
intervention, celle-ci se verrouille automatiquement dès
que la température intérieure du four atteint 325°.
Que se passe-t-il en fin de fast clean?
• Le programmateur émet un signal sonore,
• et l'affichage indique END.
Appuyez sur la touche 4 pour arrêter le signal sonore,
l'affichage disparaît et le voyant clé clignote.
Vous ne pourrez ouvrir la porte du four qu'après que la
température soit redescendue à un niveau acceptable.
Vous pouvez constater que quelques poussières blanches
se sont déposées sur la sole et les parois du four, enlevez-
Attention: pendant la pyrolyse, les surfaces peuvent
devenir chaudes, éloignez les jeunes enfants.
les avec une éponge humide quand le four est
complètement refroidi.
Si vous souhaitez profiter de la chaleur emmagasinée pour
débuter une cuisson, les poussières peuvent rester : elles
sont inoffensives pour votre préparation.
Petites anomalies de fonctionnement
NE VOUS INQUIETEZ PAS SI...
Quelques anomalies de fonctionnement peuvent apparaître, elles sont généralement dues à une mauvaise manipulation
ou à une appréciation erronée d’un phénomène.
Si au cours d’une cuisson votre four dégage beaucoup de fumée :
• Vérifiez que vous avez sélectionné la bonne fonction par rapport à la cuisson recherchée, choisi les bons accessoires
et enfourné à la hauteur conseillée.
• Vérifiez également la température sélectionnée, elle est sans doute trop élevée pour le type de cuisson considéré.
• Vérifiez si le degré de salissure du four ne nécessite pas un nettoyage. Ce sont en effet les déchets alimentaires
collés sur l’émail, qui se carbonisent avec dégagement de fumées et d’odeurs âcres.
• Des projections de graisse ou des débordements sur des surfaces très chaudes peuvent produire de la fumée.
7
FR
Page 7
Les accessoires
Vis à ailettes
Broche
Poignée de broche
Fourche
Berceau de
tournebroche
Votre four est doté de nombreuses possibilités de cuissons.
Celles-ci ne peuvent être réussies qu’avec un certain
nombre d’accessoires que nous avons choisis.
Ces accessoires coulissent dans les différents gradins
de la crémaillère à l’intérieur de l’enceinte du four et
peuvent ainsi être placés à la bonne hauteur pour la
cuisson à réaliser.
Pour chaque mode de cuisson et chaque exemple donné,
nous vous précisons le numéro de gradin (à partir du bas)
Gradin n˚ 5
Gradin n˚ 4
Gradin n˚ 3
Gradin n˚ 2
Gradin n˚ 1
Crémaillères
Le plateau émaillé
Il est utilisé :
• comme support de plat pour toutes les cuissons un
niveau et le bain-marie,
• comme support de préparations (petits fours, ...),
• comme récupérateur des jus et graisses de cuisson
associé à la grande grille.
Il est déconseillé d'utiliser le plateau émaillé aux gradins
4 et 5.
La grande grille
Elle est toujours utilisée en décrochement vers le bas et
associée au plateau émaillé.
• Positionnée au gradin 2, elle sert de support de
viandes, le plateau émaillé se trouvant au gradin 1
pour la récupération des graisses et des jus.
• Positionnée en gradin supérieur (en fonction de
l'épaisseur de l'aliment) pour les grillades, le plateau
émaillé se trouvant au gradin 1 pour la récupération
des graisses et des jus.
• Positionnée en gradin supérieur pour les
multicuissons.
Nous vous déconseillons de placer les viandes à cuire
dans le plateau émaillé pour les cuissons "gratin"; en
effet, les jus et les graisses chauffés par le dessous dans
ce mode de cuisson, risquent de carboniser, d'être
projetés sur les parois et de donner naissance à de la
fumée.
LE TOURNEBROCHE
Cet accessoire est apprécié pour les pièces à rôtir qui
tournent lentement et se colorent régulièrement jusqu’à
cuisson complète. Il se compose de:
• un berceau qui se place au 3
crémaillère afin que le tournebroche puisse
s’encastrer dans l’axe creux du moteur
d’entraînement situé au fond de l’enceinte, derrière
la paroi perforée.
• une broche qui traverse la pièce à rôtir, laquelle
est immobilisée de part et d’autre à l’aide de deux
fourches coulissantes qui se fixent chacune sur
l’axe par une vis à ailettes.
Attention: lors de la mise en place de l’ensemble, vérifiez
que la broche soit bien engagée dans l’axe creux de sortie
du moteur.
Veillez à bien positionner:
- la broche au centre de la pièce à rôtir
- la pièce à rôtir à égale distance des extrémités de la
broche.
• une poignée amovible en matière isolante qui se
visse à l’avant de la broche et permet:
- d’avoir un tournebroche suffisamment long pour
accueillir des pièces à rôtir de grande dimension
- d’éviter de se brûler lorsqu’on retire la pièce en
fin de cuisson.
Vissez à fond la poignée pour retirer la broche (la poignée
doit être retirée durant la cuisson).
Temporisation du tournebroche
Les fours ARISTON sont dotés d’un dispositif de
temporisation du tournebroche. En fin de cuisson, le
moteur continue à entraîner la broche, il ne s’arrête que
lorsque la température est suffisamment redescendue:
tout risque de carbonisation est ainsi écarté.
En fin de cuisson, laissez le sélecteur de fonctions sur le
mode de cuisson en cours et ramenez le sélecteur de
températures à son minimum.
ème
gradin de la
FR
8
Page 8
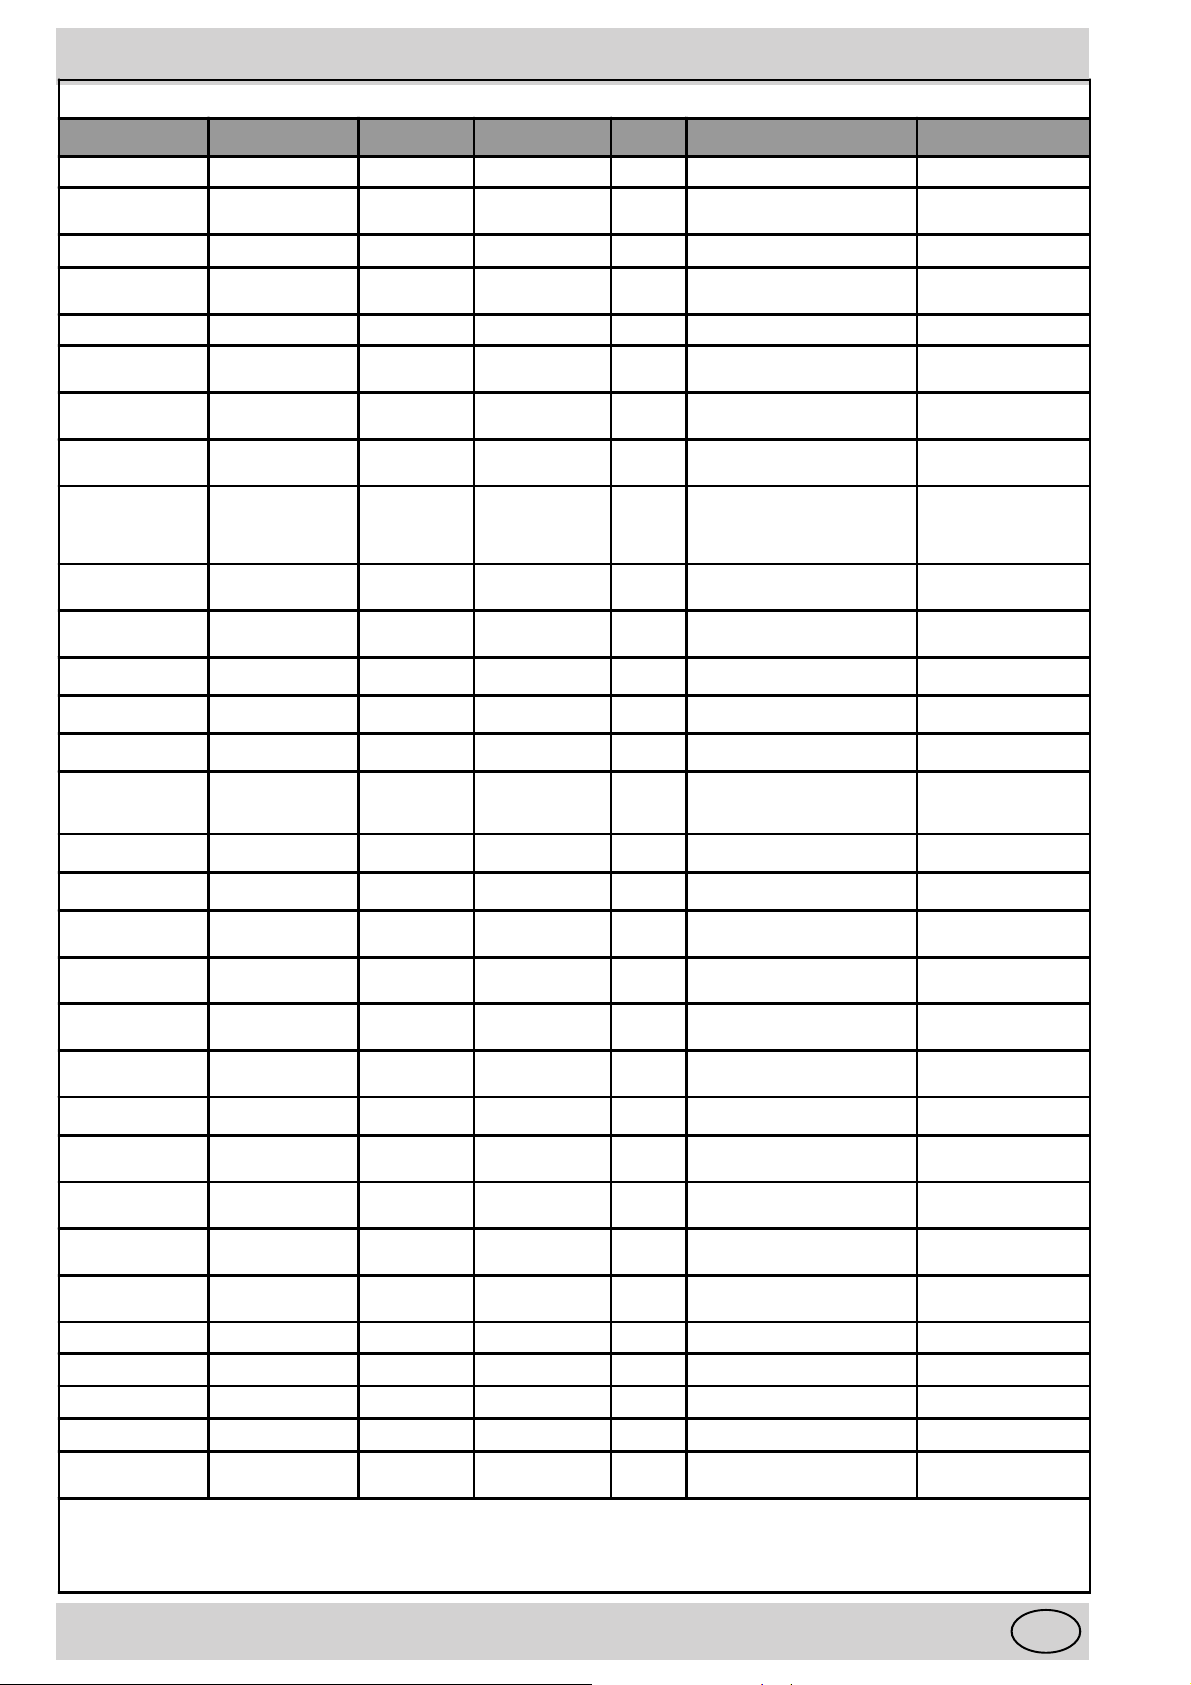
QUELQUES EXEMPLES DE CUISSONS SUR UN SEUL NIVEAU
Recettes Mode de cuisson Tem pérature Tem ps Gradin Remarques Préchauffage
Pain (miche-1kg)
Feuilletés individuels
Pizza (pâte à pain)
Quiche lorraine
Soufflé au fromage
Pâté de campagne
Gigot d'agneau
Gratin dauphinois
Pois son
Poul et
Rôti de bœuf
Rôti de porc
Rôti de veau
Multicuisson 210°C 30-35' 2 Sur plateau émaillé Oui
Multicuisson 200°C
Pizza 240°C 10-15' 1 Sur plateau émaillé Ou
Pizza 220°C 30' 1 Moule sur plateau émaillé Oui
Multicuisson 200°C 30-40' 2 Moule diam. 20cm sur plateau émaillé Oui
Traditionnel 180°C 50-60' 2
Gratin 210°C
Gratin 200°C
Traditionnel
Gratin
Gril
Gratin
Gril tournebroche
Gratin 210°C
Gratin 210°C 1 heure pour 1kg 2-1* Viande sur grille Non
Gratin 210°C 1 heure pour 1kg 2-1* Viande sur grille Non
200°C
240°C
250°C
210°C
250°C
20-25'
suivant épaisseur
1 heure pour
1,5 à 2 kg
40-45' suivant
épaisseur
Suivant nature
poisson et épaisseur22-1*
1 heure pour
1,2 à 1,5 kg
Variable suivant
degré de cuisson
2-1* Viande sur grille Non
2-1*
2-1*
3-1*
2-1* Viande sur grille Non
2 Sur plateau émaillé Oui
Au bain-marie dans plateau émaillé
(départ eau chaude)
2 Plat sur plateau émaillé Oui
Filets+liquides, plateau émaillé
Entier sur grille
Grillades poisson sur grille
Viande sur grille
T.Broche por te fermée
Oui
Oui
Non
Tomates farcies
Plats surgelés
Lasagnes
Moussaka
Brioche
Cake
Choux
Crème caramel
Génoise
Macarons
Meringues blanches
Meringues ambrées
Pommes au four
Sablés
Tarte aux pommes
Sablés (au beurre)
Tar te à la confiture
Salés apéritif (pâte
brisée)
X - Y* dans la colonne gradin :
X = grille ou broche placés au gradin x
Y = plateau émaillé placé au gradin Y pour la récupération des jus et graisses
Rappel : la grille est toujours utilisée en décrochement vers le bas.
Multicuisson 200°C 20-25' 2 Plat sur plateau émaillé Oui
Cuisson rapide
Cuisson rapide 200°C Suivant épaisseur 2 Plat sur plateau émaillé Non
Cuisson rapide 200°C Suivant épaisseur 2 Plat sur plateau émaillé Non
Pâtisserie 160°C 35-45' 2
Pâtisserie 160°C60'2
Pâtisserie 200°C 20-25' 2
Traditionnel 180°C30'2
Pâtisserie 190°C 30' 2 Moule aluminium sur plateau émaillé Oui
Pâtisserie 180°C
Pâtisserie 70-80°C
Pâtisserie 110°C
Multicuisson 210°C
Pâtisserie 190°C 10-15' 2 Plateau émaillé Oui
Pizza 220°C 30' 1 Moule sur plateau émaillé Oui
Chaleur brassée190°C 10-15' 2 Moule sur plateau émaillé Oui
Chaleur brassée190°C 15-25' 2 Moule sur plateau émaillé Oui
Chaleur brassée190°C 10-15' 2 Moule sur plateau émaillé Oui
suivant
indications sur
emballage
suivant indications
sur emballage
15-20'
suivant grosseur
3 heures
suivant grosseur
2 heures
suivant grosseur
20-25'
suivant grosseur
2 Plat sur plateau émaillé Non
Moule aluminium sur
plateau émaillé
Moule aluminium sur
plateau émaillé
Petites profiterolles non sucrées sur
plateau émaillé
Ramequins individuels au bain-marie
départ eau chaude
2 Sur plateau émaillé Oui
2Séchage pour petites meringues Oui
2Séchage pour petites meringues Oui
2 Plat sur plateau émaillé Oui
Oui
Oui
Oui
Oui
9
FR
Page 9

La sécurité, une bonne habitude
Pour garantir l'efficacité et la sécurité de ce produit
• adressez-vous exclusivement à des Centres d’assistance technique agréés
• exigez toujours l’utilisation de pièces détachées originales.
• Cet appareil a été conçu pour un usage non
professionnel, à domicile, et ses caractéristiques ne
peuvent être modifiées.
• Les instructions fournies ne sont applicables qu'aux
pays dont les symboles sont reportés dans la notice
et sur la plaquette d'immatriculation....
• La sécurité de cet appareil n'est garantie que si ce
dernier a été correctement raccordé à une installation
de mise à la terre efficace conforme aux normes de
sécurité.
• En cours de fonctionnement, les éléments
chauffants et certaines parties de la porte peuvent
devenir très chauds. Attention à ne pas les toucher
et à garder les enfants à distance.
Ce dernier pouvant représenter un danger, évitez que
des enfants ou des incapables aient accès :
- aux commandes et à l'appareil en général ;
- aux emballages (sachets, polystyrène, clous etc.) ;
- à l'appareil, pendant et tout de suite après l'utilisation
du four et du gril, à cause de la surchauffe;
- à l'appareil inutilisé (dans ce cas il faut rendre
inoffensives les parties pouvant s'avérer
dangereuses)...
Evitez :
- de toucher l'appareil avec des parties du corps
humides;
- de l'utiliser pieds nus ;
- de tirer sur l'appareil ou sur le cordon d'alimentation
pour le débrancher de la prise de courant ;
- toute opération inappropriée et dangereuse ;
- de boucher les fentes d'aération ou de déperdition de
la chaleur ;
- que le cordon d'alimentation de petits électroménagers
touchent à des parties chaudes de l'appareil ;
- l'exposition aux agents atmosphériques (pluie, soleil);
- d'utiliser le four comme rangement ;
- d'utiliser des liquides inflammables à proximité ;
- d'utiliser des adaptateurs, des prises multiples et/ou
des rallonges;
- toute tentative d'installation ou de réparation sans
l'intervention de personnel qualifié.
Faites toujours appel à des techniciens qualifiés dans
les cas suivants :
- installation (conforme aux instructions du fabricant) ;
- quand vous avez des doutes sur son fonctionnement ;
- remplacement de la prise en cas d'incompatibilité avec
la fiche de l'appareil.
Faites appel aux centres de service après-vente
agréés par le fabricant dans les cas suivants :
- en cas de doute sur le bon état de l'appareil lors de
son déballage ;
- endommagement ou remplacement du cordon
d'alimentation ;
- en cas de panne ou de mauvais fonctionnement, exigez
des pièces détachées d'origine.
Effectuez les opérations suivantes :
- évitez toute opération autre que la cuisson ;
-vérifiez le bon état de l'appareil lors de son déballage;
-déconnectez l'appareil en cas de mauvais
fonctionnement et avant toute opération de nettoyage
ou d'entretien ;
- quand il est inutilisé, débranchez l'appareil de la prise
de courant et fermez le robinet du gaz (s'il y en a un de
prévu) ;
- utilisez des gants de protection pour enfourner ou sortir
des plats du four ;
- saisissez toujours la poignée de porte en son milieu
car à ses extrémités les sorties d'air chaud pourraient
la rendre plus chaude ;
- contrôlez toujours si les manettes sont bien sur "•"/"o"
quand l'appareil n'est pas utilisé.
- coupez le cordon d'alimentation après l'avoir débranché
de la prise quand vous décidez de ne plus utiliser votre
appareil.
• Le fabricant décline toute responsabilité en cas de
dommages provoqués par une mauvaise installation,
un usage impropre et erroné.
FR
10
Page 10
INSTALLATION
Fig. C
L'installation doit être effectuée conformément aux
instructions du fabricant et par un professionnel du
secteur. Le fabricant décline toute responsabilité pour tous
dommages causés à des personnes, à des animaux ou à
des choses du fait d'une installation incorrecte de
l'appareil.
Important : déconnectez le four avant de procéder à toute
opération de réglage, d'entretien etc.
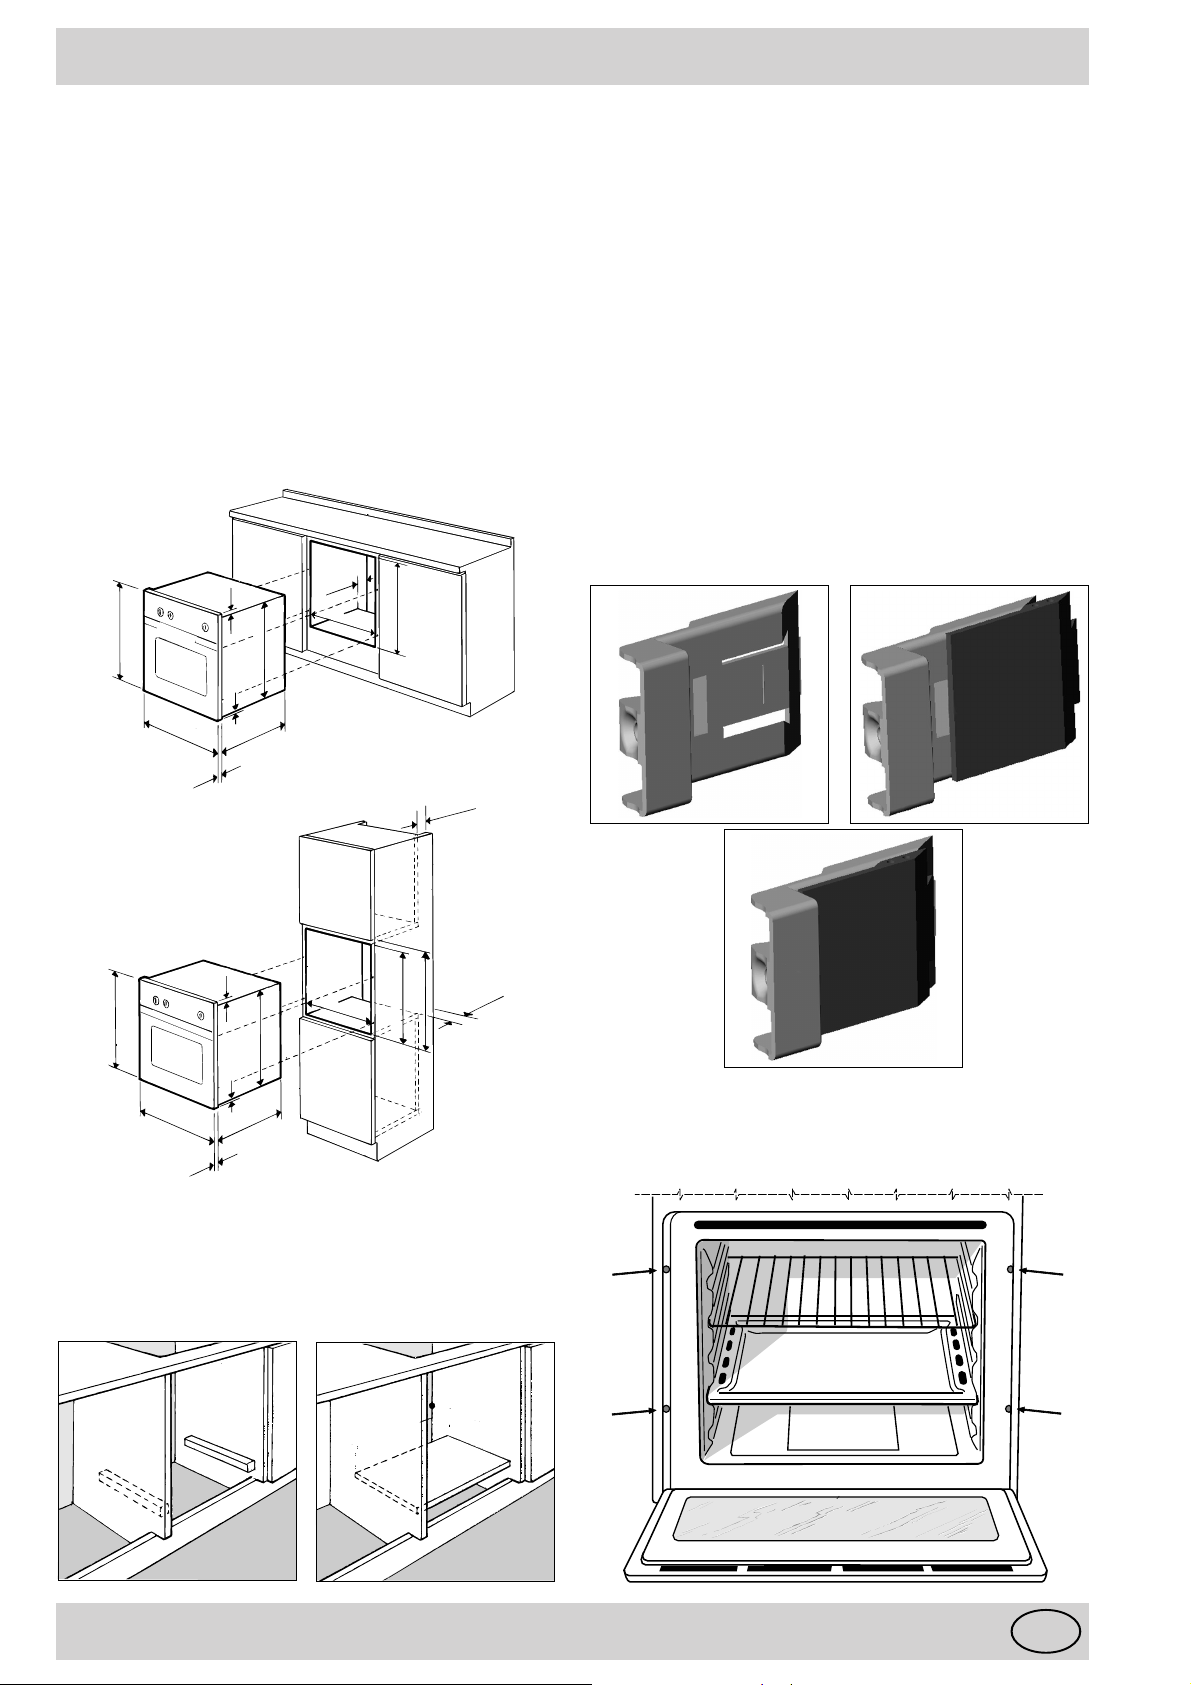
Installation des fours à encastrer
Pour garantir un bon fonctionnement d'un appareil à
encastrer, il faut que le meuble possède des
caractéristiques bien précises. Les dimensions de la niche
à l'intérieur du meuble en cas d'installation sous plan (nb:
configuration pour consommations indiquées
) ou en colonne
sont indiquées sur la figure qui suit.
567 mm.
45 mm.
558 mm.
593 mm.
20/23 mm.
595 mm.
Les panneaux des meubles adjacents doivent être
fabriqués dans un matériau résistant à la chaleur . Dans
le cas notamment de meubles en bois plaqué, il faut que
les colles résistent à une température de 100 °C.
Conformément aux normes de sécurité, après
encastrement de l'appareil, il ne doit plus y avoir possibilité
de contact avec les parties électrifiées.
Toutes les parties qui servent de protection doivent être
fixées de manière à ne pouvoir être enlevées qu'avec l'aide
d'un outil.
Pour bien le centrer, positionnez les 4 taquets situés sur
les côtés du four en face des 4 trous pratiqués sur le cadre
du four. Attention à l'épaisseur des joues du meuble:
• si elle est de 20 mm : enlevez la partie amovible du
taquet (Fig. A) ;
• si elle est de 18 mm : utilisez la première rainure ; déjà
prévu en usine (Fig. B) ;
• si elle est de 16 mm : utilisez la deuxième rainure
(Fig.C).
5 mm.
595 mm.
545 mm.
20/28 mm.
45 mm.
min.
595 mm.
20/23 mm.
567 mm.
5 mm.
595 mm.
545 mm.
20/28 mm.
558 mm.
595 mm.
575-585 mm.
45 mm.
min.
Pour garantir une bonne aération il faut éliminer la paroi
arrière de la niche, il vaut mieux installer le four de manière
à ce qu'il repose sur deux cales en bois; s'il y a par contre
un plan d'appui continu, ce dernier doit avoir une ouverture
d'au moins 45 x 560 mm.
Fig. A Fig. B
Pour fixer le four au meuble, ouvrez la porte du four et
fixez le four à l'aide des 4 vis à bois dans les 4 trous situés
sur le pourtour.
11
FR
Page 11
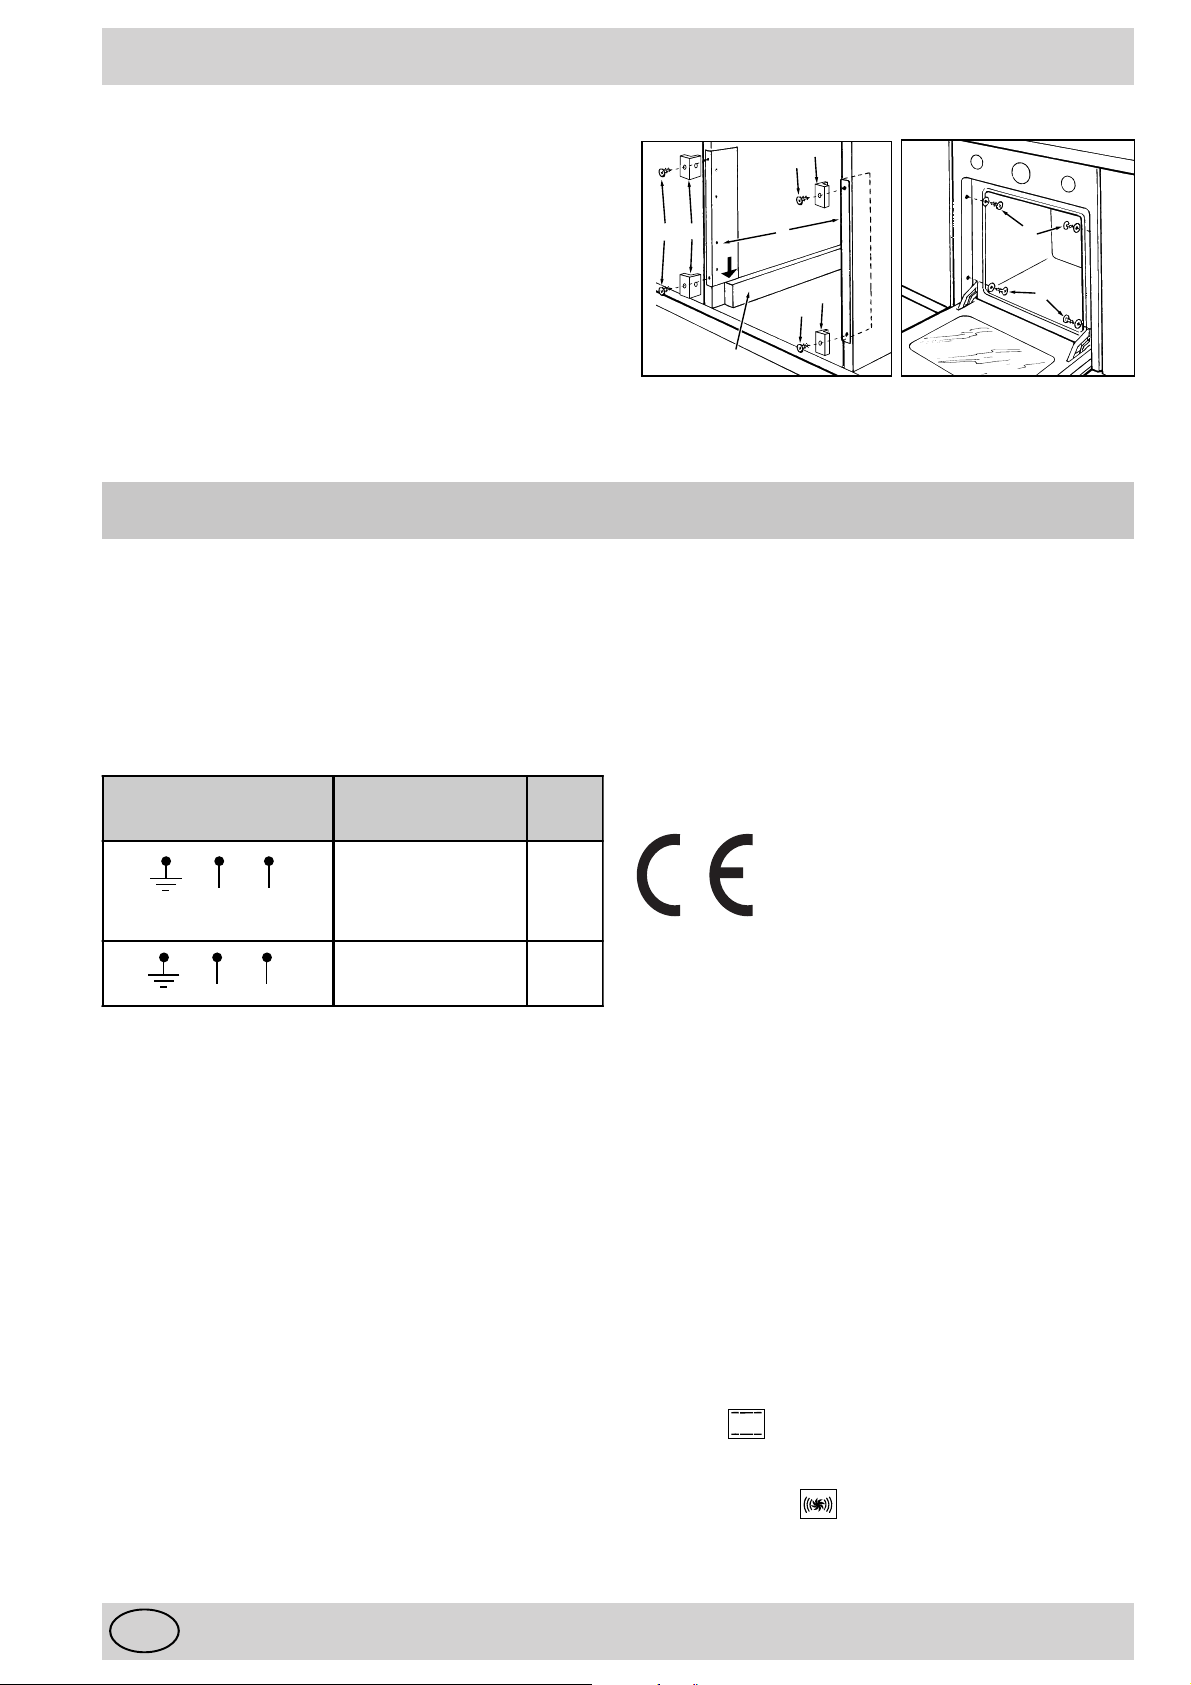
Fixation du four au meuble (que sur modèles FC...)
1. Positionnez les pattes "A" de manière à ce qu'elles
buttent contre les cales support du four "B".
2. Positionnez les taquets "C" contre les pattes "A".
Attention à l'épaisseur des joues du meuble :
• si elle est de 16 mm : montez le taquet de manière à
ce que le chiffre 16 indiqué sur ce dernier soit tourné
vers vous ;
• si elle est de 18 mm : montez le taquet côté dépourvu
d'indication tourné vers vous ,
• si elle est de 20 mm : ne montez pas le taquet.
3. Fixez les pattes et les taquets en bordure de la joue
du meuble à l'aide des vis "D".
4. Fixez le four au meuble à l'aide des vis et des rondelles
plastique "E".
Branchement électrique
Branchement
Il faut préalablement vérifier, au compteur, les conditions
de délivrance de l’énergie électrique disponible (nombre
de phases - tension - puissance maximum nécessaire)
afin qu’elles soient compatibles avec les besoins de
l’appareil Ariston à brancher.
16
16
D
C
16
16
B
C
D
A
C
D
E
E
Important: Après raccordement de l’appareil au câble
souple, resserrer toutes les vis du bornier de raccordement.
Les fours Ariston peuvent s’adapter aux installations
électriques suivantes:
Branchements électriques
LN
L1L2
Ten sio n
Fréquence
FR-AT-BE-DE-GP-ES-IE-IL-IS-IT-DK
LU-RE-FI-GB- GR-PT- SE-MA-NZ-NL
230 V-1+N ~ 50 Hz
CY-MT-AU-NZ-KW
240 V-1+N ~ 50 Hz
FR-BE-NO
230 V-2 ~ 50 Hz
Fusible
Section
16 A
1,5 mm²
16 A
1,5 mm²
Vous pouvez raccorder votre four à l’installation électrique
par l’intermédiaire d’un boîtier de connexion.
Reportez-vous au tableau ci-dessus pour les sections
minimales de fils et le calibrage des éléments de protection
en fonction du branchement.
Si l’installation est réalisée avec un boîtier de connexion,
un dispositif de coupure omnipolaire - dont l’écartement
minimum entre contacts doit être d’au moins 3 mm - doit
être installé en amont du branchement de l’appareil.
Nous vous conseillons de prévoir un câble de raccordement
suffisamment long afin de pouvoir désencastrer le four pour
les éventuelles opérations de maintenance (n’utiliser que
des câbles de qualité HAR - H 05 - RRF munis d’une prise
de courant conforme à la réglementation en vigueur dans le
pays où est installé l’appareil).
La prise de courant doit être accessible.
Appareil en conformité CE suivant directives :
DBT 73/23 CEE modifiée par la directive 93/68/CEE
CEM 89/336/CEE modifiée par les directives 92/31/CEE
et 93/68/CEE
Dimensions utiles du four :
largeur 43,5 cm
profondeur 40,0 cm
hauteur 32,0 cm
Volume utile du four : 56 litres
Tension et fréquence d'alimentation :
230V~50Hz : 2800 W
240V~50Hz : 3050 W
ENERGY LABEL
Directive étiquetage énergétique 2002/40/CE des fours
électriques, Norme EN 50304
Consommation énergie (calculée en charge normalisée)
classique:
Avant toute intervention, y compris pour le remplacement de la lampe, veillez à déconnecter l’appareil.
Il y a danger à mettre l’appareil en service sans relier sa
masse à la terre.
FR
Consommation énergie (calculée en charge normalisée)
convection forcée:
12
Page 12

13
FR
Page 13

IT
14
Page 14
La ringraziamo per aver scelto un prodotto Ariston, sicuro e davvero facile da usare. Per conoscerlo, utilizzarlo al
meglio e a lungo, le consigliamo, prima di utilizzare l’apparecchio, di leggere attentamente le avvertenze contenute nel
presente libretto, in quanto forniscono importanti indicazioni riguardanti la sicurezza di installazione, d’uso e di manutenzione. Conservare con cura questo libretto per ogni ulteriore consultazione. Grazie.
Visto da vicino
250
C
200
150
100
A
PI ZZ
40
A
G
A. Cruscotto comandi
B. Manopola di selezione funzioni di cottura
C. Manopola per la temperatura / tempo di cottura
D. Programmatore elettronico
F. Leccarda o piano di cottura
G. Griglia ripiano del forno
H. Guide di scorrimento di leccarde e griglie
H
B
D
C
6
F
250
C
200
150
14
8
PI ZZ
A
100
40
7
2
1. Impostazione fine cottura / orologio / data
2. Impostazione durata cottura / timer / blocco tastiera
3. Impostazione lingua
4. Start cottura / Stop cottura / luce forno / luminosità
display
5. Descrizione funzione
6. Numero funzione
7. Durata cottura
8. Fine cottura
9. Scala graduata delle temperature
10.Livello di energia per funzioni grill
11.Ora o temperatura / Percentuale di energia
12.Elementi elettrici accesi
13.Indicatore orologio
14.Indicatore cottura programmata
111
1013 912
435
15
IT
Page 15

Come utilizzarlo
Il 7 Cuochi riunisce in un unico apparecchio i pregi dei
tradizionali forni a convezione naturale (statici) a quelli
dei moderni forni a convezione forzata (ventilati).
E' un apparecchio estremamente versatile che permette
di scegliere in modo facile e sicuro fra diversi metodi di
cottura. La selezione delle diverse funzioni offerte si ottiene
agendo sulla manopola di selezione "B" presente sul
cruscotto.
Impostare l’orologio
L'impostazione dell'ora è possibile solo con forno spento.
In seguito all’allacciamento alla rete o dopo una mancanza
di corrente, il display lampeggia su 12:00 o sull’ultima ora
memorizzata.
Eventuali aggiornamenti dell’ora possono essere effettuati
pigiando il tasto 1 ed aggiornando l’ora tramite la manopola
"C" che è possibile modificare finché non scompaiono
completamente le scritte scorrevoli.
Impostare la data
Per aggiornare la data tenere premuto il tasto 1 finchè sul
display non compare la scritta “ANNO”. Aggiornare l'anno
ruotando la manopola "C" e quindi premere il tasto 1 per
impostare il mese utilizzando, ancora una volta, la
manopola "C". Premere nuovamente il tasto 1 per regolare,
tramite la manopola "C", il giorno. Premere il tasto 1 per
memorizzare la data impostata.
Funzione contaminuti
Il funzionamento del contaminuti è possibile solo con il
forno spento.
Ricordate che il timer non controlla l'accensione e lo
spegnimento del forno ma emette solamente un segnale
acustico a tempo scaduto che può essere arrestato
premendo un tasto qualsiasi.
Per impostare il contaminuti premere il tasto 2, e quindi
regolare tramite la manopola "C".
Premere il tasto 4 per avviare il contaminuti.
In ogni momento in cui il contaminuti funziona è possibile:
• modificarne la durata tramite la manopola "C";
• arrestarne il conteggio premendo per circa 3 secondi
il tasto 4 o ruotando in senso antiorario la manopola
"B";
• inserire/disinserire il blocco comandi, premendo per
almeno 3 secondi il tasto 2 (vedi paragrafo "Blocco/
Sblocco comandi").
Impostare la lingua
Ad apparecchio spento premere per qualche secondo il
tasto 3. Sul display compaiono in sequenza le varie lingue
disponibili. Ripremere nuovamente il tasto 3 per impostare
la lingua desiderata.
Impostare la luminosità del display
Ad apperecchio spento tenere premuto il tasto 4 finchè
sul display non compare la scritta “LUMINOSITA’”.
Ruotare la manopola "C" in senso orario/antiorario per
aumentare/diminuire la luminosità del display. Dopo pochi
secondi dalla fine dell'impostazione, il forno si riporta in
attesa di comando.
Blocco/Sblocco comandi
Questa opzione permette di disattivare le funzioni dei tasti
e delle manopole. Si consiglia di utilizzarla soprattutto in
presenza di bambini. Per attivare il blocco premere per
qualche secondo il tasto 2 finchè sul display non compare
la scritta "LOCKED". Per ripristinare le normali funzioni
dei comandi dell'apparecchio è sufficiente premere
nuovamente per qualche secondo il tasto 2 finchè sul
display non compare la scritta "UNLOCKED".
La luce forno
In qualunque istante, preriscaldamento e cottura
compresa, è possibile accenderla o spegnerla premendo
il tasto 4. A forno spento si disattiva automaticamente dopo
10 minuti dall'ultima operazione effettuata sui comandi
frontali.
Ventilazione di raffreddamento
Al fine di ottenere una riduzione delle temperature esterne
il forno è dotato di una ventola di raffreddamento. Durante
la cottura essa è sempre attiva ed è possibile sentire un
getto d’aria che esce tra frontalino e porta forno.
Al fine di far salire più rapidamente la temperatura
all'interno della cavità, durante il preriscaldamento la
velocità di uscita dell'aria è circa la metà di quella che si
ha durante la cottura.
Nel caso in cui sia presente un piano cottura sopra il forno,
la ventola di raffreddamento potrebbe attivarsi
aumaticamente per proteggere i componenti elettronici
anche ad apparecchio spento.
Nota: A fine cottura la ventola rimane attiva finchè il
forno non sarà sufficientemente freddo.
Utilizzo del forno
Ruotando la manopola "B" in senso orario è possibile
scegliere tra le funzioni di cottura predefinite oppure tra le
ricette preinserite (vedi ricettario Ariston).
Per ogni funzione il display indicherà:
• il nome della funzione (o della ricetta);
• il numero della funzione (o della ricetta);
• la temperatura predefinita;
• le fonti di calore.
Se la temperatura consigliata non dovesse essere quella
desiderata, è sempre possibile modificarla tramite la
manopola "C".
Ad ogni funzione di cottura è associata anche una durata
consigliata che è possibile regolare, tra un minuto e 10
ore, premendo il tasto 2 e successivamente ruotando la
manopola "C" fino al raggiungimento del valore desiderato.
E’ possibile aggiornare la durata finché non scompaiono
completamente le scritte scorrevoli. Ricordate che il tempo
inserito non include quello necessario al preriscaldamento.
Per far partire la cottura premere il tasto 4 di inizio cottura.
Ad eccezione delle funzioni "Fast cooking" e "Grill", a
questo punto il forno inizia la fase di preriscaldamento
durante il quale è sempre possibile:
• modificare la temperatura agendo sulla manopola "C";
• modificare la durata della cottura premendo il tasto 2 e
successivamente ruotando la manopola "C";
• inserire/disinserire il blocco comandi, premendo per
almeno 3 secondi il tasto 2 (vedi paragrafo "Blocco/
Sblocco comandi");
• interrompere la cottura e spegnere il forno ruotando la
manopola "B" in senso antiorario.
Nota: il preriscaldamento viene effettuato in automatico
dall'apparecchio che imposta la durata in base alla
IT
16
Page 16

temperatura scelta dall'utente. Sul display è visualizzato il
tempo che deve trascorrere prima che inizi la fase di
cottura.
Al raggiungimento della temperatura impostata, il forno
entra nella fase di cottura durante la quale è sempre
possibile:
• modificare la temperatura agendo sulla manopola "C".
Se l’incremento è superiore a 25 °C, il forno ritorna
nella fase di preriscaldamento;
• modificare la durata della cottura premendo il tasto 2 e
successivamente ruotando la manopola "C";
• inserire/disinserire il blocco comandi, premendo per
almeno 3 secondi il tasto 2 (vedi paragrafo "Blocco/
Sblocco comandi");
• interrompere la cottura e spegnere il forno ruotando la
manopola "B" in senso antiorario.
Al termine della cottura sul display comparirà la scritta
"END-PRONTO” e si udirà un segnale acustico che
terminerà dopo 1 minuto, dopo la pressione di un tasto o
in seguito alla rotazione di una delle due manopole.
Attenzione: Alla prima accensione consigliamo di far
funzionare il forno a vuoto per circa mezz’ora con il
termostato al massimo, quindi aprite la porta del forno ed
areare il locale. L’odore che talvolta si avverte durante
questa operazione è dovuto all’evaporazione delle
sostanze usate per proteggere il forno durante l’intervallo
di tempo che intercorre tra la produzione e l’installazione
del prodotto.
fondo del forno) funzionano insieme.
Al contatto con queste fonti di calore, l'aria si scalda e si
sposta all'interno del vano forno secondo il fenomeno per
cui l'aria calda, più leggera, tende a salire verso l'alto. Si
tratta del fenomeno della convezione naturale. Questo
tipo di cottura è particolarmente indicato per le cotture
lente in pentole di ghisa coperte (backenhof, trippa,
ecc.) o la cottura a bagno-maria (crème caramel, pâté,
ecc.).
Come piano di appoggio, si consiglia di utilizzare la
leccarda posta sul 2° ripiano.
Infornare sempre a caldo.
: "Pasticceria"
Si attiva unicamente l'elemento riscaldante circolare ed
entra in funzione la ventola, in modo da fornire un calore
"delicato", idoneo alla cottura di dolci di pasticceria, come
brioches, torte al cioccolato, plum-cake, pan di spagna,
pasticcini, meringhe, ecc.
Come piano di appoggio, si consiglia di utilizzare la
leccarda posta sul 2° ripiano.
Infornare sempre a caldo.
: "Fast cooking"
L'accensione di tutti gli elementi riscaldanti e l'attivazione
della ventola garantiscono una distribuzione uniforme del
calore all'interno del vano forno.
Questa funzione è particolarmente indicata per le cotture
rapide (che non richiedono preriscaldamento) e i piatti
già cotti (surgelati, precotti).
Come piano di appoggio, si consiglia di utilizzare la
leccarda posta sul 2° ripiano.
Attenzione: Utilizzare il primo ripiano dal basso,
posizionandoci la leccarda in dotazione per raccogliere
sughi e/o grassi, solamente nel caso di cotture al grill o
con girarrosto (presente solo su alcuni modelli). Per le
altre cotture non utilizzate mai il primo ripiano dal basso e
non appoggiate mai oggetti sul fondo del forno mentre
state cuocendo perchè potreste causare danni allo smalto.
Ponete sempre i Vostri recipienti di cottura (pirofile, pellicole
di alluminio, ecc. ecc.) sulla griglia in dotazione con
l’apparecchio, appositamente inserita nelle guide del forno.
Attenzione: l'apparecchio è dotato di un sistema di
diagnostica che consente di rilevare eventuali
malfunzionamenti. L'utente ne viene informato tramite
messaggi del tipo:
• "F nn" (nn=numero composto da 2 cifre): in questi casi
è necessario l'intervento dell'assistenza tecnica in
quanto il forno non è funzionante;
• "W nn" (nn=numero composto da 2 cifre): in questi casi
sarebbe opportuno l'intervento dell'assistenza tecnica
in quanto il forno, pur continuando a funzionare, ha
rilevato un malfunzionamento.
Descrizioni funzioni
Le funzioni vengono selezionate agendo sulla manopola
"B".
: "Tradizionale"
: "Multicottura"
L'accensione di tutti gli elementi riscaldanti e l'attivazione
della ventola garantiscono una distribuzione uniforme del
calore all'interno del vano forno.
Questo tipo di cottura è indicato per cucinare pietanze
poste contemporaneamente su più ripiani.
In questo caso, la cottura avviene senza alterazione del
sapore dei cibi, anche se molto diversi tra di loro.
Per l'utilizzo di questa funzione è comunque necessario
che tutte le pietanze richiedano la stessa temperatura di
cottura (i vari piatti verranno sfornati man mano che
vengono cotti). Per una cottura su due ripiani, ad esempio,
si consiglia di utilizzare come piano di appoggio la leccarda
posta sul 1° ripiano e la griglia posta sul 3° ripiano.
Infornare sempre a caldo.
: "Forno pizza"
Gli elementi riscaldanti (inferiore e circolare) entrano in
funzione in modo tale da scaldare rapidamente il forno.
Per la preparazione di pizze e crostate si ottengono
notevoli vantaggi, in quanto il maggiore apporto di calore
proveniente dal basso garantisce la corretta cottura a
fuoco vivo dell'impasto durante la cottura. La funzione della
ventola permette invece di ottenere la necessaria doratura
sul lato superiore dell'alimento, che lo rende più appetitoso.
Come piano di appoggio, si consiglia di utilizzare la
leccarda posta sul 2° ripiano.
Infornare sempre a caldo.
È il sistema di cottura più tradizionale, ideale per la cottura
di singole pietanze. Due resistenze (una, visibile, posta
in alto, sotto la parete superiore e l'altra nascosta sotto il
17
IT
Page 17

: "Grill"
In questa posizione entra in funzione esclusivamente
l'elemento riscaldante superiore: il grill, reso
incandescente, emette una irradiazione infrarossa simile
a quella prodotta dai raggi solari.
La funzione grill, infatti, non mira a riscaldare l'aria
contenuta all'interno del vano forno, ma, soprattutto, ad
esporre l'alimento direttamente a questa irradiazione.
La cottura avviene con la porta chiusa e preferibilmente
con partenza a freddo.
Il calore irradiato è regolabile tramite la manopola di
selezione delle temperature.
Si consiglia di inserire la leccarda sul 1° ripiano per
raccogliere i grassi e il sugo di cottura, e la griglia su un
ripiano superiore, scelto in funzione dello spessore della
carne da cuocere.
: "Gratin"
Entra in funzione unicamente l'elemento riscaldante
superiore, con emissione di una irradiazione infrarossa.
La circolazione forzata dell'aria, prodotta dalla ventola del
forno, garantisce una distribuzione uniforme della
temperatura, cosicché gli alimenti vengono sottoposti
contemporaneamente all'azione:
• dei raggi infrarossi, che garantiscono la cottura
superficiale dei cibi,
• dell'aria calda, che permette una cottura in
profondità per effetto della conduzione.
Il grill ventilato è particolarmente apprezzato per la cottura
di arrosti (carni rosse o bianche) e di pollame.
Posizionare la griglia sul 2° ripiano come piano di appoggio
della carne e la leccarda sul 1° ripiano per raccogliere i
grassi e i sughi di cottura.
Infornare sempre a freddo.
biscottini salati (pasta brisée). Si consiglia di utilizzare il 2°
ripiano.
Infornare sempre a forno caldo.
Il girarrosto fornito in dotazione con l'apparecchio potrà
essere utilizzato con le funzioni "grill" e "gratin".
La cottura deve avvenire con la porta del forno chiusa. Si
raccomanda inoltre di infornare a freddo, per evitare il
rischio di ustioni durante l'operazione di inserimento dello
spiedo.
Si consiglia di riporre la leccarda sul 1° ripiano per il
recupero dei grassi e dei sughi di cottura e il girarrosto sul
3° ripiano (per l'inserimento del girarrosto vedere paragrafo
seguente).
Durante la cottura al "grill" e "gratin", le parti
accessibili possono diventare molto calde; tenere i
bambini a distanza.
Pulizia automatica mediante fast clean
È la funzione di pulizia integrale del forno.
Per le informazioni riguardanti il fast clean, vedere pagina
20.
: "Ventilato"
Si attiva unicamente l’elemento riscaldante circolare ed
entra in funzione la ventola, in modo da fornire un calore
“delicato”, idoneo per la cottura di cibi con basso contenuto
di liquidi, come frollini al burro, crostate alla marmellata e
Programmare la cottura
Per poter programmare una cottura è sufficiente seguire
le operazioni sotto descritte:
• impostare il programma di cottura agendo sulla
manopola "B" e la temperatura desiderata ruotando la
manopola "C".
• impostare la durata premendo il tasto 2. Viene
visualizzata sul display la durata di cottura consigliata
che può essere variata ruotando la manopola
"C".Ricordate che il tempo inserito non include quello
necessario al preriscaldamento.
• impostare l'ora di fine cottura premendo il tasto 1. Viene
visualizzata l'ora di fine cottura ottenuta sommando
all'ora corrente la durata della cottura impostata in
precendenza e del preriscaldamento automaticamente
calcolato dall'apparecchio in base alla funzione
richiesta. Ruotare la manopola "C" fino a visualizzare
sul display l'ora in cui si desidera il cibo sia pronto.
A fine impostazioni sul display scorre l'ora d'inizio del
preriscaldamento (ove previsto) e quella di fine cottura,
quest'ultima modificabile finchè non ricompare il nome
della funzione e la temperatura impostata. In caso di
errori nei dati immessi è possibile correggerli ripetendo
le operazioni sopra descritte.
• premere il tasto 4 per attivare la programmazione.
Per modificare le impostazioni premere per circa 3
secondi il tasto 4 e ripetere le operazioni sopra
descritte.
Per annullare una cottura già programmata
Per cancellare qualsiasi programmazione effettuata,
ruotare la manopola "B" in senso antiorario finchè non
compare sul display la scritta "OFF".
IT
18
Page 18

Come tenerlo in forma
Interno del forno
Si consiglia di procedere alla pulizia del forno dopo ogni uso,
specie dopo la cottura di arrosti. È bene infatti evitare
l'accumulo dei residui schizzati durante la cottura, i quali, al
successivo utilizzo del forno, subirebbero una nuova cottura,
con conseguente carbonizzazione e liberazione di fumo
e odori sgradevoli.
Esterno del forno
Pulire le superfici esterne smaltate o inox usando una spugna
con acqua e detersivo, risciacquando abbondantemente e
asciugando con cura, evitando prodotti abrasivi o corrosivi
che potrebbero rovinarle.
Acciaio inox
Sciacquare le parti in acciaio inox e asciugarle con cura con
un panno morbido e umido. Per le macchie persistenti,
utilizzare un prodotto specifico non abrasivo.
Uso di pellicola alluminio
Evitare rigorosamente di coprire il fondo del forno con una
pellicola di alluminio (pensando in questo modo di poter
evitare la pulizia del fondo). L'alluminio, posto a contatto
diretto con lo smalto riscaldato rischia di fondere e di
rovinare irrimediabilmente lo smalto del fondo.
FC 98 P
123
Sostituzione della lampada del forno
• Prima di effettuare qualsiasi operazione, disinserire
elettricamente il forno, staccando la spina o agendo
sull'interruttore utilizzato per il collegamento del forno
all'impianto elettrico.
• Servendosi di un oggetto stretto e piatto (cacciavite,
manico di cucchiaio, ecc.), togliere il coperchio in vetro.
• Svitare la lampada e sostituirla con una dalle
caratteristiche analoghe:
- tensione 230/240 W
- potenza 15 W
- attacco E 14
• Rimontare il coperchio in vetro prestando attenzione
a posizionare correttamente la guarnizione.
Pulizia del girarrosto e degli altri accessori
Il girarrosto è interamente smontabile, grazie alle 2 viti ad
alette. Le varie parti del girarrosto si puliscono assieme a
tutti gli altri accessori (leccarda, griglia) nel lavello con una
spugna umida e un normale detersivo, oppure in lavastoviglie.
Smontaggio della porta
Per poter pulire lo spazio sotto il lato inferiore della porta, è
possibile smontare molto semplicemente la porta,
procedendo in questo modo:
• aprire la porta e lasciarla in posizione orizzontale;
• sollevare e far ruotare le leve poste sulle due cerniere;
• richiudere completamente la porta;
• afferrare la porta per i bordi esterni e tirare per sfilarla
dalla sede.
Rimontare la porta seguendo il procedimento sopra descritto in
senso contrario.
FO / FD 98 P
132
cavità
lampadina
guarnizione
coperchio
19
IT
Page 19

La pulizia automatica mediante fast clean
Dispositivi di sicurezza
Attivando la funzione fast clean, la temperatura interna del
vano forno raggiunge i 500 °C necessari per la
carbonizzazione dei residui, come illustrato di seguito.
Data l'alta temperatura, il forno è dotato di alcuni dispositivi
di sicurezza:
• la porta si blocca automaticamente non appena la
temperatura raggiunge valori elevati, per evitare ogni
rischio di ustioni;
• gli elementi riscaldanti non sono più alimentati
elettricamente, a titolo preventivo nel caso in cui
sopraggiungesse un evento anomalo.
Nota:
Attraverso il vetro della porta forno è possibile notare alcune
particelle che si illuminano durante la loro carbonizzazione
per pirolisi entrando in contatto con le resistenze: si tratta di
una combustione istantanea, fenomeno assolutamente
normale, che non comporta alcun pericolo.
Alcuni utili accorgimenti prima della pulizia
automatica
1- Cercare di eliminare i residui di sostanze alimentari più
consistenti con una spugna umida. Evitare rigorosamente
di utilizzare detergenti o qualsiasi altro prodotto consigliato
per la pulizia dei forni.
2- Estrarre tutti gli accessori, i quali, infatti, non sono
concepiti per resistere a temperature così elevate. Inoltre,
alcuni accessori potrebbero alterare l'esito della pulizia
automatica ostacolando la circolazione del calore su tutte le
pareti. Gli accessori possono essere lavati facilmente come
normali stoviglie (anche in lavastoviglie).
3- Non lasciare strofinacci da cucina sulla maniglia.
Come attivare la pulizia ?
- Chiudere la porta.
- Ruotare la manopola B su FAST CLEAN
- L'operazione di pulizia automatica richiederà
approssimativamente 90 minuti. È comunque possibile
regolare la durata dell'operazione (60 - 90 - 120 minuti)
in funzione dello stato di sporcizia del forno.
- Per avviare la funzione, premere il tasto 4.
Come per le funzioni di cottura, è possibile programmare
l'operazione di fast clean con inizio ritardato.
⇒ La porta del forno si blocca automaticamente non
appena viene avviata l'operazione di fast clean.
⇒ La spia con il simbolo della chiave lampeggia
durante il blocco della porta e inizia il conto alla rovescia
della durata programmata. La spia diventa fissa appena la
porta è bloccata.
Finché la temperatura all'interno del forno non ha raggiunto
i 125°, è ancora possibile sbloccare la porta del forno
mantenendo premuto il tasto 3 per 3 secondi. Lo sblocco
è immediato.
Se dopo questo intervento ci si dimentica di bloccare
nuovamente la porta, quest'ultima di blocca
automaticamente non appena la temperatura interna del
forno raggiunge 325°.
Cosa accade al termine del fast clean?
• Il programmatore emette un segnale acustico,
• e sul display compare il messaggio END.
Premere il tasto 4 per far cessare il segnale acustico; il
messaggio scompare e la spia con il simbolo della chiave
comincia a lampeggiare.
La porta del forno potrà essere riaperta soltanto dopo che la
temperatura del forno sia scesa a un livello accettabile.
A questo punto è possibile constatare la presenza di alcuni
Attenzione: durante la pulizia automatica, le superfici
possono diventare molto calde. Tenere i bambini a
distanza.
depositi di polvere bianca sul fondo e sulle pareti del forno;
rimuoverli con una spugna umida una volta che il forno si è
completamente raffreddato.
Se invece si desidera approfittare del calore immagazzinato
per avviare una cottura, le polveri possono anche restare,
in quanto non comportano alcun pericolo per gli alimenti da
cucinare.
Alcuni piccole anomalie di funzionamento
NON PREOCCUPATEVI SE ...
Può accadere che si verifichino alcune anomalie di funzionamento, dovute generalmente a manovre non corrette o alla
valutazione erronea di un fenomeno.
Se nel corso di una cottura il forno sprigiona molto fumo:
• Verificare che sia stata selezionata la funzione idonea rispetto al tipo di cottura desiderata, che siano stati scelti gli
accessori adeguati e che il cibo sia stato infornato sul ripiano consigliato.
• Controllare inoltre la temperatura selezionata, che verosimilmente risulterà eccessiva a fronte del tipo di cottura prevista.
• Ispezionare lo stato di sporcizia del forno e valutare l'eventualità di una pulizia. Potrebbero infatti essere presenti residui
alimentari attaccati allo smalto che, carbonizzando, liberano fumo e odori acri.
• Gli schizzi di grasso o gli scolamenti sulle superfici molto calde possono determinare la produzione di fumo.
IT
20
Page 20

Gli accessori
Il forno è dotato di numerose possibilità di cottura, per la cui
riuscita è necessario utilizzare un certo numero di accessori
da noi scelti.
Questi accessori possono essere installati sui vari ripiani
della guida di scorrimento posta all'interno del forno,
permettendo così di stabilire l'altezza più idonea in funzione
della cottura da eseguire.
Guida n˚ 5
Guida n˚ 4
Guida n˚ 3
Guida n˚ 2
Guida n˚ 1
Cremagliere
La leccarda
Viene utilizzata:
• come piano di appoggio per qualsiasi recipiente di
cottura su un solo livello e a bagno-maria,
• come piano di appoggio per gli alimenti (pasticcini,
ecc.),
• come contenitore di raccolta dei sughi e grassi di
cottura, abbinata alla griglia grande.
Si sconsiglia di utilizzare la leccarda sui ripiani 4 e 5.
La griglia grande
Viene sempre utilizzata in abbinamento alla leccarda, con le
tacche rivolte verso il basso.
• Posizionata sul 2° ripiano, funge da piano di
appoggio per le carni, con la leccarda inserita sul 1°
ripiano per il recupero di grassi e sughi di cottura.
• Posizionata sul gradino superiore (a seconda dello
spessore dell'alimento) per le carni ai ferri, con la
leccarda inserita sul 1° ripiano per il recupero di grassi e
sughi di cottura.
• Posizionata sul ripiano superiore per la cottura su
più livelli.
Evitare di riporre le carni da cuocere direttamente sulla
leccarda per le cotture al "gratin"; il forte calore
proveniente dall'alto verso il basso provoca infatti la
fuoriuscita degli umori e dei grassi, i quali rischiano di
bruciare o schizzare sulle pareti, con conseguente
creazione di fumo.
IL GIRARROSTO
Vite ad alette
Spiedo
Manico dello spiedo
Grazie a questo accessorio, gli arrosti vengono cotti
lentamente, girando costantemente, e con una perfetta
rosolatura, fino alla cottura completa. Il girarrosto è composto
da:
• un supporto posto sul 3° ripiano della guida di
scorrimento, che permette l'inserimento del girarrosto
all'interno dell'albero cavo del motore situato sul retro
del vano, dietro la parete perforata;
• uno spiedo sul quale infilare il pezzo di carne da
arrostire, che poggia, alle due estremità, su due
forchette scorrevoli, ciascuna fissata all'asse tramite
una vite ad alette.
Attenzione: durante l'installazione del girarrosto, accertarsi
che lo spiedo sia correttamente inserito all'interno dell'albero
cavo collegato al motore.
Fare attenzione a posizionare:
- lo spiedo al centro del pezzo da arrostire;
- il pezzo da arrostire in un punto equidistante dalle estremità
dello spiedo.
• un manico estraibile in materiale isolante che si
avvita sulla parte posteriore dello spiedo permette:
- di aumentare la lunghezza disponibile sul girarrosto
per potervi cuocere anche pezzi di carni di notevoli
dimensioni;
- di evitare ustioni quando si estrae la pietanza al
termine della cottura.
Avvitare a fondo il manico per estrarre lo spiedo (durante
la cottura il manico deve essere svitato).
Timer del girarrosto
I forni ARISTON sono provvisti di un dispositivo di
temporizzazione del girarrosto. Al termine della cottura, il
motore continua a far girare lo spiedo, arrestandosi soltanto
quando la temperatura è opportunamente scesa, evitando
così ogni rischio di bruciatura della carne.
Una volta terminata la cottura, lasciare la manopola di
selezione delle funzioni sul tipo di cottura in corso di
esecuzione e riportare la manopola di selezione delle
temperature al minimo.
Supporto
del girarrosto
Forchetta
21
IT
Page 21

E
SEMPI DI COTTURE SU UN SOLO LIVELLO
Ricette Modo di cottura Tem per atur a Te mpo Guida Osservazioni
Pane (pagnotta-1kg)
Sfoglie porzioni
singole
Pizza (pasta di pane)
Crostata
(pasta brisée)
Soufflé al formaggio
Terrine
Cosciotto d'agnello
Gratin dauphinois
Pesc e
Pollo
Arrosto di manzo
Arrosto di maiale
Arrosto di vitello
Pomodori ripieni
Piatti surgelati
Lasagne
Parmigiana
Brioche
Cake
Choux
Crème caramel
Pan di Spagna
Amaretti
Meringhe bianche
Meringhe ambrate
Mele al forno
Frollini
Tor ta di me le
Frollini al burro
Multicottura 210°C 30-35' 2 Su piastra smaltata Sì
Multicottura 200°C
Pizza 240°C 10-15' 1 Su piastra smaltata Sì
Pizza 220°C 30' 1
Multicottura 200°C 30-40' 2
Tradizionale 180°C 50-60' 2
Gratin 210°C 1 ora per 1,5 à 2 kg 2-1* Carne su griglia No
Gratin 200°C
Tradizionale
Gratin
Grill
Gratin
Grill girarrosto
Gratin 210°C
Gratin 210°C 1 ora per 1kg 2-1* Carne su griglia No
Gratin 210°C 1 ora per 1kg 2-1* Carne su griglia No
Multicottura 200°C 20-25' 2 Teglia su piastra smaltata Sì
Fast cooking
Fast cooking 200°C Secondo spessore 2 Teglia su piastra smaltata No
Fast cooking 200°C Secondo spessore 2 Teglia su piastra smaltata No
Pasticceria 160°C 35-45' 2
Pasticceria 160°C 60' 2
Pasticceria 200°C 20-25' 2
Tradizionale 180°C 30' 2
Pasticceria 190°C 30' 2
Pasticceria 180°C
Pasticceria 70-80°C
Pasticceria 110°C
Multicottura 210°C
Pasticceria 190°C 10-15' 2 Piastra smaltata Sì
Pizza 220°C 30' 1 Stampo su piastra smaltata Sì
Ventilato 190°C 10-15' 2 Stampo alluminio su griglia
200°C
240°C
250°C
210°C
250°C
Secondo le
indicazioni
dell'imballaggio
20-25'
secondo lo spessore
40-45'
secondo lo spessore
Secondo il tipo
di pesce e
lo spessore
1 ora per
1,2 à 1,5 kg
Variabile secondo il grado
di cottura
Secondo le indicazioni
dell'imballaggio
15-20'
secondo la grossezza
3 ore
secondo la grossezza
2 ore
secondo la grossezza
20-25'
secondo la grossezza
2 Su piastra smaltata Sì
Al bagnomaria nella piastra
smaltata (avvio acqua calda)
2 Teglia su piastra smaltata Sì
2
2-1*
2-1*
2-1*
3-1*
2-1* Carne su griglia No
2 Teglia su piastra smaltata No
2 Su piastra smaltata Sì
2
2
2 Teglia su piastra smaltata Sì
Filetti+sugo, piastra smaltata
Grigliate di pesce sulla griglia
Girarrosto porta chiusa
Stampo di alluminio su piastra
Stampo di alluminio su piastra
Piccoli profiterole non
zuccherati su piastra smaltata
bagnomaria partenza acqua
Stampo di alluminio su piastra
Asciugatura per piccole
Asciugatura per piccole
Stampo su piastra
smaltata
Stampo diam. 20cm
su piastra smaltata
Intero sulla griglia
Carne su griglia
smaltata
smaltata
Ramequin singoli a
calda
smaltata
meringhe
meringhe
Preriscalda-
mento
Sì
Sì
Sì
Sì
No
Sì
Sì
Sì
Sì
Sì
Sì
Sì
Si
Crostata alla
marmellata
Biscottini salati (pasta
brisée)
X - Y* nella colonna guida
X = griglia o spiedo inseriti nella guida X
Y = piastra smaltata inserita nella guida Y per il recupero dei grassi e dei sughi di cottura
Ventilato 190°C 15-25' 2 Stampo alluminio su griglia
Ventilato 190°C 10-15' 2 Stampo alluminio su griglia
Nota bene: la griglia viene sempre utilizzata con le tacche rivolte verso il basso.
IT
22
Si
Si
Page 22

La sicurezza una buona abitudine
Per garantire l’efficienza e la sicurezza di questo elettrodomestico:
• rivolgetevi esclusivamente a centri di assistenza tecnica autorizzati
• richiedete sempre l’utilizzo di parti di ricambio originali
• L'apparecchio è concepito per uso non professionale nelle
abitazioni e le sue caratteristiche non vanno modificate.
• Le istruzioni sono valide solo per i paesi di destinazione
i cui simboli figurano sul libretto e sulla targa matricola.
• La sicurezza elettrica di questo apparecchio è assicurata soltanto quando lo stesso è correttamente collegato
ad un efficiente impianto di messa a terra come previsto
dalle vigenti norme di sicurezza.
• Durante l'uso dell'apparecchio gli elementi riscaldanti e alcune parti della porta forno diventano
molto calde. Fare attenzione a non toccarle e tenere i bambimi a distanza.
Trattandosi di fonti di pericolo, evitare che bambini e
incapaci abbiano contatti con:
- i comandi e l'apparecchio in genere;
- gli imballaggi (sacchetti, polistirolo, chiodi ecc.);
- l'apparecchio, durante e subito dopo il funzionamento del
forno e del grill, visto il surriscaldamento;
- l'apparecchio inutilizzato (in questo caso vanno rese innocue le parti che potrebbero essere pericolose).
Vanno evitate le seguenti operazioni:
- toccare l'apparecchio con parti del corpo umide;
- l'uso quando si è a piedi nudi;
- tirare l'apparecchio o il cavo di alimentazione per staccarli dalla presa di corrente;
- operazioni improprie e pericolose;
- ostruire le aperture di ventilazione o smaltimento calore;
- che il cavo di alimentazione di piccoli elettrodomestici finisca su parti calde dell'apparecchio;
- l'esposizione ad agenti atmosferici (pioggia, sole);
- l'utilizzo del forno come ripostiglio;
- l'utilizzo di liquidi infiammabili nei pressi;
- l'impiego di adattatori, prese multiple e/o prolunghe;
- tentativi di installazione o riparazione senza l'intervento
di personale qualificato.
Occorre assolutamente rivolgersi a personale
qualificato nei seguenti casi:
- installazione (secondo le istruzioni del costruttore);
- quando si hanno dubbi sul funzionamento;
- sostituzione della presa in caso di incompatibilità con la
spina dell'apparecchio.
Occorre rivolgersi a centri di assistenza autorizzati dal
costruttore nei seguenti casi:
- in caso di dubbio sull'integrità dell'apparecchio dopo aver
tolto l'imballaggio;
- danneggiamento o sostituzione del cavo di alimentazione;
- in caso di guasto o cattivo funzionamento, richiedendo i
ricambi originali.
È opportuno effettuare le seguenti operazioni:
- solo la cottura dei cibi evitando altre operazioni;
- verificare l'integrità dopo aver tolto l'imballaggio;
- disconnettere l'apparecchio dalla rete di alimentazione
elettrica in caso di cattivo funzionamento e prima di qualsiasi operazione di pulizia o manutenzione;
- quando inutilizzato, disinserire l'apparecchio dalla rete
elettrica;
- utilizzare guanti da forno per inserire o estrarre recipienti;
- impugnare sempre la maniglia della porta al centro dato
che all'estremità potrebbe essere più calda a causa di
eventuali uscite d'aria;
- tagliare il cavo di alimentazione dopo averlo disconnesso
dalla rete elettrica quando si decide di non utilizzare più
l'apparecchio.
• Il costruttore non può essere considerato responsabile
per eventuali danni derivanti da: errata installazione, usi
impropri, erronei ed irragionevoli.
23
IT
Page 23

Installazione
Fig. C
L’installazione deve essere effettuata secondo le istruzioni del costruttore da personale professionalmente
qualificato. Una errata installazione può causare danni a
persone, animali o cose, nei confronti dei quali il costruttore
non può essere considerato responsabile.
Importante: qualsiasi intervento di regolazione, manutenzione etc. deve essere eseguito con il forno elettricamente disinserito.
Installazione dei forni da incasso
Per garantire un buon funzionamento dell’apparecchio da
incasso è necessario che il mobile sia di caratteristiche
adatte. Nella figura sottostante vengono riportate le dimensioni del vano del mobile nell’inserimento sottotavolo
(N.B. : Installazione per dichiarazione consumi) ed a colonna.
567 mm.
45 mm.
558 mm.
593 mm.
45 mm.
min.
20/23 mm.
595 mm.
5 mm.
595 mm.
545 mm.
20/28 mm.
I pannelli dei mobili adiacenti il forno dovranno essere in
materiale resistente al calore. In particolare nel caso di
mobili in legno impiallicciato le colle dovranno essere resistenti alla temperatura di 100 °C.
In conformità alle norme di sicurezza, una volta incassato
l’apparecchio, non debbono essere possibili eventuali contatti con le pareti elettriche.
Tutte le parti che assicurano la protezione debbono essere fissate in modo tale da non poter essere tolta senza
l’aiuto di qualche utensile.
Per un corretto centraggio regolare i 4 tacchetti posti lateralmente al forno in corrispondenza dei 4 fori sulla cornice perimetrale. In particolare se lo spessore della fiancata
del mobile:
• è di 20 mm: la parte mobile del taccheto deve essere
rimossa (Fig. A);
• è di 18 mm: utilizzare la prima scanalatura; già predi-
sposto in fabbrica (Fig. B);
• è di 16 mm: utilizzare la seconda scanalatura (Fig. C).
Fig. A Fig. B
595 mm.
20/23 mm.
567 mm.
5 mm.
595 mm.
545 mm.
20/28 mm.
558 mm.
595 mm.
575-585 mm.
45 mm.
min.
Per garantire una buona areazione è necessario eliminare la parete posteriore del vano, è preferibile installare il
forno in modo che appoggi su due listelli in legno; nel caso
in cui sia presente un piano continuo di appoggio questo
deve avere un’apertura di almeno 45 x 560 mm.
Per fissare il forno al mobile aprite la porta del forno e
fissate il forno tramite 4 viti a legno nei 4 fori posti sulla
cornice perimetrale.
IT
24
Page 24

Fissaggio del forno al mobile (solo per modelli FC...)
1. Posizionare le staffe "A" a battuta sull'appoggio del
forno "B".
2. Posizionare i tacchetti "C" a battuta nelle staffe "A".
In particolare se lo spessore della fiancata del mobile:
• è di 16 mm: montare il tacchetto in modo che il numero
16 riportato sullo stesso sia rivolto verso di voi;
• è di 18 mm: montare il tacchetto in modo che la parte
senza scritte sia rivolta verso di voi;;
• è di 20 mm: non montare il taccheto.
3. Fissare le staffe ed i tacchetti sul bordo fiancata mobile
tramite le viti "D".
4. Fissare il forno al mobile tramite le viti e le rondelle in
plastica "E".
Collegamento elettrico
Allacciamento
Accertarsi preventivamente che i dati della rete di distribuzione elettrica (numero di fasi, tensione, massima
potenza necessaria) corrispondano a quelli dell'apparecchio Ariston da collegare.
I forni Ariston sono compatibili con i seguenti tipi di impianto elettrico:
16
16
D
C
16
16
B
C
D
A
C
D
E
E
Importante: Una volta effettuato il collegamento
dell'apparecchio al cavo flessibile, stringere tutte le viti della
morsettiera.
Raccordi elettrici
L1L2
Tensione
Frequenza
FR-AT-BE-DE-GP-ES-IE-IL-I S-IT- DK
LU-RE-FI-GB- GR-PT- SE-MA-NZ-NL
230 V-1+N ~ 50 Hz
LN
CY-MT-AU-NZ-KW
240 V-1+N ~ 50 Hz
FR-BE-NO
230 V-2 ~ 50 Hz
Fusibile
Sezione
16 A
1,5 mm²
16 A
1,5 mm²
Il collegamento del forno all'impianto elettrico può essere
effettuato tramite una scatola di connessione.
Fare riferimento alla tabella riportata sopra per verificare
le sezioni minime dei conduttori e la taratura degli organi
di protezione in funzione del tipo di allaccio.
Se il collegamento viene eseguito tramite una scatola di
connessione, un interruttore omnipolare, con distanza di
apertura dei contatti uguale o superiore a 3 mm, deve
essere previsto a monte dell'allaccio dell'apparecchio.
Si consiglia di prevedere un cavo di alimentazione
sufficientemente lungo, in modo da poter estrarre il forno
per procedere facilmente alle eventuali operazioni di
manutenzione (utilizzare unicamente cavi di tipo HAR - H
05 - RRF dotati di una spina conforme alla normativa
vigente nel paese di installazione dell'apparecchio).
La presa di corrente deve essere accessibile.
Prima di qualsiasi intervento, inclusa la sostituzione
della lampada del forno, accertarsi che l'apparecchio
sia disinserito elettricamente.
L'utilizzo dell'apparecchio senza collegamento
all'impianto di messa a terra è pericoloso.
Apparecchio conforme CE ai sensi delle direttive:
DBT 73/23 CEE modificata dalla direttiva 93/68/CEE
CEM 89/336/CEE modificata dalle direttive 92/31/CEE e
93/68/CEE
Dimensioni utili del forno:
larghezza 43,5 cm
profondità 40,0 cm
altezza 32,0 cm
Volume utile del forno:
56 litri
Tensione e frequenza di alimentazione:
230V~50Hz : 2800 W
240V~50Hz : 3050 W
ENERGY LABEL
Direttiva 2002/40/CE sull’etichettatura dei forni elettrici,
Norma EN 50304
Consumo energia convezione Naturale, funzione di
riscaldamento:
Consumo energia dichiarazione Classe, convezione forzata
funzione di riscaldamento:
25
IT
Page 25

GB
26
Page 26

Congratulations on choosing an Ariston appliance, which you will find is dependable and easy to use. We recommend
that you read the instructions in this owner's manual carefully before use for the best performance and to extend the life
of your appliance, as it will provide you with all the instructions you require to ensure its safe installation, use and
maintenance. Always keep this owner's manual close to hand since you may need to refer to it in the future. Thank you.
Close-up view
250
C
200
150
100
A
PI ZZ
40
A
G
A. Control Panel
B. Cooking mode selection knob
C. Cooking temperature / time selection knob
D. Electronic programmer
F. Dripping Pan or Baking Sheet
G. Oven Rack
H. Guides for sliding the racks or dripping pan in and
out
H
B
D
C
6
F
250
C
200
150
14
8
PI ZZ
A
100
40
7
2
1. End cooking time setting/ clock/ date
2. Control panel lock / timer / cooking time setting
3. Language setting
4. Start cooking / stop cooking / oven light / display
brightness
5. Mode description
6. Mode number
7. Cooking time
8. End cooking time
9. Graduated temperature scale
10.Energy level for grill modes
11.Time or temperature / Energy percentage
12.Electric elements in use
13.Clock display
14.Programmed cooking indicator
111
1013 912
435
27
GB
Page 27

How to use your oven
The 7 Cuochi oven combines the advantages of traditional
convection ovens with those of the more modern fan
assisted models in a single appliance.
It is an extremely versatile appliance that allows you to
choose easily and safely between different cooking modes.
The various features offered by the oven are selected by
means of selector knob "B" situated on the control panel.
Setting the clock
The clock can only be set if the oven is turned off.
After the appliance has been connected to the power
supply, or following a power failure, the clock displays a
flashing 12:00 or the last time memorised.
Any adjustments to the time setting can be made by
pressing button 1 and resetting the clock using knob "C",
which you can modify until the scrolling writing disappears
completely from the display.
Setting the date
To update the date, press button 1 until the word "YEAR"
comes up on the display. Update the year by turning knob
"C" and then press button 1 to set the month, again using
knob "C". Press button 1 again to set the day using knob
"C". Press button 1 to memorise the date set.
Timer Feature
The timer can only operate when the oven is turned off.
Please remember that the timer does not control the
starting or stopping of the oven, it merely sounds a buzzer
when the time is up and can be interrupted at any time
just by pressing a button.
To set the timer, press button 2, and then make the
necessary adjustment using knob "C".
Press button 4 to start the timer.
At all times during the timer operation, you may:
• adjust its duration using knob "C";
• stop the countdown by pressing button 4 for
approximately 3 seconds or turning knob "B" anticlockwise;
• enable/disable the control panel lock, by pressing
button 2 for at least 3 seconds (see the paragraph
entitled "Locking and Unlocking the Control Panel").
Selecting the language
Press button 3 for a few seconds with the oven turned off.
The languages available appear in sequence on the display
panel. Press button 3 again to select the desired language.
Selecting the display panel brightness
To update the date, press button 4 until the word
"BRIGHTNESS" comes up on the display.
Turn knob "C" clockwise/anticlockwise to increase/
decrease the brightness of the display panel. A few
seconds after this selection, the oven will be ready for
further instructions.
Locking and Unlocking the Control Panel
This option enables the user to lock all the buttons and
knobs. We especially advise you to use this option if there
are children present. To enable the control panel lock, press
button 2 for a few seconds. The word "LOCKED" comes
up on the display. To restore the usual commands to the
appliance, just press button 2 again for a few seconds.
The word "UNLOCKED" will come up on the display.
The oven light
At any time, including during pre-heating and cooking, you
can turn the oven light on or off by pressing button 4. When
the oven is turned off, the light turns off automatically 10
minutes after the last instructions were entered onto the
control panel.
Cooling ventilation
In order to reduce the external temperature of the oven,
this appliance has been equipped with a cooling fan. During
cooking, the fan is always on and a normal flow of air can
be heard exiting between the oven door and the control
panel.
In order to raise the temperature inside the oven more
quickly during pre-heating, the speed of the air outlet is
approximately half the speed of air outlet during cooking.
If there is a hob above the oven, the cooling fan may switch
itself on automatically to protect the electronic
components, even if the appliance has been switched off.
Note: When cooking is done, the fan stays on until
the oven cools down sufficiently.
How To Use Your Oven
Turn knob "B" clockwise to choose from the default cooking
modes or among the pre-entered recipes available (see
Ariston recipe book).
For each cooking mode, the display will indicate the
following:
• the cooking mode name (or that of the recipe);
• the cooking mode number (or that of the recipe);
• the default temperature;
• the heat sources;
Should the recommended temperature not be to your
liking, you can always adjust it using knob "C".
Each cooking mode is also associated with a
recommended cooking time, which you can modify, from
one minute to 10 hours, by pressing button 2 and then
turning knob "C" to set it to the desired value. The cooking
time can be adjusted until the scrolling wording disappears
completely from the display panel. The selected cooking
time does not include the time required for preheating the
oven.
To start cooking, press cooking start button 4.
With the exception of the "Fast cooking" and "Grill"
modes, the oven will now begin the pre-heating stage,
during which you may still:
• change the temperature by turning knob "C";
• change the cooking time by pressing button 2 and then
turning knob "C";
• enable/disable the control panel lock, by pressing button 2 for at least 3 seconds (see the paragraph entitled "Locking and Unlocking the Control Panel");
• stop cooking and turn the oven off by turning knob "B"
anti-clockwise.
Note: pre-heating is performed automatically by the appliance, which sets the pre-heating time according to the
temperature selected by the user. The display panel will
feature how long the oven will take to preheat before cooking starts.
Once the temperature set has been reached, the oven
starts the cooking stage in itself, during which you may
GB
28
Page 28

still:
• change the temperature by turning knob "C"; if you in-
crease it by more than 25°C, the oven returns to the
pre-heating mode;
• change the cooking time by pressing button 2 and then
turning knob "C";
• enable/disable the control panel lock, by pressing button 2 for at least 3 seconds (see the paragraph entitled "Locking and Unlocking the Control Panel");
• stop cooking and turn the oven off by turning knob "B"
anti-clockwise.
Once cooking is done, the wording "END-READY" will
come up on the display, and a buzzer will sound, which
will stop after 1 minute, after you press a button or after
you turn one of the two knobs.
Notice: The first time you use your appliance, we recommend that you set the thermostat to the highest setting
and leave the oven on for about half an hour with nothing
in it. Then, open the oven door and let the room air. The
odour that is often detected during this initial use is due to
the evaporation of substances used to protect the oven
during storage and until it is installed.
Notice: Place the dripping pan provided on the bottom
shelf of the oven to prevent any sauce and/or grease from
dripping onto the bottom of the oven only when grilling
food or when using the rotisserie (only available on certain models). For all other types of cooking, never use the
bottom shelf and never place anything on the bottom of
the oven when it is in operation because this could damage the enamel. Always place your cookware (dishes, aluminium foil, etc. etc.) on the grid provided with the appliance inserted especially along the oven guides.
Notice: the appliance is fitted with a diagnosis system which
detects any malfunctions. The user is informed of the latter
by messages such as:
• "F nn" (nn = a number comprising two digits): in these
cases, you need to call for technical assistance as the
oven is faulty;
• "W nn" (nn = number comprising two digits): in these
cases, it is best to call for technical assistance as the
oven has detected a malfunction, although it continues to operate.
Cooking mode description
The cooking modes are selected by turning knob "B".
ance. Excellent results can be attained when cooking vegetable-based side dishes like courgettes, aubergines,
peppers, etc.
Desserts: this mode is also perfect for baking leavened
cakes.
The "Multi-cooking" mode can also be used to thaw red
or white meat and bread, by setting the temperature to 80
°C. To thaw more delicate foods, set the thermostat to
60°C.
: "Traditional"
This is the oldest cooking mode suitable for cooking
individual dishes. Two heating elements (one at the top of
the oven and the other at the bottom) work together.
The air heats up upon contact with these heat sources,
and circulates around the inside of the oven to provide
uniform heat, as the hot, lighter air tends to rise. This is
caused by natural convection. This cooking mode is
especially recommended when cooking simmered recipes
using covered casserole dishes (hotpots, tripe, etc.) or
for Bain Marie cooking (crème caramel, terrines, etc.).
In this case, use the dripping pan as a dish support and
place it on the 2nd rack from the oven bottom.
We recommend you pre-heat the oven before placing your
dishes in it.
: "Pastry"
Only the circular heating element and the fan come on to
provide delicate heat, suitable for baking cakes and
pastries such as brioches, chocolate cake, fruitcake,
sponge cake, mini cup cakes, meringues, etc.
In this case, use the dripping pan as a dish support and
place it on the 2nd rack from the oven bottom.
We recommend you pre-heat the oven before placing your
dishes in it.
: "Fast cooking"
The combination of all the heating elements together with
the fan guarantees a uniform distribution of heat throughout
the oven.
This particular cooking mode is ideal for fast cooking
(not requiring any pre-heating) and for cooked dishes
(frozen, pre-cooked food).
In this case, use the dripping pan as a dish support and
place it on the 2nd rack from the oven bottom.
: "Multicooking"
The combination of all the heating elements together with
the fan guarantees a uniform distribution of heat throughout
the oven.
This cooking mode is recommended for cooking several
dishes on more than one rack.
Even if the dishes vary in nature, their respective flavours
are maintained during cooking.
When using this cooking mode, all the dishes should
require the same cooking temperature (you just need to
take them out gradually as each one is ready). When
cooking on two racks, for example, use the dripping pan
as a dish support on the first oven rack from the bottom
and the grid on the third rack from the bottom.
We recommend you pre-heat the oven before placing your
dishes in it.
: "Pizza"
The heating elements (bottom and circular) are turned on
to heat the oven up quickly.
Your pizzas and tarts will benefit from a greater amount
of heat from below, thus guaranteeing the rapid baking of
the dough during cooking. As for the fan, the latter browns
the surface as necessary, making the food even more
appetising.
Use the dripping pan as a dish support and place it on the
1st rack from the oven bottom.
We recommend you pre-heat the oven before placing your
dishes in it.
: "Grill"
The top heating element comes on: the grill goes red and
emits infrared rays just like those contained in sunlight.
29
GB
Page 29

In fact, this cooking mode does not essentially intend to
heat up the air inside the oven, but rather to expose the
food directly to these rays.
Use this cooking mode with the oven door closed. We
recommend you start with the oven cold.
The amount of heat radiated is adjustable on the
temperature selector.
Place the dripping pan on the first rack from the bottom in
order to catch any fat or juices that may drip from the dish
and place the grid on one of the top racks depending on
the size of the meat.
: "Gratin"
Only the top heating element comes on, with the emission
of infrared rays. The forced circulation of air caused by
the fan at the back of the oven ensures the uniform
distribution of heat throughout the latter, and all foods thus
benefit from the following at the same time:
• the infrared rays that guarantee the perfect cooking
of the food surface, thus sealing in the tenderness and
juices in the case of meat,
• the hot air that also allows for the food to be cooked
thoroughly via conduction.
This cooking mode is recommended when cooking roasts
(red or white meats), and for poultry.
Place the grid on the 2nd rack from the oven bottom as a
support for the meat and the dripping pan on the 1st rack
from the bottom to catch any dripping fat or juices.
Always place your food in the oven when it is cold.
liquid content, such as shortbread biscuits, jam tarts and
savoury biscuits (shortcrust pastry). We recommend the
use of the second oven rack from the bottom. Preheat the
oven first.
Your appliance is fitted with a rotisserie, which can be
used with the "grill" and "gratin" modes.
Always keep the oven door shut when using the rotisserie
and start with the oven cold in order to avoid scalding
yourselves when positioning the spit.
Place the dripping pan on the 1st oven rack from the bottom
to catch any dripping fat or juices and position the rotisserie
on the 3rd rack from the oven bottom (please see the next
paragraph for instructions on positioning the rotisserie).
When using the "grill" or "gratin" modes, remember
to keep children away from the accessible parts of
the appliance as they become very hot.
: fast clean
This process cleans the oven fully.
For further details on the oven's fast clean properties,
please see page 33.
: Ventilated oven
The circular heating element and the fan come on, providing
“delicate” heat which is ideal for baking recipes with a low
Programming the cooking mode
To programme the cooking mode, follow the instructions
below:
• select the cooking mode by turning knob "B", and the
temperature by turning knob "C".
• set the cooking time by pressing button 2. The
recommended cooking time comes up on the display,
and you can adjust the same by turning knob "C".
Please remember that the time entered does not include the necessary pre-heating stage.
• set the end cooking time by pressing button 1. The
display panel will feature the end cooking time obtained
by adding the current time to the previously selected
cooking time, as well as the time necessary for the
oven to preheat (automatically calculated by the
appliance according to the cooking mode selected).
Turn knob "C" until the display panel features the time
you want the food to be ready.
After these selection procedures, the display panel will
feature the time at which preheating will commence
(where foreseen), and that at which cooking will be
over. The latter can be altered up until the cooking mode
and temperature reappear on the display panel. Any
incorrect data can be corrected simply by repeating
the above-stated instructions.
• press button 4 to activate the programming.
To modify the settings made, press button 4 for
approximately 3 seconds and repeat the above
procedures.
To cancel a programmed cooking
To cancel a cooking schedule already programmed.To
cancel any programme which has been entered, turn knob
"B" anticlockwise until the word "OFF" appears on the
display panel.
GB
30
Page 30

How to Keep Your Oven in Shape
Inside the oven
We recommend you clean your oven each time you use it,
especially after cooking roasts. In fact, it is advisable to
prevent food residue from building up during cooking: the
residue would be re-cooked each time the oven is used
and would char and release smoke and unpleasant
odours.
Oven exterior
Clean the enamelled or stainless steel exterior surfaces of
your oven using a sponge soaked in soapy water, making
sure you rinse and dry these thoroughly, without using
abrasive or corrosive products which could damage them.
Stainless steel
Rinse stainless steel parts and dry them thoroughly using
a soft cloth. Use a specific non-abrasive product to remove
tougher stains,
Using aluminium foil
To avoid having to clean the bottom of the oven, you may
be tempted to line the same with some aluminium foil. We
strongly advise against this. The aluminium foil sheet
in direct contact with the heated enamel coating could
melt and damage the enamel coating inside the oven
irreversibly.
FC 98 P
123
Replacing the oven lamp
• Always unplug the appliance from the mains or switch
off the main switch before all operations.
• With the aid of a narrow, flat item (such as a screwdriver
or a spoon handle, etc…), remove the glass cover.
• Unscrew the lamp and replace it with another featuring
the same characteristics:
- voltage 230/240 W
- wattage 15 W
- type E 14
• Replace the glass cover and ensure you reposition the
seal correctly.
Cleaning the rotisserie and other accessories
The rotisserie can be removed completely thanks to the 2
wing nuts. The elements comprising the rotisserie assembly
should be cleaned together with the other accessories
(dripping pan, grid) in the sink using a damp sponge and
ordinary detergent or even in your dishwasher.
Disassembling the oven door
The oven door can easily be removed to clean the space
between the bottom of the door and the front of the oven. To
disassemble the door, proceed as follows:
• open the oven door fully,
• lift up and turn the small levers situated on the two hinges,
• shut the door, but not completely,
• grip the door on the two external sides and pull it towards
you, pulling it out of its seat.
Reassemble the door by following the above procedures
backwards.
FO / FD 98 P
132
Oven
compartment
Lamp
Seal
Glass door
31
GB
Page 31

Fast clean
Safety devices
In fast clean mode, the temperature inside the oven reaches
500°, which is necessary for the destruction of food and fat
residue, as illustrated below.
Given this high temperature, your oven is fitted with some
safety devices:
• the oven door is locked automatically as soon as
the temperature is high in order to avoid all risks of
burns.
• the heating elements are no longer powered if an
anomaly occurs.
Note:
When looking through the oven door, you may notice some
particles that light up when they are destroyed by pyrolysis
upon contact with the heating elements: this is simply
spontaneous combustion, it is extremely normal and
without danger.
Precautions to be taken before performing the
fast clean process
1- Try to remove the larger food residue from inside the
oven using a wet sponge. We highly advise against the use
of detergents or all other products recommended for cleaning
ovens.
2- Remove all the accessories from the oven: they are
not designed to withstand such high temperatures. What's
more, some of these accessories would alter the result of
the pyrolytic self-cleaning process and obstruct the circulation
of heat inside the oven. The accessories can easily be
cleaned like everyday crockery and are dishwasher-proof.
3- Don't leave any tea towels on the oven door handle.
How to start the cleaning process
• Shut the oven door.
• Turn knob B and set it to FAST CLEAN
• The cleaning process takes approximately 90 minutes.
You can set the duration of the cleaning cycle (60 - 90 - 120
minutes) depending on the degree of soil of your oven.
• Press key 4 to start the cycle.
Just as for cooking, you can set a fast clean cycle with a
delayed start.
ð The oven door is locked automatically as soon as
you start a fast clean cycle.
ð The key indicator light flashes while the door is being
locked and the cycle time gradually decreases. The
indicator light stops flashing and stays on as soon as the
oven door is locked.
As long as the temperature inside the oven stays below
125°C, you can unlock the oven door by pressing key 3
for 3 seconds. The door is unlocked immediately.
If you forget to relock the oven door again, the latter will
be locked automatically as soon as the temperature inside
the oven reaches 325°C.
What happens at the end of the fast clean
cycle?
• The programmer beeps,
• and the word END comes up on the display.
Press key 4 to stop the beeping, the word END disappears
and the key indicator light flashes.
You may only open the oven door after the temperature inside
the oven has dropped sufficiently.
You will notice some white dust deposits on the bottom and
sides of the oven, remove them with a damp sponge when
the oven has cooled down completely.
Warning: the oven surfaces may get hot during the fast
clean process: keep children well away.
If on the other hand you want to take advantage of the heat
accumulated during the process to start cooking, the dust
can stay where it is: it is completely harmless and will not
affect your food.
Troubleshooting
DO NOT WORRY IF…
Some operating anomalies may arise. These are generally due to incorrect handling or to the erroneous valuation of a
phenomenon.
If your oven releases a lot of smoke during cooking:
• Make sure you have selected the correct cooking mode for the type of dish you want to prepare and that you have
selected the right accessories and put the dish in the oven at the recommended rack height.
• Check the temperature selected: it is no doubt too high for the type of cooking required.
• Check the degree of soil of the oven, and whether the latter needs to be cleaned. Food residue encrusted onto the
enamel coating inside the oven becomes charred and creates both smoke and pungent smells.
• Splashes of grease or overflows onto very hot surfaces could crate smoke.
GB
32
Page 32

The accessories
Your oven offers you many differing cooking modes. These
can only be achieved thanks to a certain number of
accessories which we have chosen for you.
These accessories slide in and out of the different oven racks
inside your oven and can thus be positioned in accordance
with the individual cooking requirements of differing foods
and dishes.
Rung n˚ 5
Rung n˚ 4
Rung n˚ 3
Rung n˚ 2
Rung n˚ 1
Trammels
The dripping pan
Use it:
• as a dish support for all dishes when cooking on
one rack only and in Bain Marie cooking,
• as a support for food (mini cup cakes, etc.),
• as a dripping pan to catch juices and fat dripping
from food situated on the large grid.
We advise against using the dripping pan on the 4th and 5th
racks from the oven bottom.
The large grid
Always use the large grid with the edges upwards and
together with the dripping pan.
• When it is positioned on the 2nd rack from the oven
bottom, it acts as a meat support, with the dripping pan
placed on the 1st rack from the bottom to catch any
dripping fat or juices.
• When it is positioned on the top rack (depending on
the size of the foodstuff) for grilled food, the dripping
pan is to be placed on the 1st rack from the oven bottom
to catch any dripping fat or juices.
• When it is positioned on the top rack for cooking on
more than one rack.
We advise against placing meat directly onto the
dripping pan when using the "gratin" mode as the fat
and juices heated from below in this particular cooking
mode could in fact char and splash onto the oven inside
panels and create smoke.
The rotisserie
Wing screw
Spit cradle
Spit
Prong
Spit handle
This specific accessory is ideal for roasting meats, as the
latter rotate slowly and are browned uniformly until cooking
is done. It is comprised of the following:
• a support situated on the 3rd oven rack from the oven
bottom so the rotisserie fits into the hollow shaft of
the rotisserie motor located at the back of the oven,
behind the perforated oven back panel.
• a spit that passes through the roast, which is kept
firmly in place on both ends by two adjustable sliding
forks each fastened onto the spit by means of a wing
nut.
Warning: when positioning the rotisserie assembly, ensure
the spit fits firmly into the hollow shaft connected to the motor.
Make sure you position the following correctly:
- the spit in the centre of the roast
- the roast at an equal distance from both ends of the spit.
• a removable handle made of insulating material to
screw onto the front of the spit allows you:
- to have a rotisserie which is long enough for even
the largest of roasts
- to avoid scalding yourself when removing the roast
at the end of cooking.
Screw on the handle tightly to take out the spit (the handle
should be removed from the spit during cooking).
Rotisserie timer
ARISTON ovens are fitted with a rotisserie timing device.
When cooking is done, the rotisserie motor continues to turn
the spit and only comes to a stop when the temperature
inside the oven has dropped sufficiently: this prevents the
surface of the meat from burning.
When cooking is done, leave the mode selector set to the
cooking mode under way and set the temperature selector
back to the minimum setting.
33
GB
Page 33

A FEW EXAMPLES OF COOKING ON ONE LEVEL
Dish Cooking mode Temperature Time Shelf level Remarks Preheat
Bread (1 kg loaf)
Savoury pasties
Pizza (bread dough)
Quiche
Cheese soufflé
Pâté
Leg of lamb
Potatoes au gratin
cooked with cream
Fish
Chicken
Roast beef
Roast pork
Roast veal
Stuffed tomatoes
Frozen meals
Lasagne
Moussaka
Multicooking 210°C 30-35' 2 on backing tray Yes
Multicooking 200°C
Pizza 240°C 10-15' 1 on backing tray Yes
Pizza 220°C 30' 1 Tin on backing tray Yes
Multicooking 200°C 30-40' 2
Traditional 180°C 50-60' 2
Gratin 210°C 1 hour for 1,5 à 2 kg 2-1* Meat on shelf No
Gratin 200°C
Traditional
Gratin
Grill
Gratin
Rotisserie grill
Gratin 210°C
Gratin 210°C 1 hour for 1kg 2-1* Meat on shelf No
Gratin 210°C 1 hour for 1kg 2-1* Meat on shelf No
Multicooking 200°C 20-25' 2 Tin on backing tray Yes
Fast cooking
Fast cooking 200°C
Fast cooking 200°C
200°C
240°C
250°C
210°C
250°C
Foll ow
instructions on
packet
20-25'
Depending on thickness
40-45'
Depending on thickness
Depending on type and
thickness of fish
1 hour for
1,2 à 1,5 kg
Depends on how well
cooked required
Follow instructions on
packet
Depending on
thickness
Depending on
thickness
2 on backing tray Yes
Tin diam. 20 cm on backing
Bain-marie on backing tray
2 Tin on backing tray Yes
2
2-1*
2-1*
2-1*
3-1*
2-1* Meat on shelf No
2 Tin on backing tray No
2 Tin on backing tray No
2 Tin on backing tray No
Fillets + liquid, enamelled tray
Rotisserie,oven door shut
tray
(start with hot water)
Whole on shelf
Fish on shelf for grilling
Meat on shelf
Ye s
Ye s
Ye s
No
Buns
Cake
Profiteroles
Crème caramel
Sponge cake
Macaroons
White meringues
Blond meringues
Baked apples
Shortbread biscuits
Apple tart
Shortbread biscuits
Jam tart
Savoury biscuits
X - Y* in the "Shelf level" column
X = shelf or spit rod at level X
Y = baking tray at level Y to catch the roasting juices
Pastry 160°C 35-45' 2 Aluminium tin on backing tray Yes
Pastry 160°C 60' 2 Aluminium tin on backing tray Yes
Pastry 200°C 20-25' 2
Traditional 180°C 30' 2
Pastry 190°C 30' 2 Aluminium tin on backing tray Yes
Pastry 180°C
Pastry 70-80°C
Pastry 110°C
Multicooking 210°C
Pastry 190°C 10-15' 2 on backing tray Yes
Pizza 220°C 30' 1 Cake tin on backing tray Yes
Ventilated oven 190°C 10-15' 2
Ventilated oven 190°C 15-25' 2
Ventilated oven 190°C 10-15' 2
15-20'
Depending on thickness
3 hour
Depending on thickness
2 hour
Depending on thickness
20-25'
Depending on thickness
Small savoury profiteroles on
backing tray
Individual ramekins in bain-
marie (start with hot water)
2 on backing tray Yes
2 Drying small meringues Yes
2 Drying small meringues Yes
2 Tin on backing tray Yes
Aluminium baking tin on
backing tray
Aluminium baking tin on
backing tray
Aluminium baking tin on
backing tray
Ye s
Ye s
Ye s
Ye s
Ye s
Reminder: always place the shelf with the indentations facing downwards
GB
34
Page 34

Safety Is A Good Habit To Get Into
To maintain the efficiency and safety of this appliance, we recommend that you do the following:
• only call the Service Centres authorised by the manufacturer
• always use original spare parts
• This appliance is designed for non-professional, household use and its functions must not be changed.
• These instructions are only valid for the countries whose
symbols appear on the manual and the serial number
plate.
• The electrical system of this appliance can only be used
safely when it is correctly connected to an efficient earthing system in compliance with current safety standards.
• When the appliance is in use, the heating elements
and some parts of the oven door become extremely
hot. Make sure you don't touch them and keep children well away.
The following items are potentially dangerous, and
therefore appropriate measures must be taken to
prevent children and the disabled from coming into
contact with them:
- Controls and the appliance in general;
- Packaging (bags, polystyrene, nails, etc.);
- The appliance itself, immediately after use of the oven or
grill due to the heat generated;
- The appliance itself, when no longer in use (potentially
dangerous parts must be made safe).
Avoid the following:
- Touching the appliance with wet parts of the body;
- Using the appliance when barefoot;
- Pulling on the appliance or the supply cable to unplug it
from the electrical outlet;
- Improper or dangerous operations;
- Obstructing the ventilation or heat dissipation slots;
- Allowing power supply cables of small appliances to come
into contact with the hot parts of the appliance;
- Exposing the appliance to atmospheric agents such as
rain, or sunlight;
- Using the oven for storage purposes;
- Using flammable liquids near the appliance;
- Using adapters, multiple sockets and/or extension leads;
- Attempting to install or repair the appliance without the
assistance of qualified personnel.
Qualified personnel must be contacted in the following cases:
- Installation (following the manufacturer's instructions);
- When in doubt about operating the appliance;
- Replacing the electrical socket when it is not compatible
with the appliance plug.
Service Centres authorised by the manufacturer must
be contacted in the following cases:
- If in doubt about the soundness of the appliance after
removing it from its packaging;
- If the power supply cable has been damaged or needs to
be replaced;
- If the appliance breaks down or functions poorly; ask for
original spare parts.
It is a good idea to do the following:
- Only use the appliance to cook food and nothing else;
- Check the soundness of the appliance after it has been
unpacked;
- Disconnect the appliance from the electrical mains if it is
not functioning properly and before cleaning or performing maintenance;
- When left unused, unplug the appliance form the electricity mains and turn off the gas tap (if foreseen);
- Use oven gloves to place cookware in the oven or when
removing it;
- Always grip the oven door handle in the centre as the
extremities of the same may be hot due to any hot air
leaks;
- Make sure the knobs are in the "•"/"o" position when the
appliance is not in use.
- Cut the power supply cable after disconnecting it from
the mains when you decide not to use the appliance any
longer.
• The manufacturer may not be held responsible for any
damage due to: incorrect installation, improper, incorrect
and irrational use.
35
GB
Page 35

INSTALLATION
Fig. C
The appliance must be installed only by a qualified
person in compliance with the instructions provided.
The manufacturer declines all responsibility for improper
installation which may harm persons and animals and
damage property.
Important: The power supply to the appliance must be
cut off before any adjustments or maintenance work is
done on it.
Installation of Built-in Ovens
In order to ensure that the built-in appliance functions properly, the cabinet containing it must be appropriate. The
figure below gives the dimensions of the cut-out for
installation (N.B.: Installation in compliance with the
consumption declaration)
under the counter or in a wall
cabinet unit.
567 mm.
45 mm.
558 mm.
593 mm.
20/23 mm.
595 mm.
The panels of the adjacent cabinets must be made of heatresistant material. In particular, cabinets with a veneer
exterior must be assembled with glues which can withstand temperatures of up to 100 °C.
In compliance with current safety standards, contact with
the electrical parts of the oven must not be possible once
it has been installed.
All parts which ensure the safe operation of the appliance
must be removable only with the aid of a tool.
For the correct centring of your appliance, position the 4
tabs on the sides of the oven in correspondence with the
4 holes on the perimeter of the frame. In particular, if the
cabinet side panel:
• is 20 mm thick: the removable part of the tab must be
removed (Fig. A);
• is 18 mm thick: use the first groove, which is factory-
set (Fig. B);
• is 16 mm thick: use the second groove (Fig. C).
5 mm.
595 mm.
545 mm.
595 mm.
20/28 mm.
595 mm.
20/28 mm.
20/23 mm.
567 mm.
5 mm.
545 mm.
558 mm.
45 mm.
min.
595 mm.
575-585 mm.
45 mm.
min.
In order to ensure adequate ventilation, the back panel of
the cabinet unit must be removed. Installing the oven so that
it rests on two strips of wood is preferable. If the oven rests
on a continuous, flat surface, there must be an aperture of at
least45x560mm.
Fig. A Fig. B
To fasten the oven to the cabinet, open the door of the
oven and attach it by inserting the 4 wooden screws into
the 4 holes located on the perimeter of the frame.
GB
36
Page 36

Fastening the oven to the cabinet (only on models
FC...)
1. Place brackets "A" up against the oven support "B".
2. Place the tabs "C" up against brackets "A". In particular,
if the cabinet side panel:
• is 16 mm thick: mount the tab so that the number 16 it
features is facing you;
• is 18 mm thick: mount the tab so that the part without
any wording is facing you;
• is 20 mm thick: do not mount the tab.
3. Fasten the brackets and tabs on the oven cabinet side
panel using screws "D".
4. Fasten the oven to the cabinet using the screws and
plastic washers "E".
Electrical connection
16
16
D
C
16
16
B
C
D
A
C
D
E
E
Connection
First check the mains electricity supply available (number
of phases - voltage - maximum power necessary) to
ensure these are compatible with the requirements of the
Ariston appliance to be connected.
Ariston ovens can adapt to the following electrical systems:
Electrical connections
LN
L1L2
Vol ta ge
Frequency
FR-AT-BE-DE-GP-ES-IE-IL-IS-IT-DK
LU-RE-FI-GB- GR-PT- SE-MA-NZ-NL
230 V-1+N ~ 50 Hz
CY-MT-AU-NZ-KW
240 V-1+N ~ 50 Hz
FR-BE-NO
230 V-2 ~ 50 Hz
Fuse
Section
16 A
1,5 mm²
16 A
1,5 mm²
You can connect your oven to the system by means of a
terminal board.
Please refer to the table above for the minimal cable
sections and the calibration of the protective elements
according to the connection.
If the appliance is installed with a junction box, an
omnipolar circuit breaker - with a minimum contact opening
of 3 mm - should be installed between the appliance and
the mains.
We recommend you use a power supply cable which is
long enough to allow you to take the oven out of its recess
in the event of maintenance operations (only use HAR H 05 - RRF quality cables fitted with a plug conforming to
the regulations in force in the country where the appliance
is fitted).
The plug must be accessible at all times.
Important: After connecting the appliance to the flexible
cable, tighten all the screws on the terminal board.
This appliance conforms with the following European
Community directives:
DBT 73/23 EEC modified by 93/68/EEC directive
CEM 89/336/EEC modified by 92/31/EEC and 93/68/EEC
directives
Inner dimensions of the oven:
width 43.5 cm
depth 40.0 cm
height 32.0 cm
Inner volume of the oven:
56 litres
Voltage and frequency of power supply:
230V~50Hz : 2800 W
240V~50Hz : 3050 W
Energy Label
Energy Label Directive 2002/40/CE of electric ovens. Norm
EN 50304.
Energy consumption (based on standard load) :
Conventional
Forced air convection
Unplug the appliance before all operations, even when
replacing the oven lamp.
Using the appliance without correct earthing is highly
dangerous.
37
GB
Page 37

DE
38
Page 38

Wir danken Ihnen, dass Sie dieses sichere und äußerst leicht zu bedienende Ariston-Gerät gewählt haben. Um sich
mit diesem vertraut zu machen und es auf optimale Art zu gebrauchen lernen, empfehlen wir Ihnen, dieses Handbuch
vor Inbetriebnahme des Gerätes aufmerksam zu lesen, da es wichtige Hinweise hinsichtlich der Sicherheit bei der
Installation, dem Gebrauch und der Wartung liefert. Bewahren Sie dieses Handbuch sorgfältig auf, damit Sie es jederzeit
zu Rate ziehen können. Danke.
Aus der Nähe betrachtet
250
C
200
150
100
A
PI ZZ
40
A
G
A. Schalterblende
B. Drehknopf Garfunktionen
C. Drehknopf Gartemperaturen
D. Elektronischer Programmierer
F. Fettpfanne bzw. Backblech
G. Backofenrost
H. Gleitführungen für Backblech und Backofenroste
H
B
D
C
6
F
250
C
200
150
14
8
PI ZZ
A
100
40
7
2
1. Einstellung Garzeitende / Uhr / Datum
2. Einstellung Garzeit / Timer / Tastensperre
3. Einstellung der Sprache
4. Garzeitstart / Garzeitstopp / Backofenbeleuchtung
/ Display-Helligkeit
5. Funktionsbeschreibung
6. Funktionsnummer
7. Garzeit (Dauer)
8. Garende
9. Temperaturskala
10.Leistungsgrad der Grillfunktionen
11.Uhrzeit oder Temperatur / Prozentualer
Energieverbrauch
12.Eingeschaltete Elektroelemente
13.Anzeige Uhr
14.Anzeige Programmierter Garzeitstart
111
1013 912
435
39
DE
Page 39

Inbetriebnahme des Gerätes
Der '7 Cuochi' - Backofen vereint in einem einzigen Gerät
die Vorzüge der herkömmlichen Backöfen mit "statischem"
Wärmeübergang und die der modernen "Heißluft"- Backöfen
mit Wärmeströmung.
Es handelt sich um ein äußerst vielseitiges Gerät, das es
Ihnen ermöglicht, zwischen einfachen und sicheren Brat-/
Backmethoden wählen zu können. Eingestellt werden diese
verschiedenen Funktionen über den Funktionswähler "B" der
Schalterblende.
Einstellung der Uhr
Die Uhrzeit kann nur bei ausgeschaltetem Backofen
eingestellt werden.
Nach dem Netzanschluß oder nach einem Stromausfall blinkt
die Display-Anzeige auf 12:00 oder auf der zuletzt
gespeicherten Uhrzeit.
Soll die Uhrzeit korrigiert werden, drücken Sie die Taste 1
und ändern die Uhrzeit über den Drehknopf "C", Änderungen
können während der gesamten Lauftext-Einblendung
geändert werden, danach nicht mehr.
Einstellung des Datums
Um das Datum zu ändern drücken Sie die Taste 1, bis auf
dem Display die Anzeige "JAHR" erscheint. Stellen Sie das
Jahr nun über den Drehknopf "C" ein und drücken Sie
anschließend die Taste 1, um den Monat, auch diesen mittels
des Drehknopfes "C", einzustellen. Drücken Sie erneut die
Taste 1, und geben Sie über den Drehknopf "C" den Tag ein.
Zur Bestätigung der Eingabe drücken Sie die Taste "1".
Kurzzeitwecker-Funktion
Der Kurzzeitwecker funktioniert nur bei ausgeschaltetem
Backofen.
Beachten Sie, dass der Kurzzeitwecker weder das Ein- noch
das Ausschalten des Backofens steuert; nach abgelaufener
Zeit ertönt nur ein akustisches Signal, das durch Drücken
einer beliebigen Taste abgestellt werden kann.
Durch Drücken der Taste "2" und Drehen des Knopfes "C"
kann der Kurzzeitwecker eingestellt werden.
Der Start des Kurzzeitweckers wird durch Drücken der Taste
4 veranlasst.
Folgende Änderungen können auch bei bereits laufendem
Kurzzeitwecker noch erfolgen:
•Änderung der eingestellten Zeit über den Drehknopf "C";
• Abstellen der Zeitrechnung durch Drücken der Taste 4
(für ca. 3 Sekunden), oder durch Drehen des Knopfes
"B" gegen den Uhrzeigersinn.
• die Sperre der Bedienungselemente eingestellt/
aufgehoben werden, durch Drücken der Taste 2 für
mindestens 3 Sekunden (siehe Abschnitt "Sperre/
Freigabe der Bedienungselemente");
Einstellung der Sprache
Drücken Sie bei ausgeschaltetem Gerät einige Sekunden
lang die Taste 3. Auf dem Display werden nacheinander die
zur Verfügung stehenden Sprachen eingeblendet. Wählen
Sie die gewünschte Sprache durch erneutes Drücken der
Taste 3.
Regulieren der Display-Helligkeit
Drücken Sie bei ausgeschaltetem Gerät die Taste 4, bis auf
dem Display die Anzeige "HELLIGKEIT" erscheint.
Drehen Sie den Knopf "C" im Uhrzeigersinn/gegen den
Uhrzeigersinn, um die Display-Helligkeit zu erhöhen/zu
verringern. Wenige Sekunden nach Einstellen dieser Daten
ist der Backofen erneut bedienbereit.
Sperre/Freigabe der Bedienungselemente
Hierdurch können die Tasten- und Knopffunktionen
unwirksam gemacht werden. Dies ist besonders bei
Anwesenheit von kleinen Kindern zu empfehlen. Zur
Aktivierung der Sperre halten Sie die Taste 2 einige Sekunden
lang gedrückt, bis auf dem Display die Anzeige "LOCKED"
erscheint. Zur Freigabe bzw. zur Wiederherstellung der
normalen Steuerfunktionen drücken Sie erneut für einige
Sekunden auf Taste 2, bis auf dem Display die Anzeige
"UNLOCKED" erscheint.
Backofenbeleuchtung
Diese kann zu jeder Zeit, Vorheizzeit und Garvorgang
eingeschlossen, durch Druck auf die Taste 4 ein- oder
ausgeschaltet werden. Bei ausgeschaltetem Backofen
schaltet sich die Beleuchtung 10 Minuten nach der letzten
Einstellung der Frontschaltertasten automatisch aus.
Kühlluftgebläse
Um die Wärmeerzeugung an den äußeren Teilen des
Backofens herabzusetzen, wurde das Gerät mit einem
Kühlluftgebläse bestückt. Während des Backofenbetriebs
bleibt dieses Gebläse eingeschaltet, weshalb zwischen
Frontblende und Backofentür ein austretender Luftstrahl zu
vernehmen ist.
Damit die erforderliche Gartemperatur im Backofeninnern
möglichst rasch erreicht wird, ist der austretende Luftstrom
während der Vorheizzeit, im Vergleich zur eigentlichen
Garzeit, nur halb so stark.
Befindet sich über dem Backofen eine Kochmulde, dann
könnte sich das Kühlluftgebläse zum Schutz der
elektronischen Komponenten auch bei abgeschaltetem Gerät
automatisch in Gang setzen.
Anmerkung: Nach Abschluss des Garvorgangs bleibt
das Gebläse so lange in Betrieb, bis der Backofen
ausreichend abgekühlt ist.
Gebrauch des Backofens
Durch Drehen des Schalterknopfes "B" im Uhrzeigersinn
kann die jeweilig gewünschte Garfunktion unter den
Verfügung stehenden eingestellt, oder eines der
vorgegebenen Rezepte (siehe Ariston-Kochbuch) gewählt
werden.
Für jede Funktion wird auf dem Display Folgendes angezeigt:
• der Name der Funktion (oder des Rezeptes);
• die Nummer der Funktion (oder des Rezeptes);
• die vorgegebene Temperatur;
• die Hitzequelle.
Sollte die vorgegebene Temperatur nicht der von Ihnen
gewünschten entsprechen, kann diese über den Drehknopf
"C" geändert werden.
Jeder Garfunktion ist eine vorgeschlagene Garzeit
zugeordnet, die jedoch durch Drücken der Taste 2 und
anschließendes Drehen des Knopfes "C" (von 1 Minute bis
10 Stunden) geändert werden kann. Änderungen können
so lange erfolgen, so lange der Lauftext läuft, dann nicht
mehr. Berücksichtigen Sie bitte, dass in der vorgeschlagenen
Garzeit die zum Vorheizen erforderliche Zeit nicht inbegriffen
ist.
Um den Garvorgang zu starten, drücken Sie die Taste 4.
Mit Ausnahme der Funktion "Intensivbacken" und der
Funktion "Grillen" setzt sich der Backofen nun auf 'Vorheizen'
in Betrieb, während dieser Zeit kann noch:
• die Temperatur geändert werden, und zwar über den
Drehknopf "C";
• die Garzeit geändert werden, durch Druck auf die Taste
2 und anschließendes Drehen des Knopfes "C";
• die Sperre der Bedienungselemente eingestellt/
aufgehoben werden, durch Drücken der Taste 2 für
mindestens 3 Sekunden (siehe Abschnitt "Sperre/
DE
40
Page 40

Freigabe der Bedienungselemente");
• der Garvorgang unterbrochen, und der Backofen
ausgeschaltet werden, und zwar durch Drehen des
Knopfes "B" gegen den Uhrzeigersinn.
Anmerkung: Die Vorheizphase erfolgt automatisch durch
das Gerät, das die Dauer je nach der vom Benutzer
gewählten Temperatur selbsttätig einstellt. Auf dem Display
wird die Zeit eingeblendet, die vor Start des Garvorganges
verstreichen muß.
Nach Erreichen der eingestellten Temperatur beginnt der
eigentliche Garvorgang, während dieser Zeit kann noch:
• die Temperatur geändert werden, und zwar über den
Drehknopf "C". Wird diese um mehr als 25% erhöht,
schaltet der Backofen auf Vorheizen zurück;
• die Garzeit geändert werden, durch Druck auf die Taste
2 und anschließendes Drehen des Knopfes "C";
• die Sperre der Bedienungselemente eingestellt/
aufgehoben werden, durch Drücken der Taste 2 für
mindestens 3 Sekunden (siehe Abschnitt "Sperre/
Freigabe der Bedienungselemente");
• der Garvorgang unterbrochen, und der Backofen
ausgeschaltet werden, und zwar durch Drehen des
Knopfes "B" gegen den Uhrzeigersinn.
Nach Abschluss des Garvorgangs wird auf dem Display die
Schrift "END-FERTIG" eingeblendet, Sie vernehmen ein
kurzes Tonsignal, das sich nach Drücken einer beliebigen
Taste oder nach Drehen eines der beiden Drehknöpfe nach
1 Sekunde abschaltet.
Zur Beachtung: Bei erstmaligem Benutzen sollte der leere
Backofen für etwa 30 Minuten bei eingestellter Höchsttem-
peratur in Betrieb gesetzt werden. Öffnen Sie daraufhin die
Backofentür. Die Küche sollte währenddessen ausreichend
gelüftet werden. Der hierbei evtl. entstehende Geruch wird
durch das Verdunsten der zum Schutz des Backofens wäh-
rend des Zeitraums zwischen Produktion und erster Inbetriebnahme aufgetragenen Stoffe verursacht.
Zur Beachtung: Verwenden Sie bitte die erste (die unterste) Führungsschiene nur für die Fettpfanne, d.h. zum Auffangen des abtropfenden Fleischsaftes und/oder Fettes beim
Grillen oder bei Einsatz des Bratspießes (nur an einigen Modellen). Für alle anderen Gararten ist diese Führungsschie-
ne nicht zu verwenden. Stellen Sie bei in Betrieb befindlichem Backofen auch niemals Kochgeschirr auf den Boden
des eingeschalteten Backofens, Sie könnten hierdurch das
Email beschädigen. Stellen Sie Ihr Kochgeschirr (Auflaufformen, Alufolien, usw.) stets auf die ordnungsgemäß in die
Führungsschienen eingesetzten, mit dem Gerät gelieferten
Backofenroste.
Zur Beachtung: Das Gerät ist mit einem Diagnose-System
ausgestattet, dank dessen eventuelle Betriebsstörungen
erfasst werden können. Der Benutzer wird durch Meldungen
nachfolgender Art auf solche Störungen aufmerksam
gemacht:
• "F nn" (nn=zweistellige Zahlen): In diesen Fällen ist der
Kundendienst anzufordern, da der Backofen nicht
funktioniert;
• "W nn" (nn=zweistellige Zahlen): Obwohl der Backofen
noch funktioniert, wäre es in diesen Fällen trotzdem
ratsam, den Kundendienst anzufordern, da der Backofen
eine Störung erfasst hat.
Beschreibung der Funktionen
Die Funktionen werden über den Knopf "B" eingestellt.
: "Traditionell"
Diese Einstellung entspricht der traditionellen Garmethode und
ist ideal für die Zubereitung von Einzelgerichten. Zwei
Heizwiderstände setzen sich gleichzeitig in Betrieb (der eine
befindet sich sichtbar an der oberen Ofeninnenwand, der
andere nicht sichtbar unter dem Ofenboden).
Diese beiden Wärmequellen erhitzen die Luft im Ofeninnern:
Die warme, leichtere Luft steigt nach oben und sorgt somit für
die Luftzirkulation. Dies wird als Wärmeübergang bezeichnet.
Diese Garmethode ist besonders geeignet für das langsame
Garen in geschlossenen Gusseisentöpfen (Fleischeintöpfe,
Kutteln etc.) oder für das Garen im Wasserbad (Crème
Caramel, Pasteten etc.).
Es empfiehlt sich, das Backblech als Auflagefläche für das
Kochgeschirr zu benutzen, und dieses auf die erste Schiene
von unten zu schieben.
Schieben Sie das Gargut in den heißen Backofen.
: "Kuchen- Gebaeck"
Bei dieser Funktion wird nur das runde Heizelement sowie das
Gebläse aktiviert. Diese "delikate" Wärme ist ideal zum Garen
von Kuchen und Kleingebäck, wie z.B. Brioches,
Schokoladenkuchen, Plum-Cake, Biscuitböden, Plätzchen,
Baisers etc.
Es empfiehlt sich, das Backblech dazu auf die zweite Schiene
von unten zu schieben und das Gargut darauf zu platzieren.
Schieben Sie das Gargut in den heißen Backofen.
: "Intensivbacken"
Sämtliche Heizelemente sowie das Gebläse werden in Betrieb
gesetzt, sodass sich die heiße Luft im Backofenraum
gleichmäßig verteilt.
Diese Funktion eignet sich besonders zum schnellen Garen
(ohne vorheriges Vorheizen) und für bereits vorgegarte
Speisen (Tiefgefrorenes, Fertiggerichte).
Es empfiehlt sich, das Backblech als Auflagefläche für die
entsprechenden Behältnisse zu benutzen, und dieses auf die
erste Schiene von unten zu schieben.
: "Multicooking"
Sämtliche Heizelemente sowie das Gebläse werden in Betrieb
gesetzt, sodass sich die heiße Luft im Backofenraum
gleichmäßig verteilt.
Diese Garfunktion kann verwendet werden, um verschiedene
Gerichte gleichzeitig auf verschiedenen Ebenen im Ofen garen
zu lassen.
Bei dieser Garfunktion bleibt der Eigengeschmack der
verschiedenen Speisen erhalten, selbst wenn diese sehr
unterschiedliche Geschmacksrichtungen aufweisen.
Voraussetzung für diese Funktion ist, dass alle Gerichte bei
derselben Temperatur gegart werden müssen (die fertigen
Speisen werden nacheinander aus dem Ofen genommen). Soll
auf zwei Führungsschienen gleichzeitig gegart werden, so
empfiehlt es sich, das Backblech auf die erste
Führungsschiene von unten und den Backofenrost auf die
dritte Führungsschiene von unten zu geben.
Schieben Sie das Gargut in den heißen Backofen.
: "Pizza"
Die Heizelemente (unteres und rundes Heizelement) sorgen
schnell für Heißluft im Ofen.
Aufgrund der starken Unterhitze ist diese Funktion besonders
41
DE
Page 41

für das vollständige Garen von Pizzateig und Mürbeteig
geeignet. Das Gebläse sorgt für die Bräunung der Oberseite,
sodass das Backgut eine appetitliche Farbe erhält.
Es empfiehlt sich, das Backblech als Auflagefläche zu
benutzen, und dieses auf die erste Schiene von unten zu
schieben.
Schieben Sie das Gargut in den heißen Backofen.
: "Grillen"
Bei dieser Funktion wird ausschließlich das obere
Heizelement aktiviert. Der Grill wird zum Glühen gebracht
und gibt eine Infrarotstrahlung (mit den Eigenschaften der
Sonneninfrarots-trahlung) ab.
Bei Einschalten der Grillfunktion werden die Speisen nicht
nur mittels Hitze sondern vor allen Dingen mittels dieser
Infrarotstrahlung gegart.
Grillen Sie bei geschlossener Backofentür. Das Grillgut sollte
möglichst in den kalten Backofen geschoben werden.
Die Strahlungswärme ist mittels des
Temperaturwählschalters einstellbar.
Es empfiehlt sich, das Backblech auf die erste
Führungsschiene von unten zu geben, sodass dieses
abtropfendes Fett und Fleischsaft auffangen kann; der Rost
dagegen wird auf eine höhere Schiene geschoben, je nach
der Dicke des zu garenden Fleisches.
: "Gratinieren"
Nur das obere Heizelement, welches Infrarotstrahlung abgibt,
wird in Betrieb gesetzt. Das Gebläse sorgt für die Zirkulation
der Heißluft im Ofen und damit für eine gleichmäßige
Temperaturverteilung. Das Gargut wird gleichzeitig folgenden
Faktoren ausgesetzt:
• Infrarotstrahlen zum Garen an der Oberfläche;
• Heißluft zum vollständigen Garen durch
Wärmeleitung.
Die Funktion "Umluftgrill" eignet sich insbesondere zum
schmackhaften Zubereiten von Braten (egal ob rotes oder
weißes Fleisch) sowie Geflügel.
Geben Sie das Fleisch auf den Rost, der auf die zweite
Führungsschiene von unten geschoben wird und schieben
Sie das Backblech zum Auffangen von abtropfendem Fett
und Fleischsaft auf die erste Schiene von unten.
Schieben Sie das Grillgut in diesem Fall in den nicht
vorgeheizten Ofen.
: Heissluftofensp
Es schaltet sich nur das runde Heizelement ein und das
Gebläse wird in Betrieb genommen, wodurch eine äußerst
„delikate“, zum Garen von Backwerk mit niedrigem
Flüssigkeitsgehalt (wie Sandgebäck, Buttergebäck,
Mürbeteigtorten und Salzgebäck) geeignete Hitze
gewährleistet wird. Es empfiehlt sich, das Backblech auf die
2. Führung von unten zu schieben. Für Gebäck muss der
Backofen immer vorgeheizt werden.
Der zugehörige Drehspieß kann sowohl für die Funktion
"Grill" als auch für die Funktion "Gratinieren" verwendet
werden.
Grillen Sie bei geschlossener Backofentür. Zur Vermeidung
von Verbrennungen bei Einsetzen des Spießes empfiehlt es
sich, den Ofen nicht vorzuheizen.
Das Backblech zum Auffangen von abtropfendem Fett und
Fleischsaft sollte sich auf der ersten Führung und der
Drehspieß auf der dritten Führung von unten befinden
(Hinweise zum Einsetzen des Drehspießes: siehe nächsten
Abschnitt).
Während des Betriebs der Funktionen "Grill" und
"Gratinieren" können die äußeren Ofenteile sehr heiß
werden. Halten Sie daher Kinder vom Ofen fern.
: Fastclean-Selbstreinigung
Zur vollständigen Reinigung Ihres Backofens.
Detaillierte Angaben zur Fastclean-Selbstreinigung siehe Seite
44.
Garzeit-Programmierung
Die Garzeit kann wie folgt programmiert werden:
• Stellen Sie durch Drehen des Knopfes "B" das Garprogramm
und durch Drehen des Knopfes "C" die gewünschte
Temperatur ein.
• Stellen Sie die Garzeit durch Drücken der Taste 2 ein. Auf
dem Display wird die vorgeschlagene Garzeit eingeblendet,
die durch Drehen des Knopfes "C" geändert werden kann.
Berücksichtigen Sie bitte, dass in letzterer die zum Vorheizen
erforderliche Zeit nicht inbegriffen ist.
• Stellen Sie durch Drücken der Taste 1 die als Garende
vorgesehene Uhrzeit ein. Es wird die für den Abschluss der
Garzeit vorgesehene Uhrzeit eingeblendet, die durch
Summieren der laufenden Uhrzeit und der zuvor
eingegebenen Garzeit, sowie der zum Aufheizen
erforderlichen Zeit, die das Gerät unter Berücksichtigung der
eingestellten Funktion automatisch kalkuliert, errechnet
wurde. Drehen Sie den Knopf "C" bis auf dem Display die
Uhrzeit eingeblendet wird, zu der Sie Ihre Speise fertig gegart
DE
haben möchten.
Nach Abschluß sämtlicher Einstellungen laufen auf dem
Display die Einblendungen der Uhrzeit, zu der das Vorheizen
(wo vorgesehen) beginnt, und die Uhrzeit, zu der der
Garvorgang abgeschlossen wird. Letztere kann noch
geändert werden, und zwar bevor auf dem Display die
Funktionsbezeichnung und die eingegebene Temperatur
erscheint. Zur Korrektur falsch eingegebener Daten sind
sämtliche oben beschriebenen Eingaben zu wiederholen.
• Zur Aktivierung der Programmierung drücken Sie die Taste
4
Zur Änderung der Einstellungen drücken Sie für ca. 3
Sekunden die Taste 4; daraufhin wiederholen Sie Obiges
erneut.
Löschen eines gespeicherten Programms
Um die gesamte Programmierung eines Garvorgang zu löschen,
drehen Sie den Knopf "B" gegen den Uhrzeigersinn, bis auf
dem Display die Anzeige "OFF" eingeblendet wird.
42
Page 42

So halte ich das Gerät in Topform
Innenteile des Backofens
Es empfiehlt sich, das Backofeninnere nach jedem Gebrauch,
besonders nach der Zubereitung von Braten zu reinigen. Auch
um eine Ablagerung von Speiserestespritzern zu vermeiden,
die bei dem nächsten Einsatz des Backofens neu eingebrannt
würden, und demnach durch Verkohlen unangenehme
Gerüche und Rauchbildung verursachen würden.
Außenteile des Backofens
Reinigen Sie die äußeren Oberflächen aus Email oder
Edelstahl mit einem Schwamm und einer milden
Spülmittellauge, und spülen Sie diese dann mit klarem Wasser
gründlich nach. Verwenden Sie keine Scheuermittel oder
scharfe Reinigungsmittel, diese würden die Oberflächen
beschädigen.
Edelstahl
Reiben Sie die Edelstahlteile mit einem weichen feuchten
Tuch ab und trocknen Sie diese dann vorsichtig. Verwenden
Sie bei besonders hartnäckigen Flecken ein mildes
Spezialmittel.
Gebrauch von Alufolie
Der Backofenboden darf nicht mit Alufolie ausgelegt
werden, (weil man vielleicht denkt, sich hierdurch ein Reinigen
des Backofenbodens zu ersparen). Der direkte Kontakt des
Aluminiums auf dem heißen Emailboden würde einen
derartigen Wärmestau verursachen, der das Email zum
Schmelzen bringen und so hoffnungslos beschädigen
würde.
Reinigung des Drehspießes und der anderen
Zubehörteile
Der Drehspieß läßt sich mit Hilfe der 2 Flügelschrauben
vollständig auseinandernehmen. Sämtliche Drehspießteile
können zusammen mit den anderen Zubehörteilen
(Backblech, Bratrost) mit einem Schwamm und einer
normalen Spülmittellauge von Hand oder im Geschirrspüler
gereinigt werden.
FC 98 P
123
Austausch der Backofenlampe
• Vor jedem Eingriff ist der Backofen entweder durch
Herausziehen des Steckers oder durch Abschalten des zum
Anschluss des Gerätes an die Hausanlage verwendeten
Schalters stromlos zu machen.
• Nehmen Sie unter Zuhilfenahme eines schmalen und
flachen Werkzeuges (Schraubenziehen, Löffelgriff usw.) die
Glasabdeckung ab.
• Schrauben Sie die Lampe aus und ersetzen Sie sie durch
eine neue gleicher Eigenschaften.
- Spannung 230/240 V
- Leistung 15 W
- Sockel E 14
• Bringen Sie die Glasabdeckung wieder an; achten Sie
hierbei darauf, dass die Dichtung ordnungsgemäß eingelegt
wird.
Demontage der Backofentür
Die Backofentür kann mühelos abgenommen werden, um den
unter der Tür liegenden Bereich einfacher reinigen zu können.
Verfahren Sie hierzu wie folgt:
• Backofentür ganz öffnen und in ihrer horizontalen Stel
lung belassen;
• die seitlich an den beiden Scharnieren befindlichen
kleinen Hebel hochklappen und drehen;
• die Tür ganz schließen;
• die Tür an den Seitenteilen fassen und nach oben
herausziehen.
In umgekehrter Reihenfolge wird die Tür wieder ange-
bracht.
FO / FD 98 P
132
Backofenraum
Lampe
Dichtung
Glasscheibe
43
DE
Page 43

Fast clean
Sicherheitsvorrichtungen
Bei Aktivierung der Fast-cleanfunktion erreicht die
Temperatur im Backofenraum 500º. Bei derartigen
Temperaturen verkohlen die im Ofen zurückgebliebenen
Speisereste.
Angesichts der hohen Temperaturen, die hierbei erreicht
werden, ist der Ofen mit einigen Sicherheitsvorrichtungen
ausgestattet:
• bei Erreichen höherer Temperaturen wird die Ofentür,
zur Vermeidung eventueller Verbrennungen,
automatisch gesperrt;
• bei jedweder Störung wird die Stromversorgung der
Heizelemente sofort unterbrochen
Anmerkungen:
Durch das Glas der Ofentür kann beobachtet werden, wie
aufgrund des Pyrolyseverfahrens einige Speisereste bei
Kontakt mit den Heizelementen verkohlen und aufglimmen:
Es handelt sich um eine spontane Verbrennung, einen
völlig normalen Vorgang, der keinerlei Risiken birgt.
Einige nützliche Hinweise, die Sie vor Einstellen der
Selbstreinigungs-Funktion beachten sollten:
1- Versuchen Sie zunächst, größere Speisereste mit einem
feuchten Schwamm zu entfernen. Verwenden Sie auf keinen
Fall Spülmittel oder spezielle Ofenreinigungsmittel.
2- Entfernen Sie sämtliches Zubehör: Es hält derart hohen
Temperaturen nicht stand. Darüberhinaus könnten einige
Zubehörteile das Reinigungsergebnis beeinträchtigen, indem
sie die gleichmäßige Zirkulation der heißen Luft im
Ofeninnern verhindern. Das Zubehör läßt sich problemlos
wie normales Geschirr reinigen (auch in der Spülmaschine).
3- Hängen Sie keine Geschirrtücher zum Trocknen an den
Ofentürgriff.
Wie wird die Reinigung in Gang gesetzt?
Schließen Sie die Ofentür.
•
• Drehen Sie den Schalter B auf FAST CLEAN
• Die vollständige Selbstreinigung dauert ca. 90 Minuten.
Es ist jedoch möglich, die Dauer je nach Verschmutzungsgrad
auf 60 - 90 - 120 Minuten einzustellen.
• Zum Start der Funktion drücken Sie die Taste 4.
Wie bei den Garfunktionen, kann auch die FAST CLEAN
Reinigungsfunktion mit verzögertem Start vorgewählt
werden.
ð Sobald die FAST CLEAN Reinigung startet, wird die
Ofentür automatisch gesperrt.
ð Die mit dem Schlüsselsymbol versehene
Kontrollleuchte blinkt während des Blockiervorgangs der
Tür. Der „Countdown“ des eingestellten Programms beginnt
abzulaufen. Sobald die Tür gesperrt ist, schaltet die
Kontrollleuchte auf Festlicht.
Solange die Temperatur im Backofeninnern 125°C nicht
erreicht hat, kann die Ofentür durch Drücken und Halten
(für 3 Sekunden) der Taste 3 noch entriegelt werden. Die
Entriegelung erfolgt unverzüglich.
Sollten Sie hierauf jedoch vergessen, die Tür erneut zu
blockieren, wird sie automatisch gesperrt, sobald die
Temperatur auf 325°C angestiegen ist
Was geschieht nach Abschluss der fast clean
Reinigung?
• Der Programmierer meldet dies durch ein akustisches
Signal,
• und auf der Anzeige erscheint die Meldung END.
Schalten Sie über die Taste 4 das Tonsignal ab; die Meldung
erlischt, das Schlüssel-Symbol blinkt.
Die Ofentür kann erst dann geöffnet werden, wenn die
Ofentemperatur entsprechend gesunken ist.
Leichte weiße Spuren bleiben auf dem Boden und den
Anmerkung: Während der Fast clean können einzelne
Ofenteile sehr heiß werden. Halten Sie daher Kinder vom
Ofen fern.
Innenwänden des Backofens übrig. Wenn der Ofen
vollständig abgekühlt ist, lassen sie sich mit einem feuchten
Schwamm mühelos entfernen.
Möchten Sie jedoch die noch vorhandene Ofenwärme zum
Garen nutzen, dann ist es nicht erforderlich, diese
Staubablagerungen sofort zu entfernen; sie sind unschädlich.
Einige kleinere Funktionsstörungen
KEIN GRUND ZUR SORGE …
wenn nachstehende, kleinere Betriebsanomalien auftreten; diese sind im allgemeinen auf unkorrekte Bedienung oder falsche
Bewertung vermeintlicher Störungen zurückzuführen.
Beim Backen bzw. Braten tritt starker Rauch aus dem Backofen aus:
• Vergewissern Sie sich, dass für die gewünschte Garart auch die geeignete Funktion eingestellt wurde, dass das geeignete
Kochgeschirr gewählt, und das Gargut auf die empfohlene Einschubhöhe eingeschoben wurde.
• Prüfen Sie auch die eingestellte Temperatur, die sehr wahrscheinlich zu hoch für die vorgesehene Garart ist.
• Kontrollieren Sie den Verschmutzungsgrad des Backofens, wahrscheinlich sollte er gereinigt werden. Am Email könnten
Speisereste zurückgeblieben sein, die verkohlen und so den Rauch verursachen.
• Fettspritzer, oder eventuell heruntergelaufene Flüssigkeiten auf heißen Oberflächen können ebenfalls die Ursache von
Rauchbildung sein.
DE
44
Page 44
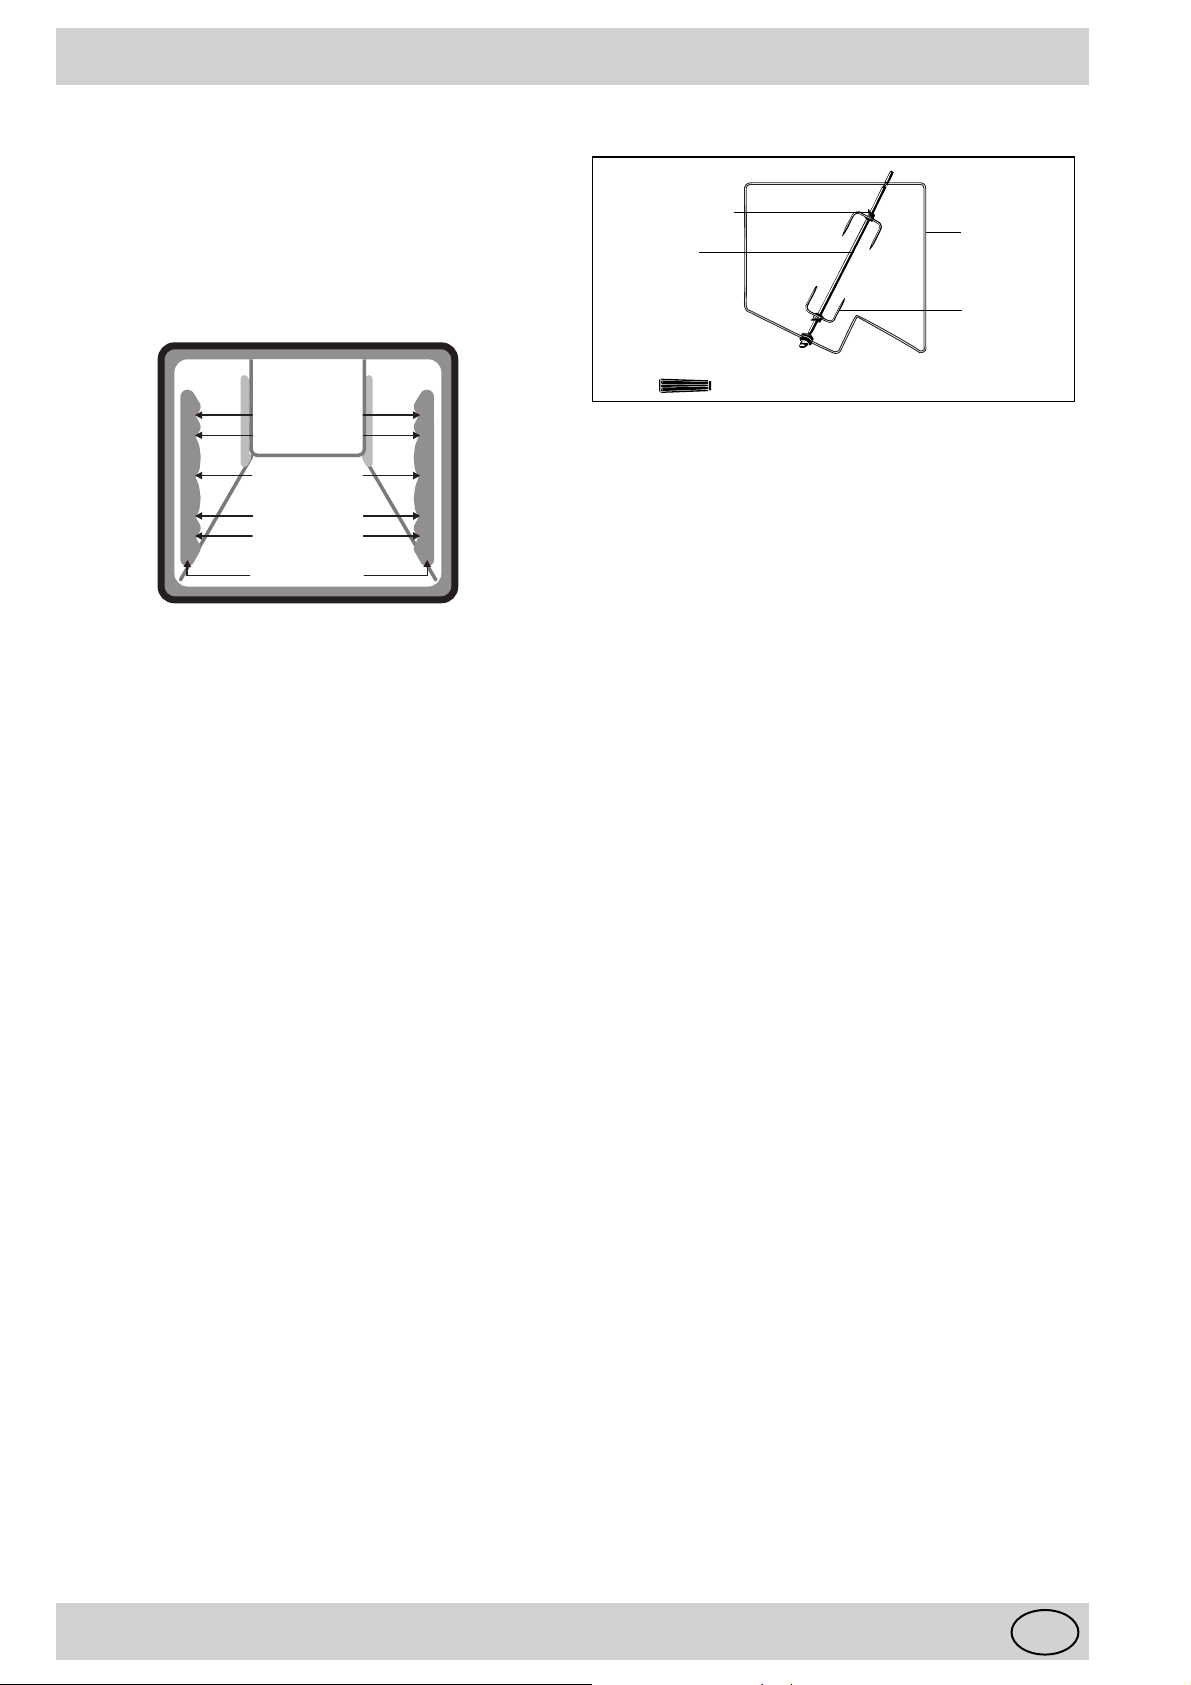
Zubehör
Ihr Backofen ist für eine Vielzahl an unterschiedlichen
Garmethoden ausgestattet. Damit Sie bestmögliche
Zubereitungsergebnisse erzielen können, bieten wir eine Reihe
an Zubehörteilen an.
Dieses Zubehör kann je nach Bedarf auf den verschiedenen
Führungsschienen im Ofeninnern installiert werden.
Für jede aufgeführte Funktion und Garmethode wird die jeweils
empfohlene Führungsschiene angegeben (durchnummeriert
von unten nach oben).
Höhenstufe n˚5
Höhenstufe n˚4
Höhenstufe n˚3
Höhenstufe n˚2
Höhenstufe n˚1
Zahnleisten
Das Backblech
Wird verwendet…
• als Auflagefläche des jeweiligen Speisenbehälters
beim Garen auf einer Ebene und beim Garen im Wasserbad;
• als direkte Auflagefläche für das Gargut (Kleingebäck
etc.);
• zum Auffangen von abtropfendem Fett oder
Fleischsaft, bei gleichzeitiger Verwendung des großen
Rostes.
Es empfiehlt sich nicht, das Backblech auf die
Führungsschienen 4 und 5 zu schieben.
Der große Backofenrost
Er wird stets zusammen mit dem Backblech in der
vorgesehenen Position (d.h. mit den Halterungen nach oben)
verwendet:
• Auf der zweiten Führungsschiene von unten dient er
als Auflagefläche für zu garendes Fleisch; das Backblech
wird dann auf die erste Führung geschoben und dient dem
Auffangen von abtropfendem Fett oder Fleischsaft.
• Auf der oberen Führungsschiene (je nach Fleischdicke)
dient er als Ablage für das zu grillende Fleisch (Fleisch
vom Rost); das Backblech wird auf die erste Führung
gegeben und dient dem Auffangen von abtropfendem Fett
oder Fleischsaft.
• Zum Garen verschiedener Speisen auf
verschiedenen "Ebenen" wird der große Rost in die obere
Führungsschiene geschoben.
Der Bratspieß
Flügelmuttern
Traggestell
Spieß
Gabel
Handgriff des Drehspießes
Dieses Zubehör ermöglicht ein langsames, vollständiges Garen
auf einem sich ununterbrochen drehenden Spieß. Das Ergebnis
ist eine perfekte Bräunung des Fleisches. Der Drehspieß setzt
sich zusammen aus:
• einer Halterung, die auf der dritten Führungsschiene
von unten installiert wird, sodass der Drehspieß in die
Hohlachswelle des Motors, der sich hinter der mit
Öffnungen versehenen Ofenrückwand befindet,
eingesetzt werden kann;
• einem Spieß, auf den das zu grillende Stück Fleisch
gespießt wird, und der an beiden Enden auf je einer mit
einer Flügelschraube befestigten Gabel aufliegt.
Anmerkung: Achten Sie bei Installieren des Drehspießes
darauf, dass der Spieß korrekt in die mit dem Motor verbundene
Hohlachswelle eingeführt wird.
Achten Sie darauf, dass…
- das zu grillende Fleischstück in der Mitte aufgespießt wird;
- das zu grillende Fleisch sich in der Mitte des Spießes befindet.
• ein verlängerbarer Griff aus Isoliermaterial, der vorn
auf den Spieß geschraubt wird…
- ermöglicht die Verwendung des Spießes auch für das
Garen sehr großer Fleischstücke
- verhindert Verbrennungen beim Herausnehmen des
fertiggegarten Fleisches.
Schrauben Sie den Griff zum Herausnehmen des Spießes bis
zum Anschlag fest (während des Garens muss der Griff
entfernt werden).
Zeitschalter für den Drehspieß
Der Drehspieß der ARISTON Backöfen kann über einen
Zeitschalter zeitlich vorprogrammiert werden. Nach Ablauf
der Garzeit sorgt der Motor dafür, dass sich der Spieß so lange
weiterdreht, bis die Temperatur im Ofen ausreichend gesunken
ist, sodass kein Risiko besteht, dass das Fleisch verbrennen
könnte.
Nach Beendigung des Garvorgangs wird die Einstellung des
Funktionswählschalters beibehalten und die Temperatur auf "0"
gestellt.
Bei der Funktion "Gratinieren" sollte das Fleisch auf keinen
Fall direkt auf das Backblech gelegt werden, da die
Unterhitze den Austritt von Fleischsaft und Fett hervorruft,
was zu Spritzern oder Verkrustungen an den Ofenwänden
und schließlich zu Rauchbildung durch Verbrennung
führen könnte.
45
DE
Page 45

EINIGE BEISPIELE ZUM GAREN AUF EINER EBENE
Rezepte Backofenfunktion Temperatur Garzeit Höhenstufe Hinweise Vo r he i ze n
Brot (1 kg)
Blätterteiggebäck
Pizza (Brotteig)
Quiche lorraine
(Mürbeteig)
Käse-Soufflé
Pâté de campagne
Lammkeule
Überbackene
Kartoffeln
Fisch
Hühnchen
Rinderbraten
Schweinebraten
Multicooking 210°C 30-35' 2 Auf Emailleblech Ja
Multicooking 200°C
Pizza 240°C 10-15' 1 Auf Emailleblech Ja
Pizza 220°C 30' 1 Backform auf Emailleblech Ja
Multicooking 200°C 30-40' 2
Traditionell 180°C 50-60' 2
Gratinieren 210°C
Gratinieren 200°C
Traditionell
Gratinieren
Grillen
Gratinieren
Grillen Drehspieß
Gratinieren 210°C
Gratinieren 210°C1 Std. für 1 kg 2-1* Fleisch auf Rost Nein
200°C
240°C
250°C
210°C
20-25'
je nach Dicke
1 Std. für
1,5 bis 2 kg
40-45'
je nach Dicke des Auflaufs
je nach Fisch und Dicke
1 Std. für
1,2 bis 1,2 kg
je nach gewünschter
Konsistenz
2 Auf Emailleblech Ja
Backform Ø 20 cm auf
Emailleblech
Im Wasserbad (warm) auf
Emailleblech
2-1* Fleisch auf Rost Nein
2 Auflaufform auf Emailleblech Ja
2
2-1*
2-1*
2-1*
3-1*
2-1* Fleisch auf Rost Nein
Filets + Flüssigkeiten, Emailleblech
Ganzer Fisch, Rost
Grillfisch, Rost
Fleisch auf Rost
Drehspieß bei geschl.
/Gescholssene Tür
Ja
Ja
Ja
Nein
Kalbsbraten
Gefüllte Tomaten
Aufwärmen von
Fertiggerichten
Lasagne
des Auflaufs
Hefegebäck
Napfkuchen
Windbeutel
Karamelcreme
Biskuitteig
Macaron
Wei ße Baisers
Braune Baisers
Bratäpfel
Sandgebäck
Apfeltorte
Buttergebäck
Mürbeteigtorte
Salzgebäck
X - Y* in der Spalte "Höhenstufe" :
X = Rost oder Spiess auf H¨henstufe X
Y = Emailleblech zum Auffangen des Fleischsafts und Fetts auf Höhenstufe Y
Gratinieren 210°C1 Std. für 1 kg 2-1* Fleisch auf Rost Nein
Multicooking 200°C 20-25' 2 Teller auf Emailleblech Ja
Intensivbacken
Intensivbacken 200°C
Intensivbacken 200°C
Kuchen / Gebaeck 160°C 35-45' 2
Kuchen / Gebaeck 160°C60' 2
Kuchen / Gebaeck 200°C 20-25' 2
Traditionell 180°C30' 2
Kuchen / Gebaeck 190°C30' 2
Kuchen / Gebaeck 180°C
Kuchen / Gebaeck 70-80°C
Kuchen / Gebaeck 110°C
Multicooking 210°C
Kuchen/Gebaeck 190°C 10-15' 2 Auf Emailleblech Ja
Pizza 220°C 30' 1 Backform auf Emailleblech Ja
Heißluftofens 190°C 10-15' 2 Backblech a/Backrost Ja
Heißluftofens 190°C 15-25' 2 Backblech a/Backrost Ja
Heißluftofens 190°C 10-15' 2 Backblech a/Backrost Ja
siehe Angaben
auf der
Verpackung
siehe Angaben auf der
Verpackung
je nach Dicke
des Auflaufs
je nach Dicke
des Auflaufs
15-20'
je nach Größe
3 Std.
je nach Größe
2 Std.
je nach Größe
20-25'
je nach Größe
Hinweis : Das Rost ist immer mit der Wölbung nach unten in den Backofen zu schieben.
2 Teller auf Emailleblech Nein
2 Teller auf Emailleblech Nein
2 Teller auf Emailleblech Nein
Backform aus Aluminium auf
Emailleblech
Backform aus Aluminium auf
Emailleblech
Kleine Beutel ohne Zucker auf
Emailleblech
Kleine Töpfchen im Wasserbad
2 Auf Emailleblech Ja
2 Trocknung kleiner Baisers Ja
2 Trocknung kleiner Baisers Ja
2 Teller auf Emailleblech Ja
(warm)
Backform aus Aluminium auf
Emailleblech
Ja
Ja
Ja
Ja
Ja
DE
46
Page 46

Die Sicherheit - Eine gute Gewohnheit
Um die Leistungsfähigkeit und Sicherheit dieses Gerätes zu gewährleisten, bitte folgendes beachten:
• wenden Sie sich ausschließlich an unsere anerkannten Kundendienst-Zentren
• verlangen Sie, dass nur Original-Ersatzteile verwendet werden.
• Das Gerät ist für den Einsatz im privaten Haushalt bestimmt; seine Eigenschaften dürfen nicht verändert
werden.
• Die Anweisungen gelten nur für die Bestimmungsländer, deren Symbole im Handbuch und auf dem Typenschild angegeben sind.
• Die elektrische Sicherheit dieses Gerätes wird nur dann
gewährleistet, wenn es sachgemäß und gemäß den
einschlägigen Sicherheitsvorschriften an eine leistungsfähige Erdungsanlage angeschlossen wird.
• Bei in Betrieb befindlichem Gerät werden die
Heizelemente und einige Ofentürteile sehr heiß.
Vermeiden Sie demnach, diese zu berühren und
halten Sie Kinder vom Ofen fern.
Folgende Gefahrenquellen sollten für Kinder und
unfähige Personen nicht zugänglich sein:
- die Bedienungselemente und das Gerät im allgemeinen;
- die Verpackung (Plastikbeutel, Nägel usw.)
- das Gerät während des Gebrauchs und auch sofort
nach dem Gebrauch, da es sehr heiß werden kann;
- das Altgerät (bei einem solchen muss auch dafür gesorgt werden, dass keines seiner Bestandteile mehr
eine Gefahrenquelle darstellen kann).
Vermeiden Sie bitte:
- das Gerät mit feuchten Körperteilen zu berühren;
- das Gerät barfuß zu benutzen;
- den Stecker am Kabel oder am Gerät selbst aus der
Steckdose zu ziehen;
- unsachgemäße und demnach gefährliche Eingriffe;
- die Be- und Entlüftungsschlitze zu verstopfen;
- dass das Kabel kleiner Elektrogeräte mit heißen Teilen des Backofens in Berührung kommt;
- das Gerät der Witterung (Regen, Sonne usw.) auszusetzen;
- den Backofen als Lagerungsstätte zu verwenden;
- den Gebrauch brennbarer Flüssigkeiten in seiner Nähe;
- den Einsatz von Adaptern, Vielfachsteckdosen und/
oder Verlängerungen;
- Installations- und Reparationsversuche, ohne Fachpersonal anzufordern.
Fordern Sie absolut Fachpersonal an:
-für die Installation (gemäß den Anweisungen des Her-
stellers);
- bei Zweifeln hinsichtlich der Funktionsweise;
- wenn die Steckdose ausgetauscht werden muss, falls
diese mit dem Gerätestecker nicht übereinstimmen
sollte.
Fordern Sie den Einsatz von Technikern der vom
Hersteller anerkannten Kundendienststellen an bei:
- Zweifeln hinsichtlich der Unversehrtheit des Gerätes
nach Abnahme des Verpackungsmaterials;
- Beschädigung oder Austausch des Zufuhrkabels;
-Störungen oder schlechter Betriebsweise, und verlan-
gen Sie den Einsatz von Original-Ersatzteilen.
Folgendes sollte befolgt werden:
- Verwenden Sie das Gerät für keine anderen Zwecke,
als zum Garen von Speisen.
- Überzeugen Sie sich nach Abnahme der Verpackung,
dass das Gerät auch nicht beschädigt wurde.
- Trennen Sie das Gerät bei Betriebsstörungen, vor der
Wartung und Reinigung vom Stromnetz.
- Schalten Sie das Gerät vom Stromnetz ab, und drehen Sie den Gashahn (wenn vorgesehen) ab, wenn
das Gerät nicht in Betrieb ist.
- Verwenden Sie Backofenhandschuhe.
- Fassen Sie den Griff stets in der Mitte an, da die Seitenteile durch eventuellen Heißluftaustritt äußerst heiß
sein könnten.
- Vergewissern Sie sich stets, daß sich die Reglerknöpfe
auf Position "•"/"o" befinden, wenn sich das Gerät nicht
in Gebrauch befindet.
- Schneiden Sie bitte vor der Entsorgung Ihres Altgerätes
das (vom Stromnetz getrennte!) Elektrokabel ab.
• Der Hersteller kann für eventuelle, durch fehlerhafte
Installation, oder unsachgemäßen, falschen oder unangemessenen Gebrauch nicht haftbar gemacht werden.
47
DE
Page 47

INSTALLIERUNG
Fig. C
Die Installation ist von Fachpersonal und gemäß den
Anweisungen des Herstellers durchzuführen. Eine un-
sachgemäße Installation kann zu Schäden an Personen, Tieren oder Gegenständen führen, für die der Hersteller nicht
zur Verantwortung gezogen werden kann.
Wichtig: Vor jeder Einstellung, Wartung usw. muss der Backofen vom Stromnetz getrennt werden.
Installation der Einbaubacköfen
PUm eine einwandfreie Betriebsweise des Gerätes zu gewährleisten, muss der Umbauschrank geeignete Merkmale
aufweisen. Auf nachstehender Abbildung sind die jeweils für
den Einbau in einen Unterbau (NB: Installation zwecks
Energiedeklaration) oder in einen Hochschrank
erforderlichen Abmessungen ersichtlich.
567 mm.
45 mm.
558 mm.
593 mm.
20/23 mm.
595 mm.
5 mm.
595 mm.
545 mm.
Die an den Backofen angrenzenden Schrankwände müs-
sen aus hitzebeständigem Material beschaffen sein. Dies gilt
besonders für Möbel aus Furnierholz, deren Leim einer Temperatur von 100 °C standhalten muss.
Gemäß den Sicherheitsvorschriften muss nach erfolgtem
Einbau die Möglichkeit einer Berührung mit den Elektroteilen
ausgeschlossen sein.
Alle zum Schutz dienenden Teile müssen so befestigt werden, dass ein Entfernen derselben ohne ein Werkzeug zu
Hilfe nehmen zu müssen, nicht möglich ist.
Um eine korrekte Zentrierung zu gewährleisten, müssen die
4 seitlich am Backofen befindlichen Klampen mit den 4 Lö-
chern des Rahmens in Übereinstimmung gebracht werden.
Im Besonderen muss, bei einer Stärke der Umbauschrankwand von:
• 20 mm: der bewegliche Teil der Klampe abgenommen
werden (Abb. A);
• 18 mm: die erste, werkseitig bereits angebrachte Rille
genutzt werden (Abb. B);
• 16 mm: die zweite Rille genutzt werden (Fig. C).
20/28 mm.
45 mm.
min.
595 mm.
20/23 mm.
567 mm.
5 mm.
595 mm.
545 mm.
20/28 mm.
558 mm.
595 mm.
575-585 mm.
45 mm.
min.
Um eine einwandfreie Belüftung zu gewährleisten, muss die
Rückwand des Schrankumbaus abgenommen werden. Der
Backofen sollte möglichst so installiert werden, dass er auf
zwei Holzleisten aufliegt; sollte eine durchgehende Fläche
als Auflage vorhanden sein, muss diese mit einem Ausschnitt
von mindestens 45 x 560 mm versehen werden.
Fig. A Fig. B
Zur Befestigung des Backofens am Möbel öffnen Sie die
Backofentür und befestigen Sie ihn dann mittels 4 Holz-
schrauben, die in die 4 im Backofenrahmen befindlichen Lö-
cher einzuschrauben sind.
DE
48
Page 48

Befestigung des Backofens am Umbauschrank (nur
an Modellen FC...)
1. Setzen Sie die Bügel "A" auf die Anschlagfläche "B"
des Backofens.
2. Setzen Sie die Eckstücke "C" in die Bügel "A" ein.
Achten Sie darauf, dass bei einer Stärke der
Umbauschrankwand von:
• 16 mm: das Eckstück so angebracht wird, dass die
darauf gedruckte Zahl 16 vor Ihnen liegt;
• 18 mm: das Eckstück so angebracht wird, dass der
unbeschriftete Teil vor Ihnen liegt;
• 20 mm: das Eckstück nicht anzubringen ist.
3. Befestigen Sie die Bügel und die Eckstücke an der
Kante der Umbauschrankwand "D".
Elektroanschluss
4. Befestigen Sie den Backofen mittels der Schrauben
und Kunststoff-Unterlegscheiben "E" am
Umbauschrank.
16
16
D
C
16
16
B
C
D
A
C
D
E
E
Anschluss
Vor dem Anschluss ist zu prüfen, dass die Daten der
Netzversorgung (Phasenanzahl, Spannung, erforderliche
Höchstleistung) den auf dem zu installierenden AristonGerät angegebenen Werten entsprechen.
Die Ariston-Backöfen können an folgende Elektroanlagen
angeschlossen werden:
Elektrischer Anschluss
LN
L1L2
Netzspannung
Frequenz
FR-AT-BE-DE-GP-ES-IE-IL-IS-IT-DK
LU-RE-FI-GB-GR-PT-SE-MA-NZ-NL
230 V-1+N ~ 50 Hz
CY-MT-AU-NZ-KW
240 V-1+N ~ 50 Hz
FR-BE-NO
230 V-2 ~ 50 Hz
Sicherung
Querschnitt
16 A
1,5 mm²
16 A
1,5 mm²
Sie können Ihren Ofen mit der elektrischen Einrichtung
über ein Verbindungsgehäuse verbinden. Vertagen Sie auf
die Tabelle für die minimalen Sektionen Fäden und das
Kalibrieren der Schutzelemente gemäß der Verzweigung.
Erfolgt der Anschluss über eine Verbindungsdose, muss
oberhalb des Geräteanschlusses ein allpoliger Schalter
mit einem Kontaktöffnungsabstand von 3 mm
zwischengeschaltet werden.
Es empfiehlt sich, ein ausreichend langes
Versorgungskabel zu verwenden, damit der Backofen bei
Wartungsarbeiten mühelos aus der Nische
herausgezogen werden kann. Verwenden Sie
ausschließlich Kabel des Typs HAR H 05 - RRF, der mit
einem Netzstecker bestückt ist, der die Vorschriften des
Landes erfüllt, in dem das Gerät installiert wird. Die
Steckdose muss leicht zugänglich sein.
Wichtig: Nach Anschluss des Gerätes an das Kabel sind
sämtliche Schrauben der Klemmenleiste neu anzuziehen.
Das Gerät besitzt die CE-Kennzeichnung und entspricht
folgenden EU-Richtlinien:
DBT 73/23 EWG geändert durch die Richtlinie 93/68/EWG
CEM 89/336/EWG geändert durch die Richtlinien 92/31/
EWG e 93/68/EWG
Nutzabmessungen des Backofens :
Breite 43,5 cm
Tiefe 40,0 cm
Höhe 32,0 cm
Nutzvolumen des Backofens: 56 Liter
Versorgungsspannung und -frequenz:
230V~50Hz : 2800 W
240V~50Hz : 3050 W
Energy Label
Richtlinie Energieetikettierung 2002/40/EG für
Elektrobacköfen. Norm EN 50304.
Energieverbrauch (bei Standardbeladung) :
Conventionelle Beheizung
Umluft/Heißluft
Vergewissern Sie sich, dass vor jeder Wartung und
Pflege, auch vor Austausch der Backofenlampe, das
Gerät vom Stromnetz abgeschaltet ist.
Der Anschluss des Gerätes an eine nichtgeerdete
Anlage ist gefährlich.
49
DE
Page 49

DE
50
Page 50

51
DE
 Loading...