

Page 1
Congratulations on choosing an Ariston appliance, which you will find is dependable and easy to use. W e recommend
that you read the instructions in this owner’ s manual carefully before use f or the best performance and to extend the lif e
of your appliance, as it will provide you with all the instructions you require to ensure its safe installation, use and
maintenance. Always k eep this owner’ s manual close to hand since you ma y need to refer to it in the future. Thank you.
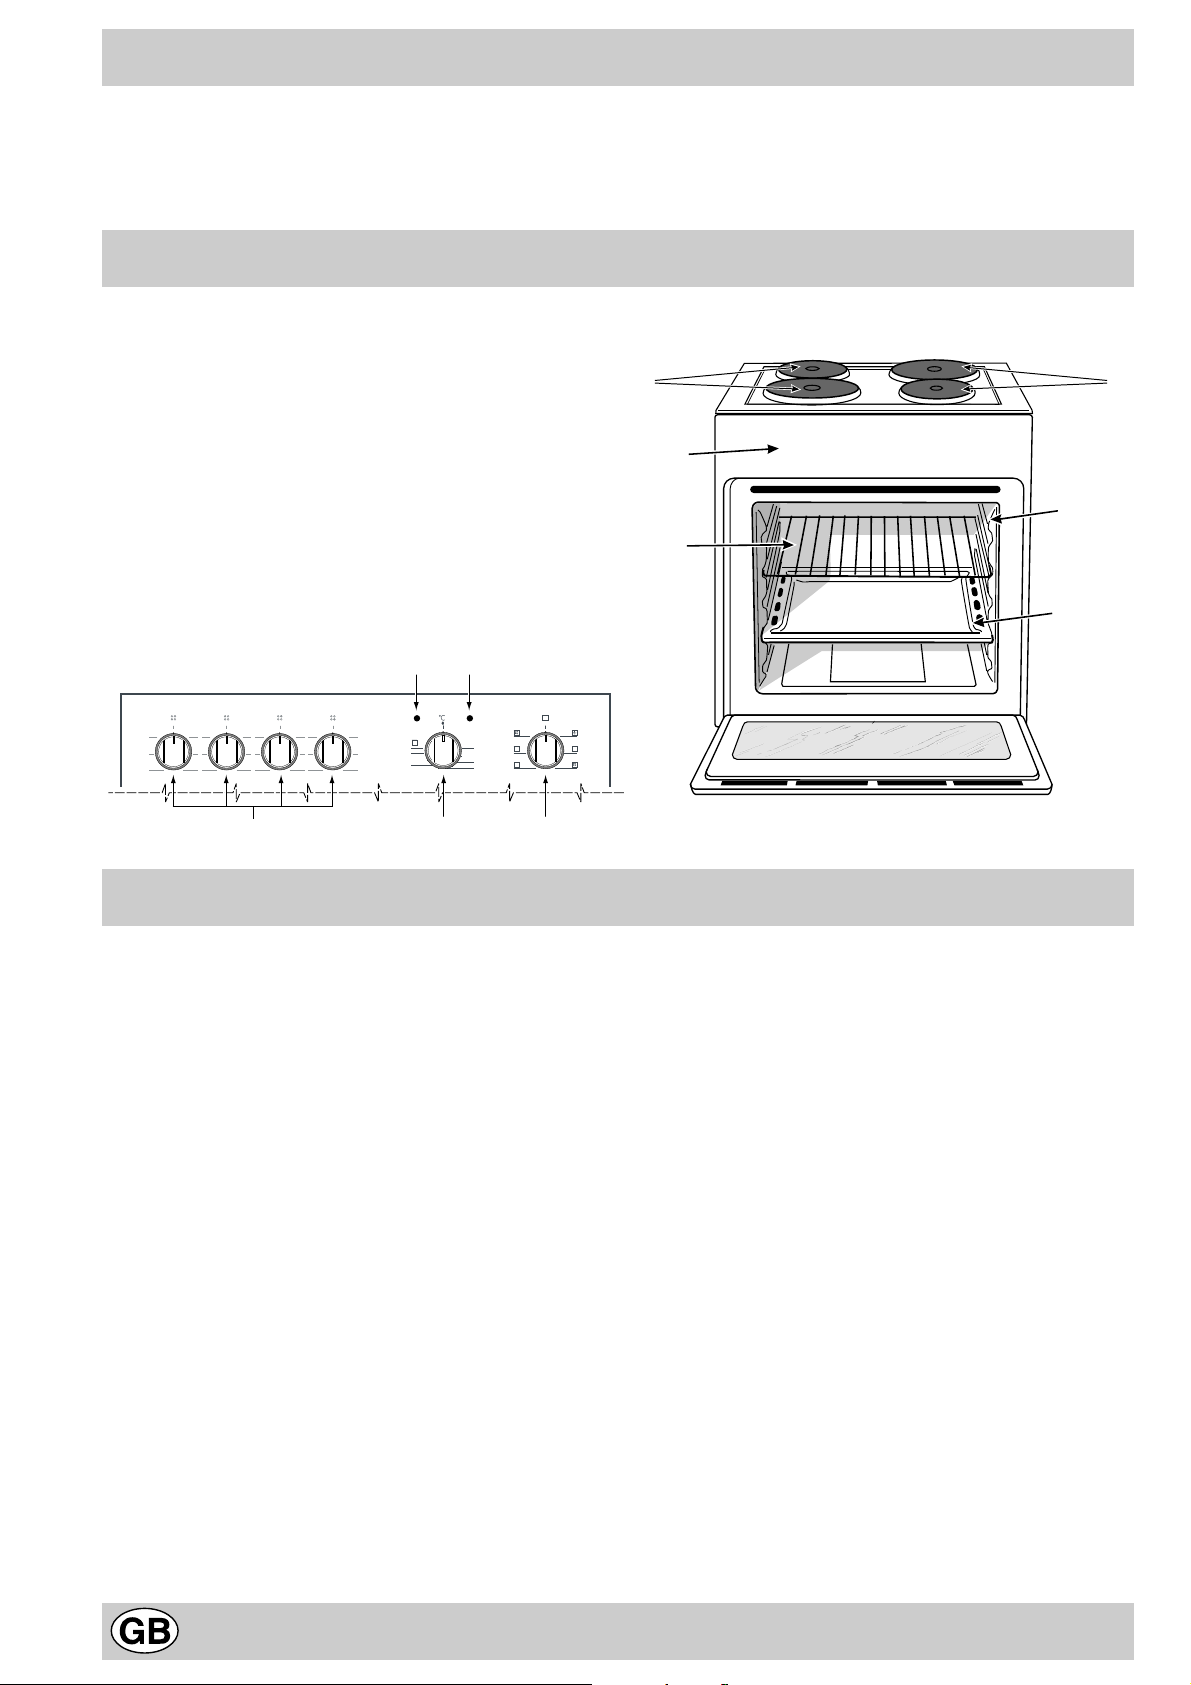
Close-up view
A. Control Panel
B. Dripping Pan or Baking Sheet
C. Oven Rack
D. Electric hotplate
E. Cooking mode selection knob
F. Electric hotplate knobs
G. Electric hotplate indicator light
H. Guides for sliding the racks or dripping pan in and
out
I. Oven indicator light (only on certain models) - When
lit, it indicates the oven is heating up to the temperature set.
L. Cooking temperature selection knob
I
G
D
A
C
D
H
B
0
1
2 5
3
6
1
2 5
3
4
0
6
1
2 5
3
4
F
0
6
1
2 5
3
4
0
6
MAX
220
180
4
60
100
140
L
0
E
How to use your oven
This multi-function oven combines the adv antages of traditional convection ov ens with those of the more modern
fan assisted models in a single appliance.
It is an extremely versatile appliance that allows you to
choose easily and safely between 5 different cooking
modes. The various features offered by the oven are selected by means of selector knob “E” and thermostat “L”
situated on the control panel.
Notice: The first time y ou use your appliance, w e recommend that you set the thermostat to the highest setting
and leave the ov en on f or about half an hour with nothing
in it, with the oven door shut. Then, open the oven door
and let the room air. The odour that is often detected during this initial use is due to the evaporation of substances
used to protect the oven during storage and until it is installed.
Notice: Place the dripping pan provided on the bottom
shelf of the oven to prev ent any sauce and/or grease from
dripping onto the bottom of the oven only when grilling
food or when using the rotisserie (only available on certain models). F or all other types of cooking, ne ver use the
bottom shelf and never place anything on the bottom of
the oven when it is in operation because this could damage the enamel. Alw ays place your cookware (dishes , aluminium foil, etc. etc.) on the grid provided with the appliance inserted especially along the oven guides.
Convection Mode a
Position of thermostat knob “L”: betw een 60°C and Max.
On this setting, the top and bottom heating elements come
on. This is the classic, traditional type of oven which has
been perfected, with exceptional heat distribution and reduced energy consumption. The convection oven is still
unequalled when it comes to cooking dishes made up of
several ing redients, e.g. cabbage with ribs, Spanish style
cod, Ancona style stockfish, tender veal strips with rice,
etc. Excellent results are achieved when preparing veal
or beef-based dishes as well (braised meats, stew, goulash, wild game, ham etc.) which need to cook slowly and
require basting or the addition of liquid. It nonetheless remains the best system for baking cakes as well as fruit
and cooking using covered casserole dishes for ov en baking. When cooking in conv ection mode, only use one dripping pan or cooking rack at a time, otherwise the heat
distribution will be uneven. Using the diff erent rack heights
available, you can balance the amount of heat between
the top and the bottom of the oven. Select from among
the various rack heights based on whether the dish needs
more or less heat from the top.
Fan Assisted Mode b
Position of thermostat knob “ L”: Between 60°C and Max.
The heating elements, as well as the fan, will come on.
Since the heat remains constant and uniform throughout
2
Page 2
the oven, the air cooks and browns f ood uniformly over its
entire surface. With this mode , you can also cook v arious
dishes at the same time, as long as their respective cooking temperatures are the same. A maximum of 2 racks
can be used at the same time, following the instructions in
the section entitled: “Cooking On More Than One Rack”.
This fan assisted mode is particularly recommended for
dishes requiring a gratin finish or for those requiring considerably prolonged cooking times, such as for example:
lasagne, pasta bakes, roast chic ken and potatoes, etc…
Moreover, the excellent heat distribution makes it possible to use lower temperatures when cooking roasts. This
results in less loss of juices, meat which is more tender
and a decrease in the loss of weight for the roast. The fan
assisted mode is especially suited for cooking fish, which
can be prepared with the addition of a limited amount of
condiments, thus maintaining their flavour and appearance.
Desserts: the fan assisted mode is also perf ect for baking
leavened cak es.
Moreover, this mode can also be used to thaw quickly
white or red meat and bread by setting the temperature to
80 °C. To thaw more delicate foods, set the thermostat to
60°C or use only the cold air circulation feature by setting
the thermostat to 0°C.
“Top” oven c
Position of thermostat knob “L”: Between 60°C and Max.
The top heating element comes on.
This mode can be used to brown food at the end of cooking.
Grill d
Position of thermostat knob “ L”: Max
The top central heating element comes on.
The extremely high and direct temperature of the grill
makes it possible to brown the surf ace of meats and roasts
while locking in the juices to keep them tender . The grill is
also highly recommended for dishes that require a high
temperature on the surface: beef steaks, veal, rib steak,
filets, hamburgers etc...
Some grilling examples are included in the “Pr actical Cooking Advice” paragraph.
Fan Assisted Grill e
Position of thermostat knob “L”: between 60°C and 200°C.
The top central heating element and the fan come on. This
combination of features increases the effectiv eness of the
unidirectional thermal radiation of the heating elements
through forced circulation of the air throughout the ov en.
This helps prevent food from burning on the surface, allowing the heat to penetrate right into the food. Excellent
results are achieved with kebabs made with meats and
vegetables, sausages , ribs, lamb chops, chicken in a spicy
sauce, quail, pork chops, etc.
This mode is also ideal for cooking fish steaks, lik e swordfish, tuna, grouper , stuff ed cuttlefish etc.
The oven light
Set knob “E” to the 8 symbol to turn it on. It lights the
oven and stays on when an y of the electrical heating elements in the oven come on.
The control knobs for the hob electric hotplates (F)
The cookers can be equipped with standard, rapid and
automatic electric hotplates in a variety of combinations (the
rapid hotplates can be distinguished from the rest by the red
boss in the centre of the same, and the automatic hotplates
by the smaller circular aluminium plate in their centre).
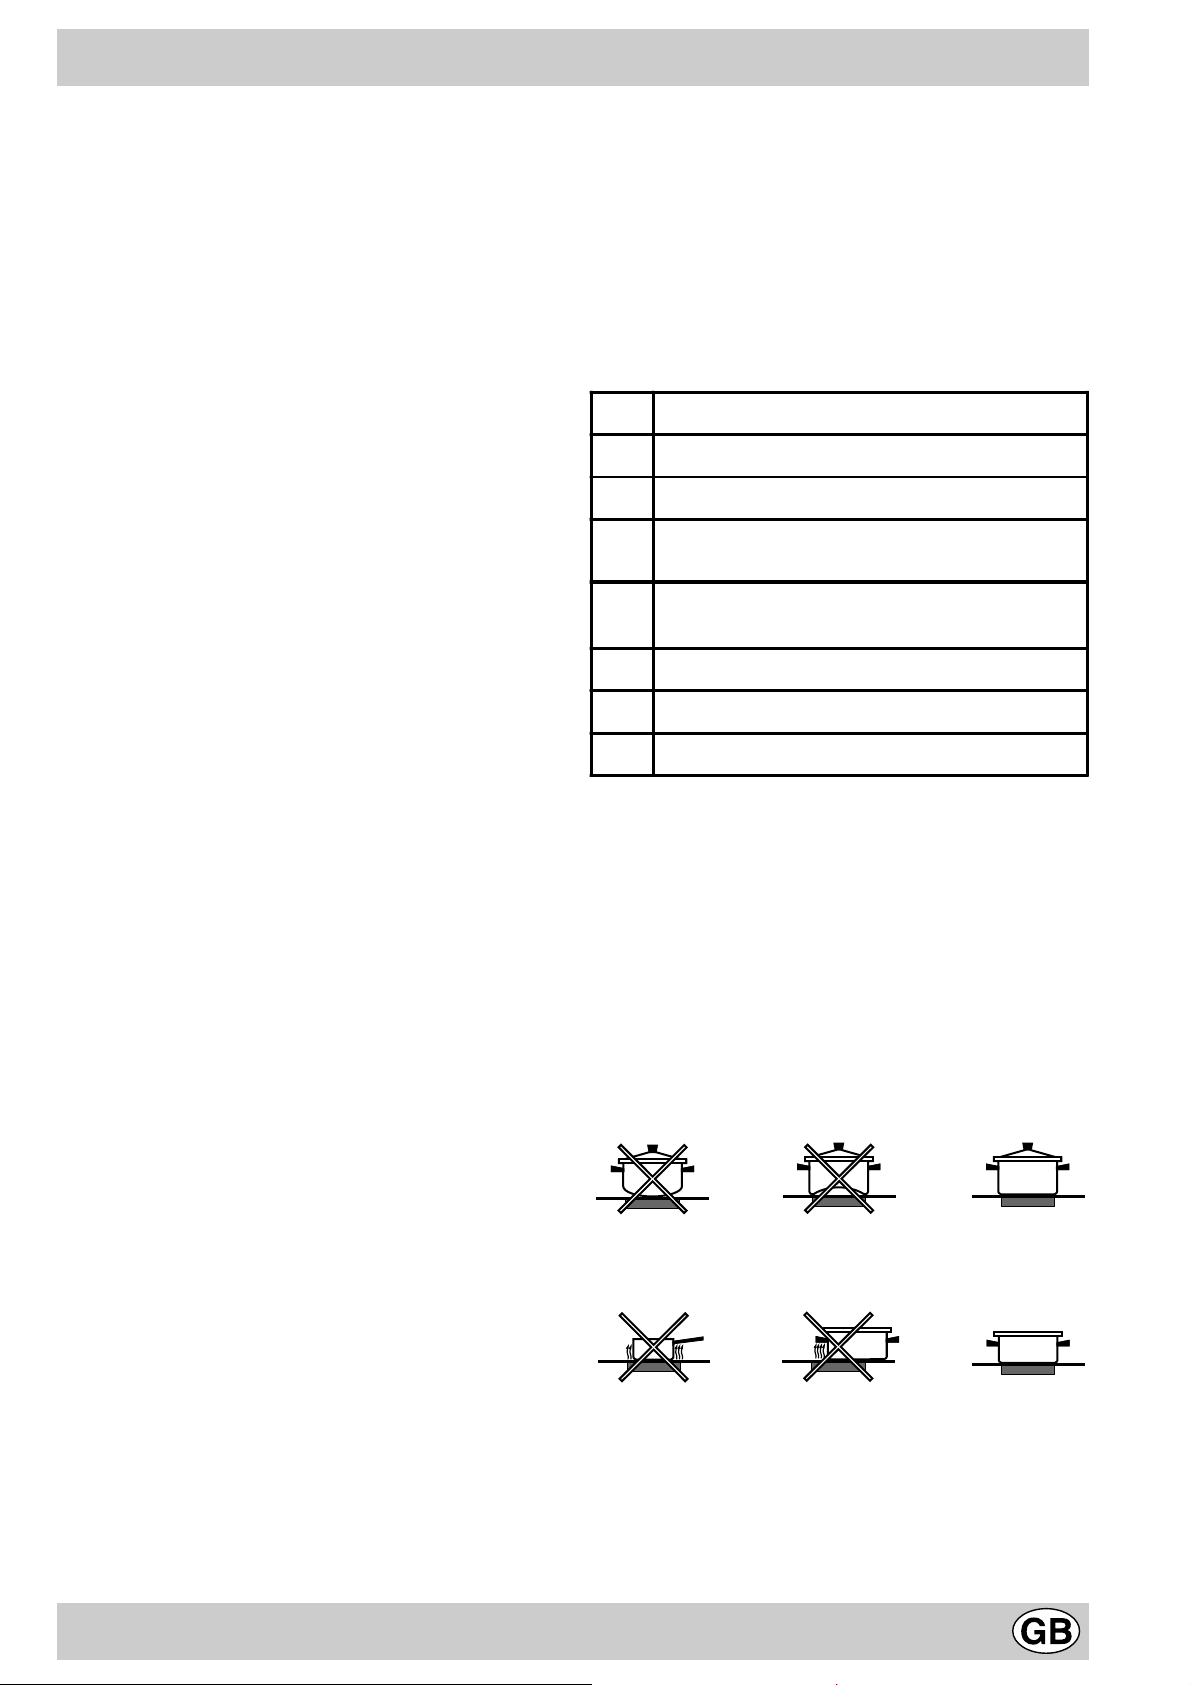
To avoid any heat loss and damage to the hotplates, we
advise you to use pans with a flat bottom, whose diameter is
no less than that of the hotplate itself.
The table contains the different settings indicated on the
knobs and the use for which the hotplates are recommended.
Pos. Piastr a normale o rapida
0 Spento
1 Cottura di verdure, pesci
Cottura di patate (a vapore) minestre, ceci,
2
fagioli
Proseguiment o di cottura di gr andi quantità di
3
cibi, minestroni
4
Arrostire (medio)
5
Arrostire (forte)
6
Rosolare o raggiungere bollitura in poco tempo
Before using the hotplates for the first time, you should
heat them at maximum temperature for appr oximately 4
minutes, without an y pans. During this initial stage, their
protective coating hardens and reaches its maximum
resistance.
Electric hotplate indicator light (G)
This light comes on when any of the electrical hotplates on
the hob have been turned on.
Using the hob
To get the best from your hob , here are a f ew helpful tips to
keep in mind during cooking or when preparing food.
· Use flat-bottomed pans to ensure the same adheres fully
to the cooking zone.
· Use pans whose diameter is sufficient to cover the
hotplate fully , so as to guarantee the use of all the availab le
heat.
· Make sure the bottom of the pan is always clean and dry ,
to ensure correct contact and a long life for y our hotplates
and pans.
3
Page 3
How to Keep Your Oven in Shape
Before cleaning your oven, or performing maintenance,
disconnect it from the power supply.
To extend the life of your oven, it must be cleaned
frequently, keeping in mind that:
• Do not use steam equipment to clean the appliance.
• the enamelled or stainless steel parts should be
washed with lukewar m water without using any abrasive powders or corrosive substances which could ruin
them; Stainless steel could get stained. If these stains
are difficult to remove, use special products available
on the market. After cleaning, it is advisable to rinse
thoroughly and dry .
• the inside of the oven should preferably be cleaned
immediately after use, when it is still warm, with hot
water and soap; the soap should be rinsed away and
the interior dried thoroughly . Avoid using abr asiv e detergents (for example cleaning powders, etc…) and
abrasive sponges for dishes or acids (such as
limescale-remover , etc…) as these could damage the
enamel. If the grease spots and dirt are par ticularly
tough to remove, use a special product f or oven cleaning, following the instructions provided on the pack et.
• if you use your oven for an extended period of time,
condensation may form. Dry it using a soft cloth.
• there is a rubber seal surrounding the oven opening
which guarantees its perfect functioning. Check the
condition of this seal on a regular basis. If necessary,
clean it and avoid using abrasive products or objects
to do so. Should it become damaged, please contact
your nearest After-sales Service Centre. We recommend you avoid using the oven until it has been repaired.
• nev er line the oven bottom with aluminium foil, as the
consequent accumulation of heat could compromise
the cooking and even damage the enamel.
• clean the glass door using non-abrasive products or
sponges and dry it with a soft cloth.
• the electric hotplates should be cleaned with a damp
cloth and lubricated with a little oil while still warm;
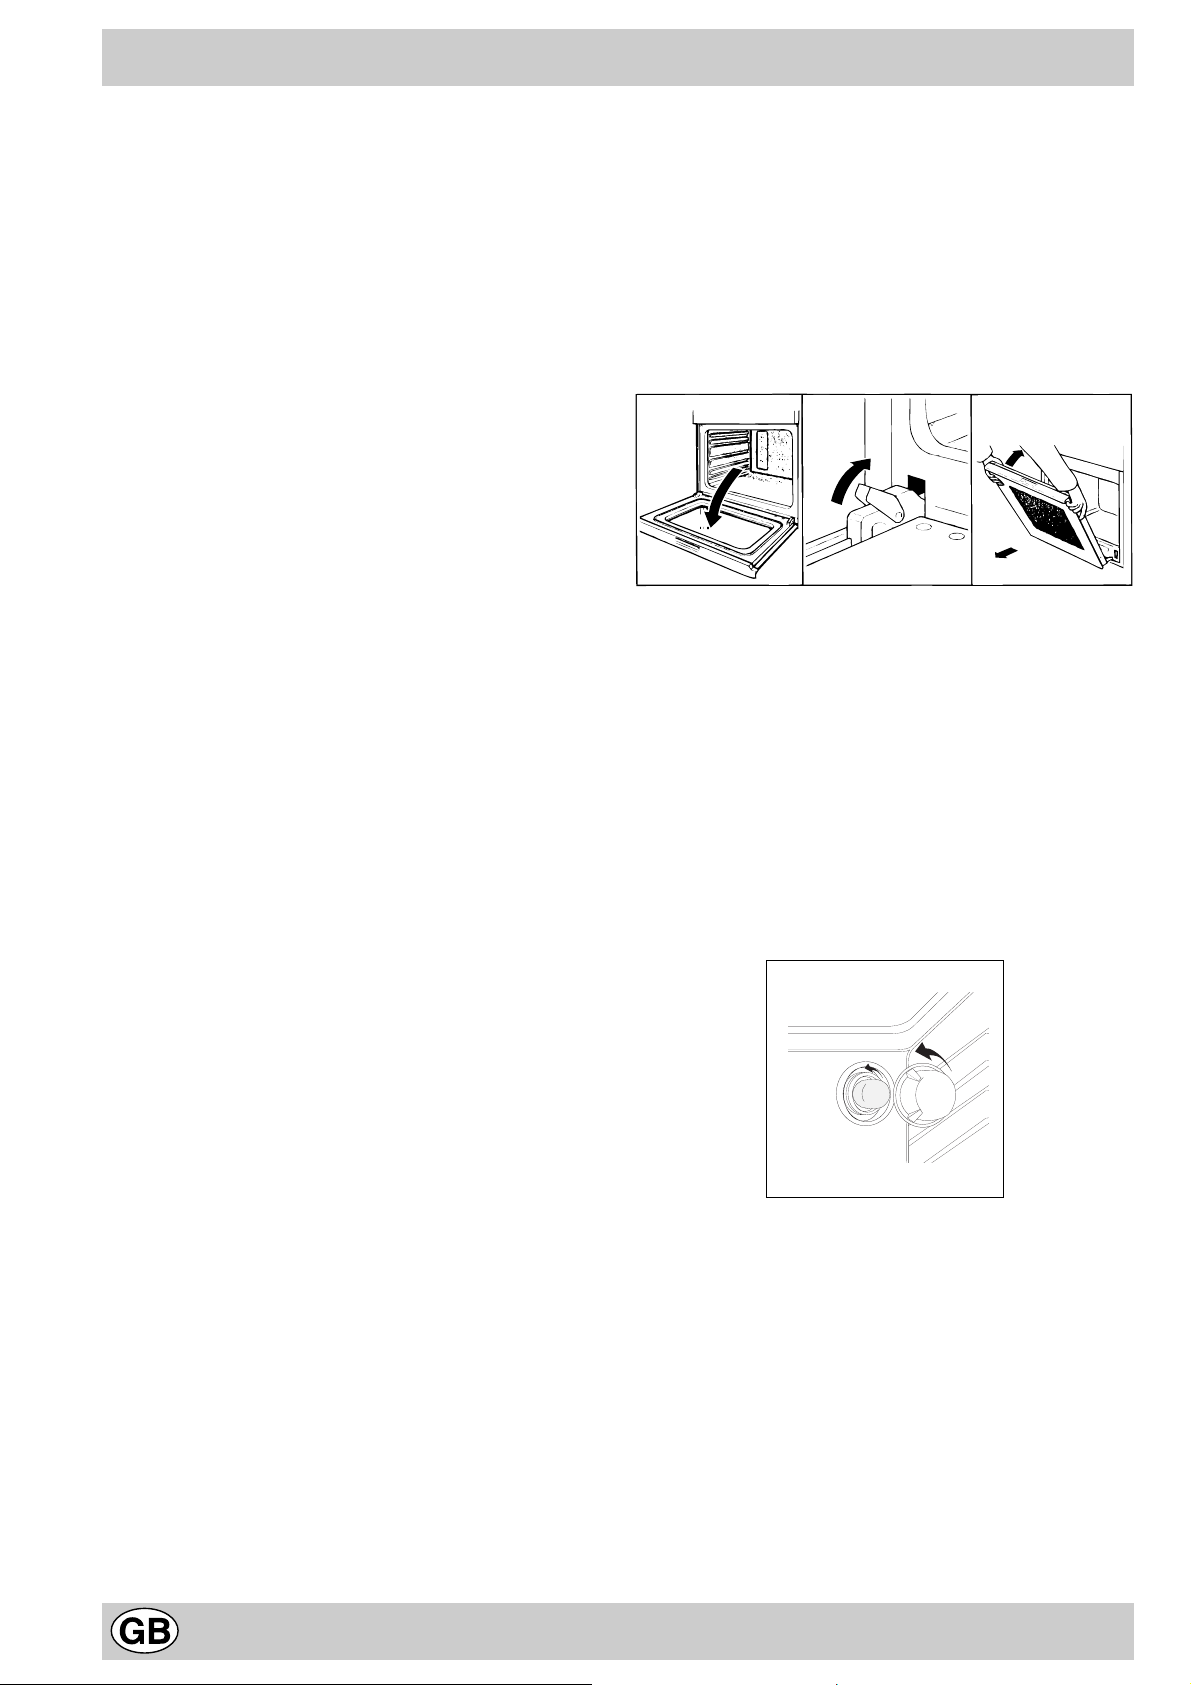
How to remove the oven door
For a more thorough clean, you can remove the oven
door. Proceed as follows:
• open the door fully;
• lift up and turn the small levers situated on the two
hinges;
• grip the door on the two external sides, shut it slowly
but not completely;
• pull the door towards you, pulling it out of its seat;
Reassemble the door by following the above procedures
backwards.
123
Replacing the Oven Lamp
• Disconnect the oven from the pow er supply by means
of the omnipolar switch used to connect the appliance
to the electrical mains; or unplug the appliance if the
plug is accessible;
• Remove the glass cov er of the lamp-holder;
• Remove the lamp and replace with a lamp resistant to
high temperatures (300°C) with the following characteristics:
- Voltage: 230/240 V
- Wattage 25W
- Type E14
• Replace the glass cover and reconnect the oven to
the mains power supply.
4
Page 4
Practical Cooking Advice
The oven off ers a wide range of alternatives which allow
you to cook any type of food in the best possib le wa y . With
time you will learn to make the best use of this versatile
cooking appliance and the following directions are only a
guideline which may be varied according to your o wn personal experience.
Preheating
If the oven must be preheated (this is generally the case
when cooking leavened f oods), the “fan assisted” mode
b can be used to reach the desired temperature as quickly
as possible in order to save on energy.
Once the food has been placed in the oven, the most
appropriate cooking mode can then be selected.
Cooking on More Than One Rack
If you have to cook on more than one rack at the same
time, use only the “fan assisted mode” b which is the
only one that is appropriate for this type of cooking.
• The oven is fitted with 5 racks. During fan assisted
cooking, use two of the three central racks; the lowest
and highest racks receive the hot air directly and
therefore delicate foodstuffs could be bur nt on these
racks.
• As a general rule, use the 2nd and 4th rack from the
bottom, placing the foodstuffs that require greater heat
on the 2nd rack from the bottom. For example, when
cooking meat roasts together with other food, place
the roast on the 2nd rack from the bottom and the more
delicate food on the 4th rack from the bottom.
• When cooking foodstuffs that require differing times
and temperatures, set a temperature that is somewhere
between the two temperatures required, place the more
delicate food on the 4th rack from the bottom and tak e
the food requiring less time out of the oven first.
• Use the dripping pan on the lower rack and the grid on
the upper;
Using the Grill
This multi-function oven offers you 2 different grilling
modes only and exclusively with the o ven door shut.
Use the “grill” mode d, placing the food under the centre
of the grill (situated on the 3rd or 4th rack form the bottom)
because only the central part of the top heating element
is turned on.
Use the bottom rack (1st from the bottom), placing the
dripping pan provided to collect any sauce and/or grease
and prevent the same from dripping onto the ov en bottom.
When using this mode, we recommend you set the
thermostat to the highest setting. However, this does not
mean you cannot use lower temperatures, simply by
adjusting the thermostat knob to the desired temperature.
Setting e, “fan assisted grill”, is extremely useful for
grilling foods rapidly, as the distribution of heat makes it
possible not only to brown the surface, but also to cook
the bottom part.
Moreover, it can also be used for browning foods at the
end of the cooking process, such as adding that gratin
finish to pasta bakes, for example.
When using this mode, place the grid on the 2nd or 3rd
oven rack from the bottom (see cooking table) then, to
prevent fat and grease from dripping onto the bottom of
the oven and thus smoke from f orming, place a drippingpan on the 1st rack from the bottom.
Important: always use the grill with the oven door shut.
This will allow you both to obtain excellent results and to
save on energy (appro ximately 10%).
When using this mode, we advise you to set the thermostat
to 200°C, as it is the most efficient way to use the grill,
which is based on the use of infrared rays . However, this
does not mean you cannot use lower temperatures , simply
by adjusting the thermostat knob to the desired temperature.
Therefore the best results when using the grill modes
are obtained by placing the grid on the lower racks
(see cooking table) then, to prevent fat and grease
from dripping onto the bottom of the oven and smoke
from forming, place a dripping-pan on the 1st oven
rack from the bottom.
Baking Cakes
When baking cakes, always place them in a preheated
oven. Make sure you wait until the oven has been
preheated thoroughly (the red light “I” will turn off). Do not
open the oven door during baking to prev ent the cake from
dropping. In general:
Dolce troppo secco
La prossima volta im postate una tem peratur a di10°C
superiore e riduce te il tempo d i cottu ra.
Dolce si abbassa
Usate meno liquido o abbassate la tem peratura di
10°C.
Dolce scuro superiormente
Inseritelo ad altezza inf eriore, impos tate una
temperatura più bassa e pr olung ate la cottu ra.
Buona cottura esterna, ma interno colloso
Usate meno liquido, riducete la temperatura,
aumentate il tempo di cottura.
Dolce non si stacca dallo stampo
Ungete bene lo stampo e c ospar getelo a nch e con un
pò di farina oppure utili zzat e cart a forn o.
Ho cotto su più ripiani (nella funzione "ventilato")
e non tutti sono allo stesso avanzam ento di
cottura
Impostate una tem peratura inferiore.
Non necessariamente ripiani inseriti
contemporaneamente debbono e ssere tolti insieme.
5
Page 5

Cooking Pizza
For best results when cooking pizza, use the “fan
assisted “ b mode:
• Preheat the oven f or at least 10 min utes;
• Use a light aluminium pizza pan, placing it on the grid
supplied with the oven. If the dripping pan is used, this
will extend the cooking time, making it difficult to get a
crispy crust;
• Do not open the oven door frequently while the pizza
is cooking;
• If the pizza has a lot of toppings (three of four), we
recommend you add the mozzarella cheese on top
halfway through the cooking process .
• When cooking pizza on two racks, use the 2nd and
4th with a temperature of 220°C and place the pizzas
in the oven after having preheated it for at least 10
minutes.
Cooking Fish and Meat
When cooking white meat, fowl and fish, use temperature
settings from 180 °C to 200 °C.
For red meat that should be well done on the outside while
tender and juicy in the inside, it is a good idea to start with
a high temperature setting (200°C-220°C) for a short time,
then turn the oven down afterwards.
In general, the larger the roast, the lower the temperature
setting. Place the meat on the centre of the grid and place
the dripping pan beneath it to catch the fat.
Make sure that the grid is inserted so that it is in the centre
of the oven. If you would like to increase the amount of
heat from below, use the low rack heights. For savoury
roasts (especially duck and wild game), dress the meat
with lard or bacon on the top.
6
Page 6

Posizione
manopola
selezione
Cibo da cucinare Peso
(Kg )
Posizione di
cottu ra rip iani
dal basso
Tempo di preriscaldamento
(minuti)
Posizione
manopola
term ostato
Tempo di
cottu ra
(minuti)
1 Statico
a
2 Ventilato
b
3 Forno Sopra
Anatra
Arrosto di vitello o
manzo
Ar ro st o di ma ia le
Bisc ot ti (di fro lla)
Crostate
Pizza
(su 2 ripiani)
Lasagne
Agnello
Pollo arrosto + patate
Sgombro
Plum-cake
Bignè
(su 2 ripian i)
Biscotti
Pan di spagna
ripiano
Pan di spagna
ripiani)
Torte salate
Ritocchi di cottura - 3/4 15 220 -
(su 2 ripia ni
)
)
(su 1
(su 2
1
1
1
-
1
1
1
1
1
1
1
0.5
0.5
0.5
1.0
1.5
3
3
3
3
3
2-4
3
2
2-4
2
2
2-4
2-4
2
2-4
3
15
15
15
15
15
15
10
10
10
10
10
10
10
10
10
15
200
200
200
180
180
220
200
180
180
180
170
190
180
170
170
200
c
4 G rill
d
5 G rill
ventila to
Sogliole e seppie
Spiedini di calamari e
gamberi
File tt o di me rlu z z o
Verdure alla griglia
Bistecca di vitello
Coto lette
Hamburger
Sgombri
Toast
Con girarrosto (ove
presente)
Vitello allo spiedo
Po llo a llo sp ie d o
Agnello allo spiedo
Po llo a lla g rig lia
Seppie
1
1
1
1
1
1
1
1
n.° 4
1.0
1.5
1.0
1.5
1.5
4
4
4
3/4
4
4
4
4
4
-
-
-
3
3
5
5
5
5
5
5
5
5
5
5
5
5
5
5
Max
Max
Max
Max
Max
Max
Max
Max
Max
Max
Max
Max
200
200
e
Con girarrosto (ove
presente)
Vitello allo spiedo
Po llo a llo sp ie d o
Pollo (allo spiedo) +
patate (sulla leccarda)
Agnello allo spiedo
i tempi di cottura sono indicativi e possono essere modificati in base ai propri gusti personali. Nelle cotture al
NB:
grill o grill ventilato, la leccarda va posta sempre al 1° ripiano a partire dal basso.
1.5
2.0
1.5
-
1.5
-
-
-
2
-
5
5
5
5
5
200
200
200
200
200
65-75
70-75
70-80
15-20
30-35
15-20
30-35
50-60
60-75
30-35
40-50
20-25
10-15
15-20
20-25
25-30
8-10
6-8
10
10-15
15-20
15-20
7-10
15-20
2-3
80-90
70-80
70-80
55-60
30-35
70-80
70-80
70-75
70-75
70-80
7
Page 7

Safety Is A Good Habit To Get Into
T o maintain the efficienc y and saf ety of this appliance, we recommend that you do the following:
• only call the Service Centres authorised by the manufacturer
• always use original spare parts
• When handling the appliance, we recommend you
always use the purpose pro vided handles recessed
into the sides of the oven to prevent harming
people or damaging the appliance itself.
• This appliance is designed for non-professional, household use and its functions must not be changed.
• These instructions are only valid for the countries
whose symbols appear on the manual and the serial
number plate.
• The electrical system of this appliance can only be used
safely when it is correctly connected to an efficient
earthing system in compliance with current safety
standards.
• When the appliance is in use, the heating elements
and some parts of the oven door become extremely
hot. Make sure you don’t touc h them and keep children well away.
The following items are potentially danger ous, and
therefore appropriate measures must be taken to
prevent children and the disabled from coming into
contact with them:
- Controls and the appliance in general;
- Packaging (bags, polystyrene , nails, etc.);
- The appliance itself, immediately after use of the oven
or grill due to the heat generated;
- The appliance itself, when no longer in use (potentially
dangerous parts must be made safe).
Av oid the following:
- Touching the appliance with wet parts of the body;
- Using the appliance when barefoot;
- Pulling on the appliance or the supply cable to unplug
it from the electrical outlet;
- Improper or dangerous operations;
- Obstructing the ventilation or heat dissipation slots;
- Allowing power supply cables of small appliances to
come into contact with the hot parts of the appliance;
- Exposing the appliance to atmospheric agents such
as rain, or sunlight;
- Using the oven for storage purposes;
- Using flammable liquids near the appliance;
- Using adapters, multiple sockets and/or extension
leads;
- Attempting to install or repair the appliance without the
assistance of qualified personnel.
Qualified personnel must be contacted in the
following cases:
- Installation (following the manuf acturer’s instructions);
- When in doubt about operating the appliance;
- Replacing the electrical socket when it is not compatible with the appliance plug.
Service Centres authorised by the manufacturer
must be contacted in the follo wing cases:
- If in doubt about the soundness of the appliance after
removing it from its packaging;
- If the power supply cable has been damaged or needs
to be replaced;
- If the appliance breaks down or functions poorly; ask
for original spare parts.
It is a good idea to do the following:
- Only use the appliance to cook food and nothing else;
- Check the soundness of the appliance after it has been
unpacked;
- Disconnect the appliance from the electrical mains if it is
not functioning properly and before cleaning or performing maintenance;
- When left unused, unplug the appliance form the electricity mains and turn off the gas tap (if foreseen);
- Use oven gloves to place cookware in the ov en or when
removing it;
- Always grip the oven door handle in the centre as the
extremities of the same may be hot due to any hot air
leaks;
- Make sure the knobs are in the “•”/”o” position when the
appliance is not in use.
- Cut the power supply cable after disconnecting it from
the mains when you decide not to use the appliance any
longer.
• The manufacturer may not be held responsible for any
damage due to: incorrect installation, improper , incorrect
and irrational use.
8
Page 8

Instalation
The appliance must be installed only by a qualified
person in compliance with the instructions provided.
The manufacturer declines all responsibility f or improper
installation which may harm persons and animals and
damage property.
Important: The power supply to the appliance must be
cut off before any adjustments or maintenance work is
done on it.
Installation of Built-in Ovens
In order to ensure that the built-in appliance functions properly, the cabinet containing it must be appropriate. The
figure below gives the dimensions of the cut-out f or installation under the counter or in a wall cabinet unit.
555
580
560
min
+4 -0
min
min
45
575-585
+4 -0
480
23
572
558
543545
500
39
15
595
595
For the correct centring of your appliance, position the 4
tabs on the sides of the oven in correspondence with the
4 holes on the perimeter of the frame. In particular , if the
cabinet side panel:
• is 20 mm thick: the remov a b le part of the tab must be
removed (Fig. A);
• is 18 mm thick: use the first groove, which is factoryset (Fig. B);
• is 16 mm thick: use the second groo ve (Fig.C)
Fig. A Fig. B
In order to ensure adequate ventilation, the back panel of
the cabinet unit must be removed. Installing the oven so
that it rests on two strips of wood is preferab le. If the oven
rests on a continuous, flat surface, there must be an aperture of at least 45 x 560 mm.
45 mm.
560 mm.
The panels of the adjacent cabinets must be made of heatresistant material. In particular, cabinets with a v eneer exterior must be assembled with glues which can withstand
temperatures of up to 100 °C.
In compliance with current safety standards, contact with
the electrical parts of the oven must not be possible once
it has been installed.
All parts which ensure the safe operation of the appliance
must be removab le only with the aid of a tool.
Fig. C
To fasten the oven to the cabinet, open the door of the
oven and attach it by inserting the 4 wooden screws into
the 4 holes located on the perimeter of the frame.
Electrical Connection
The cooker must be connected to the mains electricity
supply . The hob is connected to the cook er using a special
connector. The cookers are designed to operate on
alternating current featuring the supply voltage and
frequency indicated on the appliance data plate.
9
Page 9

BUILT-IN HOB
Only on
certain models
P
NL2L3
L1
WHITERED
BUILT-IN COOKER
YELLOW
BLUE GREEN
Fitting on a Po wer Suppl y Cable
Opening the terminal board:
• Using a screwdriver, prise on the side tabs of the
terminal board cover;
• Pull open the cover of the terminal board.
To install the cable, proceed as f ollows:
• unscrew the wire clamp screw and the contact screws
Note: the jumpers are factory-set for a three-phase
400V connection (fig. D).
• to make the electrical connections illustrated in fig. F
and fig. G, use the tw o jumpers housed in the box (fig.
E - reference “P”)
• fasten the supply cable in place with the clamp and
close the cover of the terminal board.
400V 3N~
H05RR-F 5x2.5 CEI-UNEL 35363
NL3L1L2
5
3
4
Fig. D
1
2
Fig. E
230V 1N~
H07RN-F 3x4 CEI-UNEL 35364
NL
5
3
4
Fig. F
1
2
400V 2N~
H05RR-F 4x2.5 CEI-UNEL 35363
NL2L1
5
3
4
Fig. G
Connecting the supply cable to the mains
Install a standardised plug corresponding to the load indicated on the data plate. When connecting the cable directly to the mains, install an omnipolar circuit-breaker with
a minimum contact opening of 3 mm between the appliance and the mains. The omnipolar circuit break er should
be sized according to the load and should comply with
current regulations (the earth wire should not be interrupted by the circuit breaker).
The supply cable should be positioned so that it does not
reach a temperature of more than 50°C with respect to
the room temperature, anywhere along its length.
Before making the connection, check that:
• The electrical safety of this appliance can only be guaranteed if the cooker is correctly and efficiently earthed,
in compliance with regulations on electrical safety. Always ensure that the earthing is efficient; if you have
any doubts call in a qualified technician to check the
system. The manufacturer declines all responsibility
for damage resulting from a system which has not been
earthed.
• Before plugging the appliance into the mains, check
that the specifications indicated on the date plate (on
the appliance and/or packaging) correspond to those
of the electrical mains system of your home.
1
2
10
Page 10

• Check that the electrical capacity of the system and
sockets will support the maximum power of the appliance, as indicated on the data plate. If you have any
doubts, call in a qualified technician.
• If the socket and appliance plug are not compatible,
have the socket replaced with a suitable model by a
qualified technician. The latter, in particular, will also
have to ensure that the cross section of the soc ket cables are suitable for the power absorbed by the appli-
Technical Specifications
ance. The use of adapters, multiple sockets and/or
extensions, is not recommended. If their use cannot be
avoided, remember to use only single or multiple adapters and extensions which comply with current safety
regulations. In these cases, never exceed the maximum current capacity indicated on the single adapter
or extension and the maximum power indicated on the
multiple adapter. The plug and socket must be eas-
ily accessible.
Inner dimensions of the oven:
Width 43.5 cm
Depth 40 cm
Height 32 cm
Inner Volume of the Oven:
56 litres
ENERGY LABEL
Directive 2002/40/EC on the label of electric ovens
Norm EN 50304
Energy consumption for Forced con v ection
heating mode: b F an assisted
Declared energy consumption for Natural conv ection Class
heating mode: a Convection
Voltage and Frequency of Power Supply:
230/400V ~ 3N 50/60Hz 8450W
7
This appliance conforms with the following
European Economic Community directives:
- 73/23/EEC of 19/02/73 (Low V oltage) and subsequent
modifications;
- 89/336/EEC of 03/05/89 (Electromagnetic
Compatibility) and subsequent modifications;
- 93/68/EEC of 22/07/93 and subsequent
modifications.
- 2002/96/EC
The European Directive 2002/96/EC on Waste Electrical
and Electronic Equipment (WEEE), requires that old
household electrical appliances must not be disposed of
in the normal unsorted municipal waste stream. Old
appliances must be collected separately in order to
optimise the recovery and recycling of the materials they
contain and reduce the impact on human health and the
environment. The crossed out “wheeled bin” symbol on
the product reminds you of your obligation, that when y ou
dispose of the appliance it must be separately collected.
Consumers should contact their local authority or retailer
for information concerning the correct disposal of their old
appliance.
11
Page 11

Рецепты
Ariston составила для Вас краткий перечень кулинарных советов, практичный, ценный и простой в использовании,
благодаря которому Вы откроете для себя удовольствие готовить.
На следующих страницах Вы найдете советы по простому приготовлению новых блюд: благодаря цифровому
дисплею, каждую секунду информирующему Вас о работе духовки, приготовление Ваших рецептов
осуществляется в полностью автоматическом режиме и, следовательно, идеально.
Описание комплектующих духовки
A. Пульт управления
B. Противень для духовки
C. Решетка духовки
D. Электрическая плита
E. Рукоятка выбора функции приготовления
F. Рукоятки электрической плиты
G. Лампочка функционирования электрической
плиты
H. Опорные направляющие противеней и решеток
I. Лампочка функционирования духовки (имеется
только в некоторых моделях) Когда горит, означает
фазу нагрева духовки вплоть до заданной
температуры
L. Регулятор температуры приготовления
I
G
D
A
C
D
H
B
0
1
2 5
3
6
1
2 5
3
4
0
6
1
2 5
3
4
F
0
6
1
2 5
3
4
0
6
MAX
220
180
4
60
100
140
L
0
E
Как пользоваться духовкой
Многофункциональный духовой шкаф сочетает в себе
преимущества обычных духовок с натуральной
конвекцией: статических, и современных духовой с
принудительной конвекцией: вентилированных.
Это чрезвычайно универсальное изделие,
предоставляющее на выбор 5 имеющихся легких
и надежных способов приготовления продуктов.
Выбор различных имеющихся функций
производится при помощи рукоятки E и
термостата L, расположенных на панели
управлений.
Внимание: При первом включении духовки
рекомендуем прокалить ее примерно в течение
30 минут при максимальной температуре и с
закрытой дверцей. По истечении 30 минут
выключить духовку, открыть дверцу и
проветрить помещение. Запах, который может
появиться в процессе этой операции, образуется
в результате испарения веществ,
использованных для предохранения духовки в
период от ее производства до установки.
Внимание: Установить прилагающийся противень
для сбора сока и/или жира на самый нижний
уровень только в случае использования функции
гриль или вертела (имеющихся только в
некоторых моделях). Для других функций
никогда не используйте самый нижний уровень и
никогда не помещайте никаких предметов на дно
духовки в процессе приготовления, так как это
может повредить эмалированное покрытие.
Всегда ставьте Вашу посуду для приготовления
блюд (жаровни, алюминиевые листы и т.д.) на
прилагающуюся решетку, установленную на
опорные направляющие духовки.
Статическая духовка a
Положение рукоятки термостата L: Между 60°C è Ìàêñ.
В этом положении включаются два
нагревательных элемента: нижний и верхний. Это
12
Page 12

типичная бабушкина духовка, которая, однако,
была оснащена отличной системой
термораспределения и позволяет сократить расход
электроэнергии. Статическая духовка остается
непревзойденной для приготовление блюд с двумя
и более ингредиентами, составляющими единое
блюдо, таких, например, как: капуста со свиными
ребрами, треса по-испански, треска по-
анконетански, кусочки телятины с рисом и т.д.
Отличный результат получается при приготовлении
мясных блюд из телятины или говядины, таких как:
тушеное мясо, мясное рагу, гуляш, блюда из дичи,
свиной окорок и филейная часть свинины и т.д.,
требующих медленного тушения с постоянной
поливкой соком от жарки. Такая система остается
оптимальной для кондитерской выпечки, для
приготовления фруктов и для тушения в
специальных закрытых емостях для духовки. В
процессе приготовления блюд в статической
духовке используйте только один уровень, так как
при одновременном использовании нескольких
уровней получается плохое термораспределение.
Используя разные имеющиеся уровни, можно
распределить жар между верхней и нижней частью
духового шкафа. Если для приготовления какого-
либо блюда требуется больший жар снизу или
сверху, следует использовать соответственно
нижние или верхние уровни.
Вентилированная духовка b
Положение рукоятки термостата L: Между 60°C è Ìàêñ.
Включаются нагревательные элементы и вентилятор. Так
как жар является постоянным и однородным во всем
духовом шкафу, воздух обеспечивает однородное
приготовление и зажаривание продукта. Кроме того можно
одновременно приготовить разные виды продуктов, при
условии что для их приготовления требуется одинаковая
температура. Можно использовать максимум 2 уровня
для одновременного приготовления, следуя специальным
инструкциям, приведенным в параграфе Одновременное
приготовление на нескольких уровнях.
Эта функция в особенности рекомендуется для
приготовления блюд, требующих подрумянивания, или
продолжительного приготовления, на пример: лазанья,
запеканка из макарон, жареная курица с картошкой и т.д.
Значительные преимущества получаются при
приготовлении жаркого из мяса, так как оптимальное
распределение жара позволяет использовать более низкие
температуры, что позволяет сократить потерю мясного
сока, сохраняя мясо нежным и сочным с минимальным
ужариванием. Вентилированная функция в особенности
подходит для приготовления рыбы, которую готовят с
минимальным добавлением приправ, сохраняя таким
образом ее естественный вид и вкус.
Десерт: отличные результаты получаются при выпечке
кондитерских изделий из теста, замешанного на пивных
или химических дрожжах.
Функция вентилированный может также
использоваться для быстрой разморозки белого и
красного мяса, хлеба, установив температуру 80°C. Для
разморозки более деликатных продуктов установить
температуру 60°C или включить только циркуляцию
холодного воздуха, установив рукоятку термостата на
0°C.
Нагрев сверху c
Положение рукоятки термостата L: Между 60°C è Ìàêñ.
Включается верхний нагревательный элемент.
Эта функция может быть использована для
доводки готовых блюд.
Гриль d
Положение рукоятки термостата L”: Ìàêñ.
Включается центральный верхний нагревательный
элемент.
Значительная температура прямого действия гриля
позволяет получить быстрое образование корочки
на поверхности продукта, которая препятствует
выходу соков и сохраняет продукт нежным и
сочным. Использование функции гриль в
особенности рекомендуется для блюд, для
приготовления которых требуется высокая
поверхностная температура: телячьих и говяжьих
бифштексов, антрекотов, вырезки, гамбургеров и
ò.ä.
В параграфе Практические советы по
приготовлению приводятся некоторые примеры
использования духового шкафа.
Вентилированный гриль e
Положение рукоятки термостата L: Между 60°C è 200°C.
Включается центральный верхний нагревательный
элемент и вентилятор. Сочетает однонаправленное
выделение жара с принудительной циркуляцией
воздуха внутри духового шкафа. Это препятствует
обгоранию поверхности продуктов, повышая
проникающую способность жара. Отличные
результаты получаются при использовании
вентилированного гриля для приготовления мяса
и овощей на шампурах, колбасок, свиных
ребрышек, бараньих отбивных, курицы с острой
приправой, перепелок с сальвией, свиной вырезки
è ò.ä.
В особенности функция вентилированного гриля
подходит для приготовления таких видов рыбы как
филе чернии, тунца, рыбы-меч, фаршированных
каракатиц и т.д.
Освещение духового шкафа
Освещение включается, повернув рукоятку E íà
çíàê 8. Освещает духовой шкаф и остается
включенным, когда включается какой-либо
нагревательный электрический элемент духовки.
13
Page 13

Рукоятки включения электрических канфорок
варочной панели (F)
Варочная панель может иметь стандартные
электрические канфорки, быстрые и автоматические
в различных сочетаниях (быстрые канфорки
отличаются от других наличием красного кружка в
центре; автоматические наличием в центре
алюминиевого диска).
Во избежание дисперсии тепла и повреждения
канфорок следует использовать емкости с плоским
дном диаметром, не меньше диаметра канфорки.
В таблице указаны соответствия между
положениями, промаркированными на рукоятках,
и рекомендуемое назначение канфорок.
Позиция Обычная или быстрая конфорка
0 Выключено
1
2
3
4
Приготовление овощей, рыбы
Приготовление картофеля на пару,
супов, фасоли
Приготовление и выдерживание
больших количеств пищи
Жаренье (среднее)
5 Жаренье (усиленное)
6 Жарень е до корочки, кипячение
Использование варочной панели
Для оптимального использования вашей варочной
панели приводим некоторые основные
рекомендации, которые следует соблюдать в
процессе приготовления пищи.
· Использовать кастрюли с плоским дном для
большей контактной площади кастрюли с зоной
нагревания.
· Использовать кастрюли с диаметром, полностью
покрывающим канфорку, с целью использования
всего выделяемого жара.
· Проверить, чтобы днища кастрюль были
всегда чистыми и сухими для обеспечения
хорошего контакта и долгого срока службы
канфорок и самих кастрюль.
Перед первым использованием электрических
канфорок необходимо прогреть их при максимальной
температуре примерно в течение 4 минут без кастрюли.
В процессе этой начальной операции защитное
покрытие затвердевает и достигает максимальной
прочности.
Лампочка функционирования электрических канфорок
(G)
Горит, когда включается какой-либо электрический
нагревательный элемент варочной панели.
14
Page 14

Óõîä çà духовкой
Перед началом какой-либо операции по обслуживанию
или чистке отсоединить изделие от сети
электропитания.
Для длительного срока службы духовки важно
регулярно производить ее тщательную общую
чистку, учитывая следующее:
• не использовать паровые агрегаты для чистки
• необходимо мыть наружные эмалированные части
или детали из нержавеющей стали теплой водой
без применения абразивных порошков и
коррозийных средств, которые могут повредить эти
поверхности. На деталях из нержавеющей стали
могут остаться пятна. Для удаления особо трудных
пятен использовать специальные чистящие
средства, имеющиеся в продаже. После чистки
рекомендуется тщательно удалить остатки
моющего средства влажной тряпкой и высушить
духовку.
• Необходимо прочищать духовку изнутри по
возможности после каждого ее использования, не
дожидаясь ее полного охлаждения, при помощи
теплой воды и моющего средства, ополаскивая и
тщательно высушивая при помощи мягкой тряпки.
Избегать использования абразивных чистящих
средств (например, порошков и т.д.) и жестких
посудных щеток или кислот (например, против
образования известковых налетов), так как они
могут повредить эмалированное покрытие. В
случае особо трудных загрязнений необходимо
использовать специальное чистящее средство для
духовок в соответствии с инструкциями, указанными
на упаковке чистящего средства.
• в случае длительного использования духовки
возможно образование конденсата. Протереть
духовку мягкой тряпкой.
• резиновая прокладка вокруг отверстия духовки
гарантирует ее исправное функционирование.
Следовательно необходимо регулярно проверять
состояние этой прокладки. При необходимости
прочистите ее неагрессивными моющими
средствами и неабразивными губками. В случае
повреждения прокладки обращайтесь в ближайший
Центр Технического Обслуживания. Не
рекомендуется пользоваться духовкой с
поврежденной прокладкой.
• никогда не покрывайте днище духовки
алюминиевыми листами, так как создаваемая таким
образом концентрация тепла может нарушить
приготовление пищи, а также повредить
эмалированное покрытие духовки.
• чистить стекло дверцы духовки неабразивными
моющими средствами и губками и протирать мягкой
тряпкой.
следует чистить электрические кухоные плиты
влажной тряпкой и протирать их небольшим
количеством растительного масла, не дожидаясь
полного охлаждения плиты.
Порядок съема дверцы духовки
Для более тщательной чистки можно снять дверцу
духовки. Выполнить операции в следующем порядке:
• полностью открыть дверцу;
• поднять и повернуть шпонки на двух шарнирах;
• взяться за дверцу руками с двух сторон, плавно
закрыть åå, íî íå полностью;
• потянуть дверцу на себя, снимая ее со своего
гнезда;
Для установки дверцы на место выполнить
вышеописанные операции в обратном порядке.
123
Замена лампочки освещения духовки
• Отключить электропитание духовки при помощи
многополярного выключателя, используемого для
подсоединения духовки к сети электропитания, или
вынуть вилку из розетки, если это возможно.
• Отвинтить стеклянную крышку плафона лампочки;
• Вывинтить лампочку и заменить ее на новую,
устойчивую к высоким температурам (300°C),
имеющую следующие характеристики:
- Напряжение 230/240 В
- Мощность 25 Вт
- Подсоединение Е14
Восстановить стеклянную крышку на место и
включить напряжение.
15
Page 15

Практические советы по приготовлению блюд
Духовка дает возможность использования широкой
гаммы функций, позволяющих приготовить любые
блюда оптимальным образом. Со временем Вы
научитесь оптимально использовать это
многофункциональное изделие, поэтому приведенные
ниже советы являются только общими указаниями,
которые Вы можете дополнить Вашим собственным
опытом.
Предварительный нагрев
При необходимости в предварительном нагреве духового
шкафа, что обычно требуется для выпечки всех
дрожжевых изделий, можно использовать функцию b
вентилированный, которая позволяет достичь нужной
температуры за короткий срок с сокращенным расходом
электроэнергии.
Поместив выпечку в духовой шкаф, можно
переключить его на более подходящий режим
приготовления.
Одновременное приготовление на нескольких
уровнях
При необходимости приготовления на двух уровнях
следует использовать только режим b вентилированный
- единственный, дающий такую возможность.
• В духовом шкафу имеется 5 уровней. При приготовлении
в вентилированном режиме использовать два из трех
центральных уровней. Первый снизу и последний
сверху подвергаются прямому воздействию горячего
воздуха, которое может привести к обгоранию
деликатных блюд.
Обычно используются 2-ой и 4-ый уровни снизу,
помещая на 2-ой уровень продукты, приготовление
которых требует более сильного жара. Например, в
случае приготовления мясного жаркого одновременно
с другими блюдами следует поместить жаркое на 2-ой
уровень, оставив 4-ый уровень для более деликатных
áëþä.
В случае одновременного приготовления блюд,
требующих разного времени и температур
приготовления, следует выбрать среднее значение
между двумя температурами, поместить наиболее
деликатный продукт на 4-ый уровень и в первую очередь
вынуть из духовки блюдо, требующее более короткого
приготовления.
ый уровень снизу), так как включена только
центральная часть верхнего электрического
сопротивления. Установить на первый уровень
снизу прилагающийся противень для сбора соков
è/èëè æèðà.
При использовании этой функции рекомендуется
установить на термостате максимальную температуру.
Это, однако, не исключает возможность использования
более низких температур, устанавливая рукоятку
термостата на требуемую температуру.
Функция e вентилированный гриль является
чрезвычайно удобной для быстрого зажаривания,
распределяет выделяемый грилем жар, позволяя
одновременно обжаривать поверхность продукта и
осуществлять приготовления блюд также в нижней
части духового шкафа
Вы можете использовать эту функцию также в конце
приготовления блюд, требующих поверхностного
подрумянивания, напрмер, идеально подходит для
завершающего подрумянивания запеканки из макарон.
При использовании этой функции установить
решетку на 2-ой или 3-ий уровень снизу (смотреть
таблицу приготовления), после чего установить
противень на 1-ый уровень снизу для сбора жира
и во избежание образования дыма.
Важно: использовать функцию гриль с закрытой
дверцей духовки для получения оптимальных
результатов и для значительной экономии энергии
(примерно 10%).
При использовании этой функции рекомендуется
установить рукоятку термостата на 200°C, òàê êàê ýòà
оптимальная температура, обеспечивающая
наибольшую отдачу на основе инфракрасного
излучения. Это, однако, не исключает возможность
использования более низких температур,
устанавливая рукоятку термостата на требуемую
температуру.
Оптимальный результат при использовании функции
гриль получается, когда решетка устанавливается на
верхних уровнях (смотреть таблицу приготовления),
после чего для сбора жира и во избежание образования
дыма установить прилагающийся противень на самый
нижний уровень.
Устанавливать противень на нижний уровень, а
решетку на верхний.
Функция гриль
Многофункциональный духовой шкаф дает вам
возможность использования 2 различных функций
гриля только и исключительно с закрытой дверцей
духовки.
Используйте функцию d “гриль, поместив продукт
в центр решетки (установленной на 3-ий или на 4-
Кондитерская выпечка
При выпечке кондитерских изделий всегда следует
помещать их в разогретую духовку, дождавшись
окончания предварительного нагрева,
сигнализируемого выключением красной лампочки
I. Не открывать дверцу духовки в процессе выпечки
во избежание оседания изделия. Общие
рекомендации:
16
Page 16

Если пирог слишком сухой
В следующий раз повысьте температуру на
10°C и сократите время приготовления.
Если пирог слишком сырой
В следующий раз повысьте температуру на
10°C или сократите количество жидкости при
замешивании теста.
Если поверхность пирога слишком темная
Поместите форму с пирогом на более низкий
уровень, уменьшите температуру и увеличьте
время приготовления.
Если пирог хорошо пропечен снаружи, а
внутри сырой
Сократите количество жидкости при
замешивании теста, уменьшите температуру и
увеличьте время приготовления.
Выпечка не вынимается из формы
Приготовление рыбы и мяса
Белое мясо, птицу и рыбу следует запекать при
температуре от 180°C äî 200°C.
Для приготовления красного мяса, хорошо прожаренного
снаружи и сочного внутри, следует в начале установить
высокую температуру (200°С - 220°C) в течение короткого
времени, затем понизить температуру.
Обычно, чем крупнее кусок запекаемого мяса, тем
дольше будет его приготовление при низкой температуре.
Поместить кусок мяса в центр решетки и установить под
решетку противень для сбора жира.
Установить решетку таким образом, чтобы мясо
находилось в центре духовки. Если требуется
получить больший нагрев снизу, установите решетку
на нижние направляющие. Для приготовления
ароматного запеченого мяса (в особенности утки и
дичи) следует обложить кусок мяса кусочками сала
или корейки и расположить его на верхнем уровне
духовки.
Обильно протрите форму маслом, а также слегка
посыпьте ее мукой или используйте пергаментную
бумагу для духовки
При одновременном использовании
нескольких уровней духовки (в режиме
"вентилированный") размещенные на них
продукты имели разную степень готовности.
Выбрать более низкую температуру. Противени,
помещенные в духовку в одно и то же время,
могут быть вынуты в разное время.
Выпечка пиццы
Для оптимальной выпечки пиццы следует
использовать функцию b вентилированный”:
• Разогреть духовку по крайней мере в течение 10
минут.
Использовать противень из легкого алюминия,
устанавливая его на прилагающуюся решетку. При
использовании противеня время выпечки удлиняется,
что затрудняет получение хрустящей пиццы.
• Не следует часто открывать духовку в процессе
выпечки.
В случае выпечки пиццы с обильной начинкой
(каприччоза, четыре сезона) рекомендуется положить
на пиццу сыр моццарелла в середине выпечки.
При выпечке пиццы на двух уровнях следует
использовать 2-ой и 4-ый уровни с
температурой 220°C и поместить пиццу в
духовку, разогрев ее перед этим примерно в
течение 10 минут.
17
Page 17

Положение
рукоятки
регуляции
Приготавливаемый
продукт
Âåñ
Расположение
(êã)
духовки снизу
на уровнях
вверх
Время
предварительного
нагрева (минуты)
Положение
рукоятки
термостата
Время
приготовления
(минуты)
1 Statico (Ñ
татический)
a
2 Ventilato
(Вентилиро-
ванный)
b
3 Forno
Sopra
(Нагрев
сверху)
c
4 Grill
(Гриль)
d
Óòêà
Жаркое из телятины или
говядины
Жаркое из свинины
Печенье (песочное)
Песочный торт с начинкой
Пицца (на 2-х уровнях)
Лазанья
Баранина
Kурица с картошкой
Скумбрия
Kåêñ
Эклеры (на 2-х уровнях)
Печенье (на 2-х уровнях)
Бисквит (на 1-ом уровне)
Бисквит (на 2-ух уровнях)
Несладкие торты
Доведение доготовности - 3/4 15 220 -
Kамбала и каракатицы
Kальмары и креветки на
шампурах
Филе трески
Овощи-гриль
Телячий бифштекс
Отбивные
Гамбургер
Скумбрия
Горячие бутерброды
1
1
1
-
1
1
1
1
1
1
1
0.5
0.5
0.5
1.0
1.5
1
1
1
11
1
1
1
1
n.° 4
3
3
3
3
3
2-4
3
2
2-4
2
2
2-4
2-4
2
2-4
3
4
4
4
3/4
4
4
4
4
4
15
15
15
15
15
15
10
10
10
10
10
10
10
10
10
15
5
5
5
5
5
5
5
5
5
200
200
200
180
180
220
200
180
180
180
170
190
180
170
170
200
Ìàêñ.
Ìàêñ.
Ìàêñ.
Ìàêñ.
Ìàêñ.
Ìàêñ.
Ìàêñ.
Ìàêñ.
Ìàêñ.
65-75
70-75
70-80
15-20
30-35
15-20
30-35
50-60
60-75
30-35
40-50
20-25
10-15
15-20
20-25
25-30
8-10
10-15
15-20
15-20
7-10
15-20
6-8
10
2-3
На вертеле (если имеется)
Телятина на вертеле
Kурица на вертеле
Баранина на вертеле o
5 Grill
ventilato
(Вентилиро-
ванный
гриль)
e
ПРИМЕЧАНИЕ: указанная продолжительность приготовления служит только в качестве примера и может быть
изменена в соответствии с личными вкусами. При использовании функций grill или grill ventilato (гриля или
вентилированного гриля) противень всегда устанавливается на 1-ый уровень духовки снизу.
Kурица-гриль
Kаракатицы
На вертеле (если имеется)
Телятина на вертеле
Kурица на вертеле Kурица
(на вертеле) + картошка (на
противене) Баранина на
вертеле
1.0
1.5
1.0
1.5
1.5
1.5
2.0
1.5
1.5
-
-
-
3
3
-
-
-
-
2
-
5
5
5
5
5
5
5
5
5
5
Ìàêñ.
Ìàêñ.
Ìàêñ
200
200
200
200
200
200
200
80-90
70-80
70-80
55-60
30-35
70-80
70-80
70-75
70-75
70-80
18
Page 18

Безопасность - хорошее правило
Äëÿ обеспечения эффективности è безопасности данного изделия:
• обращайтесь только â уполномоченные центры технического обслуживания
• всегде требуйте установку оригинальных запасных частей
• При перемещении изделия во избежание
причинения ущерба людям и самому изделию
следует всегда поднимать его за специальные
ручки, расположенные с боков духового шкафа.
• Изделие предназначено для непрофессионального
использования в жилых помещениях, и его
характеристики не должны изменяться.
Инструкции относятся только к странам,
обозначения которых приведены в руководстве и
на заводской табличке изделия.
Электрическая безопасность данного изделия
гарантируется только, если оно правильно
подсоединено к надежной системе заземления в
соответствии с действующими правилами
безопасности.
• В процессе эксплуатации изделия
нагревательные элементы и некоторые части
дверцы духовки подвергаются сильному
нагреву. Необходимо проявлять острожность во
избежание контактов с этими частями и не
разрешать детям приближаться к духовке.
Так как речь идет об источниках опасности, не
допускать детей и недееспособных лиц:
- к электрическому изделию в целом и к его
управлениям;
- к упаковочным материалам (пакетам, пенопласту,
гвоздям и т.д.);
- к электрическому изделию в процессе и сразу же
после функционирования духовки и гриля по
причине сильного нагревания;
- к выключенному изделию (в этом случае должна
быть обеспечена защита от компонентов, несущих
потенциальную опасность).
Действия, которых следует избегать:
- прикасаться к электрическому изделию влажными
частями тела;
- пользоваться электрическим изделием босиком;
- тянуть электрическое изделие или кабель
электропитания для его отсоединения от сети
электропитания;
- опасных и неразумных действий;
- закрывать вентиляционные отверстия или решетки
рассеивания тепла;
- контактов электрического провода малых бытовых
электроприборов с горячими частям духовки;
- воздействия на изделие атмосферных явлений
(дождь, солнце);
- использовать духовой шкаф в качестве кладовки;
- использовать горючие жидкости рядом с духовкой;
- использовать переходники, тройники и/или
удлинители;
- пытаться произвести установку или ремонт духовки
самостоятельно, не обращаясь к
квалифицированному персоналу.
В перечисленных ниже случаях вызов
квалифицированного персонала является
обязательным:
- установка изделия (в соответствии с инструкциями
производителя);
- в случае сомнений касательно исправного
функционирования изделия;
- замена электрической розетки в случае ее
несовместимости с электрической вилкой изделия.
В следующих случаях необходимо обращаться в
центры технического обслуживания,
уполномоченные производителем:
- в случае сомнений касательно целостности изделия
после его распаковки;
- повреждение или замена кабеля электропитания;
- в случае неисправности или плохого
функционирования изделия, запрашивая установку
оригинальных запасных частей.-
Рекомендуемые действия:
- использовать духовой шкаф только для
приготовления пищи, избегая иных операций;
- сняв упаковку с изделия, проверить его
целостность;
- отсоединить изделие от сети электропитания в
случае его неисправного функционирования и
перед началом осуществления какой-либо
операции по его чистке или техническому
обслуживанию;
- в период простоя отсоединить изделие от сети
электропитания и перекрыть кран подачи газа (если
он предусмотрен);
- использовать варежки для духовки когда Вы ставите
или вынимаете блюда из духовки;
- всегда беритесь за центральную часть ручки
дверцы, так как она может нагреться по краям
выходящим из духовки горячим воздухом;
- всегда проверяйте, чтобы рукоятки находились в
положении о, когда изделие не используется;
- по завершении срока службы электрического
изделия перед его утилизацией обрезать кабель
электропитания, отсоединив перед этим изделие от
сети электропитания;
Производитель не несет ответственности за
возможный ущерб, вызванный: неправильной
установкой, ошибочным, несоответствующим или
неразумным использованием изделия.
• Для исправного функционирования газовых
устройств необходимо отрегулировать
воздухообмен. Проверить, чтобы при
установке этих устройств соблюдались
требования, описанные в параграфе
Расположение.
19
Page 19

Установка
543
Установка должна быть выполнена
квалифицированным персоналом в соответствии с
инструкциями производителя. Неправильная
установка может причинить ущерб людям,
животным или имуществу, за который
производитель не несет никакой
ответственности.
Важно: любая операция по регуляции,
техническому обслуживанию и т.д. должна
производиться только после отсоединения
духовки от сети электропитания.
Установка встраиваемых духовок
Для обеспечения исправного функционирования
встраиваемого изделия необходимо, чтобы мебельный
элемент имел соответствующие характеристики. На
рисунке ниже приводятся размеры мебельного
элемента для установки духовки под кухонной рабочей
поверхностью и в колонне.
555
580
480
560
+4 -0
+4 -0
500
39
15
исключена возможность касания к электрическими
частями.
Все защитные элементы должны быть
закреплены таким образом, чтобы их можно
было снять только при помощи специального
инструмента.
Для правильной центровки выровнять 4 крепежные
вставки, расположенные с боков духовки, в
соответствии с 4 отверстиями в периметральной раме
мебельного элемента. В частности, если толщина
боковой панели мебельного элемента:
• 20 мм: съемная часть крепежной вставки должна
быть удалена (Рис. А);
• 18 мм: использовать первый паз, уже
подготовленный на фабрике (Рис. В);
• 16 мм: использовать второй паз (Рис. С).
min
min
min
45
575-585
23
572
595
558
543
545
595
ПРИМЕЧАНИЕ: Монтаж соответствует заявлению о расходе электроэнергии.
Ðèñ. À Ðèñ. Â
Для обеспечения надлежащей вентиляции
необходимо снять заднюю панель мебельного
элемента. Рекомендуется установить духовку на
деревянные бруски. В случае сплошной опорной
поверхности, в ней должно иметься отверстие
размером не менее 45 х 560 мм.
Для прикрепления духового шкафа к мебельному
элементу откройте дверцу духовки и прикрепите
духовку 4 винтами для дерева в 4 отверстиях,
расположенных на периметральной раме
45 mm.
560 mm.
мебельного элемента.
Ðèñ. Ñ
Панели мебельных элементов, прилегающих к
духовке, должны быть выполнены из термостойкого
материала. В частности, в случае мебельных
элементов из фанерованного дерева, клей должен
быть устойчивым к температуре 100°C.
В соответствии с правилами безопасности после
установки изделия в мебельный элемент должна быть
20
Page 20

Электрическое подсоединение
NL
230V 1N~
H07RN-F 3x4 CEI-UNEL 35364
1
3
2
4
5
NL2L3
L1
P
Подсоединение к сети электропитания
осуществляется через разъемы духового шкафа.
Варочная панель соединяется с духовым
шкафом при помощи специального разъема.
Духовые шкафы расчитаны на электропитание
переменным током с напряжением и частотой,
указанными на заводской табличке с данными.
Подсоединение кабеля электропитания
Порядок открывания зажимной коробки:
• При помощи отвертки приподнять боковые шпонки крышки
зажимной коробки;
Потянуть и открыть крышку зажимной коробки.
зафиксировать кабель электропитания в
специальном кабельном зажиме и закрыть крышку.
400V 3N~
H05RR-F 5x2.5 CEI-UNEL 35363
NL3L1L2
5
3
4
Ðèñ. D
1
2
Для подсоединения кабеля электропитания выполнить
следующие операции:
• отвинтить винт кабельного зажима и винты контактов
Примечание: фабричная установка перемычек
соответствует трехфазному соединению 400 В (рис. D).
• для осуществления электрических соединений, показанных
на рис. F и G, использовать две перемычки, расположенные
внутри соединительной коробки (рис. Е ссылка P”)
ВСТРОЕННАß
ÂÀÐÎ×ÍÀß ÏÀÍÅËÜ
Èмеется только
в некоторых
моделях
Ðèñ. Å
Ðèñ. F
400V 2N~
H05RR-F 4x2.5 CEI-UNEL 35363
NL2L1
5
3
4
Ðèñ. G
1
2
ÁÅËÛÉ
КРАСНЫЙ
ÆÅËÒÛÉ
ВСТРОЕННЫЙ ДУХОВОЙ ШКАФ
ÑÈÍÈÉ
ÇÅËÅÍÛÉ
Подсоединение кабеля к сети электропитания
Подсоединить к кабелю стандартную электрическую вилку,
расчитанную на нагрузку, указанную на заводской табличке с
данными. В случае прямого подсоединения к сети
электропитания необходимо установить между
электроприбором и сетью многополярный выключатель с
минимальным расстоянием между контактами 3 мм,
расчитанный на нагрузку и соответствующий действующим
нормативам (провод заземления не должен прерываться
выключателем).
21
Page 21

Кабель электропитания должен быть расположен таким
образом, чтобы ни в одной точке его температура не
превышала температуру помещения более чем на 50°C.
Перед подсоединением кабеля проверить следующее:
• Электрическая безопасность данного изделия
гарантируется только, если оно правильно
подсоединено к надежной системе заземления в
соответствии с действующими правилами
электрической безопасности. Необходимо проверить
соблюдение этого важного требования по безопасности
и в случае сомнений поручить тщательную проверку
системы квалифицированному персоналу.
Производитель не несет ответственности за
возможный ущерб, вызванный отсутствием
заземления электрического изделия.
• Перед подсоединением электрического изделия
проверить, чтобы данные, указанные на заводской
табличке (расположенной на самом изделии и/или на
его упаковке), соответствовали характеристиками сети
электропитания и газопровода.
• Проверить, чтобы потребление электроэнергии
электрического изделия и электрических розеток
соответствовало максимальной мощности изделия,
указанной на заводской табличке. В случае сомнений
обратиться к квалифицированному специалисту.
• В случае несовместимости электророзетки и
электровилки изделия поручить замену розетки на
другую, пригодную, квалифицированному
персоналу. Этот персонал в частности должен
проверить, чтобы сечение проводов электророзетки
соответствовало поглощаемой мощности
электрического изделия. Как правило не
рекомендуется использовать переходники,
тройники и/или удлинители. При необходимости в
использовании вышеуказанных устройств, следует
использовать только простые или множественные
переходники и удлинители, соответствующие
действующим нормативам по безопасности. При
этом важно не превышать предел расхода по
значению тока, указанный на простом переходнике
или удлинителе, и максимальную мощность,
указанную на множественном переходнике. Êàê
электрическая вилка, так и розетка дожны
оставаться легко доступными.
Технические характеристики
Рабочие габаритные размеры духового шкафа:
ширина см. 43,5
глубина см. 40
высота см. 32
Рабочая ¸мкость духового шкафа:
56 литров
ENERGIA TÁBLA
Az elektromos sütõk jelzéseirõl szóló 2002/40/EU elõírás.
EN 50304 szabvány
Расход электроэнергии при принудительной
конвекции
функция нагревания: b Вентилированное
T ermészetes hõáramlási Osztály névleges
energiafogyasztása
Напряжение и частота электропитания:
230/400 Â ~ 3 Í 50/60 Ãö 8450 Âò
7
Данное изделие соответствует следующим
Директивам Европейского Сообщества:
- 73/23/СЕЕ от 19.02.73 (Низкое напряжение) и
последующим дополнениям;
- 89/336/СЕЕ от 03.05.89 (Электромагнитная
совместимость) и последующим дополнениям;
- 93/68/СЕЕ от 22.07.93 и последующим
дополнениям;
функция нагревания: a Статическое
22
Page 22

23
 Loading...