

Page 1
Installazione
Le istruzioni che seguono sono rivolte all’installatore qualificato affinché compia le operazioni di installazione,
regolazione e manutenzione tecnica nel modo più corretto e secondo le norme in vigore.
Importante: qualsiasi intervento di regolazione, manutenzione etc. deve essere eseguito con l’elettrodomestico elettricamente disinserito.
Posizionamento
La cucina è predisposta con grado di protezione contro i
riscaldamenti eccessivi di tipo X, è pertanto possibile l’installazione a fianco di mobili la cui altezza non superi quella
del piano di lavoro .
Livellamento (presente solo su alcuni modelli)
Nella parte inferiore dell’apparecchio si trovano 4 piedini
di sostegno regolabili con viti che permettono di migliorare il livellamento dell’apparecchio, se necessario. E’ indispensabile che l’apparecchio sia posizionato in modo
uniforme.
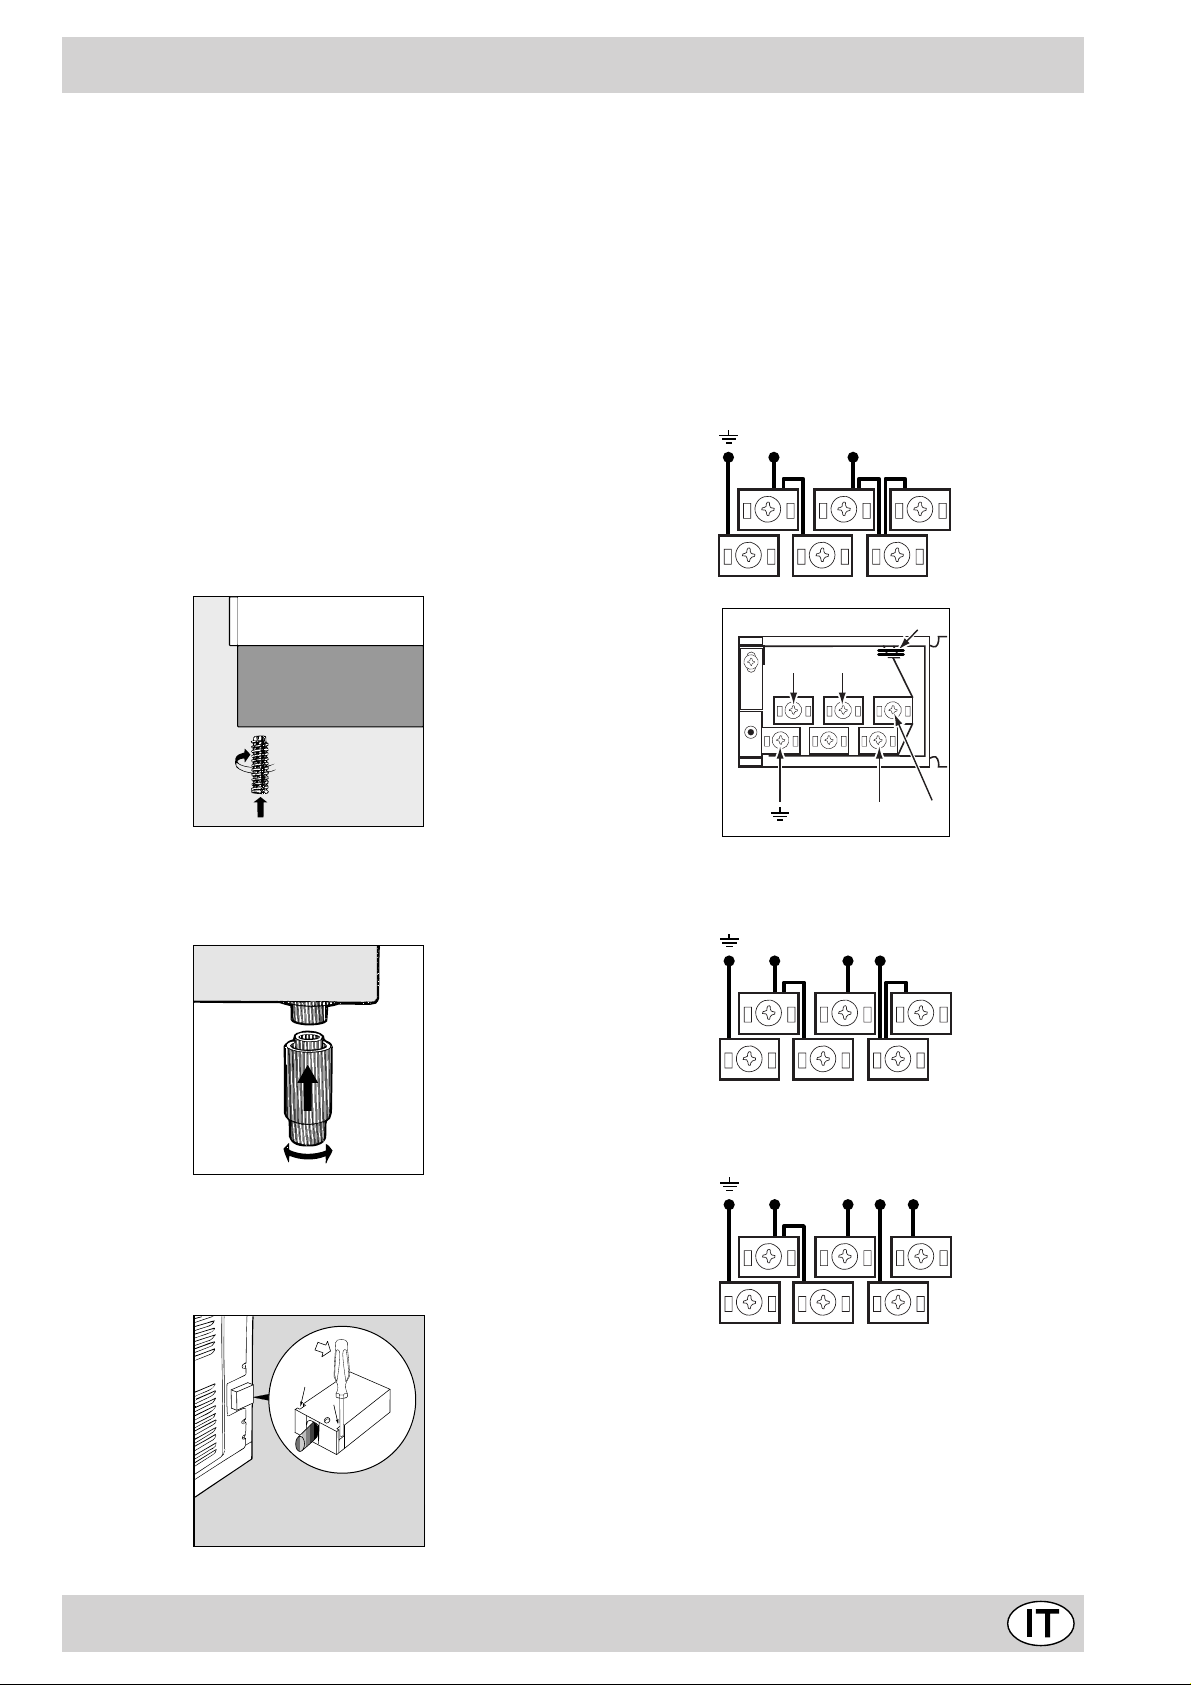
Per la messa in opera del ca vo eseguire le seguenti operazioni:
• svitare la vite del serracavo e le viti dei contatti
Nota: i ponticelli vengono predisposti dalla Fabbrica
per il collegamento a 230V monofase (fig. A).
• per effettuare i collegamenti elettrici delle fig. C e fig.
D , utilizzare i due ponticelli alloggiati dentro la scatola
(fig. B - riferimento "P")
• fissare il cavo di alimentazione nell’apposito fermacavo
e chiudere il coperchio.
230V 1N~
H07RN-F 3x4 CEI-UNEL 35364
NL
5
3
4
Fig. A
1
2
P
NL2L3
Montaggio gambe (presente solo su alcuni modelli)
V engono fornite delle gambe da montare ad incastro sotto la base della cucina.
Montaggio cavo di alimentazione
Apertura morsettiera:
• Servendosi di un cacciavite, fare leva sulle linguette
laterali del coperchio della morsettiera;
• Tirare ed aprire il coperchio della morsettiera.
L1
Fig. B
400V 2N~
H05RR-F 4x2.5 CEI-UNEL 35363
NL2L1
5
3
4
Fig. C
1
2
400V 3N~
H05RR-F 5x2.5 CEI-UNEL 35363
NL3L1L2
5
3
4
Fig. D
Collegamento del cavo di alimentazione alla rete
Montare sul cavo una spina normalizzata per il carico indicato sulla targhetta caratteristiche, nel caso di collegamento diretto alla rete è necessario interporre tra l’apparecchio e la rete un interruttore omnipolare con apertura
minima fra i contatti di 3 mm. dimensionato al carico e
rispondente alle nor me in vigore (il filo di terra, di colore
giallo-verde, non dev e essere interrotto dall’interruttore).
Il cavo di alimentazione de ve essere posizionato in modo
1
2
3
Page 2

che non raggiunga in nessun punto una temperatura superiore di 50°C a quella ambiente.
Prima di effettuare l’allacciamento accertarsi che:
• la valvola limitatrice e l’impianto domestico possano
sopportare il carico dell’apparecchiatura (vedi targhetta
caratteristiche);
• l’impianto di alimentazione sia munito di efficace col-
legamento a terra secondo le norme e le disposizioni
di legge;
• la presa o l’interruttore omnipolare siano facilmente
raggiungibili con l’apparecchio installato.
4
Page 3
Caratteristiche tecniche
Forno
Dimensioni (HxLxP): 32x40,5x39,5 cm
V olume: 52 Litr i
Assorbimento Max Forno: 2250 W
Dimensioni utili del cassetto scaldavivande:
larghezza cm. 46
profondità cm. 42
altezza cm. 8.5
Piano Elettrico
Dietro destra: 2100 W
Avanti destra: 1200 W
Avanti sinistr a: 1700 W
Dietro sinistra: 1200 W
Assorbimento Max Piano Elettrico: 6200 W
Voltaggio e Frequenza
230V / 400V 3N AC 50 Hz
ENERGY LABEL
Consumo energia convezione Forzata
funzione di riscaldamento:
Consumo energia dichiarazione Classe convezione Natur ale
funzione di riscaldamento: a Statico
b V entilato
7
Questa apparecchiatura è conforme alle seguenti
Direttive Comunitarie:
- 73/23/CEE del 19/02/73 (Bassa T ensione) e successive modificazioni;
- 89/336/CEE del 03/05/89 (Compatibilità Elettromagnetica) e successive modificazioni;
- 93/68/CEE del 22/07/93 e successive modificazioni.
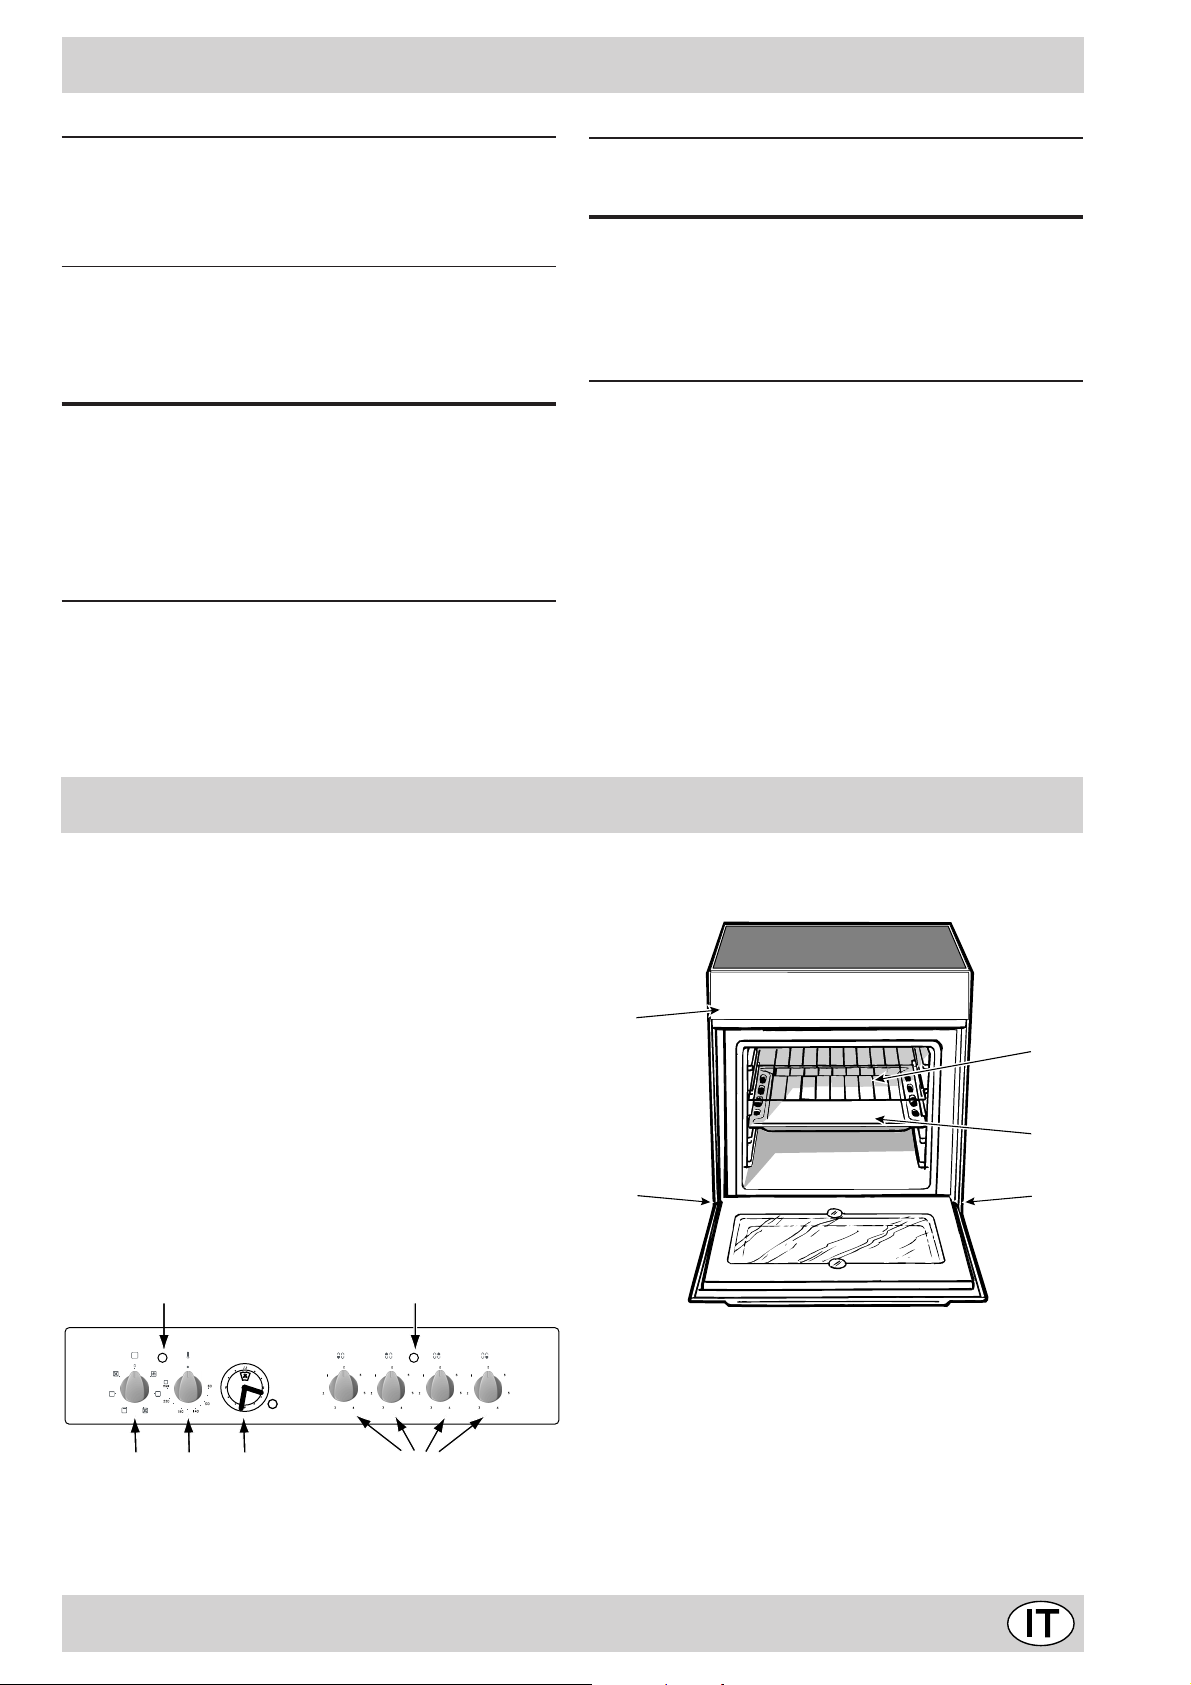
La cucina con forno multifunzione
A Cruscotto
B Griglia ripiano del forno
C Leccarda o piatto di cottura
D Piedini regolabili
H La spia di funzionamento delle piastre elettriche
L Manopola di selezione forno
M Manopola termostato
N Manopole di comando delle piastre elettriche
O La spia termostato forno
S Orologio con contaminuti Rustico
O
H
A
D
B
C
D
L M S
N
5
Page 4

Istruzioni per l’uso
Il forno multifunzione riunisce in un unico apparecchio i
pregi dei tradizionali forni a convezione naturale: “statici”
a quelli dei moderni forni a convezione forzata: “v entilati”.
E’ un apparecchio estremamente versatile che permette
di scegliere in modo facile e sicuro fra 5 div ersi metodi di
cottura. La selezione delle diverse funzioni off erte si ottiene agendo sulle manopole di selezione “L” e del termostato “M” presenti sul cruscotto.
Attenzione: Alla prima accensione consigliamo di f ar funzionare il forno a vuoto per circa mezz’ora con il termostato al massimo e a porta chiusa. Quindi trascorso tale
tempo spegnerlo, aprite la porta ed areare il locale. L’odore che talvolta si avverte durante questa operazione è
dovuto all’ev aporazione delle sostanze usate per proteggere il forno durante l’intervallo di tempo che intercorre
tra la produzione e l’installazione del prodotto .
Attenzione: Utilizzare il primo ripiano dal basso, posizionandoci la leccarda in dotazione per raccogliere sughi e/
o grassi, solamente nel caso di cotture al grill o con girarrosto (presente solo su alcuni modelli). Per le altre cotture
non utilizzate mai il primo ripiano dal basso e non appoggiate mai oggetti sul fondo del f orno mentre state cuocendo perchè potreste causare danni allo smalto. P onete sempre i Vostri recipienti di cottura (pirofile, pellicole di alluminio, ecc. ecc.) sulla griglia in dotazione con l’apparecchio ,
appositamente inserita nelle guide del forno.
Forno Statico
Posizione manopola termostato “ M”: Tra 60°C e Max.
In questa posizione si accendono i due elementi riscaldanti
inferiore e superiore. E’ il classico forno della nonna che è
stato però portato ad un eccezionale livello di distribuzione
della temperatura e di contenimento dei consumi. Il f orno
statico resta insuperato nei casi in cui si debbano cucinare
piatti i cui ingredienti risultano composti da due o più
elementi che concorrono a formare un piatto unico come
ad esempio: cavoli con costine di maiale, baccalà alla
spagnola, stoccafisso all’anconetana, teneroni di vitello
con riso etc... Ottimi risultati si ottengono nella
preparazione di piatti a base di carni di manzo o vitello
quali: brasati, spezzatini, gulasch, carni di selvaggina,
cosciotto e lombo di maiale etc... che necessitano di
cottura lenta con costante aggiunta di liquidi. Resta
comunque il miglior sistema di cottura per i dolci, per la
frutta e per le cotture con recipienti coperti specifici per le
cotture al forno. Nella cottur a al f orno statico utilizzate un
solo ripiano, in quanto su più ripiani si avrebbe una cattiv a
distribuzione della temperatura. Usando i div ersi ripiani a
disposizione potrete bilanciare la quantità di calore tra la
parte superiore ed infer iore. Se la cottura necessita di
maggior calore dal basso o dall’alto, utilizzate
rispettivamente i ripiani inferiori o superiori.
Forno Ventilato
Posizione manopola termostato “M”: T r a 60°C e Max.
Si attivano gli elementi riscaldanti ed entra in funzione la
ventola. Poichè il calore è costante ed unif orme in tutto il
forno, l’aria cuoce e rosola il cibo in modo uniforme in tutti
i punti. Potete cuocere contemporaneamente anche pie-
a
b
tanze diverse tra loro, purchè le temperature di cottura
siano simili. E’ possibile utilizzare fino ad un massimo di 2
ripiani contemporaneamente seguendo le avvertenze riportate nel paragrafo “Cottura contemporanea su più ripiani”.
Questa funzione è particolarmente indicata per piatti che
necessitano di gratinatura o per piatti che necessitano di
cottura abbastanza lunga ad esempio: lasagne,
maccheroni pasticciati, pollo e patate arrosto etc... Note voli
vantaggi si ottengono nella cottura degli arrosti di carne
in quanto la migliore distribuzione della temperatura
consente di utilizzare temperature più basse che riducono
la dispersione degli umori mantenendo la carne più
morbida con minor calo di peso. Il ventilato è
particolarmente apprezzato per la cottura dei pesci che
possono essere cucinati con pochissima aggiunta di
condimenti mantenendo così inalterato l’aspetto e il
sapore.
Dessert: risultati sicuri si ottengono cuocendo torte
lievitate.
La funzione “ventilato” può anche essere usata per uno
scongelamento rapido carne bianca o rossa, pane, impostando una temperatura di 80 °C. Per scongelare cibi più
delicati potete impostare 60°C o usare la sola circolazione di aria fredda impostando la manopola termostato a
0°C.
Forno “sopra”
Posizione manopola termostato “ M ”: Tra 60°C e Max.
Si accende l’elemento riscaldante superiore.
Questa funzione può essere utilizzata per ritocchi di cottura.
Grill
d
Posizione manopola termostato “M”: Max.
Si accende l’elemento riscaldante superiore centrale.
La temperatura assai elevata e diretta del grill consente
la immediata rosolatura superficiale dei cibi che,
ostacolando la fuoriuscita dei liquidi, li mantiene più teneri
internamente. La cottura al grill è particolarmente
consigliata per quei piatti che necessitano di elevata
temperatura superficiale: bistecche di vitello e manzo,
entrecôte, filetto, hamburger etc...
Alcuni esempi di utilizzo sono riportati al paragrafo “Consigli
pratici per la cottura”.
Grill Ventilato
Posizione manopola termostato “ M ”: Tra 60°C e 200°C.
Si accende l’elemento riscaldante superiore centrale e si
mette in funzione la ventola. Unisce all’irradiazione termica unidirezionale la circolazione forzata dell’aria all’interno del forno. Ciò impedisce la bruciatura superficiale degli alimenti aumentando il potere di penetrazione del calore. Risultati eccellenti si ottengono utilizzando il grill v entilato per spiedini misti di carne e verdura, salsicce, costine di maiale, costolette di agnello , pollo alla diav ola, quaglie alla salvia, filetto di maiale etc...
Fra i pesci il g rill ventilato è insuperabile nella cottura di tranci di cernia, di tonno, di pesce spada, seppioline ripiene etc...
La luce forno
Si accende ruotando la manopola “L” sul simbolo
mina il forno e resta accesa quando sia messo in funzio-
c
e
3. Illu-
6
Page 5
ne un qualsivoglia elemento elettrico riscaldante del forno.
La spia termostato forno (O)
Indica la fase di riscaldamento dello stesso, il suo spegnimento segnala il raggiungimento all’interno del forno della
temperatura impostata con la manopola. A questo punto l’alternativo accendersi e spegnersi di questa spia indica che il
termostato sta lavorando correttamente per mantenere costante la temperatura del forno.
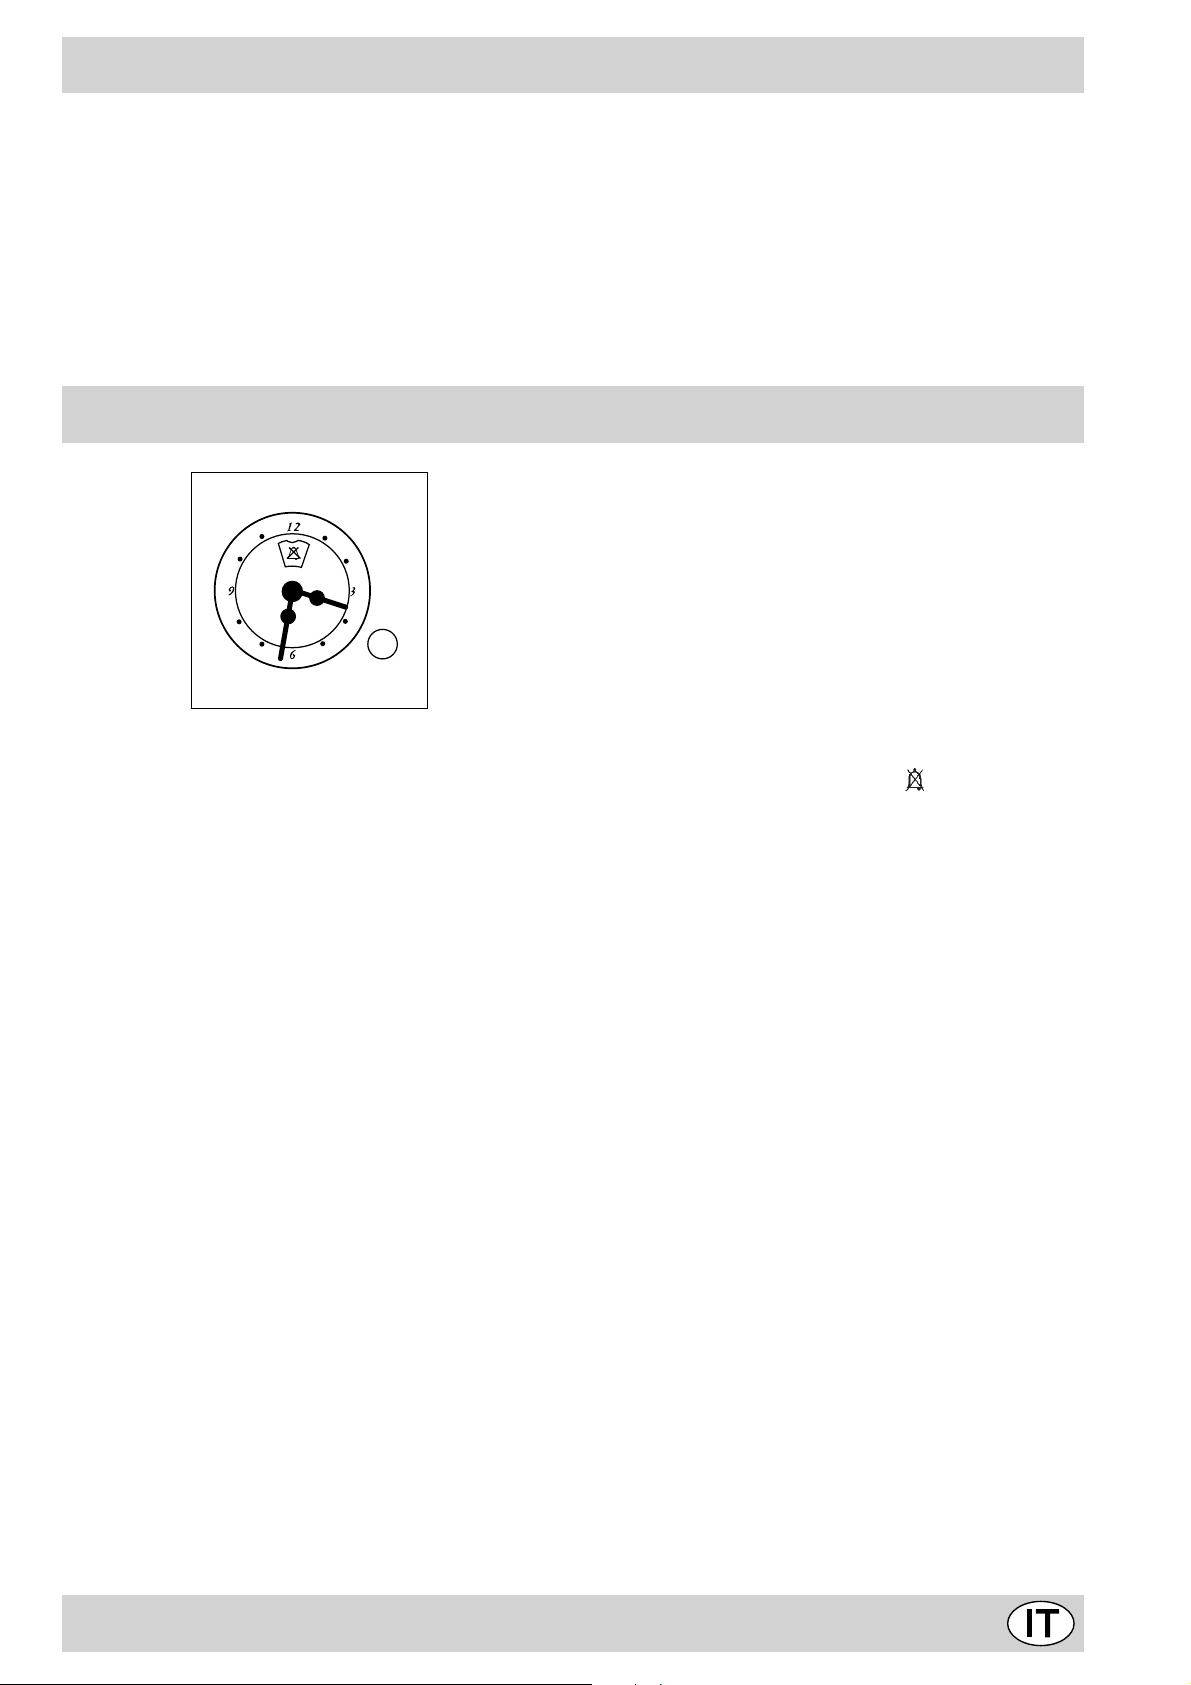
Orologio con contaminuti Rustico
Come rimettere l’ora corrente
Il forno deve essere collegato elettricamente .
Tirare la manopola e ruotare in senso antiorario fino ad
impostare l’ora esatta.
N.B.: L’orologio funziona elettricamente, quindi in caso di
mancanza di corrente si fermerà per tutta la durata della
mancanza stessa. Dopodichè sarà necessario ripetere
l’operazione di impostazione dell’ora corrente.
Funzione contaminuti
Nel funzionamento contaminuti viene impostato un tempo dal quale comincia un conto alla rovescia. Questa funzione non controlla l’accensione e lo spegnimento del forno, emette solamente un allarme acustico a tempo scaduto.
Come impostare il contaminuti
Ruotare la manopola in senso antiorario fino a portare
l’indice sul tempo desiderato (scala interna), visibile attraverso la “finestrella”.
Il conteggio del tempo inizierà immediatamente.
Per interrompere il suono, o per utilizzare la sola funzione
orologio portare l’indice sul simbolo
.
7
Page 6
Consigli pratici per la cottura
Il forno mette a vostra disposizione una vasta gamma di
possibilità che consentono di cuocere ogni cibo nella maniera migliore. Con il tempo potrete sfruttare al meglio
questo versatile apparecchio di cottura, pertanto le note
ripor tate di seguito sono solamente delle indicazioni di
massima che potrete ampliare con la vostra esperienza
personale.
Preriscaldamento
Nel caso in cui sia necessario preriscaldare il forno, in
linea di massima tutte le volte in cui si cuocciano cibi lie-
vitati, è possibile utilizzare la funzione
consente di raggiungere la temperatura desiderata in bre ve
tempo e con consumi ridotti.
Una volta infornato si può passare alla funzione di cottura
più indicata.
Cottura contemporanea su più ripiani
Se dovete cuocere su due ripiani utilizzate solamente la
funzione
possibilità.
• Il forno è dotato di 5 ripiani. Nella cottura v entilata uti-
• Normalmente utilizzate il 2° ed il 4° ripiano dal basso,
• Nella cottura contemporanea di cibi che hanno tempi
• Utilizzate la leccarda al ripiano inferiore e la griglia a
b “ventilato” che è l’unica che consente tale
lizzate due dei tre ripiani centrali, il primo in basso e
l’ultimo in alto sono investiti direttamente dall’aria calda che potrebbe provocare delle bruciature sui cibi delicati;
inserendo nel 2° ripiano i cibi che richiedono maggior
calore. Ad esempio nel caso della cottura di arrosti di
carne contemporaneamente ad altri cibi, inserite l’arrosto al 2° ripiano, lasciando il 4° a cibi più delicati;
e temperature di cottura diversi impostate una temperatura intermedia tra le due, infornate il cibo più delicato al 4° ripiano ed estraete dal forno prima l’alimento
con tempo di cottura più brev e;
quello superiore;
b “ventilato” che
ripiano partendo dal basso (vedi tabella cottura)
dopodiché, per raccogliere i grassi ed e vitare la formazione
di fumo, disponente una leccarda nel 1° ripiano dal basso.
Importante: effettuare la cottura al grill con porta del
forno chiusa, ciò per ottenere migliori risultati ed un sen-
sibile risparmio di energia (10% circa).
Quando si utilizza tale funzione, si raccomanda di
impostare il termostato a 200 °C, perchè questa è la
condizione di rendimento ottimale, che si basa
sull’irraggiamento ai raggi infrarossi. Questo, però, non
significa che non si possano utilizzare temperature
inferiori, semplicemente regolando la manopola del
termostato sulla temperatura desiderata.
Pertanto i migliori risultati nell’utilizzo delle funzioni
grill si ottengono disponendo la griglia sugli ultimi
ripiani partendo dal basso (vedi tabella cottura)
dopodiché, per raccogliere i grassi ed evitare la formazione di fumo, disponete la leccarda in dotazione
nel primo ripiano dal basso.
Cottura dei dolci
Nella cottura dei dolci infornate sempre a f orno caldo, attendete la fine di preriscaldamento, indicata dallo spegnimento della spia rossa “O”. Non aprite la porta durante la
cottura, per evitare un abbassamento del dolce. In generale:
Dolce troppo secco
La prossima volta impostate una temperatura di10°C
superiore e riducete il tempo di cottura.
Dolce si abbassa
Usate meno liquido o abbassate la temperatura di
10°C.
Dolce scuro superiormente
Utilizzo del grill
Il forno multifunzione mette a vostra disposizione 2 diver se possibilità di grigliare solo ed esclusivamente con
la porta forno chiusa.
Utilizzate la funzione
tro della griglia (posta al 3° o 4° ripiano partendo dal basso), dato che risulta accesa solamente la parte centrale
della resistenza superiore.
Utilizzare il primo ripiano dal basso, posizionandoci la
leccarda in dotazione per raccogliere sughi e/o grassi.
Quando si utilizza tale funzione, si raccomanda di
impostare il termostato al massimo. Questo, però, non
significa che non si possano utilizzare temperature
inferiori, semplicemente regolando la manopola del
termostato sulla temperatura desiderata.
La posizione
veloci, si distribuisce il calore emesso dal grill consentendo contemporaneamente alla doratura superficiale anche
una cottura nella parte inferiore.
Potete anche usarla nella parte finale della cottura dei
cibi che abbiano bisogno di doratura superficiale, ad esempio è l’ideale per dorare la pasta al forno a fine cottura.
Nell’utilizzo di tale funzione disponete la griglia sul 2° o 3°
e “grill ventilato” è utilissima per grigliature
d “grill” posizionando il cibo al cen-
Inseritelo ad altezza inferiore, impostate una
temperatura più bassa e prolungate la cottura.
Buona cottura esterna, ma interno colloso
Usate meno liquido, riducete la temperatura,
aumentate il tempo di cottura.
Dolce non si stacca dallo stampo
Ungete bene lo stampo e cospargetelo anche con un
pò di farina oppur e utilizzate carta for no .
Ho cotto su pi ù ri piani (nella f unzi one " ve ntil at o")
e non tutti sono allo stesso avanz am ento di
cottura
Impostate una temperatura inferiore.
Non necessariamente ripiani inseriti
contemporaneamente debbono essere tolti insieme.
8
Page 7
Cottura della pizza
Per una buona cottur a della pizza utilizzate la funzione
“ventilato”:
• Preriscaldare il forno per almeno 10 minuti
• Utilizzare una teglia in alluminio leggero appoggiandola sulla griglia in dotazione. Utilizzando la leccarda
si allungano i tempi di cottura e difficilmente si ottiene
una pizza croccante
• Non aprite frequentemente il forno durante la cottura
• Nel caso di pizze molto farcite (capricciosa, quattro
stagioni) è consigliabile inserire la mozzarella a metà
cottura.
• Nella cottura della pizza su due ripiani utilizzate il 2°
ed il 4° con temperatura di 220°C ed infornate dopo
aver preriscaldato per almeno 10 minuti.
b
Consigli pratici per l'uso del piano in ceramica
Cottura del pesce e della carne
Per le carni bianche, i volatili ed il pesce utilizzate temperature da 180 °C a 200 °C.
Per le carni rosse che si vuole siano ben cotte all’esterno
conservando all’interno il sugo, è bene utilizzare una temperatura iniziale alta (200°C-220°C) per breve tempo , per
poi diminuirla successivamente.
In generale, più grosso è l’arrosto, più bassa do vrà essere la temperatura e più lungo il tempo di cottura. P onete la
carne da cuocere al centro della griglia ed inserite sotto
la griglia la leccarda per raccogliere i grassi.
Inserite la griglia in modo che il cibo si trovi al centro del
forno. Se volete più calore da sotto, utilizzate i ripiani più
bassi. P er ottenere arrosti saporiti (in particolare anatra e
selvaggina) bardate la carne con lardo o pancetta e posizionatela in modo che sia nella parte superiore.
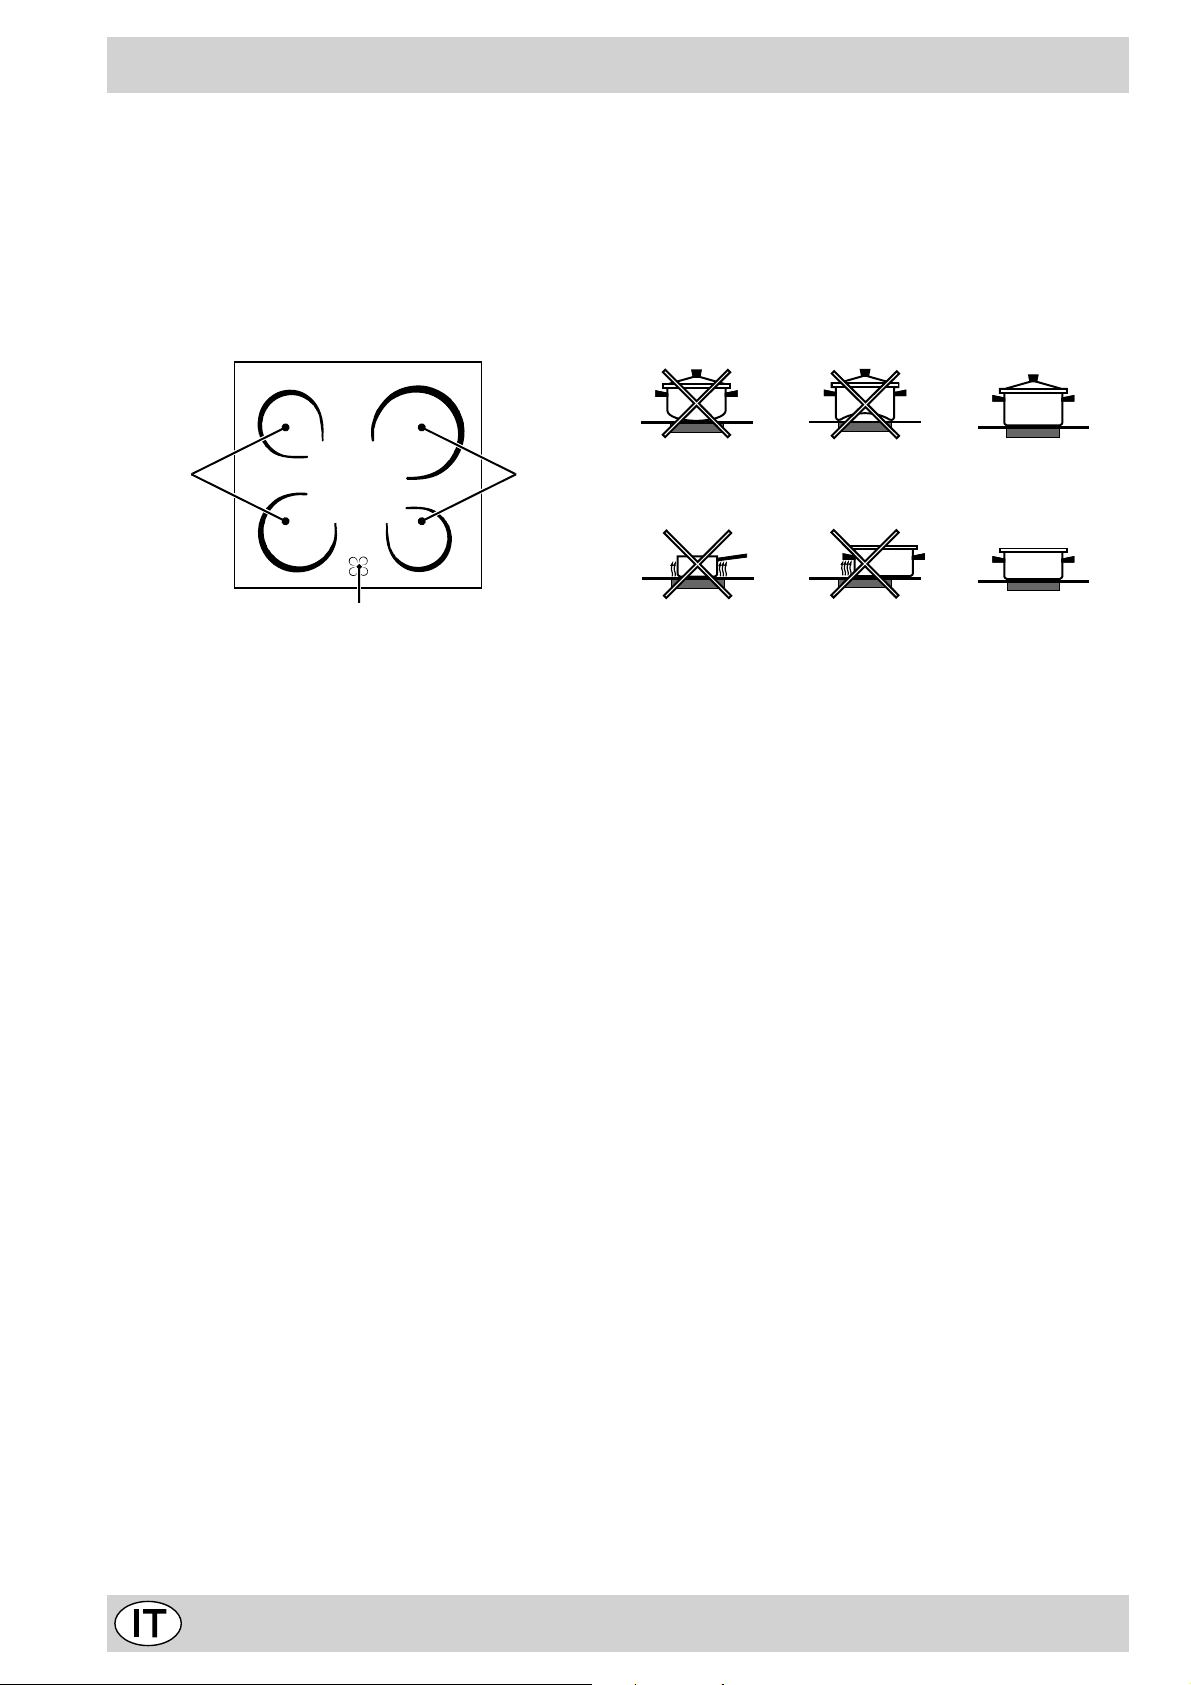
Le manopole di comando delle piastre elettriche del
piano di cottura (N)
Le cucine possono essere dotate di piastre elettriche normali e rapide in varie combinazioni (le piastre rapide si distinguono dalle altre per la presenza di un bollo rosso al
centro). Per evitare dispersioni di calore e danni alle piastre
è bene usare recipienti con fondo piano e di diametro non
inferiore a quello della piastra. Nella tabella sono r iportate le
corrispondenze fra la posizioni indicate sulle manopole e
l’uso per il quale le piastre sono consigliate.
Pos. Piastra normale o rapid a
0
Spento
1 Cottura di verdure, pesci
Cottura di patate (a vapore) minestre, ceci,
2
fagioli
Proseguimento di cottura di grandi quantità di
3
cibi, minestroni
4
Arrostire (medio)
5 Arrostire (forte)
La spia di funzionamento delle piastre elettriche (H)
Risulta accesa quando sia messo in funzione un qualsivoglia
elemento elettrico riscaldante del piano di cottura eventualmente provvisto di piastre elettriche.
6
Rosolare o raggiungere bollitura in poco tempo
9
Page 8
Istruzioni sull'uso del piano di cottura in ceramica
Descrizione
Il piano di cottura è munito di 4 elementi riscaldanti radianti. Questi riscaldatori sono incorporati al di sotto della
superficie del piano di cottura (zone che diventano rosse
durante il funzionamento):
A. Elementi riscaldanti radianti
B. Luci che indicano se la temperatura dei riscaldatori
corrispondenti supera i 60°C, anche se la zona del piano di cottura è stata spenta.
AA
B
Descrizione degli elementi riscaldanti
Gli elementi riscaldanti radianti sono costituiti da elementi riscaldanti circolari, che diventano rossi soltanto
dopo 10-20 secondi dall'accensione.
Istruzioni per l'uso del piano di cottura in
vetroceramica
Per ottenere dal piano di cottura i migliori risultati possibili, seguire alcune regole fondamentali al momento di preparare o cucinare i cibi.
· Sui piani di cottura in vetroceramica è possibile utilizzare tutti i tipi di pentole e padelle. Tuttavia, la superficie inferiore deve essere perfettamente piana. Naturalmente, più spesso è il fondo della pentola o della
padella, più uniformemente viene distribuito il calore.
· Controllare che la base della padella copra completamente la corona: ciò permetterà di sfruttare appieno il
calore prodotto
· Controllare che la base della padella sia sempre asciutta e pulita: ciò garantisce non solo che il contatto sia
quello ottimale, ma anche che le padelle e i piani di
cottura durino a lungo.
· Non utilizzare le stesse padelle che vengono utilizzate
per la cottura sui bruciatori a gas, perché la forza del
calore di questi ultimi potrebbe deformare la base della padella e non darà gli stessi risultati se poi viene
utilizzata su di un piano di cottura in vetroceramica.
10
Page 9

Manutenzione or dinaria e pulizia della cucina
Prima di ogni operazione disinserire elettricamente
la cucina. Per una lunga durata della cucina è indispen-
sabile eseguire frequentemente una accurata pulizia generale, tenendo presente che:
· per la pulizia non utilizzare apparecchi a vapore
• le par ti smaltate e i pannelli autopulenti, se presenti,
vanno lavate con acqua tiepida senza usare polveri
abrasive e sostanze corrosive che potrebbero ro vinarle;
• l’interno del forno va pulito, con una certa frequenza,
quando è ancora tiepido usando acqua calda e detersivo, risciacquando ed asciugando poi accuratamente;
• l’acciaio inox può rimanere macchiato se rimane a con-
tatto per lungo tempo con acqua fortemente calcarea
o con detergenti aggressivi (contenenti fosforo). Si consiglia di sciacquare abbondantemente ed asciugare
dopo la pulizia. E’ inoltre oppor tuno asciugare eventuali trabocchi d’acqua.
Cleaning the hob surface
Prior to cooking, the hob surface should always be cleaned
using a damp cloth to remove any dust or stray food
particles. The hob surface should be regularly cleaned
with a lukewarm solution of water and a mild detergent.
Periodically it may be necessary to use a proprietary
ceramic hob cleaner. First remove all spilt food and fat
with a window scrape, preferably the razor blade type
(not supplied) or, failing that, the fixed blade
razor edge type (see Fig. A). Then clean the hob while it
is still warm to the touch with a suitable cleaner and paper
towel.
Then rinse it and wipe it dry with a clean cloth .If aluminium
foil or plastic items are accidentally allowed to melt on the
hob surface they should be immediately removed from
the hot cooking area with a scraper. This will avoid any
possible damage to the surface . This also applies to sugar
or any food with a high sugar content.
Do not use abrasive sponges or scourers of any type.
Corrosive cleaners such as oven sprays and stain
removers should also not be used (see Fig. B).
Prodotti specifici per la
pulizia del vetroceramica
Raschietto a lametta e Lamette
di ricambi
Stahl-Fix
SWISSCLEANER
WK TOP
Altri prodotti per vetroceramica
Sostituzione della lampada nel vano forno
Dove acquistarli
Hobbistica e
Ferramenta
Casalinghi
Fai-Da-Te
Ferramenta
Supermercati
• Togliere l’alimentazione al forno tramite l’interruttore
omnipolare utilizzato per il collegamento del forno all’impianto elettrico, o scollegare la spina, se accessibile;
• Svitare il coperchio in vetro del portalampada;
• Svitare la lampada e sostituirla con una resistente ad
alta temperatura (300°C) con queste caratteristiche:
- Tensione 230V
- Potenza 25W
- Attacco E14
• Rimontare il coperchio in vetro e ridate alimentazione
al forno.
Fig. A Fig. B
11
Page 10
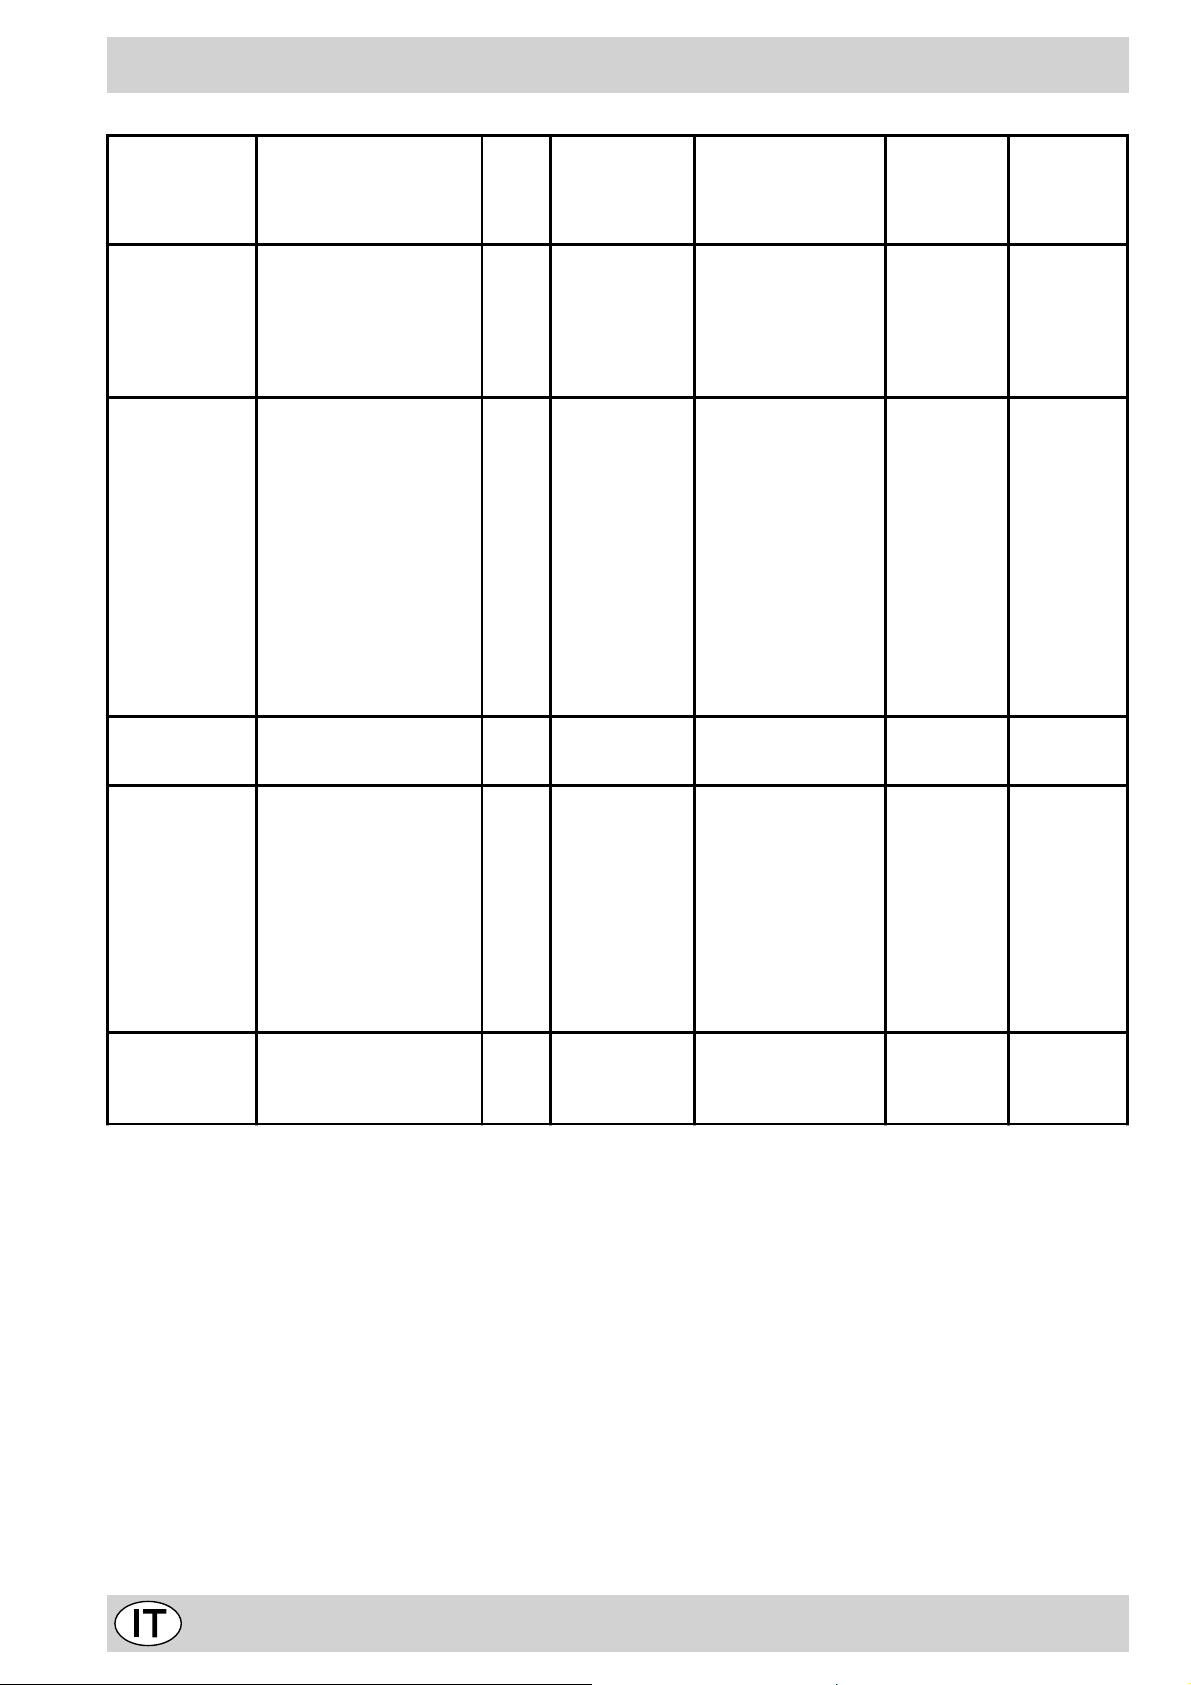
Consigli pratici per la cottura
Posizione
manopola
selezione
1 Statico
a
2 Ventilato
b
3 Forno Sopra
c
Cibo da cucinare Peso
(Kg)
Anatra
Arrosto di vitello o
manzo
Arrosto di maiale
Biscotti (di frolla)
Crostate
Pizza
(su 2 ripiani)
Lasagne
Agnello
Pollo arrosto + patate
Sgombro
Plum-ca ke
Bignè
(su 2 ripiani)
Biscotti
Pan di spagna
ripi ano
Pan di spagna
ripi ani)
Torte salate
Ritocchi di cottura - 3/4 15 220 -
(su 2 ripiani
)
)
(su 1
(su 2
0.5
0.5
0.5
1.0
1.5
Posi z ione di
cottura ripiani
dal basso
1
1
1
-
1
1
1
1
1
1
1
3
3
3
3
3
2-4
3
2
2-4
2
2
2-4
2-4
2
2-4
3
Tempo di pre-
riscaldamento
(minuti)
15
15
15
15
15
15
10
10
10
10
10
10
10
10
10
15
Posizione
manopola
termostato
200
200
200
180
180
220
200
180
180
180
170
190
180
170
170
200
Tempo di
cottura
(minuti)
65-75
70-75
70-80
15-20
30-35
15-20
30-35
50-60
60-75
30-35
40-50
20-25
10-15
15-20
20-25
25-30
4 Grill
d
5 Grill
ventilato
Sogliole e seppie
Spiedini di calamari e
gamberi
Filetto di merluzzo
Verdure alla griglia
Bistecca di vitello
Cotolette
Hamburger
Sgombri
Toast
Pollo alla griglia
Seppie
1
1
1
1
1
1
1
1
n.° 4
1.5
1.5
4
4
4
3/4
4
4
4
4
4
3
3
5
5
5
5
5
5
5
5
5
5
5
Max
Max
Max
Max
Max
Max
Max
Max
Max
200
200
8-10
6-8
10
10-15
15-20
15-20
7-10
15-20
2-3
55-60
30-35
e
NB: i tempi di cottura sono indicativi e possono essere modificati in base ai propri gusti personali. Nelle cotture al
grill o grill ventilato, la leccarda va posta s empre al 1° ripiano a partire dal basso.
12
Page 11

Important
To maintain the EFFICIENCY and SAFETY of this appliance, we recommend:
• call only the Service Centers authorized by the manufacturer
• always use original Spare Pa rts
1 This appliance is intended for non-professional use within
the home.
2 Before using the appliance, carefully read the instructions
contained in this manual, as they provide important
information for ensuring safe installation, use and
maintenance. Keep this manual as a reference guide.
3 Remove the packing and make sure the appliance hasn’t been
damaged during transport. If you have any doubts, don’t use
the appliance. Call a qualified technician for assistance. For
safety , keep pac king materials (plastic bags, polystyrene foam,
tacks, etc.) aw ay from children.
4 The appliance must be installed by a qualified technician in
accordance with the manufacturer’s instructions. No liability for
injury or damage to persons, animals or property will be accepted
by the manufacturer arising from failure to follow these
instructions.
5 The electrical safety of this appliance is ensured only if it is
correctly connected to an efficiently earthed system in
accordance with electrical safety regulations. Make sure this
basic safety requirement has been complied with. If in doubt,
have it check ed by a qualified technician. No liability f or damage
will be accepted by the manufacturer because of defective
earthing.
6 Before connecting the appliance, make sure the specifications
on the rating plate correspond with those of your power supply.
7 Check that your supply and sockets are sufficient for the total
load taken by y our appliance which is stated on the rating plate.
If you hav e any doubts, contact a qualified technician for service.
8 A multipole circuit breaker with a space between contacts of 3
mm or more must be fitted for installation
9 If the socket and cooker plug are not compatible, ha ve the socket
replaced with a suitable model by a qualified technician who
should also check that the cross-section of the sock et cable is
suited to the power absorbed by the appliance. The use of
adaptors, multiple sockets and/or extensions, is not
recommended. If their use can not be avoided, remember to
use only single or multiple adapters and extensions which comply
with current safety regulations. In these cases, never exceed
the maximum current capacity indicated on the single adaptor
or extension and the maximum power indicated on the multiple
adapter.
10 Do not leave the appliance plugged in if it is not necessary.
Switch off the main switch and gas cock when you are not using
the cooker.
11 The openings and slots used for ventilation and dispersion
of heat must never be closed or plugged.
12 The user must not replace the supply cable of this appliance.
Always call an after-sales servicing centre authorised by the
manufacturer in the case of cable damage or replacement.
13 This appliance must be used for the purpose for which it was
expressly designed.
Any other use (e.g. heating rooms) is considered to be improper
and consequently dangerous.
The manufacturer declines all responsibility for damage resulting
from improper and irresponsible use.
14 A number of fundamental rules must be followed when using
electrical appliances. The following are of particular importance:
· do not touch the appliance when your hands or feet are wet
· do not use the appliance barefooted
· do not use extensions, but if these are necessary caution
must be ex ercised.
· never pull the power supply cab le or the appliance to unplug
the appliance plug from the mains.
· never lea v e the appliance exposed to atmospheric agents
(rain, sun etc.)
· do not allow children or persons who are not familiar with
the appliance to use it, without supervision.
15 Always unplug the hob from the mains or switch off the main
switch before cleaning or carrying out maintenance operations.
16 If the surface of the glass breaks, disconnect the appliance
immediately. For repairs call only an authorised after-sales
servicing centre and request the use of original spare par ts
only. Failure to comply with the abo ve may compromise the
safety of the appliance.
17 If you are no longer using the appliance, remember to make it
unserviceable by unplugging the appliance from the mains and
cutting the supply cable. Also make all potentially dangerous
parts of the appliance, safe, above all for children who could
play with the appliance.
18 The vitreous china hob is resistant to temperature fluctuations
and shockproof. Remember however that sharp kitchen tools
or cutters may break the surface of the hob. If this happens,
unplug the cooker immediately from the mains and call your
local servicing centre.
19 Remember that the cooking surface remains hot for at least
half an hour after you switch off the surface. Do not place
containers or other objects on the hot surface.
20 Avoid setting anything on the glass surf ace of the cooktop.
21 Do not turn on the cooking surfaces if there are sheets of
aluminium foil or plastic on the hob .
22 Keep aw a y from the hot surf aces.
23 When using small electrical household appliances close to the
hob, ensure that the power cable does not rest on the hot
surfaces
24 Keep pot handles turned inwards to av oid knoc king the pot off
the hob.
25 When you turn on the cooking surface always place a pot on
the surface immediately as it will otherwise overheat v ery quickly
and possibly damage the heating elements.
26 Preliminary instructions. The glass sealant utilised ma y leave
traces of grease on the glass. Remember to wipe these away
with a normal non abrasive detergent before you turn on the
appliance. During the first few hours of use there may be a
smell of rubber which will disappear very quickly.
27 When the appliance is in use, the heating elements and
some parts of the oven door become extremely hot. Make
sure you don't touch them and keep children well a way.
28 Make sure the knobs are in the “•”/”o” position when the appli-
ance is not in use.
29 If the cooker is placed on a pedestal, take the necessary
precautions to prevent the same from sliding off the pedestal
itself.
13
Page 12

Installation Instructions
NL2L3
L1
P
The following instructions should be read by a qualified
technician to ensure that the appliance is installed,
regulated and technically serviced correctly in compliance
with current regulations.
Important: The power supply to the appliance must be
cut off before any adjustments or maintenance work is
done on it.
Positioning
The cooker is manufactured with type X deg ree protection
against overheating.
Levelling Y our Appliance (only on certain models)
4 support feet which are adjusted using screws are located
in the lower part of the cooker. These level off the oven
when necessary . It is essential that the cooker be standing
lev el.
To install the cable, proceed as follows:
• unscrew the wire clamp screw and the contact screws
Note: the jumpers are factory-set for a single-phase
230V connection (Fig. A).
• to make the electrical connections illustrated in fig. C
and fig. D, use the two jumpers housed in the box (fig.
B - reference “P”)
• fasten the supply cable in place with the clamp and
close the cover of the terminal board.
230V 1N~
H07RN-F 3x4 CEI-UNEL 35364
NL
5
3
4
Fig. A
1
2
Mounting the legs (only on certain models)
Press-fit legs are supplied which fit under the base of your
cooker.
Fitting on a Power Supply Cable
Opening the terminal board:
• Using a screwdriver, prise on the side tabs of the
terminal board cover;
• Pull open the cover of the terminal board.
Fig. B
400V 2N~
H05RR-F 4x2.5 CEI-UNEL 35363
NL2L1
5
3
4
Fig. C
1
2
400V 3N~
H05RR-F 5x2.5 CEI-UNEL 35363
NL3L1L2
5
3
4
Fig. D
1
2
Connecting the supply cable to the mains
Install a standardised plug corresponding to the load
indicated on the data plate. When connecting the cable
directly to the mains, install an omnipolar circuit-breaker
with a minimum contact opening of 3 mm between the
appliance and the mains. The omnipolar circuit breaker
should be sized according to the load and should comply
with current regulations (the green-yellow earth wire should
not be interrupted by the circuit breaker). The supply cab le
should be positioned so that it does not reach a tempera-
14
Page 13

ture of more than 50°C with respect to the room temperature, anywhere along its length.
Before making the connection, check that:
• the limiter valve and the home system can support the
appliance load (see data plate);
Technical Characteristics
• the mains are properly earthed in compliance with
current directives and regulations;
• there is easy access to the socket and omnipolar circuit
breaker , once the hob has been installed.
Oven
Dimensions (HxWxD): 32x40.5x39.5 cm
V olume: 52 Litres
Max. Ov en Power Absorption: 2250 W
Innder dimensions of the plate plate warmer:
Width: 46 cm
Depth: 42 cm
Height: 8.5 cm
Ceramic Hob
Back Right: 2100 W
Front Right: 1200 W
Front Left: 1700 W
Back Left: 1200 W
Hob Ceramic absorption Max: 6200 W
V oltage and Frequenc y
230V/400V~ 3N 50Hz
Cooker description
ENERGY LABEL
Energy consumption for Forced convection
heating mode: b Fan assisted
Declared energy consumption for Natural con vection Class
heating mode: a Convection
This appliance conforms with the following Eur opean
Economic Community directives:
- 73/23/EEC of 19/02/73 (Low V oltage) and subsequent
modifications;
- 89/336/EEC of 03/05/89 (Electromagnetic
Compatibility) and subsequent modifications;
- 93/68/EEC of 22/07/93 and subsequent modifications.
A Control Panel
B Oven Rack
C Dripping Pan or Baking Sheet
D Adjustable F eet
H Electric hotplate indicator light
L Selector Knob
M Thermostat Knob
N Electric hotplate control knobs
O Thermostat Light
S Country Style Clock and Timer
O
L M S
A
B
C
D
H
N
D
15
Page 14

How T o Use Y our Appliance
This multi-function ov en combines the advantages of tr aditional convection o v ens with those of the more modern
fan assisted models in a single appliance.
It is an extremely versatile appliance that allows you to
choose easily and safely between 5 different cooking
modes. The various features offered by the oven are selected by means of selector knob “L” and thermostat “M”
situated on the control panel.
Notice: The first time y ou use y our appliance, we recommend that you set the thermostat to the highest setting
and leav e the oven on f or about half an hour with nothing
in it, with the oven door shut. Then, open the oven door
and let the room air. The odour that is often detected during this initial use is due to the ev aporation of substances
used to protect the oven during storage and until it is installed.
Notice: Place the dripping pan provided on the bottom
shelf of the oven to pre vent any sauce and/or g rease from
dripping onto the bottom of the oven only when grilling
food or when using the rotisserie (only available on certain models). For all other types of cooking, ne ver use the
bottom shelf and never place anything on the bottom of
the oven when it is in operation because this could damage the enamel. Always place y our cookware (dishes, aluminium foil, etc. etc.) on the grid provided with the appliance inserted especially along the oven guides
Convection Mode
Position of thermostat knob “M”: between 60°C and Max .
On this setting, the top and bottom heating elements come
on. This is the classic, traditional type of oven which has
been perfected, with exceptional heat distrib ution and reduced energy consumption. The convection oven is still
unequalled when it comes to cooking dishes made up of
several ingredients, e .g. cabbage with ribs , Spanish style
cod, Ancona style stockfish, tender veal strips with rice,
etc. Excellent results are achieved when preparing veal
or beef-based dishes as well (braised meats, stew, goulash, wild game, ham etc.) which need to cook slowly and
require basting or the addition of liquid. It nonetheless remains the best system for baking cakes as well as fruit
and cooking using covered casserole dishes f or ov en baking. When cooking in con vection mode, only use one dripping pan or cooking rack at a time, otherwise the heat
distribution will be une ven. Using the different rack heights
available, you can balance the amount of heat between
the top and the bottom of the oven. Select from among
the various rack heights based on whether the dish needs
more or less heat from the top.
Fan Assisted Mode
Position of thermostat knob “ M”: Between 60°C and Max.
The heating elements, as well as the fan, will come on.
Since the heat remains constant and uniform throughout
the ov en, the air cooks and browns food uniformly ov er its
entire surface. With this mode, you can also cook various
dishes at the same time, as long as their respective cook-
a
b
ing temperatures are the same. A maximum of 2 racks
can be used at the same time, following the instructions in
the section entitled: “Cooking On More Than One Rack”.
This fan assisted mode is particularly recommended for
dishes requiring a gratin finish or for those requiring considerably prolonged cooking times, such as for example:
lasagne, pasta bakes, roast chicken and potatoes, etc…
Moreover, the excellent heat distribution makes it possible to use lower temperatures when cooking roasts . This
results in less loss of juices, meat which is more tender
and a decrease in the loss of weight for the roast. The f an
assisted mode is especially suited for cooking fish, which
can be prepared with the addition of a limited amount of
condiments, thus maintaining their flavour and appearance.
Desserts: the fan assisted mode is also perfect f or baking
leavened cakes.
Moreover, this mode can also be used to thaw quickly
white or red meat and bread by setting the temperature to
80 °C. To tha w more delicate f oods , set the thermostat to
60°C or use only the cold air circulation feature by setting
the thermostat to 0°C.
“Top” oven
Position of thermostat knob “M”: Between 60°C and Max.
The top heating element comes on.
This mode can be used to brown food at the end of cooking.
Grill
d
Position of thermostat knob “ M”: Max
The top central heating element comes on.
The extremely high and direct temperature of the grill
makes it possible to brown the surf ace of meats and roasts
while locking in the juices to keep them tender . The g rill is
also highly recommended for dishes that require a high
temperature on the surface: beef steaks, veal, rib steak,
filets, hamburgers etc...
Some grilling examples are included in the “Practical Cooking Advice” paragraph.
Fan Assisted Grill
Position of thermostat knob “M”: between 60°C and 200°C.
The top central heating element and the fan come on. This
combination of features increases the effectiv eness of the
unidirectional thermal radiation of the heating elements
through forced circulation of the air throughout the oven.
This helps prevent food from burning on the surface, allowing the heat to penetrate right into the f ood. Excellent
results are achieved with kebabs made with meats and
vegetables, sausages , ribs, lamb chops, chicken in a spicy
sauce, quail, pork chops, etc.
This mode is also ideal for cooking fish steaks, like s wordfish, tuna, grouper, stuffed cuttlefish etc.
The oven light
Set knob “L” to the
oven and sta ys on when any of the electrical heating elements in the oven come on.
Thermostat Light (O)
This light indicates that the oven is heating. When it turns
off, the temperature inside the ov en has reached the set-
c
e
3 symbol to turn it on. It lights the
16
Page 15

ting made with the thermostat knob. At this point, the light
will turn on and off as the oven maintains the temperature
at a constant level.
Country Style Clock and Timer
How to Set the Current Time
The oven must be connected to the po wer supply
Pull and turn the knob in the counter-clockwise direction
to set the time.
N.B.: The clock is electric. Therefore, in the event of a
power outage, the clock will stop for the entire time the
oven remains without pow er. When the power comes bac k
on, the clock must be reset to the current time
Timer Feature
The timer operates by counting down a given period of
time. This feature does not, how ever, turn the oven on or
off. It merely emits an acoustical alarm when the time has
run out.
How to Set the Timer
Turn the knob in the counter-clockwise direction until the
indicator is set on the length of time desired (using the
inside numbers). The time is clearly visible through the
transparent window on the indicator itself.
The timer will begin to count down immediately .
To turn off the buzzer, or to use only the clock, set the
indicator on the
symbol.
17
Page 16

Practical Cooking Advice
The oven offers a wide range of alternatives which allow
you to cook any type of f ood in the best possible wa y. With
time you will learn to make the best use of this versatile
cooking appliance and the following directions are only a
guideline which may be varied according to your o wn personal experience.
Preheating
If the oven must be preheated (this is generally the case
when cooking leavened f oods), the “fan assisted” mode
b can be used to reach the desired temperature as quic kly
as possible in order to sav e on energy.
Once the food has been placed in the oven, the most
appropriate cooking mode can then be selected.
Cooking on More Than One Rack
If you have to cook on more than one rack at the same
time, use only the “fan assisted mode”
only one that is appropriate for this type of cooking.
• The oven is fitted with 5 racks. During fan assisted
cooking, use two of the three central racks; the lowest
and highest racks receive the hot air directly and
therefore delicate foodstuffs could be burnt on these
racks.
• As a general rule, use the 2nd and 4th rack from the
bottom, placing the foodstuffs that require greater heat
on the 2nd rack from the bottom. For example, when
cooking meat roasts together with other food, place
the roast on the 2nd rack from the bottom and the more
delicate food on the 4th rack from the bottom.
• When cooking foodstuffs that require differing times
and temperatures, set a temperature that is somewhere
between the two temperatures required, place the more
delicate food on the 4th rack from the bottom and take
the food requiring less time out of the oven first.
• Use the dripping pan on the lower rack and the grid on
the upper;
b which is the
When using this mode, place the grid on the 2nd or 3rd
oven rack from the bottom (see cooking table) then, to
prevent fat and grease from dripping onto the bottom of
the oven and thus smoke from f orming, place a drippingpan on the 1st rack from the bottom.
Important: always use the grill with the o ven door shut.
This will allow you both to obtain excellent results and to
save on energy (appro ximately 10%).
When using this mode, we advise you to set the thermostat
to 200°C, as it is the most efficient way to use the grill,
which is based on the use of infrared ray s. However , this
does not mean you cannot use lower temperatures, simply
by adjusting the thermostat knob to the desired temperature.
Therefore the best results when using the grill modes
are obtained by placing the grid on the lower racks
(see cooking table) then, to prevent fat and grease
from dripping onto the bottom of the oven and smoke
from forming, place a dripping-pan on the 1st oven
rack from the bottom.
Baking Cakes
When baking cakes, always place them in a preheated
oven. Make sure you wait until the oven has been
preheated thoroughly (the red light “O” will turn off). Do
not open the oven door during baking to prev ent the cake
from dropping. In general:
Cooked well on the inside but sticky on the
outside
Use less liquid, lower the temperature, and increase
the cooking time.
The pastry sticks to the pan
Grease the pan well and sprinkle it with a dusting of
flour or use greaseproof paper.
Using the Grill
This multi-function oven offers you 2 different grilling
modes only and exclusively with the oven door shut.
Use the “grill” mode
of the grill (situated on the 3rd or 4th rack f orm the bottom)
because only the central part of the top heating element
is turned on.
Use the bottom rack (1st from the bottom), placing the
dripping pan provided to collect any sauce and/or grease
and prev ent the same from dripping onto the oven bottom.
When using this mode, we recommend you set the
thermostat to the highest setting. However, this does not
mean you cannot use lower temperatures, simply by
adjusting the thermostat knob to the desired temperature.
Setting
grilling foods rapidly, as the distribution of heat makes it
possible not only to brown the surface, but also to cook
the bottom part.
Moreover, it can also be used for browning foods at the
end of the cooking process, such as adding that gratin
finish to pasta bakes, for example.
e, “fan assisted grill”, is extremely useful for
d, placing the food under the centre
Pastry is too dry
Increase the temperature by 10°C and reduce the
cooking time.
Pastry dropped
Use less liquid or lower the temperature by 10°C.
Pastry is too da rk on top
Place it on a lower rack, lower the temperature, and
increase the cooking time.
I used more than one level (in the function
"ventilated oven") and they are not all at the same
cooking point
Use a lower temperature setting. It is not necessary to
remove the food from all the racks at the same time.
18
Page 17

Cooking Pizza
For best results when cooking pizza, use the “fan
assisted “
• Preheat the oven for at least 10 minutes;
• Use a light aluminium pizza pan, placing it on the grid
supplied with the oven. If the dripping pan is used, this
will extend the cooking time, making it difficult to get a
crispy crust;
• Do not open the oven door frequently while the pizza
is cooking;
• If the pizza has a lot of toppings (three of four), we
recommend you add the mozzarella cheese on top
halfway through the cooking process.
• When cooking pizza on two racks, use the 2nd and
4th with a temperature of 220°C and place the pizzas
in the oven after having preheated it for at least 10
minutes.
b / b mode:
Pratical advice for using the electric plates
Cooking Fish and Meat
When cooking white meat, fowl and fish, use temperature
settings from 180 °C to 200 °C.
For red meat that should be well done on the outside while
tender and juicy in the inside, it is a good idea to start with
a high temperature setting (200°C-220°C) for a short time,
then turn the oven down afterwards.
In general, the larger the roast, the lower the temperature
setting. Place the meat on the centre of the g rid and place
the dripping pan beneath it to catch the fat.
Make sure that the grid is inserted so that it is in the centre
of the oven. If you would like to increase the amount of
heat from below, use the low rack heights. For savoury
roasts (especially duck and wild game), dress the meat
with lard or bacon on the top.
The control knobs for the hob electric hotplates (N)
The cookers can be fitted with normal and rapid electric
hotplates in a variety of combinations (the rapid hotplates
can be distinguished from the rest by the red boss in the
centre of the same). To avoid any heat loss and damage to
the hotplates, we advise you to use pans with a flat bottom,
with a diameter which matches that of the hotplate itself. The
table contains the different settings indicated on the knobs
and the use for which the hotplates are recommended.
Setting Norma l or Fast P l ate
0
1 Cooking vegetables, fish
2
3
4 For roasting (average)
5 For roasting (above average)
6
Off
Cooking potatoes (using steam) soups,
chickpeas, beans.
Continuing the cooking of large quantities
of food, minestrone
For browning and reaching a boil in a
short time.
Electric hotplate indicator light (H)
This light comes on when any of the electrical hotplates on a
hob which features electric hotplates have been turned on.
19
Page 18

User's instructions the ceramic hob
Description
The hobs hav e been provided with radiant electric heaters.
These heaters are incorporated under the surface of the
hob as zones which redden while they are in use.
A. Cooking area (A).
B. A lights which indicate whether the corresponding
heaters are at a temperature in excess of 60° C; e v en
if the hob/zone has been switched off.
AA
B
Description of the heating elements
The radiant heating elements are composed of circular
heating elements. The y only become red after being turned
on for 10-20 seconds.
Instructions for using the pyr oceram top
To obtain the best results from your hob, there are some
basic rules to follow when cooking or preparing food.
· All types of pots and pans may be used on the ceramic
glass cooktop. However, the bottom surface must be
perfectly flat (see Fig. A). Naturally, the thicker the
bottom of the pot or pan, the more uniformly the heat
is distributed.
Fig. A
· Make sure that the base of the pan completely cov ers
the cooking ring, so as to make full use of the heat
produced (Fig. B)
Fig. B
· Alwa ys make sure that the pan base is alwa ys dry and
clean so as to guarantee proper contact as well as
longer-lasting pans and the long life-span of the hob.
· Do not use the same pans which are used for cooking
on gas burners. The heat strength of gas b urners may
deform the pan base and will not give the same results
if it is subsequently used on a glazed ceramic hob.
20
Page 19

Selector knob
setting
Food t o be co o k ed
Weight
(in kg)
Cooking rack
position from
bottom
Preheating time
(minutes)
Thermostat
knob
setting
Cooking
time
(minutes)
1 Convection
a
2 Fan
assisted
b
3 Top Oven
c
4 Grill
d
5 Fan
assisted grill
Duck
Roast veal or beef
Pork roast
Biscuits (short pastry)
Tarts
Pizza (on 2 racks)
Lasagne
Lamb
Roast chicken + potatoes
Mackerel
Plum-cake
Cream puffs (on 2 racks)
Biscuits (on 2 racks)
Sponge cake (on 1 rack)
Sponge cake (on 2 racks)
Savoury pies
Browning food to perfect
cooking
Soles and cuttlefish
Squid and prawn kebabs
Cod filet
Grilled vegetables
Veal steak
Cutlets
Hamburgers
Mackerels
Toasted sandwiches
Grilled chicken
Cuttlefish
1
1
1
-
1
1
1
1
1
1
1
0.5
0.5
0.5
1.0
1.5
- 3/4 15 220 -
1
1
1
1
1
1
1
1
n.° 4
1.5
1.5
3
3
3
3
3
2-4
3
2
2-4
2
2
2-4
2-4
2
2-4
3
4
4
4
3/4
4
4
4
4
4
3
3
15
15
15
15
15
15
10
10
10
10
10
10
10
10
10
15
5
5
5
5
5
5
5
5
5
5
5
200
200
200
180
180
220
200
180
180
180
170
190
180
170
170
200
Max
Max
Max
Max
Max
Max
Max
Max
Max
200
200
65-75
70-75
70-80
15-20
30-35
15-20
30-35
50-60
60-75
30-35
40-50
20-25
10-15
15-20
20-25
25-30
8-10
10-15
15-20
15-20
7-10
15-20
55-60
30-35
e
NB: cooking times are approximate and may vary according to personal taste. When cooking using the grill or fan
assisted grill, the dripping pan must always be placed on the 1st oven rack from the bottom.
6-8
10
2-3
21
Page 20

Routine Maintenance and Cleaning
Disconnect the oven from the source of electricity
before performing any maintenance or cleaning. To
ensure a long life for your oven, clean it frequently and
carefully, keeping in mind that:
· Do not use steam equipment to clean the appliance.
· the enamelled parts and the self-cleaning panels
should be washed with warm water without the addition
of abrasive powders or corrosive substances which
could damage the finish;
· stainless steel may become marked if it comes into
contact with very hard water or harsh detergents
(containing phosphorous) for long periods of time. After
cleaning, it is advisable to rinse thoroughly and dry. It
is also recommended to dry any water drops;
· av oid dirt and grease accumulating on the control panel
by cleaning it frequently . Use non-abr asive sponges or
soft cloths to avoid scratching enamelled or shin y steel
parts.
Cleaning the hob surface
Prior to cooking, the hob surface should always be cleaned
using a damp cloth to remove any dust or stray food
particles. The hob surface should be regularly cleaned
with a lukewarm solution of water and a mild detergent.
Periodically it may be necessary to use a proprietary
ceramic hob cleaner. First remove all spilt food and fat
with a window scrape, preferably the razor blade type
(not supplied) or, failing that, the fixed blade
razor edge type (see Fig. A). Then clean the hob while it
is still warm to the touch with a suitable cleaner and paper
towel.
Then rinse it and wipe it dry with a clean cloth .If aluminium
foil or plastic items are accidentally allo wed to melt on the
hob surface they should be immediately removed from
the hot cooking area with a scraper. This will avoid any
possible damage to the surf ace. This also applies to sugar
or any food with a high sugar content.
Do not use abrasive sponges or scourers of any type.
Corrosive cleaners such as oven sprays and stain
removers should also not be used (see Fig. B).
Glass ceramic hob cleaners Available from
Window scraper Razor blade
scrapers
Replacement blades DIY Stores,
COLLO luneta
HOB BRITE
Hob Clean
SWISSCLEANER
DIY Stores
supermarkets,
chemists
Boots, Co-op stores,
department stores, Regional
Electricity Company shops,
supermarkets
Replacing the Oven Lamp
• Disconnect the oven from the power supply by means
of the omnipolar switch used to connect the appliance
to the electrical mains; or disconnect the plug if it is
accessible.
• Remove the glass cov er of the lamp-holder.
• Remove the lamp and replace it with a lamp resistant
to high temperatures (300°C) with the follo wing specifications:
- V oltage: 230V
- Wattage: 25W
- Socket: E14
• Replace the glass cover and connect the oven to the
mains.
Fig. A Fig. B
22
Page 21

Предупреждения
Для обеспечения эффективной и безопасной эксплуатации данного бытового электроприбора:
обращайтесь только в уполномоченные центры технического обслуживания
всегде требуйте установку оригинальных запасных частей
1 Данное изделие предназначается для непрофессионального
использования в домашних условиях.
2 Перед началом эксплуатации данного изделия рекомендуется
внимательно прочитать инструкции, содержащиеся в данном
руководстве, предоставляющие важные рекомендации по
безопасному осуществлению монтажа, эксплуатации и технического
обслуживания. Сохраните данное техническое руководство для
справок в будущем.
3 Снимите упаковку и проверьте, чтобы изделие не было повреждено в
процессе его перевозки. В случае сомнений не пользуйтесь изделием и
обратитесь к квалифицированному технику. В целях безопасности не
допускайте детей к упаковочным материалам изделия (полиэтиленовые
пакеты, пенопласт, грозди и т.д.).
4 Установка изделия должна выполняться квалифицированным техником
в соответствии с техническим руководством производителя.
Производитель изделия снимает с себя всякую ответственность за ущерб,
причиненный людям, домашним животным или имуществу,
несоблюдением инструкций данного технического руководства.
5 Электрическая безопасность данного бытового электроприбора
гарантируется только при условии, что оно будет правильно подсоединено
к исправной системе заземления, соответствующей действующим
нормативам в области электробезопасности. Проверьте, чтобы это основное
требование по безопасности всегда соблюдалось. В случае сомнений
поручите проверку заземления квалифицированному технику.
Производитель изделия снимает с себя всякую ответственность за ущерб,
вызванный неисправным заземлением.
6 Перед электрическим подсоединением изделия проверьте, чтобы данные
на паспортной табличке изделия соответствовали характеристикам вашей
сети электропитания.
7 Проверьте, чтобы электропитание и электрические розетки были расчитаны
на общую нагрузку, необходимую для работы изделия, как указано на
паспортной табличке с техническими характеристиками изделия. В случае
сомнений обращайтесь к квалифицированному технику.
8 При монтаже изделия необходимо предусмотреть многополярный
выключатель с расстоянием между контактами не менее 3 мм.
9 Если вилка электроприбора не подходит к электророзетке, поручите
квалифицированному электрику замену розетки на пригодную. В частности
электрик должен проверить, чтобы сечение проводов электророзетки
соответствовало поглощаемой мощности электрического изделия. Как
правило не рекомендуется использовать переходники, тройники и/или
удлинители. Если использование таких устройств неизбежно, используйте
только удлинители и одинарные или множественные переходники,
соответствующие действующим нормативам по безопасности, никогда
не превышайте максимальную мощность, указанную на удлинителе или
на одинарном переходнике, и максимальную мощность, указанную на
множественном переходнике.
10 В период простоя изделия отсоедините его от сети электропитания. На
период простоя изделия выключите общий выключатель изделия и
перекройте газовый кран.
11 Категорически запрещается закрывать отверстия и решетки,
предназначенные для вентиляции и рассеивания тепла.
12 Пользователь не должен самостоятельно заменять провод
электропитания данного изделия. В случае повреждения провода
электропитания или для его замены обращайтесь только в центр
технического обслуживания, уполномоченный производителем изделия.
13 Данное изделие должно использоваться исключительно в целях, для
которых оно было спроектировано.
Любое другое его использование (например, отопление помещения)
считается ненадлежащим и следовательно опасным.
Производитель не несет ответственности за возможный ущерб, вызванный
ненадлежащим, неправильным и неразумным использованием изделия.
14 При использовании любого электроприбора необходимо соблюдать
некоторые основные правила. В частности:
· Не прикасайтесь к электроприбору мокрыми или влажными руками
или с мокрыми ногами.
· не пользуйтесь электроприбором с босыми ногами
· используйте удинители только в случае крайней необходимости
· Не тяните за провод электропитания электроприбора или за сам
электроприбор для его отсоединения от электророзетки.
· не подвергайте электроприбор воздействию атмосферных осадков
(дождь, солнце и т.д.)
· не разрешайте детям или недееспособным лицам пользоваться
электроприбором без присмотра.
15 Перед осуществлением чистки или технического обслуживания
электроприбора отсоедините его от сети электропитания, вынув вилку из
розетки или при помощи общего выключателя.
16 В случае разбивания стеклянной поверхности незамедлительно
отсоедините прибор от сети электропитания. Для выполнения ремонтных
работ обращайтесь только в уполномоченный центр технического
обслуживания и требуйте установки оригинальных запасных частей.
Несоблюдение вышеуказанных рекомендаций может скомпрометировать
безопасное функционирование изделия.
17 По завершении срока службы данного изделия рекомендуется вывести
его из строя, обрезав провод электропитания, вынув перед этим вилку из
розетки. Кроме того рекомендуется обезвредить потенциально опасные
части изделия в особенности для детей, которые могут использовать
выведенный из строя электроприбор для игры.
18 Твердая стеклокерамическая варочная панель является устойчивой к
скачкам температуры и к ударам. Тем не менее следует помнить, что лезвия
или острые кухонные приборы могут повредить поверхность варочной
панели. В случае повреждения поверхности варочной панели
незамедлительно выньте вилку кухонной плиты из розетки и обратитесь в
местный центр технического обслуживания.
19 Следует помнить, что поверхность варочной панели остается горячей в
течение примерно получаса после ее выключения. Не ставьте хрупкую
посуду и не кладите другие предметы на горячую поверхность.
20 Не следует ставить какие-либо предметы на стеклянную поверхность
варочной панели.
21 Не включайте конфорки варочной панели, если на ней лежат листы фольги
или пластмассовые предметы.
22 Держитесь на безопасном расстоянии от горячих поверхностей.
23 Если вы пользуетесь маленькими бытовыми электроприборами рядом с
варочной панелью, проверьте, чтобы их провод электропитания не касался
горячих поверхностей.
24 Поворачивайте рукоятки кастрюль и сковород так, чтобы случайно не
задеть их и не опрокинуть с варочной панели.
25 Включив поверхность варочной панели, всегда сразу же ставьте на нее
одну кастрюлю во избежание быстрого перегрева варочной панели и
повреждения нагревательных элементов.
26 Перед первым включением варочной панели. На стекле могут остаться
следы герметика, использованного для герметизации варочной панели.
Не забудьте удалить остатки герметика обычным неабразивным моющим
веществом перед началом эксплуатации изделия. В первые часы работы
варочной панели вы можете почувствовать запах жженой резины. Это
нормальное явление, которое быстро пропадает.
27 В процессе функционирования гриля или духовки некоторые детали
дверцы духового шкафа могут сильно нагреться. Не разрешайте детям
приближаться к духовому шкафу.
28 всегда проверяйте, чтобы рукоятки находились в положении o/o, когда
изделие не используется;
29 Если кухонная плита устанавливается на возвышение, необходимо
зафиксировать ее надлежащим образом.
23
Page 22

Установка
NL2L3
L1
P
Приведенные ниже инструкции предназначены для
квалифицированного установщика для осуществления
установки, наладки и технического обслуживания
плиты надлежащим образом с соблюдением
действующих нормативов.
Важно: любая операция по регуляции, техническому
обслуживанию и т.д. должна производиться только
после отсоединения электроприбора от сети
электропитания.
Расположение
Кухонная плита оснащена системой защиты от
чрезмерного перегрева класса Х, поэтому рядом с
кухонной плитой можно ставить мебельные элементы,
высота которых не превышает уровень варочной
панели.
Нивелировка (имеется только в некоторых
моделях)
В нижней части кухонной плиты расположены 4
опорные ножки с регулируемыми винтами, которые при
необходимости позволяют оптимизировать
выравнивание кухонной плиты. Очень важно, чтобы
кухонная плита была установлена ровно.
Для подсоединения кабеля электропитания выполнить
следующие операции:
отвинтить винт кабельного зажима и винты
контактов
Примечание: фабричная установка перемычек
соответствует монофазному соединению 230 В (рис.
А).
для осуществления электрических соединений,
показанных на рис. C и D, использовать две
перемычки, расположенные внутри
соединительной коробки (рис. B ссылка P)
зафиксировать кабель электропитания в
специальном кабельном зажиме и закрыть крышку.
230V 1N~
H07RN-F 3x4 CEI-UNEL 35364
NL
Установка ножек (имеется только в некоторых
моделях)
К кухонной плите прилагаются ножки, вставляемые в
основание кухонной плиты.
Подсоединение кабеля электропитания
Порядок открывания зажимной коробки:
При помощи отвертки приподнять боковые шпонки
крышки зажимной коробки;
Потянуть и открыть крышку зажимной коробки.
5
3
4
1
2
Ðèñ. À
Ðèñ. B
400V 2N~
H05RR-F 4x2.5 CEI-UNEL 35363
NL2L1
5
3
4
Ðèñ. C
1
2
24
Page 23

400V 3N~
H05RR-F 5x2.5 CEI-UNEL 35363
NL3L1L2
5
3
4
1
2
Ðèñ. D
Подсоединение провода электроприбора к сети
электропитания
Подсоедините к проводу стандартную электрическую
вилку, расчитанную на нагрузку, указанную на
заводской табличке с данными. В случае прямого
подсоединения к сети электропитания необходимо
установить между электроприбором и сетью
многополюсный выключатель с минимальным
расстоянием между контактами 3 мм, расчитанный на
нагрузку и соответствующий действующим нормативам
(желто-зеленый провод заземления не должен
прерываться выключателем). Провод электропитания
должен располагаться таким образом, чтобы ни в какой
точке он не подвергался нагреванию, превышающему
температуру помещения на 50°C.
Перед осуществлением электрического
подсоединения необходимо проверить следующее:
• ограничительный клапан и домашняя система
должны быть расчитаны на нагрузку плиты
(смотреть заводскую табличку с техническими
данными);
• Сеть электропитания должна быть оснащена
надежным заземлением согласно нормативам и
указаниям законодательства;
• электрическая розетка или многополюсный
выключатель должны быть легкодоступны без
необходимости разбирать электроприбор.
25
Page 24

Технические характеристики
Духовой шкаф
Габаритные размеры (В x Ш x Г) 32x40,5x39,5 cm
Рабочая: 52 литров
Макс. поглощаемая мощность духового шкафа: 2250 Вт
Рабочие размеры ящика для разогревания пищи:
ширина см. 46
глубина см. 42
высота см. 8.5
Электрическая варочная панель
Сзади справа: 2100 Вт
Спереди справа: 1200 Вт
Спереди слева: 1700 Вт
Сзади слева: 1200 Вт
Макс. поглощаемая мощность электрической
варочной панели: 6200 Вт
Напряжение и частота
230 В / 400 В 3 Н перем. ток 50 Гц
ТАБЛИЧКА С ТЕХНИЧЕСКИМИ ДАННЫМИ
Расход электроэнергии при принудительной конвекции
функция нагревания:
Természetes hõáramlási Osztály névleges energiafogyasztása
функция нагревания: a Статическое
b Вентилированное
7
Данное изделие соответствует следующим
Директивам Европейского Сообщества:
- 73/23/CEE от 19/02/73 (Низкое напряжение) и
последующим изменениям;
- 89/336/CEE от 03.05.89 (Электромагнитная
совместимость) и последующим изменениям;
- 93/68/CEE от 22.07.93 и последующим изменениям.
Кухонная плита с многофункциональным духовым шкафом
À Панель управления
B Решетка духового шкафа
C Противень или жарочный лист
D. Регулируемые ножки
H Световой индикатор функционирования
электрических конфорок
L Рукоятка выбора функций духового шкафа
M Рукоятка выбора температуры
N Рукоятки электрических конфорок
O Световой индикатор термостата духового шкафа
S Стилизованные часы с таймером
O
H
A
D
B
C
D
L M S
N
26
Page 25

Руководство по эксплуатации
Многофункциональный духовой шкаф сочетает в себе
преимущества обычных духовок с натуральной
конвекцией: «статических» и современных духовок с
принудительной конвекцией: «вентилированных».
Это чрезвычайно универсальное изделие,
предоставляющее на выбор5 имеющихся легких и
надежных способов приготовления продуктов. Выбор
различных имеющихся функций производится при
помощи рукоятки L и термостата M, расположенных
на панели управлений.
Внимание: При первом включении духового шкафа
рекомендуем прокалить его примерно в течение 30
минут при максимальной температуре и с закрытой
дверцей. По истечении 30 минут выключите духовку,
откройте дверцу и проветрите помещение. Запах,
который может появиться в процессе этой операции,
образуется в результате испарения веществ,
использованных для предохранения духовки в период
от ее производства до установки.
Внимание: Установите прилагающийся противень для
сбора сока и/или жира на самый нижний уровень
только в случае использования функции гриль или
вертела (имеющихся только в некоторых моделях).
Для других функций никогда не используйте самый
нижний уровень и никогда не помещайте никаких
предметов на дно духового шкафа в процессе
приготовления, так как это может повредить его
эмалированное покрытие. Всегда ставьте Вашу посуду
для приготовления блюд (жаровни, алюминиевые
листы и т.д.) на прилагающуюся решетку,
установленную на опорные направляющие духовки.
Статическая духовка
Положение рукоятки термостата M: Между 60°C è
Ìàêñ.
В этом положении включаются два нагревательных
элемента: нижний и верхний. Это
типичная«бабушкина» духовка, которая, однако, была
оснащена отличной системой термораспределения и
позволяет сократить расход электроэнергии.
Статическая духовка остается непревзойденной для
приготовление блюд с двумя и более ингредиентами,
составляющими единое блюдо, таких, например, как:
капуста со свиными ребрами, треса по-испански,
треска по-анконетански, кусочки телятины с рисом и
т.д. Отличный результат получается при приготовлении
мясных блюд из телятины или говядины, таких как:
тушеное мясо, мясное рагу, гуляш, блюда из дичи,
свиной окорок и филейная часть свинины и т.д.,
требующих медленного тушения с постоянной
поливкой соком от жарки. Такая система остается
оптимальной для кондитерской выпечки, для
приготовления фруктов и для тушения в специальных
закрытых емостях для духовки. В процессе
приготовления блюд в статической духовке используйте
только один уровень, так как при одновременном
использовании нескольких уровней получается плохое
термораспределение. Используя разные имеющиеся
уровни, можно распределить жар между верхней и
a
нижней частью духового шкафа. Если для
приготовления какого-либо блюда требуется больший
жар снизу или сверху, следует использовать
соответственно нижние или верхние уровни.
Вентилированная духовка
Положение рукоятки термостата M: Между 60°C è
Ìàêñ.
Включаются нагревательные элементы и вентилятор.
Так как жар является постоянным и однородным во
всем духовом шкафу, воздух обеспечивает однородное
приготовление и зажаривание продукта. Кроме того
можно одновременно приготовить разные виды
продуктов, при условии что для их приготовления
требуется одинаковая температура. Можно
использовать максимум 2 уровня для одновременного
приготовления, следуя специальным инструкциям,
приведенным в параграфе «Одновременное
приготовление на нескольких уровнях».
Эта функция в особенности рекомендуется для
приготовления блюд, требующих подрумянивания или
продолжительного приготовления, на пример: лазанья,
запеканка из макарон, жареная курица с картошкой и
т.д. Значительные преимущества получаются при
приготовлении жаркого из мяса, так как оптимальное
распределение жара позволяет использовать более
низкие температуры, что позволяет сократить 7отерю
мясного сока, сохраняя мясо нежным и сочным с
минимальным ужариванием. Вентилированная
функция в особенности подходит для приготовления
рыбы, которую готовят с минимальным добавлением
приправ, сохраняя таким образом ее естественный вид
и вкус.
Десерт: отличные результаты получаются при выпечке
кондитерских изделий из теста, замешанного на пивных
или химических дрожжах.
Функция «вентилированный» может также
использоваться для быстрой разморозки белого и
красного мяса, хлеба, установив температуру 80°C.
Для разморозки более деликатных продуктов
установить температуру 60°C или включить только
циркуляцию холодного воздуха, установив рукоятку
термостата на 0°C.
Нагрев сверху
Положение рукоятки термостата M: Между 60°C è
Ìàêñ.
Включается верхний нагревательный элемент.
Эта функция может быть использована для доводки
готовых блюд.
Гриль
Положение рукоятки термостата M: Ìàêñ.
Включается центральный верхний нагревательный
элемент.
Значительная температура прямого действия гриля
позволяет получить быстрое образование корочки на
поверхности продукта, которая препятствует выходу
соков и сохраняет продукт нежным и сочным.
Использование функции гриль в особенности
рекомендуется для блюд, для приготовления которых
требуется высокая поверхностная температура:
d
c
b
27
Page 26

телячьих и говяжьих бифштексов, антрекотов, вырезки,
гамбургеров и т.д.
В параграфе «Практические советы по приготовлению»
приводятся некоторые примеры использования духового
шкафа.
Вентилированный гриль
Положение рукоятки термостата M: Между 60°C è
200°C.
Включается центральный верхний нагревательный
элемент и вентилятор. Сочетает однонаправленное
выделение жара с принудительной циркуляцией
воздуха внутри духового шкафа. Это препятствует
обгоранию поверхности продуктов, повышая
проникающую способность жара. Отличные результаты
получаются при использовании вентилированного гриля
для приготовления мяса и овощей на шампурах,
колбасок, свиных ребрышек, бараньих отбивных,
курицы с острой приправой, перепелок с сальвией,
свиной вырезки и т.д.
e
Часы со стилизованным секундомером
Для возврата к текущему времени
Духовой шкаф должен быть подсоединен к сети
электропитания.
Потяните рукоятку и поверните ее против часовой
стрелки вплоть до установки точного времени.
ПРИМЕЧАНИЕ: Часы являются электрическими,
следовательно в случае отключения электричества
часы останавливаются вплоть до его включения.
После этого необходимо вновь установить текущее
время в описанном выше порядке.
В особенности функция вентилированного гриля
подходит для приготовления таких видов рыбы как филе
чернии, тунца, рыбы-меч, фаршированных каракатиц и
т. д .
Освещение духового шкафа
Включается, повернув рукоятку L на символ
Освещает духовой шкаф и остается включенным,
когда включается какой-либо нагревательный
электрический элемент духовки.
Световой индикатор термостата духового шкафа (O)
Показывает фазу нагревания, когда индикатор
термостата гаснет, это означает, что внутри духового
шкафа была достигнута температура, заданная
рукояткой термостат. На данном этапе мигание этого
индикатора означает, что термостат функционирует
исправно для поддержания неизменного значения
температуры в духовке.
Функция таймера
Таймер служит для установки отрезка времени и его
обратного отсчета. Эта функция не влияет на
включение и выключение духового шкафа, а только
подает звуковой сигнал по истечении заданного
времени.
Порядок программирования таймера
Поверните рукоятку против часовой стрелки вплоть до
установки индикатора на нужное время (внутренняя
шкала, которую видно через стекло).
Отсчет времени начинается мгновенно.
Для отключения звукового сигнала или для возврата к
функции только часы поверните индикатор на символ
.
3.
28
Page 27

Практические советы по приготовлению блюд
ðîòð
ð
Духовка дает возможность использования широкой
гаммы функций, позволяющих приготовить любые
блюда оптимальным образом. Со временем вы
научитесь оптимально использовать это
многофункциональное изделие, поэтому приведенные
ниже советы являются только общими указаниями,
которые вы можете дополнить вашим собственным
опытом.
Предварительный нагрев
При необходимости в предварительном нагреве
духового шкафа, что обычно требуется для выпечки
всех дрожжевых изделий, можно использовать
функцию
достичь нужной температуры за короткий срок с
сокращенным расходом электроэнергии.
Поместив выпечку в духовой шкаф, можно
переключить его на более подходящий режим
приготовления.
Одновременное приготовление на нескольких
уровнях
При необходимости приготовления на двух уровнях
следует использовать только режим
вентилированный - единственный, дающий такую
возможность.
В духовом шкафу имеется 5 уровней. При
приготовлении в вентилированном режиме
используйте два из трех центральных уровней.
Первый снизу и последний сверху подвергаются
прямому воздействию горячего воздуха, которое
может привести к обгоранию деликатных блюд.
Обычно используются 2-ой и 4-ый уровни снизу,
помещая на 2-ой уровень продукты, приготовление
которых требует более сильного жара. Например,
в случае приготовления мясного жаркого
одновременно с другими блюдами следует
поместить жаркое на 2-ой уровень, оставив 4-ый
уровень для более деликатных блюд.
В случае одновременного приготовления блюд,
требующих разного времени и температур
приготовления, следует выбрать среднее значение
между двумя температурами, поместить наиболее
деликатный продукт на 4-ый уровень и в первую
очередь вынуть из духовки блюдо, требующее
более короткого приготовления.
Устанавливайте противень на нижний уровень, а
решетку на верхний.
Функция гриль
Многофункциональный духовой шкаф дает вам
возможность использования 2 различных функций
гриля только и исключительно с закрытой дверцей
духовки.
Используйте функцию
центр решетки (установленной на 3-ий или на 4-ый
уровень снизу), так как включена только центральная
часть верхнего электрического сопротивления.
Установить на первый уровень снизу прилагающийся
противень для сбора соков и/или жира.
При использовании этой функции рекомендуется
установить на термостате максимальную температуру.
b вентилированное, которая позволяет
b
d гриль, поместив продукт в
Это, однако, не исключает возможность использования
более низких температур, устанавливая рукоятку
термостата на требуемую температуру.
Функция
чрезвычайно удобной для быстрого зажаривания,
распределяет выделяемый грилем жар, позволяя
одновременно обжаривать поверхность продукта и
осуществлять приготовления блюд также в нижней
части духового шкафа.
Вы можете использовать эту функцию также в конце
приготовления блюд, требующих поверхностного
подрумянивания, например, идеально подходит для
завершающего подрумянивания запеканки из макарон.
При использовании этой функции установить решетку
на 2-ой или 3-ий уровень снизу (смотреть таблицу
приготовления), после чего установить противень на
1-ый уровень снизу для сбора жира и во избежание
образования дыма.
Важно: использовать функцию гриль с закрытой
дверцей духовки для получения оптимальных
результатов и для значительной экономии энергии
(примерно 10%).
При использовании этой функции рекомендуется
установить рукоятку термостата на 200°C, так как эта
оптимальная температура, обеспечивающая
наибольшую отдачу на основе инфракрасного
излучения. Это, однако, не исключает возможность
использования более низких температур,
устанавливая рукоятку термостата на требуемую
температуру.
Оптимальный результат при использовании
функции гриль получается, когда решетка
устанавливается на верхних уровнях (смотрите
таблицу приготовления), после чего для сбора
жира и во избежание образования дыма
установите прилагающийся противень на самый
нижний уровень.
Кондитерская выпечка
При выпечке кондитерских изделий всегда следует
помещать их в разогретую духовку, дождавшись
окончания предварительного нагрева,
сигнализируемого выключением красной лампочки O.
Не открывайте дверцу духовки в процессе выпечки во
избежание оседания изделия. Общие рекомендации:
Если пирог хорошо пропечен снаружи, а
внутри сырой
Сократите кол ичество жидкости при
замешивании теста, уменьшите температуру и
увеличьте время приготовления.
Выпечка не вынимается из формы
Обильно п
посыпьте ее мукой или используйте пе
бумагу для духовки
e Вентилированный гриль является
ите форму маслом, а также слегка
гаментную
29
Page 28

Если пирог слишком сухой
ð
ð
ð
В следующий раз повысьте температуру на
10°C и сократите время приготовления.
Если пирог слишком сырой
В следующий раз повысьте температуру на
10°C или сократите количество жидкости при
замешивании теста.
Если поверхность пирога слишком темная
Поместите форму с пирогом на более низкий
уровень, уменьшите температуру и увеличьте
время приготовления.
При одновременном использовании
нескольких уровней духовки (в режиме
"вентилированный") размещенные на них
продукты имели разную степень готовности.
ать более низкую температуру. Противени,
Выб
помещенные в духовку в одно и то же в
могут быть вынуты в
Выпечка пиццы
Для оптимальной выпечки пиццы следует
использовать функцию
Разогреть духовку по крайней мере в течение 10
минут.
азное время.
b вентилированное:
åìÿ,
Используйте противень из легкого алюминия,
устанавливая его на прилагающуюся решетку. При
использовании противеня время выпечки
удлиняется, что затрудняет получение хрустящей
пиццы.
Не следует часто открывать духовку в процессе
выпечки.
В случае выпечки пиццы с обильной начинкой
(каприччоза, четыре сезона) рекомендуется
положить на пиццу сыр моццарелла в середине
выпечки.
При выпечке пиццы на двух уровнях следует
использовать 2-ой и 4-ый уровни с температурой
220°C и поместить пиццу в духовку, разогрев ее
перед этим примерно в течение 10 минут.
Приготовление рыбы и мяса
Белое мясо, птицу и рыбу следует запекать при
температуре от 180°C до 200°C.
Для приготовления красного мяса, хорошо
прожаренного снаружи и сочного внутри, следует в
начале установить высокую температуру
(200°С-220°C) в течение короткого времени, затем
понизить температуру.
Обычно, чем крупнее кусок запекаемого мяса, тем
дольше будет его приготовление при низкой
температуре. Поместите кусок мяса в центр решетки
и установите под решетку противень для сбора жира.
Установите решетку таким образом, чтобы мясо
находилось в центре духовки. Если требуется получить
больший нагрев снизу, установите решетку на нижние
направляющие. Для приготовления ароматного
запеченого мяса (в особенности утки и дичи) следует
обложить кусок мяса кусочками сала или корейки и
расположить его на верхнем уровне духовки.
Практические рекомендации по использованию
стеклокерамической варочной панели
Рукоятки включения электрических канфорок
варочной панели (N)
Кухонные плиты могут быть оснащены нормальными и
быстро нагревающимися электрическими конфорками
и конфорками в разных комбинациях (конфорки быстрого
нагрева отличаются от других наличием красного кружка
в центре). Во избежание дисперсии тепла и повреждения
канфорок следует использовать емкости с плоским дном
диаметром, не меньше диаметра канфорки. В таблице
указаны соответствия между положениями,
промаркированными на рукоятках, и рекомендуемое
назначение канфорок.
Индикатор функционирования электрических
конфорок (H)
Загорается, когда включается любой электрический
нагревательный элемент на варочной панели,
оснащенной электрическими конфорками.
Позиция Обычная или быстрая конфорка
0 Выключено
1 Приготовление овощей, рыбы
2
3
4 Жаренье (среднее)
5 Жаренье (усиленное)
6 Жаренье до корочки, кипячение
Приготовление картофеля на пару,
супов, фасоли
Приготовление и выдерживание
больших количеств пищи
30
Page 29

Инструкции по эксплуатации стеклокерамической варочной панели
Описание
На варочной панели расположены 4 спиральный
нагревательных элемента Эти нагревательные
элементы встроены под поверхностью варочной
панели (зоны, накаливающиеся до красна в процессе
функционирования):
A. Спиральные нагревательные элементы
B. Световые индикаторы, показывающие, что
температура соответствующих нагревательных
элементов превышает 60°C, даже если данная зона
на варочной панели была выключена.
AA
B
Описание нагревательных элементов
Спиральные нагревательные элементы состоят из
круглых сопротивлений, которые раскаляются до
красна за 10 20 секунд после их включения.
Инструкции по эксплуатации
стеклокерамической варочной панели
Для оптимального использования варочой панели
необходимо следовать некоторым основным правилам
по разделке или по приготовлению продуктов.
На стеклокерамические варочные панели можно
ставить все виды кастрюль и сковород. Тем не
менее днище используемой посуды всегда должно
быть идеально плоским. Разумеется, что чем толще
дно кастрюли или сковороды, тем более однородно
происходит распределение тепла.
Проверьте, чтобы основание посуды полностью
закрывало конфорку: это позволит вам оптимально
использовать выделяемое тепло.
Проверьте, чтобы дно посуды было всегда сухим и
чистым: это не только способствует оптимальному
контакту с конфоркой, но также продлевает срок
службы вашей посуды и варочной панели.
Не используйте ту же посуду, которой вы пользуетесь
для приготовления пищи на газовых конфорках, так
как сила тепла газовых конфорок может
деформировать дно посуды и не гарантирует те же
результаты, если эта посуда потом будет
использоваться на стеклокерамической варочной
панели.
31
Page 30

Регулярное техническое обслуживание и чистка кухонной плиты
Перед началом какой-либо операции отсоедините
кухонную плиту от сети электропитания. Äëÿ
длительного срока службы кухонной плиты важно
регулярно производить ее тщательную общую чистку,
учитывая следующее:
· не использйте паровые агрегаты для чистки
• эмалированные части и самочистящиеся панели,
если последние имеются, должны мыться теплой
водой без использования абразивных порошков и
коррозийных моющих средств, которые могут
повредить такие поверхности;
• внутри духовой шкаф следует мыть регулярно,
когда он еще теплый, при помощи горячей воды и
моющего средства, которое затем удалить влажной
тряпкой и высушить.
• на деталях из нержавеющей стали могут
образоваться пятна, если они остаются в течение
длительного времени в контакте с водой
повышенной жесткости или с агрессивными
моющими средствами (содержащими фосфор).
После чистки рекомендуется тщательно удалить
остатки моющего средства влажной тряпкой и
высушить. Кроме того следует незамедлительно
удалять возможные утечки воды.
Ðèñ. À Ðèñ. Â
Чистящие средства для
керамичес кой
повер хности
Скребки
Сменные лезвия
COLLO luneta
HOB BRIT E
Hob C lean
SWISSCLEANER
Где можно приобрести
Фирменные магазины,
универмаги, супермаркеты.
магазины электробытовой
техники, хозяйственные
магазины.
Чистка поверхности варочной панели
Перед началом приготовления всегда следует
протирать поверхность варочной панели влажной
тряпкой для удаления пыли или остатков пищи.
Следует регулярно мыть поверхность варочной панели
раствором теплой воды с нейтральным моющим
средством. Время от времени может понадобиться
применение специального чистящего средства для
стеклокерамический варочных панелей. Прежде всего
необходимо удалить все остатки пищи и жира при
помощи скребка для стекла, по возможности с тонким
лезвием
отсутствие, с тонким фиксированным лезвием (см. Рис.
А). Протирайте варочную панель, пока она еще
теплая, бумажной салфеткой и пригодным моющим
средством.
Затем удалите остатки моющего средства и вытрите
насухо чистой тряпкой. Затем удалите остатки
моющего средства и вытрите насухо чистой тряпкой.
Если к вашей варочной панели случайно приварился
кусок пластмассы или алюминиевой фольги,
незамедлительно удалите их с горячей варочной зоны
при помощи скребка во избежание повреждения
поверхности Выполните те же операции, если вы
просыпали сахар или другие продукты с высоким
содержанием сахара.
Не используйте никаких абразивных губок или
металлических мочалок. Не следует также
использовать для чистки варочной панели коррозийные
моющие средства такие как спрай для чистки духовых
шкафов или пятновыводители (смотри рис. B).
(не прилагается) или в его
Замена лампочки освещения духовки
• Отключить электропитание духовки при помощи
многополярного выключателя, используемого для
подсоединения духовки к сети электропитания, или
вынуть вилку из розетки, если это возможно.
• Отвинтите стеклянную крышку плафона лампочки;
• Вывинтите лампочку и замените ее на новую,
устойчивую к высоким температурам (300°C),
имеющую следующие характеристики:
- Напряжение 230 В
- Мощность 25 Вт
- Подсоединение Е14
• Восстановите стеклянную крышку на место и
подключите напряжение.
32
Page 31

Практические советы по приготовлению блюд
Положение
рукоятки
регуляции
1 Statico
(Статический)
a
2 Ventilato
(Вентилированный)
b
3 Forno Sopra
(Нагрев сверху)
c
4 Grill (Гриль)
d
5 Grill ventilato
(Вентилированный
гриль)
e
Приготавливаемый
продукт
Утка
Жаркое из телятины
или говядины
Жаркое из свинины
Печенье (песочное)
Песочный торт
Пицца (на 2-х уровнях)
Лазанья
Баранина
Kурица с картошкой
Скумбрия
Kекс
Эклеры
(на 2-х уровнях)
Печенье
(на 2-х уровнях)
Бисквит
(на 1-ом уровне)
Бисквит
(на 2-ух уровнях)
Несладкие пироги
Доведение
доготовности
Kамбала и каракатицы
Kальмары и креветки
на шампурах
Филе трески
Овощи-гриль
Телячий бифштекс
Отбивные
Гамбургер
Скумбрия
Горячие бутерброды
Kурица-гриль
Kаракатицы
Âåñ
Расположение
(êã)
0.5
0.5
0.5
1.0
1.5
n.° 4
1.5
1.5
на уровнях
духовки снизу
вверх
1
1
1
-
1
1
1
1
1
1
1
- 3/4 15 220 -
1
1
1
1
1
1
1
1
3
3
3
3
3
2-4
3
2
2-4
2
2
2-4
2-4
2
2-4
3
4
4
4
3/4
4
4
4
4
4
3
3
Время
предварительного
нагрева (минуты)
15
15
15
15
15
15
10
10
10
10
10
10
10
10
10
15
5
5
5
5
5
5
5
5
5
5
5
Положение
рукоятки
термостата
200
200
200
180
180
220
200
180
180
180
170
190
180
170
170
200
Ìàêñ.
Ìàêñ.
Ìàêñ.
Ìàêñ.
Ìàêñ.
Ìàêñ.
Ìàêñ.
Ìàêñ.
Ìàêñ.
200
200
приготовления
Время
(минуты)
65-75
70-75
70-80
15-20
30-35
15-20
30-35
50-60
60-75
30-35
40-50
20-25
10-15
15-20
20-25
25-30
8-10
6-8
10
10-15
15-20
15-20
7-10
15-20
2-3
55-60
30-35
ПРИМЕЧАНИЕ: указанная продолжительность приготовления служит только в ка честве примера и может быть изменена
в соответствии с личными вкусами.
При использовании функций grill или grill ventilato (гриля или вентилированного гриля) противень всегда устанавливается
на 1-ый уровень духовки снизу.
33
Page 32

34
Page 33

35
 Loading...