


MOD. 1385 - 1385/1
11/07/2003 eld 1 .REV -4055100200 .COD (PI) Calcinaia - srl esignD Italia
Via Toscana, 57 a-b - Località Macrolotto
59100 Prato PO - Italy E-Mail: info@ariete.net Internet: www.ariete.net

R
E
A C
B
D
J
F
E
N
M
L
Q
|
P |
K |
|
|
|
|
O |
|
|
|
|
Solo per mod. 1385/1 |
|
G |
Only for mod. 1385/1 |
|
|
|
|
|
I
H

I
AVVERTENZE IMPORTANTI
•Leggere attentamente le istruzioni prima dell’uso
•Non usare la macchina senza acqua, poiché in tale caso la pompa si brucerebbe.
•Il cavo non deve toccare le parti calde della macchina.
•Togliere la spina dalla presa prima di ogni intervento di pulizia o di manutenzione.
•Non lasciare la macchina a temperatura ambiente inferiore a 0°C, in quanto, il residuo d’acqua nella caldaia potrebbe ghiacciare e provocare dei danni.
•Prima di procedere all’operazione di riempimento del serbatoio dell’acqua, scollegare l’apparecchio dalla presa di corrente.
•L’apparecchio è destinato solo ad uso domestico.
•Non lasciare mai la macchina in funzione alla portata dei bambini.
•Se il cavo di alimentazione è danneggiato, esso deve essere sostituito dal costruttore o dal suo servizio Assistenza Tecnica o comunque da una persona con qualifica similare in modo da prevenire ogni rischio.
•Non toccare l’aggancio del portafiltro ed il tubicino metallico del cappuccinatore quando l’apparecchio è in funzione, in quanto potrebbero causare delle scottature.
•Non lasciare mai il cavo di alimentazione dentro la propria sede durante l’uso. Svolgerlo completamente.
•Dopo aver ovviamente staccato la spina di alimentazione e dopo che le parti calde si saranno freddate, l’apparecchio dovrà essere pulito esclusivamente con un panno non abrasivo appena
inumidito, aggiungendo poche gocce di detergenti neutri non aggressivi (non usare mai solventi che danneggiano la verniciatura); NON IMMERGERE L’APPARECCHIO IN ACQUA O
ALTRI LIQUIDI.
•Questo apparecchio è conforme alla direttiva 89/336 CEE relativa alla compatibilità elettromagnetica.
•CONSERVARE SEMPRE QUESTE ISTRUZIONI
Le macchine da caffè ARIETE sono ideali per chi sa gustarsi i piaceri della vita, a cominciare da un buon caffè. Grazie al dispositivo Thermocream® si può sempre ottenere a casa un caffè caldo e cremoso come quello del bar.
Infatti, il dispositivo Thermocream® è dotato di un filtro che assicura l’erogazione del caffè a pressione costante.
In questo modo si può gustare un caffè con molta crema, dall’aroma intenso e dal gusto pieno e corposo, senza la necessità di pressare energicamente ed utilizzando qualsiasi tipo di miscela purché non troppo fine.
Le macchine da caffè Ariete soddisfano anche gli amanti del cappuccino perché grazie al dispositivo MAXI CAPPUCCINO si può ottenere, in meno di dieci secondi, una schiuma ricca e densa.
Inoltre caffè subito pronto con le macchine Ariete perché dotate del sistema autoinnesco che consente di fare subito il caffè anche in caso di lungo inutilizzo delle macchine o dopo il riempimento del serbatoio dell’acqua.
Buon caffè a tutti con CAFÉ RETRÓ Ariete!
1

I
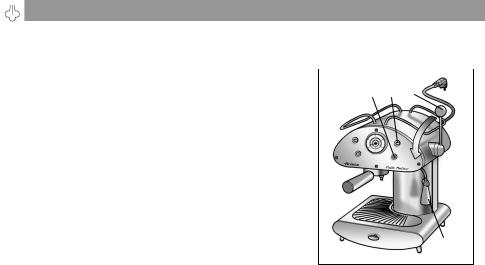
DESCRIZIONEDEICOMANDIEDEICOMPONENTI
A.Interruttore accensione
Posizione verso l’alto ( ): macchina accesa Posizione verso il basso: macchina spenta
B.Spia accensione
C.Interruttore caffè/vapore Posizione centrale: standby
Posizione( ): erogazione vapore Posizione (
 ): erogazione caffè
D.Spia temperatura caldaia
E.Termometro temperatura caldaia (°C e °F)
F.Leva comando vapore
G.Cassetto raccogligocce
H.Dispositivo MAXI CAPPUCCINO e stilo erogatore acqua/vapore
I.Serbatoio acqua estraibile
J.Cavo alimentazione + spina
K.Griglia appoggiatazze estraibile
L.Portafiltro
M.Disco Thermocream®
N.Filtro Thermocream®
O.Misurino
P.Pressino per caffè
Q.Portafiltro per cialda (solo per mod. 1385/1)
R.Alloggio cavo elettrico
FASIPRELIMINARIPERL’USO
Controllare che la tensione della rete domestica sia uguale a quella indicata sulla targhetta dati tecnici dell’apparecchio. Posizionare poi la macchina su una superficie piana. Riempire il serbatoio con acqua fredda, 0,7 litri (MAX) avendo poi cura di inserirlo bene nella sua sede. Estrarre il cavo elettrico dal suo alloggio (R) e svolgerlo completamente. Inserire la spina nella presa di corrente elettrica, che deve essere dotata di messa a terra.
Mettere in funzione la macchina azionando l’interruttore (A) sulla posizione ( ) verso l’alto. Si accenderà la spia (B), la quale indica che la macchina è accesa e che la caldaia interna inizia a riscaldarsi. Al primo utilizzo, occorre posizionare l’interruttore (C) sulla posizione caffè (
 ) fino a quando si vedrà fuoriuscire acqua dalla sede del portafiltro. Si raccomanda di far fuoriuscire almeno una tazza di acqua dal circuito idraulico della caldaia. Terminare l’erogazione riportando l’interruttore (C) nella posizione centrale ed attendere che la spia (D) si spenga. A questo punto la macchina è pronta per fare il caffè.
2

I
COMEFAREILCAFFÈ
Dosare il caffè nel filtro: per due caffè riempire completamente due misurini, mentre per un caffè riempirne uno solo. Pressare la polvere all’interno del filtro con l’apposito pressino (P). Innestare il portafiltro nell’apposita sede. Ruotare il portafiltro di 40÷45 gradi in senso antiorario fino a dove è possibile, senza però forzare eccessivamente. Se viene inserita una quantità eccessiva di polvere di caffè all’interno del filtro, la rotazione del portafiltro all’interno della apposita sede può risultare difficoltosa e/o durante l’erogazione caffè si possono avere perdite dal portafiltro. È consigliabile lasciar riscaldare il portafiltro, inserito nella sua sede, per qualche minuto in modo da avere anche il primo caffè ben caldo.
Questo non sarà necessario per i successivi caffè. La spia (D) si spegnerà e accenderà periodicamente, mostrando l’intervento del termostato della caldaia, che serve a mantenere ottimale la temperatura dell’acqua (attorno ai 100°C per fare il caffè, e a circa 150°C per erogare vapore). È opportuno, sia per il primo caffè sia per i successivi, avviare l’erogazione del caffè solo quando tale spia è spenta. Posizionare l’interruttore (C) sulla posizione caffè ( ): inizierà la fuoriuscita del caffè dai beccucci del portafiltro. Per interromperla riportare il tasto nella posizione centrale.
N.B.: come nelle macchine da caffè professionali, non togliere il portafiltro quando l’interruttore di erogazione è inserito (in posizione caffè  ); dopo aver fatto il caffè, allentate gradualmente il portafiltro ruotandolo in senso orario. La dose massima per un caffè è di 50 ml.
Non è necessaria alcuna operazione particolare quando si esaurisce l’acqua nel serbatoio, perché la macchina possiede una speciale valvola di auto-innesco. Basterà, dopo aver disinserito la spina dalla presa della corrente, estrarre il serbatoio e riempirlo nuovamente.
Il sistema Thermocream® di ARIETE è stato studiato appositamente N
per soddisfare al meglio tutte le esigenze del consumatore, e si com-
M
pone di due elementi: il filtro Thermocream® (N) ed il disco Thermocream® (M) che possono essere utilizzati nei seguenti modi:
-Inserendoli entrambi nel portafiltro si ottiene un caffè con una crema più fine
-Utilizzando il solo filtro (N) si ottiene un caffè con una crema più alta
N
3
I
COMEFAREILCAPPUCCINO
Per preparare un cappuccino, una cioccolata calda, o |
|||
riscaldare qualsiasi altra bevanda, portare l’interruttore (C) |
|
||
D C F |
|||
in posizione vapore ( |
|
||
) ed attendere che si spenga la |
|||
spia (D), la quale indica che la caldaia è giunta alla giusta |
|||
temperatura per erogare vapore (circa 150°C). |
|||
ATTENZIONE: se nella fase di attesa vapore si doves- |
|||
sero verificare piccoli sbuffi di vapore dal portafiltro, il |
|||
fenomeno è da ritenersi assolutamente normale; A |
|||
questo punto abbassare la leva (F) di erogazione vapore, avendo l’accortezza di posizionare un bicchiere sotto il dispositivo MAXI CAPPUCCINO (H): dapprima uscirà un po’ d’acqua e subito dopo un forte getto di vapore.
Rialzare quindi la leva (F) per interrompere il getto di vapo-
H
re e porre sotto il dispositivo MAXI CAPPUCCINO il bricco del latte da montare. Immergere a fondo lo stilo nel bricco del latte e abbassare nuovamente la leva di erogazione (F) fino ad ottenere il risultato voluto.
Durante queste operazioni si potrà notare che la spia (D) si spegne e riaccende periodicamente, indicando gli interventi del termostato che mantiene la giusta temperatura della caldaia per l’erogazione del vapore. È opportuno avviare l’erogazione del vapore solo quando questa spia è spenta.
RIUTILIZZOPERCAFFÈ
Riportare l’interruttore (C) nella posizione centrale per far raffreddare la caldaia. Volendo affrettare il raffreddamento della caldaia, è possibile operare come segue: dopo aver posto un recipiente sotto lo
stilo (H), portare l’interruttore (C) in posizione ( ) (come per l’erogazione del caffè) e abbassare subito la leva (F) (come per l’erogazione di vapore): si provocherà la fuoriuscita di acqua, fino a quando non si riaccenderà la spia (D). A questo punto rilasciare la leva (F) e riportare l’interruttore destro (C) nella posizione centrale. La macchina è nuovamente pronta per fare il caffè.
PULIZIEPERIODICHE
ATTENZIONE: tutte le operazioni di pulizia sotto indicate devono essere effettuate a macchina spenta.
Pulizia del filtro contenente il macinato. Verificare che i forellini interni non si otturino e nel caso ripulirli con uno spazzolino. Verificare che il foro sottostante non si otturi e nel caso ripulirlo con uno spillo.
Pulizia della sede del portafiltro. Con l’uso si può verificare, nella sede attacco del portafiltro, una sedimentazione di fondi di caffè, che possono essere rimossi con uno stuzzicadenti, inoltre periodicamente provvedere alla pulizia del disco forato, lasciando scorrere acqua senza inserire il portafiltro nell’apposita sede.
Pulizia del dispositivo MAXI CAPPUCCINO
Eseguire l’operazione quando il tubo cromato è freddo per evitare scottature. Svitare il dispositivo (H) dal tubetto, e lavarlo con acqua corrente. Il tubetto può essere pulito con un panno non a-
4

I
brasivo. Riavvitare il cappuccinatore fino alla fine della corsa. Se necessario ripulire con uno spillo il forellino di uscita del vapore.
Pulizia del serbatoio. Si consiglia di pulire periodicamente l’interno del serbatoio con una spugna o un panno umido.
CONSIGLIUTILIPEROTTENEREUNBUONESPRESSOALL’ITALIANA
Il caffè macinato nel portafiltro dovrà essere pressato leggermente. Un caffè più forte o meno forte dipende dal grado di macinatura del caffè, dalla quantità di esso immessa nel portafiltro, e dalla pressatura. Pochi secondi sono il tempo sufficiente perché il caffè scenda nelle tazzine. Se il tempo di erogazione è superiore significa che la macinatura è troppo fine o che la polvere immessa del portafiltro è stata pressata eccessivamente.
Per ottenere un caffè con una crema più fine, si consiglia di utilizzare il filtro (N) assieme al disco (M); per ottenere una crema più alta si consiglia invece di utilizzare il solo filtro (N) dopo aver rimosso il disco (M) dal portafiltro.
COMEFARETÈOINFUSI
Dopo aver effettuato le operazioni descritte nel capitolo FASI PRELIMINARI PER L’USO, posizionare una tazza sotto il beccuccio (H) e portare l’interruttore di erogazione del caffè (C), in posizione
( ), abbassare subito dopo la leva (F); così facendo dal beccuccio uscirà acqua calda. La dose massima per due tazze è di 200 ml.
COMEFAREILCAFFÈCONCIALDA(soloperMOD.1385/1)
Per fare il caffè con cialda occorre utilizzare l’apposito portafiltro per cialda in dotazione nel seguente modo:
1.Posizionare la cialda nel portafiltro accertandosi che la parte con la scritta “down” sia rivolta verso il basso.
2.Spingere la cialda con le dita verso la parte inferiore del filtro, accertandosi che i lembi di carta aderiscano alla parte interna del filtro.
3.La cialda deve essere ben centrata e collocata all’interno del filtro. È consigliabile piegare gli angoli verso l’interno.
4.Adesso è possibile inserire il portafiltro nella sua sede. Girare il portafiltro in senso antiorario per 40-45 gradi fino a completo serraggio.
5.Dopo aver preparato il caffè, nel togliere il porta filtro, la cialda
potrebbe rimanere incastrata nella parte superiore della macchina. Per toglierla, inclinare il porta filtro, come mostrato in figura, lasciando che la cialda ricada sullo stesso.
Per avere un caffè sempre ottimo occorre acquistare la cialda che presenta il marchio di compatibilità E.S.E.
6.Se la cialda non è bene inserita o il portafiltro non è ben serrato, potrebbe fuoriuscire qualche goccia di acqua dal portafiltro stesso.
5
|
|
I |
COMERIMEDIAREAISEGUENTIINCONVENIENTI |
||
|
|
|
PROBLEMI |
CAUSE |
RIMEDI |
La macchina non |
Probabilmente è entrata |
Verificare che il serbatoio sia ben inserito ed il livello non |
eroga acqua bollente |
aria nel circuito e ciò ha |
sia sceso sotto il minimo indicato dall’apposito riferimento |
per infusi. |
disinnescato la pompa. |
in rilievo sullo stesso. |
|
|
Ripetere le operazioni descritte nel paragrafo “Fasi preli- |
|
|
minari per l’uso”. |
La macchina non |
|
Stasare con uno spillo eventuali incrostazioni formatesi |
eroga Vapore. |
|
nel foro dello stilo erogatore. |
|
|
Controllare che il livello dell’acqua nel serbatoio sia regola- |
|
|
re. |
Fuoriuscita di caffè |
Probabilmente nel |
Ripetere l’operazione, immettendo nel filtro la giusta quan- |
dai bordi del portafil- |
portafiltro è stata im- |
tità di caffè. |
tro. |
messa una quantità |
Sulla guarnizione della sede del portafiltro sono rimasti |
|
eccessiva di caffè |
residui di caffè macinato. Provvedere a ripulire la guarni- |
|
macinato che ha |
zione con uno stuzzicadenti. Se nonostante l’esecuzione |
|
impedito di stringere a |
delle operazioni sopra suggerite il problema permane, |
|
fondo il portafiltro nella |
rivolgersi ad un Centro Assistenza Autorizzato. |
|
sua sede. |
|
L’erogazione del 1º |
È possibile che la scar- |
Controllare il filtro contenente il macinato. Se i forellini |
caffè non avviene od |
sa erogazione del caffè |
sono otturati, vanno ripuliti con uno spazzolino oppure, |
avviene troppo len- |
dipenda anche dalla |
mediante l’uso di un attrezzo, tenere sospeso il filtro sulla |
tamente. |
insufficiente fuoriuscita |
fiamma del gas per alcuni secondi: i residui di fondi di caffè |
|
dell’acqua dal disco |
verranno bruciati ed i forellini saranno perfettamente |
|
forato a doccia nella |
stasati. |
|
sede del portafiltro. È |
Azionare la macchina senza portafiltro facendo defluire |
|
possibile infatti che, |
l’acqua. Se l’acqua non esce uniformemente da tutti i fori |
|
dopo alcuni mesi di uso, |
significa che il disco è otturato. In questo caso è opportuno |
|
i residui di grasso o |
recarsi al più vicino centro di Assistenza Autorizzato per |
|
calcare possano ostrui- |
far eseguire la pulizia. |
|
re i fori del disco forato |
Inserire bene il serbatoio spingendolo a fondo. |
|
a doccia. |
Riempire il serbatoio. |
|
Il serbatoio non è ben |
|
|
inserito. |
|
|
C’è poca acqua e la |
|
|
pompa non aspira. |
|
Il caffè è troppo |
La miscela è stata |
Per ottenere un caffè più concentrato e più caldo, si deve |
acquoso e freddo. |
macinata troppo grossa |
usare una miscela più finemente macinata. |
|
|
In ogni caso questo problema si elimina usando il Disco |
|
|
Thermocream®, che assicura sempre un caffè bollente ed |
|
|
una ricca crema, anche con caffè macinato grosso |
6

*%
,03257$17 :$51,1*6
•Carefully read the instructions before using
•Do not use the coffee maker without water because the pump will burn.
•The cord must not touch any hot parts of the coffee maker.
•Unplug before any maintenance or cleaning operations.
•Do not leave the coffee maker at a room temperature below 0º because the water remaining in the boiler could freeze and cause damage.
•Disconnect the appliance from the socket before filling with water.
•The appliance is only for domestic use.
•Keep the appliance out of the reach of children while it is operating.
•If the cord is damaged it must be replaced by the manufacturer or its Technical Assistance Service or by a person with similar professional training in order to avoid any possible risk.
•Do not touch the filter holder hook or the metal steam wand when operating the coffee maker because they may cause burns.
•Do not leave the cord in its housing during use. It must be completely unwound.
•The appliance must be cleaned, obviously after unplugging it and allowing the hot parts to cool,
only with a non-abrasive cloth that has been slightly dampened with water, adding a few drops of neutral non-aggressive detergent (never use solvents that damage paint). '2 127 ,00(56(
7+( $33/,$1&( ,1 :$7(5 25 27+(5 /,48,'6
•This appliance is in conformity with EC directive 89/336 concerning electromagnetic compatibility.
•$/:$<6 .((3 7+(6( ,16758&7,216
$5,(7( coffee makers are for those who know how to enjoy the pleasures of life, beginning with a good cup of coffee. The innovative Thermocream® device gives you hot and rich coffee shop espresso, right at home. In fact, Thermocream® is designed with a filter that ensures coffee brewing at constant pressure.
In this manner it is possible to enjoy very creamy coffee with an intense aroma and fullbodied flavor, without the necessity of pressing energetically, and by using whatever type of blend as long as it is not too fine.
Ariete coffee makers also satisfy cappuccino lovers as they have a MAXI CAPPUCCINO attachment that allows you to obtain a rich and dense froth in less than ten seconds. Furthermore, the coffee is ready instantly with Ariete makers as they have an auto-priming system which allows a cup of coffee to be made immediately, even if the maker has not been used for a long time or after filling the water tank. Enjoy your coffee with RETRÓ Ariete!
7

GB
DESCRIPTION OF THE CONTROLS AND COMPONENTS
A.On/off switch
Lifted position ( ) coffee maker on Lowered position: coffee maker off
B.On warning light
C.Coffee brewer/steam switch
Central position: standby
Position ( ): steam distribution Position (
 ): coffee distribution
D.Heating unit warning light
E.Heating unit thermostat (ºC and ºF)
F.Steam lever
G.Water collector tray
H.MAXI CAPPUCCINO attachment and wand for water and steam supply
I.Removable water tank
J.Cord + plug
K.Removable coffee cup storage
L.Filter ring
M.Thermocream® disc
N.Thermocream® filter
O.Measure
P.Coffee presser
Q.Pod ring (only for model 1385/1)
R.Cord housing
PRELIMINARYPHASESFORUSE
Check that the mains voltage is the same as the one indicated on the appliance plate containing technical information. Place the coffee maker on a flat surface. Fill the tank with cold water, 0.7 liters (MAX), then reinsert it carefully in its housing. Remove the cord from its housing (R) and unwind it completely. Insert the plug in a socket which must be equipped with a ground connection.
Start the coffee maker by lifting switch (A) into the ( ) position. The warning light (B) will go on, indicating that the coffee maker is on and the heating unit will begin heating. The first time you use it, put switch (C) in the coffee (
 ) position until water comes out of the filter ring. At least a cup of water should drain from the heating unit hydraulic circuit. Once finished put switch (C) in the center position and wait until warning light (D) goes off. At this point the coffee maker is ready to brew coffee.
8
GB
HOWTOBREWCOFFEE
Measure out the coffee into the filter: for two coffees completely fill two measures, while for one coffee fill just one. Press the grounds in the filter with the press (P).
Insert the filter ring into its position. Turn the filter ring counterclockwise 40-45 degrees as far as possible, without forcing it too much. If too much coffee is put in the filter it may be difficult to turn the filter in its position, or coffee may leak out of the sides of the filter while brewing. The filter ring should be preheated for a few minutes to ensure a nice, hot cup of coffee. For the following coffees this is not necessary. The warning light (D) will go on and off at regular intervals indicating that the boiler’s thermostat is keeping the water at the right temperature (around 100º C for brewing coffee and around 150º C for making steam). When using the coffee maker for the first time and thereafter, it is best to begin brewing coffee only when this light is off. Position the switch (C) to coffee brewing ( ): the coffee will begin coming out of the spouts in the filter holder. To stop the flow move the switch back to the central position.
N.B. Like professional coffee makers, do not remove the filter ring when the coffee distribution switch
is turned on (in coffee brewing position |
); after making the coffee gradually loosen the filter ring |
|||||||
by turning it clockwise. The maximum dose for one cup is 50 ml. |
|
|
|
|
|
|
||
|
|
|
|
|
|
|||
No special operation is necessary when the water in the tank runs out, |
N |
|
|
|
|
|||
|
|
|
||||||
because the coffee maker is equipped with a special self-priming valve. |
M |
|
|
|
|
|||
Just unplug the coffee maker, pull out the tank and fill it with water |
|
|
|
|
||||
|
|
|
|
|
|
|||
again. ARIETE’s Thermocream® system has been specifically de- |
|
|
|
|
|
|
||
signed to best meet the needs of consumers. It is composed of two |
|
|
|
|
|
|
||
parts: the Thermocream® filter (N) and the Thermocream® disc (M) |
|
|
|
|
|
|
||
which can be used as follows: |
|
|
|
|
|
|
|
|
|
|
|
|
|
|
|
|
|
|
|
|
|
|
|
|
|
|
- Inserting both in the filter ring you obtain coffee with a finer crema |
N |
|
|
|
|
|
||
|
|
|
|
|
||||
-Using only the filter (N) you obtain coffee with a higher crema
9

GB
HOWTOMAKEACAPPUCCINO
To make cappuccino, hot chocolate or heat any beverage,
move switch (C) to the steam position ( |
) and wait until |
D C F |
the warning light (D) goes off, which indicates that the |
|
|
heating unit has reached the right temperature to produce |
|
|
steam (approximately 150º C). |
|
|
WARNING: if small spurts of steam come out of the |
|
|
ring holder while waiting for the steam, this is com- |
|
|
pletely normal. At this point turn the steam switch (F) |
|
|
down, making sure to position the cup under the MAXI |
|
|
CAPPUCCINO device (H): at first a little water will come |
|
|
out immediately followed by a strong jet of steam. |
|
|
Lift lever (F) to stop the steam and place the pitcher of milk |
H |
|
to froth under the MAXI CAPPUCCINO device. Immerse |
|
|
the wand into the pitcher of milk down to the bottom and |
|
|
lower the lever (F) again to obtain the desired froth. |
|
|
During these operations you will notice that the warning light (D) goes on and off at regular intervals indicating that the boiler’s temperature is keeping the water required for the steam supply at the right temperature. It is best to start steam flow only when the warning light is off.
REUTILIZATIONFORCOFFEE
Move the switch (C) to the central position to cool off the heating unit. To cool the heating unit more quickly, proceed as follows: after placing the receptacle under the wand (H), move the switch (C) to position ( ) (for coffee brewing) and immediately lower the level (F) (for making steam): this will cause water to flow out, until the warning light (D) turns back on. At this point, release the lever (F) and move the right switch (C) to the central position. The coffee maker is now ready to brew coffee again.
PERIODICALCLEANING
WARNING: all cleaning operations must be carried out with the coffee maker turned off. Cleaning the filter containing the ground coffee. Make sure the tiny holes are not blocked and if necessary clean them with a brush. Make sure that the hole below them is not blocked, if necessary clean with a pin.
Cleaning the ring filter housing. With use a sediment of coffee grounds may form in the housing where the filter ring is placed. They can be removed with a toothpick. Periodically clean the perforated disc by running water without putting the filter ring in its housing.
Cleaning the MAXI CAPPUCCINO attachment.
Carry out this operation when the chromed tube is cool to avoid getting burned. Unscrew the device (H) from the wand and rinse under running water. The wand can be cleaned using a nonabrasive cloth.
Rescrew the cappuccino attachment until it reaches the end. If necessary clean the hole where the steam comes from with a pin.
10

GB
Cleaning the tank. It is advisable to periodically clean the inside of the tank with a sponge or damp cloth.
USEFUL ADVICE FOR OBTAINING A GOOD ITALIAN ESPRESSO
The ground coffee in the filter ring must be lightly pressed. The strength of the coffee depends on the degree of grinding of the coffee, the quantity placed in the filter ring and the pressing. Only a few seconds are needed for the coffee to flow into the cups. If it takes any longer it means that the grind is too fine or the coffee has been pressed too much.
To obtain coffee with a finer crema, use filter (N) with disc (M); to obtain a higher crema use only the filter (N) after removing the disc (M) from the filter ring.
HOW TO MAKE TEA OR TISANES
After proceeding with the operations described in the PRELIMINARY PHASES FOR USE, put the cup under the spout (H) and move the coffee brewer switch (C) to the position ( ), immediately lower lever (F); hot water will now flow out of the spout. The maximum dose for two cups is 200 ml.
HOW TO BREW COFFEE WITH PODS (only for MOD. 1385/1)
To make coffee with pods you must use the specific pod filter that came with the coffee maker as described below:
1.Place the pod in the filter ring making sure that the part with the word “down” is facing down.
2.With your fingers, press the pod towards the lower part of the filter, making sure that the paper flaps adhere to the inner part of the filter.
3.The pod needs to be well centered and placed in the filter. The corners should be folded inwards.
4.The filter ring can now be inserted in its housing. Turn the filter ring counterclockwise 40-45 degrees until it is completely tightened.
5.After brewing the coffee, the pod may stick to the upper part of the machine when you try to remove the filter ring. To remove the pod, tilt the filter ring, as shown in the figure, so that the
pod falls on the filter.
To always have excellent coffee, only buy E.S.E. compatible brands of pods.
6.If the pod is not properly inserted or the filter ring is not completely tightened, a few drops of water may come out of the filter ring.
11
|
|
GB |
|
TROUBLESHOOTING |
|
|
|
|
PROBLEMS |
CAUSE |
SOLUTIONS |
The coffee maker |
Air has probably en- |
Make sure the tank is properly inserted and that the water |
does not supply |
tered the circuit and |
is not below the minimum level. |
boiling water for |
deactivated the pump. |
Repeat the operations described in the “Preliminary |
tisanes |
|
phases for use” paragraph. |
The coffee maker |
|
Use a pin to unclog the wand. |
does not supply |
|
Make sure the water level in the tank is normal. |
steam. |
|
|
Coffee overflowing |
Probably an excess |
Repeat the operation placing the correct quantity of coffee |
from the edges of the |
amount of ground coffee |
in the filter. |
filter ring |
has been placed in the |
Residues of coffee grounds have remained on the seal. If |
|
filter ring preventing the |
the problem persists after carrying out the above opera- |
|
filter ring from being |
tions, go to an Authorized Assistance Center. |
|
correctly tightened into |
|
|
its housing. |
|
Outflow of the first |
It is possible that the |
Check the filter containing the grounds. If the holes are |
coffee does not |
scarce outflow of coffee |
clogged, clean them with a brush, or use a utensil to hold |
occur or occurs too |
also depends on the |
the filter over the flame of a gas burner for a few seconds, |
slowly. |
insufficient emission of |
the coffee grounds will burn, unclogging the holes. |
|
water from the perfo- |
Operate the coffee maker without the filter ring making the |
|
rated showerhead type |
water flow. If the water does not flow out uniformly from all |
|
disc in the filter ring |
the holes it means that the disc is clogged. In this case go |
|
housing. In fact it is |
to an Authorized Assistance Center to have it cleaned. |
|
possible that after a few |
Insert the tank properly by pushing it all the way down. |
|
months of use, fat or |
Fill the tank. |
|
lime residues can ob- |
|
|
struct the disc. |
|
|
There is not enough |
|
|
water and the pump |
|
|
does not suction. |
|
The coffee is too |
The blend has been |
A more finely ground blend must be used to obtain a more |
watery and cold. |
ground too coarsely. |
concentrated and hotter coffee. |
|
|
The problem can be eliminated by using the Ther- |
|
|
mocream® Disc which always ensures an extremely hot |
|
|
coffee and rich crema, even with coarsely ground coffee. |
12

F
NOTES IMPORTANTES
•Lire attentivement les instructions avant l’utilisation;
•Ne pas utiliser la machine sans eau sinon, la pompe risque de se brûler;
•Le câble ne doit pas entrer en contact avec les parties chaudes de la machine;
•Débrancher la prise avant toute intervention de nettoyage ou bien d’entretien;
•Ne pas laisser la machine à température ambiante inférieure à 0°, étant donné que l’eau stagnante dans le chauffe-eau risquerait de se congéler et par conséquent endommager la machine;
•Avant de procéder à l’opération de remplissage du réservoir de l’eau, débrancher l’appareil de la prise de courant;
•L’appareil est destiné uniquement à un emploi domestique/ménager;
•Ne pas laisser la machine en marche à la portée des enfants;
•Si le câble d’alimentation est endommagé, il doit être remplacé par le fabricant ou bien par le Service d’Assistance Technique ou dans tous les cas par une personne qualifiée dans la prévention de ce genre de risques;
•Ne pas toucher le crochet du porte-filtre ainsi que le petit tube métallique du dispositif du cappuccino lorsque la machine est en marche, car cela pourrait provoquer des brûlures;
•Ne jamais laisser le câble d’alimentation dans son propre logement lors de l’utilisation. Le dérouler complètement;
•Après avoir débrancher la prise d’alimentation et après que les parties chaudes se seront refroidies, l’appareil devra être nettoyé uniquement avec un chiffon propre non abrasif humidifié,
et en y ajoutant quelques gouttes de détergents neutres non agressifs (ne jamais utiliser de solvants susceptibles d’abîmer la peinture); NE PAS IMMERGER L’APPAREIL DANS
L’EAU OU DANS D’AUTRES LIQUIDES.
•Cet appareil est conforme à la Directive CEE 89/336 concernant la compatibilité électromagnétique;
•TOUJOURS CONSERVER CES INSTRUCTIONS.
Les machines à café ARIETE sont idéales pour tous ceux qui savent apprécier les plaisirs de la vie, à commencer par un bon petit café. Grâce au dispositif Thermocream® , on peut toujours obtenir, chez soi, un bon café chaud et crémeux comme au bar.
En effet, le dispositif Thermocream® est muni d’un filtre qui assure le débit du café à une pression constante.
De cette manière, on peut déguster un café très crémeux, d’un arôme très intense et d’une saveur pleine et forte , sans pour cela avoir besoin d’exercer de pression énergique et seulement en utilisant n’importe quel mélange de café pas trop fin.
Les machines à café Ariete sont en mesure de satisfaire également les amateurs de cappuccino car grâce à son dispositif MAXI CAPPUCCINO, il est possible d’obtenir, en moins de 10 secondes, une crème riche et dense.
En outre, le café est toujours prêt avec les machines Ariete car elles sont équipées d’un système d’auto-amorçage permettant de préparer tout de suite le café même en cas de longue inactivité de la machine et seulement après avoir rempli le réservoir d’eau.
Bon café à tous avec CAFE RETRO ARIETE.
13

F
DESCRIPTION DES COMMANDES ET DES COMPOSANTS
A.Interrupteur allumage
Position vers le haut ( ): machine allumée Position vers le bas: machine éteinte
B.Témoin allumage
C.Interrupteur café/vapeur
Position centrale: standby Position ( ) débit vapeur Position (
 ) débit café
D.Témoin température chauffe-eau
E.Thermomètre température chauffe-eau (°C et °F)
F.Levier de commande vapeur
G.Système anti-gouttes
H.Dispositif MAXI CAPPUCCINO et distributeur eau/vapeur
I.Réservoir de l’eau extractible
J.Câble d’alimentation et prise
K.Grille repose-tasses extractible
L.Porte-filtres
M.Disque Thermocream®
N.Filtre Thermocream®
O.Doseur
P.Presse-café
Q.Porte-filtre pour papier filtre (uniquement pour mod. 1385/1)
R.Siège câble électrique
PHASES PRELIMINAIRES POUR L’EMPLOI
Contrôler que la tension du réseau est bien égale à celle indiquée sur la plaque des données techniques de l’appareil. Ensuite, positionner la machine sur une superficie plate. Remplir le réservoir avec de l’eau froide, 0,7 litre maximum, en ayant bien soin de l’introduire convenablement dans son siège. Extraire le câble électrique de son logement (R) et le dérouler complètement. Brancher la prise de courant électrique, l’installation doit comporter la prise de terre.
Mettre en marche la machine en actionnant l’interrupteur (A) sur la position ( ) vers le haut. Le témoin (B) s’allumera et indiquera que la machine est allumée et que le chauffe-eau interne commence à se réchauffer. Lors de la première utilisation, il faut positionner l’interrupteur (C) sur la position café (
 ) jusqu’à ce que l’on puisse voir l’eau sortir du siège du porte-filtre: Il est recommandé de faire écouler au moins une tasse d’eau du circuit hydraulique du chauffeeau. Terminer la distribution en ramenant l’interrupteur (C) à la position centrale et attendre que le témoin (D) s’éteigne. A ce moment-là, la machine est prête pour préparer le café.
14

F
COMMENT FAIRE LE CAFÉ
Doser le café dans le filtre: pour deux cafés, remplir complètement deux doseurs alors que pour un café, un seul suffit. Tasser la poudre à l’intérieur du filtre à l’aide du presse-café approprié (P). Introduire le porte-filtre dans le siège adéquat. Tourner le porte-filtre de 40-45 degrés dans le sens contraire aux aiguilles d’une montre jusque là où il est possible, sans forcer de manière excessive. Si l’on introduit une quantité excessive de poudre de café à l’intérieur du filtre, la rotation du porte-filtre à l’intérieur de son logement peut être difficile et/ou lors du débit café, il peut y avoir des fuites. Il est conseillé de laisser chauffer le porte-filtre, inséré dans son siège, pendant quelques minutes de façon à obtenir le permier café bien chaud.
Ceci ne sera pas nécessaire pour les cafés successifs. Le témoin (D) s’éteindra et s’allumera périodiquement, en montrant l’intervention du thermostat du chauffe-eau qui sert à maintenir à un niveau optimal la température de l’eau (autour de 100 C° pour faire le café et à environ 150 C° pour le débit de vapeur). Il est opportun, aussi bien pour le premier café que pour les successifs, de commencer la distribution du café seulement quand le témoin est éteint. Positionner l’interrupteur (C)
sur la position café ( ); le café commencera à s’écouler par les petits becs du porte-filtre. Pour l’interrompre, ramener la touche sur la position centrale.
N.B. Comme dans le cas des machines professionnelles, ne pas enlever le porte-filtre quand
l’interrupteur de débit est inséré (en position café  ); aprés avoir fait le café, relâcher graduellement le porte-filtre en le tournant dans le sens des aiguilles d’une montre. La dose maximum pour un café est de 50 ml.
Aucune opération particulière n’est nécessaire quand l’eau s’épuise |
N |
|
|
|
|
dans le réservoir, car la machine possède une soupape spéciale |
|
|
|
||
|
|
||||
d’auto-amorçage. Il suffira, après avoir débranché la prise électrique, |
M |
|
|
|
|
|
|
||||
d’extraire le réservoir et de le remplir de nouveau. Le système |
|
|
|
|
|
Thermocream de ARIETE a été étudié exprès pour satisfaire au mieux |
|
|
|
|
|
toutes les exigences du consommateur; il se compose de deux |
|
|
|
|
|
éléments: le filtre Thermocream® (N) et le disque Thermocream® (M) |
|
|
|
|
|
qui peuvent être utilisés de la manière suivante: |
|
|
|
|
|
|
|
|
|
|
|
- en les introduisant tous les deux dans le porte-filtre, on obtient un |
N |
|
|
||
|
|||||
café avec une crème plus fine: |
|
|
|
|
|
- en utilisant seulement le filtre (N), on obtient un café avec une |
|
|
|
|
|
crème plus épaisse. |
|
|
|
|
|
|
|
|
|
|
|
15

F
COMMENT FAIRE LE CAPPUCCINO
Afin de préparer un cappuccino, un chocolat chaud ou |
|
|
réchauffer n’importe quelle autre |
boisson, porter |
D C F |
l’interrupteur (C) en position vapeur ( |
) et attendre que |
|
le témoin (D) s’éteigne, ce qui veut dire que le chauffe-eau |
|
|
a atteint la juste température pour distribuer de la vapeur. |
|
|
(environ 150 °C) |
|
|
ATTENTION: si lors de la phase d’attente vapeur, il y a |
|
|
de petites bouffées de vapeur, il faut considérer tout cela absolument normal. A ce moment là, baisser le levier (F) de distribution vapeur, en ayant bien soin de placer un verre sous le dispositif MAXI CAPPUCCINO (H);
au début, un peu d’eau sortira et tout de suite après un H gros jet de vapeur.
Ensuite, relever le levier (F) pour interrompre le jet de vapeur et placer sous le dispositif MAXI CAPPUCCINO, le récipient du lait à monter. Tremper à fond le bec/la tige dans le récipient à lait et baisser de nouveau le levier de distribution (F) jusqu’à l’obtention du résultat désiré. Lors de telles opérations, on pourra remarquer que le témoin (D) s’éteint et se ré-allume périodiquement, indiquant ainsi les interventions du thermostat qui maintient la température correcte du chauffe-eau pour le débit de la vapeur. Il est opportun de démarrer la distribution de la vapeur seulement lorsque le témoin est éteint.
RE-UTILISATION POUR CAFE
Ramener l’interrupteur (C) en position centrale pour faire refroidir le chauffe-eau. Si l’on veut accélérer le refroidissement du chauffe.eau, il est possible d’agir comme suit: après avoir placé un
récipient sous la tige/bec (H), amener l’interrupteur (C) en position ( ) (comme pour la distribution du café) et baisser tout de suite le levier (F) (comme pour la distribution de la vapeur); cela provoquera l’écoulement d’eau, jusqu’à ce que le témoin (D) se ré-allume de nouveau. A ce moment là, relâcher le levier (F) et ramener l’interrupteur de droite (C) dans la position centrale. La machine est de nouveau prête pour faire le café.
NETTOYAGES PERIODIQUES
ATTENTION: toutes les opérations de nettoyage indiquées ci-dessous doivent être effectuées lorsque la machine est éteinte.
Nettoyage du filtre contenant la poudre. Vérifier que les petits trous internes se soient pas bouchés et si besoin est, les nettoyer à l’aide d’une brosse. Vérifier que le trou situé dessous ne soit pas bouché et si nécesaire le nettoyer à l’aide d’une épingle.
Nettoyage du siège du porte-filtre. A force de l’utiliser, on peut apercevoir, dans le siège d’attache du porte-filtre, une sédimentation de fonds de café qui peuvent être éliminés à l’aide d’un cure-dent: en outre, il est possible de procéder au nettoyage du disque troué, en laissant couler de l’eau sans introduire le porte-filtre dans son siège.
Nettoyage du dispositif MAXI CAPPUCCINO
Effectuer l’opération lorsque le tube chromé est froid pour éviter des brûlures. Dévisser le dispositif (H) du petit tube et le laver à l’eau courante. Le petit tube peut être lavé à l’aide d’un chiffon non abrasif.
16
 Loading...