

Page 1

Congratulations on your new RXV .
This innovative motorcycle is designed to provide high performance and great fun under all usage conditions - in other words, with an intent to
revolutionise the concept of enduro motorcycles. aprilia's first and foremost commitment is to build motorcycles with high technological content, that
are extremely safe to ride and will retain their value over time.
IMPORTANT NOTICE ON VEHICLE USE AND LEGAL WARRANTY
aprilia RXV motorcycles have been conceived and designed for race-track and off-road competitions. As a result, they meet the rules and class
requirements currently adopted by major international motorcycling associations.
The RXV model has been specifically designed for off-road endurance racing (enduro) and not mainly for motorcrossing.
Having the motorcycle serviced at the recommended intervals as specified in the maintenance charts provided in this manual is critical to avoiding
premature wear and severe failures. To preserve motorcycle performance and avoid severe damage, have the recommended maintenance procedures
performed by Authorised aprilia Dealers or Service Centres.
The RXV come in a derated version which can be legally used on public roads and is covered by a legal warranty. In order to maintain the warranty,
the recommended maintenance must be performed at the specified intervals by Authorised aprilia Dealers or Service Centres and each service must
be recorded in the warranty booklet.
Please note that these motorcycles are not suitable for road use. Gear ratios, cooling system, suspension set-up, braking system and engine power
delivery are designed and tuned up for racing, and the operating conditions encountered in competitions differ greatly from those experienced when
riding on public roads.
Below is a short non-exhaustive list of typical operating conditions that may lead to severe engine damage: long stops at traffic lights, motorway trips
with the engine steadily running at maximum rpm, or drafting vehicles.
Any changes or modifications to the motorcycle, especially performance enhancing modifications, will make the motorcycle illegal to ride on public roads
and void the legal warranty. A modified motorcycle may be used for racing in organised races approved by competent authorities.
For your own safety, use only genuine aprilia parts and accessories. aprilia disclaims all liabilities for the event non-genuine parts are used and for
resulting damage.
APRILIA WOULD LIKE TO THANK YOU
for choosing one of its products. We have compiled this booklet to provide a comprehensive overview of your vehicle's quality features. Please, read it
carefully before riding the vehicle for the first time. It contains information, tips and precautions for using your vehicle. It also describes features, details
and devices to assure you that you have made the right choice. We believe that if you follow our suggestions, you will soon get to know your new vehicle
well and that it will continue to give you satisfactory service for many years to come. This booklet is an integral part of the vehicle and must be handed
over to the new owner in the event of sale.
Gefeliciteerd met de aankoop van de nieuwe RXV.
Ed. 10 2008
Page 2

Het is een motor die de manier van opvatten van enduro motoren radicaal wil veranderen. Het is een innovatief voertuig, en het is in staat hoge prestaties
en plezier in alle gebruiksomstandigheden te garanderen. De primaire doelstelling van aprilia is dan ook het realiseren van motoren met een hoge
technologische inhoud, die buitengewoon veilig zijn en in staat zijn om mettertijd hun waarde te behouden.
BELANGRIJKE WAARSCHUWINGEN WAT BETREFT HET GEBRUIK VAN HET VOERTUIG EN DE WETTELIJKE GARANTIE
De motoren aprilia RXV werden geproduceerd, ontworpen en ontwikkeld voor sportief gebruik op een piste of om te crossen. Daarom moeten ze
voldoen aan reglementen en de categorieën die actueel in gebruik zijn door de belangrijkste internationale motorbonden.
Het model RXV werd ontworpen voor lange crosswedstrijden (enduro) en is niet geschikt voor courant gebruik voor motorcross.
Om een voortijdige slijtage en het eventueel stukgaan te vermijden, moeten de vooraf bepaalde handelingen die aangeduid worden in de tabel van het
onderhoud, in deze handleiding, absoluut noodzakelijk gerespecteerd worden. Door het respecteren van de intervals en de handelingen van het
onderhoud, uitgevoerd bij een dealer of erkende garage van aprilia, zullen de prestaties van het voertuig behouden blijven en zal ernstige schade
vermeden worden.
De motoren RXV worden niet opgevoerd geleverd, zodat ze in deze versie gehomologeerd zijn voor het gebruik op openbare wegen en gedekt zijn
door de wettelijke garantie op voorwaarde dat de intervals en de handelingen van het onderhoud nauwkeurig gerespecteerd worden, en dat ze uitgevoerd
worden bij een dealer of erkende garage van aprilia, waar de servicebeurt genoteerd zal worden op het daarvoor bestemde garantieboekje.
Deze voertuigen zijn niet geschikt voor weggebruik: de verhoudingen van de versnellingsbak, de koelinstallatie, de setting van de ophangingen, de
reminstallatie en de kenmerken van de levering van de motor zijn geoptimaliseerd voor sportief gebruik, waar de omstandigheden en het type van
gebruik zeer verschillen van de omstandigheden die zich voordoen op openbare wegen.
Hier volgen enkele voorbeelden, die niet gelden voor alle gevallen, van enkele omstandigheden die de motor ernstig kunnen beschadigen: lang wachten
bij een verkeerslicht, trajecten op snelwegen met de motor steeds aan het maximum toerental of het rijden achter wagens.
Eender welke wijziging of geknoei aan het voertuig, en vooral voor het verhogen van de prestaties van de motor, maken dat het voertuig niet meer
gehomologeerd is voor gebruik op de openbare weg, maar dat het enkel gebruikt mag worden in georganiseerde wedstrijden en met goedkeuring van
de bevoegde instanties. Deze handelingen doen alle rechten op de wettelijke garantie vervallen.
Voor uw veiligheid is het best dat enkel de originele reserveonderdelen en accessoires van aprilia gebruikt worden. aprilia kan niet aansprakelijk
gesteld worden voor het gebruik van niet-originele onderdelen en voor de schade die hierdoor veroorzaakt wordt.
APRILIA WIL U BEDANKEN
omdat u één van haar producten heeft gekozen. Wij hebben deze handleiding opgesteld opdat u de kwaliteiten ervan ten volle kan waarderen. Wij
raden aan om deze handleiding geheel door te lezen, voordat u met het voertuig gaat rijden. Het bevat informatie, raadgevingen en waarschuwingen
in verband met het gebruik van uw voertuig; daarnaast zal u eigenschappen, bijzonderheden en handigheidjes ontdekken die u ervan zullen overtuigen
dat u een juiste keuze heeft gemaakt. Wij zijn er zeker van dat indien u hier rekening mee zal houden, u makkelijk zal wennen aan uw nieuw voertuig,
waar u lang naar volle tevredenheid gebruik van zal kunnen maken. Deze uitgave is een integrerend deel van het voertuig, en bij verkoop van dit laatste
moet het worden overhandigd aan de nieuwe eigenaar.
Ed. 10 2008
Page 3

RXV 450-550
Ed. 10 2008
Page 4

The instructions in this booklet have been compiled primarily to offer a simple and clear guide to using the vehicle; it also describes routine maintenance
procedures and regular checks that should be carried out on the vehicle at an Aprilia Dealer or Authorised Workshop. This booklet also contains
instructions for simple repairs. Any operations not specifically described in this booklet require the use of special tools and/or particular technical
knowledge; for these operations, please take your vehicle to an Aprilia Dealer or Authorised Workshop.
De instructies in deze handleiding zijn voorbereid om vooral een eenvoudige en duidelijke leidraad te zijn voor het gebruik; men vindt eveneens de
handelingen van het klein onderhoud en van de periodieke controles die bij een Dealer of Erkende aprilia Garage moeten uitgevoerd worden. De
handleiding bevat tevens instructies voor een aantal eenvoudige herstellingen. De herstellingen die niet uitgebreid in deze uitgave zijn beschreven,
vereisen dat men over speciale gereedschappen en/of specifieke technische kennis beschikt; voor het uitvoeren van deze herstellingen raadt men aan
om zich te wenden tot een Dealer of Erkende aprilia Garage.
4
Page 5

Personal safety
Persoonlijke veiligheid
Failure to completely observe these instructions will
result in serious risk of personal injury.
Safeguarding the environment
Sections marked with this symbol indicate the correct
use of the vehicle to prevent damaging the environ-
ment.
Vehicle intactness
The incomplete or non-observance of these regula-
tions leads to the risk of serious damage to the vehicle
and sometimes even the invalidity of the guarantee.
The symbols shown above are very important. They
are used to highlight those parts of the booklet that
should be read with particular care. As you can see,
each sign consists of a different graphic symbol, making it quick and easy to locate the various topics.
Before starting the engine, read this booklet thoroughly and the "SAFE RIDING" section in particular. Your
safety as well as other's does not only depend on the
quickness of your reflexes and agility, but also on how
well you know your vehicle, the state of maintenance
of the vehicle itself and your knowledge of the rules
for SAFE RIDING. For your safety, get to know your
vehicle well so as to safely ride and master it in road
traffic IMPORTANT This booklet is an integral part of
the vehicle, and must be handed to the new owner in
the event of sale.
Indien deze voorschriften niet of niet volledig worden
opgevolgd, kan dit ernstig letsel aan personen tot ge-
volg hebben.
Bescherming van
Geeft het juiste gedrag aan dat u aan moet houden
zodat het gebruik van het voertuig geen schade aan-
richt aan de natuur.
Staat van het voertuig
Indien deze voorschriften niet of niet volledig worden
opgevolgd kan dit ernstige schade aan het voertuig,
en eventueel het vervallen van deze garantie tot ge-
volg hebben.
Bovengenoemde signalen zijn erg belangrijk. Ze hebben namelijk tot doel om de delen van het boekje aan
te geven die u aandachtig door moet lezen. Zoals u
ziet, bestaat ieder teken uit een ander grafisch symbool, zodat de bijbehorende onderwerpen meteen
duidelijk kunnen worden gevonden in de verschillende delen. Vooraleer men de motor start, leest men
aandachtig deze handleiding, en vooral de paragraaf
"VEILIG RIJDEN". Uw veiligheid en die van anderen
hangt niet enkel af van uw reflexen en vlugheid, maar
ook van de kennis en de efficiëntie van het voertuig,
en van de kennis van de fundamentele regels voor het
VEILIG RIJDEN. We raden daarom aan om vertrouwd
te raken met het voertuig, zodat u zich veilig en beheersd kan bewegen in het verkeer. BELANGRIJK
Deze handleiding moet beschouwd worden als integrerend deel van het voertuig, en moet worden overhandigd bij de verkoop ervan.
5
Page 6

6
Page 7

INDEX
INDEX
GENERAL RULES.......................................................................... 9
Carbon monoxide..................................................................... 10
Fuel.......................................................................................... 10
Hot components....................................................................... 11
Coolant..................................................................................... 11
Used engine oil and gearbox oil............................................... 13
Brake and clutch fluid............................................................... 14
Battery hydrogen gas and electrolyte....................................... 14
Reporting of defects that affect safety...................................... 16
VEHICLE......................................................................................... 23
Arrangement of the main components......................................... 25
Dashboard................................................................................... 27
Analog instrument panel.............................................................. 28
Light unit...................................................................................... 28
Digital lcd display......................................................................... 30
Ignition switch........................................................................... 35
Locking the steering wheel....................................................... 35
Horn button.................................................................................. 36
Switch direction indicators........................................................... 36
High/low beam selector............................................................... 37
Start-up button............................................................................. 37
Engine stop switch....................................................................... 38
Opening the saddle.................................................................. 39
Identification................................................................................. 39
USE................................................................................................. 43
Checks......................................................................................... 44
Refuelling..................................................................................... 47
Rear shock absorbers adjustment............................................... 49
Front fork adjustment................................................................... 53
Running in.................................................................................... 55
Starting up the engine.................................................................. 57
ALGEMENE NORMEN..................................................................... 9
Koolmonoxide............................................................................. 10
Brandstof.................................................................................... 10
Warme onderdelen..................................................................... 11
Koelvloeistof............................................................................... 11
Gebruikte motorolie en koppelingsolie....................................... 13
Rem- en koppelingsvloeistof...................................................... 14
Elektrolyt en waterstofgas van de accu...................................... 14
Communicatie van de defecten die invloed hebben op de vei-
ligheid......................................................................................... 16
VOERTUING..................................................................................... 23
Plaats van de hoofdcomponenten................................................. 25
Legenda......................................................................................... 27
Analoog instrumentenpaneel......................................................... 28
Groep controlelampjes................................................................... 28
Digitaal display............................................................................... 30
Startschakelaar.......................................................................... 35
Stuurslot vergrendelen............................................................... 35
Drukknop claxon............................................................................ 36
Schakelaar richtingaanwijzers....................................................... 36
Lichtschakelaar.............................................................................. 37
Startknop........................................................................................ 37
Stopschakelaar motor.................................................................... 38
Zadel openen............................................................................. 39
Identificatie..................................................................................... 39
GEBRUIK.......................................................................................... 43
Controles........................................................................................ 44
Tanken........................................................................................... 47
Regulering achterdempers............................................................. 49
Regulering voorvorken................................................................... 53
Inrijden........................................................................................... 55
7
Page 8

Stopping the engine..................................................................... 61
Anti-theft device........................................................................... 62
Stand........................................................................................... 63
Safe driving.................................................................................. 64
Load............................................................................................. 70
MAINTENANCE.............................................................................. 71
Engine oil level............................................................................. 72
Engine oil change..................................................................... 75
Gearbox oil level.......................................................................... 77
Spark plug dismantlement........................................................... 81
Removing the air filter.................................................................. 86
Cooling fluid level......................................................................... 88
Checking the brake oil level......................................................... 92
Battery......................................................................................... 102
Fuses........................................................................................... 103
Lamps.......................................................................................... 107
Front light group........................................................................... 107
Headlight adjustment............................................................... 109
Front and rear disc brake............................................................. 110
Periods of inactivity...................................................................... 114
Cleaning the vehicle.................................................................... 116
Transport..................................................................................... 120
Transmission chain...................................................................... 120
Chain backlash check.............................................................. 121
Chain backlash adjustment...................................................... 122
Checking wear of chain, front and rear sprockets.................... 123
Chain lubrication and cleaning................................................. 125
TECHNICAL DATA......................................................................... 127
Kit equipment............................................................................... 134
SPARE PARTS AND ACCESSORIES........................................... 135
Warnings...................................................................................... 136
PROGRAMMED MAINTENANCE.................................................. 137
Scheduled maintenance table..................................................... 138
Starten des motors......................................................................... 57
Stoppen van de motor.................................................................... 61
Antidiefstalsysteem........................................................................ 62
Standaard...................................................................................... 63
Veilig rijden.................................................................................... 64
Lading............................................................................................ 70
ONDERHOUD................................................................................... 71
Peil motorolie................................................................................. 72
Vervanging van de motorolie...................................................... 75
Versnellingsbak oliepeil................................................................. 77
Demonteren van de bougie............................................................ 81
Demonteren van het luchtfilter....................................................... 86
Peil koelvloeistof............................................................................ 88
Controle van het oliepeil van de remmen...................................... 92
Accu............................................................................................... 102
Zekeringen..................................................................................... 103
Lampjes......................................................................................... 107
Koplampset.................................................................................... 107
Afstellen van de koplamp........................................................... 109
Schijfrem voor en achter................................................................ 110
Stilstand van het voertuig............................................................... 114
Reinigen van het voertuig.............................................................. 116
Vervoer.......................................................................................... 120
Transmissieketting......................................................................... 120
Controle van de speling van de ketting...................................... 121
Regeling van de speling van de ketting...................................... 122
Controle van het gebruik van de ketting, het tandrad en kroon
................................................................................................... 123
Smering en reiniging van de ketting........................................... 125
TECHNISCHE GEGEVENS.............................................................. 127
Bijgeleverd gereedschap............................................................... 134
ONDERDELEN EN ACCESSOIRES................................................ 135
Waarschuwingen........................................................................... 136
GEPLAND ONDERHOUD................................................................ 137
Tabel gepland onderhoud.............................................................. 138
8
Page 9

RXV 450-550
Chap. 01
General rules
Hst. 01
Algemene normen
9
Page 10
Carbon monoxide
Koolmonoxide
If you need to keep the engine running in
order to perform a procedure, please ensure that you do so in an open or very well
ventilated area. Never let the engine run
in an enclosed area. If you do work in an
enclosed area, make sure to use a
smoke-extraction system.
CAUTION
EXHAUST EMISSIONS CONTAIN
CARBON MONOXIDE, A POISONOUS
GAS WHICH CAN CAUSE LOSS OF
CONSCIOUSNESS AND EVEN
DEATH.
Fuel
CAUTION
FUEL USED TO POWER INTERNAL
COMBUSTION ENGINES IS HIGHLY
FLAMMABLE AND CAN BECOME EXPLOSIVE UNDER SPECIFIC CONDITIONS. IT IS THEREFORE RECOMMENDED TO CARRY OUT REFUELLING AND MAINTENANCE PROCE-
Wanneer het nodig is om de motor te
doen werken om een handeling uit te
voeren, controleert men of dit in een open
ruimte of in een goed geventileerd lokaal
gebeurt. Laat de motor nooit werken in
een gesloten ruimte. Wanneer men in
een gesloten ruimte werkt, gebruikt men
een evacuatiesysteem voor de uitlaatgassen.
LET OP
DE UITLAATGASSEN BEVATTEN
KOOLMONOXIDE, EEN GIFTIG GAS
DAT BEWUSTELOOSHEID EN OOK
DE DOOD KAN VEROORZAKEN.
Brandstof
LET OP
DE BRANDSTOF DIE WORDT GEBRUIKT VOOR DE AANDRIJVING VAN
DE ONTPLOFFINGSMOTOR IS UITERST BRANDBAAR EN KAN EXPLOSIEF WORDEN IN BEPAALDE OMSTANDIGHEDEN. VOER HET TANKEN
EN DE ONDERHOUDSHANDELINGEN
10
Page 11

1 General rules / 1 Algemene normen
DURES IN A VENTILATED AREA WITH
THE ENGINE OFF. DO NOT SMOKE
DURING REFUELLING AND NEAR
FUEL VAPOURS, AVOID ANY CONTACT WITH NAKED FLAMES,
SPARKS OR OTHER SOURCES
WHICH MAY CAUSE THEM TO IGNITE
OR EXPLODE.
DO NOT DISPOSE OF FUEL IN THE
ENVIRONMENT.
KEEP OUT OF THE REACH OF CHILDREN
UIT IN EEN GEVENTILEERDE ZONE
EN MET DE MOTOR UIT. ROOK NIET
TIJDENS HET TANKEN EN IN DE NABIJHEID VAN BRANDSTOFDAMPEN,
EN VERMIJD ABSOLUUT CONTACT
MET VRIJE VLAMMEN, VONKEN EN
ELKE ANDERE BRON DIE HET VLAM
VATTEN OF EXPLODEREN ERVAN
KAN VEROORZAKEN.
LOOS DE BRANDSTOF NIET IN HET
MILIEU.
BUITEN BEREIK VAN KINDEREN
HOUDEN
Hot components
The engine and the exhaust system components get very hot and remain in this
condition for a certain time interval after
the engine has been switched off. Before
handling these components, make sure
that you are wearing insulating gloves or
wait until the engine and the exhaust system have cooled down.
Coolant
The coolant contains ethylene glycol
which, under certain conditions, can become flammable. When ethylene glycol
burns, it produces an invisible flame
which can nevertheless cause burns.
11
Warme onderdelen
De motor en de onderdelen van de uitlaatinstallatie worden zeer warm en blijven lang warm, ook nadat de motor wordt
uitgezet. Vooraleer men deze onderdelen hanteert, draagt men isolerende
handschoenen, of wacht men tot de motor en de uitlaatinstallatie zijn afgekoeld.
Koelvloeistof
De koelvloeistof bevat ethyleenglycol,
wat in sommige omstandigheden ontvlambaar is. Wanneer het brandt, produceert ethylglycol onzichtbare vlammen,
die toch brandwonden veroorzaken.
Page 12

CAUTION
LET OP
TAKE CARE NOT TO POUR COOLANT
ONTO HOT ENGINE OR EXHAUST
SYSTEM COMPONENTS; THE FLUID
MAY CATCH FIRE AND BURN WITH
INVISIBLE FLAMES. WHEN CARRYING OUT MAINTENANCE OPERATIONS, IT IS ADVISABLE TO WEAR
LATEX GLOVES. EVEN THOUGH IT IS
TOXIC, COOLANT HAS A SWEET FLAVOUR WHICH MAKES IT VERY ATTRACTIVE TO ANIMALS. NEVER
LEAVE THE COOLANT IN OPEN CONTAINERS IN AREAS ACCESSIBLE TO
ANIMALS AS THEY MAY DRINK IT.
KEEP OUT OF THE REACH OF CHILDREN
DO NOT REMOVE THE RADIATOR
CAP WHEN THE ENGINE IS STILL
HOT. THE COOLANT IS UNDER PRESSURE AND MAY CAUSE BURNS.
LET OP OM GEEN KOELVLOEISTOF
TE MORSEN OP DE HETE DELEN VAN
DE MOTOR EN DE UITLAATINSTALLATIE; DEZE ZOU BRAND KUNNEN
VATTEN MET ONZICHTBARE VLAMMEN. BIJ ONDERHOUDSHANDELINGEN RAADT MEN AAN OM LATEX
HANDSCHOENEN TE GEBRUIKEN.
DE KOELVLOEISTOF IS GIFTIG,
MAAR HEEFT TOCH EEN ZOETE
SMAAK, WAT HEM UITERST AANTREKKELIJK MAAKT VOOR DIEREN.
LAAT DE KOELVLOEISTOF NOOIT IN
GEOPENDE VERPAKKINGEN OF IN
POSITIES DIE BEREIKBAAR ZIJN
VOOR DIEREN, DIE ER ZOUDEN VAN
KUNNEN DRINKEN.
BUITEN BEREIK VAN KINDEREN
HOUDEN
VERWIJDER DE RADIATORDOP NIET
WANNEER DE MOTOR NOG WARM
STAAT. DE KOELVLOEISTOF STAAT
ONDER DRUK, EN ZOU BRANDWONDEN KUNNEN VEROORZAKEN.
12
Page 13

Used engine oil and gearbox
1 General rules / 1 Algemene normen
oil
Gebruikte motorolie en
koppelingsolie
CAUTION
IT IS ADVISABLE TO WEAR LATEX
GLOVES WHEN SERVICING THE VEHICLE.
THE ENGINE OR GEARBOX OIL MAY
CAUSE SERIOUS INJURIES TO THE
SKIN IF HANDLED FOR PROLONGED
PERIODS OF TIME AND ON A REGULAR BASIS.
WASH YOUR HANDS CAREFULLY
AFTER HANDLING OIL.
HAND THE OIL OVER TO OR HAVE IT
COLLECTED BY THE NEAREST USED
OIL RECYCLING COMPANY OR THE
SUPPLIER.
DO NOT DISPOSE OF OIL IN THE ENVIRONMENT
KEEP OUT OF THE REACH OF CHILDREN
LET OP
BIJ ONDERHOUDSHANDELINGEN
RAADT MEN AAN OM LATEX HANDSCHOENEN TE GEBRUIKEN.
DE OLIE VAN DE MOTOR OF DE VERSNELLINGSBAK KAN ERNSTIGE
SCHADE VEROORZAKEN AAN DE
HUID, WANNEER HIJET LANG EN DAGELIJKS WORDT GEBRUIKT.
MEN RAADT AAN OM DE HANDEN
ZORGVULDIG TE WASSEN NA HET
HANTEREN VAN OLIE.
BEZORG HEM AAN OF LAAT HEM OPHALEN DOOR HET DICHTSTBIJZIJNDE RECYCLEBEDRIJF VAN GEBRUIKTE OLIES OF DOOR DE
LEVERANCIER.
LOOS DE OLIE NIET IN HET MILIEU.
BUITEN BEREIK VAN KINDEREN
HOUDEN
13
Page 14

Brake and clutch fluid
Rem- en koppelingsvloeistof
THE BRAKE FLUID MAY DAMAGE
PAINTED, PVC OR RUBBER SURFACES. WHEN SERVICING THE BRAKING SYSTEM PROTECT THESE COMPONENTS WITH A CLEAN CLOTH.
ALWAYS WEAR PROTECTIVE GOGGLES WHEN SERVICING THE BRAKING SYSTEM. THE BRAKE FLUID IS
EXTREMELY DANGEROUS TO THE
EYES. IN THE EVENT OF ACCIDENTAL CONTACT WITH THE EYES,
RINSE THEM IMMEDIATELY WITH
ABUNDANT COLD, CLEAN WATER
AND SEEK MEDICAL ADVICE.
KEEP OUT OF THE REACH OF CHILDREN
Battery hydrogen gas and
electrolyte
CAUTION
DE REMVLOEISTOF KAN GELAKTE,
PLASTIC OF RUBBEREN OPPERVLAKKEN BESCHADIGEN. WANNEER MEN HET ONDERHOUD VAN
DE REMINSTALLATIE UITVOERT, BESCHERMT MEN DEZE ONDERDELEN
MET EEN REIN DOEK. DRAAG
STEEDS EEN BESCHERMENDE BRIL
WANNEER MEN ONDERHOUD UITVOERT OP DE REMINSTALLATIE. DE
REMVLOEISTOF IS UITERST SCHADELIJK VOOR DE OGEN. IN GEVAL
VAN TOEVALLIG CONTACT MET DE
OGEN, SPOELT MEN ONMIDDELLIJK
MET OVERVLOEDIG KOUD EN REIN
WATER, EN RAADPLEEGT MEN ONMIDDELLIJK EEN ARTS.
BUITEN BEREIK VAN KINDEREN
HOUDEN
Elektrolyt en waterstofgas van
de accu
LET OP
BATTERY ELECTROLYTE IS TOXIC,
CORROSIVE AND AS IT CONTAINS
SULPHURIC ACID, IT CAN CAUSE
14
DE ELEKTROLYT VAN DE ACCU IS
GIFTIG EN BIJTEND, EN IN CONTACT
MET DE HUID KAN HET BRANDWON-
Page 15

1 General rules / 1 Algemene normen
BURNS WHEN IN CONTACT WITH
THE SKIN. WHEN HANDLING BATTERY ELECTROLYTE, WEAR TIGHTFITTING GLOVES AND PROTECTIVE
APPAREL. IF THE ELECTROLYTIC
FLUID COMES INTO CONTACT WITH
THE SKIN, RINSE WELL WITH ABUNDANT FRESH WATER. IT IS PARTICULARLY IMPORTANT TO PROTECT
YOUR EYES AS EVEN TINY AMOUNTS
OF BATTERY ACID MAY CAUSE
BLINDNESS. IF THE FLUID GETS INTO
CONTACT WITH YOUR EYES, WASH
WITH ABUNDANT WATER FOR FIFTEEN MINUTES AND CONSULT AN
EYE SPECIALIST IMMEDIATELY. IF
THE FLUID IS ACCIDENTALLY SWALLOWED, DRINK LARGE QUANTITIES
OF WATER OR MILK, FOLLOWED BY
MILK OF MAGNESIA OR VEGETABLE
OIL AND SEEK MEDICAL ADVICE IMMEDIATELY. THE BATTERY RELEASES EXPLOSIVE GASES; KEEP IT
AWAY FROM FLAMES, SPARKS, CIGARETTES OR ANY OTHER HEAT
SOURCE. ENSURE ADEQUATE VENTILATION WHEN SERVICING OR RECHARGING THE BATTERY.
KEEP OUT OF THE REACH OF CHILDREN
BATTERY LIQUID IS CORROSIVE. DO
NOT POUR OR SPILL IT, PARTICULARLY ON PLASTIC COMPONENTS.
ENSURE THAT THE ELECTROLYTIC
ACID IS COMPATIBLE WITH THE BATTERY TO BE ACTIVATED.
DEN VOORZAKEN OMDAT HET ZWAVELZUUR BEVAT. DRAAG NAUWSLUITENDE HANDSCHOENEN EN
BESCHERMENDE KLEDING WANNEER MEN HET ELEKTROLYT VAN
DE ACCU HANTEERT. WANNEER DE
ELEKTROLYTVLOEISTOF IN CONTACT ZOU KOMEN MET DE HUID,
MOET MEN OVERVLOEDIG WASSEN
MET KOUD WATER. HET IS ZEER BELANGRIJK OM DE OGEN TE BESCHERMEN, OMDAT OOK EEN ZEER
KLEINE HOEVEELHEID ZUUR VAN DE
ACCU BLINDHEID KAN VEROORZAKEN. WANNEER HET IN CONTACT
ZOU KOMEN MET DE OGEN, MOET
MEN OVERVLOEDIG WASSEN MET
WATER VOOR ONGEVEER VIJFTIEN
MINUTEN, EN ONMIDDELLIJK EEN
OOGARTS RAADPLEGEN. WANNEER
HET TOEVALLIG ZOU WORDEN INGESLIKT, MOET MEN VEEL WATER OF
MELK DRINKEN, DAARNA MAGNESIUMMELK OF VEGETALE OLIE
DRINKEN, EN ONMIDDELLIJK EEN
ARTS RAADPLEGEN. DE ACCU VERSPREIDT EXPLOSIEVE GASSEN EN
MOET DUS UIT DE BUURT WORDEN
GEHOUDEN VAN VLAMMEN, VONKEN, SIGARETTEN EN ELKE ANDERE
WARMTEBRON. VOORZIE EEN GEPASTE VERLUCHTING WANNEER
MEN ONDERHOUD OF HET OPLADEN
VAN DE ACCU UITVOERT.
BUITEN BEREIK VAN KINDEREN
HOUDEN
15
Page 16

DE VLOEISTOF VAN DE ACCU IS
CORROSIEF. GIET ZE NIET UIT EN
VERSPREIDT ZE NIET, VOORAL NIET
OP DE PLASTIC DELEN. CONTROLEER OF HET ELEKTROLYTZUUR
SPECIFIEK VOOR DE TE ACTIVEREN
ACCU IS.
Reporting of defects that
affect safety
GENERAL PRECAUTIONS AND INFORMATION
When repairing, dismantling and reassembling the vehicle follow the recommendations reported below carefully.
BEFORE REMOVING COMPONENTS
•
Before dismantling components, remove dirt, mud, dust
and foreign bodies from the vehicle. Use the special tools designed for this bike, as required.
COMPONENTS REMOVAL
•
Do not loosen and/or tighten
screws and nuts using pliers or
other tools than the especially
designed wrench.
•
Mark positions on all connection
joints (pipes, cables etc.) before
16
Communicatie van de
defecten die invloed hebben
op de veiligheid
ALGEMENE VOORZORGSMAATREGELEN EN INFORMATIE
Wanneer men de herstelling, de demontage en hermontage van het voertuig uitvoert, moet men zich nauwgezet aan het
volgende advies houden.
VÓÓR DE DEMONTAGE VAN DE ONDERDELEN
•
Verwijder vuil, modder, stof en
vreemde voorwerpen van het
voertuig, voordat men de demontage van de onderdelen uitvoert. Gebruik, waar voorzien,
de speciale gereedschappen
die voor dit voertuig ontworpen
werden.
DEMONTAGE VAN DE ONDERDELEN
•
Los en/of sluit de bouten en de
moeren niet met tangen of an-
Page 17

1 General rules / 1 Algemene normen
separating them, and identify
them with distinctive symbols.
•
Each component needs to be
clearly marked in order to be
identified during reassembly.
•
Clean and wash the dismantled
components carefully using a
low-flammability detergent.
•
Keep coupled parts together
since they have "adjusted" to
each other due to normal wear
and tear.
•
Some components must be
used together or replaced altogether.
•
Keep away from heat sources.
dere gereedschappen, maar gebruik steeds de speciale sleutel.
•
Merk de posities op alle verbindingskoppelingen (buizen, kabels, enz.) vooraleer men ze
scheidt, en identificeer ze met
verschillende onderscheidende
tekens.
•
Elk stuk moet duidelijk gemerkt
worden, zodat het tijdens de fase van de installatie geïdentificeerd kan worden.
•
Reinig en was de gedemonteerde onderdelen zorgvuldig met
een reinigingsmiddel met lage
ontvlambaarheidsgraad.
•
Houd de onderling gekoppelde
delen bij elkaar, omdat het ene
bij het andere "past" als gevolg
van de normale slijtage.
•
Sommige onderdelen moeten
samen gebruikt worden of volledig vervangen worden.
•
Houd ze ver van warmtebronnen.
REASSEMBLY OF COMPONENTS
CAUTION
BEARINGS MUST BE ABLE TO RO-
TATE FREELY, WITHOUT JAMMING
AND/OR NOISE: OTHERWISE, THEY
NEED TO BE REPLACED.
17
HERMONTAGE VAN DE ONDERDELEN
LET OP
DE KUSSENTJES MOETEN VRIJ
DRAAIEN, ZONDER WRIJVINGEN EN/
OF LAWAAI, ANDERS MOETEN ZE
VERVANGEN WORDEN.
Page 18

•
Only use ORIGINAL APRILIA
SPARE PARTS.
•
Comply with lubricant and consumables use guidelines.
•
Lubricate parts (whenever possible) before reassembling
them.
•
When tightening nuts and
screws, start from the ones with
the largest section or from the
internal ones, moving diagonally. Tighten nuts and screws in
successive steps before applying the tightening torque.
•
Always replace self-locking
nuts, washers, sealing rings, circlips, O-rings (OR), split pins
and screws with new ones if
their tread is damaged.
•
When assembling the bearings,
make sure to lubricate them
well.
•
Check that each component is
assembled correctly.
•
After a repair or routine maintenance procedure, carry out preride checks and test the vehicle
on private grounds or in an area
with low traffic density.
•
Clean all coupling surfaces, oil
guard rims and gaskets before
refitting them. Smear a light layer of lithium-based grease on
the oil guard rims. Reassemble
oil guards and bearings with the
brand or lot number facing outward (visible side).
•
Gebruik enkel ORIGINELE RESERVEONDERDELEN van
aprilia.
•
Gebruik de aanbevolen smeermiddelen en verbruiksmaterialen.
•
Smeer de delen (wanneer mogelijk) vooraleer men ze monteert.
•
Bij het sluiten van de bouten en
de moeren, begint men met diegene met de grootste diameter
of met de interne, en men werkt
diagonaal. Voer het sluiten uit
met opeenvolgende passages,
vooraleer men het sluitingskoppel toepast.
•
Vervang steeds de zelfborgende moeren, de pakkingen, de
dichtingsringen, de elastische
ringen, de O-ringen (OR), de
splitpennen en de bouten door
nieuwe, wanneer ze schade aan
de schroefdraad vertonen.
•
Wanneer men de kussentjes
monteert, smeert men ze overvloedig.
•
Controleer of elk onderdeel correct gemonteerd is.
•
Na een herstellingshandeling of
periodiek onderhoud, voert men
de voorafgaande controles uit
en test men het voertuig in een
privé-zone of in een zone met
weinig verkeer.
•
Reinig alle koppelingsvlakken,
de randen van de oliekeerringen
en de pakkingen vóór de her-
18
Page 19

1 General rules / 1 Algemene normen
montage. Breng een laagje vet
op basis van lithium aan op de
randen van de oliekeerringen.
Hermonteer de oliekeerringen
en de kussentjes met het merk
of het fabricatienummer naar de
buitenkant gericht (zichtbare
kant).
ELECTRIC CONNECTORS
Electric connectors must be disconnected as described below; failure to comply
with this procedure causes irreparable
damage to both the connector and the
cable harness:
Press the relevant safety hooks, if any.
•
Grip the two connectors and disconnect them by pulling them in
opposite directions.
•
If there are signs of dirt, rust, humidity, etc., clean the connector
internal parts carefully using a
pressurised air jet.
•
Make sure that the cables are
correctly cramped to the connector internal terminal ends.
•
Then insert the two connectors
making sure that they couple
correctly (if the relevant hooks
are provided, you will hear them
"click" into place).
19
ELEKTRISCHE CONNECTORS
De elektrische connectors moeten als
volgt worden losgemaakt, het niet respecteren van deze procedure leidt tot onherstelbare schade aan de connector en
aan de bekabeling:
Indien aanwezig, drukt men op de speciale veiligheidskoppelingen.
•
Grijp de twee connectors vast
en verwijder ze, door ze in de
tegenovergestelde richting uit
elkaar te trekken.
•
In aanwezigheid van vuil, roest,
vochtigheid, enz., reinigt men
zorgvuldig de binnenkant van de
connector met gebruik van een
persluchtstraal.
•
Controleer of de kabels correct
vastgeklemd zijn aan de interne
terminals van de connectors.
•
Plaats vervolgens de twee connectors, en controleer de correcte koppeling (wanneer tegenovergestelde koppelingen
aanwezig zijn, hoort men een typische "klik").
Page 20

CAUTION
TO DISCONNECT THE TWO CONNEC-
TORS, DO NOT PULL THE CABLES.
NOTE
THE TWO CONNECTORS CONNECT
ONLY FROM ONE SIDE: CONNECT
THEM THE RIGHT WAY ROUND.
LET OP
TREK NIET AAN DE KABELS OM DE
TWEE CONNECTORS LOS TE MAKEN.
N.B.
DE TWEE CONNECTORS KUNNEN
MAAR OP EEN WIJZE INGEBRACHT
WORDEN, PLAATS ZE IN DE JUISTE
RICHTING OP DE KOPPELING.
TIGHTENING TORQUE
CAUTION
DO NOT FORGET THAT THE TIGHT-
ENING TORQUE OF ALL FASTENING
ELEMENTS ON WHEELS, BRAKES,
WHEEL SPINDLES AND OTHER SUSPENSION COMPONENTS PLAY A KEY
ROLE IN ENSURING THE VEHICLE'S
SAFETY AND MUST COMPLY WITH
SPECIFIED VALUES. CHECK THE
TIGHTENING TORQUE OF FASTENING PARTS ON A REGULAR BASIS
AND ALWAYS USE A TORQUE
WRENCH TO REASSEMBLE THESE
COMPONENTS. FAILURE TO COMPLY WITH THESE RECOMMENDATIONS MAY CAUSE ONE OF THESE
COMPONENTS TO GET LOOSE AND
EVEN DETACHED, THUS BLOCKING
A WHEEL, OR OTHERWISE COMPROMISE VEHICLE HANDLING. THIS CAN
LEAD TO FALLS, WITH THE RISK OF
SERIOUS INJURY OR DEATH.
20
SLUITINGSKOPPELS
LET OP
VERGEET NIET DAT DE SLUITINGS-
KOPPELS VAN ALLE BEVESTIGINGSELEMENTEN OP WIELEN, REMMEN,
WIELPINNEN EN ANDERE ONDERDELEN VAN DE OPHANGINGEN EEN
FUNDAMENTELE ROL SPELEN VOOR
HET GARANDEREN VAN DE VEILIGHEID VAN HET VOERTUIG, EN DAT ZE
AAN DE VOORGESCHREVEN WAARDEN MOETEN GEHOUDEN WORDEN.
CONTROLEER REGELMATIG DE
SLUITINGSKOPPELS VAN DE BEVESTIGINGSELEMENTEN, EN GEBRUIK
STEEDS EEN DYNAMOMETRISCHE
SLEUTEL WANNEER MEN ZE HERMONTEERT. WANNEER MEN DEZE
WAARSCHUWINGEN NIET RESPECTEERT, ZOU ÉÉN VAN DEZE ELEMENTEN KUNNEN LOSSEN EN LOSKOMEN EN EEN WIEL BLOKKEREN OF
ANDERE PROBLEMEN VEROORZAKEN DIE DE MANOEUVREERBAAR-
Page 21

1 General rules / 1 Algemene normen
HEID NEGATIEF KUNNEN BEÏNVLOEDEN ZODAT MEN KAN VALLEN MET
HET RISICO OP ERNSTIGE LETSELS
OF DE DOOD.
21
Page 22

22
Page 23

RXV 450-550
Chap. 02
Vehicle
Hst. 02
Voertuing
23
Page 24
24
02_01
Page 25

2 Vehicle / 2 Voertuing
02_02
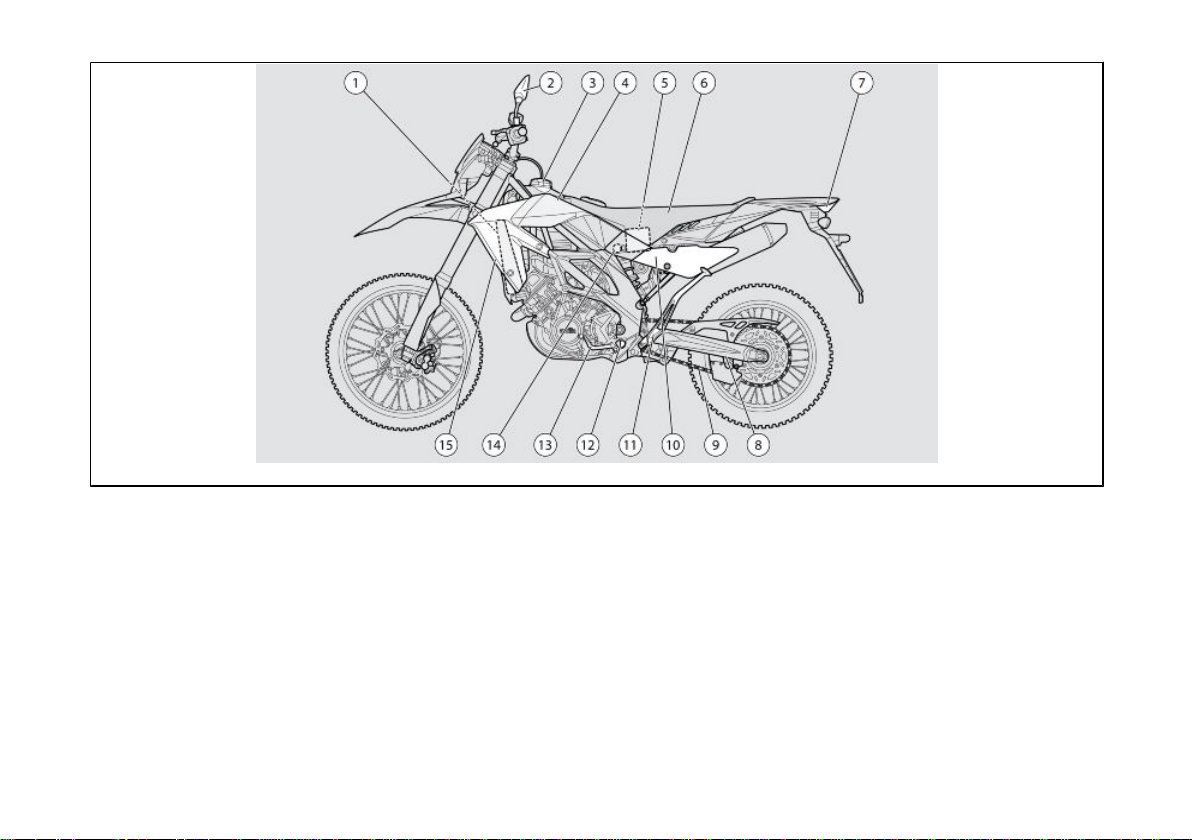
Arrangement of the main
components (02_02)
KEY
1. Coolant left side radiator
2. Left rear-view mirror
3. Fuel tank cap
4. Fuel tank
5. Battery
6. Saddle
7. Rear light
8. Rear fork
9. Drive chain
10. Rear left side fairing
25
Plaats van de
hoofdcomponenten (02_02)
Legende
1. Linker radiator koelvloeistof
2. Linker achteruitkijkspiegeltje
3. Dop van de brandstoftank
4. Brandstoftank
5. Accu
6. Zadel
7. Achterlicht
8. Achtervork
9. Transmissieketting
10. Linker zijplaatje achteraan
Page 26

11. Side stand
12. Left rider footrest
13. Gear shift lever
14. Main fuse box
15. Front left side fairing
16. Front right side fairing
17. Coolant right side radiator
18. Coolant expansion tank cap
19. Right rear-view mirror
20. Air filter housing
21. Auxiliary fuses housing
22. Rear right side fairing
23. Pump with rear brake fluid reservoir
24. Right rider footrest
25. Rear brake control lever
11. Laterale standaard
12. Linker voetensteun van de bestuurder
13. Commandohendel voor het
schakelen
14. Hoofdzekeringenhouder
15. Linker zijplaatje vooraan
16. Rechter zijplaatje vooraan
17. Rechter radiator koelvloeistof
18. Dop van het expansievat van de
koelvloeistof
19. Rechter achteruitkijkspiegel
20. Doos luchtfilter
21. Doos secundaire zekeringen
22. Rechter zijplaatje achteraan
23. Pomp met vloeistoftank achterrem
24. Rechter voetensteun van de bestuurder
25. Commandohendel van de achterrem
26
Page 27
2 Vehicle / 2 Voertuing
02_03
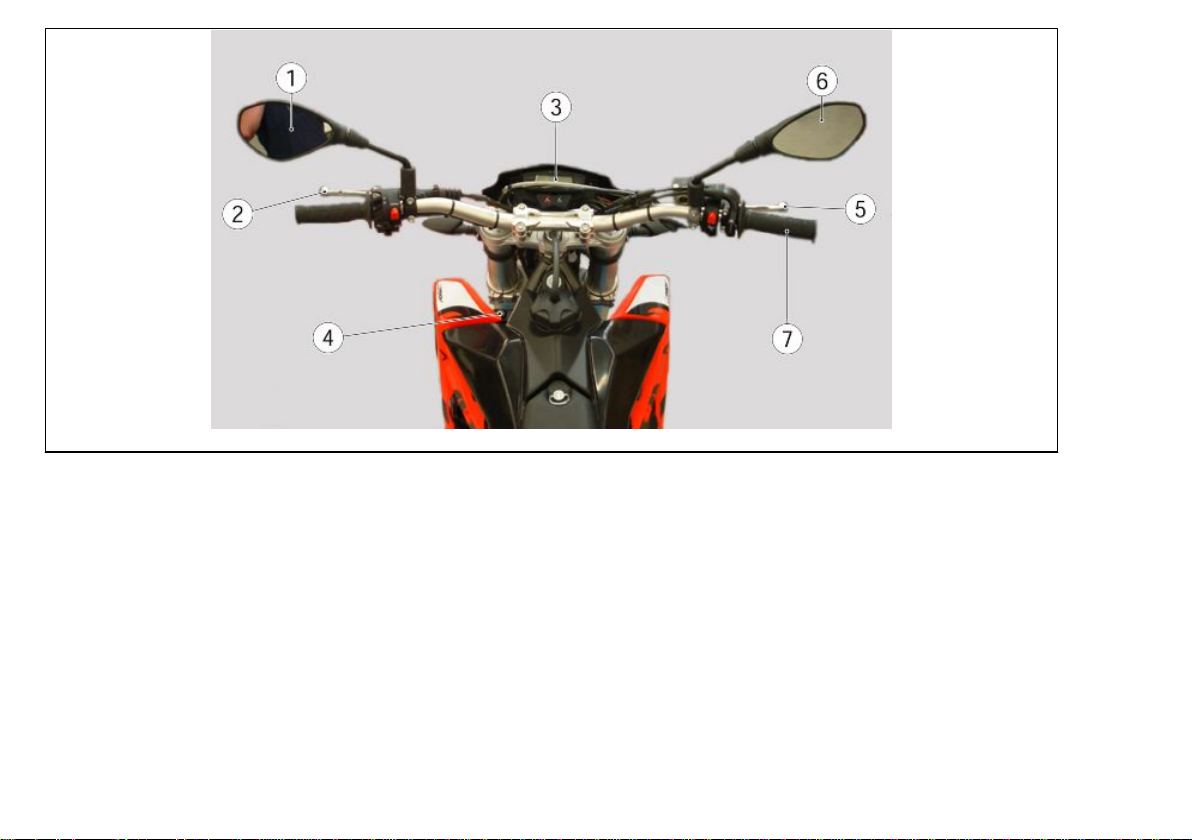
Dashboard (02_03)
KEY
1. Left rear-view mirror
2. Clutch control lever
3. Instruments and gauges
4. Ignition switch (ON-OFF)
5. Front brake lever
6. Right rear-view mirror
7. Throttle grip
27
Legenda (02_03)
Legende
1. Linker achteruitkijkspiegel
2. Commandohendel van de koppeling
3. Instrumenten en indicatoren
4. Ontstekingsschakelaar (ONOFF)
5. Hendel van de voorrem
6. Rechter achteruitkijkspiegel
7. Gashandvat
Page 28
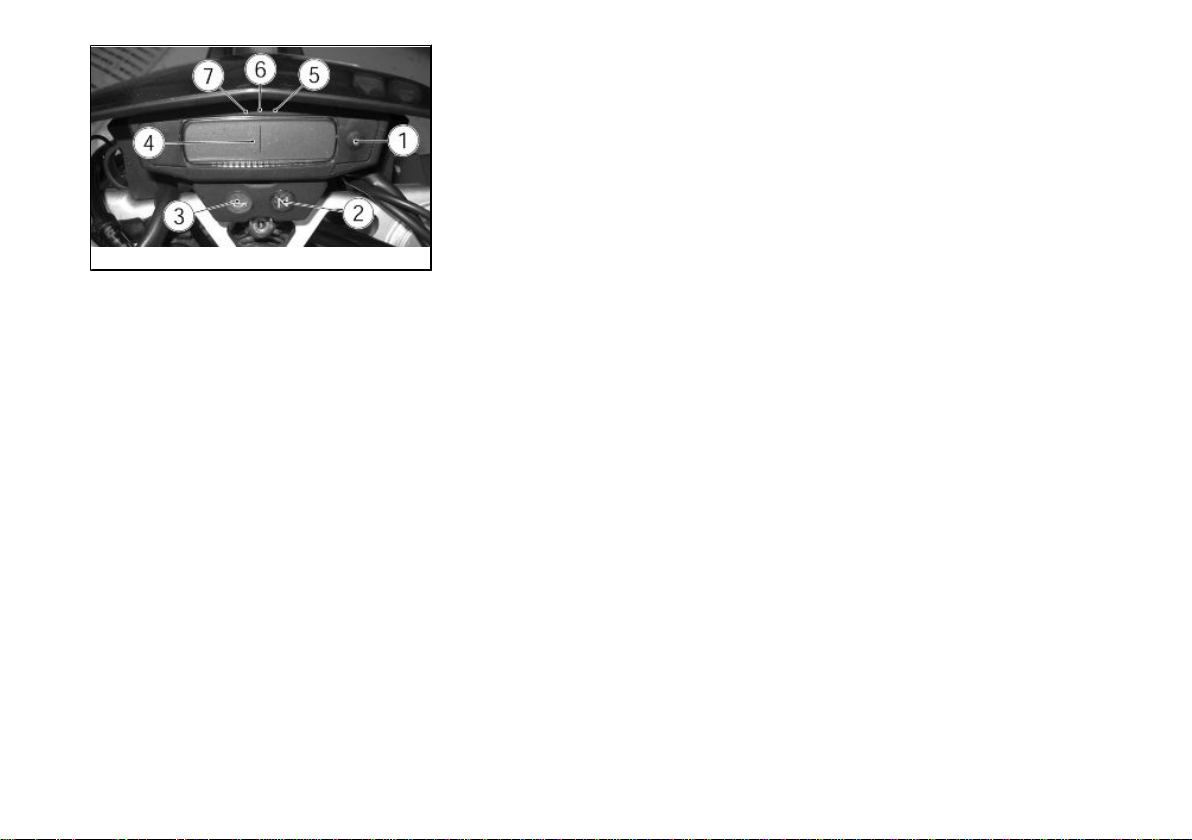
Analog instrument panel
(02_04)
Analoog instrumentenpaneel
(02_04)
02_04
KEY
1. SCROLL button
2. Neutral gear warning light
(green)
3. Engine oil pressure warning
light (red) (not active)
4. Multifunctional digital display.
5. Low fuel warning light (orange)
6. High-beam warning light (blue)
7. Turn indicator warning light
(green)
Light unit
Neutral gear indicator «2 »
It comes on when neutral is selected.
Multifunction LCD display «4»
Speedometer (km/h - MPH) Displays
driving speed in three digits and in real
time.
Odometer km/mi Displays the partial or
total number of kilometres/miles covered
Legende
1. SCROLL knop
2. Controlelamp van de versnelling
in vrij (groen)
3. Controlelamp van de druk van
de motorolie (rood) (niet actief)
4. Digitaal multifunctioneel display
5. Controlelamp van de brandstofreserve (oranje)
6. Controlelamp van het groot licht
(blauw)
7. Controlelamp van de richtingaanwijzers (groen)
Groep controlelampjes
Indicatielamp, versnellingsbak in vrij
«2 »
Deze licht op wanneer de versnellingsbak zich in de vrijpositie bevindt.
Multifunctioneel digitaal display «4 »
Snelheidsmeter (km/h - MPH) Visuali-
seert de onmiddellijke rijsnelheid op 3
cijfers.
28
Page 29

2 Vehicle / 2 Voertuing
Kilometerteller / Mijlenteller Visualiseert het partieel of totaal aantal afgelegde kilometers of mijlen
Low fuel warning light «5 »
Comes on when 2.2 ± 1 l (0.48 ± 0.22
Ukgal) of fuel are left in the fuel tank.
CAUTION
AVOID DEPLETING THE FUEL RESERVE AT ALL COSTS, OR YOU WILL
DAMAGE THE FUEL PUMP.
High-beam warning light «6 »
It comes on when the high-beam light is
activated or the high-beam light is flashed.
Turn indicator warning light «7 »
It flashes when the turning indication is
activated
Controlelamp van de brandstofreserve «5 »
Deze licht op wanneer in de brandstoftank een hoevelheid brandstof overblijft
van 2,2 ± 1 liter (0.48 ± 0.22 Uk gal).
LET OP
VERMIJDT ABSOLUUT OM ZONDER
BRANDSTOFRESERVE TE VALLEN,
OMDAT ZO DE BRANDSTOFPOMP
WORDT BESCHADIGD.
Controlelamp van het groot licht «6 »
Deze licht op wanneer de lampen van de
grote lichten geactiveerd zijn, of wanneer
men de knippering van de grote lichten
activeert.
Controlelamp van de richtingaanwijzers «7 »
Deze knippert wanneer het signaal van
verandering van richting in functie is
29
Page 30
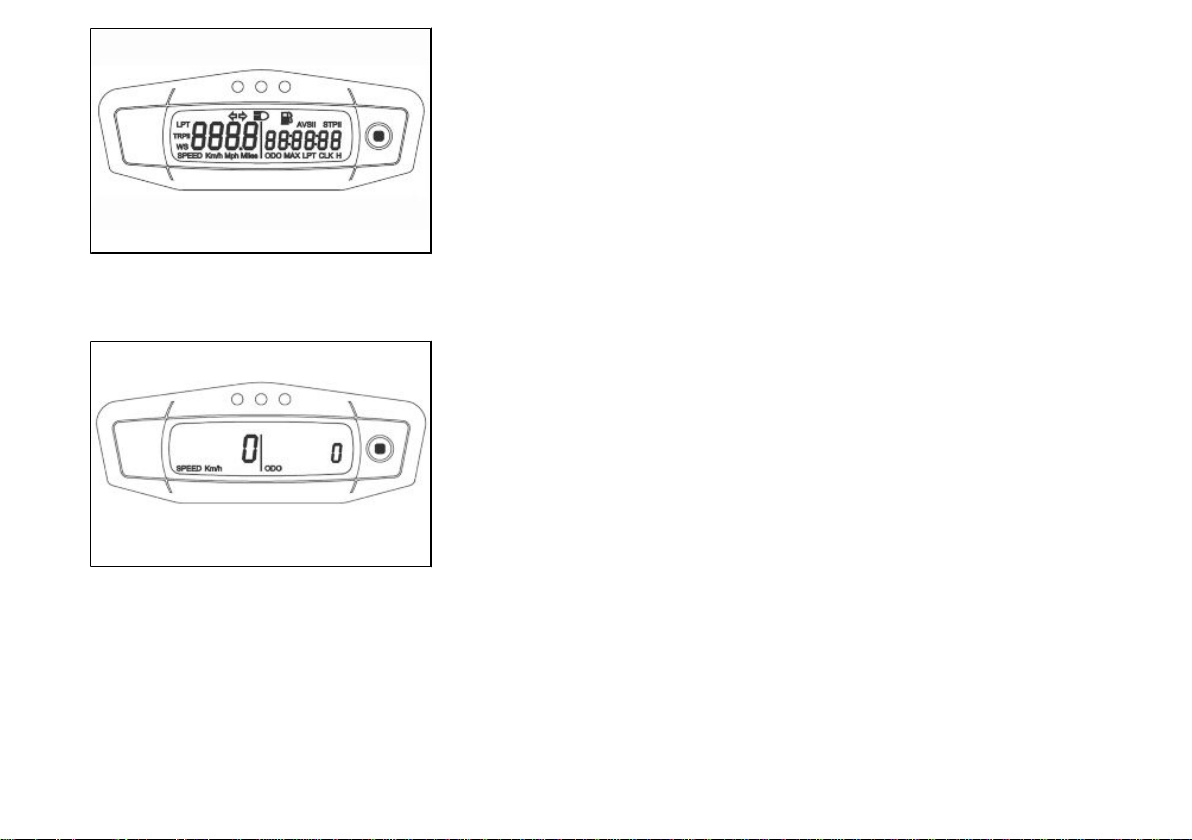
Digital lcd display (02_05,
02_06, 02_07, 02_08, 02_09,
02_10, 02_11, 02_12, 02_13,
02_14, 02_15)
Digitaal display (02_05, 02_06,
02_07, 02_08, 02_09, 02_10,
02_11, 02_12, 02_13, 02_14,
02_15)
02_05
02_06
Each time the instrument panel turns on,
there is a 2-second check for the display
and all warning lights; afterwards, the instrument panel shows the last function
set.
Each time the SCROLL button is pressed, the functions are displayed in the following sequence:
SPEED - ODO
The vehicle current speed is shown in
km/h or mph on the left side of the display.
The number of kilometres or miles cov-
ered, according to the setting, is shown
on the right side of the display.
Bij elke aanschakeling van het bedieningspaneel volgt een check van 2 seconden van het display en de controlelampen, en vervolgens geeft het
dashboard de laatst ingestelde functie
weer.
Bij elke druk op de SCROLL knop volgen
de volgende functies elkaar op:
SPEED - ODO
Links op het display wordt de onmiddelij-
ke snelheid van het voertuig weergegeven in km/h of mph.
Rechts op het display wordt de afgelegde
afstand weergegeven in km of miles, afhankelijk van de instelling.
30
Page 31

2 Vehicle / 2 Voertuing
02_07
SPEED - H
The vehicle current speed is shown in
km/h or mph on the left side of the display.
The hours of engine operation are shown
on the right side of the display.
SPEED - H
Links op het display wordt de onmiddelij-
ke snelheid van het voertuig weergegeven in km/h of mph.
Rechts op het display worden de werkingsuren van de motor weergegeven.
02_08
SPEED - CLK
The vehicle current speed is shown in
km/h or mph on the left side of the display.
The time is shown on the right side of the
display.
CLOCK SETTING
The hours increase if you hold down the
SCROLL button for at least 3 seconds.
The minutes increase once the button is
released after 3 seconds.
31
SPEED - CLK
Links op het display wordt de onmiddelij-
ke snelheid van het voertuig weergegeven in km/h of mph.
Rechts op het display wordt het uur weergegeven.
INSTELLING VAN DE KLOK
Wanneer de SCROLL knop voor min-
stens 3 seconden wordt ingedrukt, zal de
waarde van de uren vergroten. Wanneer
de knop na 3 seconden wordt losgelaten,
zal de waarde van de minuten vergroten.
Page 32

02_09
SPEED - TRIP 1
The vehicle current speed is shown in
km/h or mph on the left side of the display.
The number of kilometres or miles parti-
ally covered, according to the setting, is
shown on the right side of the display.
SPEED - TRIP 1
Links op het display wordt de onmiddelij-
ke snelheid van het voertuig weergegeven in km/h of mph.
Rechts op het display wordt de partieel
afgelegde afstand weergegeven in km of
miles, afhankelijk van de instelling.
02_10
SPEED - STP 1
The vehicle current speed is shown in
km/h or mph on the left side of the display.
A chronometer is shown on the right side
of the display.
Hold down the SCROLL button for at
least 3 seconds to activate this function
1st activation - start
2nd activation - stop
3rd activation - reset
32
SPEED - STP 1
Links op het display wordt de onmiddelij-
ke snelheid van het voertuig weergegeven in km/h of mph.
Rechts op het display wordt een chronometer weergegeven.
Om deze functie te activeren, moet de
SCROLL knop voor minstens 3 seconden ingedrukt worden
1° activering - start
2° activering - stop
3° activering - nulstelling
Page 33

2 Vehicle / 2 Voertuing
02_11
SPEED - AVS 1
The vehicle current speed is shown in
km/h or mph on the left side of the display.
The average speed is shown on the right
side of the display. This information is
generated when TRIP 1 is activated.
SPEED - AVS 1
Links op het display wordt de onmiddelij-
ke snelheid van het voertuig weergegeven in km/h of mph.
Rechts op het display wordt de gemiddelde snelheid weergegeven. Dit gegeven wordt gegenereerd door de activering van TRIP 1.
02_12
02_13
SPEED - Max speed
The vehicle current speed is shown in
km/h or mph on the left side of the display.
The maximum speed in the current unit
of measurement is shown on the right
side of the display.
Hold down the SCROLL button for at
least 3 seconds to reset this function.
SPEED - TRIP 2
The vehicle current speed is shown in
km/h or mph on the left side of the display.
The number of kilometres or miles parti-
ally covered, according to the setting, is
shown on the right side of the display.
Hold down the SCROLL button for at
least 3 seconds to reset this function.
33
SPEED - V max
Links op het display wordt de onmiddelij-
ke snelheid van het voertuig weergegeven in km/h of mph.
Rechts op het display wordt de maximum
snelheid weergegeven in de huidige
meeteenheid.
Om deze functie op nul te stellen, moet
voor minstens 3 seconden op de
SCROLL knop gedrukt worden.
SPEED - TRIP 2
Links op het display wordt de onmiddelij-
ke snelheid van het voertuig weergegeven in km/h of mph.
Rechts op het display wordt de partieel
afgelegde afstand weergegeven in km of
miles, afhankelijk van de instelling.
Page 34

Om deze functie op nul te stellen, moet
voor minstens 3 seconden op de
SCROLL knop gedrukt worden.
02_14
02_15
SPEED - RPM
The vehicle current speed is shown in
km/h or mph on the left side of the display.
The numbers for engine revolutions per
minute are shown on the right side of the
display.
UNIT OF MEASUREMENT CONVERSION
Start the vehicle while holding down the
SCROLL button until the "km/h" symbol
is displayed.
The "Km/h" and "Mph Miles" symbols will
be shown alternately.
Push the SCROLL button again when the
desired unit of measurement is shown.
SPEED - RPM
Links op het display wordt de onmiddelij-
ke snelheid van het voertuig weergegeven in km/h of mph.
Rechts op het display wordt het toerental
per minuut van de motor weergegeven.
OMZETTING VAN DE MEETEENHEID
Schakel het voertuig aan en hou de
SCROLL knop ingedrukt tot het symbool
"km/h" verschijnt.
De symbolen "Km/h" en "Mph Miles" zullen afwisselend weergegeven worden.
Druk nogmaals op de SCROLL knop
wanneer de gewenste meeteenheid
weergegeven wordt.
34
Page 35

Ignition switch (02_16)
2 Vehicle / 2 Voertuing
Startschakelaar (02_16)
02_16
02_17
The ignition switch is in front of the left
radiator.
The vehicle is supplied with two keys
(one is the spare key).
The lights go off when the ignition switch
is set to «OFF».
NOTE
THE LIGHTS TURN ON AUTOMATI-
CALLY UPON THE ENGINE STARTUP.
Locking the steering wheel
(02_17)
To lock the steering:
• Turn the handlebar completely to the
left.
• Push in the key and turn it anticlockwise
(to the left), move the handlebar slowly to
the right until the key is turned to the right
while still pressed.
• Remove the key.
De ontstekingsschakelaar bevindt zich
vóór de linker radiator.
Bij het voertuig worden twee sleutels bijgeleverd (één reservesleutel).
Het uitgaan van de lichten gebeurt wanneer de ontstekingsschakelaar op
«OFF» wordt geplaatst.
N.B.
DE LICHTEN LICHTEN AUTOMA-
TISCH OP NA DE START VAN DE MOTOR.
Stuurslot vergrendelen
(02_17)
Om het stuur te blokkeren:
• Draai het stuur volledig naar links.
• Druk op de sleutel en draai hem in tegenwijzerszin (naar links), stuur traag
naar rechts terwijl de sleutel ingedrukt
blijft en naar rechts wordt gedraaid.
• Verwijder de sleutel.
35
Page 36

Horn button (02_18)
Drukknop claxon (02_18)
02_18
02_19
To action the horn, press button «3».
Switch direction indicators
(02_19)
To indicate left turn, turn the switch «4»
to the left; to indicate right turn, turn the
switch «4» to the right. To deactivate the
turn indicator, press the «4» switch.
NOTE
ELECTRICAL COMPONENTS FUNC-
TION ONLY WHEN THE IGNITION KEY
IS SET TO "ON"
Door op drukknop «3» te drukken, activeert men de akoestische melder.
Schakelaar richtingaanwijzers
(02_19)
Verplaats schakelaar «4» naar links, om
aan te duiden dat men naar links draait;
Verplaats schakelaar «4» naar rechts,
om aan te duiden dat men naar rechts
draait; Druk op schakelaar «4» om de
richtingaanwijzer te desactiveren.
N.B.
DE ELEKTRISCHE ONDERDELEN
WERKEN ENKEL WANNEER DE ONTSTEKINGSSCHAKELAAR ZICH IN POSITIE «ON» BEVINDT
36
Page 37

2 Vehicle / 2 Voertuing
02_20
High/low beam selector
(02_20)
If the light switch «2» is set to the upper
position, this activates the high-beam
light; if it is set to the lower position, the
low-beam light is switched on. In case of
danger and/or emergency it is possible to
activate high-beam flashing using the
«1» button.
Lichtschakelaar (02_20)
Wanneer de omleider van de lichten «2»
zich in de bovenste positie bevindt, wordt
het groot licht geactiveerd; wanneer hij
zich in de onderste positie bevindt, wordt
het dimlicht geactiveerd. Met drukknop
«1» is het mogelijk om het knipperen van
het groot licht te activeren in geval van
gevaar of nood.
02_21
Start-up button (02_21)
By pressing the starter button «2», the
starter motor makes the engine rotate.
37
Startknop (02_21)
Door op drukknop «2» te drukken, doet
het startmotortje de motor draaien.
Page 38

Engine stop switch (02_22)
Stopschakelaar motor (02_22)
02_22
It acts as an engine cut-off or emergency
stop switch. With switch «1» set to «ON»
is possible to start the engine; by pressing it into the «OFF» position, the engine
stops.
CAUTION
DO NOT ACTIVATE THE ENGINE
STOP SWITCH WHILE RIDING THE
VEHICLE.
CAUTION
WITH ENGINE OFF AND THE IGNITION
SWITCH SET TO «ON» THE BATTERY
MAY GET DISCHARGED.
CAUTION
WHEN THE VEHICLE IS NOT MOVING,
AFTER THE ENGINE HAS BEEN
STOPPED, SET THE IGNITION
SWITCH TO «OFF»
Dit is een veiligheidsschakelaar of een
noodstopschakelaar. Met schakelaar
«1» in positie «ON», is het mogelijk om
de motor te starten; door er op te drukken
in positie «OFF» wordt de motor stilgelegd.
LET OP
RAAK DE STOPSCHAKELAAR VAN
DE MOTOR NIET AAN TIJDENS HET
RIJDEN.
LET OP
MET DE MOTOR UIT EN DE ONTSTEKINGSSCHAKELAAR IN POSITIE
«ON», KAN DE ACCU ONTLADEN.
LET OP
WANNEER HET VOERTUIG STILSTAAT NADAT MEN DE MOTOR
HEEFT STILGELEGD, DRAAIT MEN
DE ONTSTEKINGSSCHAKELAAR IN
POSITIE «OFF».
38
Page 39

2 Vehicle / 2 Voertuing
02_23
Opening the saddle (02_23,
02_24)
•
Turn the fastening clip.
•
Push the saddle forwards.
Zadel openen (02_23, 02_24)
•
Draai aan de bevestigingsclip.
•
Duw het zadel naar voor.
02_24
•
Remove the saddle.
Identification (02_25, 02_26)
Write down the chassis and engine number in the specific space of this booklet.
The chassis number can be used to order
spare parts.
39
•
Verwijder het zadel.
Identificatie (02_25, 02_26)
Het is goed om het framenummer en het
motornummer op de speciale plaats in dit
boekje te schrijven. Het framenummer
kan gebruikt worden voor de aankoop
van reserveonderdelen.
Page 40

CAUTION
LET OP
02_25
ALTERING IDENTIFICATION NUMBERS IS AN OFFENCE WHICH MAY
RESULT IN SEVERE CRIMINAL
CHARGES AND FINES. PARTICULARLY MODIFYING THE CHASSIS NUMBER WILL IMMEDIATELY INVALIDATE THE WARRANTY
ENGINE NUMBER
The engine number is stamped on the
base of the left side engine crankcase.
Engine No ....................
CHASSIS NUMBER
The chassis number is stamped on the
right side of the headstock.
Chassis No....................
HET WIJZIGEN VAN DE IDENTIFICATIENUMMERS KAN LEIDEN TOT ZWARE STRAFRECHTELIJKE EN ADMINISTRATIEVE SANCTIES; VOORAL DE
WIJZIGING VAN HET FRAMENUMMER VEROORZAAKT HET ONMIDDELLIJKE VERVAL VAN DE GARANTIE
MOTORNUMMER
Het motornummer is gedrukt op het onderstel van de motorcarter, op de linker
kant.
Motor nr....................
FRAMENUMMER
Het framenummer is gedrukt op de kop
van het stuur, rechter kant.
Frame nr....................
02_26
40
Page 41

2 Vehicle / 2 Voertuing
41
Page 42

42
Page 43

RXV 450-550
Chap. 03
Use
Hst. 03
Gebruik
43
Page 44

Checks
Controles
CAUTION
BEFORE SETTING-OFF, ALWAYS
CARRY OUT A PRELIMINARY CHECK
OF THE VEHICLE, FOR CORRECT
AND SAFE OPERATION. FAILURE TO
DO SO MAY LEAD TO SEVERE PERSONAL INJURY OR VEHICLE DAMAGE. DO NOT HESITATE TO CONTACT AN OFFICIAL aprilia DEALER IF
YOU DO NOT UNDERSTAND HOW
SOME CONTROLS WORK OR IF A
MALFUNCTION IS DETECTED OR
SUSPECTED. CHECKS DO NOT TAKE
LONG AND RESULT IN SIGNIFICANTLY ENHANCED SAFETY.
PRE-RIDE CHECKS
Front and rear disc brake Check operation. Check brake
lever travel when stationary and
brake fluid level. Check for leaks.
Check brake pads for wear. If
necessary top-up with brake fluid.
LET OP
VOER VOOR HET WEGRIJDEN ALTIJD EEN CONTROLE VAN HET
VOERTUIG UIT OM EEN CORRECTE
EN VEILIGE WERKZAAMHEID TE GARANDEREN. HET NIET UITVOEREN
VAN DEZE HANDELINGEN KAN ERNSTIGE LETSELS AAN UZELF OF
SCHADE AAN HET VOERTUIG VEROORZAKEN. AARZEL NIET OM ZICH
TE WENDEN TOT EEN Officiële aprilia
Dealer, WANNEER MEN DE WERKING
VAN BEPAALDE COMMANDO'S NIET
BEGRIJPT OF WANNEER MEN ONREGELMATIGHEDEN IN DE WERKING
MERKT OF VERMOEDT. DE NODIGE
TIJD VOOR EEN CONTROLE IS UITERST BEPERKT, EN DE VEILIGHEID
KOMT OP DE EERSTE PLAATS.
VOORAFGAANDE CONTROLES
Voorste en achterste schijfrem Controleer de werking, de loze slag
van de commandohendels, het peil
van de vloeistof en eventuele
lekken. Controleer de slijtage van
de pastilles. Indien nodig vult men
remvloeistof bij.
44
Page 45

Throttle grip Check that the throttle functions
3 Use / 3 Gebruik
smoothly and can be fully opened
and closed in all steering positions.
Adjust and/or lubricate if
necessary.
Gashendel Controleer of hij zacht werkt en of
men hem volledig kan openen en
sluiten, in alle posities van het
stuur. Registreer en/of smeer
indien nodig.
Engine/gearbox oil Check and/or top-up as required.
Wheels/ tyres Check that tyres are in good
condition. Check inflation pressure
and check for tyre wear and
damage.
Remove any foreign objects stuck
in the tread.
Brake levers Check they function smoothly.
Lubricate joints and adjust travel if
necessary.
Clutch Check for proper operation. Check
control lever empty travel. The
clutch must work without gripping
and/or slipping.
Steering Check that the rotation is uniform,
smooth and there are no signs of
clearance or slackness.
Side stand Check its operation. Check that
there is no friction when the side
stand is pulled up and down and
that the springs' tension makes it
snap back to its rest position.
Lubricate joints and couplings as
required.
Olie motor/versnellingsbak Controleer en/of vul bij indien
nodig.
Wielen/banden Controleer de conditie van de
rijvlakken van de banden, de
spanning, de slijtage en eventuele
schade.
Verwijder eventueel aanwezige
vreemde voorwerpen uit het profiel
van het rijvlak.
Remhendels Controleer of ze zacht werken.
Smeer de bewegingsplaatsen en
regel de slag indien nodig.
Koppeling Controleer de werking en de lege
loop van de commandohendel. De
koppeling moet zonder rukken en/
of slippen werken.
Stuur Controleer of het draaien
homogeen en vloeiend, en zonder
speling of het lossen ervan
gebeurt.
Laterale standaard Controleer of ze werkt. Controleer
of er tijdens het in- en uitklappen
van de standaard geen wrijvingen
zijn, en of de spanning van de
45
Page 46

Fastener elements Check that the fastener elements
are not loose.
Adjust or tighten if necessary.
veren hem weer in de normale
positie brengt. Smeer indien nodig
de koppelingen en de
bewegingsplaatsen.
Drive chain Check it for backlash.
Fuel tank Check the level and refill if
Coolant The coolant level in the radiator
Engine stop switch (RUN - OFF) Check function.
Lights, warning lights, horn, rear
stop light switch and electrical
devices
necessary.
Check the circuit for leaks or
obstructions.
Check that the tank cover closes
correctly.
must be such as to cover the grids.
Check function of horn and lights.
Replace bulbs or repair any faults
noted.
Bevestigingselementen Controleer of de
Transmissieketting Controleer de speling.
Brandstoftank Controleer het peil, en tank indien
Koelvloeistof Het peil in de radiator moet zodanig
Schakelaar voor het stilleggen van
de motor (RUN - OFF)
Lichten, controlelampen,
akoestische melder, schakelaars
van het achterste stoplicht en
elektrische mechanismen
bevestigingselementen niet gelost
zijn.
Stel ze af of sluit ze eventueel.
nodig.
Controleer eventuele lekken of
afsluitingen van het circuit.
Controleer de correcte sluiting van
de brandstofdop.
zijn dat de platen van de radiator
bedekt zijn.
Controleer de correcte werking.
Controleer de correcte werking van
de akoestische en visuele
mechanismen. Vervang de
lampjes of grijp in bij defecten.
46
Page 47

3 Use / 3 Gebruik
03_01
Refuelling (03_01)
Use premium unleaded petrol as per DIN
51 607, minimum octane rating of 95
(NORM) and 85 (NOMM).
To refuel:
•
Unscrew and remove the fuel
tank cap (1).
•
Refuel.
CAUTION
FUEL USED TO POWER INTERNAL
COMBUSTION ENGINES IS HIGHLY
FLAMMABLE AND CAN BECOME EXPLOSIVE UNDER SPECIFIC CONDITIONS. IT IS THEREFORE RECOMMENDED TO CARRY OUT REFUELLING AND MAINTENANCE PROCEDURES IN A VENTILATED AREA WITH
THE ENGINE OFF. DO NOT SMOKE
DURING REFUELLING AND NEAR
FUEL VAPOURS, AVOID ANY CONTACT WITH NAKED FLAMES,
SPARKS OR OTHER SOURCES
WHICH MAY CAUSE THEM TO IGNITE
OR EXPLODE.
DO NOT DISPOSE OF FUEL IN THE
ENVIRONMENT.
KEEP OUT OF THE REACH OF CHILDREN
Tanken (03_01)
Gebruik loodvrije superbenzine volgens
DIN 51 607, met een minimum octaangehalte van 95 (N.O.R.M.) en 85
(N.O.M.M.).
Voor het tanken, handelt men als
volgt:
•
Draai de dop van de brandstoftank (1) los, en verwijder hem.
•
Voer het tanken van brandstof
uit.
LET OP
DE BRANDSTOF DIE WORDT GEBRUIKT VOOR DE AANDRIJVING VAN
DE ONTPLOFFINGSMOTOR IS UITERST BRANDBAAR EN KAN EXPLOSIEF WORDEN IN BEPAALDE OMSTANDIGHEDEN. VOER HET TANKEN
EN DE ONDERHOUDSHANDELINGEN
UIT IN EEN GEVENTILEERDE ZONE
EN MET DE MOTOR UIT. ROOK NIET
TIJDENS HET TANKEN EN IN DE NABIJHEID VAN BRANDSTOFDAMPEN,
EN VERMIJD ABSOLUUT CONTACT
MET VRIJE VLAMMEN, VONKEN EN
ELKE ANDERE BRON DIE HET VLAM
VATTEN OF EXPLODEREN ERVAN
KAN VEROORZAKEN.
LOOS DE BRANDSTOF NIET IN HET
MILIEU.
BUITEN BEREIK VAN KINDEREN
HOUDEN
47
Page 48

CAUTION
LET OP
AVOID SPILLING FUEL FROM THE
FILLER OR IT MAY IGNITE IF IT
COMES INTO CONTACT WITH HOT
ENGINE PARTS. IN THE EVENT OF
ACCIDENTAL FUEL SPILLAGE, MAKE
SURE THAT THE AFFECTED AREA IS
FULLY DRY BEFORE STARTING THE
ENGINE. FUEL EXPANDS WITH HEAT
AND DIRECT SUNLIGHT. THEREFORE, NEVER FILL THE FUEL TANK
UP TO THE RIM. CLOSE THE CAP ADEQUATELY AFTER REFUELLING. BE
CAREFUL FUEL DOES NOT GET INTO
CONTACT WITH THE SKIN, DO NOT
INHALE VAPOURS OR SWALLOW
FUEL. DO NOT TRANSFER FUEL
FROM ONE CONTAINER TO ANOTHER USING A HOSE.
Characteristic
FUEL TANK CAPACITY (including reserve):
7.5 l (1.65 Ukgal)
Reservoir reserve:
2.2 l (0.48 Ukgal)
VERMIJDT HET UITSTROMEN VAN
BRANDSTOF UIT DE KLEP, OMDAT
HIJ KAN VLAM VATTEN IN CONTACT
MET DE GLOEIEND HETE OPPERVLAKKEN VAN DE MOTOR. WANNEER ER ONVRIJWILLIG BRANDSTOF WORDT GEMORST, CONTROLEERT MEN OF DE ZONE COMPLEET
DROOG IS, VOORDAT MEN HET
VOERTUIG START. BRANDSTOF ZET
UIT DOOR DE WARMTE EN ONDER
ACTIE VAN ZONNESTRALEN. VUL DE
TANK DUS NOOIT TOT AAN DE RAND.
SLUIT ZORGVULDIG DE DOP NA HET
TANKEN. VERMIJDT DAT DE BRANDSTOF IN CONTACT KOMT MET DE
HUID, VERMIJDT HET INADEMEN
VAN DE DAMPEN, HET INSLIKKEN,
EN HET OVERGIETEN VAN EEN TANK
NAAR EEN ANDERE MET BEHULP
VAN EEN BUIS.
Technische kenmerken
CAPACITEIT VAN DE TANK (inclusief
de reserve):
7,5 l (1.65 Uk gal)
Reserve van de tank
2,2 l (0.48 Uk gal)
48
Page 49

3 Use / 3 Gebruik
03_02
Rear shock absorbers
adjustment (03_02, 03_03,
03_04, 03_05)
The rear suspension consists of a springshock absorber unit linked to the frame
via silent-block and to the rear fork via a
linkage system. To adjust the setting, the
shock absorber is fitted with a set screw
that adjusts hydraulic rebound damping
(1), with a set screw (2) that adjusts hydraulic compression damping (low
speed), with a knob (6) that adjusts hydraulic compression damping (high
speed) and a ring nut that adjusts spring
preloading (3) and a locking ring nut (4).
Regulering achterdempers
(03_02, 03_03, 03_04, 03_05)
De achterste ophanging bestaat uit een
groep veerschokdemper, die verbonden
is door middel van een silentblock aan
het frame en door middel van hefsystemen aan de achtervork. Om de instelling
te regelen, is de schokdemper voorzien
van een regelaar met bout voor de regeling van de hydraulische remming in extensie (1), van een regelaar met bout (2)
voor de regeling van de hydraulische
remming in compressie (lage snelheid),
van een draaiknop (6) voor de regeling
van de hydraulische remming in compressie (hoge snelheid), van een moer
voor de regeling van de voorbelasting
van de veer (3) en van een blokkeermoer
(4).
03_03
REAR SHOCK ABSORBER ADJUSTMENT
The standard setting of the rear shock
absorber is adjusted so as to satisfy all
main high and low speed riding conditions, both with reduced and full vehicle
load. It is at any rate possible to insert
personal settings, depending on vehicle
utilisation.
49
REGELING VAN DE ACHTERSTE
SCHOKDEMPER
De standaardinstelling van de achterste
schokdemper is zodanig geregeld om te
voldoen aan de meeste rijcondities aan
lage en hoge snelheid, en met weinig en
volle lading van het voertuig. Het is alleszins mogelijk om een aangepaste regeling uit te voeren volgens het gebruik van
het voertuig.
Page 50

CAUTION
LET OP
03_04
03_05
TO COUNT THE NUMBER OF RELEASES AND/OR REVOLUTIONS OF ADJUSTMENT SETTINGS (1 - 2) ALWAYS
START FROM THE MOST RIGID SETTING (WHOLE CLOCKWISE ROTATION OF THE SETTING). DO NOT
FORCE THE SET SCREWS (1 - 2) TO
TURN BEYOND THE END OF THE
STROKE ON BOTH SIDES SO AS NOT
DAMAGE THEM.
•
Using the specific spanner,
slightly loosen the locking ring
nut (4).
•
Operate on the adjusting ring
nut (3) to adjust the spring preloading (B).
•
When the optimal adjustment
level has been obtained, screw
the locking nut ring (4) completely.
•
Operate on screw (2) to adjust
hydraulic compression damping
at low speeds (see chart).
•
Operate on knob (6) to adjust
hydraulic compression damping
at high speeds (see chart).
VOOR HET TELLEN VAN HET AANTAL KLIKKEN EN/OF DRAAIEN VAN
HET REGELREGISTER (1 - 2), VERTREKT MEN STEEDS VAN DE HARDSTE INSTELLING (VOLLEDIGE ROTATIE VAN HET REGISTER IN WIJZERZIN). FORCEER DE ROTATIE VAN HET
REGELREGISTER NIET (1 - 2), NAAST
DE EINDELOOP IN TWEE RICHTINGEN, VOOR HET VERMIJDEN VAN
MOGELIJKE BESCHADIGINGEN.
•
Gebruik de speciale sleutel, en
draai gematigd de blokkeermoer (4) los.
•
Handel op de regelmoer (3) om
de voorbelasting van de veer (B)
te regelen.
•
Wanneer men de optimale inrichtingscondities heeft bereikt,
sluit men de blokkeermoer (4)
volledig.
•
Handel op de bout (2) voor de
regeling van de hydraulische
remming in compressie aan lage snelheden (raadpleeg de tabel).
•
Handel op de draaiknop (6) voor
de regeling van de hydraulische
remming in compressie aan hoge snelheden (raadpleeg de tabel).
50
Page 51

3 Use / 3 Gebruik
CAUTION
SET SPRING PRELOAD AND REBOUND DAMPING BASED ON THE
VEHICLE'S USAGE CONDITIONS. IF
YOU INCREASE THE SPRING PRELOAD, YOU ALSO NEED TO INCREASE REBOUND DAMPING, IN ORDER TO AVOID SUDDEN JERKS
WHEN RIDING. SHOULD YOU NEED
ANY ASSISTANCE, CONTACT AN Official aprilia Dealer.
TO AVOID COMPROMISING THE
SHOCK ABSORBER'S OPERATION,
DO NOT LOOSEN SCREW «5» AND
DO NOT TAMPER WITH THE SEAL
UNDERNEATH IT, AS NITROGEN MAY
COME OUT, WITH RESULTING RISK
OF AN ACCIDENT.
CAUTION
SPORT SETTINGS MAY BE USED ONLY FOR OFFICIAL COMPETITIONS TO
BE CARRIED OUT ON TRACKS,
AWAY FROM NORMAL ROAD TRAFFIC AND WITH THE AUTHORISATION
OF THE RELEVANT AUTHORITIES.
USING SPORT SETTINGS AND RID-
LET OP
REGISTREER DE VOORBELASTING
VAN DE VEER EN DE HYDRAULISCHE
REMMING IN extensie VAN DE
SCHOKDEMPER, OP BASIS VAN DE
GEBRUIKSCONDITIES VAN HET
VOERTUIG. WANNEER MEN DE
VOORBELASTING VAN DE VEER
VERHOOGT, MOET MEN OOK DE HYDRAULISCHE REMMING IN extensie
VAN DE SCHOKDEMPER VERHOGEN, VOOR HET VERMIJDEN VAN
PLOTSELINGE STUITERINGEN TIJDENS HET RIJDEN. INDIEN NODIG
WENDT MEN ZICH TOT EEN Officiële
aprilia Dealer.
OM DE WERKING VAN DE SCHOKDEMPER NIET TE SCHADEN, MAG DE
BOUT «5» NIET GELOST WORDEN EN
MAG MEN NIET HANDELEN OP HET
ONDERSTAANDE MEMBRAAN, ANDERS ZAL ER STIKSTOF UITSTROMEN, EN IS ER GEVAAR OP ONGEVALLEN.
51
Page 52

ING THE VEHICLE ON ROADS AND
MOTORWAYS WITH THESE SETTINGS IS STRICTLY FORBIDDEN.
LET OP
DE REGELINGEN VOOR SPORTIEF
GEBRUIK MOGEN UITSLUITEND UITGEVOERD WORDEN VOOR GEORGANISEERDE WEDSTRIJDEN OF SPORTIEVE EVENEMENTEN, DIE ALLESZINS IN EEN GESLOTEN CIRCUIT
MOETEN GEREDEN WORDEN, NIET
IN HET VERKEER, EN MET TOESTEMMING VAN DE RECHTSBEVOEGDE
AUTORITEITEN. HET IS TEN STRENGSTE VERBODEN OM REGELINGEN
VOOR SPORTIEF GEBRUIK UIT TE
VOEREN, EN OM MET HET VOERTUIG
VOORZIEN VAN DEZE INRICHTING TE
RIJDEN OP WEGEN EN AUTOSTRADES.
REAR SUSPENSION STANDARD ADJUSTMENT
Shock absorber axial distance (A) 473 ± 1.5 mm (18.6 ± 0.06 in)
(preloaded) Spring (B) length 241 ± 1 mm (9.48 in)
Rebound adjustment, screw (1) 16 clicks from fully closed
Compression damping
adjustment, (low speeds), screw
(2)
13 clicks from fully closed
STANDAARD REGELING VAN DE ACHTERSTE
OPHANGING
Asafstand van de schokdemper
(A)
Lengte van de veer (voorbelast)
(B)
Regeling in extensie, bout (1) 16 klikken vanaf helemaal gesloten
Regeling in compressie (lage
snelheid), bout (2)
52
473 ± 1,5 mm (18.6 ± 0.06 in)
241 ± 1 mm (9.48 in)
13 klikken vanaf helemaal gesloten
Page 53

Compression damping
3 Use / 3 Gebruik
adjustment, (high speeds), knob
(6)
14 clicks from fully closed Regeling in compressie (hoge
snelheid), knop (6)
14 klikken vanaf helemaal gesloten
03_06
Front fork adjustment (03_06,
03_07)
FRONT SUSPENSION
The front suspension consists of a hydraulic fork connected to the headstock
by means of two plates. To adjust the vehicle setting, each fork stem is equipped
with an upper screw «1» to adjust rebound damping and with a lower screw
«2» to adjust compression damping.
FRONT FORK ADJUSTMENT
CAUTION
TO PREVENT DAMAGE, DO NOT
FORCE THE ADJUSTER (1-2) BEYOND THE RESPECTIVE END OF
TRAVEL IN EITHER DIRECTION. SET
BOTH STEMS WITH THE SAME
SPRING PRELOAD AND DAMPING
TOLERANCES: RIDING THE VEHICLE
WITH A DIFFERENT ADJUSTMENT
FOR THE TWO STEMS REDUCES ITS
STABILITY. IF YOU INCREASE
SPRING PRELOAD, YOU ALSO NEED
TO INCREASE REBOUND DAMPING
TO PREVENT SUDDEN JERKS WHILE
RIDING.
Regulering voorvorken
(03_06, 03_07)
VOORSTE OPHANGING
De voorste ophanging bestaat uit een hydraulische vork, verbonden door middel
van twee platen aan de stuurinrichtingskop Voor de instelling van de inrichting
van het voertuig, is elke stang van de vork
voorzien van een bovenste bout «1» voor
de regeling van de hydraulische regeling
in extensie, en een onderste bout «2»
voor de regeling van de hydraulische
remming in compressie.
REGELING VAN DE VOORVORK
LET OP
FORCEER DE ROTATIE VAN HET RE-
GELREGISTER (1-2) NIET VERDER
DAN DE EINDSLAG IN DE TWEE RICHTINGEN, OM MOGELIJKE BESCHADIGINGEN TE VERMIJDEN. STEL BEIDE
STANGEN IN MET DEZELFDE IJKING
VAN DE VOORBELASTING VAN DE
VEER EN DE HYDRAULISCHE REMMING: WANNEER MEN MET HET
VOERTUIG RIJDT MET EEN VERSCHILLENDE INSTELLING VAN DE
STANGEN, VERMINDERT DIT DE STABILITEIT VAN HET VOERTUIG. WAN-
53
Page 54

NEER MEN DE VOORBELASTING
VAN DE VEER VERHOOGT, MOET
MEN OOK DE HYDRAULISCHE REMMING IN EXTENSIE VERHOGEN, OM
PLOTSELINGE STUITERINGEN TIJDENS HET RIJDEN TE VERMIJDEN.
03_07
The standard setting of the front fork is
adjusted so as to satisfy all main high and
low speed riding conditions, both with reduced and full vehicle load. It is at any
rate possible to insert personal settings,
depending on vehicle usage.
Front suspension standard adjustment:
•
Rebound damping adjustment,
screw (1): open (**) 12 clicks
from fully closed (*);
•
Compression damping adjustment, screw (2): open (**) 12
clicks from fully closed (*) (H);
•
Stems (A) (***) protrusion from
top plate (excluding cover): 1
notch.
(*)= Clockwise
(**)= Anticlockwise
(***)= Only use an Official aprilia Dealer
for this type of adjustment
CAUTION
TO COUNT THE NUMBER OF RELEA-
SES AND/OR REVOLUTIONS OF ADJUSTMENT SETTINGS (1 - -2) ALWAYS START FROM THE MOST RIGID
De standaardinstelling van de voorste
schokdemper is zodanig geregeld om te
voldoen aan de meeste rijcondities aan
lage snelheid, en met weinig en met volle
lading van het voertuig. Het is alleszins
mogelijk om een aangepaste regeling uit
te voeren, volgens het gebruik van het
voertuig.
Standaard regeling van de voorste ophanging:
•
Hydraulische regeling in extensie, bout (1) vanaf alles gesloten
(*), openen (**) voor 12 klikken;
•
Hydraulische regeling in compressie, bout (2) vanaf alles gesloten (*) (H), openen (**) voor
12 klikken;
•
Uitsteking van de stangen (A)
(***) vanaf de bovenste plaat
(exclusief de dop): 1 streep.
(*)= Wijzerszin
(**)= Tegenwijzerszin
(***)= Voor dit type van regeling wendt
men zich uitsluitend tot een Officiële aprilia Dealer
54
Page 55

3 Use / 3 Gebruik
SETTING (WHOLE CLOCKWISE ROTATION OF THE SETTING).
CAUTION
SPORT SETTINGS MAY BE USED ONLY FOR OFFICIAL COMPETITIONS TO
BE CARRIED OUT ON TRACKS,
AWAY FROM NORMAL ROAD TRAFFIC AND WITH THE AUTHORISATION
OF THE RELEVANT AUTHORITIES.
USING SPORT SETTINGS AND RIDING THE VEHICLE ON ROADS AND
MOTORWAYS WITH THESE SETTINGS IS STRICTLY FORBIDDEN.
LET OP
VOOR HET TELLEN VAN HET AAN-
TAL KLIKKEN EN/OF DRAAIEN VAN
HET REGELREGISTER (1-2), VERTREKT MEN STEEDS VAN DE HARDSTE INSTELLING (VOLLEDIGE ROTATIE VAN HET REGISTER IN WIJZERSZIN).
LET OP
DE REGELINGEN VOOR SPORTIEF
GEBRUIK MOGEN UITSLUITEND UITGEVOERD WORDEN VOOR GEORGANISEERDE WEDSTRIJDEN OF SPORTIEVE EVENEMENTEN, DIE ALLESZINS IN EEN GESLOTEN CIRCUIT
MOETEN GEREDEN WORDEN, NIET
IN HET VERKEER, EN MET TOESTEMMING VAN DE RECHTSBEVOEGDE
AUTORITEITEN. HET IS TEN STRENGSTE VERBODEN OM REGELINGEN
VOOR SPORTIEF GEBRUIK UIT TE
VOEREN, EN OM MET HET VOERTUIG
VOORZIEN VAN DEZE INRICHTING TE
RIJDEN OP WEGEN EN AUTOSTRADES.
Running in
Engine run-in is essential to ensure engine long life and correct operation.
Twisty roads and gradients are ideal to
55
Inrijden
De proefperiode van de motor is fundamenteel voor het garanderen van de duur
en de correcte werking. Rij indien moge-
Page 56

run in engine, brakes and suspensions
effectively. Vary your riding speed during
the run-in. In this way, you allow for the
work of components to be "loaded" and
then "unloaded", thus cooling the engine
parts. Even if it is important to "strain" engine components during run-in, make
sure not to overdo this.
Follow the guidelines detailed below:
•
Do not twist the throttle grip
abruptly and completely when
the engine is working at a low
revs, either during or after runin.
•
for the first 3 operating hours, do
not exceed 50% of the throttle
grip travel and never go over
8000 rpm,
•
for the next 12 hours, do not exceed 75% of the throttle grip
travel.
NOTE
EVEN AFTER THE RUNNING-IN PERI-
OD, AVOID RUNNING THE ENGINE TO
TOP SPEED, WHEN THE LIMITER
CUTS IN:
•
RXV 450 11500 rpm
•
RXV 550 11000 rpm
lijk op wegen met veel bochten en/of hellingen, waar de motor, de ophangingen
en de remmen worden onderworpen aan
een meer efficiëntere proefperiode. Wijzig de rijsnelheid tijdens de proefperiode.
Op deze manier kan men het werk van de
onderdelen "belasten" en vervolgens
"ontlasten", door de delen van de motor
af te koelen. Ook al is het belangrijk om
de onderdelen van de motor tijdens de
proefperiode te belasten, moet men opletten om niet te overdrijven.
Men moet zich houden aan de volgende indicaties:
•
Versnel niet bruusk en volledig
wanneer de motor aan een laag
regime werkt, tijdens en na de
proefperiode.
•
voor de eerste 3 werkingsuren
mag de gashendel voor maxi-
mum 50% gedraaid worden, en
mogen de 8000 toeren/min
(rpm) niet overschreden wor-
den,
•
voor de volgende 12 uren mag
de gashendel voor maximum
75% gedraaid worden.
N.B.
OOK NA DE PROEFPERIODE MOET
MEN VERMIJDEN OM DE MOTOR TE
LATEN DRAAIEN AAN HET TOERENAANTAL VAN DE INGREEP VAN DE
BEGRENZER:
•
RXV 450 11500 rpm (toeren/
min)
56
Page 57

3 Use / 3 Gebruik
•
RXV 550 11000 rpm (toeren/
min)
03_08
Starting up the engine (03_08,
03_09, 03_10, 03_11, 03_12)
CAUTION
DO NOT CARRY OBJECTS IN THE
WINDSHIELD (BETWEEN HANDLEBAR AND INSTRUMENT PANEL) SO
THAT THE HANDLEBAR CAN TURN
FREELY AND THE INSTRUMENT PANEL IS VISIBLE AT ALL TIMES.
CAUTION
BEFORE STARTING THE ENGINE,
READ THE ''SAFE RIDING'' SECTION
CAREFULLY.
•
Get onto the bike in riding position.
•
Make sure that the stand has
been fully retracted.
•
Make sure the light switch (1) is
set to "low-beam".
•
Set the engine stop switch (2) to
RUN.
Starten des motors (03_08,
03_09, 03_10, 03_11, 03_12)
LET OP
PLAATS GEEN VOORWERPEN IN HET
KAPJE (TUSSEN HET STUUR EN HET
DASHBOARD), ZODAT DE ROTATIE
VAN HET STUUR EN HET ZICHT OP
HET DASHBOARD NIET WORDEN GEHINDERD.
LET OP
VOORALEER MEN DE MOTOR
START, LEEST MEN AANDACHTIG DE
PARAGRAAF "HET VEILIG RIJDEN''.
•
Ga op het voertuig zitten in de
rijpositie.
•
Controleer of de standaard volledig ingeklapt is.
•
Controleer of de omleider van
de lichten (1) zich in de positie
van de dimlichten bevindt.
•
Plaats de schakelaar voor het
stilleggen van de motor (2) op
RUN.
57
Page 58

03_09
•
Push the ignition switch (4) (a
red LED lights up in the switch).
•
Druk op de ontstekingsschake-
laar (4) (er zal een rode led op-
lichten op de schakelaar).
At this stage:
•
The ignition screen is shown on
the displayed for two seconds.
•
All warning lights in the instrument panel turn on for two seconds.
•
Block at least one wheel by operating one brake lever.
•
Operate the clutch lever completely and set the gearshift lever to neutral [green warning light
(N) on].
•
Press the starter button «3»
without opening the throttle and
release it as soon as the engine
starts.
58
Op dit moment gebeurt het volgende:
•
Op het dashboard verschijnt het
beeldscherm van de start voor
twee seconden.
•
Op het dashboard lichten alle
controlelampen op voor twee
seconden.
•
Blokkeer minstens een wiel,
door een remhendel te active-
ren.
•
Activeer de koppelingshendel
volledig, en plaats de comman-
dohendel van de versnellings-
bak in vrij [groene controlelamp
(N) aan].
•
Druk op de startknop «3» zon-
der gas te geven, en laat hem
los zodra de motor start.
Page 59

3 Use / 3 Gebruik
03_10
03_11
03_12
CAUTION
DO NOT START THE ENGINE WHEN A
GEAR AND THE CLUTCH ARE ENGAGED.
CAUTION
IN ORDER TO AVOID EXCESSIVE
BATTERY CONSUMPTION, DO NOT
KEEP THE START-UP BUTTON ON
«3» FOR MORE THAN THREE SECONDS AT A TIME FOR FIVE SUCCESSIVE ATTEMPTS. IF THE ENGINE
DOES NOT START, WAIT FOR SOME
TIME TO ALLOW THE STARTER MOTOR TO COOL.
CAUTION
TO AVOID OVERLOADING THE
START-UP COMPONENTS, THE VEHICLE ELECTRONIC CONTROL UNIT INTERVENES IN CASE OF DIFFICULT
START-UP: THE STARTER MOTOR
CAN BE ACTIVATED FOR A MAXIMUM
OF 6 SECONDS, TIME AFTER WHICH
THE CONTROL UNIT DISABLES
START-UP FOR 10 SECONDS. ONLY
AFTER THIS TIME HAS ELAPSED,
YOU CAN ATTEMPT A NEW STARTUP. IN CASE OF EMERGENCY, THE
TIMER CAN BE RESET WITH A "KEY
OFF/KEY ON", AND THEN THE VEHICLE CAN BE STARTED.
LET OP
START DE MOTOR NIET WANNEER
ER GESCHAKELD IS EN WANNEER
DE KOPPELING GEACTIVEERD IS
LET OP
OM EEN EXCESSIEF VERBRUIK VAN
BRANDSTOF TE VERMIJDEN, DRUKT
MEN NIET LANGER OP DE STARTKNOP «3» VOOR LANGER DAN DRIE
SECONDEN, VOOR VIJF OPEENVOLGENDE POGINGEN. WANNEER IN DIT
TIJDSINTERVAL DE MOTOR NIET
START, WACHT MEN ENKELE MINUTEN ZODAT DE STARTMOTOR KAN
AFKOELEN.
LET OP
OM DE STARTMECHANIEK NIET TE
OVERBELASTEN, GRIJPT DE ELEKTRONISCHE CENTRALE VAN HET
VOERTUIG IN IN GEVAL VAN EEN
MOEILIJKE START: DE STARTMOTOR KAN VOOR MAXIMUM 6 SECONDEN CONTINU GEACTIVEERD WORDEN, WAARNA DE CENTRALE DE
START VOOR 10 SECONDEN ZAL
DESACTIVEREN; NA DEZE 10 SECONDEN KAN EEN NIEUWE POGING
ONDERNOMEN WORDEN. IN NOODGEVALLEN KAN DE TIMER OP NUL
GESTELD WORDEN, DOOR EEN KEY
OFF/KEY ON UIT TE VOEREN, EN KAN
DE START ONMIDDELLIJK UITGEVOERD WORDEN.
59
Page 60

CAUTION
AVOID PRESSING THE «ON» START-
ER BUTTON WHEN THE ENGINE HAS
ALREADY STARTED, AS THIS COULD
DAMAGE THE STARTER MOTOR.
CAUTION
DUE TO THE ENGINE'S TIGHT MANU-
FACTURING TOLERANCES AND THE
FACT THAT OIL DUCTS ARE SIZED
FOR SPORTS APPLICATIONS, THE
ENGINE MAY NOT START AT TEMPERATURES LOWER THAN 0 °C (32 °
F). DO NOT ATTEMPT TO START THE
ENGINE TIME AND TIME AGAIN TO
AVOID DAMAGING THE STARTER
MOTOR. IT IS THEREFORE ADVISABLE TO PARK THE VEHICLE INDOORS, PARTICULARLY DURING
THE WINTER.
CAUTION
DO NOT SET OFF SUDDENLY WHEN
THE ENGINE IS COLD. RIDE AT LOW
SPEED FOR SEVERAL KILOMETRES.
THIS WILL ALLOW THE ENGINE TO
WARM UP AND REDUCE POLLUTING
EMISSIONS AND FUEL CONSUMPTION.
LET OP
VERMIJDT OM OP DE STARTKNOP
«ON» TE DRUKKEN WANNEER DE
MOTOR GESTART IS, WANT DE
STARTMOTOR ZOU BESCHADIGD
KUNNEN WORDEN.
LET OP
ALS GEVOLG VAN DE BEPERKTE
BOUWTOLERANTIES VAN DE MOTOR EN DE DIMENSIONERING VOOR
SPORTIEF GEBRUIK VAN DE SLIPKANALEN VAN DE OLIE, ZOU HET KUNNEN DAT DE MOTOR NIET START BIJ
TEMPERATUREN DIE LAGER ZIJN
DAN 0 °C (32 °F). VERMIJDT OM DOOR
TE GAAN MET POGINGEN OM TE
STARTEN, OM DE STARTMOTOR
NIET TE BESCHADIGEN. ER WORDT
AANGERADEN OM HET VOERTUIG
TE STALLEN IN GESLOTEN RUIMTES,
VOORAL TIJDENS DE WINTER.
LET OP
VERTREK NIET BRUUSK WANNEER
DE MOTOR KOUD STAAT. OM DE
EMISSIE VAN VERVUILENDE STOFFEN IN DE LUCHT EN HET BRANDSTOFVERBRUIK TE BEPERKEN,
RAADT MEN AAN OM DE MOTOR OP
TE WARMEN, DOOR DE EERSTE KILOMETERS AF TE LEGGEN AAN EEN
BEPERKTE SNELHEID.
60
Page 61

Stopping the engine (03_13)
3 Use / 3 Gebruik
Stoppen van de motor (03_13)
It is very important to select an adequate
parking spot, in compliance with road signals and the guidelines described below.
CAUTION
PARK ON SAFE AND LEVEL GROUND
TO PREVENT THE VEHICLE FROM
FALLING.
DO NOT LEAN THE vehicle ON A
WALL OR LAY IT ON THE GROUND.
MAKE SURE THE VEHICLE AND SPECIALLY ITS HOT PARTS DO NOT
POSE ANY RISK TO PEOPLE OR
CHILDREN. DO NOT LEAVE YOUR VEHICLE UNATTENDED WITH THE ENGINE ON OR THE KEY IN THE IGNITION SWITCH.
DO NOT SEAT ON THE VEHICLE
WHEN THE STAND IS LOWERED.
To park the vehicle:
•
Select an appropriate parking
spot.
•
Stop the vehicle.
•
Set the engine stop switch «1»
to «OFF».
De keuze van de parkeerzone is zeer belangrijk en moet de verkeerstekens en de
volgende aanduidingen respecteren.
LET OP
PARKEER HET VOERTUIG OP EEN
VASTE EN VLAKKE ONDERGROND,
ZODAT HET NIET VALT.
LAAT HET VOERTUIG NIET STEUNEN
TEGEN MUREN, EN LEG HET NIET OP
DE GROND.
CONTROLEER OF HET VOERTUIG,
EN VOORAL DE GLOEIEND HETE DELEN ERVAN, NIET GEVAARLIJK KUNNEN ZIJN VOOR PERSONEN EN KINDEREN. LAAT HET VOERTUIG NIET
ONBEWAAKT ACHTER MET DE MOTOR AAN, OF MET DE SLEUTEL IN DE
ONTSTEKINGSSCHAKELAAR.
GA NIET OP HET VOERTUIG ZITTEN
WANNEER DE STANDAARD UITGEKLAPT IS.
Voor het parkeren van het voertuig:
•
De parkeerzone kiezen.
•
Het voertuig stilleggen.
•
Plaats de schakelaar voor het
stilleggen van de motor «1» op
«OFF».
61
Page 62

•
Set the ignition switch «2» to
«OFF» .
The red LED next to the switch
should turn off.
•
Plaats de ontstekingsschake-
laar «2» op «OFF».
De rode led naast de schakelaar
moet uitgaan.
03_13
03_14
•
Get off the vehicle.
•
Rest the vehicle on its stand.
Anti-theft device (03_14)
Six Days Version:
The Six Days version is supplied with an
antitheft device (1) to be applied to the
rear brake disc (2) (padlock with key
lock).
NOTE
REMOVE THE ANTITHEFT DEVICE
FROM THE REAR BRAKE DISC EACH
TIME YOU USE THE VEHICLE OR
WHEN CARRYING OUT ANY PROCEDURE WITH ENGINE OFF. FAILURE
•
Stap van het voertuig af.
•
Plaats het voertuig op de stan-
daard.
Antidiefstalsysteem (03_14)
Versie Six Days:
De versie Six Days is uitgerust met een
antidiefstalsysteem (1) dat moet aangebracht worden op de schijf van de achterrem (2) (hangslot met sleutel).
N.B.
VERWIJDER HET ANTIDIEFSTALSYSTEEM VAN DE SCHIJF VAN DE ACHTERREM ELKE KEER HET VOERTUIG
WORDT GEBRUIKT OF EEN MANOEUVRE UITGEVOERD WORDT
62
Page 63

3 Use / 3 Gebruik
TO OBSERVE THIS WARNING MAY
SERIOUSLY DAMAGE THE VEHICLE
AND INJURE PEOPLE.
WANNEER HET VOERTUIG NIET GESTART IS. HET NIET RESPECTEREN
VAN DEZE WAARSCHUWING KAN
ERNSTIGE SCHADE AAN HET VOERTUIG EN LETSELS AAN PERSONEN
VEROORZAKEN.
03_15
Stand (03_15)
To place the vehicle on the stand:
•
Grasp the left grip «1» and put
the right hand on the upper rear
part of the vehicle «2».
•
Push the side stand «3» with
your right foot, and extend it
completely.
•
With the stand fully extended,
lean the vehicle to the side until
the stand rests on the ground.
•
Turn the handlebar fully leftwards.
CAUTION
MAKE SURE THE GROUND WHERE
YOU HAVE PARKED IS UNOCCUPIED,
FIRM AND LEVEL.
63
Standaard (03_15)
Voor het plaatsen van het voertuig op de
standaard:
•
Grijp het linker handvat «1» vast
en steun de rechter hand op het
achterste bovenste deel van het
voertuig «2».
•
Duw op de laterale standaard
«3» met de rechter voet, en klap
hem volledig uit.
•
Hou de standaard volledig uitgeklapt, en hel het voertuig tot
de standaard de grond raakt.
•
Draai het stuur volledig naar
links.
LET OP
CONTROLEER OF HET TERREIN VAN
DE PARKEERZONE VRIJ, VAST EN
VLAK IS.
Page 64

Safe driving (03_16, 03_17,
03_18, 03_19, 03_20, 03_21,
03_22, 03_23, 03_24, 03_25,
03_26, 03_27)
Veilig rijden (03_16, 03_17,
03_18, 03_19, 03_20, 03_21,
03_22, 03_23, 03_24, 03_25,
03_26, 03_27)
03_16
03_17
03_18
MAIN SAFETY RULES
To ride the vehicle it is necessary to comply with all legal requirements (driving
license, minimum driving age, psychophysical performance, insurance, taxes
and fees, registration, license plate, etc.).
You should practise using the vehicle in
traffic-free areas and/or private property
until you have become thoroughly acquainted with the vehicle.
Driving under the influence of medication, alcohol and narcotic drugs or psychotropic substances dramatically increases the risk of accidents.
Do not ride your vehicle if you feel tired or
drowsy and always keep safe psychophysical riding conditions.
The main cause of motorcycle accidents
is users' inexperience.
NEVER lend the vehicle to beginners and
always make sure that the rider complies
with all necessary requirements for a safe
riding.
Strictly obey all national and local traffic
signs and rules.
Avoid any abrupt and dangerous
swerves for your own as well as others'
safety (for example: rearing up on the
FUNDAMENTELE VEILIGHEIDSREGELS
Om met het voertuig te rijden moet men
beschikken over alle door de wet voorziene vereisten (rijbewijs, minimum leeftijd, psychofysische geschiktheid, verzekering, overheidsbelasting, registratie,
nummerplaat, enz.).
Men raadt aan om het voertuig gewoon
te raken in zones met weinig verkeer en/
of in private eigendommen.
Rijden onder invloed van medicijnen, alcohol, verdovende of psychotrope middelen verhoogt aanzienlijk het risico op
ongevallen.
Men moet er zeker van zijn dat de psychofysische condities geschikt zijn voor
het rijden, met vooral aandacht voor fysische moeheid of slaperigheid.
De meeste ongevallen zijn te wijten aan
het gebrek aan ervaring van de bestuurder.
Leen het voertuig NOOIT aan beginners,
en controleer in elk geval of de bestuurder in het bezit is van alle vereisten voor
het rijden.
64
Page 65

3 Use / 3 Gebruik
back wheel, riding over the speed limit,
etc.). Besides, always assess and bear in
mind the road surface conditions, visibility, etc.
Do not knock obstacles that can damage
the vehicle or cause loss of control.
Do not ride on the course of the vehicle
in front just to improve your own speed.
CAUTION
ALWAYS RIDE WITH BOTH HANDS
ON THE HANDLEBAR AND FEET ON
THE FOOTRESTS (OR THE RIDER' S
FOOTRESTS) IN THE ADEQUATE RIDING POSITION.
Respecteer nauwkeurig de bewegwijzering en het normenstelsel in verband met
het nationale en plaatselijk verkeer.
Vermijdt bruuske en gevaarlijke manoeuvres voor zichzelf en voor anderen (voorbeeld: het steigeren, het niet naleven van
de snelheidslimieten, enz.), bovendien
moet men steeds rekening houden met
de condities van het wegdek, de zichtbaarheid, enz.
Stoot niet tegen obstakels die schade
aan het voertuig of controleverlies over
het voertuig kunnen veroorzaken.
Blijf niet achter voertuigen rijden om de
eigen snelheid te verhogen.
LET OP
RIJ STEEDS MET BEIDE HANDEN OP
HET STUUR EN DE VOETEN OP HET
VOETENVLAK (OF OP DE VOETENSTEUNEN VAN DE BESTUURDER),
EN BEHOU EEN CORRECTE RIJPOSITIE.
65
Page 66

03_19
03_20
03_21
Never stand on your feet or stretch yourself while riding.
The rider should always be attentive,
never get distracted or influenced by people, things or actions (never smoke, eat,
drink, read, etc.) while riding.
Always use fuel and lubricants specific
for the vehicle, of the type recommended
in the "LUBRICANTS TABLE". Check
fuel, oil and coolant frequently for correct
level.
In case of an accident or after the vehicle
has fallen down or suffered a sudden
bump, make sure the control levers, piping, cables, brake circuit and main parts
of the vehicle have not been damaged.
If necessary, take the vehicle to an Official aprilia Dealer to check especially the
frame, handlebar, suspensions, safety
components and any device the user
cannot assess without the aid of a specialist.
Report any malfunction to the engineers
and/or mechanics in order to facilitate
their work.
Never ride the vehicle if the damage jeopardises safety.
Do not modify the position, angle or colour of: license plate, turn indicators, lighting devices and horn.
Any changes to the vehicle will void the
warranty.
Vermijdt absoluut om recht te staan op
het voertuig en om zich uit te rekken tijdens het rijden.
De bestuurder mag niet afgeleid zijn, zich
niet laten afleiden of niet laten beïnvloeden door personen, voorwerpen, acties
(niet eten, roken, drinken, lezen, enz.)
wanneer hij met het voertuig rijdt.
Gebruik de brandstof en specifieke
smeermiddelen voor het voertuig, van
het type dat men vindt in de "TABEL VAN
DE SMEERMIDDELEN", controleer herhaaldelijk of de voorgeschreven peilen
van brandstof, olie en koelvloeistoffen
correct zijn.
Wanneer het voertuig een ongeval heeft
gehad, gevallen is of er werd tegen gestoten, controleert men of de commandohendels, de buizen, de kabels, de
reminstallatie en de fundamentele delen
niet zijn beschadigd.
Laat het voertuig eventueel controleren
bij een Officiële aprilia Dealer, door vooral aandacht te schenken voor het frame,
het stuur, de ophangingen, de veiligheidsonderdelen en mechanismen waarvoor de gebruiker niet in staat is om hun
integriteit vast te stellen.
Meldt eender welke slechte werking om
de ingreep van techniekers en/of mechaniciens te bevorderen.
Rij absoluut niet met het voertuig wanneer de aangebrachte schade de veiligheid schaadt.
66
Page 67

3 Use / 3 Gebruik
Any change introduced to the vehicle and
the removal of original parts may jeopardise the vehicle performance and
therefore reduce safety or even render
the vehicle inappropriate for legal riding.
Comply with all national and local laws
and regulations on vehicle equipment.
In particular do not introduce technical
changes leading to improve performance
and under no circumstances alter the
original specifications of the vehicle.
Never race with vehicles.
Never ride off-road.
Wijzig absoluut niet de positie, de helling
of de kleur van: de nummerplaat, de richtingaanwijzers, de verlichtingsmechanismen en de akoestische melders.
Wanneer men wijzigingen uitvoert aan
het voertuig, vervalt de garantie.
Elke eventuele aan het voertuig aangebrachte wijziging en de verwijdering van
originele stukken, kan de prestaties van
het voertuig schaden, en dus het veiligheidsniveau schaden en het voertuig
zelfs illegaal maken.
Men raadt aan om zich steeds te houden
aan alle wetsvoorschriften en nationale
en plaatselijke reglementen in verband
met de uitrusting van het voertuig.
Men moet vooral vermijden om technische wijzigingen aan te brengen voor het
verhogen van de prestaties, of die alleszins de originele kenmerken van het
voertuig wijzigen.
Vermijdt absoluut om wedstrijden te houden met de voertuigen.
Vermijdt om te crossen.
67
Page 68

03_22
03_23
CLOTHING
Before riding off, remember to put on the
helmet and fasten it correctly. Make sure
it is a homologated model, that it is undamaged, of the right size and that the
visor is clean.
Wear appropriate protective clothes,
preferably light-coloured and/or in reflective material. In this way you will be easily
visible to other drivers, thus reducing the
risk of being hit, and you will be better
protected in case of falling.
Always wear tight-fitting clothes without
open cuffs; avoid hanging strings, belts or
ties; these or any other objects should not
interfere with a safe riding when getting
entangled with the riding elements or due
to a special movement.
Never carry in your pockets objects that
can be potentially dangerous in case of
fall, like: pointed objects such as keys,
pens, glass containers, etc. (the same
rule applies to passengers).
KLEDING
Vooraleer men gaat rijden denkt men eraan om steeds en correct de helm op te
zetten en vast te maken. Controleer of hij
gehomologeerd en integer is, of de maat
juist is en of het visier rein is.
Draag beschermende kleding, indien mogelijk met een lichte en/of reflecterende
kleur. Op deze manier is men goed zichtbaar voor andere weggebruikers en vermindert men aanzienlijk het risico op
aanrijdingen, en is men beter beschermd
wanneer men valt.
De kleding moet goed aansluiten en de
uiteinden moeten gesloten zijn; koorden,
ceinturen en dassen mogen niet bengelen; vermijdt dat deze of andere voorwerpen interfereren met het rijden, doordat
ze verstrengd raken met bewegende onderdelen of ander delen.
Hou geen voorwerpen bij zich, die mogelijk gevaarlijk zijn wanneer men valt, bijvoorbeeld: puntige voorwerpen zoals
sleutels, pennen, glazen voorwerpen,
enz. (dit advies geldt eveneens voor de
eventuele passagier).
68
Page 69

3 Use / 3 Gebruik
03_24
03_25
03_26
ACCESSORIES
User is personally responsible for the installation and use of the accessories.
While assembling accessories, make
sure that they do not cover the sound or
light alarm devices or affect their correct
functioning, do not limit the suspension
travel or the steering angle, do not obstruct control actuation or reduce the
ground clearance and inclination angle at
corners.
Do not use accessories that hinder access to the controls as they may increase
the reaction time in case of an emergency.
Fairings and large windshields fitted to
the vehicle may cause aerodynamic
forces that affect the vehicle stability
while riding, mainly at high speeds.
Make sure the accessory is firm and secured to the vehicle and that it does not
pose any risks while riding the vehicle.
Do not add or modify electrical equipment
that exceed the vehicle capacity as this
may result in a sudden stop or a dangerous lack of power required to keep the
sound and light alarm devices operative.
ACCESSOIRES
De gebruiker is verantwoordelijk voor de
keuze van de installatie en het gebruik
van de accessoires.
Men raadt aan tijdens de montage, dat
het accessoire de mechanismen van het
akoestisch en visief melden niet bedekt
en dus de functionaliteit ervan schaadt,
de werking van de ophangingen en de
hoek van sturing niet beperkt, de activering van de commando´s niet hindert, en
de hoogte van de grond en de helhoek in
een bocht niet vermindert.
Vermijdt het gebruik van accessoires die
de toegang tot de commando´s hinderen,
en die dus de reactietijden bij nood kunnen verlengen.
De bekledingen en de windschermen
met grote afmetingen, die gemonteerd
zijn op het voertuig, kunnen aerodynamische krachten veroorzaken die de stabiliteit van het voertuig tijdens het rijden
schaden, vooral bij hoge snelheden.
Controleer of het accessoire goed verankerd is op het voertuig en dat het niet
gevaarlijk is tijdens het rijden.
Wijzig of voeg geen elektrische apparaten toe die het draagvermogen van het
voertuig overschrijden; op deze wijze zou
het voertuig onverwacht kunnen stilvallen
of zou er een gevaarlijke afwezigheid van
stroom kunnen zijn, die nodig is voor de
werking van de akoestische en visieve
meldingsmechanismen.
69
Page 70

03_27
aprilia advises using original accessories (aprilia genuine accessories).
aprilia raadt het gebruik aan van originele accessoires (aprilia genuine accessories).
Load
NOTE
THE VEHICLE IS NOT SUITABLE FOR
TRANSPORTING LOADS OR LUGGAGE.
70
Lading
N.B.
HET VOERTUIG IS NIET GESCHIKT
OM LASTEN OF BAGAGE TE VERVOEREN.
Page 71

RXV 450-550
Chap. 04
Maintenance
Hst. 04
Onderhoud
71
Page 72

Engine oil level (04_01, 04_02)
Peil motorolie (04_01, 04_02)
Checking and topping up engine oil
level
CAUTION
DO NOT SPILL OIL!
AVOID SPILLING OIL OVER COMPO-
NENTS, THE AREA YOUR ARE WORKING IN AND ITS SURROUNDS. REMOVE ANY TRACE OF OIL CAREFULLY.
IN THE EVENT OF LEAKS OR MALFUNCTION, CONTACT AN Official
aprilia Dealer.
To check:
CAUTION
THIS TYPE OF VEHICLE HAS SEPA-
RATE LUBRICATION CIRCUITS FOR
ENGINE AND TRANSMISSION/
CLUTCH. OIL LEVEL CHECK AND REPLACEMENT MUST BE CARRIED OUT
FOR BOTH CIRCUITS.
CAUTION
THE ENGINE MUST BE WARM TO
CHECK ENGINE OIL LEVEL. IF ENGINE OIL LEVEL IS CHECKED WHEN
Controle van het peil van de motorolie
en het bijvullen
LET OP
MORS DE OLIE NIET!
DRAAG ZORG OM GEEN ENKEL ON-
DERDEEL, OM DE ZONE WAARIN
MEN WERKT, EN OM OMLIGGENDE
ZONES NIET TE BESMEUREN. REINIG
ZORGVULDIG ELK EVENTUEEL OLIESPOOR.
BIJ OLIELEKKEN OF EEN SLECHTE
WERKING WENDT MEN ZICH TOT
EEN Officiële aprilia Dealer.
Voor de controle:
LET OP
DEZE VOERTUIGEN ZIJN UITGERUST
MET EEN GESCHEIDEN SMEERCIRCUIT VOOR VERSNELLINGSBAK/
KOPPELING EN MOTOR. DE CONTROLE VAN DE PEILEN EN DE VERVANGING VAN DE OLIE MOET UITGEVOERD WORDEN OP BEIDE CIRCUITS.
72
Page 73

4 Maintenance / 4 Onderhoud
THE ENGINE IS COLD, THE OIL MAY
GO TEMPORARILY BELOW THE MINIMUM LEVEL. THIS IS NOT A PROBLEM.
LET OP
DE CONTROLE VAN DE MOTOROLIE
MOET UITGEVOERD WORDEN BIJ
WARME MOTOR. WANNEER MEN DE
CONTROLE VAN HET PEIL VAN DE
MOTOROLIE BIJ KOUDE MOTOR UITVOERT, ZOU DE OLIE TIJDELIJK ONDER HET MIN. PEIL KUNNEN DALEN.
DIT VORMT GEEN ENKEL PROBLEEM.
04_01
NOTE
IN ORDER TO WARM-UP THE ENGINE
AND BRING THE OIL TO THE RIGHT
TEMPERATURE, RIDE THE VEHICLE
FOR A SHORT PERIOD OF TIME (10 15 MIN), KEEP THE ENGINE RUNNING
AT IDLE FOR AT LEAST 30 SECONDS
AFTER YOU HAVE COME TO A HALT,
THEN CUT OFF THE ENGINE.
•
Hold the vehicle level with the
two wheels on the ground.
•
Check the oil level
using the relevant transparent dipstick
«1».
MAX = maximum level
MIN = minimum level
•
The correct oil level is near the
MAX mark.
73
N.B.
OM DE MOTOR OP TE WARMEN EN
DE OLIE OP TEMPERATUUR TE
BRENGEN, GEBRUIKT MEN HET
VOERTUIG VOOR EEN KORTE PERIODE (10 - 15 MIN), LAAT MEN DE MOTOR AAN HET MINIMUM TOERENTAL
WERKEN MET HET VOERTUIG STIL
VOOR MINSTENS 30 SECONDEN, EN
LEGT MEN DAARNA DE MOTOR STIL.
•
Hou het voertuig verticaal met
de twee wielen op de grond.
•
Controleer het oliepeil langs het
speciale transparante buisje
«1».
MAX = maximum peil
MIN = minimum peil.
•
Het peil is correct wanneer het
ongeveer het MAX peil bereikt.
Page 74

04_02
Top up as required:
CAUTION
IF YOU RIDE THE VEHICLE IN A
SPORTY FASHION, SOME OIL SPLATTER MAY GET TO THE AIR FILTER
HOUSING THROUGH THE ENGINE
VENT.
CAUTION
DO NOT GO BEYOND THE MAX AND
BELOW THE MIN LEVEL MARKS TO
AVOID SEVERE ENGINE DAMAGE.
Indien nodig herstelt men het peil van de
motorolie:
LET OP
WANNEER MEN HET VOERTUIG
SPORTIEF GEBRUIKT MET EEN TE
HOOG OLIEPEIL, IS HET MOGELIJK
DAT ENKELE OLIESPATTEN DE FILTERKIST BEREIKEN LANGS DE ONTLUCHTING VAN DE MOTOR.
LET OP
OVERSCHRIJDT DE MARKERING
«MAX» NIET EN LAAT HET NIET ONDER DE MARKERING «MIN» KOMEN,
OM GEEN ERNSTIGE SCHADE AAN
DE MOTOR TE VEROORZAKEN.
•
Unscrew and remove the filler
plug «2».
•
Top-up the oil in the reservoir
until you reach the correct level.
CAUTION
DO NOT ADD ADDITIVES OR ANY
OTHER SUBSTANCES TO THE OIL.
WHEN USING A FUNNEL OR ANY
OTHER ELEMENT, MAKE SURE IT IS
PERFECTLY CLEAN.
74
•
Draai de toevoerdop «2» los, en
verwijder hem.
•
Herstel het juiste peil door de
tank bij te vullen.
LET OP
VOEG GEEN ADDITIEVEN OF ANDE-
RE STOFFEN TOE AAN DE OLIE.
WANNEER MEN EEN TRECHTER OF
IETS ANDERS GEBRUIKT, MOET DEZE PERFECT REIN ZIJN.
Page 75

4 Maintenance / 4 Onderhoud
NOTE
USE OIL RECOMMENDED IN THE
PRODUCTS TABLE.
N.B.
GEBRUIK DE OLIE DIE WORDT AAN-
BEVOLEN IN DE TABEL VAN DE PRODUCTEN
04_03
04_04
Engine oil change (04_03,
04_04, 04_05, 04_06)
•
Park the vehicle on firm and level ground.
•
Rest the vehicle on its stand.
•
Stop the engine and let it cool off
so that the oil in the crankcase
flows down and cools as well.
•
Remove the oil sump guard.
•
Unscrew and take out the oil filler plug (1).
•
Place a container to collect the
oil underneath the engine oil
drainage plug on the flywheel
side.
•
Unscrew and remove the oil
drainage plug (2) and then drain
all the engine oil .
Vervanging van de motorolie
(04_03, 04_04, 04_05, 04_06)
•
Plaats het voertuig op een vaste
en vlakke ondergrond.
•
Plaats het voertuig op de standaard.
•
Leg de motor stil en laat hem afkoelen, om de drainage van de
olie in de carter en de afkoeling
van de olie zelf toe te staan.
•
Verwijder de carterbedekking
•
Draai de vuldop van de olie (1)
los, en verwijder hem.
•
Plaats een recipiënt onder de afvoerdop van de motorolie aan
de kant van het vliegwiel.
•
Draai de afvoerdop van de olie
(2) los, verwijder hem, en laat
alle motorolie volledig uitstromen.
75
Page 76

04_05
04_06
•
Unscrew the engine oil filter cover (4).
•
Remove the engine oil filter cover (4) and collect the O-ring.
•
Remove the engine oil filter.
•
Place a container underneath
the engine oil drainage plug (3)
of the recovery reservoir.
•
Unscrew and remove the oil
drainage plug (3) from the recovery reservoir and drain all
the engine oil.
•
Fit a new engine oil filter.
•
Screw the engine oil filter cover
(4).
•
Screw and tighten the oil drainage/filler plugs (2)(3).
•
Pour approx. 1000 cm³ (61.02
cu.in) of engine oil through the
filler opening.
•
Screw and tighten the oil filler
plug (1).
•
Start the engine and let it run for
several minutes.
•
Stop the engine.
76
•
Draai het deksel van de motoro-
liefilter (4) los.
•
Verwijder de bedekking van de
filter van de motorolie (4), en re-
cupereer de O-ring.
•
Verwijder de van de motorolief-
ilter.
•
Plaats een recipiënt onder de af-
voerdop van de motorolie (3)
van de recupereertank.
•
Draai de afvoerdop van de mo-
torolie (3) van de tank los, en
laat alle motorolie volledig uit-
stromen.
•
Installeer een nieuwe motoro-
liefilter.
•
Draai het deksel van de motoro-
liefilter (4) vast.
•
Draai de afvoer/vuldoppen van
de olie (2) en (3) vast, en sluit ze.
•
Voer het bijvullen uit langs de
vulboring, met ongeveer 1000
cc (61.02 cu.in) motorolie.
•
Draai de vuldop van de olie (1)
vast, en sluit hem.
Page 77

4 Maintenance / 4 Onderhoud
•
Unscrew and take out the oil filler plug (1).
•
Top up with other 250 cm³
(15.25 cu.in) of oil.
•
Screw and tighten the plug (1).
•
Start the engine and let it run for
several minutes.
•
Stop the engine and leave it cool
off.
•
Check engine oil level.
•
Start de motor, en laat hem voor
enkele minuten opwarmen.
•
Leg de motor stil.
•
Draai de vuldop van de olie (1)
los, en verwijder hem.
•
Voeg nog 250 cc (15.25 cu in)
olie bij.
•
Draai de dop (1) vast, en sluit
hem.
•
Start het voertuig, en laat de motor voor enkele minuten draaien.
•
Leg de motor stil, en laat hem
afkoelen.
•
Voer de controle uit van het peil
van de motorolie.
Gearbox oil level (04_07,
04_08, 04_09, 04_10)
CAUTION
GEARBOX OIL LEVEL MUST BE
CHECKED WHEN THE ENGINE IS
WARM.
77
Versnellingsbak oliepeil
(04_07, 04_08, 04_09, 04_10)
LET OP
DE CONTROLE VAN HET OLIEPEIL
VAN DE VERSNELLINGSBAK MOET
UITGEVOERD WORDEN BIJ WARME
MOTOR.
Page 78

04_07
•
Stop the engine.
•
Wait some minutes for the oil to
flow from the transmission to the
clutch.
•
Keep the vehicle upright with the
two wheels on the ground.
•
Remove the rear brake lever by
undoing the screw (1); collect
the washer.
•
Leg de motor stil.
•
Wacht enkele minuten zodat de
olie van de versnellingsbak naar
de koppeling kan lopen.
•
Houd het voertuig in verticale
positie met de twee wielen op de
grond.
•
Verwijder de hendel van de ach-
terrem door de bout (1) los te
draaien, en recupereer de sluit-
ring.
04_08
04_09
•
Unscrew and remove the cap/
dipstick (2).
•
The oil level is correct when it is
close to the cap/dipstick (2)
opening.
If necessary:
•
Remove the filler cap (3).
•
Top-up with oil up to the cap/
dipstick (2) opening.
78
•
Draai de inspectiedop (2) los, en
verwijder hem.
•
Het peil is correct wanneer de
olie de opening van de inspec-
tiedop (2) bijna bereikt.
Indien nodig:
•
Verwijder de vuldop (3).
•
Vul olie bij tot de opening van de
inspectiedop (2) bereikt wordt.
Page 79

4 Maintenance / 4 Onderhoud
CAUTION
DO NOT ADD ADDITIVES OR OTHER
SUBSTANCES TO THE FLUID.
IF A FUNNEL OR ANY OTHER ELEMENT IS USED, MAKE SURE IT IS
PERFECTLY CLEAN.
LET OP
VOEG GEEN ADDITIEVEN OF ANDERE STOFFEN TOE AAN DE VLOEISTOF.
WANNEER MEN EEN TRECHTER OF
IETS ANDERS GEBRUIKT, MOET DEZE PERFECT SCHOON ZIJN.
•
Wait some minutes to allow the
oil to flow from the clutch to the
transmission. Then check the oil
level again.
•
Refit the rear brake lever, remember to insert the washer between the lever and the crankcase, by tightening the screw
(1).
REPLACEMENT
NOTE
TO ENSURE EASIER AND FULL OIL
DRAINAGE THE OIL MUST BE HOT
AND THEREFORE MORE FLUID.
79
•
Wacht enkele minuten zodat de
olie van de koppeling naar de
versnellingsbak kan lopen. Controleer daarna opnieuw het oliepeil.
•
Hermonteer de hendel van de
achterrem, en denk er aan om
de ring tussen de hendel en de
carter te plaatsen, door de bout
(1) vast te draaien.
VERVANGING
N.B.
VOOR EEN BETERE EN VOLLEDIGE
UITSTROMING, MOET DE OLIE WARM
ZIJN, EN DUS VLOEIBAARDER
Page 80

04_10
•
Lower the oil pan guard.
•
Place a container with suitable
capacity under the drainage
plug (4).
•
Unscrew and remove the drainage plug (4).
•
Unscrew and remove the filler
plug (3).
•
Drain the oil into the container;
allow several minutes for oil to
drain out completely.
•
Check and if necessary, replace
the drainage plug (4) sealing
washers.
•
Screw and tighten the drainage
plug (4).
•
Remove the rear brake lever by
undoing the screw (1); collect
the washer.
•
Unscrew and remove the cap/
dipstick (2).
•
Pour in new oil until it reaches
the cap/dipstick opening (2).
•
Wait some minutes to allow the
oil to flow from the clutch to the
transmission.
•
Then check the oil level again.
•
Tighten the filler cap (3).
CAUTION
THE OIL FLOW FROM THE CLUTCH
TO THE TRANSMISSION AND FROM
THE TRANSMISSION TO THE CLUTCH
CAN BE PARTICULARLY SLOW
WHEN THE OIL OR ENGINE TEMPERATURE IS LOW.
•
Verlaag de carterbuffer.
•
Plaats een geschikt recipiënt
met gepaste capaciteit onder de
afvoerdop (4).
•
Draai de afvoerdop (4) los en
verwijder hem.
•
Draai de vuldop (3) los en ver-
wijder hem.
•
Voer de olie af, en laat ze enkele
minuten uitdruipen in het recipi-
ënt.
•
Controleer en vervang eventu-
eel de dichtingsrondellen van de
afvoerdop (4).
•
Draai de afvoerdop (4) vast en
sluit hem.
•
Verwijder de hendel van de ach-
terrem door de bout (1) los te
draaien, en recupereer de sluit-
ring.
•
Draai de inspectiedop (2) los, en
verwijder hem.
•
Vul nieuwe olie bij tot de ope-
ning van de inspectiedop (2) be-
reikt wordt.
•
Wacht enkele minuten zodat de
olie van de koppeling naar de
versnellingsbak kan lopen.
•
Controleer daarna opnieuw het
oliepeil.
•
Sluit de vuldop (3).
LET OP
DE PASSAGE VAN DE OLIE VANAF
DE KOPPELING NAAR DE VERSNELLINGSBAK EN VICEVERSA, KAN BIJZONDER TRAAG VERLOPEN WAN-
80
Page 81

4 Maintenance / 4 Onderhoud
NEER DE OMGEVINGS-, OLIE- OF
MOTORTEMPERATUUR LAAG IS.
04_11
•
Refit the rear brake lever, remember to insert the washer between the lever and the crankcase, by tightening the screw
(1).
NOTE
USE OIL RECOMMENDED IN THE
PRODUCTS TABLE.
Spark plug dismantlement
(04_11, 04_12, 04_13)
At regular intervals, remove the spark
plugs and clean off any carbon deposits
or replace them as required.
CAUTION
ALWAYS REPLACE BOTH SPARK
PLUGS, EVEN IF ONLY ONE NEEDS
REPLACING.
•
Hermonteer de hendel van de
achterrem, en denk er aan om
de sluitring tussen de hendel en
de carter te plaatsen, door de
bout (1) vast te draaien.
N.B.
GEBRUIK DE OLIE DIE WORDT AAN-
BEVOLEN IN DE TABEL VAN DE PRODUCTEN
Demonteren van de bougie
(04_11, 04_12, 04_13)
Demonteer periodiek de bougie, reinig ze
van koolstofafzettingen, en vervang ze
indien nodig.
LET OP
OOK WANNEER SLECHTS ÉÉN VAN
DE BOUGIES MOET VERVANGEN
WORDEN, VERVANGT MEN STEEDS
BEIDE BOUGIES.
81
Page 82

In order to gain access to the spark plugs:
CAUTION
Om de bougies te bereiken:
LET OP
BEFORE CARRYING OUT THE FOLLOWING OPERATIONS AND IN ORDER TO AVOID BURNS, LEAVE ENGINE AND MUFFLER TO COOL OFF
TO AMBIENT TEMPERATURE.
•
Place the vehicle on the stand.
NOTE
THE VEHICLE HAS A SPARK PLUG (2)
FOR EACH CYLINDER. THE FOLLOWING STEPS RELATE TO JUST ONE
SPARK PLUG BUT APPLY TO BOTH.
•
Remove the tube (1) of spark
plug (2).
•
Clean off any trace of dirt from
the spark plug (2) base.
•
Insert the spanner supplied in
the tool kit into the hexagonal
head of spark plug (2).
VOORALEER MEN DE VOLGENDE
HANDELINGEN UITVOERT, LAAT
MEN DE MOTOR EN DE UITLAAT AFKOELEN TOT DEZE DE OMGEVINGSTEMPERATUUR HEBBEN BEREIKT,
OM MOGELIJKE BRANDWONDEN TE
VERMIJDEN.
•
Plaats het voertuig op de stan-
daard.
N.B.
HET VOERTUIG IS UITGERUST MET
EEN BOUGIE (2) PER CILINDER. DE
VOLGENDE HANDELINGEN ZIJN IN
VERBAND MET ÉÉN BOUGIE, MAAR
GELDEN VOOR BEIDE.
•
Verwijder de pipet (1) van de
bougie (2).
•
Verwijder elk vuilspoor van de
basis van de bougie (2).
•
Plaats de sleutel die wordt bij-
geleverd bij de gereedschapskit
op de zeskantige zit van de bou-
gie (2).
82
Page 83

4 Maintenance / 4 Onderhoud
•
Unscrew spark plug (2) and remove it from its seat, making
sure no dust or dirt gets into the
cylinder.
Checking and cleaning:
CAUTION
•
Draai de bougie (2) los en verwijder ze uit de zit, en laat geen
stof of andere stoffen in de cilinder terechtkomen.
Voor de controle en de reiniging:
LET OP
DO NOT USE METAL BRUSHES AND/
OR ABRASIVE PRODUCTS TO CLEAN
SPARK PLUGS; USE ONLY A SHORT
BLAST OF COMPRESSED AIR.
•
Check that the electrodes and
the insulator of the spark plug
(2) do not show signs of carbon
deposits or corrosion. If necessary, clean them using a short
blast of compressed air.
Replace spark plug (2) if its insulator is
cracked, the electrodes show signs of
corrosion or excessive deposits or the top
of the central electrode gets rounded.
CAUTION
USE RECOMMENDED SPARK PLUGS
ONLY. USING A SPARK PLUG OTHER
THAN THE TYPE SPECIFIED MIGHT
COMPROMISE ENGINE PERFORMANCE AND LIFE. CHECK THE GAP
83
VOOR DE REINIGING MAG MEN GEEN
METALEN BORSTELS EN/OF ABRASIEVE PRODUCTEN GEBRUIKEN,
MAAR UITSLUITEND EEN PERSLUCHTSTRAAL.
•
Controleer of de elektroden en
de isolering van de bougie (2)
geen koolstofresten of corrosietekens vertonen, reinig ze eventueel met een persluchtstraal.
Wanneer de bougie (2) scheurtjes op de
isolering, corrosie op de elektroden, excessieve afzettingen vertoont, of de centrale elektrode vertoont een afgerond
toppunt, moet ze vervangen worden.
LET OP
GEBRUIK ENKEL BOUGIES VAN HET
AANBEVOLEN TYPE, ANDERS ZOUDEN DE PRESTATIES EN DE DUUR
VAN DE MOTOR GESCHAAD KUNNEN WORDEN. VOOR DE CONTROLE
Page 84

BETWEEN ELECTRODES WITH A
FEELER THICKNESS GAUGE
VAN DE AFSTAND TUSSEN DE ELEKTRODE MOET EEN DIKTEMETER VAN
HET RANDTYPE GEBRUIKT WORDEN.
04_12
04_13
•
Check the gap between electrodes with a feeler thickness
gauge.
CAUTION
DO NOT ATTEMPT TO READJUST
THE ELECTRODE GAP.
Characteristic
Electrode gap
0.7 ± 0.8 mm (0.027 ± 0.031 in)
If the electrode gap is different from the
prescribed gap, replace the spark plug
(2).
•
Make sure the washer is in good
conditions.
•
Controleer de afstand tussen de
elektroden met een diktemeter
van het randtype.
LET OP
PROBEER OP GEEN ENKELE MANIER OM DE AFSTAND TUSSEN DE
ELEKTRODEN WEER OP MAAT TE
BRENGEN.
Technische kenmerken
Afstand van de elektroden
0,7 ± 0,8 mm (0.027 ± 0.031 in)
Als de afstand tussen de elektroden verschilt van wat beschreven wordt, moet de
bougie (2) vervangen worden.
•
Controleer of de rondel zich in
goede condities bevindt.
84
Page 85

4 Maintenance / 4 Onderhoud
Installation:
•
Manually screw the spark plug
(2) to avoid damaging the
thread.
•
Tighten using the spanner supplied in the tool kit. Make each
spark plug (2) complete 1/2 of a
turn to compress the washer.
CAUTION
Voor de installatie:
•
Draai de bougie (2) manueel
vast zodat de schroefdraad niet
wordt beschadigd.
•
Sluit de bougies met behulp van
de bij de gereedschapskit bijgevoegde sleutel, door elke bougie
(2) een 1/2 draai vast te draaien
om de rondel vast te drukken.
LET OP
IT IS ESSENTIAL TO TIGHTEN THE
SPARK PLUG (2) PROPERLY. A
LOOSE SPARK PLUG MAY CAUSE
ENGINE OVERHEATING AND RESULT
IN SEVERE DAMAGE.
Locking torques (N*m)
Spark plug USA
8.85 lbf ft (12 Nm)
•
Position the spark plug tube (1)
correctly so that it does not get
detached due to engine vibrations.
85
DE BOUGIE (2) MOET GOED WORDEN
VASTGEDRAAID, OMDAT ANDERS
DE MOTOR KAN OVERVERHITTEN,
EN DUS ERNSTIG WORDT BESCHADIGD.
Aandraaikoppels (N*m)
Bougie USA
8.85 lbf ft (12 Nm)
•
Plaats de pipet van de bougie
(1) correct, zodat deze niet loskomt door de vibraties van de
motor.
Page 86

Removing the air filter (04_14,
04_15)
Demonteren van het luchtfilter
(04_14, 04_15)
04_14
04_15
•
Remove the saddle.
•
Remove the side fairings.
•
Lift the tank paying attention to
the fuel pipe.
•
Release the air filter cover by
gripping and lifting the handles
from both sides.
•
Take the filter casing cover off
together with the air filter paying
attention not to damage the control unit connector (remove it if
necessary).
NOTE
DURING FUEL TANK LIFTING AND
REFITTING, MANUALLY PLACE THE
FUEL PIPE AND CHECK ITS CORRECT POSITIONING.
CAUTION
OIL THE SPONGE FILTER AS IN-
STRUCTED IN THE SCHEDULED
MAINTENANCE CHART.
NOTE
WHEN REFITTING THE AIR FILTER,
ENSURE THAT ITS HOUSING IS PERFECTLY CLEAN. REMOVE ANY
TRACE OF DIRT THAT MAY HAVE ENTERED DURING REMOVAL. DURING
REASSEMBLY, MAKE SURE THAT
THE AIR VENTS ARE INSERTED CORRECTLY.
•
Verwijder het zadel.
•
Verwijder de zijplaatjes.
•
Hef de tank op door op te letten
voor de benzinebuis.
•
Koppel het deksel van de filter-
kist los, door de handgrepen
langs beide kanten vast te grij-
pen, en het op te heffen.
•
Verwijder de bedekking van de
filterdoos compleet met filter
langs achter, en let op om de
connector van de centrale niet
te beschadigen (verwijder deze
eventueel).
N.B.
TIJDENS HET OPHEFFEN EN DE HER-
PLAATSING VAN DE BRANDSTOFTANK MOET DE BENZINEBUIS MANUEEL BEGELEID WORDEN, EN MOET
DE CORRECTE PLAATSING IN DE ZIT
ERVAN GECONTROLEERD WORDEN.
LET OP
VOORZIE DE SPONS VAN DE FILTER
VAN OLIE, ZOALS AANGEDUID WORDEN IN DE TABEL VAN HET GEPROGRAMMEERD ONDERHOUD.
N.B.
BIJ DE HERMONTAGE LET MEN OP
DAT DE FILTERKIST PERFECT REIN
IS. VERWIJDER ELK SPOOR VAN
VUIL, ZODAT DIT ER NIET KAN INVAL-
86
Page 87

4 Maintenance / 4 Onderhoud
CAUTION
MAKE SURE THAT TANK'S THREAD
SEALER DOES COME INTO TOUCH
WITH THE BATTERY'S POSITIVE
POLE UNDER ANY CIRCUMSTANCE.
CAUTION
IN THE EVENT OF A FALL, CLEAN
THE AIR FILTER AND ITS HOUSING
CAREFULLY, REMOVING ANY
TRACES OF OIL WHICH MAY HAVE
ENTERED FROM THE OIL TANK
THROUGH THE OIL VAPOURS
BREATHER PIPES.
CAUTION
REMOVE THE AIR FILTER COVER ONLY WHEN THE VEHICLE IS PERFECTLY CLEAN SO AS TO AVOID THAT
ANY TRACE OF DIRT MAY INGRESS
THE HOUSING.
LEN TIJDENS DE VERWIJDERING. BIJ
DE HERMONTAGE LET MEN OP
VOOR DE CORRECTE PLAATSING
VAN DE LUCHTINLATEN.
LET OP
LET OP DAT DE TREKDRAAD VAN DE
TANK VOOR GEEN ENKELE REDEN
DE POSITIEVE POOL VAN DE ACCU
RAAKT.
LET OP
WANNEER DE LUCHTFILTER EN DE
FILTERKIST GEVALLEN ZIJN, REINIGT MEN ZE ZORGVULDIG, ZODAT
ER GEEN OLIE MEER AANWEZIG IS
DIE EVENTUEEL VAN DE OLIETANK
LANGS DE ONTLUCHTINGSBUIS VAN
DE OLIEDAMPEN ZOU BINNENGEKOMEN ZIJN.
LET OP
87
VOER DE HANDELING VAN HET VERWIJDEREN VAN HET LUCHTFILTERDEKSEL ENKEL UIT WANNEER DE
MOTOR PERFECT REIN IS, OM TE
Page 88

VERMIJDEN DAT HET VUIL IN DE FILTERKIST KOMT.
Cooling fluid level (04_16,
04_17)
Do not use the vehicle if the coolant is
below the minimum level.
CAUTION
COOLANT IS TOXIC IF INGESTED;
CONTACT WITH YOUR EYES OR SKIN
MAY CAUSE IRRITATION. IF THE FLUID GETS IN CONTACT WITH THE
EYES OR SKIN, RINSE REPEATEDLY
WITH PLENTY OF WATER AND SEEK
MEDICAL ADVICE. IF SWALLOWED,
INDUCE VOMITING, RINSE MOUTH
AND THROAT WITH PLENTY OF WATER AND SEEK MEDICAL ADVICE IMMEDIATELY.
Coolant solution is 50% water and 50%
antifreeze fluid.
Peil koelvloeistof (04_16,
04_17)
Gebruik het voertuig niet wanneer het
peil van de koelvloeistof zich onder het
minimum peil bevindt.
LET OP
DE KOELVLOEISTOF IS SCHADELIJK
WANNEER HIJ WORDT INGESLIKT;
HET CONTACT MET DE HUID EN DE
OGEN KAN IRRITATIES VEROORZAKEN. WANNEER DE VLOEISTOF IN
CONTACT ZOU KOMEN MET DE HUID
EN DE OGEN, SPOELT MEN LANG
MET VEEL WATER, EN RAADPLEEGT
MEN EEN ARTS. WANNEER HET
WORDT INGESLIKT, MOET MEN
OVERGEVEN, DE MOND EN DE KEEL
SPOELEN MET VEEL WATER, EN ONMIDDELLIJK EEN ARTS RAADPLEGEN.
De oplossing van de koelvloeistof bestaat uit 50% water en 50% antivries.
88
Page 89

4 Maintenance / 4 Onderhoud
This is the ideal mixture for most operating temperatures and provides good corrosion protection.
It is advisable to use the same mixture
even in hot weather as this minimises
loss due to evaporation and the need of
frequent top-ups.
Less water evaporation means fewer
mineral salts depositing in the radiators,
which helps preserve the efficiency of the
cooling system.
Dit mengsel is ideaal voor de meeste
werkingstemperaturen, en garandeert
een goede bescherming tegen corrosie.
Het is een goede gewoonte om hetzelfde
mengsel ook tijdens het warme seizoen
te gebruiken, omdat op deze manier verlies door verdamping en het frequent bijvullen wordt vermeden.
Op deze manier verminderen de bezinksels van mineraalzouten, die in de radiator door het verdampte water werden
gelaten, en verandert de efficiëntie van
de koelinstallatie niet.
04_16
When the external temperature drops below zero degrees centigrade, check the
cooling system frequently and add more
antifreeze solution if needed (up to 60%
max.).
Use distilled water in the coolant mixture
to avoid damaging the engine.
CAUTION
DO NOT REMOVE THE RADIATOR
CAP «1» WHEN THE ENGINE IS HOT
SINCE COOLANT IS UNDER PRESSURE AND VERY HOT. CONTACT
WITH SKIN OR CLOTHES MAY CAUSE
SEVERE BURNS AND/OR INJURIES.
89
Wanneer de buitentemperatuur zich onder het vriespunt bevindt, moet men het
koelcircuit frequent controleren, en voegt
men indien nodig een hogere concentratie antivries toe (tot een maximum van
60%).
Voor de koeloplossing gebruikt men gedestilleerd water, om de motor niet te
beschadigen.
LET OP
VERWIJDER DOP «1» NIET VAN DE
RADIATOR WANNEER DE MOTOR
WARM STAAT, OMDAT DE KOELVLOEISTOF EEN HOGE TEMPERATUUR HEEFT EN ONDER HOGE DRUK
STAAT. BIJ CONTACT MET DE HUID
Page 90

OF DE KLEDING KAN HET ERNSTIGE
LETSELS/SCHADE VEROORZAKEN.
04_17
Checking and topping up
CAUTION
WAIT FOR THE ENGINE TO COOL
DOWN BEFORE CHECKING OR TOPPING-UP THE COOLANT LEVEL.
•
Shut off the engine and wait until
it cools off.
•
Park the vehicle on firm and level ground.
•
Keep the vehicle upright with the
two wheels on the ground.
•
Turn the radiator cap (1) anticlockwise just one click.
•
Wait for some seconds so that
any pressure in the system may
be purged.
•
Turn the radiator cap (1) anticlockwise again and remove it.
•
Make sure the fluid covers the
radiator plates completely.
•
Also check the level in the expansion tank (under the engine
sump cover) through the appropriate sight glass.
Controle en bijvullen
LET OP
VOER DE HANDELINGEN VAN DE
CONTROLE EN HET BIJVULLEN VAN
DE KOELVLOEISTOF UIT WANNEER
DE MOTOR KOUD STAAT.
•
Leg de motor stil en wacht tot hij
afgekoeld is.
•
Plaats het voertuig op een vaste
en vlakke ondergrond.
•
Houd het voertuig in verticale
positie met de twee wielen op de
grond.
•
Draai de radiatordop (1) voor
één klik in tegenwijzerzin.
•
Wacht enkele seconden lang
zodat de eventuele druk in de
inrichting afgelaten wordt.
•
Draai de radiatordop (1) op-
nieuw in tegenwijzerzin, en ver-
wijder hem.
•
Controleer of de vloeistof de ra-
diatorplaten helemaal bedekt.
•
Controleer bovendien het peil in
het expansievat (onder het dek-
sel van de motorcarter) langs
90
Page 91

4 Maintenance / 4 Onderhoud
•
The level should be between the
MIN and MAX reference marks.
CAUTION
DO NOT ADD ADDITIVES OR OTHER
SUBSTANCES TO THE FLUID.
IF A FUNNEL OR ANY OTHER ELEMENT IS USED, MAKE SURE IT IS
PERFECTLY CLEAN.
het daarvoor bestemde venstertje.
•
Het peil moet zich tussen de
MIN en MAX referenties bevinden.
LET OP
VOEG GEEN ADDITIEVEN OF ANDERE STOFFEN TOE AAN DE VLOEISTOF.
WANNEER MEN EEN TRECHTER OF
IETS ANDERS GEBRUIKT, MOET DEZE PERFECT SCHOON ZIJN.
•
If required, top-up with coolant
until the radiator plates are covered. Do not exceed this level;
otherwise, the coolant will spill
during engine operation. When
using a funnel or any other element, make sure it is perfectly
clean.
•
Refit the radiator cap (1).
CAUTION
IN THE EVENT OF EXCESSIVE COOL-
ANT CONSUMPTION, CHECK COOLING SYSTEM FOR LEAKS.
HAVE ANY MALFUNCTION REPAIRED BY AN Official aprilia Dealer.
91
•
Indien nodig vult men koelvloeistof bij, tot de platen van de radiator volledig bedekt zijn. Overschrijd dit peil niet, anders zal de
vloeistof tijdens de werking van
de motor uitstromen. Wanneer
een trechter of iets anders gebruikt wordt, moet deze perfect
gereinigd worden.
•
Plaats de radiatordop (1) weer.
LET OP
IN GEVAL VAN EXCESSIEF KOEL-
VLOEISTOFVERBRUIK, CONTROLEERT MEN OF ER GEEN LEKKEN IN
HET CIRCUIT ZIJN.
Page 92

VOOR DE HERSTELLING MOET MEN
ZICH TOT EEN Officiële aprilia Dealer
WENDEN.
Checking the brake oil level
(04_18, 04_19, 04_20, 04_21)
Check the brake fluid level following the
instructions on the scheduled maintenance table.
The information provided below relates to
an individual braking system but is applicable to both.
NOTE
THIS VEHICLE IS EQUIPPED WITH
FRONT AND REAR DISC BRAKES,
EACH OPERATED BY AN INDEPENDENT HYDRAULIC CIRCUIT.
CAUTION
UNEXPECTED CLEARANCE VARIATIONS OR ELASTIC RESISTANCE IN
THE BRAKE LEVER ARE DUE TO
FAILURE IN THE HYDRAULIC CIRCUIT. CONTACT AN Official aprilia
Dealer IN CASE OF DOUBTS ON THE
CORRECT OPERATION OF THE
BRAKING SYSTEM OR WHEN UN-
Controle van het oliepeil van
de remmen (04_18, 04_19,
04_20, 04_21)
Controleer het peil van de remvloeitof
volgens de aanduidingen in de tabel van
het geprogrammeerd onderhoud
De volgende informatie is in verband met
slechts één reminstallatie, maar geldt
voor beide.
N.B.
DIT VOERTUIG IS UITGERUST MET
SCHIJFREMMEN VOORAAN EN ACHTERAAN, MET GESCHEIDEN HYDRAULISCHE CIRCUITS.
LET OP
HET PLOTSELING WIJZIGEN VAN DE
SPELING OF EEN ELASTISCHE
WEERSTAND VAN DE REM, ZIJN TE
WIJTEN AAN PROBLEMEN MET DE
HYDRAULISCHE INSTALLATIE. IN
GEVAL VAN TWIJFELS IN VERBAND
MET DE PERFECTE WERKING VAN
DE REMINSTALLATIE EN IN GEVAL
92
Page 93

4 Maintenance / 4 Onderhoud
ABLE TO CARRY OUT ROUTINE
CHECK PROCEDURES.
CAUTION
MAKE ESPECIALLY SURE THAT
BRAKE DISCS ARE NOT SMEARED
OR LUBRICATED, PARTICULARLY
AFTER MAINTENANCE AND CHECK
PROCEDURES HAVE BEEN CARRIED
OUT.
CHECK THAT BRAKE WIRES ARE
NOT TWISTED OR WORN.
PAY UTMOST ATTENTION THAT NO
WATER OR DUST INADVERTENTLY
GETS INTO THE CIRCUIT.
IT IS ADVISABLE TO WEAR LATEX
GLOVES WHEN SERVICING THE HYDRAULIC CIRCUIT.
THE BRAKE FLUID MAY CAUSE IRRITATION IF IN CONTACT WITH SKIN
OR EYES.
CAUTION
MEN NIET IN STAAT IS OM DE NORMALE CONTROLEHANDELINGEN UIT
TE VOEREN, WENDT MEN ZICH TOT
EEN Officiële aprilia Dealer.
LET OP
LET VOORAL OP DAT DE REMSCHIJVEN NIET VETTIG OF INGEVET ZIJN,
VOORAL NA HET UITVOEREN VAN
DE ONDERHOUDSHANDELINGEN OF
DE CONTROLE.
CONTROLEER OF DE REMBUIZEN
NIET IN ELKAAR GEDRAAID OF VERSLETEN ZIJN.
LET OP DAT ER GEEN WATER OF
STOF TOEVALLIG IN HET CIRCUIT
KOMT.
BIJ ONDERHOUDSHANDELINGEN
AAN HET HYDRAULISCH CIRCUIT,
RAADT MEN AAN OM LATEX HANDSCHOENEN TE GEBRUIKEN.
DE REMVLOEISTOF ZOU IRRITATIE
KUNNEN VEROORZAKEN WANNEER
HET IN CONTACT KOMT MET DE HUID
OF DE OGEN.
RINSE CAREFULLY ALL BODY
PARTS WHICH HAVE COME INTO
CONTACT WITH THE FLUID AND,
SHOULD THE FLUID COME INTO
CONTACT WITH THE EYES, SEEK
93
Page 94

MEDICAL ADVICE OR CONTACT AN
OPHTHALMOLOGIST.
CAUTION
DO NOT DISPOSE OF THE FLUID INTO
THE ENVIRONMENT.
CAUTION
KEEP OUT OF THE REACH OF CHILDREN.
CAUTION
WHEN YOU USE THE BRAKE FLUID,
MAKE SURE NOT TO SPILL IT ONTO
PLASTIC OR PAINTED COMPONENTS
AS IT WILL DAMAGE THEM BEYOND
REPAIR.
LET OP
WAS ZORGVULDIG DE DELEN VAN
HET LICHAAM DIE IN CONTACT ZIJN
GEKOMEN MET DE VLOEISTOF,
WENDT ZICH BOVENDIEN TOT EEN
OOGARTS OF EEN ARTS WANNEER
DE VLOEISTOF IN CONTACT KOMT
MET DE OGEN.
LET OP
LOOS DE VLOEISTOF NIET IN HET MILIEU.
LET OP
BUITEN BEREIK VAN KINDEREN
HOUDEN
LET OP
94
WANNEER MEN REMVLOEISTOF GEBRUIKT MOET MEN OPLETTEN OM
HET NIET TE MORSEN OP DE PLASTIC OF GELAKTE DELEN, OMDAT
HET ONHERSTELBARE SCHADE ZAL
AANRICHTEN.
Page 95

4 Maintenance / 4 Onderhoud
Disc brake
CAUTION
Schijfremmen
LET OP
BRAKES ARE THE MOST IMPORTANT
COMPONENTS TO ENSURE SAFETY
AND THEREFORE THEY HAVE TO BE
ALWAYS IN PERFECT CONDITIONS;
CHECK THE BRAKES BEFORE EACH
RIDE.
REPLACE THE BRAKE FLUID ACCORDING TO THE SCHEDULED
MAINTENANCE TABLE.
USE THE BRAKE FLUID SPECIFIED IN
THE RECOMMENDED PRODUCT TABLE.
Brake fluid decreases gradually in the
reservoir as the brake pads wear down,
to compensate the wear automatically.
The front brake fluid reservoir (1) is
placed near the front brake lever connection.
The rear brake fluid reservoir (2) is integrated in the brake pump fastened to the
frame, on the right side, near the fork.
DE REMMEN ZIJN DE ONDERDELEN
DIE HET MEEST DE VEILIGHEID GARANDEREN, EN MOETEN DUS
STEEDS PERFECT EFFICIËNT WORDEN GEHOUDEN; CONTROLEER ZE
VÓÓR ELKE REIS.
VOER DE VERVANGING VAN DE REMVLOEISTOF UIT OP BASIS VAN DE
TABEL VAN HET GEPROGRAMMEERD ONDERHOUD.
GEBRUIK DE SPECIFIEKE REMVLOEISTOF DIE WORDT AANGEDUID
IN DE TABEL VAN DE AANBEVOLEN
PRODUCTEN.
Met het verbruik van de wrijvingspastilles
vermindert het peil van de remvloeistof in
de tank, om automatisch de slijtage te
compenseren.
De vloeistoftank van de voorrem (1) bevindt zich nabij de koppeling van de hendel van de voorrem.
De vloestoftank van de achterrem (2) is
geïntegreerd in de rempomp die op het
frame bevestigd is, op de rechter kant,
naast de vork.
95
Page 96

Check the brake fluid level in the reservoirs before setting off.
CAUTION
Controleer vóór het vertrek het peil van
de remvloeistof in de tanks.
LET OP
04_18
04_19
DO NOT USE YOUR VEHICLE IF A
FLUID LEAK IN THE BRAKING CIRCUIT IS DETECTED.
Front brake
Checking
•
Place the vehicle upright and
keep the handlebar right.
•
Make sure the fluid level in the
reservoir (1) is above the MIN
level reference mark.
MIN = minimum level
MAX = maximum level
If the fluid does not reach the MIN. mark
CAUTION
BRAKE LEVEL DECREASES GRADU-
ALLY AS BRAKE PADS WEAR DOWN.
GEBRUIK HET VOERTUIG NOOIT
WANNEER MEN EEN LEK OPMERKT
VAN DE REMINSTALLATIE.
Voorrem
Controle
•
Plaats het voertuig verticaal en
hou het stuur recht.
•
Controleer of de vloeistof in de
tank (1) de MIN referentie over-
schrijdt.
MIN = minimum peil.
MAX = maximum peil
Wanneer de vloeistof niet minstens het
MIN bereikt.
LET OP
HET PEIL VAN DE VLOEISTOF VER-
MINDERT PROGRESSIEF MET DE
SLIJTAGE VAN DE PASTILLES.
96
Page 97

4 Maintenance / 4 Onderhoud
04_20
•
Check the brake pads and discs
for wear.
If the pads and/or the disc do not need
replacing, top up the fluid.
CAUTION
RISK OF BRAKE FLUID SPILLING. DO
NOT PULL THE FRONT BRAKE LEVER WHEN THE SCREWS (3) ARE
LOOSE OR, MAINLY, WHEN THE
BRAKE FLUID RESERVOIR CAP (4)
HAS BEEN REMOVED.
•
Controleer de slijtage van de
rempastilles en van de schijf.
Wanneer de pastilles en/of de schijf niet
moeten vervangen worden, voert men
het bijvullen uit.
LET OP
GEVAAR OP HET UITSTROMEN VAN
REMVLOEISTOF. ACTIVEER DE HENDEL VAN DE VOORREM NIET WANNEER DE BOUTEN (3) GELOST ZIJN,
OF VOORAL NIET WANNEER HET
DEKSEL VAN DE TANK VAN DE REMVLOEISTOF (4) VERWIJDERD IS.
•
Undo the screws (3) of the brake
fluid reservoir using a short Phillips screwdriver.
CAUTION
AVOID PROLONGED AIR EXPOSURE
OF THE BRAKE FLUID. THE BRAKE
FLUID IS HYGROSCOPIC AND ABSORBS MOISTURE WHEN IS IN CONTACT WITH THE AIR. LEAVE THE
BRAKE FLUID RESERVOIR «1» OPEN
ONLY FOR THE TIME NEEDED TO
COMPLETE THE TOPPING UP PROCEDURE.
97
•
Gebruik een korte kruisschroevendraaier voor het losdraaien
van de bouten (3) van de tank
van de remvloeistof.
LET OP
VERMIJDT DAT DE REMVLOEISTOF
LANG WORDT BLOOTGESTELD AAN
DE LUCHT. DE REMVLOEISTOF IS HYGROSCOPISCH, EN ABSORBEERT
VOCHTIGHEID WANNEER HET IN
CONTACT KOMT MET DE LUCHT.
LAAT DE TANK VAN REMVLOEISTOF
«1» ENKEL OPEN VOOR DE TIJD DIE
NODIG IS OM HET BIJVULLEN UIT TE
VOEREN.
Page 98

•
Lift and remove the cover (4) together with the screws (3) and
the gasket (5).
CAUTION
•
Hef het deksel op (4) compleet
met bouten (3) en pakking (5),
en verwijder het.
LET OP
TO AVOID SPILLING BRAKE FLUID
DURING TOP-UP, DO NOT SHAKE
THE VEHICLE. DO NOT ADD ADDITIVES OR OTHER SUBSTANCES TO
THE FLUID. WHEN USING A FUNNEL
OR ANY OTHER ELEMENT, MAKE
SURE IT IS PERFECTLY CLEAN.
•
Top up the reservoir «1» with
the brake fluid, until you go beyond the MIN minimum level
mark.
CAUTION
TOP UP TO MAX LEVEL MARK ONLY
WHEN BRAKE PADS ARE NEW. IT IS
ADVISABLE NOT TO TOP UP TO THE
MAX LEVEL MARK WHEN THE
BRAKE PADS ARE WORN BECAUSE
YOUR RISK SPILLING THE FLUID
WHEN CHANGING THE BRAKE PADS.
OM TIJDENS HET BIJVULLEN DE
REMVLOEISTOF NIET TE MORSEN,
RAADT MEN AAN OM NIET TE
SCHUDDEN MET HET VOERTUIG.
VOEG GEEN ADDITIEVEN OF ANDERE STOFFEN TOE AAN DE VLOEISTOF. WANNEER MEN EEN TRECHTER OF IETS ANDERS GEBRUIKT,
MOET DEZE PERFECT REIN ZIJN.
•
Vul de tank «1» bij met remvloei-
stof, tot het aangeduide MIN peil
wordt overschreden.
LET OP
MEN MAG ENKEL BIJVULLEN TOT
AAN HET MAX PEIL WANNEER ER
NIEUWE PASTILLES AANWEZIG
ZIJN. MEN RAADT AAN OM NIET BIJ
TE VULLEN TOT AAN HET MAX PEIL
WANNEER DE PASTILLES VERSLETEN ZIJN, OMDAT DE VLOEISTOF
ZAL UITSTROMEN WANNEER DE
REMPASTILLES ZULLEN VERVANGEN WORDEN.
98
Page 99

4 Maintenance / 4 Onderhoud
CHECK BRAKING EFFICIENCY.
WHEN THE BRAKE LEVER HAS EX-
CEEDING TRAVEL OR IF YOU NOTICE
A LOSS OF BREAKING, CONTACT AN
APRILIA OFFICIAL DEALER. THE
BRAKING SYSTEM MAY NEED
BLEEDING.
CONTROLEER DE REMEFFICIËNTIE.
IN GEVAL VAN EEN EXCESSIEVE
LOOP VAN DE REMHENDEL OF VAN
VERLIES VAN EFFICIËNTIE VAN DE
REMINSTALLATIE, WENDT MEN ZICH
TOT EEN OFFICIËLE APRILIA DEALER, OMDAT HET NODIG KAN ZIJN
OM EEN ONTLUCHTING UIT TE VOEREN VAN DE INSTALLATIE.
Rear brake
Checking
•
Keep the vehicle upright.
•
Check that the liquid contained
in the reservoir is higher than the
MIN. mark.
MIN = minimum level
If the fluid does not reach the MIN. mark
CAUTION
BRAKE LEVEL DECREASES GRADU-
ALLY AS BRAKE PADS WEAR DOWN.
99
Achterrem
Controle
•
Plaats het voertuig verticaal.
•
Controleer of de vloeistof in de
tank de MIN teferentie overschrijdt.
MIN = minimum peil.
Wanneer de vloeistof niet minstens het
MIN bereikt.
LET OP
HET PEIL VAN DE VLOEISTOF VER-
MINDERT PROGRESSIEF MET DE
SLIJTAGE VAN DE PASTILLES.
Page 100

04_21
•
Check the brake pads and discs
for wear.
If the pads and/or the disc do not need
replacing, top up the fluid.
Topping up
CAUTION
RISK OF BRAKE FLUID SPILLING. DO
NOT PULL THE FRONT BRAKE LEVER WHEN THE SCREWS (6) ARE
LOOSE OR, PRIMARILY, WHEN THE
BRAKE FLUID RESERVOIR CAP (7) IS
REMOVED.
•
Controleer de slijtage van de
rempastilles en van de schijf.
Wanneer de pastilles en/of de schijf niet
moeten vervangen worden, voert men
het bijvullen uit.
Bijvulling
LET OP
GEVAAR OP HET UITSTROMEN VAN
REMVLOEISTOF. ACTIVEER DE HENDEL VAN DE VOORREM NIET WANNEER DE BOUTEN (6) GELOST ZIJN,
OF VOORAL NIET WANNEER HET
DEKSEL VAN DE TANK VAN DE REMVLOEISTOF (7) VERWIJDERD IS.
•
Using a wrench, unscrew the
two screws (6) of the brake fluid
reservoir (2).
CAUTION
AVOID PROLONGED AIR EXPOSURE
OF THE BRAKE FLUID. THE BRAKE
FLUID IS HYGROSCOPIC AND ABSORBS MOISTURE WHEN IS IN CONTACT WITH THE AIR. LEAVE THE
BRAKE FLUID RESERVOIR «2» OPEN
ONLY FOR THE TIME NEEDED TO
COMPLETE THE TOPPING UP PROCEDURE.
100
•
Gebruik een sleutel voor het los-
draaien van de twee bouten (6)
van de tank van de remvloeistof
(2).
LET OP
VERMIJDT DAT DE REMVLOEISTOF
LANG WORDT BLOOTGESTELD AAN
DE LUCHT. DE REMVLOEISTOF IS HYGROSCOPISCH, EN ABSORBEERT
VOCHTIGHEID WANNEER HET IN
CONTACT KOMT MET DE LUCHT.
LAAT DE TANK VAN DE REMVLOEISTOF «2» ENKEL OPEN VOOR DE
TIJD DIE NODIG IS OM HET BIJVULLEN UIT TE VOEREN.
 Loading...