

Page 1

1
Connecting Monitors and Other Equipment
You can use a single monitor to switch between the PC environment and the
Mac OS environment. Or you can simultaneously display both environments
on two monitors. Any monitor you use must be connected in a specific way
for you to access your PC Compatibility Card software.
To learn how to connect your monitor or monitors, first read about using the
loopback cable on the next page. Then turn to the section on connecting a
sing le monitor or the section on connecting two monitors. Follow the
instructions for your model of Power Macintosh computer. If you have an
AudioVision or AppleVision monitor, turn to the section with additional
instructions for these monitors.
After you’ve connected your monitor, read the end of this chapter to find out
how to connect other equipment.
1
Page 2

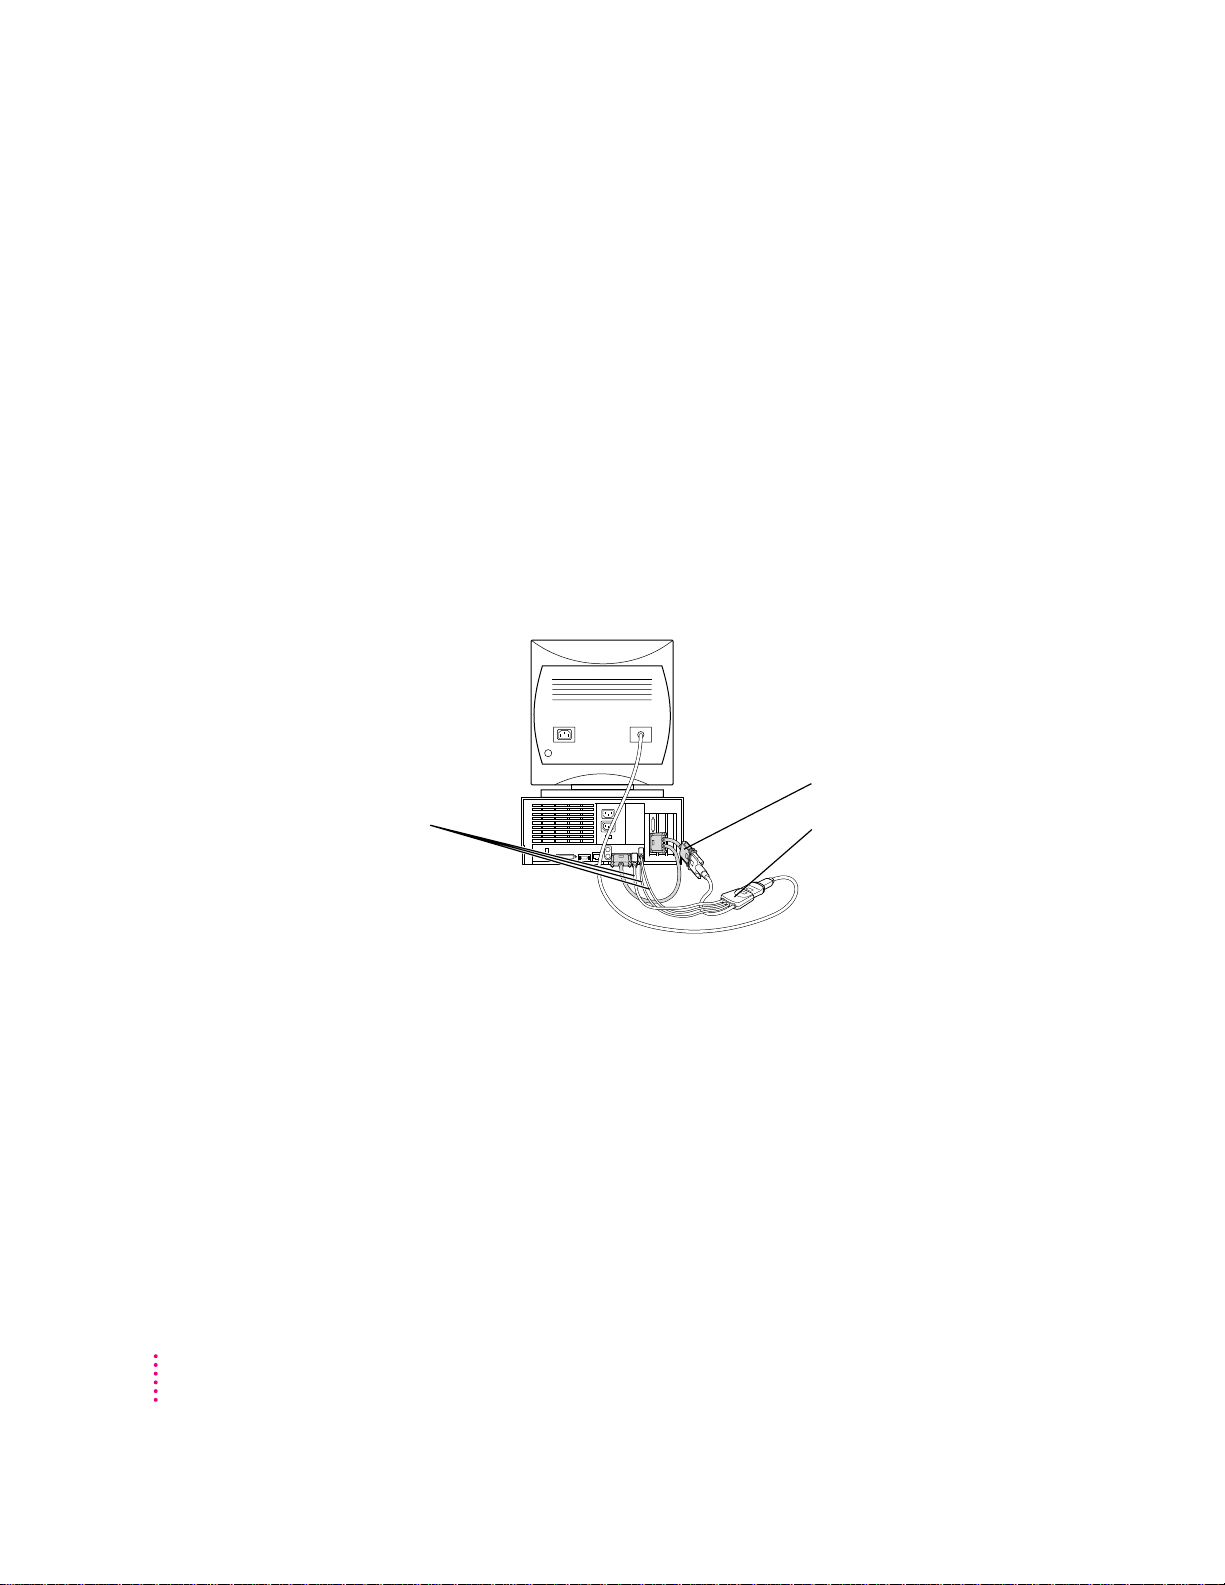
Using th e lo opback cable
This connector
(“middle connector”)
attaches to the
PC Compatibility Card.
This connector (“long connector”)
attaches to either your computer’s built-in
monitor port or video card. It is usually left
disconnected if you are using two monitors.
This connector (“short connector”)
attaches to your monitor cable.
Your PC Compatibility Card came with a loopback cable. It has three
connectors: middle, long, and short. No matter how you connect your
monitors, these connectors always attach to the same ports:
m The middle connector attaches to the port on your PC Compatibility Card;
this is the port that lets you see the PC environment.
m The long connector attaches to either your computer’s built-in monitor
port, or to a video card (you may leave this end disconnected if you are
using two monitors).
m The short connector attaches to your monitor cable.
2
Chapter 1
Page 3
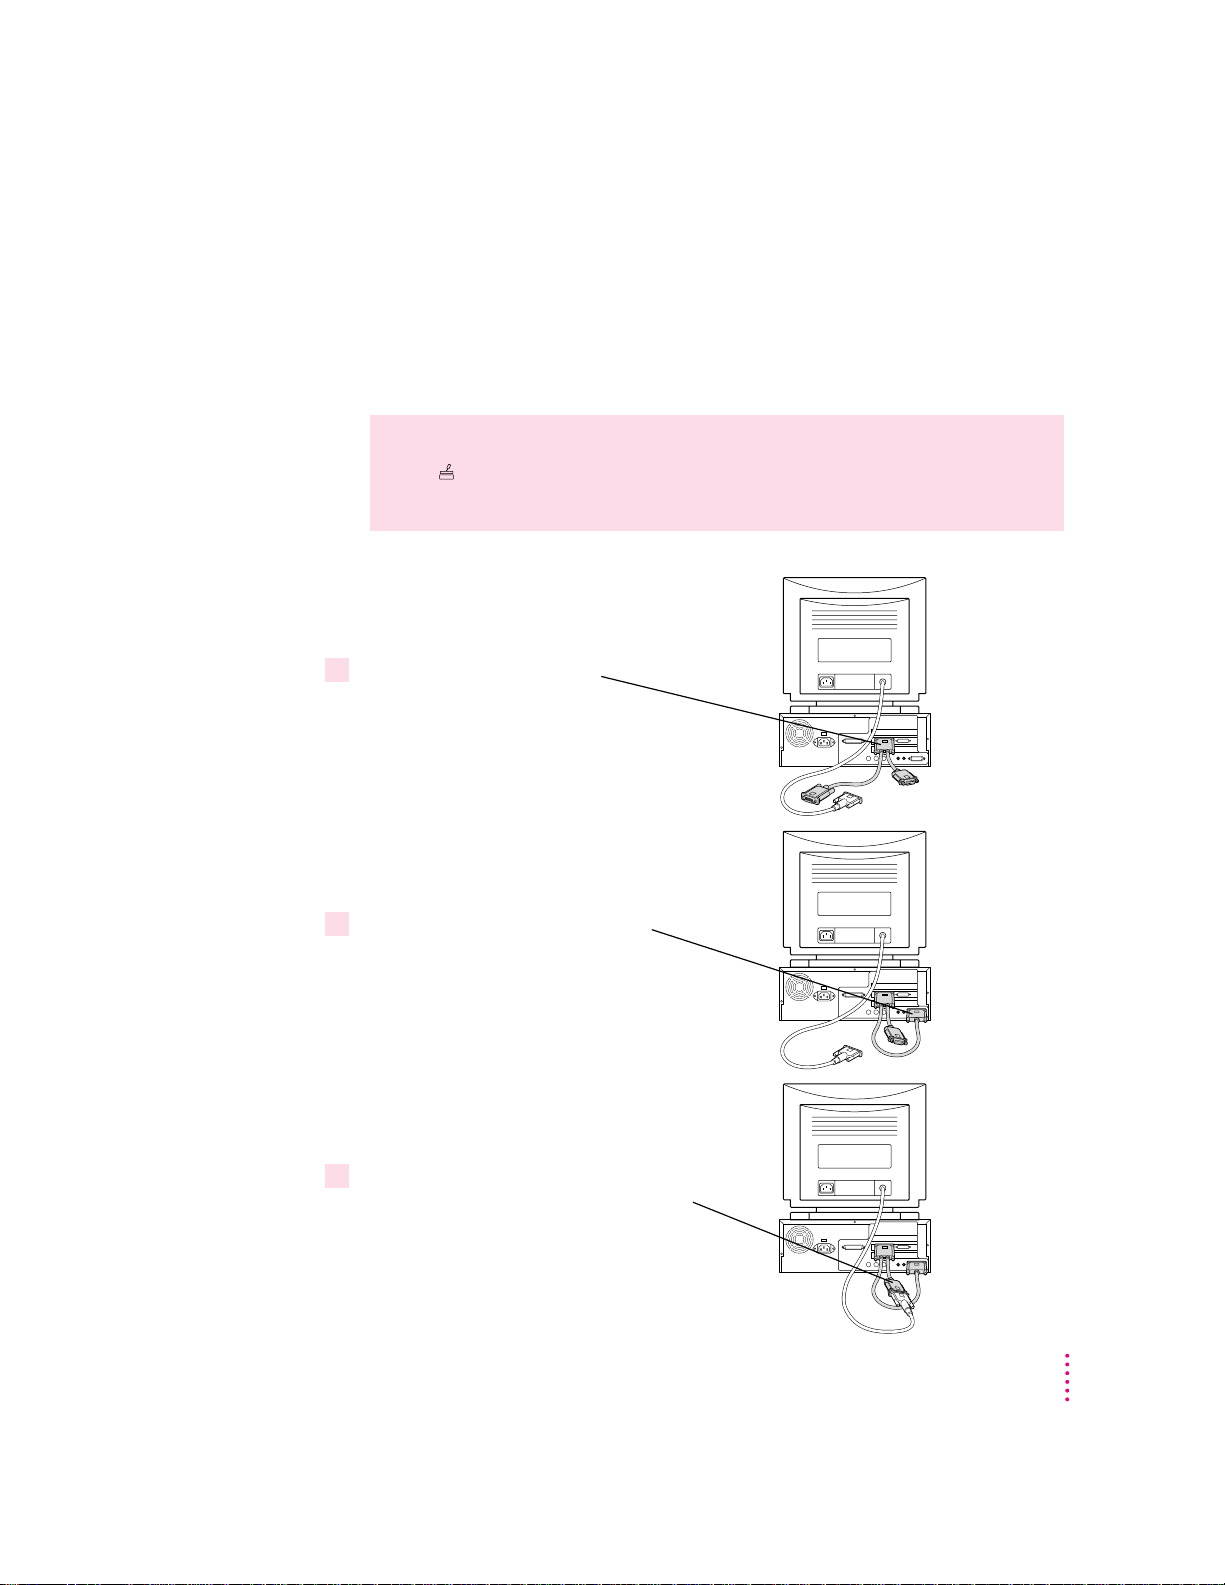
Connecting a single monitor
Plug the middle connector on the
loopback cable into the left port
on your PC Compatibility Card. This
connector has a triple row of pins and
an Apple (
K
) icon on either side.
Plug the long connector on the loopback
cable into the built-in monitor port
(or video card if one is installed).
Plug the short connector on the loopback
cable into your monitor’s cable. This connector
has an Apple (
K
) icon on one side and
a monitor (
™
) icon on the other.
1
2
3
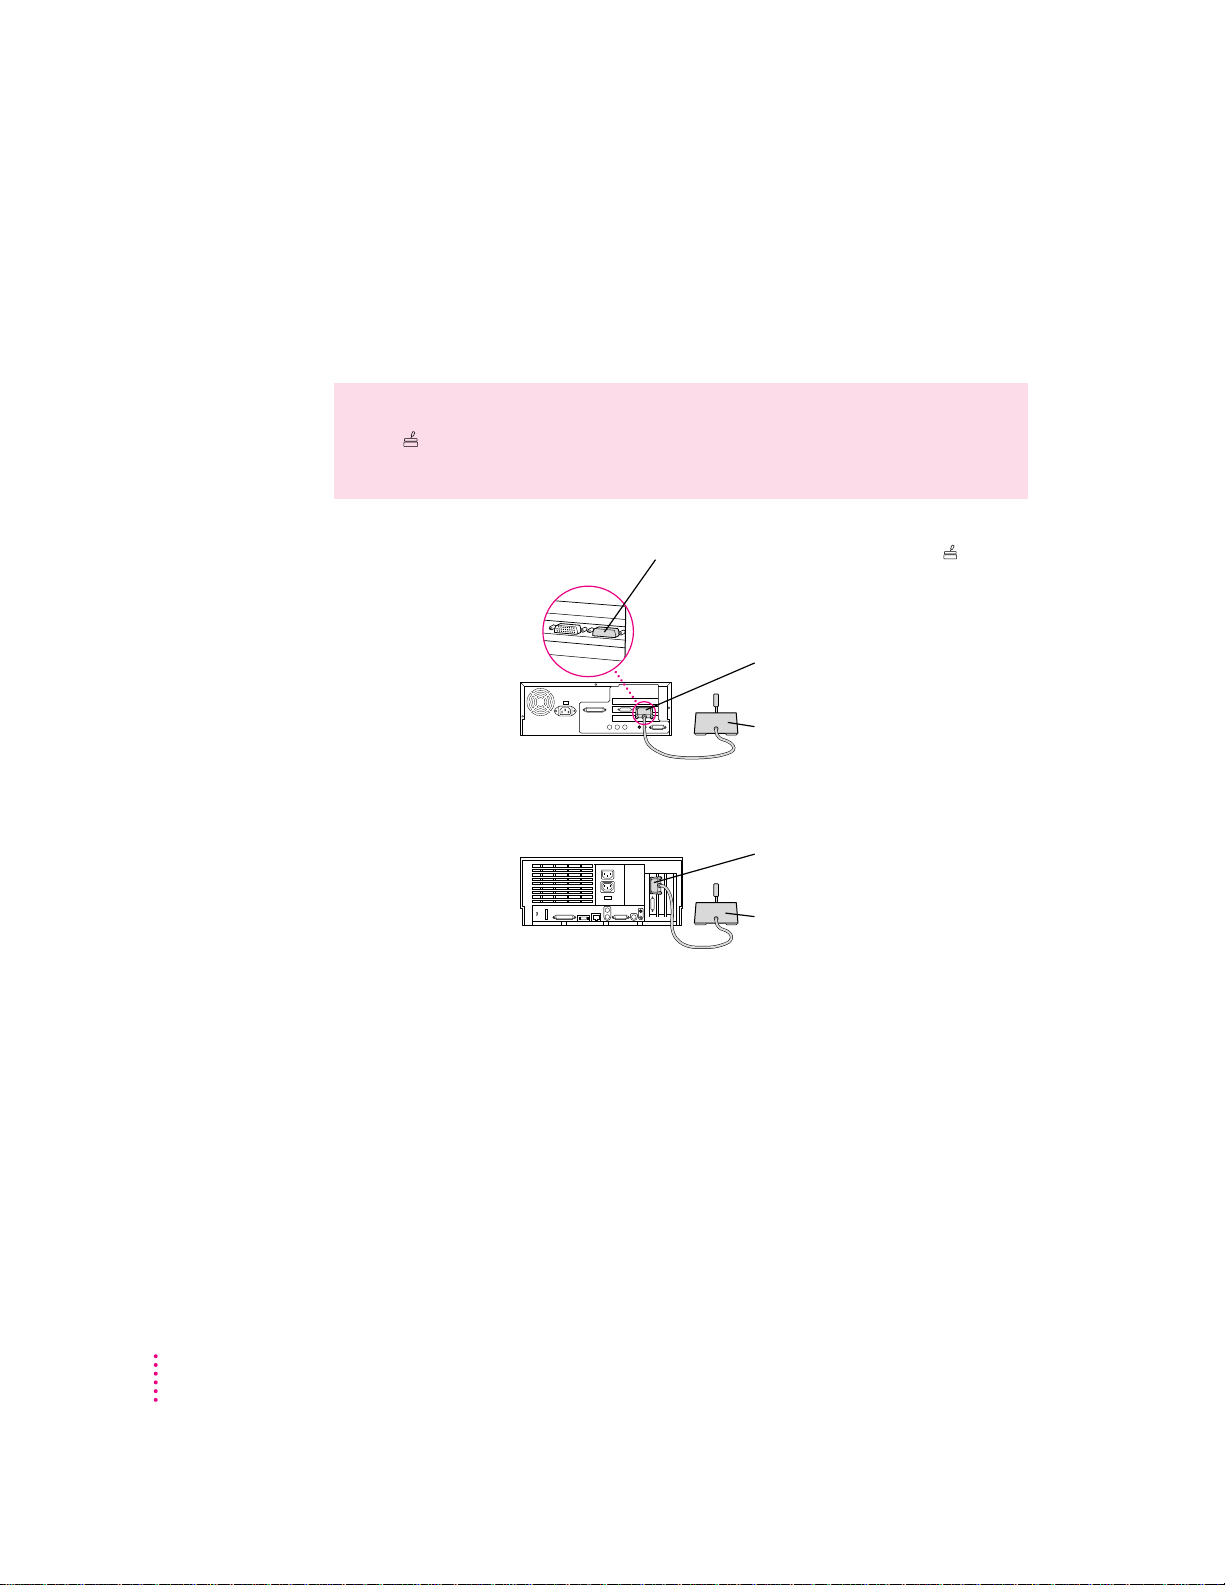
Connecting a monitor to your Po wer Macintosh 4400
Before you begin, make sure your computer and monitor are unplugged. Then
follow these steps using the loopback cable:
WARNING
Do not plug a monitor into the joystick port (marked with the
icon ), and do not plug a joystick into a monitor port (marked with the
icon ™). Serious damage can result to your equipment.
Connecting Monitors and Other Equipment
3
Page 4
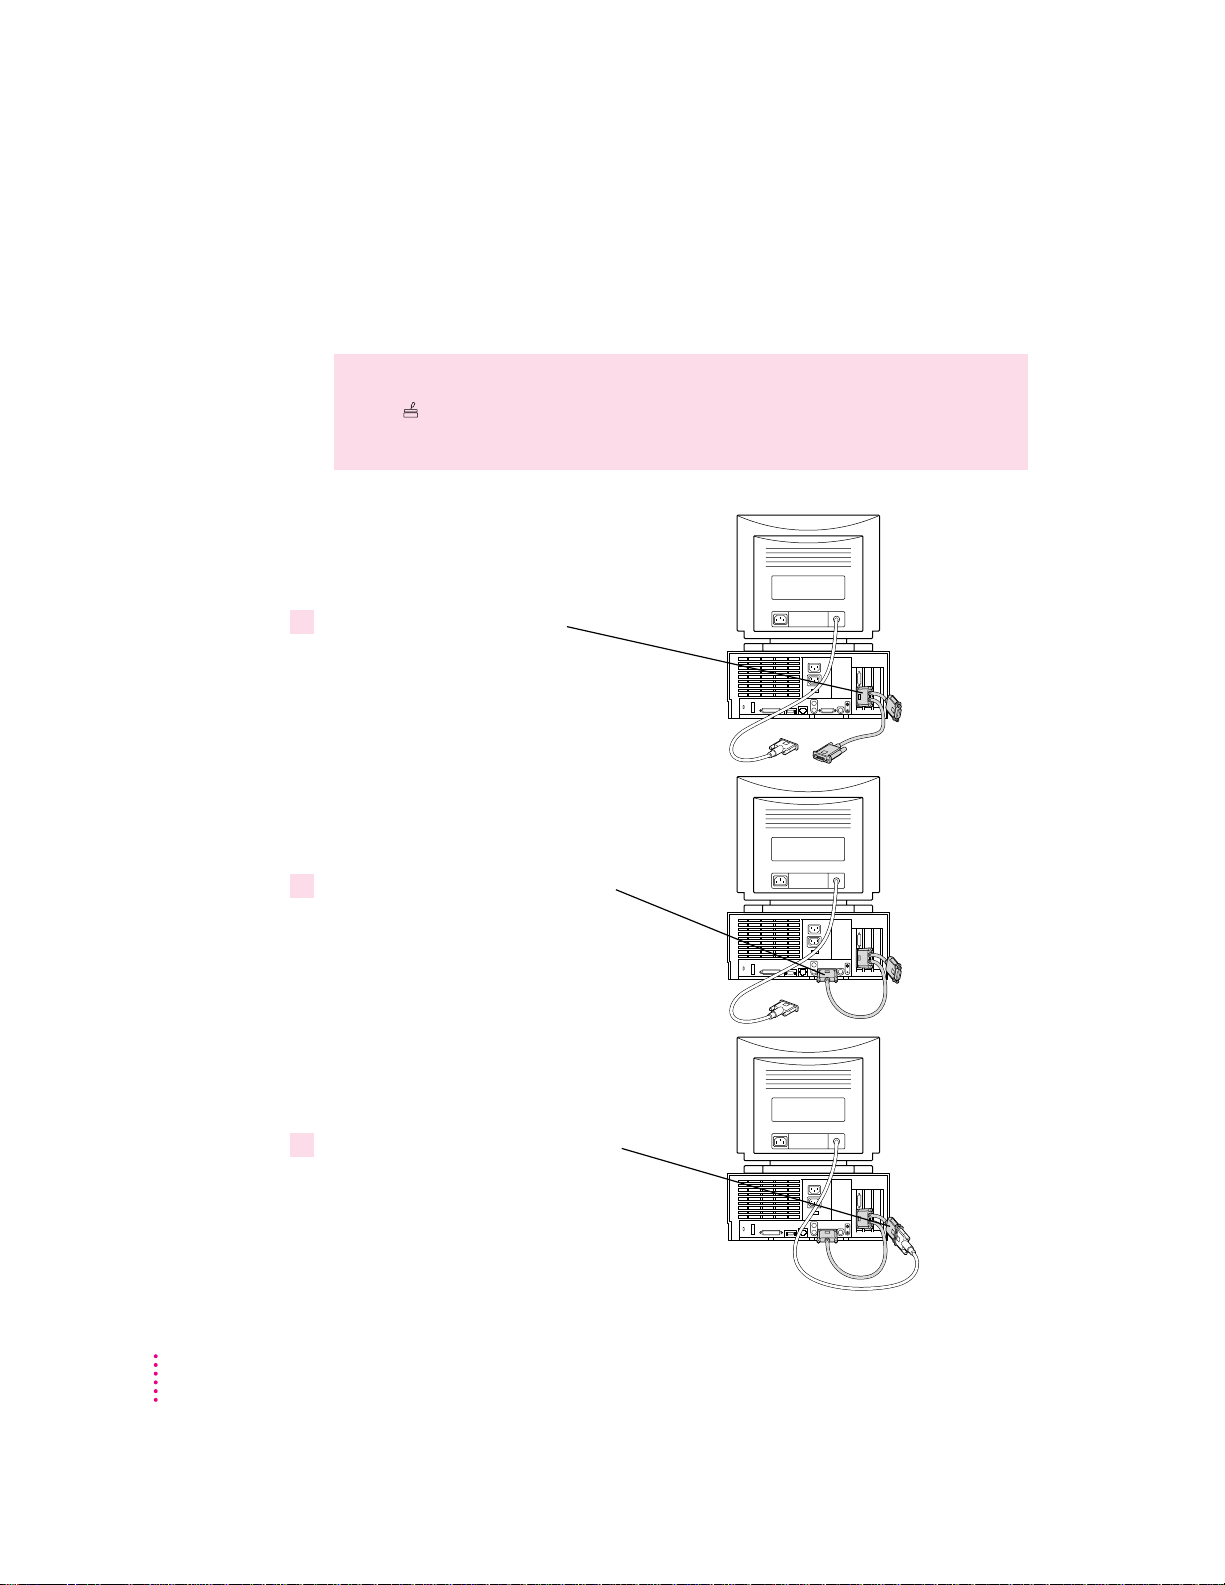
Connecting a monitor to your Po wer Macintosh 7300
Plug the middle connector on the
loopback cable into the bottom port
on your PC Compatibility Card. This
connector has a triple row of pins and
an Apple (
K
) icon on either side.
Plug the long connector on the loopback
cable into the built-in monitor port
(or video card if one is installed).
Plug the short connector on the loopback
cable into your monitor’s cable. This connector
has an Apple (
K
) icon on one side and a
monitor (
™
) icon on the other.
1
2
3
Before you begin, make sure your computer and monitor are unplugged. Then
follow these steps using the loopback cable:
WARNING
Do not plug a monitor into the joystick port (marked with the
icon ), and do not plug a joystick into a monitor port (marked with the
icon ™). Serious damage can result to your equipment.
4
Chapter 1
Page 5

Connecting two monitors
If you connect two monitors, you see the Mac OS environment on one and
the PC environment on the other. The monitor connected to the PC
Compatibility Card shows the PC environment. You can also switch between
Mac OS and PC environments on this monitor if you have a video card.
You can use any combination of Mac OS–compatible and PC-compatible
monitors (with the proper cable adapters, available from your monitor vendor
or Apple-authorized dealer).
Multiple-scan monitor: If you want to use a multiple-scan monitor from a
manufacturer other than Apple to display the PC environment, you also need
to use a VGA-to-Macintosh adapter (available from your computer vendor).
You connect this adapter between the monitor’s cable and the loopback cable.
WARNING
Do not plug a monitor into the joystick port (marked with the
icon ), and do not plug a joystick into a monitor port (marked with the
icon ™). Serious damage can result to your equipment.
Connecting Monitors and Other Equipment
5
Page 6
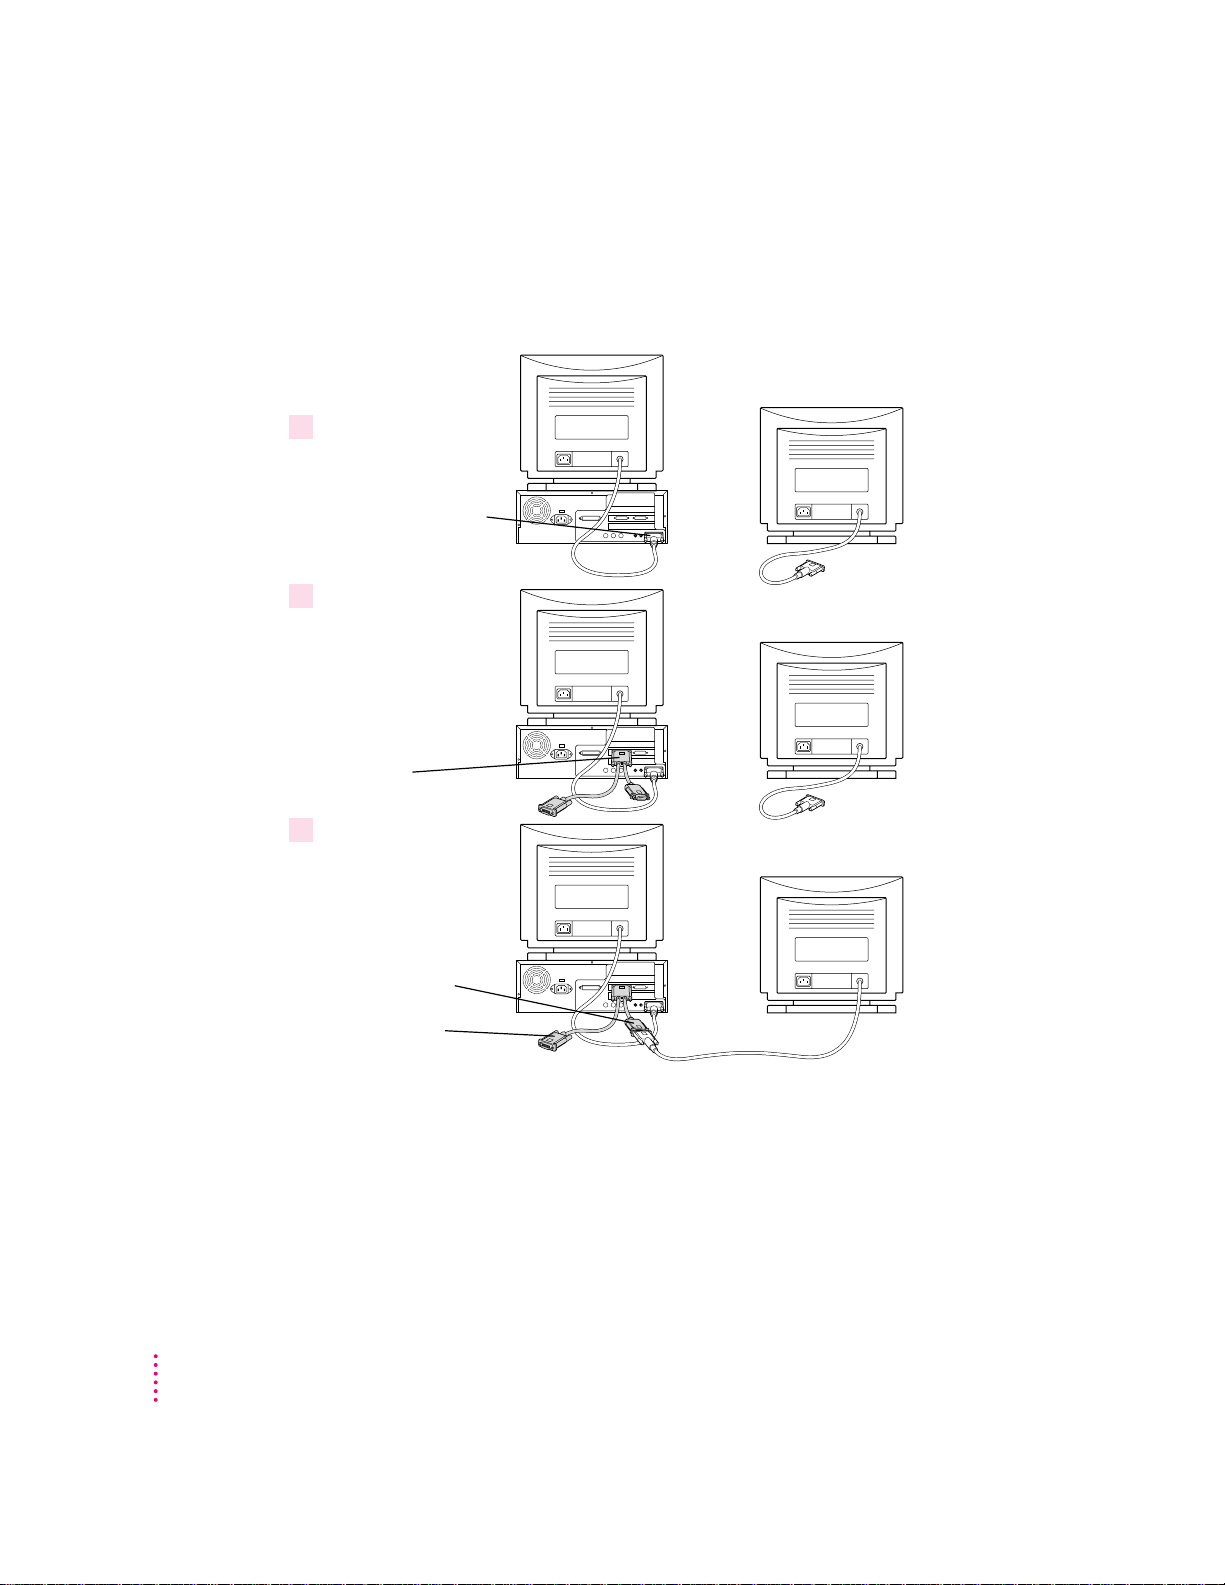
Connecting two monitors to your Power Macintosh 4400
Plug the monitor you
want to use for the
Mac OS environment
into the built-in monitor
port (
™
) on the back
of your computer.
Mac OS PC
Mac OS PC
Plug the middle
connector on the
loopback cable into
the left port on the
PC Compatibility Card.
This connector has a
triple row of pins and
an Apple (
K
) icon on
either side.
Plug the short
connector on the
loopback cable into the
second monitor’s cable.
This connector has an
Apple (
K
) icon on one
side and a monitor (
™
)
icon on the other.
Long connector
Mac OS PC
1
2
3
Before you begin, make sure your computer and monitor are unplugged. Then
follow these steps using the loopback cable:
6
Chapter 1
You can leave the long connector unplugged. Or, if you have a video card and
want one monitor to switch between the Mac OS and PC environments, you
can plug the long connector into the video card port.
Page 7
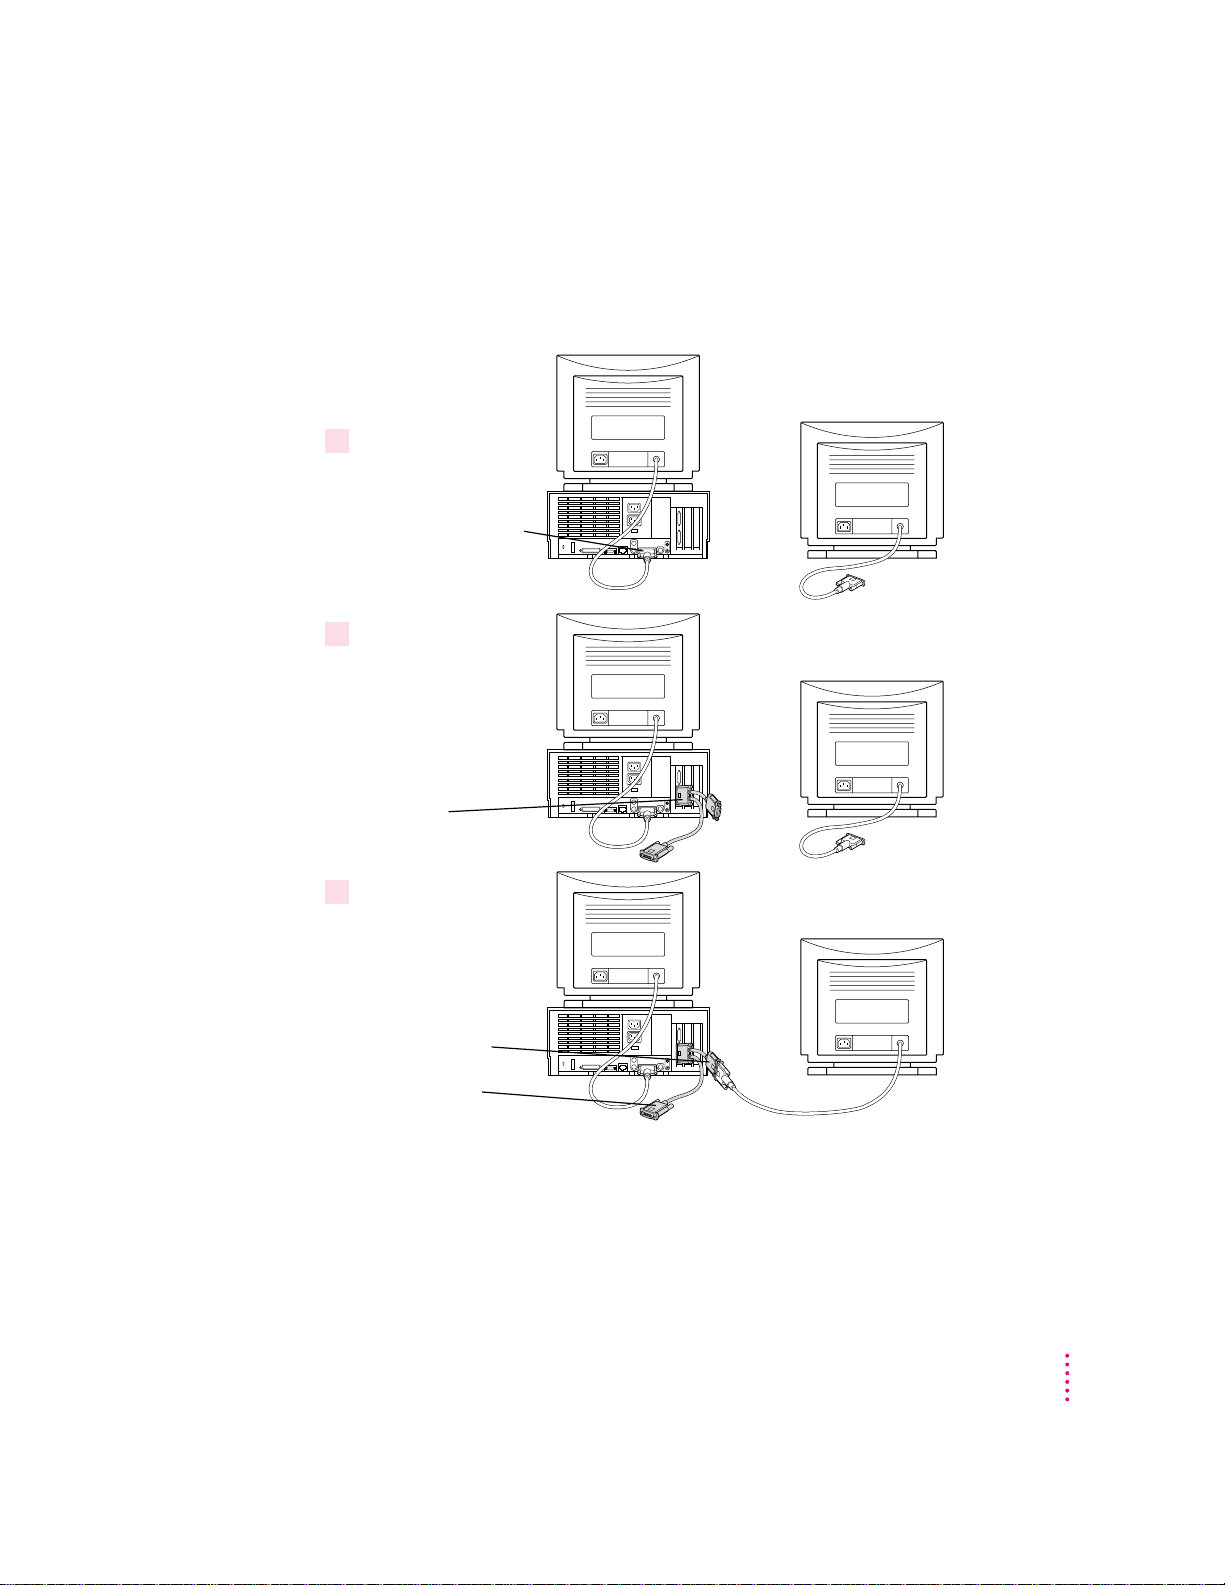
Connecting two monitors to your Power Macintosh 7300
Plug the monitor you
want to use for the
Mac OS environment
into the built-in monitor
port (
™
) on the back
of your computer.
Mac OS PC
Mac OS PC
Mac OS PC
Plug the middle
connector on the
loopback cable into
the bottom port on the
PC Compatibility Card.
This connector has a
triple row of pins and
an Apple (
K
) icon on
either side.
Plug the short
connector on the
loopback cable into the
second monitor’s cable.
This connector has an
Apple (
K
) icon on one
side and a monitor (
™
)
icon on the other.
Long connector
1
2
3
Before you begin, make sure your computer and monitor are unplugged. Then
follow these steps using the loopback cable:
You can leave the long connector unplugged. Or, if you have a video card and
want one monitor to switch between the Mac OS and PC environments, you
can plug the long connector into the video card port.
Connecting Monitors and Other Equipment
7
Page 8
Connecting an AudioVision monitor
Plug the ADB (V),
sound output (
-
), and
sound input (
≈
) cables
into the corresponding
ports on the back of
the computer.
Plug the short connector on
the loopback cable into the
AudioVision adapter cable.
AudioVision adapter cable
To connect an AudioVision monitor to your Macintosh computer, first
connect the loopback cable to the appropriate ports on your computer as you
would w ith a ny other monitor:
m Plug the middle connector on the loopback cable into the PC Compatibility
Card port with the triple row of pins and Apple (K) icon on either side.
m Plug the long connector on the loopback cable into the computer’s built-in
monitor port or video card.
Then plug the short end of the loopback cable into the AudioVision adapter
cable. Plug the remaining cables into the corresponding ADB, sound input,
and sound output ports on the back of your computer. (For more information,
see the manual that came with your AudioVision monitor.)
Connecting an AppleVision monitor
8
Chapter 1
You connect your AppleVision monitor like any other monitor, except you
also have to connect an extra cable—the ADB cable, which is thinner than the
others. Plug this cable into the ADB port (marked with V) on the back of your
computer. (For more information, see the manual that came with your
AppleVision monitor.)
If you are using an AppleVision monitor to display the PC environment
only, you will need to adjust the video manually, by pressing the buttons on
the monitor.
Page 9

Connecting a pointing device
If you have a standard ADB (Apple Desktop Bus) one-button mouse or other
pointing device, you can simulate the behavior of a two-button PC mouse
using keys on your keyboard. For more information, see the section “Using a
Poi ntin g Device” in Chapter 4.
You can also use an ADB multibutton mouse or other pointing device and
configure it to work as a PC mouse. To use a multibutton pointing device in
the PC environment, you need to install the appropriate software. See the
manual that came with your computer and pointing device for more
information.
You can connect a pointing device to any available ADB port (marked with V)
on your Macintosh computer.
Pointing devices designed specifically for a PC are not recommended for use
with your Macintosh computer.
Connecting a MIDI device
You can connect a MIDI (musical instrument digital interface) device to the
game controller port that comes on some models of the PC Compatibility
Card. To connect a MIDI device, you need a Sound Blaster–compatible
MIDI-to-joystick adapter (available from your computer dealer). For
instructions on connecting devices to the joystick port, see the next section,
“Connecting a PC Game Controller.”
Connecting Monitors and Other Equipment
9
Page 10
Connecting a PC game controller
Game controller
Plug the game controller
into the joystick port.
Power Macintosh 4400
PC Compatible
The joystick port is marked with this icon:
Remove the port cover before plugging a game
controller into the joystick port. Leave the port
cover on when a game controller is not attached.
Game controller
Plug the game controller
into the joystick port.
Power Macintosh 7300
PC Compatible
Your PC Compatibility Card comes with a game controller port. To connect a
PC game controller, such as a joystick, remove the plastic cover on the game
controller port. Then plug your game controller into the port.
WARNING
Do not plug a monitor into the joystick port (marked with the
icon ), and do not plug a joystick into a monitor port (marked with the
icon ™). Serious damage can result to your equipment.
Connecting a printer
10
Chapter 1
You can print from the PC environment on any printer connected to your
Macintosh computer.
You can also purchase a PC Serial and Parallel Card (available from your
Apple-authorized dealer), which allows you to connect a PC-compatible
printer. A printer connected to this card can print only from the PC
environment. You can also purchase a package such as GDT’s PowerPrint.
For more information, see “Setting Printer Options” in Chapter 3.
Page 11

Connecting to a network
You can connect to shared disks on an AppleTalk or other Mac OS–compatible
network using Macintosh file sharing.
By installing the appropriate networking software, you can also connect your
computer to a PC-compatible network, such as a Novell NetWare network.
For more information, see the section “Setting Up Your PC on a Network” in
Chapter 3 and Appendix D, “Installing Network Client Software.”
Connecting a modem or other serial device
Even in t he PC environment, you can use a modem or other serial device
connected to the Macintosh serial port. Macintosh computers do not have the
same serial interface that PCs have, so your modem or communications
software may require adjustment when connected to this port.
You can also connect your modem to a PC Serial and Parallel Card (available
from your Apple-authorized dealer), which has a true RS-232 PC serial
interface. A modem or other serial device connected to this card can only be
accessed from the PC environment.
For more information, see Chapter 3, “Setting Up the PC Environment.”
Connecting a security dongle
If your PC software requires a security dongle, you can connect it
by purchasing a PC Serial and Parallel Card (available from your
Apple-authorized dealer).
Connecting Monitors and Other Equipment
11
Page 12

Page 13

2
Installing the PC Compatibility Card Software
This chapter describes how to install software for your PC Compatibility Card.
The CDs that came with your PC Compatibility Card contain the software
you need to use the card in both the Macintosh and PC environments. In
addition, Windows 95 is provided so that you can install a basic operating
system for the PC environment.
IMPORTANT
Compatibility Card software is already installed. In addition, a PC container
with Windows 95 and the necessary PC utilities and support software has also
been installed. Refer to this chapter if you need to reinstall the PC
Compatibility Card software, create a new drive container, reinstall
Windows 95, or reinstall PC utilities.
To install the software, you need the following items that came with your PC
Compatibility Card:
m PC Compatibility Card–Mac OS Software CD
m PC Compatibility Card–PC Utilities CD
m Microsoft Windows 95 CD-ROM Setup Boot Disk
m Microsoft Windows 95 CD
Note: Your PC Compatibility card came with two different Windows 95 CDs.
Make sure to use the CD labeled Microsoft Windows 95 and not the one
labeled Microsoft Windows 95 Starts Here/How & Why.
If you received this manual with your new computer, the PC
13
Page 14

There are several steps to installing your PC Compatibility Card software:
m installing the Mac OS software
m creating a storage area (called a drive container) for your PC software
m installing Windows 95
m installing support software for Windows 95
m installing PC utilities
Installing th e Mac OS PC Compatibility software
To install the Mac OS software for operating your PC Compatibility Card,
follow t hese steps:
1Insert the
PC Compatibility Card–Mac OS Software
CD into the CD-ROM drive.
If necessary, double-click the CD icon to open it.
2Double-click the PC Compatibility Software folder to open it.
3Double-click the Installer icon in the PC Compatibility Software folder.
If you see a message describing the Installer software, click OK.
The Installer window appears.
4Make sure the disk named in the box is the one on which you want to install software.
If not, click Switch Disk until the correct disk name appears.
Note: If you want to install only specific components, choose Custom Install
from the Easy Install menu. In the Custom Install window, click to place an X
in the boxes next to the components you want to install.
5Click Install.
The software is automatically installed on your hard disk.
14
Chapter 2
Page 15

6When the installation is complete, follow the instructions on the screen to quit the
Installer and restart your computer.
The following Mac OS software is now installed for use with your PC
Compatibility Card:
Name Location
PC Setup Control Panels folder
Ethernet (built-in) Extensions folder
PC Compatibility Guide Extensions folder
PC Clipboard Extensions folder
PC Net Exchange Extensions folder
PC Network Extension Extensions folder
PC Print Spooler Extensions folder
PC Setup Switch Control Strip Modules
Creating a drive conta iner
A drive container is a file on your computer’s hard disk that acts as a hard drive
for the PC. You create a drive container using the PC Setup control panel.
1Choose Control Panels from the Apple (
2Double-click the PC Setup icon.
K
) menu.
Installing the PC Compatibility Card Software
15
Page 16
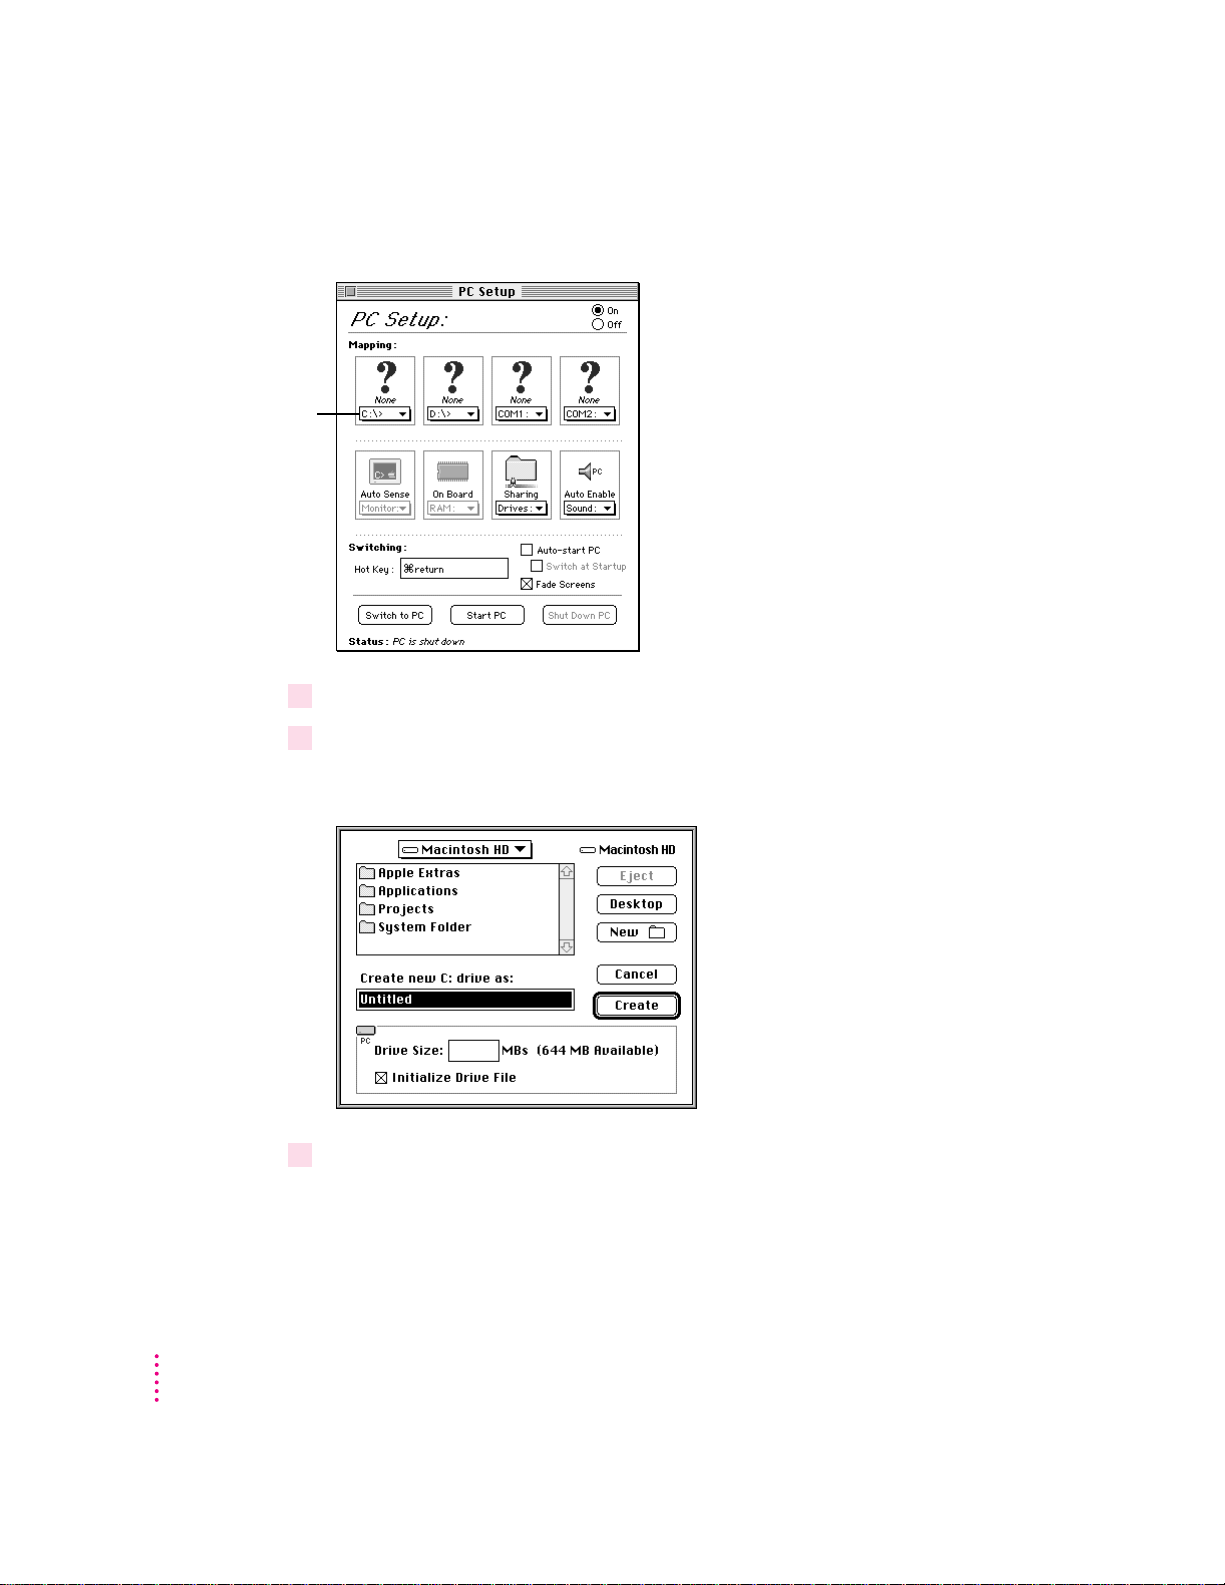
C drive pop-up menu
3If the PC is running click Shut Down PC.
4Choose New Drive File from the C drive pop-up menu.
The PC Setup control panel appears.
A dialog box appears.
16
5Choose a location for the drive container.
The drive container can be on any hard disk attached to the computer that has
sufficient free space.
Chapter 2
Page 17

6Type a name for the drive container and then press the Tab key.
You can type up to 31 characters.
7Type a size (in MB) for the drive container.
You can make the container as small as 2 MB or as large as 1023 MB. The
amount of space you need depends on the software you want to install. If you
are installing Microsoft Windows 95, you’ll need at least 200 MB.
IMPORTANT
Once a drive container is created, its size cannot be changed.
Before choosing a size for your drive container, decide which PC operating
system and applications you want to run. Check the documentation that came
with the software to estimate how much space you’ll need; then allow some
extra room for applications. If you still run out of space on the drive
container, you can create another drive container and assign it to drive D.
8Make sure Initialize Drive File is checked.
The Initialize Drive File option is used to create a drive container with a
single partition. A single-partition drive container is recommended for most
standard installations. However, you can create a drive container with
multiple partitions. See “Creating a Multiple Partition/Bootable Drive
Container” in Chapter 3, “Setting Up the PC Environment,” if you need a
drive container with multiple partitions.
9Click Create.
The new drive container is created.
10 Click Start PC.
Note: If you want the PC to start automatically when the Mac OS starts up,
click the box labeled “Auto-start PC” to place an X in it.
Installing the PC Compatibility Card Software
17
Page 18

Installing Windows 95
Once the drive container is created, the next step is to install the Windows 95
operating system in it. You can think of a new drive container as a formatted
hard drive that needs an operating system in order to be a startup disk. You
need to install Windows 95 before you can install any applications. Find the
Microsoft Windows 95 CD-ROM Setup Boot Disk and Microsoft Windows 95 CD
that came with your PC Compatibility Card and follow these steps:
Note: Your PC Compatibility card came with two different Windows 95 CDs.
Make sure to use the CD labeled Microsoft Windows 95 and not the one
labeled Microsoft Windows 95 Starts Here/How & Why.
1 Open the PC Setup control panel and click “Switch to PC.”
The Mac OS desktop disappears. (If you set up a dedicated monitor for the
PC environment, the image on the Mac OS monitor dims.) The PC
environment starts up and you see a message about a Non-System disk or disk
error. This message indicates that the PC has started up and not found any
operating system.
2Insert the
Microsoft Windows 95 CD-ROM Setup Boot Disk
into the disk drive.
The Microsoft Windows 95 CD-ROM Setup Boot Disk contains the necessary
CD-ROM drivers so that the PC Compatibility Card can access the Macintosh
CD-ROM drive.
3Insert the
4Press the Space bar to continue.
5 Follow the onscreen instructions to install Windows 95.
Microsoft Windows 95
CD into the CD-ROM drive.
m You need the Windows 95 Certificate of Authenticity number found on the
cover of the Windows 95 manual that came with your PC Compatibility
Card.
m If you choose to make a startup floppy disk, make sure the disk you are
goi n g to use is already formatted for the PC environment. The PC
environment will not recognize an unformatted or Macintosh-formatted
disk.
18
Chapter 2
Page 19

m Do not install any networking software during the Windows 95 installation
process. To install networking software, see Appendix D, “Installi ng
Network Client Software,” after you have completed the Windows 95 setup
process.
m At th e end of the installation process, make sure to eject the Microsoft
Windows 95 CD-ROM Setup Boot Disk by pressing x-E before the computer
restarts. If the Microsoft Windows 95 CD-ROM Setup Boot Disk is still in the
disk drive, the computer will boot from the floppy disk when it restarts.
When the installation process is complete, the PC environment automatically
restarts and runs Windows 95.
6 Follow the onscreen instructions to complete the Windows 95 setup.
The first time you run Windows 95 after installation, the Windows 95 setup
program automatically starts. Follow the instructions on the screen noting the
following items:
m When you are asked to install printer drivers, click Cancel. To set up
printing, see Chapter 3, “Setting Up the PC Environment,” after you have
completed the Windows 95 setup process.
m Do not print the test page if you are prompted to do so.
Installing the PC Compatibility Card Software
19
Page 20

Installing suppo rt software for Windows 95
The software on the PC Compatibility Card–PC Utilities CD that came with
your PC Compatibility Card allows the card to work with the Mac OS and
Mac OS–compatible CD-ROM drives, networks, and other equipment.
To install the software, follow these steps:
1If necessary, switch to the PC environment.
To switch to the PC environment from the Mac OS, press x-Return, or open
the PC Setup control panel and click “Switch to PC.”
2Insert the
3Click the Start button; then choose Run from the menu that appears.
4In the dialog box that appears, type the following:
E:\APPLE\SETUP <return>
5 Follow the instructions that appear on the screen.
PC Compatibility Card–PC Utilities
CD.
The recommended directory in which to install files is C:\APPLE.
By default, all options will be installed. However, you may choose not to
install specific options. These are the installation options:
m Install Macintosh/Windows Copy and Paste: allows you to transfer Clipboard
information between the Mac OS and PC environments
m Install Macintosh/PC Folder Sharing: allows you to use a Mac OS folder
with the PC as a shared PC drive
m Install CD-ROM Support: allows you to use CD-ROM discs in the PC
environment
m Install PC Compatibility Help: helps you set up your Windows 95
environment to properly work with the PC Compatibility Card
20
Chapter 2
Page 21
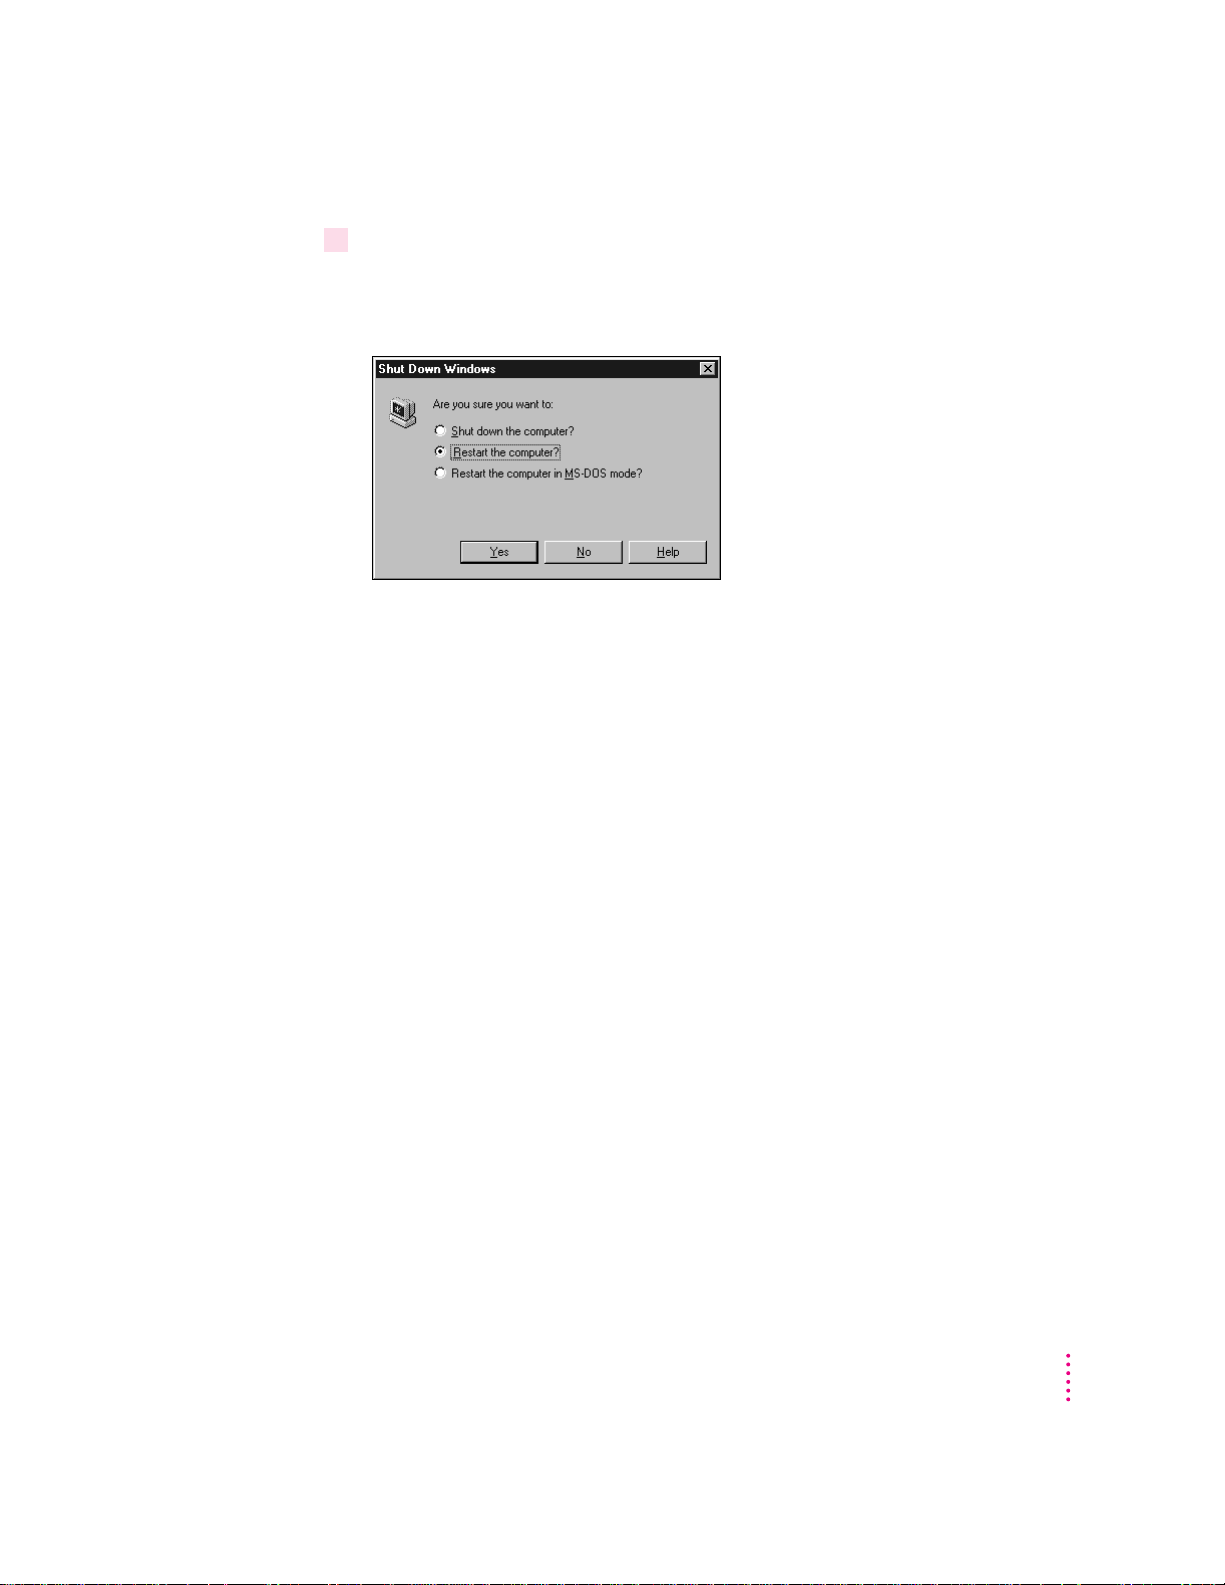
6When installation is complete, restart the PC.
Click the Start button and select Shutdown. In the Shutdown dialog box,
choose “Restart the Computer?”
Configuring network support in Wind ows
To configure network support in Windows, see Appendix D, “Installing
Network Client Software.”
Installing PC utilities
The PC Compatibility Card–PC Utilities CD also contains the following
programs and utilities:
m Keyboard files let you use keyboard layouts for a variety of languages.
m QuickTime for Windows lets you view and manipulate video on the PC.
m Sound Blaster software lets you play music and manipulate sound files.
m Video drivers let you configure and use a variety of monitors.
You should install Sound Blaster and the video drivers. QuickTime and the
keyboard files are optional.
Installing the PC Compatibility Card Software
21
Page 22
Installing keyboard files in Windows 95
Keyboard files allow you to use keyboard layouts for other languages and
keyboards.
IMPORTANT
use th e keyboard files on the PC Compatibility Card–PC Utilities CD. (The
supported languages vary from country to country.) The keyboard files that
come with Windows 95 may not work with your keyboard.
1 Start Windows 95.
.2Insert the
3Click the Start button.
4Choose Settings from the menu that appears; then choose Control Panel.
5Double-click the Keyboard icon.
6Click the Language tab.
7Click Add.
8From the pop-up list that appears, select the language you want. Then click OK.
9Select the name of the language whose keyboard layout you want to use and then click
OK.
PC Compatibility Card–PC Utilities
If you are using an international keyboard, be sure to install and
CD into the CD-ROM drive.
22
Chapter 2
10 Click “Set as Default” and then click OK.
11 When requested to insert the Windows 95 CD, leave the
Utilities
CD in the CD-ROM drive and click OK.
PC Compatibility Card–PC
You can only use the keyboard drivers provided on the PC Compat i b ility
Card–PC Utilities CD.
12 If an error message appears, click OK.
13 Click Browse.
Page 23

14 Select the E drive in the Drives window.
15 In the Folders window, click the folder and file you want. Then click OK.
The keyboard files are located in the following directory:
E:\KEYBOARD\WIN95
Installing QuickTime for Windows 95
Foll ow these st eps to install the QuickTime for Windows 95 software:
1 In the PC environment, insert the
CD-ROM drive.
2 In Windows 95, click the Start button.
3Choose Run from the menu that appears.
4 In the dialog box that appears, type the following:
E:\QUICKTME\QT32INST <return>
5 Follow the instructions that appear on your screen to complete the installation.
PC Compatibility Card–PC Utilities
CD into the
Installing Sound Blaster software for Windows 95
1 In the PC environment, insert the
CD-ROM drive.
2 In Windows 95, click the Start button.
3Choose Run from the menu that appears.
4 In the dialog box that appears, type the following:
E:\SOUND\W95SETUP.BAT <return>
If a message asks you to insert a disk, click OK.
PC Compatibility Card–PC Utilities
CD into the
Let the setup program modify your .INI file.
5When the Installer asks if you want to reboot the PC, choose No.
6When the installation is complete, quit and restart Windows 95.
To use the Sound Blaster programs in Windows 95, click Start, choose
Programs, and select the Sound Blaster 16 directory.
Installing the PC Compatibility Card Software
23
Page 24

Installing video software for Windows 95
The Windows 95 display driver that comes with the PC Compatibility Card
offers better performance than the standard driver. To install the driver, follow
these s t eps:
1Insert the
2In Windows 95, click the Start button.
3Choose Run from the menu that appears.
4In the dialog box that appears, type the following:
E:\VIDEO\ATISETUP <return>
5Click Display Driver.
6 Follow the onscreen instructions to complete the installation.
IMPORTANT
PC Compatibility Card–PC Utilities
CD into the CD-ROM drive.
The ATI setup program asks you to type D:\WIN95 to specify
the video driver location. Because you are using the PC Compatibility
Card–PC Utilities CD rather than the Microsoft Windows 95 CD, type
E:\VIDEO\WIN95 instead.
You may need to move windows to see the information presented. To move
a window, drag the window’s top bar. To set up your monitor for use in
Windows 95, see Chapter 3, “Setting Up the PC Environment,” after you have
completed the Windows 95 setup process.
Installing yo ur own PC software
You can now install your own PC programs in the drive container you’ve
created. Follow the instructions that came with the programs.
You may need to eject disks during installation. Press x-E to eject a floppy
disk. Press x-Y to eject a CD. For more information on working with disks,
see “Using Floppy Disk Drives and Floppy Disks” and “Using CD-ROM
Discs and Drives” in Chapter 4, “Working in the PC Environment.”
For further information on installing network client software, see
Appendix D, “Installing Network Client Software.”
24
Chapter 2
Page 25

3
Setting Up the PC Environment
This chapter contains information on the following aspects of your PC
environment:
m the PC Setup control panel and Control Strip module
m monitors and video software
m RAM
m printer settings
m sound options
m PC drives
m shared volumes
m network settings
m serial port settings
m modem settings
m joystick and MIDI devices
m DOS configuration files
25
Page 26

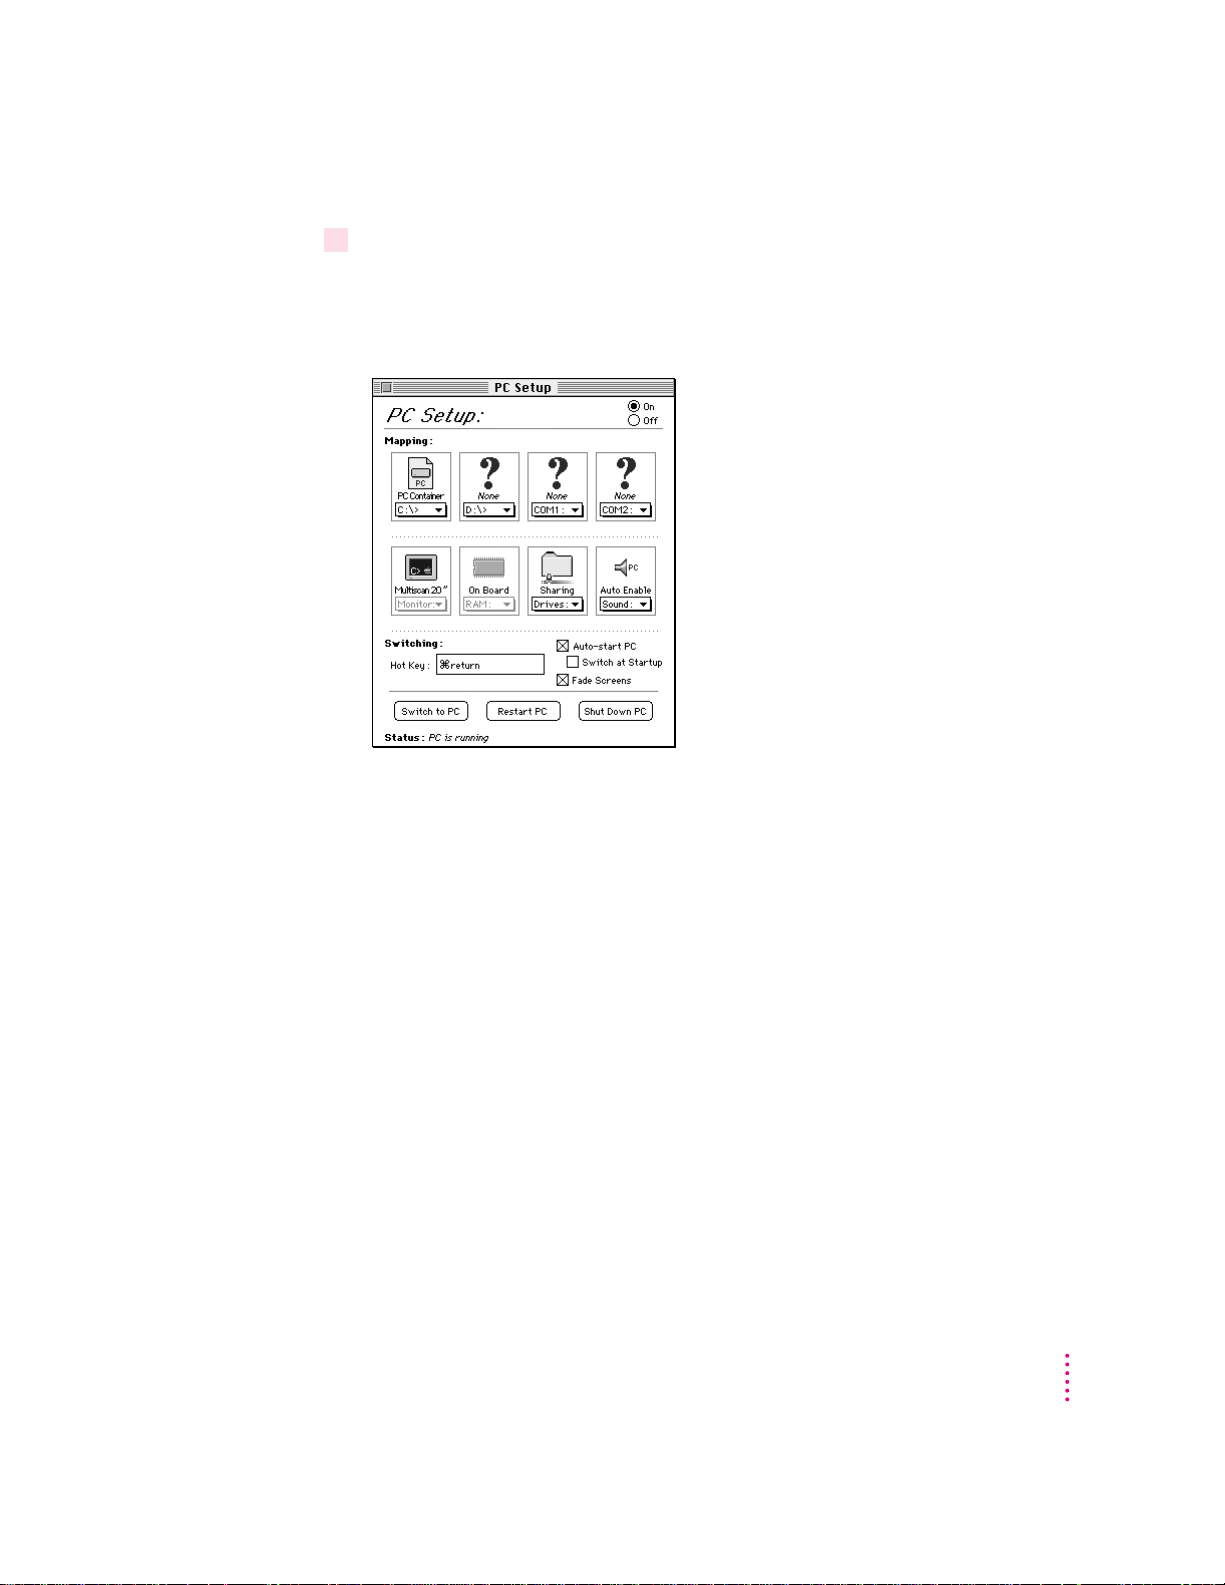
About the PC Setup control panel
You can control the following PC options in the PC Setup control panel:
m turning the PC Compatibility Card on and off
m assigning PC drives to drive containers or volumes
m assigning PC COM1 and COM2 ports to Macintosh serial ports or
text files
m setting up shared folders and volumes
m turning PC sound on and off
m changing the command (hot key) that switches between environments
m setting the PC to start automatically when you start up your computer
m switching to the PC automatically when you start up your computer
m setting the fade screen option when switching environments
m switching to, starting, and shutting down the PC
These options are described in this chapter and in Chapter 4, “Working in
the PC Environment.”
To us e th e PC Setup control panel, follow these steps:
26
Chapter 3
1Choose Control Panels from the Apple (
2Double-click the PC Setup icon to open the PC Setup control panel.
K
) menu.
Page 27
3When you have specified the settings you want, close the control panel.
Onscreen help: To see brief explanations of items in the control panel, choose
Show Balloons from the Guide (h) menu. For detailed step-by-step help, see
the PC Compatibility Guide, available in the Guide (h) menu.
Setting Up the PC Environment
27
Page 28
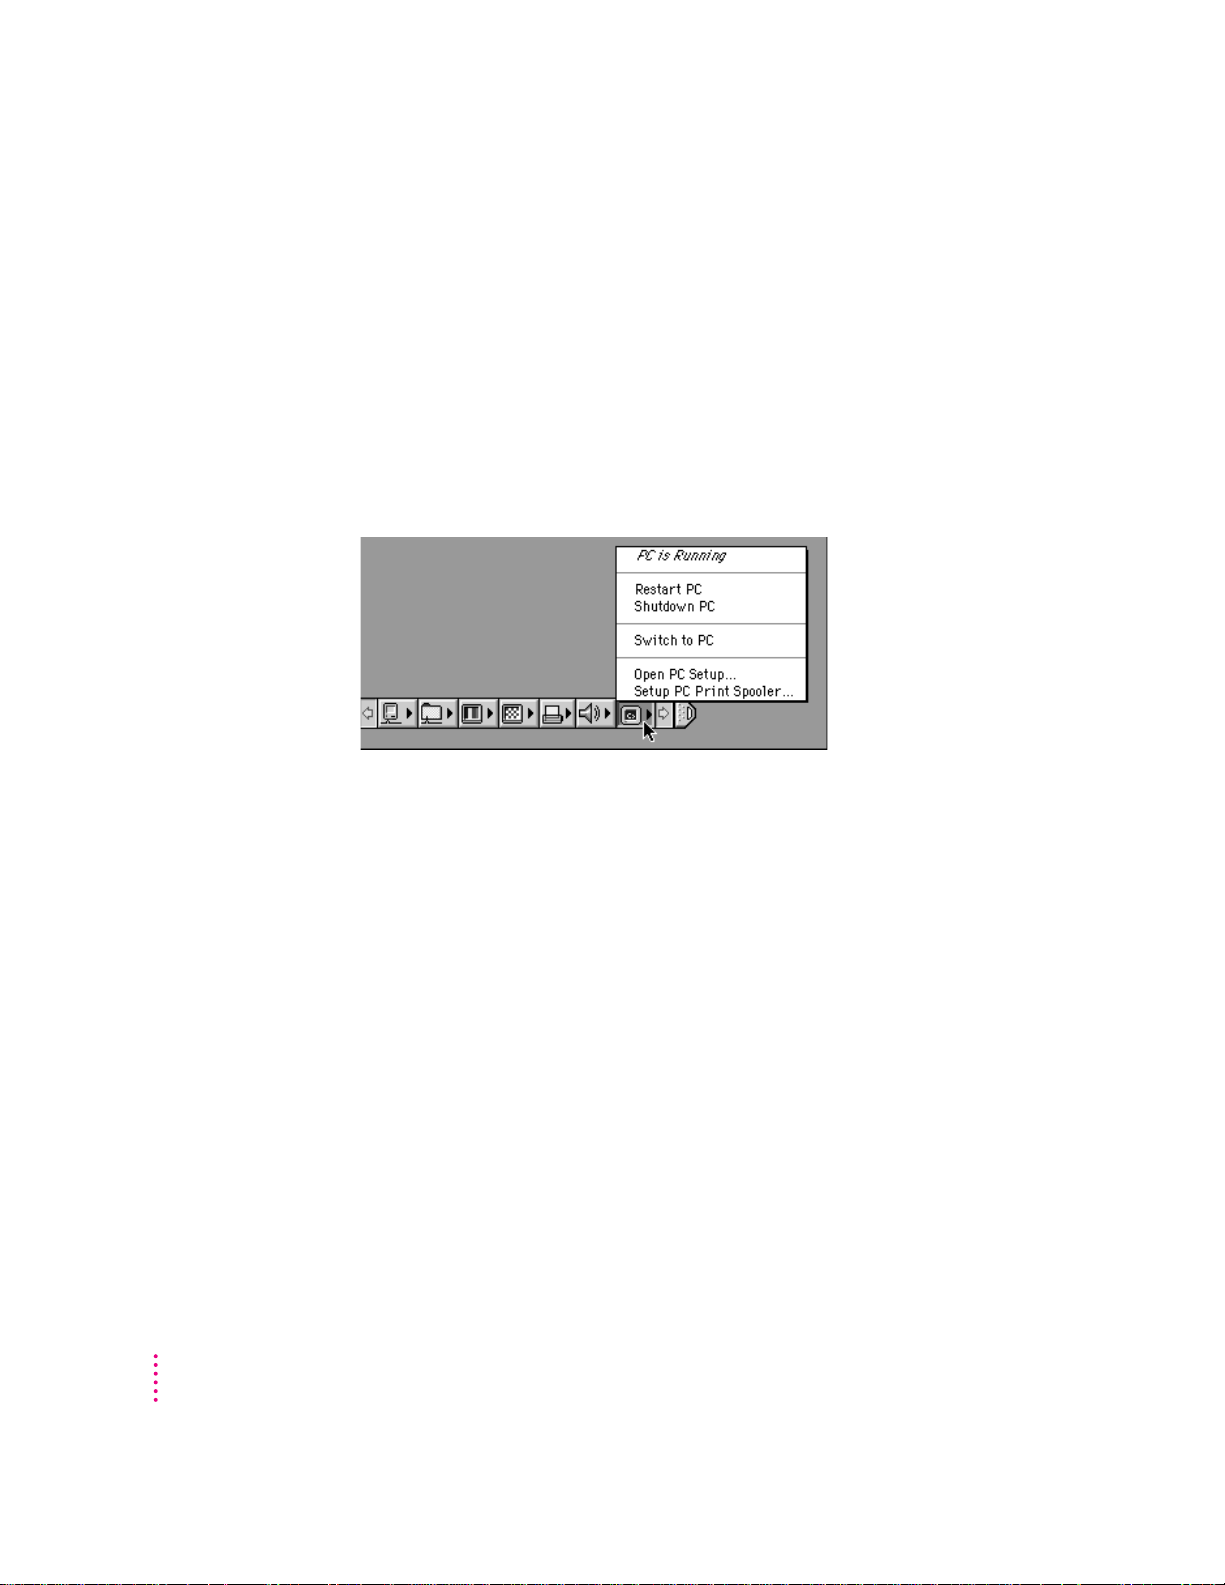
Using th e PC Setup Control Strip module
As part of the installation process, a PC Setup module is added to your
Control Strip. From this Control Strip module you can do the following:
m start up the PC or restart the PC
m shut down the PC
m switch to the PC
m open the PC Setup control panel
m set up the PC Print Spooler
For more information on using the Control Strip, see “How do I use the
Control Strip?” in the “Customizing Your Computer” topic area of Mac OS
Guide, available in t he Guide (h) menu.
28
Chapter 3
Page 29

Configuring monitors
To connect a monitor, see Chapter 1, “Connecting Monitors and Other
Equipment.”
In most cases, the Mac OS recognizes the monitor you’re using to display the
PC environment. The monitor type appears in the Monitor section of the PC
Setup control panel.
If the monitor you’re using to display the PC environment is not working
correctly, make sure you have connected the monitor according to the
instructions in Chapter 1, “Connecting Monitors and Other Equipment,” and
make sure you have installed and configured the video software as described
in Chapter 2, “Installing the PC Compatibility Card Software.” For additional
information on video settings, see Appendix E, “Configuring Video
Software,” and Chapter 5, “Troubleshooting.”
If a VGA monitor is not working correctly, also check whether your
VGA-to-Macintosh adapter is configurable and verify the correct settings.
Setting Up the PC Environment
29
Page 30
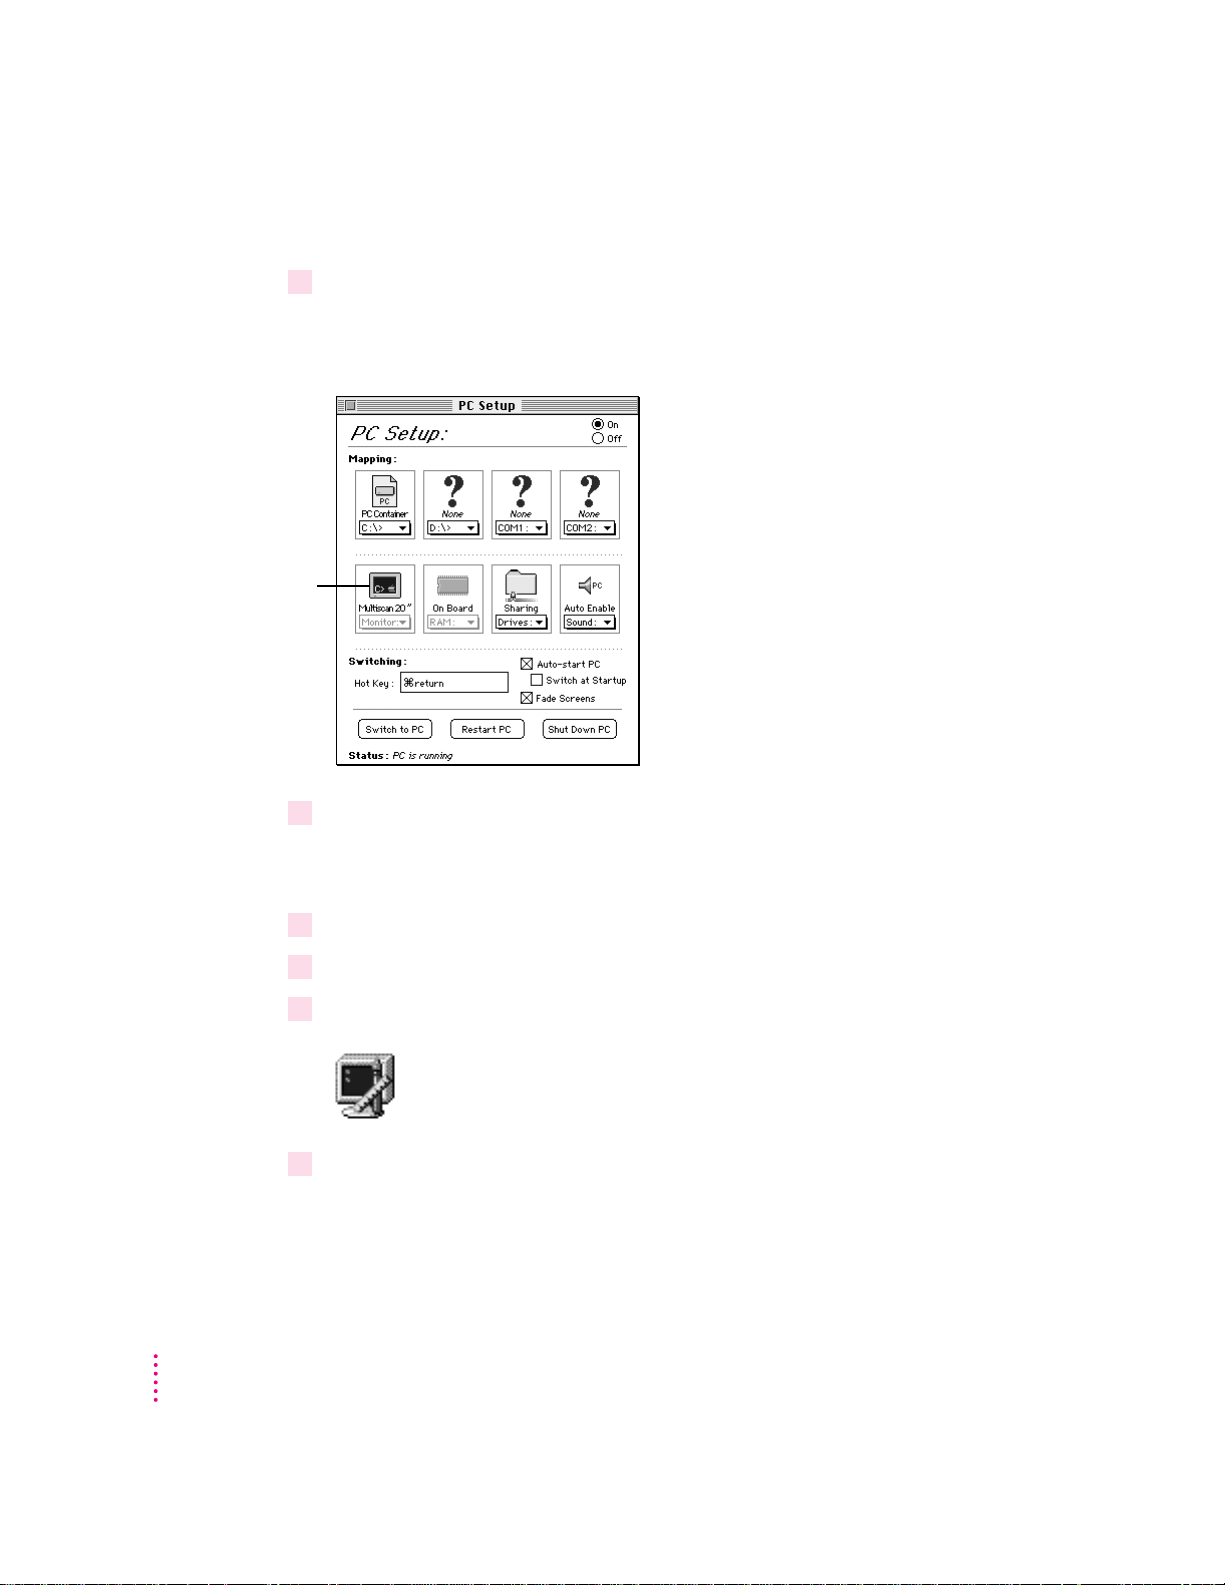
1In the Mac OS, open the PC Setup control panel, and make a note of the monitor type
Type of monitor
recognized by the PC
Setup control panel
2Switch to the PC environment and make sure Windows 95 is running.
Selecting and configuring monitors in Windows 95
that appears in the Monitor section of the control panel.
You can switch to the Mac OS by typing x-Return.
30
You can switch to the PC environment by clicking “Switch to PC” in the
PC Setup control panel or by pressing x-Return.
3In Windows 95, click the Start button.
4Choose Settings from the menu that appears; then choose Control Panel.
5Double-click the Display icon to open the Display control panel.
6Click the Settings tab in the Display control panel.
Note: If you have a DDC-compliant monitor (such as an AppleVision display)
connected directly to the video port on the PC Compatibility Card, you do not
need to select a monitor type. Windows 95 will make the appropriate settings
for you. In addition, Windows 95 will configure the Display control panel so
that only the settings that work with your monitor appear. Skip ahead to step 13.
Chapter 3
Page 31

7Click Advanced Properties.
8Click the Monitor tab and then click Change.
9If your monitor is listed in the dialog box that appears, click its name, click OK, and then
go to step 13. If not, click “Have Disk” and go on to step 10.
10 Insert the
PC Compatibility Card–PC Utilities
CD. Make sure the path in the text box is
E: \ APPLE; then click OK.
11 Click Show All Devices.
12 In the Models box, choose a model corresponding to the monitor type listed in the PC
Setup control panel. Then click OK.
If this type is listed in PC Setup... ...choose this type in the Models box
Apple 14" (this type appears if you’ve “(all other Apple monitors)”
connected a 12-, 13-, or 14-inch
fixed-frequency monitor)
Apple 16" “(all other Apple monitors)”
Multiscan (this type appears if you’ve Plug and Play Monitor (VESA DDC) if this type is
connected an AppleVision or other automatically selected in the list. Otherwise,
AV
DDC-compliant monitor) AppleVision 1710
AppleVision 1705, Multiple Scan 1705, or
Multiple Scan 20.
Multiscan 14" Apple Multiple Scan 14" or Apple Multiple Scan 15"
Multiscan 17" Apple Multiple Scan 17"
Multiscan 20" Apple Multiple Scan 20"
, AppleVision 1710,
19" Color Your monitor model (if listed), or SuperVGA 1024 x 768
Portrait “(all other Apple monitors)”
21" Color “(all other Apple monitors)”
21" Monochrome “(all other Apple monitors)”
VGA Standard VGA 640 x 480
To cus tomize a multiple-scan monitor, click the Adjustments tab in the
Display control panel.
Setting Up the PC Environment
31
Page 32

13 Restart Windows.
RAM informa tion
A help window appears with information on the video software. When you’re
finished with the help window, click to remove the X from the box at the
bottom of the window, so it won’t appear each time you start up.
The RAM portion of the PC Setup control panel shows where RAM is
installed on your PC Compatibility Card. If a DIMM (dual inlin e memory
module) is installed, the word “DIMM” appears in the box. If no DIMM is
installed, the words “On Board” appear in the box.
PC RAM status
32
For more information on adding memory to your PC Compatibility Card, see
Appendix C, “Adding Memory to Your PC Compatibility Card.”
Chapter 3
Page 33

Setting printer options
From the PC environment, you can print on most printers connected to the
Mac OS–compatible serial port or network connection, using the PC Print
Spooler software.
Note: The PowerPrint package by GDT Softworks lets you use a
PC-compatible parallel-port printer with your computer. For more
information, you can phone GDT at 800-663-6222 or 604-473-3600, or visit
thei r Wo rld Wide Web site at http://www.gdt.com.
Setting up printing in the Mac OS
To print from the PC environment on a printer connected to the computer’s
printer port or other n etwork connection, you need to select a printer in the
Mac OS Chooser and set up the PC Print Spooler software. Follow these steps;
then go to “Setting Up Printing in the PC Environment,” later in this section.
Note: If you are printing from the PC environment using the optional PC
Serial a nd Parallel Card, see the manual that came with that card for
instructions on how to print from the PC environment.
1 In the Mac OS environment, open the Chooser in the Apple (
printer is selected.
K
) menu and make sure a
If you are using a PostScript™printer, be sure to select the LaserWriter 8
driver. For more information on selecting a printer, see the documentation or
onscreen help that came with your computer.
2 Open the Extensions folder inside the System Folder.
Note: You can also open the PC Print Spooler from the PC Setup Control
Strip module, then skip ahead to step 5.
Setting Up the PC Environment
33
Page 34

3 Open the PC Print Spooler icon.
4Choose Preferences from the File menu.
5Select how you want to be notified of printing errors.
34
Chapter 3
Page 35

6Choose an option under “Interpret Print Data as.”
Printing data sent from the PC environment has to be interpreted by the Mac
OS before it can be sent to the printer. The PC Print Spooler provides three
ways to in terpret printing information from the PC environment.
Note: If you are unsure what printing option to use, select Epson. Epson
emulation is a generic option that works with most printers.
m Select PostScript if your printer supports PostScript. If you plan to print
non-PostScript files on a PostScript printer (for example, if you print files
from the DOS prompt), make sure the checkbox labeled “Allow DOS Text
Printing” has an X in it.
m If you have a PC parallel-port printer and you are using the PowerPrint
package by GDT Softworks, select Printer Specific. You will only be able
to selec t this option if you have selected a PowerPrint printer in the
Chooser.
m Choose Epson if you are using a non-PostScript printer (such as the Apple
StyleW riter, Apple LaserWriter 30 0, and certain HP DeskJet models).
For more information about the Epson options, see the next section,
“Epson Emulation and Page Setup Options.”
7Click OK.
8Choose Quit from the File menu to exit the Print Spooler application.
Epson emulation and page setup options
If you chose Epson in the Print Spooler Preferences dialog box, you can make
the following settings:
m Select “Gaps between pages” if the application you are printing from does
not allow a 1/2-inch margin at the top and bottom of the page (such as the
DOS prompt or Windows 95 Notepad). Selecting “Gaps between pages”
adds a 1/2-inch margin to the top and bottom of the document. This extra
margin will be in addition to whatever margin is currently set. Choose
“No gaps between pages” if the application you are printing from can
format the page to have at least a 1/2-inch margin at the top and bottom
of the page.
Setting Up the PC Environment
35
Page 36

m The font in the Default Font box is used when you’re printing ASCII text
from DOS and when the Faster Printing option is selected. For best results,
use a fixed-space font such as Courier or Monaco. Using a proportional
®
font such as Times
may change your document’s formatting.
m Select Faster Printing when you want to quickly print text from a DOS
application. When this option is selected, printers that use less than 300dpi resolution (such as ImageWriter dot-matrix printers) will print in 72dpi resolution.
m Select Better Quality if you want Epson printer fonts in your document to
be translated to corresponding Macintosh TrueTyp e fonts. Because Epson
printer fonts are fixed-space fonts, the TrueType font will be scaled to
behave like a fixed-space font. Printers that use less than 300-dpi
resolution will print in 144-dpi resolution.
36
Chapter 3
Page 37

For best results, use Epson printer fonts that map to a fixed-space Tr ueType
font, or use graphical fonts supplied by your DOS application. The following
table lists some Epson printer fonts and the TrueType fonts they are translated
to if Better Quality is selected:
Epson font TrueType font
Roman Times (proportional)
®
SanSerif Helvetica
Prestige Palatino
Courier Courier (fixed)
OCR-A, OCR-B Monaco (fixed)
Script, Script C, Monaco (fixed)
Orator, Orator S Monaco (fixed)
(proportional)
®
(proportional)
To print legal-size and other size paper from the PC with Epson emulation,
follow t hese steps:
1 Open the PC Print Spooler.
2Choose Page Setup from the File menu.
The Page Setup dialog box for the printer currently selected appears.
Setting Up the PC Environment
37
Page 38

3Select the desired page size and click OK.
Any attributes you set in the Page Setup dialog box within the PC Print
Spooler will remain in effect until you reset them or select the Default Prefs
button in the Preferences dialog box.
IMPORTANT
You must set the page size in the DOS or Windows application
you are printing from to the same size you selected in the Page Setup dialog
box in PC Print Spooler. If you do not do this, your documents may not
print properly.
Note: This feature is only available for Epson emulation printing. For
PostScript and pri nter-specific printing, set the page attributes within the
DOS or Windows application you are printing from. If “Allow DOS Text
Printing” is selected for PostScript printers, you can adjust the page attributes
for a PostScript printer, but these settings will only take effect when you are
printing from the DOS prompt or a DOS application that does not send
PostScript to the printer.
Resetting the default printing preferences
1 Open the PC Print Spooler.
2Choose Preferences from the File menu.
3Click Default Prefs to restore the default settings in the Preferences dialog box.
This sets the printing option to PostScript, sets the default font to Courier,
and resets the page setup attributes to their default state (as defined by the
printer driver selected in the Chooser).
38
Printing problems
If there is a printing problem, the file you’re trying to print is moved to the
Spooler Rejected folder (in the Preferences folder inside the System Folder).
This might happen if, for example, you try to print a PostScript file with
Epson selected in the PC Print Spooler Preferences.
After setting your preferences correctly, you can print the file automatically by
moving the PC Spooler file from the Spooler Rejected folder to the Spooler
folder. Or you can try switching to the PC environment and printing again.
Chapter 3
Page 39

Setting up printing in the PC environment
This section includes basic information you need to set up your printer
drivers in the PC environment. For more detailed information, refer to the
documentation that came with your software and printer.
Note: If you are printing from the PC environment using the optional PC
Serial a nd Parallel Card, see the manual that came with that card for
instructions on how to print from the PC environment.
IMPORTANT
Some printer models support more than one printer language and
may provide separate printer drivers for each language. If you are using the
PostScript printing option, be sure to choose the printer driver that supports
PostScript; otherwise, printing may not work properly.
Setting up prin ting in Windows 95
Before you print from Windows 95 for the first time (and any time you
change printer drivers), follow these steps:
1 In Windows 95, click the Start button.
2Choose Settings from the menu that appears, and then choose Printers.
If no printers are installed, see your Windows 95 documentation for
instructions on how to add a printer.
3Double-click the printer that you are printing on.
4Choose Properties from the Printer menu.
The properties window for the printer you have selected appears.
5Click the Details tab.
The Details page appears.
6Click the Spool Settings button.
The Spool Settings dialog box appears.
Setting Up the PC Environment
39
Page 40

7Click the button labeled “Disable bi-directional support for this printer.” Then click OK.
If this button is not available, click OK; then go on to the next step.
8In the Properties window, click Port Settings.
The Configure LPT Port dialog box appears.
9Make sure the checkbox labeled “Check port state before printing” is unchecked. Then
click OK.
40
If you are using a non-Post Script printer, go to step 13. If you are using a
PostScript printer, follow these steps:
10 In the Properties window, click the PostScript tab.
11 Click Advanced.
The Advanced PostScript Options dialog box appears.
12 Make sure the checkboxes labeled “Send CTRL+D before Job” and “Send CTRL+D after
Job” are unchecked. Then click OK.
Chapter 3
Page 41

13 Close the Properties window.
IMPORTANT
When printing on a PostScript printer from the PC environment,
be sure to print one file at a time. Printing multiple files may cause a
PostScript er ror. To verify that the file has finished printing, check the
Windows 95 Printer queue.
Printing fr o m Windows 95
To print from Windows 95 using a printer connected to the computer printer
port or network connection, you need to select a printer driver in Windows 95
that corresponds to the option you selected in the PC Print Spooler
Preferences dialog box. If you have not set up the PC Print Spooler, see
“Setting U p Printing in the Mac OS,” earlier in this chapter.
m If you have a PostScript printer (and have selected the PostScript option in
the PC Print Spooler Preferences dialog box), install and select the
PostScript version of the Windows 95 driver that came with your printer. If
you don’t have a Windows driver specifically for your printer, you can
select another PostScript printer driver, such as one of the following:
m LaserWriter Pro 630, if you have a PostScript Level 2 printer (preferred)
m Apple LaserWriter II NTX, if you have a PostScript Level 1 printer
If you are not sure whether you have a PostScript Level 1 or Level 2
printer, choose a PostScript Level 1 printer driver. If you select a driver for
a PostScript Level 1 printer, you can print on any PostScript printer. If you
select a driver for a PostScript Level 2 printer, you can print only on
printers that support PostScript Level 2.
m If you have a PC parallel-port printer and you are using the PowerPrint
package by GDT Softworks (and have selected the Printer Specific option
in the PC Print Spooler Preferences dialog box), select the driver for the
printer connected to the computer using the PowerPrint cable.
Setting Up the PC Environment
41
Page 42

m If you are using a non-PostScript printer (and have selected the Epson
option in the PC Print Spooler Preferences dialog box), select one of the
following drivers:
m Epson AP-3260 for 360-dpi color printing (preferred driver)
m Epson AP-3250 for 360-dpi black-and-white printing
m Epson Color Stylus for 360-dpi color printing
m Epson LQ-2500 for 180-dpi color printing
If none of the drivers listed above is available, try one of the following:
m Epson LQ-2550/LQ-1050/LQ-1010
m Epson Action Printer 4500/ActionPrinter 4000
Note: The Epson Color Stylus printer is capable of 720 x 360-dpi printing.
However, the PC Compatibility Card software currently supports a maximum
resolution of 360 x 360 dpi. Please verify the maximum resolution in the
application you are printing from, or improper printing may occur.
Saving a printer file
To save a printer file such as a PostScript file in the PC environment, use the
option in your Windows printer driver to print to a file. Do not assign a PC
COM port to a text file in the PC Setup control panel and print to that port in
the PC environment.
Configuring PC sound
42
Chapter 3
You can use three kinds of sound in the PC environment:
m
PC beep sounds
m
CD sound
m
Sound Blaster sound
You can play and control audio CDs in the PC environment.
You can hear Sound Blaster sound in games and other
programs, and you can use Sound Blaster–compatible utilities to
manipulate sound files. You can also record sound from audio CDs in the
PC environment. For more information about Sound Blaster capabilities,
see the PC Sound manual that came with your PC Compatibility Card.
You can hear sound from the PC environment through the computer speaker,
headphones, or speakers built into your monitor.
Page 43

The Mac OS treats all PC sound as if it were coming from the internal
CD-ROM drive. You can still use the internal CD-ROM drive to play CDs
and CD-ROM discs in the Mac OS.
Note: Microphone and line input are not supported by the PC Compatibility
Card.
Turning PC sound on and off
To hear PC sound, you need to turn on sound for the PC by following
these steps.
Note: Before you begin, make sure that sound is turned on (not muted) in the
Mac OS.
1 Open the PC Setup control panel.
2Choose an option from the Sound pop-up menu.
Open the pop-up menu to see the
different PC sound options.
You can choose the following options:
m To hear PC sounds in both environments, choose Enabled.
m To hear PC sounds only in the PC environment, choose Auto Enable.
m To shut off PC sounds, choose Disabled.
3Close the PC Setup control panel.
Setting Up the PC Environment
43
Page 44

Configuring PC drives
To work in the PC environment, you need to tell the PC Compatibility Card
where PC software and files are stored. You do this by assigning PC drive
letters to storage areas using the PC Setup control panel. You can assign drive
C or D to a PC-formatted SCSI hard drive attached to your Macintosh, or to a
drive container—a file you create on a Macintosh hard disk that acts as a
virtual PC drive. You can also use a drive container created by SoftPC or
SoftWindows
Note: A hard drive or drive container only boots when assigned to drive C in
the PC Setup control panel.
™
; however, that drive container cannot be bootable.
IMPORTANT
If you received this manual with your new computer, a PC drive
container with Windows 95 has already been created on your hard drive and
assign ed to Drive C in the PC Setup control panel. Follow the steps in this
section if you need to create additional drive containers. For information on
creating a new drive container with the necessary software, see Chapter 2,
“Installing the PC Compatibility Card Software.”
Creating a single partition/bootable drive container
To create a single partition/bootable drive container for drive C or D, follow
these steps:
1In the Mac OS, open the PC Setup control panel.
2If the PC is running, click Shut Down PC.
3Choose New Drive File from the C: or D: pop-up menu.
4In the dialog box that appears, choose a location for the drive container.
5Type a name and a size for the container.
You can make the container as small as 2 MB or as large as 1023 MB. The
amount of space you need depends on the software you want to install. If you
are installing DOS and a few small applications, you’ll need about 100 MB. If
you are installing Microsoft Windows, you’ll need at least 150 MB. If you are
installing Microsoft Windows 95, you’ll need at least 20 0 MB.
44
Chapter 3
Page 45

IMPORTANT
Once a drive container is created, its size cannot be changed.
Before choosing a size for your drive container, decide which PC operating
system and applications you want to run. Check the documentation that came
with the software to estimate how much space you’ll need; then allow some
extra room for applications. If you still run out of space on the drive
container, you can create another drive container and assign it to
another drive.
6 To format the drive container with a single partition, make sure the Initialize Drive File
box is checked.
When this box is checked, PC Setup will initialize the container for you.
7Click Create.
The time that it takes to create a drive container depends on the size of
the contai n er.
Creating a multiple partition/bootable drive container
IMPORTANT
bootable drive containers with the PC Compatibility Card.
To create a multiple partition/bootable drive container for drive C or D, follow
these steps:
1 In the Mac OS, open the PC Setup control panel.
2If the PC is running, click Shut Down PC.
Apple do es not recommend the use of multiple partition/non-
Setting Up the PC Environment
45
Page 46

3Choose New Drive File from the C: or D: pop-up menu.
4In the dialog box that appears, choose a location for the drive container.
5Type a name and a size for the container.
You can make the container as small as 2 MB or as large as 1023 MB. The
amount of space you need depends on the software you want to install. If you
are installing DOS and a few small applications, you’ll need about 100 MB. If
you are installing Microsoft Windows, you’ll need at least 150 MB. If you are
installing Microsoft Windows 95, you’ll need at least 20 0 MB.
IMPORTANT
Once a drive container is created, its size cannot be changed.
Before choosing a size for your drive container, decide which PC operating
system and applications you want to run. Check the documentation that came
with the software to estimate how much space you’ll need; th en allow some
extra room for additional applications. If you still run out of space on the drive
container, you can create another drive container and assign it to another drive.
6 To format the drive container with multiple partitions, make sure the Initialize Drive File
box is not checked.
When this box is unchecked, PC Setup does not initialize the container for
you. You have to do it manually in DOS, as described in step 8.
46
7Click Create.
The time that it takes to create a drive container depends on the size of the
container.
Chapter 3
Page 47

8 To format the container with multiple partitions, switch to DOS and prepare the drive
using the FDISK and FORMAT commands.
To make the container bootable, use the /S parameter of the FORMAT
command. For example, if you want to format the D drive as a bootable
container type, use
FORMAT D: /S <return>
Use the DOS HELP command for more information.
Assigning a drive to a PC-formatted hard disk
To assign a drive to a PC-formatted hard disk connected to your Macintosh
SCSI port or SCSI chain, first assign the drive letter to the hard disk. Then
make sure the hard disk driver is not being loaded by PC Exchange. To do so,
follow t he steps below.
IMPORTANT
If you use a dedicated PC-formatted partition or SCSI device
instead of a drive container, you may experience some disk read/write errors.
Apple recommends using drive containers on Macintosh-formatted partitions
or SCSI devices as your primary method of data storage.
1 Open the PC Setup control panel.
2Choose Drive Partition from the C: or D: pop-up menu.
3 In the dialog box that appears, select the hard disk drive you want to assign.
4 Open the PC Exchange control panel.
5Click the Options button.
6Make sure the SCSI driver for the PC drive is not checked. Then click OK.
To make the drive bootable, switch to DOS and use the FORMAT command
with the /S parameter. See the DOS HELP command for more information.
IMPORTANT
You cannot boot from a locked PC container, a PC container that
is open on your desktop, or a PC contain er that is on a write-protected file
server. Also, you may not be able to mount a locked PC container if file
sharing is turned on. You can correct the problem by either unlocking the PC
container or turning off file sharing.
Setting Up the PC Environment
47
Page 48

Changing a drive a ssi gnment
To ch a nge the c ontainer or partition assigned to the C or D drive, follow
these steps:
1 Open the PC Setup control panel.
2 To assign a new drive container, choose Other Drive File from the C: or D: pop-up menu.
To assign a PC-formatted hard disk (or partition), choose Drive Partition.
3In the dialog box that appears, locate the container or partition you want to assign.
4Make sure the item is not being used as a disk drive in the Mac OS environment.
If a mounted PC drive container icon appears on the desktop, drag it to the
Trash to unmount it.
Mounted drive container
5Click Restart PC.
IMPORTANT
use a PC compression program. The Mac OS cannot mount compressed drives.
Using sha red volumes
You can set up a Mac OS folder, hard disk, or network volume to act as a
PC drive.
Sharing a folder is a convenient way to transfer files between the Mac OS and
the PC environment. Sharing is also useful for network volumes and other
volumes that otherwise would not be readily available to the PC environment.
Note: Do not set up a floppy disk as a shared folder. This can cause
unpredictable results.
Note: DOS treats all shared volumes as if they were on a network. Some
DOS commands, such as FORMAT, CHKDSK, UNDELETE, and SUBST, do
not work on these shared volumes.
If you want to make your PC drive available to the Mac OS, do not
48
Chapter 3
Page 49

Sharing files between the Mac OS and the PC
To set up a shared volume, follow these steps:
1If the PC is not already running, open the PC Setup control panel and click Start PC.
2 In the PC Setup control panel, open the Sharing pop-up menu and choose an available
drive letter.
If no drive letters appear, switch to the PC, open the CONFIG.SYS file, and
make sure that both a LASTDRIVE statement appears and sufficient available
drive letters are assigned. See “Setting Up Your DOS Configuration Files,”
later in this chapter.
Open this pop-up menu to see the
available drive letters.
Setting Up the PC Environment
49
Page 50

3In the dialog box that appears, select a folder or disk you want to share.
You can share a Mac OS folder, hard disk, CD-ROM discs, or shared disk. You
cannot share floppy disks.
Note: When you name a folder in the Mac OS environment that you intend to
share with the PC environment, you may want the name to be compatible
with DOS 8.3 filename guidelines. Otherwise, the sharing software will
truncate and translate the name to fit the guidelines. For more information
about naming files, see your DOS manual.
4 To automatically share this item whenever you start up the PC, click the box labeled
“Share every time PC is started.”
50
Automatically shared items are underlined in the Sharing pop-up menu.
For more information on transferring files between the PC environment and
the Mac OS, see “Using Floppy Disk Drives and Floppy Disks,” “Copying and
Pas ti ng Inf ormation Between the Mac OS and Windows Environments,” and
“Using Shared Folders and Volumes” in Chapter 4. Also see the PC
Compatibility Guide, available in the Guide (h) menu.
Note: When you add or remove a shared folder in Windows 95, the view in
the “My Computer” section does not immediately change. You need to refresh
the view once to update the Shared Folder status.
Chapter 3
Page 51

Turning off volume sharing
If you no longer want to share a volume, follow these steps:
1 In the Mac OS environment, open the PC Setup control panel.
2 Open the Sharing pop-up menu and choose the name of the volume you want to
stop sharing.
A warni ng message appears telling you that the item will no longer be
available. Click OK.
Turning off a utomatic sharing
1 In the Mac OS environment, open the PC Setup control panel.
2 Open the Sharing pop-up menu and choose the name of the volume you no longer want
to share automatically.
Automatically shared items are underlined in the Sharing pop-up menu.
Setting up your PC on a network
Your PC Compatibility Card supports most networking protocols, operating
systems, and application programs that are compatible with the following
network drivers: Novell’s Open Data-Link Interface specification (ODI) or
Microsoft’s Network Driver Interface Specification (NDIS) version 2.0.
WARNING
You must run SETNET every time you add or remove a
network protocol, install or upgrade network software, or change
anything in the network control panel. If you do not run SETNET, you
will experience network problems.
To set up networking, you need to acquire and install networking client
software in the PC environment. For more information, see Appendix D,
“Installing Network Client Software.”
Setting Up the PC Environment
51
Page 52

Configuring t he PC serial ports
Your PC Compatibility Card supports two serial ports, COM1 and COM2.
You can assign these ports to Macintosh serial ports (such as the printer or
modem port) or to a text file for later processing. Or you can leave the
ports unassigned.
Note: If you are using the optional PC Serial and Parallel Card to connect a
printer, modem, or other device to the PC environment, you do not need to
configure the Macintosh serial ports. See the manual that came with the PC
Serial a nd Parallel Port card for additional information.
Unassigned Macintosh serial port
Macintosh modem port assigned
to COM1 in the PC environment
52
To assign a PC COM port, open the PC Setup control panel and choose a setting in the
COM1 or COM2 pop-up menu.
These are the Macintosh serial ports that can be assigned to
COM1 or COM2 in the PC environment. Serial ports already in
use (either by the Macintosh or the PC) are dimmed.
Chapter 3
Page 53

IMPORTANT
Mac OS programs cannot access a port that you’ve assigned to the
PC environment. If you’re trying to print, fax, or use your modem in the Mac
OS environ ment, and you get a warning message that the port requested is
busy or in use, then you need to unassign a PC COM port in the PC Setup
control panel.
Setting up a modem or other serial device
From the PC environment, you can use a modem or other serial device
connected to the Macintosh serial port. For best results, use the Apple DB-25
DIN-8 Mac to High-Speed Modem cable (part number M5537LL/A). If you
are unable to obtain this modem cable, you can use the information in the
next section to build a custom cable.
Because the Macintosh uses the RS-422 protocol, the RS-232 Ring Indicator
(RI), Request to Send (RTS), and Data Set Ready (DSR) signals are not
available through a Macintosh serial port. You can attempt to configure your
application to use the carrier string or ignore carrier detect.
Note: The serial port on the optional PC Serial and Parallel Port card (not
included) supports the RS-232 interface directly without your having to use a
special cable or configure your software.
Note: For more information on setting up a modem in Windows 95 to use
TCP/IP for PPP (point-to-point protocol) connections, see Appendix D,
“Installing Network Client Software.”
Setting Up the PC Environment
53
Page 54

Building a cu s to m cable
The following chart lists the signals present on the Macintosh Mini DIN-8
serial connector and the pins that carry these signals on PC-style DB-9 and
DB-25 connectors. You can use this information to build a custom cable to
connect your PC-compatible serial device to a Macintosh serial port. Refer
to the m anual for the serial device you want to connect for more information.
Macintosh signal Macintosh Mini DIN-8 DB-9 DB-25 RS-232 name
HSKo 1420DTR
HSKi 285CTS
TXD-3 32TXD
GND 457GND
RXD-5 23RXD
TXD+ 6N/CN/C
GPi 718DCD
RXD+ 857GND
Connecting a joystick
Connecting a MIDI device
54
Chapter 3
You can connect a game controller to the joystick port on your PC
Compatibility Card. For more information, see Chapter 1, “Connecting
Monitors and Other Equipment,” and the documentation that came with
your joystick.
With an optional adapter, you can connect a MIDI device to the joystick port
on your PC Compatibility Card. For more information, see Chapter 1,
“Connecting Monitors and Other Equipment,” and see the documentation that
came with your MIDI device and MIDI adapter.
Page 55

Setting up your DOS configuration files
When you install the PC Compatibility Card software, it makes all the
necessary modifications to your DOS CONFIG.SYS and AUTOEXEC.BAT
files. However, there may be times when you want to modify these files.
Foll ow these guidelines:
Editing the C ONFIG.SYS file
Your CONFIG.SYS files should include the following statements:
DOS=HIGH,UMB
STACKS=9,256
DEVICE=C:\DOS\HIMEM.SYS /TESTMEM:OFF
DEVICE=C:\DOS\EMM386.EXE NOEMS
LASTDRIVE=M
DEVICEHIGH=C:\APPLE\CDROM.SYS /D:CDDRVR
INSTALLHIGH=C:\APPLE\MACSHARE.COM
The first line loads DOS into high memory.
If you’re using the DOS utility EMM386 and you don’t require expanded
memory, use all the statements shown above. If you are using EMM386 and
you do require expanded memory, remove the following line:
DEVICE=C:\DOS\EMM386.EXE NOEMS
and replace it with this line:
DEVICE=C:\DOS\EMM386.EXE
For more information on making the best use of memory, see the
information on memory management in the documentation for DOS or for
your memory manager.
The last two lines load the CD-ROM drive software and file-sharing software
into high memory.
Setting Up the PC Environment
55
Page 56

Setting the number of drive letters
You can share folders and volumes with the PC by assigning them to PC drive
letters. When you install your PC software, the statement
LASTDRIVE=M is
included in the CONFIG.SYS file. This allows you to view up to nine folders
or volumes at once.
To change the number of drive letters, change your CONFIG.SYS file to
include the following statement:
LASTDRIVE=x
where x is a l e tter b etween F and Z. (The PC reserves drive letters A
through E.)
Each drive letter uses 100 bytes of PC memory.
Editing the AUTOEXE C .B AT file
Your AUTOEXEC.BAT file should include the following statements:
SET TEMP=C:\TMP
SET TMP=C:\TMP
PATH=C:\DOS
LOADHIGH C:\DOS\MSCDEX.EXE /D:CDDRVR /L:E
LOADHIGH C:\APPLE\APPLEPC
C:\DOS\SMARTDRV.EXE /X
56
The first two lines determine the location for temporary files used by DOS
applications.
The LOADHIGH lines load Windows support and CD-ROM software into
high memory. The letter “E” at the end of the MSCDEX.EXE line assigns the
letter “E” to the CD-ROM drive. You can change it to any unused letter up to
the limit specified in the LASTDRIVE line in your CONFIG.SYS file.
The SMARTDRV line creates a disk cache to speed up DOS disk operations.
The /X option disables the write cache, which is the slower but safer option.
For best CD-ROM performance, the line containing MSCDEX.EXE must
come before the line containing SMARTDRV.EXE.
Chapter 3
Page 57

4
Working in the PC Env ironment
This chapter describes the software that you use to work in the PC
environment, to switch between the Mac OS and PC environments, and to
share information between both environments.
This chapter describes the following:
m switching between the Mac OS and PC environments
m turning the PC on and off
m using floppy disk drives and floppy disks
m using CD-ROM discs and drives
m using a pointing device
m using keyboards
m copyi ng and pasting information between Mac OS and Windows
environments
m using onscreen help in the PC environment
m using s hared folders and volumes
m using P C files in the Mac OS environment
57
Page 58

Switching between the Mac OS and PC environments
Even though the Mac OS and PC environments are running simultaneously,
you can only use one environment at a time. There are three methods you can
use to switch between the Mac OS and the PC.
Switching with the PC Setup control panel
1Choose Control Panels from the Apple (
2Double-click the PC Setup icon to open the control panel.
3Click “Switch to PC” to switch to the PC environment.
K
) menu.
58
Chapter 4
If you are using a single monitor to display both environments, you can set
the screen to fade briefly before switching environments by making sure Fade
Screens is checked.
4 To switch back to the Mac OS, press
x
-Return.
Page 59

Switching with the Control Strip
If you have the Control Strip open in the Mac OS, you can use the PC Setup
module to switch to the PC.
With the Control Strip visible, follow these steps:
1 Open the pop-up menu in the PC Setup module of the Control Strip and choose
“Switch to PC.”
2 To switch back to the Mac OS, press
x
-Return.
Switching with a keyboard command
You can set a keyboard command, or hot key, to switch between the Mac OS
and PC environments. The default hot key is x-Return.
WARNING
make sure rebuilding is complete before you attempt to switch to the PC
environment. If you switch during the rebuilding of the desktop, your
system c ould “freeze.”
Note: If you set a new hot key, it will work in both environments, and
x-Return will still work to switch from the PC to the Mac OS. But x-Return
will not work to switch from the Mac OS to the PC.
If you are rebuilding the desktop in the Mac OS environment,
Working in the PC Environment
59
Page 60

To set a new hot key, follow these steps:
1In the Mac OS environment, open the PC Setup control panel.
2Click the Hot Key text box.
3Type the command you want to use to switch environments.
60
The x key is a utomatica lly included; you type the additional characters you
want. For example, you might type Option-Tab, setting the switch command
to x-Option-Tab.
Some character combinations cannot be used. The PC Setup control panel
will alert you if you select a reserved key combination.
Chapter 4
Page 61

Turning the PC on and off in the Mac OS environment
WARNING
Be sure to shut down Windows 95 before shutting down the
PC or Mac OS using either the PC Setup control panel or the Control
Strip. If you shut down the PC without shutting down Windows 95, you
could lose information or damage your drive container.
Turning the PC on and off with the PC Setup control panel
With the PC Setup control panel open, do one of the following:
m To start the PC if it’s shut down, click Start PC in the PC Setup control
panel.
If the PC is already running, the button is labeled Restart PC.
m To restart the PC, click Restart PC in the PC Setup control panel.
m To shut down the PC, make sure you have shut down Windows 95. Then
click S hut Down PC in the PC Setup control panel.
This option turns off the PC until you click Start PC.
Working in the PC Environment
61
Page 62

m To turn off the PC Compatibility Card entirely, click Off at the top of the
PC Setup control panel; then restart the Mac OS.
If you turn off the PC Compatibility Card, you will not be able to switch to
the PC environment.
m To turn the PC Compatibility Card on, click On in the PC Setup control
panel and restart the Mac OS.
Turning the PC on and off with the Control Strip
With the Control Strip visible, do one of the following:
m To start the PC if it’s shut down, choose Start PC from the pop-up menu in
the PC Setup module of the Control Strip.
If the PC is already running, the menu will display Restart PC.
m To restart the PC, choose Restart PC from the pop-up menu in the PC
Setup module of the Control Strip.
m To shut down the PC, make sure you have shut down Windows 95. Then
choose Shutdown PC from the pop-up menu in the PC Setup module of
the Control Strip.
62
Chapter 4
Page 63

Starting the PC automatically
You can set the PC to start automatically when you start your computer, and
you can set your computer to switch to the PC environment automatically
after st artup. To do this, you use the PC Setup control panel.
m To start the PC automatically whenever you start up the Mac OS
environment, click the box next to “Auto-start PC” to place an X in it.
m To auto m a tically switch to the PC environment whenever you start up
the Mac OS environment, click the box next to “Switch at Startup” to
place an X in it.
WARNING
If you want to switch to the PC whenever you start up, make
sure that the Shut Down Warning option is turned off in the Mac OS
General Controls panel. If the warning is on, you may not be able to
switch back to the Mac OS environment for a few minutes after
switching to the PC.
Working in the PC Environment
63
Page 64

Rest arting t he PC in th e PC environment
234567891
!
@
#
$
%
^
&
*
(
-
_
delete
=
+
)
0
return
esc
NM
,<.
>
/
?
QWERT
SDFGA
ctrl
option
caps
lock
shift
tab
`
~
ZXCVB
UI OP
JKL
shift
Y
H
:
;
}
]
"
'
{
[
|
\
789
456
123
.
0
clear
*
=
/
enter
+
–
Control key Option
(Alt) key
Command key Numeric keypad
period key
esc
F1 F2 F3 F4 F5 F6 F7 F8 F9 F10 F11 F12 F13 F14 F15
print
screen
scroll
lock
pause
num
lock
caps
lock
scroll
lock
num
lock
clear
=
/
*
7
4
0
8
5
2
9
6
3
enter
1
.
homehelp
end
ins
page
up
page
down
delete
return
shift
controloption
alt
'
"
/
?
;
:
.
>,<
MNBVCXZ
JHGFDSA LK
UYTREWQ OIP
7654321 980
&^%$#
@
! (*)
`
~
tab
caps
lock
shift
Control key Option
(Alt) key
Command key (Del) key
control
option
alt
del
To restart (“warm boot”) the PC in the PC environment, use one of the following
keyboard combinations:
m Control-Alt-… (using the Del key, not the Delete key)
m Control-Alt-. (using the period key on the numeric keypad)
To reset (“cold boot”) the PC in the PC environment, use one of the following
keyboard combinations:
mx-Control-Alt-… (using the Del key, not the Delete key)
mx-Control-Alt-. (using the period key on the numeric keypad)
64
Chapter 4
Page 65

Using flop py disk drives and floppy disks
Keep the following in mind when you use floppy disks:
m To eject a floppy disk in the PC environment, press x-E.
m In the PC environment, the floppy disk drives are A and B.
m In the PC environment, you cannot use a Mac OS–formatted floppy disk. If
you insert one, it will be ejected.
m You can use a locked PC disk in both the PC and Mac OS environments.
m You can access an unlocked floppy disk in the environment that was active
whe n you inserted the floppy disk, but not in the other environment.
m In the PC environment, blank disks are formatted for the PC. In the
Mac OS, you can format disks for either environment.
m Some blank disks are preformatted. If you insert a new, blank disk in the
PC environment and it is ejected, it may have been preformatted in Mac OS
format. To use the disk in the PC environment, you can switch to the Mac
OS and format the disk for the PC. For instructions, see the documentation
that came with your computer or Mac OS software upgrade kit.
Note: Removable media drives such as Zip or Syquest drives are not directly
accessible from the PC environment in the same way that your CD-ROM and
floppy disk drives are. However, you can set up a shared folder in the Mac OS
environment and then transfer information to and from the removable media.
For more information see “Using Shared Volumes” in Chapter 3, “Setting Up
the PC Environment.”
Rest arting t he PC from a f loppy dis k
To restart (reboot) the PC using a floppy disk, insert a floppy disk containing
operating system software into the disk drive. Press Control-Alt-… to restart
the PC.
Working in the PC Environment
65
Page 66

Using CD-ROM discs and drives
Keep the following in mind when using CD audio discs and CD-ROM discs
and drives:
m In the PC environment, press x-Y to eject a CD. If the disc cannot be
ejected (because a file is in use or the disc is being shared), you will hear
a beep.
m You can start an audio CD in either environment and continue to listen
when you switch environments. (If you start up and switch to the PC while
listening to an audio CD, the CD sound may pause for several seconds
while the PC starts up.)
m If you have more than one CD-ROM drive, the PC environment can use
only the one with the lowest SCSI ID number.
m You can record sound from an audio CD in the PC environment. For more
information, see the PC Sound manual that came with your PC
Compatibility Card.
Using a pointing device
The standard mouse or other pointing device for Macintosh computers has
one button; most PC devices have two buttons that perform different
functions. If you do not have a two-button pointing device, you can purchase
one from your Apple-authorized dealer. Be sure to ask for an ADB (Apple
Desktop Bus) device—input devices designed for a PC will not work with the
Macintosh ADB port.
66
If you have a multibutton Mac OS–compatible pointing device, you may be
able to configure it to use the right button in the PC environment. Refer to the
instructions that came with your device.
You can use keyboard commands to simulate the actions of the second button.
If you are using a one-button device, you can control it as follows:
m The button behaves like the left button on a two-button device.
m There are two ways to simulate pressing the right button:
m Select an item and then press the = (equal) key on the numeric keypad.
m Hold down the Command key (x) while you press the button.
m To simulate pressing the left and right buttons at the same time, press the
button and the = (equal) key simultaneously.
Chapter 4
Page 67

Using keybo a rds
Note: If the software for your two-button device does not automatically
configure your device for the PC or does not include a “Windows Right
Mouse Button” option, you may be able to assign the = (equal) key to the
right button.
You can use all Apple keyboards with your PC Compatibility Card.
The Option key on an Apple keyboard is the same as the Alt key in the
PC environment.
On the Apple Extended Keyboard II, use the following equivalents for keys on
a PC keyboard. (These equivalents also apply to the Apple Adjustable
Keyboard if the function keyboard isn’t plugged in.)
PC key Macintosh keyboard equivalent
Alt Option
x
F1 through F9
F10
F11
-1 through 9
x
-0
x
-(minus)
x
F12
F13
F14
F15
Home
PageUp
End
PageDown
Insert
Del
Backspace Delete
Eject a floppy disk
Eject a CD
-(equal)
x
-[
x
-]
x
-\
x
-[keypad] 7
x
-[keypad] 9
x
-[keypad] 1
x
-[keypad] 3
x
-[keypad] 0
x
-[keypad] (period)
x
-E
x
-Y
Working in the PC Environment
67
Page 68

Copying and pasting information bet ween the Mac OS and Windows environ men t s
You can exchange certain kinds of information between the Mac OS and
Windows environments using the Copy and Paste commands in the Edit menu
in both environments. To do this, the PC Clipboard extension and Macintosh
Easy Open (Mac OS Easy Open) control panel must be installed in the
Mac OS and the WINCLIP utility must be installed in Windows.
The PC Clipboard translates the following information formats:
m Windows CF_TEXT to/from Mac OS TEXT
m Windows RTF to/from Mac OS RTF
m Windows DIB to/from Mac OS PICT
To determine the format of information in the Mac OS, you can paste the
material into the Scrapbook.
Note: Copying and pasting between DOS and the Mac OS is not supported.
However, you can paste information into the MS-DOS prompt in
Windows 95 by using the paste button. If you want to translate information
between the DOS and Mac OS environments, you can exchange files via a
file translation program.
When transferring information between the Mac OS and Windows 95, keep
the following i n mind:
68
m If you have the PC Clipboard extension installed, the Mac OS and
Windows 95 share a Clipboard. That means if you copy an item to the
Mac OS Clipboard, switch to Windows 95, and then copy an item to the
Windows 95 Clipboard, the original Mac OS Clipboard contents will
be deleted.
To prevent this, you can turn off Automatic Document Translation in the
Macintosh Easy Open (Mac OS Easy Open) control panel, or you can
remove the PC Clipboard extension from the Extensions folder (inside the
System Folder in the Mac OS). Removing the extension turns off Clipboard
translation between Mac OS and Windows 95.
Note: If you remove the PC Clipboard extension, you will see an alert
message every time you switch from the PC to the Mac OS.
Chapter 4
Page 69

m If you want to transfer information from the Mac OS Clipboard to
Windows 95, make sure that Windows 95 is running before you switch
environments.
m Sounds cannot be transferred on the Clipboard between the Mac OS
and Windows 95. You must use a sound translation program to transfer
sound files.
m When you’re in the PC environment, all Mac OS programs are put in the
background and the PC Clipboard runs in the foreground. You can prevent
this by removing the PC Clipboard extension from the Extensions folder
(inside the System Folder in the Mac OS). Removing the extension turns
off Clipboard translation between the Mac OS and Windows 95.
Note: If you remove the extension, you will see an alert message every
time you switch from the PC to the Mac OS.
If you are having trouble pasting information between Windows and the
Mac OS, try the following:
m Assign more memory to the PC Clipboard utility and to the Mac OS
application into which you are pasting information.
m Make sure that Macintosh Easy Open (Mac OS Easy Open) is installed.
m In the Macintosh Easy Open (Mac OS Easy Open) control panel, make
sure the Automatic Document Translation option is turned on.
m Save the document you’re copying from in a different format. Then reopen
the document and copy the material you want to move.
m Use the Paste Special command that is available in some Windows
applications. This command lets you specify the format of material
you’re pasting.
m If you’re pasting an image to the Win95 WordPad, try using the command
“Insert Object as Paintbrush Picture.”
m Images that are compressed in the Mac OS (such as Kodak Photo CD
thumbnails) may display only in gray when you paste them into Windows.
If this happens, try expanding the image before copying it.
Working in the PC Environment
69
Page 70

Transferring large bitmap images
If you are transferring large bitmap images from the PC to the Mac OS
environment, you may have to increase the memory allocated to the PC
Clipboard application. To increase the memory allocation, follow these steps:
1 Open the System Folder and then open the Extensions folder.
2Select the PC Clipboard icon.
3 Open the File menu and choose Get Info.
4In the Preferred Size text box, type a larger memory allocation, such as 1000K.
5Close the PC Clipboard Info window.
Using ons creen help in the PC environment
You can install onscreen help for the PC environment when you install the
support software. If you install help, it will be available in the PC
environment in the HELP directory, in the directory where the Apple
software is installed.
70
To start h elp in Windows 95, follow these steps:
1 Open the “My Computer” icon on the Windows 95 desktop.
2 Open the C drive.
3 Open the Apple software folder. (The default folder name is “Apple.”)
4 Open the Help folder.
5Double-click the SETUPHLP application.
Chapter 4
Page 71

Using sha red folders and volumes
You can share Mac OS folders and volumes with the PC by assigning them
drive letters. The MACSHARE utility (installed with the PC support
software) makes this possible.
Note: When you name a folder in the Macintosh environment that you intend
to shar e with the PC environment, use a name that conforms to DOS 8.3
filename guidelines. Otherwise, the sharing software will truncate and
translate the name to fit the guidelines. For more information about naming
files, see your DOS manual.
Note: PC applications and their files work more quickly in a drive container
or on a hard disk than in a shared folder. The performance of Mac OS
programs is not affected by placing them in shared folders.
IMPORTANT
Information in the “resource fork” of a Mac OS file (such as an
original icon) is lost when the file is copied in the PC environment. This may
damage some files. To copy a QuickTime file, for example, you must open it
in the Mac OS using the MoviePlayer program and save it in “non-Apple
computer format” before copying or using it in the PC environment.
Using PC files in the Mac OS environment
There are three ways to access PC files in the Mac OS:
m You can access PC files on a floppy disk. For more information, see
“Using Floppy Disk Drives and Floppy Disks,” earlier in this chapter.
m You can access PC files in a shared folder or volume. For information on
setting up a shared area, see “Using Shared Volumes” in Chapter 3.
m You can access PC files in a PC drive container or a PC-formatted SCSI
hard drive attached to your Macintosh.
Working in the PC Environment
71
Page 72

With M acintosh PC Exchange, you can see, move, and copy PC documents as
icons in the Mac OS. However, you may not be able to open every kind of PC
file in the Mac OS. If you can’t open a file or if the file is not displayed
properly, try one of the following:
m Try opening the file using a different application program.
m Translate the document into a different file format using a file translation
utility.
m If your PC program has an Export feature, use it to save the document in a
different file format.
m Use a PC–Mac OS translation utility.
To gai n a ccess to files in a PC drive container from the Mac OS, follow
these steps:
1In the Finder, double-click the drive container to open it.
The drive container appears on the Mac OS desktop as one of the following
disk icons:
Drive container file
72
Mounted drive container
2Double-click the container’s disk icon.
The icon opens and you have access to the files inside it.
Note: If the PC is running, you can copy files from the drive container to the
Mac OS, but you can’t add anything to the drive container or change any files
in it. If you want to add or change files from the Mac OS environment, you
must shut down the PC.
Chapter 4
Page 73

5
Troubleshooti ng
Consult this chapter when you have questions about using the PC
environment on your Macintosh.
If you have questions about using Windows 95 or PC application programs,
see the manuals that came with your operating system software or programs.
WARNING
or software and nothing presented in this manual solves it, consult the
service and support i nformation that came with your computer for
instructions on how to contact an Apple-authorized service provider or
Apple for assistance. If you attempt to repair the PC compatibility
hardware yourself, any damage you may cause will not be covered by the
limited warranty. Contact an Apple-authorized dealer or service provider
for additional information about this or any other warranty question.
If you have a problem with your PC compatibility hardware
73
Page 74

Starting up
The Macintosh “freezes” during startup.
Restart the computer while holding down the Shift key. This turns off
extensions. After the computer starts up, restart the computer again. If the
computer still doesn’t start up, consult the troubleshooting information in the
user’s manual that came with the computer.
The PC Setup icon has a red slash through it at startup.
The PC setup extension did not load.
You may have started up the computer holding down the Shift key, which
turns off extensions. Restart the computer without holding down the Shift key.
A RAM disk or RAM cache in the Mac OS may be using too much memory.
Reduce the size of the RAM disk or RAM cache, and restart the computer.
There may be a problem with the PC Setup Prefs file (in the Preferences
folder with in the System Folder). Remove the file and restart the Macintosh.
Then use the PC Setup control panel to recreate your settings. If this doesn’t
work, try reinstalling the PC software (see Chapter 2, “Installing the PC
Compatibility Card Software”).
74
The Mac OS software for the PC Compatibility Card doesn’t seem to be installed.
See Chapter 2, “Installing the PC Compatibility Card Software,” for a list of
the Mac OS software that is required for the PC Compatibility Card. If any
of th es e items is missing, and you are having trouble using the PC
Compatibility Card, try reinstalling the software, following the instructions
in Chapter 2.
The PC didn’t start up.
Open the PC Setup control panel. If drive C is not assigned to a drive
container or hard disk drive, you see a question mark icon in the C drive box.
In this case, either assign drive C to an existing drive container or create a
new drive container (see “Creating a Drive Container” in Chapter 2).
Chapter 5
Page 75

In the PC Setup control panel, make sure the On button is selected. If it is,
click S tart PC at the bottom of the control panel. If the On button is not
selected, click it; then restart your Macintosh. Open the PC Setup control
panel again and click Start PC.
If the On button is selected and you have restarted the Macintosh, but the
“Switch to PC,” Start PC, and Shut Down PC buttons are not available, there
may be a problem with your PC Compatibility Card. Consult your Appleauthorized service provider.
There may be a problem with an additional DIMM installed on your PC
Compatibility Card. Open the PC Setup control panel and check the RAM
portion of the control panel. If no DIMM is indicated and you have installed
an additional DIMM, remove it and restart the computer. If a DIMM is
detected by the PC Setup control panel, you can still remove it and restart the
computer. For more information on adding and removing DIMMs, see
Appendix C, “Adding Memory to Your PC Compatibility Card.”
When I start up the computer it goes directly into the PC environment.
If you don’t want the PC environment to start automatically, return to the
Mac OS environment by pressing
x-Return. Open the PC Setup control panel
and make sure the “Switch at Startup” box is not checked.
DOS begins to start up but then the screen freezes. The cursor blinks, but I cannot
type anything.
Press x-Control-Alt-… to restart the PC. (If you do not have the … key on
your keyboard, use the period key on the numeric keypad.) When you see the
message “Starting MS-DOS” or “Starting Windows 95,” follow this step to
bypass your CONFIG.SYS and AUTOEXEC.BAT files:
DOS or Windows: Press and hold the Shift key.
Windows 95: Press and hold the F5 key.
After the PC has started up, check the CONFIG.SYS and AUTOEXEC.BAT
files, change any incorrect lines, and then restart the PC.
Troubleshooting
75
Page 76

Switching to and from the PC
I can’t remember the command I set to switch back from the PC environment to the
Mac OS.
In the PC environment, you can always use x-Return to switch back to the
Mac OS environment. To change the command, see “Switching Between the
Mac OS and PC Environments” in Chapter 4.
There is a delay when switching between environments.
There is a delay when you switch to the PC immediately after starting it or
when you use the x-Control-Alt-… command to perform a hard restart. The
PC is performing some system configuration tasks.
When switching would interfere with a Mac OS system task, there is a slight
delay until the task is completed.
There also may be a delay while a large amount of Clipboard information
is transferred.
If you are switching to the PC immediately after starting up the computer,
make sure the Shut Down Warning is turned off in the General Controls
panel in the Mac OS. If it is on, you may not be able to switch back to the
Mac OS for several minutes after switching to the PC.
76
When I switch to the Mac OS from the PC environment, a message appears:
“PC Clipboard requires additional system services in order to function. Please ensure
that the PC Compatibility Card is successfully installed.”
Mac OS Easy Open software may be turn ed off or may not be installed.
Restart the computer, open the Mac OS Easy Open control panel, and make
sure the software is turned on. If you can’t find the control panel, you need to
reinstall it.
In the PC environment, I see the message “Non-system disk or disk error. Replace and
strike any key when ready.”
The PC Compatibility Card can’t find operating system software such as DOS
or Windows.
A nonbootable floppy disk may be in the floppy disk drive. Press x-E to eject
the d isk; then press any key to continue or try restarting the PC again.
Chapter 5
Page 77

Monitor problems
Also, make sure drive C is assigned to a drive container or hard disk drive that
contains DOS or Windows software.
If you can’t find a drive container, it may have been installed on an external
drive that is not turned on, or on removable media that is not available. Or the
drive may have been thrown away or never created. (See Chapter 2,
“Installing the PC Compatibility Card Software,” for more information on
drive containers.)
My monitor flashes oddly when I switch environments.
When you are using a single monitor for both environments, there is a flash
whe n you switch from one environment to the other. If you prefer not to see
the f las h, select the Fade Screens option in the PC Setup control panel.
See also the troubleshooting section in Appendix E, “Configuring Video
Software .”
When I try to switch to the PC environment, my screen is blank or garbled.
Open the PC Setup control panel and check the Monitor portion of the
control panel.
If you see the message “Not Supported,” your monitor may not be compatible
with the PC Compatibility Card. Refer to Appendix E, “Configuring Video
Software,” for monitor specifications and video modes, and check with your
monitor vendor to see if your monitor conforms to these specifications.
If you see the message “No Monitor,” your monitor may not be connected
properly. Make sure your monitor is connected according to the instructions
in the chapter for installing the card in your computer model and Chapter 1,
“Connecting Monitors and Other Equipment.”
If you’re using a VGA monitor connected to a VGA-to-Macintosh adapter,
you may be able to reconfigure the adapter to identify itself to the PC
Compatibility Card and Macintosh. Check the documentation that came with
your monitor and adapter.
Troubleshooting
77
Page 78

Make sure that you’ve configured your video software correctly. The PC
Compatibility Card does not support resolutions greater than 1280 x 1024. For
more information, see Chapter 2, “Installing the PC Compatibility Card
Software,” and Appendix E, “Configuring Video Software.”
The PC Setup Prefs file may be damaged. Locate the file (in the Preferences
folder i nside the System Folder) and drag it to the Trash; then restart th e
Macintosh. When the Mac OS starts up, open the PC Setup control panel
and reconfigure your settings.
I tried configuring my display and now it won’t work properly.
In Windows 95, if you choose a configuration that doesn’t display properly,
follow t hese steps to correct the problem:
1. Switch to the Mac OS by typing x-Return.
2. I n t he P C S etup control panel, click Restart PC.
3. Switch to the PC.
4. When you see the message “Starting Windows 95,” press F8 to enter
Safe Mode.
5. When Windows 95 starts up, click Start, choose the Settings menu item,
and click Control Panel.
78
6. Double-click the Display icon.
7. Cl i c k t h e Se t t i ngs t ab, and select a correct monitor setting in the list that
appears (such as 64 0 x 480). Then restart Windows 95.
My monitor flashes oddly when I switch environments.
When you are using a single monitor for both environments, there is a flash
whe n you switch from one environment to the other. If you prefer not to see
the f las h, select the Fade Screens option in the PC Setup control panel.
When I start up certain software in the PC environment, my monitor shows a jumbled or
rolling image.
You may have selected the wrong monitor type when configuring your video
software. For more information, see Chapter 2, “Installing the PC
Compatibility Card Software.”
Chapter 5
Page 79

Some ap pl ication programs that write directly to the hardware (especially
games) may not work with some monitors. Contact the software company and
ask if the software has a switch to force it to make BIOS calls.
The PC Setup control panel does not report the correct monitor type.
Hold down the Option key and open the Monitor pop-up menu. Choose
“Sense Display Type.” If that does not solve the problem, hold down the
Option key and open the Monitor pop-up menu. Choose the monitor that
most closely matches your monitor.
You may have a VGA-to-Macintosh adapter that is set incorrectly.
If you are using the AppleVision 1710 or 1710
AV display, make sure that the
AppleVision software is installed in the Mac OS environment and that the
monitor’s ADB cable is connected to the Macintosh ADB port. For more
information, see Chapter 1, “Connecting Monitors and Other Equipment.”
If you are using a non-Apple monitor, it may report the incorrect monitor
type. If you are using a multiscan monitor, you may want to turn off
autosensing in the PC Setup control panel. Hold down the Option key, open
the Display pop-up menu, and choose the monitor that most closely matches
your monitor.
PC Setup seems to detect my monitor correctly, but when I switch to the PC environment
the image is jumbled or rolling.
If you are using a VGA-to-Macintosh adapter, check whether you can control
the “sync” pulse on one or more signals going to the display. If so, try
changing the “sync” pulse and see if this solves the problem.
My non-Apple display does not seem to work correctly in the PC environment.
m Use the Windows 95 Display control panel to select your monitor name. If
your monitor name is not available, select the SuperVGA monitor option
that matches the maximum resolution supported by your monitor.
m Use the Windows 95 control panel to set the refresh rate to 60 Hz. For
more information, see Appendix E, “Configuring Video Software.”
m If the monitor still does not display properly, reduce the resolution.
Troubleshooting
79
Page 80

Problems us ing a modem
My modem is not working correctly in Windows 95.
Try disabling the “Use flow control” or “Use error control” options for the
modem. To do so, follow these steps:
1. In Windows 95, click the Start button, choose the Settings menu item, and
then choose Control Panel.
2. Double-click the Modem icon.
3. Click th e Properties button.
4. Click the C onnection tab in the dialog box that appears.
5. Click the Advanced button.
6. Deselect t he “Use flow control” or “Use error control” options, and
click OK.
If you are having trouble connecting at higher baud rates, try setting the
modem speed to 19,200 baud or less.
When I try to use my Mac OS communications software, I get an error that says the
selected port is in use.
Your Mac OS communications software may be trying to use a port that is
assigned to the PC Compatibility Card. Open the PC Setup control panel and
unassign the selected port by setting it to None.
80
After I assigned a PC COM port to a Macintosh serial port, my computer did not
start up properly.
This problem can occur if you are using Apple Remote Access (ARA) 2.0
or 2.0.1. To correct the problem, restart while holding down the Shift key to
temporarily turn off all system extensions. Then remove the Serial Port
Arbitrator from the Extensions folder inside your System Folder, and restart
your computer. (Before you use ARA, unassign the PC COM port and restart
the Mac OS environment.) You can also correct this problem by upgrading to
ARA 2.1.
Chapter 5
Page 81

Problems with files and disks
I can’t eject my floppy disk or CD when I am in the PC environment.
To eject a floppy disk in the PC environment, press x-E. To eject a CD in the
PC environment, press x-Y .
If you are unable to eject the disk using the keyboard combination, the disk
may be in use. Close all open applications in both environments and then try
to eject the disk from the Mac OS environment.
I want to assign a drive container to the C or D drive, but I can’t find the drive container
in the dialog box.
The drive container may be assigned to another drive letter. Check the C:
and D: pop-up menus.
The drive container may be on an external hard drive. Make sure that the
drive is connected correctly and the power is on. If it is not connected, shut
down the computer, reconnect it, and then restart.
I want my drive container to have more than one partition.
Create a new drive container following the instructions in “Creating a
Multiple Partition/Bootable Drive Container” in Chapter 3. Initialize the drive
container in DOS using the FDISK and FORMAT commands.
I can’t share all the folders I want.
Make sure that you have sufficient drive letters assigned in your
CONFI G.SYS file’s LASTDRIVE statement. The PC reserves the letters A–E;
other letters are available to be assigned to shared folders or volumes.
Novell NetWare may reassign drive letters even if you have assigned them to
shared folders. Try reserving additional drive letters and reassigning your
shared folders.
I inserted a floppy disk in the PC environment and it was ejected.
The disk may have been formatted for the Mac OS. Switch to the Mac OS and
try inserting the disk again.
Troubleshooting
81
Page 82

I want to change the size of my drive container.
Once a drive container is created, its size cannot be changed. If you need to
increase the size of your drive container in order to install more applications
or files, you can create another drive container and assign it to drive D.
I inserted a PC-formatted disk in the Mac OS and an initialization message appeared.
PC Exchange may not be installed in the Control Panels folder. If you don’t
find it, you can reinstall it using your system software CD-ROM disc.
The disk may be damaged. Try inser ting another disk. If that works, test the
original disk in the PC environment using a disk repair utility.
I can access a floppy disk from one environment but not the other.
Only a locked floppy disk can be accessed in both environments
simultaneously. Eject, lock, and reinsert the disk, or eject the disk, switch to
the environment you want to use it in, and reinser t the disk. The disk must be
formatted for the PC if you want to use it in the PC environment.
I switched to the Mac OS, and I don’t see the floppy disk I was using.
The floppy disk may not have been locked. To use an unlocked PC-formatted
floppy disk in the Mac OS, you must switch to the Mac OS before inserting
the disk. To use a disk in both environments, lock the disk.
82
Shared folders don’t get updated in Windows 95.
Sometimes you ne e d to refresh shared folders manually in Windows 95. Click
“My Computer,” click View, then click Refresh.
In some Microsoft applications, a shared drive icon looks like a floppy disk or CD icon.
The shared drive is still usable.
I can’t access my Zip or Syquest drive while in the PC environment.
While in the PC environment, you can’t access removable media directly the
same way you access the floppy disk drive. However, you can set up a shared
folder in the Mac OS environment and then transfer information to and from
the removable media. For more information, see “Using Shared Volumes” in
Chapter 3, “Setting Up the PC Environment.”
Chapter 5
Page 83

I am unable to use Microsoft Backup.
In Windows 95, you cannot use Microsoft Backup because it needs a PC
floppy drive controller that does not exist in your Macintosh. You can use a
Mac OS backup program to back up your PC container file.
You can use Microsoft Backup in Windows 3.1 or Windows for Workgroups.
To do so, configure the backup manually by following these steps:
1. Add the following line to the [386enh] section of your SYSTEM.INI file:
device=vfintd.386
Your SYSTEM.INI file is in the WINDOWS directory.
2. Start the Microsoft Backup program.
3. Click No in the Auto-configure dialog box.
4. In the Configuration window, select “1.44 Mb 3.5” in the Drive A list box.
You may also click Configure from the standard toolbar at the top. Do not
click the Compatibility Test button because it may cause a system “freeze.”
5. Click Backup on the standard toolbar.
6. If you are backing up to floppy disks, choose MS-DOS Path from the
Backup To list box. Type “A:\” in the second list box that appears.
You can type a different path to back up to a network device.
7. Continue with your backup.
When you use the Compare or Restore options, you must choose MS-DOS
Path in th e Co mpare From and Restore From list boxes.
I can’t start up the PC from a drive container created in Insignia SoftWindows or SoftPC.
You can use drive containers created with SoftWindows or SoftPC, but you
will not be able to start up from them. When you select a container created
with SoftWindows or SoftPC, be sure to choose a drive letter other than C.
If SoftWindows or SoftPC is running, you cannot access the drive containers.
In the PC environment, the CD-ROM drive doesn’t recognize some CDs.
The PC Compatibility Card only recognizes the following types of CDs: PC
format (ISO 9660), dual format (discs formatted for both the Macintosh and
PCs), and audio. Some specialized formats are not supported.
Troubleshooting
83
Page 84

Problems with informa tion tran s fer
Copying and pasting between environments isn’t working.
Only certain kinds of information can be copied and pasted. See “Copying
and Pasting Information Between the Mac OS and Windows Environments”
in Chapter 4 for more information.
Copying and pasting between Mac OS and Windows works only if the PC
Clipboard extension is installed in the Extensions folder inside the System
Folder (in the Mac OS) and WINCLIP is installed in the Windows
environment.
Check the Control Panels folder in your System Folder to make sure that the
Macintosh Easy Open (Mac OS Easy Open) control panel is installed. Make
sure the Automatic Document Translation option is turned on.
If Mac OS Easy Open is not available, you can install it from your system
software CD.
Windows must be running before you begin to copy and paste.
You cannot copy and paste between the Mac OS and DOS.
The PC Setup Prefs file may be damaged. Locate the file (in the Preferences
folder i nside the System Folder) and throw it away; then restart the
Macintosh. When the computer star ts up, open the PC Setup control panel
and reconfigure your settings.
84
Tips for copying and pasting images
If you are having trouble copying and pasting text or images between the
Mac OS and PC environments, try the following tips:
m Instead of using the Paste command, use the Paste Special command if it
is available in the application you are pasting into.
m If you cannot paste an image into a word-processing program in the PC
environment, try pasting the image into a graphics program, such as
PaintBrush. Then copy the image to the Clipboard from the graphics
program and try pasting it into your word-processing program.
Chapter 5
Page 85

m Instead of copying and pasting, use a shared folder to transfer an entire
file from one environment to another. Some Macintosh and Windows
programs can open files created on other platforms. For example,
®
ClarisWorks
for Windows can open ClarisWorks files created in the
Mac OS environment, and vice versa. Even if you are using two different
programs, you may be able to save a file in a file format that both
programs understand, such as RTF for text, and EPS or TIF F for graphics.
(Check the manuals that came with your programs to see if they support
common file formats.)
m If you must use the Clipboard to transfer a lot of data or a large graphic,
try transferring the data in smaller pieces or making more memory
available to the application. For more information on increasing a
program’s memory, see the “Memory” topic area of Mac OS Guide,
available in the Guide (h) menu.
m If you are copying and pasting a Photo CD image, make sure you are
copyi ng an expanded version of the image.
I can’t copy graphics from a Microsoft Word 6.0 document in the Mac OS environment.
Try this method instead:
1. Select the graphic in Word 6.0 and choose Cut from the Edit menu.
2. Open the Edit menu and choose Paste Special.
3. In the Paste Special dialog box, select Picture format and click OK.
4. Select the graphic you just pasted and choose either Cut or Copy from the
Edit menu.
5. Switch to the PC environment and try pasting the graphic.
I can’t copy files from the Mac OS environment to a drive container.
To copy files to a drive container, the drive container file has to be mounted
on the desktop and the PC must be shut down.
I cannot open or save my files in a shared folder.
With some Wi ndows 95 programs, you may not be able to open or save files
in a shared folder. You may have to move a file out of the shared folder before
you can open it, or save a file in a different location and then move it into the
shared folder.
Troubleshooting
85
Page 86

Communication and network problems
I can’t connect to a network in the PC environment.
Make sure that your networking software is properly installed and configured
(see the section on installing network support for Windows or Windows 95 in
Chapter 2, “Installing the PC Compatibility Card Software,” and see
Appendix D, “Installing Network Client Software”).
Make sure the network is up and running (check the Chooser and check with
your network administrator).
My PC communications software doesn’t work.
The Macintosh serial port does not have the same interface as the PC does
and some commands do not work. See “Setting Up a Modem or Other Serial
Device” in Chapter 3.
I get an error message associated with my Windows 95 PROTOCOL.INI file.
If an error message appears stating that there are illegal decimal characters in
the PROTOCOL.INI file, the Windows 95 Network control panel may have
modified some of the lines. To cor rect this problem, run the SETNET utility.
For more information, see Appendix D, “I nstalling Network Client Software.”
86
My system “freezes” when I am using ODI with Windows 95.
You may experience system “freezes” if you are using NetBEUI or TCP/IP
with ODI in Windows 95. To correct this problem, delete the following line
from the STARTNET.BAT file in the NWCLIENT directory:
C:\WINDOWS\ODIHLP.EXE
After deleting the line, add it to the end of your AUTOEXEC.BAT file.
When I start up in the PC environment I get a message that a shared volume no
longer exists.
Reassign the drive letter to a new drive. If you cannot remember the drive
letter, drag the PC Setup Preferences file to the Trash, open the PC Setup
control panel, and reconfigure your settings.
Chapter 5
Page 87

Configuration proble m s
I can’t assign a COM port to a Macintosh serial port.
COM ports cannot be assigned to Macintosh serial ports that are in use by an
application or network software.
If you assign a COM port to a Macintosh serial port, the serial port cannot be
used by the Mac OS until you unassign the COM port.
When I try to use my Mac OS communications software, I get an error that says the
selected port is in use.
Your Mac OS communications software may be trying to use a port that is
assigned to the PC Compatibility Card. Open the PC Setup control panel and
unassign the selected port by setting it to None.
Sound problems
I can’t hear PC sounds.
PC sound may be turn ed off in the PC Setup control panel.
If you can’t hear sound from a CD, make sure that the internal audio cables
are installed according to the instructions in the chapter on installing the PC
Compatibility Card in your computer model.
The PC Compatibility Card can play sound only from the CD-ROM drive
with the lowest SCSI ID number. If you’re using another CD-ROM drive, you
won’t hear sound when you switch to the PC environment.
If you are using DOS or Windows, increase the speaker volume with the
Sound Blaster Mixerset application. To run the Mixerset application from
DOS, change to t he
VIBRA16 directory, typ e mixerset, and press Return.
Troubleshooting
87
Page 88

Check that the AUTOEXEC.BAT and CONFIG.SYS files contain the
following lines:
AUTOEXEC.BAT (for Windows 95)
SET SOUND=C:\PROGRA~1\CREATIVE\CTSND
SET BLASTER=A220 I5 D1 H5 P330 T6
SET MIDI=SYNTH:1 MAP:E
AUTOEXEC.BAT (for Windows)
SET SOUND=C:\VIBRA16
SET BLASTER=A220 I5 D1 H5 P330 T6
SET MIDI=SYNTH:1 MAP:E
C:\VIBRA16\DIAGNOSE /S
C:\VIBRA16\MIXERSET.EXE /P /Q
CONFIG.SYS (for Windows 95 or Windows)
DEVICE=C:\VIBRA16\DRV\VIBRA16.SYS /UNIT=0 /BLASTER=A:220
I:5 D:1 H:5
DEVICE=C:\VIBRA16\DRV\CTMMSYS.SYS
CD sound went away when I switched environments.
If you are playing an audio CD when you start the PC and switch
environments, there is a delay in the sound while the PC completes some
system c onfiguration tasks.
88
Check that the CONFIG.SYS file contains this line:
DEVICEHIGH=C:\APPLE\CDROM.SYS/D:CDDRVR
Check that the AUTOEXEC.BAT file contains this line:
For Windows 95:
LOADHIGH C:\WINDOWS\COMMAND\MSCDEX.EXE /D:CDDRVR /L:E
For Windows:
LOADHIGH C:\DOS\MSCDEX.EXE /D:CDDRVR /L:E
Chapter 5
Page 89

Printing problems
I’m using Windows or Windows for Workgroups, and I can’t play audio CDs with the
Media Player or CD utilities.
Reinstall the MCI CD Audio driver from your original Windows installation
disks. To install this driver, open the Control Panel icon in the Main
program group. Double-click the Drivers icon, select [MCI] sound driver
and click the Add button in the window that appears. Select [MCI CD
Audio] from the scroll list and click OK. Insert the specific Windows
installation disk if necessary.
Printing doesn’t work.
Make sure that you’ve selected the correct preferences in PC Print Spooler (in
the Extensions folder inside the System Folder). If your printer does not
support PostScript, choose Epson.
Make sure that you have chosen appropriate printer drivers in your DOS
applications and your Windows environment. If you have a PostScript Level 1
printer, you must choose a PostScript Level 1 printer driver in Windows—a
driver for a Level 2 printer will not work.
Make sure a printer is selected in the Macintosh Chooser.
If you’re using Windows, make sure that bidirectional printing and the
“Check port before printing” options are turned off. If you’re printing to a
PostScript printer, make sure that the “Send Ctrl+D” feature is turned off.
For more information, see “Setting Printer Options” in Chapter 3.
When I try to print from the DOS prompt, I get an error message.
If you’re using a PostScript printer driver, open PC Print Spooler in the
Extensions folder (inside the System Folder). Choose Preferences from the
File menu. Make sure the checkbox labeled “Allow DOS Text Printing” has an
X in it. Switch to DOS and try printing again (or move the spool file from the
Spooler Rejected folder to the Spooler folder).
Troubleshooting
89
Page 90

When I print a document in the PC environment, the top and bottom get clipped.
If you’re using Epson emulation, open PC Print Spooler in the Extensions
folder, choose Preferences from the File menu, and select “Gaps between
pages.” In the PC environment, configure your applications to print to a
60-lin e page.
When I print a document from a DOS application, the fonts don’t look right.
Try choosing different fonts. If you’re using Epson fonts instead of bitmap
fonts, use monospaced fonts for best formatting results.
If you’re using Epson emulation, you may have chosen Faster Printing in the
Preferences dialog box of the PC Print Spooler, which prints the whole
document using a single font. Choose Better Quality and try printing again.
You may have selected a proportional space font as your default font in the
PC Print Spooler. If you select a proportional space font, the formatting of
your files may change. Try selecting a monospaced font such as Courier or
Monaco or using the graphical fonts available in your DOS application.
When I print a document in the PC environment, text doesn’t print or is cut off, or text
that should print at the bottom of one page prints on the next page.
Try selecting “No gaps between pages” in the PC Print Spooler Preferences
dialog box, and try printing again. (When you print after choosing this option,
the PC Print Spooler software will print 66 lines per page instead of 60 lines
per page.) For more information, see “Setting Printer Options” in Chapter 3,
“Setting U p the PC Environment.”
90
I selected “No gaps between pages” in the PC Print Spooler Preferences dialog box, but
text near the top and bottom of each page still doesn’t print or is cut off.
Most laser and ink jet printers cannot print close to the edges of a page. Find
out the minimum margins for your printer in the specifications section of the
manual that came with your printer. Then reset the top and bottom margins in
the application from which you are printing.
When printing multiple files in Windows 95, I keep getting PostScript errors.
Print one file at a time. Printing multiple files may cause a PostScript error. To
verify that the file has finished printing, check the Windows 95 printer queue.
Chapter 5
Page 91

I can’t print a test page in Windows 95.
When you use Add Printer Wizard to set up a printer, do not print a test page
until the printer is configured according to the instructions in “Setting Up
Printing in Windows 95” in Chapter 3, “Setting Up the PC Environment.”
Then you can print a test sheet by doing the following:
1. In the Printers window, click the icon of the printer you just added.
2. Choose Properties from the Printer menu.
3. In the dialog box that appears, click Print Test Page.
When I print from Windows 95 to my Hewlett Packard PostScript printer, I get several
pages of strange text.
This occurs with some Hewlett Packard printers that support both PCL and
PostScript, including the following printers:
m LaserJet 6 Series w/ PostScript
m LaserJet 5 Series w/ PostScript
m LaserJet 4 Series w/ PostScript
m DeskJet 1600C/CM
m DeskJet 1200C/PS
The Windows 95 printer drivers for these printers include non-PostScript
information called a PJL (Printer Job Language) header that causes the PC
Compatibility Card to incorrectly print the PostScript code.
If the first line of every print job contains the letters PJL, you are experiencing
this problem. Configure the printer driver not to send a PJL header by setting
the printer driver to “archive format.” To do so, follow these steps:
1. Open the Prop erties window for the HP printer driver.
2. Se lect the PostScript tab.
3. Change the “PostScript output format” option to “Archive format.”
4. Click OK.
Troubleshooting
91
Page 92

Other problems
I’m running applications in both environments and they seem sluggish.
Significant drive access in one environment (including file sharing) can cause
a slowdown in the other.
The PC environment is frozen, and pressing Control-Alt-
…
doesn’t reset the system.
Try restarting by pressing x-Control-Alt-period (the decimal point on the
numeric keypad) or x-Control-Alt-…. If you can, switch to the Mac OS and
click Rest art PC i n the PC Setup control panel. If these options don’t work,
restart the Macintosh using the Reset key or keyboard command.
I can’t configure my pointing device.
You don’t need to configure some pointing devices.
If you have a two-button ADB pointing device, you may be able to use its
software to map the = (equal) key on the numeric keypad to the right button.
This lets the device behave like a standard PC device.
92
Chapter 5
Page 93

Appendix A Removing the PC Compatibility Card
From Your Power Macintosh 7300 Computer
To completely remove your PC Compatibility Card hardware from your Power
Macintosh 7300 PC-Compatible computer, follow the instructions in this
appendix.
To remove the card to add memory, see Appendix B for instructions on how
to open the computer, and Appendix C for how to add memory.
To learn how to remove the card from your Power Macintosh 4400 PCCompatible computer, see the
your computer.
PC Compatibility Card Update tha t came with
WARNING
Macintosh 4 4 00 into any other computer. Using this card in another
computer could damage the system or cause random crashes. Only
a Power Macintosh 4400 model can accommodate the power
consumption of this card. (You can install the card from a Power
Macintosh 7300 computer into other models.)
Do not install the card that came installed in your Power
93
Page 94

What you need
WARNING
The removal of the PC Compatibility Card is technically
complex. Unless you are comfortable working with components inside
computers, Apple recommends that you have the PC Compatibility Card
removed by your Apple-authorized dealer (who may charge a fee). If
you attempt to remove the card yourself, any damage you may cause
to your equipment will not be covered by the limited warranty on
your computer.
Do not attempt to remove the card, install memory, install the card, or
connect the cables without first reading this manual.
Yo u’ ll be removing your PC Compatibility Card and audio cables. For your
audio to work correctly, you’ll n eed to install the audio ribbon cable, shown
below on the left, that came with your computer. You will also need to install
the met a l port access cover, shown below on the right, to cover the port access
opening on the back of your computer.
94
Appendix A
Page 95
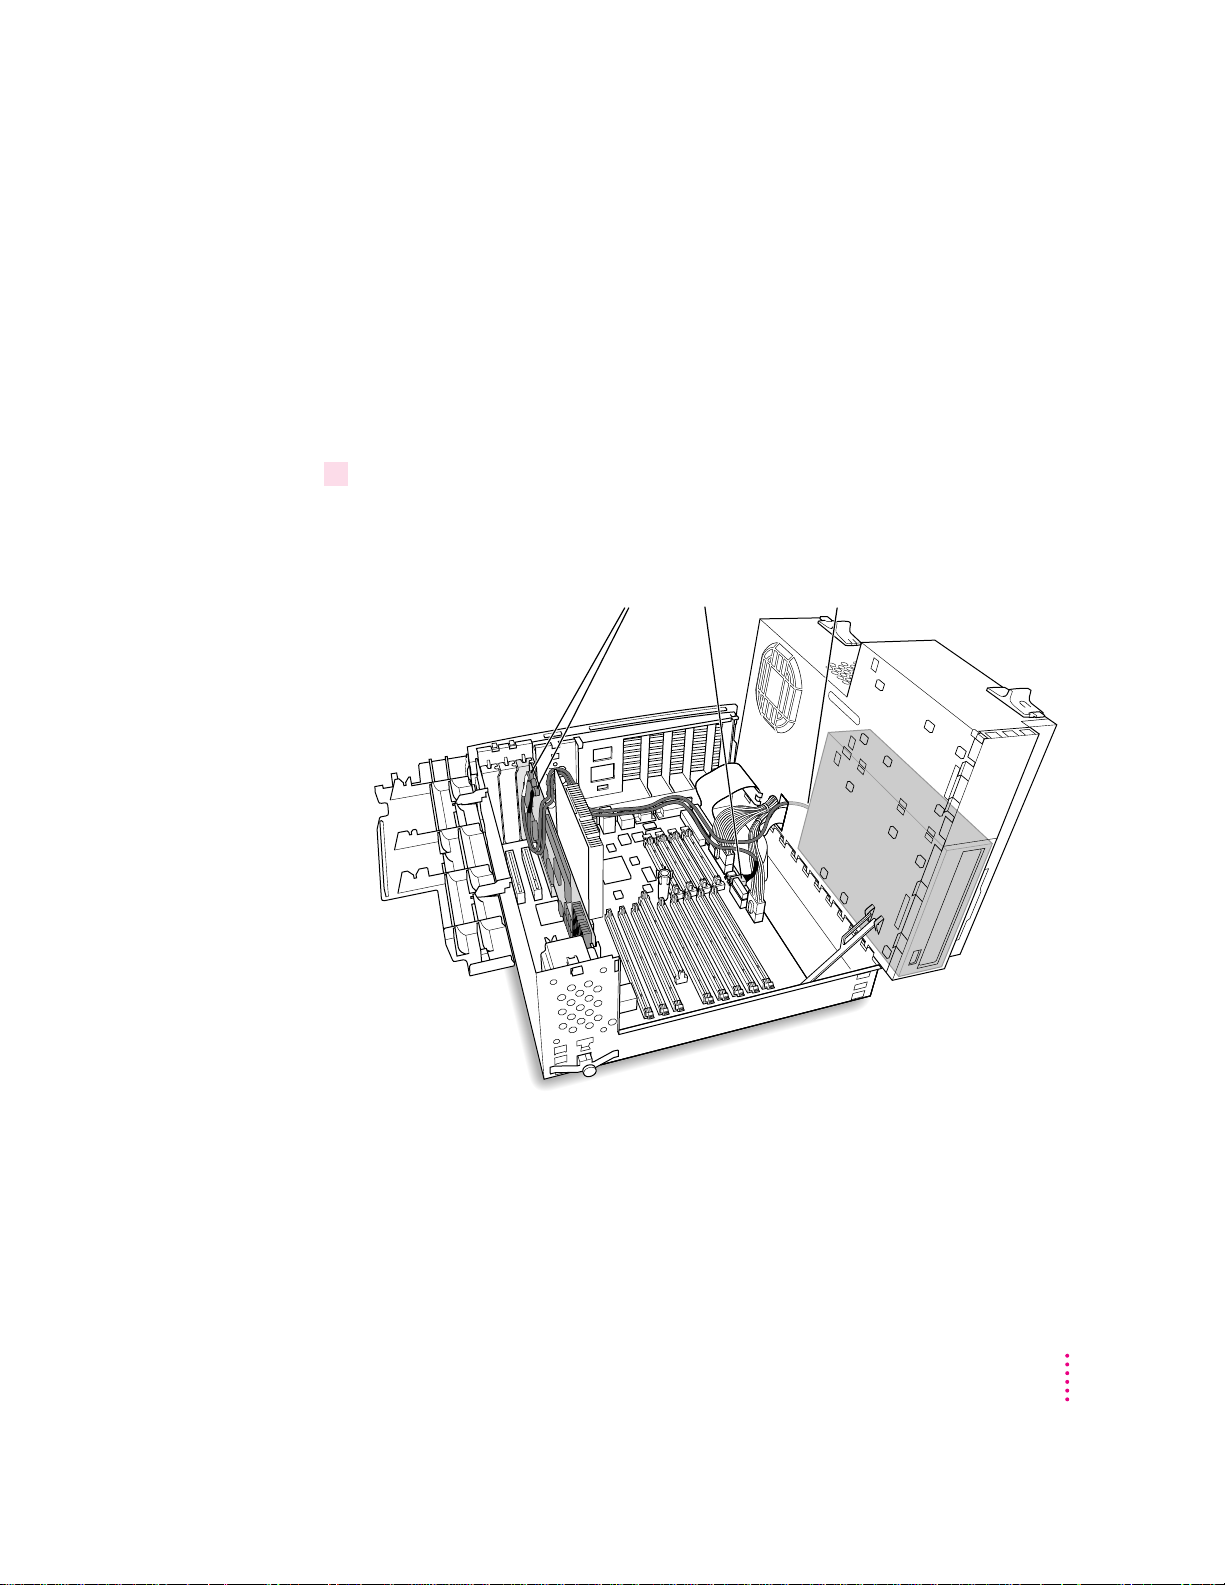
Removing the PC Compatibility Card hardware
Remove the audio cables from the card, the logic board, and the CD-ROM drive.
Opening the computer, expansion card cover, and chassis
For detailed instructions on opening your computer, expansion card cover,
and chassis, including important precautions, see Appendix B.
Disconnecting the cables
1Unplug the audio cables from the PC Compatibility Card, the Macintosh logic board, and
the CD-ROM drive.
Be sure to pull the plugs, not the cables.
Removing the PC Compatibility Card From Your Power Macintosh 7300 Computer
95
Page 96

To remove a small plug attached to the card, grasp the sides of the plug and
Gently rock
the plug.
Don’t pull on
the cable.
pull firmly. It may help to gently rock the plug from side to side as you pull.
96
Appendix A
IMPORTANT
Do not attempt to use pliers to remove any plugs; you may
damage the plugs, the card, or your computer.
2 Remove any other cables from the PC Compatibility Card.
If you have not already done so, remove the loopback cable and the PC
game controller cable (if one is attached) from the ports on the back of the
PC Compatibility Card.
If you are also removing a PC Serial and Parallel Card, detach the
peripheral flex cable from the PC Compatibility Card.
Page 97

Removing the card
3Grasp the card by its edges (without touching any components on the card) and pull it
straight out of the slot.
IMPORTANT
Do not rock the card side to side as you remove it. Doing so may
break the card or damage the slot.
Installing the port access cover
4Slide the port access cover into the port access opening at the back of the computer, to
cover the opening.
Use the por t access cover that came with your computer (shown earlier in this
appendix).
Installing the audio ribbo n cable
5Plug the audio ribbon cable into your CD-ROM drive and into the CD Audio
connector on the Macintosh logic board.
You need the audio ribbon cable that came with your computer (shown earlier
in this appendix). Plug either end of the cable into your CD-ROM drive,
thread it through the slot in the chassis, and plug the other end into the CD
audio connector on the Macintosh logic board (where you unplugged one of
the audio cables in step 1).
Replacing the computer’s cover
Replace the computer’s cover by following the instr uctions in Appendix B, in
the s e ction “Replacing the Computer’s Cover.”
Removing the PC Compatibility Card From Your Power Macintosh 7300 Computer
97
Page 98

Page 99

Appendix B Reinstalling the PC Compatibility Card
in Your Power Macintosh 7300 Computer
If you have removed your PC Compatibility Card from your Power Macintosh
4400 computer and want to reinstall it, see the
that came with your computer.
PC Compatibility Card Update
WARNING
Macintosh 4 4 00 into any other computer. Using this card in another
computer could damage the system or cause random crashes. Only
a Power Macintosh 4400 model can accommodate the power
consumption of this card. (You can install the card from a Power
Macintosh 7300 computer into other models).
If you have removed your PC Compatibility Card from your Power Macintosh
7300 c omputer a nd want to reinstall it, follow the instructions in this
appendix. (To remove the card, first follow the instructions on how to open
the co mputer, expansion card cover, and chassis in this appendix; then see
Appendix A.)
IMPORTANT
Compatibility Card, it’s easiest to install both cards at the same time. The PC
Serial and Parallel Card has standard PC ports that allow you to use several
kinds of PC-compatible peripherals from the Windows or DOS environment
(not from the Mac OS environment). Instructions in this chapter indicate when
to see your PC Serial and Parallel Card manual for installation information.
Do not install the card that came installed in your Power
If you will be installing a PC Serial and Parallel Card with your PC
99
Page 100

What you need
PC Compatibility Card
Audio cables for
SCSI CD-ROM drives (2)
WARNING
The installation of the PC Compatibility Card is technically
complex. Unless you are comfortable installi ng components inside
computers, Apple recommends that you have the PC Compatibility
Card installed by your Apple-authorized dealer (who may charge a
fee). If you attempt to install the card yourself, any damage you may
cause to your equipment will not be covered by the limited warranty
on your computer.
Do not attempt to remove the card, add memory, install the card, or
connect the cables without first reading this manual.
Before beginning the installation process, make sure you have the PC
Compatibility Card and the audio cables.
100
Appendix B
 Loading...