

Page 1

Macintosh Performa
User’s Guide
Includes setup, troubleshooting, and important health-related
information for Macintosh Performa 600 series computers
Page 2

K Apple Computer, Inc.
© 1995 Apple Computer, Inc. All rights reserved.
Under the copyright laws, this manual may not be copied, in whole or in part, without the
written consent of Apple. Your rights to the software are governed by the accompanying
software license agreement.
The Apple logo is a trademark of Apple Computer, Inc., registered in the U.S. and other
countries. Use of the “keyboard” Apple logo (Option-Shift-K) for commercial purposes without
the prior written consent of Apple may constitute trademark infringement and unfair
competition in violation of federal and state laws.
Every effort has been made to ensure that the information in this manual is accurate. Apple is
not responsible for printing or clerical errors.
Apple Computer, Inc.
1 Infinite Loop
Cupertino, CA 95014-2084
(408) 996-1010
Apple, the Apple logo, LaserWriter, LocalTalk, Macintosh, Performa, and PlainTalk are
trademarks of Apple Computer, Inc., registered in the U.S. and other countries.
Apple Backup, Apple Desktop Bus, Apple Restore, AppleScript, Balloon Help, Disk First Aid,
Extensions Manager, Finder, Macintosh PC Exchange, PowerTalk, and QuickDraw are
trademarks of Apple Computer, Inc.
Adobe, Adobe Illustrator, Adobe Photoshop, and PostScript are trademarks of Adobe Systems
Incorporated, which may be registered in certain jurisdictions.
ExposurePro is a registered trademark of Baseline Publishing, Inc.
Helvetica and Times are registered trademarks of Linotype Company.
IBM is a registered trademark of International Business Machines Corporation.
QMS is a registered trademark of QMS, Inc.
QuarkXPress is a registered trademark of Quark, Inc.
SuperPaint is a registered trademark of Aldus Corporation.
Tektronix is a registered trademark of Tektronix, Inc.
Simultaneously published in the United States and Canada.
Mention of third-party products is for informational purposes only and constitutes neither an
endorsement nor a recommendation. Apple assumes no responsibility with regard to the
performance or use of these products.
Page 3

Contents
Communications regulation information vi
1 Getting Started 1
Plugging in the computer 1
Installing an expansion card 3
Connecting a monitor 3
Connecting the mouse and keyboard 6
Connecting other equipment 8
Turning the computer on 9
Problems turning your computer on? 11
What’s next? 12
Learning the basics 13
Reviewing the basics 14
Turning the computer off 15
Where to find answers 17
2 Getting Help 19
Getting answers to your questions 20
Identifying objects on the screen 28
Learning useful shortcuts 29
iii
Page 4

3 Connecting Additional Equipment 31
Where to connect additional equipment 32
Connecting an Apple PlainTalk Microphone 33
Connecting external stereo speakers 34
Expanding memory 36
Installing internal drives 36
4 Using Programs and Backing Up Disks 37
Installing application programs 38
Working with several programs at a time 39
Protecting the information on a disk 40
Restoring the information on your hard disk 46
5 Troubleshooting 49
When you have questions 49
When you run into trouble 49
Solutions to common problems 53
Repairing a damaged disk 64
Initializing a hard disk 71
Installing or reinstalling system software 73
iv
Contents
Page 5

Appendix A Health, Safety, and Maintenance Tips 75
Health-related information about computer use 75
Safety instructions 80
Handling your computer equipment 81
Cleaning your equipment 85
Locking and unlocking the mouse 87
Appendix B Installing an Expansion Card 89
Opening the computer 91
Installing a processor-direct slot (PDS) card 94
Installing a communication card 95
Closing the computer 97
Appendix C Special Keys on Your Keyboard 101
Typing special characters and symbols 103
Special key combinations 104
Index 105
Contents
v
Page 6

Communications regulation information
FCC statement
This equipment has been tested and found to comply with the limits for a Class B digital device
in accordance with the specifications in Part 15 of FCC rules. See instructions if interference to
radio or television reception is suspected.
Radio and television interference
The equipment described in this manual generates, uses, and can radiate radio-frequency
energy. If it is not installed and used properly—that is, in strict accordance with Apple’s
instructions—it may cause interference with radio and television reception.
This equipment has been tested and found to comply with the limits for a Class B digital device
in accordance with the specifications in Part 15 of FCC rules. These specifications are designed
to provide reasonable protection against such interference in a residential installation. However,
there is no guarantee that interference will not occur in a particular installation.
You can determine whether your computer system is causing interference by turning it off. If
the interference stops, it was probably caused by the computer or one of the peripheral devices.
If your computer system does cause interference to radio or television reception, try to correct
the interference by using one or more of the following measures:
m Turn the television or radio antenna until the interference stops.
m Move the computer to one side or the other of the television or radio.
m Move the computer farther away from the television or radio.
m Plug the computer into an outlet that is on a different circuit from the television or radio.
(That is, make certain the computer and the television or radio are on circuits controlled by
different circuit breakers or fuses.)
If necessary, consult an Apple-authorized service provider or Apple. See the service and support
information that came with your Apple product. Or, consult an experienced radio/television
technician for additional suggestions. You may find the following booklet helpful:
Handbook (stock number 004-000-00493-1). This booklet, prepared by the Federal
Communications Commission, is available from the U.S. Government Printing Office,
Washington, DC 20402.
IMPORTANT
could void the FCC Certification and negate your authority to operate the product.
This product was tested for FCC compliance under conditions that included the use of Apple
peripheral devices and Apple shielded cables and connectors between system components. It is
important that you use Apple peripheral devices and shielded cables and connectors between
system components to reduce the possibility of causing interference to radios, television sets,
and other electronic devices. You can obtain Apple peripheral devices and the proper shielded
cables and connectors through an Apple-authorized dealer. For non-Apple peripheral devices,
contact the manufacturer or dealer for assistance.
Changes or modifications to this product not authorized by Apple Computer, Inc.,
Interference
vi
Communications Regulation Information
Page 7

DOC statement
DOC Class B Compliance This digital apparatus does not exceed the Class B limits for radio
noise emissions from digital apparatus as set out in the interference-causing equipment standard
entitled “Digital Apparatus,” ICES-003 of the Department of Communications.
Observation des normes—Classe B Cet appareil numérique respecte les limites de bruits
radioélectriques applicables aux appareils numériques de Classe B prescrites dans la norme
sur le matériel brouilleur : “Appareils Numériques”, NMB-003 édictée par le ministre des
Communications.
VCCI statement
CD-ROM drive
WARNING
equipment’s manual may result in hazardous exposure.
WARNING
this product is harmful to the eyes. The use of optical instruments, such as magnifying lenses,
with this product increases the potential hazard to your eyes. For your safety, have this
equipment serviced only by an Apple-authorized service provider.
If you have an internal Apple CD-ROM drive in your computer, your computer is a Class 1
laser product. The Class 1 label, located on the computer, indicates that the drive meets
minimum safety requirements. A service warning label is on the CD-ROM drive inside the
computer.
Making adjustments or performing procedures other than those specified in your
Do not attempt to disassemble the cabinet containing the laser. The laser beam used in
Communications Regulation Information
vii
Page 8

Monitor cable
(sometimes built into the monitor)
Monitor power cord
Computer power cord
Keyboard
Macintosh Performa computerMonitor
Mouse
Keyboard cable
(sometimes built
into the keyboard
as shown here)
Page 9

Follow the instructions in this
chapter to set up your computer
and learn the basics.
1
Getting Started
The illustration on the facing page shows all the equipment you will need to
set up your computer and begin using it. Place your equipment on a sturdy,
flat surface near a grounded wall outlet. Before following the setup
instructions in this chapter, you may want to read “Arranging Your Office”
in Appendix A (in the section on health-related information) for tips on
adjusting your work furniture so that you’re comfortable when using the
computer.
Plugging in the computer
Before you plug your Macintosh into a wall socket (and before you connect
anything else to your Macintosh), carefully read all the setup instructions in
this chapter. Then, begin by plugging in the computer according to the
instructions that follow. The plug grounds the computer and protects it from
electrical damage while you are setting up.
1
Page 10
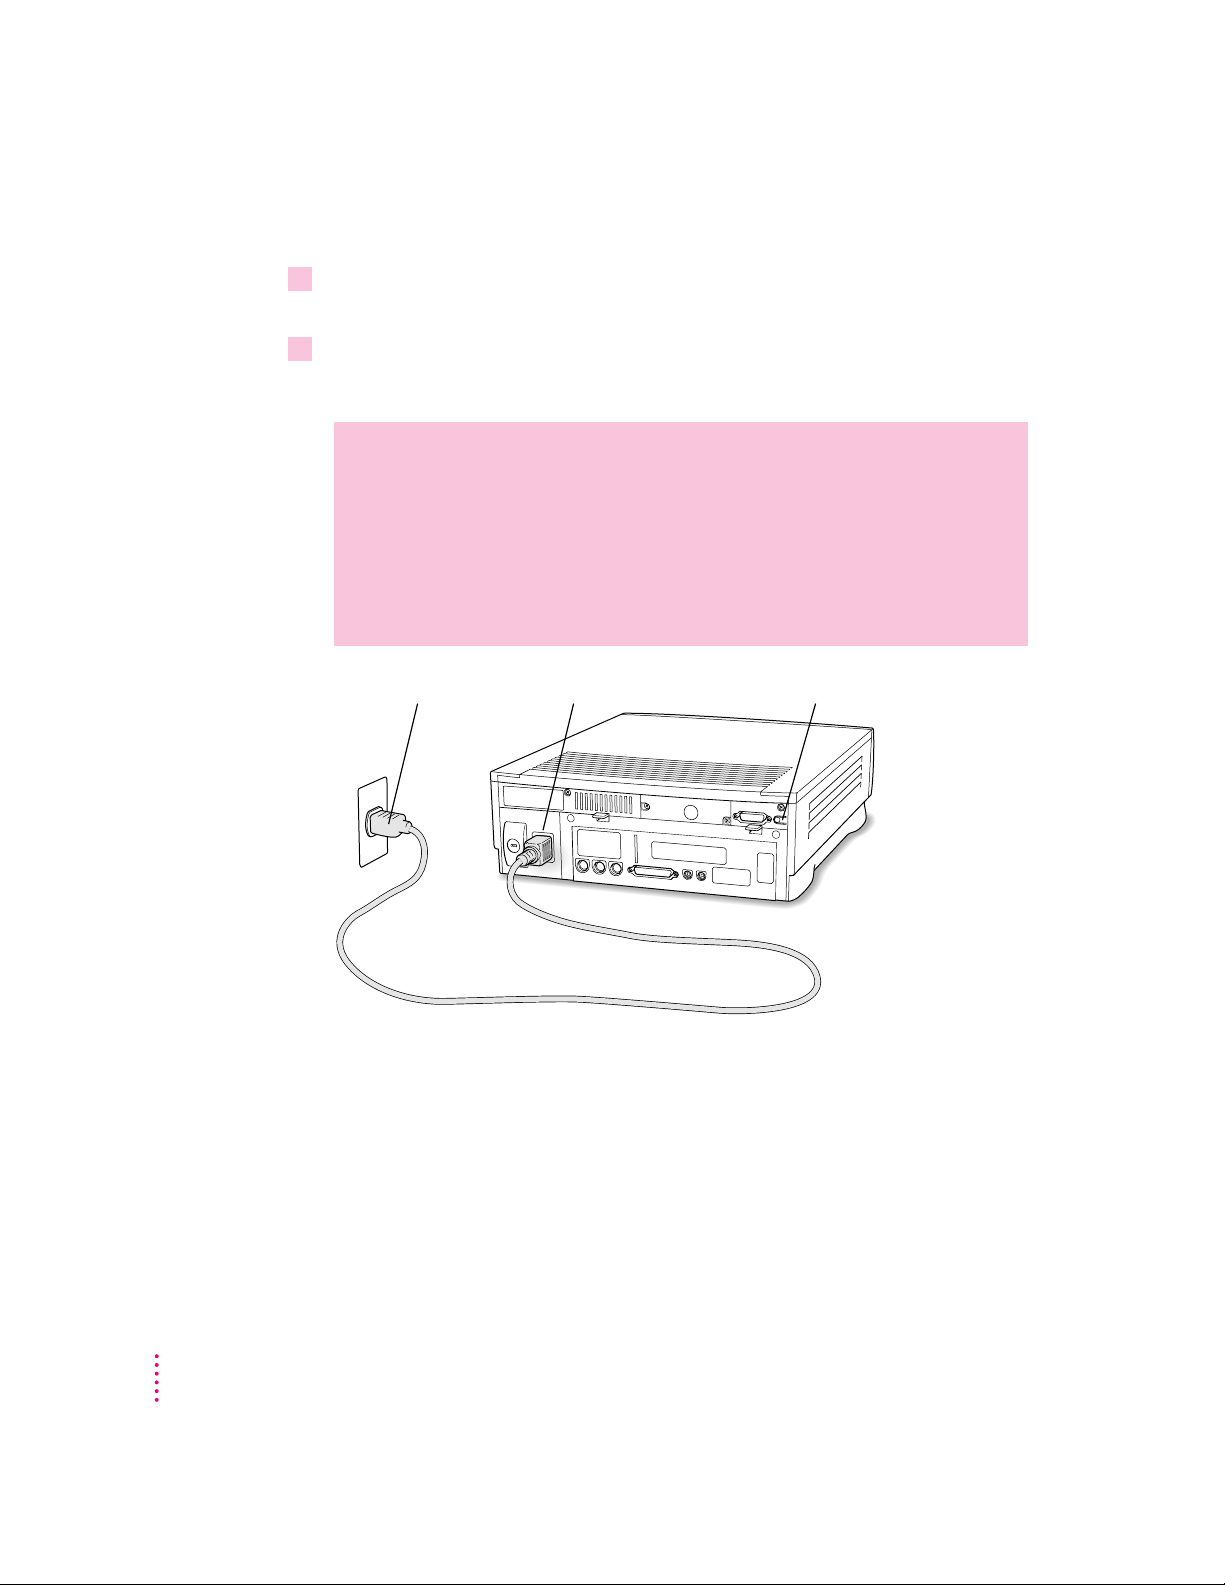
When you are ready to begin, follow these steps:
Power cord plug Power cord socket Standby power button
1Plug the socket end of the computer’s power cord into the recessed power cord socket
≤
(marked with the symbol
2Plug the other end of the power cord into a three-hole grounded outlet or power strip.
) on the back of the computer.
Choose a power outlet to which you have easy access.
WARNING
This equipment is intended to be electrically grounded.Your
Macintosh is equipped with a three-wire grounding plug—a plug that
has a third (grounding) pin. This plug will fit only a grounded AC
outlet. This is a safety feature. If you are unable to insert the plug into
the outlet, contact a licensed electrician to replace the outlet with a
properly grounded outlet. Do not defeat the purpose of the grounding
plug!
IMPORTANT
Be sure that at least one end of the power cord is within easy
reach so that you can unplug the computer when you need to.
If the computer starts up: If you hear a tone, the computer has started up and
you need to turn it off before proceeding. Press the power button (also called
the standby power button) located on the back of the computer to turn the
computer off.
2
Chapter 1
Page 11

Installing an expansion card
If you purchased any expansion cards separately from your Macintosh, install
them now. (For instructions, see Appendix B, “Installing an Expansion Card,”
as well as the documentation that came with the cards.) If you don’t have an
expansion card, go on to the next section, “Connecting a Monitor.”
Connecting a monitor
You can connect many types of monitors to your Macintosh. To connect a
monitor from a manufacturer other than Apple, refer to the instructions that
came with the monitor.
Connecting the monitor power cord
Monitors have two cords to connect—a power cord and a monitor cable.
To connect the monitor power cord, follow these steps:
1Place the monitor where you will be using it.
You may place it on top of your computer. Keep these considerations in mind:
m Allow a few inches for air circulation around the sides of the computer
and monitor.
m Make sure that the top of the screen is slightly below eye level when you’re
sitting at the keyboard.
m Position the monitor to minimize glare and reflections on the screen from
overhead lights and windows.
m Consult “Arranging Your Office” in Appendix A for suggestions on
locating your computer equipment.
2Connect the monitor power cord to the monitor.
On some monitors, the cord is already attached.
Getting Started
3
Page 12
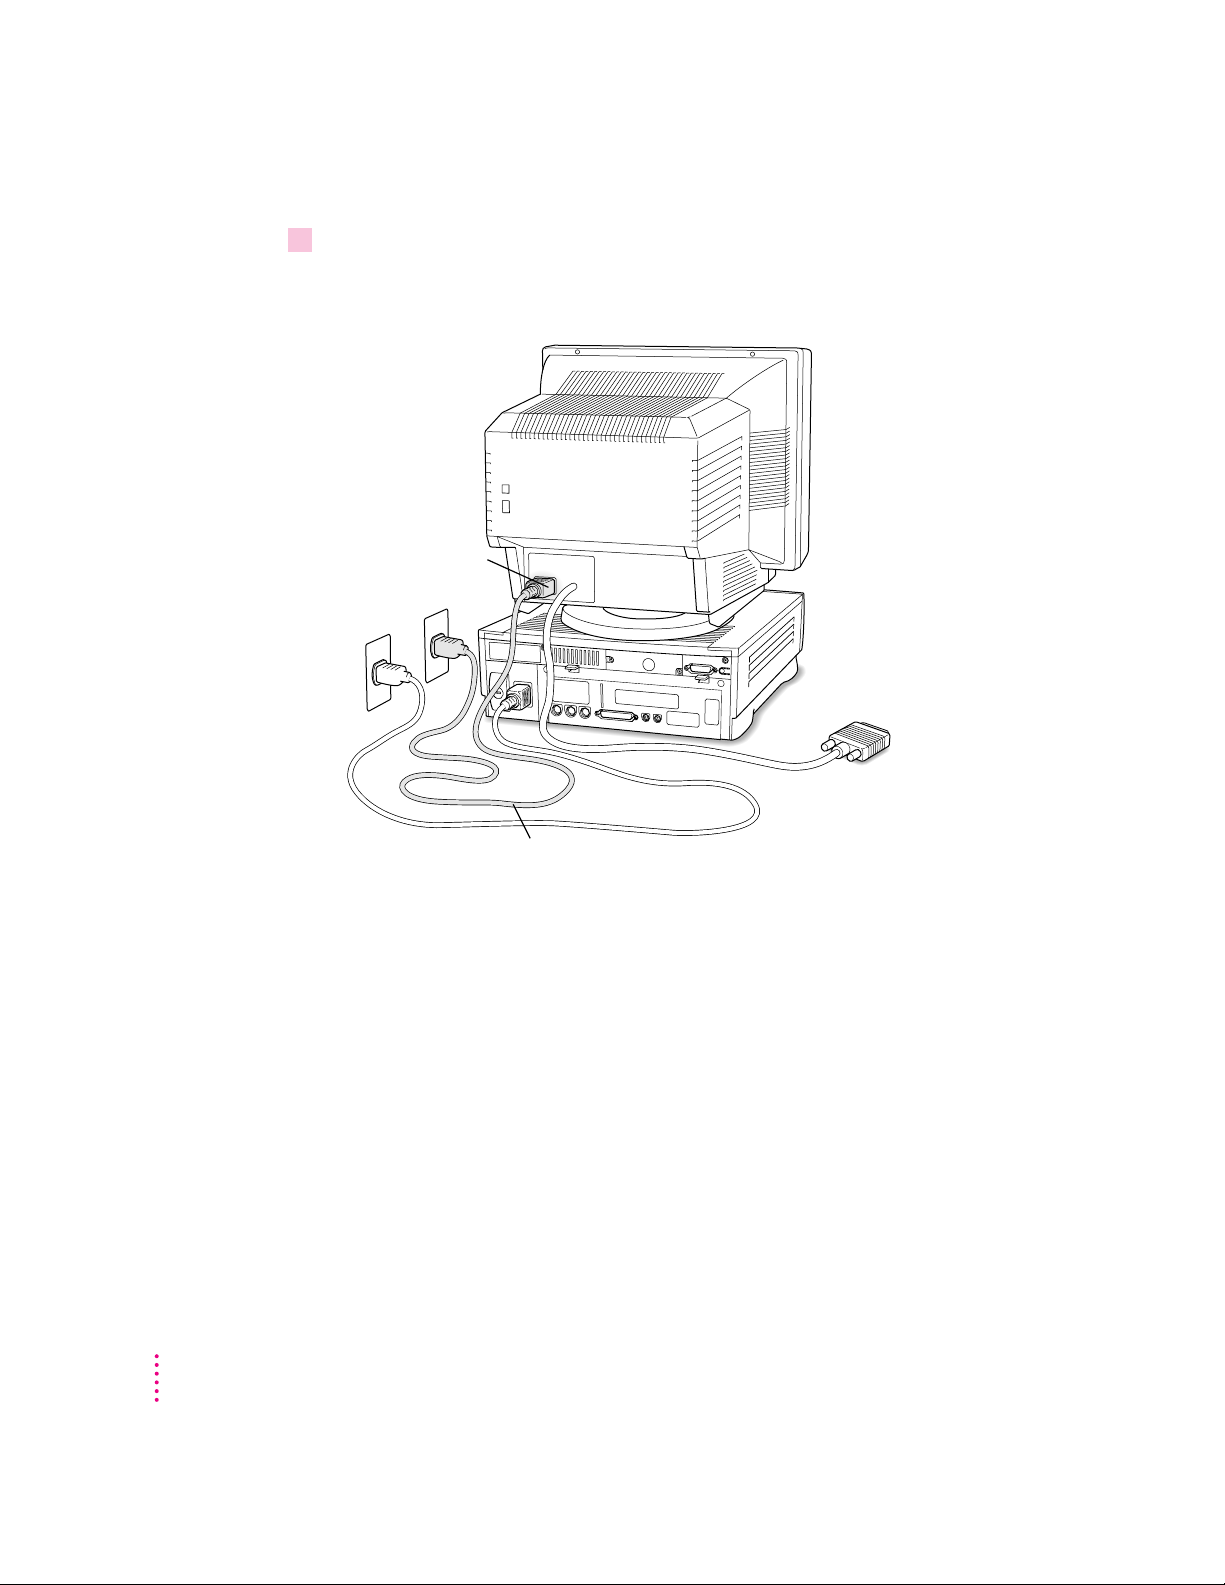
3Plug in the monitor power cord.
Monitor power cord
Monitor power socket
Be sure to plug the power cord into a three-hole grounded outlet or power
strip.
4
Chapter 1
Page 13
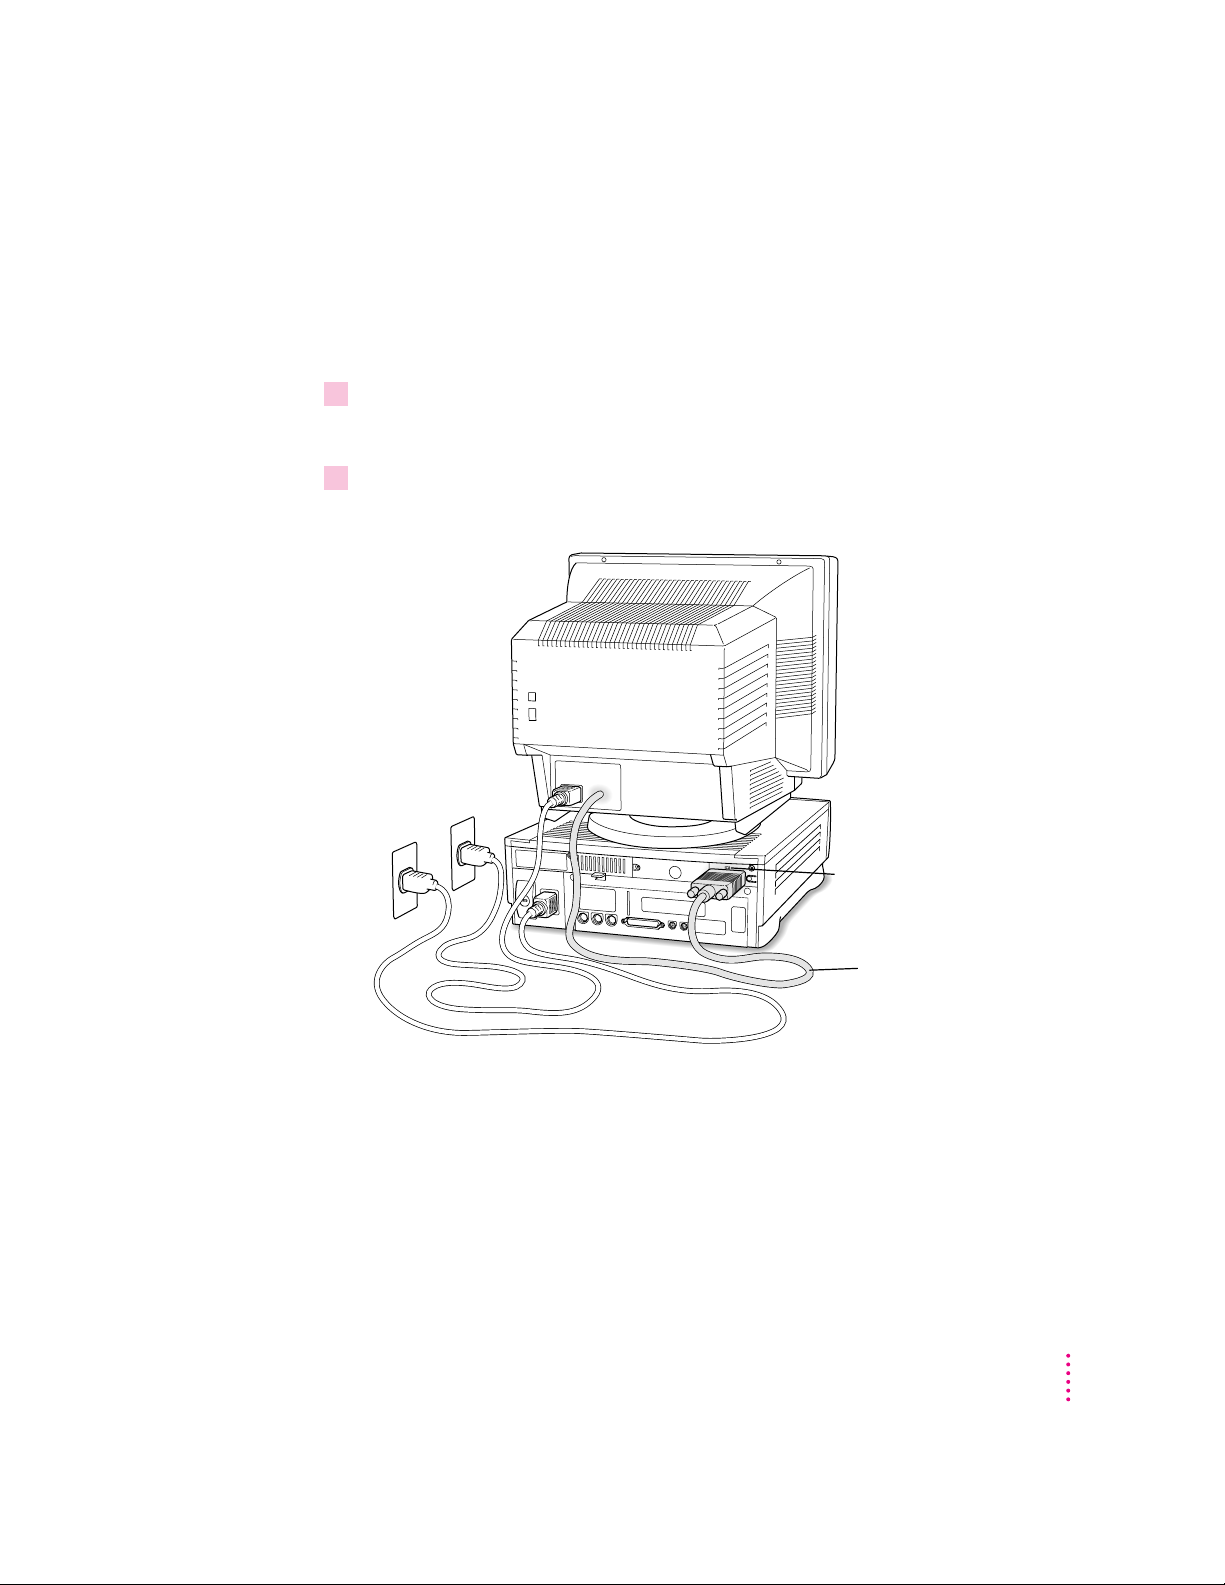
Connecting the monitor cable
Monitor cable
™
Monitor port
After you plug in the monitor power cord, you connect the monitor cable to
the computer’s monitor port.
To connect the monitor cable, follow these steps:
1Attach the monitor cable to the monitor.
On some monitors, the cable is already attached (as shown below).
2Attach the monitor cable to the monitor port on the back panel of the computer.
The monitor port is marked with the ™ icon (symbol).
Getting Started
5
Page 14

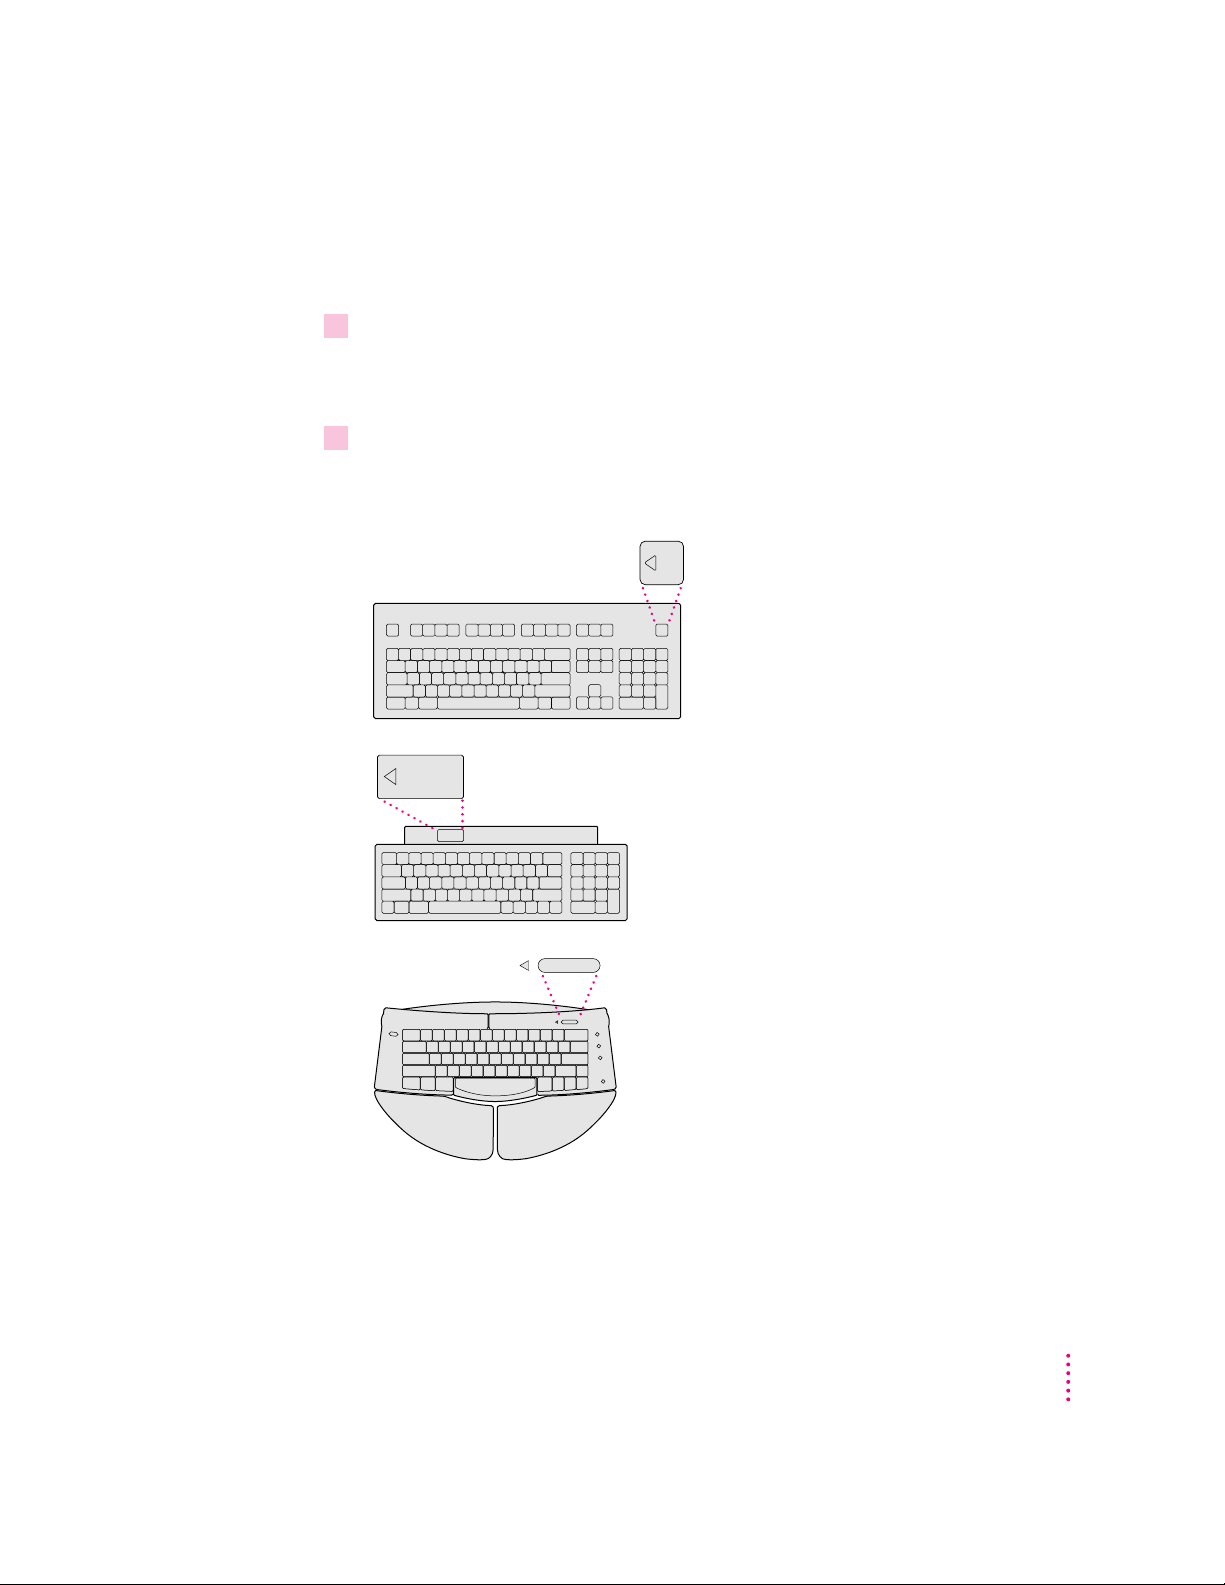
Connecting the mouse and keyboard
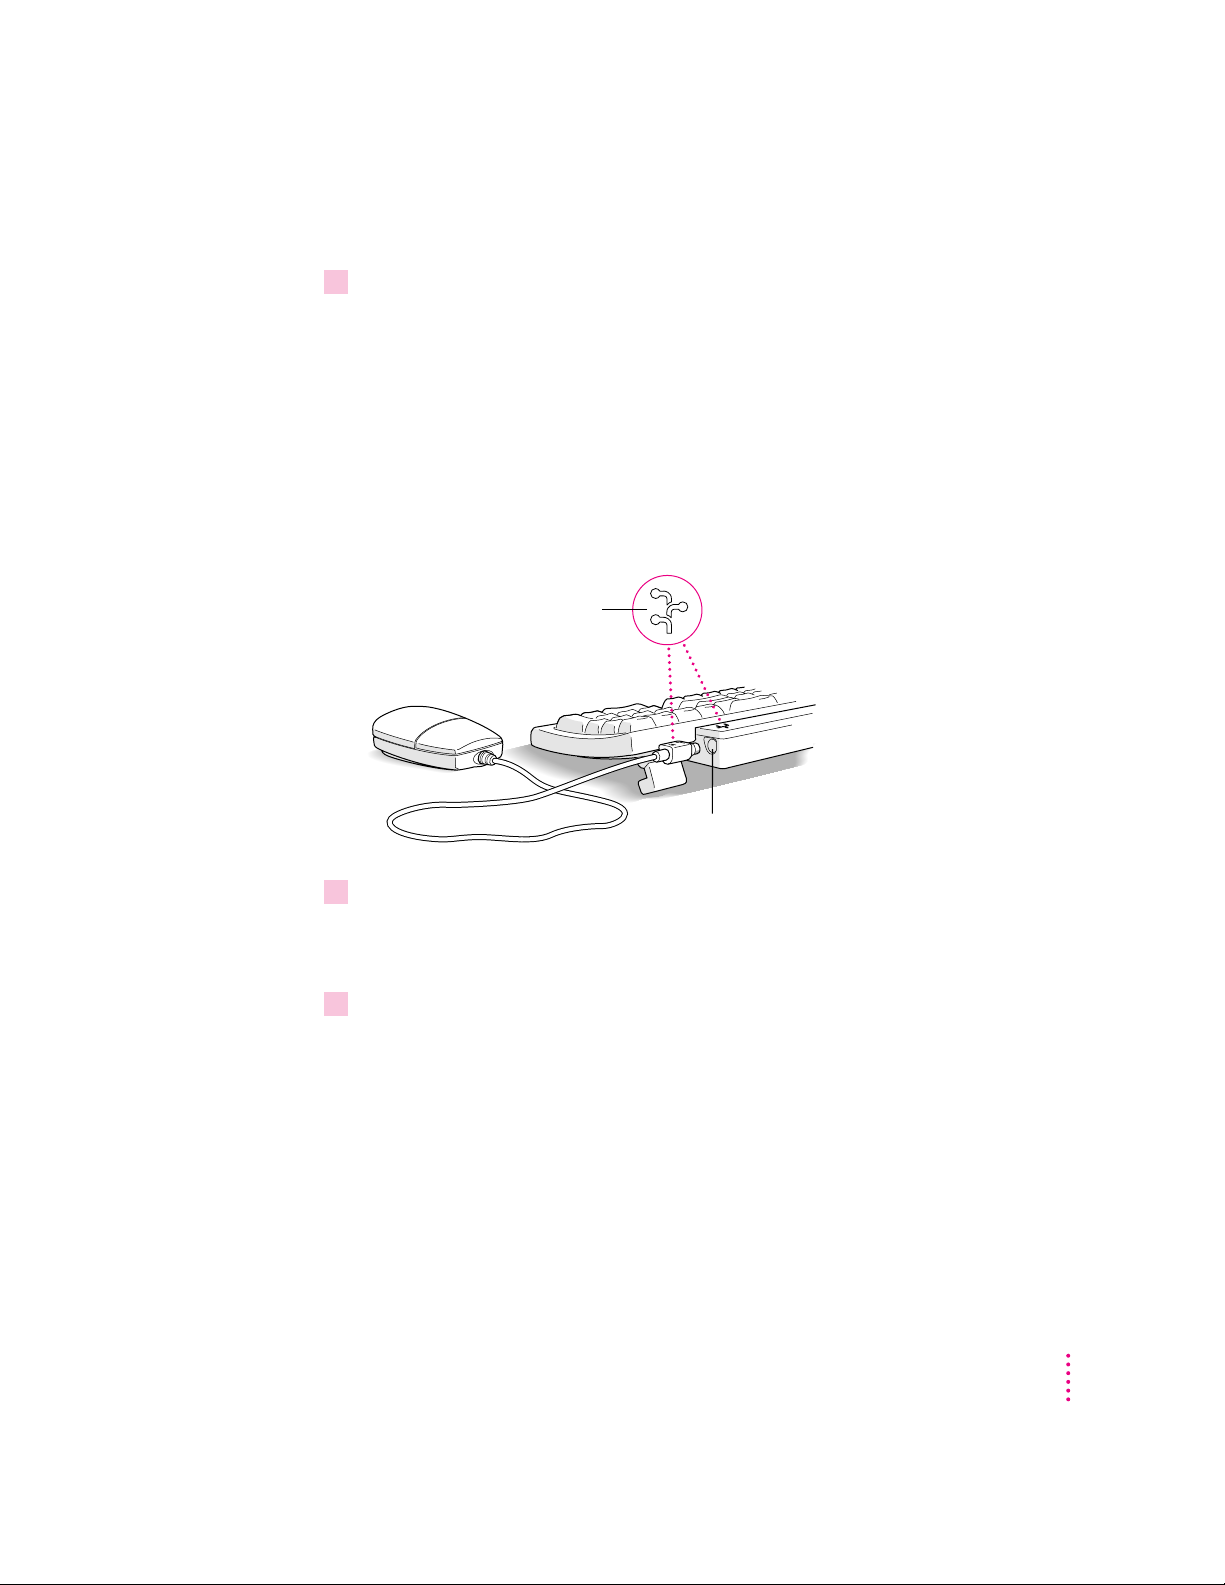
This cable plugs into the Apple Desktop Bus (ADB) port,
marked with the
◊
icon, on the back of the computer.
Plug the mouse into the recessed port on
the keyboard. The flat part of the plug should
be pointing down, as shown here.
You have a choice of several keyboards for your Macintosh. The way you
connect the mouse and keyboard depends on whether the keyboard has a
separate cable or a built-in cable.
Connecting a keyboard with a built-in cable
1Plug the mouse cable into the recessed port on the back of the keyboard.
The plug and the port are marked with the ◊ icon (symbol). The positions of
the port and icon on your keyboard may be different from those pictured.
By the way: A port marked with the ◊ icon is called an Apple Desktop Bus
(ADB) port.
2Plug the keyboard cable into the port marked with the ◊icon on the back of the
computer.
Some monitors have a port to which you can connect the keyboard or mouse.
See the information that came with your monitor.
6
Chapter 1
Page 15
Connecting a keyboard with a separate cable
ADB port
This icon is on both
the cable and the port.
1Plug the mouse cable into the port on either side of the keyboard.
Most right-handed people prefer to use the mouse with their right hand; most
left-handed people prefer to use their left hand. Plug the mouse into the port
on the side you prefer.
The plug and the port are marked with the ◊ icon (symbol). Align the
symbols before you insert the plug. (The positions of the port and icon on
your keyboard may be different from those pictured here.)
By the way: A port marked with the ◊ icon is called an Apple Desktop Bus
(ADB) port.
2Plug the keyboard cable (both ends are the same) into the other port on the keyboard.
If you plugged the mouse cable in on the right, for example, plug the keyboard
cable in on the left.
3Plug the keyboard cable into the port marked with the
computer.
◊
icon on the back of the
Some monitors have a port to which you can connect the keyboard or mouse.
See the information that came with your monitor.
Getting Started
7
Page 16

Connecting other equipment
If you are new to the Macintosh, it’s a good idea to get some experience using
your computer before you connect other equipment, such as a printer or
scanner. To learn basic Macintosh skills, continue with the instructions in this
chapter.
When you’re ready to connect other equipment to your Macintosh, see the
instructions in Chapter 3.
8
Chapter 1
Page 17
Turning the computer on
Follow these steps to turn the computer on:
1 Turn on the monitor.
See the information that came with your monitor for the location of the power
button.
2 Turn on your computer by pressing the Power key.
The Power key is at the top of the keyboard. You can recognize this key by the
triangle outline on it (P).
You hear a tone from the computer as it starts up.
Getting Started
9
Page 18
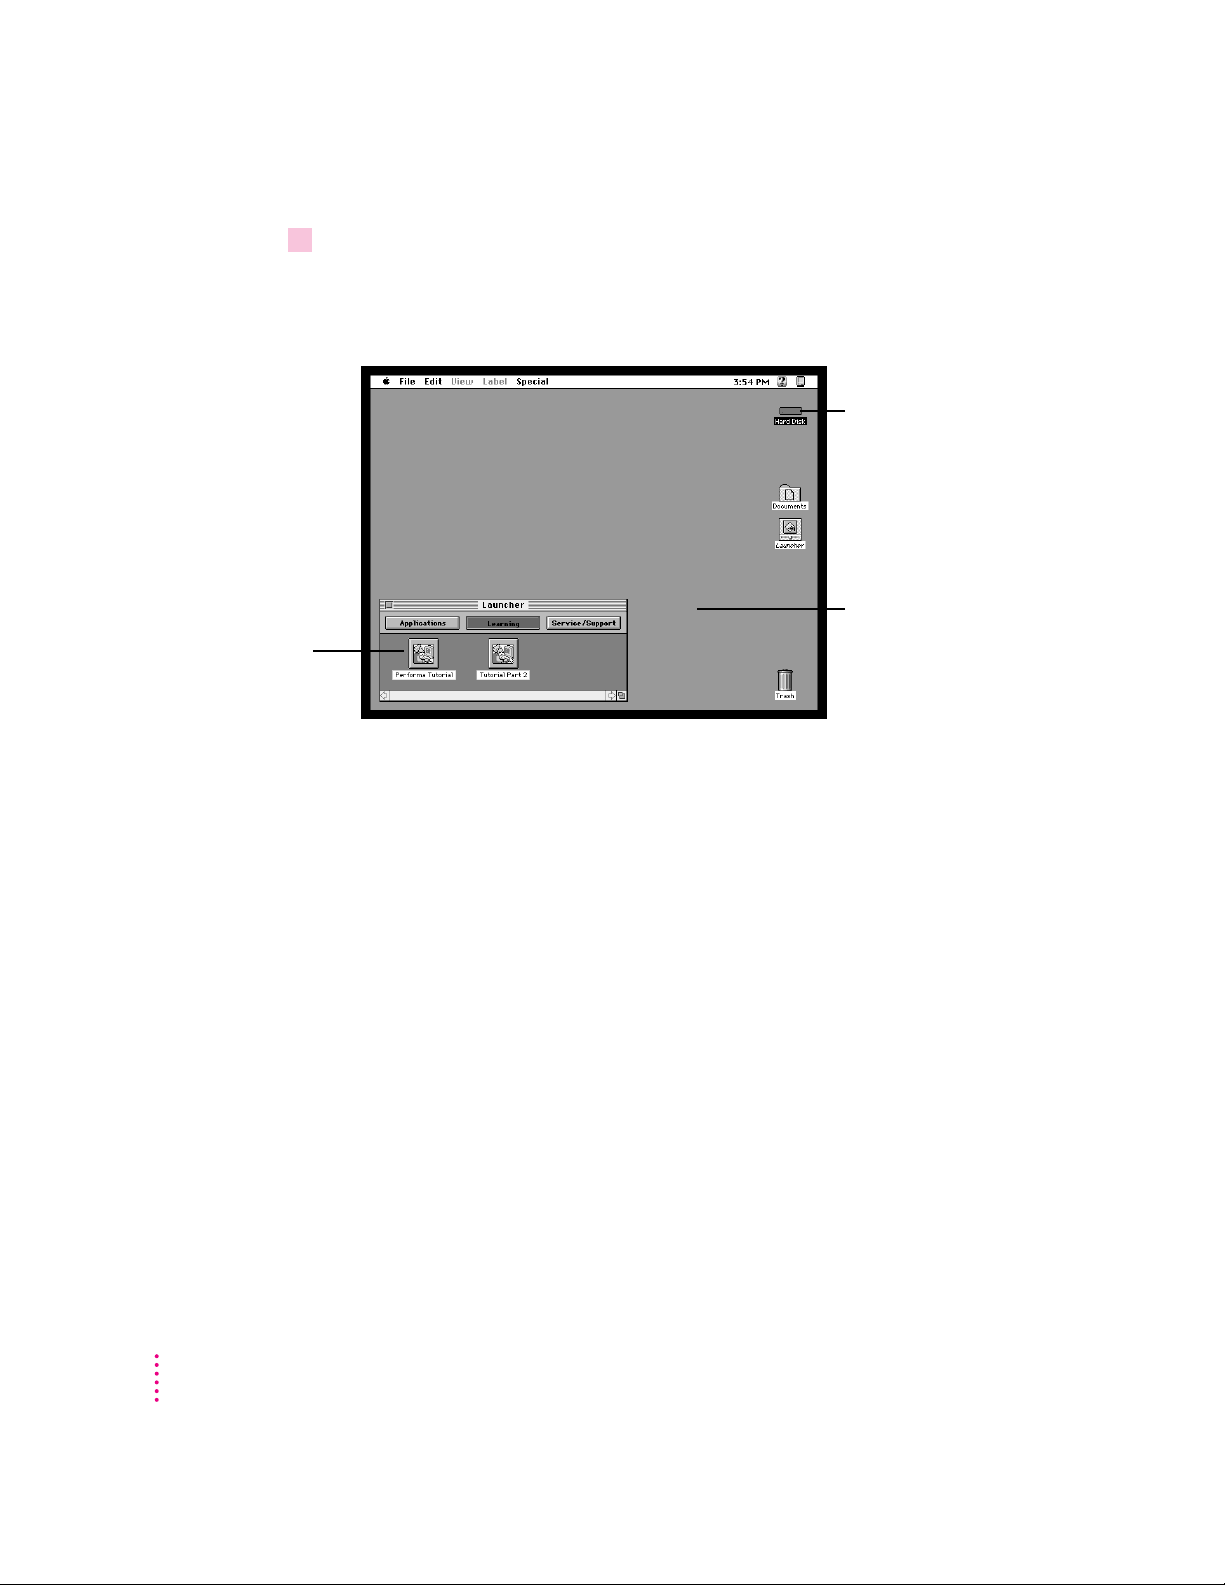
3Check to see what’s on your screen.
Your Launcher
probably has
more items in it
than are shown in
this illustration.
m If you see the Macintosh desktop, as in the illustration below, your system
software has already been installed, and your computer is ready to use.
Skip now to the section “What’s Next?” later in this chapter.
Hard disk icon
Macintosh desktop
m If you see a blinking question mark, you probably need to install system
software on your computer’s hard disk. (System software is the set of
programs your computer uses to start itself up.) See “Solutions to Common
Problems” in Chapter 5.
10
m If you see anything else on your screen, or nothing at all, see the next
section, “Problems Turning Your Computer On?”
Chapter 1
Page 19

Problems turning your computer on?
If you don’t see anything on the screen, check these items to see if you can
identify the problem:
m Is the computer plugged into a power source? If it is plugged into a power
strip, is the power strip turned on?
m Is the computer turned on? The power-on light on the front panel should
be on. If it isn’t on, press the standby power button on the computer’s back
panel (marked with the symbol ®).
m Are the keyboard and mouse cables connected correctly? (Don’t disconnect
the keyboard or mouse cable while the computer is on. You could damage
your equipment.)
m Is the monitor power cord plugged in?
m Is the monitor turned on? (Check the power-on light on the front of the
monitor.)
m Is the monitor cable attached firmly to both the monitor and computer?
m Is the brightness control on the monitor adjusted correctly? (On Apple
monitors, the brightness control is marked with the symbol ¤.)
Getting Started
11
Page 20

What’s next?
Congratulations! You’ve finished setting up your computer. Now continue
with one of the following steps:
m If you are new to the Macintosh, turn to the next section, “Learning the
Basics.”
m If you are an experienced Macintosh user, turn to Chapter 2, “Getting
Help,” to learn about Macintosh Guide, your main source of information
when you’re working with the Macintosh.
m If you want to connect other equipment, such as a printer, to your
computer, see Chapter 3, “Connecting Additional Equipment.”
Before you begin working with your computer, be sure to read the important
health and safety information in Appendix A.
IMPORTANT
If you need to turn off your computer at any point, please see
“Turning the Computer Off” later in this chapter. It is very important to use
the correct procedure for shutting down your Macintosh before turning it off.
12
Chapter 1
Page 21
Learning the basics
If you are new to the Macintosh, you should begin by looking at the
easy-to-use program called the Performa Tutorial. The two-part tutorial
teaches you the basic skills you’ll need to use your computer. To start the
tutorial, follow these steps:
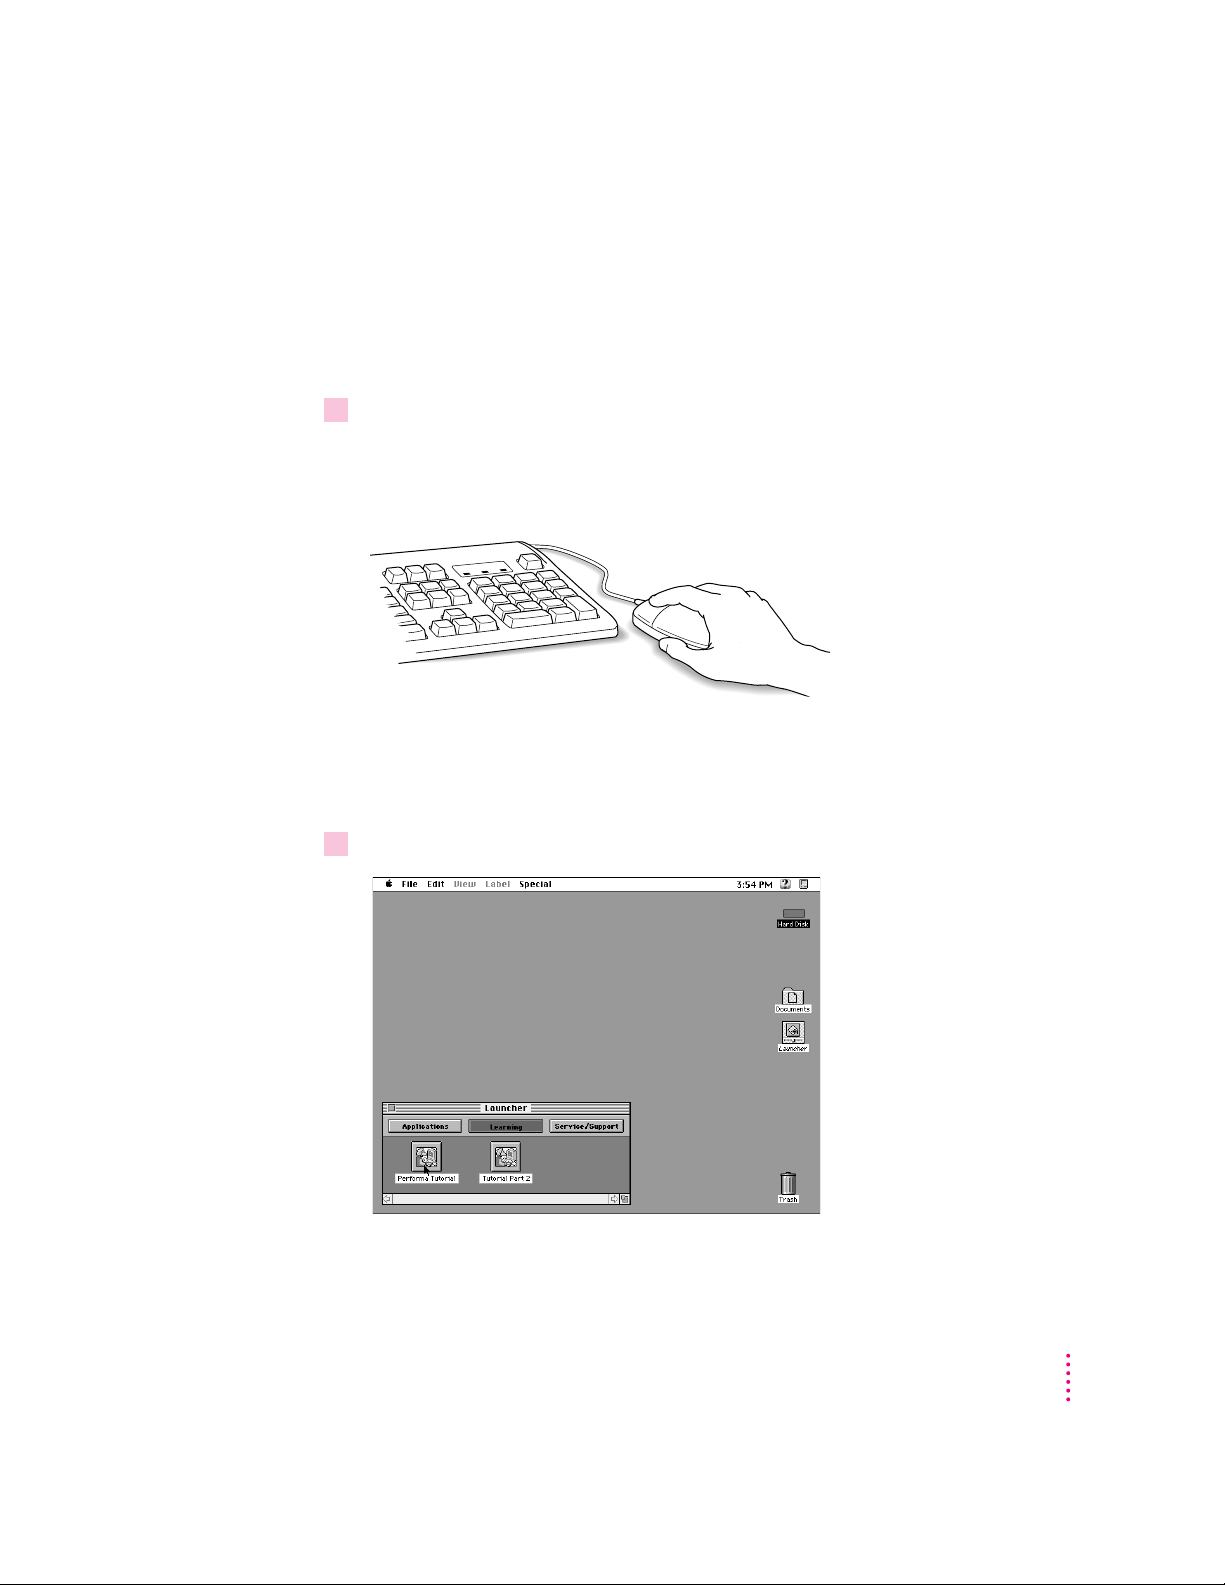
1Slide your mouse along your mouse pad or desk.
Hold the mouse as shown, with the cable pointing away from you. Don’t press
the mouse button (under your index finger). Notice that the arrow (8) on the
screen moves in the same direction that you move the mouse.
If the arrow doesn’t move, make sure that the cables connecting the mouse
and keyboard are secure and that your mouse is positioned as shown in the
illustration.
2Move the mouse so that the arrow is over the picture labeled “Performa Tutorial.”
Getting Started
13
Page 22
If you don’t see the picture for the Performa Tutorial on your screen, put the
arrow on the word “Learning” and click (press and release) the mouse button.
If you run out of room on your mouse pad or desk while moving the mouse,
pick up the mouse and place it where there’s more room. (The arrow on the
screen moves only when the mouse is in contact with the mouse pad or desk.)
3Without moving the mouse, click the mouse button.
A window appears welcoming you to the tutorial. You can set this book aside
for now and follow the instructions on the screen. When you have completed
both parts of the tutorial, return to this book.
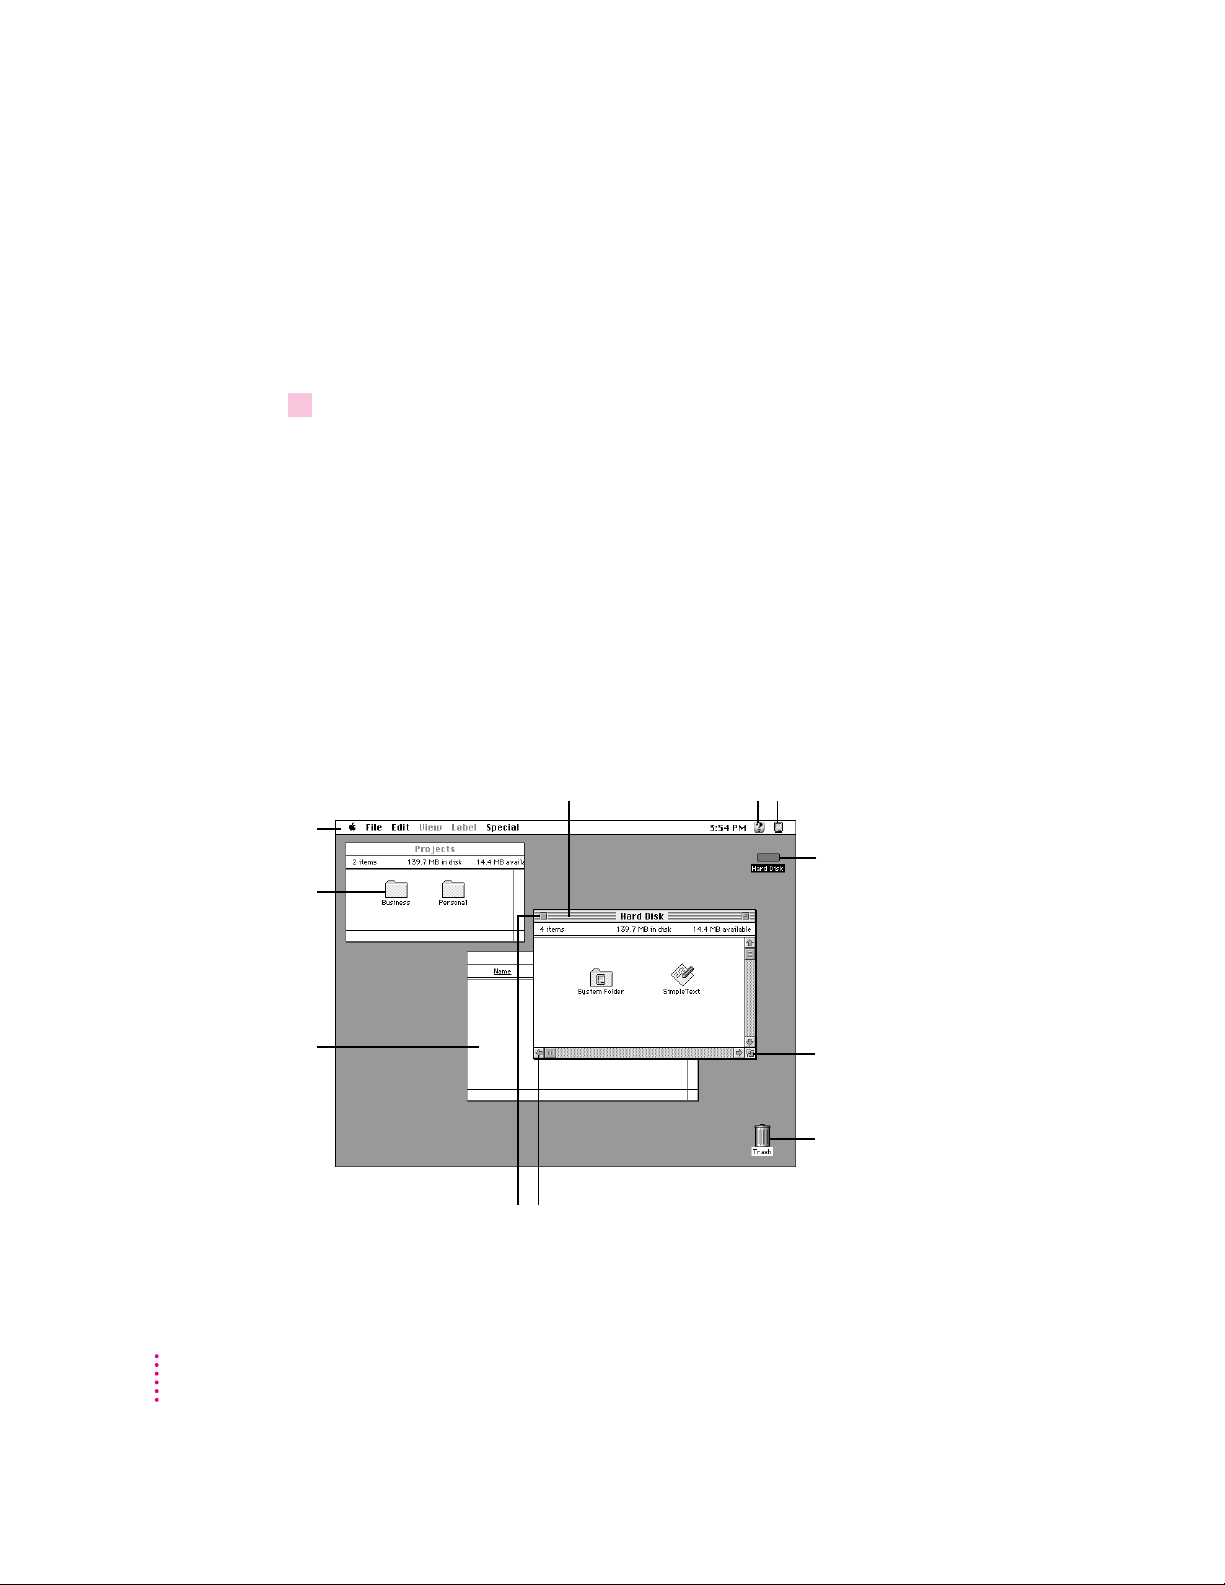
Reviewing the basics
The following illustration summarizes many of the basic skills and terms you
learned from the tutorial.
The strip across the
top of the screen is
called the menu bar.
The symbols and
words in it represent
menus of commands.
Icons are small pictures
that represent disks,
folders, programs, and
documents. To open
an icon, click the
icon twice quickly.
Windows are boxes
that display text,
graphics, or icons. To
bring a partially
covered window to the
front, click anywhere
in the window.
To move a window,
drag it by the title bar.
To close a window,
click the close box.
To find an answer to
a question, look in the
Guide (
To bring hidden portions of a
window’s contents into view,
click the scroll arrows.
) menu.
h
You can have several application
programs open at once. To see which
program is active or to switch from
one program to another, use this
menu (called the Application menu).
This icon represents your
computer’s internal hard disk.
To change the size or shape of
a window, drag the size box.
To throw away an item you
no longer want, drag it to the
Trash and choose Empty
Trash from the Special menu.
14
Chapter 1
Page 23
Turning the computer off
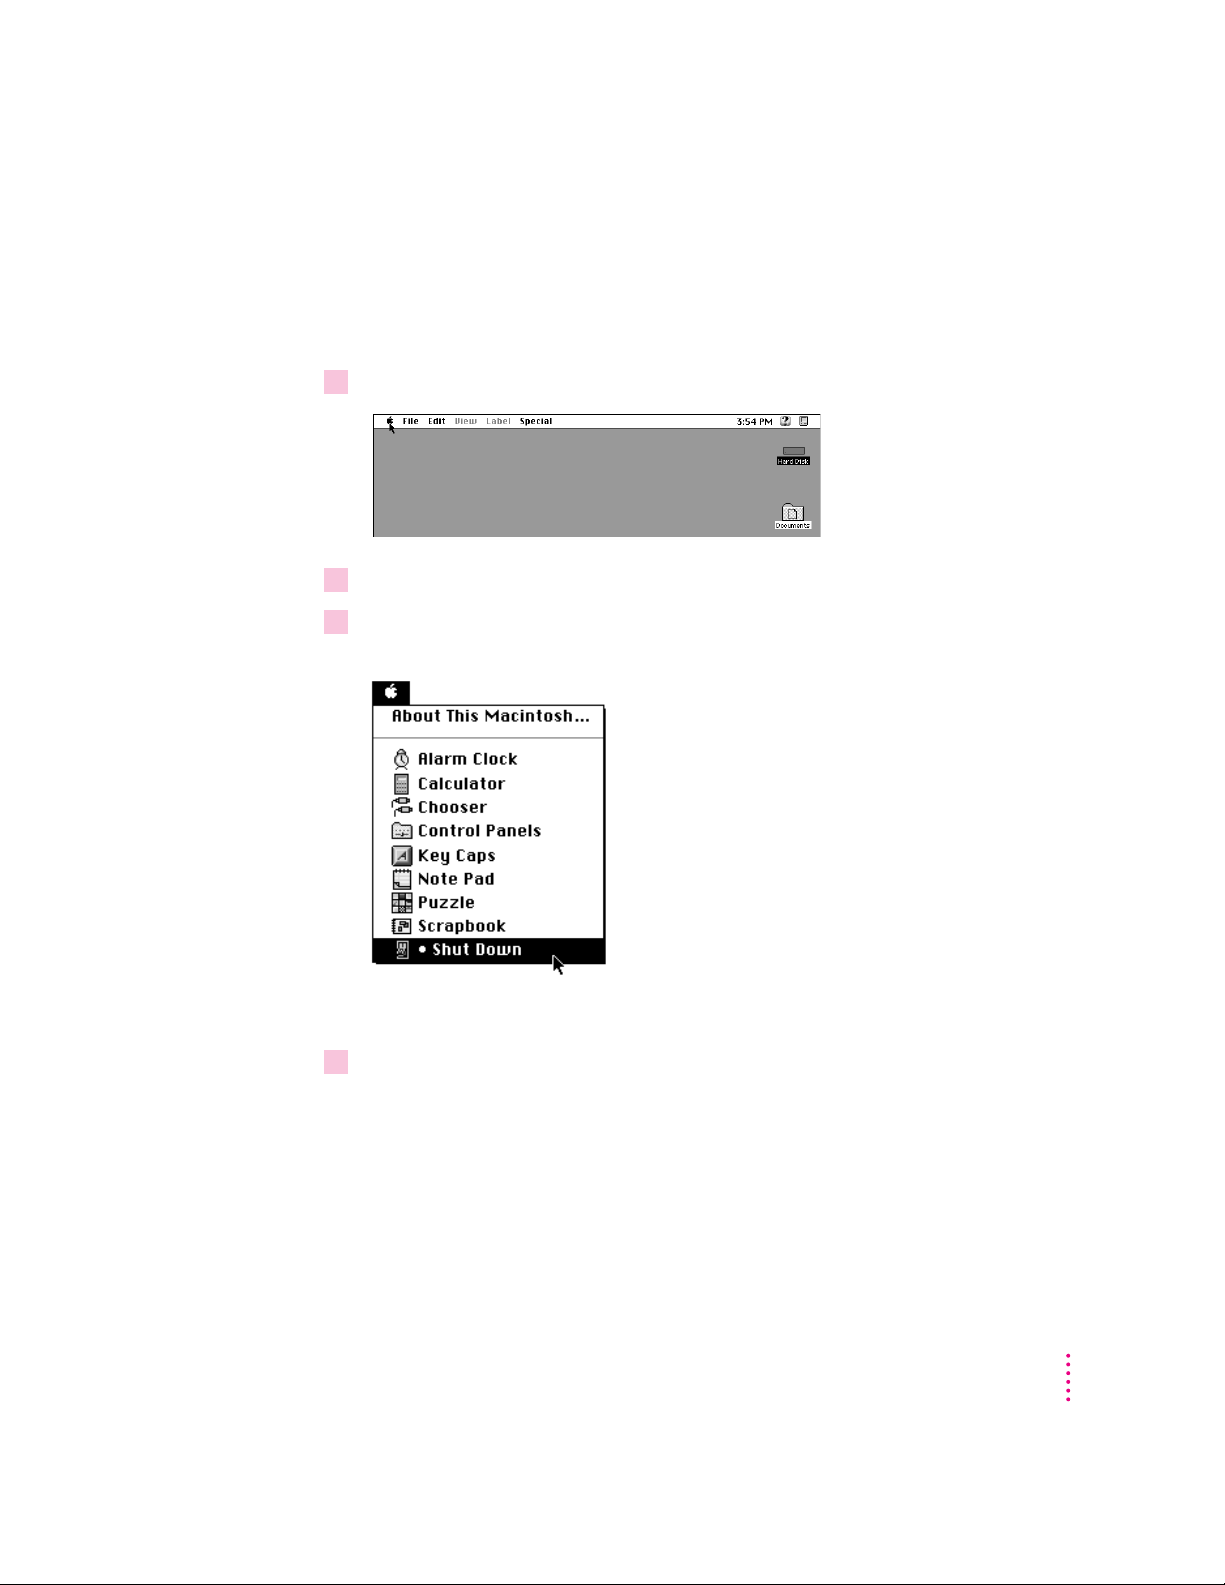
To turn the computer off, you choose Shut Down from the Apple (K) menu.
Detailed instructions follow. (Note: The Shut Down command is also
available in the Special menu.)
1Move the tip of the arrow to the Apple (
2With the tip of the arrow on the apple, press and hold down the mouse button.
3While holding down the mouse button, move the arrow down the list of choices until the
words “Shut Down” are highlighted, then release the mouse button.
K
) menu at the top left of the screen.
You can also shut down your computer from the keyboard.
1Press the Power key (marked with a triangle) on the keyboard.
You will see a message asking whether you want to shut down or continue
working.
Getting Started
15
Page 24

2Click Shut Down.
To turn the computer on, simply press the Power key again.
WARNING
Do not turn the computer off by pressing the standby power
button on the back panel. If you do so, you may lose any work you
haven’t previously saved to a disk. You also risk losing any open
documents.
16
Chapter 1
Page 25
Where to find answers
User’s GuideUser’s Guide
Macintosh PerformaMaci
ntosh
Performa
When you have questions about using your Macintosh, there are several
places you can look for answers.
In this book
Use this book to help you set up your computer and learn about it,
or to find solutions to problems.
In the Guide menu
The Guide menu (marked with the hicon) is your main source
of information about the Macintosh. To learn how to get different
kinds of help from the Guide menu, see Chapter 2 in this book.
In other manuals
For answers to questions about other equipment or about
application programs you have purchased, see the manuals
that came with the equipment or programs.
From Apple’s customer support hotline
If you can’t find an answer in any of the materials provided, call the
customer support hotline. (The phone number for the hotline is in
the service and support information that came with your computer.)
Getting Started
17
Page 26

Use the instructions in this
chapter to learn about the help
available to you in the Guide menu.
2
Getting Help
TheGuide menu is your main source of information when you’re working
with your computer. The menu is identified by a question mark (
upper-right corner of the screen.
h) in the
19
Page 27
Getting answers to your questions
When you have a question while working with your computer, you can get the
answer by choosing Macintosh Guide from the Guide menu.
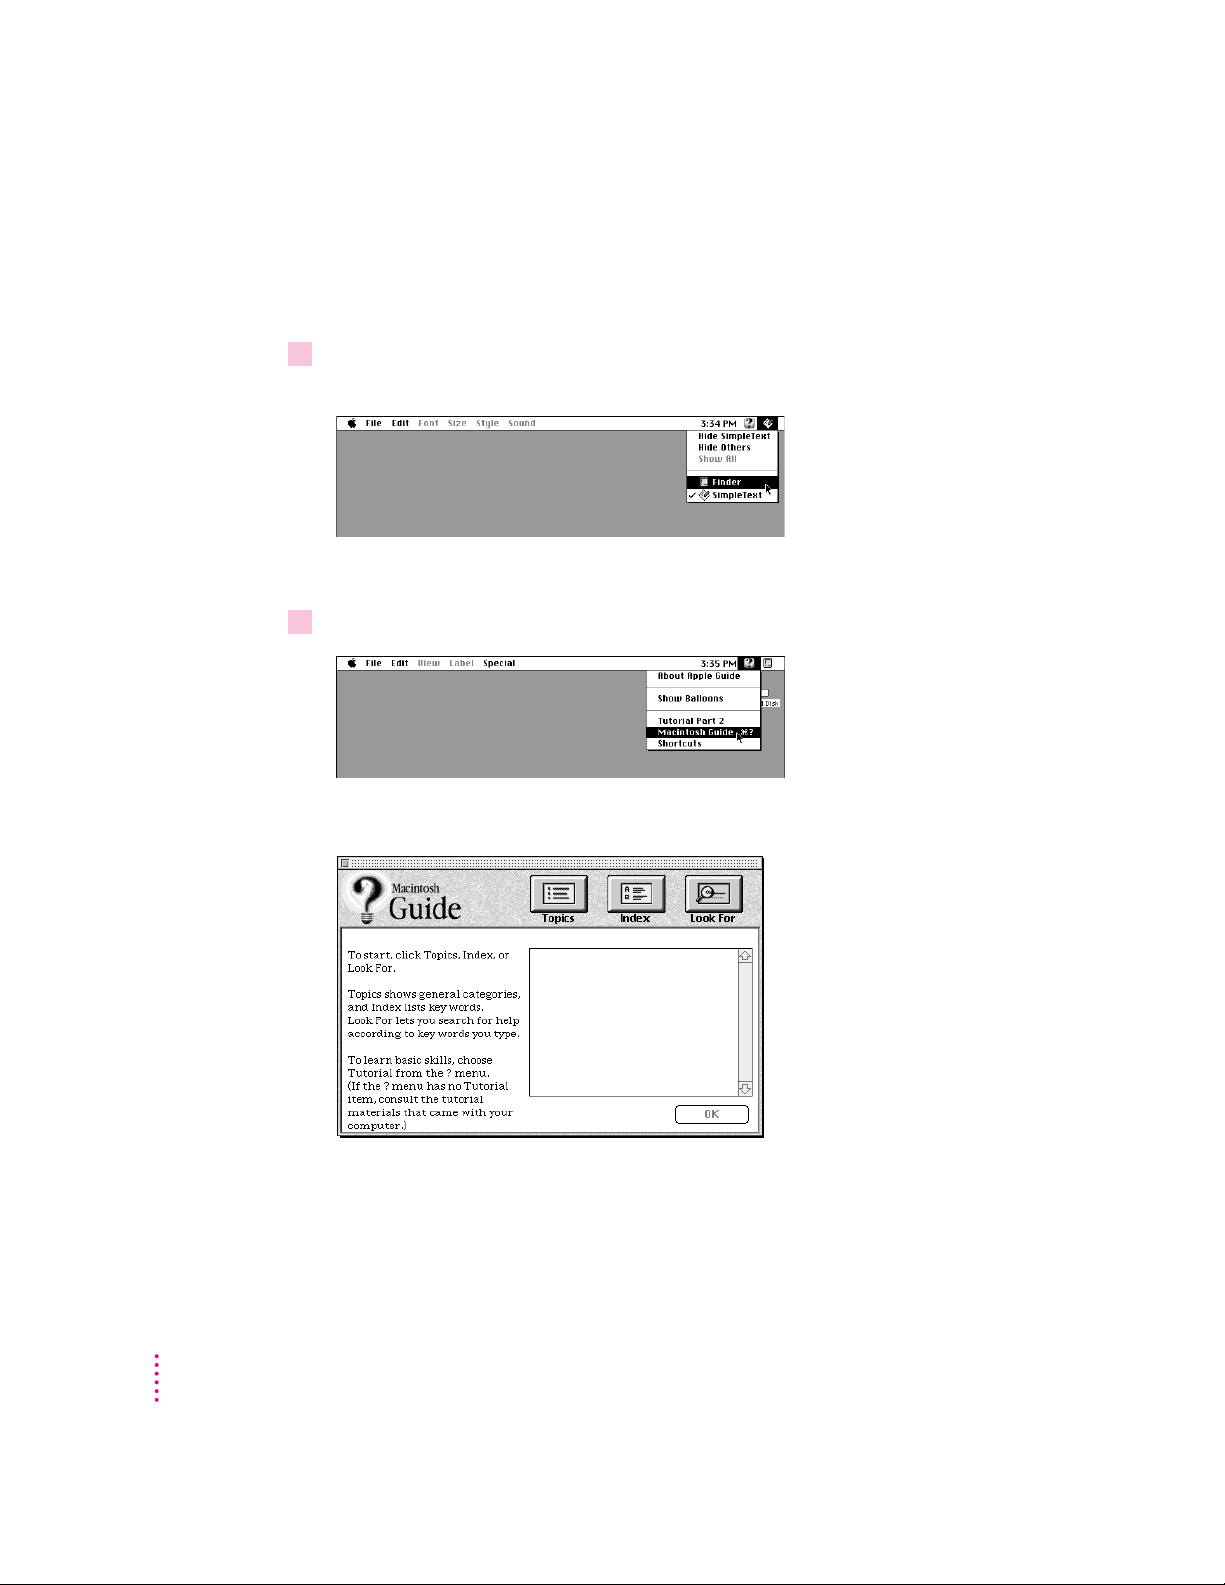
1Pull down the Application menu (in the upper-right corner of the screen) and choose
Finder to make it the active application program.
A checkmark in the menu indicates that the Finder is the active program.
2Pull down the Guide menu (marked with the
h
icon) and choose Macintosh Guide.
The Macintosh Guide window appears.
Whenever you use Macintosh Guide, its window remains in front of other
windows. If the window gets in your way, you can move it by dragging its
title bar (the gray bar across the top of the window).
20
Chapter 2
Page 28
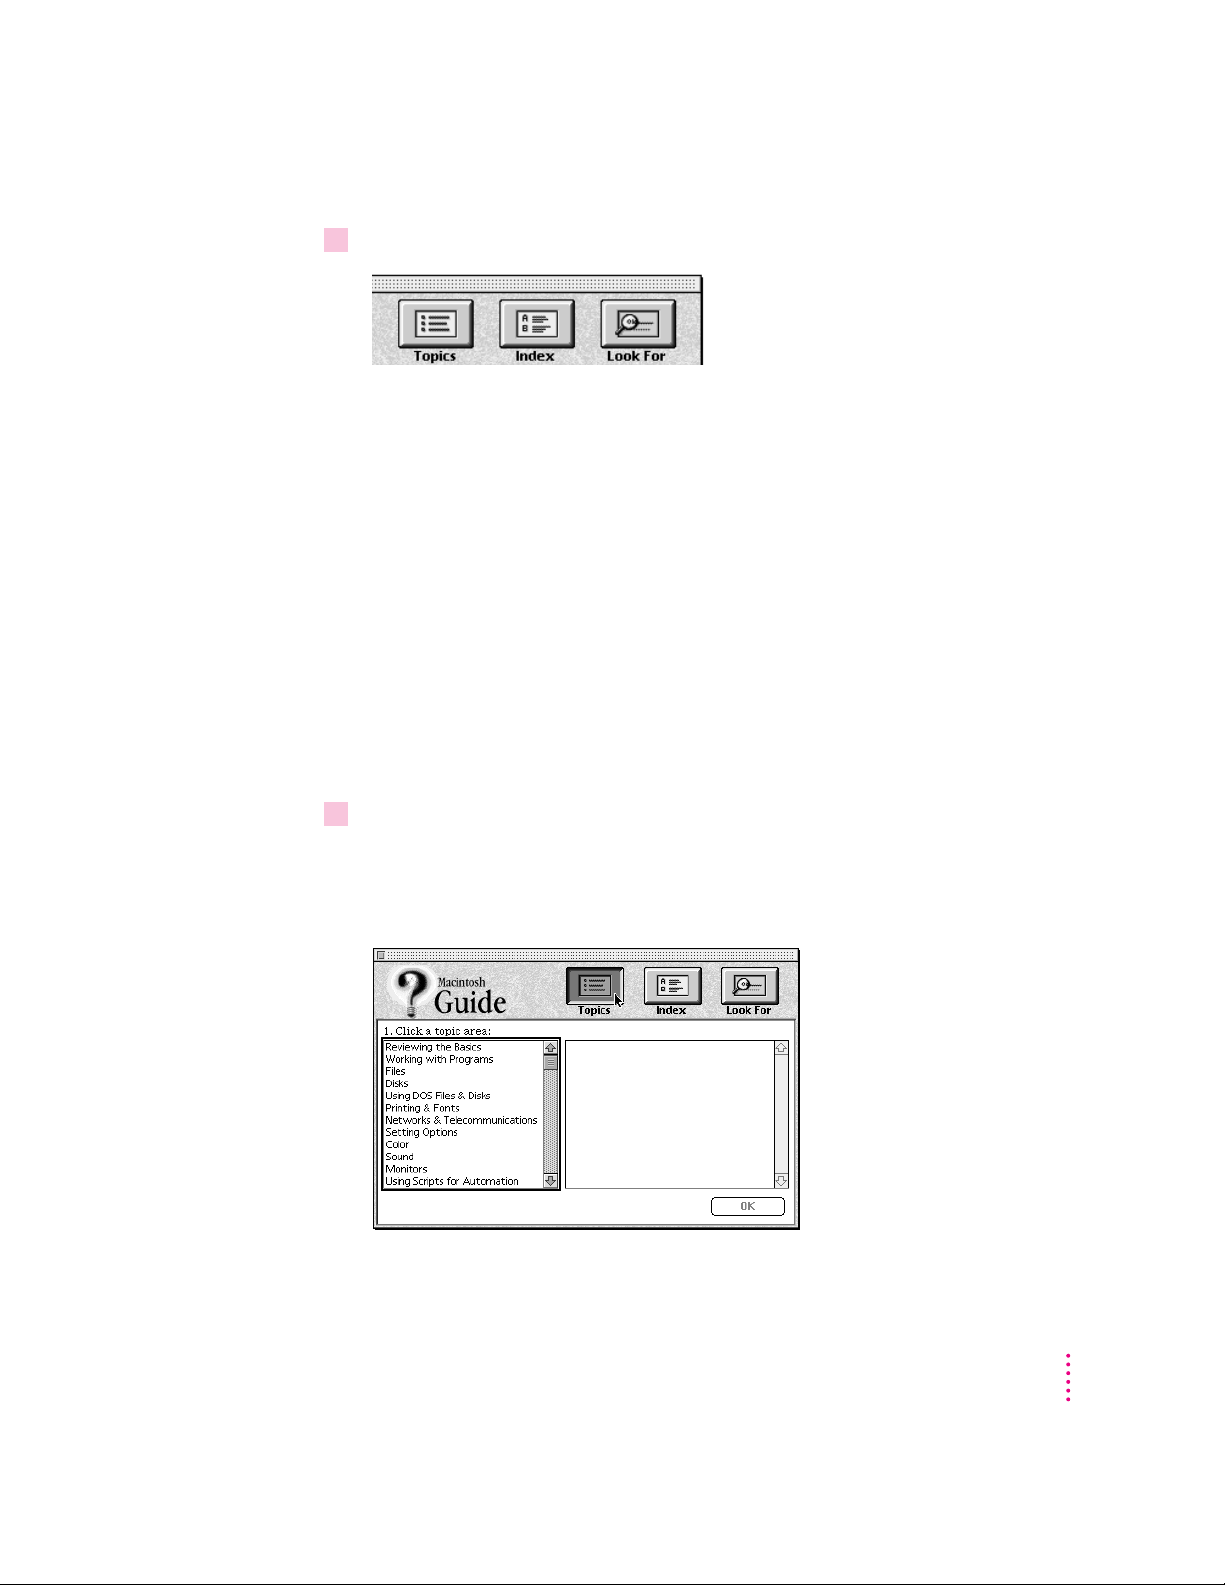
3Notice the three buttons at the top of the window: Topics, Index, and Look For.
Macintosh Guide gives you three ways of finding information:
m
Topics
lets you choose from a list of general subjects; it is like the table of
contents in a book.
m
Index
lets you choose from an alphabetical list of more specific subjects; it
is like the index in a book.
m
Look For
lets you search for information related to a specific word or phrase
that you type.
In the following sections you will practice using each method.
If you have problems while using Macintosh Guide, see “Tips for Using
Macintosh Guide” later in this chapter.
Getting answers with the Topics button
1 In the Macintosh Guide window, click the Topics button.
A list of general topics appears on the left side of the Macintosh Guide
window. (Depending on the hardware and software you have, the list of topics
may look different.)
Getting Help
21
Page 29
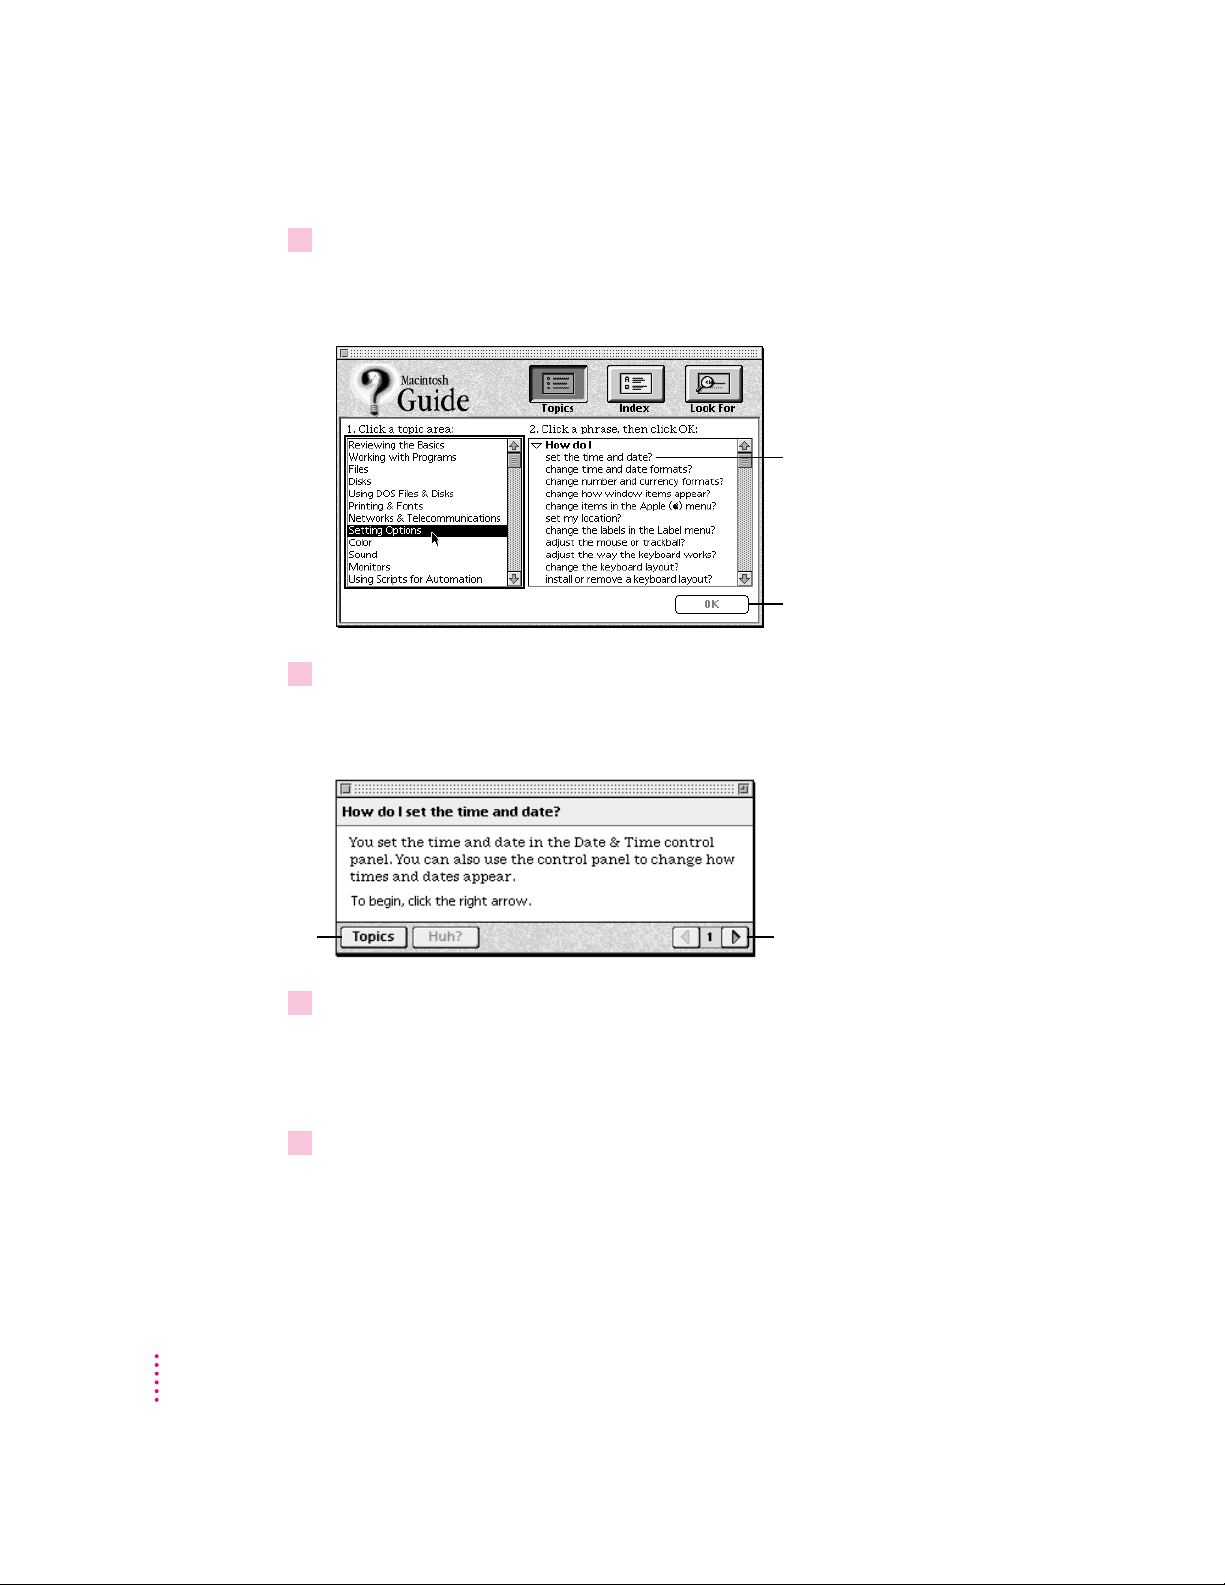
2Click “Setting Options” in the list of topics.
When you click any topic area, a list of related questions appears on the right
side of the Macintosh Guide window.
To get instructions,
click a question…
…and then click OK.
3Click the question “How do I set the time and date?” and then click OK. Or double-click
the question.
A small window appears with instructions for you to follow.
22
If you want to
return to the main
Macintosh Guide
window, click here.
4 Read and follow the instructions in this window.
5When you have completed all the steps, click the Topics button in the lower-left corner to
Chapter 2
Click here to see the next
step (if there is one).
Macintosh Guide provides step-by-step instructions to answer the question
you selected. When you have completed each step, click the right arrow in the
lower-right corner to see the next step.
return to the main Macintosh Guide window.
Now continue with the next section.
Page 30
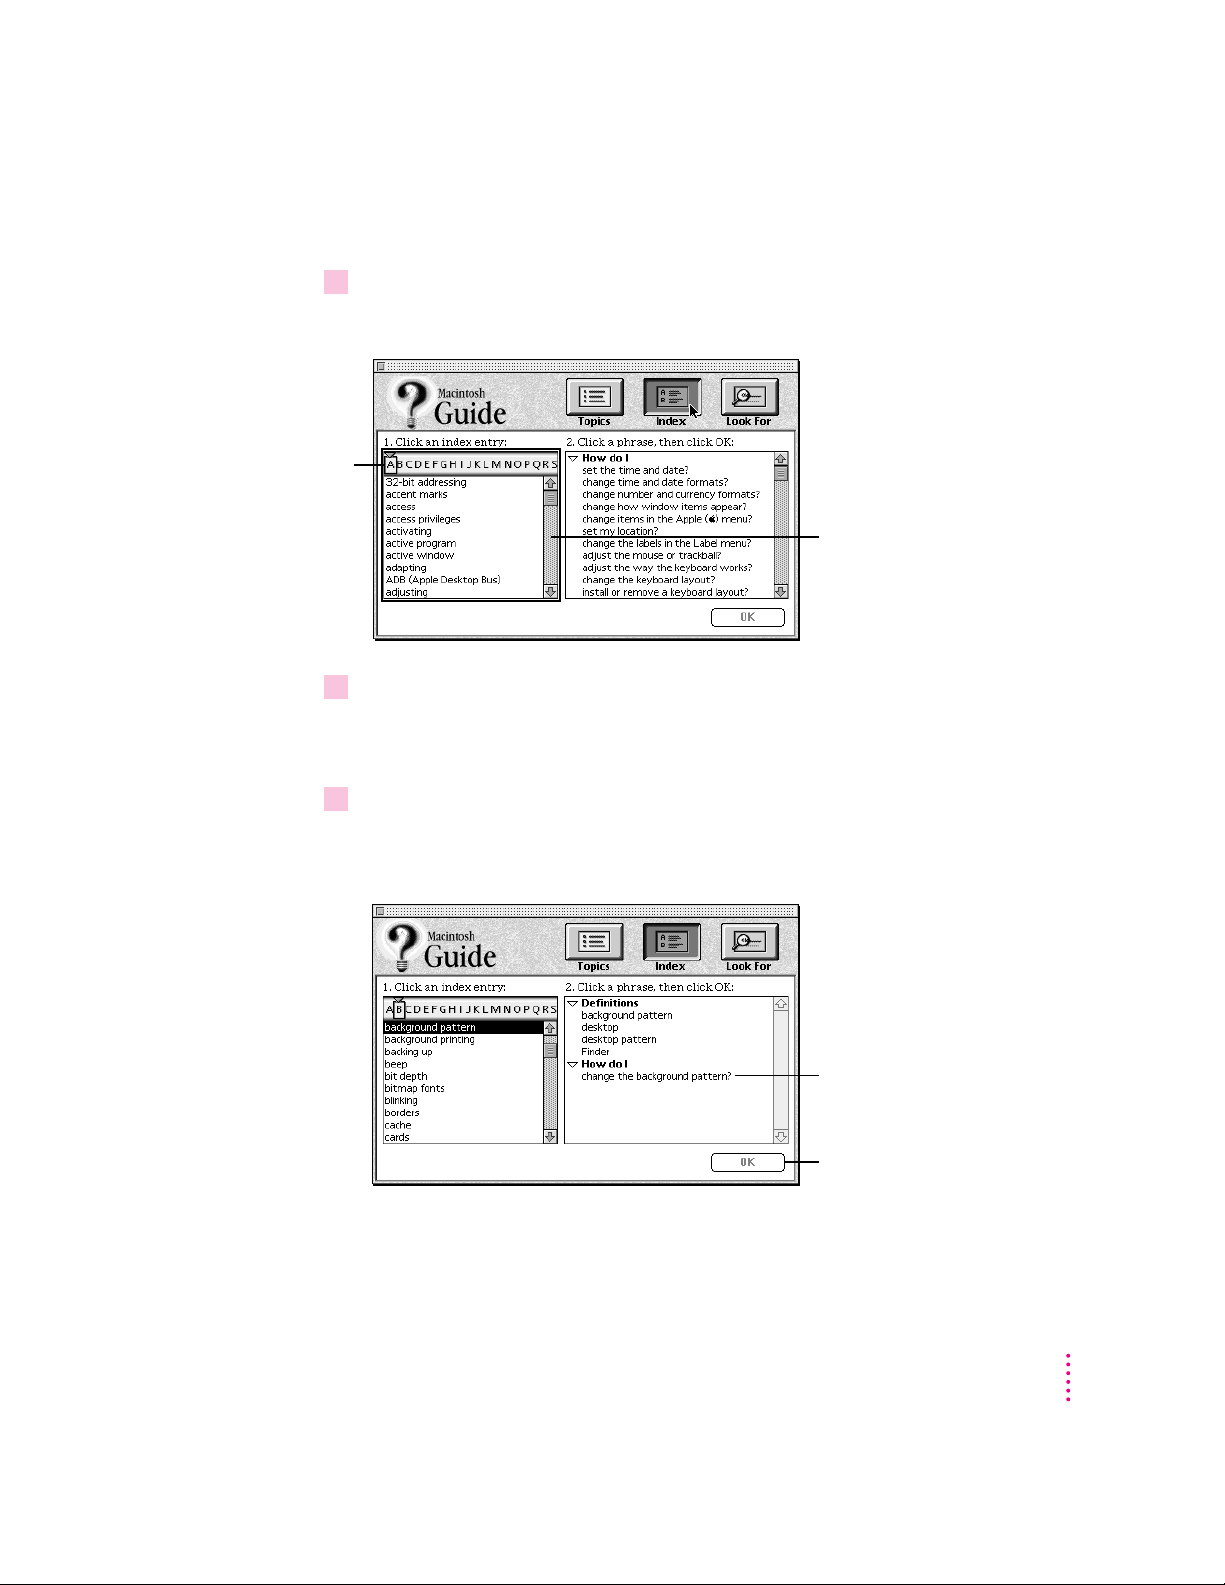
Getting answers with the Index button
1 In the Macintosh Guide window, click the Index button.
An alphabetical list of subjects appears on the left side of the window.
Slider
Scroll bar
2Scroll through the alphabetical list until the phrase “background pattern” is visible.
You can scroll through the list either by dragging the slider to the letter B or
by using the scroll bar at the right of the list.
3Click the phrase “background pattern” in the alphabetical list.
When you click any index entry, a list of related questions appears on the
right side of the Macintosh Guide window.
To get instructions,
click a question…
…and then click OK.
Getting Help
23
Page 31

4Click the question “How do I change the background pattern?” and then click OK. Or
If you want to
return to the main
Macintosh Guide
window, click here.
5 Read and follow the instructions in the window.
6When you have completed all the steps, click the Topics button in the lower-left corner to
double-click the question.
A small window appears with instructions for you to follow.
Click here to see the next
step (if there is one).
Macintosh Guide provides step-by-step instructions to answer the question
you selected. When you have completed each step, click the right arrow in the
lower-right corner to see the next step.
return to the main Macintosh Guide window.
Now continue with the next section.
24
Chapter 2
Page 32

1 In the Macintosh Guide window, click the Look For button.
To activate the text
box, click here.
Type a word or phrase
in the text box…
…and then click here.
2 Click the arrow button to activate the text box.
3Type “sound” in the text box and then click Search.
Getting answers with the Look For button
A small box appears on the left side of the window, where you can type text.
When you click Search, a list of questions related to the word or phrase you
typed appears on the right side of the Macintosh Guide window.
To get instructions,
click a question…
…and then click OK.
Getting Help
25
Page 33

4Click the question “How do I change the beep sound?” and then click OK. Or double-
If you want to close
Macintosh Guide,
click here.
5 Read and follow the instructions in the window.
6When you have completed all the steps, click the close box in the upper-left corner to
click the question.
A small window appears with instructions for you to follow.
Click here to see the next
step (if there is one).
Macintosh Guide provides step-by-step instructions to answer the question
you selected. When you have completed each step, click the right arrow in the
lower-right corner to display the next step.
close Macintosh Guide.
26
Chapter 2
Page 34

Tips for using Macintosh Guide
Here are a few tips for using Macintosh Guide effectively:
m Macintosh Guide is available only when you are in the Finder—the
desktop area where you can see the icons of disks, folders, and files.
(Other programs may also have help available in the Guide menu,
however.) If you don’t see Macintosh Guide in the Guide menu, pull
down the Application menu (to the right of the Guide menu) and
choose Finder.
m Follow the steps when you’re instructed to; don’t skip ahead or read
ahead. That way the computer can check to make sure you’ve done a
step correctly.
m Unlike most windows, the Macintosh Guide window stays in front of
other windows on the screen so that your instructions are never
covered. If you need to move the Guide window out of the way, drag
it by the title bar at the top of the window.
You can also move the window out of the way by clicking the zoom
box. Click the box once to shrink the window; click it a second time
to expand the window to its original size.
m If you need more information about an instruction or a term, click the
button labeled “Huh?” to get further explanation. (The “Huh?” button
is dimmed when no additional information is available.)
m If you want to return to the main Macintosh Guide window, click the
Topics button in the lower-left corner of the Guide window.
m When you’re finished using Macintosh Guide, click the close box in
the upper-left corner of the window.
Close box
Topics button
“Huh?” button
Title bar
Zoom box
Right arrow
Getting Help
27
Page 35

Identifying objects on the screen
Sometimes you’ll see an unfamiliar item on the screen and ask yourself,
“What’s that?” You can get an answer by using a Macintosh feature known as
Balloon Help.
Balloon Help explains the function of icons, menus, commands, and other
items on the Macintosh screen in balloons like those you see in comic strips.
Follow these steps to use Balloon Help:
1Pull down the Guide menu (marked with the
2Point to any object on the screen that you want to identify.
h
icon) and choose Show Balloons.
A balloon appears next to the object. In the following illustration, for
example, pointing to the Trash displays a balloon that explains how to use the
Trash to throw items away.
Although balloons appear next to items when you point to them, the way
you work does not change; you can still select icons, choose commands, and
so on.
28
3When you’re finished using Balloon Help, choose Hide Balloons from the Guide menu.
Chapter 2
Page 36

Learning useful shortcuts
You can perform many tasks in the Finder more quickly if you use keyboard
or mouse shortcuts. For example, instead of clicking an icon and choosing
Open from the File menu, you can simply double-click the icon to open it.
Follow these steps to learn keyboard and mouse shortcuts:
1Pull down the Guide menu (marked with the
2 Click one of the category buttons.
If you want to
close the window,
click here.
h
icon) and choose Shortcuts.
The main Macintosh Shortcuts window appears.
Another window appears, describing shortcuts for that category.
Click here to return to
the main Macintosh
Shortcuts window for
more categories.
Click here to see the next
window (if there is one).
Getting Help
29
Page 37

3 Read about the shortcuts available for the category you selected.
Click the right arrow in the lower-right corner of the window to display the
next window (if there is one).
4When you finish reading about the shortcuts for your category, click the Topics button in
the lower-left corner to return to the main Macintosh Shortcuts window. Or click the
close box in the upper-left corner to close the window.
30
Chapter 2
Page 38

Mouse
Monitor
Computer
Keyboard
Hard disk drive
(internal)
Floppy disk drive
CD-ROM drive
(optional)
Volume buttons
Use these buttons to
change the volume of the
computer’s sound.
CD-ROM drive
Open/Close button
Power-on light
Headphone jack
Remote control sensor
-
f
Read this chapter for information on
expanding your computer system
with additional hardware.
3
Connecting Additional Equipment
The illustration below shows a basic Macintosh system. You can expand your
computer system by connecting additional hardware (such as a printer,
modem, or external stereo speakers).
31
Page 39

Where to connect additional equipment
-
Sound output port
W
Modem port
[
Printer port
Connects your Macintosh
to a printer or
LocalTalk network.
V
Apple Desktop
Bus (ADB) port
Connects your
Macintosh to input
equipment, such as a
keyboard or a trackball.
≈
Sound input port
g
SCSI port
Connects your Macintosh to
SCSI equipment, such as external
hard disk drives and scanners.
Connects an external
modem to your Macintosh.
Connects your Macintosh to
headphones, externally
powered (amplified)
speakers, or other audio
output equipment.
Connects your Macintosh to a
professional-quality microphone
or other audio input equipment.
F
Security lock
port
Standby power button
≤
Power socket
™
Monitor port
Connects your monitor
to your Macintosh.
Communication card
access cover
Covers port for optional
communication card.
PDS card access cover
Covers port for optional
processor-direct slot (PDS)
expansion card.
Video input card (optional)
Connects your Macintosh to a video camera,
VCR, or other video equipment.
TV tuner card (optional)
Connects your Macintosh
to an external TV antenna
or cable TV service.
®
The illustration on this page shows where equipment should be connected to
your computer.
For instructions on connecting additional equipment such as a printer or
scanner, see the manual that came with the equipment.
32
Chapter 3
WARNING
Before you connect any equipment—such as a mouse,
keyboard, or external SCSI device—to your computer, make sure that
your computer is plugged in (in order to ground the computer) and
turned
off. If you connect equipment with the computer turned on, you
can damage your computer and your equipment.
Page 40

Connecting an Apple PlainTalk Microphone
Sound
input port
Sound
output port
Your computer has a sound input port, which you can use to connect an Apple
PlainTalk Microphone.
Use PlainTalk only: You should connect only the Apple PlainTalk
Microphone. Other models of microphone will not work with your
Macintosh.
To connect the microphone, do this:
Plug the microphone’s connector into the sound input port (marked with the icon
m
on the back of the computer.
X
)
Connecting Additional Equipment
33
Page 41

Connecting external stereo speakers
Stereo miniplug
Audio In port
-
Sound output port
Externally
powered
speakers
You can take advantage of your computer’s stereo sound output by attaching
external powered (amplified) speakers.
1 Assemble the speakers and the cable you need.
You need a cable with stereo miniplugs at each end to connect one or both
speakers to the computer. (Some speakers require a dual-plug adapter.
Others, like those shown here, accept a single stereo miniplug and are joined
by standard speaker wires.)
The following illustration shows the equipment configuration and the
connections for a computer sound system.
2 Turn off the Macintosh.
3Plug a stereo miniplug into the sound output port on the Macintosh.
34
4Plug a stereo miniplug into the Audio In port on one of the speakers.
If the speakers take a dual-plug cable, connect both plugs to the speakers’
Audio In ports.
Chapter 3
Page 42

5Connect the speakers together with speaker wires, if necessary.
6 Turn on the computer.
You hear the computer’s sound through the external speakers.
Note: To control the volume of your external speakers, use the volume
buttons on the front of the computer. If you are playing an audio compact
disc (CD), you may also need to adjust the volume control in the program
you’ re using to play CDs. For more information on sound and playing
audio CDs, see the “Sound” topic of Macintosh Guide, available in the
Guide (h) menu.
Connecting Additional Equipment
35
Page 43

Expanding memory
The random-access memory (RAM) in your computer can be expanded.
Installing additional RAM adds more memory chips to your computer and
expands its capabilities. The Technical Information booklet that came with
your computer describes how much additional memory can be installed in
your Macintosh.
WARNING
only an Apple-certified technician install additional RAM. Consult the
service and support information that came with your computer for
instructions on how to contact an Apple-authorized service provider or
Apple for service. If you attempt to install additional RAM yourself, any
damage you may cause to your equipment will not be covered by the
limited warranty on your computer. See an Apple-authorized dealer or
service provider for information about this or any other warranty
question.
Installing internal drives
Your Macintosh can hold up to three internal storage devices, including a
floppy disk drive, a CD-ROM (compact disc read-only memory) drive, and
a hard disk drive (several capacities are available). These drives may already
be installed. If you want to add or replace an internal drive, see your Appleauthorized dealer.
To avoid damage to your computer, Apple recommends that
36
Chapter 3
Page 44

Read this chapter to learn how to work
with application programs and protect
the information on your disks.
4
Using Programs and Backing Up Disks
Your computer came installed with several ready-to-use application programs.
You can open these programs by clicking their buttons in the Launcher.
The Apple Extras folder on your hard disk (or the
contains other programs (some of which must be installed before they will
work), including the following:
m AppleScript. You need AppleScript on your hard disk in order to use
Macintosh Guide. With AppleScript you can also automate tasks in the
Finder and other scriptable programs (programs that support AppleScript).
Instructions for using AppleScript are included in the AppleScript folder.
m QuickDraw GX gives your computer more powerful printing and font
capabilities. You’ll want to install QuickDraw GX if you purchased another
program that requires it. If your computer has at least 8 megabytes of
random-access memory (RAM), you can install QuickDraw GX by
opening the QuickDraw GX folder and double-clicking the Installer icon.
m PowerTalk provides an open collaboration environment with a universal
mailbox and other electronic mail services. You’ll want to install PowerTalk
if you purchased another program that requires it. If your computer has at
least 8 megabytes of RAM, you can install PowerTalk by opening the
PowerTalk folder and double-clicking the Installer icon.
Macintosh Performa CD)
m Apple Video Player lets you watch video or TV on your computer. With
Apple Video Player and a video input card, you can watch video on your
computer. With Apple Video Player, a video input card, and a TV tuner
card, you can watch video and TV. For instruction on using Apple Video
Player, open Apple Video Player and then choose Apple Video Player
Guide from the Guide (h) menu.
37
Page 45

Installing application programs
Insert the floppy disk, metal
end first, into the floppy disk
drive of your computer.
You’ll probably want to buy and install additional application programs. See
the manuals you receive with your programs for instructions on installing and
using them.
In most cases, you’ll install an application program on your internal hard disk
from floppy disks that contain the program. The following illustration shows
how to insert a floppy disk in your computer’s floppy disk drive.
For instructions on how to eject floppy disks, see the “Disks” topic of
Macintosh Guide, available in the Guide (h) menu.
38
Chapter 4
To use your programs most effectively, follow these guidelines:
m Put only one copy of each program on your hard disk. Having more than
one copy can cause errors.
m Whenever you copy a program disk to your hard disk, be careful not to
copy a System Folder. Always check to see what you’ve copied, and drag
any extra System Folders to the Trash.
m If you have problems using a program, read the manuals you received with
the program.
m If a program malfunctions consistently, try installing a fresh copy. If that
doesn’t help, find out from the software manufacturer whether your version
of the program is compatible with the system software you’re using.
For instructions on how to put a program into the Launcher, see the
“Launcher” index topic of Macintosh Guide, available in the Guide (h) menu.
Page 46

Working with several programs at a time
You can open as many application programs and desk accessories as your
computer’s memory allows.
All open programs are listed in the Application menu at the right end of the
menu bar. The name of the active program (the one you’re using right now)
has a checkmark next to it, and its icon appears in the menu bar.
The Finder icon
Commands to hide or
display open windows
A checkmark
indicates the active
program.
Open programs
Finding out which programs are open
If you have several programs and windows open, you can find out which
program is active and which other programs are open by pulling down the
Application menu.
Switching programs
You can switch to another open program or desk accessory by choosing its
name from the Application menu.
If a program’s icon is dimmed in the menu, that means its windows are
hidden. Choosing the program from the Application menu displays its
windows.
You can also switch to another program by clicking in a window that belongs
to an open program, or by double-clicking a program icon (or the icon of a
document that was created with the program).
Using Programs and Backing Up Disks
39
Page 47

Hiding and showing windows on the desktop
You can hide all windows except those of the active program by choosing
Hide Others from the Application menu.
The other programs remain open even though their windows are hidden.
When you switch to another program, its windows become visible again.
If you want to see all the open windows, choose Show All from the
Application menu.
Protecting the information on a disk
Your computer’s hard disk comes with a lot of valuable information already
stored on it, including system software and some application programs. If
you had a valuable document like a birth certificate, you’d probably make
an extra copy of it for safekeeping. Similarly, you should make a copy of the
information on your hard disk for safekeeping. (The extra copy is called a
backup, and the process of making the copy is called backing up.)
Once you have a backup, you’re protected from accidentally losing the
information on your hard disk. In the unlikely event that something happens
to your hard disk, you can easily get the information back.
40
Backing up your files
You can back up the work you store on a hard disk by copying individual files
to another disk in the usual way (dragging the files’ icons to the icon of the
other disk). You can back up the contents of an entire floppy disk by dragging
its icon to another floppy disk or hard disk icon.
If your computer has a CD-ROM drive
If your computer has a CD-ROM drive, you also received the Macintosh
Performa CD, which contains a backup copy of all the software that came
with your computer. You should make backup copies of the documents you
create. If you alter the contents of your System Folder, you may also want to
use Apple Backup and Apple Restore—application programs that came with
your computer—to preserve the contents of your hard disk. (See the following
sections for instructions on using Apple Backup and Apple Restore.)
Chapter 4
Page 48

If your computer does not have a CD-ROM drive
If your computer does not have a CD-ROM drive, use Apple Backup to copy
the entire contents of your Macintosh hard disk to floppy disks. Keeping this
backup copy up-to-date will protect you in case information on your hard disk
is accidentally lost or damaged. You should update your backup copy at least
once a month, and in between full backups you should store copies of
important documents on floppy disks.
If something happens to the information on your hard disk, you can use the
backup copy you made to put the information back on your hard disk. To do
this, you use Apple Restore. (See the following sections for instructions on
using Apple Backup and Apple Restore.)
It’s a good idea to keep two sets of backup copies, and to alternate between
them (using one set one month, and the other the next) when updating your
backup copy. This protects you from losing files in the unlikely event that a
problem damages the files on both your internal hard disk and your backup
set of floppy disks.
You can also purchase a backup program with additional features that make
copying faster. (For example, some programs have a feature that lets you copy
only the new and changed information on your hard disk.)
Using Apple Backup for the first time
If you have a Macintosh Performa CD, you don’t need to use Apple Backup,
because the CD contains all the software that came with your computer.
However, if you don’t have the CD as backup, use Apple Backup to copy the
software to floppy disks, as backup.
WARNING
have been preformatted for an IBM-compatible personal computer.
To use Apple Backup for the first time, follow these steps:
1Click the Applications grouping button in the Launcher.
The buttons for application programs available in the Launcher are grouped
under the Applications button.
Do not attempt to back up your Macintosh with disks that
Using Programs and Backing Up Disks
41
Page 49

2Click the Apple Backup button in the Launcher window.
The Apple Backup program opens.
3Click the Continue button.
42
A message appears, showing you how to identify the high-density floppy
disks you need.
4Make sure your floppy disks are high-density. Then click the Continue button.
A message appears, telling you how many disks you need to make the copy
and approximately how long it will take. Make sure you have enough time
and disks to complete the copying. If you stop the copying before it’s finished,
you’ll have to start over again from the beginning.
5 Click the appropriate button, as follows:
m If you have enough disks to copy everything, then click the Copy All
Files button.
m If you have only enough disks to copy the System information, then click
the Copy System Folder button. As soon as you buy more disks, follow the
instructions in this chapter to back up everything.
m If you don’t have enough disks for either choice, click the Quit button.
Chapter 4
Page 50

6 Insert a high-density floppy disk into the disk drive.
A message tells you when it’s time to insert another floppy disk.
7 Lock each disk as you remove it from the computer. Label the disks to indicate the order
in which you create them (for example:
Backup 1,Backup 2
, and so on).
To lock a disk, turn it label-side down and use a pen or your fingernail to slide
the tab in the lower-right corner of the disk so that the square hole is open.
(The disk has two square holes, but only one of them has a moveable tab.)
8When a message appears telling you that you’ve finished, store the labeled and locked
floppy disks in a safe, cool place.
Using Apple Backup to update your backup copy
If you made a backup copy of your hard disk information on floppy disks
using Apple Backup, you can keep your backup copy up-to-date by following
the instructions here.
By the way: Another way to make sure you have up-to-date information is to
use a new set of floppy disks to create your backup copy, preserving your
original backup. If you are using a fresh set of floppy disks, follow the
instructions in the previous section, “Using Apple Backup for the First Time.”
1Get the floppy disks that you used to make a previous backup copy.
Have some extra high-density disks on hand in case there is more information
on your hard disk than there was the last time you made a copy.
2 Turn on your Macintosh, if it’s not already on.
3Click the Applications grouping button in the Launcher.
The buttons for application programs available in the Launcher are grouped
under the Applications button.
Using Programs and Backing Up Disks
43
Page 51

4Click the Apple Backup button in the Launcher window.
The Apple Backup program opens.
5Click the Continue button.
44
A message appears, showing you how to identify the high-density floppy
disks you need.
6Make sure your floppy disks are high-density. Then click the Continue button.
A message appears, telling you how many disks you will need to copy all files
on your hard disk, or to copy just the System Folder. It also tells you
approximately how long it will take to make the copy.
Copy all files or just the System Folder? Because all the information on your
hard disk is important, it’s recommended that you make a copy of all the
files on the hard disk. But if you don’t have enough disks or time right now
to make a copy of everything, you can choose to make a copy of just the
System Folder.
If you want to be doubly protected, you can make a copy of all files and then
start Apple Backup again and make an extra copy of the System Folder. That
way, if something goes wrong with your System Folder, you can replace it
quickly without having to copy everything back onto your hard disk.
Chapter 4
Page 52

7Click the button that corresponds to your choice.
Make sure you have enough time and disks to complete the copying. If you
stop the copying before it’s done, you’ll have to start over from the beginning.
8Unlock your first backup floppy disk.
To unlock the disk, turn the disk label-side down and use a pen or your
fingernail to slide the tab in the lower-right corner of the disk so that it covers
the square hole. (The disk has two square holes, but only one of them has a
moveable tab.)
9 Insert the disk into the floppy disk drive.
If you did not unlock the disk correctly, it is ejected and a message appears.
Unlock the disk, making sure that the tab snaps into place, and try again.
A message appears, telling you that the disk contains information.
10 Click the Continue button.
If there is a problem with the disk, a message appears. Otherwise, copying
takes place automatically. A sound alerts you when it’s time to insert another
disk.
11 When the disk is ejected, lock and label it.
To lock a disk, turn it label-side down and use a pen or your fingernail to
slide the tab in the lower-right corner of the disk so that the square hole
is open.
12 Repeat steps 7 through 11 for each disk in your stack of backup disks.
Apple Backup lets you know when you’ve finished.
13 Store the disks in a safe, cool place.
Using Programs and Backing Up Disks
45
Page 53

Restoring the information on your hard disk
If information on your hard disk becomes damaged or lost, you can restore
it if you have a backup copy of the information. If your computer has a
CD-ROM drive, the Macintosh Performa CD contains copies of all the system
software and application programs that came with your computer. See the
Macintosh Performa CD booklet for instructions on using the Macintosh
Performa CD.
If you have used Apple Backup to copy the information on your hard disk to
floppy disks, you can use the Apple Restore program to put that information
back on your hard disk. You can also use Apple Backup and Apple Restore to
replace only the System Folder (the folder that contains the software the
Macintosh uses to operate). See the following section, “Using Apple Restore,”
for instructions.
If your computer doesn’t have a CD-ROM drive and you have not used Apple
Backup to back up the contents of your hard disk, call the customer support
hotline. (The phone number for the hotline is in the service and support
information that came with your computer.)
Using Apple Restore
If you made backup floppy disks with Apple Backup, follow these steps to
restore your information:
46
Chapter 4
1 Get the
2Make sure your Macintosh is turned off.
3Insert the floppy disk or CD into its drive.
Utilities
computer—and the floppy disks that you made when you used Apple Backup.
floppy disk or the
Macintosh Performa CD
—whichever came with your
If you’re starting up from the Utilities floppy disk, go to step 4. If you’re
starting up from the Macintosh Performa CD, go to step 5.
4If you’re starting up from the
step 6.
Utilities
floppy disk, turn on your Macintosh. Then skip to
It takes several moments for your computer to start up.
Page 54

5If you’re starting up from the
immediately press and hold down the
the same time). As soon as the smiling Macintosh appears on your screen, release
the keys.
Macintosh Performa CD,
x
(Command), Shift, Option, and Delete keys (all at
turn on your Macintosh and then
The key combination tells your computer not to start up from the internal
hard disk.
It takes several moments for you computer to start up.
6 Locate the Apple Restore icon (on
7 Open the Apple Restore program.
Utilities
disk) or button (on
Macintosh Performa CD
In a moment you’ll see this screen:
8 Read the information on the screen and click the Continue button.
).
9 Insert your first backup floppy disk.
Restoring proceeds automatically. If there is a problem with the disk, you see
a message describing the problem.
IMPORTANT
If at any time during the restore process you see a message
reporting that the hard disk is damaged or unreadable, see “Repairing a
Damaged Disk” in Chapter 5, “Troubleshooting.”
Using Programs and Backing Up Disks
47
Page 55

10 Respond to any messages you see on the screen.
If Apple Restore finds an item on your hard disk that is newer than an item
with the same name on the floppy disk, it asks whether you want the older
version of the item to replace the newer version. Use the following guidelines
to decide whether or not to replace the item:
m If the item is system software, click Replace Newer Version.
m If the item is one of your own files, click Keep Newer Version.
m If, after the restore procedure, you still have problems with the disk, repeat
the restore procedure and, this time, replace all newer items with the older
items.
A sound alerts you when it’s time to insert another disk.
11 Repeat steps 8 and 9 for each disk in your stack of backup disks.
Apple Restore lets you know when you have finished.
12 Restart your Macintosh and make sure that everything is back on your hard disk.
If the Macintosh does not start up or is not working properly, see “Repairing
a Damaged Disk” in Chapter 5, “Troubleshooting.” If you are able to repair
the disk, then try again to restore the information on your hard disk.
48
If repairing the disk doesn’t help, you may need to reinstall system software.
See “Installing or Reinstalling System Software” in Chapter 5,
“Troubleshooting.”
13 Store your backup disks in a safe, cool place.
Chapter 4
Page 56

Consult this chapter if you experience
problems using your computer.
5
Tr oubleshooting
When you have questions
If you want to know how to do a particular task with your computer, refer to
Macintosh Guide in the Guide (
Macintosh Guide, see Chapter 2 of this manual.
When you run into trouble
While you’re using your computer, you may occasionally see a bomb icon
or an error message, or you may have a problem such as the pointer (8)
“freezing” on the screen. If you have trouble with your computer, take a few
minutes to read the information in this chapter. If your problem is related to a
particular procedure, you should also look for information on that procedure
in Macintosh Guide, available in the Guide (h) menu. For additional
troubleshooting information and a list of common questions relating to your
system software, see the “Troubleshooting” topic of Macintosh Guide.
h) menu. For instructions on using
If you are unable to access Macintosh Guide (for example, if your screen
is “frozen”), refer to this chapter to see if you can resolve the problem.
49
Page 57

Take your time
When you see an error message, you don’t have to take action immediately.
The message stays on the screen until you click the OK button or turn off the
Macintosh.
To help diagnose and correct the problem, gather as much information on the
situation as you can before starting over.
m Make a note of exactly what you were doing when the problem occurred.
Write down the message on the screen and its ID number (if any). Also list
the programs you were using and the names of any items you know have
been added to the System Folder since the system software was installed.
This information will help a service person diagnose the problem. (It is
helpful to keep a printed copy of the items in your System Folder. For
instructions on printing the contents of a folder, see the “Printing & Fonts”
topic of Macintosh Guide, available in the Guide [h] menu.)
m Check the screen for any clues. Is a menu selected? What programs and
document icons are open? Note anything else that seems relevant.
m If you were typing text and were not able to save it before the problem
occurred, you can write down the parts of the text still visible on the
screen so that some of your work will be easy to replace.
50
m Ask other Macintosh users about the problem you’re having; they may have
a solution for it.
If you need repair service, consult the service and support information that
came with your computer for instructions on how to contact an Appleauthorized service provider or Apple for assistance.
Chapter 5
Page 58

Start over
Often you can eliminate a problem simply by clearing the computer’s memory
and starting over.
If you can, save any open documents before restarting the Macintosh. If your
system is frozen and does not respond to anything you do, or if you have a
“bomb” message on the screen, saving may not be possible. You can try
pressing x-Option-Esc to quit the program in use when the problem
occurred; if this works, you can then save the documents open in other
programs before restarting.
To restart your Macintosh, try the following steps:
1If you can, choose Restart from the Special menu or from the dialog box that’s on the
screen.
Dialog boxes contain messages from the computer. If something goes wrong,
a message may appear on the screen, asking you to restart the computer.
2If you can’t choose Restart, hold down the
Power key (marked with a triangle).
x
and Control keys while you press the
This key combination restarts the computer. (Use this key combination only
when you can’t choose Restart from the Special menu.)
3If nothing happens, turn off your computer with the standby power button, wait at least
10 seconds, and then turn it on again.
4If the standby power button doesn’t turn off the computer, unplug your Macintosh.
If you suspect that the problem is with other equipment, such as a printer or
an external hard disk that’s attached to your computer, turn that equipment off
for 10 seconds or longer, then turn it on again and restart the Macintosh.
Troubleshooting
51
Page 59

Rebuild your desktop regularly
A process known as “rebuilding the desktop” helps your Macintosh keep
track of data on your startup disks. Although you usually use the hard disk in
your computer as a startup disk, you can also start up from any other disk that
has system software installed. It’s a good idea to rebuild the desktop of your
startup disks once a month or so.
To rebuild the desktop of a startup disk, follow these steps:
1Hold down the Option and xkeys while you start up your computer.
Do not release the keys until you see a message asking whether you want to
rebuild the desktop.
2 Click OK.
52
Chapter 5
Page 60

Solutions to common problems
The computer is turned on but the screen is dark.
One of the following is probably the cause:
m You have a screen saver program that darkens the screen when the
computer has not been used for a certain period.
Press a key or move the mouse to turn off the screen saver.
m The monitor’s brightness control (¤) is not adjusted properly.
Check the monitor’s brightness control and turn it up if necessary.
m The Macintosh or the monitor is not getting power.
If you have a separate monitor, check that the monitor is plugged in and
turned on, and that the monitor cable is firmly connected to both the
computer and the monitor.
Check that the computer’s power cord is firmly connected to the computer
and plugged into a grounded electrical outlet, and that the outlet has power.
If you have more than one monitor and only one is dark, check that it is set
up correctly in the Monitors control panel. For information on using more
than one monitor, see the “Monitors” topic of Macintosh Guide, available
in the Guide (h) menu.
If you are displaying video from your computer on a television screen, it is
normal for your computer monitor to be dark.
The computer’s clock keeps time inaccurately.
Your computer has a clock that runs continuously. When the computer is
turned off, a battery keeps the clock running. If your clock begins to keep
time inaccurately, have your Apple-authorized service provider replace the
battery.
Troubleshooting
53
Page 61

When you start up, a disk icon with a blinking question mark appears in the middle
of the screen.
This icon indicates that your Macintosh cannot find the system software it
needs to start up. One of the following is probably the cause:
m Your computer may be having a problem recognizing external equipment
that uses the Small Computer System Interface (SCSI).
Turn off all external SCSI equipment and disconnect the first SCSI device
in the chain from your computer’s SCSI port. Then restart the computer. If
the computer starts up after you disconnect your SCSI equipment, refer to
the manuals that came with the equipment for information on the proper
way to connect SCSI equipment and assign SCSI ID numbers.
If you have a printer connected to your computer’s SCSI port, make sure
your printer is not supposed to be connected to the printer port instead.
Check the manuals that came with your printer for information on how to
connect it properly.
m System software is not installed on the startup hard disk, the system
software is damaged, or the hard disk is not working properly.
54
Chapter 5
Start up your computer using the
Utilities floppy disk or, if you have a builtin CD-ROM drive, using the Macintosh Performa CD. (For instructions on
how to start up your computer from the CD-ROM disc, see “Starting Up
From a CD-ROM Disc” in the section “Repairing a Damaged Disk” later in
this chapter.) Then follow the rest of the instructions on repairing a disk to
test your startup hard disk and repair any damage.
If repairing the disk doesn’t help, follow the instructions in “Installing or
Reinstalling System Software” later in this chapter to reinstall system
software on your startup hard disk.
Page 62

When you try to start up from a floppy disk, a disk icon with an X appears in the middle
of the screen and the floppy disk is ejected.
This icon indicates that the floppy disk you tried to start up from is not a
startup disk.
Wa it a few seconds. The computer should start up from its internal hard
disk. Make sure you insert floppy disks only after the computer has begun
starting up.
A “sad Macintosh” icon appears and the computer won’t start up.
This icon indicates that your Macintosh cannot start up because of a problem
with the system software or the computer hardware.
Eject any floppy disks by turning off the computer and then holding down
the mouse button while you turn the computer on again. Try starting up with
the Utilities floppy disk or, if you have a built-in CD-ROM drive, with the
Macintosh Performa CD.(For instructions on how to start up your computer
from the CD-ROM disc, see “Starting Up From a CD-ROM Disc” in the
section “Repairing a Damaged Disk” later in this chapter.) If the “sad
Macintosh” icon appears again, consult the service and support information
that came with your computer for information on contacting an Appleauthorized service provider or Apple for assistance.
Troubleshooting
55
Page 63

The hard disk icon does not appear on the desktop.
If you don’t see a hard disk icon on the desktop, try the following:
m If the hard disk is internal, shut down your computer, wait at least 10
seconds, and then turn it on again.
m If the hard disk is external, make sure that it is turned on and that its cable
is connected firmly; then restart the Macintosh.
m Check the ID numbers of all SCSI equipment connected to your computer.
See the manuals that came with your SCSI equipment for information on
setting SCSI ID numbers.
m If the hard disk is your startup disk, start your computer using the Utilities
floppy disk or, if you have a built-in CD-ROM drive, with the Macintosh
Performa CD. (For instructions on how to start up your computer from the
CD-ROM disc, see “Starting Up From a CD-ROM Disc” in the section
“Repairing a Damaged Disk” later in this chapter.) Then follow the rest of
the instructions on repairing a disk to test your startup hard disk and repair
any damage.
If repairing the disk doesn’t help, follow the instructions in “Installing or
Reinstalling System Software” later in this chapter to reinstall system
software on your startup hard disk.
56
Icons do not appear correctly on your screen.
You need to rebuild the desktop—a process that helps your Macintosh keep
track of files and folders on your hard disks. For instructions, see “Rebuild
Your Desktop Regularly” in the section “When You Run Into Trouble” earlier
in this chapter.
If icons do not appear correctly after you rebuild the desktop, restart your
computer while pressing the Shift key to temporarily turn off system
extensions. When you see the “Welcome to Macintosh—extensions off”
message, release the Shift key and press the Option and x keys until you see
a message asking if you want to rebuild the desktop.
Chapter 5
Page 64

Your Macintosh can’t read a floppy disk.
If you see a message that a floppy disk is unreadable, try one of the following:
m If the disk has never been used, you may simply need to initialize it. For
instructions, see the “Disks” topic of Macintosh Guide, available in the
Guide (h) menu.
m The disk may be damaged. See “Repairing a Damaged Disk” later in this
chapter for information on testing and repairing disks.
m If the disk is a high-density disk previously used on another computer, the
disk may have been formatted incorrectly as an 800K disk rather than as a
14 40K (high-density) disk. If so, use the other computer to copy the disk’s
contents onto a properly formatted disk.
If you are trying unsuccessfully to use a DOS floppy disk, consider the
following:
m When formatting floppy disks on a DOS computer for use in a Macintosh,
users need to format standard double-sided disks as 720K disks and highdensity disks as 1440K disks. Because DOS computers allow standard
double-sided disks to be formatted in 1440K format and high-density disks
to be formatted in 720K format, it’s possible that your disk has been given
a format that won’t work in a Macintosh. If you think your DOS floppy
disk might have a format that doesn’t work in a Macintosh, use a DOS
computer to copy the contents of your DOS floppy disk onto another DOS
floppy disk that has been properly formatted for use in a Macintosh.
Troubleshooting
57
Page 65

A dialog box with a bomb appears.
Your system has a software problem.
m Write down what you were doing when the message appeared, the text of
the message, and the message number, if there is one.
m Restart your Macintosh. (See “Start Over” in the section “When You Run
Into Trouble” earlier in this chapter for instructions.) Most software
problems are temporary, and restarting usually corrects the problem.
m Check the startup disk and application program you were using when the
dialog box appeared. Make sure that all programs, desk accessories, and
system extensions you’re using are compatible with the system software.
Reinstalling the system software may correct the problem.
m Sometimes incompatible system extensions or control panels can cause
system software problems. Restart while holding down the Shift key; this
temporarily turns off all system extensions. If your computer works
normally after you do this, use the Extensions Manager control panel to
turn on extensions and control panels one at a time. Restart after you turn
on each extension. This procedure should identify any incompatible
extensions.
For information on using the Extensions Manager control panel to manage
system extensions, see the “Setting Options” topic of Macintosh Guide,
available in the Guide (h) menu.
58
m If the problem recurs, you may need to reinstall system software. See
“Installing or Reinstalling System Software” later in this chapter for
instructions.
The pointer (8) doesn’t move when you move the mouse.
One of the following situations is probably the cause.
m Your system has a software problem. Try one or more of the following:
Press x-Option-Esc to quit the application program in use when the
problem occurred. If this works, you can save the documents open in other
programs before restarting.
Restart your Macintosh. See “Start Over” in the section “When You Run
Into Trouble” earlier in this chapter for instructions.
Chapter 5
Page 66

Check the startup disk and program you were using when the problem
occurred. Make sure that all programs, desk accessories, and system
extensions you’re using are compatible with the system software. Try starting
up the computer with the Utilities floppy disk or, if you have a built-in
CD-ROM drive, with the Macintosh Performa CD. (For instructions on how
to start up your computer from the CD-ROM disc, see “Starting Up From a
CD-ROM Disc” in the section “Repairing a Damaged Disk” later in this
chapter.) If your computer starts up normally, there may be an extension
conflict.
m Sometimes incompatible system extensions or control panels can cause
system software problems. Restart while holding down the Shift key; this
temporarily turns off all system extensions. If your computer works
normally after you do this, use the Extensions Manager control panel to turn
on extensions and control panels one at a time. Restart after you turn on
each extension. This procedure should identify any incompatible extensions.
For information on using the Extensions Manager control panel to manage
system extensions, see the “Setting Options” topic of Macintosh Guide,
available in the Guide (h) menu.
If the problem recurs, you may need to reinstall system software. See
“Installing or Reinstalling System Software” later in this chapter for
instructions.
m The mouse is not connected properly.
Tu rn the computer off using the standby power button, check that the mouse
and keyboard cables are connected properly, and then restart the computer.
m Signals from the mouse are not reaching the computer, either because the
mouse needs cleaning or because there is something wrong with the mouse.
Clean the mouse according to the instructions in Appendix A of this book.
If you have another mouse or pointing device, try connecting and using it.
(Turn off the computer before connecting it.) If the new device works, there
is probably something wrong with the mouse you replaced.
If none of these procedures solves the problem, consult the service and support
information that came with your computer for instructions on how to contact
an Apple-authorized service provider or Apple for assistance.
Troubleshooting
59
Page 67

Typing on the keyboard produces nothing on the screen.
One of the following is probably the cause:
m Your system has a software problem.
Restart your Macintosh. For instructions, see “Start Over” in the section
“When You Run Into Trouble” earlier in this chapter.
Check the startup disk and application program you were using when the
problem occurred. Make sure that all programs, desk accessories, and
system extensions you’re using are compatible with the system software.
If the problem recurs, you may need to reinstall system software. See
“Installing or Reinstalling System Software” later in this chapter for
instructions.
m You haven’t selected any text or set the insertion point (i).
Make sure the program you want to type in is the active program. Then
place the pointer (8) in the active window and click to set an insertion
point (i) or drag to select text (if you want to replace the text with your
typing).
m The keyboard is not connected properly.
Tu rn off the computer using the standby power button, then check that the
keyboard cable is connected properly at both ends.
60
If you have a keyboard with an ADB port (marked with the ◊ icon) on
each end, turn off the Macintosh using the standby power button and plug
the keyboard cable into the other ADB port on the keyboard. (You may
have to unplug the mouse to do this.) Then restart the computer.
m The keyboard is damaged.
If you have access to another keyboard, try using it instead. (Turn the
computer off before connecting it.) If the new keyboard works, there is
probably something wrong with the one you replaced.
If none of these procedures solves the problem, consult the service and
support information that came with your computer for instructions on how
to contact an Apple-authorized service provider or Apple for assistance.
Chapter 5
Page 68

You can’t start an application program or it quits unexpectedly. Or, when you try to open
a program, you see a message that not enough memory is available.
One of the following is probably the cause:
m The Macintosh ran out of memory.
Quit the programs that you have open and then open the program you want
to use, or restart your Macintosh.
Use the Memory control panel to turn on virtual memory. For more
information on virtual memory, see the “Memory” topic of Macintosh
Guide, available in the Guide (h) menu.
m The program needs more memory.
Use the program’s Info window to give it more memory. For more
information on increasing a program’s memory, see the “Memory” topic of
Macintosh Guide, available in the Guide (h) menu.
m The program requires special hardware, and your computer doesn’t have
the hardware installed.
Check the documentation that came with the program to find out if the
program requires a Macintosh with special hardware. Then check the
Technical Information booklet that came with your Macintosh to find out if
your computer is equipped with such special hardware, or if the hardware
can be installed. Consult your Apple-authorized service provider for
information on installing special hardware in your computer.
Troubleshooting
61
Page 69

You can’t open a document, or you see a message that an application program can’t
be found.
m Some documents can be opened by more than one application program.
Try starting a program that you think might be able to open the document,
then choose Open from the program’s File menu to try to open
the document.
m Purchase and install the correct software to use the document, or find out
if the creator of the document can convert it to a form that one of your
programs can use.
m Don’t try to open the files in your System Folder. Most of the files in your
System Folder are used by your computer for internal purposes and are not
intended to be opened.
m Rebuild your desktop by holding down the Option and x keys while
starting up your computer. Keep holding down the keys until you see a
message asking whether you want to rebuild the desktop. Click OK.
m If the document is from a DOS computer, use the PC Exchange control
panel to specify which Macintosh program will open the document. For
information about working with DOS documents on your Macintosh, see
the “Using DOS Files & Disks” topic of Macintosh Guide, available in the
Guide (h) menu.
62
You experience problems using a document from a DOS computer.
If you can’t open a DOS document using a Macintosh program, try the
following:
m Open the document from within the program by choosing Open in the
program’s File menu.
m Use the PC Exchange control panel to change the document’s type to one
that can be opened by the program.
If a DOS document is displayed incorrectly, or you see strange codes or
characters in the document, try one of the following:
m Your application program may have special procedures for opening and
saving documents with different file formats. See the information that
came with your program or call the program’s publisher.
m Try opening the document in another program.
Chapter 5
Page 70

Note: Some characters that can be displayed on the Macintosh are not
accurately displayed on DOS computers, and vice versa.
For more information about working with DOS documents on your
Macintosh, see the “Using DOS Files & Disks” topic of Macintosh Guide,
available in the Guide (h) menu.
Repairing a damaged disk
If you see a message reporting that a disk is damaged or unreadable, you may
need to repair the disk.
Try these suggestions first
If you can’t start up from a hard disk or you don’t see the hard disk icon on the
desktop, try the following:
m If the hard disk is internal, shut down your Macintosh, wait at least 10
seconds, and then turn it on again.
m If the hard disk is external, make sure that it is turned on and that its cable
is connected firmly; then restart the Macintosh.
m If the hard disk is your startup disk, start up with a different startup disk.
(See the following sections, “Starting Up From a CD-ROM Disc” and
“Starting Up From a Floppy Disk.”)
If, after you start up from a different disk, your hard disk’s icon appears on
your desktop, reinstall system software on the hard disk (see “Installing or
Reinstalling System Software” later in this chapter).
If your hard disk’s icon does not appear on your desktop, you may need to
initialize the disk (see “Initializing a Hard Disk” later in this chapter).
m Check the ID numbers of all SCSI equipment connected to your computer.
Each device must have a unique ID number less than 7; the computer
itself has the ID number 7, and the internal CD-ROM drive (if there is one)
has the ID number 3. The ID numbers 0, 1, 2, 4, 5, and 6 are available for
additional SCSI devices.
Troubleshooting
63
Page 71

Also check that the chain of devices is terminated properly. For
information on setting SCSI ID numbers and terminating a SCSI chain,
see the manuals that came with your SCSI equipment.
m If none of these suggestions solves the problem, test the disk by following
the instructions given later in this section.
Starting up from a CD-ROM disc
To test, repair, or initialize a hard disk, or to install system software on a hard
disk, you need to start up your computer from another disk. If your computer
has a CD-ROM drive, you can start up your computer using the Macintosh
Performa CD that came with your computer.
The procedure for starting up from the CD varies depending on the condition
of the system software on your hard disk. To find out which procedure to use,
you must turn on your Macintosh.
The steps that follow tell how to start up from a CD-ROM disc, depending on
what you see on your screen.
If you see a blinking question mark on your screen
The blinking question mark means that your Macintosh is unable to find
usable system software on your hard disk.
64
Chapter 5
1Press the Open/Close button of your CD-ROM drive to open the CD-ROM tray.
2Place the
Macintosh Performa CD
disc in the tray with the disc label facing up.
Make sure the disc is lying flat in the tray.
3Push the tray in, or press the Open/Close button, to close the tray.
Your Macintosh recognizes the CD as a startup disk, and in a few seconds the
Macintosh desktop with a Launcher appears.
Page 72

If you see the Macintosh desktop
1Press the Open/Close button of your CD-ROM drive to open the CD-ROM tray.
2Place the
Macintosh Performa CD
disc in the tray with the disc label facing up.
Make sure the disc is lying flat in the tray.
3Push the tray in, or press the Open/Close button, to close the tray.
If the Macintosh Performa CD icon does not appear on your screen, follow
the steps in the section “Problems Starting Up From the CD?”
If the Macintosh Performa CD icon appears on the right side of your screen,
continue with these steps.
4Choose Control Panels from the Apple (
5Double-click the Startup Disk icon.
K
) menu.
The Startup Disk control panel window appears.
6 Click the CD icon to select it as your startup disk.
7Choose Restart from the Special menu.
Your computer recognizes the CD as its startup disk, and in a few seconds the
Macintosh desktop with a Launcher appears.
Problems starting up from the CD?
If you’ve followed the steps in the previous sections and the Macintosh
Performa CD icon does not appear on your screen, follow these steps:
1 Insert the CD into the tray.
2Choose Restart from the Special menu.
3Press and hold down the Command (
x
), Shift, Option, and Delete keys.
The Macintosh Performa CD icon appears on the desktop.
4Choose Control Panels from the Apple (
5Double-click the Startup Disk icon.
K
) menu.
The Startup Disk control panel window appears.
Troubleshooting
65
Page 73

6 Click the CD icon to select it as your startup disk.
7 Close the Startup Disk control panel.
8Press and hold down the Control, Command (
x
), and Power keys.
Starting up from a floppy disk
To test, repair, or initialize a hard disk, or to install system software on a hard
disk, you need to start up your computer from another disk. If you don’t have
a built-in CD-ROM drive, you can start up the computer using the Utilities
floppy disk that came with your computer.
To start up your computer using the Utilities floppy disk, follow these steps:
1Shut down your computer.
2Insert the
3 Turn the computer on.
Utilities
disk into the disk drive.
It takes several moments for your computer to start up from the Ut ilities disk.
Checking for damage on your internal hard disk
You can check for damage on your internal hard disk with the Internal HD
Format program, which is on the Utilities floppy disk that came with your
computer. If your computer has a built-in CD-ROM drive and you didn’t
receive floppy disks, you can find the Internal HD Format program on the
Macintosh Performa CD. You can use Internal HD Format at any time to check
for damaged blocks (segments of the hard disk that cannot reliably be used to
store information).
66
Chapter 5
1 Start up your computer from the
Utilities
floppy disk or the
Macintosh Performa CD.
See “Starting Up From a CD-ROM Disc” or “Starting Up From a Floppy
Disk” earlier in this section.
2 Open the Internal HD Format program.
You may need to look in a folder called Utilities to find Internal HD Format.
Page 74

3Choose Scan For Defects in the Functions menu.
If the program finds damaged blocks, it marks them so the computer will not
store information in them. This process does not harm any information on the
hard disk.
Testing an external SCSI hard disk
You can test an external Apple SCSI hard disk with the Apple HD SC Setup
program, which is on the Macintosh Performa CD or the Utilities disk—
whichever came with your computer.
1 Start up your computer from the
Macintosh Performa CD
or the
Utilities
See “Starting Up From a CD-ROM Disc” or “Starting Up From a Floppy
Disk,” earlier in this section.
2 Open the Apple HD SC Setup program.
3Click Drive until the disk you want appears.
SCSI ID number of the currently selected hard disk
Name of the currently selected hard disk
disk.
Troubleshooting
67
Page 75

4 Click Test.
5When a message tells you that testing is complete, click Quit.
If the test reveals a problem, you may be able to correct it by using Disk First
Aid or another disk repair program (see the instructions in the next section),
or you may need to reinitialize the disk (see “Initializing a Hard Disk” later in
this chapter). Consult an Apple-authorized service provider for assistance if
necessary.
How to repair a hard disk or floppy disk
You can repair some types of disk damage by using the Disk First Aid
program, which is included either on the Utilities floppy disk or on the
Macintosh Performa CD.
1 Start up your computer from the
Utilities
disk or the
Macintosh Performa CD.
See “Starting Up From a CD-ROM Disc” or “Starting Up From a Floppy
Disk” earlier in this section.
2 Open the Disk First Aid program.
3 Click the icon of the disk you want to test.
Disk icons appear in a box at the top of the Disk First Aid window.
68
Chapter 5
Page 76

4Click Repair to begin testing and repairing the disk.
You can’t repair the startup disk or the disk that contains the Disk First Aid
program, but you can test these disks by clicking Verify. If the program
reveals a problem with either of these disks, start up the computer from
another disk so that you can repair the damaged disk.
If you want to test and repair another disk, click its icon and then click Repair.
5When testing and repair are done, choose Quit from the File menu.
If Disk First Aid cannot correct the problem
m Try repairing the disk again. Sometimes repeating the process corrects the
problem.
m Use another disk repair or recovery program. Some disk repair programs
let you recover information from a damaged disk.
m Consult a computer repair specialist for help.
m Once you have recovered all the information you can and backed it up,
erase (reinitialize) the disk. For instructions on reinitializing a floppy disk,
see the “Disks” topic of Macintosh Guide, available in the Guide (h) menu.
For instructions on reinitializing a hard disk, see the next section,
“Initializing a Hard Disk.”
If initialization doesn’t work, discard the damaged disk (if it’s a floppy
disk), or take it to your Apple-authorized service provider for repair (if it’s
a hard disk). If you received a copy of the Macintosh Performa CD (whether
or not your computer has a CD-ROM drive), bring this disc with you to the
service provider.
Troubleshooting
69
Page 77

Initializing a hard disk
The hard disk inside your computer was initialized (formatted for use) at the
factory, so you shouldn’t need to initialize it. You need to initialize a hard disk
only if
m you purchase a hard disk that has not been initialized at the factory
m your hard disk is damaged
If a hard disk needs to be initialized, the disk’s icon may not appear on the
desktop when you start up the computer using another disk.
WARNING
Initializing a disk erases any information that may be on it.
Before you initialize a damaged disk, try to repair it as described in
“Repairing a Damaged Disk” earlier in this chapter.
How to initialize an external SCSI hard disk
You initialize an Apple SCSI hard disk by using a program called Apple HD
SC Setup, which is on the Macintosh Performa CD or the Utilities disk,
whichever came with your computer.
1 Start up your computer from the
See “Starting Up From a CD-ROM Disc” or “Starting Up From a Floppy
Disk” in the section “Repairing a Damaged Disk,” earlier in this chapter.
2 Open the Apple HD SC Setup program.
Macintosh Performa CD.
70
Chapter 5
Page 78

3 Click Drive until the disk you want to initialize appears.
You cannot initialize the disk that you used to start up your computer or the
disk that contains the Apple HD SC Setup program.
SCSI ID number of the currently selected hard disk
Name of the currently selected hard disk
4Click Initialize.
5Click Init to initialize the hard disk.
Click here to initialize the disk.
6If a message appears asking you to name the disk, type a name and then click OK.
7Click Quit when you see a message reporting that initialization was successful.
If a message reports that initialization failed, try again. If initialization
fails a second time, take the disk to your Apple-authorized service provider
for repair.
Troubleshooting
71
Page 79

Reinitializing your computer’s internal hard disk
You initialize your internal hard disk using a program called Internal HD
Format, which is on the Utilities floppy disk that came with your computer.
If your computer came with a CD-ROM drive and you didn’t receive floppy
disks, you can find Internal HD Format on the Macintosh Performa CD.
1 Start up your computer from the
Utilities
floppy disk or the
Macintosh Performa CD
.
See “Starting Up From a CD-ROM Disc” or “Starting Up From a Floppy
Disk” in the section “Repairing a Damaged Disk,” earlier in this chapter.
2Click the Internal HD Format Launcher button once (if you are using the
Performa CD)
floppy disk) to open it.
3Type a name for your hard disk in the name box.
4If you want to make sure that none of the hard disk’s original information is recognizable
after reinitialization, choose Zero Out Data from the Options menu.
or double-click the Internal HD Format icon (if you are using the
Macintosh
Utilities
If you choose Zero Out Data, initialization may take a few minutes. (If you
don’t choose Zero Out Data, initialization will take less than 30 seconds.)
5Click Initialize.
A message informs you that initializing the disk erases all information on it.
6 Click OK.
During initialization, a status bar shows you the progress of the initialization.
7When the initialization is complete, click Done.
72
If a message reports that initialization failed, try again. If initialization fails a
second time, take the disk to your Apple-authorized service provider for
repair.
Chapter 5
Page 80

Installing or reinstalling system software
System software is the set of programs and other files that your computer uses
to start itself up, keep track of your files, and run the application programs
you use. System software is kept in the System Folder. When you turn on your
computer, it looks for a startup disk, which is a disk that contains the system
software. The startup disk is usually the hard disk that’s inside your computer,
though another hard disk or a floppy disk can also be a startup disk.
When should you install or reinstall system software?
Your Macintosh came with all the necessary system software installed on its
internal hard disk, so you don’t need to install system software on that disk
unless you encounter software problems.
If you have a new hard disk or a newly initialized hard disk that doesn’t
contain system software, or if you want to upgrade to a more recent version of
system software on a hard disk, you’ll need to install system software. See the
next section, “How to Install or Reinstall System Software.”
If your hard disk already has system software installed on it but there is a
problem with the disk or the software, you may see this icon in the middle of
the screen:
If this icon appears, first try testing your startup hard disk and repairing any
damage. To do this, follow the instructions in “Repairing a Damaged Disk”
earlier in this chapter. If repairing the disk doesn’t help, you may need to
reinstall system software.
Troubleshooting
73
Page 81

How to install or reinstall system software
If your computer has a CD-ROM drive, you can install or reinstall system
software by following the instructions in the Macintosh Performa CD booklet
that came with your computer.
If your computer doesn’t have a CD-ROM drive and you’ve used Apple
Backup to back up the contents of your hard disk, you can use Apple Restore
to reinstall system software. For instructions, see “Restoring the Information
on Your Hard Disk” in Chapter 4.
If your computer doesn’t have a CD-ROM drive and you have not used Apple
Backup to back up the contents of your disk, try one of the following:
m If you received the Macintosh Performa CD with your computer, contact
an Apple-authorized service provider, a Macintosh user group, or another
Macintosh user for access to a CD-ROM drive. Reinstall system software
on your hard disk by following the instructions in the Macintosh Performa CD
booklet that came with your computer.
m If you did not receive the Macintosh Performa CD with your computer,
or if you cannot get access to a CD-ROM drive, call the customer support
hotline. (The phone number for the hotline is in the service and support
information that came with your computer.)
74
Chapter 5
Page 82

Appendix A
Health, Safety, and Maintenance Tips
For your own safety and that of your equipment, follow all the instructions in
this chapter. Keep these instructions available for reference by you and others.
Health-related information about computer use
Muscle soreness, eye fatigue, and other discomforts and injuries sometimes
associated with using computers can occur from performing any number of
activities. In fact, misuse of the same muscles during multiple activities can
create a problem that might not otherwise exist. For example, if you engage in
nonwork activities that involve repetitive stress on the wrist—such as
bicycling—and also use your computer’s keyboard improperly, you may
increase your likelihood of developing wrist problems. Some individuals are
at greater risk of developing these problems because of their health,
physiology, lifestyle, and general exposure to stress. Work organization and
conditions, such as workstation setup and lighting, also play a part in your
overall health and comfort. Preventing health problems is a multifaceted task
that requires careful attention to the way you use your body every hour of
every day.
Read this appendix for important
health and safety instructions,
as well as tips on keeping your
computer in good working order.
The most common health effects associated with using a computer are
musculoskeletal discomfort and eye fatigue. We’ll discuss each area of
concern below.
75
Page 83

Musculoskeletal discomfort
As with any activity that involves sitting for long periods of time, using a
computer can make your muscles sore and stiff. To minimize these effects, set
up your work environment carefully, using the guidelines that follow, and take
frequent breaks to rest tired muscles. To make working with your computer
more comfortable, allow enough space in your work area so that you can
change position frequently and maintain a relaxed posture.
Another type of musculoskeletal concern is repetitive stress injuries (RSIs),
also known as cumulative trauma disorders (CTDs). These problems can
occur when a certain muscle or tendon is repeatedly overused and forced into
an unnatural position. The exact causes of RSIs are not totally understood, but
in addition to awkward posture, such factors as the amount of repetition, the
force used in the activity, the individual’s physiology, workplace stress level,
and lifestyle may affect the likelihood of experiencing an RSI.
RSIs did not suddenly arise when computers were invented; tennis elbow and
writer’s cramp, for example, are two RSIs that have been with us for a long
time. Although less common than other RSIs, one serious RSI discussed more
often today is a wrist problem called carpal tunnel syndrome, which may be
aggravated by improper use of computer keyboards. This nerve disorder
results from excessive pressure on the median nerve as it passes through the
wrist to the hand.
76
This section offers advice on setting up your work area to enhance your
comfort while you use your computer. Since the effects of repetitive
movements associated with using a computer can be compounded by those of
other work and leisure activities to produce or aggravate physical problems,
proper use of your computer system must be considered as just one element
of a healthy lifestyle.
No one, of course, can guarantee that you won’t have problems even when you
follow the most expert advice on using computer equipment. You should
always check with a qualified health specialist if muscle, joint, or eye
problems occur.
Appendix A
Page 84

Eye fatigue
Eye fatigue can occur whenever the eyes are focused on a nearby object for a
long time. This problem occurs because the eye muscles must work harder to
view an object that’s closer than about 20 feet (6 meters). Improper lighting
can hasten the development of eye fatigue. Although eye fatigue is annoying,
there’s no evidence that it leads to permanent damage.
Whenever you’re engaged in an activity that involves close-up work—such as
reading a magazine, doing craft work, or using a computer—be sure to have
sufficient glare-free lighting and give your eyes frequent rest breaks by
looking up and focusing on distant objects. Remember to have your eyes
examined regularly.
To prevent discomfort and eye fatigue:
m Arrange your work space so that the furniture is properly adjusted for you
and doesn’t contribute to an awkward working posture.
m Ta ke frequent short breaks to give your muscles and eyes a chance to rest.
Arranging your office
Here are some guidelines for adjusting the furniture in your office to
accommodate your physical size and shape.
m An adjustable chair that provides firm, comfortable support is best. Adjust
the height of the chair so your thighs are horizontal and your feet flat on
the floor.
The back of the chair should support your lower back (lumbar region).
Follow the manufacturer’s instructions for adjusting the backrest to fit your
body properly.
m When you use the computer keyboard, your shoulders should be relaxed.
Your upper arm and forearm should form an approximate right angle, with
your wrist and hand in roughly a straight line.
Health, Safety, and Maintenance Tips
77
Page 85

You may have to raise your chair so your forearms and hands are at the
Thighs horizontal
Shoulders relaxed
Screen positioned to avoid
reflected glare
Forearms and hands
in a straight line
Forearms level
or tilted up slightly
Lower back supported
Feet flat on the floor
Top of the screen at or slightly
below eye level (You may need
to adjust the height of your
monitor by placing something
under it or by raising your
work surface.)
Clearance under work surface
45–70 cm (18–28 in.)
proper angle to the keyboard. If this makes it impossible to rest your feet
flat on the floor, you can use a footrest with adjustable height and tilt to
make up for any gap between the floor and your feet. Or you may lower
the desktop to eliminate the need for a footrest. Another option is to use a
desk with a keyboard tray that’s lower than the regular work surface.
m Position the mouse at the same height as your keyboard. Allow adequate
space to use the mouse comfortably.
m Arrange the monitor so the top of the screen is slightly below your eye
level when you’re sitting at the keyboard. The best distance from your eyes
to the screen is up to you, although most people seem to prefer 18 to 28
inches (45 to 70 cm).
m Position the monitor to minimize glare and reflections on the screen from
overhead lights and windows. You may want to use a tiltable monitor
stand. The stand lets you set the monitor at the best angle for viewing,
helping to reduce or eliminate glare from lighting sources you can’t move.
78
Appendix A
Page 86

Avoiding fatigue
m Change your seated position, stand up, or stretch whenever you start to feel
tired. Frequent short breaks are helpful in reducing fatigue.
m Use a light touch when typing or using a mouse and keep your hands and
fingers relaxed.
m Some computer users may develop discomfort in their hands, wrists, or
arms after intensive work without breaks. If you begin to develop chronic
pain or discomfort in your hands, wrists, or arms, consult a qualified
health specialist.
m Allow adequate work space so that you can use your keyboard and mouse
comfortably. Place papers or other items so you can view them easily while
using your computer. A document stand may make reading papers more
comfortable.
m Eye muscles must work harder to focus on nearby objects. Occasionally
focus your eyes on a distant object, and blink often while you work.
m Clean your screen regularly. Keeping the screen clean helps reduce
unwanted reflections.
What about electromagnetic emissions?
There has been recent public discussion of the possible health effects of
prolonged exposure to extremely low frequency (ELF) and very low
frequency (VLF) electromagnetic fields. Such fields are associated with
electromagnetic sources such as television sets, electrical wiring, and some
household appliances—as well as computer monitors.
Apple has reviewed scientific reports and sought the counsel of government
regulatory agencies and respected health organizations. Based on the
prevailing evidence and opinions, Apple believes that the electric and
magnetic fields produced by computer monitors do not pose a health risk.
In response to those customers who wish to reduce their exposure to
electromagnetic fields, Apple has lowered the emission levels of our products.
We are also actively encouraging further scientific research so we can
continue to promote the health and safety of our customers and employees.
Health, Safety, and Maintenance Tips
79
Page 87

Safety instructions
For your own safety and that of your equipment, always take the following
precautions.
Turn off the computer completely and disconnect the power plug (by pulling
the plug, not the cord) if any of the following conditions exists:
m the power cord or plug becomes frayed or otherwise damaged
m you spill something into the case
m your Macintosh is exposed to rain or any other excess moisture
m your Macintosh has been dropped or the case has been otherwise damaged
m you suspect that your Macintosh needs service or repair
m you want to clean the case (use only the recommended procedure
Be sure that you always do the following:
m Keep your Macintosh away from sources of liquids, such as wash basins,
m Protect your Macintosh from dampness or wet weather, such as rain, snow,
described later in this chapter)
bathtubs, shower stalls, and so on.
and so on.
80
Appendix A
m Read all the installation instructions carefully before you plug your
Macintosh into a wall socket.
m Keep these instructions handy for reference by you and others.
m Follow all instructions and warnings dealing with your system.
WARNING
Electrical equipment may be hazardous if misused. Operation
of this product, or similar products, must always be supervised by an
adult. Do not allow children access to the interior of any electrical
product and do not permit them to handle any cables.
Page 88

Handling your computer equipment
Follow these guidelines for handling your computer and its components:
m When setting up your computer, place components on a sturdy, flat surface,
and carefully follow all setup instructions.
m When connecting or disconnecting a cable, always hold the cable by its
connector (the plug, not the cord).
m Tu rn off your computer and all its components before connecting or
disconnecting any cables to add or remove any component. Failure to do so
could seriously damage your equipment.
m Never force a connector into a port. If the connector and port do not join
with reasonable ease, they probably don’t match. Make sure that the
connector matches the port and that you have positioned the connector
correctly in relation to the port.
m Ta ke care not to spill any food or liquid on the computer, keyboard, mouse,
or other components. If you do, turn your computer off immediately and
unplug it before cleaning up the spill. Depending on what you spilled and
how much of it got into your equipment, you may have to bring your
equipment to an Apple-authorized service provider.
m Protect the computer and its components from direct sunlight and rain or
other moisture.
m Keep all ventilation openings clear and unobstructed. Without proper air
circulation, components can overheat, causing damage or unreliable
operation.
WARNING
This equipment is intended to be electrically grounded. Your
Macintosh is equipped with a three-wire grounding plug—a plug that
has a third (grounding) pin. This plug will fit only a grounded AC
outlet. This is a safety feature. If you are unable to insert the plug into
the outlet, contact a licensed electrician to replace the outlet with a
properly grounded outlet. Do not defeat the purpose of the grounding
plug!
Health, Safety, and Maintenance Tips
81
Page 89

Handling the monitor
Follow these procedures for handling a monitor:
m Turn down the screen brightness control if you leave the computer turned
on for extended periods. If the brightness is not turned down, the image on
the screen could “burn in” and damage the screen.
You can also use a “screen saver” program, which dims or varies the image
on the screen when the computer has been idle for a specified period of
time. These programs are available from independent suppliers and user
groups.
m Make sure that the ventilation openings on the computer and the monitor
are clear and unobstructed.
m Some large monitors cannot safely be placed on top of the computer.
Check the instructions that came with the monitor for setup information.
m If there is interference on the monitor’s screen or on a television or radio
near your computer, move the affected equipment farther away.
Handling the keyboard
Ta ke care not to spill any liquid on the keyboard. If you do, turn off your
computer immediately.
82
m If you spill liquid that is thin and clear, unplug the keyboard, turn it upside
down to let the liquid drain out, and let it dry for 24 hours at room
temperature. If, after you take these steps, the keyboard doesn’t work, take
it to an Apple-authorized service provider for repair.
m If you spill liquid that is greasy, sweet, or sticky, unplug the keyboard and
take it to an Apple-authorized service provider for repair.
Appendix A
Page 90

Handling floppy disks
125° F (52° C)
50
°
F (10° C)
Keep disks dry.
Do not use a
pencil or an
eraser on a disk
or disk label.
Store disks at
temperatures
between 50
°
F
and 125
°
F.
Do not touch the
exposed part of the
disk behind the
metal shutter.
Keep disks away
from magnets.
Avoid exposing
disks to extremely
hot temperatures.
Ejecting a disk
For instructions on ejecting a floppy disk, a CD-ROM disc, or a removable
media disk, see the “Disks” topic of Macintosh Guide, available in the Guide
(h) menu.
Health, Safety, and Maintenance Tips
83
Page 91

If you can’t eject a floppy disk
If you can’t eject a floppy disk in the usual way, try the following in order:
m Hold down the x and Shift keys and press the number 1 key on your
keyboard to eject a disk in the internal disk drive.
m Turn off the computer. If the disk isn’t ejected, then hold down the button
on your mouse or other pointing device while you turn the computer on
again.
m Locate the small hole near the disk drive’s opening, and carefully insert the
end of a large straightened paper clip into it. Push gently until the disk is
ejected. Do not use excessive force.
If nothing works, take the computer or disk drive to your Apple-authorized
service provider to have the disk removed.
84
Power supply
The power supply in your computer is a high-voltage component and should
not be opened for any reason, even when the computer is off. If the power
supply needs service, contact your Apple-authorized dealer or service
provider.
Appendix A
Page 92

Cleaning your equipment
Follow these general rules when cleaning the outside of your computer and
its components:
m Use a damp, soft, lint-free cloth to clean the computer’s exterior. Avoid
getting moisture in any openings.
m Don’t use aerosol sprays, solvents, or abrasives.
Cleaning the computer case
To clean the case, do the following:
1 Turn off the computer completely and then disconnect the power plug. (Pull the plug, not
the cord.)
2Wipe the surfaces lightly with a clean, soft cloth dampened with water.
Cleaning the monitor
To clean the screen, put household glass cleaner on a soft cloth and wipe the
screen. Don’t spray the cleaner directly on the screen, because the liquid
might drip into the monitor or computer.
Cleaning the mouse
The mouse contains a small ball that must roll smoothly for the mouse to
work properly. You can keep this ball free of dirt and grease by using the
mouse on a clean, lint-free surface and cleaning it occasionally.
You need a few cotton swabs and a clean, soft, lint-free cloth.
1 Turn off your computer.
Health, Safety, and Maintenance Tips
85
Page 93

2 Turn the mouse upside-down and turn the plastic ring on the bottom counterclockwise
to disengage it.
On some mouse devices, you may need to press the plastic ring (rather than
turn it) to disengage it. If you cannot disengage the ring, your mouse may be
locked. See “Locking and Unlocking the Mouse,” next in the appendix.
3 Turn the mouse right-side up with one hand and catch the ring and the ball with your
other hand.
4Clean the three small rollers inside the mouse with a cotton swab moistened with water.
Rotate the rollers to clean all around them.
86
5Wipe the mouse ball with a clean, soft, dry, and lint-free cloth.
6If necessary, wash the mouse ball with warm soapy water (use a mild soap such as a
dishwashing liquid) and then dry the mouse ball thoroughly.
7Gently blow into the mouse case to remove any dust that has collected there.
8Put the ball and the ring back in place.
Your mouse should roll smoothly across your mouse pad or desk. If it doesn’t,
repeat these instructions carefully.
Appendix A
Page 94

Locking and unlocking the mouse
The mouse ring is locked when the recessed area on the ring
does not line up with the recessed area surrounding the ring.
Recessed area on ring
Recessed area surrounding ring
Insert a straightened paper clip into this hole.
(The hole may be located here on your mouse.)
Some mouse devices can be locked so that the ball can’t be removed. A
locking mouse has a small hole on the plastic ring.
To lock the mouse, follow these steps:
1 Insert a straightened paper clip into the hole on the plastic ring.
2Press down on the paper clip while you turn the ring clockwise.
Turn the ring a very short distance, until it stops. When the recessed area on
the ring is
not lined up with the recessed area surrounding the ring, the mouse
is locked.
Health, Safety, and Maintenance Tips
87
Page 95

To unlock the mouse, follow these steps:
The mouse ring is unlocked when the recessed area on the
ring lines up with the recessed area surrounding the ring.
Recessed area on ring
Recessed area surrounding ring
Insert a straightened paper clip into this hole.
(The hole may be located here on your mouse.)
1Insert a straightened paper clip into the hole on the plastic ring.
2Press down on the paper clip while you turn the ring counterclockwise.
Turn the ring a very short distance. When the recessed area on the ring is
lined up with the recessed area surrounding the ring, the mouse is unlocked.
88
Appendix A
Page 96

Read this appendix for instructions
on installing an expansion card
in your computer.
Appendix B
Installing an Expansion Card
Expansion cards are printed circuit boards that can be installed in your
computer to give it special capabilities, such as enhanced video capabilities,
networking and communications, and additional processing power.
If you purchased an expansion card separately from your computer, you can
install it by following the instructions that came with the card, or by
following the instructions in this appendix. However, be sure to read this
appendix for instructions that may be specific to your computer.
89
Page 97

Cards fit into slots on the computer’s logic board, the board that holds the
Video-in slot
Processor-direct slot
Communication slot
Vertical plate
components that make your computer work. There are three types of slots on
your computer’s logic board, each labeled on the board:
m an LC-compatible 68030 processor-direct slot (PDS) for most
expansion cards
m a communication slot for an internal modem or an Ethernet card
m a video-in slot for a card that brings signals into the computer from a
videocassette recorder (VCR), laserdisc player, video camera, or
similar device
90
Appendix B
This appendix contains instructions for installing a PDS card or a
communication card. To install a video input card or a TV tuner card, follow
the instructions that came with the card.
WARNING
To avoid damaging your computer and expansion card, do not
attempt to install any expansion card without first checking the
documentation for that card. If the documentation specifies that an
Apple-certified technician must install the card (usually because
the installation requires special training or tools), consult the service
and support information that came with your computer for instructions
on how to contact an Apple-authorized service provider or Apple for
assistance. If you attempt to install the card yourself, any damage you
may cause to the computer or card will not be covered by the limited
warranty on your computer. If the card is not an Apple-labeled product,
check with an Apple-authorized dealer or service provider to see if you
can install it yourself.
Page 98

Installing an expansion card involves three steps:
m opening the computer
m inserting the card into a specific slot
m closing the computer
Opening the computer
1Shut down your computer by choosing Shut Down from the Apple (
Special menu.
K
) menu or the
You can also press the Power key on the keyboard.
2Unplug all the cables except the power cord from your computer.
Leaving the power cord plugged in helps protect the computer from
electrostatic discharge.
IMPORTANT
To avoid generating static electricity that may damage
components, do not walk around the room until you have completed the
installation of the expansion card and closed the computer. Additionally, move
the logic board as little as possible while it is outside the computer case.
3Place your thumbs on the two tabs at the top of the computer’s back panel, and
press down.
Installing an Expansion Card
91
Page 99

4Pulling gently, swing the panel down, and slip it out.
If there are security screws, remove both screws from the vertical plate.
Remove the back panel.
5If there are security screws on the vertical plate on the back of the computer, remove
them with a Phillips screwdriver.
92
Appendix B
Page 100

6Unplug the power cord from your computer.
7Swing the handle out from its storage position. Then grasp the handle and gently but
firmly pull it toward you.
The vertical plate and the logic board to which it’s attached slide all the way
out of the computer. Carefully support the logic board as it comes out, and
put it on a stable, clean, flat surface.
What you do next depends on the type of expansion card you want to install.
Installing an Expansion Card
93
 Loading...