

Apple LED Cinema Display User Manual [en, ru, pl]

Apple LED Cinema Display

V Apple Inc.
© 2010 Apple Inc. All rights reserved.
Under the copyright laws, this manual may not be copied, in whole
or in part, without the written consent of Apple.
The Apple logo is a trademark of Apple Inc., registered in the U.S.
and other countries. Use of the "keyboard" Apple logo (OptionShift-K) for commercial purposes without the prior written consent
of Apple may constitute trademark infringement and unfair
competition in violation of federal and state laws.
Every effort has been made to ensure that the information in
this manual is accurate. Apple is not responsible for printing or
clerical errors.
Apple
1 Infinite Loop
Cupertino, CA 95014
408-996-1010
www.apple.com
Apple, the Apple logo, Apple Cinema Display, iChat, iMovie,
iPhone, iPod, iSight, Mac, MacBook, MagSafe, and Photo Booth are
trademarks of Apple Inc., registered in the U.S. and other countries.
Apple Store is a service mark of Apple Inc., registered in the U.S.
and other countries.
ENERGY STAR® is a U.S. registered trademark.
The Bluetooth® word mark and logos are registered trademarks
owned by Bluetooth SIG, Inc. and any use of such marks by Apple
is under license.
Other company and product names mentioned herein may be
trademarks of their respective companies. Mention of third-party
products is for informational purposes only and constitutes
neither an endorsement nor a recommendation. Apple assumes
no responsibility with regard to the performance or use of these
products.

Contents
6 Getting Started
7 Setting Up Your Display
9 Using Your Display
13 Care and Safety
15 Ergonomics
16 Troubleshooting Your Display
17 Learning More, Service, and Support
18 Specifications
19 Kayttoonotto
20 Nayton kayttoonotto
22 Nayton kayttaminen
26 Huolto ja turvallisuus
28 Ergonomia
29 Nayton vianmaaritys
30 Lisatiedot, huolto ja tuki
31 Tekniset tiedot
3

33 Klargj0re skjermen
35 Bruke skjermen
39 Vedlikehold og sikkerhet
41 Ergonomi
42 Probleml0sing
43 Service, support og mer informasjon
44 Spesifikasjoner
45 Pierwsze kroki
46 Podtqczanie monitora
48 Korzystanie z monitora
52 Dbatosc i bezpieczenstwo
54 Ergonomia
55 Rozwiqzywanie problemów z monitorem
56 Dodatkowe informacje, serwis i pomoc
57 Dane techniczne
58 Introdu^áo
59 Instala^ào do monitor
61 Utiliza^ào do monitor
65 Cuidado e seguranza
67 Ergonomia
68 Resolu^ào de problemas do monitor
69 Mais informa^óes, assistència e suporte
70 Especifica^óes
4

71 Komma igang
72 Installera skarmen
74 Anvanda skarmen
78 Skotsel och sakerhet
80 Ergonomi
81 Felsoka bildskarmen
82 Mer information, service och support
83 Teknisk information
84 Начало работы
85 Настройка монитора
87 Использование монитора
91 Безопасность и уход
93 Эргономика
94 Устранение неполадок монитора
95 Дополнительная информация, обслуживание и поддержка
96 Спецификации
97 Regulatory Compliance Information
98 Apple and the Environment
5

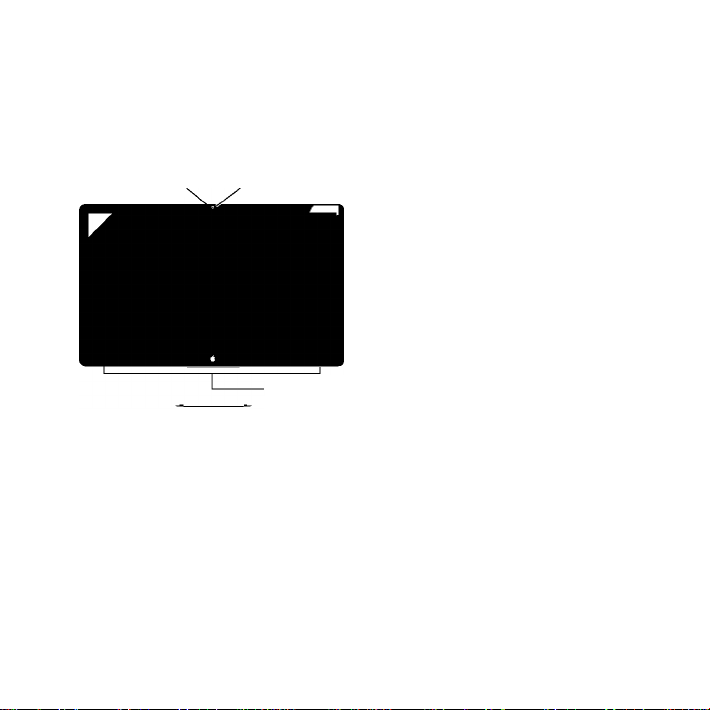
Getting Started
Your Apple LED Cinema Display is designed to work seamlessly
with Mac computers that have a Mini DisplayPort connector.
It features an LED-backlit widescreen display, a MagSafe
connector to charge your MacBook computer, a built-in iSight
camera, a microphone, and a speaker system.
The instructions on the following pages help you set up and use your new display.
Learn how to:
• Connect your display to your computer
• Use your display's camera, microphone, speaker system, and USB ports
• Adjust your display's settings
Note: You can connect your Apple LED Cinema Display to a Mac desktop computer
that has a Mini DisplayPort.
Important: Carefully read all the installation instructions (and the safety information
starting on page 13) before you set up and use your display.
For information about the specific computers and graphics cards that are compatible
with your display, go to www.apple.com/displays.
6 English
Setting Up Your Display
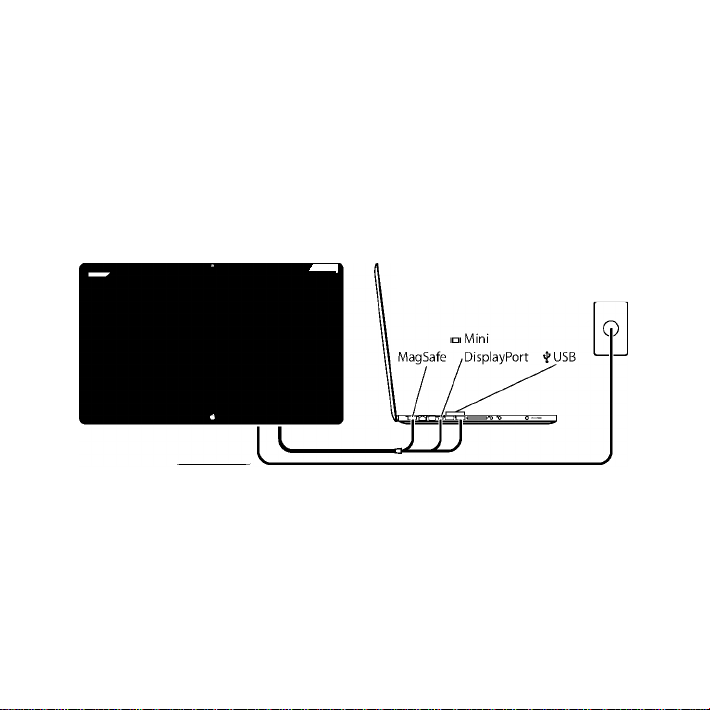
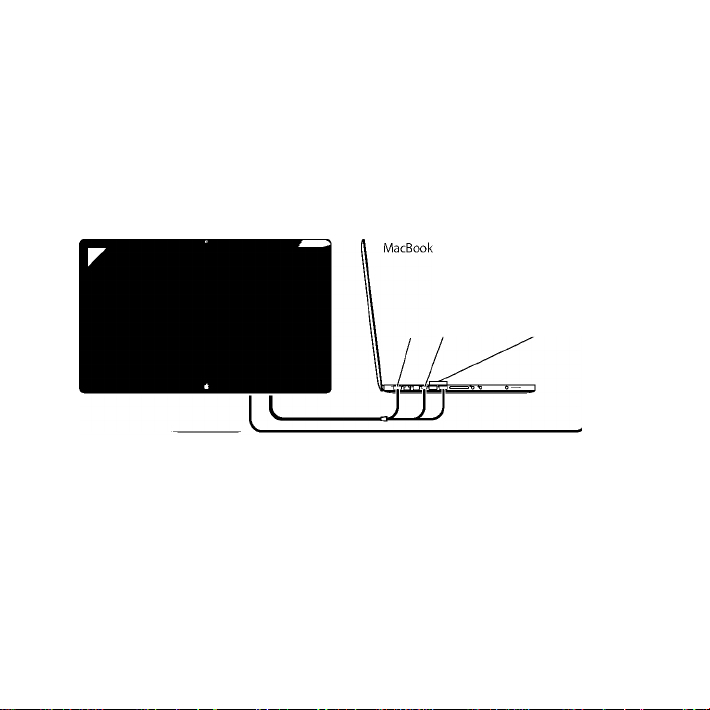
Follow these steps to set up your Apple LED Cinema Display:
1 Remove the protective film from the display and cables.
2 Insert the power cord into the display, and then insert the AC plug into a grounded
power outlet.
3 Plug the MagSafe connector into the MagSafe power port on your MacBook to charge
the battery and provide power to your computer.
Apple LED Cinema Display
MacBook
4 Connect the USB cable to your computer to use the display's built-in iSight camera,
microphone, speaker system, and USB ports.
5 Connect the Mini DisplayPort cable to your computer.
6 Press the power (®) button on your computer to start it up. The display turns on
automatically when you start up your computer.
Grounded
power outlet
English 7

Setting Up Your MacBook with the Lid Closed
You can close the lid of your MacBook and use just your Apple LED Cinema Display.
Follow the setup instructions on the previous page and make sure the MagSafe
connector from the display is plugged into the MagSafe power port on your MacBook.
To use your Apple LED Cinema Display with your MacBook lid closed:
1 Connect an external USB keyboard and mouse to a USB port on your display, or use the
Bluetooth® Setup Assistant to set up a wireless keyboard and mouse.
2 Make sure your MacBook is turned on.
3 Close the lid on your MacBook to put it to sleep.
4 Wait a few seconds, and then press any key on the external keyboard or click the
mouse to wake your MacBook.
8 English
Using Your Display
Your Apple LED Cinema Display has a built-in iSight camera, microphone, and speaker
system. The USB connection between the display and your computer is required for
these features.
Microphone
Using the Built-in iSight Camera and Microphone
You can use the built-in iSight camera and microphone to capture still images, video,
and sound using applications such as iChat, iMovie, and Photo Booth.
To set up the camera and microphone with iChat:
1 Click the iChat icon in the Dock to open the iChat application.
2 Choose iChat > Preferences, and then click Audio/Video.
3 Choose Display iSight from the Camera pop-up menu.
4 Choose Display Audio from the Microphone pop-up menu.
Built-in
iSight camera
Speaker system
English 9

Setting Up Sound Input and Output
You can listen to music, movies, games, and multimedia files through the speaker
system on your display. You can use the microphone to record sounds, or talk with
friends using iChat. Use Sound preferences to manage sound input and output.
To set up sound input:
1 Choose Apple (V) > System Preferences, and then click Sound.
2 Click the Input tab in Sound preferences.
3 Choose Display Audio to input sound through your display's microphone.
To set up sound output:
1 Choose Apple (V) > System Preferences, and then click Sound.
2 Click the Output tab in Sound preferences.
3 Choose Display Audio to hear sound through your display's speaker system.
If your Mac computer supports sound output through the Mini DisplayPort in addition
to the USB port, you can choose either Mini DisplayPort or USB Audio for audio output.
These sound settings are used whenever your computer is connected to your display.
They remain in effect until you change them.
10 English

Setting Up Your Apple LED Cinema Display as an Additional Display
When you leave the lid on your MacBook open, you can mirror the same desktop
image on both displays or use the additional display as an extension of your desktop.
Use Displays preferences to set up video mirroring or extended desktop.
To set up video mirroring or extended desktop:
1 Choose Apple (V) > System Preferences, and then click Displays.
2 Click the Arrangement tab and follow the onscreen instructions.
Adjusting the Resolution, Brightness, and Color
Your Apple LED Cinema Display can automatically adjust the screen brightness for
current light conditions using the built-in ambient light sensor. You can turn auto
brightness on or off in Displays preferences.
To change the resolution or brightness:
1 Choose Apple (V) > System Preferences, and then click Displays.
2 Choose a resolution or drag the Brightness slider.
You can also use the brightness keys on an external Apple Keyboard to increase ^-) or
decrease (^:) the brightness of your display.
To change the display color profile or calibrate your display:
1 Click the Color tab in Displays preferences.
2 Choose a display color profile, or click Calibrate to open the Display Calibrator Assistant.
For more information about calibrating your display, choose Help > Mac Help in the
menu bar and search for "calibrate.”
English 11
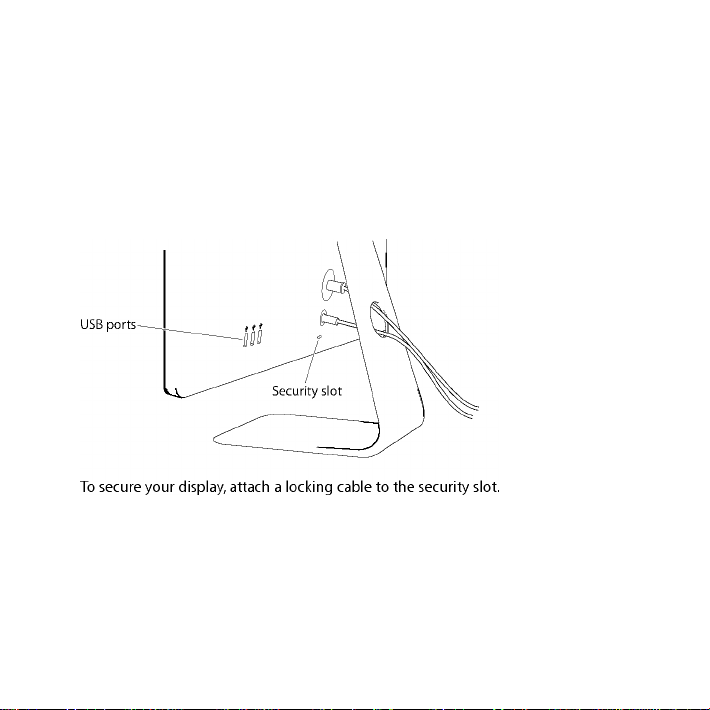
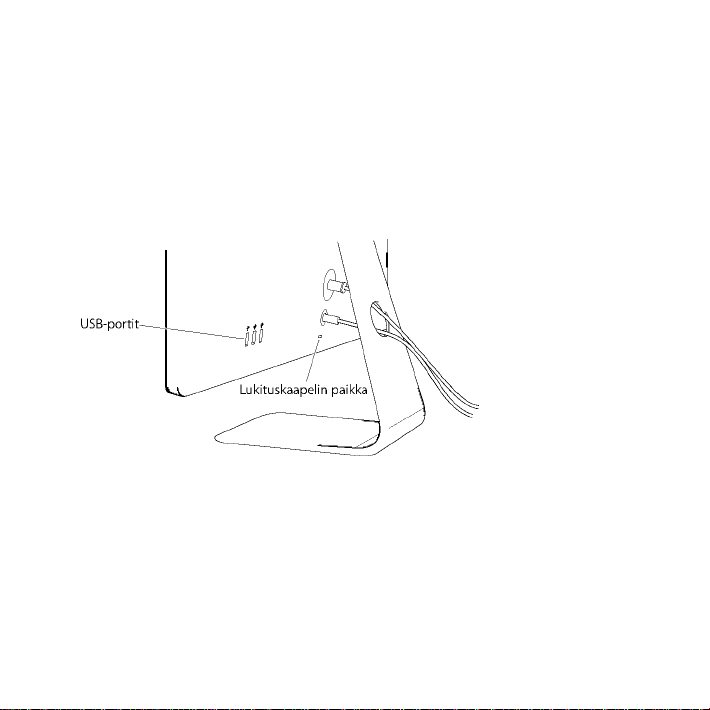
Using the USB Ports and Security Slot
Your Apple LED Cinema Display has three powered USB ports on the back. Use these
ports to connect a mouse, keyboard, iPhone, iPod, or other USB peripheral.
Important: You can use these USB ports to charge your iPhone or iPod, even when
your display isn't connected to a computer. If you use one of these ports to sync
information between your computer and an iPhone or iPod, make sure the display's
USB cable is connected to your computer.
12 English

Using a VESA Mounting Solution with Your Display
You can attach your display to an alternative mounting solution, using the VESA Mount
Adapter Kit available from the Apple Online Store at www.apple.com/store. Use the
kit to attach your display to any available VESA-compatible mounting solution. Simply
follow the instructions included with the kit.
Care and Safety
Before you lift or reposition your display, you may need to disconnect the cables and
power cord. Use correct lifting techniques when positioning the display. When lifting or
carrying the display, hold it by the edges. Don't lift the display by the stand or the cord.
To clean the screen on your display:
1 Disconnect the power cord.
2 Use the cloth that came with your display, or another soft, dry cloth, to wipe dust from
the screen.
WARNING: Don't clean the screen with a cleaner containing alcohol or acetone. Use a
cleaner intended for use with a screen or display. Never spray cleaner directly on the
screen. It may drip inside the display and cause damage.
English 13

Don't operate your display in areas with significant amounts of airborne dust, or smoke
from cigarettes, cigars, ashtrays, stoves, or fireplaces, or near an ultrasonic humidifier
using unfiltered tap water. Tiny airborne particles produced by smoking, cooking,
burning, or using an ultrasonic humidifier with unfiltered water may, in rare instances,
enter the ventilation openings of your display and, under certain conditions, result in a
slight haze on the inside surface of the glass panel that covers the display.
Follow these safety guidelines for using your display:
• The only way to completely disconnect power is to unplug the power cord. Be sure to
pull the plug, not the cord.
• Disconnect power immediately if the power cord is frayed or damaged, if you spill
something on the display, or if the display falls or is damaged in some other way.
WARNING: Use only the power cord that came with your display. The power cord has
a three-wire grounding plug (a plug that has a third grounding pin) that fits only a
grounded AC outlet. If you are unable to insert the plug into an outlet because the
outlet is not grounded, contact a licensed electrician to replace the outlet with a
properly grounded outlet.
WARNING: Your display is a high-voltage component and should not be opened for
any reason, even when it's unplugged. If your display needs service, see "Learning
More, Service, and Support” on page 17
14 English
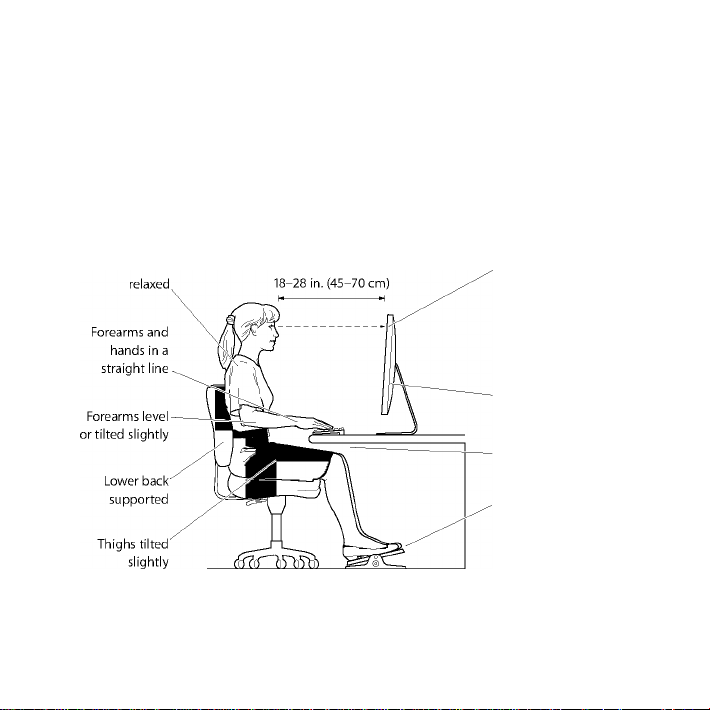
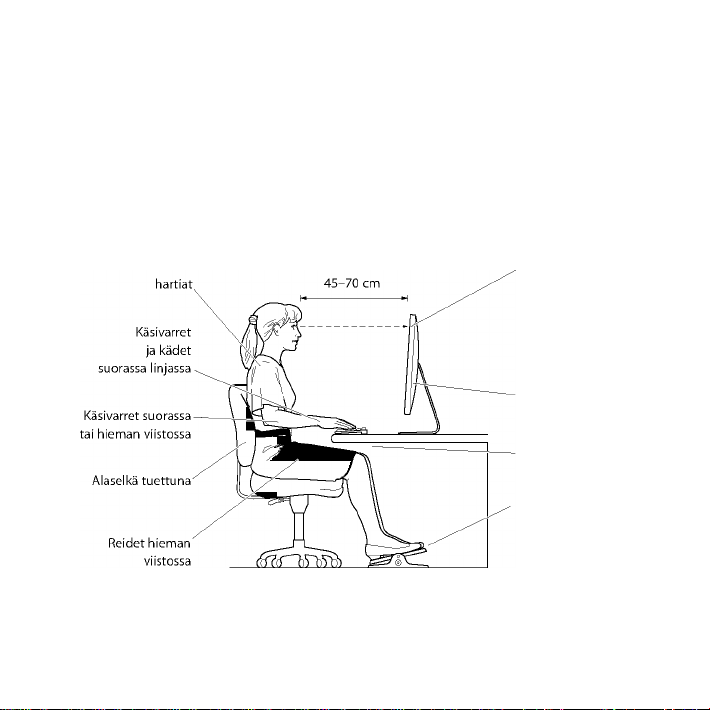
Ergonomics
Here are some guidelines for adjusting your display to reduce glare and to
accommodate your physical size and shape.
• Arrange the display so that the top of the screen is slightly below your eye level
when you're sitting at the keyboard. The best distance from your eyes to the screen is
up to you, although most people tend to prefer 18 to 28 inches (45 to 70 cm).
• Position the display by tilting it up or down to minimize glare and reflections from
overhead lights and nearby windows.
Top of the screen at or
slightly below eye level
(You may need to adjust
the height of your display
by raising or lowering
your work surface)
Screen positioned to
avoid reflected glare
Clearance under
work surface
Feet flat on the floor
or on a footrest
For more information about health, safety, and maintenance, go to the Apple
ergonomic website at
www.apple.com/about/ergonomics.
English 15

Troubleshooting Your Display
Before performing any of these steps, make sure your computer is turned on, the
display is plugged into an outlet, all the cables are connected properly to your
computer and display, and your computer is not in sleep mode.
If the screen doesn't have an image:
• Check the cables and connectors again to make sure they are connected properly to
your computer and the display.
• Make sure your computer is turned on and is not in sleep mode. If the lid on your
MacBook is closed, use the external keyboard or mouse to wake the MacBook from
sleep.
• Unplug the display's power cord from the grounded power outlet, wait a few
minutes, then plug it in again.
• Reset the PRAM by restarting your computer while holding down the Command (x),
Option, P, and R keys until you hear the startup sound a second time.
If the screen is dim:
• Make sure the display brightness is set properly. Choose Apple (V) > System
Preferences and click Displays. Drag the Brightness slider to adjust the brightness.
• If the colors on the display are too saturated or not correct, you may need to calibrate
your display. Open Displays preferences, click the Color tab, click Calibrate, and follow
the instructions.
If your MacBook isn't charging:
Make sure the MagSafe connector from your display is seated properly in the MagSafe
power port on your MacBook.
16 English

If the built-in iSight camera, microphone, speaker system, or USB ports on the
display aren't working:
Make sure the USB cable from the display is firmly plugged into the USB port on your
computer. The display's camera, microphone, speaker system, and USB ports work only
when this cable is connected to your computer.
More Troubleshooting Information
You can find more troubleshooting information on the Displays support website at:
www.apple.com/support/displays
Learning More, Service, and Support
You can find more information about your display on the Apple website and in
Mac Help.
1 To learn about See 1
Using your display Mac Help and search for "displays."
Display service, support,
discussions, troubleshooting,
and software downloads
The latest information about
displays
Registering your display The Apple Product Registration site at www.apple.com/register.
The Displays Support site at www.apple.com/support/displays.
The Apple Display site at www.apple.com/displays.
English 17

Specifications
• Model number: A1316
• Resolution: 2560 x 1440 @ 60 Hz
• Ports: Three high-speed USB 2.0 ports on the back
• Camera and microphone: Built-in iSight camera with microphone
• Speakers: Built-in 2.1 speakers with 49 W output
Dimensions:
• Weight: 23.5 lb. (10.7 kg)
• Height: 19.2 inches (488.1 mm)
• Width: 25.65 inches (651.7 mm)
• Depth (with stand): 8.2 inches (208.13 mm)
• Viewable: 27 inches (685.8 mm) diagonal
Operating environment:
• Operating temperature: 50° to 95° F (10° to 35° C)
• Relative humidity: 20% to 80% (noncondensing)
• Altitude: 0 to 10,000 feet (0 to 3048 meters)
18 English

Kayttoonotto
Apple LED Cinema Display on suunniteltu toimimaan
saumattomasti mini-DisplayPort-liitannalla varustettujen
Mac-tietokoneiden kanssa. Siina on LED-taustavalaistu
laajakuvanaytto, MagSafe-liitanta MacBook-tietokoneen
lataamiseen, sisainen iSight-kamera, mikrofoni ja
kaiutinjarjestelma.
Seuraavien sivujen ohjeet auttavat sinua ottamaan kayttoon ja kayttamaan uutta
nayttoasi. Opit kuinka:
• Liittaa naytto tietokoneeseen
• Kayttaa nayton kameraa, mikrofonia, kaiutinjarjestelmaa ja USB-portteja
• Saataa nayton asetuksia
Huomaa: Voit liittaa Apple LED Cinema Display -nayton Mac-poytakoneeseen, jossa on
mini-DisplayPort-liitanta.
Tàrkeàà: Lue kaikki asennusohjeet (ja turvallisuustiedot, alkaen sivu 26) huolellisesti
ennen nayton kayttoonottoa ja kayttoa.
Tietoja nayton kanssa yhteensopivista tietokoneista ja naytonohjaimista loytyy
osoitteesta www.apple.com/fi/displays.
Suomi 19
Nayton kayttoonotto
Ota Apple LED Cinema Display kayttoon seuraamalla naita ohjeita:
1 Poista suojakalvot naytosta ja kaapeleista.
2 Liita virtajohto nayttoon ja virtapistoke maadoitettuun pistorasiaan.
3 Jos haluat ladata MacBookin akkua ja antaa sille virtaa, liita MagSafe-liitin MacBookin
MagSafe-porttiin.
Apple LED Cinema Display
Maadoitettu pistorasia
la Mini-DisplayPort
MagSaf^ / iUSB -
4 Jos haluat kayttaa nayton sisaista iSight-kameraa, mikrofonia, kaiutinjarjestelmaa ja
USB-portteja, liita USB-kaapeli tietokoneeseen.
5 Liita mini-DisplayPort-kaapeli tietokoneeseen.
6 Kaynnista tietokone painamalla kaynnistyspainiketta (®). Naytto kytkeytyy
automaattisesti paalle, kun tietokone kaynnistetaan.
20 Suomi

MacBookin káyttóónotto kansi suljettuna
Voit sulkea MacBookin kannen ja kayttaa vain Apple LED Cinema Display -nayttoa.
Seuraa edellisen sivun kayttoonotto-ohjeita ja varmista, etta nayton MagSafe-liitin on
liitetty MacBookin MagSafe-porttiin.
Apple LED Cinema Display -náytón káyttáminen MacBookin náyttó suljettuna:
1 Liita ulkoinen USB-nappaimisto ja -hiiri nayton USB-porttiin tai ota kayttoon langaton
nappaimisto ja hiiri Bluetoothin® kayttóónottoapurilla.
2 Varmista, etta MacBook on paalla.
3 Laita MacBook nukkumaan sulkemalla sen kansi.
4 Odota muutama sekunti ja herata MacBook painamalla ulkoisen nappaimiston
nappainta tai osoittamalla hiirta.
Suomi 21
Nayton kayttaminen
Apple LED Cinema Display -naytossa on sisainen iSight-kamera, mikrofoni ja kaiutin-
jarjestelma. Nama ominaisuudet edellyttavat USB-yhteytta nayton ja tietokoneen valilla.
Mikrofon
i
Sisainen iSight-kamera
Kaiutinjarjestelma
Sisaisen iSight-kameran ja mikrofonin kayttaminen
Voit tallentaa still-kuvia, videota ja aanta sisaisella iSight-kameralla ja mikrofonilla
ohjelmissa kuten iChat, iMovie ja Photo Booth.
Kameran ja mikrofonin kayttoonotto iChatissa:
1 Avaa iChat-ohjelma osoittamalla Dockissa olevaa iChat-symbolia.
2 Valitse iChat > Asetukset ja osoita Aani/video.
3 Valitse Kamera-ponnahdusvalikosta Nayton iSight.
4 Valitse Mikrofoni-ponnahdusvalikosta Nayton aani.
22 Suomi

Aanen sisaanmenon ja ulostulon kayttoonotto
Voit kuunnella musiikkia, elokuvia, peleja ja multimediatiedostoja naytossa olevan
kaiutinjarjestelman kautta. MikrofoniNa voit tallentaa aanta ja keskustella ystavien
kanssa iChatilla. Voit hallita aanen sisaanmenoa ja ulostuloa Âanet-asetuksissa.
Âanen sisaanmenon kayttoonotto:
1 Valitse Omenavalikko (V) > Jarjestelmaasetukset ja osoita Âanet.
2 Osoita Âanet-asetuksissa Âani sisaan -valilehtea.
3 Valitse Nayton aani, jolloin nayton mikrofonin aanet tulevat tietokoneeseen.
Âanen ulostulon kayttoonotto:
1 Valitse Omenavalikko (V) > Jarjestelmaasetukset ja osoita Âanet.
2 Osoita Âanet-asetuksissa Âani ulos -valilehtea.
3 Valitse Nayton aani, jolloin aanet kuuluvat nayton kaiutinjarjestelman kautta.
Jos Mac-tietokoneesi tukee aanen ulostuloa USB-portin lisaksi mini-DisplayPortin
kautta, voit valita aanen ulostuloon joko mini-DisplayPortin tai USB:n.
Naita aaniasetuksia kaytetaan aina, kun naytto liitetaan tietokoneeseen. Ne pysyvat
voimassa, kunnes muutat niita.
Suomi 23

Apple LED Cinema Display -nayton kayttoonotto lisanayttona
Kun jatat MacBookin kannen auki, voit peilata saman kuvan molemmille naytoille tai
laajentaa tyopoytaa lisanaytoNa. Voit ottaa peilaamisen tai laajennetun tyopoydan
kayttoon Naytot-asetuksissa.
Peilaamisen tai laajennetun tyopoydan kayttoonotto:
1 Valitse Omenavalikko (V) > Jarjestelmaasetukset ja osoita Naytot.
2 Osoita Jarjestys-valilehtea ja seuraa naytolla nakyvia ohjeita.
Tarkkuuden, kirkkauden ja varin saataminen
Apple LED Cinema Display voi automaattisesti saataa nayton kirkkautta valaistukseen
sopivaksi sisaisella ympariston valoisuuden tunnistimella. Voit laittaa automaattisen
kirkkauden saadon paalle tai pois paalta Naytot-asetuksissa.
Tarkkuuden tai kirkkauden muuttaminen:
1 Valitse Omenavalikko (V) > Jarjestelmaasetukset ja osoita Naytot.
2 Valitse tarkkuus tai veda Kirkkaus-liukusaadinta.
Voit myos lisata ^-) tai vahentaa ^l-) nayton kirkkautta ulkoisen Applen nappaimiston
kirkkaudensaatonappaimilla.
Nayton variprofiilin vaihtaminen tai nayton kalibroiminen:
1 Osoita Naytot-asetuksissa Vari-valilehtea.
2 Valitse nayton variprofiili tai avaa Nayton kalibrointiapuri osoittamalla Kalibroi.
Saat lisatietoja nayton kalibroimisesta valitsemalla valikkorivilta Ohjeet > Mac-ohjeet ja
etsimalla sanalla ”kalibroi”
24 Suomi
USB-porttien ja lukituskaapelin paikan kayttaminen
Apple LED Cinema Displayn takana on kolme USB-porttia. Voit liittaa naihin portteihin
hiiren, nappaimiston, iPhonen, iPodin tai muun USB-lisalaitteen.
Tàrkeàà: Voit kayttaa USB-portteja iPhonen tai iPodin akun lataamiseen silloinkin, kun
naytto ei ole yhdistettyna tietokoneeseen. Jos kaytat porttia synkronoidaksesi tietoja
tietokoneen ja iPhonen tai iPodin valilla, varmista, etta nayton USB-kaapeli on liitetty
tietokoneeseen.
Jos haluat suojata nayttoa varkauksilta, liita lukituskaapeli lukituskaapelin paikkaan.
Suomi 25

VESA-kiinnitysratkaisun käyttäminen näytön kanssa
Voit kiinnittää näytön vaihtoehtoiseen kiinnitysratkaisuun VESA-kiinnityssovitinpaketin
avulla, joka on ostettavissa Apple Online Storesta osoitteesta store.apple.com/fi. Paketin
avulla voit liittää näytön mihin tahansa VESA-yhteensopivaan kiinnitysratkaisuun.
Noudata vain paketin mukana tulevia ohjeita.
Huolto ja turvallisuus
Ennen näytön nostamista tai siirtämistä voi olla tarpeen irrottaa kaapelit ja virtajohto.
Käytä oikeaa nostotekniikkaa, kun siirrät näyttöä. Kun nostat tai kannat näyttöä, tartu
kiinni sen reunoista. Älä nosta näyttöä sen jalasta tai johdosta.
Näyttöruudun pinnan puhdistaminen:
1 Irrota virtajohto.
2 Pyyhi pölyt näytön pinnasta näytön mukana tulleella liinalla tai muulla pehmeällä,
kuivalla liinalla.
VAROITUS: Älä käytä näytön puhdistukseen alkoholia tai asetonia sisältävää
puhdistusainetta. Käytä näytölle tarkoitettua puhdistusainetta. Älä koskaan ruiskuta
ainetta suoraan näytölle. Se saattaa valua näytön sisään ja vahingoittaa näyttöä.
26 Suomi

Ala kayta nayttoa paikoissa, joissa on paljon lentavaa polya tai tuhkaa tupakoista,
sikareista, tuhkakupeista, uuneista tai takoista, tai laheNa ultraaaneNa toimivaa
ilmankostutinta, joka kayttaa suodattamatonta vesijohtovetta. Pienet lentavat
hiukkaset, jotka muodostuvat tupakoinnista, ruoanlaitosta, tupakoinnista tai ultraaaniilmankostuttajan kaytosta suodattamattomalla vedella saattavat harvinaisissa
tapauksissa menna sisaan nayton tuuletusaukoista ja joissakin olosuhteissa aiheuttaa
pienen samentuman nayttoa ymparoivan lasipaneelin sisapinnalla.
Seuraa naita turvaohjeita nayttoa kayttaessasi:
• Ainoa tapa katkaista virta kokonaan on irrottaa virtajohto. Veda liittimesta, ala
johdosta.
• Irrota virtajohto valittomasti, jos se rispaantuu tai vahingoittuu, jos kaadat nestetta
nayton paalle tai jos naytto kaatuu tai vahingoittuu jollain muulla tavalla.
VAROITUS: Kayta vain nayton mukana tullutta virtajohtoa. Virtajohto on maadoitettu
ja sopii vain maadoitettuun vaihtovirtapistorasiaan. Jos kaytossasi ei ole maadoitettua
pistorasiaa, pyyda valtuutettua sahkoasentajaa asentamaan maadoitettu pistorasia.
VAROITUS: Naytto on korkeajannitteinen komponentti, eika sita saa avata mistaan
syysta edes sen ollessa irrotettuna. Jos naytto on huollon tarpeessa, katso
”Lisatiedot,
huolto ja tuki” sivulla 30.
Suomi 27
Ergonomia
Seuraavassa esitettyjen ohjeiden avulla voidaan vahentaa nayton heijastuksia ja saataa
naytto kàyttajaNe sopivaksi.
• Aseta nàytto niin, ettà nàyton ylàreuna on nàppàimiston edessà istuttaessa hiukan
silmiesi tason alapuolella. Nàyton paras katseluetàisyys on yksilòllinen, mutta
useimpien kàyttàjien mielestà paras etàisyys on 45 - 70 cm.
• Kallista nàyttòà ylòs tai alas niin, ettà kattolamppujen ja ikkunoiden aiheuttamat
heijastukset ovat mahdollisimman vàhàisià.
Nàyton ylàreuna
silmien tasolla tai
hieman sen alle
(Nàyton korkeutta
on ehkà sààdettàvà
nostamalla tai
laskemalla tyotasoa)
Nàytto sijoitettu niin,
ettà sen pinnalla ei
này heijastuksia
Tilaa tyopoydàn alla
' Jalat tasaisesti lattialla
tai jalkatuen pààllà
Lisàtietoa terveydestà, turvallisuudesta ja huollosta on Applen ergonomiasivuilla
osoitteessa
www.apple.com/fi/about/ergonomics.
28 Suomi

Nayton vianmaaritys
Varmista ennen naiden toimien suorittamista, etta tietokone on paalla, naytto on
liitetty pistorasiaan, kaikki kaapelit ovat kunnolla kiinni tietokoneessa ja naytossa ja
etta tietokone ei ole nukkumassa.
Jos naytolla ei nay kuvaa:
• Tarkista uudelleen, etta kaapelit on liitetty kunnolla tietokoneeseen ja nayttoon.
• Varmista, etta tietokone on paalla ja etta se ei ole nukkumassa. Jos MacBookin kansi
on suljettuna, herata MacBook ulkoisella nappaimistolla tai hiirella.
• Irrota nayton virtajohto maadoitetusta pistorasiasta, odota muutama minuutti ja liita
se takaisin.
• Nollaa PRAM kaynnistamalla tietokone uudelleen pitaen Komento- (x), Optio-, P- ja
R-nappaimia painettuina, kunnes kuulet kaynnistysaanen toisen kerran.
Jos naytto on himmea:
• Varmista, etta nayton kirkkaus on asetettu asianmukaisesti. Valitse Omenavalikko
(•) > Jarjestelmaasetukset ja osoita Naytot. Saada kirkkautta vetamalla Kirkkausliukusaadinta.
• Jos nayton varit ovat liian kyllaisia tai muuten vaarin, naytto on ehka kalibroitava.
Avaa Naytot-asetukset, osoita Vari-valilehtea, osoita Kalibroi ja seuraa ohjeita.
Jos MacBook ei lataudu:
Varmista, etta nayton MagSafe-liitin on kunnolla MacBookin MagSafe-portissa.
Suomi 29

Jos nayton sisainen iSight-kamera, mikrofoni, kaiutinjarjestelma tai USB-portit eivat
toimi:
Varmista, etta nayton USB-kaapeli on liitetty kunnolla tietokoneen USB-porttiin. Nayton
kamera, mikrofoni, kaiutinjarjestelma ja USB-portit toimivat vain, kun tama kaapeli on
liitetty tietokoneeseen.
Lisaa vianmaaritystietoja
Lisaa vianmaaritystietoja loytyy nayttojen tukisivustolta osoitteesta: www.apple.com/fi/
support/displays
Lisatiedot, huolto ja tuki
Lisatietoja naytosta loytyy Applen verkkosivustolta ja Mac-ohjeista.
Kun haluat lisatietoja
aiheesta
Nayton kayttaminen Mac-ohjeet ja etsi sanalla "naytot"
Nayttojen huolto, tuki,
keskustelut, vianmaaritys ja
ohjelmistolataukset
Tuoreimmat uutiset naytoista Applen nayttosivusto osoitteessa www.apple.com/fi/displays.
Nayton rekisteroiminen Applen tuoterekisterointi osoitteessa www.apple.com/fi/register.
30 Suomi
Katso
Nayttojen tukisivusto osoitteessa www.apple.com/fi/support/
displays.
 Loading...