

Page 1

Nike + iPod Sensor
Nike + iPod 感应器
Nike + iPod 感應器
Nike + iPod
센서
Page 2

K Apple Inc.
© 2011 Apple Inc. All rights reserved.
Apple, the Apple logo, iPhone, iPod, i Po d nano, iPod touch, and iTunes
are trademarks of Apple Inc., registered in the U.S. and other countries.
Shue is a trademark of Apple Inc. iTunes Store is a service mark of
Apple Inc., registered in the U.S. and other countries.
NIKE and the Swoosh Design are trademarks of NIKE, Inc. and its aliates,
and are used under license. The Nike + iPod Sport Kit is covered by
one or more of U.S. patent numbers 6,018,705, 6,052,654, 6,493,652,
6,298,314, 6,611,789, 6,876,947, and 6,882,955, either alone or when used in
combination with a Nike + iPod enabled iPod media player or iPhone.
Polar Wearlink is a trademark of Polar, Inc.
Mention of third-party products is for informational purposes only and
constitutes neither an endorsement nor a recommendation. Apple
assumes no responsibility with regard to the performance or use of these
products. All understandings, agreements, or warranties, if any, take place
directly between the vendors and the prospective users. Every eort has
been made to ensure that the information in this manual is accurate.
Apple is not responsible for printing or clerical errors.
Page 3

Contents
5 Welcome to Nike + iPod
5 Your Personal Workout Assistant
6 Quick Start
14 Using Nike + iPod
14 Calibrating Nike + iPod
17 Setting the Unit of Distance
17 Entering Your Weight
17 Locking Your Device During a Workout
18 Getting Spoken Feedback
19 Using a PowerSong
20 Pausing a Workout
20 Receiving Calls During a Workout
21 Changing Music During a Workout
22 Sending Workouts to Nikeplus.com
Automatically
22 Reviewing Workouts on Your Device
24 Creating Custom Workout Shortcuts
25 Purchasing Nike+ Workouts
26 Linking a Nike + iPod Compatible Remote or
Heart Rate Monitor
28 Working Out with iPod nano (6th Generation)
and a Heart Rate Monitor
30 Linking to Another Sensor
31 Putting the Nike + iPod Sensor to Sleep
32 Important Safety Information
33 Learning More, Service, and Support
3
Page 4
Welcome to Nike + iPod
Your Personal Workout Assistant
Nike + iPod is a workout partner and coach all in one.
Select the type of workout you want—open-ended,
distance, time, or calorie-burning—choose music
to keep you motivated, and then keep track of your
progress every step of the way with spoken and onscreen
feedback. Upload your workout data to nikeplus.com,
where you can set goals and monitor your improvement
from workout to workout. Join the world’s largest online
running community, participating in challenges with
runners from across the globe.
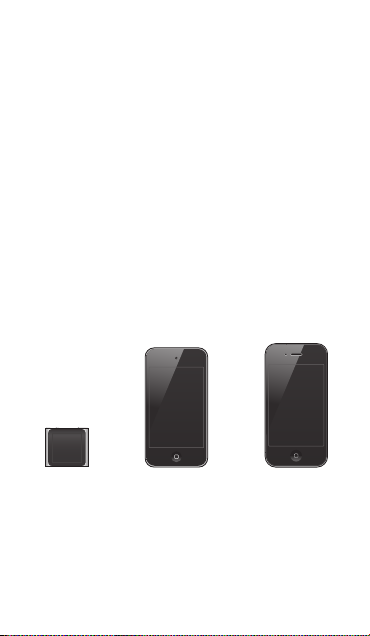
Nike + iPod is supported by iPhone (3GS or later), all
iPod nano models
or later).
1
, and iPod touch (2nd generation
iPod nano
(all models)
1
For iPod nano (6th generation), the Nike + iPod Sensor
is optional and only required for workouts using the
Polar Wearlink® + Heart Rate Transmitter for Nike+.
4
iPod touch
(2nd generation or later)
iPhone 3GS
or later
Page 5

Quick Start
Follow these instructions to get started using
Nike + iPod right away.
Step 1: Enable Nike + iPod on your device.
m iPod nano (5th generation or earlier): Attach the
Nike + iPod receiver to iPod nano. Nike + iPod appears
in the main menu.
m iPod nano (6th generation): Attach the Nike + iPod
receiver to iPod nano. Tap Fitness.
Note: iPod nano (6th generation) can optionally track
your workouts without using the Nike + iPod receiver
and sensor. For more information, see the iPod nano
User Guide that came with the device.
m iPhone and iPod touch: Choose Settings > Nike + iPod
and set it to On. A Nike + iPod icon appears on the
Home screen.
Note: iPhone 3GS or later and iPod touch have an
internal receiver; no external receiver is required.
Step 2: Make sure you have the latest iPod and
iTunes software.
1 Download and install the latest iTunes software to your
computer from www.apple.com/itunes.
5
Page 6
2 Connect the device to your computer, then select it in
the iTunes sidebar and click Summary.
3 If iTunes indicates that your iPod needs an update,
click Update and follow the onscreen instructions.
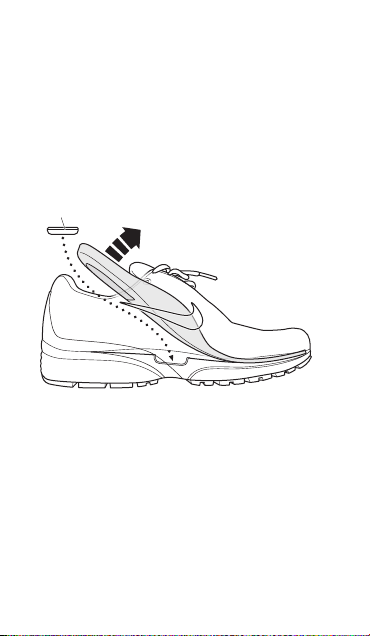
Step 3: Insert the Nike + iPod Sensor in your Nike+
ready shoe.
m Lift the insole of the left shoe, remove the foam insert
from the pocket underneath, and replace it with the
sensor, at side up.
Sensor
You can leave the sensor in your shoe when you aren’t
working out, but if you plan to wear your shoes for a
long time without working out, replace the sensor with
the foam insert to save battery life.
The battery in the sensor is not replaceable or
rechargeable, and has a life of over 1000 hours of
active use. Battery life varies, depending on use and
other factors.
6
Page 7

Step 4: Choose a type of workout.
An open-ended workout
 iPod nano (5th generation or earlier):
Choose Nike + iPod > Nike + iPod > Basic.
 iPod nano (6th generation): Choose Fitness > Run > Basic.
 iPhone and iPod touch: Choose Nike + iPod > Basic.
A workout with a time goal
 iPod nano (5th generation or earlier):
Choose Nike + iPod > Nike + iPod > Time.
 iPod nano (6th generation): Choose Fitness > Run > Time.
 iPhone and iPod touch: Choose Nike + iPod > Time.
A workout with a distance goal
 iPod nano (5th generation or earlier):
Choose Nike + iPod > Nike + iPod > Distance.
 iPod nano (6th generation): Choose Fitness > Run >
Distance.
 iPhone and iPod touch: Choose Nike + iPod > Distance.
A workout with a calorie-burning goal
 iPod nano (5th generation or earlier):
Choose Nike + iPod > Settings > Weight and enter
your weight. Then press the Menu button and choose
Nike + iPod > Nike + iPod > Calorie.
 iPod nano (6th generation):
Choose Settings > Fitness > Weight and enter your
weight. Choose Fitness > Run > Calorie.
 iPhone and iPod touch: Choose Settings > Nike + iPod
> Weight and enter your weight. Then press the Home
button and choose Nike + iPod > Calorie.
Note: You need to enter your weight only the rst time
you start a calorie-burning workout.
7
Page 8
Step 5: Choose music for your workout.
To play Do this
A Nike+ Workout mix Choose the mix
The currently playing song Choose Now Playing.
A Genius mix Choose Genius Mixes
Songs from a playlist Choose Playlists, then
A podcast Choose Podcast
An audiobook Choose Audiobook
Songs in random order Choose Shue Songs.
A radio station Choose Radio
No music Choose None.
(see page 24).
(iPod nano 6th generation).
choose a playlist.
(iPod nano 6th generation).
(iPod nano 6th generation).
(iPod nano 6th generation).
Step 6: Start your workout.
You next walk or run a few steps to activate your sensor.
When your device detects and links to the sensor, you’re
ready to start the workout.
m iPod nano (5th generation or earlier): Press the Center
button and begin walking or running.
m iPod nano (6th generation): Tap Start Workout and begin
walking or running.
m iPhone and iPod touch: Tap Play and begin walking or
running.
8
Page 9
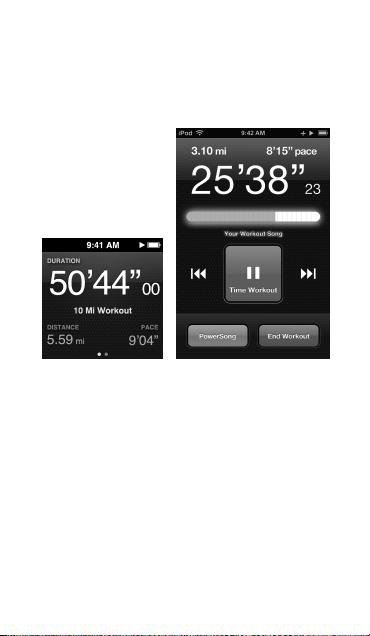
Step 7: Monitor your progress.
Nike + iPod automatically displays your workout status
on the screen, similar to the following illustration.
(Depending on your device type, the screen may appear
slightly dierent.)
iPod nano
(6th generation)
iPhone 3GS or later
and iPod touch
Nike + iPod automatically gives you spoken feedback
on your progress during your workout (see “Getting
Spoken Feedback” on page 17). You can also get feedback
whenever you want it.
9
Page 10

To get spoken feedback manually:
m iPod nano (5th generation or earlier): Press the Center
button at any time during your workout.
m iPod nano (6th generation): Press the Sleep/Wake button
at any time during your workout.
m iPhone and iPod touch: Press the Home button at any
time during your workout.
Note: iPhone and iPod touch must be locked to get
spoken feedback manually (see “Getting Spoken
Feedback” on page 17).
Step 8: End your workout.
You can end your workout at any time. If you continue
working out after you reach your time, distance, or
calorie goal, your progress continues to be monitored.
To end your workout:
m iPod nano (5th generation or earlier): Press the Play/Pause
’) to pause your workout. Then press the Menu
button (
button and choose End Workout.
m iPod nano (6th generation): Tap the screen to display
the Pause button, then tap Pause. Tap End Workout.
If the screen is o, press the Sleep/Wake button.
Note: To quickly pause or resume your workout on
an iPod nano (6th generation), double-click the
Sleep/Wake button.
m iPhone and iPod touch: Tap End Workout. If iPhone or
iPod is locked, press the Home button and tap Pause.
Then drag the slider and tap End Workout.
10
Page 11

Step 9: Track your progress at nikeplus.com.
At nikeplus.com you can track your progress over time,
view a record of all of your past workouts, set and
monitor goals, and compare your results with others.
You can even compete with other Nike + iPod users in
online workout challenges.
If you have an iPhone or iPod touch, you can send your
workout data wirelessly to the Nike website. If you have
an iPod nano, you can send your workout data from
your computer to nikeplus.com.
It’s recommended that you rst create a nikeplus.com
account before you upload your workout data. Follow
the instructions on the nikeplus.com website to sign up
for a free account.
To send your workout data wirelessly to nikeplus.com
from your iPhone or iPod touch:
1 Make sure your device is connected to the Internet,
then choose Nike + iPod.
When you have a workout that hasn’t been synced with
your nikeplus.com account, a small red dot appears on
the History button.
2 Tap the History button to view your workouts.
3 Tap the “Send to Nike+” button to send your workout
data to nikeplus.com. You can do it later if you don’t
want to do it now.
4 Enter your email address and nikeplus.com account
password and then tap “Login to Nike+.”
After you log in, your workouts are sent to your
nikeplus.com account.
11
Page 12

If you don’t have a nikeplus.com account, tap “Join Nike+”
and follow the instructions for creating an account.
The nikeplus.com website opens with a graph
exhibiting your most recent workout.
5 Follow the onscreen instructions for accessing your
workouts.
To send your iPod nano workout data from your
computer to nikeplus.com:
1 Make sure your computer is connected to the Internet,
and then connect iPod nano to your computer.
2 Click Send in the dialog that asks if you want to send
your workout data to nikeplus.com. You can do it later
if you don’t want to do it now.
3 Click Visit in the dialog that asks if you want to go to
nikeplus.com.
The nikeplus.com website opens with a graph showing
your most recent workout.
4 Click Save Your Runs, then click Sign Me Up and follow
the onscreen instructions.
12
Page 13

Using Nike + iPod
Follow these instructions to get the most out of
Nike + iPod.
Calibrating Nike + iPod
The default calibration for Nike + iPod is accurate for
many users. You can improve the accuracy by calibrating
Nike + iPod to your natural running and walking
style. On iPod nano, you can perform a calibration
workout over a known distance, or use your last
completed workout and enter the distance travelled.
On iPhone or iPod touch, you can calibrate using your
latest completed workout for which you know the
distance traveled.
To calibrate Nike + iPod for running and walking using
iPod nano (5th generation or earlier):
1 Choose Nike + iPod > Settings > Sensor > Calibrate.
2 Choose Run or Walk and enter a distance.
For best results, use a distance of at least one mile.
The shortest calibration distance you can enter is one
quarter of a mile.
3 Press the Center button.
4 Run or walk the set distance at a steady, natural pace.
5 Press the Menu button and choose Done Calibrating.
A message lets you know if the calibration was
successful. If you want to calibrate for both running and
walking, repeat steps 1–5.
Note: Even after calibrating, the accuracy of the distance
measurements may vary depending on gait, running
surface, incline, and temperature.
13
Page 14

You can also calibrate iPod nano using the workout you
just nished. This is useful if you’ve traveled a known
distance that doesn’t match the summary distance
displayed on your device.
To calibrate iPod nano (5th generation or earlier) using
your latest completed workout:
m Choose End Workout, press and hold the Center button,
then choose Calibrate. Set the correct distance you
walked or ran, then press the Center button.
The device senses whether the workout was a walk or
run, and correctly uses the new calibration instead of
the existing one.
To calibrate Nike + iPod for running and walking using
iPod nano (6th generation):
1 Choose Settings > Fitness > Nike + iPod Spor t Kit >
Sensor > Calibrate.
2 Choose Walk Calibration or Run Calibration, then select
a distance and tap Done.
For best results, use a distance of at least one mile.
The shortest calibration distance you can enter is one
quarter of a mile.
3 Choose music to accompany your calibration workout.
4 Run or walk the set distance at a steady, natural pace.
5 If the screen is o, press the Sleep/Wake button, tap the
screen to display the Pause button, then tap Stop.
A message lets you know if the calibration was
successful. If you want to calibrate for both running and
walking, repeat steps 1–5.
14
Page 15

Note: Even after calibrating, the accuracy of the distance
measurements may vary depending on gait, running
surface, incline, and temperature.
Using iPhone or iPod touch, you can calibrate
Nike + iPod using the workout you just nished. You
can only calibrate workouts that are a distance of a
quarter mile or more.
To calibrate iPhone or iPod touch using your latest
completed workout:
m Tap End Workout, then tap Calibrate. Set the correct
distance you ran or walked and tap Done.
The device updates with the new calibration to override
the previous one for a walking or running pace.
To reset Nike + iPod calibration to the default setting:
m iPod nano (5th generation or ealier): Choose
Nike + iPod > Settings > Sensor > Calibrate > Reset Walk
(or Reset Run).
m iPod nano (6th generation): Choose Settings > Fitness >
Nike + iPod Sport Kit > Sensor > Calibrate > Reset Walk
(or Reset Run) > Reset.
m iPhone and iPod touch: Choose Settings > Nike + iPod,
then tap Reset Calibration.
15
Page 16

Setting the Unit of Distance
You can set Nike + iPod to measure your workouts in
either miles or kilometers.
To set the unit of distance:
m iPod nano (5th generation or earlier): Choose
Nike + iPod > Settings, and set Distances to Miles
or Kilometers.
m iPod nano (6th generation): Choose Settings > Fitness >
Distances, then choose Miles or Kilometers.
m iPhone and iPod touch: Choose Settings > Nike + iPod >
Distances, then choose Miles or Kilometers.
Entering Your Weight
To enter your weight:
m iPod nano (5th generation or earlier): Choose
Nike + iPod > Settings > Weight, then enter your weight.
m iPod nano (6th generation): Choose Settings > Fitness >
Weight, then enter your weight.
m iPhone and iPod touch: Choose Settings > Nike + iPod >
Weight, then enter your weight.
For better accuracy in calculating calories burned,
update your weight if it changes.
Locking Your Device During a Workout
You can lock iPhone or iPod touch so that its controls
can’t be accidentally activated during a workout.
To lock iPhone or iPod touch:
m Press the Sleep/Wake button.
To unlock, press the Sleep/Wake button or the Home
button and drag the slider.
16
Page 17

Getting Spoken Feedback
As you work out, Nike + iPod periodically gives spoken
feedback on your status. You can choose a female or
male voice, or turn o feedback.
To set the voice type or turn spoken feedback o:
m iPod nano (5th generation or earlier): Choose
Nike + iPod > Settings, then set Spoken Feedback to
Male, Female, or O.
m iPod nano (6th generation): Choose Settings > Fitness >
Spoken Feedback, then choose Male, Female, or O.
m iPhone and iPod touch: Choose Settings > Nike + iPod >
Spoken Feedback, then choose Male, Female, or O.
When spoken feedback is turned o, you can still get
spoken feedback manually.
To get spoken feedback manually:
m iPod nano (5th generation or earlier): Press the Center
button at any time during your workout.
m iPod nano (6th generation): Press the Sleep/Wake button
at any time during your workout.
m iPhone and iPod touch: Press the Home button while the
device is locked.
On iPod nano, spoken feedback is available in some
languages besides English. If you set iPod nano to one
of these languages and connect it to your computer
(which must be connected to the Internet), iTunes
prompts you to download feedback in that language.
 iPod nano (5th generation or earlier) can have only
one non-English version of spoken feedback at a time.
 iPhone, iPod touch, and iPod nano (6th generation)
automatically support all spoken feedback languages.
17
Page 18

Using a PowerSong
Choose a song that motivates you and make it your
PowerSong. You can switch quickly to your PowerSong
at any time during your workout.
To choose a PowerSong:
m iPod nano: Choose Nike + iPod > Settings > PowerSong,
then choose a song.
iPod nano (5th generation) can also use a playlist as a
PowerSong.
m iPod nano (6th generation): Choose Settings > Fitness >
PowerSong, then choose a song.
m iPhone and iPod touch: Choose Settings > Nike + iPod >
PowerSong, then choose a song.
To play your PowerSong:
m iPod nano (5th generation or earlier): Hold down the
Center button during a workout. After a short pause,
your PowerSong plays.
m iPod nano (6th generation): Press the Sleep/Wake button
to wake the screen, then tap the screen to display the
Pause button, then tap PowerSong on the workout
screen. When the screen is on, you can also place and
hold two ngers on the screen to start the PowerSong.
m iPhone and iPod touch: Tap PowerSong on the workout
screen. If iPhone or iPod touch is locked, press the Home
button, drag the slider to unlock, then tap PowerSong.
18
Page 19

Pausing a Workout
You can pause your workout, temporarily stopping
music and data collection, and resume the workout later
without losing any data.
To pause or resume a workout:
m iPod nano (5th generation or earlier): Press the Play/Pause
’).
button (
m iPod nano (6th generation): Tap the screen to display the
Pause button. Tap Pause. Tap Resume to resume your
workout. If the iPod nano (6th generation) screen is o,
press the Sleep/Wake button to wake it.
m iPhone and iPod touch: Tap Pause. If the device is locked,
rst press the Home button once. Tap Play to resume
your workout.
Receiving Calls During a Workout
You can use iPhone to answer calls during your workout.
When you receive a call, your workout is automatically
paused when you answer.
To answer a call:
m Tap Answer, or press the mic button if you’re wearing
the stereo headset. If iPhone is locked, drag the slider
to unlock it.
To silence a call:
m Press the Sleep/Wake button or either volume button.
You can still answer the call after silencing it, until it
goes to voicemail.
19
Page 20

To decline a call:
m Tap Decline, or hold down the mic button on the
headset for about two seconds and then release it.
Two low beeps conrm that the call was declined.
You can also press the Sleep/Wake button twice quickly
to decline a call. This silences the ringer but the music
doesn’t resume until the call has gone to voicemail;
the workout continues in the background.
To resume your workout after a call:
m Tap Play.
Changing Music During a Workout
You can change your music during a workout without
losing your workout data. Your workout is paused while
the music changes.
To change music during a workout:
1 iPod nano (5th generation or earlier):
button and choose Change Music. Your workout pauses.
iPod nano (6th generation): Tap the screen to display
the Pause button.Tap Pause, then tap Change Music.
If the iPod nano (6th generation) screen is o, press the
Sleep/Wake button to wake it.
iPhone and iPod touch: Tap Pause, then tap Change
Music. If the device is locked, rst press the Home
button and drag the slider to unlock it.
2 iPod nano (5th generation or earlier):
Your workout resumes automatically.
iPhone, iPod touch, and iPod nano (6th generation):
Choose new music.
20
Press the Menu
Choose new music.
Page 21

Sending Workouts to Nikeplus.com Automatically
You can set iTunes to automatically send your workout
data to nikeplus.com over the Internet whenever you
connect your iPod nano to your computer.
To send workouts to nikeplus.com automatically:
1 Make sure your computer is connected to the Internet,
and then connect iPod nano to your computer.
2 Open iTunes on your computer or device, click the
Nike + iPod tab, then select “Automatically send workout
data to nikeplus.com.”
3 Click “Visit nikeplus.com” below the checkbox or, if you’ve
already set your workout to be sent automatically, click
Visit in the dialog that appears.
The nikeplus.com website opens with a graph showing
your most recent workout.
4 Click Save Your Runs and log in, or register if you haven’t
already done so.
See the nikeplus.com website for Nike’s privacy policy
and terms and conditions.
Reviewing Workouts on Your Device
iPod nano, iPhone, or iPod touch saves the date, time,
duration, distance, pace, and calories burned for up to
your last one thousand workouts.
To review recent workouts on your device:
m iPod nano (5th generation or earlier): Choose
Nike + iPod > History.
m iPod nano (6th generation): Choose Fitness > History at
the bottom of the screen.
21
Page 22

m iPhone and iPod touch: Choose Nike + iPod, then tap
History at the bottom of the screen.
iPod nano (5th generation or earlier) provides daily
totals of all your workouts: Nike + iPod workouts,
pedometer steps, and cardio workouts using
Nike + iPod compatible gym equipment.
To view workouts on iPod nano (5th generation
or earlier):
1 Choose Daily Totals from the History menu.
2 Choose a date and activity.
3 Rotate iPod nano (5th generation) to landscape
orientation to see a graph of that activity.
To delete a single workout session:
m iPod nano (5th generation or earlier): Choose Nike + iPod
> History. Choose a workout session, press and hold the
Center button, then choose Delete.
You cannot delete individual workouts on iPod nano
(6th generation).
m iPhone and iPod touch: Choose Nike + iPod and tap
History. Tap Edit, choose a workout session, then tap
Delete.
On iPhone, iPod touch, and iPod nano (6th generation),
you can delete all workout sessions from History by
tapping Clear at the top of the History screen.
22
Page 23

Creating Custom Workout Shortcuts
Custom workout shortcuts let you easily choose and
repeat a workout. iPod nano (4th generation or later)
automatically saves your completed workouts as
shortcuts. iPhone and iPod touch also let you create
custom workout shortcuts.
To create a custom workout shortcut on iPhone 3GS or
later and iPod touch:
1 Choose Nike + iPod, then tap My Workouts at the
bottom of the screen.
2 Tap Plus (+), then choose the type of workout and the
workout goal.
3 Choose music, enter a name for the workout, then
tap Save.
Note: You can create custom workout shortcuts only on
iPhone and iPod touch (2nd generation or later).
To delete a custom workout shortcut on iPhone 3GS
or later and iPod touch:
m Choose Nike + iPod, then tap My Workouts. Tap Edit,
choose a shortcut, then tap Delete.
To choose a custom workout shortcut:
m iPod nano (4th and 5th generation): Choose Nike + iPod,
then choose a shortcut. Shortcuts are named according
to the type of workout and music. They can’t be deleted.
m iPod nano (6th generation): Choose Fitness > Run, then
tap My Workouts. Choose a shortcut. Shortcuts are
named according to the type of workout and music.
They can’t be deleted.
23
Page 24

m iPhone and iPod touch: Choose Nike + iPod, then tap
My Workouts. Shortcuts are listed by the name you
specied when you created the workout.
Your most recent custom workout shortcut appears at
the top of the list.
Purchasing Nike+ Workouts
You can purchase and download Nike+ Workouts that
feature continuous music mixed with professional
coaching. When you purchase a Nike+ Workout, you get
a single workout track with music and voiceover, and
you also get all the individual songs in the mix. Choose
mixes for your level and style of workout.
To purchase a Nike+ Workout:
1 Open iTunes and click iTunes Store on the left side
of the window, then type “Nike Sport Music” in the
iTunes search eld.
2 Click the Buy button next to the Nike+ Workout of
your choice.
3 Follow the onscreen instructions to complete the
purchase. The download begins automatically.
4 Connect the device to your computer and load the
workout onto the device.
Note: The iTunes Store is available only to people age 13
or older, in the U.S. and many other countries; for a list
of countries, go to www.apple.com/itunes/download.
Terms apply. You must have Internet access (fees may
apply) to use the iTunes Store.
24
Page 25

Linking a Nike + iPod Compatible Remote or Heart Rate Monitor
Nike + iPod compatible devices are sold separately from
the Nike + iPod Sport Kit and the Nike + iPod Sensor.
You can use a compatible remote to control Nike + iPod
wirelessly while you work out.
iPod nano (5th generation or later) also supports
Nike + iPod compatible heart rate monitors.
Note: You must have the iPod + Nike receiver attached
to your iPod nano (6th generation) to use a heart rate
monitor or remote.
Before using one of these devices for the rst time,
you must link it to your iPod nano receiver, iPhone, or
iPod touch.
To link to a Nike + iPod compatible remote
(sold separately):
m iPod nano (5th generation or earlier): Connect your
Nike + iPod receiver to iPod nano, choose Nike + iPod >
Settings > Sensor > Link, then follow the onscreen
instructions.
m iPod nano (6th generation): Choose Settings > Fitness >
Nike + iPod Sport Kit > Remote. Turn on the Remote
option and tap Link.
m iPhone and iPod touch: Choose Settings > Nike + iPod >
Remote, then follow the onscreen instructions.
25
Page 26

To link to a Nike + iPod compatible heart rate monitor
(sold separately):
m iPod nano (5th generation or earlier): Connect your
Nike + iPod receiver to iPod nano, choose Nike + iPod >
Settings > Heart Rate Monitor > Link, then follow the
onscreen instructions.
m iPod nano (6th generation): Choose Settings > Fitness >
Nike + iPod Sport Kit > Heart Rate Monitor > Link, then
follow the onscreen instructions.
To unlink a device:
m iPod nano (5th generation or earlier): Choose
Nike + iPod > Settings > Remote (or Heart Rate Monitor) >
Unlink, then follow the onscreen instructions.
m iPod nano (6th generation): Choose Settings >
Nike + iPod Sport Kit > Remote (or Heart Rate Monitor),
then tap Unlink.
m iPhone, and iPod touch: Choose Settings > Nike + iPod >
Remote (or Heart Rate Monitor), then tap Unlink.
You can turn the functions of a Nike+ compatible
remote on or o without unlinking the device.
To turn remote functionality on or o:
m iPod nano (5th generation or earlier): Choose
Nike + iPod > Settings > Remote, then set Remote to
On or O.
m iPod nano (6th generation): Choose Settings > Fitness >
Nike + iPod Sport Kit > Remote, then set Remote to
On or O.
m iPhone and iPod touch: Choose Settings > Nike + iPod >
Remote, then link or unlink the remote.
26
Page 27

Working Out with iPod nano (6th Generation) and a Heart Rate Monitor
If you have iPod nano (6th generation) and a
compatible Nike + iPod heart rate monitor (purchased
separately), iPod nano can record and display your heart
rate as you work out. You can also specify a range or
“zone” of the maximum and minimum heart rates that
you want to maintain during a workout and track how
well you maintain your heart rate within that zone
as you exercise. As you work out, iPod nano displays
your current heart rate and an upward- or downwardpointing arrow appears when you need to increase or
decrease your activity. You can use a heart rate monitor
while doing any of the standard workouts.
You can also monitor your heart rate as you participate
in activities besides running or walking. For example,
you can use iPod nano and a heart rate monitor as
you participate in sports activities such as basketball,
aerobics, circuit training, golf, hiking, soccer, and more.
When your workout is done, you can transfer your heart
rate information to your nikeplus.com account, where
you can review it.
As you set up a workout, you can set a zone of
maximum and minimum heart rates that you want to
maintain when you select a workout. You must rst turn
on the zone workout feature.
To turn zone workouts on or o:
m Tap Settings > Fitness > Nike + iPod Sport Kit, then tap
the On/O button in Zone Workout.
27
Page 28

When you turn on zone workouts and select a workout,
options appear for setting a heart rate zone. As you
work out, heart rate information is recorded and
displayed during any of the workout types.
iPod nano (6th generation) also provides a heart rate
workout. To perform a heart rate workout, you specify
the heart rate zone you want to maintain, choose the
activity type that you’ll be doing, and then enjoy a good
workout. All your heart rate information is recorded
automatically. When you do a heart rate workout, you
don’t need a sensor in your shoe to record motion.
To start a heart rate workout:
1 Tap Fitness > Run > Heart Rate.
2 Set the heart rate zone you want.
3 Choose an activity and tap Done.
4 Choose the workout music you want.
5 Tap Start Workout and begin your workout.
6 When done, press the Sleep/Wake button to wake the
screen and tap the screen to display the Pause button.
Rap Pause, then tap End Workout to nish your heart
rate workout.
Once you complete a heart rate workout, you can
transfer the information to your nikeplus.com account
just as you can with your other workouts.
28
Page 29

Linking to Another Sensor
Once your device links to a specic sensor, it’s set to
link with that sensor only. If you use a dierent sensor,
you must set the device to link to the other sensor.
You may want to do this, for example, if there’s more
than one person in your family with a sensor and Nike+
ready shoes.
To link to another sensor:
1 iPod nano:
2 Put on the shoes with the new sensor, and make sure
3 Link the sensor to your device:
Connect the receiver to iPod nano.
there’s no other Nike + iPod Sensor nearby.
Walk around to activate the sensor so that your receiver
can detect it.
 iPod nano (5th generation or earlier):
Choose
Nike + iPod > Settings > Sensor > Link, then follow
the onscreen instructions. A message indicates iPod
is now linked to the new sensor.
 iPod nano (6th generation): Choose Settings >
Fitness > Nike + iPod Sport Kit > Sensor, tap Link,
then tap the screen while walking or running to
relink the device to the dierent sensor.
 iPhone and iPod touch:
Choose Settings >
Nike + iPod > Sensor, tap Link New, then follow the
onscreen instructions.
Note: If you link to a previously linked sensor,
Nike + iPod detects your calibration settings. You don’t
need to recalibrate.
29
Page 30
If you connect an iPod receiver to a dierent iPod and
use it with the same sensor, you don’t need to relink
or recalibrate. The receiver stores your settings, your
workout history, and your workout shortcuts. You don’t
need to relink or recalibrate.
Putting the Nike + iPod Sensor to Sleep
The sensor is awake and on by default. If you want to
store the sensor for a long period of time or stop it from
transmitting, you can put it to sleep.
Important: To comply with applicable government
regulations, put the sensor to sleep before taking it on
an aircraft.
To put the sensor to sleep:
m Use a pen or a paper clip to hold down the Sleep/Wake
button for three seconds.
Sleep/Wake button
To wake the sensor:
m Use a pen or a paper clip to press the Sleep/Wake button.
30
Page 31

Important Safety Information
WARNING: Failure to follow these safety instructions
could result in injury or damage.
Before starting any exercise program, you
Exercising
should have a complete physical examination by your
physician. Do a warmup or stretching exercise before
beginning any workout. Be careful and attentive while
exercising. Slow down, if necessary, before adjusting
your device while running. Stop exercising immediately
if you feel pain, or feel faint, dizzy, exhausted, or short
of breath. By exercising, you assume the risks inherent
in physical exercise, including any injury that may result
from such activity.
Do not use the receiver, iPhone, or iPod in or near water
or wet locations.
Choking hazard
choking hazards. Keep them away from children under
three years of age.
Avoid hearing damage
occur if earphones are used at high volume. Set the
volume to a safe level. You can adapt over time to a
higher volume of sound that may sound normal but can
be damaging to your hearing. If you experience ringing
in your ears or mued speech, stop listening and have
your hearing checked. The louder the volume, the less
time is required before your hearing could be aected.
Hearing experts suggest that to protect your hearing:
The receiver and sensor are potential
Permanent hearing loss may
31
Page 32

 Limit the amount of time you use the earphones at
high volume.
 Avoid turning up the volume to block out noisy
surroundings.
 Turn down the volume if you can’t hear people
speaking near you.
Disassembling the sensor
Do not attempt to open
the sensor, disassemble it, or remove the battery.
No user-serviceable parts are inside.
Learning More, Service, and Support
Answers to frequently asked questions about Nike + iPod
Go to www.apple.com/support/nikeplus.
Service and support for the Nike + iPod Sensor and
Receiver
Go to www.apple.com/support/nikeplus.
Service and support for Nike+ ready shoes or the
nikeplus.com website
Go to www.nikeplus.com.
Information about using iTunes
Open iTunes and choose Help > iTunes Help.
Information about using iPod nano or iPod touch
Go to www.apple.com/support/ipod.
Information about using iPhone
Go to www.apple.com/support/iphone.
32
Page 33

目录
34 欢迎使用 Nike + iPod
34 您的私人体育锻炼助理
35 快速入门
43 使用 Nike + iPod
43 校准 Nike + iPod
46 设定距离单位
46 输入体重
46 体育锻炼过程中锁定设备
47 获得语音反馈
48 使用 PowerSong
49 暂停体育锻炼
49 体育锻炼过程中接听电话
50 体育锻炼过程中更改音乐
51 自动将体育锻炼数据发送到 Nikeplus.com
51 在设备上查阅体育锻炼数据
53 创建自定体育锻炼的快捷方式
54 购买 Nike+ Workouts 音乐
55 链接 Nike + iPod 兼容的遥控器或心率监视器
57 使用 iPod nano(第 6 代)和心率监视器进行体育
锻炼
59 链接到另一个感应器
60 将 Nike + iPod 感应器置入睡眠状态
61 重要安全信息
62 了解更多信息及服务与支持
33
Page 34

欢迎使用 Nike + iPod
您的私人体育锻炼助理
Nike + iPod 是体育锻炼伙伴并兼教练于一身。选择您想要的体
育锻炼类 型:无 目标、 距离、 时间或卡 路里消 耗,选 取音乐 以
激发您的动力,然后通过语音或屏幕反馈跟踪路途上每一步的进
度。将您的体育锻炼数据上传到 nikeplus.com,您可以在该站
点设定目标并监视从一次体育锻炼到另一次体育锻炼的改进。加
入世界上最大的网上跑步社区,参加全球跑步者挑战赛。
1
iPhone(3GS 或新款机型)、所有 iPod nano 机型
iPod touch(第 2 代或新款机型)都支持 Nike + iPod。
以及
iPod nano
ˤྱቸᅛ˥
1
对于 iPod nano(第 6 代),Nike + iPod 感应器是可选配件,
仅在使用 Nike+ 配套的 Polar Wearlink® + 心率传送器进行体
育锻炼时才需要。
34
iPod touch
ˤݾ 2 ݀ᅐାᅛ˥
iPhone 3GS
ˤᅐାᅛ˥
Page 35

快速入门
请按照这些说明,立即开始使用 Nike + iPod。
步骤 1:在设备上启用 Nike + iPod。
m iPod nano(第 5 代或旧款机型):将 Nike + iPod 接收器连
接到 iPod nano。“Nike + iPod”会出现在主菜单中。
m iPod nano(第 6 代):将 Nike + iPod 接收器连接到
iPod nano。轻按“健身”。
【注】iPod nano(第 6 代)可以选择性地跟踪您的体育锻炼,
而无需使用 Nike + iPod 接收器和感应器。有关更多信息,请
参阅设备附带的《iPod nano 使用手册》。
m iPhone 和 iPod touch:选取“设置”>“Nike + iPod”并它
将设定为“打开”。主屏幕上会出现一个 Nike + iPod 图标。
【注】iPhone 3GS 或新款机型以及 iPod touch 配有内置接收
器,不需要外部接收器。
步骤 2:请确定您安装了最新的 iPod 和 iTunes 软件。
1 从 www.apple.com.cn/itunes 下载最新的 iTunes 软件并安
装到电脑中。
35
Page 36

2 将设备连接到电脑上,然后在 iTunes 边栏中选择它并点按
“摘要”。
3 如果 iTunes 指示您的 iPod 需要更新,请点按“更新”,然后
按照屏幕指示进行操作。
步骤 3:将 Nike + iPod 感应器插入 Nike+ 运动鞋中。
m 抬起左鞋鞋 垫,取 出下面 凹槽中 的泡沫 塞,换上 感应器 ,平的
一面朝上。
ࢎෙ
您可以在没有进行体育锻炼时,将感应器一直放在鞋子里,但如
果您打算长时间穿运动鞋而不进行体育锻炼,请用泡沫塞换下感
应器以延长电池寿命。
感应器中的电池不可更换也不可充电,使用寿命超过 1000 个工
作小时。取决于使用情况及其他因素,电池寿命可能有所差异。
36
Page 37

步骤 4:选取一种体育锻炼类型。
无目标的体育锻炼
 iPod nano(第 5 代或旧款机型):
选取“Nike + iPod”>“Nike + iPod”>“基本”。
 iPod nano(第 6 代):选取“健身”>“跑步”>“基本”。
 iPhone 和 iPod touch:选取“Nike + iPod”>“基本”。
有时间目标的体育锻炼
 iPod nano(第 5 代或旧款机型):
选取“Nike + iPod”>“Nike + iPod”>“时间”。
 iPod nano(第 6 代):选取“健身”>“跑步”>“时间”。
 iPhone 和 iPod touch:选取“Nike + iPod”>“时间”。
有距离目标的体育锻炼
 iPod nano(第 5 代或旧款机型):选取“Nike + iPod”>
“Nike + iPod”>“距离”。
 iPod nano(第 6 代):选取“健身”>“跑步”>“距离”。
 iPhone 和 iPod touch:选取“Nike + iPod”>“距离”。
有卡路里消耗目标的体育锻炼
 iPod nano(第 5 代或旧款机型):选取“Nike + iPod”>
“设置”>“体重”,输入您的体重。然后按下菜单按钮
(MENU),选取“Nike + iPod”>“Nike + iPod”>
“卡路里”。
 iPod nano(第 6 代):选取“设置”>“健身”>“体重”,
然后输入您的体重。选取“健身”>“跑步”>“卡路里”。
 iPhone 和 iPod touch:选取“设置”>“Nike + iPod”>
“体重”,然后输入您的体重。然后按下主屏幕按钮并选取
“Nike + iPod”>“卡路里”。
【注】您只需要在第一次进行有卡路里消耗目标的体育锻炼时输
入您的体重。
37
Page 38

步骤 5:选取体育锻炼时要播放的音乐。
若要播放 请这样操作
Nike+ Workout 混音 选取该混音(请参阅第 54 页)。
当前正在播放的歌曲 选取“正在播放”。
Genius 混曲 选取“Genius 混曲”
播放列表中的歌曲 选取“播放列表”,然后选取
Podcast 选取“Podcast”(iPod nano
有声读物 选取“有声读物”
随机顺序的歌曲 选取“随机播放歌曲”。
广播电台 选取“收音机”(iPod nano
无音乐 选取“无”。
(iPod nano 第 6 代)。
一个播放列表。
第 6 代)。
(iPod nano 第 6 代)。
第 6 代)。
步骤 6:开始体育锻炼。
接下来,走几步或跑几步就可以激活感应器。当您的设备检测到
感应器并与其链接时,您就可以开始体育锻炼了。
m iPod nano(第 5 代或旧款机型):按下中央按钮,然后开始
步行或跑步。
m iPod nano(第 6 代):轻按“开始体育锻炼”并开始步行或
跑步。
m iPhone 和 iPod touch:轻按“播放”,然后开始步行或跑步。
38
Page 39

步骤 7:查看进度。
Nike + i Pod 会 自动在屏 幕上显示 您的体育 锻炼状态 ,类似于
如下插图 。(取 决于设 备类型 ,屏幕上 显示的 内容可 能稍有 不
同。)
iPod nano
(第 6 代)
iPhone 3GS 或新款机型
以及 iPod touch
Nike + i Pod 会 在体育锻 炼过程中 自动给您 语音反馈 ,报告您
的进度信息(请参阅第 47 页“获得语音反馈”)。您也可以随
时获得反馈。
39
Page 40

若要手动获得语音反馈:
m iPod nano(第 5 代或旧款机型):在体育锻炼过程中,随时
按下中央按钮即可。
m iPod nano(第 6 代):在体育锻炼过程中,随时按下睡眠/唤
醒按钮即可。
m iPhone 和 iPod touch:在体育锻炼过程中,随时按下主屏幕
按钮即可。
【注】您必须锁定 iPhone 和 iPod touch 才能手动获得语音反
馈(请参阅第 47 页“获得语音反馈”)。
步骤 8:结束体育锻炼。
您任何时 候都可 以结束 体育锻 炼。如果 您在达 到时间 目标、 距
离目标或 卡路里 目标后 继续进 行体育锻 炼,则 会继续 监视您 的
进度。
若要结束体育锻炼:
m iPod nano(第 5 代或旧款机型):按下播放/暂停按钮 (’)
以暂停体育锻炼。然后按下菜单按钮 (MENU) 并选取“结束体
育锻炼”。
m iPod nano(第 6 代):轻按屏幕以显示“暂停”按钮,然后
轻按“暂停”。轻按“结束
下睡眠/唤醒按钮。
【注】若要在 iPod nano(第 6 代)上快速暂停或继续体育锻
炼,请连按睡眠/唤醒按钮。
体育锻炼”。如果屏幕已关闭,请按
m iPhone 和 iPod touch:轻按“结束体育锻炼”。如果 iPhone
或 iPod 已锁定,请按下主屏幕按钮并轻按“暂停”。然后拖移
滑块并轻按“结束体育锻炼”。
40
Page 41

步骤 9:将您的进度记录在 nikeplus.com 上。
在 nikeplus.com,您可以按时间来追踪您的进度,查看您过去
的所有体育锻炼的记录,设定并监视目标以及将您的结果与他人
进行对比。您甚至可以在网上体育锻炼挑战赛中与其他
Nike + iPod 用户角逐一番。
如果有 iPhone 或 iPod touch,您可以将体育锻炼数据以无线
方式发送到 Nike 网站。如果有 iPod nano,您可以将体育锻炼
从电脑发送到 nikeplus.com。
建议您先创建 nikeplus.com 帐户,然后再上传体育锻炼数据。
请按照 nikeplus.com 网站上的指示来注册免费帐户。
若要以无线方式将体育锻炼数据从 iPhone 或 iPod touch 发
送到 nikeplus.com:
1 确定设备已接入互联网,然后选取“Nike + iPod”。
如果有体育锻炼数据尚未同步到 nik
eplus.com 帐户,则“历
史记录”按钮上会出现一个红色的小圆点。
2 轻按“历史记录”按钮可查看体育锻炼数据。
3 轻按“发送到 Nike+”按钮可将体育锻炼数据发送到
nikeplus.com。如果您不想现在发送,您可以以后发送。
4 输入您的电子邮件地址以及 nikeplus.com 帐户密码,然后点
按“登录 Nike +”。
在登录后,体育锻炼数据会被发送到 nikeplus.com 帐户。
41
Page 42

如果您没有 nikeplus.com 帐户,请轻按“加入 Nike+”并遵
循相关指示来创建帐户。
nikeplus.com 网站会打开,同时您最近的体育锻炼数据会以图
形展示在页面上。
5 请遵循屏幕指示来访问体育锻炼数据。
若要将 iPod nano 体育锻炼数据从电脑发送到
nikeplus.com:
1 确定您的电脑已连接到互联网,然后将 iPod nano 连接到电
脑上。
2 在询问您是否想要将体育锻炼数据发送到 nikeplus.com 的对
话框中,点按“发送”。如果不想现在发送,您可以以后发送。
3 在询问您是否想要访问 nikeplus.com 的对话框中,点按“
访问”。
nikeplus.com 网站会打开,同时您最近的体育锻炼会以图形显
示在页面上。
4 点按“Save Your Runs”(存储您的跑步),然后点按“Sign
Me Up”(注册)并按照屏幕指示进行操作。
42
Page 43

使用 Nike + iPod
请按照这些说明,充分使用 Nike + iPod 的功能。
校准 Nike + iPod
对于大多数用户而言,Nike + iPod 的默认校准是准确的。您可
以通过校准 Nike + iPod 以符合自然的跑步和步行方式来提高
准确度。在 iPod nano 上,您可以根据一段已知距离来进行体
育锻炼校准,或者也可以使用最近完成的体育锻炼记录,并输入
行进的距离。在 iPhone 或 iPod touch 上,您可以用最近一
次完成的体育锻炼进行校准,当然您需要知道当时行进的距离。
若要使用 iPod nano(第 5 代或旧款机型)来针对跑步和步行
校准 Nike + iPod:
1 选取“Nike + iPod”>“设置”>“感应器”>“校准”。
2 选取“跑步”或“步行”并输入一段距离。
为获得最佳效果,距离应至少为一英里。您可以输入的最短校准
距离为四分之一英里。
3 按下中央按
4 以相同的、自然的步速跑完或走完所设定的距离。
5 按下菜单按钮 (MENU) 并选取“完成校准”。
钮。
会有一则信息告诉您校准是否成功。如果您想要校准跑步和步
行,请重复步骤 1 到 5。
【注】即使在校准之后,距离测量的准确度会因步法、路面、坡
度和温度的不同而异。
43
Page 44

您也可以使用刚完成的体育锻炼来校准 iPod nano。当您已经行
进了一段已知的距离,但该距离与设备上显示的累计距离不相符
时,这就很有用。
若要使用最近完成的体育锻炼来校准 iPod nano(第 5 代或
旧款机型):
m 选取“结束 体育锻 炼”, 按住中 央按钮 ,然后选 取“校 准”。
设定您步行或跑步的正确距离,然后按下中央按钮。
设备会感应到体育锻炼是步行还是跑步,并正确地使用新校准
(而非现有校准)。
若要使用 iPod nano 来针对跑步和步行校准 Nike + iPod
(第 6 代):
1 选取“设置”>“健身”>“Nike + iPod 运动套件”>“感应
器”>“校准”。
2 选取“步行校准”或“跑步校准”,然后选择一段距离并轻
按“完成”。
为获得最佳效果,距离应至少为一英里。您可以输入的最短校准
距离为四分之一英里。
3 选取校准体育锻炼时播放的伴奏音乐。
4 以相同的、自然的步速跑完或走完所设定的距离
。
5 如果屏幕已关闭,请按下睡眠/唤醒按钮,轻按屏幕以显示“暂
停”按钮,然后轻按“停止”。
会有一则信息告诉您校准是否成功。如果您想要校准跑步和步
行,请重复步骤 1 到 5。
44
Page 45

【注】即使在校准之后,距离测量的准确度会因步法、路面、坡
度和温度的不同而异。
使用 iPhone 或 iPod touch,您也可以使用刚完成的体育锻炼
来校准 Nike + iPod。您只能用锻炼距离为四分之一英里或以上
的体育锻炼来进行校准。
若要使用刚完成的体育锻炼来校准 iPhone 或 iPod touch:
m 轻按“结束体育锻炼”,然后轻按“校准”。设定您步行或跑步
的正确距离,然后轻按“完成”。
设备会使用新的校准进行更新,覆盖以前的步行或跑步速度。
若要将 Nike + iPod 校准还原为默认设置:
m iPod nano(第 5 代或旧款机型):选取“Nike + iPod”>
“设置”>“感应器”>“校准”>“还原步行”(或“还原
跑步”)。
m iPod nano(第 6 代):选取“设置”>“健身”>“Nike +
iPod 运动套件”>“感应器”>“校准”>“还原步行”(或
还原跑步”)>“还原”。
“
m iPhone 和 iPod touch:选取“设置”>“Nike + iPod”,
然后轻按“还原校准”。
45
Page 46

设定距离单位
您可以设定 Nike + iPod 以英里或公里为单位来测量体育锻炼
的距离。
若要设定距离单位:
m iPod nano(第 5 代或旧款机型):选取“Nike + iPod”>
“设置”,然后将“距离”设定为“英里”或“公里”。
m iPod nano(第 6 代):选取“设置”>“健身”>“距离”,
然后选取“英里”或“公里”。
m iPhone 和 iPod touch:选取“设置”>“Nike + iPod”>
“距离”,然后选取“英里”或“公里”。
输入体重
若要输入体重:
m iPod nano(第 5 代或旧款机型):选取“Nike + iPod”>
“设置”>“体重”,然后输入体重。
m iPod nano(第 6 代):选取“设置”>“健身”>“体重”,
然后输入您的体重。
m iPhone 和 iPod touch:选取“设置”>“Nike + iPod”>
“体重”,然后输入体重。
为了较准 确地计 算消耗 的卡路 里,如果 您的体 重有变 化,请 更
新体重信息。
体育锻炼过程中锁定设备
您可以锁定 iPhone 或 iPod touch 以免在体育锻炼过程中意外
激活它的控制。
若要锁定 iPhone 或 iPod touch:
m 按下睡眠/唤醒按钮。
若要 解 锁 , 请按 下 睡 眠 /唤醒 按 钮 或 主 屏幕 按 钮 , 然 后拖 移
滑块。
46
Page 47

获得语音反馈
随着您进行体育锻炼,Nike + iPod 定时提供语音反馈报告您的
状态。您可以选取女嗓音或男嗓音,或者关闭反馈。
若要设定语音类型或关闭语音反馈:
m iPod nano(第 5 代或旧款机型):选取“Nike + iPod”>
“设置”,然后将“语音反馈”设定为“男声”、“女声”
或“关闭”。
m iPod nano(第 6 代):选取“设置”>“健身”>“语音反
馈”,然后选取“男声”、“女声”或“关闭”。
m iPhone 和 iPod touch:选取“设置”>“Nike + iPod”>
“语音反馈”,然后选取“男声”、“女声”或“关闭”。
语音反馈被关闭时,您仍可以手动获得语音反馈。
若要手动获得语音反馈:
m iPod nano(第 5 代或旧款机型):在体育锻炼过程中,随时
按下中央按钮即可。
m iPod nano(第 6 代):在体育锻炼过程中,随时按下睡眠/唤
醒按钮即可。
m iPhone 和 iPod touch:当设备被锁定时,按下主屏幕按钮。
在 iPod nano 上,除了英语之外,还有某些其他语言的语音反
馈。如果您将 iPod nano 设定为使用这些语言中的一种,并将
它连接到电脑(电脑必须已接入互联网),则 iTunes 会提示您
下载以该语言撰写的反馈。
 iPod nano(第 5 代或旧款机型)每次只能有一种非英语版
本的语音反馈。
 iPhone、iPod touch 和 iPod nano(第 6 代)会自动支
持所有语音反馈语言。
47
Page 48

使用 PowerSong
选取一首能激发您动力的歌曲并将其作为您的 PowerSong。您
可以在体育锻炼的过程中随时快速切换到 PowerSong。
若要选取 PowerSong:
m iPod nano:选取“Nike + iPod”>“设置”>
“PowerSong”,然后选取一首歌曲。
iPod nano(第五代)还可以将一个播放列表作为
PowerSong。
m iPod nano(第 6 代):选取“设置”>“健身”>
“PowerSong”,然后选取一首歌曲。
m iPhone 和 iPod touch:选取“设置”>“Nike + iPod”>
“PowerSong”,然后选取一首歌曲。
若要播放 PowerSong:
m iPod nano(第 5 代或旧款机型):在体育锻炼过程中按住中
央按钮。短暂停顿后,就会播放您的 PowerSong。
m iPod nano(第 6 代):按下睡眠/唤醒按钮以唤醒屏幕,轻按
屏幕以显示“暂停”按钮,然后轻按体育锻炼屏幕上的
“PowerSong”。如果屏幕已打开,您也可以用两个手指按住
屏幕以开始播放 PowerSong。
m iPhone 和 iPod touch:在体育锻炼屏幕上轻按
“PowerSong”。如果 iPhone 或 iPod touch 已锁定,请按
下主屏幕按钮,将滑块拖到解锁位置,然后轻按
“PowerSong”。
48
Page 49

暂停体育锻炼
您可以暂停体育锻炼、暂时停止音乐播放和数据收集,稍后再继
续体育锻炼而不会丢失体育锻炼数据。
若要暂停或继续体育锻炼:
m iPod nano(第 5 代或旧款机型):按下播放/暂停按钮 (’)。
m iPod nano(第 6 代):轻按屏幕以显示“暂停”按钮。轻按
“暂停”。轻按“继续”以继续体育锻炼。如果 iPod nano
(第 6 代)屏幕已关闭,请按下睡眠/唤醒按钮以唤醒它。
m iPhone 和 iPod touch:轻按“暂停”。如果设备已锁定,请
先按下主屏幕按钮一次。轻按“播放”以继续体育锻炼。
体育锻炼过程中接听电话
在体育锻炼过程中,您可以使用 iPhone 来接听电话。当您收到
呼叫时,您的体育锻炼会在您接听时自动暂停。
若要接听电话:
m 轻按“接听”,或者按下麦克风按钮(如果您戴着立体声耳机的
话)。如果 iPhone 已锁定,请拖移滑块来将其解锁。
若要使来电静音:
m 请按下睡眠/唤醒 按钮或者任 何一个音量按 钮。将来电静 音后,
您仍可以接听它,直到它前往语音信箱。
49
Page 50

若要拒绝来电:
m 轻按“拒绝”,或者按住耳机上的麦克风按钮大约两秒钟,然后
松开它。两声低的嘟嘟声确认已拒绝了该来电。
您也可以快速按下睡眠/唤醒按钮两次以拒绝来电。这会将响铃
静音,但直到来电已前往语音信箱后,音乐才会继续播放;体育
锻炼会在后台继续进行。
若要在通话结束后继续体育锻炼:
m 轻按“播放”。
体育锻炼过程中更改音乐
您可以在体育锻炼过程中更改音乐,而不会丢失体育锻炼数据。
当音乐改变时,您的体育锻炼会被暂停。
若要在体育锻炼过程中更改音乐:
1 iPod nano(第 5 代或旧款机型):按下菜单按钮 (MENU) 并
选取“音乐”。您的体育锻炼会暂停。
iPod nano(第 6 代):轻按屏幕以显示“暂停”按钮。轻按
“暂停”,然后轻按“更改音乐”。如果 iPod nano(第 6 代)
屏幕已关闭,请按下睡眠/唤醒按钮以唤醒它。
iPhone 和 iPod touch:轻按“暂停”,然后轻按“
乐”。如果设备已锁定,请先按下主屏幕按钮并拖移滑块以将
它解锁。
2 iPod nano(第 5 代或旧款机型):选取新音乐。您的体育锻
炼会自动继续。
iPhone、iPod touch 和 iPod nano(第 6 代):选取新
音乐。
50
更改音
Page 51

自动将体育锻炼数据发送到 Nikeplus.com
无论何时您将 iPod nano 连接到电脑上,您都可以设定 iTunes
自动将您的体育锻炼数据通过互联网发送到 nikeplus.com。
若要将体育锻炼数据自动发送到 nikeplus.com:
1 确定您的电脑已连接到互联网,然后将 iPod nano 连接到电
脑上。
2 在电脑或设备上打开 iTunes,点按“Nike + iPod”标签,然
后选择“自动将体育锻炼数据发送到 nikeplus.com”。
3 点按注记格下方的“访问 nikeplus.com”或在出现的对话框中
点按“访问”(如果您已经设定自动发送您的体育锻炼数据)。
nikeplus.com 网站会打开,同时您最近的体育锻炼会以图形
显示在页面上。
4 点按“Save Your Runs”(存储您的跑步)并登录,或者如果
您尚未注册,请进行注册。
有关 Nike 的隐私权政策及条款和条
网站。
件,请访问 nikeplus.com
在设备上查阅体育锻炼数据
iPod nano、iPhone 或 iPod touch 可以存储最近一千次体育
锻炼的日期、时间、持续时间、距离、步速以及消耗的卡路里。
若要在设备上查阅最近的体育锻炼:
m iPod nano(第 5 代或旧款机型):选取“Nike + iPod”>
“历史记录”。
m iPod nano(第 6 代):在屏幕底部选取“健身”>“历史
记录”。
51
Page 52

m iPhone 和 iPod touch:选取“Nike + iPod”,然后轻按屏幕
底部的“历史记录”。
iPod nano(第 5 代或旧款机型)会提供您的所有体育锻炼的
每日汇总:Nike + iPod 体育锻炼次数,计步器步数以及使用
Nike + iPod 兼容的健身设备的有氧锻炼次数。
若要在 iPod nano(第 5 代或旧款机型)上查看体育锻炼
情况:
1 从“历史记录”菜单中选取“每日汇总”。
2 选取一个日期和活动。
3 将 iPod nano(第 5 代)转动到横排模式可查看该活动的
图形。
若要删除单个体育锻炼练习:
m iPod nano(第 5 代或旧款机型):选取“Nike + iPod”>
“历史记录”。选取一个体育锻炼练习,按住中央按钮,然后
选取“删除”。
您不能在 iPod nano(第 6 代)上删除单项体育锻炼。
m iPhone 和 iPod touch:选取“Nike + iPod”,轻按“历史
记录”。轻按“编辑”,选取一个体育锻炼练习,然后轻按
“删除”。
在 iPhone、iPod touch 和 iPod nano(第 6 代)上,您可以
通过轻按“历史记录”屏幕顶部的“清除”来删除“历史记录”
中的所有体育锻炼练习。
52
Page 53

创建自定体育锻炼的快捷方式
自 定 体 育 锻 炼 快 捷 方 式 可 让 您 轻 松 地 选 取 并 重 复 体 育 锻
炼。iPod nano(第 4 代或新款机型)会自动将您已完成的体
育锻炼存储为快捷方式,iPhone 和 iPod touch 还允许您创建
自定体育锻炼快捷方式。
若要在 iPhone 3GS 或新款机型以及 iPod touch 上创建自定
体育锻炼快捷方式:
1 选取“Nike + iPod”,然后轻按屏幕底部的“我的体育锻
炼”。
2 轻按加号 (+),然后选取体育锻炼的类型和目标。
3 选取音乐,输入体育锻炼的名称,然后轻按“存储”。
【注】您只能在 iPhone 和 iPod touch(第 2 代或新款机型)
上创建自定体育锻炼快捷方式。
若要在 iPhone 3GS 或新款机型以及 iPod touch 上删除自定
体育锻炼快捷方式:
m 选取“Nike + iPod”,然后轻按“我的体育锻炼”。轻按“编
辑”,选取一个快捷方式
若要选取自定体育锻炼快捷方式:
,然后轻按“删除”。
m iPod nano(第 4 代和第 5 代):选取“Nike + iPod”,然
后选取一个快捷方式。快捷方式是根据体育锻炼的类型和音乐而
命名的。它们不能被删除。
m iPod nano(第 6 代):选取“健身”>“跑步”,然后轻按
“我的体育锻炼”。选取一个快捷方式。快捷方式是根据体育锻
炼的类型和音乐而命名的。它们不能被删除。
53
Page 54

m iPhone 和 iPod touch:选取“Nike + iPod”,然后轻按
“我的体育锻炼”。快捷方式会按您创建体育锻炼时指定的
名称列出。
您最近的自定体育锻炼快捷方式会出现在列表的顶部。
购买 Nike+ Workouts 音乐
您可以购买和下载 Nike+ Workout 音乐,其中包含连续音乐并
混合了专业训练法。在购买 Nike+ Workout 音乐时,您不仅会
获得一个带有音乐和配音的体育锻炼音轨,还能获得该混音中的
所有单曲。选取适合您的体育锻炼水平和风格的混音。
若要购买 Nike+ Workout 音乐:
1 打开 iTunes,点按窗口左侧的“iTunes Store”,然后在
iTunes 搜索栏内键入“Nike Sport Music”(Nike 运动音
乐)。
2 点按您要选择的 Nike+ Workout 音乐旁边的“Buy”(购买)
按钮。
3 按照屏幕指示来完成购买。下载
4 将设备连接到电脑上,然后将该体育锻炼音乐载入到设备中。
【注】iTunes Store 仅适用于年满 13 岁的用户,在美国及其他
许多国家和地区可用;若要获得这些国家和地区的列表,请访问
www.apple.com.cn/itunes/download。访问网站需要遵守
相关条款。您的电脑必须具有互联网访问(可能需要付费)才能
使用 iTunes Store。
54
会自动开始。
Page 55

链接 Nike + iPod 兼容的遥控器或心率监视器
Nike + iPod 兼容的设备单独销售,不与 Nike + iPod 运动套件
和 Nike + iPod 感应器捆绑销售。
您可 以在 体 育锻 炼 过程 中 使用 兼 容的 遥控 器 以无 线 方式 控 制
Nike + iPod。
iPod nano(第 5 代或新款机型)还支持 Nike + iPod 兼容的
心率监视器。
【注】您必须将 iPod + Nike 接收器连接到 iPod nano(第 6
代)上,才能使用心率监视器或遥控器。
首次使用这类设备之前,您必须将它链接到 iPod nano 接收
器、iPhone 或 iPod touch。
若要链接到 Nike + iPod 兼容的遥控器(单独销售):
m iPod nano(第 5 代或旧款机型):将 Nike + iPod 接收器
连接到 iPod nano,选取“Nike + iPod”>“设置”>“感应
器”>“链接”,然后按照屏幕指示进行操作。
m iPod nano(第 6 代):选取“设置”>“健身”>
“Nike + iPod 运动套件”>“遥控器”。打开“遥控器”
选项,轻按“链接”。
m iPhone 和 iPod touch:选取“设置”>“Nike + iPod”>
“遥控器”,然后按照屏幕指示进行操作。
55
Page 56

若要链接到 Nike + iPod 兼容的心率监视器(单独销售):
m iPod nano(第 5 代或旧款机型):将 Nike + iPod 接收器连
接到 iPod nano,选取“Nike + iPod”>“设置”>“心率监
视器”>“链接”,然后按照屏幕指示进行操作。
m iPod nano(第 6 代):选取“设置”>“健身”>
“Nike + iPod 运动套件”>“心率监视器”>“链接”,然后
按照屏幕指示进行操作。
若要解除设备的链接:
m iPod nano(第 5 代或旧款机型):选取“Nike + iPod”>
“设置”>“遥控器”(或“心率监视器”)>“解除链接”,
然后按照屏幕指示进行操作。
m iPod nano(第 6 代):选取“设置”>“Nike + iPod 运动
套件”>“遥控器”(或“心 率监视器”),然后轻按“解 除链
接”。
m iPhone 和 iPod touch:选取“设置”>“Nike + iPod”>
“遥控器”(或“心率监视器”),然后轻按“解除链接”。
您可以在不与设备解除链接的情况下打开或关闭 Nike+ 兼容的
遥控器的功能。
若要打开或关闭遥控器功能:
m iPod nano(第 5 代或旧款机型):选取“Nike + iPod”>
“设置”>“遥控器”,然后将“遥控器”设定为“打开”
或“关闭”。
m iPod nano(第 6 代):选取“设置”>“健身”>
“Nike + iPod 运动套件”>“遥控器”,然后将“遥控器”
设定为“打开”或“关闭”。
m iPhone 和 iPod touch:选取“设置”>“Nike + iPod”>
“遥控器”,然后链接遥控器或解除遥控器的链接。
56
Page 57

使用 iPod nano(第 6 代)和心率监视器进行体育锻炼
如果您有 iPod nano(第 6 代)和兼容的 Nike + iPod 心率监
视器(单独销 售),则在您 进行体育锻炼 时,iPod nano 可以
记录您的心率并将其显示出来。您还可以指定一个由最大心率和
最小心率构成的范围或“区域”(体育锻炼过程中您想要保持的
范围或“区域”),并跟踪在您锻炼时您的心率在多大程度上保
持在该区域内 。在您进行体 育锻炼时,i Pod nano 会随之 显示
您的当前心率;并且在需要时,您可以触摸屏幕以显示向上指或
向下指的箭头,来增强或减弱活动量。进行任何一项标准体育锻
炼时,都可以使用心率监视器。
除跑步或 步行之 外,您 也可以 在参与其 他活动 时监视 心率。 例
如,在参 与篮球 、健美 操、循 环训练、 高尔夫 、徒步 旅行、 足
球等等体育运动时,您可以使用 iPod nano 和心率监视器来监
视心率。
完成体育锻炼后,您可以将心率信息
户,然后在其中查看它。
在设置体育锻炼时,您可以设定一个由最大心率和最小心率构成
的区域(您在选择体育锻炼时想要保持的区域)。您必须先打开
区域体育锻炼功能。
若要打开或关闭区域体育锻炼:
传输到 nikeplus.com 帐
m 轻按“设置”>“健身”>“Nike + iPod 运动套件”,然后轻
按“区域体育锻炼”中的“开/关”按钮。
57
Page 58

当您打开区域体育锻炼并选择体育锻炼后,用于设定心率区域的
选项会显示出来。在您进行体育锻炼时,不管体育锻炼的类型为
何,都会记录心率信息并将其显示出来。
iPod nano(第 6 代)也提供心率体育锻炼。若要进行心率体
育锻炼,您可以指定您想要保持的心率区域,选取您将进行的活
动的类型,然后就可以尽情享受令人愉快的体育锻炼了。您的所
有心率信息都会被自动记录。进行心率体育锻炼时,您的鞋子中
不需要感应器即可记录运动。
若要开始心率体育锻炼:
1 轻按“健身”>“跑步”>“心率”。
2 设定您想要的心率区域。
3 选取活动并轻按“完成”。
4 选取您想要的体育锻炼音乐。
5 轻按“开始体育锻炼”并开始您的体育锻炼。
6 完成后,按下睡眠/唤醒按钮以唤醒屏幕,轻按屏幕以显
示“PowerSong”按钮,轻按屏幕以显示“暂停”按钮。轻
按“暂停”,然后轻按“结束体育锻炼”以完成心率体育锻炼。
在完成心率体育锻炼后,您便可以将信息传输
到 nikeplus.com
帐户,就像处理其他体育锻炼一样。
58
Page 59

链接到另一个感应器
在设备链 接到特 定感应 器后, 它会被设 定为仅 与该感 应器相 链
接。如果您使用其他感应器,则必须将设备设定为链接到其他感
应器。例如,如果您的家里有多个成员拥有感应器和 Nike+ 运
动鞋,您不妨这样做。
若要链接到另一个感应器:
1 iPod nano:将接收器连接到 iPod nano。
2 穿上带有新感应器的鞋子,并确定附近没有其他 Nike + iPod
感应器。
四处走动来激活感应器,以便接收器可以检测到它。
3 将感应器链接到设备:
 iPod nano(第 5 代或旧款机型):选取“Nike + iPod”>
“设置”>“感应器”>“链接”,然后按照屏幕指示进行操
作。一则信息会告诉您 iPod 现在已链接到新感应器。
 iPod nano(第 6 代):选取“设置”>“健身”>
“Nike + iPod 运动套件”>“感应器”,轻按“链接”,
然后在步行或跑步时轻按屏幕以将设备重新链
应器。
 iPhone 和 iPod touch:选取“设置”>
“Nike + iPod”>“感应器”,轻按“链接新感应器”,
然后按照屏幕指示进行操作。
【注】如果您将接收器链接到以前链接过的感应器,Nike + iPod
会检测您的校准设置。您不需要重新校准。
接到不同感
59
Page 60

如果 iPod 接收器被连接到其他 iPod 并且与同一个感应器配合
使用,您 不必重 新链接 或重新 校准。接 收器会 存储您 的设置 、
体育锻炼 历史记 录和体 育锻炼 快捷方式 。您不 需要重 新链接 或
重新校准。
将 Nike + iPod 感应器置入睡眠状态
默认情况下,感应器处于待命和开启状态。如果想要长期存放感
应器或使它停止传输,您可以将它置入睡眠状态。
【重要事项】为了遵守相应的政府法规,将感应器带上飞机之
前,请将其置入睡眠状态。
若要将感应器置入睡眠状态:
m 使用钢笔或回形针按住睡眠/唤醒按钮三秒钟。
ཧಧ/কᅟւഩ
若要唤醒感应器:
m 使用钢笔或回形针按下睡眠/唤醒按钮。
60
Page 61

重要安全信息
【警告】如果不遵循这些安全说明,则可能导致伤害或损失。
体育运动 在开始任何一项体育运动之前,您都应该请医生进行
一次全面 的身体 检查。 在开始 任何体育 锻炼之 前,请 先进行 热
身或伸展运动。运动时请务必小心和集中注意力。跑步过程中,
如果需要 ,请先 慢下来 后,再 调整设备 。如果 您感到 疼痛, 或
感到头晕、眼花、疲惫或呼吸跟不上,请立即停止运动。参加运
动,您应意识到体育锻炼本身的风险(包括这类运动可能导致的
任何伤害)。
不要在水中、水边或潮湿的地方使用接收器、iPhone 或 iPod。
窒息的危险 接收器和感应器可能会有导致窒息的危险。请使它
们远离三岁以下的小孩。
避免听力受损 使用耳塞时如果音量很高,可能会造成听力的永
久性损伤 。请将 音量调 到安全 的水平。 听一段 时间音 乐后, 您
会习惯高一些的音量,虽然可能听起来很正常,但会损坏您的听
力。如果耳朵有耳鸣或声音听不清楚的现象,请停止听并检查听
力。音量越大,听力就越容易受
法保护您的听力:
到影响。听力专家建议按如下方
61
Page 62

 限制以高音量使用耳塞的时间。
 避免通过调高音量来隔离嘈杂的环境。
 如果您听不到周围人说话,请调低音量。
拆开感应器 切勿尝试打开感应器、拆开它或取出电池。里面没
有用户可以自行维修的部件。
了解更多信息及服务与支持
有关 Nike + iPod 常见问题的答案
访问 www.apple.com.cn/support/nikeplus。
有关 Nike + iPod 感应器和接收器的服务与支持
访问 www.apple.com.cn/support/nikeplus。
有关 Nike+ 运动鞋或 nikeplus.com 网站的服务与支持
访问 www.nikeplus.com。
有关使用 iTunes 的信息
打开 iTunes,然后选取“帮助”>“iTunes 帮助”。
有关使用 iPod nano 或
iPod touch 的信息
访问 www.apple.com.cn/support/ipod。
有关使用 iPhone 的信息
访问 www.apple.com.cn/support/iphone。
62
Page 63

目錄
64 歡迎使用 Nike + iPod
64 您個人體能訓練的助手
65 快速入門
73 使用 Nike + iPod
73 校正 Nike + iPod
76 設定距離單位
76 輸入您的重量
76 在體能訓練進行時鎖定您的裝置
77 取得語音回
78 使用 PowerSong
79 暫停體能訓練
79 在體能訓練進行時接聽電話
80 在體能訓練進行時更改音樂
81 自動將體能訓練傳送至 Nikeplus.com
81 在裝置上檢視體能訓練
83 製作自定體能訓練快速鍵
84 購買 Nike+ Workout
85 連結 Nike + iPod 相容遙控器或心率監視器
87 使用 iPod nano(第六代)和“心率監視器”
來體能訓練
89 連結至另一個感應器
90 讓 Nike + iPod 感應器進入睡眠狀態
91 重要的安全資訊
92 瞭解更多內容、服務與支援
饋
63
Page 64

歡迎使用 Nike + iPod
您個人體能訓練的助手
Nike + iPod 將體能訓練的伙伴和指導功能全部整合在
一起。選擇您要的體能訓練類型(未設定目標、距
離、時間或消耗卡路里),選擇讓您保持律動感的
音樂,然後使用語音和螢幕回饋功能來追蹤路程上
每一步的進度。將您的體能訓練資料上傳到 nikeplus.
com,您可在其中設定目標並監控每次體能訓練後的
進步狀況。加入世界最大的線上跑步社群,與來自
全球的跑者一同參與挑戰。
iPhone(3GS 或新款機型)、所有 iPod nano 機型
和 iPod touch(第二代或新款機型)均支援 Nike +
iPod。
1
iPod nano
(ֺτዀێ)
1
Nike + iPod 感應器是 iPod nano(第六代)的選購項
目,且僅在使用 Polar Wearlink® + Heart Rate Transmitter
for Nike+ 進行體能訓練時必需搭配使用。
64
iPod touch
(ɀˤֶณಁዀێ)
ֶณಁዀێ
iPhone 3GS
Page 65

快速入門
請依照下列指示立即開始使用 Nike + iPod。
步驟 1: 在您的裝置上啟用 Nike + iPod。
m iPod nano(第五代或較早機型):將 Nike + iPod
接收器連結至 iPod nano。Nike + iPod 便會顯示在
主選單上。
m iPod nano(第六代):將 Nike + iPod 接收器連結至
iPod nano。點一下“運動”。
【注意】iPod nano(第六代)可以不必使用 Nike +
iPod 接收器和感應器,選擇性追蹤您的體能訓練。
如需更多資訊,請參閱裝置隨附的「iPod nano 使
用手冊」。
m iPhone 和 iPod touch:請選擇“設定”> Nike +
iPod,然後設為“啟用”。Nike + iPod 圖像會顯示
在“主畫面”螢幕上。
【注意】iPhone 3GS 或新款機型和 iPod touch 已內建
接收器;不需外接附加接收器。
步驟 2: 確定您擁有最新的 iPod 和 iTunes 軟體。
1 從 www.apple.com/tw/itunes 網站下載和安裝最新的
iTunes 軟體到您的電腦。
65
Page 66

2 將設備連接到電腦,然後在 iTunes 側邊欄中將其選
取,並按一下“摘要”。
3 若 iTunes 顯示您的 iPod 需要更新,請按一下“更
新”,然後依照螢幕上的指示來操作。
步驟 3: 將“Nike + iPod 感應器”置入 Nike+ 相容
運動鞋。
m 拉出左腳運動鞋內的軟墊,將鞋墊下方的底部凹槽
中的海綿片取下,然後將感應器置入底部凹槽中,
平坦的一面朝上。
Ꮆኂ
當您沒有進行體能訓練的時候,可以讓感應器留在
運動鞋裡,但如果您打算長時間穿著運動鞋而不進
行體能訓練,請將感應器置換為原來的海綿片,藉
此節省電池的電力。
感應器中的電池無法更換或充電,其電力有超過
1000 小時的活動時間。電池電力視使用狀況和其他
因素而有所不同。
66
Page 67

步驟 4: 選擇體能訓練的類型。
開放式體能訓練
 iPod nano(第五代或較早機型):
請選擇 Nike + iPod > Nike + iPod >“基本”。
 iPod nano(第六代):請選擇“運動”>“跑步”>
“基本”。
 iPhone 和 iPod touch:請選擇 Nike + iPod >“基本”。
具有時間目標的體能訓練
 iPod nano(第五代或較早機型):
請選擇 Nike + iPod > Nike + iPod >“時間”。
 iPod nano(第六代):請選擇“運動”>“跑步”>
“時間”。
 iPhone 和 iPod touch:請選擇 Nike + iPod >“時間”。
具有距離目標的體能訓練
 iPod nano(第五代或較早機型):請選擇 Nike + iPod >
Nike + iPod >“距離”。
 iPod nano(第六代):請選擇“運動”>“跑步”>
“距離”。
 iPhone 和 iPod touch:請選擇 Nike + iPod >“距離”。
設定消耗卡路里目標的體能訓練
 iPod nano(第五代或較早機型):請選擇 Nike + iPod >
“設定”>“重量”,然後輸入您的重量。然後按一下
Menu(選單)按鈕,並選擇 Nike + iPod > Nike + iPod >
“卡路里”。
 iPod nano(第六代):請選擇 “設定”>“運動”>
“重量”,然後輸入您的重量。請選擇“運動”>
“跑步”>“卡路里”。
 iPhone 和 iPod to uch:請選擇 “設定”> Nike + iPod >
“重量”,然後輸入您的重量。然後按“主畫面”按鈕,
並選擇 Nike + iPod >“卡路里”。
【注意】只有在第一次開始進行消耗卡路里的體能訓練
時,您才需要輸入您的重量。
67
Page 68

步驟 5: 選擇體能訓練的音樂。
播放項目 執行方式
Nike+ Workout 混曲 請選擇混曲(請參閱
正在播放的歌曲 請選擇“播放中”。
Genius 組曲 請選擇“Genius 組曲”
來自播放列表的歌曲 請選擇“播放列表”,然
Podcast 請選擇 Podcast
有聲書 請選擇“有聲書”
隨機播放的歌曲 請選擇“隨機播放歌曲”。
廣播電台 請選擇“廣播”
沒有音樂 請選擇“無”。
第 84 頁)。
(iPod nano 第六代)。
後選擇一個播放列表。
(iPod nano 第六代)。
(iPod nano 第六代)。
(iPod nano 第六代)。
步驟 6: 開始進行體能訓練。
接著開始步行或跑幾步來啟動您的感應器。當您的
裝置偵測到並連結至感應器,您便可以開始體能訓
練了。
m iPod nano(第五代或較早機型):請按一下中央按
鈕並開始步行或跑步。
m iPod nano(第六代):點一下“開始體能訓練”並
開始步行或跑步。
m iPhone 和 iPod touch:點一下“播放”並開始步行
或跑步。
68
Page 69

步驟 7: 監控您的進度。
Nike + iPod 會在螢幕上自動顯示您的體能訓練狀態,
就像下面的插圖般。(根據您的裝置類型,螢幕顯
示可能會稍有不同。)
iPod nano
(第六代)
iPhone 3GS 或新款機型
和 iPod touch
進行體能訓練時,Nike + iPod 會自動以語音回饋向您
報告目前進度(請參閱第 77 頁「取得語音回饋」)。
您也可以視需要隨時取得回饋。
69
Page 70

若要手動取得語音回饋:
m iPod nano(第五代或較早機型):在體能訓練過程
中隨時按一下中央按鈕。
m iPod nano(第六代):在體能訓練過程中隨時按一
下“睡眠 / 喚醒”按鈕。
m iPhone 和 iPod touch:在體能訓練過程中隨時按一
下“主畫面”按鈕。
【注意】iPhone 以及 iPod touch 必須鎖定才能手動
取得語音回饋(請參閱 第 77 頁「取得語音回饋」)。
步驟 8: 結束體能訓練。
您可以隨時結束您的體能訓練。如果您在達成運動
時間、距離或卡路里的目標之後繼續您的體能訓
練,您的進度仍會繼續受到監控。
若要結束您的體能訓練:
m iPod nano(第五代或較早機型):請按一下
“播放 / 暫停”按鈕(
然後按 Menu(選單)按鈕並選擇“結束體能訓練”。
’)來暫停您的體能訓練。
m iPod nano(第六代):點一下螢幕來顯示“暫停”
按鈕,然後點一下“暫停”。點一
練”。若螢幕為關閉,請按下“睡眠 / 喚醒”按鈕。
【注意】若要在 iPod nano(第六代)上快速暫停或
繼續體能訓練,請按兩下“睡眠 / 喚醒”按鈕。
下“結束體能訓
m iPhone 和 iPod touch:點一下“結束體能訓練”。
若 iPhone 或 iPod 為鎖定狀態,請按下“主畫面”
按鈕並點一下“暫停”。然後拖移滑桿並點一下
“結束體能訓練”。
70
Page 71

步驟 9: 在 nikeplus.com 追蹤您的進度。
在 nikeplus.com 上,您可以依據時間來追蹤進度、
檢視過去所有的體能訓練記錄、設定和監控目標,
並將您的訓練結果與他人比較。您甚至可以在體能
訓練挑戰中與其他線上的 Nike + iPod 使用者進行
競賽。
如果有 iPhone 或 iPod touch,您可以無線傳送體能訓
練資料至 Nike 網站。如果有 iPod nano,您可以從電
腦傳送體能訓練資料至 nikeplus.com。
建議您在上傳體能訓練資料前,先建立一個 nikeplus.
com 帳號。請依照 nikeplus.com 網站上的指示來申請
一個免費的帳號。
若要使用 iPhone 或 iPod touch 來無線傳送體能訓練
資料至 nikeplus.com:
1 請確認您的裝置已連接至 Internet,然後選擇
Nike + iPod。
當您有尚未與 nikep
lus.com 帳號同步的體能訓練時,
會在“歷程記錄”按鈕上顯示紅色小圓點。
2 點一下“歷程記錄”來檢視您的體能訓練。
3 點一下“傳送到 Nike+”按鈕來傳送您的體能訓練資
料至 nikeplus.com。如果您現在不想這樣做,也可以
稍後再進行。
4 輸入您的電子郵件位址及 nikeplus.com 帳號密碼,
然後點一下“登入 Nike +”。
登入之後,您的體能訓練便會傳送至您的 nikeplus.
com 帳號。
若您沒有 nikeplus.com 帳號,請點一下“加入 Nike+”
並依照指示來建立帳號。
71
Page 72

nikeplus.com 網站開啟時會顯示您最近體能訓練的
圖表。
5 依照螢幕上的指示來取存您的體能訓練。
若要從電腦傳送您的 iPod nano 體能訓練資料到
nikeplus.com:
1 請確認您的電腦已連接至 Internet,然後連接 iPod nano
至電腦上。
2 在詢問您是否要將體能訓練資料傳送至 nikeplus.com
網站的對話框中,請按一下“傳送”。如果您現在
不想這樣做,也可以稍後再進行。
3 在詢問您是否要前往 nikeplus.com 網站的對話框中,
請按一下“參訪”。
nikeplus.com 網站開啟時會顯示您最近體能訓練的
圖表。
4 請按一下 Save Your Runs(儲存您的跑步記錄),
然後按一下 Sign Me Up(為我註冊),並依照螢幕
上的指示來操作。
72
Page 73

使用 Nike + iPod
請依照下列指示來瞭解 Nike + iPod 的全部功能。
校正 Nike + iPod
對多數使用者而言,Nike + iPod 的預設校正相當準
確。您可以依照您自然的跑步及步行風格來校正
Nike + iPod,增加準確度。在 iPod nano 上,您可在
已知的距離上執行校正體能訓練,或使用您上次完
成的體能訓練並輸入行走的距離。在 iPhone 或 iPod
touch 上,您可以使用最近完成且已知行走距離的體
能訓練來校正。
若要使用 iPod nano(第五代或較早機型)校正
Nike + iPod 跑步和步行:
1 選擇 Nike + iPod >“設定”>“感應器”>“校正”。
2 選擇“跑步”或“步行”,然後輸入距離。
若要取得最佳結果,所使用的距離至少要有 1.6 公里
(一英里)。您可輸入的最短校正距離為 0.4 公里
(1/4 英里)。
3 按下中央按鈕
4 以穩定、自然的步伐跑動或步行一段所設定的距離。
5 按下 Menu(選單)按鈕並選擇“完成校正”。
畫面上會出現一則訊息,告知您校正是否成功。如
果您要對跑步和步行都進行校正,請重複步驟 1–5。
【注意】即使經過校正,距離測量的準確度仍會因
步態、跑步時的地面、傾斜度和溫度而有變化。
您也可以使用最近完成的體能訓練來校正 iPod
nano。當您行進的已知距離與裝置上顯示的總距離
不相符時,此功能是相當有用的。
。
73
Page 74

若要使用最近完成的體能訓練來校正 iPod nano
(第五代或較早機型):
m 請選擇“結束體能訓練”,然後按住中央按鈕,然
後選擇“校正”。設定行走或跑步時的正確距離,
然後按中央按鈕。
裝置能偵測此體能訓練是步行還是跑步,並能正確
地使用新的校正設定來取代現有的校正設定。
若要使用 iPod nano(第六代)校正 Nike + iPod
跑步和步行:
1 選擇 “設定”>“運動”> Nike + iPod Sport Kit >
“感應器”>“校正”。
2 選擇“步行校正”或“跑步校正”,然後選擇距離
並按一下“完成”。
若要取得最佳結果,所使用的距離至少要有 1.6 公里
(一英里)。您可輸入的最短校正距離為 0.4 公里
(1/4 英里)。
3 選擇伴隨校正體能訓練時所播放的音樂。
4 以穩定、自然的步伐跑動或步行一段所設定的距離。
5 若螢幕為關閉,請按一下“睡眠 / 喚醒”按鈕,
點一下螢幕來顯示
“暫停”按鈕,然後點一下
“停止”。
畫面上會出現一則訊息,告知您校正是否成功。如
果您要對跑步和步行都進行校正,請重複步驟 1–5。
【注意】即使經過校正,距離測量的準確度仍會因
步態、跑步時的地面、傾斜度和溫度而有變化。
使用 iPhone 或 iPod touch,您可以使用最近完成的體
能訓練來校正 Nike + iPod。您可以僅校正四分之一英
里或更長距離的體能訓練。
74
Page 75

若要使用最近完成的體能訓練來校正 iPhone 或
iPod touch:
m 點一下“結束體能訓練”,然後點一下“校正”。設定您
所跑步或步行的正確距離,然後點一下“完成”。
裝置會以新的校正數據來更新並覆蓋之前的步行或
跑步步速。
若要以預設的設定來重置 Nike + iPod 校正設定:
m iPod nano(第五代或較早機型):請選擇 Nike + iPod >
“設定”>“感應器”>“校正”>“重置步行”(或“重置
跑步”)。
m iPod nano(第六代):請選擇“設定”>“運動”>
Nike + iPod Sport Kit >“感應器”>“校正”>“重置
步行”(或“重置跑步”)>“重置”。
m iPhone 和 iPod touch:選擇“設定”> Nike + iPod,
然後點一下“重置校正”。
75
Page 76

設定距離單位
您可以設定 Nike + iPod 以英里或公里來測量您的體
能訓練。
若要設定距離單位:
m iPod nano(第五代或較早機型):請選擇 Nike + iPod >
“設定”,然後將“距離”設為“英里”或“公里”。
m iPod nano(第六代):請選擇“設定”>“運動”>
“距離”,然後選擇“英里”或“公里”。
m iPhone 和 iPod touch:請選擇“設定”> Nike + iPod >
“距離”,然後選擇“英里”或“公里”。
輸入您的重量
若要輸入您的重量:
m iPod nano(第五代或較早機型):請選擇 Nike + iPod >
“設定”>“重量”,然後輸入您的重量。
m iPod nano(第六代):請選擇“設定”>“運動”>
“重量”,然後輸入您的重量。
m iPhone 和 iPod touch:請選擇“設定”> Nike + iPod >
“重量”,然後輸入您的重量
若要準確地計算已消耗的卡路里,請您在體態改變
時更新重量。
。
在體能訓練進行時鎖定您的裝置
您可以鎖定 iPhone 或 iPod touch,以免在體能訓練進
行時意外啟動控制項目。
若要鎖定 iPhone 或 iPod touch:
m 請按“睡眠 / 喚醒”按鈕。
若要解鎖,請按“睡眠 / 喚醒”按鈕,或是按“主畫
面”按鈕並拖移滑桿。
76
Page 77

取得語音回
當您在運動時,Nike + iPod 會依您的狀態定期提供語
音回饋。您可以選擇使用女性或男性的聲音,或者
關閉回饋功能。
若要設定語音類型或關閉語音回饋:
饋
m iPod nano(第五代或較早機型):請選擇 Nike + iPod >
“設定”,然後將“語音回饋”設為“男性”、“女性”
或“關閉”。
m iPod nano(第六代):請選擇“設定”>“運動”>
“語音回饋”,然後選擇“男性”、“女性”或
“關閉”。
m iPhone 和 iPod touch:請選擇“設定”> Nike + iPod >
“語音回饋”,然後選擇“男性”、“女性”或“關閉”。
若已關閉語音回饋,您仍可以手動取得語音回饋。
若要手動取得語音回饋:
m iPod nano(第五代或較早機型):在體能訓練過程
中隨時按一下中央按鈕。
m iPod nano(第六代):在體能訓練過程中隨時按一
下“睡眠 / 喚醒”按鈕。
m iPhone 和 iPod touch:裝置鎖定時請按一下“主畫
面”按鈕。
在 iPod nano 上,語音回饋的功能可以使用英語以
外的部分語言。如果您將 iPod nano 設定為可以使
用語音回饋的某種語言,並將其連接到電腦上(必
須連接 Internet),iTunes 會提示您下載該語言的語
音回饋。
 iPod nano (第五代或較早機型)一次只能使用一
種非英語版本的語音回饋。
 iPhone、iPod touch 和 iPod nano(第六代)能自
動支援所有的語音回饋語言。
77
Page 78

使用 PowerSong
請選擇能激勵您的歌曲並使其成為您的 PowerSong。
您可以在進行體能訓練時,隨時快速切換到您的
PowerSong。
若要選擇 PowerSong:
m iPod nano:請選擇 Nike + iPod >“設定”> PowerSong,
然後選擇歌曲。
iPod nano(第 5 代)也能使用播放列表做為
PowerSong。
iPod nano(第六代):請選擇“設定”>“運動”>
PowerSong,然後選擇歌曲。
m iPhone 和 iPod touch:請選擇“設定”> Nike + iPod >
PowerSong,然後選擇“英里”或“公里”。
若要播放您的 PowerSong:
m iPod nano(第五代或較早機型):在體能訓練時按
住中央按鈕。短暫的暫停後,您的 PowerSong 便會
開始播放。
m iPod nano(第六代):請按一下“睡眠 / 喚醒”
按鈕來喚醒螢幕,然後點一下螢幕來顯示“暫停”
按鈕,然後在體能訓練螢幕點一下 PowerSong。當
螢幕為啟用時,您也可以將兩指按住螢幕來啟動
PowerSong。
m iPhone 和 iPod touch:在體能訓練螢幕上點一下
PowerSong。若 iPhone 或 iPod touch 已鎖定,請按
下“主畫面”按鈕,拖移滑桿將其解除鎖定,然後
點一下 PowerSong。
78
Page 79

暫停體能訓練
您可以暫停您的體能訓練、暫停音樂和資料收集,
於稍後再繼續進行,同時不遺失您的體能訓練資料。
若要暫停或繼續體能訓練:
m iPod nano(第五代或較早機型):請按一下“播放 /
暫停”按鈕(
’)。
m iPod nano(第六代):點一下螢幕來顯示“暫停”
按鈕。點一下“暫停”。點一下“繼續”來繼續體
能訓練。若 iPod nano(第六代)螢幕為關閉,請按
下“睡眠 / 喚醒”按鈕來將其喚醒。
m iPhone 和 iPod touch:點一下“暫停”。若裝置為
鎖定狀態,請先按一下“主畫面”按鈕。點一下
“播放”來繼續體能訓練。
在體能訓練進行時接聽電話
您可以使用 iPhone 在進行體能訓練時接聽電話。
若您接到電話,您的體能訓練會在您接聽電話時自
動暫停。
若要接聽電話:
m 點一下“接聽”,或者按下麥克風按鈕(若您配戴
了立體聲耳麥)。若 iPhone 已鎖定,請拖移滑桿來
解除鎖定。
將來電設成靜音:
若要
m 按下“睡眠 / 喚醒”按鈕或音量按鈕。讓來電靜音
後,在其進入語音信箱前,您仍然可以接聽電話。
79
Page 80

若要拒絕來電:
m 點一下“拒絕”,或按住耳麥上的麥克風按鈕約兩
秒鐘,然後放開按鈕。兩聲低沉的嗶聲會確認您已
拒絕通話。
您也可以快速地按兩下“睡眠 / 喚醒”按鈕來拒絕來
電。這樣會將鈴聲設成靜音,但是直到來電被轉接
到語音信箱之後音樂才會繼續,而體能訓練會繼續
在幕後執行。
若要在通話後繼續體能訓練:
m 點一下“播放”。
在體能訓練進行時更改音樂
您可以在體能訓練期間更改音樂,同時不遺失您的
體能訓練資料。您的體能訓練會在音樂更改時暫停。
若要在體能訓練進行時更改音樂:
1 iPod nano(第五代或較早機型):按下“選單”按
鈕並選擇“更改音樂”。您的體能訓練便會暫停。
iPod nano(第六代):點一下螢幕來顯示“暫停”
按鈕。點一下“暫停”,然後點一下“更改音樂”
。若 iPod nano(第六代)螢幕為關閉,請按下“睡
眠 / 喚醒”按鈕來將其喚醒。
iPhone 和 iPod touch:點一下“暫停”
下“更改音樂”。若裝置已鎖定,請先按下“主畫
面”按鈕,並拖移滑桿將其解除鎖定。
2 iPod nano(第五代或較早機型):選擇新的音樂。
您的體能訓練便會自動繼續進行。
iPhone、iPod touch 和 iPod nano(第六代):選擇
新的音樂。
80
,然後點一
Page 81

自動將體能訓練傳送至 Nikeplus.com
您可以設定 iTunes 在您將 iPod nano 連接到電腦時,
自動透過 Internet 將您的體能訓練資料傳送至
nikeplus.com。
若要將體能訓練自動傳送至 nikeplus.com:
1 請確認您的電腦已連接至 Internet,然後連接
iPod nano 至電腦上。
2 在電腦或裝置上打開 iTunes,按一下 Nike + iPod
標籤頁,然後選擇“自動將體能訓練資料傳送至
nikeplus.com”。
3 按一下註記框下方的“參訪 nikeplus.com”;或是
若您已設定自動傳送體能訓練,請在顯示的對話框
中按一下“參訪”。
nikeplus.com 網站開啟時會顯示您最近體能訓練的
圖表。
4 按一下“儲存您的跑步資料”並登入,或若您沒有
註冊,請進行註冊。
請參訪 nikeplus.com 網站以取得 Nike 的隱私
條款與條件。
政策及
在裝置上檢視體能訓練
您的 iPod nano、iPhone 或 iPod touch 可儲存多達
一千次您最近的體能訓練資料,包含日期、時間、
持續時間、距離、步速和消耗的卡路里。
若要在裝置上檢視最近的體能訓練:
m iPod nano(第五代或較早機型):請選擇 Nike +
iPod >“歷程記錄”。
m iPod nano(第六代):請選擇螢幕底部的“運動”>
“歷程記錄”。
81
Page 82

m iPhone 和 iPod touch:請選擇 Nike + iPod,然後點一
下螢幕底部的“歷程記錄”。
iPod nano(第五代或新款機型)能提供您體能訓
練的每天總和:使用 Nike + iPod 相容健身房設備
的 Nike + iPod 體能訓練、計步器步數,和心肺體能
訓練。
若要在 iPod nano(第五代或較早機型)上檢視體
能訓練:
1 從“歷程記錄”選單中選擇“每天總和”。
2 選擇日期和活動。
3 將 iPod nano(第五代)旋轉為橫向來查看該活動
的圖形。
若要刪除單筆體能訓練時程:
m iPod nano(第五代或較早機型):請選擇 Nike + iPod >
“歷程記錄”。選擇體能訓練時程,按住中央按鈕,然
後選擇“刪除”。
您無法在 iPod nano(第六代)上刪除單筆的體能
訓練。
iPhone 和 iPod touch:選擇 Nike + iPod,然後點一
下“歷程記錄”
訓練時程,然後點一下“刪除”。
在 iPhone、iPod touch 和 iPod nano(第六代)上,您
可以從“歷程記錄”螢幕的最上方點一下“清除”,
藉此刪除“歷程記錄”中所有的體能訓練時程。
82
。點一下“編輯”,選擇一筆體能
Page 83

製作自定體能訓練快速鍵
自定體能訓練快速鍵可讓您輕鬆地選擇和重複體能
訓練。iPod nano(第四代或新款機型)可自動儲存
您已完成的體能訓練作為快速鍵。而 iPhone 和
iPod touch 也可讓您製作自定的體能訓練快速鍵。
若要在 iPhone 3GS 或新款機型和 iPod touch 上製作
自定的體能訓練快速鍵:
1 請選擇 Nike + iPod,然後點一下螢幕底部的“我的
體能訓練”。
2 點一下加號(+),然後選擇體能訓練類型和體能
訓練目標。
3 請選擇音樂,輸入體能訓練的名稱,然後點一下
“儲存”。
【注意】您只能在 iPhone 和 iPod touch(第二代或
新款機型)製作自定的體能訓練快速鍵。
若要在 iPhone 3GS 或新款機型和 iPod touch 上刪除
自定的體能訓練快速鍵:
m 選擇 Nike + iPod,然後點一下“我的體能訓練”。
點一下“編輯”,選擇一
“刪除”。
若要選擇自定的體能快速鍵:
個快速鍵,然後點一下
m iPod nano(第四代或第五代):請選擇 Nike + iPod,
然後選擇快速鍵。快速鍵會依據體能訓練和音樂的類
型來命名。快速鍵無法刪除。
m iPod nano(第六代):請選擇“運動”>“跑步”,
然後點一下“我的體能訓練”。選擇快速鍵。快速
鍵會依據體能訓練和音樂的類型來命名。快速鍵無
法刪除。
83
Page 84

m iPhone 和 iPod touch:選擇 Nike + iPod,然後點一
下“我的體能訓練”。快速鍵會依照您製作體能訓
練時所指定的名稱來排列。
您最近一次自定的體能訓練快速鍵會顯示在列表的
最上方。
購買 Nike+ Workout
您可以購買與下載融合了專業指導於連續音樂之中
的 Nike+ Workout。當您購買 Nike+ Workout 時,會得
到一個包含音樂及旁白的體能訓練單曲,而您也會
在混曲中找到全部的個別曲目。為您的體能訓練水
準與風格選擇搭配的混曲。
若要購買 Nike+ Workout:
1 打開 iTunes 並按一下視窗左側的 iTunes Store,然
後在 iTunes 的搜尋欄位中輸入“Nike Sport Music”
(Nike 運動音樂)。
2 按一下您所選 Nike+ Workout 旁的 Buy(購買)按
鈕。
3 依照螢幕上的指示來完成購買過程。下載會立即
。
開始
4 將裝置連接到您的電腦上,然後將體能訓練載入
裝置。
【注意】在美國和其他許多國家與地區,iTunes Store
服務僅提供給 13 歲以上的使用者;如需相關國家
或地區的列表,請前往 www.apple.com/tw/itunes/
download 網站。需遵守相關的條款。您必須有
Internet 連線(可能需付費)才能使用 iTunes Store。
84
Page 85

連結 Nike + iPod 相容遙控器或心率監視器
Nike + iPod 相容裝置需另外購買,不包含於
“Nike + iPod Sport Kit”和“Nike + iPod 感應器”。
當您在進行體能訓練時,您可以使用相容的遙控器
來以無線方式遙控 Nike + iPod。
iPod nano(第五代或新款機型)也支援 Nike + iPod
相容心率監視器。
【注意】您必須將 Nike + iPod 接收器連結至 iPod
nano(第六代)才能使用心率監視器或遙控器。
在初次使用其中一種裝置之前,您必須將其連結至
iPod nano 接收器、iPhone 或 iPod touch。
若要連結至 Nike + iPod 相容遙控器(需另外購買):
m iPod nano(第五代或較早機型):連接您的
Nike + iPod 接收器至 iPod nano,選擇 Nike + iPod >
定”>“感應器”>“連結”,然後依照螢幕上
“設
的指示來操作。
m iPod nano(第六代):請選擇 “設定”>“運動”>
Nike + iPod Sport Kit >“遙控器”。啟用“遙控器”
選項然後點一下“連結”。
m iPhone 和 iPod touch:選擇“設定”> Nike + iPod >
“遙控器”,然後依照螢幕上的指示來操作。
85
Page 86

若要連結至 Nike + iPod 相容心率監視器(需另外
購買):
m iPod nano(第五代或較早機型):連接您的
Nike + iPod 接收器至 iPod nano,選擇 Nike + iPod >
“設定”>“心率監視器”>“連結”,然後依照螢
幕上的指示來操作。
m iPod nano(第六代):請選擇“設定”>“運動”>
Nike + iPod Sport Kit >“心率監視器”>“連結”,然
後依照螢幕上的指示來操作。
若要中斷連結裝置:
m iPod nano(第五代或較早機型):請選擇
Nike + iPod >“設定”>“遙控器”(或“心率監視
器”)>“中斷連結”,然後依照螢幕上的指示來
操作。
m iPod nano(第六代):請選擇“設定”> Nike + iPod
Sport Kit >“遙控器”(或“心率監視器”),然後
點一下“中斷連結”。
m iPhone 和 iPod touch:請選擇“設定”>
Nike + iPod >“遙控器”(或“心率監視器”),
然後點一下“中斷連結”。
您可以啟用或關閉 Nike+ 相容遙控器的功能,無須
中斷連結裝置。
若要啟用或關閉遙控器功能:
m iPod nano(第五代或較早機型):請選擇
Nike + iPod >“設定”>“遙控器”,然後設定
“遙控器”為“啟用”或“關閉”。
m iPod nano(第六代):請選擇“設定”>“運動”>
Nike + iPod Sport Kit >“遙控器”,然後設定“遙控
器”為“啟用”或“關閉”。
86
Page 87

m iPhone 和 iPod touch:請選擇“設定”>
Nike + iPod >“遙控器”,然後連結或中斷連結遙
控器。
使用 iPod nano(第六代)和“心率監視器” 來體能訓練
若您使用 iPod nano(第六代)及相容的 Nike + iPod
心率監視器(需另外購買),iPod nano 能記錄並
顯示您體能訓練時的心率。您也可以指定在體能訓
練時想保持的最高及最低心率範圍或“區域”,並
追蹤您在運動時保持心率的程度區域。在體能訓練
時,iPod nano 會顯示您目前的心率及向上或向下指
標箭頭,來顯示您需要增加或減少活動的時機。您
可以在做任何標準體能訓練時使用心率監視器。
您也可以在參與除了跑步或步行的活動時監視您的
心率。例如,您可以在參與體育活動(像是籃球、
有氧運動、循環訓練、高爾夫、健行、足球及其他
項目)時使用 iPod nano 及心率監視器。
體能訓練完成時,您可以傳送心率
com 帳號並加以檢視。
設定體能訓練時,您可以設定在選擇體能訓練時想
要保持的最高與最低心率區域。您必須先啟用區域
體能訓練功能。
若要啟用或關閉區域體能訓練:
資訊至 nikeplus.
m 點一下“設定”>“運動”> Nike + iPod Sport Kit >,
然後在“區域體能訓練”中點一下“開啟 / 關閉”
按鈕。
87
Page 88

當您啟用區域體能訓練並選取體能訓練時,會出現
設定心率區域的選項。體能訓練時,會在所有的體
能訓練類型期間記錄並顯示心率資訊。
iPod nano(第六代)也提供心率體能訓練。若要執
行心率體能訓練,請指定要維持的心率區域,選擇
要進行的活動類型,然後開始享受您的體能訓練。
所有的心率資訊都會自動記錄。當您執行心率體能
訓練時,您不需要運動鞋中的感應器來記錄動態。
若要開始心率體能訓練:
1 點一下“運動”>“跑步”>“心率”。
2 設定您要的心率區域。
3 選擇活動並點一下“完成”。
4 選擇您要的體能訓練音樂。
5 點一下“開始體能訓練”並開始進行體能訓練。
6 完成時請按一下“睡眠 / 喚醒”按鈕來喚醒螢幕並
點一下螢幕來顯示“暫停”按鈕。點一下“暫停”
,然後點一下“結束體能訓練”來完成您的心率體
能訓練。
當您完成心率體能訓練時,您可以傳送資訊至
nikeplus.com 帳號,就如同其他的體能訓練一樣。
88
Page 89

連結至另一個感應器
當裝置連結至指定的感應器時,該裝置僅會設定連
結至該感應器。若您使用不同的感應器,您必須設
定裝置連結至其他感應器。例如,若您有一位以上
的家人擁有感應器和 Nike+ 相容運動鞋,您可能會想
要使用這項功能。
若要連結至另一個感應器:
1 iPod nano:連接接收器至 iPod nano。
2 穿上裝有新感應器的運動鞋,並確定附近沒有其他
“Nike + iPod 感應器”。
3 隨意走動一下來啟用感應器,讓接收器能夠偵測
到它。
4 連結感應器至設備:
 iPod nano(第五代或較早機型):請選擇
Nike + iPod >“設定”>“感應器”>“連結”,
然後依照螢幕上的指示來操作。畫面上會出現一
則訊息,指示 iPod 已連結至新的感應器。
 iPod nano(第六代):請選擇“設定”>“運動”>
Nike + iPod Sport Kit >“感應器”,點一下“連結”
然後在步行或跑步時點一下螢幕來將裝置重新連結
至不同的感應器。
 iPhone 和 iPod touch:請選擇“設定”> Nike + iPod >
“感應器”,點一下“新建連結”,然後依照螢幕上的
指示來操作。
【注意】若您連結至之前連結過的感應器,Nike + iPod
便會偵測到您的校正設定。您不必重新校正。
,
89
Page 90

如果您將 iPod 接收器連接到不同的 iPod 上並將其與
相同的感應器搭配使用,則您無須重新連結或重新
校正。接收器會儲存您的設定、體能訓練歷程記錄
和體能訓練快速鍵。您不必重新連結或重新校正。
讓 Nike + iPod 感應器進入睡眠狀態
感應器是預設為作用中且開啟的狀態。如果您想要
將感應器放置一段很長的時間,或讓其停止傳送,
您可以讓它進入睡眠狀態。
【重要事項】為了遵守政府相關的安全規定,請在
將感應器攜帶到飛機上之前,讓感應器進入睡眠
狀態。
若要讓感應器進入睡眠狀態:
m 使用筆尖或迴紋針按住“睡眠 / 喚醒”按鈕三秒鐘。
§ဣ௴ፚ¨ܘ൶
若要喚醒感應器:
m 使用筆尖或迴紋針按一下“睡眠 / 喚醒”按鈕。
90
Page 91

重要的安全資訊
【警告】若未確實遵守以下的安全指示,可能會
導致傷害或損毀的事故。
運動 在開始任何運動計畫之前,應先由醫師對您實
施完整的身體檢查。務必先做好暖身操或伸展操,
再開始任何的體能訓練。運動時,請務必小心並注
意周遭環境。若您在跑步時要調整裝置,有需要的
話請先放慢腳步再進行調整。若您覺得疼痛,或感
到頭昏、暈眩、精疲力盡或呼吸困難,請立即停止
運動。從事運動的時候,您必須承擔體能運動本身
存在的風險,包括此類活動所帶來的任何傷害。
請勿在靠近水或潮溼的環境使用接收器、iPhone 或
iPod。
窒息的危險 接收器與感應器可能會造成潛在的窒息
危險。請讓產品遠離三歲以下的孩童。
避免聽力受損 使用耳機時如果音量過大,可能會
導致永久性的聽力受損。請將音量調整至適當的大
小。如果您長時間在高音量的狀態下聆聽,或許會
因為習慣了高音量而認為這是正常的音量,但這還
是會對您的聽力造成損害。如果您出現了耳鳴或聽
不清楚的現象
聽力。音量愈大,就愈容易也愈快導致聽力受損。
要保護您的聽力,請參考以下來自專家的建議:
,請立即停止使用,並儘速就醫檢查
91
Page 92

 若要以較大的音量來使用耳機,請務必限制使用
的時間。
 請避免用調高音量的方式來阻絕外界環境的雜
音干擾。
 如果您無法聽到週遭其他人在對您說話,請調
低音量。
拆解感應器 請勿嘗試打開、拆解感應器,或取下
感應器的電池。感應器內沒有使用者可自行維修的
組件。
瞭解更多內容、服務與支援
關於 Nike + iPod 的常見問題解答
請前往 www.apple.com/tw/support/nikeplus 網站。
關於 Nike + iPod 感應器與接收器的服務與支援
請前往 www.apple.com/tw/support/nikeplus 網站。
關於 Nike+ 相容運動鞋或 nikeplus.com 網站的
服務與支援
請前往 www.nikeplus.com 網站。
使用 iTunes 的相關資訊
請打開 iTunes,然後選擇“輔助說明”>
“iTunes 輔助說明”。
關於使用 iPod nano 或 iPod touch 的資訊
請前往 www.apple.com/tw/support/ipod 網站。
使用 iPhone 的相關資訊
請前往 www.apple.com/tw/support/iphone 網站。
92
Page 93

차례
94 Nike + iPod
개인용 운동 지원 도구
94
빠른 시작
95
103 Nike + iPod
103 Nike + iPod
106 거리 단위
106 체중
106 운동 중에 장비
107 음성
108 PowerSong
109 운동 일시
109 운동 중에 전화
110 운동 중에 음악
111 Nikeplus.com에
111
113 운동
114 Nike+ Workout
시작하기
사용하기
보정하기
설정하기
입력하기
잠그기
피드백 받기
사용하기
정지하기
받기
변경하기
자동으로 운동 기록 전송하기
장비에서 최근 운동 기록 보기
사용자 단축키 생성하기
구입하기
115 Nike + iPod 호환
링크하기
117 iPod nano(6세대)와
사용하여 운동하기
119 다른
센서에 링크하기
120 Nike + iPod 센서
중요한 안전 정보
121
122 추가 정보,
서비스 및 지원
리모컨 또는 심박수 측정기에
심박수 측정기를
잠자기 상태로 두기
93
Page 94

Nike + iPod
시작하기
개인용 운동 지원 도구
Nike + iPod은 운동
있습니다. 원하는 운동의 종류(기본, 거리, 시간 또는 칼로리
소모 운동)를 선택하고 운동을 독려하는 음악을 선택하며
음성 및 화면상 피드백으로 여러분의 운동 상태를 추적할 수
있습니다
. nikeplus.com에서
업로드하면 목표를 설정하여 운동 기록 간에 향상된 정도를
모니터할 수 있습니다. 세계 최대의 온라인 레이스 커뮤니티에
참가하여 전세계 러너들과 도전에 참여할 수도 있습니다
은
Nike + iPod
iPod touch(2
iPod nano
(
ක౷ කస
1
94
iPhone(3GS 이상), 모든 iPod nano
세대 이상)를 지원합니다
)
iPod nano(6세대)의 경우 Nike + iPod
용
Polar Wearlink® + Heart Rate Transmitter를
Nike+
사용하여 운동하는 경우에만 필요합니다
파트너이자 코치로 모든 지원이 포함되어
목표를 설정한 후 운동 데이터를
.
iPod touch
(2
ໞఝ ၦື
)
iPhone 3GS
센서는 옵션이며
.
ၦື
모델
,
.
1
및
Page 95

빠른 시작
다음 지침에 따라 즉시
단계: 장비에서
1
m
iPod nano(5세대 이전 모델):
에 연결합니다
nano
Nike + iPod을
Nike + iPod을
. Nike + iPod이 주
사용할 수 있습니다
활성화시킵니다
Nike + iPod
메뉴에 나타납니다
수신기를
.
.
iPod
.
m
iPod nano(6세대):
연결합니다. 피트니스를 살짝 누르십시오
참고
: iPod nano(6세대)는 Nike + iPod
사용하지 않고 선택 사항으로 운동 기록을 추적할 수 있습니다
자세한 정보는 해당 장비와 함께 제공되는
설명서
m
iPhone 및 iPod touch:
켬으로 설정하십시오
나타납니다
참고
: iPhone 3GS 이상 및 iPod touch에는 내장
있기 때문에 외장 수신기가 필요하지 않습니다
단계: 최신
2
확인하십시오
1 www.apple.
소프트웨어를 다운로드하여 설치하십시오
Nike + iPod
를 참조하십시오
. Nike + iPod
.
iPod 및 iTunes
.
com/kr/itunes
수신기를
iPod nano에
.
수신기 및 센서를
iPod nano 사용
.
설정 > Nike + iPod을
아이콘이 홈 화면에
소프트웨어가 있는지
사이트에서 최신
.
선택하고
수신기가
.
iTunes
.
95
Page 96

장비를 컴퓨터에 연결하고
2
선택한 다음 요약을 클릭하십시오
에서 해당
3 iTunes
나타나면 업데이트를 클릭하고 화면 상의 지침을 따르십시오
단계
3
넣으십시오
왼쪽 운동화의 밑창을 들어내고 밑바닥 포켓에 있는
m
삽입물을 제거한 다음, 센서를 평평한 면이 위로 향하게 하여
교체하십시오
iPod을
: Nike + iPod
.
.
사이드바에서 장비를
iTunes
.
업데이트해야 한다는 메시지가
센서를
Nike+ 호환
운동화에
.
운동하지 않을 때도 운동화에 센서를 넣은 채로 보관해도
되지만, 오랫동안 이 운동화를 신고 운동할 계획이 없다면
배터리 수명을 절약하기 위해 센서를 삽입물로 교체하는 것이
좋습니다
.
센서의 배터리는 교체하거나 충전할 수 없으며
실제 사용 시간) 이상 운동을 지속할 수 있는 수명을 지니고
(
있습니다. 배터리 수명은 사용 용도 및 기타 요인에 따라
다릅니다
.
96
1000시간
Page 97

4단계: 운동
유형을 선택하십시오
.
제한이 없는 운동
Â
iPod nano(5세대 이전 모델):
Nike + iPod > Nike + iPod >
Â
iPod nano(6세대):
Â
iPhone 및 iPod touch:
피트니스
Nike + iPod >
기본을 선택합니다
달리기
기본을 선택합니다
>
>
기본을 선택합니다
시간을 목표로 한 운동
Â
iPod nano(5세대 이전 모델):
Nike + iPod > Nike + iPod >
Â
iPod nano(6세대):
Â
iPhone 및 iPod touch:
피트니스
Nike + iPod >
시간을 선택합니다
달리기
시간을 선택합니다
>
>
시간을 선택합니다
거리를 목표로 한 운동
Â
iPod nano(5세대 이전 모델):
Nike + iPod > Nike + iPod >
Â
iPod nano(6세대):
Â
iPhone 및 iPod touch:
피트니스
Nike + iPod >
거리를 선택합니다
달리기
거리를 선택합니다
>
>
거리를 선택합니다
칼로리 소모를 목표로 한 운동
Â
iPod nano(5세대 이전 모델):
Nike + iPod >
그런 다음
칼로리를 선택합니다
Â
iPod nano(6세대):
설정
피트니스
Â
iPhone 및 iPod touch:
선택하고 체중을 입력합니다. 그런 다음 홈 버튼을 누르고
Nike + iPod
참고
됩니다
설정
Menu
피트니스
>
달리기
>
칼로리를 선택합니다
>
체중은 칼로리 소모 운동을 맨 처음 시작할 때만 입력하면
:
.
체중을 선택하고 체중을 입력합니다
>
버튼을 누르고
Nike + iPod > Nike + iPod >
.
체중을 선택하고 체중을 입력합니다
>
칼로리를 선택합니다
>
.
설정 > Nike + iPod >
.
체중을
.
.
.
.
.
.
.
.
.
.
.
97
Page 98

운동하면서 들을 음악을 선택하십시오
5단계:
재생 수행
Nike+ Workout
현재 재생 중인 곡 지금
Genius
재생목록에 있는 곡 재생목록을
Podcast Podcast를
오디오북 오디오북을
임의 순서의 곡 노래
라디오 방송국 라디오를
음악 없음 없음을
6단계:
몇 걸음 걷거나 달려서 센서를 활성화하십시오. 장비가
감지되고 센서와 연결되면 운동을 시작할 준비가 된 것입니다
m
iPod nano(5세대 이전 모델):
달리기를 시작하십시오
m
iPod nano(6세대):
시작하십시오
m
iPhone 및 iPod touch:
시작하십시오
98
믹스 믹스를
믹스
운동을 시작하십시오
.
시작을 살짝 누르고 걷거나 달리기
운동
.
재생을 살짝 누르고 걷거나 달리기
.
참조
).
재생 중을
Genius
(iPod nano 6세대).
재생목록을 선택합니다
(iPod nano 6세대).
(iPod nano 6세대).
임의
(iPod nano 6세대).
.
버튼을 누르고 걷거나
중앙
.
선택합니다
(114
선택합니다
믹스를 선택합니다
선택하고 원하는
선택합니다
선택합니다
재생을 선택합니다
선택합니다
선택합니다
.
페이지
.
.
.
.
Page 99

7단계: 운동
Nike + iPod
상태를 표시합니다
다르게 나타날 수 있습니다
상태를 모니터하십시오
은 자동으로 화면에 다음 그림과 비슷한 운동
사용자의 장비 유형에 따라 화면이 약간
. (
.
.)
iPod nano(6세대) iPhone 3GS 이상
Nike + iPod은 운동 중에
음성 피드백을 제공합니다
또한 원할 때마다 피드백을 받을 수도 있습니다
및
iPod touch
여러분의 운동 상태에 대해 자동으로
페이지의
(107
음성 피드백 받기
“
참조
).
”
.
99
Page 100

수동으로 음성 피드백을 받으려면
m
iPod nano(5세대 이전 모델):
버튼을 누르십시오
m
iPod nano(6세대):
누르십시오
m
iPhone 및 iPod touch:
누르십시오
참고
:
touch
참조
).
단계: 운동을 끝내십시오
8
언제든지 운동을 끝낼 수 있습니다. 목표한 시간, 거리 또는
칼로리를 달성한 후에도 계속 운동을 한다면, 계속해서 운동
상태를 모니터합니다
운동을 끝내려면
m
iPod nano(5세대 이전 모델):
운동을 일시 정지하십시오. 그런 다음
운동 끝내기를 선택하십시오
m
iPod nano(6세대):
표시한 다음 일시 정지를 누르십시오. 운동 끝내기를 살짝
누르십시오. 화면이 꺼져 있는 경우 잠자기/깨우기 버튼을
누르십시오
참고
: iPod nano(6세대)에서
다시 시작하려면 잠자기/깨우기 버튼을 이중 클릭하십시오
m
iPhone 및 iPod touch:
iPhone
정지를 살짝 누르십시오. 그런 다음 슬라이더를 드래그하고
운동 끝내기를 살짝 누르십시오
100
.
운동 중에
.
운동 중에
.
수동으로 음성 피드백을 받으려면
가 잠겨 있어야 합니다
.
,
화면을 살짝 눌러 일시 정지 버튼을
.
운동
또는
잠겨있는 경우 홈 버튼을 누르고 일시
iPod이
,
언제든지 중앙
운동 중에
언제든지 잠자기/깨우기 버튼을
언제든지 홈 버튼을
iPhone 및 iPod
페이지의
(107
음성 피드백 받기
“
.
재생/일시 정지 버튼
Menu
버튼을 누르고
.
운동을 빠르게 일시 정지하거나
끝내기를 살짝 누르십시오
.
(’)을 눌러
.
.
”
 Loading...