

Page 1
Aperture
Performing
Image Adjustments
Page 2

K
Apple Computer, Inc.
© 2006 Apple Computer, Inc. All rights reserved.
The owner or authorized user of a valid copy of Aperture
software may reproduce this publication for the purpose
of learning to use such software. No part of this
publication may be reproduced or transmitted for
commercial purposes, such as selling copies of this
publication or for providing paid for support services.
Every effort has been made to ensure that the
information in this manual is accurate. Apple is not
responsible for printing or clerical errors. Because Apple
frequently releases new versions and updates to its
system software, applications, and Internet sites, images
shown in this book may be slightly different from what
you see on your screen.
The Apple logo is a trademark of Apple Computer, Inc.,
registered in the U.S. and other countries. Use of the
“keyboard” Apple logo (Option-Shift-K) for commercial
purposes without the prior written consent of Apple
may constitute trademark infringement and unfair
competition in violation of federal and state laws.
Apple and the Apple logo are trademarks of Apple
Computer, Inc., registered in the U.S. and other countries.
Aperture is a trademark of Apple Computer, Inc.
Page 3

1
Contents
Chapter 1 5 An Overview of Image Adjustments
6
An Overview of Adjustments in Aperture
9
Using the Adjustment Controls
11
Working with Tools in the Toolbar
12
Performing Adjustments in Full Screen Mode
13
Applying Adjustments to a Group of Images
15
Working with Adjustment Presets
19
Remove All Adjustments from Selection Command
19
Using the Color Meter
22
Using an External Editor
23
Understanding How to Read Histograms
Chapter 2 29 Making Image Adjustments
30
Working with Automatic Adjustments
31
Using the Auto Exposure Button
33
Using the Auto Levels Combined Button
34
Using the Auto Levels Separate Button
35
Setting the Auto Levels Options
36
Resetting Auto Levels Adjustments
37
Working with the Red Eye Correction Controls
37
Reducing Red-Eye Using the Red Eye Tool
38
Adjusting the Size of Red Eye Target Overlays
40
Adjusting the Sensitivity of Red-Eye Target Overlays
41
Viewing the Corrected Image Without Red Eye Target Overlays
42
Moving Red Eye Target Overlays
43
Deleting Red Eye Target Overlays
44
Working with the Spot & Patch Controls
44
Spotting Your Images
46
Patching Your Images
49
Using the Spot & Patch Controls
54
Viewing the Corrected Image Without Spot & Patch Target Overlays
54
Moving Spot & Patch Target Overlays
55
Deleting Spot & Patch Target Overlays
3
Page 4

56
Working with the Straighten Controls
57
Rotating Images with the Straighten Tool
58
Rotating Images with the Straighten Controls
59
Working with the Crop Controls
60
Cropping Images with the Crop Tool
62
Displaying the Cropped Image Without the Crop Overlay
63
Cropping Images with the Crop Controls
64
Working with the Exposure Controls
64
Correcting Exposure in the Image
65
Adjusting Saturation in the Image
67
Adjusting Brightness in the Image
69
Adjusting Contrast in the Image
71
Setting the Tint of the Black, Gray, and White Values in the Image
78
Working with the Levels Controls
78
Adjusting the Luminance Levels in an Image
81
Showing Quarter-Tone Levels Controls
81
Adjusting the Brightness of an Image with the Brightness Levels Sliders
82
Using Levels for Color Correction
86
Working with the Highlights & Shadows Controls
86
Adjusting Brightness Values in the Highlight Areas of the Image
87
Adjusting Brightness Values in the Shadow Areas of the Image
88
Using the Highlights & Shadows Advanced Settings
94
Working with the White Balance Controls
95
Adjusting White Balance in the Image with the White Point Eyedropper
96
Adjusting the Color Temperature of the Image with the Temp Controls
97
Adjusting the Tint of the Image with the Tint Controls
98
Working with the Color Controls
10 4
Working with the Monochrome Mixer Controls
10 4
Choosing a Monochrome Mixer Preset
10 6
Using the Monochrome Mixer Controls
10 7
Working with the Color Monochrome Controls
10 8
Working with the Sepia Tone Controls
10 9
Working with the Noise Reduction Controls
111
Working with the Sharpen and Edge Sharpen Controls
112
Working with the Edge Sharpen Controls
11 5
Working with the Sharpen Controls
Index 117
4
Contents
Page 5

1
An Overview
of Image Adjustments
1
Aperture provides adjustment controls to help you improve the
appearance of your images. You can make image adjustments
using the Adjustments Inspector or the Adjustments HUD.
This chapter provides basic information about making adjustments to images, such as
correcting red-eye and adjusting exposure, levels, and white balance.
This chapter covers:
Â
An Overview of Adjustments in Aperture (p. 6)
Â
Using the Adjustment Controls (p. 9)
Â
Working with Tools in the Toolbar (p. 11)
Â
Performing Adjustments in Full Screen Mode (p. 12)
Â
Applying Adjustments to a Group of Images (p. 13)
Â
Working with Adjustment Presets (p. 15)
Â
Remove All Adjustments from Selection Command (p. 19)
Â
Using the Color Meter (p. 19)
Â
Using an External Editor (p. 22)
Â
Understanding How to Read Histograms (p. 23)
5
Page 6
An Overview of Adjustments in Aperture
Adjustment controls are found in the Adjustments Inspector and the Adjustments HUD.
The controls are the same in each. The Adjustments Inspector is shown on the right
side of the screen. The Adjustments HUD is a floating version of the Adjustments
Inspector that can be placed anywhere onscreen, allowing you the most flexibility in
how you use your screen workspace.
You can make the following adjustments to images in Aperture:
Adjustment Function
Red Eye Correction
Spot & Patch
Straighten
Crop
Exposure
Levels
Highlights & Shadows
White Balance
Color
Monochrome Mixer
Color Monochrome
Sepia Tone
Noise Reduction
Sharpen
Edge Sharpen
Reduces red-eye in the eyes of the subjects in your images. Used in
conjunction with the Red Eye tool.
Retouches imperfections in an image, such as sensor dust. Used in
conjunction with the Spot & Patch tool.
Levels the image’s horizon. Used in conjunction with the
Straighten tool.
Trims the image. Used in conjunction with the Crop tool.
Adjusts exposure, saturation, brightness, and contrast, as well as
black, gray, and white tints.
Selectively adjusts the tonal range of an image.
Selectively adjusts the exposure in the shadows and highlights of
an image.
Sets an image’s white balance by adjusting its color temperature
and tint.
Adjusts hue, saturation, and luminance on a color-by-color basis, as
well as chromatic range.
Selectively controls the source red, green, and blue color channels
when a color image is converted to grayscale.
Desaturates the image and applies a color tint of your choosing to
the midtones.
Changes a color image to sepia. Allows you to desaturate the color
image to the level of sepia coloring you want.
Reduces digital noise in an image.
Sharpens the image.
Sharpens the image based on luminance using multiple
sharpening passes.
6 Chapter 1
An Overview of Image Adjustments
Page 7
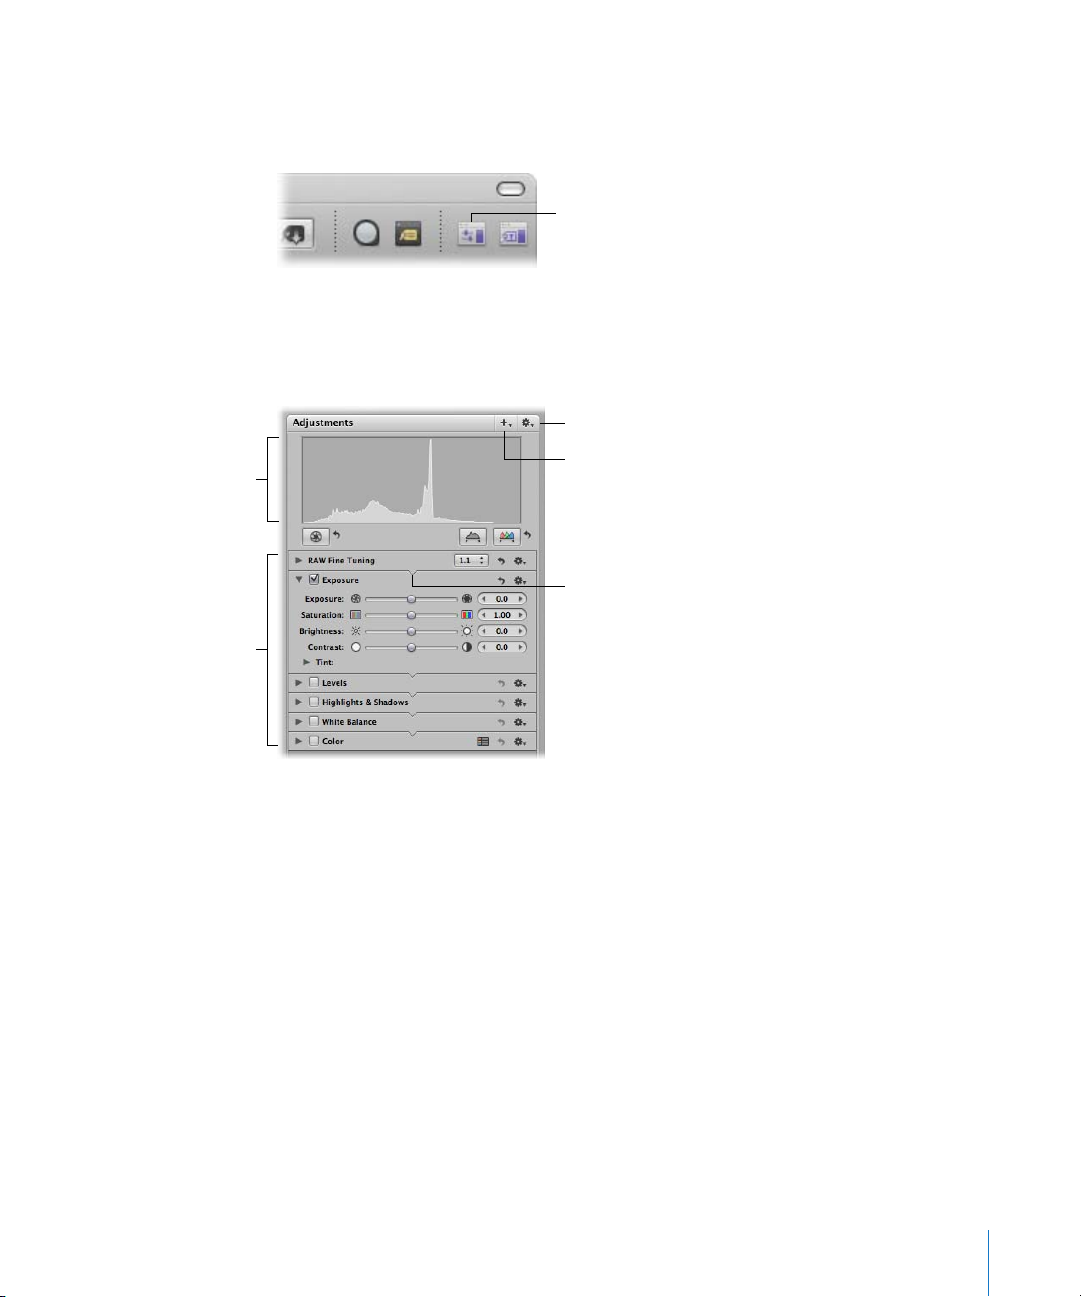
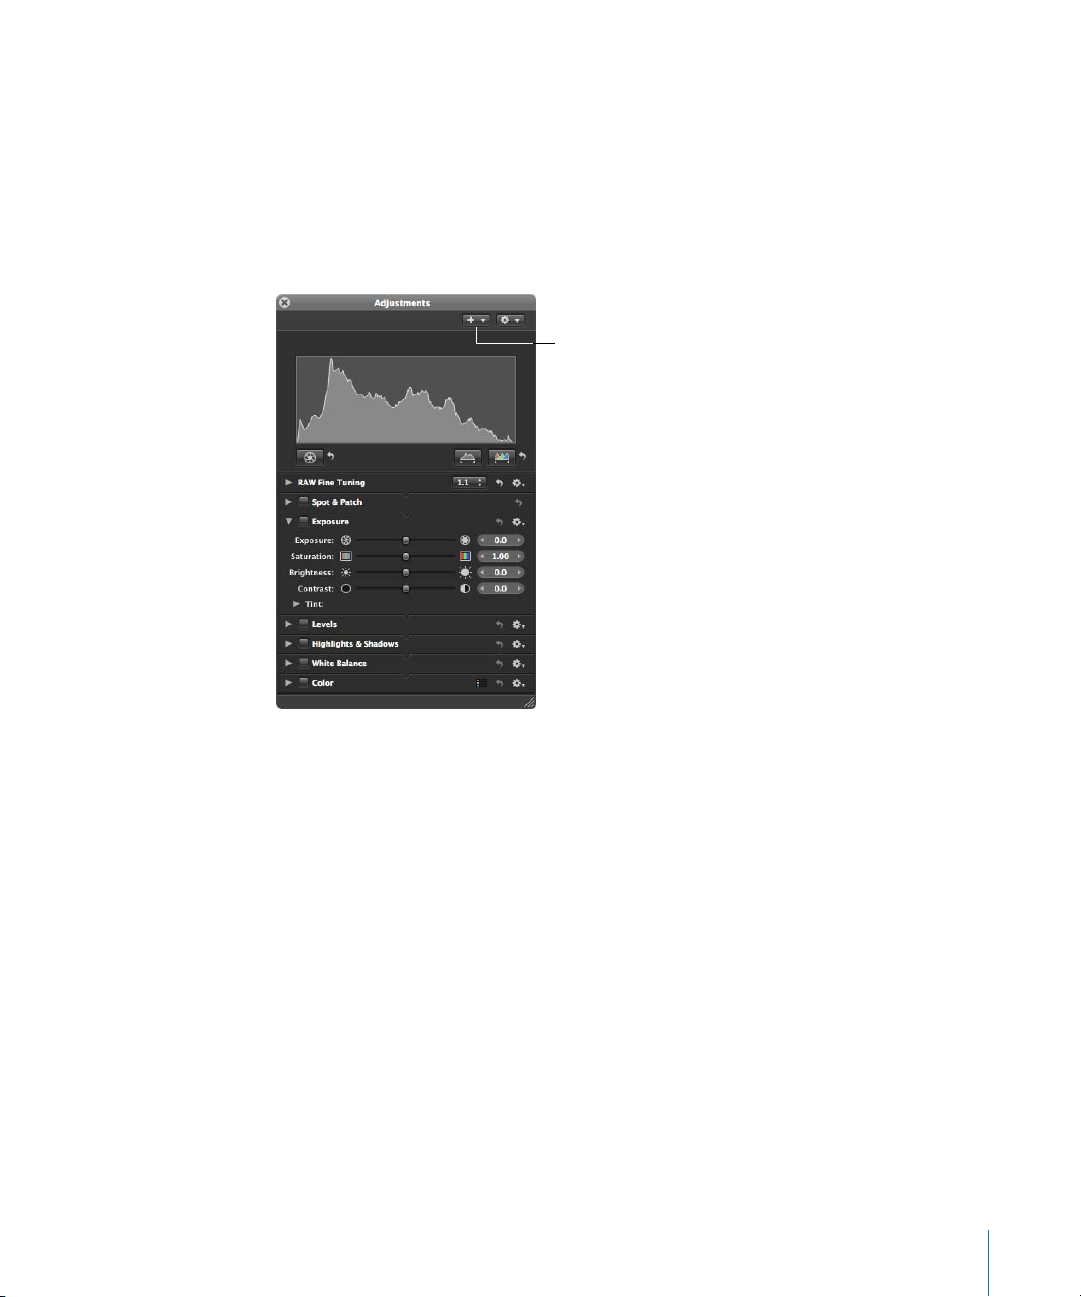
Showing the Adjustment Controls
You can use menu commands, keyboard shortcuts, or the buttons on the right side of
the toolbar to show and hide the Adjustments Inspector.
Adjustments Inspector
button
To show the Adjustments Inspector, do one of the following:
m
Choose Window > Show Adjustments (or press Control-A).
m
Click the Adjustments Inspector button in the toolbar.
Adjustment Action pop-up menu
(set to show luminance)
Histogram
Available adjustments
(Click a disclosure
triangle to view the
controls for an
adjustment.)
Add Adjustments pop-up menu
Double-click the top of the
adjustment to show and hide the
adjustment’s controls.
Each adjustment contains individual properties, called
parameters
, for which you can
specify a range of values. You click an adjustment’s disclosure triangle, or double-click
the top of the adjustment, to view the parameters for the adjustment and the controls
you use to change parameter values. For more information about using the adjustment
controls to change parameter values, see “Using the Adjustment Controls” on page 9.
You can use menu commands and buttons in the Full Screen mode toolbar to show or
hide the Adjustments HUD.
Chapter 1
An Overview of Image Adjustments
7
Page 8
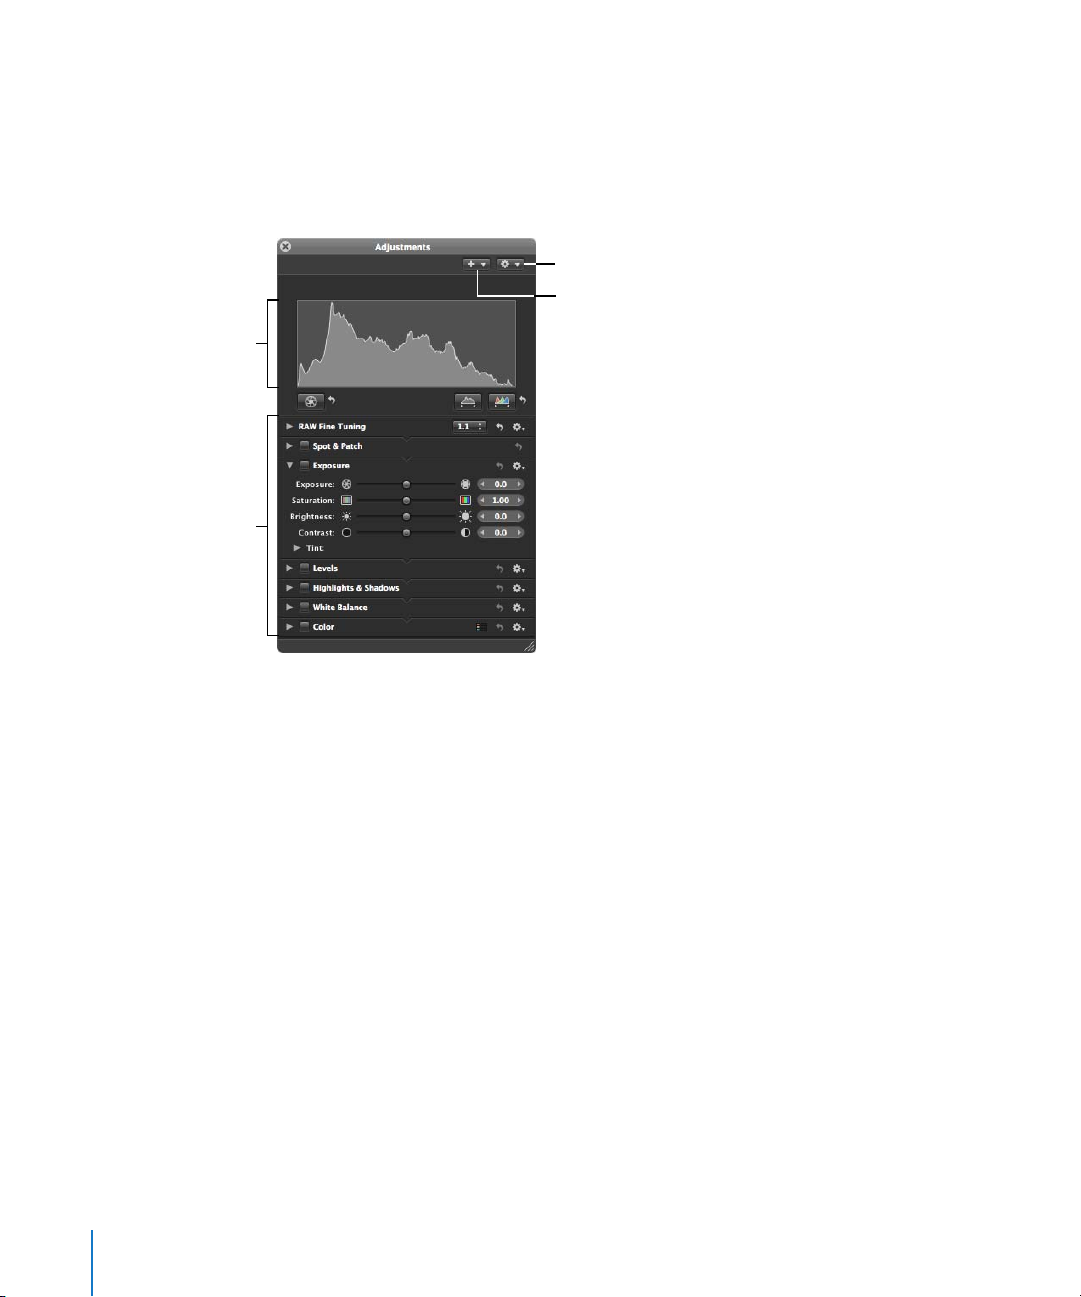
Histogram
(set to show red, green,
and blue channels)
Available adjustments
To show the Adjustments HUD, do one of the following:
m
Choose Window > Show Adjustments HUD (or press H).
m
Click the Adjustments HUD button in the Full Screen mode toolbar.
For more information about Full Screen mode, see “Performing Adjustments in Full
Screen Mode” on page 12.
Adjustment Action pop-up menu
Add Adjustments pop-up menu
Choosing a Histogram View for Adjustments
When you show the Adjustments Inspector or the Adjustments HUD, a histogram of
the selected image’s luminance or color channels appears. The histogram displays a
graph of the brightness values in the image, from the blackest point to the whitest
point. You can adjust the histogram to show luminance; red, green, and blue (RGB)
channels displayed together; or separate red, green, and blue channels.
To choose a histogram view:
m
Choose a view option from the Histogram Options section of the Adjustment Action
pop-up menu.
Note:
The histogram updates in real time in the Viewer and in Full Screen mode, but it
is slightly delayed in the Book Layout Editor, the Webpage Editor, and the Light Table.
For more information about how to interpret a histogram, see “Understanding How to
Read Histograms” on page 23.
8 Chapter 1
An Overview of Image Adjustments
Page 9
Showing Additional Adjustment Controls
The first time you show either the Adjustments Inspector or the Adjustments HUD,
only the Exposure, Levels, Highlights & Shadows, White Balance, and Color
adjustments are available.
To add additional adjustments:
m Choose a type of adjustment from the Add Adjustments pop-up menu at the top of
either the Adjustments Inspector or Adjustments HUD.
Add Adjustments pop-up menu
The new adjustment appears highlighted in both the Adjustments Inspector and the
Adjustments HUD, if both are shown.
Using the Adjustment Controls
Whenever an image is selected and displayed in the Viewer or in Full Screen mode,
you can adjust it using the adjustment controls in the Adjustments Inspector and
Adjustments HUD. You can also adjust images in the Book Layout Editor, Webpage
Editor, and Light Table.
Note: The Crop, Straighten, and Spot & Patch tools and adjustment controls are not
available for use in the Book Layout Editor, Webpage Editor, and Light Table, but you
can easily switch to the Viewer to make your changes.
Chapter 1 An Overview of Image Adjustments 9
Page 10
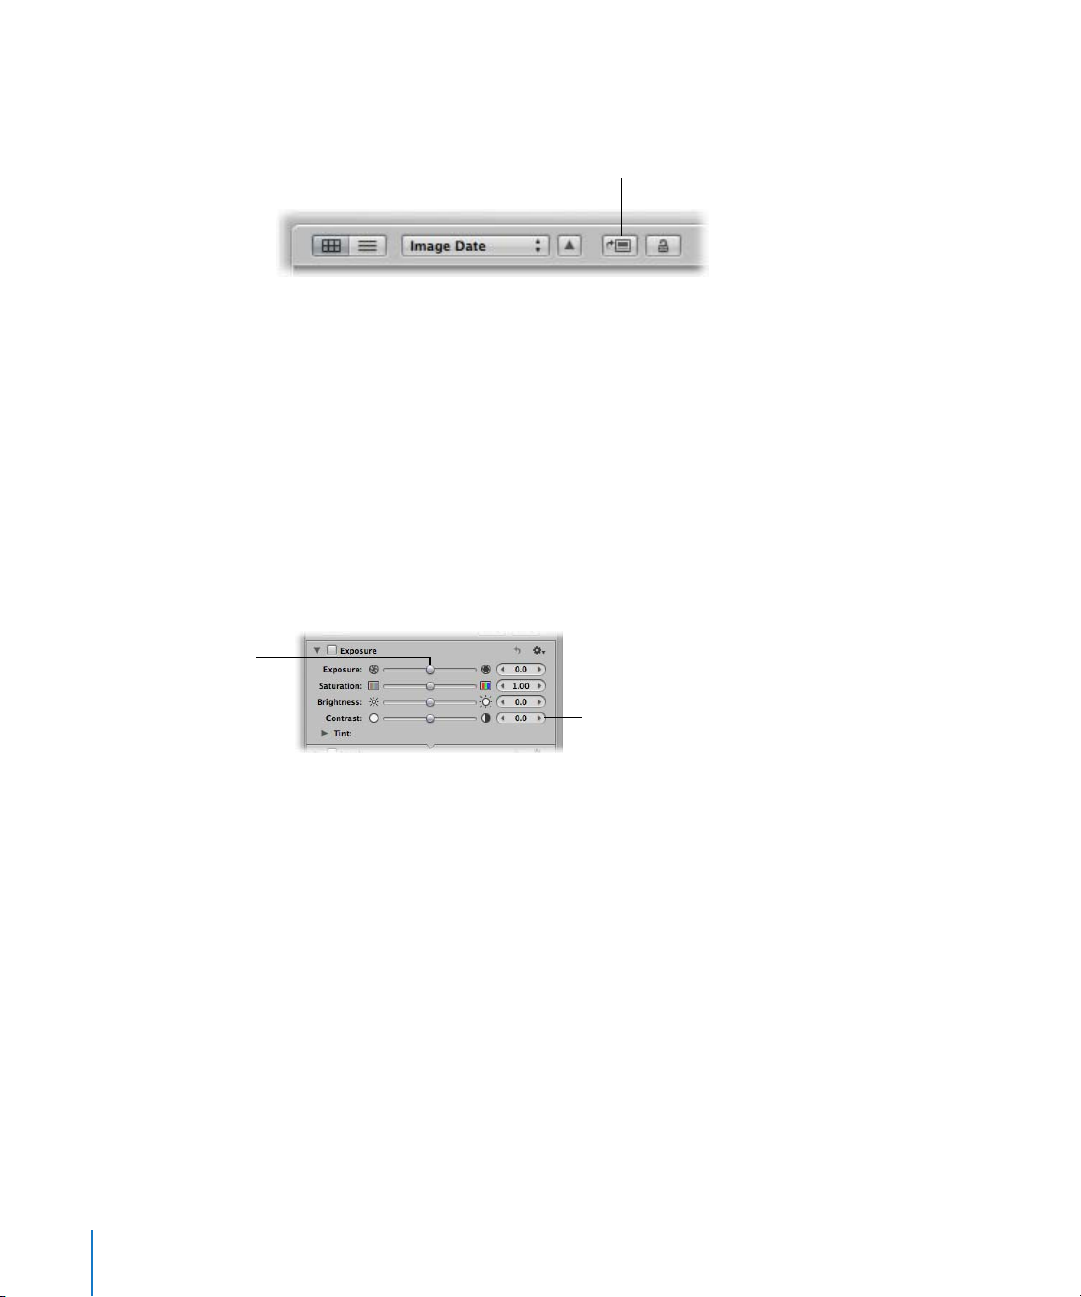
To switch to the Viewer from the Book Layout Editor, Webpage Editor, or Light Table,
do one of the following:
m At the top of the Browser, click the Show Viewer button.
Show Viewer button
When you have finished making the adjustment, click the Show Viewer button again to
return to the previous view.
m If you have a system with more than one display, choose Alternate from the Viewer Mode
pop-up menu in the control bar, then perform the adjustments on the second display.
For more information about the Show Viewer button and the Viewer Mode pop-up
menu, see the Aperture User Manual, available in the Aperture Help menu.
Using Sliders
There are two types of slider controls for changing parameter values—sliders and value
sliders. Slider controls have varying value ranges depending on the parameter.
 Sliders: Drag the slider left or right to set a value.
Drag this slider to
change the value for the
Exposure parameter.
Use this value slider to
change the value for the
Contrast parameter.
 Value sliders: Double-click the value and type a specific number in the value field,
click the left or right arrow, or drag inside the value field to set a value. Often, you
can type a much higher number in the value field than can be achieved by dragging
the normal sliders. When using value sliders, you can use a modifier key to make
value adjustments in small or large increments.
To change values in small increments:
m Option-drag in the value field.
To change values in large increments:
m Shift-drag in the value field.
10 Chapter 1 An Overview of Image Adjustments
Page 11
Turn an adjustment
on or off by selecting or
deselecting the checkbox.
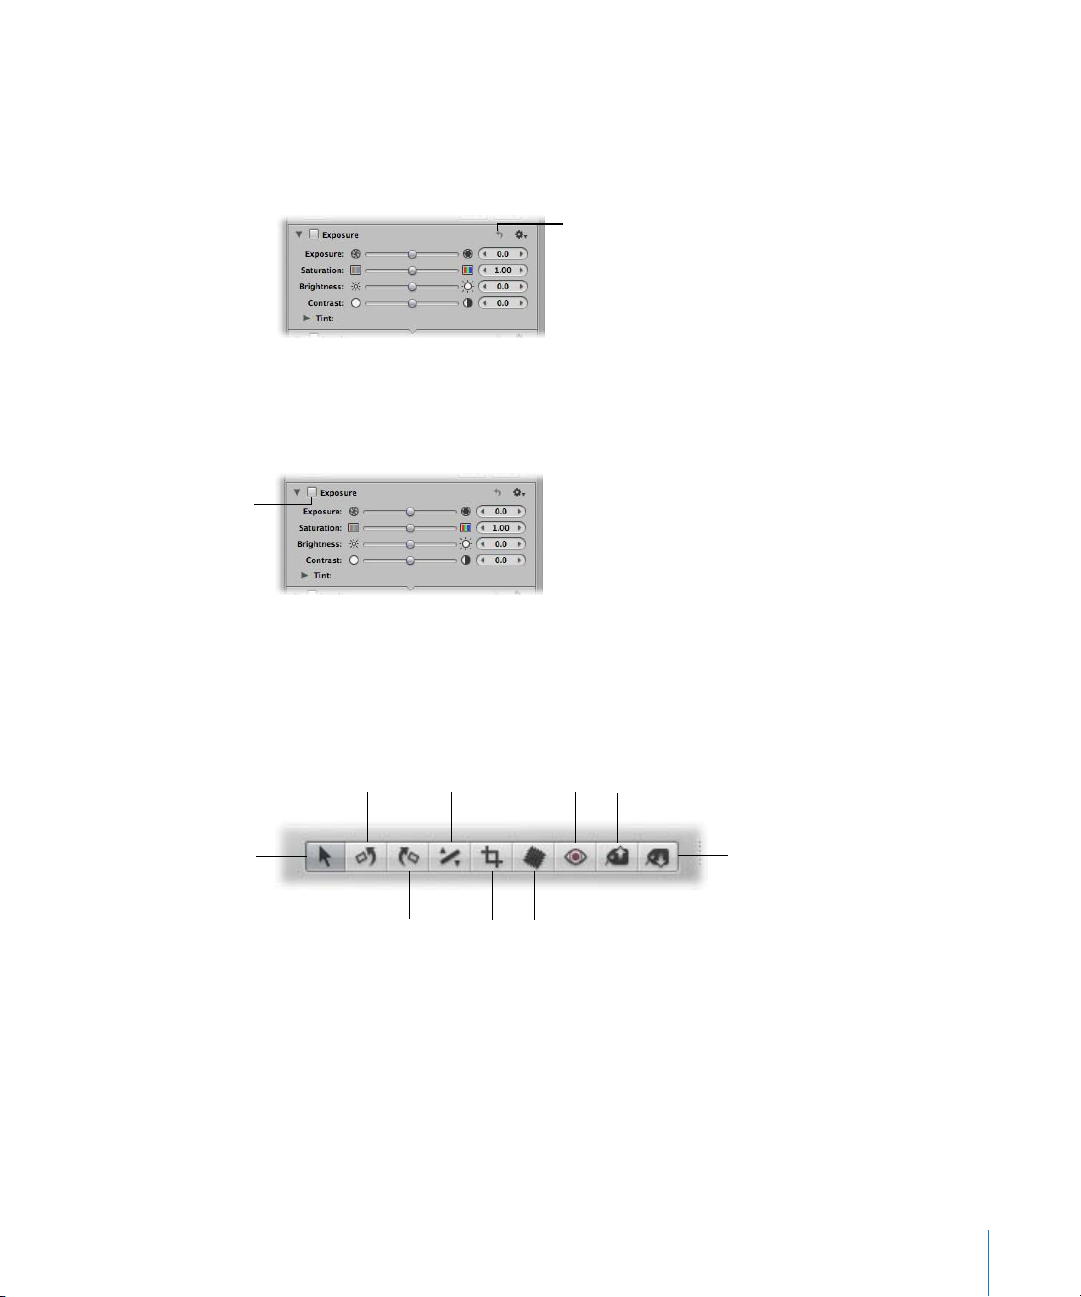
Resetting Parameter Values
You can reset all of the parameters for an adjustment to their default values.
To reset all parameter values for an adjustment:
m Click the Reset button to the right of the adjustment name.
Reset button
Turning Adjustments On and Off
Use checkboxes to turn adjustments on and off. Turning adjustments on and off is a
good way to verify the cumulative effect of adjustments on your image.
Selection
Working with Tools in the Toolbar
The center-right side of the toolbar contains tools for working with your images in the
Viewer and Browser. Many of the tools also work in conjunction with adjustment controls.
For information about the individual tools, see Chapter 2, “Making Image Adjustments.”
Rotate Left
Chapter 1 An Overview of Image Adjustments 11
Straighten
Rotate Right
Crop
Red Eye
Spot & Patch
Lift
Stamp
Page 12
Performing Adjustments in Full Screen Mode
Aperture provides a Full Screen mode to create the best onscreen work environment
for performing color adjustments. Full Screen mode displays an image against a black
background and contains only a few interface elements. It is highly recommended that
you perform adjustments in Full Screen mode to achieve the best results possible. For
more information about Full Screen mode, see the Aperture User Manual, available in
the Aperture Help menu.
To switch to Full Screen mode, do one of the following:
m Choose View > Full Screen (or press F).
m Click the Full Screen button in the control bar.
To switch back to the Aperture main window, do one of the following:
m Click the Exit Full Screen button in the filmstrip (or press F or the Escape key).
In Full Screen mode, you have access to all the tools you need to perform adjustments
to your images.
To show the Adjustments HUD while in Full Screen mode:
m Press H.
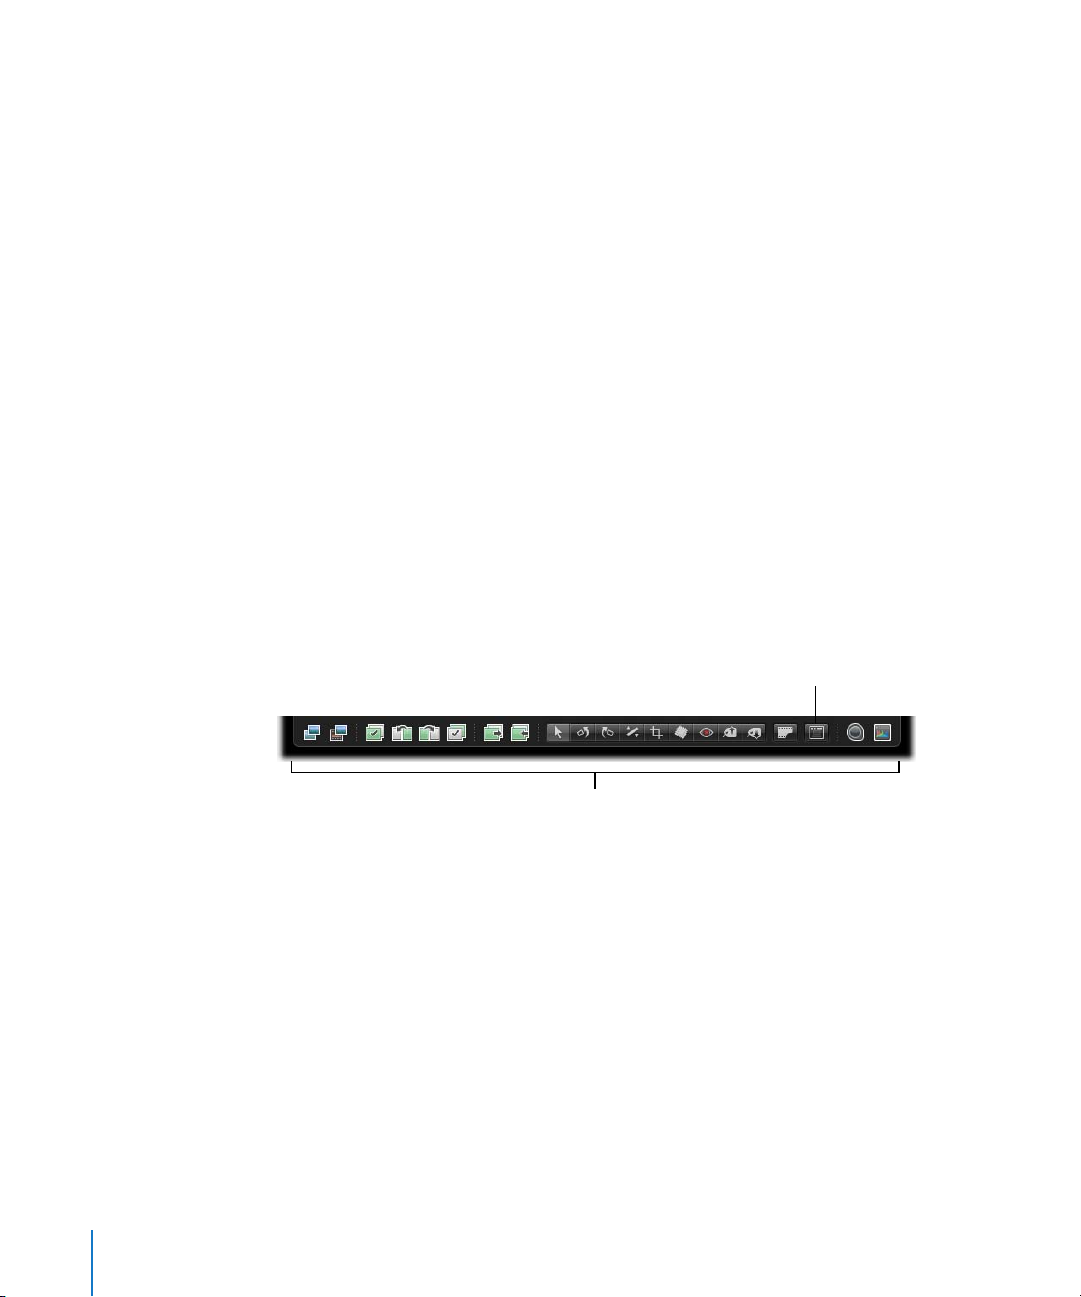
To access a tool in Full Screen mode:
m Move your pointer to the top of the screen, and in the Full Screen mode toolbar that
appears, select a tool.
By default, the toolbar is not shown in Full Screen mode until the pointer is moved to
the top of the screen. You can set the toolbar to remain on the screen.
To keep the Full Screen mode toolbar on the screen:
m Move the pointer to the top of the screen in Full Screen mode, then click the Always
Show Toolbar button in the toolbar.
12 Chapter 1 An Overview of Image Adjustments
Always Show Toolbar button
Toolbar shown at the top of the
screen in Full Screen mode
Page 13
Applying Adjustments to a Group of Images
You can apply an adjustment or group of adjustments to a range of images by first
applying the adjustments to one image, and then lifting the adjustments from the first
image and stamping them on the other images using the Lift and Stamp tools and the
Lift & Stamp HUD.
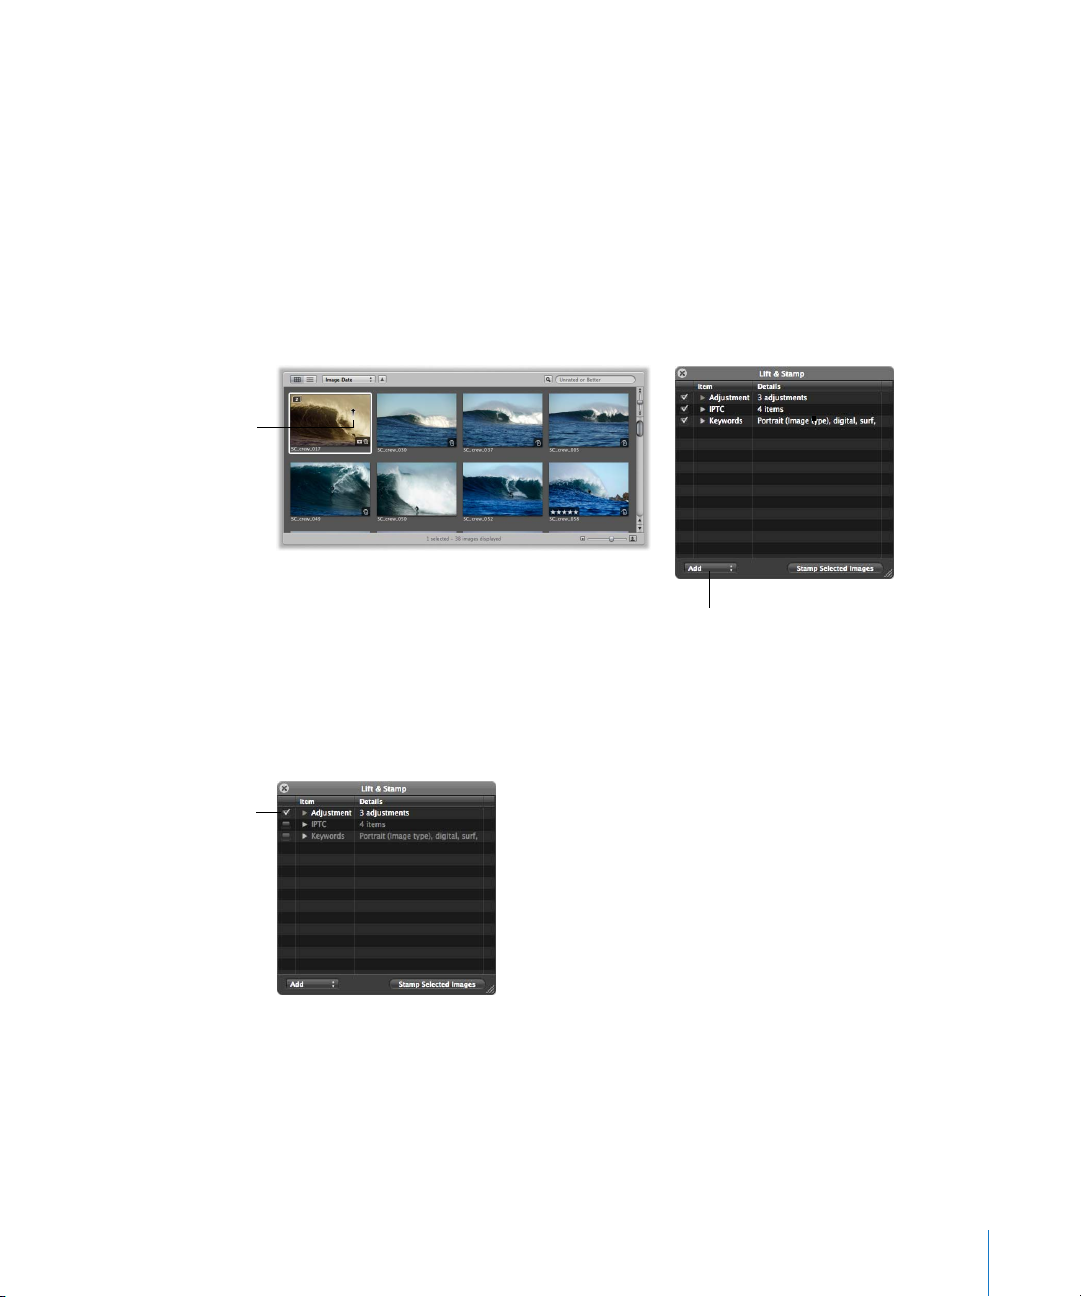
To lift adjustments from one image and stamp them on a group of images:
1 In the toolbar, select the Lift tool (or press O).
The pointer changes from the Selection tool to the Lift tool.
2 Click the image that has the adjustments you want to copy.
Click the image with the
Lift tool.
Deselect a checkbox to
prevent Aperture from
copying the item from
the selected image.
The Lift & Stamp HUD appears.
The Lift & Stamp HUD appears, showing the adjustments, IPTC metadata, and keywords
applied to the image.
3 Deselect the IPTC and Keywords checkboxes to prevent Aperture from copying IPTC
metadata and keywords from the selected image.
Chapter 1 An Overview of Image Adjustments 13
Page 14
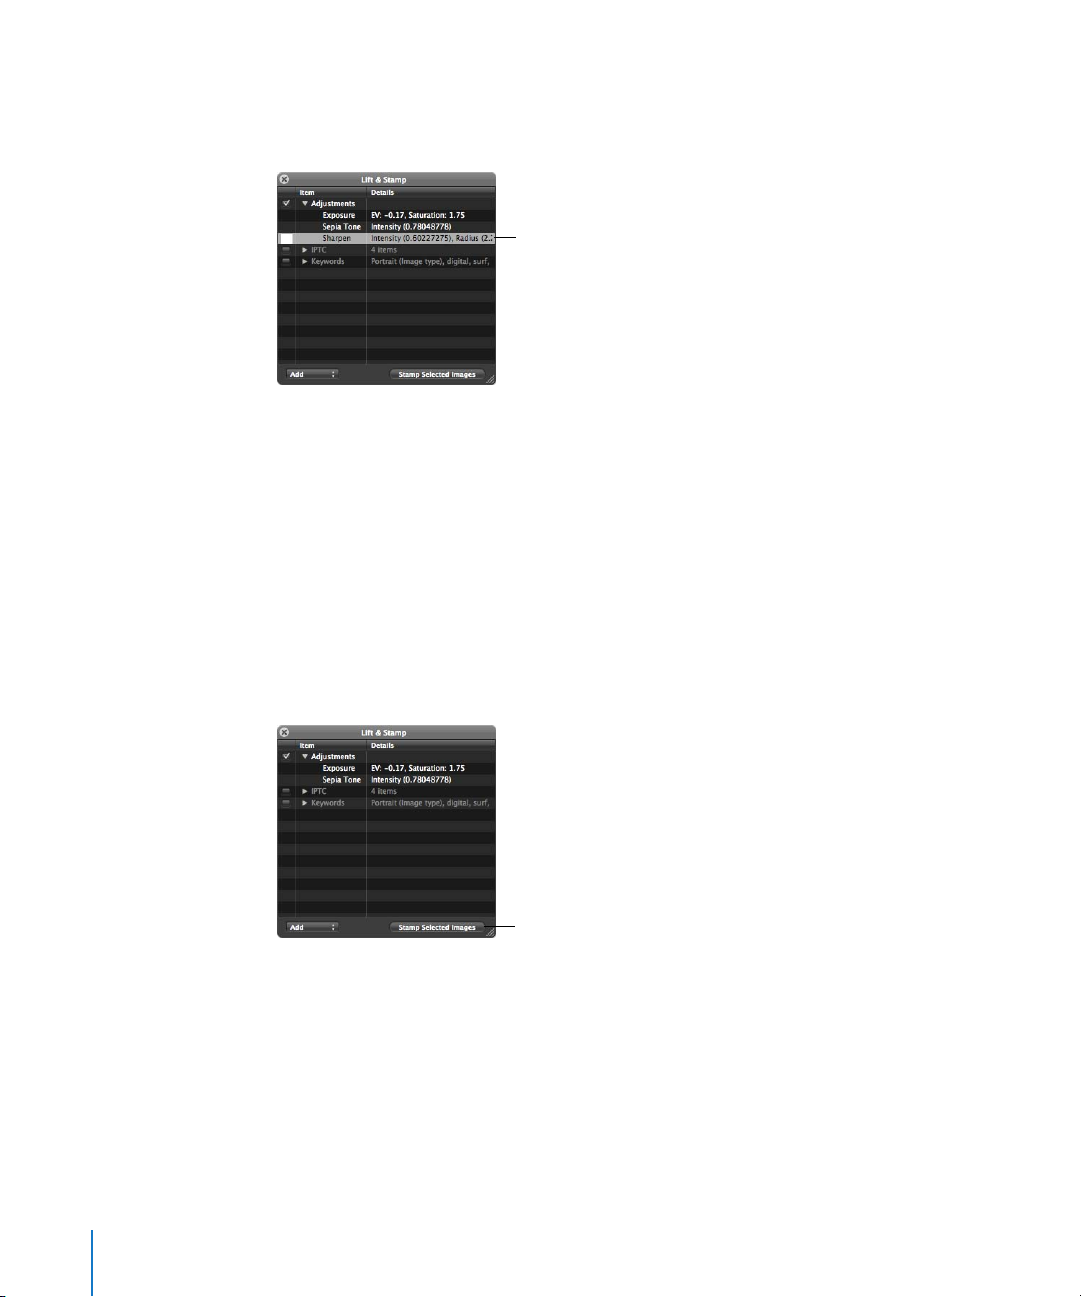
4 If necessary, remove any unwanted adjustments by clicking the Adjustments disclosure
triangle in the Lift & Stamp HUD, selecting the unwanted adjustments, and then
pressing Delete.
Select an adjustment and
press Delete to remove it.
5 In the toolbar, select the Selection tool (or press A), then do one of the following:
 Drag a selection rectangle around the images to which you want to apply
the adjustments.
 Select the images to which you want to apply the adjustments by Shift-clicking to select
a range of adjacent images and Command-clicking to select nonadjacent images.
Note: The adjustments aren’t applied to images within closed stacks. If you want to
stamp the adjustments on images within a stack, you must open it first by choosing
Stacks > Open Stack (or pressing Shift-K).
6 In the toolbar, select the Stamp tool, then click the Stamp Selected Images button in
the Lift & Stamp HUD.
Click the Stamp Selected
Images button to apply
the adjustments to the
selected images.
The adjustments copied from the first image are applied to the selected images. For
more information about using the Lift & Stamp HUD, see the Aperture User Manual,
available in the Aperture Help menu.
14 Chapter 1 An Overview of Image Adjustments
Page 15
Working with Adjustment Presets
If you frequently use the same adjustment parameter settings, Aperture provides the
ability to save these settings as adjustment presets. You can create new adjustment
presets, rename and rearrange adjustment presets, and delete adjustment presets you
no longer use. When you delete an adjustment preset, adjustments already applied to
your images are unaffected. Each individual adjustment has its own set of presets
accessible via its Preset Action pop-up menu. (Adjustment presets are not supplied with
Aperture, and do not appear in the Preset Action pop-up menu until you create them.)
Preset Action
pop-up menu
Creating Adjustment Presets
Creating an adjustment preset is as simple as saving the adjustment parameter settings
and naming them using the Preset Action pop-up menu.
To create an adjustment preset:
1 Select an image with the adjustment parameter settings you want to save.
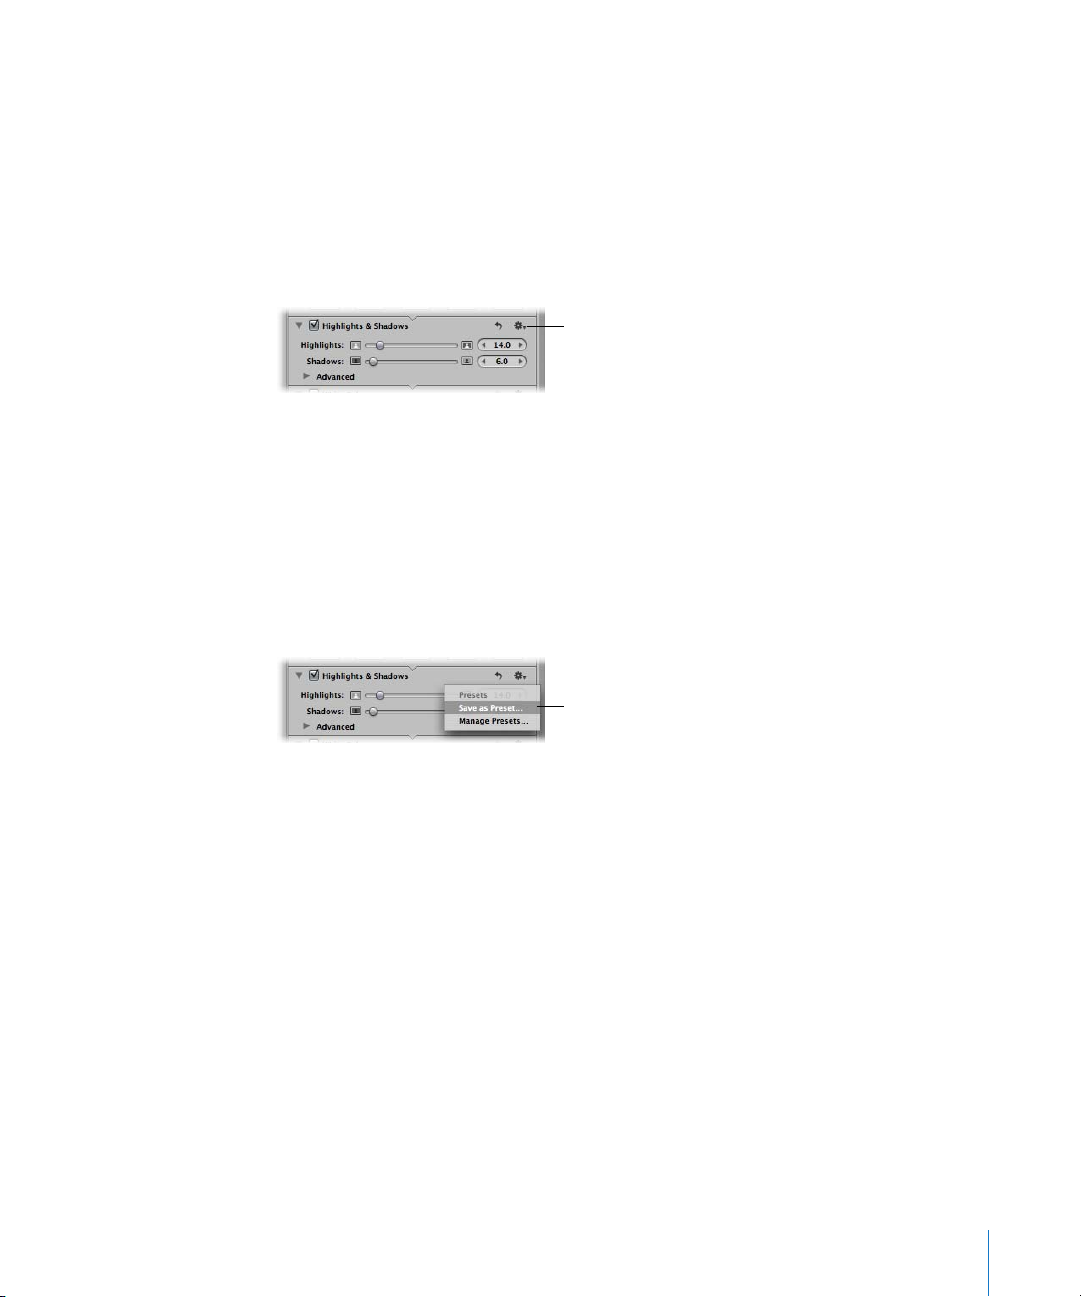
2 In the Adjustments Inspector or Adjustments HUD, choose Save as Preset from the
Preset Action pop-up menu for the adjustment.
Choose Save as Preset
from the Preset Action
pop-up menu.
Note: Each adjustment has its own Preset Action pop-up menu. For example, if you
want to save a White Balance parameter setting as a preset, use the Preset Action
pop-up menu for the White Balance adjustment.
Chapter 1 An Overview of Image Adjustments 15
Page 16
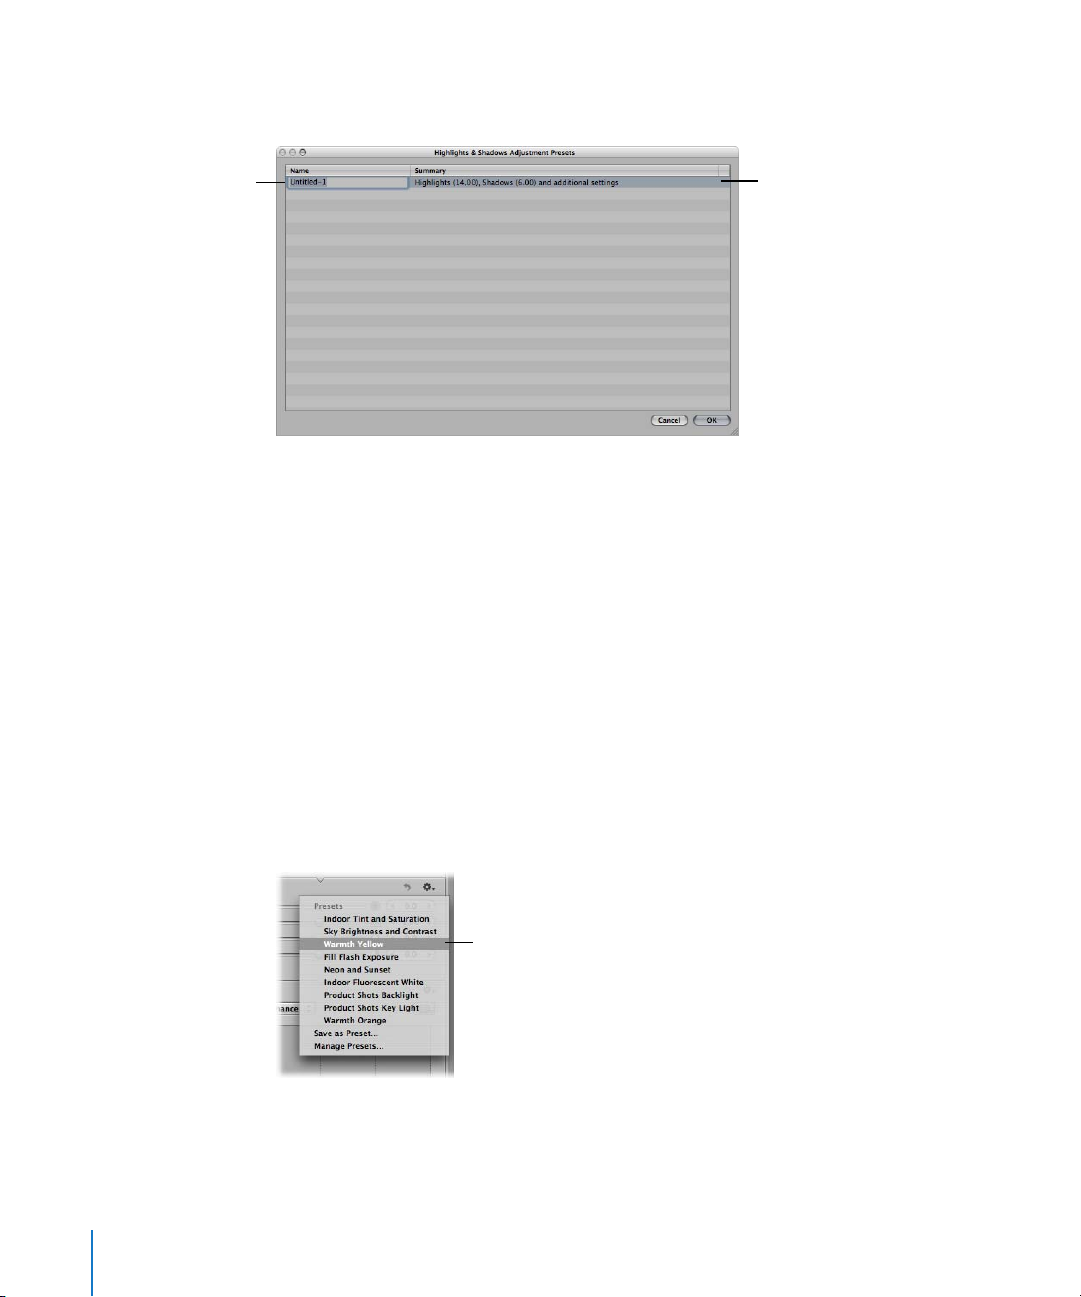
3 In the Adjustment Presets dialog, enter a name for the new adjustment preset, then
click OK.
Enter a name for the
preset here.
The parameter settings
are displayed in the
Summary column.
The adjustment parameter settings are saved as an adjustment preset, and the adjustment
preset is now available for use in the Preset Action pop-up menu for the adjustment.
Applying Adjustment Presets
Applying an adjustment preset to an image is as simple as selecting the image and
choosing the adjustment preset from the Preset Action pop-up menu. When you apply
an adjustment preset to an image, the adjustment controls and parameter values
update to reflect the settings saved in the adjustment preset. If you prefer, you can use
an adjustment preset as a starting point in your image adjustment workflow, and then
fine-tune the adjustment after it’s applied to the image.
To apply an adjustment preset to an image:
1 Select an image.
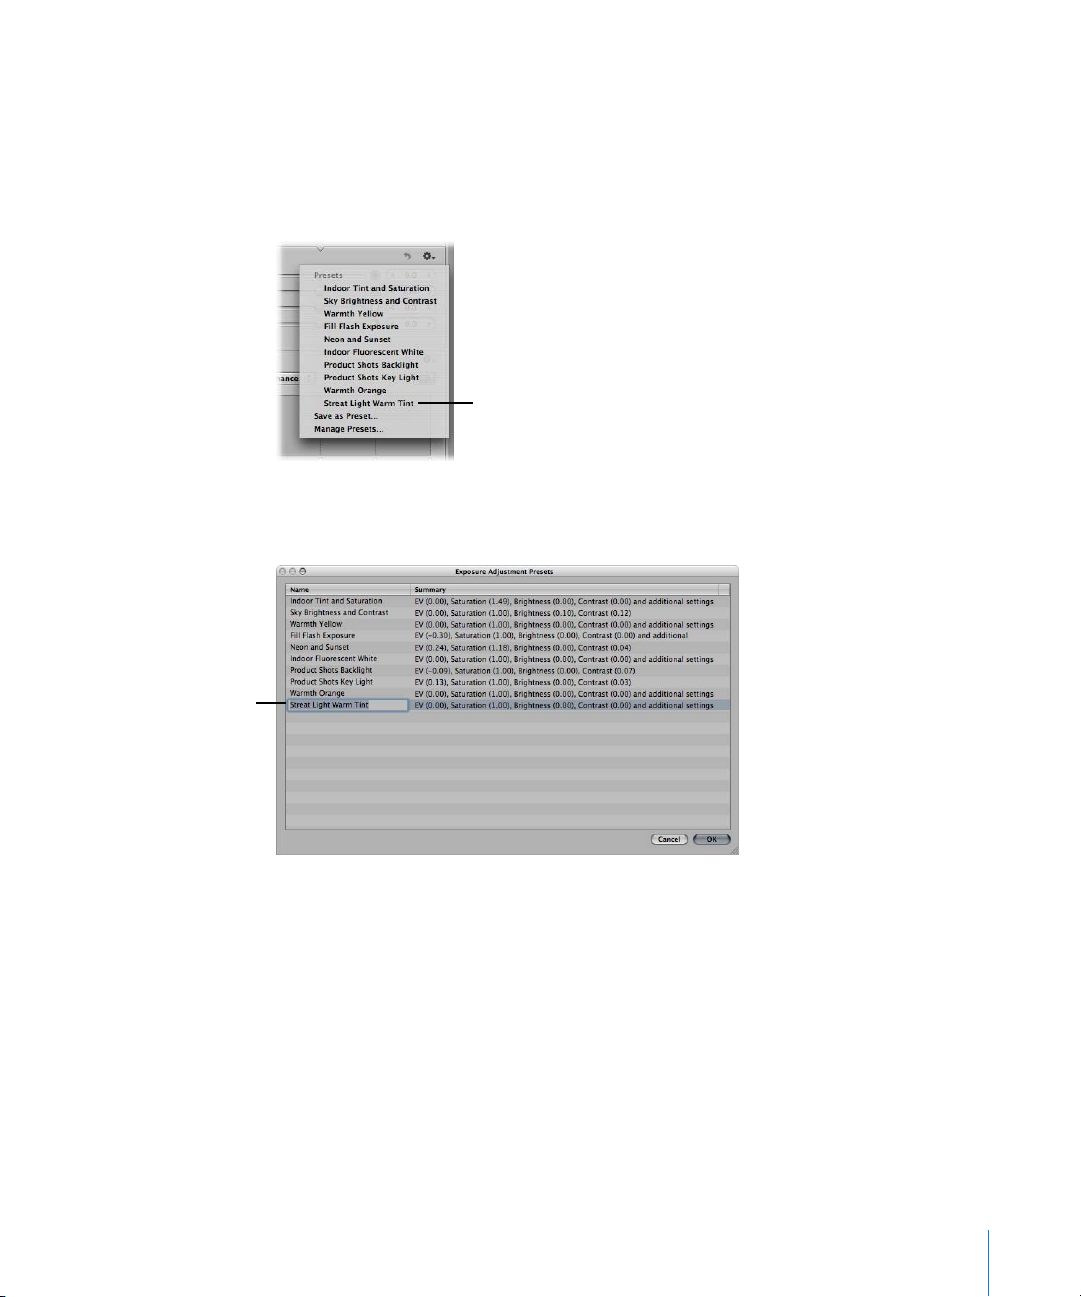
2 In the Adjustments Inspector or Adjustments HUD, choose the preset you want to
apply to the image from the Preset Action pop-up menu for the adjustment.
Choose an adjustment
preset from the Preset
Action pop-up menu.
The adjustment preset is applied to the image, and a checkmark appears next to the
preset in the Preset Action pop-up menu.
16 Chapter 1 An Overview of Image Adjustments
Page 17
Renaming Adjustment Presets
You can rename an adjustment preset at any time.
To rename an adjustment preset:
1 In the Adjustments Inspector or Adjustments HUD, choose Manage Presets from the
Preset Action pop-up menu for the adjustment.
You can rename an
adjustment preset, for
example, when you want
to fix a spelling error.
2 In the Adjustment Presets dialog, double-click the name of the adjustment preset you
want to change.
Double-click an
adjustment preset’s
name to rename it.
The adjustment preset’s name is highlighted.
3 Enter a new name, then press Return.
The adjustment preset is renamed.
4 Repeat steps 2 and 3 until all presets that need renaming have been renamed, then
click OK.
Chapter 1 An Overview of Image Adjustments 17
Page 18
Organizing Adjustment Presets
Each time you create an adjustment preset, it is added to the bottom of the list of presets
in the Adjustment Presets dialog and Preset Action pop-up menu. As this list grows, it can
become difficult to locate a specific adjustment preset in a long list of presets. Therefore,
you can rearrange the order of the presets in the Adjustment Presets dialog.
You can rearrange the
order of adjustment
presets, for example,
when you want to group
similar parameter
settings like tint values.
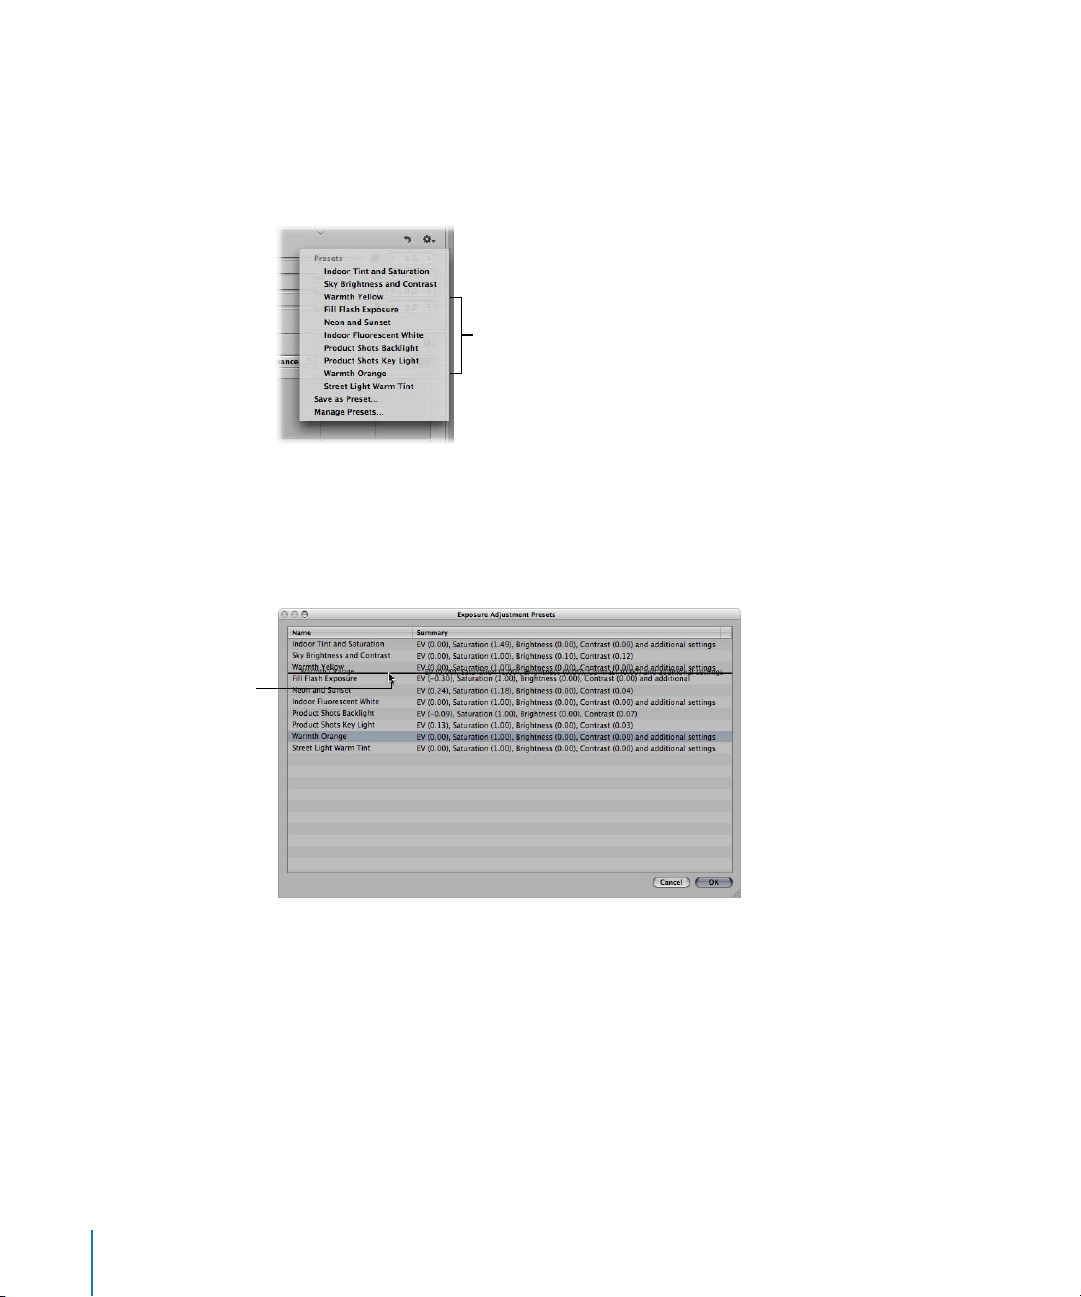
To rearrange the order of adjustment presets:
1 In the Adjustments Inspector or Adjustments HUD, choose Manage Presets from the
Preset Action pop-up menu for the adjustment.
2 In the Adjustment Presets dialog, drag the adjustment preset to its new position.
Drag the preset to its
new position. A black bar
indicates where it
will be placed.
A black bar indicates where the adjustment preset will be placed.
3 Repeat step 2 until your adjustment preset list is organized, then click OK.
The adjustment presets list in the Preset Action pop-up menu updates to match the
order of presets in the Adjustment Presets dialog.
18 Chapter 1 An Overview of Image Adjustments
Page 19

Deleting Adjustment Presets
You can delete an adjustment preset at any time. Any adjustments that were previously
applied using the deleted preset are unaffected.
To delete an adjustment preset:
1 In the Adjustments Inspector or Adjustments HUD, choose Manage Presets from the
Preset Action pop-up menu for the adjustment.
2 In the dialog that appears, select the adjustment preset you want to delete, then press
the Delete key.
The adjustment preset is deleted.
3 Repeat step 2 until all of the presets you want to remove have been deleted, then click OK.
Remove All Adjustments from Selection Command
In Aperture, you can remove all adjustments from an image selection.
Note: The Remove All Adjustments command located in the Adjustment Action
pop-up menu in the Adjustments Inspector or Adjustments HUD removes the
adjustments from single images only.
To remove all adjustments from an image selection:
1 Select a group of images.
2 Choose Images > Remove All Adjustments from Selection.
All adjustments applied to the selection of images are removed.
Using the Color Meter
Aperture provides a built-in Color meter you can use to sample the color values in an
image and display them as RGB, Lab, CMYK, HSL, or HSB values. When you place the
pointer over an image or thumbnail, the color values are displayed in the Adjustments
Inspector or Adjustments HUD. You can also use the Loupe for a more accurate pixel
selection and see the color values displayed within the magnified area of the Loupe.
Chapter 1 An Overview of Image Adjustments 19
Page 20
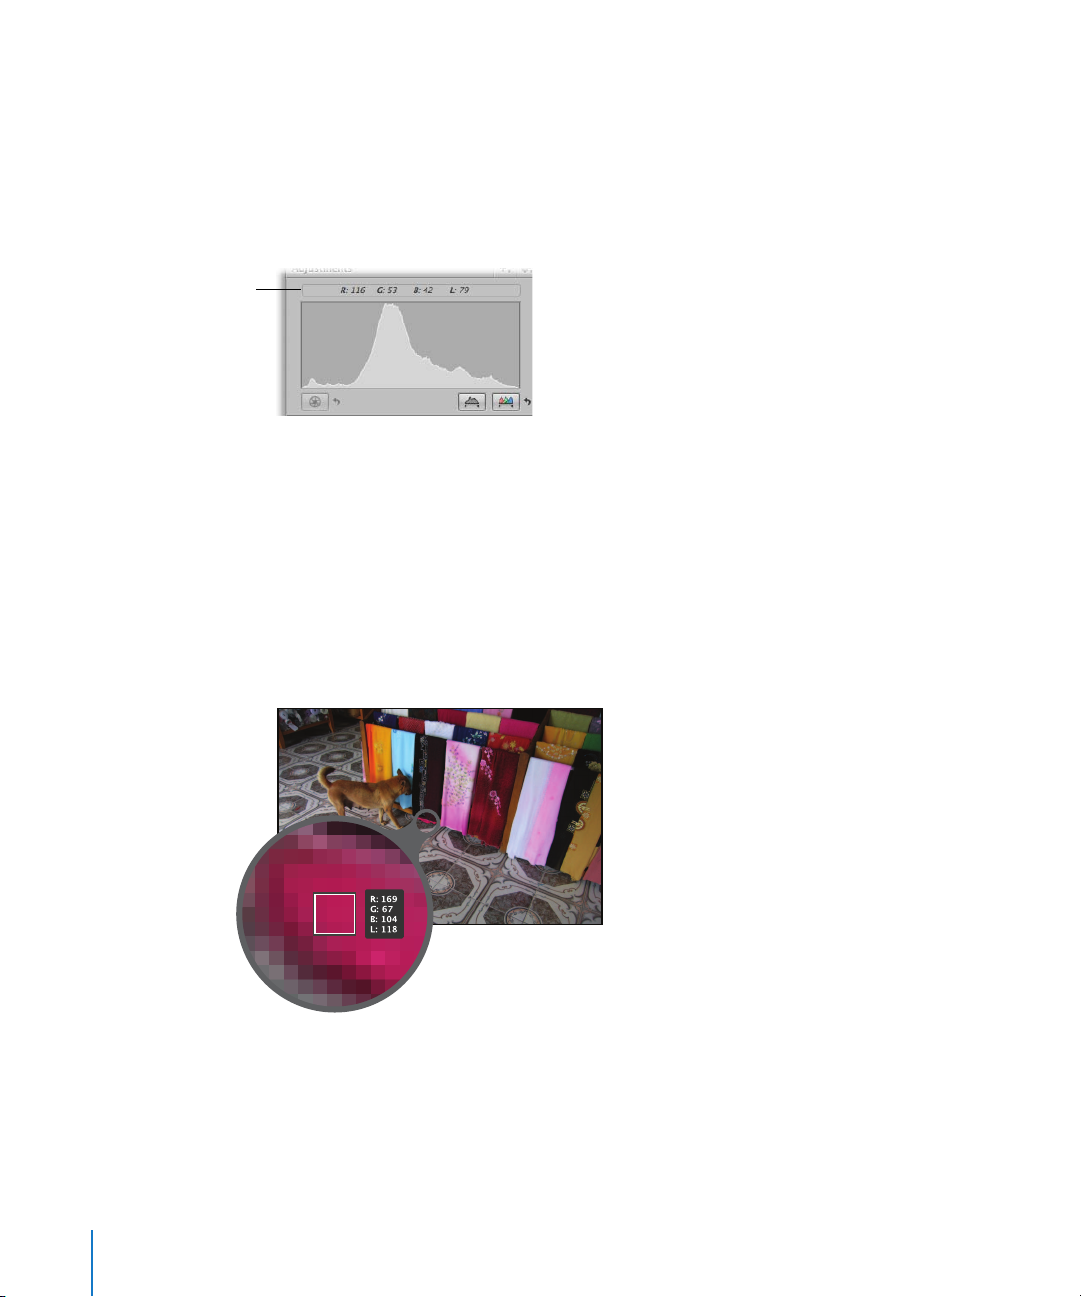
Sampling Color Values
The Color meter displays the color values of the pixels in the image beneath the
pointer or the target area of the Loupe.
To use the pointer to sample the color values in an image:
m Place the pointer over the area of the image where you want to sample the color values,
and view the values at the top of the Adjustments Inspector or Adjustments HUD.
Color meter
Note: When you select a large image with multiple adjustments applied, ellipsis
points (...) may appear in the Color meter rather than numerical values. As soon as
Aperture renders the image, the appropriate numerical values appear.
To use the Loupe to sample color values in an image:
1 Click the Loupe button in the toolbar (or press the grave accent [`] key).
2 Choose View > Show Color Value in Loupe.
3 Place the target area of the Loupe over the area of the image where you want to
sample the color values, and the values appear in the magnified area of the Loupe.
20 Chapter 1 An Overview of Image Adjustments
Page 21

Choosing a Color Value Option
In Aperture, you can set the Color meter to display RGB, Lab, CMYK, HSB, or HSL
color values.
To choose a color value option for the Color meter:
m In the Adjustments Inspector or Adjustments HUD, choose a color value option from
the Adjustment Action pop-up menu.
Choose a color value option here.
Chapter 1 An Overview of Image Adjustments 21
Page 22
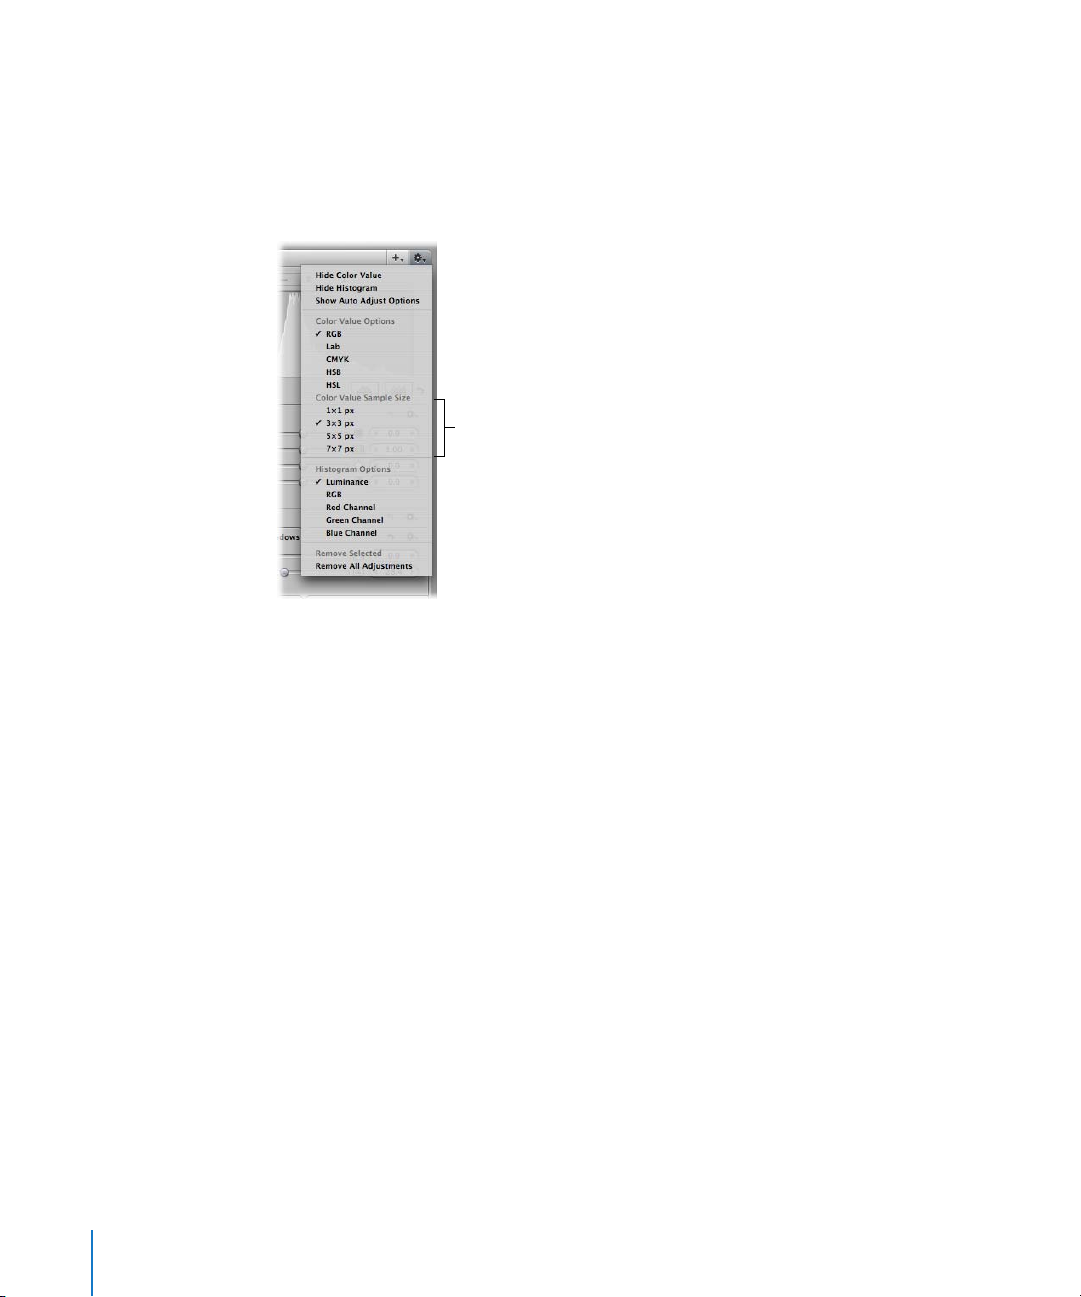
Choosing a Color Value Sample Size
You can also set the sample size (pixel area) Aperture uses to determine color values.
To choose a color value sample size for the Color meter:
m In the Adjustments Inspector or Adjustments HUD, choose an appropriate color value
sample size from the Adjustment Action pop-up menu.
Choose a color value sample
size here.
Using an External Editor
If you need to perform more advanced image operations, such as compositing, you can
set an external editor for use within Aperture. First you have to specify which application
Aperture should use and the 16-bit file format (TIFF or PSD). You only have to do this
once. Then you select an image and choose a menu command to have the image open
in the application designated as the external editor.
To set an external editor in Aperture:
1 Choose Aperture > Preferences, or press Command-comma (,).
2 Click the Choose button below the External Image Editor field, navigate to an
application in the Select Application dialog, then click Select.
The application’s name appears in the External Image Editor field.
3 Choose the appropriate 16-bit file format (TIFF or PSD) from the External Editor File
Format pop-up menu.
This is the file format Aperture uses when opening files in external editors.
22 Chapter 1 An Overview of Image Adjustments
Page 23
To use an external editor in Aperture:
1 Select an image in the Browser.
2 Choose Images > Open With External Editor (or press Command-Shift-O).
Aperture creates a new master image file (leaving the original unchanged), converts it
to the chosen file format, and then opens the image file in the selected external editor.
The image file is tracked as a new master file stacked with the original master file.
3 When you’ve finished modifying the image in the external application, save it.
The saved image file is automatically updated in Aperture.
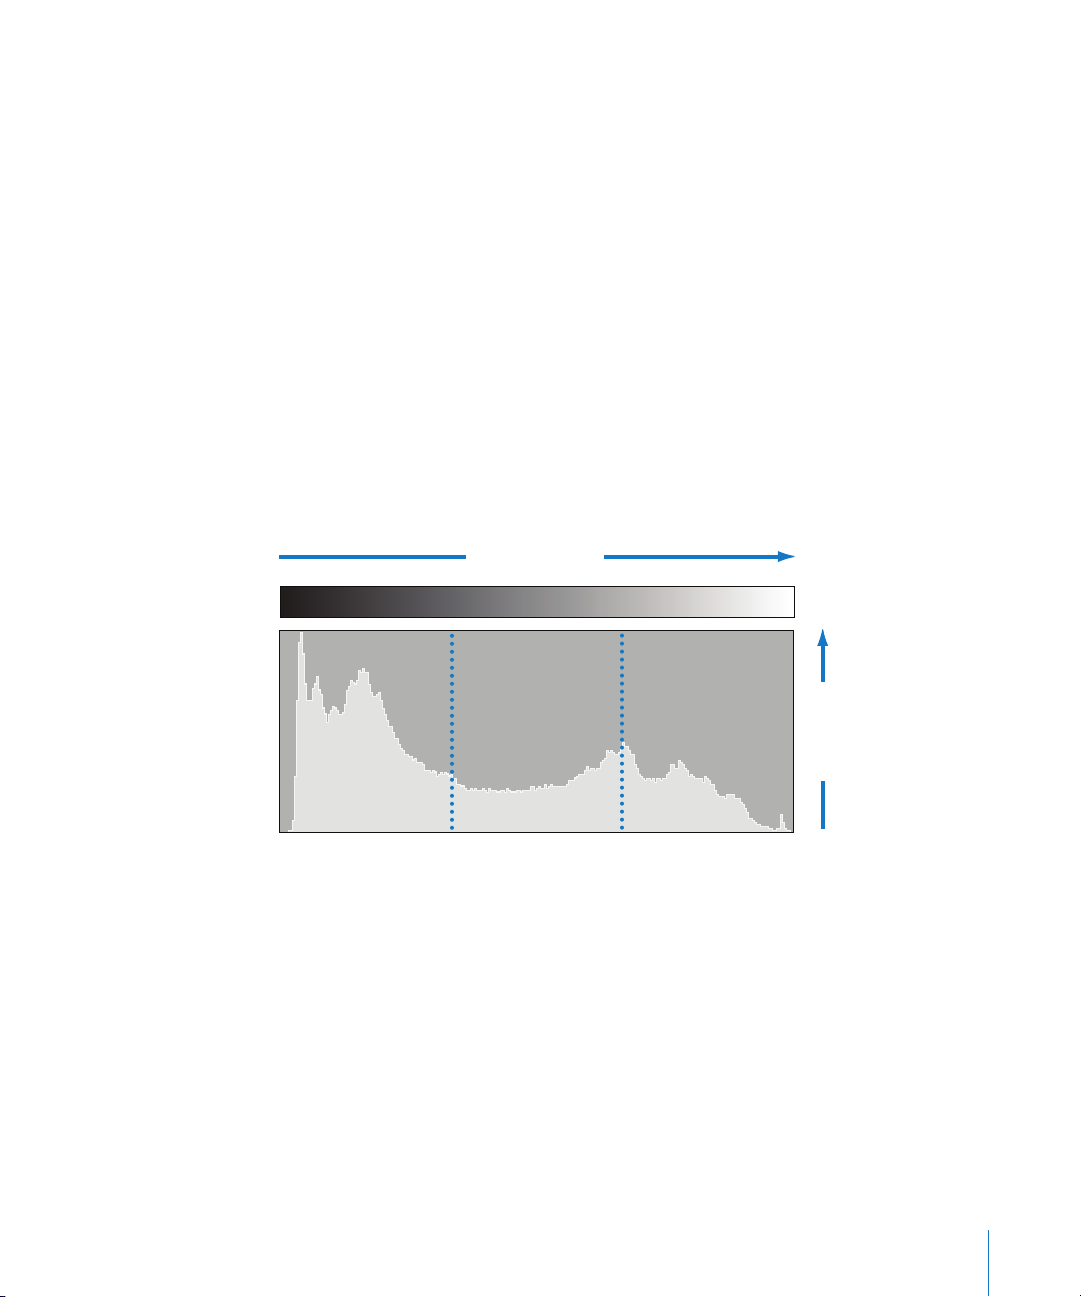
Understanding How to Read Histograms
The histogram is a graph that displays relative brightness in an image, from pure black to
pure white. The area under the graph represents all the pixels in the image. From left to
right, the histogram describes the range of dark pixels (shadows), gray pixels (midtones),
and bright pixels (highlights) in the image. The shape of the histogram graph depends on
the tonality of the scene and the exposure.
Brightness increases
Pixels increase
Shadows
Chapter 1 An Overview of Image Adjustments 23
Midtones
Highlights
Page 24

Evaluating Exposure
Histograms are good tools for evaluating exposure. For example, a series of peaks in
the darker side of the histogram often indicates an underexposed image that consists
mainly of dark pixels.
A series of peaks in the center of the histogram often indicates a balanced exposure
because a majority of the pixels are concentrated within the midtones of the
histogram. They’re not too dark or too bright.
However, a series of peaks in the brighter side of the histogram often indicates an
overexposed image because most of the pixels in the image are too bright.
24 Chapter 1 An Overview of Image Adjustments
Page 25
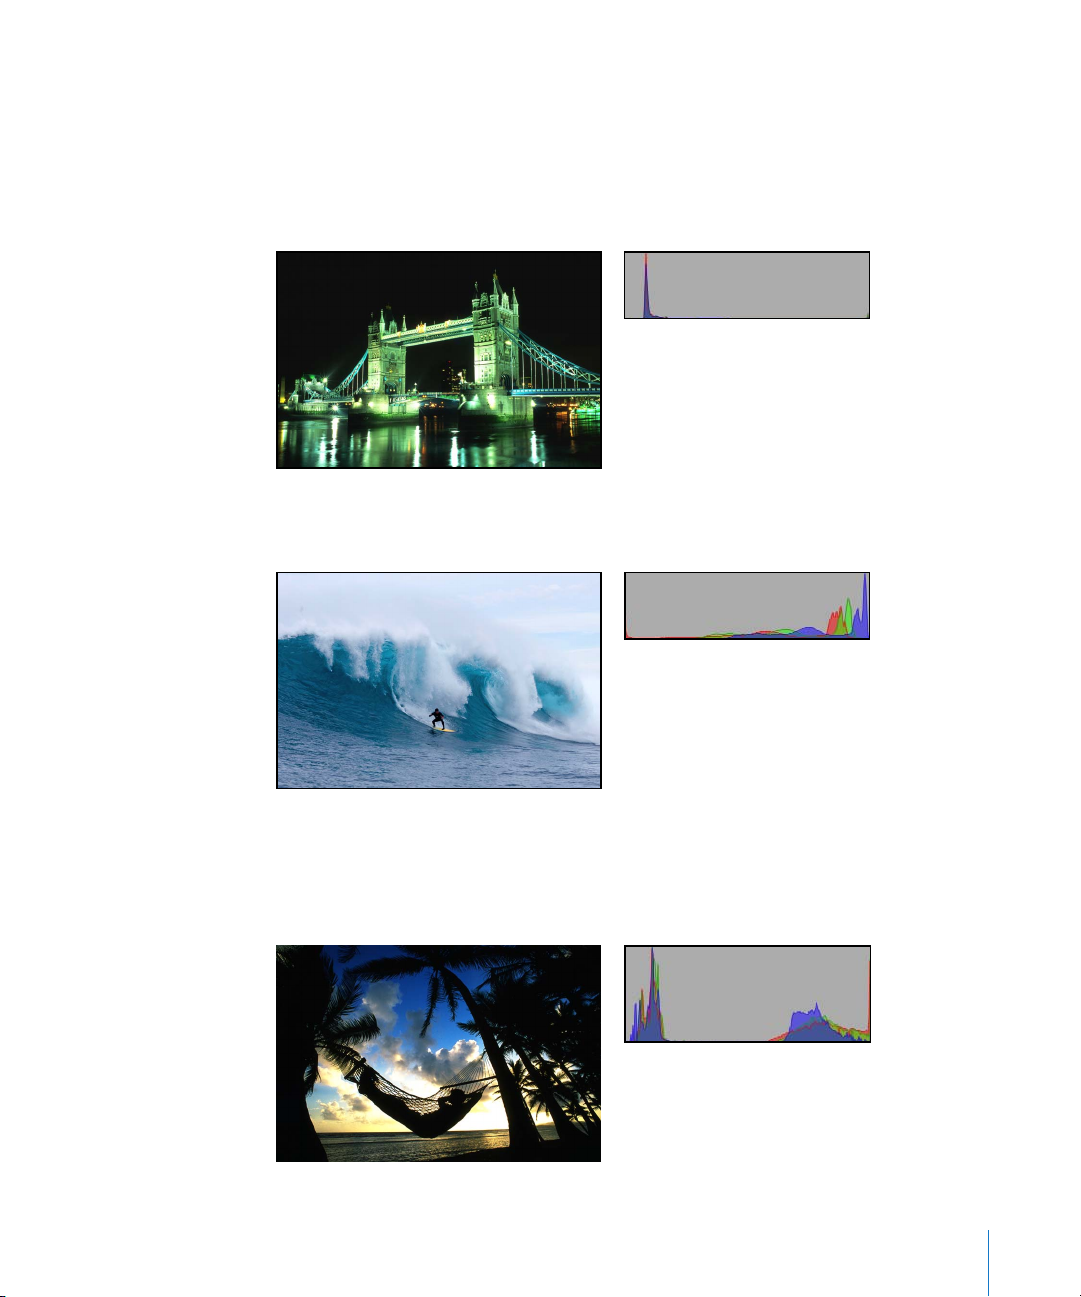
Evaluating Tonality and Contrast
Although histogram graphs are good tools for evaluating an image’s exposure, you
shouldn’t interpret histograms for exposure information only, because the shape of the
histogram is also influenced by the tonality in the scene. You need to take the subject of
the image into account when evaluating its histogram. For example, images shot at night
are naturally going to have a majority of peaks in the darker side of the histogram.
Likewise, images of bright scenes, such as snow or light reflecting off the ocean, have a
majority of their peaks in the brighter side of the histogram.
Histograms can also depict contrast in an image. For example, this silhouette of the
man in the hammock in front of the sunset consists of a relatively even assortment of
extreme bright and dark tonal values with few midtones. In this case, the histogram is
shaped like a valley with peaks in both the dark and bright sides.
Chapter 1 An Overview of Image Adjustments 25
Page 26
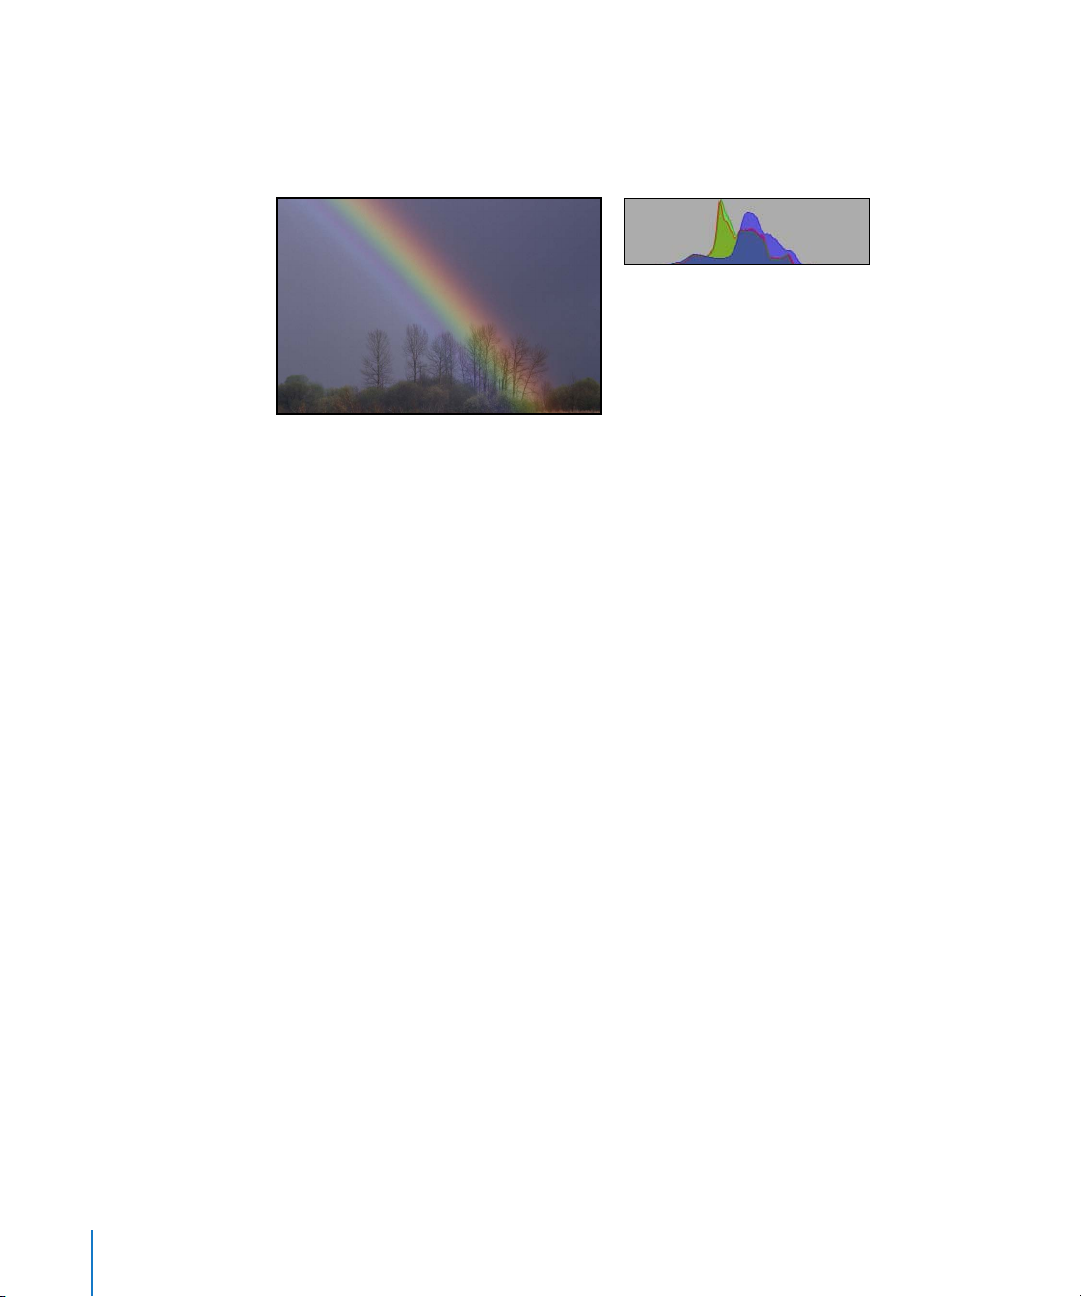
Likewise, histograms can also depict lack of contrast in an image. For example, an
image of a rainbow in the fog lacks contrast. Without directional lighting, there aren’t
any highlights or shadows in the image. In this case, the peaks of the histogram are
concentrated in the center and do not come close to either the dark or bright sides.
Using Histograms to Correct Images
A histogram can also be used as a tool to evaluate whether or not there is enough
shadow, midtone, and highlight information in the image. Aperture provides two
histograms in the Adjustments Inspector and the Adjustments HUD. The histogram
above the adjustment controls indicates the current state of the image. The Levels
histogram included with the Levels adjustment controls provides a way to adjust the
brightness values in the image in relation to the displayed histogram. You use the
Levels controls to adjust the shadow, dark quarter-tone, midtone, light quarter-tone,
and highlight values independently of each other without affecting the other areas of
the image. For more information about performing levels adjustments, see “Working
with the Levels Controls” on page 78.
About Making Adjustments Onscreen
Human eyes perceive color subjectively. It’s difficult for the human eye to make
objective changes to the colors in an image because the brain is so advanced it skews
the perception of colors to make them appear as natural as possible. For this reason, it
is essential that you create the best possible work environment for performing color
adjustments. Such an environment excludes extraneous colors that have the potential
to throw off your eye.
26 Chapter 1 An Overview of Image Adjustments
Page 27

Creating a Good Work Environment
Before you begin making color adjustments to your images, it’s important to pay
attention to the following:
 Set your display to its highest-resolution setting. This will give you the best view of
your image.
 Make sure you are employing good color management. This means that your
displays and printers are calibrated and their profiles are up to date. For more
information about calibrating and profiling your Aperture system, see the
Aperture User Manual, available in the Aperture Help menu.
 Reduce the ambient light in the room you are working in to prevent the light from
skewing your perception of the colors on your screens, and make sure your displays
are set to their brightest levels.
 If possible, paint the walls in the room in which you perform detailed image
adjustments a neutral gray. Keep bright-colored objects to a minimum to ensure
that the colors on your screens are not altered by the color in the rest of the room.
Chapter 1 An Overview of Image Adjustments 27
Page 28

Page 29

2 Making Image Adjustments
You use adjustment controls when you want to perfect an
image. The type of adjustment control you use depends on
the aspect of the image you are trying to change.
This chapter provides detailed information about using adjustment controls to
perfect your image.
This chapter covers:
 Working with Automatic Adjustments (p. 30)
 Working with the Red Eye Correction Controls (p. 37)
 Working with the Spot & Patch Controls (p. 44)
 Working with the Straighten Controls (p. 56)
 Working with the Crop Controls (p. 59)
 Working with the Exposure Controls (p. 64)
 Working with the Levels Controls (p. 78)
 Working with the Highlights & Shadows Controls (p. 86)
 Working with the White Balance Controls (p. 94)
 Working with the Color Controls (p. 98)
 Working with the Monochrome Mixer Controls (p. 104)
 Working with the Color Monochrome Controls (p. 107)
 Working with the Sepia Tone Controls (p. 108)
 Working with the Noise Reduction Controls (p. 109)
 Working with the Sharpen and Edge Sharpen Controls (p. 111)
2
29
Page 30

Working with Automatic Adjustments
Aperture comes with a set of automatic adjustment controls. These controls analyze
the image and apply an adjustment to the image based on that analysis. This is a good
way to make a quick correction to an image before fine-tuning the adjustment with the
manual adjustment controls.
Auto Exposure
Auto Levels
Combined
Auto Levels
Separate
The automatic adjustments include:
 Auto Exposure button: Click the button to have Aperture automatically adjust the
exposure of the selected RAW image.
 Auto Levels Combined button: Click the button to have Aperture automatically adjust
the levels in the selected image based on the combined luminance values of all three
color channels.
 Auto Levels Separate button: Click the button to have Aperture automatically adjust
the levels in the selected image by individual color channels.
30 Chapter 2 Making Image Adjustments
Page 31

Using the Auto Exposure Button
When you want to quickly adjust the exposure of a RAW image, you can use the
Auto Exposure button. Depending on the exposure Aperture sets for the image, you
can always fine-tune the image’s exposure setting using the Exposure controls. For
more information about manually adjusting the exposure of an image, see “Working
with the Exposure Controls” on page 64.
Before Auto Exposure adjustment
After Auto Exposure adjustment
Note: Automatic exposure adjustment is available for Aperture-supported RAW images
only. If you want to adjust the exposure of another file type, such as JPEG or TIFF, see
“Working with the Exposure Controls” on page 64. For a list of supported RAW file
types, go to the Apple website at http://www.apple.com/aperture/raw.
Chapter 2 Making Image Adjustments 31
Page 32

Click the Auto Exposure
button to automatically
set the exposure for
the image.
To automatically correct the exposure of a RAW image:
1 Select an image.
2 In either the Adjustments Inspector or Adjustments HUD, click the Auto Exposure button.
Click the Reset button to
reset the image back to its
original exposure value.
The exposure of the image is automatically corrected. If you need to fine-tune the
image’s exposure setting, see “Working with the Exposure Controls” on page 64.
You can always reset the image to its original exposure.
To reset the exposure of an image:
m Make sure the image is selected, then click the Reset button (with a curved arrow) to
the right of the Auto Exposure button.
32 Chapter 2 Making Image Adjustments
Page 33

Using the Auto Levels Combined Button
When you want to quickly adjust the levels of an image based on total luminance
values—red, green, and blue channels combined—you use the Auto Levels Combined
button. Red, green, and blue channels are adjusted by the same amount based on the
total luminance. You use the Auto Levels Combined button when you want to correct
the contrast of the image without modifying the color cast of the image.
Before Auto Levels Combined adjustment
After Auto Levels Combined adjustment
To automatically adjust the levels of an image based on total luminance:
1 Select an image.
2 In either the Adjustments Inspector or Adjustments HUD, click the Auto Levels
Combined button.
The luminance histogram is
displayed as a gray graph.
Click the Auto Levels Combined
button to automatically set the levels
for the image based on the combined
luminance of all three color channels.
The levels of the image are automatically adjusted. To fine-tune the levels adjustment,
see “Working with the Levels Controls” on page 78.
Chapter 2 Making Image Adjustments 33
Page 34

Using the Auto Levels Separate Button
When you want to automatically adjust the levels of an image based on individual
evaluations of the red, green, and blue channels, you use the Auto Levels Separate
button. Red, green, and blue channels are adjusted based on the evaluation of each
channel. You use the Auto Levels Separate button when you want to correct the color
cast in the image in addition to correcting the contrast.
Before Auto Levels Separate adjustment
After Auto Levels Separate adjustment
To automatically adjust the levels based on an evaluation of each color channel:
1 Select an image.
2 In either the Adjustments Inspector or Adjustments HUD, click the Auto Levels
Separate button.
Click the Auto Levels Separate button
to automatically set the levels for the
image based on an evaluation of each
color channel’s luminance values.
The levels of the image are automatically adjusted for each color channel. To fine-tune
the levels adjustment, see “Working with the Levels Controls” on page 78.
34 Chapter 2 Making Image Adjustments
Page 35

Use the Black Clip slider
and value slider to add
tolerance to Auto Levels
adjustments when
evaluating colors
beyond black.
Setting the Auto Levels Options
Aperture provides the option to set both the black and white clipping point
parameters for the Auto Levels adjustments. Modifying the black and white clipping
points from their default value of 0% expands the tonal range of the image. One reason
for expanding the tonal range of an image is to preserve shadow and highlight detail
when the image is printed.
Note: You may have to perform a few print tests to determine the output
characteristics of your printer before settling on final values for black and white
clipping points.
To adjust the Black Clip parameter:
1 Choose Show Auto Adjust Options from the Adjustment Action pop-up menu in the
Adjustments Inspector or Adjustments HUD.
Choose Show Auto Adjust
Options from the Adjustment
Action pop-up menu.
 By default, the Black Clip slider is set to the left side of the slider control. Drag the
slider to the right to increase the tolerance of Auto Levels adjustments to colors
beyond the analyzed black point in the image, and drag the slider back to the left to
reduce the tolerance.
 By default, the Black Clip value slider is set to 0%. Double-click the number in the
value slider, then enter a value from 0% to 10% and press Return.
 Click the left or right arrow in the value slider to change the tolerance of Auto Levels
adjustments to colors beyond the analyzed black point in the image, or drag in the
value field.
The left arrow reduces the tolerance, and the right arrow increases it.
2 Once the Black Clip parameter is adjusted, click either the Auto Levels Combined or
Auto Levels Separate button to view the effect on the image.
Chapter 2 Making Image Adjustments 35
Page 36

To adjust the White Clip parameter:
1
If necessary, choose Show Auto Adjust Options from the Adjustment Action pop-up
menu in the Adjustments Inspector or Adjustments HUD, then do one of the following:
Use the White Clip slider and
value slider to add tolerance to
Auto Levels adjustments when
evaluating colors beyond white.
Â
By default, the White Clip slider is set to the left side of the slider control. Drag the
slider to the right to increase the tolerance of Auto Levels adjustments to colors
beyond the analyzed white point in the image, and drag the slider back to the left to
reduce the tolerance.
Â
By default, the White Clip value slider is set to 0%. Double-click the number in the
value slider, then enter a value from 0% to 10% and press Return.
Â
Click the left or right arrow in the value slider to change the tolerance of Auto Levels
adjustments to colors beyond the analyzed white point in the image, or drag in the
value field.
The left arrow reduces the tolerance, and the right arrow increases it.
2
Once the White Clip parameter is adjusted, click either the Auto Levels Combined or
Auto Levels Separate button to view the effect on the image.
Resetting Auto Levels Adjustments
You can always reset the levels of your image back to their original values.
To reset the levels of the image:
m
Click the Reset button to the right of the Auto Levels Separate button.
36 Chapter 2
Click the Reset button to
reset the image’s levels back
to their original values.
Making Image Adjustments
Page 37

Working with the Red Eye Correction Controls
You use the Red Eye tool and the Red Eye Correction adjustment controls to reduce the
red-eye effect in the eyes of the subjects in your image. You use the Red Eye tool to
place targets on the red eyes of the subjects in the image, and then you can adjust the
radius and sensitivity of the target overlays using the Red Eye Correction controls.
Aperture desaturates the red pixels within the target overlay area, reducing the effect.
Reducing Red-Eye Using the Red Eye Tool
Reducing red-eye in the eyes of the subjects in your image is as simple as targeting
them with the Red Eye tool.
Before Red Eye adjustment
To remove red-eye with the Red Eye tool:
1 Select an image.
2 It’s a good idea to set the image to display at full size (100 percent) to prevent image
scaling from obscuring details. To display images at full size, click the Zoom Viewer
button in the control bar (or press Z).
3 Select the Red Eye tool in the toolbar (or press E).
The pointer changes to a target, and the Red Eye HUD appears.
Chapter 2 Making Image Adjustments 37
After Red Eye adjustment
Page 38

4 Click a red eye in the image to place a Red Eye target overlay on it.
The Red Eye target overlay is placed over the red eye, and the red pixels within the Red
Eye target overlay are desaturated.
5 Repeat step 4 until all of the red eyes in your image are removed.
Adjusting the Size of Red Eye Target Overlays
Aperture fixes red-eye in your images by desaturating the red pixels within the Red Eye
target overlay area. It’s a good idea to fit each Red Eye target overlay to the size of the eye
it covers. This prevents any red pixels in the skin around your subject’s eyes or in clothing,
such as a scarf or hat, from being affected by the red-eye adjustment. You may also need
to increase the size of a Red Eye target overlay to completely encompass the eye you are
targeting if the image is a close-up. You can adjust the size of a Red Eye target overlay
before and after it’s placed on the image.
To change the size of the Red Eye tool’s target, do one of the following:
m Drag the Radius slider in the Red Eye HUD.
Drag the Radius slider in the Red Eye HUD
to adjust the size of the Red Eye target
overlay that the tool places on an image.
m If you have a mouse device with a scroll wheel, rotate the scroll wheel.
The size of the Red Eye tool’s target changes.
38 Chapter 2 Making Image Adjustments
Page 39

The Red Eye tool changes
to a hand icon to indicate
that you can select the
Red Eye target overlay.
You can also change the size of any Red Eye target overlay that you’ve already placed
on an image.
To change the size of an existing Red Eye target overlay:
1 Display the image at full size (100 percent) by clicking the Zoom Viewer button in the
control bar (or pressing Z).
2 Click the Red Eye target overlay to select it.
A hand icon appears to indicate that you can select the Red Eye target overlay.
3 If necessary, click the Inspectors button (or press I) to show the Adjustments Inspector,
or click the Adjustments HUD button (or press H) to show the Adjustments HUD.
4 In the Red Eye Correction area of the Adjustments Inspector or Adjustments HUD,
adjust the Radius parameter by doing one of the following:
Drag the Radius slider to adjust the size
of the selected Red Eye target overlay.
 Drag the Radius slider.
 Click the left or right arrow in the Radius value slider to change the size of the Red
Eye target overlay by single increments, or drag in the value field.
 Double-click the number in the Radius value slider, then enter a value from
3.00 to 400.00.
The size of the Red Eye target overlay increases as the parameter value increases.
Chapter 2 Making Image Adjustments 39
Page 40

Adjusting the Sensitivity of Red-Eye Target Overlays
When you select a red eye in a picture, Aperture automatically chooses the area within
the target overlay circle where the desaturation is applied. In a few cases, the area chosen
by Aperture might be either slightly too wide or slightly too small (typically including a
few pixels in the eyelid skin, or missing a few red pixels inside the pupil). For these
difficult cases, you can adjust the Sensitivity parameter to change the area where
desaturation occurs. For example, dragging the Sensitivity slider to the left by one notch
decreases the size of the active area within the Red-Eye target overlay by one pixel, and
dragging the Sensitivity slider one notch to the right enlarges it by one pixel.
Before Sensitivity adjustment
(the eyelids are desaturated)
40 Chapter 2 Making Image Adjustments
After Sensitivity adjustment
Page 41

To adjust the sensitivity of a Red Eye target overlay:
1 Click the Red Eye target overlay to select it.
2 In the Red Eye Correction area of the Adjustments Inspector or Adjustments HUD,
adjust the Sensitivity parameter by doing one of the following:
Use the Sensitivity slider and value
slider to fine-tune the area within
the Red Eye target overlay where
desaturation occurs.
 Drag the Sensitivity slider.
 Click the left or right arrow in the Sensitivity value slider to change the sensitivity of
the Red Eye target overlay by single-pixel increments, or drag in the value field.
 Double-click the number in the Sensitivity value slider, then enter a value
from –10.00 to 10.00 and press Return.
The area within the Red Eye target overlay where desaturation occurs increases as the
parameter value increases.
Viewing the Corrected Image Without Red Eye
Target Overlays
After correcting the red eyes in your image, you can view the corrected image with the
Red Eye target overlays turned off.
To view the corrected image with the Red Eye target overlays turned off:
m Select the Selection tool in the toolbar (or press A).
The Red Eye target overlays disappear, but the effect of the red-eye adjustment
remains visible.
Note: You can still make adjustments to the targeted red eyes with the overlays turned
off, and the image updates to show the changes.
To turn the Red Eye target overlays on again:
m Select the Red Eye tool in the toolbar (or press E).
The Red Eye target overlays reappear.
Chapter 2 Making Image Adjustments 41
Page 42

Moving Red Eye Target Overlays
Once placed, a Red Eye target overlay can always be moved.
To move a Red Eye target overlay:
1 Make sure the Red Eye tool is selected, then hover over the Red Eye target overlay you
want to move until the target changes to a hand icon.
Drag the Red Target overlay
over the red eye in the image.
The hand icon indicates that you can drag the target overlay rather than place a new one.
2 Drag the Red Eye target overlay to the appropriate position over the subject’s eye.
42 Chapter 2 Making Image Adjustments
Page 43

Deleting Red Eye Target Overlays
You can always delete a Red Eye target overlay.
To delete a Red Eye target overlay, do one of the following:
m Select a Red Eye target overlay in the image, then click the Delete button in the Red
Eye Correction area of the Adjustments Inspector or Adjustments HUD.
Click the Delete button to
delete a Red Eye target overlay.
m Command-click a Red Eye target overlay.
Command-click a Red Eye
target overlay to delete it.
The Red Eye target overlay disappears.
Chapter 2 Making Image Adjustments 43
Page 44

Working with the Spot & Patch Controls
You use the Spot & Patch tool and adjustment controls to touch up imperfections in
the image caused by sensor dust and other environmental conditions. Aperture
provides two methods for fixing these imperfections. The method you use depends on
the area surrounding the blemish in the image. If the surrounding area is fairly similar
to the problem area, such as a solid color, you use the “spotting” method. Aperture
copies the pixels surrounding the blemish and replaces the problem pixels with the
cloned pixels. The second method is used when the surrounding pixels have a distinct
texture or fall in an area of high contrast, but an area similar in appearance exists
elsewhere in the image. This “patching” method involves copying pixels from the
alternate area and pasting them over the problem area.
Spotting Your Images
When the area around the blemish is continuous (such as a solid color) and doesn’t
contain a distinct texture, you can use the spotting method to obscure the blemish by
integrating the pixels that surround it. You fix a blemish by placing the Spot & Patch
target overlay over the blemish in the image, and then adjusting the size of the target
overlay so that it just barely covers the blemish. By keeping the target overlay small,
you minimize the chance of a visual aberration in the final image. Aperture provides
additional parameter controls to allow you to adjust the softness, opacity, and amount
of detail in the cloned pixels, so that the corrected area looks as natural as possible.
Before Spot & Patch adjustment
(spotting)
44 Chapter 2 Making Image Adjustments
After Spot & Patch adjustment
(spotting)
Page 45

To spot an image:
1 Select an image.
2 It’s a good idea to set the image to display at full size (100 percent) to prevent image
scaling from obscuring details. To display an image at full size, click the Zoom Viewer
button in the control bar (or press Z).
3 Select the Spot & Patch tool in the toolbar (or press X).
The pointer changes to a target, and the Spot & Patch HUD appears.
4 Click the blemish area to place the Spot & Patch target overlay on it.
Click a blemish to place a
Spot & Patch target overlay on it.
The yellow Spot & Patch target overlay is placed over the blemish, and the
blemish disappears.
Note: You can always adjust the size of the target overlay and other parameters. For
more information, see “Using the Spot & Patch Controls” on page 49.
5 Repeat step 4 until all of the blemishes in your image are removed.
Chapter 2 Making Image Adjustments 45
Page 46

Patching Your Images
When you need to clone pixels from a different area of an image to fix the area where
the blemish is, you use the “patching” method. Patching is similar to spotting, except
that there are some additional steps. You first place a Spot & Patch overlay (yellow) over
the blemish, and then you place a source target overlay (white) over the area you want
to clone. The pixels in the Spot & Patch target overlay are replaced by the pixels copied
from the source target overlay. Aperture provides additional parameter controls to
allow you to adjust the size of target overlays and the softness, opacity, and amount of
detail in cloned pixels, so that the patched area looks as natural as possible.
Before Spot & Patch adjustment (patching)
After Spot & Patch adjustment (patching)
To patch a blemish in an image:
1 Select an image.
2 It’s a good idea to set the image to display at full size (100 percent) to prevent image
scaling from obscuring details. To display an image at full size, click the Zoom Viewer
button in the control bar (or press Z).
3 Select the Spot & Patch tool in the toolbar (or press X).
The pointer changes to a target, and the Spot & Patch HUD appears.
46 Chapter 2 Making Image Adjustments
Page 47

4 Click the blemish area to place a Spot & Patch target overlay on it.
Click a blemish to place a Spot
& Patch target overlay on it.
A yellow target overlay is placed over the blemish, and the blemish is replaced by the
pixels that surround it. This yellow target overlay is the destination target overlay.
5 Do one of the following:
Option-click the area you want
to clone to place a source
target overlay on it.
 Select the Patch checkbox in the Spot & Patch area of the Adjustments Inspector or
Adjustments HUD, then drag the white source target overlay to the area you want to
clone (the source area).
 Option-click the area you want to clone.
A white source target overlay appears and is placed over the source area.
The pixels within the source target overlay are copied and replace the pixels within the
destination target overlay. The blemish is patched.
Note: You can always adjust the size of the target overlay and other parameters. For
more information, see “Using the Spot & Patch Controls” on page 49.
6 Repeat steps 4 and 5 until all blemishes are removed from your image.
Chapter 2 Making Image Adjustments 47
Page 48

You can adjust the angle of the cloned pixels within the destination target overlay.
Adjusting the angle rotates the cloned pixels over the destination area. This is particularly
useful if you’re cloning an area that has visual elements, such as a pattern or line, that are
at a different angle from elements in the destination area. The angle adjustment allows
you to match the angle of the pixels within the destination target overlay.
You can adjust the angle of the
cloned pixels.
To adjust the angle of the cloned pixels within a destination target overlay:
m In the Spot & Patch area of the Adjustments Inspector or Adjustments HUD, adjust the
Angle parameter by doing one of the following:
Use the Angle slider and value
slider to adjust the angle of
the pixels in the destination
target overlay.
 Drag the Angle slider to the left to rotate the cloned pixels counterclockwise, or drag
the Angle slider to the right to rotate the cloned pixels clockwise.
 Click the left or right arrow in the Angle value slider, or drag in the value field.
 Double-click the number in the Angle value slider, then enter a value from –180.00 to
180.00 and press Return.
A negative value rotates the cloned pixels counterclockwise, and a positive value
rotates the cloned pixels clockwise.
48 Chapter 2 Making Image Adjustments
Page 49

Using the Spot & Patch Controls
When using the Spot & Patch tool to spot or patch your images, you can modify the
appearance of the pixels within the target overlays using the Spot & Patch adjustment
controls. You can also adjust the size of Spot & Patch target overlays.
Adjusting the Size of Spot & Patch Target Overlays
You can change the size of a Spot & Patch target overlay before and after it’s placed on an
image. It’s best to adjust the size of the target overlay so it fits the area around the
blemish as tightly as possible. A tight fit ensures that any visual aberrations are minimal.
To change the size of the Spot & Patch tool’s target, do one of the following:
m Drag the Radius slider in the Spot & Patch HUD.
Drag the Radius slider in the Spot & Patch HUD
to adjust the size of the Spot & Patch target
overlay that the tool places on an image.
m Click the left or right arrow in the Radius value slider, or drag in the value field.
m Double-click the number in the Radius value slider, then enter a value from 3.00 to
400.0 and press Return.
m If you have a mouse with a scroll wheel, rotate the scroll wheel.
The size of the Spot & Patch tool’s target changes.
You can also change the size of any Spot & Patch target overlay that you’ve already
placed on an image.
Chapter 2 Making Image Adjustments 49
Page 50

To change the size of an existing Spot & Patch target overlay:
1 Display the image at full size (100 percent) by clicking the Zoom Viewer button in the
control bar (or pressing Z).
2 Click a Spot & Patch target overlay to select it.
A hand icon appears to
indicate that you can select the
Spot & Patch target overlay.
A hand icon appears to indicate that you can select the Spot & Patch target overlay
rather than place a new one.
3 In the Spot & Patch area of the Adjustments Inspector or Adjustments HUD, adjust the
Radius parameter by doing one of the following:
Use the Radius slider and value
slider to adjust the size of
previously placed Spot & Patch
target overlays.
 Drag the Radius slider.
 Click the left or right arrow in the Radius value slider to change the radius of the
Spot & Patch target overlay by single-pixel increments, or drag in the value field.
 Double-click the number in the Radius value slider, then enter a value from 3.00 to
400.00 and press Return.
The size of the Spot & Patch target overlay increases as the parameter value increases.
50 Chapter 2 Making Image Adjustments
Page 51

Adjusting the Softness Within Spot & Patch Target Overlays
You can also change the “softness” of cloned pixels within Spot & Patch target overlays.
Softness describes how well the area within the target overlay blends in with the
surrounding image area. The Softness parameter controls the blending of pixels
between the center of the Spot & Patch target overlay and the circumference. The
higher the Softness parameter value, the closer to the center the pixel blending occurs.
The lower the parameter value, the less pixel blending occurs, resulting in a “hard edge”.
You can adjust the softness of
the cloned pixels.
To adjust the softness of pixels within a Spot & Patch target overlay:
m In the Spot & Patch area of the Adjustments Inspector or Adjustments HUD, adjust the
Softness parameter by doing one of the following:
Use the Softness slider and value
slider to make the edges of the Spot
& Patch target overlay blend better
with the surrounding image area.
 Drag the Softness slider.
 Click the left or right arrow in the Softness value slider, or drag in the value field.
 Double-click the number in the Softness value slider, then enter a value from 0% to
100% and press Return.
A low value decreases the softness of pixels within the Spot & Patch target overlay, and
a high value increases the softness.
Chapter 2 Making Image Adjustments 51
Page 52

Adjusting the Opacity Within Spot & Patch Target Overlays
Another method of modifying Spot & Patch target overlays to make cloned pixels
blend in better with surrounding pixels is to adjust the opacity of pixels in the target
overlay. The higher the Opacity parameter value, the more the cloned pixels obscure
the original pixels they cover.
You can adjust the opacity of
the cloned pixels.
To adjust the opacity of cloned pixels in a Spot & Patch target overlay:
m In the Spot & Patch area of the Adjustments Inspector or Adjustments HUD, adjust the
Opacity parameter by doing one of the following:
Use the Opacity slider and value
slider to adjust the opacity of the
cloned pixels in the target overlay.
 Drag the Opacity slider.
 Click the left or right arrow in the Opacity value slider, or drag in the value field.
 Double-click the number in the Opacity value slider, then enter a value from 0% to
100% and press Return.
A low value decreases the opacity of the cloned pixels in the Spot & Patch target
overlay, and a high value increases the opacity.
52 Chapter 2 Making Image Adjustments
Page 53

Adjusting the Detail Within Spot & Patch Overlays
In addition to adjusting softness and opacity in Spot & Patch target overlays, you can
adjust the amount of detail, such as texture or grain, that is preserved in the cloned pixels.
You can adjust the amount of
detail in the cloned pixels.
To adjust the amount of detail in cloned pixels in a Spot & Patch target overlay:
m In the Spot & Patch area of the Adjustments Inspector or Adjustments HUD, adjust the
Detail parameter by doing one of the following:
Use the Detail slider and value
slider to adjust the amount of
detail in the cloned pixels in
the target overlay.
 Drag the Detail slider.
 Click the left or right arrow in the Detail value slider, or drag in the value field.
 Double-click the number in the Detail value slider, then enter a value from 0% to
100% and press Return.
A low value decreases the amount of detail, such as texture or grain, preserved in the
cloned pixels, and a high value increases the amount of detail.
Chapter 2 Making Image Adjustments 53
Page 54

Viewing the Corrected Image Without Spot & Patch
Target Overlays
After retouching the blemishes in your image, you can view the corrected image with
the Spot & Patch target overlays turned off.
To view the corrected image with the Spot & Patch target overlays turned off:
m Select the Selection tool in the toolbar (or press A).
The Spot & Patch target overlays disappear, but the effects of the Spot & Patch
adjustments remain visible.
To turn the Spot & Patch target overlays on again:
m Select the Spot & Patch tool in the toolbar (or press X).
The Spot & Patch target overlays reappear.
Moving Spot & Patch Target Overlays
Once placed, a Spot & Patch target overlay can always be moved.
To move a Spot & Patch target overlay:
1 Make sure the Spot & Patch tool is selected, then hover over the Spot & Patch target
overlay you want to move until the target changes to a hand icon.
The hand icon indicates that you can drag the target overlay rather than place a new one.
2 Drag the Spot & Patch target overlay to the appropriate position on the image.
54 Chapter 2 Making Image Adjustments
The Spot & Patch tool changes
to a hand icon indicating that
you can move the target overlay.
Page 55

Deleting Spot & Patch Target Overlays
You can delete a Spot & Patch target overlay at any time.
To delete a Spot & Patch target overlay:
m Select a Spot & Patch target overlay in the image, then click the Delete button in the
Spot & Patch area of the Adjustments Inspector or Adjustments HUD.
Click the Delete button to delete
a Spot & Patch target overlay.
m Command-click the Spot & Patch target overlay.
Command-click a Spot & Patch
target overlay to delete it.
The Spot & Patch target overlay disappears.
Chapter 2 Making Image Adjustments 55
Page 56

Working with the Straighten Controls
When you shoot photos, environmental conditions often make it difficult to frame an image
that is level in relation to the horizon—either real or virtual. In Aperture, you can straighten
an image so that the horizon in the image is parallel to the bottom and top edges.
Before Straighten adjustment
After Straighten adjustment
You can use two different methods to straighten your images. You can use either the
Straighten tool or the Straighten adjustment controls. However, you may find it most
efficient to use the Straighten tool to quickly level the image so that it’s roughly
straight, and then use the Straighten controls for more precision.
56 Chapter 2 Making Image Adjustments
Page 57

Rotating Images with the Straighten Tool
Rotating an image with the Straighten tool is as simple as selecting the tool and dragging
within the image to make it straight. However, it’s important to understand that although
the image appears to enlarge as you rotate it, Aperture actually crops the image so that it
fits within its rectangular border without blank edges appearing on the sides.
To straighten your image using the Straighten tool:
1 Select an image.
2 Select the Straighten tool in the toolbar (or press G).
The Selection tool changes to the Straighten tool.
3 With the Straighten tool selected, drag within the image to rotate it either clockwise or
counterclockwise.
Drag within the image
to rotate it.
As you rotate the image, a yellow grid overlay appears to help you make the horizon
perfectly straight, and the image is cropped to prevent gaps from appearing in the
corners of the image.
Note: It’s a good idea to turn zooming off when straightening an image, so that the full
image fits within the Viewer. If an image is zoomed in to actual size, you can turn off
zooming by clicking the Zoom Viewer button in the control bar (or pressing Z).
Chapter 2 Making Image Adjustments 57
Page 58

Rotating Images with the Straighten Controls
You can also straighten an image using the Straighten adjustment controls. Using these
controls provides more precision.
To straighten an image using the Straighten controls:
1 Select the image.
2 If the Straighten controls are not shown in the Adjustments Inspector or Adjustments
HUD, choose Straighten from the Add Adjustments pop-up menu.
3 Change the value for the Rotate parameter by doing one of the following:
Use the Rotate slider and value
slider to straighten the image.
 Drag the Rotate slider.
 Click the left or right arrow in the Rotate value slider, or drag in the value field.
 Double-click the number in the Rotate value slider, then enter a value from –20 to 20
degrees and press Return.
Decreasing the value rotates the image clockwise, and increasing the value rotates the
image counterclockwise.
As you rotate the image, a yellow grid overlay appears to help you make the horizon
perfectly straight, and the image is cropped to prevent gaps from appearing in the
corners of the image.
Note: It’s a good idea to turn zooming off when straightening an image, so that the full
image fits within the Viewer. If an image is zoomed in to actual size, you can turn off
zooming by clicking the Zoom Viewer button in the control bar (or pressing Z).
58 Chapter 2 Making Image Adjustments
Page 59

Working with the Crop Controls
You use the Crop tool and Crop adjustment controls when you want to improve the
composition of your image by trimming the edges, or when you want to change the
aspect ratio of the image. For example, you can change an image’s aspect ratio from
4 x 6 to 3 x 5.
After Crop adjustment
Before Crop adjustment
There are two methods for cropping an image: you can either use the Crop tool to
manually crop the image, or you can use the Crop adjustment controls. The method you
choose is determined by the level of precision you require. The Crop tool provides a fast
freehand method, and works in conjunction with a Crop HUD that contains controls for
setting the aspect ratio of the crop. The extra precision provided by the Crop controls is
useful when you want to specify exact dimensions for the cropped image.
Chapter 2 Making Image Adjustments 59
Page 60

Cropping Images with the Crop Tool
Cropping an image with the Crop tool is the easiest method. You simply select the Crop
tool and drag a rectangle over your image to exclude the unwanted areas. The Crop HUD
appears, providing additional controls for setting the aspect ratio of the image.
To crop an image using the Crop tool:
1 Select an image.
2 Select the Crop tool in the toolbar (or press C).
The Selection tool changes to the Crop tool, and the Crop HUD appears.
3 With the Crop tool selected, drag a rectangle over the image to exclude the areas that
you want to trim.
Drag across the image with
the Crop tool to crop it. A
dark overlay is placed over
the trimmed areas.
A Crop overlay appears on the image with resize handles, and the trimmed edges are
dimmed. When you release the mouse button, the image is cropped. For instructions
on viewing the cropped image without the Crop overlay, see “Displaying the Cropped
Image Without the Crop Overlay” on page 62.
60 Chapter 2 Making Image Adjustments
Page 61

After adding a Crop overlay to an image, you can always change its size and shape.
To change the size and shape of a Crop overlay:
m Drag a resize handle on the Crop overlay to change the size of the crop.
Drag a resize handle to resize
the Crop overlay.
You can adjust the placement of the crop by moving the Crop overlay across the image.
To adjust the placement of the crop:
m Drag the Crop overlay to the appropriate position.
Drag the Crop overlay to
adjust its position.
Chapter 2 Making Image Adjustments 61
Page 62

You can also set the Crop overlay to a specific aspect ratio using the Crop HUD.
To set the aspect ratio of the Crop overlay:
1 In the Crop HUD, choose an aspect ratio from the Common Sizes pop-up menu.
Choose a standard aspect ratio
for the crop from the Common
Sizes pop-up menu.
The Crop overlay updates to match the chosen aspect ratio. The “Constrain cropping
tool to” checkbox in the Crop HUD is automatically selected.
2 If you wish, click the Switch Aspect Ratio button to switch the orientation of the Crop
overlay to portrait or landscape.
Click the Switch Aspect Ratio
button to change the orientation
to portrait or landscape.
The values in the Width and Height fields are reversed, and the Crop overlay updates to
show the new orientation. (Entering a number in the Width field that is smaller than
the number in the Height field sets a portrait orientation. Entering a larger number in
the Width field sets a landscape orientation.)
Displaying the Cropped Image Without the Crop Overlay
When the Crop tool is selected, the whole image is shown, with the trimmed edges
dimmed. You can also have Aperture display the cropped image without the
trimmed edges.
To display the cropped image without the trimmed edges:
m Select another tool in the toolbar, such as the Selection tool (or press A).
Select the Crop tool (or press C) to make the trimmed edges visible in the Viewer again.
62 Chapter 2 Making Image Adjustments
Page 63

Cropping Images with the Crop Controls
You use the Crop adjustment controls when an extra level of precision is required. For
example, if a client wants an image cropped to a precise dimension that is different
from the standard aspect ratios, you use the Crop controls.
Aperture uses a simple coordinate system to position the Crop overlay on the image.
You simply set X and Y coordinates to specify the position of the bottom-left corner of
the crop. The X coordinate moves the bottom-left corner of the crop horizontally, and
the Y coordinate moves the bottom-left corner of the crop vertically. Then you set the
width and height to determine the area within the crop.
To set crop dimensions using the Crop controls:
1 Select an image.
2 If you wish, use the Crop tool to place a rough crop on the image.
3 If the Crop controls are not shown in the Adjustments Inspector or Adjustments HUD,
choose Crop from the Add Adjustments pop-up menu.
4 In the Crop area of the Adjustments Inspector or Adjustments HUD, click the X value
slider’s left or right arrow, or double-click the number and enter a new number, to set
the horizontal position of the bottom-left corner of the crop.
Use the Width and Height value
sliders to adjust the size of the
area within the crop.
The X and Y value sliders control the
position of the bottom-left corner of
the crop on the original image.
The X value is measured in pixels, and as the value increases, the crop moves to the right.
5 Specify the vertical position of the bottom-left corner of the crop using the Y value slider.
The Y value is measured in pixels, and as the value increases, the crop moves up.
6 Specify the width of the crop using the Width value slider.
The width is measured in pixels, and the measurement starts at the bottom-left corner,
increasing from left to right.
7 Specify the height of the crop using the Height value slider.
The height is measured in pixels, and the measurement starts at the bottom-left corner,
increasing from bottom to top.
Chapter 2 Making Image Adjustments 63
Page 64

Working with the Exposure Controls
You use the Exposure adjustment controls to set the exposure, saturation, contrast, and
brightness, as well as black, gray, and white tint values.
Correcting Exposure in the Image
If you’ve over- or underexposed an image, you can correct it by adjusting the
Exposure parameter. The amount of latitude you have—the visually acceptable range
of f-stops—depends on the file type and the bit depth of the image. Typically, a RAW
file is capable of a slightly wider latitude than a JPEG file.
Before Exposure adjustment
Note: The amount of latitude depends on the camera, bit depth, file format, and
amount of compression applied during capture. For optimum results, you should shoot
your images within 1.5 stops of a balanced exposure. For more information about bit
depth, f-stops, and RAW files, see the Digital Photography Fundamentals document,
available in the Aperture Help menu.
64 Chapter 2 Making Image Adjustments
After Exposure adjustment
Page 65

To correct the exposure of an image:
1 Select an image.
2 In the Exposure area of the Adjustments Inspector or Adjustments HUD, adjust the
Exposure parameter by doing one of the following:
Use the Exposure slider and
value slider to correct the
image’s exposure.
 Drag the Exposure slider.
 Click the left or right arrow in the Exposure value slider to change the exposure of
the image by tenths of an f-stop, or drag in the value field.
 Double-click the number in the Exposure value slider, then enter a value from
–9.99 to 9.99 stops and press Return.
A negative value decreases the exposure (darkening the image), and a positive value
increases the exposure (lightening the image). The exposure of the image updates as
you change the parameter value.
Adjusting Saturation in the Image
You can change the value for the Saturation parameter to either give your image an
extra burst of color or tone down the color palette by desaturating the image.
Before Saturation adjustment
After Saturation adjustment
Chapter 2 Making Image Adjustments 65
Page 66

To change the saturation of an image:
1 Select an image.
2 In the Exposure area of the Adjustments Inspector or Adjustments HUD, adjust the
Saturation parameter by doing one of the following:
Use the Saturation slider
and value slider to adjust
the saturation of colors in
the image.
 Drag the Saturation slider.
 Click the left or right arrow in the Saturation value slider to change the saturation of
the image by 10 percent increments, or drag in the value field.
 Double-click the number in the Saturation value slider, then enter a value from 0.00
to 4.00 and press Return.
A value below 1.00 decreases the color saturation in the image, and a value above 1.00
increases the saturation. A value of 0.00 removes all color from the image, making it
grayscale. A value of 4.00 increases the saturation by 400 percent.
The saturation of the image updates as you change the parameter value.
A Little Saturation Goes a Long Way
Increasing the saturation of an image can make the colors appear more pure, and many
people like the effect of an image whose colors are more saturated than they would
appear naturally. However, you can easily oversaturate an image. In the process of
making the colors more pure, subtleties in shades of colors disappear, often resulting in
reduced detail in the image. To ensure that visual elements aren’t unnecessarily lost, pay
attention to the details in your image as you increase saturation.
66 Chapter 2 Making Image Adjustments
Page 67

Adjusting Brightness in the Image
You can adjust the Brightness parameter when you want to lighten or darken your
image. When you make a brightness adjustment, the brightness values of the midtone
pixels in the image change the most. You can change the brightness of the image
temporarily to see how the adjustment affects details in the shadows, midtones, and
highlights. For more precise control over the range of tonality in the image, consider
using the Levels adjustment controls. For more information about adjusting levels, see
“Working with the Levels Controls” on page 78.
Before Brightness adjustment
After Brightness adjustment
Chapter 2 Making Image Adjustments 67
Page 68

To adjust brightness in an image:
1 Select an image.
2 In the Exposure area of the Adjustments Inspector or Adjustments HUD, adjust the
Brightness parameter by doing one of the following:
Use the Brightness slider and
value slider to lighten or
darken the image.
 Drag the Brightness slider.
 Click the left or right arrow in the Brightness value slider to change the brightness of
the image by 5 percent increments, or drag in the value field.
 Double-click the number in the Brightness value slider, then enter a value from
–2.00 to 2.00 and press Return.
A value below 0.0 decreases the brightness of the image. A value greater than 0.0
increases the brightness of the image. The brightness of the image updates as you
change the parameter value.
68 Chapter 2 Making Image Adjustments
Page 69

Adjusting Contrast in the Image
If you want to adjust the difference between the dark and bright areas of the image,
you can modify the Contrast parameter. An image with very little midtone tonality is
considered to have a lot of contrast, whereas an image with considerable midtone
tonality is considered to have minimal contrast. Often, an image with too much
midtone tonality looks flat. Adding contrast to the image can add depth to it. However,
you add contrast to the image at the expense of detail in the midtones, so a little
contrast goes a long way.
Before Contrast adjustment
After Contrast adjustment
Chapter 2 Making Image Adjustments 69
Page 70

To adjust the contrast in an image:
1 Select an image.
2 In the Exposure area of the Adjustments Inspector or Adjustments HUD, adjust the
Contrast parameter by doing one of the following:
Use the Contrast slider and
value slider to modify the
contrast between light and
dark colors in the image.
 Drag the Contrast slider.
 Click the left or right arrow in the Contrast value slider to change the contrast of the
image by 5 percent increments, or drag in the value field.
 Double-click the number in the Contrast value slider, then enter a value from
–1.00 to 1.00 and press Return.
A value below 0.0 decreases the contrast in the image. A value greater than 0.0
increases the contrast in the image. The contrast in the image updates as you change
the parameter value.
Note: If you’re trying to retrieve detail in a high-contrast image, you should use the
Highlights & Shadows controls. For more information, see “Working with the Highlights
& Shadows Controls” on page 86.
70 Chapter 2 Making Image Adjustments
Page 71

Setting the Tint of the Black, Gray, and White Values
in the Image
You use the Black, Gray, and White Tint color wheels when you want to selectively
remove color casts from the shadows, midtones, and highlights in the image. Color
casts are often caused by shooting in mixed lighting and unnatural lighting situations
where the difference in the color from the mixture of multiple types of source lights
can produce a color variance in a specific tonal range in an image. For example, when
shooting indoors, interior incandescent (tungsten) lighting can often produce a yellow
color cast through the white colors in the image. Using the White Tint eyedropper, you
can have Aperture isolate the highlights and add blue to the white values, thereby
reducing the yellow color cast and returning the whites to neutral white.
There are two methods for selectively adjusting the tint values in an image: you can
either use the Black, Gray, and White Tint eyedroppers to have Aperture automatically
adjust the tint to neutral color values, or you can use the Black, Gray, and White Tint
color wheels to manually adjust the tint values. The method you choose is determined
by the level of precision you require. The eyedroppers provide an accurate means of
identifying the color cast within the tonal range of each eyedropper and returning the
color values to neutral. However, depending on the subject, you may not want to
completely remove the color cast found in a specific tonal range. Therefore, you can
manually adjust the tint values in the shadows, midtones, and highlights using the
Black, Gray, and White Tint color wheels.
Using the Eyedroppers to Set the Tint of the Shadows, Midtones,
and Highlights in an Image
You use the Black, Gray, and White Tint eyedropper tools when you want to have
Aperture selectively modify the tints of the shadows, midtones, and highlights in an
image automatically. Whereas using the White Balance controls adjusts the tints of all
tonal values in the image uniformly, the Black, Gray, and White Tint eyedropper tools
allow you to selectively neutralize color casts that affect only the shadows, midtones,
or highlights. In some difficult cases, you can use the Black, Gray, and White Tint
eyedropper tools in combination with the White Balance controls to first neutralize a
tint in a specific tonal range, and then uniformly remove the tint from the rest of the
image. For more information about adjusting white balance, see “Working with the
White Balance Controls” on page 94.
Chapter 2 Making Image Adjustments 71
Page 72

Correcting the Tint of the Shadows with the Black Tint Eyedropper
You use the Black Tint eyedropper to remove color casts from the shadows in your images.
Click the disclosure
triangle to reveal the Tint
color wheels.
Before Black Tint adjustment
After Black Tint adjustment
To set the tint of the shadows in an image:
1 Select an image.
2 If necessary, click the Tint disclosure triangle in the Exposure area of the Adjustments
Inspector or Adjustments HUD to reveal the Tint color wheels, and select the
Black Tint eyedropper.
Select the Black Tint eyedropper
to activate the Loupe.
The pointer changes to the Loupe, showing a magnified view of the target area. By
default, the Loupe is set to magnify the image to 100 percent (full size). If necessary,
you can increase the magnification of the Loupe by pressing Command–Shift–plus sign
(+). For more information about the Loupe, see the Aperture User Manual, available in
the Aperture Help menu.
72 Chapter 2 Making Image Adjustments
Page 73

3 Position the target area of the Loupe over the darkest pixels in the image, then click.
The tint (hue and saturation) of the black values in the image is set to remove the color
cast in the shadows.
Important: Make sure that there are no bright pixels in the target area of the Loupe.
Bright pixels in the target area can skew the black tint calculation, making the image
appear different than intended. A simple way to avoid errant bright pixels is to increase
the magnification of the Loupe by pressing Command–Shift–plus sign (+).
Correcting the Tint of the Midtones with the Gray Tint Eyedropper
You use the Gray Tint eyedropper to remove color casts from the midtones in your images.
Before Gray Tint adjustment
Chapter 2 Making Image Adjustments 73
After Gray Tint adjustment
Page 74

Click the disclosure
triangle to reveal the Tint
color wheels.
To set the tint of the midtone values in an image:
1 Select an image.
2 If necessary, click the Tint disclosure triangle in the Exposure area of the Adjustments
Inspector or Adjustments HUD to reveal the Tint color wheels, and select the
Gray Tint eyedropper.
Select the Gray Tint eyedropper
to activate the Loupe.
The pointer changes to the Loupe, showing a magnified view of the target area. By
default, the Loupe is set to magnify the image to 100 percent (full size). If necessary,
you can increase the magnification of the Loupe by pressing Command–Shift–plus sign
(+). For more information about the Loupe, see the Aperture User Manual, available in
the Aperture Help menu.
3 Position the target area of the Loupe over a midrange color that is as close as possible
to medium gray, then click.
The tint (hue and saturation) of the gray values in the image are set to remove the
color cast in the midtones.
74 Chapter 2 Making Image Adjustments
Page 75

Correcting the Tint of the Highlights with the White Tint Eyedropper
You use the White Tint eyedropper to remove color casts from the highlights in your images.
Click the disclosure
triangle to reveal the Tint
color wheels.
Before White Tint adjustment
After White Tint adjustment
To set the tint of the highlight values in an image:
1 Select an image.
2 If necessary, click the Tint disclosure triangle in the Exposure area of the Adjustments
Inspector or Adjustments HUD to reveal the Tint color wheels, and select the
White Tint eyedropper.
Select the White Tint eyedropper
to activate the Loupe.
The pointer changes to the Loupe, showing a magnified view of the target area. By
default, the Loupe is set to magnify the image to 100 percent (full size). If necessary,
you can increase the magnification of the Loupe by pressing Command–Shift–plus sign
(+). For more information about the Loupe, see the Aperture User Manual, available in
the Aperture Help menu.
Chapter 2 Making Image Adjustments 75
Page 76

3 Position the target area of the Loupe over the lightest (white) pixels in the image,
then click.
The tint (hue and saturation) of the white values in the image is set to remove the color
cast in the highlights.
Important: Make sure that there are no dark pixels in the target area of the Loupe. Dark
pixels in the target area can skew the white tint calculation, making the image appear
different than intended. A simple way to avoid errant dark pixels is to increase the
magnification of the Loupe by pressing Command–Shift–plus sign (+).
76 Chapter 2 Making Image Adjustments
Page 77

Manually Setting the Tint of the Shadows, Midtones,
and Highlights in an Image
You can also manually adjust the tint of the shadow, midtone, and highlight values in
the image using the Black, Gray, and White Tint color wheels.
To manually adjust the tint of the shadow, midtone, and highlight values
in an image:
1 Select an image.
2 In the Exposure area of the Adjustments Inspector or Adjustments HUD, do the following:
Drag the Black, Gray, and White
points (white circles) to
selectively adjust the tint of
the image.
 Drag the Black point in the color wheel to adjust the tint of the shadows.
 Drag the Gray point in the color wheel to adjust the tint of the midtones.
 Drag the White point in the color wheel to adjust the tint of the highlights.
You remove a color cast in a tonal range by dragging the point in the color wheel
toward the opposite color. For example, to remove a blue cast, you drag the point in
the color wheel toward yellow until the color cast is neutralized.
Resetting the Tint Color Wheels
You can individually reset the Tint color wheels without affecting the other parameters
in the Exposure area of the Adjustments Inspector or Adjustments HUD.
To reset a Tint color wheel:
m Double-click the color wheel.
Double-click a color wheel to
reset it to its default value.
Chapter 2 Making Image Adjustments 77
Page 78

Working with the Levels Controls
You use the Levels adjustment controls when you want to manually set the tonal
values of the shadows, midtones, and highlights in an image. By default, Aperture sets
0 as pure black and 1 as pure white. Constraining the white and black point values
evenly redistributes the tonal range of the pixels between black and white.
Reapportioning the luminance values increases the tonal range and contrast in the
image. However, if you clip too far into either the black or white tonal values, tonal
values that were originally near pure black and pure white are now changed to pure
black and pure white, resulting in lost image detail.
In addition to adjusting the tonal values of an image for overall shadows, midtones,
and highlights, you can also color correct an image by adjusting the levels of the red,
green, and blue channels independently. Aperture provides a way to adjust levels for
each color channel, allowing you to control the color tonality in an image.
Adjusting the Luminance Levels in an Image
When you want to adjust the overall tonality of an image, you use the Levels adjustment
controls based on a histogram that shows luminance. When the histogram is set to show
luminance, it displays the cumulative brightness values for all three color channels for
each pixel. You use the histogram’s luminance view when you want to adjust an image’s
tonal values without affecting the color cast.
Before Levels adjustment
78 Chapter 2 Making Image Adjustments
After Levels adjustment
Page 79

To adjust levels in an image based on luminance:
1 Select an image.
2 Show the Adjustments Inspector or Adjustments HUD.
3 By default, the Levels histogram is off. Turn it on by selecting the Levels checkbox.
Black Levels slider
White Levels slider
The Levels histogram appears.
4 Choose Luminance from the Channel pop-up menu.
5 Do one of the following:
Drag the Black and White Levels
sliders to where they touch the
outside of the histogram graph.
 Drag the Black and White Levels sliders to where they touch the outside of the
histogram graph, constraining the image to its new black and white points.
 Select the numbers in the Black (B) and White (W) fields, then enter a value from 0 to
1.00. By default, the black point is set to 0.00, and the white point is set to 1.00.
The tonal values for shadows and highlights in the image are updated, resulting in
more defined blacks and highlight values as well as increased overall contrast.
Chapter 2 Making Image Adjustments 79
Page 80

You can also use the Gray Levels slider if you need to adjust the brightness values of
the midtones while limiting the brightening effect in the black and white points. The
brighter areas of shadows and darker areas of highlights are affected, but the effect
tapers off as it nears the dark blacks and bright whites.
Before Gray Levels adjustment
After Gray Levels adjustment
To adjust the midtone levels in an image, do one of the following:
m Drag the Gray Levels slider until the brightness values in the image’s midtones are correct.
Grey Levels slider
m By default, the gray point is set to 0.50. Select the number in the Gray (G) field, then enter
a value from 0 to 1.00 until the brightness values in the image’s midtones are correct.
80 Chapter 2 Making Image Adjustments
Page 81

Showing Quarter-Tone Levels Controls
When you need additional control over tonal values between the midtones and shadows
as well as the midtones and highlights, you use the Quarter-Tone controls. For example, if
you need to add contrast to the midtone values independently of the black and white
point settings, you use the Quarter-Tone Levels sliders. Unlike the Black and White Levels
sliders, Quarter-Tone Levels sliders are independent and affect only the tonal range of the
pixels they represent: either shadows to midtones or midtones to highlights.
To show the Quarter-Tone controls:
m Click the Quarter-Tone Controls button.
Click the Quarter-Tone
Controls button to show the
Quarter-Tone Levels sliders.
Adjusting the Brightness of an Image
with the Brightness Levels Sliders
You can also use the Levels adjustment controls to adjust the brightness of an image.
When you adjust the brightness of the image, the Black, Gray, and White Levels sliders
modify the tonality of the image based on the new brightness value.
Adjusting the Brightness of an Image Uniformly
with the Brightness Levels Slider
You use the center Brightness Levels slider at the top of the Levels histogram to
uniformly adjust the brightness of the image.
To uniformly adjust the brightness of the image:
m Drag the Brightness Levels slider until the brightness of the entire image is correct.
Drag the Brightness
Levels slider to uniformly
adjust the brightness of
an image.
Chapter 2 Making Image Adjustments 81
Page 82

Selectively Adjusting the Brightness of an Image with the Shadow
and Highlight Brightness Levels Sliders
You can selectively adjust the brightness of the shadows and highlights in the image
using the Shadow and Highlight Brightness Levels sliders.
To selectively adjust the brightness of the shadows and highlights in an image:
m Drag the Shadow and Highlight Brightness Levels sliders until the brightness values of
the shadows and highlights in the image are correct.
Drag the Shadow (on the
left) and Highlight
Brightness Levels sliders
to selectively adjust the
brightness of an image.
Using Levels for Color Correction
A powerful way to color correct an image is to adjust the levels of each color channel in
the image. Adjusting the levels of each color channel is useful for removing color casts
in an image. It’s important to understand that you’re adjusting the colors of the image
within the RGB spectrum; therefore, you reduce yellow when you increase blue, you
reduce magenta when you increase green, and so on.
To adjust the levels of a single color channel in an image:
1 In the Levels area of the Adjustments Inspector or Adjustments HUD, choose a color
channel from the Channel pop-up menu.
Choose a color channel
from the Channel
pop-up menu.
2 Drag the Black, Gray, and White Levels sliders (or enter values in the corresponding
fields) to create the effect you want.
For more information about making specific adjustments to the levels of each color
channel, see the next sections.
82 Chapter 2 Making Image Adjustments
Page 83

Adjusting the Levels of the Red Color Channel
You adjust the levels of the red color channel when you want to remove red and cyan
color casts in the image.
Before Red Levels adjustment
Red adjustments Effect
Move Black Levels slider right Adds cyan to the shadows, removing red.
Move Gray Levels slider left Adds red to the midtones, removing cyan.
Move Gray Levels slider right Adds cyan to the midtones, removing red.
Move White Levels slider left Adds red to the highlights, removing cyan.
After Red Levels adjustment
(moved Gray Levels slider right)
Chapter 2 Making Image Adjustments 83
Page 84

Adjusting the Levels of the Green Color Channel
You adjust the levels of the green color channel when you want to remove green and
magenta color casts in the image.
Before Green Levels adjustment
Green adjustments Effect
Move Black Levels slider right Adds magenta to the shadows, removing green.
Move Gray Levels slider left Adds green to the midtones, removing magenta.
Move Gray Levels slider right Adds magenta to the midtones, removing green.
Move White Levels slider left Adds green to the highlights, removing magenta.
After Green Levels adjustment
(moved Gray Levels slider right)
84 Chapter 2 Making Image Adjustments
Page 85

Adjusting the Levels of the Blue Color Channel
You adjust the levels of the blue color channel when you want to remove blue and
yellow color casts in the image.
Before Blue Levels adjustment
Blue adjustments Effect
Move Black Levels right Adds yellow to the shadows, removing blue.
Move Gray Levels slider left Adds blue to the midtones, removing yellow.
Move Gray Levels slider right Adds yellow to the midtones, removing blue.
Move White Levels slider left Adds blue to the highlights, removing yellow.
After Blue Levels adjustment
(moved White and Gray Levels sliders left)
Chapter 2 Making Image Adjustments 85
Page 86

Working with the Highlights & Shadows Controls
You use the Highlights & Shadows adjustment controls to correct the exposure in images
shot in complex lighting conditions. For example, you can use the Highlights & Shadows
controls to correct the exposure of the darker areas (shadows) of an image that was
otherwise correctly exposed for silhouette. You can also use the Highlights & Shadows
controls to retrieve detail in extremely bright areas of an image. This is particularly useful
when adjusting images of clouds, snow, or images correctly exposed for the shadow areas.
Using the Highlights & Shadows controls is the best way to optimize your image’s
exposure in the highlights, midtones, or shadows without compromising detail in the
other areas of tonality.
Adjusting Brightness Values in the Highlight Areas
of the Image
When you want to adjust the brightness values in the highlight areas of the image
without affecting the midtones and shadows, you can adjust the Highlights parameter.
Although the human eye is more sensitive to details in shadow areas than in highlight
areas, such as snow, there is usually a fair amount of visual information that you can
retrieve in the highlights using the Highlights parameter controls. Another example of
when to use the Highlights controls is when the background of your image is correctly
exposed, and the foreground of the image is slightly overexposed. In this case, you use
the Highlights controls to make the overexposed foreground match the exposure of
the correctly exposed background.
Before Highlights adjustment
86 Chapter 2 Making Image Adjustments
After Highlights adjustment
Page 87

To adjust the highlights in an image:
1 Select an image.
2 In the Highlights & Shadows area of the Adjustments Inspector or Adjustments HUD,
adjust the Highlights parameter by doing one of the following:
Use the Highlights slider and value
slider to adjust the brightness values
in the image’s highlights.
 By default, the Highlights slider is set to the left side of the slider control. Drag the
slider to the right to darken the highlight areas of the image, and drag the slider
back to the left to reduce the darkening effect in the highlights.
 Click the left or right arrow in the Highlights value slider to change the brightness of
the highlights in the image by single increments, or drag in the value field.
The left arrow reduces the darkening effect in the highlights, making them brighter.
The right arrow increases the darkening effect in the highlights, making them darker.
 By default, the Highlights value slider is set to 0.0. Double-click the number in the
value slider, then enter a value from 0.0 to 100.0 and press Return.
Aperture isolates the areas of the image with highlights and updates them as you
change the parameter value.
Adjusting Brightness Values in the Shadow Areas
of the Image
Adjusting the shadow areas is necessary when the shadow areas in an image are
underexposed. A good example is an image shot in a doorway, where the background
is correctly exposed but the foreground is a little underexposed. Adjusting the shadows
lightens the pixels in the shadow areas only, bringing out detail that would normally
have been shades of black or dark gray.
Before Shadows adjustment
Chapter 2 Making Image Adjustments 87
After Shadows adjustment
Page 88

To adjust the shadows in an image:
1 Select an image.
2 In the Highlights & Shadows area of the Adjustments Inspector or Adjustments HUD,
adjust the Shadows parameter by doing one of the following:
Use the Shadows slider and value
slider to adjust the brightness
values in the image’s shadows.
 By default, the Shadows slider is set to the left side of the slider control. Drag the
slider to the right to lighten the shadow areas of the image, and drag the slider back
to the left to reduce the lightening effect in the shadows.
 Click the left or right arrow in the Shadows value slider to change the brightness of
the shadows in the image by single increments, or drag in the value field.
The left arrow reduces the lightening effect in the shadows, making them darker. The
right arrow increases the lightening effect in the shadows, making them lighter.
 By default, the Shadows value slider is set to 0.0. Double-click the number in the
value slider, then enter a value from 0.0 to 100.0 and press Return.
Aperture isolates the shadow areas of the image and updates them as you change the
parameter value.
Using the Highlights & Shadows Advanced Settings
The Highlights & Shadows adjustment includes the following advanced parameters:
Click the disclosure
triangle to reveal the
advanced Highlights &
Shadows controls.
 Radius: Sets the area Aperture uses to determine each pixel’s tonality.
 Color Correction: Sets the amount of saturation applied during a shadow or
highlight adjustment.
 High Tonal Width: Sets the range of tones that are modified in the highlights.
 Mid Contrast: Sets the amount of contrast in the midtones.
 Low Tonal Width: Sets the range of tones that are modified in the shadows.
88 Chapter 2 Making Image Adjustments
Page 89

Adjusting the Radius of the Highlights & Shadows Controls
You use the Radius parameter controls to adjust the area around each pixel that
Aperture uses to assess the tonal area that each pixel inhabits. The larger the radius
value is, the larger the area used to determine each pixel’s tonality. The Radius controls
can have a large impact on the behavior of the Highlights & Shadows controls, because
the Radius controls either increase or decrease the range of pixels used to determine
how light or dark each individual pixel should be.
To adjust the radius of the Highlights & Shadows controls:
1 If necessary, click the Advanced disclosure triangle to show the advanced
Highlights & Shadows controls.
Use the Radius slider and value
slider to adjust the area used
to determine a pixel’s tonality.
2 Adjust the Radius parameter by doing one of the following:
 By default, the Radius slider is set to the left side of the slider control. Drag the slider
to the right to increase the radius of the area Aperture uses to assess whether the
pixel requires a highlights or shadows adjustment, and drag the slider back to the
left to reduce the radius.
 Click the left or right arrow in the Radius value slider to adjust the radius by
single-pixel increments, or drag in the value field.
The left arrow reduces the radius of the pixel area, and the right arrow increases it.
 By default, the Radius value slider is set to 200.00. Double-click the number in the
Radius value slider, then enter a value from 1.0 to 1000.0 and press Return.
Aperture uses the new Radius setting to determine each pixel’s tonality in relation to
the pixels that surround it.
Chapter 2 Making Image Adjustments 89
Page 90

Adjusting the Color Correction for the Highlights & Shadows Controls
You use the Color Correction parameter controls to adjust the amount of saturation
applied during shadows and highlights adjustments. However, the saturation
adjustment is most noticeable in the shadows.
Before Highlights & Shadows Color Correction
adjustment
After Highlights & Shadows Color Correction
adjustment (increased color correction)
To adjust the saturation applied during highlights and shadows adjustments:
1 If necessary, click the Advanced disclosure triangle to show the advanced
Highlights & Shadows controls.
Use the Color Correction slider
and value slider to adjust the
amount of saturation applied
during highlights and shadows
adjustments.
2 Adjust the Color Correction parameter by doing one of the following:
 Drag the Color Correction slider to the right to increase the amount of saturation
applied during highlights and shadows adjustments, and drag the slider back to the
left to reduce the saturation.
 Click the left or right arrow in the Color Correction value slider, or drag in the value field.
The left arrow reduces the saturation, and the right arrow increases it.
 By default, the Color Correction value slider is set to 0.0. Double-click the number in the
Color Correction value slider, then enter a value from –100.0 to 100.0 and press Return.
The new Color Correction setting determines the amount of saturation applied to the
highlights and shadows during a highlights and shadows adjustment.
90 Chapter 2 Making Image Adjustments
Page 91

Adjusting the High Tonal Width of the Highlights & Shadows Controls
You use the High Tonal Width parameter controls to set the range of highlights that
Aperture adjusts with the Highlights controls. Increasing the High Tonal Width
parameter value widens the range of highlight tonal values that are adjusted toward
the midtones. If you want to limit the highlights adjustment to a range of highlight
values that are closer to white, you decrease the High Tonal Width parameter value.
Before High Tonal Width adjustment
After High Tonal Width adjustment
(increased high tonal width)
To adjust the high tonal width of the Highlights & Shadows controls:
1 If necessary, click the Advanced disclosure triangle to show the advanced Highlights
& Shadows controls.
Use the High Tonal Width slider
and value slider to adjust the
range of highlight tonal values
affected by a highlights
adjustment.
Chapter 2 Making Image Adjustments 91
Page 92

2 Adjust the High Tonal Width parameter by doing one of the following:
 Drag the High Tonal Width slider to the right to increase the tonal range of the
highlights adjustment, and drag the slider back to the left to reduce the tonal range.
 Click the left or right arrow in the High Tonal Width value slider to adjust the tonal
range of the highlights adjustment by single increments, or drag in the value field.
The left arrow reduces the tonal range, and the right arrow increases it.
 By default, the High Tonal Width value slider is set to 40.0. Double-click the number in
the High Tonal Width value slider, then enter a value from 0.0 to 100.0 and press Return.
Aperture uses the new High Tonal Width setting to determine the range of highlight
tonal values that are taken into account during a highlights adjustment. The tonal
range begins at pure white, and increasing the High Tonal Width parameter value
broadens the tonal range to include tonal values closer to the midtones.
Adjusting the Midtone Contrast of the Highlights & Shadows Controls
You use the Mid Contrast parameter controls to adjust the contrast of the midtones.
To adjust the midtone contrast of the Highlights & Shadows controls:
1 If necessary, click the Advanced disclosure triangle to show the advanced
Highlights & Shadows controls.
2 Adjust the Mid Contrast parameter by doing one of the following:
 Drag the Mid Contrast slider to the right to increase the contrast Aperture applies to
the midtones in the image, and drag the slider back to the left to reduce the contrast.
 Click the left or right arrow in the Mid Contrast value slider, or drag in the value field.
The left arrow reduces the contrast in the midtones, and the right arrow increases it.
 By default, the Mid Contrast value slider is set to 0.0. Double-click the number in the
Mid Contrast value slider, then enter a value from –100.0 to 100.0 and press Return.
The contrast in the midtones updates as you change the parameter value.
92 Chapter 2 Making Image Adjustments
Use the Mid Contrast slider
and value slider to adjust the
contrast of the midtone values
in the image.
Page 93

Adjusting the Low Tonal Width of the Highlights & Shadows Controls
You use the Low Tonal Width parameter controls to set the range of shadows that
Aperture adjusts with the Shadows controls. Increasing the Low Tonal Width parameter
value widens the range of shadow tonal values that are adjusted toward the midtones.
If you want to limit the shadows adjustment to a range of shadow values that are
closer to black, you decrease the Low Tonal Width parameter value.
Before Low Tonal Width adjustment
After Low Tonal Width adjustment
(increased low tonal width)
To adjust the low tonal width of the Highlights & Shadows controls:
1 If necessary, click the Advanced disclosure triangle to show the advanced
Highlights & Shadows controls.
Use the Low Tonal Width slider
and value slider to adjust the
range of shadow tonal values
affected by a shadows
adjustment.
2 Adjust the Low Tonal Width parameter by doing one of the following:
 Drag the Low Tonal Width slider to the right to increase the tonal range of the
shadows adjustment, and drag the slider back to the left to reduce the tonal range.
 Click the left or right arrow in the Low Tonal Width value slider to adjust the tonal
range of the shadows adjustment by single increments, or drag in the value field.
The left arrow reduces the tonal range, and the right arrow increases it.
 By default, the Low Tonal Width value slider is set to 40.0. Double-click the number in
the Low Tonal Width value slider, then enter a value from 0.0 to 100.0 and press Return.
Chapter 2 Making Image Adjustments 93
Page 94

Aperture uses the new Low Tonal Width setting to determine the range of shadow
tonal values that are taken into account during a shadows adjustment. The tonal range
begins at pure black, and increasing the Low Tonal Width parameter value broadens
the tonal range to include tonal values closer to the midtones.
Working with the White Balance Controls
You use the White Balance adjustment controls to change the color temperature and
color tint of an image. If an image has pixels that are supposed to be pure white, you
can use the White Point eyedropper to automatically adjust the color temperature and
tint, or you can adjust the color temperature and tint manually. In most cases, the
automatic adjustment succeeds in removing the color cast from the image. If the White
Point eyedropper does not completely remove the color cast from the image, you can
use the Temp and Tint adjustment controls to fine-tune the image.
Although Aperture can set the white balance of the image with great accuracy,
sometimes you have to use a combination of these two methods to have the image
appear with the warm or cool tonality you intended.
Before White Balance adjustment
94 Chapter 2 Making Image Adjustments
After White Balance adjustment
Page 95

Click the White Point
eyedropper tool to
activate the Loupe.
Adjusting White Balance in the Image
with the White Point Eyedropper
When you have pixels in your image that should be pure white, you can use the White
Point eyedropper tool to automatically set the color temperature and tint of the image.
All you have to do is select a portion of the image that contains neutral gray pixels with
the White Point eyedropper, and Aperture white balances the image instantaneously.
To adjust the color temperature and tint with the White Point eyedropper:
1 Select an image.
2 In the White Balance area of the Adjustments Inspector or Adjustments HUD, select the
White Point eyedropper.
The pointer changes to the Loupe, showing a magnified view of the target area. By
default, the Loupe is set to magnify the image to 100 percent (full size). If necessary, you
can increase the magnification of the Loupe by pressing Command–Shift–plus sign (+).
For more information about the Loupe, see the Aperture User Manual, available in the
Aperture Help menu.
3 Position the target area of the Loupe over the pixels in the image that are a neutral
gray, then click.
Chapter 2 Making Image Adjustments 95
Page 96

The white balance of the image is adjusted. The color tonality of the image is shifted
either cooler or warmer, depending on the white-balance adjustment.
Important: Make sure that there is as little digital noise in the target area of the Loupe
as possible. Digital noise can skew the white-balance calculation results, introducing a
color cast that wasn’t previously there. A simple way to avoid errant pixels is to increase
the magnification of the Loupe by pressing Command–Shift–plus sign (+).
Adjusting the Color Temperature of the Image
with the Temp Controls
You can also adjust the color temperature of an image manually using the Temp
parameter controls. Color temperature is a term used to describe the color of light when
the image was shot. However, it refers to the color value of the light rather than its heat
value. Light’s color temperature is measured in units called kelvin (K). Adjusting the
color temperature of the image changes how Aperture interprets the colors in the
image in relation to the assigned temperature of light. The purpose of adjusting the
color temperature of an image is to make colors look as natural as possible. For more
information about color temperature, see the Digital Photography Fundamentals
document, available in the Aperture Help menu.
To manually adjust the color temperature of an image:
1 Select an image.
2 In the White Balance area of the Adjustments Inspector or Adjustments HUD, adjust the
Temp parameter by doing one of the following:
Use the Temp slider and value slider to
adjust the color temperature of the image.
 Drag the Temp slider to the left to cool the tonality of the image, or drag it to the
right to warm the tonality.
 Click the left or right arrow in the Temp value slider to change the brightness of the
image by 10 K increments, or drag in the value field.
The left arrow decreases the color temperature of the image, and the right arrow
increases the color temperature.
 Double-click the number in the Temp value slider, then enter a value from 2000 K to
50000 K and press Return.
The color temperature of the image updates as you change the parameter value.
96 Chapter 2 Making Image Adjustments
Page 97

Adjusting the Tint of the Image with the Tint Controls
You can also manually adjust the tint of an image using the Tint parameter controls.
You use the tint parameter controls when you need to fine-tune the white balance
adjustment by neutralizing the remaining green or magenta tint.
To manually adjust the tint of your image:
1 Select an image.
2 In the White Balance area of the Adjustments Inspector or Adjustments HUD, adjust the
Tint parameter by doing one of the following:
Use the Tint slider and value slider to
adjust the tint of the image.
 Drag the Tint slider to the left to add a green tint to the image, or drag it to the right
to add a magenta tint.
 Click the left or right arrow in the Tint value slider to change the tint of the image by
single increments, or drag in the value field.
The left arrow adds a green tint to the image, and the right arrow adds a magenta tint.
 Double-click the number in the Tint value slider, then enter a value from –150 to 150
and press Return.
The image’s tint updates as you change the parameter value.
Chapter 2 Making Image Adjustments 97
Page 98

Working with the Color Controls
You use the Color controls to selectively adjust the red, green, blue, cyan, magenta, and
yellow colors in an image using the Color controls in the Adjustments Inspector or
Adjustments HUD. Each color has individual hue, saturation, and luminance controls.
Although segmenting control of hue, saturation, and luminance on a per-color basis
may seem complicated at first, restricting these adjustments to specific colors helps
correct and enhance targeted colors without affecting others. In addition, Aperture
provides a Range control used to set the extent of colors affected by the hue,
saturation, and luminance adjustments, also known as chromatic spread. You use the
Range control to fine-tune your color adjustments.
Before Color adjustment
98 Chapter 2 Making Image Adjustments
After Color adjustment
(adjusted the hue and saturation of blue)
Page 99

About Hue, Saturation, and Luminance
Hue (H) describes the actual color itself. Hue is measured as an angle on a color
wheel. Moving a Hue slider in Aperture remaps the color from its original position on
the color wheel to the new position indicated by the slider. Hue adjustments are
often made to match the color of the same subject in different images. Adjusting the
hue of an image is particularly useful when the subject you shot moved between
various lighting conditions. Another advantage of adjusting the hue of an image is
that camera models of different types or from different manufacturers rarely capture
and render color exactly the same way. You can use the Hue controls to match the
color of a subject shot by two different cameras, so that when the images are placed
side by side, they match.
Saturation (S) defines the intensity of a specific hue. A saturated hue gives the color a
vivid and pure appearance. A less saturated hue appears flatter and more gray. A
completely desaturated hue becomes a shade of gray.
Luminance (L) describes the brightness of the selected color. An increase in luminance
brightens the selected color value. A maximum luminance adjustment results in pure
white. Conversely, a decrease in luminance darkens the selected color. A minimum
luminance adjustment results in pure black.
L
S
H
Chapter 2 Making Image Adjustments 99
Page 100
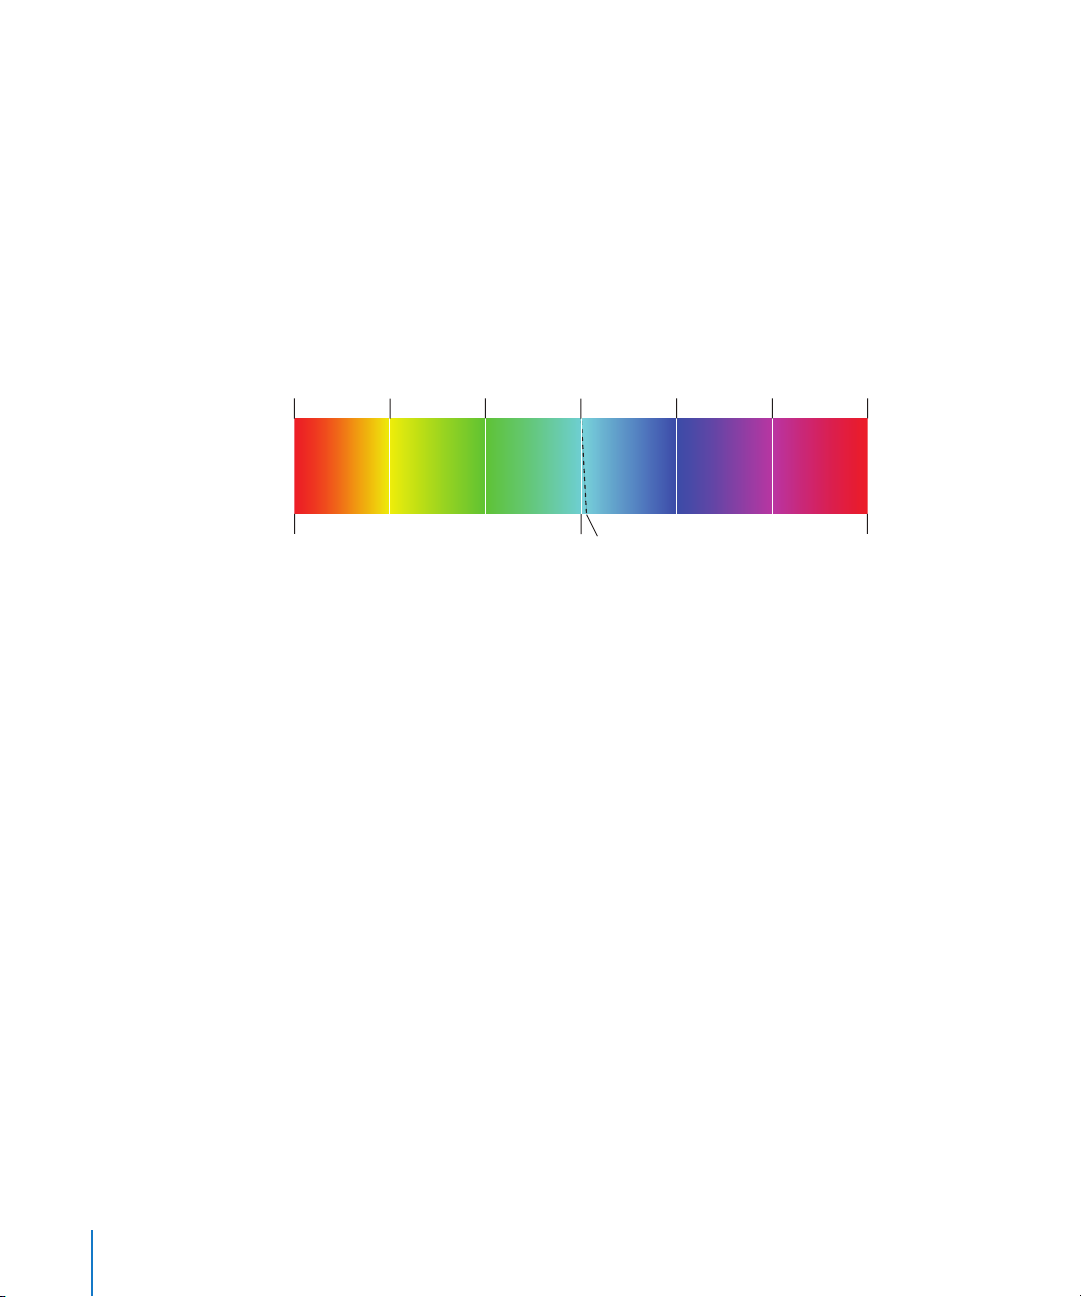
When you want to adjust the color values in an image, you must first identify the colors
that have the most influence on the colors you want to change. It’s important to
understand that you’re adjusting the colors of the image within the RGB spectrum;
therefore, you reduce yellow when you increase blue, you reduce magenta when you
increase green, and so on. When you want to isolate a color and adjust its hue, it’s
important to identify the color’s location on the color wheel. For example, if the color
value is closer to cyan than blue, you may decide to adjust the cyan’s hue value without
adjusting the blue’s hue value. Depending on the image, you may decide to adjust
both the cyan and blue hue values to achieve the color values you’re looking for.
There’s not just one correct way of perfecting the colors in an image. Your approach
should be based on the image’s subject and the overall aesthetic you want to achieve.
Reds
–180˚ 180˚
Yellows
Greens
Cyans
0˚
Cyan remapped 4˚
Blues
Magentas
Reds
To adjust a color value in an image:
1 Select an image.
2 In the Color area of the Adjustments Inspector or Adjustments HUD, click the color
button that corresponds to the color you want to adjust to view its Hue, Saturation,
Luminance, and Range controls.
100 Chapter 2 Making Image Adjustments
 Loading...