

Page 1

Getting Started
Chapter 1 Set ting Up Your Computer
Chapter 2 Learning to Use Your Computer
Chapter 3 Installing and Using Software
part
I
Page 2

Page 3

Follow the instructions in this
chapter to set up your computer
and learn the basics.
1
Getting Started
The illustration on the next page shows all the equipment you will need to set
up your computer and begin using it. Place your equipment on a sturdy, flat
surface near a grounded wall outlet. Before following the setup instructions in
this chapter, you may want to read “Ar ranging Your Office” in Appendix A
(in the section on health-related information) for tips on adjusting your work
furniture so that you’re comfortable when using the computer.
3
Page 4
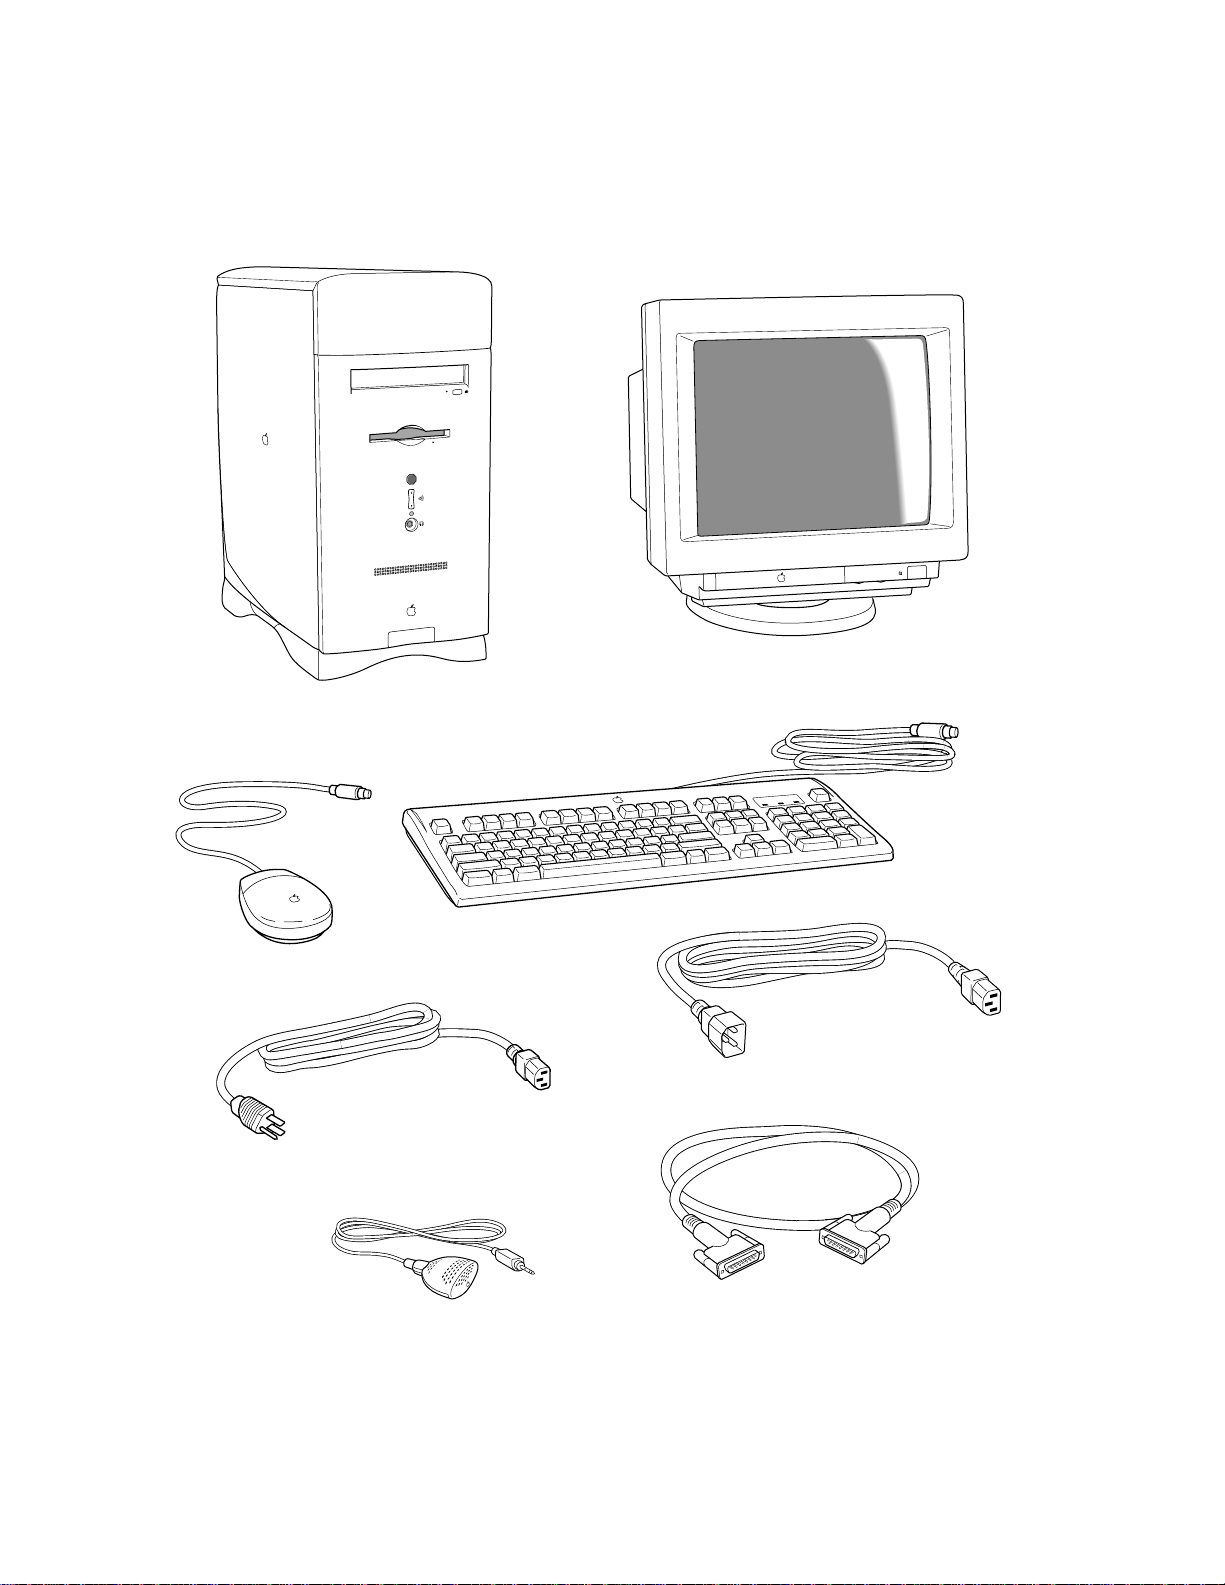
Macintosh computer
Mouse
Computer power cord
Monitor
(Your monitor may look different from this.)
Keyboard cable
(permanently attached
to the keyboard)
Keyboard
Monitor power cord
(sometimes built into the monitor)
Apple PlainTalk Microphone (optional)
Monitor cable
(sometimes built into the monitor)
Page 5
Pluggin g in the computer
Before you plug your Macintosh into a wall socket, carefully read all the
setup instructions in this chapter. Then, before you connect anything to your
Macintosh, follow the instructions in this section on how to plug it in. The
plug grounds the computer and protects it from electrical damage while you
are setting up.
When you are ready to begin, follow these steps:
1Place the computer where you want it—either on the floor or on a sturdy desk.
If your computer came with a modem, you may want to set your computer
near a phone jack (if possible) so that you can connect your modem later.
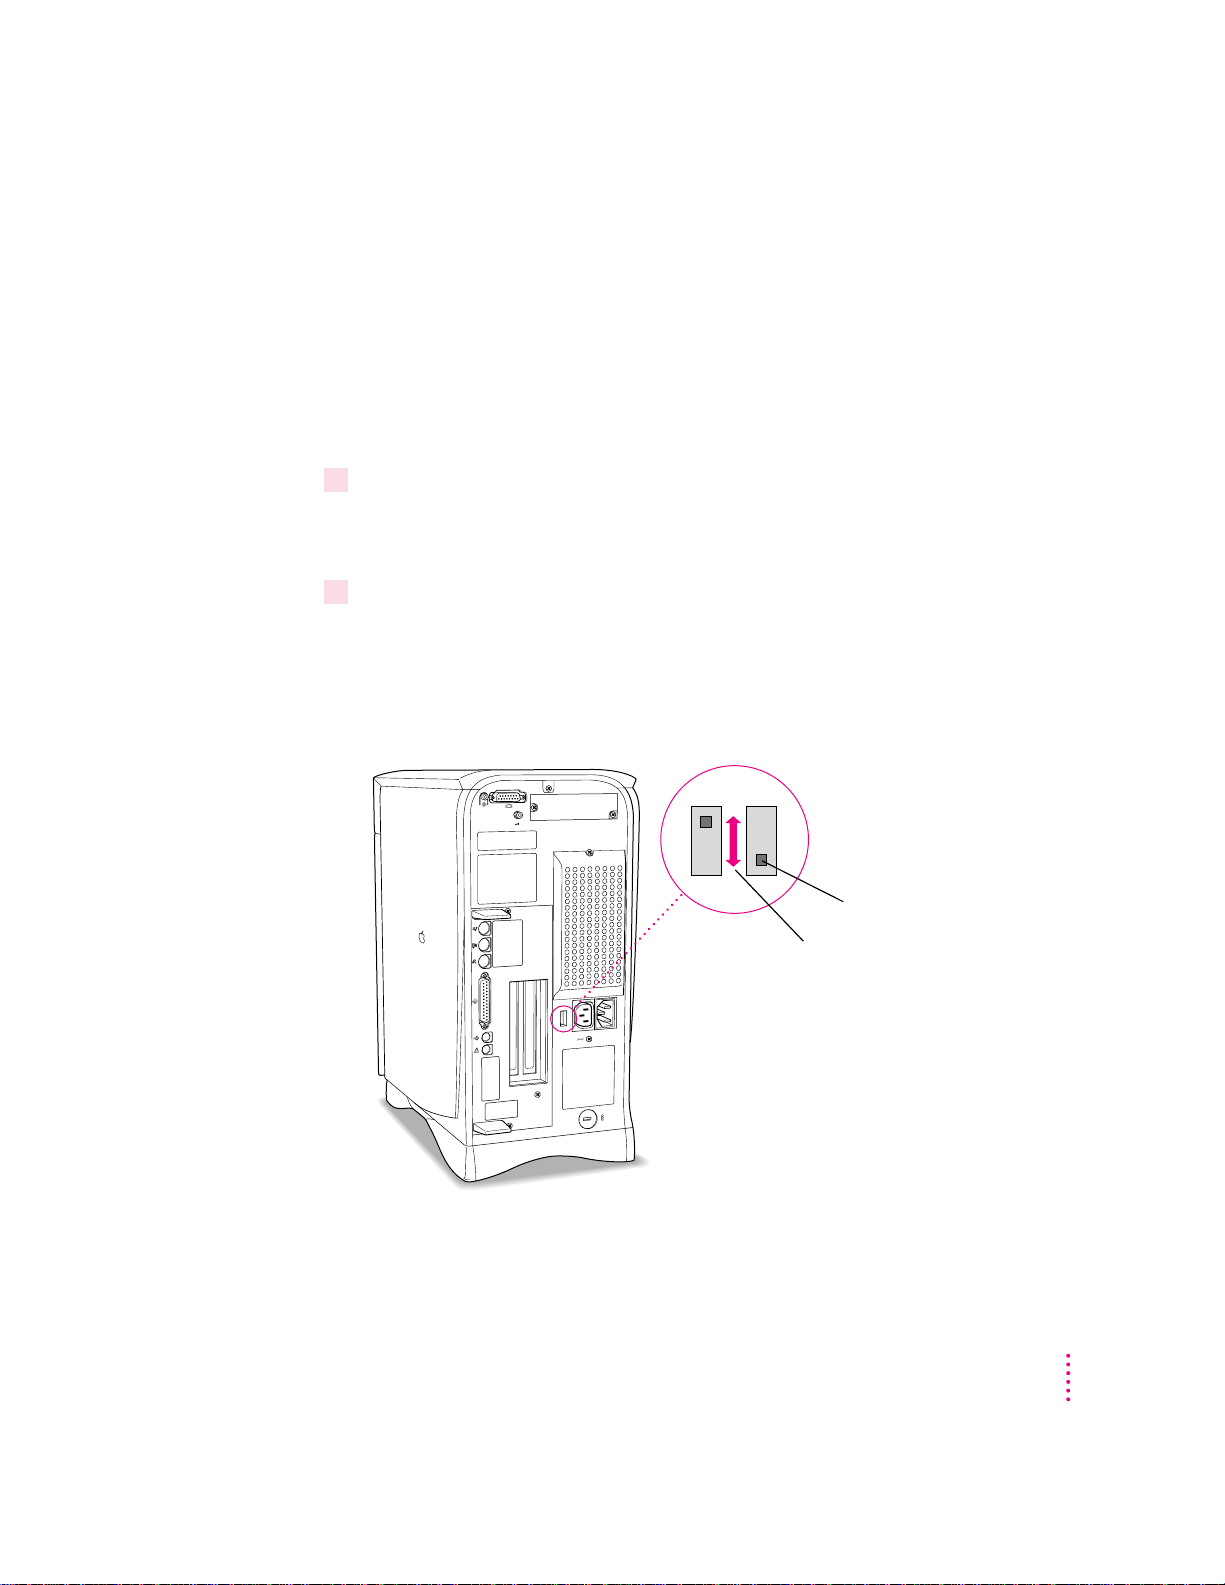
2Make sure the voltage switch on the back of the computer is set for the kind of voltage
system you will be connecting to.
The voltage switch must be set correctly to avoid damaging your computer.
If you don’t know the voltage used in the country you’re in, refer to the table
“Voltages for Different Locations” later in this chapter.
Before you plug your computer in,
check to see that the voltage
switch on the back is
properly set. If you need
to change the setting,
insert a small screwdriver
here and slide the switch.
Set the switch to show “115” for
voltages less than 135; set it to show
“230” for voltages greater than 180.
(Your computer will not operate
in the 135–179 volt range.)
Getting Started
5
Page 6

Voltages for different locations
For any voltages less than 135 in the chart below, set the voltage switch on the
back of your computer to “115.” Set the switch to show “230” for a voltage
greater than 180.
IMPORTANT
In some countries, you may have one of two voltages. If you’re not
sure which of the two voltages you have, check with your electricity supply
company before plugging in your computer.
Country Voltage
Japan 100
Algeria, Indonesia, Lebanon, Libya, Peru, S. Korea, Vietnam 100 or 220
Ecuador, Jamaica, Philippines, Taiwan 110
Bermuda, Canada, Puerto Rico, United States, Venezuela 120
Colombia, Mexico, Saudi Arabia 127
Brazil 127 or 220
Hong Kong 200
India, South Africa 220–250
Israel, Pakistan, Singapore 230
Australia, Kuwait, Malta, New Zealand, Northern Ireland, 240
Papua New Guinea, Oman, Qatar, United Kingdom
Austria, Belgium, Denmark, Finland, France, Germany, Greece, 220–230
Italy, Luxembourg, Netherlands, Norway, Portugal, Spain,
Sweden, Switzerland
6
Bahrain, Chile, China (People’s Republic), Czechoslovakia, Egypt, 220
Greenland, Hungary, Iceland, Iran, Jordan, Liechtenstein, Nepal,
Paraguay, Poland, Romania, United Arab Emirates, Russia and the
Commonwealth of Independent States (CIS),Yemen, Yugoslavia
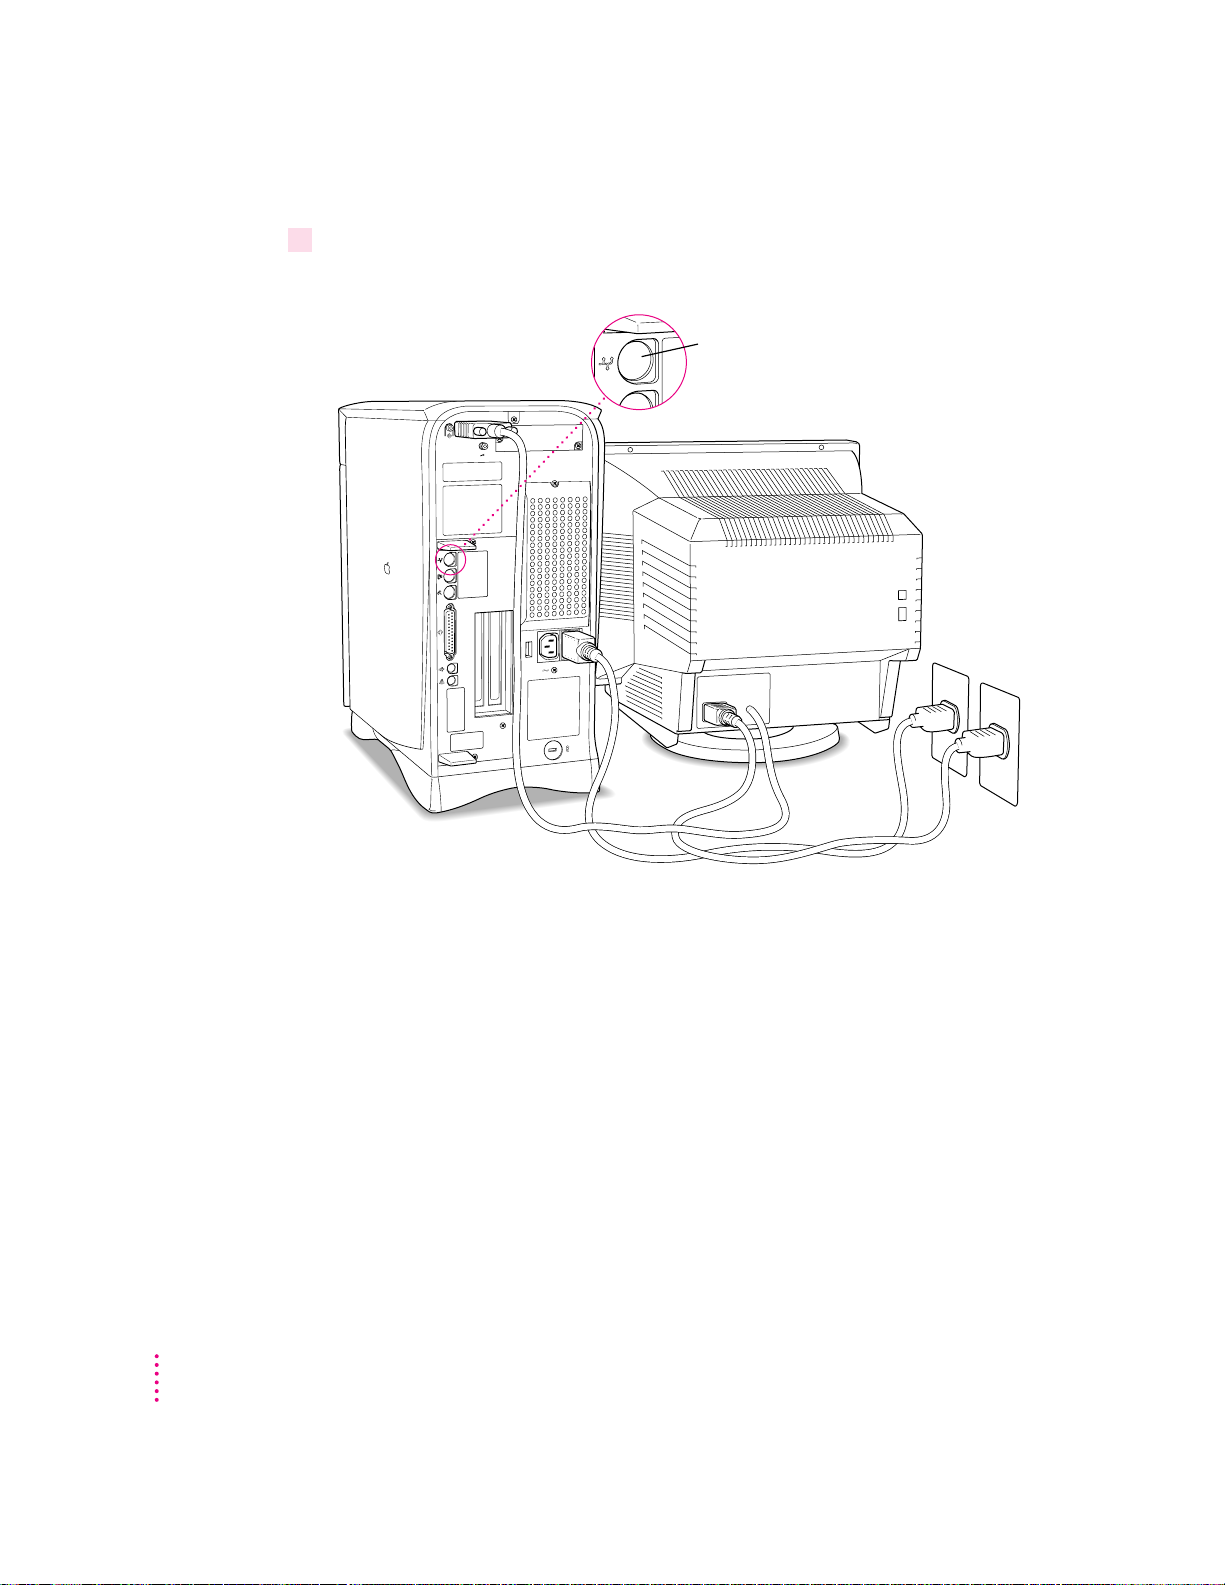
3Plug the socket end of the computer’s power cord into the recessed power plug on the
back of the computer.
Chapter 1
Page 7
4Plug the other end of the power cord into a three-hole grounded outlet or power strip.
Make sure at least one end of the power cord is within reach so that when you
need to unplug the computer you can do so easily.
Standby power button
®
Power cord socket Computer power cord
WARNING
This equipment is intended to be electrically grounded. Your
Power cord plug
Macintosh is equipped with a three-wire grounding plug—a plug that
has a third (grounding) pin. This plug will fit only a grounded AC outlet.
This is a safety feature. If you are unable to insert the plug into the
outlet, contact a licensed electrician to replace the outlet with a properly
grounded outlet. Do not defeat the purpose of the grounding plug!
If the computer starts up: If you hear a tone, the computer has started up and
you need to turn it off before proceeding. Press the standby power button (®)
located on the back of the computer to turn it off.
Getting Started
7
Page 8

Connecting a monitor
You can connect many types of monitors to your Macintosh. To connect a
monitor, refer to the instructions that came with it, in addition to the
instructions here.
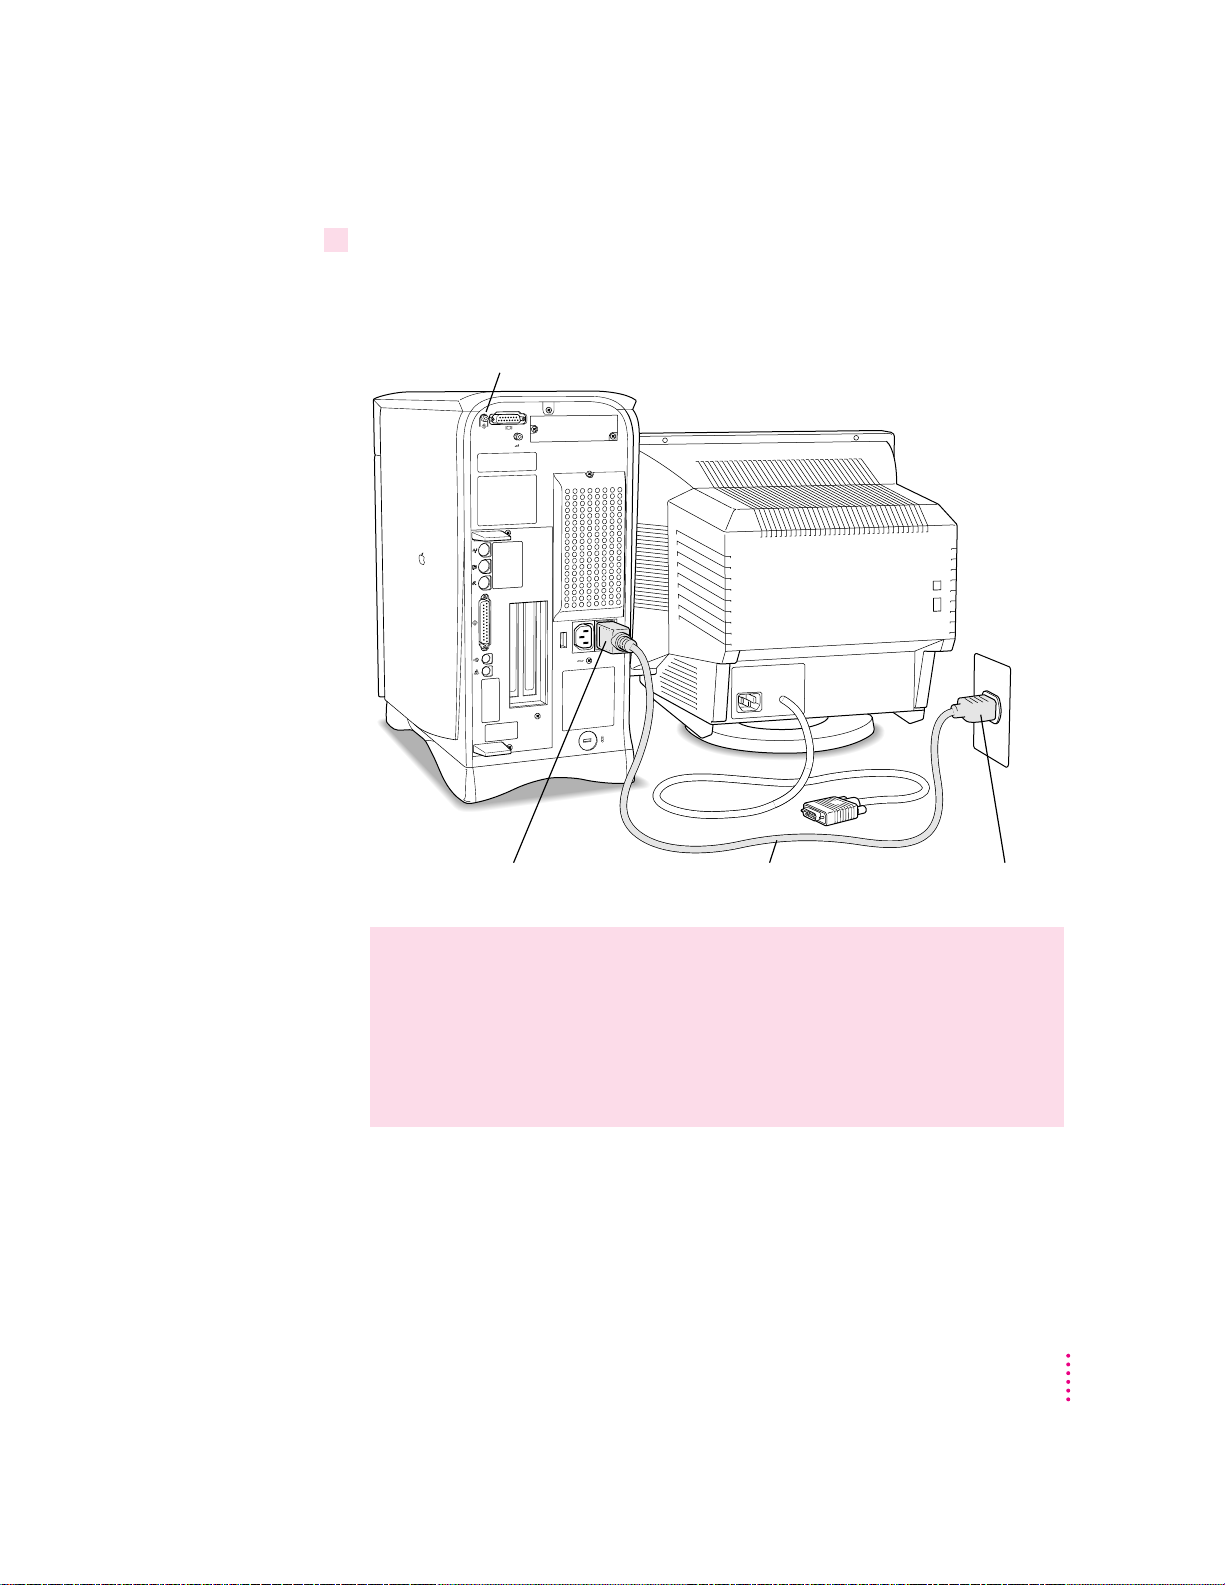
Connecting the monitor power cord
Monitors have two cords to connect: a monitor power cord and a monitor cable.
To connect the monitor power cord, follow these steps:
1Place the monitor where you’ll be using it.
Keep these considerations in mind:
m Allow 3 or more inches for air circulation around the computer and monitor.
m Position the monitor with the top of the screen at slightly below eye level
whe n you sit at the keyboard.
m Position the monitor to minimize glare and reflections on the screen from
overhead lights and windows.
m Consult “Ar ra nging Your Office” in Appendix A for suggestions on
locating your computer equipment.
8
2Connect the monitor power cord to the monitor.
On some monitors, the cord is already attached.
Chapter 1
Page 9
3Plug in the monitor power cord.
Some monitor power cords are designed to plug into the back of your computer.
Some monitor power cords must be connected to a grounded electrical outlet,
not to the computer. Check the information that came with the monitor.
Monitor power socket Monitor power cord
Monitor power cord plug
Getting Started
9
Page 10

Connecting the monitor cable
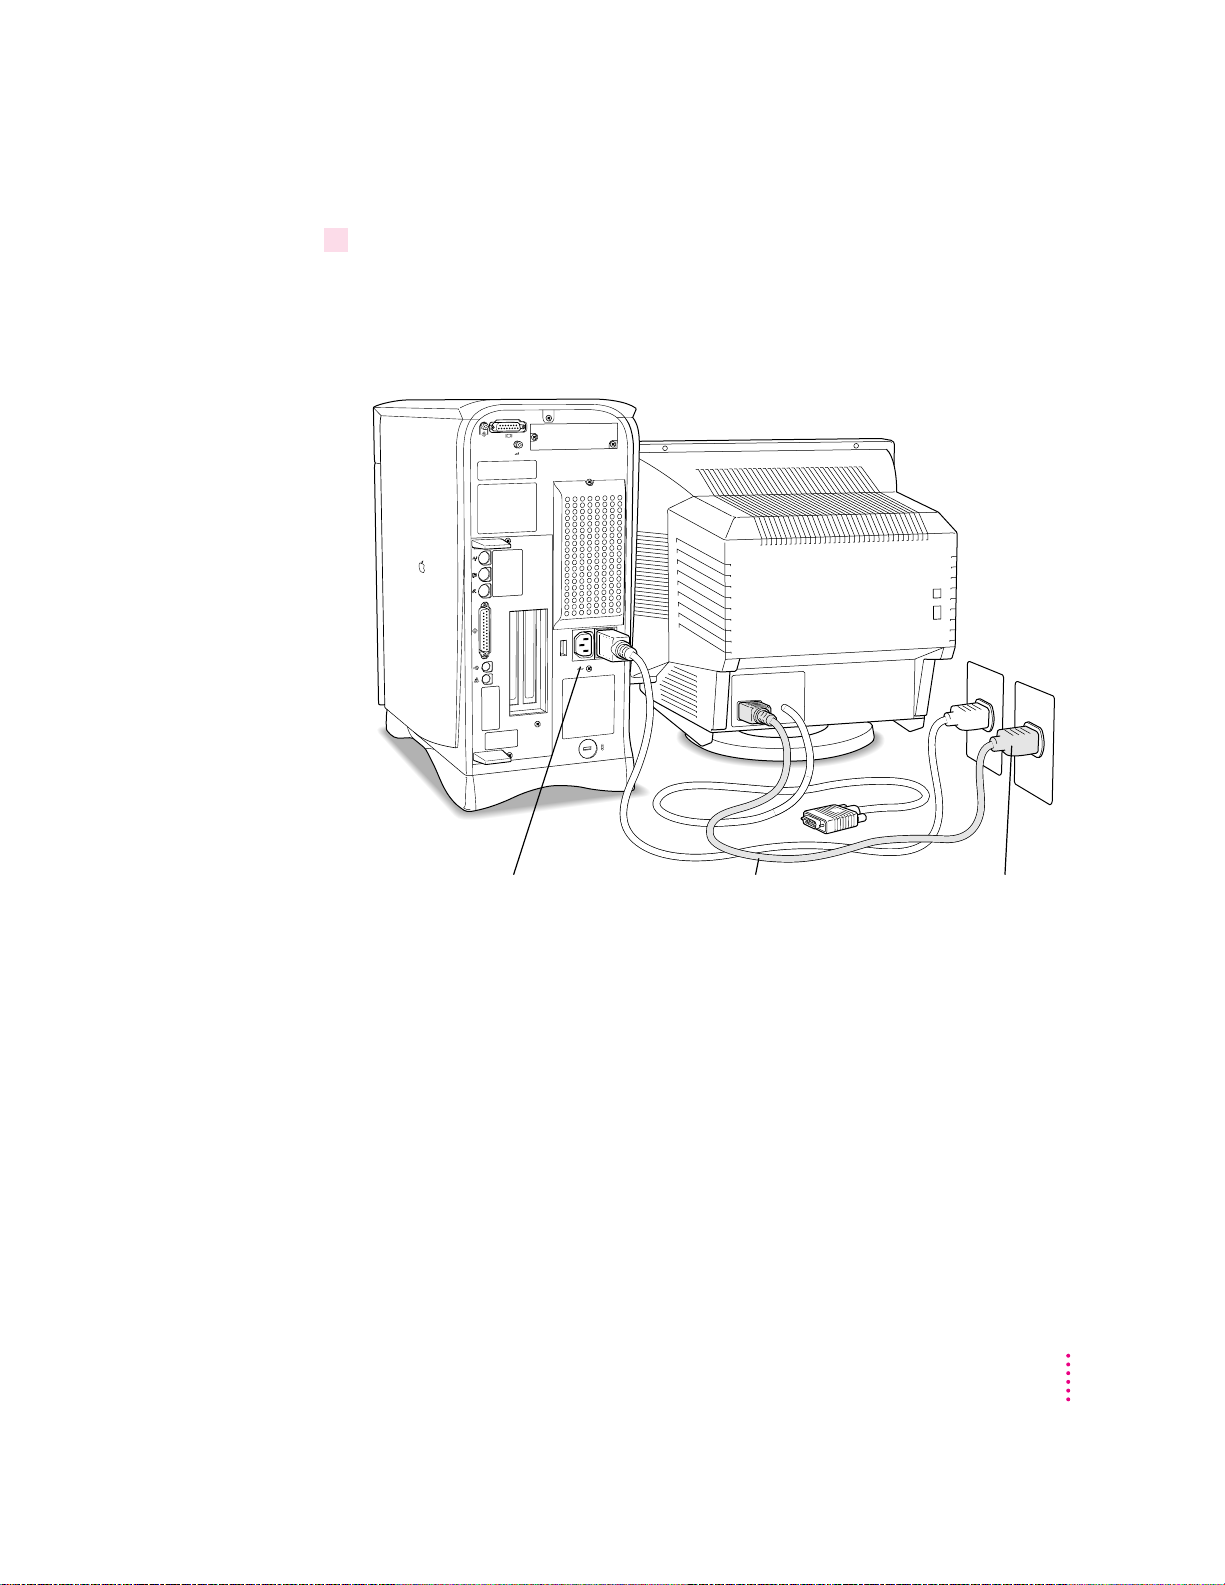
After you plug in the monitor power cord, connect the monitor cable to the
computer’s monitor port.
To connect the monitor cable, follow these steps:
1Attach the monitor cable to the monitor so that it appears as shown in the illustration.
On some monitors, the cable is already attached.
2Attach the monitor cable to the monitor port on the back of the computer so that it
appears as shown in the illustration.
10
Chapter 1
™
Monitor port Monitor cable
If your monitor has a microphone or speakers, you may need to connect
additional cables. See the documentation that came with the monitor.
Page 11

Connecting the mouse and keyboard
If you have a pointing device other than a mouse, you can connect it
following the instructions in this section. (Note that some devices require that
you install additional software to use them with your computer. For
instructions, see the documentation that came with your device.)
1Plug the mouse cable into the recessed port on the back of the keyboard.
The plug and the port are marked with the V icon (symbol). The positions of
the port and icon on your keyboard may be different from those pictured.
By the way: A port marked with the V icon is called an Apple Desktop Bus
(ADB) port.
Plug the mouse cable into the recessed port
on the keyboard. The flat part of the plug
should be pointing down, as shown here.
This cable plugs into the Apple Desktop Bus (ADB) port,
V
marked with the
icon, on the back of the computer.
Getting Started
11
Page 12
2Plug the keyboard cable into the ADB port marked with the
V
icon on the back of
the computer.
V
ADB port
12
Some monitors also have a port to which you can connect the keyboard or
mouse. See the information that came with the monitor.
Chapter 1
Page 13
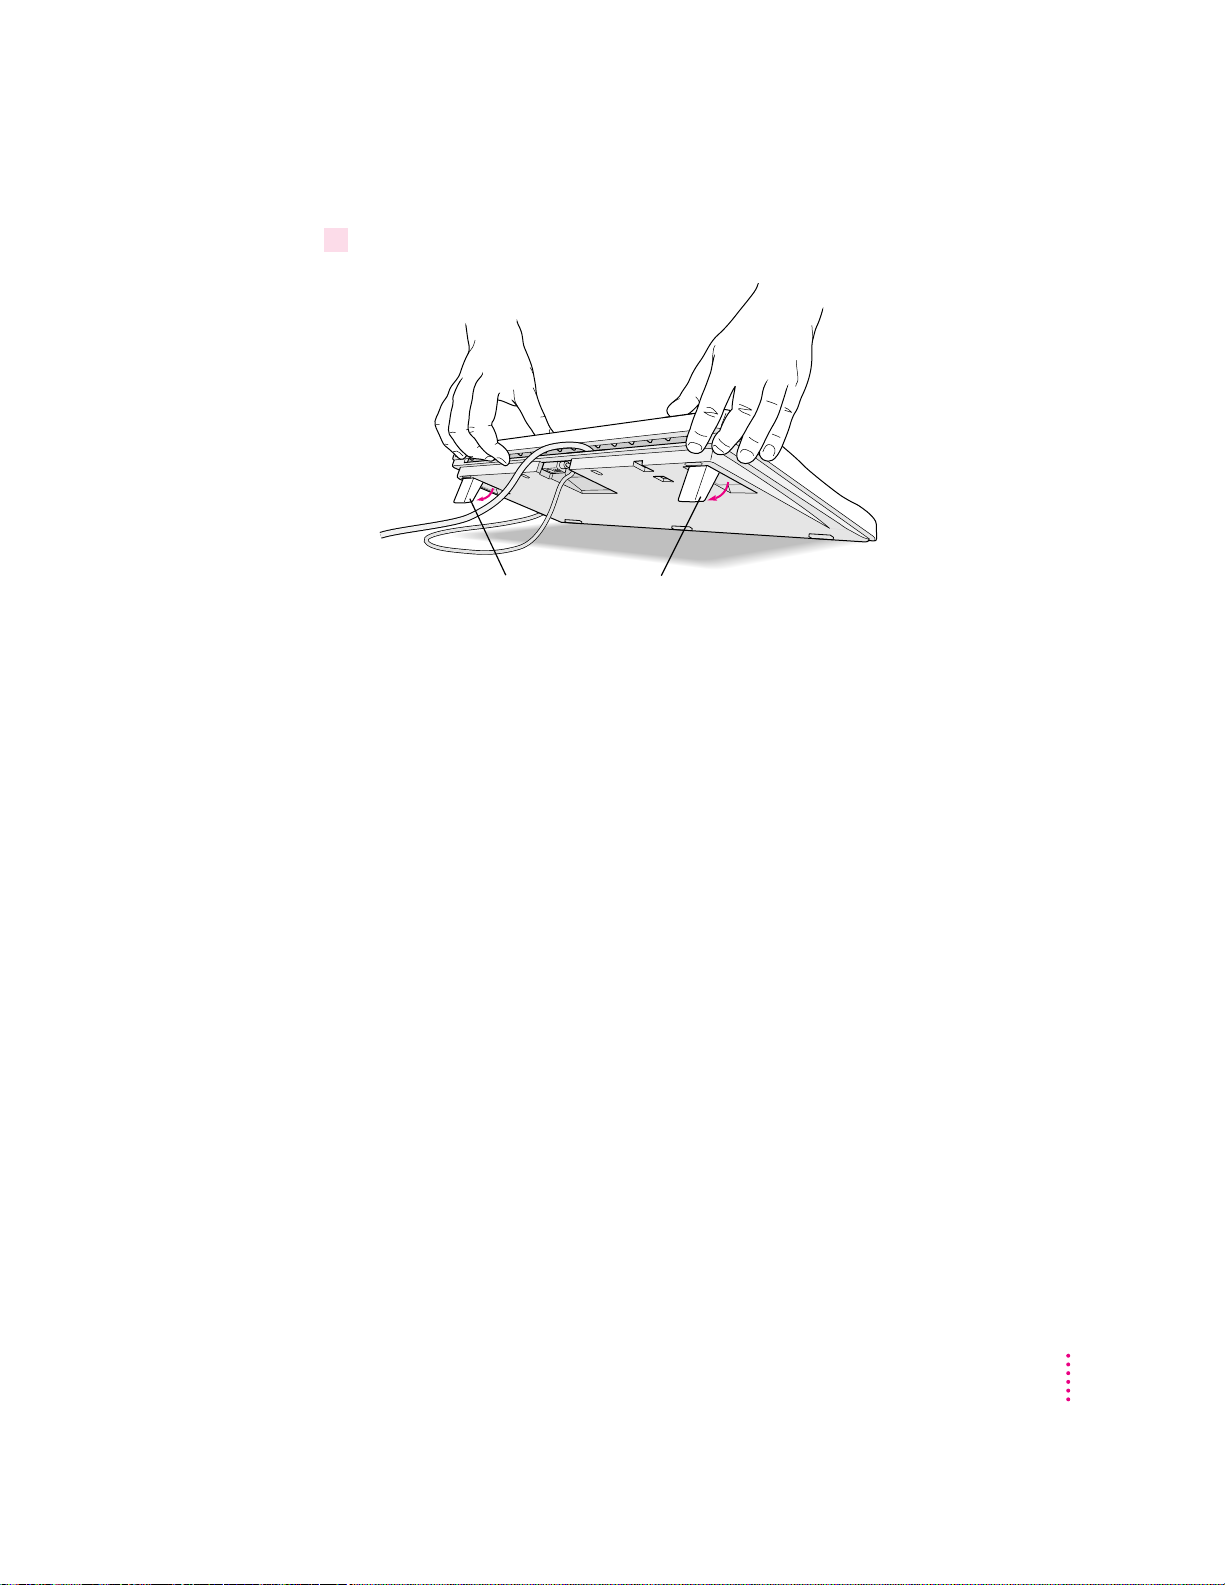
3If you want to adjust the keyboard angle, lower the feet on the keyboard.
To adjust the keyboard angle, lower the feet until they snap into position.
Connecting other equipment
If you are new to the Macintosh, it’s a good idea to get some experience using
your computer before you connect other equipment, such as a printer or
scanner. To learn basic Macintosh skills, continue with the instructions in
this cha p ter.
When you’re ready to connect other equipment to your Macintosh, see the
instructions in Chapter 3.
Getting Started
13
Page 14

Turning the computer on for the first time
To tu r n the computer on for the first time, follow these steps:
1Turn on your monitor.
Note: You may not see the monitor power come on until you turn on the
computer in the next step. Also, larger monitors can take several seconds to
turn on if you have extra DRAM installed in your computer.
See the information that came with your monitor for the location of the power
switch. On newer Apple monitors, the power switch is located on the front of
the unit.
By the way: Depending on the typ e of monitor you have, you may only need
to turn it on once. Some monitors turn off automatically when you shut
down the computer, and turn on automatically when you start up the
computer. Other monitors have to be turned on separately each time you
turn on the computer.
2Press the Power key (marked with a
π
) on your keyboard.
You h ear a tone from the computer as it starts up.
14
Chapter 1
Page 15

3Check to see what’s on your screen.
You see a sequence of messages describing what is happening, followed by
the Energy Saver dialog box.
m If you see a blinking question mark, see “Solutions to Common Problems
With Your Computer” in Chapter 9.
m If you see anything else on your screen, or if you see nothing at all, see
“Problems Turning On Your Computer?”, next.
m If you are a beginning Macintosh user, press the Return key on your
keyboard when the Energy Saver dialog box appears.
m If you’re an experienced Macintosh user, you may want to set your energy-
saving options now. For more information, refer to “Saving Energy With
the Energy Saver Control Panel,” later in this chapter, and to the “Saving
Energy” topic area of Macintosh Guide (or Mac OS Guide), available in the
Guide (h) menu.
Getting Started
15
Page 16

m If, when you press Return, you see the Macintosh desktop (shown here),
your system software is already set up correctly.
Skip now to the section, “What’s Next?”
Hard disk
icon
Macintosh
desktop
Note: To save energy, your computer is automatically set to put itself to sleep
if you don’t use it for 30 minutes or more (the computer goes into powersaving mode and the screen tur ns black). If this happens while you’re setting
it up, simply press the Power key or any key on the keyboard but Caps Lock
to “wake up” the computer (it may take a few seconds). See “Saving Energy
With the Energy Saver Control Panel” later in this chapter for more
information on setting power-saving options.
16
Chapter 1
Page 17

Problems turnin g on yo ur com pu ter ?
If the screen is dark, check these items to see if you can identify
the problem:
m Is the computer plugged into a power source? If it is plugged into a
power strip, is the power strip turned on?
m Is the computer turned on? The power-on light on the front panel
should be on. If it isn’t, press the standby power button (marked with
the symbol ®) on the back of the computer.
m Are the keyboard and mouse cables connected correctly? (Don’t
disconnect the keyboard or mouse cable while the computer is on.
You could damage your equipment.)
m Is the monitor power cord plugged in?
m Is the monitor turned on? (Check the power-on light on the front of
the monitor.)
m Is the monitor cable—the one connected to the monitor video port
(™) on your computer—attached firmly to both the monitor and
computer?
m Is the brightness control on the monitor adjusted correctly? (On most
monitors, the brightness control is marked with the symbol ¤.)
If you see a blinking question mark on the screen, turn to “Solutions to
Common Problems With Your Computer” in Chapter 9.
Getting Started
17
Page 18
What’s next?
Congratulations! You’ve finished setting up your computer. Now continue
with one of the following steps:
m If you are new to the Macintosh, see the next section, “Learning the Basics.”
m If you are an experienced Macintosh user, turn to Chapter 2, “Getting
Help,” to learn about onscreen help (called “Macintosh Guide” or “Mac OS
Guide”). Or choose Macintosh Guide (or Mac OS Guide) from the Guide
menu (h) in the upper-right corner of your screen and explore it yourself.
What you can’t find in this manual you can
find in Macintosh Guide (or Mac OS Guide),
your main source of information when working
with your computer.
m If you want to connect other equipment, such as a printer, to your computer,
see Chapter 3, “Expanding Your Computer and Using Its Special Features.”
m If you want to install application software on your computer, see
Chapter 4, “Installing and Using Application Programs.” The chapter
contains information on setting up your programs and managing memory.
Yo u’ ll n eed this information to properly set up any programs specifically
designed for computers with PowerPC microprocessors.
18
Chapter 1
m If you want to turn off your computer, see “Turning the Computer Off”
later i n this chapter.
IMPORTANT
If you need to turn off your computer at any point, please see
“Tur ning the Computer Off” later in this chapter. It is very important to use
the correct procedure for shutting down your Macintosh before turning it off.
Before you begin working with your computer, be sure to read the importa nt
health and safety information in Appendix A.
Page 19

Learning the basics
If you are new to the Macintosh, you should begin by looking at the
easy-to-use program called the Macintosh Tutorial. The tutorial teaches you
the basic skills you need to use your computer. To start the tutorial, follow
these steps:
1Slide your mouse along your mouse pad or desk.
Hold the mouse as shown, with the cable pointing away from you. Rest the
heel of your palm on the desk and grasp the sides of the mouse between your
thumb and fingers. Use your wrist and fingers to slide the mouse around with
the index finger resting on the mouse button. Don’t press the mouse button
(under your index finger). Notice that the arrow (8) on the screen moves in
the same direction that you move the mouse.
Mouse button
If the arrow doesn’t move, make sure that the cables connecting the mouse
and keyboard are secure and that your mouse is positioned as shown in the
illustration.
2Move the tip of the arrow (8) to the question mark (h) in the upper-right portion of
the screen.
If you run out of room on your mouse pad or desk while moving the mouse,
pick up the mouse and place it where there’s more room. (The arrow on the
screen moves only when the mouse is in contact with the mouse pad or desk.)
Getting Started
19
Page 20
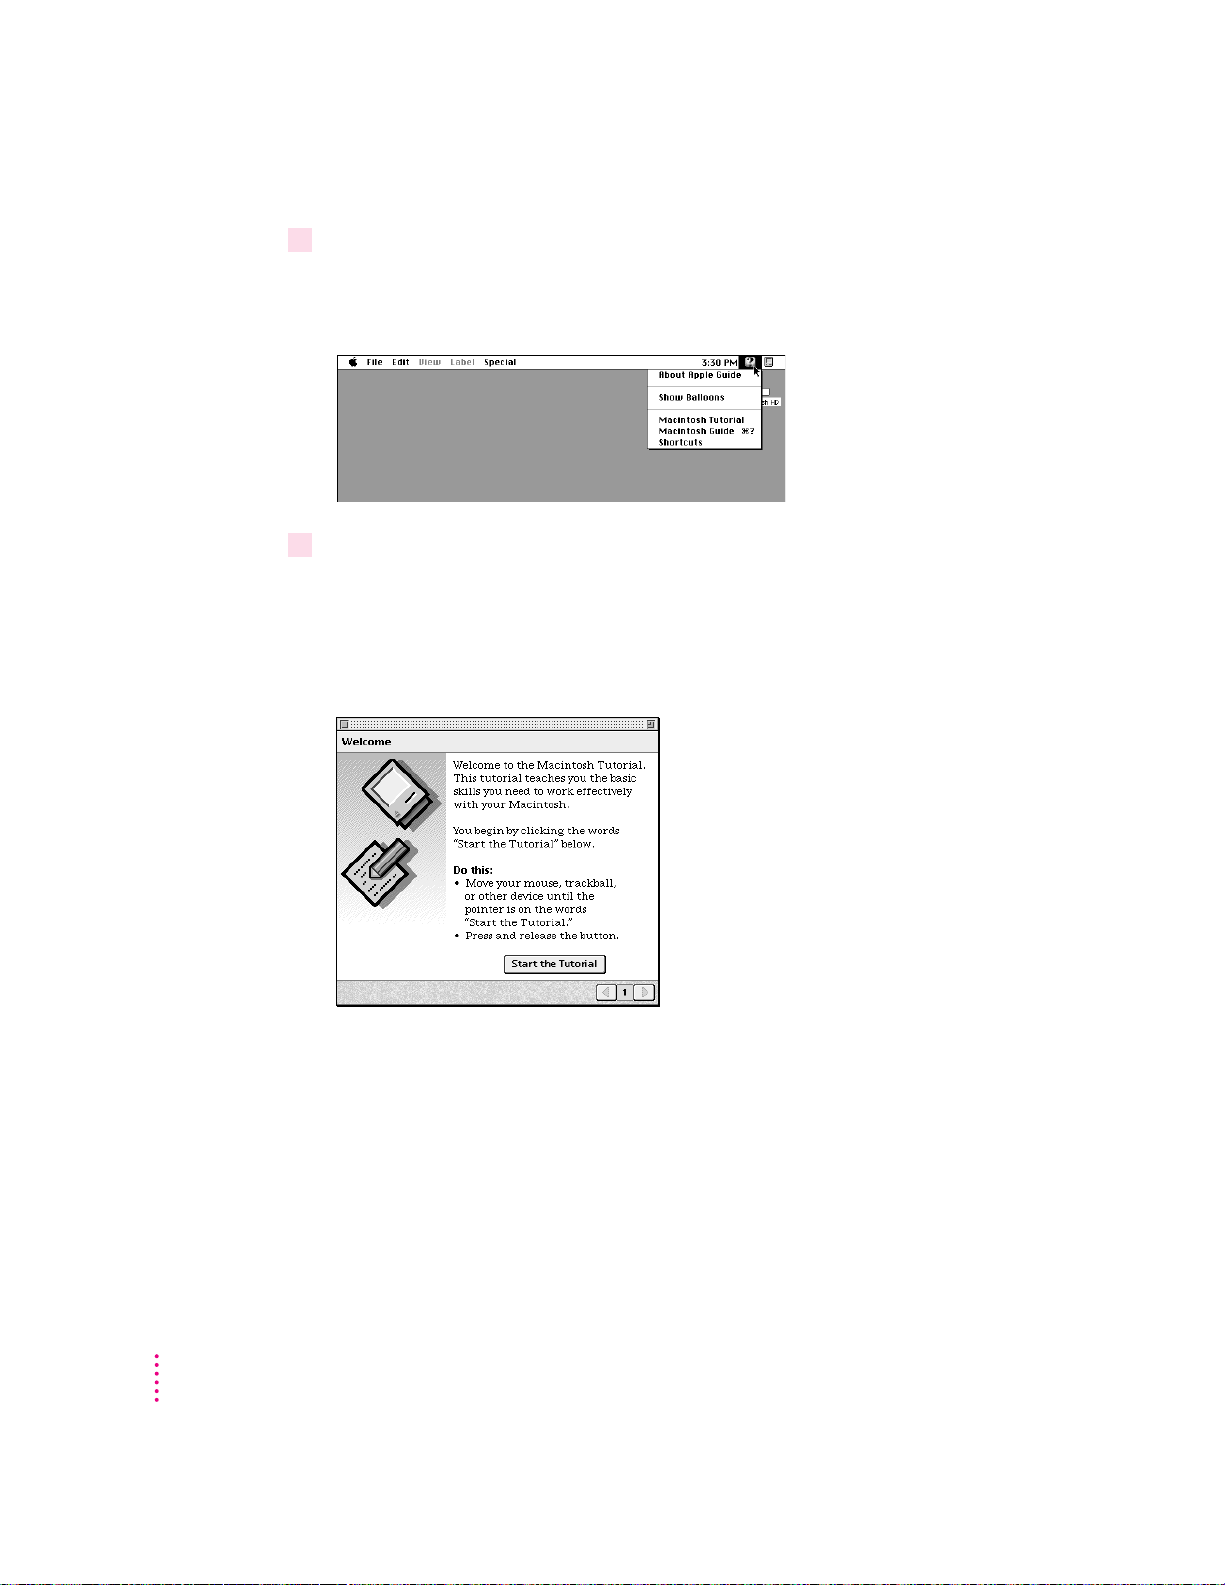
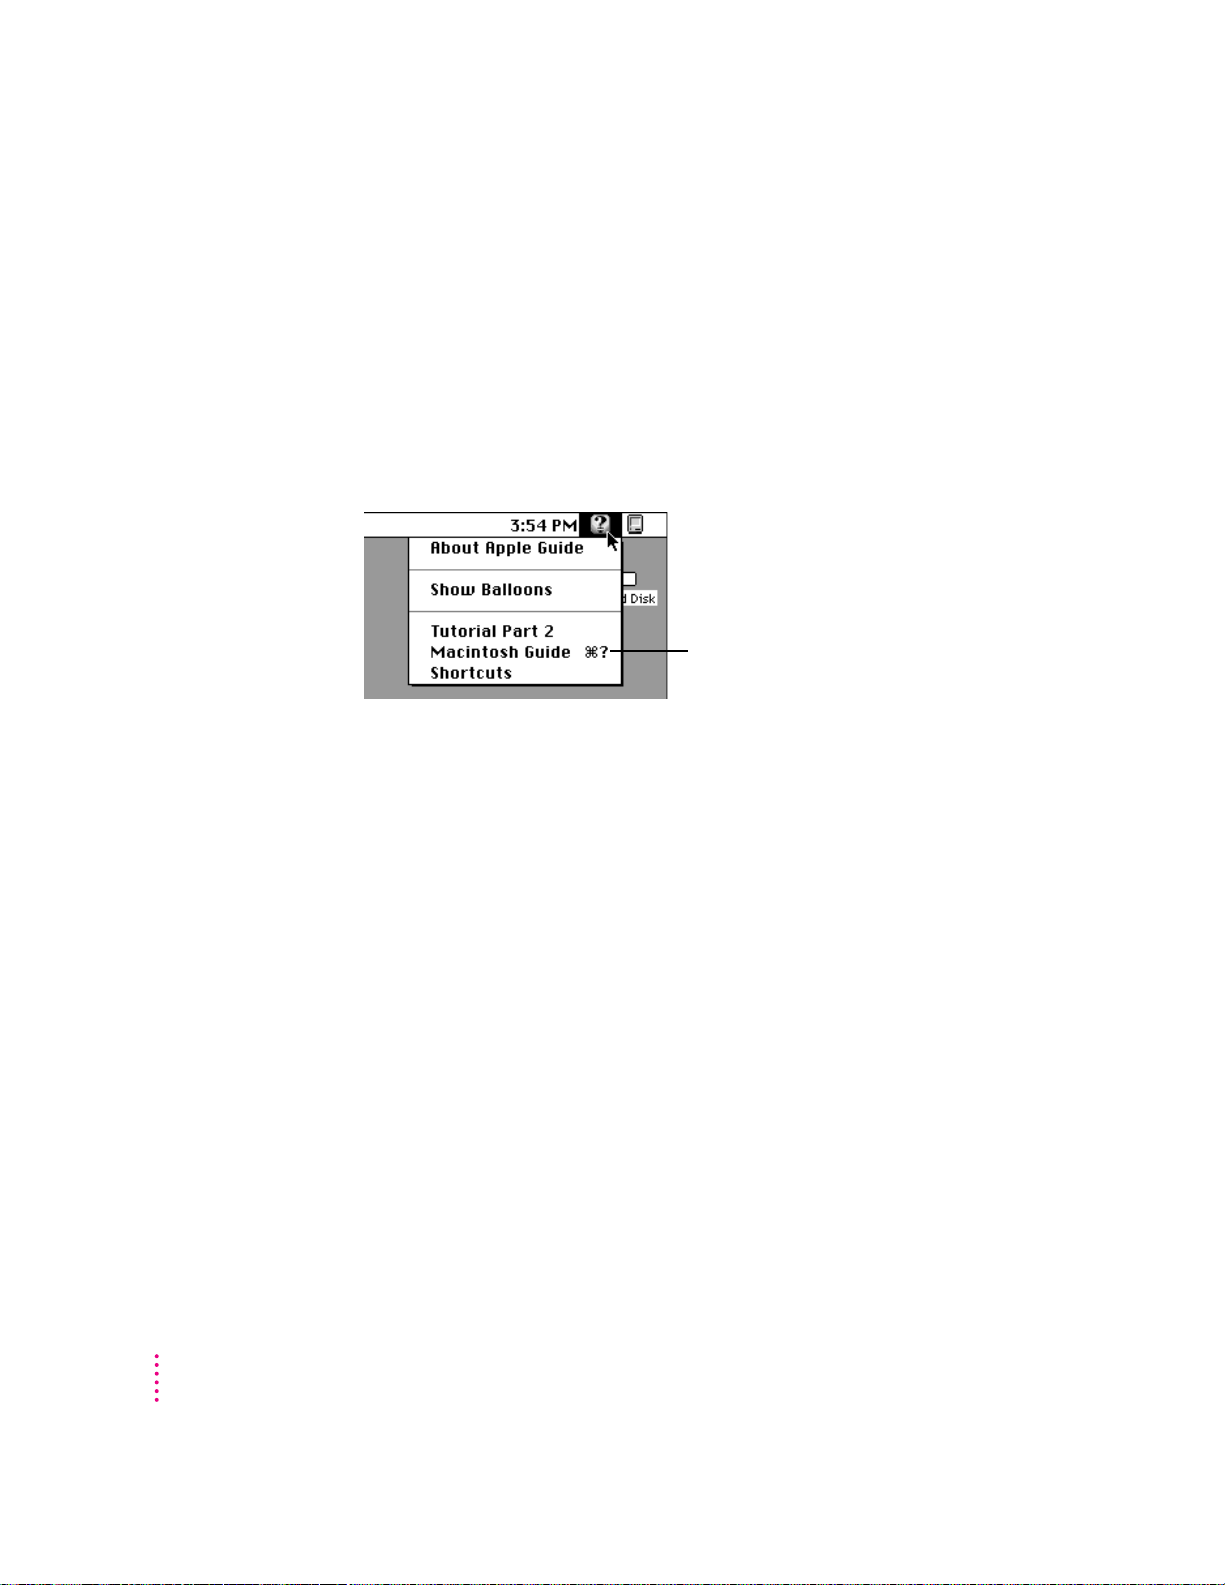
3With the tip of the arrow on the question mark, press and hold down the mouse button.
A list of choices (called a menu) appears. This is the Guide (h) menu, which
is the place to go when you have a question about how to use your computer.
4While holding down the mouse button, move the arrow until the words “Macintosh
Tutorial” are highlighted, then release the button.
A window appears welcoming you to the tutorial. You can set this book aside
for now and follow the instructions on the screen. When you have completed
the tutorial, return to this book.
20
Chapter 1
Page 21
Reviewing th e basics
Use the following illustrations to review the elements on your screen with
which you work on your computer.
Menu
Icons
Window
Menus
The strip across the top of the screen is called the menu bar. The symbols and
words in it represent “menus” (lists) of commands. To open a menu, place the
pointer on the symbol or word for the menu and press the mouse button.
Guide menu
To find an answer to a question,
look in the Guide (
) menu.
h
Application menu
You can have several
applications open at
once. To see which
application is active
or to switch from one
application to another,
use this menu.
Getting Started
21
Page 22
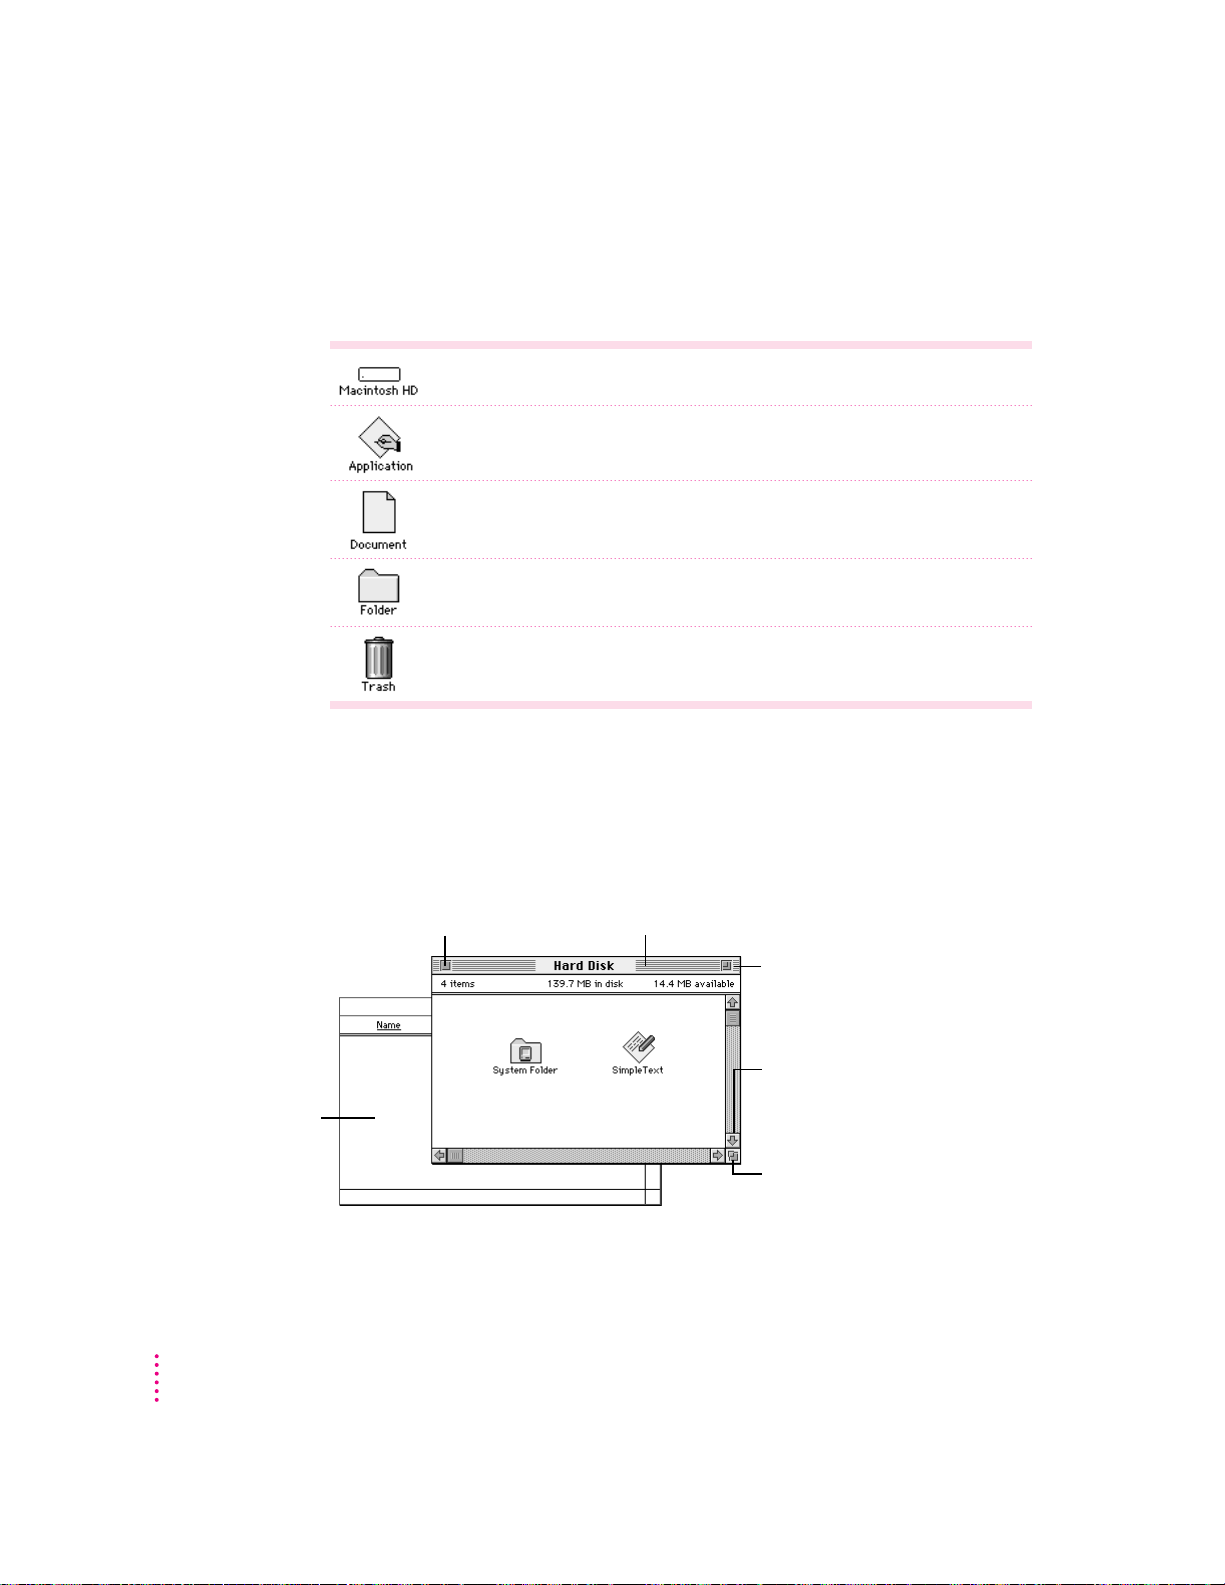
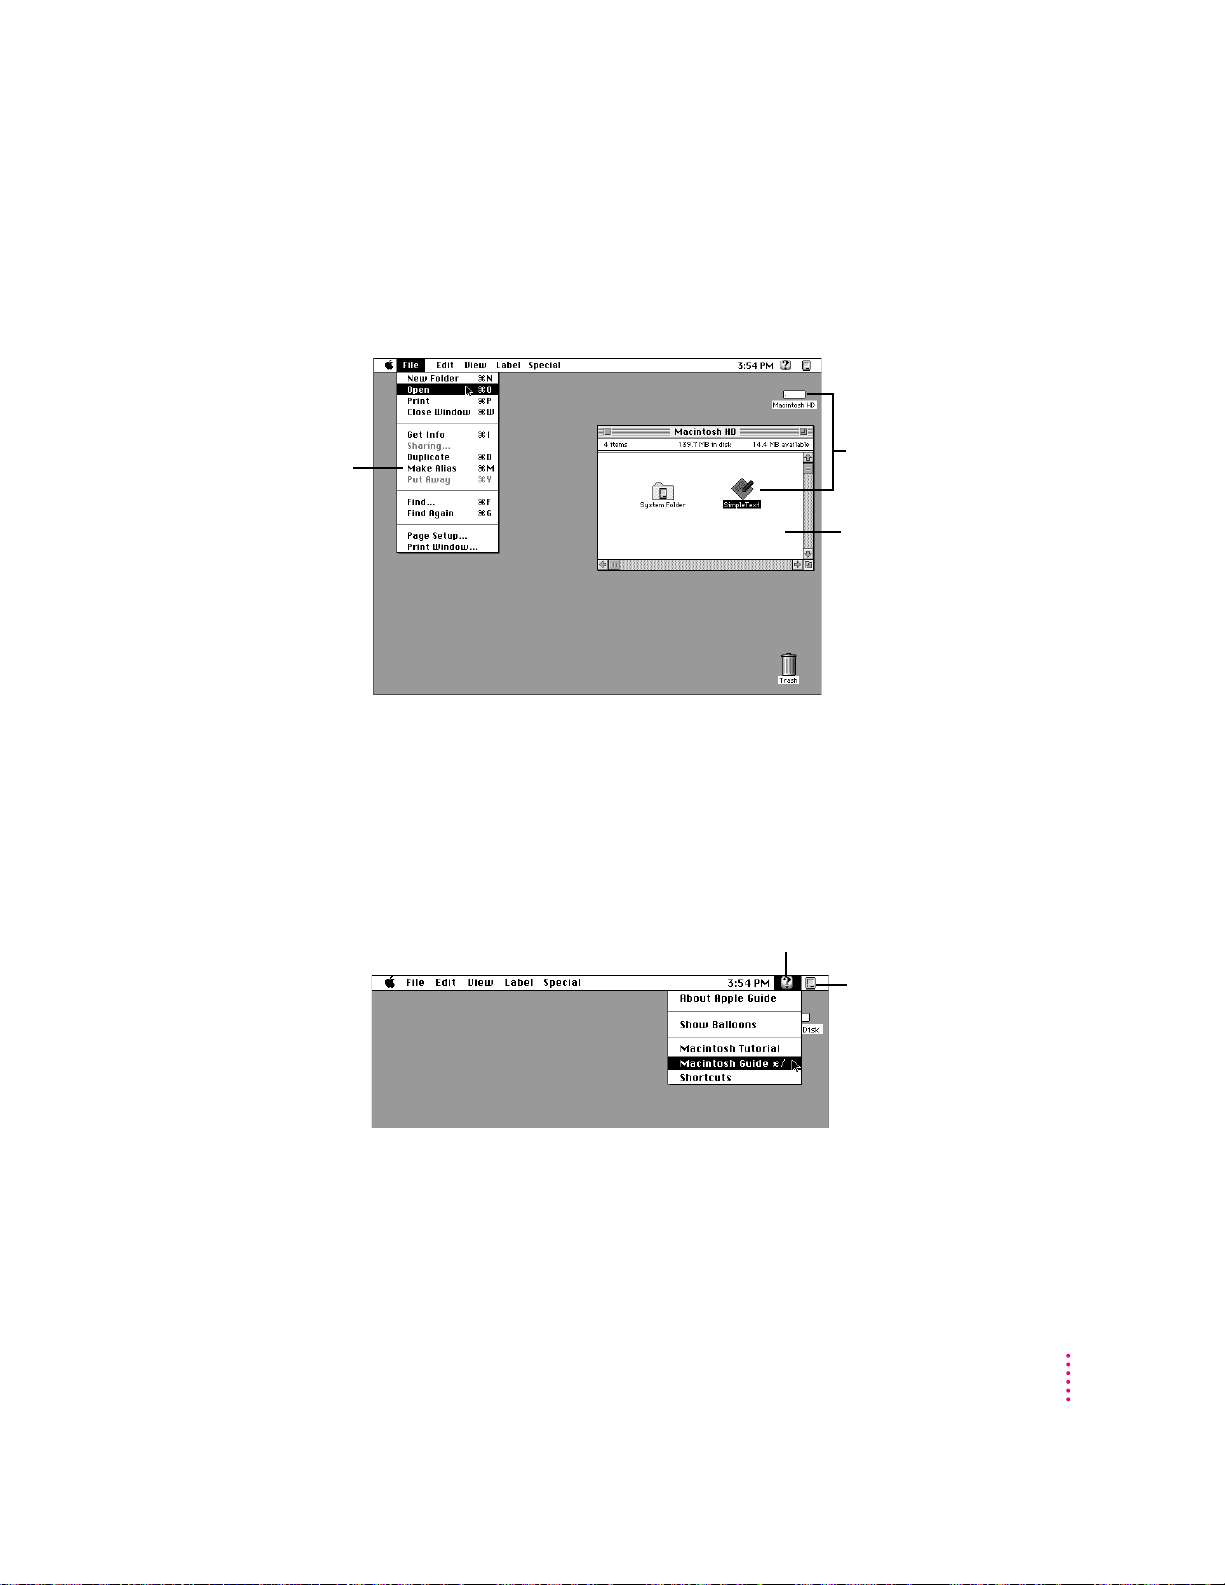
Icons
Icons are small pictures that represent disks, programs, documents, and
folders. You can double-click any icon to open it and see what it contains.
This icon represents your computer’s internal hard disk.
Icons like this one represent application programs, which you use to create
documents and do other work.
Icons like this one represent documents, which you can create and edit.
Icons like this represent folders. A folder contains other icons.
To throw away an item you no longer want, drag it to the Trash icon and choose
Empty Trash from the Special menu.
Windows
Windows are boxes that display text, graphics, and icons. To change the shape
or position of a window, or to close the window, use the elements shown here.
22
To bring a partially
covered window
to the front, click
anywhere in it.
Chapter 1
Close box
To close a window,
click the close box.
Title bar
To move a window, drag it by the middle of the title bar
(anywhere in the bar except the small boxes on the ends).
Zoom box
To make the window bigger, click
once here. Click again to return the
window to its original size.
Scroll arrow
To bring hidden portions of a window’s
contents into view, click one of the four
scroll arrows.
Size box
To change the shape or size of a
window, drag the size box.
Page 23

Saving energy with the Energy Saver control panel
When you save energy, you save natural resources and reduce pollution. Your
Power Macintosh contains features that automatically save energy. You can
increase the energy savings by using the Energy Saver control panel to turn
your computer off if you won’t be using it for a while—for example, overnight
or over the weekend.
The Energy Saver dialog box (shown in step 3 of “Turning the Computer On
for the First Time” earlier in this chapter) appears every time you start your
computer until you open the Energy Saver control panel. Once you open the
control panel, you can keep the preset options shown there, or set your own
energy-saving options. If you do not want to set your energy-saving options
whe n the Energy Saver dialog box is displayed, you can click Close Message
or press Return (the Energy Saver dialog box continues to appear when you
start your computer).
Setting energy-saving options
You can get to the Energy Saver control panel by clicking Specify Settings in
the En ergy Saver dialog box that appears when you start your computer or by
choosing Control Panels in the Apple (K) menu.
The Energy Saver control panel displays the options you can accept or
cha nge, as described next in this section. For more information on using the
Energy Saver control panel, see the “Saving Energy” topic area of Macintosh
Guide (or Mac OS Guide), available in the Guide (h) menu.
Getting Started
23
Page 24
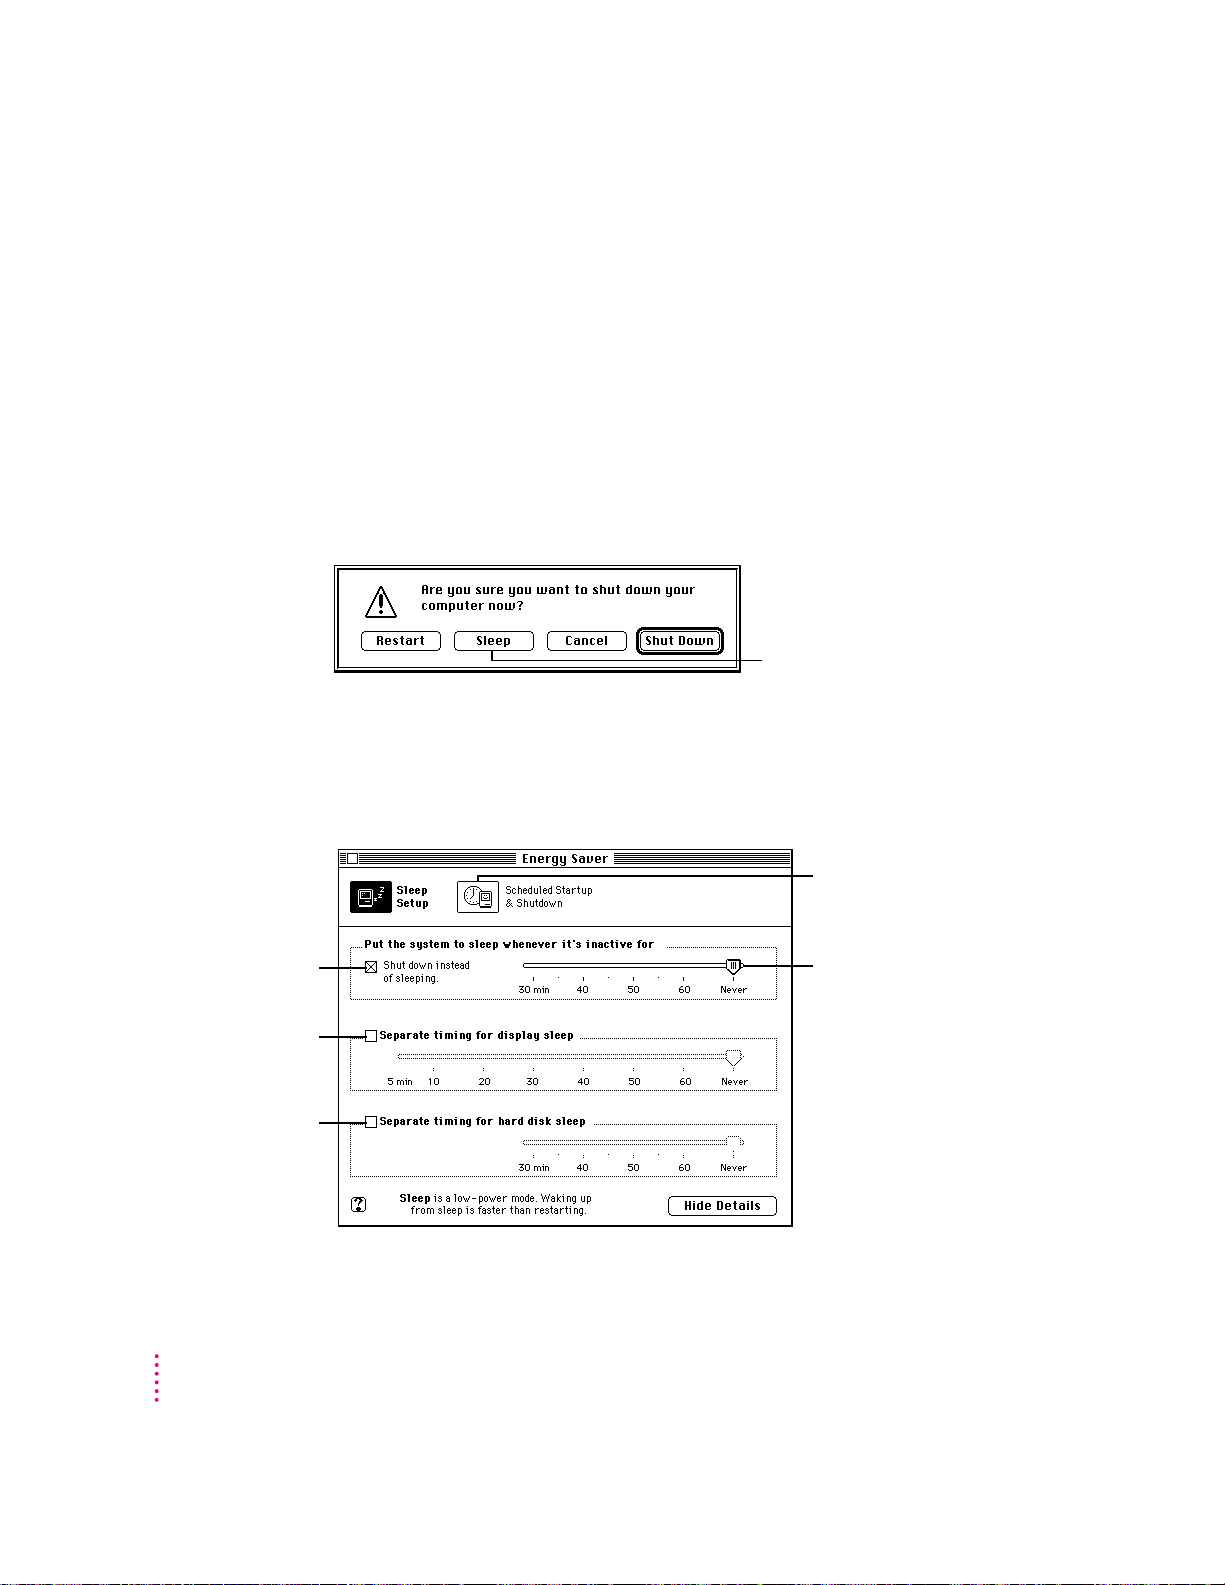
Putting you r computer to slee p
Your Power Macintosh is preset to put itself to sleep after 30 minutes of
inactivity. When your computer goes to sleep, the screen enters a low-power
mode in which it dims and the hard disk stops spinning but remains ready to
start back up quickly. (To prevent your computer from overheating, the fan
will continue to spin.) If the computer goes to sleep while you have unsaved
information on screen, you do not lose any of the information.
To put your computer to sleep right away, choose the Sleep command from
the Special menu, or press the Power key on the keyboard to bring up the
Shutdown dialog box pictured below.
Click here to put your computer
to sleep now.
You can set sleep options by clicking Sleep Setup in the Energy Saver control
panel, available under Control Panels in the Apple (K) menu. You click to put
an X in a checkbox to indicate that the option is selected. If you want to
deselect it, click to remove the X.
An X here makes
the computer shut
down instead of
going to sleep.
An X here lets you set
separate timing for
monitor sleep.
An X here lets you set
separate timing for
hard disk sleep.
24
Chapter 1
Click here to see options for
automatic startup and shutdown.
Drag the slider to set the time
to wait before sleeping.
Page 25
Waking your computer from sleep
To wake the c omputer from sleep, press any key on the keyboard except Caps
Lock. (It may take a moment or two for the computer to awaken.) The
documents and application programs you had open when the computer went
into sleep are still open and unsaved changes are preserved.
Accessing a sleeping computer over a network
If your computer is being used as a server, other users can still access it over
a network while it is asleep if you set server options that prevent the hard disk
from going to sleep. (You can set server options using the Preferences menu
when the E n ergy Saver control panel is displayed.) The network connection
does not have to be established before the computer goes to sleep. However, if
you’ve chosen to have your computer shut itself down rather than go to sleep,
other users will not be able to access it over a network after the computer
shuts itself down.
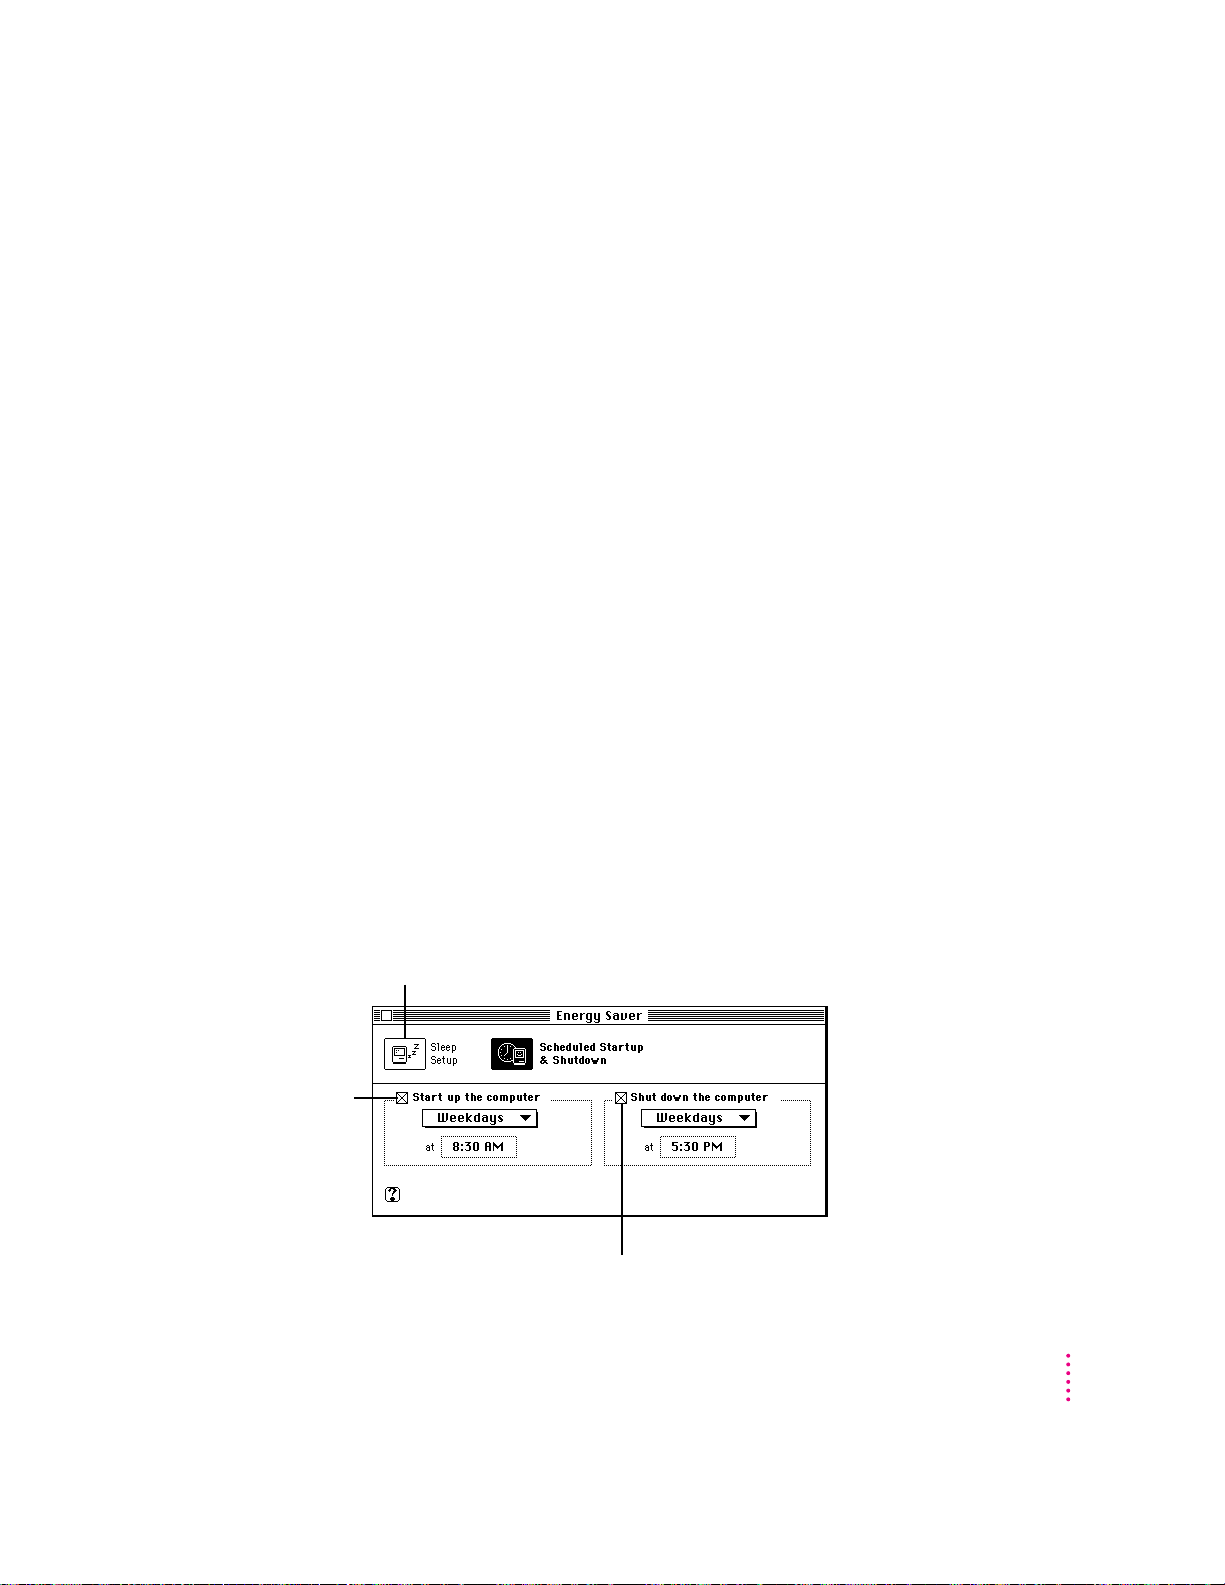
Scheduling automatic startup and shutdown
You can set your computer to start up and shut down at specified times using
the Energy Saver control panel. An X in a checkbox means the option is
selected. If you want to deselect it, click to remove the X. If there’s an unsaved
document open on your desktop when the scheduled shutdown time occurs, it
is saved automatically in a folder on your startup disk. The folder is named
with the date and time of the shutdown.
Click here to set your
computer to start up
automatically. (Use
the pop-up menu and
text box to choose
frequency and time.)
To see sleep options,
you click here.
Click here to set your computer
to shut down automatically.
Getting Started
25
Page 26

Turning the computer off
You can tur n the computer off either by using the Power key on the keyboard
or by choosing Shut Down from the Special menu.
Note: If it is open, the tray on your CD-ROM drive automatically closes when
you shut down your computer. If you have left a CD-ROM disc in the tray,
you may want to open the tray and take the disc out before shutting down.
Using the Po wer key
To tu r n the co mputer off using the Power key on the keyboard, follow
these instructions:
1If the computer is in sleep mode (the monitor is on but the screen is dark), press any key
except Caps Lock to wake it.
2Press and hold down the Power key on the keyboard for about 2 seconds.
The following dialog box appears on the screen:
26
3Press the Return key on the keyboard (or click the Shut Down button in the dialog box).
Using the Shut Down command
To turn the computer off by choosing Shut Down from the Special menu,
follow the se instructions:
1Move the tip of the arrow (8) to the Special menu at the top of the screen.
2With the tip of the arrow on the word “Special,” press and hold down the mouse button.
Chapter 1
Page 27
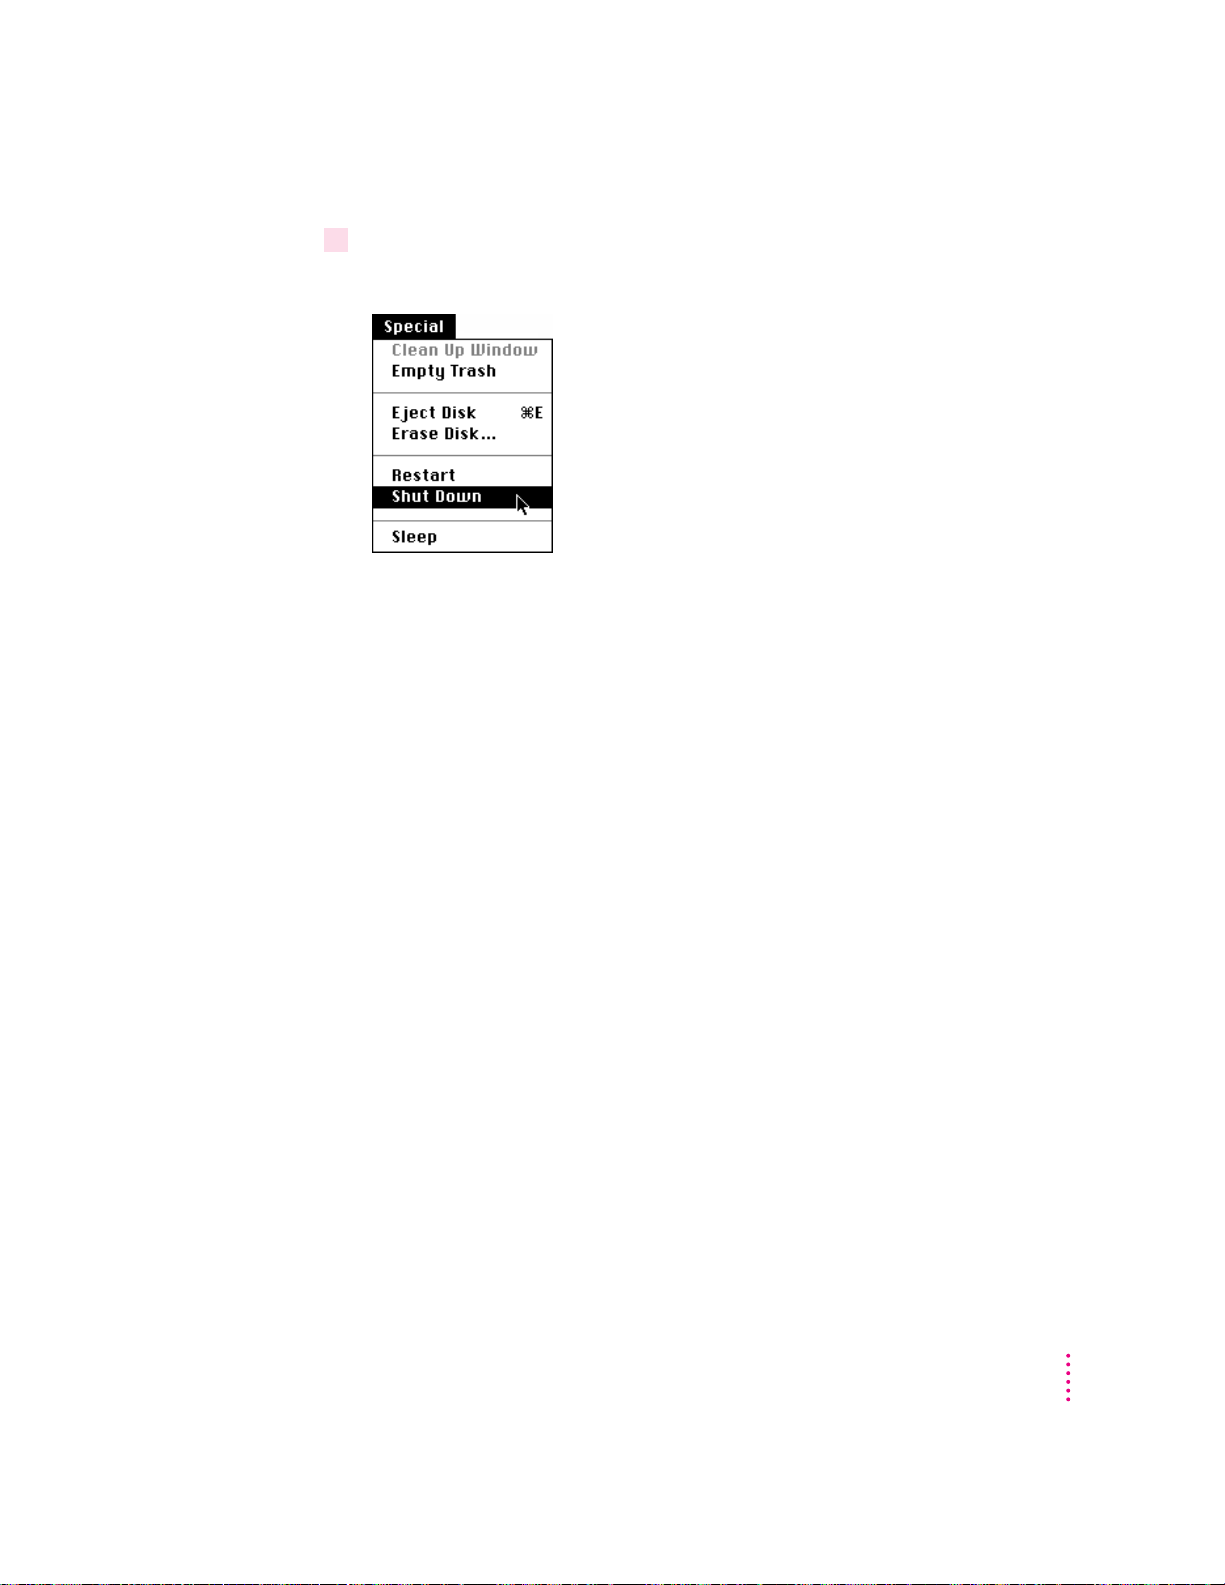
3While holding down the mouse button, move the arrow down the list of choices until the
words Shut Down are highlighted, then release the mouse button.
If you can’t shut down your computer
If a problem with the computer prevents you from using the Power key on
the keyboard or choosing Shut Down—for example, if the computer “freezes”
so that the pointer does not respond to the mouse—you can turn off the
computer by pressing the standby power button (®) on the back of
the co mputer.
IMPORTANT
button on the back of the computer to turn it off. Only use the standby
power button when there is a problem that prevents the computer from being
turned off with the Power key on the keyboard or the Shut Down command.
To make sure your work is saved, use the Power key on the keyboard or the
Shut Down command.
Turning the computer on
To tu r n on the computer after you’ve shut it down (either by pressing the
Power key on the keyboard or by choosing Shut Down from the Special menu):
m
Press the Power key (marked with a
Note: Your monitor may have to be turned on separately each time you turn
on the computer. If you have trouble turning on your computer, see the
section “Problems Turni ng On Your Computer?” earlier in this chapter.
You could lose unsaved work if you use the standby power
π)
on the keyboard.
Getting Started
27
Page 28
Where to find answers
When you have questions about using your Macintosh, there are several
places where you can look for answers.
In the Guide menu
The Guide menu (marked with the hicon) is your main source of
information about the Macintosh. To learn how to get several kinds
of help from the Guide menu, see Chapter 2 in this book.
In this book
Power Macintosh
User’s Manual
Use this book to help you set up your computer and learn about it,
or to find solutions to problems with your equipment.
In other manuals
Some of the programs that came installed on your computer have
separate manuals, either in the box with your computer or stored on
your computer’s hard disk.
From Read Me files
The Apple Extras folder (in your System Folder) on your hard disk
contains a SimpleText document, called About Apple Extras, with
important information about some of the application programs
included with your computer. Similar files called Read Me files can
be found inside application folders.
From Apple’s customer support hotline
If you can’t find an answer in any of the materials provided, call the
customer support hotline. The phone number for the hotline is in the
service and support information that came with your computer.
Note:
If you have problems with an application program not
published by Apple, call the program’s publisher.
28
Chapter 1
Page 29

Use the instructions in this
chapter to learn about the help
available to you in the Guide menu.
2
Getting Help
The Guide menu contains online h elp and information and is your main
source of information when working with your computer. Th e menu is
identified by a question mark (h) in the upper-right corner of the screen.
29
Page 30

Getting answers to your questions
When you have a question while working with your computer, you can get the
answer by choosing Macintosh Guide from the Guide menu.
Note: In some versions of system software, Macintosh Guide is called
Mac OS Guide. All inform ation i n this chapter also applies to Mac OS guide.
1 Open the Application menu (in the upper-right corner of the screen) and choose Finder
to make it the active application program.
A checkmark appears beside the Finder command, indicating that the Finder
is the active program.
2 Open the Guide menu (marked with the
Guide, if your computer has this).
h
icon) and choose Macintosh Guide (or Mac OS
30
Chapter 2
Page 31

The Macintosh Guide window appears.
Whenever you use Macintosh Guide, its wi ndow remains i n front of other
windows. If the window gets in your way, you can move it by dragging its
title ba r (the gray bar across the top of the window).
3Notice the three buttons at the top of the window: Topics, Index, and Look For.
Macintosh Guide gives you three ways of finding information:
m
Topics
lets you choose from a list of general subjects; it is like the table of
contents in a book.
m
Index
lets you choose from an alphabetical list of more specific subjects; it
is like the index in a book.
m
Look For
lets you search for information related to a specific word or
phrase that you type.
In the following sections you will practice using each method.
If you have problems while using Macintosh Guide, see “Tips for Using
Macintosh Guide” later in this chapter.
Getting Help
31
Page 32

Getting answers with the Topics button
1 In the Macintosh Guide window, click the Topics button.
A list of general topic areas appears on the left side of the Macintosh Guide
window. (Depending on the hardware and software you have, the list of topic
areas may look different.)
2 In the list of topics, click “Customizing Your Computer.”
When you click any topic area, a list of related phrases and questions appears
on the right side of the Macintosh Guide window.
32
To get instructions,
you click a phrase or
question…
…and then click OK.
Chapter 2
Page 33

3Click the question “How do I set the time and date?” and then click OK. Or double-click
If you want to
return to the main
Macintosh Guide
window, you click
this button.
4 Read and follow the instructions in this window.
5When you have completed all the steps, click the Topics button in the lower-left corner to
the question.
A small window appears with instructions for you to follow.
To see the next step (if there is one),
you click here.
Macintosh Guide provides step-by-step instructions to answer the question
you selected. When you have completed each step, click the right arrow in the
lower-right corner to see the next step.
return to the main Macintosh Guide window.
Now continue with the next section.
Getting Help
33
Page 34

Getting answers with the Index button
1 In the Macintosh Guide window, click the Index button.
An alphabetical list of index terms appears on the left side of the window.
Slider
Scroll bar
2Scroll through the alphabetical list until the term “background pattern” is visible.
You can scroll through the list either by dragging the slider to the letter B or
by using the scroll bar at the right of the list.
34
3Click the term “background pattern” in the alphabetical list.
When you click any index term, a list of related phrases and questions
appears on the right side of the Macintosh Guide window.
To get instructions,
you click a phrase or
question…
…and then click OK.
Chapter 2
Page 35

4Click the question “How do I change the background pattern?” and then click OK.
If you want to
return to the main
Macintosh Guide
window, you click
this button.
5 Read and follow the instructions in the window.
6When you have completed all the steps, click the Topics button in the lower-left corner to
Or double-click the question.
A small window appears with instructions for you to follow.
To see the next step (if there is one),
you click here.
Macintosh Guide provides step-by-step instructions to answer the question
you selected. When you have completed each step, click the right arrow in the
lower-right corner to see the next step.
return to the main Macintosh Guide window.
Now continue with the next section.
Getting Help
35
Page 36

1 In the Macintosh Guide window, click the Look For button.
To activate the text
box, you click here.
You type a word or
phrase in the text
box…
…and then click here.
2Click the arrow button to activate the text box.
3Type “trash” in the text box, then click Search.
Getting answers with the Look For button
A small box where you can type text appears on the left side of the window.
When you click Search, a list of phrases and questions related to the word or
phrase you typed appears on the right side of the Macintosh Guide window.
36
To get instructions, you click a
phrase or question…
…and then click OK.
Chapter 2
Page 37

4Click the question “How do I turn off the Empty Trash warning?” and then click OK. Or
If you want to close
Macintosh Guide,
you click here.
5 Read and follow the instructions in the window.
6When you have completed all the steps, click the close box in the upper-left corner to
double-click the question.
A small window appears with instructions for you to follow.
To see the next step (if there is one),
you click here.
Macintosh Guide provides step-by-step instructions to answer the question
you selected. When you have completed each step, click the right arrow in the
lower-right corner to see the next step.
close Macintosh Guide.
Getting Help
37
Page 38

Tips for using Macintosh Guide
Here are a few tips for using Macintosh Guide effectively:
m Macintosh Guide is available only when you are in the Finder—the
program that displays the desktop area where you can see the icons of
disks, folders, and files. (Other programs may also have help available
in the Guide menu, however.) If you don’t see Macintosh Guide in the
Guide menu, pull down the Application menu (to the right of the
Guide menu) and choose Finder.
m Foll o w the steps when you’re instructed to; don’t skip ahead or read
ahead. That way the computer can check to make sure you’ve done a
step correctly.
m Unlike most windows, the Macintosh Guide window stays in front of
other windows on the screen so that your instructions are never
covered. If you need to move the Guide window out of the way, drag
it by the title bar at the top of the window.
You can also move the window out of the way by clicking the zoom
box in the upper-right corner of the window. Click the box once to
shrink the window; click it a second time to expand the window to its
original size.
38
Chapter 2
m If you need more information about an instruction or a term, click the
button labeled “Huh?” to get a further explanation. (The “Huh?”
button is dimmed when no additional information is available.)
m If you want to return to the main Macintosh Guide window, click the
Topics button in the lower-left corner of the Guide window.
m When you’re finished using Macintosh Guide, click the close box in
the upper-left corner of the window.
Close box
Topics button
“Huh?” button
Zoom box
Title bar
Right arrow
Page 39

Identifying what’s on your computer screen
Sometimes you’ll see an unfamiliar item on the screen and ask yourself,
“What’s that?” You can get an answer by using a Macintosh feature known as
Balloon Help.
Using balloons like those you see in comic strips, Balloon Help explains the
function of icons, menus, commands, and other items on the Macintosh screen.
Follow these steps to use Balloon Help:
1 Open the Guide menu (marked with the
2With your mouse, move the pointer to any object on the screen that you want to identify.
h
icon) and choose Show Balloons.
A balloon appears next to the object. In the following illustration, for example,
pointing to the Trash displays a balloon that explains how to use the Trash.
Although balloons appear next to items when you point to them, the way you
work does not change; you can still select icons, choose commands, and so on.
3When you’re finished using Balloon Help, open the Guide menu again and choose
Hide Balloons.
Getting Help
39
Page 40

Learning useful shortcuts
You can perform many tasks in the Finder more quickly if you use keyboard
or mouse shortcuts. For example, instead of clicking an icon and choosing
Open from the File menu, you can simply double-click the icon to open it.
Foll o w these st eps to lear n keyboard and mouse shortcuts:
1 Open the Guide menu (marked with the
2Click one of the category buttons.
If you want to
close the window,
you click here.
h
icon) and choose Shortcuts.
The main Macintosh Shortcuts window appears.
Another window appears, describing shortcuts for that category.
To return to the main
Macintosh Shortcuts
window for more
categories, you click
the Topics button.
40
Chapter 2
To see the next window (if there is one),
you click here.
Page 41

3 Read about the shortcuts available for the category you selected.
Click the right arrow in the lower-right corn er of the window to see the next
window (if there is one).
4When you finish reading about the shortcuts for your category, click the Topics button
in the lower-left corner to return to the main Macintosh Shortcuts window. Or click the
close box in the upper-left corner to close the window.
Getting Help
41
Page 42

Page 43

computer and using your computer’s special
Expanding Your Com p u t e r
Read this chapter for information
on connecting additional equipment to your
features (such as sound capabilities).
3
and Using Its Special Features
The illustrations on the next pages show the basic computer system you now
have. So that you can expand your system’s capabilities, your computer has
both external ports and internal slots in which you can install or attach
additional hardware. Depending on the options your computer came with and
the items you i n stall later, you may be able to attach a printer; audio
equipment such as a microphone, speakers, or headphones; video equipment
such as a second monitor, TV, or VCR; a scanner; or an external hard disk.
Items that go inside the computer can increase its capabilities and
performance. Among these items are additional dynamic random-access
memory (DRAM) in Dual Inline Memory Mod ules (DIMMs); a High
Performance Module (level 2 cache); and different kinds of expansion cards,
such as PCI (periph eral component i nterconnect) and Ethernet cards.
Instructions for installing these internal items are provided in Appendix B,
“Installing Expansion Cards or Additional Memory.” (Depending on your
computer model, some of these items may already be installed.)
WARNING
that your computer is plugged in (in order to ground the computer) and
turned off. If you connect equipment with the computer turned on, you
can damage your computer and your equipment. Also, each device you
add should be compatible with your computer and must not exceed the
maximum power allowance for that device. For more information consult
an Apple-authorized dealer, the manufacturer of the equipment you add,
or the Techn i cal In fo r m a t i o n booklet that came with your computer.
Before you connect any equipment to your computer, make sure
43
Page 44

Expansion bay
Behind the front panel
there is an expansion
bay for an optional
5.25-inch storage device
(1.7 inches high).
Your computer may have
come with an optional
Zip drive installed in this
bay as shown here.
Floppy disk drive
Remote control sensor
Volume
-
control button
Use this button to
change the volume of
the computer’s sound.
Power-on light
A green light indicates
that the computer is on.
Ports and connectors on the back of your computer
Internal hard
disk drive
f
Headphone
jack
C
CD-ROM drive Open/Close buttonCD-ROM drive (optional)
Keyboard Mouse
Monitor
Power key
P
Use this key
to turn your
computer on
and off.
44
Chapter 3
Standby power button
Monitor port
Apple Desktop Bus
(ADB) port keyboard or a trackball.
Printer port
External modem port
SCSI port
Sound input port
Sound output port
Turns your computer on or off when you can’t use the Power
®
key on the keyboard or the Shut Down command.
Connects your monitor to your Macintosh.
™
Connects your Macintosh to an input device, such as a
V
Connects your Macintosh to a printer, LocalTalk network, or
[
GeoPort device.
Connects an external modem or GeoPort Telecom Adapter adapter to
W
Note:
your Macintosh. (
this port is covered. Don’t remove the cover or connect anything
to this port if you have an internal modem.)
Connects your Macintosh to SCSI equipment, such as
g
external hard disk drives and scanners.
Connects your Macintosh to another audio source, such as a
≈
microphone, compact disc, or audio cassette player.
Connects your Macintosh to sound output equipment, such as
-
externally powered (amplified) speakers.
If your computer came with an internal modem,
Page 45

Standby power button
®
Monitor port
™
TV/FM tuner card (optional)
Ï
Subwoofer balance control
Apple Desktop Bus
V
(ADB) port
Printer port
[
External modem port
W
SCSI port
g
Sound input port
≈
Sound output port
-
TV/FM tuner card Connects your Macintosh to an external TV antenna or cable
(optional) TV service and FM radio antenna. To install one, purchase
the Apple TV/FM Radio System or the Apple TV System.
Subwoofer balance
control if external speakers (including a monitor with built-in speakers)
Adjusts subwoofer balance in relation to external speakers,
Ï
are attached. (If external speakers are not attached, the
balance control does not affect the subwoofer volume.)
Video input card (optional)
≤
Power socket
Monitor power socket
PCI card access covers (2)
Communication card
(optional)
Security lock port
F
Video input card Connects your Macintosh to a video camera, VCR, or other
(optional) video input equipment. If you want to install a video input
card, purchase the Apple Video System.
PCI card access covers (2) Cover ports for optional 6.88-inch peripheral component
interconnect (PCI) slot expansion cards (such as a videoediting card).
Communication card Covers port for optional communication card or modem. Most
access cover models of your computer come with a twisted pair (10Base-T)
Ethernet card installed in this space.
Security lock port
Lets you to attach a security lock to your Macintosh. See your
F
computer products retailer for security lock devices that work
with your computer.
Expanding Your Computer and Using its Special Features
45
Page 46

Connecting a printer
Your computer has a printer port, which you use to connect a printer to your
computer. Follow the instructions that came with your printer when
connecting it to your computer.
Although you normally attach the cable that came with your printer to the
printer port i nstead, you can attach the printer cable to your modem port if
you already have a printer attached to your printer port.
Even if you have only one printer connected, you need to specify in the
Chooser which port you used to connect your printer and choose the printer
you want to use. For instructions on choosing a printer (including specifying
the port to which it’s connected), open the Guide (h) menu and choose
Macintosh Guide (or Mac OS Guide). Then, click the Guide’s Index button,
and choose “printing” from the Guide’s index.
Printer port
Printer port icon
Using your computer’s sound features
Your Macintosh can play a nd record stereo sound from a variety of sources.
By connecting audio equipment to the sound input and output ports on the
computer, you can listen to or reproduce stereo sound. If it has an internal
CD-ROM drive, your computer can also play and record sound from audio
compact discs (CDs). For information on using Macintosh system software
to choose audio input and output options, record an alert sound, or play
audio CDs, see the “Sound” topic area of Macintosh Guide (or Mac OS
Guide), available in the Guide (h) menu.
46
Chapter 3
Page 47

About your computer’s sound ports an d featur es
The Sound input port is marked with an icon of a microphone (≈). The
Sound output port is marked with an icon of a speaker (-). Your computer’s
built-in speaker functions as a subwoofer (a loudspeaker that delivers enhanced
bass sound) when external speakers or a monitor with built-in speakers is
attached. For more information on the subwoofer, see “Using the Built-in
Subwoofer” later in this section. For more information on the sound input
and sound output ports, see the section “Connecting Audio Equipment.”
Subwoofer balance control Volume control button
Sound input port
Sound output port
Headphone jackInternal speaker
(functions as a subwoofer when
external speakers or a monitor
with built-in speakers is attached)
Expanding Your Computer and Using Its Special Features
47
Page 48

Adjusting volume and sound
There are several ways to adjust the volume on your computer:
m Use the volume control button on the front of the computer (marked with
the - icon, above the power-on light).
m Use the volume controls on the front of your monitor if your monitor
comes with them.
m Use the volume control slider in the AppleCD Audio Player program if you
are playing an audio CD. The AppleCD Audio Player can be found in the
Apple (K) menu.
m Use the volume control sliders in the Monitors & Sound control panel,
which i s in the Control Panels folder in the Apple (K) menu. See the
“Sound” topic area of Macintosh Guide (or Mac OS Guide), available in
the Guide ( h) menu for more information about using Macintosh system
software to control sound.
Tip: You may prefer to set the Sound Out Level slider in the Monitors &
Sound control panel to the middle of the slider bar. This makes it easier for
you to gauge the adjustments you make with other volume controls.
For more information about sound, see the “Sound” topic area of Macintosh
Guide (or Mac OS Guide), available in the Guide (h) menu.
48
Listening with 3D Surround Sound
The 3D Surround Sound technology broadens the sound you hear if
you attach external speakers or if your monitor has built-in speakers. 3D
Surround Sound makes the speakers sound as if they are set wider apart, and
you can hear many “points” of sound around you. (3D Surround Sound may
not work through headphones. To turn off 3D Surround Sound, click to
remove the X in the checkbox next to “Enabled” in the Monitors & Sound
control panel.)
Using a mo nitor with b uilt -in speakers
If you have a monitor with built-in speakers, you can adjust the amount of
bass sound you hear coming from the computer’s subwoofer by adjusting the
subwoofer balance control (Ï) on the back of your computer.
Chapter 3
Page 49

Using the built-in subwoofer
Your computer comes with a built-in speaker that produces full-range,
monophonic sound. When you attach external sp eakers, the computer’s builtin speaker changes mode and functions as a subwoofer, adding bass sound to
augment the speakers’ stereo sound.
You adjust your computer’s volume with the volume controls on the front of
the computer or with the Monitors & Sound control panel in the computer’s
software. (For more information, see “Adjusting Volume and Sound” earlier in
this chapter.) However, when you attach external speakers (or if your monitor
has built-in speakers), you adjust the subwoofer volume independently of the
speaker volume. You do this by adjusting the subwoofer balance control (Ï)
on the back of the computer. (The subwoofer balance control affects the
subwoofer volum e only whe n exte rnal speakers are attached.)
Connecting audio equipment
To play or record sound with your Macintosh, you can attach a microphone,
an amplifier, a tape recorder, or a pair of speakers.
You n eed a cable with one of the 3.5 mm audio connectors shown below to
connect a microphone or other equipment to your computer’s sound input
port (≈). You need a cable with a stereo miniplug to connect speakers or other
equipment to the sound output port (-).
Stereo miniplug
(plugs into sound input port
or sound output port)
Extended miniplug
(plugs into sound input port)
Expanding Your Computer and Using Its Special Features
49
Page 50

The stereo miniplug most often comes with stereo equipment such as external
speakers. The extended miniplug, which is slightly longer, comes with voice
quality microphones such as the Apple PlainTalk Microphone. The extended
miniplug works only in your computer’s sound input port (≈). If your
equipment has a type of connector that’s different from those shown here, you
can purchase an adapter at an electronics supply store.
Connecting the Apple PlainTalk microphone
Your computer has a sound input port (≈), whi ch you can use to connect an
Apple PlainTalk Microphone. The Apple PlainTalk Microphone is included
with some computer models. If your computer did not include an Apple
PlainTalk Microphone, you can purchase one at an Apple-authorized dealer.
You cannot connect non-Apple microphones.
Note: The sound input port do es not support the Apple Omni microphone
(the round microphone shipped with some earlier models of Macintosh) or
the attenuated RCA adapter provided with some models of Macintosh.
50
Apple PlainTalk Microphone
To connect and position the external microphone, and then tell the computer
to receive its input, follow the steps below.
Note: If you want to record sound using a microphone built into a monitor,
see the “Sound” topic area of Macintosh Guide (or Mac OS Guide), available
in the Guide (h) menu. Then select the question, “How do I record or
remove a sound?”
Chapter 3
Page 51

1Shut down your computer.
2Plug the microphone’s connector into the (
3Place the microphone at the top center of the monitor, so that the microphone’s
Apple (K) icon is facing you.
≈
) on the back of the computer.
If you can’t place it on top of the monitor, position the microphone according
to these guidelines:
m The microphone should be between 1 and 3 feet away from you.
m The microphone should be directly in front of you to minimize the
effect of background noises.
4 Turn on the computer.
5 Open the Monitors & Sound control panel in the Apple (
Sound button to display the sound controls.
6 Open the Sound Input pop-up menu and choose “External Microphone.”
7Click the close box in the upper-left corner of the Monitors & Sound control panel to
close it. (The control panel does not have to remain open while you’re recording.)
K
) menu and click the
Yo u’re now ready to begin using your microphone.
See the “Sound” topic area of Macintosh Guide (or Mac OS Guide), available
in the Guide (h) menu, for instructions on recording.
Expanding Your Computer and Using Its Special Features
51
Page 52

Connecting external ste reo speakers
You can take advantage of your computer’s stereo sound output by attaching
externally powered (amplified) speakers. When you attach external speakers,
the speaker in your computer changes mode and functions as a subwoofer.
The subwoofer produces bass sound to complement the stereo sound coming
from the speakers.
52
Subwoofer (internal)
Externally powered speakers
Chapter 3
Page 53

1 Assemble the speakers and the cable you need.
You n eed a cable with a stereo miniplug at one end to connect one or both
speakers to the computer.
Stereo miniplug
Some speakers require a dual-plug adapter, which has two plugs on its end, to
plug into Audio In ports on both speakers. Others, like those shown in the
next illustration, take a single stereo miniplug and are joined by standard
speaker wires. See the documentation that came with your speakers for more
information.
2 Turn off the computer.
3Plug the end of the cable with the stereo miniplug into the Sound output port (
the computer.
4Plug the other end of the cable into the speakers’ Audio In port or ports.
5Connect the speakers together with speaker wires, if necessary.
-
) on
Your finished connections should look something like this:
Ï
Subwoofer
balance control
-
Sound
output port
Externally
powered
speakers
Audio In port
Expanding Your Computer and Using Its Special Features
53
Page 54

6Turn on the computer.
Now you’re ready to hear full-range stereo sound coming from the speakers
and bass sound coming from the computer’s internal subwoofer.
To adjust the overall volume, use the sound control buttons on the front of
the computer or use the Monitors & Sound control panel, which uses
software inside your computer to adjust volume. (For more information, see
“Adjusting Volume and Sound” in the previous section, “Using Your
Computer’s Sound Features.”)
To adjus t the subwoofer volume independently of the speaker volume, use the
subwoofer balance control (Ï) on the back of the computer. (Th e subwoofer
balance control works only when external speakers or a monitor with built-in
speakers is attached.)
Subwoofer balance control
54
For more information about using speakers attached to your computer, see
the “Sound” topic area of Macintosh Guide (or Mac OS Guide), available in
the Guide (h) menu.
Chapter 3
Page 55

Connecting headphones
You can connect headphones to either the headphone jack (f) on the front
of the computer, to external speakers, or to your monitor if it has a
headphone jack.
Note: To listen through headphones connected to external speakers, you
should turn off 3D Surround Sound. To turn off 3D Surround Sound,
open the Monitors & Sound control panel in the Control Panels folder in the
Apple (K) menu and click the checkbox to remove the X next to “Enabled.”
Also, if you have connected your headphones to the monitor and notice that
the sound quality isn’t high, you should either turn off 3D Surround Sound or
get updated monitor software from the monitor’s manufacturer.
For more information on listening with headphones, see the “Sound” topic area
of Macintosh Guide (or Mac OS Guide), available in the Guide (h) menu.
Using your computer’s video features
Depending on the options that came with it (or options you install later), you
can use your computer to display the computer’s images on a second monitor
or television. You may also be able to display, edit, and store video images from
a video camera, video cassette recorder (VCR), or other video input equipment.
The next section describes how to connect a second monitor to your computer
to increase screen space. For information about connecting video input
equipment such as cameras or VCRs, refer to the manuals that came with
your video input card (for example, the Apple Video System manual) and
with your video equipment.
Expanding Your Computer and Using Its Special Features
55
Page 56

Connecting a second monitor to increase display space
If one monitor doesn’t provide enough screen space, you can install a PCI
expansion card that provides a port for connecting a second monitor. The
second monitor gives you a larger continuous desktop area to display windows
and other items.
To connect a second monitor, purchase a video card and install it in the
computer’s PCI expansion slot, or have an Apple dealer install it for you. (If
you are installing the expansion card yourself, follow the instructions that
came with the card and the instructions in Appendix B of this manual.) Then
plug the second monitor into the port provided by the card.
When you connect an additional monitor, make sure that the ventilation
openings on the computer and the monitors are clear and unobstructed.
If there is interference on your screens or on a television or radio near
your computer, separate or reposition the affected equipment. You may
need to move the two monitors further apart so that they don’t interfere
with each other.
For additional instructions on using two monitors together, choose Macintosh
Guide (or Mac OS Guide) from the Guide (h) menu after you have connected
two monitors to your computer; click the Guide’s Index button, and select
“monitors” in the list of index terms.
56
Chapter 3
IMPORTANT
Though it is physically possible to install two expansion cards that
supply extra monitor ports, you can’t connect more than two monitors at a
time to your computer.
Page 57

Connecting external SCSI devices, such as a scanner or external hard disk
Your computer has a port for connecting devices that use the Small Computer
System Interface (SCSI, pronounced “skuh-zee”). SCSI devices commonly
used with the Macin tosh include hard disk drives, CD-ROM drives, scanners,
tape or cartridge backup drives, and some printers. The SCSI port per mits
high-speed communication between the computer and the device. The SCSI
icon appears undern eath the por t on the computer’s back panel.
SCSI port
SCSI icon
You can connect several SCSI devices to the SCSI port by linking them to
create a chain of devices. The first device in the chain plugs into the SCSI
port; the second device plugs into the first device, and so on. You can attach
up to six external SCSI devices to the SCSI port (or up to five if you have an
additional SCSI drive installed in your computer). Each SCSI device
connected to this chain must have its own unique ID number (no two devices
can use the same ID number). If your computer came with a CD-ROM drive
installed, this drive is also part of the SCSI chain and uses SCSI ID number 3.
The computer itself (the main logic board inside it) uses SCSI ID number 7.
IMPORTANT
The material that follows—“Before You Connect a Device” and
“Connecting a SCSI Device”—contains general instructions for attaching
SCSI devices to your computer. Make sure you also follow the specific
instructions that came with the SCSI device you are connecting to your
Macintosh.
Expanding Your Computer and Using Its Special Features
57
Page 58

Before you connect a device
Before you connect a SCSI device to your Macintosh, be sure to complete the
tasks explained in this section.
IMPORTANT
This section contains general instructions for attaching SCSI
devices to your computer. Be sure also to follow the specific instructions that
came with your external hard disk drive or other SCSI device when
connecting the device to your Macintosh. The sp ecific instructions that came
with the device tell how to change a device’s ID numb er and attach a SCSI
cable or terminator to the device.
Make sure each device has a unique ID number
Each SCSI device connected to your computer must have its own, unique ID
number from 0 to 6. The SCSI ID number helps the computer keep track of
the devices and sort out conflicts when more than one device in the SCSI
chain are communicating with the computer simultaneously.
The ID numbers in your computer are assigned as follows:
ID Device
3Optional internal Apple CD-ROM drive
5Optional internal Zip drive
7Main logic board
Make sure other SCSI devices you add to the chain do not use ID numbers
that are already assigned. For example, if your computer came with an
internal CD-ROM drive, don’t use SCSI ID numbers 3 (which is assigned to
the optional CD-ROM drive) or 7 (which is assigned to your computer’s main
logic board). See the instructions that came with each SCSI device for
information on checking and setting its SCSI ID number.
58
Chapter 3
IMPORTANT
If you use two or more devices attached to the same SCSI
interface with the same ID number, your equipment could malfunction and
you could lose data as a result.
The SCSI devices can be i n a ny physical order in the chain; it is not necessary
to arra nge them in numerical order.
Page 59

Make sure you use the right type and length of cable
To attach a SCSI device to your computer or to another device in the chain,
always use SCSI cables that are double-shielded, such as Apple SCSI cables.
Never use printer-type RS232 cables (commonly used with DOS and
Windows computers). Poor quality SCSI cables are often the cause of
SCSI problems.
Avoid mixing brands, types, or styles of SCSI cables.
If the device is the first or only one you’re connecting, use a SCSI system
cable to connect it to the computer’s SCSI port:
SCSI system cable
If the device is not the first one, use a SCSI peripheral interface cable to
connect it to the last device i n the chain:
SCSI peripheral interface cable
IMPORTANT
The total length of the cables in a SCSI chain should not exceed
6 meters (about 20 feet). SCSI cables must have a 110-ohm impedance. For
best results, use SCSI cables manufactured by Apple Computer.
Keep the cables between SCSI devices as short as possible. Cables 18 to 24
inches are best. PowerBooks and some SCSI devices (particularly scanners)
may not work with cables longer than 24 inches.
Expanding Your Computer and Using Its Special Features
59
Page 60

Term inate the SCSI chain properly
To ensure accurate transmission of information, a terminator must be at
each end of a SCSI chain. There is a built-in terminator at the beginning
of the chai n. You need to make sure that the last device in the chain has a
terminator.
IMPORTANT
In most cases, only the first and last devices in the SCSI chain
should be terminated (but see the exceptions, below). Make sure that no
external SCSI device other than the last one has a terminator.
Exceptions to the “first and last” ru le: If the SCSI chain is 18 inches or shorter,
the terminator on the last device is not needed. If the total cable length in the
chain is greater than 10 feet, the chain may need a third terminator at the
10 foot point. Do not add the third terminator unless you are experiencing a
SCSI problem, and check all other possible causes of the problem before
adding the third terminator. (See the information on troubleshooting SCSI
problems in Part II of this manual.)
To te r m i n ate the last device in the chain:
m If your SCSI device has a built-in terminator, use it as the last device in
the chai n.
If you wish to attach two or more SCSI devices that have built-in
terminators, an Apple-authorized service provider can remove the extra
built-in terminators.
m If the device at the end of the SCSI chain does not have a built-in terminator,
attach an external terminator. You can attach or remove external terminators
yourself. (Do not use a black terminator; the black terminators are for
Macintosh IIfx computers and certain LaserWriter printers.)
60
External SCSI terminator
Chapter 3
Page 61

Connecting a SCSI device
Be sure to read the previous section, “Before You Connect a Device,” before
following the instructions here. Use these general instructions in conjunction
with the instructions that came with your SCSI device:
1 Turn off your computer.
2Make sure the SCSI device is switched off.
WARNING
Do not connect or disconnect any device while the power to
the device or to your Macintosh is on. Doing so could damage the
device, your computer, or both.
3 Use a SCSI cable to connect the device either to the computer’s SCSI port or to the last
SCSI device already in the chain.
Use the thumbscrews and metal clips on the connectors to create a tight,
reliable connection.
IMPORTANT
Make sure that the last (or only) device in the SCSI chain has
a terminator and that no other external SCSI device has a termi nator.
Otherwise, the computer may not be able to start up.
4 Turn on all devices in your SCSI chain.
IMPORTANT
Always turn on any external SCSI devices connected to your
computer before turning on the computer itself. Otherwise, your computer
won’t b e able to recognize that the SCSI devices are connected to it and your
computer may not be able to start up.
Even if you don’t plan to use a device, you must still turn it on to ensure that
signals pass properly along the SCSI chain.
5 Install any necessary device drivers (software that makes a device work with
your computer).
Drivers usually come on a floppy disk with the device. (If no drivers come
with the device, contact the device manufacturer.)
Note: If you experience problems after connecting a SCSI device, see the
troubleshooting information in Part II for possible solutions.
Expanding Your Computer and Using Its Special Features
61
Page 62

Replacing or adding internal storage devices
Your Macintosh already comes with up to four internal storage devices—a
floppy disk drive, an optional CD-ROM (compact disc read-only memory)
drive, an optional zip drive, and a hard disk drive (several capacities are
available). If you want to replace any of these internal drives, see your Appleauthorized dealer.
If your computer didn’t include a Zip drive, you can also have additional
storage devices installed in your computer’s expansion bay—the area just
above the CD-ROM drive. The expansion bay is available for you to install
any optional 5.25-inch storage device (1.7 inches high). Examples of storage
devices include a second CD-ROM drive, a tap e storage backup system, a
second internal hard disk, or a Zip drive. If you want to install another storage
device inside your computer, see your Apple-authorized dealer.
62
Chapter 3
Page 63

Read this chapter to learn how to work
with application programs and protect
the information on your disks.
4
Installing and Using Application Programs
Applications that come with your computer are stored in the Apple Extras
folder on your hard disk and in the CD Extras folder on the system software
CD that came with your computer. Some of the applications that come with
your computer include the following:
m AppleScript, which all ows you to automate actions you perform repeatedly
in the Finder. Instructions for using AppleScript are included in the
AppleScript folder in the Apple Extras folder.
m Apple Video Player, which you use to watch video or TV on your computer,
and Apple FM Radio, which you use to listen to FM radio on your
computer if you also have the video input and TV/FM tuner cards
installed. Your computer has these cards installed if you find the Apple
Video System or Apple TV/FM Radio System manuals in the box that
came with it. If you don’t have these cards installed, you can purchase them
from an Apple-authorized dealer.
m AppleCD Audio Player, which allows you to play and control audio
CD-ROM discs in your computer’s CD-ROM drive.
m SimpleT ext, whi ch allows you to create text documents. With your
computer’s built-in text-to-speech capabilities, you can have your computer
speak the text in your SimpleText document aloud.
63
Page 64

To find out if an application needs to be installed, look inside its folder for
an icon labeled Installer. If you find an I nstaller icon and want to use that
application, double-click the Installer and follow the instructions on the
screen. Most application folders also contain Read Me files that provide
additional information about the application. To read the contents of a Read
Me file, double-click its icon.
Your computer’s system software includes additional applications that provide
special features or enhanced capabilities for your computer. I ncluded among
the system software applications are the following:
m PC Exchange, which lets you work with DOS and Windows disks as if they
were Macintosh disks
m QuickDraw 3D, which gives your computer the ability to display graphics
in three dimensions
m PlainTalk, which allows your computer to understand spoken commands in
English and Mexican Spanish
Installing application programs
You may want to buy and install additional application programs. See the
manuals you receive with these applications for instructions on installing and
using them.
64
To use your applications most effectively, follow these guidelines:
m Read the manuals you received with the application if you have a problem.
m Put only one copy of each application on your hard disk. Having more than
one copy can cause errors.
m Whenever you copy an application from its disk to your hard disk, be
careful not to copy a System Folder.
m If an application malfunctions consistently, try installing a fresh copy. If
that doesn’t help, find out from the software manufacturer whether your
version of the application is compatible with your computer model and
your system software.
Chapter 4
Page 65

Installing applications from a floppy disk
In most cases, you install application programs on your internal hard disk
from floppy disks. The following illustration shows how to insert a floppy
disk into your computer’s floppy disk drive.
Insert the floppy disk, metal
end first, into the floppy disk
drive of your computer.
For instructions on how to eject a floppy disk, see the “Disks” topic area of
Macintosh Guide (or Mac OS Guide), available in the Guide (h) menu.
Note: Be sure you’re acting within the terms of the software license
agreement that comes with your application program before you install the
program on your computer. The license agreement specifies how many copies
of the application you can make for yourself and others.
Installing and Using Application Programs
65
Page 66

Installing applications from a CD-ROM disc
To install an application program on your internal hard disk from a CD-ROM
disc, insert and op en the CD-ROM disc. Th en look for a ReadMe file or
follow the instructions that came with the disc to install the application. (For
instructions on using a CD-ROM disc, see “Inserting a CD-ROM Disc” i n
Chapter 5 and the “CD-ROM Discs” topic area of Macintosh Guide (or Mac
OS Guide), available in the Guide (h) menu.)
IMPORTANT
Never copy an entire CD-ROM disc to your hard disk by dragging
the CD-ROM disc icon to your hard disk. If you do, you may inadvertently
copy d uplicate system software files onto your hard disk and take up hard disk
space with unnecessary files.
Note: Many a p plications that come on CD-ROM discs require you to have the
CD-ROM disc in the drive whenever you use the application even though
you’ve i nstalled the application on your computer’s hard disk and opened the
copy on the hard disk.
Work ing with several applications at a time
You can open as many application programs and desk accessories (miniapplications that you usually open through the Apple menu) as your
computer’s memory allows.
All open applications are listed in the Application menu at the right end of
the menu bar. You can find out which application is active and which other
applications are open by opening the Application menu. The name of the
active application (the one you’re using right now) has a checkmark next to it,
and its icon appears in the menu bar.
66
A checkmark
indicates the
active program.
Chapter 4
The Finder icon
Commands to hide or
display open windows
Programs that are open
Page 67

Switching applications
You can switch to another open application or desk accessory by choosing its
name from the Application menu.
If an application’s icon is dimmed in the Application menu, that means its
windows are hidden. You can still choose the application from the menu,
however, to display the application’s windows.
You can also switch to another application by clicking in a window that
belongs to the other application or by double-clicking its icon.
Hiding an d showin g windows on the desktop
You can hide all windows except those of the active application by opening
the Application menu and choosing Hide Others.
The other applications remain open even though their windows are hidden.
When you switch to another application its windows become visible again.
If you want to see all the open windows, open the Application menu and
choose Show All.
Installing and Using Application Programs
67
Page 68

Incre a sing memory available to run ap plications
You can increase the memory available to run your application programs by
changing virtual memory settings.
Virtual memory uses space on your computer’s hard disk to create extra
random-access memory (RAM) to run your applications. Virtual memory
allows your computer to run more applications at the same time, and to have
more windows open at the same time, but it can result in slightly slower
performance. Also, some application programs may not perform optimally
when virtual memory is turned on.
To turn virtual memory on or off, use the Memory control panel. See the
“Memory” topic area of Macintosh Guide (or Mac OS Guide), available in the
Guide (h) menu for more information.
Note: If you turn on both vir tual memory and the RAM disk in the Memory
control panel, don’t set both of them at or near their maximum values. Doing
so can result in unpredictable or reduced performance by your computer. A
RAM disk uses RAM as if it were a hard disk. See the “Memory” topic area
of Macintosh Guide (or Mac OS Guide), available in the Guide (h) menu for
more information.
Backing up your files
68
Chapter 4
When you have a valuable paper document like a birth certificate, you
probably make an extra copy of it for safekeeping. Similarly, you should make
copies of the documents you create on your computer. Th e extra copy is
called a backup, and the process of making the copy is called backing up.
Once you have a backup, you’re protected from accidentally losing the
information on your hard disk. In the unlikely event that something happens
to your hard disk, you can easily get the information back.
Page 69

Follow these tips for making backup copies of the documents on your
computer:
m Regularly make copies of the documents you create.
m You can back up files stored on your hard disk by copying them to
floppy disks.
m You can back up an entire floppy disk by copying it to another floppy disk
of the same capacity or larger, or by copying it to a hard disk.
m If you need to copy a file onto a floppy disk and it is too large to fit onto a
single floppy disk, you can use a commercial backup application to copy
the file onto multiple floppy disks.
m You can use a commercial backup application to copy new and changed
files from a hard disk to another hard disk, to a tape drive, or to a series of
floppy disks.
m If your computer is on a network, you may be able to back up files by
copyi ng t hem to a shared disk on the network.
Tip: A good way to remember where you have stored documents is to print a
summary of the items you’ve stored in a folder. For instructions on printing
the contents of a folder, see the “Pri nting” topic area of Macintosh Guide (or
Mac OS Guide), available in the Guide (h) menu.
Using Power M acintosh application programs
Your Power Macintosh is compatible with most application programs
intended for use with Macintosh computers, but certain applications are
designed especially for Power Macintosh computers. These applications are
sometimes called “native” applications and they take best advantage of your
computer’s speed.
Installing and Using Application Programs
69
Page 70

Special memory requirements
Some Power Macintosh applications may be slightly larger than other
applications and may take up more memory. If you find that you are running
out of memory when you use your Power Macintosh applications, you can use
space on your computer’s hard disk as additional memory, which is called
virtual memory. For instructions on how to use virtual memory, see “Increasing
Memory Available to Run Applications,” under “Working With Several
Applications at a Time” earlier in this chapter, and the “Memory” topic area
of Macintosh Guide (or Mac OS Guide), available in the Guide (h) menu.
You can also add more memory to your computer, as described in
Appendix B, “Installing Expansion Cards or Additional Memory.”
Using older Macintosh applications
If you experience problems using an older Macintosh application, it may be
incompatible with your Power Macintosh. You may be able to use your older
application if you turn off Modern Memory Manager. To do this, open the
Apple (K) menu, choose Control Panels, and open the Memory control panel.
Then turn off Modern Memory Manager.
Using spec ial 3D software
The special design of your computer’s logic board allows it to take advantage
of QuickDraw 3D, which is special software built into some programs to
enhance their 3D graphics. Because of this special design, called “3D
Acceleration,” your computer renders 3D images with greater speed and
fluidity than computers that don’t have this feature. As a result, you get
enhanced texturing and greater realism when you use programs that support
QuickDraw 3D, such as 3D modeling programs and many games. To take
advantage of 3D acceleration, your software must support QuickDraw 3D or
QuickDraw 3D RAVE.
70
Chapter 4
Page 71

An example of what you might see is shown in the following illustration.
If you want to purchase additional software that supports QuickDraw 3D, see
your Apple-Authorized dealer.
IMPORTANT
For best video performance, Apple recommends setting your
monitor at a resolution of 640 x 480 and a color depth of 16 bits when
running use 3D graphics. For more information about setting your monitor’s
resolution, see Macintosh Guide (or Mac OS Guide) in the Guide (h) menu.
Installing and Using Application Programs
71
Page 72

Turning 3D acceleration off and on
If you need to turn off the QuickDraw 3D acceleration (for example, to
compare accelerated performance with software-only rendering), follow
these s t eps:
1 Quit all applications that use QuickDraw 3D.
2 Create an empty folder on the desktop.
3Move the file named “ATI 3D Accelerator” from the Extensions folder (inside the System
Folder) into the empty folder. This turns off 3D acceleration.
4 Restart QuickDraw 3D applications.
To turn QuickDraw 3D acceleration back on, follow these steps:
1 Quit all applications that use QuickDraw 3D.
2Move the file named “ATI 3D Accelerator” back into the Extensions folder.
3 Restart QuickDraw 3D applications.
Removing software
72
If you have previously installed some or all of the software in the Apple Extras
or CD Extras folder, you can remove or deinstall the software if you do not
use it. Removing software like this will make more hard disk space available.
To remove software, follow these steps:
1 Start up your computer from the system software CD-ROM disc that came with your
computer.
For detailed steps, see “Starting Up From a CD-ROM Disc” under
“Initializing a Hard Disk” in Chapter 9.
2 Open the Apple Extras folder on the hard disk or the CD Extras folder on the
CD-ROM disc.
3 Open the folder for the software you want to remove.
4Double-click the Installer icon to open the Installer application.
Chapter 4
Page 73

5If the Installer’s Welcome screen appears, click OK.
The Easy Install dialog box appears.
6Choose Custom Remove from the pop-up menu.
The Custom Remove dialog box appears, listing the software components that
can be removed.
7Scroll through the list of components, clicking the checkbox next to each component
you want to remove.
To get additional information about each component listed, click the box with
the letter i in it to the right of the component.
8Click Remove.
9 Follow the instructions that appear on the screen.
10 When you see a message reporting that the removal was successful, click Quit.
11 Restart your computer.
The software is removed and your computer is ready to use. If you want to
remove more software, you can repeat the steps in this section.
Installing and Using Application Programs
73
Page 74

Page 75

Read this chapter for information
about your computer’s built-in
CD-ROM drive.
5
Using the Optional Built-in CD-ROM Drive
This chapter provides information on the optional inter nal CD-ROM drive
(also called a CD-ROM player because you play CD-ROM discs in it). Refer
to Appendix A, “Health, Safety, and Mai ntena nce Tips,” for information on
the proper handling of CD-ROM discs.
With your internal CD-ROM (compact disc read-only memory) drive, you
have access to large amounts of information. The CD-ROM drive can read the
contents of CD-ROM discs, standard audio compact discs (CDs), and singlesession or multisession Photo CDs. However, you cannot use the drive to save
information on CD-ROM discs. ROM stands for read-only memory, meaning
that the drive cannot “write” information onto CD-ROM discs.
A wide selection of CD-ROM discs is available for entertainment, education,
and business. A typical disc can hold over 650 megabytes (MB) of
information—the equivalent of 270,00 0 pages of text, up to 8 hours of speech
or music (depending on the sound quality), hundreds of high-resolution
images, or any combination of text, sound, and graphics.
75
Page 76

Inserting a CD-ROM disc
Follow these instructions to insert a CD-ROM disc into your CD-ROM drive.
Then follow the instructions provided with your disc, as well as the
instructions in this manual.
IMPORTANT
Some CD-ROM disc labels have artwork on them that can cause
the dis c’s weight to be slightly off-center when it’s rotating in the drive. T his
may cause the computer to vibrate. See the next section, “If Your CD-ROM
Disc Vibrates in the CD-ROM Drive,” for more information.
1 Start up your computer, if it’s not already on.
2Press the Open/Close button to open the tray of the CD-ROM drive.
Open/Close button
The tray opens.
3Place a CD-ROM disc in the tray, with the disc label facing up.
Make sure the disc is lying flat and centered in the tray.
If you are using a small (8 cm) disc, make sure the disc is centered within the
inside ring on the tray.
76
Chapter 5
Page 77

4Push the tray in, or press the Open/Close button, to close the tray.
In a few moments, an icon for the CD-ROM disc appears on your screen.
Note: The tray on your CD-ROM drive automatically closes when you shut
down your computer. You may want to open the tray and take out your
CD-ROM disc before shutting down.
If your CD-ROM disc vibrates in t he CD-ROM drive
Some CD-ROM disc labels have artwork or labels on them that can cause the
CD-ROM disc’s weight to be slightly off-center. Because of the high rotation
speed of your CD-ROM drive, these discs can occasionally wobble in the
drive and cause your computer to vibrate. If you can feel or hear a CD-ROM
disc vibrating, you don’t need to do anything special. Just use the CD-ROM
disc as you normally would. The vibration damages neither your computer
nor the CD-ROM disc itself.
Note: Sometimes removing labels from discs that vibrate eliminates the
vibration.
Using the Optional Built-in CD-ROM Drive
77
Page 78

Ejecting a CD-ROM disc
Foll o w these instr uctions to open the tray of the CD-ROM drive and eject a
CD-ROM disc from your computer.
IMPORTANT
You may not be able to eject a disc if it is available to users
on other computers (shared). To turn off file sharing, use the Sharing
Setup control panel in the Control Panels folder, available through the
Apple (K) menu.
1 Open the tray.
There are several ways to open the tray of your CD-ROM drive.
If a CD-ROM disc icon appears on your screen, use one of these methods:
m Drag the icon to the Trash. (You won’t lose information on the CD-ROM disc
by dragging its icon to the Trash.)
m Click the disc icon, then choose the Put Away command in the File menu.
IMPORTANT
Don’t click the disc icon and then choose Eject Disk from the
Specia l menu. If you do this, the computer keeps the CD-ROM disc in its
memory and continually asks you to reinsert it.
m If the AppleCD Audio Player window is active, choose Eject CD from the
File menu, or simultaneously press the x and E keys. (AppleCD Audio
Player is a n application that allows you to play audio CDs and control your
CD-ROM drive; it is available in the Apple [K] menu.)
78
If no CD-ROM disc icon appears on your screen, try this:
m Press the Open/Close button of your CD-ROM drive.
Chapter 5
Page 79

2Take the CD-ROM disc out of the tray.
Store your disc in a safe place, away from heat, dust, and moisture.
3Push the tray in, or press the Open/Close button, to close the tray.
To a void possible damage to the tray and the CD-ROM drive, keep the tray
closed when you are not using it.
Copying files from CD-ROM discs
To install an application program on your internal hard disk from a CD-ROM
disc, insert and op en the CD-ROM disc. Th en look for a Read Me file or
follow the instructions that came with the disc to install the application. (For
instructions on using a CD-ROM disc, see “Inserting a CD-ROM Disc” a nd
“Ejecting a CD-ROM Disc” earlier in this chapter.)
IMPORTANT
Never copy an entire CD-ROM disc to your hard disk by dragging
the CD-ROM disc icon to your hard disk. If you do, you may inadvertently
copy d uplicate system software files onto your hard disk and take up hard disk
space with unnecessary files.
Note: Many a p plications that come on CD-ROM discs require you to have the
CD-ROM disc in the drive whenever you use the application even though
you’ve i nstalled the application on your computer’s hard disk and opened the
copy on the hard disk.
Using the Optional Built-in CD-ROM Drive
79
Page 80

Types of compact discs you can use
Not a ll CD-ROM discs store information in the same way. A disc stores and
displays information according to a particular file format. Your computer’s
system software must understand the file format in order to use the contents
of the disc.
Standard file formats
You can use CD-ROM discs with these file formats:
m HFS (Hierarchical File System)—the standard format used by the Macintosh
m ISO 9660—the Inter national Standards Organization’s file format for
CD-ROM discs. This format has been adopted by many CD manufacturers
to make thei r discs compatible with a variety of computers. It is also the
format that allows you to use Photo CDs in your CD-ROM drive.
m The High Sierra format, a predecessor of the ISO 9660 format
m Photo CDs
m Audio CDs
The software that lets you use discs with these file formats is already installed
on your computer.
80
Other CD-ROM formats
Your CD-ROM drive also works with file formats other than the ones listed
above (for example, CD-ROM XA) if you install the appropriate software on
your Macintosh. To find out about the availability of Macintosh software for
additional file formats, contact the publisher of a particular disc.
Chapter 5
Page 81

Audio CDs
Your CD-ROM drive can play audio CDs and the sound portions of other
CD-ROM discs using your computer’s built-in speaker. You can also attach
headphones or speakers to your computer for stereo sound. For further
information, see “Playing Audio CDs” later in this chapter. Also see
“CD-ROM Discs” topic area of Macintosh Guide (or Mac OS Guide),
available in the Guide (h) menu.
Photo CDs
With your CD-ROM drive, you can use QuickTime to open digitized images
stored on Photo CDs.
For more information on Photo CDs, see “Working With Photo CDs” later in
this cha p ter. Also see the “CD-ROM Discs” topic area of Macintosh Guide (or
Mac OS Guide), available in the Guide (h) menu.
Playing audio CDs
With your CD-ROM drive and your computer’s built-in sp eaker, you can play
audio compact discs (CDs) or the sound portions of other CD-ROM discs.
You can also attach headphones or speakers to the computer to listen to audio
tracks. See Chapter 3, “Expanding Your Computer and Using Its Special
Features,” for information on connecting sound equipment to your computer.
To st a r t, stop, and otherwise control audio CDs, use the AppleCD Audio
Player program, available in the Apple (K) menu. Your audio CD software
will only play tracks that contain audio information. With the AppleCD
Audio Player program, you can listen to audio tracks from CDs while doing
other work on your computer. For more information about playing audio
CDs, see the “CD-ROM Discs” topic area of Macintosh Guide (or Mac OS
Guide), available in the Guide (h) menu.
Using the Optional Built-in CD-ROM Drive
81
Page 82

Work ing with Photo CDs
With your CD-ROM drive and software, you can open Photo CD images
stored on Photo CDs. A Photo CD image is a digitized version of a standard
photograph that you can open and view on your computer screen.
82
You can do many things with the images on your Photo CDs:
m Open and view the images individually.
m View the images in a series, as you would view a slide presentation.
m Copy and save the images, print them, paste them into word-processing
documents or other documents that accept graphics, and edit them with
a graphics application program.
Photo CD images are an excellent source of graphics for desktop
publishing, multimedia presentations, business documents, and
professional-quality graphic design. For more information on working with
Photo CD images, see the “CD-ROM Discs” topic area of Macintosh Guide
(or Mac OS Guide), available in the Guide (h) menu.
Chapter 5
Page 83

Obtaining Photo CDs
Your own photographs can be recorded as Photo CD images on a Photo CD.
To obtain a Photo CD of your own photographs, take your standard 35-mm
film to a photofinisher who has a Photo CD system. The photofinisher
develops your film, digitizes the photographs, and gives you back a Photo CD
containing your images. A single Photo CD can hold approximately one
hundred images.
If your Photo CD isn’t full, you can take it back to the photofinisher and
have more photos added until the disc is full. Such discs are called
multisession discs because they contain images added after the first session.
Your CD-ROM drive can read both single-session and multisession Photo
CDs. (Other CD-ROM drives can read only single-session discs and are
unable to read the additional images placed on a multisession disc.)
Before viewing th e contents of a Photo CD
Normally, you open Photo CD images with the SimpleText program that came
with your computer. If you wish, you can use a graphics or image-editing
program instead of SimpleText. For instructions, see the “CD-ROM Discs”
topic area of Macintosh Guide (or Mac OS Guide), available in the Guide (h)
menu. If you use SimpleText to view high-resolution images, you should
increase the amount of memory that SimpleText uses. For more information
on memory, see the “Memory” topic area of Macintosh Guide (or Mac OS
Guide), available in the Guide (h) menu.
Using the Optional Built-in CD-ROM Drive
83
Page 84

A note about resolution
When a Photo CD image is created, it’s recorded at five different levels of
resolution. The higher the resolution, the more information is recorded about
the image, and the sharper the image appears when displayed or printed at
larger sizes. However, high-resolution images take up a lot of memory—up to
18 MB of data for one photograph—which affects file size, as well as the
amount of time it takes to display or print an image.
It’s best to work with a resolution appropriate for your monitor or printer.
Some monitors and printers cannot display or print very high-resolution images.
For most work, a resolution of 768 x 512 pixels or smaller is suitable. For
detailed work or very high-quality reproductions, you may want to use a
higher resolution.
Make sure to open high-resolution images with application programs designed
to handle large image files. SimpleText cannot open very large files.
Sharing a CD-ROM disc over a network
You can “share” a CD-ROM disc with users of other computers using the file
sharing feature of your system software. If your disc has audio portions, you
will be able to hear the audio yourself, but other people on the network will
not. Likewise, you cannot hear the audio portions of discs you access over a
network.
84
Chapter 5
IMPORTANT
If file sharing is on and you are having trouble ejecting a disc,
turn file sharing off in the Sharing Setup control panel in the Control Panels
folder, available through the Apple (K) menu.
For further information about file sharing, see the “Sharing Files” topic area
of Macintosh Guide (or Mac OS Guide), available in the Guide (h) menu.
Page 85

Read this chapter for information
about the equipment you need to get
online, such as modems and ISDN.
6
Con necti n g Your Computer to a Telephone Line
A world of information is now available online. By connecting your computer
to a telephone lin e (commonly referred to as going “online”), you can access
the Internet, send and receive electronic mail (e-mail) and faxes, and connect
to online services like America Online and CompuServe. You can also use a
telephone line to access another Macintosh or an entire AppleTalk n etwork
from a remote Macintosh computer. (For example, you can telecommute by
accessing a company computer network from a remote location, such as a
home office.)
To get online using a telephone line, you need special equipment and
software. This chapter provides a brief introduction to the equipment you
need. (It’s also possible to get online through a network connection, if the
network includes the right equipment.) For information about the software
you need to perform onlin e tasks, see Chapter 8, “Using Your Modem to
Connect to the Internet or an Online Service.”
85
Page 86

Types of equipment
There are three types of equipment you can use to get online: a
modem, an ISDN line, and shared telecommunications equipment on
your network.
Modem: A modem may be the most common way to connect a
computer to a phone line, particularly if you are using your computer at
home. A modem works with standard analog telephone lines. To add a
modem to your computer, you can install a modem card in your
computer’s communication slot or connect an external modem. For
more information about modems, see the next section, “Choosing and
Connecting a Modem.”
ISDN line: An Integrated Services Digital Network (ISDN) line is a
special digital phone lin e that is about four times faster than the fastest
modem used over a standard analog telephone line. However, an ISDN
line typically costs more than regular phone service and may not be
available in your community. For more information about ISDN, see
“Connecting to an ISDN Line” later in this chapter.
Shared Telecommunications Equipment on Your Network: Many models of
your computer come with an Ethern et card, allowing you to connect to
a network. If your computer is part of a network, there may be shared
communications equipment available that will allow you (or anyone
else on your network) to get online. Contact your computer network
administrator for more information. You can also find general
information about networks in Chapter 7, “Connecting Your Computer
to a Network.”
86
Chapter 6
Page 87

Choosing and connecting a modem
A modem is a piece of equipment that turns the data from your computer into
information that can be transmitted over telephone lines. The modem enables
your computer to send and receive telephone calls, connect to the Internet,
access online services, and communicate with other computer users. Some
modems also allow you to transmit documents on your computer to fax
machines as well as receive faxes as documents that you can view on screen
or print.
To add a modem to your computer, you can install an internal modem card in
the communication slot of your computer, or, if the communication slot is
already filled with a network card, you can connect an external modem (a
separate piece of equipment that sits outside the computer case and connects
to it with a cable).
Keep in mind that when your phone and a modem share a single phone line,
you will not be able to use both at the same time, even if they are attached to
separate phone jacks. While you use a modem, outside callers get a busy
signal and you cannot call out. Conversely, when you use your phone, you
cannot use the modem. (If you miss phone calls because you often use your
modem, you may want to get a second phone line installed or get a phone
company message service, which, unlike an answering machine, will record
messages even when your phone is off the hook or you are online.)
Also keep in mind that long distance charges accrue when your modem dials
long-distance numbers. In most cases, an online service or an Inter net service
provider will have a local access phone number so that long distance charges
do not apply.
Connecting Your Computer to a Telephone Line
87
Page 88

Choosing a modem
When selecting a modem, look for one with a high speed of data transfer,
a compatible modem cable (if the modem is external), and good bundled
software. Remember, if your communication slot is already filled with a
network card (many models of your computer come with an Ethernet card in
this slot), you’ll want to look for an external modem rather than a modem card.
Modem speed
The modem speed determines how fast a modem can download, or transfer
data from a remote location to your computer. Be sure to purchase the fastest
modem that you can afford, particularly if you plan to connect to the World
Wide Web. Many Web pages contain graphics, video, and sound that will take
longer to download with a slower modem.
The speed of a modem is specified in kilobits per second (Kbps) or bits per
second (bps). Faster modems transfer data to and from your computer more
quickly than slower ones. The following table describes the current modem
speeds that are available.
Modem speed Usage
33,600 bps The fastest modem available (as of this writing) for use with standard
(33.6 Kbps) analog telephone lines. Suitable for World Wide Web use.
88
28,800 bps Slightly slower than a 33.6 Kbps modem, but still suitable
(28.8 Kbps) for World Wide Web use.
14,400 bps Only half as fast as a 28.8 Kbps modem. May be acceptable for
(14.4 Kbps) text-oriented applications such as e-mail or terminal emulation.
9600, 4800, Too slow for most purposes.
and 2400 bps
Chapter 6
Page 89

Modem cables (for external modems)
If you purchase an external modem that is designed for use with a Macintosh,
it will probably include a Macintosh-compatible modem cable. If you have to
purchase a cable separately, make sure it supports hardware handshaking, a
protocol that controls the flow of data between computers. Also make sure the
cable has a rounded connector that will fit the modem port on the back of
your computer (labeled with a W icon). A cable designed for use with a
Windows- or DOS-compatible computer won’t work with your Macintosh.
Bundled software
Many modems include bundled software, such as fax software, a terminal
emulation program, and free trial membership software for online services. If
you can’t decide between two comparably priced modems, pick the one that
comes with the best bundled software.
Connecting a modem
To connect an external modem, follow the instructions in the manuals that
came with your modem. To install and connect an internal modem card,
follow the instructions in Appendix B of this manual for installing
communication cards as well as the instructions in the manual that came
with the card.
Note: Some modems have a single phone jack, while others have two. If your
modem has only one phone jack, consider purchasing a line splitter at an
electronics supply store. A li ne splitter enables you to plug your phone and
your internal modem into the same jack at the same time. (By the way, you
can keep your answering machine connected to your phone, even if your
phone and modem share the same telephone line.)
IMPORTANT
When connecting a modem, make sure you connect the modem to
an analog phone line—the kind used typically in homes. Connecting to an
ISDN line could damage the modem.
IMPORTANT
Disconnect your modem from the phone jack during lightning
storms. This will prevent a destructive voltage overload from damaging
the modem.
Connecting Your Computer to a Telephone Line
89
Page 90

Setting up your modem to connect online
Once you have installed and connected your modem, you need to configure
the connection so the modem can contact your network or Internet service
provider (ISP). The Apple Inter net Connection Kit that came on the system
software CD-ROM disc can be used to set up your modem connection. Your
network administrator or ISP can provide more information about what
settings to use to configure your connection. Refer to Chapter 8, “Using Your
Modem to Connect to the Internet or a n Online Service,” for more
information about getting your computer online.
Connecting to an I SDN line
If you have a home office, telecommute frequently, or routinely need to send
and receive large files, then a 28.8- or 33.6-Kbps modem may not be fast
enough for your needs. For faster performance, you may want to consider
connecting your computer to an Integrated Services Digital Network (ISDN)
digital telephone line, which can transfer data at 128 Kbps, nearly 4.5 times
faster than a 28.8 Kbps modem.
ISDN lines are available to most but not all residential and business telephone
customers. Ch eck with your local phone company to see if ISDN service is
available at your location.
90
There are fixed monthly charges and per-minute usage fees for ISDN, just like
regular phone service. Typically, ISDN costs more than regular phone service,
but it is still affordable for many business and residential purposes. Because
one ISDN line can support several devices simultaneously—such as a
computer, voice phone, and fax machine—you may be able to replace existing
extra phone lines with one ISDN line.
Note: Because an ISDN line requires a power source at your location, a
phone attached to an ISDN line will not work during a power outage. For
emergency use, you should strongly consider keeping your regular analog
phone line, which receives power from the phone company.
Chapter 6
Page 91

Setting up an ISDN line
If you’re interested in setting up an ISDN line, first contact your local phone
company to see if ISDN service is available at your location. Your phone
company can also provide specific information about monthly charges and
usage fees. (Your phone company may also charge an installation fee, which
may be waived or refunded if you agree to keep the ISDN line for a specified
amount of time.)
In addition, you also need to purchase and configure an ISDN terminal
adapter, which connects to the external modem port on your Macintosh and
to the ISDN line. (ISDN terminal adapters are often called “ISDN modems”
because they are somewhat similar to modems.)
Some ISDN terminal adapter models may be difficult to configure with the
network configuration of your employer or internet service provider. Work
closely with your computer network administrator or internet service provider
to make sure you purchase a compatible ISDN terminal adapter.
Connecting Your Computer to a Telephone Line
91
Page 92

Page 93

Read this chapter for information about
connecting to other computers
in a local area network.
7
Connecting Your Computer to a Network
Any group of computers and other devices connected in order to
communicate with each other constitutes a network. Some networks connect
all their computers by a particular type of cable. Such networks are called
local area networks (LANs). LANs can be as simple as two computers
connected together or as complex as a business’s in-house computer network.
Sometimes groups of networks connect to form a larger network, such as the
Internet. This is called a wide area network (WAN).This chapter discusses
several types of LANs to which you can connect your computer.
93
Page 94

Connecting to a network expands the features of your computer by giving you
access to the services and resources provided on the network. For example,
your computer by itself lets you store, retrieve, and modify information on
floppy disks, hard disks, and CD-ROM discs. When your computer is
connected to a network, however, you can also store and retrieve information
on the hard disks and CD-ROM discs of other computers, use electronic mail,
and share computing resources such as printers, modems, and network
services.
You can get much of the specific information about the network you want to
connect to from the network administrator—the person who oversees the
network’s op eration. Before you begin connecting to a network, contact its
network administrator.
Your computer can be connected to several kinds of networks, including
the following :
LocalTalk
m
To connect to a LocalTalk network, you connect a LocalTalk
cable to either the modem port or the printer port on your computer.
m
Ethernet
To connect to a high-speed Ethern et n etwork, you need an
Ethernet card installed in the communication or PCI (peripheral
component interconnect) slot in your computer. Many models of your
computer come with a 10Base-T (twisted pair) Ethern et card already
installed in the communication slot.
Alternative networks such as Token Ring, ISDN, or Fiber Distributed Data Interface
m
(FDDI)
To connect to any of these networks, you need to install a PCI card
for the specific type of network you want to connect to in one of the PCI
slots in your computer.
94
Chapter 7
Page 95

This chapter describes how to connect to and configure your computer on
LocalTalk and Ethernet networks. For other network-related information,
refer to the appropriate information source
m If your computer is already connected to a network, refer to Macintosh
Guide (or Mac OS Guide), available in the Guide (h) menu, for
information about printing to a networked printer, accessing information
on file servers, and sharing files on your computer with other users. Also,
your network administrator can provide information about network
software that may be available, such as Internet access and electronic mail.
m If your location does not currently have a network and you are interested
in setting one up, refer to a book on Macintosh networking that will help
you select and plan a network appropriate for your organization. Many
books about networks are available at computer bookstores.
Note: With a modem, you can connect to the Intern et and other online
services. However, with an E thernet card or LocalTalk connection (described
in this chapter), you can also connect your computer to other computers or
servers in a local area network. You may also be able to reach the Inter n et if
you connect to a network that has an Inter n et link. (By the way, access to the
Internet over a network may be noticeably faster than access by a modem. For
information on using your modem, see Chapter 6, “Connecting Your
Computer to a Telephone Line.”)
Connecting Your Computer to a Network
95
Page 96

Connecting to a Lo calTalk Network
To connect your Macintosh to a LocalTal k n etwork, you need LocalTalk
cables and a LocalTalk adapter. In most cases, the Apple LocalTalk Locking
Connector Kit DIN-8, available from your Apple-authorized dealer, contains
the components you need to connect your Macintosh to an existing LocalTalk
network. If your network uses standard telephone cables for your network
wiring, obtain an Apple LocalTalk RJ-11 Connector instead.
Apple LocalTalk RJ-11 ConnectorApple LocalTalk Locking Connector Kit DIN-8
LocalTalk adapterLocalTalk adapter
LocalTalk cable
Standard telephone cable
To connect your Macintosh to a LocalTal k n etwork, do the following:
1Shut down your computer.
2Attach the LocalTalk adapter to the printer port or modem port on your computer.
Printer port
Printer port icon
96
Chapter 7
Page 97

3Attach a network cable between the LocalTalk adapter connected to your computer and a
LocalTalk adapter on your existing network.
IMPORTANT
While connecting to the middle of the network you may interr upt
other users. Check with your network administrator before you connect.
If you connect to the last computer in the network, you need to attach a
network terminator to your LocalTalk adapter.
If you are using the Apple LocalTalk Locking Connector Kit DIN-8, use the
LocalTalk cable that comes with the kit to connect to a network with
LocalTalk cables. If you are using the Apple LocalTalk RJ-11 Connector, use a
standard telephone cable with RJ-11 connectors.
Printer port
LocalTalk adapter
LocalTalk cable
4Configure your LocalTalk connection following the advice of your network administrator
and the instructions in “Configuring Your Network Connection” later in this chapter.
Connecting Your Computer to a Network
97
Page 98

Connecting to an Ethernet network
Ethernet is a cable system that lets your computer communicate with other
computers much faster than it can with LocalTalk cables. To connect your
computer to an Ethernet network, you need to do the following:
m Find out from your network administrator what kind of Ethernet network
you’ re connecting to.
m If your computer did not come with the appropriate Ethernet card already
installed, buy and install the right kind of Ethernet card and cable. See
“Choosing an Ethernet Card,” next in this chapter. See Appendix B for
instructions on installing cards in your computer.
m Connect the card to the network. See the instructions later in this chapter
for connecting the card to the type of Ethernet n etwork you have.
m Configure the network connection. See the instructions in “Configuring
Your Network Connection,” later in this chapter.
Choosing an Ethernet card
Many models of your computer come with an Ethernet card already installed.
If your computer didn’t include an Ethernet card and you decide to add one,
there are two factors that affect what kind of Ethern et card you should
purchase for your computer—where the card will be installed in your
computer and what kind of network you’ll be connecting to. Dep ending on
the type of card you install, you may also need an appropriate media adapter.
98
Chapter 7
Page 99

Wher e to inst all the card
Some kinds of Ethernet cards fit into the computer’s communication slot;
however, so do internal modem cards. If you install an internal modem card
in the communication slot but you also want to connect to an Ether n et
network, purchase an Ethern et card that instead uses the computer’s PCI
(peripheral component interconnect) slot.
WARNING
Do not connect cables to the back of your computer when the
power is on or you may damage your system.
m If your Ethernet card uses a PCI slot, follow the instructions in “Installi ng
a PCI Card” in the section “Installing an Expansion Card” in Appendix B,
and the instr uctions that came with the card.
m If your Ethernet card uses the communication slot (this type of card is
often referred to as an Apple Ethern et Comm II card), follow the
instructions in “Installing a Communication Card” in the section
“Installing an Expansion Card” in Appendix B, and the instructions that
came with the card.
Network type
Find out what kind of network you will be connecting to (your network
administrator should be able to provide this information). Depending on the
kind of network, you will choose among cards that use one of these types of
cables:
m thin or thick coaxial (or “coax”) cable, also called 10Base-2
m 10Base-T (twisted pair) cable
m fiber-optic media or other standard Ethernet cable
So for example, if you know that your Ether n et network uses 10Base-T cables,
and you want to use your communication slot for a modem card, you would
purchase a 10Base-T Ethernet card that fits in a PCI slot.
Connecting Your Computer to a Network
99
Page 100

Media adapters
You can connect dir e ct ly to an E thernet network using a 10Base-T twisted-pair
cable. However, to connect your computer to an Ether n et network using
coaxial cables, you need one of the following Ethernet media adapters:
m Apple Et hernet Thin Coax Transceiver
m Apple Et hernet AUI Ada pter
See your Apple-authorized dealer for more information on Apple Ethernet
media adapters.
Connecting to a twisted-pair Ethernet network
Follow this procedure to connect your Macintosh to an Ether net network that
uses twisted-pair cable. (You can’t connect to an Ethern et network unless you
have an Ethernet card installed. If your computer didn’t come with an
Ethernet card already installed, see the information at the beginning of this
section, “Connecting to an Ether net Network.”) You need a twisted-pair patch
cord with an RJ-45 telephone-style connector, which you plug into a wall
plate connected to the existing 10Base-T Ethern et network.
100
Chapter 7
IMPORTANT
Be careful not to plug a regular telephone cable into your RJ-45
connector. Although it works very differently, an RJ-45 connector looks very
similar to a standard telephone cable. Also, the connectors at the ends of the
cables will fit into both telephone and twisted-pair Ethernet ports. Make sure
you are using an RJ-45 connector cable.
To connect your Macintosh to a twisted-pair Ethernet network, follow these
instructions:
1Shut down your computer.
2Plug one end of the twisted-pair patch cord into the 10Base-T Ethernet port on
the Ethernet card in your Macintosh.
Status light (lights up when there’s a good network connection)
Twisted-pair Ethernet port (10Base-T)
 Loading...