


Dryer
USE & CARE
G U I D E
TABLE OF CONTENTS |
|
Safety Instructions ................................................. |
1-2 |
Dryer Exhaust Tips ................................................... |
3 |
Operating Instructions........................................... |
4-5 |
Using the Controls................................................ |
6-8 |
Special Laundry Tips................................................... |
9 |
Care and Cleaning.................................................... |
10 |
Reverse the Door .................................................... |
10 |
Troubleshooting .................................................. |
11-12 |
Warranty ................................................................... |
15 |
Guide d'utilisation et d'entretien........................ |
16 |
Gu’a de Uso y Cuidado......................................... |
32 |
Part No. DC68-02031C |
©2007 All Rights Reserved |
W101611016 |
|

IMPORTANT SAFETY INSTRUCTIONS
WELCOME
Welcome and congratulations on your purchase of Amana dryer! Your complete satisfaction is
very important to us. For best results, we suggest reading this material to help acquaint you with proper operating and maintenance procedures.
Should you need assistance in the future, it is helpful to:
1)Have complete model and serial number identification of your dryer.
Date of Purchase ________________________
Model Number __________________________
Serial Number __________________________
2)IMPORTANT: Keep this guide and the sales receipt in a safe place for future reference. Proof of original purchase date is needed for warranty service.
If you have questions, call:
Amana Customer Assistance 1-800-843-0304 USA 1-866-587-2002 CANADA
(Mon.-Fri., 8am-8pm Eastern Time) http://www.amana.com
For service and warranty information, see page 15.
NOTE: In our continuing effort to improve the quality of our appliances, it may be necessary to make changes to the appliance without revising this guide.
What You Need to Know About Safety
Instructions
Warning and Important Safety Instructions appearing in this manual are not meant to cover all possible conditions and situations that may occur. Common sense, caution and care must be exercised when installing, maintaining or operating appliance. Always contact your manufacturer about problems or conditions you do not understand.
Recognize Safety Symbols, Words, Labels
WARNING
WARNING: Hazards or unsafe practices which COULD result in severe personal injury or death.
CAUTION
CAUTION: Hazards or unsafe practices which COULD result in minor personal injury.
WARNING
WARNING: For your safety, the information in this manual must be followed to minimize the risk of fire or explosion or to prevent property damage, personal injury or death.
– Do not store or use gasoline or other flammable vapors and liquids in the vicinity of this or any other appliance.
WHAT TO DO IF YOU SMELL GAS:
• Do not try to light any appliance.
• Do not touch any electrical switch.
• Do not use any phone in your building.
• Clear the room, building or area of all occupants.
• Immediately call your gas supplier from a neighbor’s phone. Follow the gas supplier’s instructions.
• If you cannot reach your gas supplier, call the fire department.
Installation and service must be performed by a qualified installer, service agency or the gas supplier.
Save These 1Instructions

IMPORTANT SAFETY INSTRUCTIONS
WARNING
To reduce the risk of fire, explosion, electric shock, or personal injury when using your dryer, follow basic safety precautions, including the following:
1. Read all instructions before using the appliance.
2. To avoid the possibility of fire or explosion:
a. Do not dry items that have been previously cleaned in, washed in, soaked in, or spotted with gasoline, drycleaning solvents, other flammable or explosive substances as they give off vapors that could ignite or explode.Any material on which you have used a cleaning solvent, or which is saturated with flammable liquids or solids, should not be placed in the dryer, until all traces of these flammable liquids or solids and their fumes have been removed.There are many highly flammable items used in homes, such as: acetone, denatured alcohol, gasoline, kerosene, some liquid household cleaners, some spot removers, turpentine, waxes and wax removers.
b. Items containing foam rubber (may be labeled latex foam) or similarly textured rubber-like materials must not be dried on a heat setting. Foam rubber materials when heated, can under certain circumstances produce fire by spontaneous combustion.
3. Do not allow children or pets to play on, in, or in front of the appliance. Close supervision is necessary when the appliance is used near children and pets.
4. Before the appliance is removed from service or discarded, remove the door to the drying compartment.
5. Do not reach into the appliance if the drum is moving. 6. Do not install or store this appliance where it will be
exposed to the weather.
7 . Do not tamper with controls.
8.Do not repair or replace any part of the appliance or attempt any servicing unless specifically recommended in published user-repair instructions that you understand and have the skills to carry out.
9.Do not use fabric softeners or products to eliminate static unless recommended for dryer use by the manufacturer of the fabric softener or product.
10.Clean the lint screen before or after each load.
11.Keep the area around the exhaust opening and surrounding areas free from lint accumulation, dust and dirt.
12.The interior of the dryer and exhaust duct should be cleaned periodically by qualified service personnel.
13.This appliance must be properly grounded. Never plug the appliance cord into a receptacle which is not grounded adequately and in accordance with local and national codes. See installation instructions for grounding this appliance.
14.Do not sit on top of the clothes dryer.
15.Do not place items exposed to cooking oils in the dryer. Items contaminated with cooking oils may contribute to a chemical reaction that could cause a load to catch fire.
NOTE: Because of continuing product improvements,
Amana reserves the right to change specifications without notice.For complete details,see the Installation Instructions packed with your product before selecting cabinetry, making cutouts or beginning installation.
WARNING
Gas leaks may occur in your system and result in a dangerous situation. Gas leaks may not be detected by smell alone. Gas suppliers recommend you purchase and install an UL approved gas detector. Install and use in accordance with the manufacturer's instructions.
Do not place into your dryer items that have been spotted or soaked with vegetable oil or cooking oil. Even after being washed, these items may contain significant amounts of these oils.The remaining oil can ignite spontaneously.The potential for spontaneous ignition increases when the items containing vegetable oil or cooking oil are exposed to heat. Heat sources, such as your clothes dryer, can warm these items, allowing an oxidation reaction in the oil to occur. Oxidation creates heat. If this heat cannot escape, the items can become hot enough to catch fire. Piling, stacking or storing these kinds of items may prevent heat from escaping and can create a fire hazard.
All washed and unwashed fabrics that contain vegetable oil or cooking oil can be dangerous.Washing these items in hot water with extra detergent will reduce, but will not eliminate, the hazard.Always use the Cool Down cycle for these items to reduce the items’ temperature. Never remove these items from the clothes dryer hot or interrupt the drying cycle until the items have run through the Cool Down cycle. Never pile or stack these items when they are hot.
2
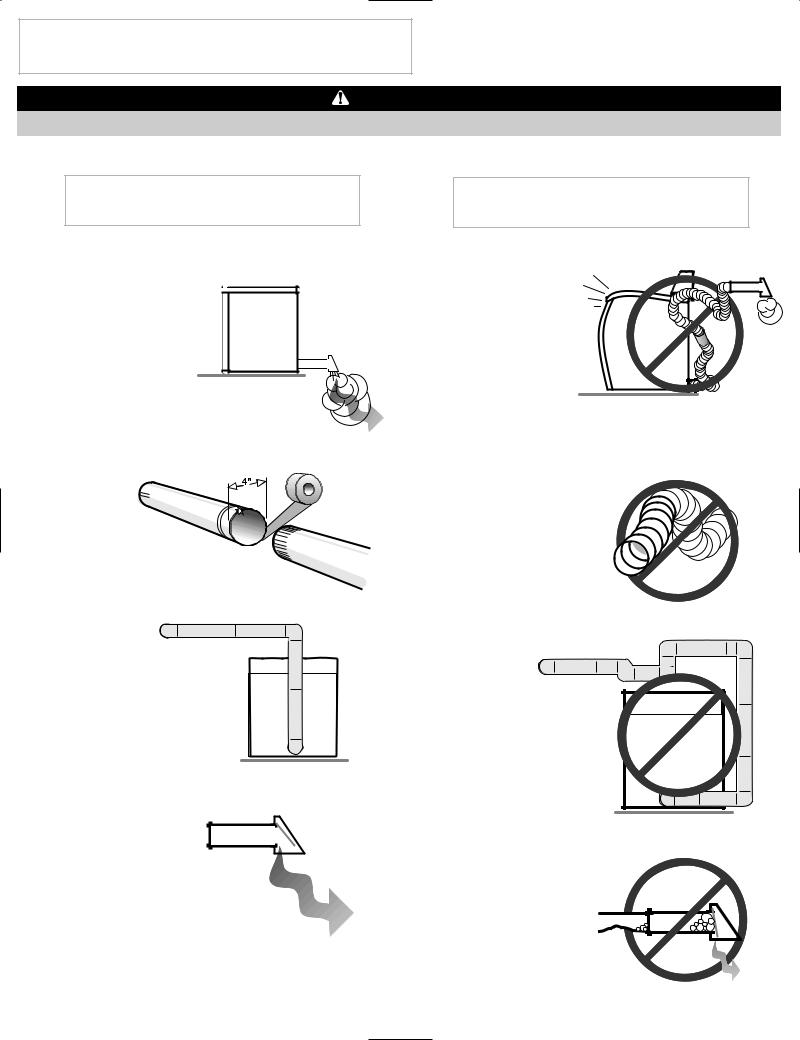
DRYER EXHAUST TIPS
WARNING
 WARNING: Plastic or nonmetal flexible duct presents a potential fire hazard.
DO
Read the installation instructions and the Use and Care Guide.
DO
Let your dryer exhaust the air easily.
DO
Use 4 inch 
 diameter rigid
  metal duct.Tape all
joints, including at the dryer.
Never use lint-trapping screws.
DO
Keep duct runs as straight as possible.
DO
Clean all old ducts before installing your new dryer. Be sure vent flap opens and closes freely. Inspect and clean the exhaust system annually.
DON’T
Let a poor exhaust system cause slow drying.
DON’T
Restrict your dryer with a poor exhaust system.
DON’T
Use plastic, thin foil, or non-metal flexible duct.
DON’T
Use longer than necessary duct runs with many elbows.
DON’T
Allow crushed or clogged ducts and vent.
3
OPERATING INSTRUCTIONS
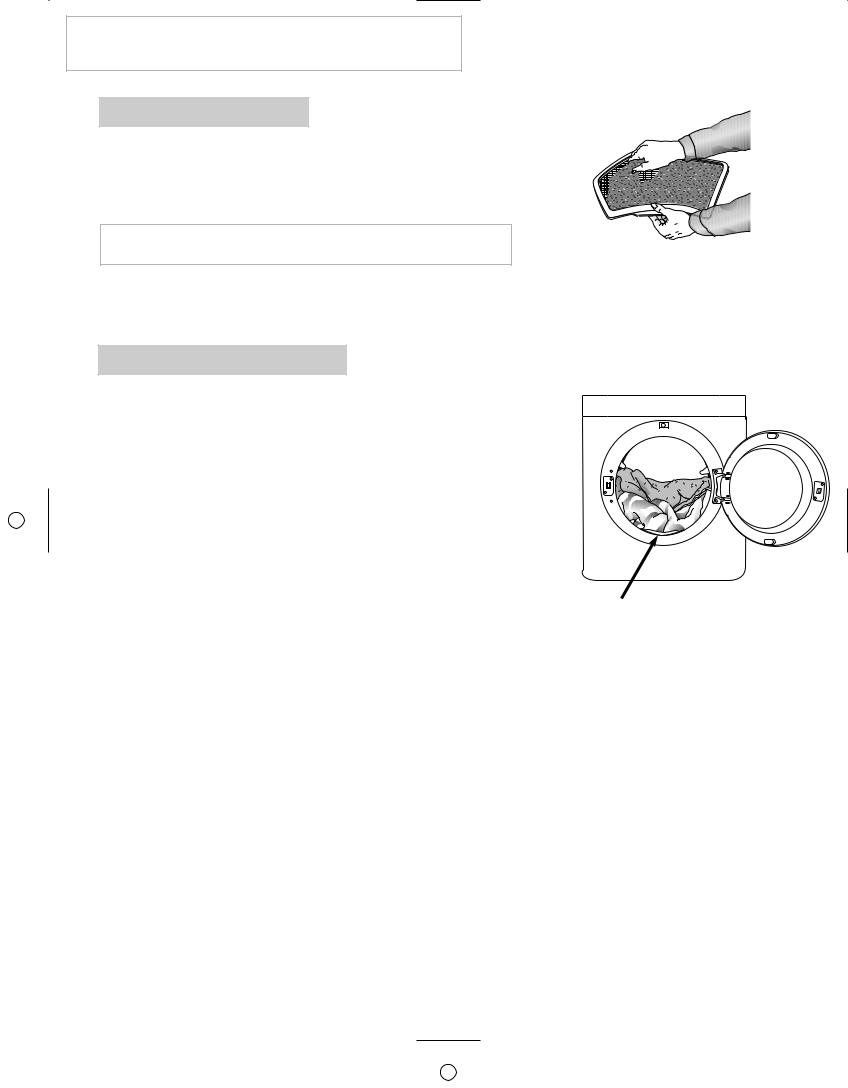
CLEAN THE LINT FILTER
• After each load.
• To shorten drying time.
• To operate more energy efficiently.
NOTE: Do not operate the dryer without the lint filter in place.
LOAD THE DRYER PROPERLY
•Place only one washload in the dryer at a time.
•Mixed loads of heavy and lightweight clothes will dry differently. Lightweight clothes will dry, while heavy clothes may be damp.
•Add one or more similar items to the dryer when only one or two articles need drying. This improves the tumbling action and drying efficiency.
•Overloading restricts tumbling action, resulting in uneven drying as well as excessive wrinkling of some fabrics.
Lint Filter
4
OPERATING INSTRUCTIONS
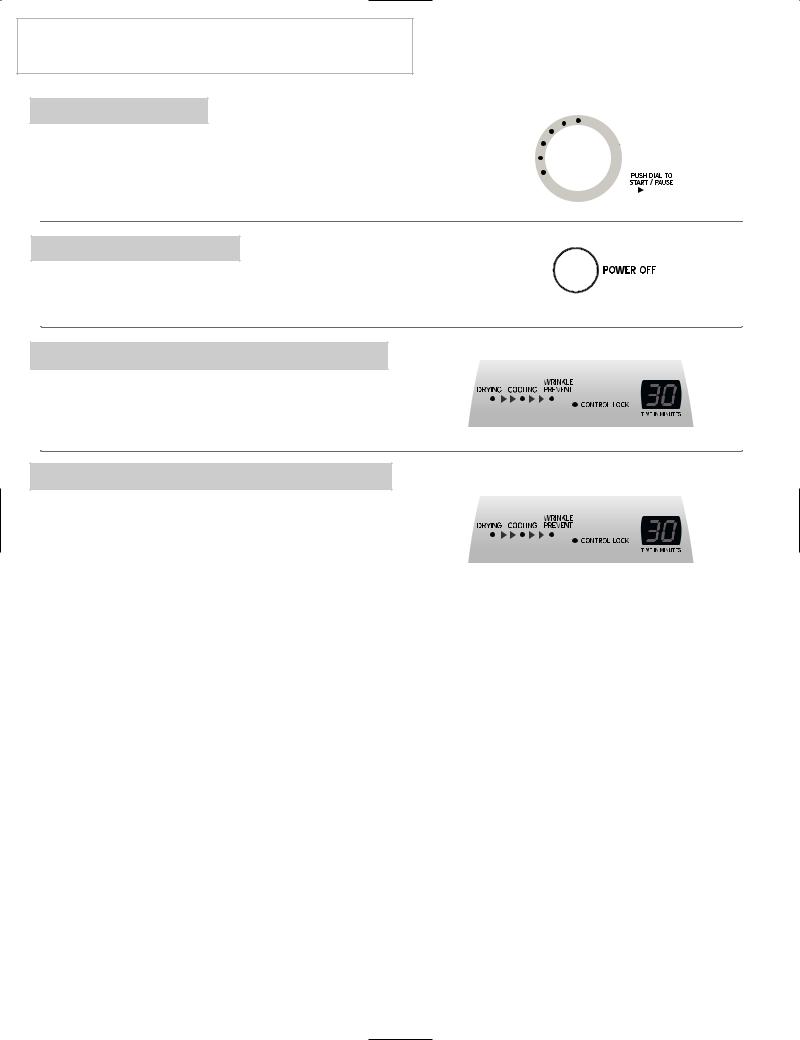
START THE DRYER
After setting the cycle and desired options, press the Cycle Selector dial to start the dryer.To pause the cycle, press Cycle Selector dial again.To restart the cycle, press Cycle Selector dial and the cycle will resume from the point of interruption.
TURN THE DRYER OFF
Power Off
Press the Power Off pad to cancel the cycle and stop the dryer.
ESTIMATED TIME DISPLAY
The display window shows the estimated time remaining in the cycle after the Cycle Selector dial is pressed. The estimated time remaining may fluctuate as the cycle progresses.
CYCLE STATUS LIGHTS
The Drying light will illuminate and remain lit until the cycle is complete. When the dryer is in the cool-down portion of the cycle, the Cooling light will illuminate.
If the Wrinkle Prevent option has been selected, the Wrinkle Prevent light will illuminate. Chasing lights will appear in the display when Wrinkle Prevent is selected (select models). See page 8.
When the cycle is complete,“END” or “00” (select models) will appear in the display until the dryer door is opened.
If the dryer is paused during a cycle, the indicator lights will blink until the Cycle Selector dial is pressed.
5
USING THE CONTROLS
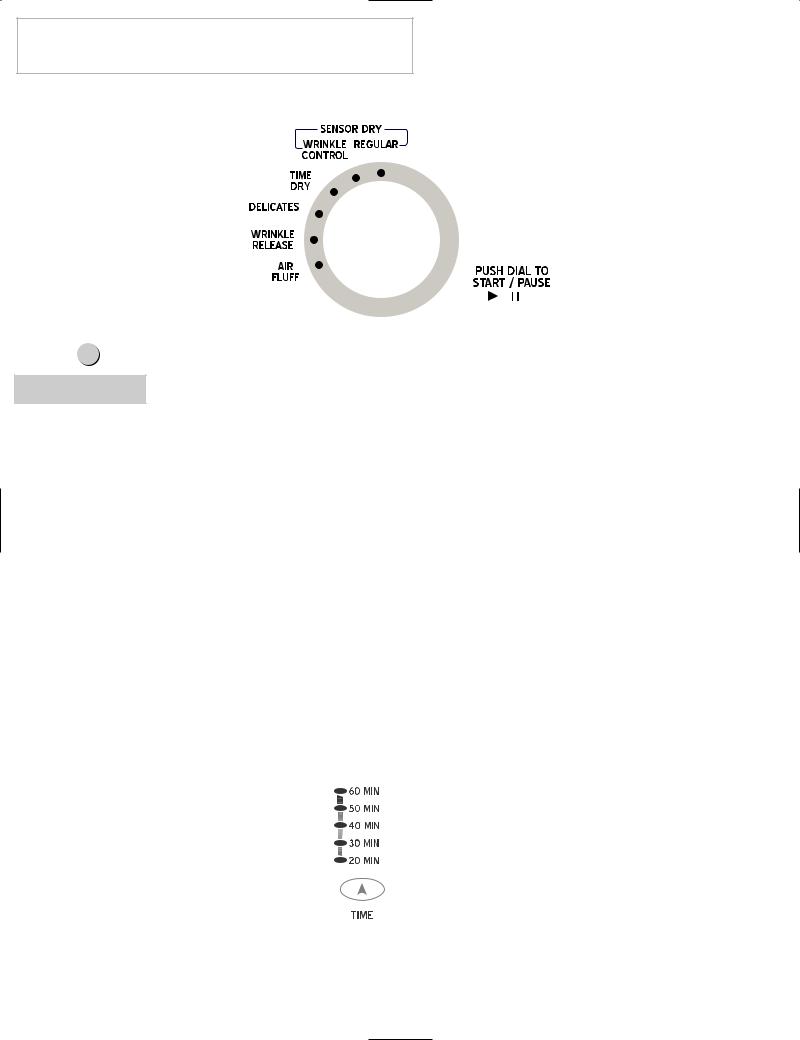
Step 1
SELECT CYCLE
To select a cycle, rotate the Cycle Selector dial to the desired cycle.The indicator light by the cycle name will illuminate.
The Regular and Wrinkle Control cycles are Sensor Dry cycles. Sensor Dry automatically senses the moisture in the load and shuts the dryer off when the selected dryness level (very dry to damp dry) is reached.
Regular
The Regular cycle is designed to dry loads such as towels, underwear, jeans, etc.
Wrinkle Control
The Wrinkle Control cycle is designed to dry wrinkle-free cottons, synthetic fabrics, knits and permanent press fabrics automatically. The cycle minimizes wrinkling by providing a longer unheated cool-down period at the end of the cycle.
Time Dry
Time Dry allows you to select the desired cycle time in minutes.Turn the Cycle Selector dial to Time Dry, then press the Time up arrow to set the drying time. Press the arrow repeatedly to scroll through the time settings.To add or subtract time from the cycle, see Options-Adjust Time, page 8.
Control features vary by model.
Delicates
The Delicates cycle is designed to dry heat-sensitive items at the low drying temperature.
Air Fluff
The Air Fluff cycle tumbles the load in room temperature air.
Wrinkle Release
The Wrinkle Release cycle will release wrinkles from items that are clean and dry but only slightly wrinkled, such as from a crowded closet or suitcase or from sitting in the dryer too long after the cycle has ended. Wrinkle Release can be used with any temperature selection.
6
USING THE CONTROLS
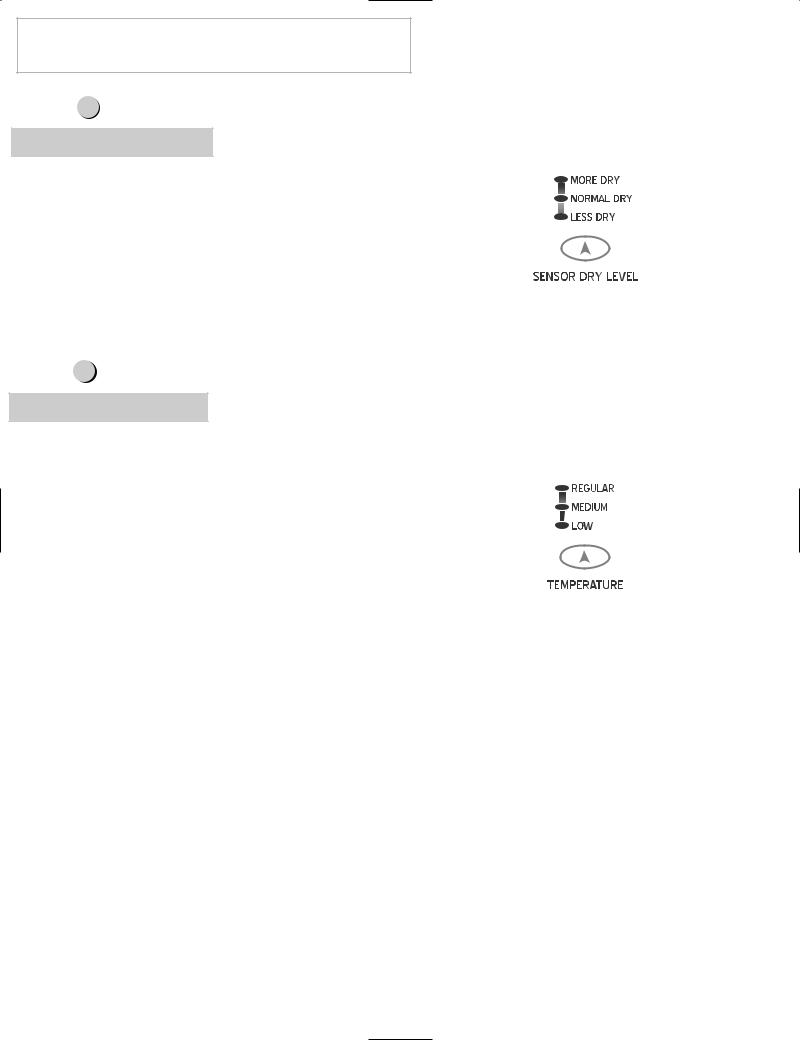
Step 2
SELECT DRYNESS LEVEL
To select the dryness level in the Regular or Wrinkle Control Sensor Dry cycles, press the Sensor Dry Level pad. An indicator light will illuminate next to the desired dryness level. Press the pad repeatedly to scroll through the settings.
Loads of larger or bulkier size may require More Dry setting to completely dry the load.
The Less Dry setting is best suited for lightweight fabrics
or for leaving some moisture in the clothing at the end of the cycle.
Step 3
SELECT TEMPERATURE
To select the correct temperature for the load, press the Temperature pad. An indicator light will illuminate next to the desired temperature. Press the pad repeatedly to scroll through the settings.
Use the chart below as a guide:
DRYER TEMPS |
LOAD TYPE |
|
|
Regular |
For sturdy cottons or those labeled |
|
Tumble Dry. |
|
|
Medium |
For permanent press, synthetics, |
|
lightweight cottons or items labeled |
|
Tumble Dry Medium. |
|
|
Low |
For heat sensitive items labeled |
|
Tumble Dry Low or Tumble Dry |
|
Warm. |
|
|
7
USING THE CONTROLS
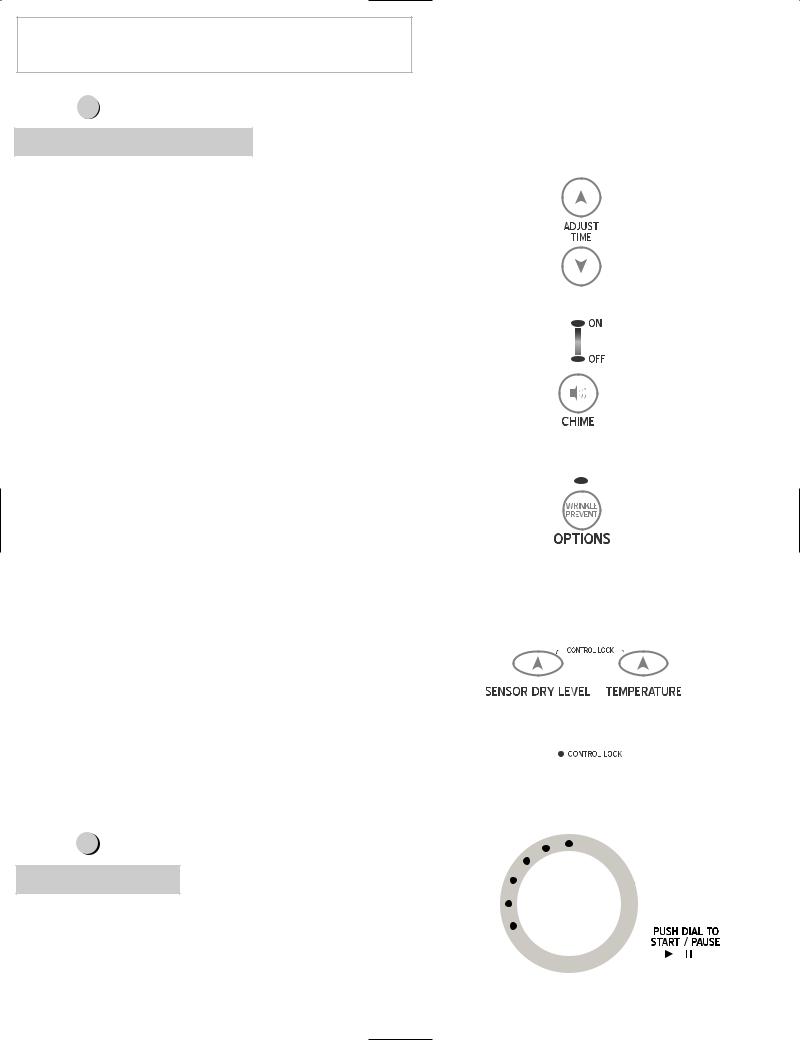
Step 4
SELECT OPTIONS(IF DESIRED)
Adjust Time
Time can be added or subtracted from the automatically set
times in the Time Dry, Delicates, Air Fluff, Wrinkle Release cycles.
To add or subtract time from the cycle, press the Adjust
Time up or down arrow pad until the desired time is displayed.
End of Cycle Chime
When the cycle is complete, an audible chime will sound. When the Wrinkle Prevent option is selected, the chime will sound intermittently.
Turn off the chime by pressing the Chime pad.
Press the pad repeatedly to scroll through the choices.
Wrinkle Prevent
Wrinkle Prevent provides approximately 95 minutes of intermittent tumbling in unheated air at the end of the cycle to reduce wrinkling. Press the Wrinkle Prevent pad to activate this feature. The indicator light above the pad will illuminate when Wrinkle Prevent is selected. Chasing lights appear in the display when the Wrinkle Prevent option is selected (select models). The load is dry and can be removed at any time during the Wrinkle Prevent cycle.
Control Lock
The control panel can be locked for safety , cleaning or to prevent unwanted use. The panel will not function when locked.
To lock the controls, pr ess and hold the Sensor Dry Level and Temperature pads for 3 seconds. The Control Lock indicator light will illuminate.
To unlock the controls, press and hold the Sensor Dry Level and Temperature pads for 3 seconds. The Control Lock indicator light will go out.
Step 5
START THE DRYER
Press the Cycle Selector dial to start the dryer. The dryer door must be closed for the dryer to operate. If the door is opened during the cycle, the Cycle Selector dial must be pushed again to resume the cycle once the door is closed.
8

SPECIAL LAUNDRY TIPS
Please follow the care label or manufacturer’s instructions for drying special items. If care label instructions are not available, use the following information as a guide.
Bedspreads & Comforters |
• Follow the care label instructions or dry on the Sensor Dry |
||
|
Regular cycle and Regular temperature. |
||
|
|
||
|
• Be sure the item is thoroughly dry before using or storing. |
||
Blankets |
• May require repositioning to ensure even drying. |
||
• Use Sensor Dry Regular and dry only one blanket at a time for |
|||
|
|||
|
|
best tumbling action. |
|
|
• Be sure the item is thoroughly dry befor e using or storing. |
||
Curtains & Draperies |
• Use the Sensor Dry Wrinkle Control cycle to help |
||
|
minimize wrinkling. |
||
|
|
||
|
• Dry these in small loads for best results and remove as soon as |
||
|
|
possible. |
|
Cloth Diapers |
• Use the Sensor Dry Regular cycle and the Regular temperature |
||
|
|
setting for soft, fluffy diapers. |
|
Down–filled Items |
• Use the Sensor Dry Regular cycle and the Low |
||
|
|||
(jackets, sleeping bags, |
|
temperature setting. |
|
• Place a clean pair of sneakers in the dryer with the item to fluff the |
|||
comforters, etc.) |
|||
|
|||
|
|
down comforters, etc. Adding a couple of dry towels shortens dry |
|
|
|
time and absorbs moisture. |
|
Foam Rubber |
• DO NOT dry on a heat setting. Use the Air Fluff cycle (no heat). |
||
(rug backs, stuffed toys, |
• |
WARNING - Drying a rubber item with heat may damage it |
|
shoulder pads, etc.) |
|
or be a fire hazard. |
|
|
|
||
|
• Use the Sensor Dry Regular cycle. |
||
Pillows |
• Add a couple of dry towels and a pair of clean sneakers to help the |
||
|
tumbling action and to fluff the item. |
||
|
|
||
|
• DO NOT drer-dry kapok or foam pillows. |
||
Plastics |
• Use the Air Fluff cycle or the Time Dry cycle and the Low |
||
(shower curtains, outdoor |
|
temperature setting depending on the care label instructions. |
|
furniture covers, etc.) |
|
|
|
|
|
|
|
AVOID DRYER DRYING
•Fiberglass items (curtains, draperies, etc.)
•Woolens, unless recommended on the label.
•Vegetable or cooking oil soaked items (see pg. 2).
9
CARE AND CLEANING
Control Panel - Clean with a soft, damp cloth. Do not use abrasive substances. Do not spray cleaners directly on the panel.
The control panel finish could be damaged by some laundry pre-treatment soil and stain-remover products. Apply such products away from the dryer and wipe up any spills or oerspray immediately.
Tumbler - Remove any stains such as crayon, ink pen or fabric dye (from new items such as towels or jeans) with an all-purpose cleaner. Then tumble old towels or rags to remove any excess stain or cleaning substance Once these steps are done, stains may still be visible, but should not transfer to subsequent loads.
Dryer Exterior - Clean with a soft, damp cloth. Do not use abrasiv e substances. Protect the surface from sharp objects.
Dryer Exhaust System - Should be inspected and cleaned once a year to maintain optimum performance. The outside. exhaust hood should be cleaned more frequently to ensure proper operation. (Refer to the Installation Instructions for more information.)
REVERSE THE DOOR
Instructions for reversing the dryer door:
1)Remove 2 hinge screws holding door hinge in place.
2)Remove the door and lay carefully aside.
3)Remoe 2 hinge screws on the opposite side of door hinge.
4)Remoe 2 screws on the door catch plate.
5)Move door catch plate to opposite side and attach with screws.
6)Move the door to the opposite side and replace 2 hinge screws.
7)Replace 2 hinge screws in opposite holes.
10

TROUBLESHOOTING
INFORMATION CODES
Information codes may be displayed to help you better understand what is occurring with the dryer. |
||
Code |
|
|
Symbol |
Meaning |
Solution |
|
Heater temperature control problem. |
Call for service, see below. |
|
Door open sensing problem. |
Call for service, see below. |
|
Door Open Error |
Be sure the door is latched shut. If problem continues, |
|
When the door is opened, the dryer |
call for service, see below. |
|
will not operate. |
|
For any codes not listed above, call Amana Customer Service at 1-800-843-0304 USA or 1-866-587-2002 Canada.
11

TROUBLESHOOTING
CHECK THESE POINTS IF YOUR DRYER...
Doesn't Run
Doesn't Heat
Doesn't Dry
Is Noisy
Dries Unevenly
Has an Odor
Dryer shuts off before load is dry
• Be sure the door is latched shut.
• Be sure the power cord is plugged into a live electrical outlet.
•Check the home's circuit breaker and fuses.
•Press the Cycle Selector dial again if the door is opened during the cycle.
•Check the home's circuit breaker and fuses.
•Select a heat setting, not Air Fluff.
• |
On a gas dryer, check that the gas supply is on. |
• |
Clean the lint filter and exhaust duct. |
• |
Dryer may have moved into the cool-down portion of the cycle. |
• Check all of the above, plus...
•Be sure the exhaust hood at the outside of the home can open and close freely.
•Check exhaust system for lint build-up. Ducting should be inspected and cleaned annually.
•Use 4" rigid metal exhaust duct.
•Do not overload. 1 Wash load = 1 Dryer load
•Sort heavy items from lightweight items.
•Large, bulky items like blankets or comforters may require repositioning to ensure even drying.
•Check that the washer is draining properly to extract adequate water from the load.
•Clothes load is too small to tumble properly. Add a few towels
•Check the load for objects such as coins, loose buttons,nails,etc. Remove promptly.
•It is normal to hear the dryer gas valve or heating element cycle on and off during the drying cycle.
•Be sure the dryer is leveled properly as outlined in the installation manual.
•It is normal for the dryer to hum due to the high velocity of air moving through the dryer drum and exhaust system.
•Seams,pockets and other similar heavy areas may not be completely dry when the rest of the load has reached the selected dryness level. This is normal. Select the Very Dry setting if desired.
•If one heavy item is dried with a lightweight load,such as one towel with sheets, it is possible that the heavy item will not be completely dry when the rest of the load has reached the selected dryness level. Sort heavy items from lightweight items for best drying results.
•Household odors such as from painting, varnishing,strong cleaners, etc. may enter the
dryer with the surrounding room air. This is normal as the dryer draws the air from the room,heats it,pulls it through the tumbler and exhausts it to the outside. When these odors are present in the air,ventilate the room completely before using the dryer.
•Clothes load is too small. Add more similar items or a few towels and restart the cycle.
•Clothes load is too large. Remove some of the load and restart the dryer.
For further assistance contact Amana ServiceSM, Amana Customer Assistance:1-800-843-0304 U.S.A.or 1-866-587-2002 Canada.
12

NOTES
13

NOTES
14
 Loading...